If you have ever tried to install software or access files from a CD or DVD on your Windows PC, you know the importance of having the necessary drivers installed. Drivers are software programs that allow your computer to communicate with hardware devices, such as a CD/DVD drive.
CD/DVD drivers are essential for the proper functioning of your optical drive, allowing you to read and write CDs and DVDs on your computer.
If your computer does not have the appropriate driver installed, it may not recognize your CD or DVD drive, preventing you from using it. Fortunately, downloading and installing required drivers on your Windows PC is a simple process that can be completed quickly and easily.
This guide will provide you with step-by-step instructions on how to download CD and DVD driver for Windows 10 or 11 PC, ensuring that your optical drive works properly and efficiently. So, let’s begin!
Easy Methods to Download and Update CD/DVD Driver On Windows
Here are some of the simple yet efficient techniques for downloading, installing, and updating the DVD and CD driver on your Windows system.
Method 1: Download the DVD and CD Driver from the Manufacturer’s Website
You can manually install the appropriate drivers if you have sufficient technical expertise and time to conduct an online search for legitimate drivers. You may follow the steps outlined below in order to download CD/DVD drivers using this method:
- Visit the manufacturer’s official website.
- Locate the Software & Drivers section or Downloads.
- Look for the serial number or model of the device you are using.
- Download the most recent driver version for your operating system and bit size.
- Double-click the setup file to launch it, and then follow the on-screen prompts to install the most recent CD driver for Windows 10 or 11.
Finally, to bring into effect the new modifications, restart your computer.
Also Know: Best Disk Cloning Software for Windows PC
Method 2: Use the Device Manager for CD and DVD Driver Update on Windows
For monitoring and controlling the linked hardware and its corresponding drivers, Windows comes with a built-in utility program called Device Manager. To obtain and update the DVD driver for Windows 10/11, follow the instructions listed below.
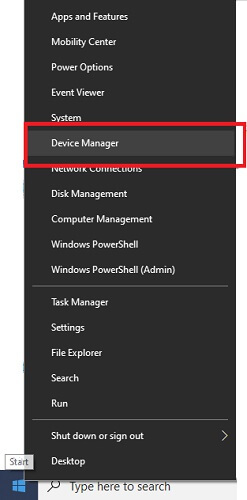
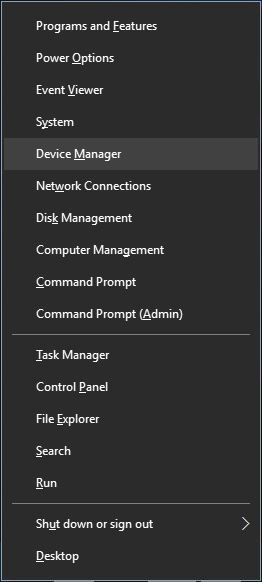
- Press Windows + X on your keyboard. Next, choose select Device Manager from the menu that appears.

- Search for the DVD/CD-ROM drives section in the Device Manager window and double-click it to expand its category.
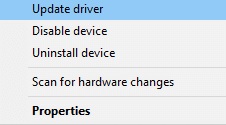
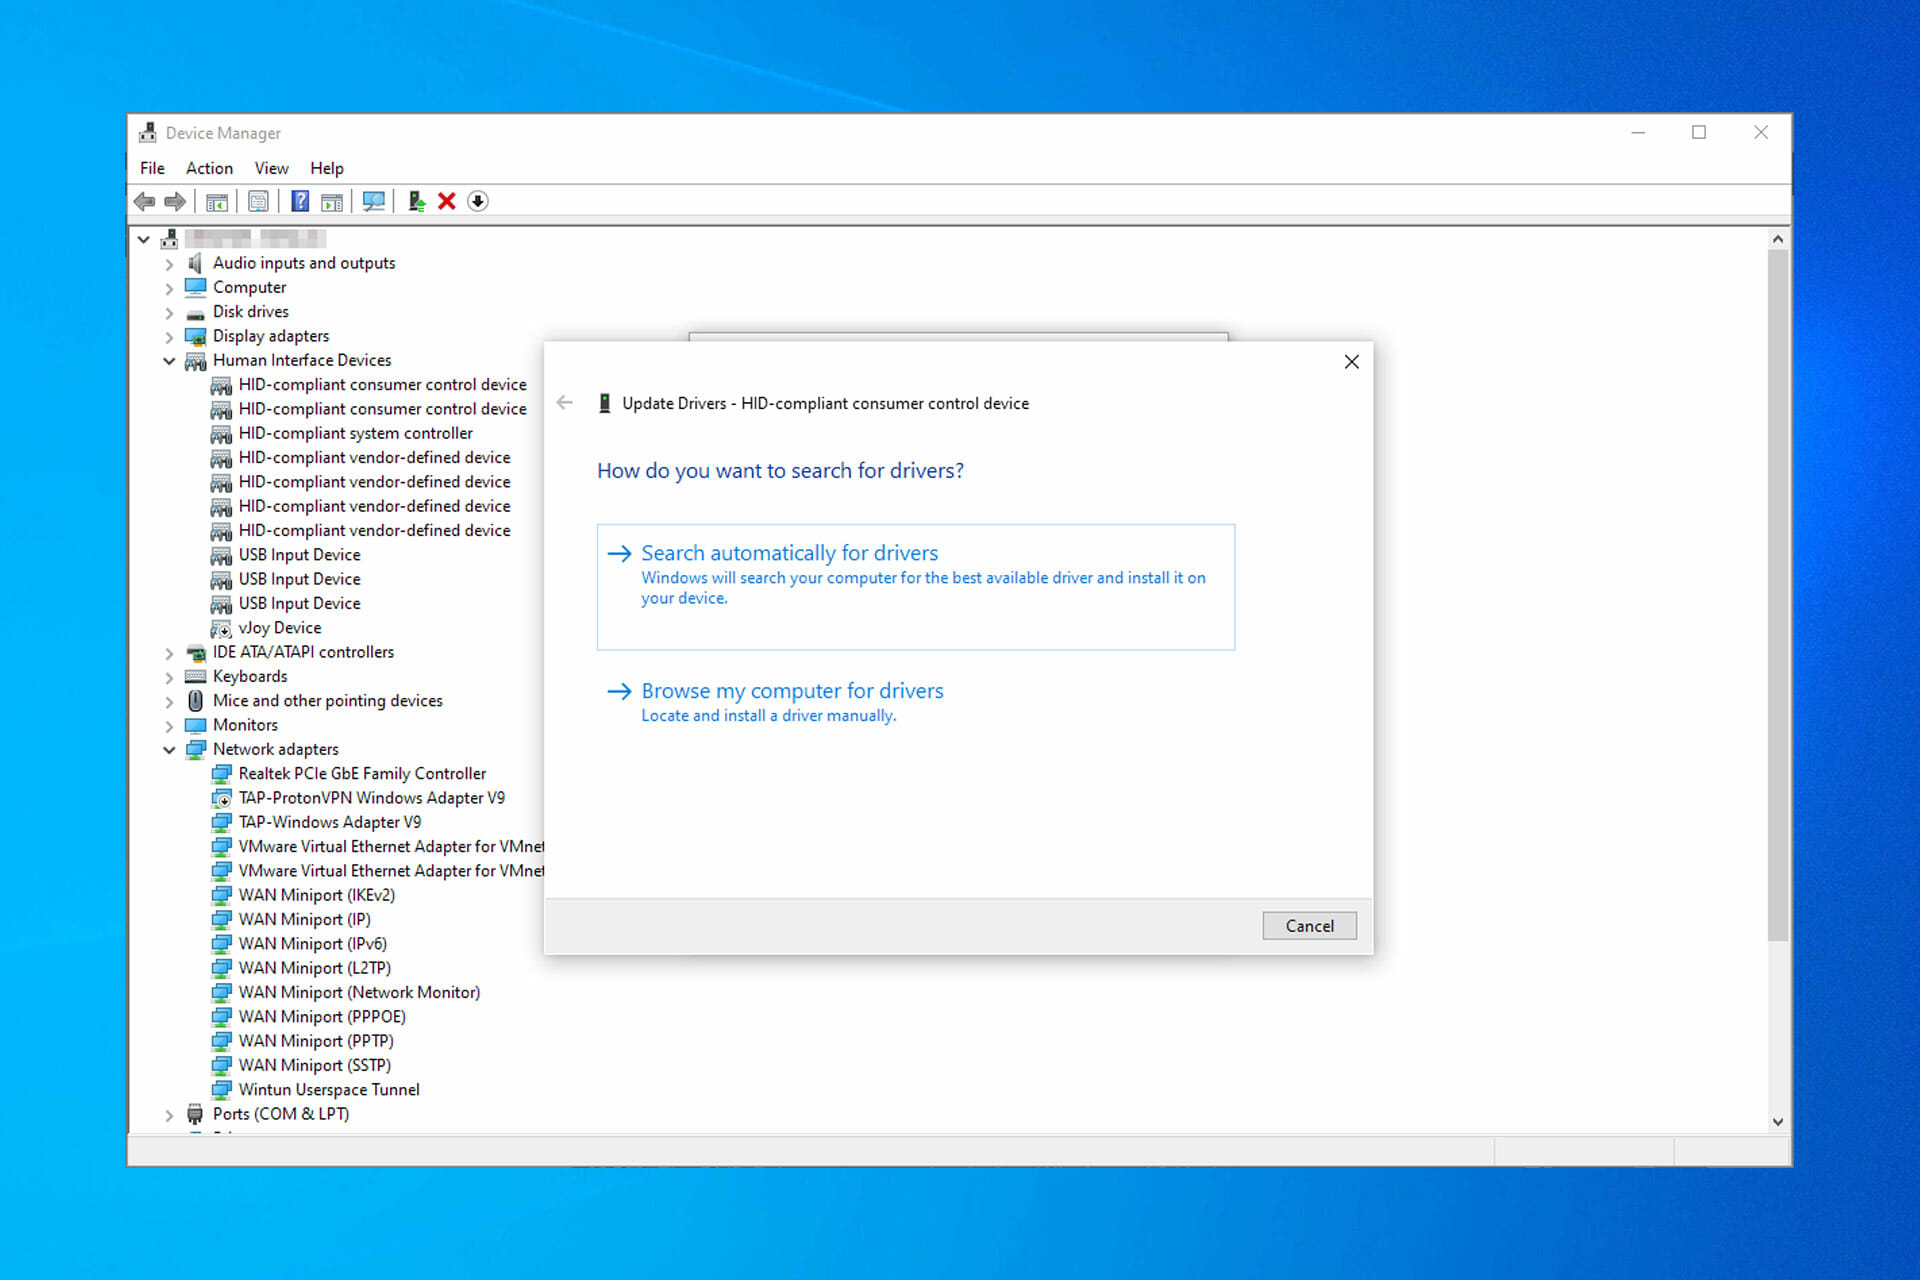
- Then, from the context menu list, right-click on the CD/DVD driver you are using and select Update Driver Software.

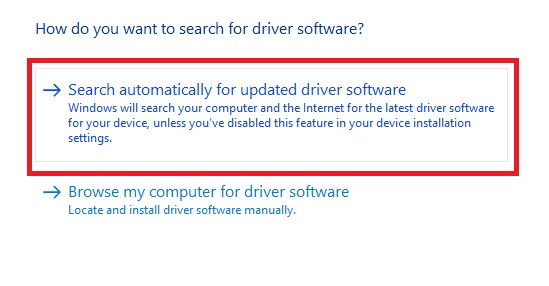
- Now, select Search Automatically for Updated Driver Software from the next pop-up window.

There you go! You can now relax and wait for Windows to install any necessary driver updates for the computer. To apply the modifications after everything is finished, simply restart your computer.
Method 3: Run Windows Update to Get DVD Driver Update on Windows
To obtain the most recent version of your CD/DVD drivers, you may use the Windows update tool. Although this approach is not always successful, many people nevertheless give it a shot. So, to apply this process, adhere to the guidelines given below.
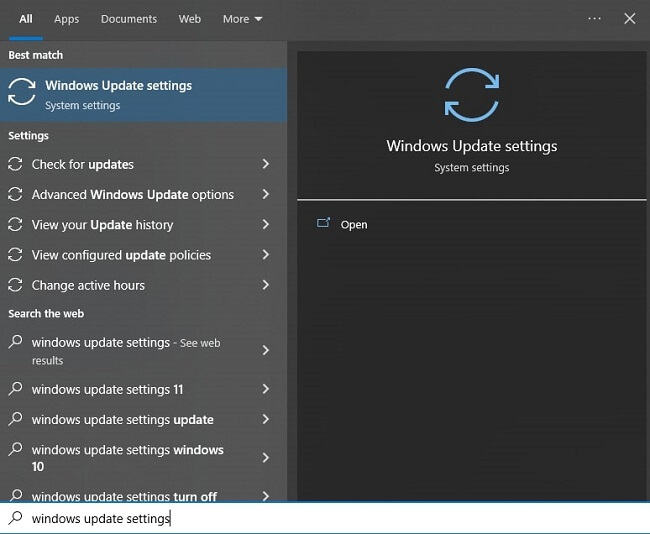
- Search Windows update settings in the Taskbar’s Search box, then press the Enter key.

- You’ll see a Windows update window. Click the Check for updates option there.
- Allow Windows to look for and display any available updates. Then, to get the most recent DVD Driver update for Windows 10 or 11, download and install the updates.
Also Know: How to Fix Windows 10 DVD/CD-ROM Error Code 19
Method 4: Use Bit Driver Updater to Download the DVD and CD Driver for Windows 10 or 11
We are aware that the three procedures listed above to download the CD/DVD driver are manual and prone to mistakes, especially for beginners. Additionally, you need the right computer skills, patience, and time to update drivers manually. Furthermore, the manual approach involves certain risks. Therefore, you may utilize Bit Driver Updater if you’re looking for a simple and quick approach to installing the most recent drivers.
With just a few mouse clicks, you can update out-of-date device drivers utilizing this most recommended driver updating program. Additionally, you don’t need any technical understanding to use this program. Bit Driver Updater automatically recognizes the details of your device and locates the most recent and suitable drivers for it.
To update out-of-date drivers on a Windows PC, you can use Bit Driver Updater’s Free or Pro versions. However, the Pro edition allows you to update all out-of-date drivers with a single click. Whereas, the free version only allows you to update just one driver at a time.
Additionally, the paid edition offers a complete money-back guarantee for a short period of 60 days and 24-hour technical assistance. If a required CD DVD drive device driver is missing on your Windows system, then you may get the required driver using this efficient driver update service.
Steps to Install and Use the Bit Driver Updater
- Use the Download button provided below to download the most recent version of Bit Driver Updater.

- Download the application’s setup file, double-click it, and then follow the on-screen instructions to install it on your computer.
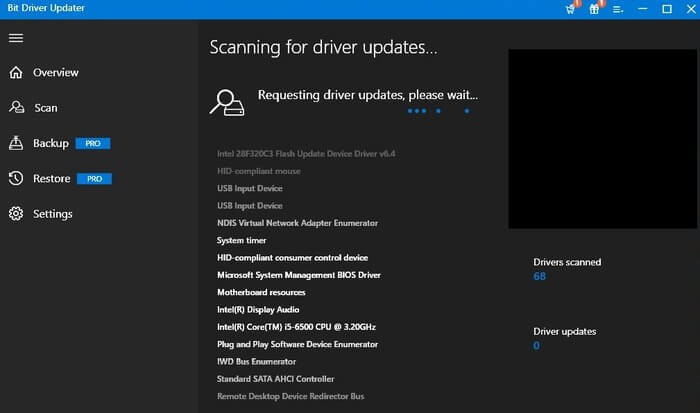
- Start the program once it has been installed, and allow it to automatically search for system drivers. If it doesn’t, you can start the process by clicking the Scan Drivers button.

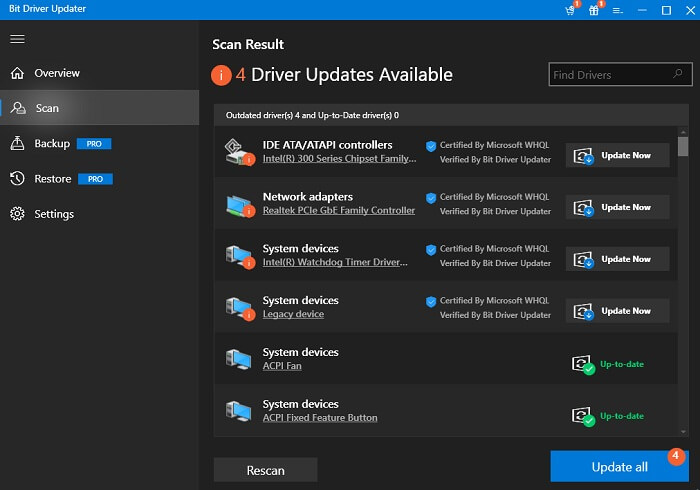
- You may get a list of every driver that needs updating after the process is complete. You can search for the CD/DVD driver you want and then hit the Update Now option next to it. Otherwise, if you are a paid user, you can choose Update All to update all drivers simultaneously.


Finally, restart your computer to make sure the changes were applied as intended. There you have it! See how simple and easy it was to update all of your drivers at once.
Also check: Best CD Ripper in 2023 ( WINDOWS | MAC | Linux)
Conclusion: Download and Update the CD/DVD Driver on Windows PC
To conclude, for the system and any attached hardware devices to run without any problems, it is essential to keep the device drivers updated. You may fix a number of faults, including non-connectivity, display-related problems, Wi-Fi connectivity, and more, by regularly updating the drivers. Hence, you can upgrade the CD/DVD driver on Windows 11/10 easily with the help of the aforementioned effective methods. Also, in the comments section below, please let us know if you have any questions, doubts, or suggestions.
“DVD Driver for Windows 10” is essential software to communicate your DVD drives (Hardware) with Operating System version installed in your computer. For example, if Windows 10 based PC/laptop have DVD drives and want to work with your DVD drives, then you should make sure DVD Drivers is properly installed in your computer.
DVD Drives can easily be accessed by opening “File Explorer” or “Windows Explorer” as like all partition of hard disk drives. DVD drives can be used to install clean Windows 10 and/or other software in your computer and even to access various media files stored there.
As we know that to use DVD, we have to insert DVD to the computer and can be easily accessed by opening “File Explorer” and double-click on DVD drives. But sometimes, DVD drives fail to appear properly “File Explorer” due to some problems, leading to inaccessible files. Although, the reasons may vary, still the missing or corrupted DVD drivers can be a root cause for such issues.
In this case, you need to check if DVD drive is showing in “Device Manager” or not. To do so, open “Device Manager”, expand “DVD/CD-ROM Drives” category and check if there is “Yellow Exclamation Mark” or “Yellow Questioned Mark” on your DVD Drive, or is not showing in “Device Manager”. If it shows “Yellow Exclamation Mark” on it, then double-click on it to open its “Properties” window. This will show some errors in “Device Status” area.
Why CD/DVD Drive is not detected in Windows 10?
When you insert a DVD/CD into the drive and open File Explorer/Windows Explorer in Windows 10, and notice that the drive doesn’t display in explored window, means the operating system failed to recognize the drive. The possible reasons behind the issue can be incorrect or bad configured settings relating to CD/DVD in BIOS, or in Windows settings. In addition to these, there might be some issues with CD/DVD drive hardware and its connections, corrupted registry settings relating to DVD/CD drive, and even more.
In such instances, you can try fixing the issues by performing various essential checks and workarounds like verifying the drive is shown in BIOS, check drive’s name in Device Manager, running Hardware and Devices troubleshooter, clearing the upper and lower registry filters, perform hard reset of computer, check internet cable connections, and test for hardware failures.
Why Optical Disk Drive is not recognized in Microsoft Windows?
There could be several reasons behind Optical Disk Drive like CD, DVD or Blu-Ray drive not recognized in Microsoft Windows PC, and that includes bad or damaged configuration of optical disk drive, Windows is unable to load the drivers that required it, corrupted/outdated DVD/CD driver, issue with CD/DVD drive hardware and its connections, and even more. The error messages generated in all these instances may vary and may show even some possible reasons. let’s check out some of the error codes below.
Some common errors occurred when DVD Drive not showing in ‘Device Manager’:
- A driver is not working properly because Windows cannot load the drivers required for this device. (Code 31)
- A driver (service) for this device has been disabled. An alternate driver may be providing this functionality. (Code 32)
- Windows successfully loaded the device driver for this hardware but cannot find the hardware device. (Code 41)
- Windows cannot load the device driver for this hardware. The driver may be corrupted or missing. (Code 39)
- Windows cannot start this hardware device because its configuration information (in the registry) is incomplete or damaged. (Code 19)
The above errors usually occur after upgrading Windows OS to latest version, improper installation of CD or DVD recording program and even while while improper installation of Microsoft Digital Image. Due to these possible causes, DVD Drive may fail to appear normally as it is not detected by Windows 10 Operating System.
In some cases, upgrading to Windows Operating System to new version causes compatibility issues with System drivers, that may lead to issues like DVD driver is incompatible with current Windows 10 version. Many users have already reported that they have encountered “DVD Drive not showing in Device Manager, File Explorer”, “DVD Drive is not detected by Windows OS” or similar issues due to problem with DVD driver, outdated firmware or a factory defect. if you are one among the users who are facing off these issues as well, we recommend to fix the issues with here mentioned workarounds or guidelines.
How to fix DVD Drive not showing in Windows 10?
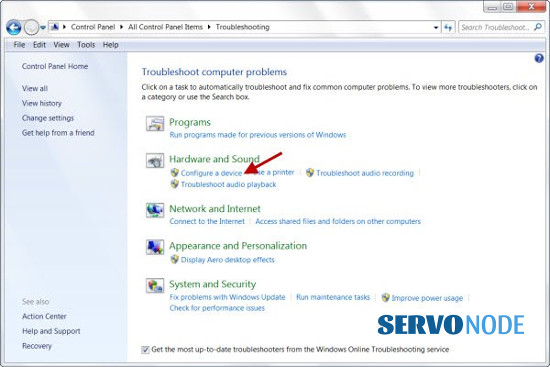
Method 1: Run “Hardware and Devices” troubleshooter
Step 1: Press “Windows + R” keys together from keyboard to open “Run Dialog Box”
Step 2: In the opened “Run Dialog Box”, type “Control Panel” and hit “Enter” key to open “Control Panel”
Step 3: In the opened “Control Panel”, type “Troubleshooter” in “search box” and click on “Troubleshooting”
Step 4: Under “Hardware and Sound” item, click on “Configure a device”
Step 5: Follow on-screen instructions to finish the troubleshooting process. Once done, please check if the trouble is resolved.
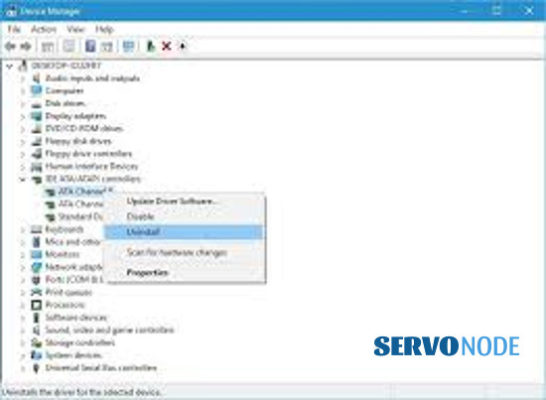
Method 2: Remove the IDE ATA/ATAPI Controllers
Step 1: Press “Windows + X” keys together from keyboard and select “Device Manager”
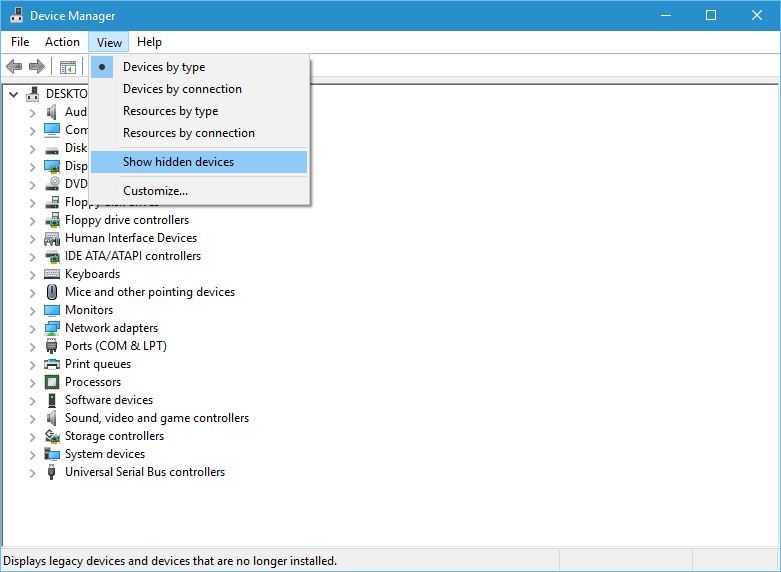
Step 2: In the opened “Device Manager”, click on “View” and choose “Show Hidden Devices”
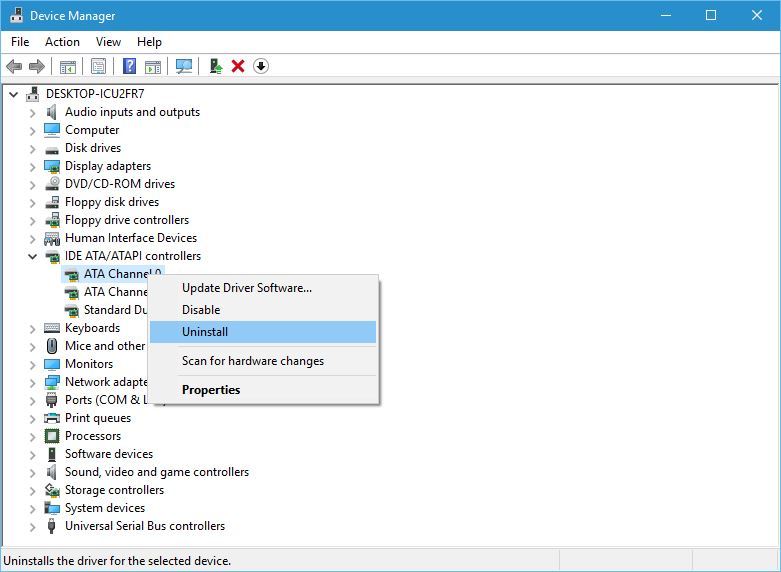
Step 3: Now, locate and expand “IDE ATA/ATAPI Controllers” category
Step 4: Right-click on “ATA Channel” and select “Uninstall”
Step 5: (Optional), remove Intel Serial ATA storage Controller.
Step 6: Once done, restart your computer to see the changes.
Method 3: How to reinstall DVD Driver for Windows 10?
Sometimes, outdated DVD driver can cause “DVD not showing in Windows 10” issue. So, you can fix this issue by updating or reinstalling DVD driver.
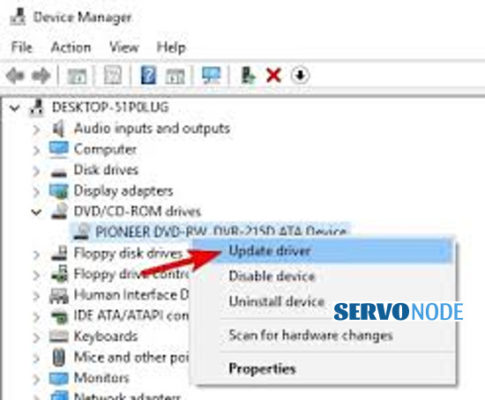
Step 1: Open “Device Manager” and expand “DVD/CD-ROM Drives” category
Step 2: Right-click on DVD device and select “Uninstall”.
Step 3: Follow on-screen instructions to finish uninstall.
Step 4: After that, restart your computer. This will automatically install DVD driver in Windows 10.
Method 4: How to update DVD Driver for Windows 10?
Step 1: At first, you need to visit your DVD Drive manufacturer’s official website and download the latest drivers for your Windows 10, and save the setup file in your computer hard drive.
Step 2: Open “Device Manager” and expand “DVD/CD-ROM” category
Step 3: Right-click on DVD drive and select “Update Driver”
Step 4: In next window, select “Browse my computer for latest driver software” and follow on-screen instructions to install the latest driver in your device.
Step 5: Once done, reboot your computer to save the changes.
Method 5: Create new Registry keys
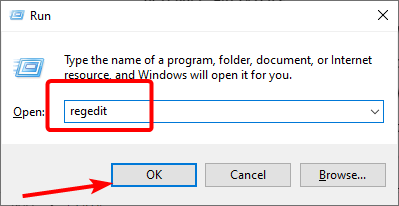
Step 1: Open “Run Dialog Box” and enter “regedit”, and hit “Ok” button to open “Registry Editor”
Step 2: In the opened “Registry Editor” window, navigate to following mentioned path.
“HKEY_LOCAL_MACHINESYSTEMCurrentControlSetServicesatapi”
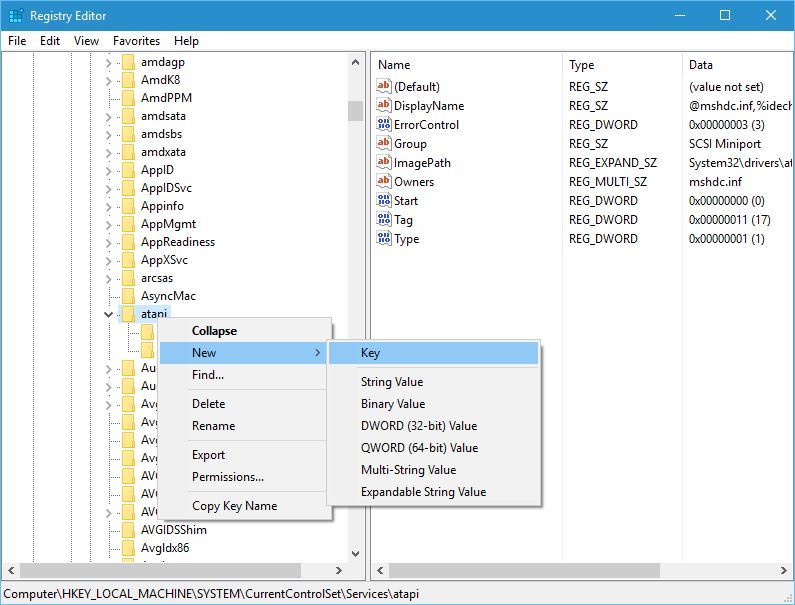
Step 3: Right-click on “ATAPI” and select “New > Key”
Step 4: Enter “Controller0” as name of the new key
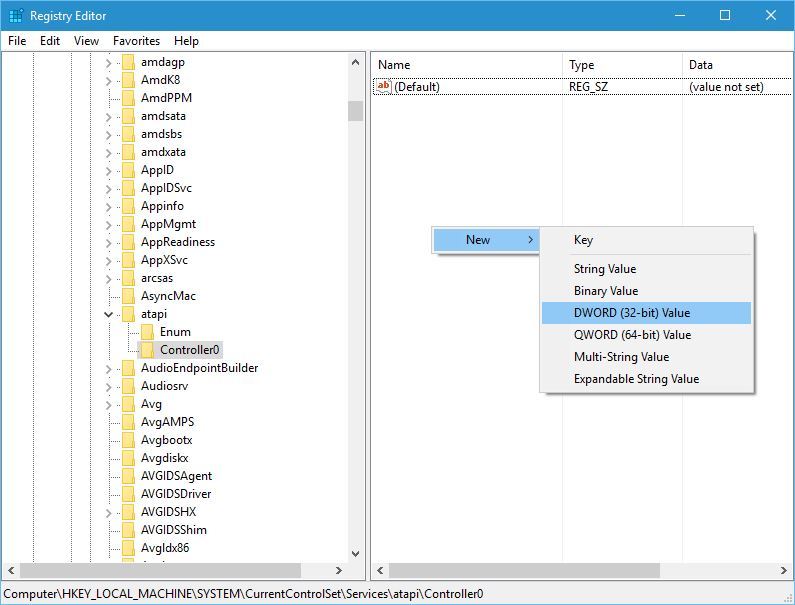
Step 5: Click on “Controller0”, and in right pane, right-click on empty space and select “New > DWORD (32-bit) value”, enter “EnumDevice1” as name of new DWORD
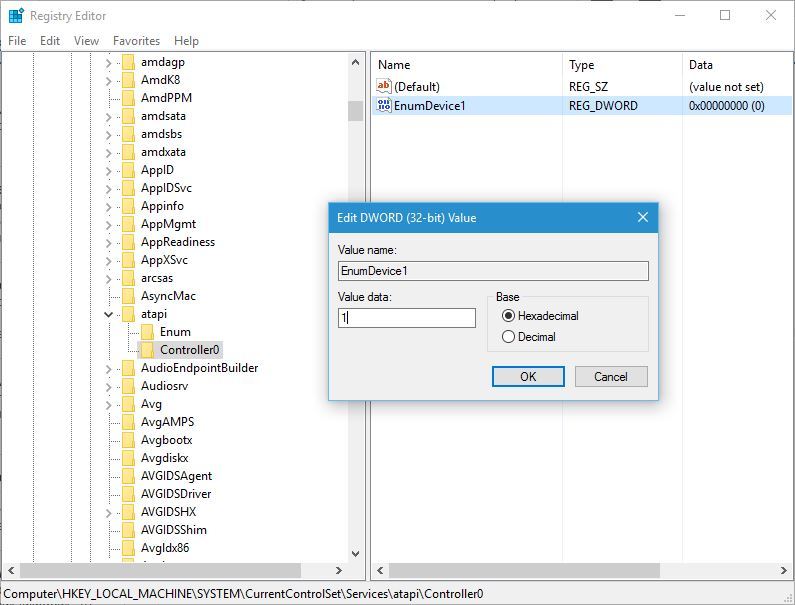
Step 6: Now, open “EnumDevice1” DWORD’s Properties, and enter ‘1’ in “Value Data” input and hit “OK” button to see the changes. This way, you can fix DVD drive not working in Windows 10.
Create new registry keys using “Command Prompt” to fix
You can try to create new registry key using ‘Command Prompt’ if you don’t want to use “Registry Editor” App.
Step 1: Press “Windows + X” keys together from keyboard and select “Command Prompt As Admin”
Step 2: Now, type the following command in command prompt and hit “Enter” key to execute
“reg.exe add “HKLMSystemCurrentControlSetServicesatapiController0” /f /v EnumDevice1 /t REG_DWORD /d 0x00000001”
Step 3: Wait to complete the process. Once done, please restart your computer to see the changes and check if the problem is resolved.
Re-install or Update DVD Driver Using a Tool
You can also try to update all Windows drivers including DVD Driver using a here suggested Automatic Driver Update Tool. You can get this tool through button/link below.
⇓ Get Automatic Driver Update Tool
Conclusion
I am sure this post helped you to know about “DVD Driver for Windows 10” and how to download/install, and update it in Windows 10 to fix DVD not working issue. we hope above mentioned instructions might have helped you resolving the issue with your DVD Rom driver related problems..
People also asked for:
Q: How do I get Windows 10 to recognize my DVD drive?
A: It is quite easy for your Windows 10 to recognize DVD drive. Just Boot to the Windows 10 desktop, then launch Device Manager by pressing Windows + X and click Device Manager. Expand DVD/CD-ROM drives, right-click the optical drive listed, then click Uninstall. Exit Device Manager then restart your computer. Windows 10 will detect the missing drive and install it automatically.
Q: Why the DVD Drive is not showing up?
A: The DVD Drive is not showing up probably due to some possible issues occurred due to DVD ROM Driver in your computer. In addition, the issue with DVD Drive hardware like faculty connection or dead drive can also be a possible reason. You should make sure DVD Drive is properly connected into your PC’s motherboard and there is no issue with DVD Drive connection in your computer.
You can reinstall DVD Drive in your Windows computer just by restarting your computer. Windows should auto-detect the drive and reinstall the drivers for you. If your hardware is still not showing up in Device Manager, then you may actually have a hardware problem like problematic DVD Drive connection. You can fix DVD Drive hardware and its connection issue in order to fix.
Q: How do I play DVD on my hard drive?
A: It is quite simple to play DVD on your hard drive. To do so, you need to Insert a DVD disk in DVD drive. Click the Browse button to select the Video_TS folder to open it. Now, copy and paste your desired files to a certain location on your hard drive. Once done, browse the location on your hard drive now, and open the file you want to play.
Q: How do I install DVD Drive in Windows PC?
A: If you want to work with DVD drive in your Windows computer, then make sure CD/DVD drive is properly installed in your computer. To install CD/DVD Drive in Windows PC, follow the steps below.
Step 1: Power down the PC completely.
Step 2: Open the computer to install the CD or DVD drive.
Step 3: Remove the drive slot cover.
Step 4: Set the IDE drive mode.
Step 5: Place the CD/DVD drive into the computer.
Step 6: Attach the internal audio cable.
Step 7: Attach the CD/DVD drive to the computer using an IDE cable.
“CD/DVD Driver for Windows 10/11” helps the DVD Drives communicate with the “Operating System” version installed on your PC. For instance, if you have a Windows 10/11 laptop or PC that has DVD drives and you want it to work with someone else’s DVD drives, you must ensure whether “DVD Drivers” is installed in your PC properly or not. You can easily access DVD Drives by opening “Windows Explorer” or “File Explorer”, you will see a list of hard disk drives there. And then, you can use DVD Drives for installing various software on your PC.
Inserting a DVD to your PC is the first requirement of using a DVD which you can access easily if you open “File Explorer” before double-clicking on DVD drives. But at times, “File Explorer” doesn’t show DVD drives if there is any issue with the DVD Driver. Under such circumstances, you must check whether “Device Manager” is showing a DVD drive or not. For doing that, just open “Device Manager” and expand the “CD/DVD-ROM Drives” part to see if your DVD Drive has “Yellow Question Mark” or “Yellow Exclamation Mark”. If it is showing that yellow mark, double-clicking on it will open its “Properties” window. You will then be able to see if there is any error in the “Device Status” part.
Let’s take a look at the errors first which may appear when “Device Manager” doesn’t show a DVD drive.
Common Errors shown in “Device Status” Area
- A driver may not work properly because Windows doesn’t load the drivers needed for that specific device.
- If a driver is disabled, it may not work as effectively as it is supposed to be. The best option is to use an alternative driver that offers the same functionality.
- If Windows has loaded the device driver successfully but hardware but is unable to find the device.
- If the driver is missing or corrupted, Windows won’t be able to load it for a hardware device.
- If the configuration information of a hardware device is damaged or incomplete, Windows won’t be able to start that device.
The above-mentioned errors usually occur when you upgrade Windows to its latest version or install CD/DVD recording program again after uninstalling it. This doesn’t let the operating system detect DVD Drive, which is also the reason why it isn’t shown in “Device Manager” or “File Explorer” of your PC. Sometimes, compatibility issues also occur when you upgrade the operating system to its latest version. That’s why users face “DVD Drive not showing in Device Manager, File Explorer” or “DVD Drive not detected by Windows” issues.
Here are some of the methods to fix this issue in order to download/install/update CD/DVD Driver on Windows 10/11.
Methods to install CD/DVD Driver for Windows 10/11
Installing CD/DVD Driver will only be possible if you fix ”DVD Drive not detected by Windows” issue. Take a look at how to do that.
Facing Driver Issues On Your PC? Fix It Automatically..!!
1. Download Driver Easy Tool Here.
2. Install the updater and click on Scan Now button to start the scan for problematic/outdated drivers.
3. Select the drivers you want to install or click Update All button to update all drivers.
Reinstall DVD Driver on Windows 10/11
Sometimes, an outdated driver may also cause a “DVD Drive not detected by Windows” issue. So, the only way to fix it is by reinstalling or updating the DVD Driver. Follow the below-mentioned steps for this purpose.
- Click on “Device Manager” and expand the “DVD/CD-ROM Drives” part.
Click on “DVD Device” then, there will be an “Uninstall” option. Select it.
Follow the instructions given on the screen for finishing uninstall.
Restart your PC now to automatically install CD/DVD Drivers on Windows 10/11.
So, in these easy steps, you will be able to fix the “DVD Drive not detected by Windows” issue. The reason is that it will remove the glitches from the windows, making the PC use new Windows again which makes it perform better than before.
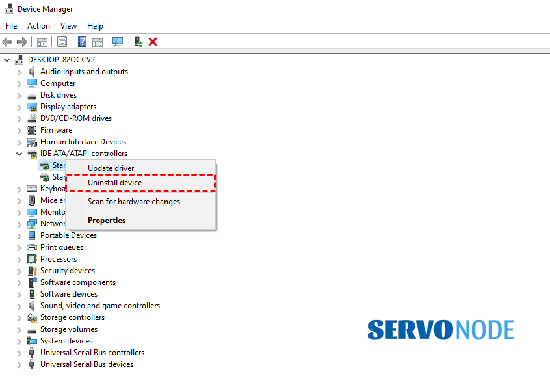
Remove “IDE ATA/ATAPI Controllers”
Follow the steps mentioned below to use this method:
- Press “Windows +X” together on your keyboard and then click on “Device Manager”.
- After opening the “Device Manager” window, press “View” and select “Show Hidden Devices”.
- After that, locate the “IDE ATA/ATAPI Controllers” part and expand it.
- Click on “ATA Channel” and then click on “Uninstall”.
- Removing “Intel Serial ATA Storage Controller” is an optional step here.
- Once you are done, restart your PC again.
This method is suitable when you are actually dealing with controllers which is an internal issue of the PC. However, uninstalling it may work for you. Try it out using the above-mentioned steps to fix the “DVD Drive not detected by Windows” issue.
Update “CD/DVD Driver for Windows 10/11”
Follow the steps mentioned below for updating “CD/DVD Driver for Windows 10/11”.
- First of all, visit the official website of the manufacturer of your DVD Drive and download the latest drivers for Windows 10/11. Save all those files on your PC.
- Click on “Device Manager” and expand the “DVD/CD-ROM Drives” part.
- Click on “DVD Drive” and then on “Update Driver”.
- After that, click on “Browse my Computer for latest driver software” and follow the instructions given on the screen for installing the latest driver on your PC.
- Once you’re done, restart your PC for saving the changes.
This method isn’t different from the one we mentioned above to install the driver. But this will also help fix “DVD Drive not detected by Windows” issue.
Use “Hardware and Devices” Troubleshooter
Here is how you can run the “Hardware and Devices” Troubleshooter.
- Press “Windows +R” together on your keyboard and then click on “Open Dialog Box”.
Type “Control Panel” then and click on “Enter” for opening it.
After that, in the search bar, type “Troubleshooter” and then press “Troubleshooting”.
Click on “Configure a Device” then.
Follow the instructions given there for finishing the troubleshooting process.
After you complete the procedure, see whether the “DVD Drive not detected by Windows” issue has been resolved or not.
Facing PC Issues? Fix It Automatically..!!
1. Download Advance System Repair Tool Here.
2. Click Install and Scan Now to find all system issues causing the current problem.
3. Click Fix, Clean & Optimize Now to fix issues affecting your computer’s security and performance.
Conclusion
All the methods mentioned above will let you know how you can fix the “DVD Drive not detected by Windows” issue and what’s the best way to Download/Install/Update Cd/DVD Driver on Windows 10/11. Just figure out the error correctly before and then use the relevant method to get rid of it.

Nishant Verma is a senior web developer who love to share his knowledge about Linux, SysAdmin, and more other web handlers. Currently, he loves to write as content contributor for ServoNode.
Fix DVD issues by making a few quick tweaks to your registry
by Milan Stanojevic
Milan has been enthusiastic about technology ever since his childhood days, and this led him to take interest in all PC-related technologies. He’s a PC enthusiast and he… read more
Updated on
- DVD driver issues on Windows 10 can be fixed by a quick driver update.
- You might have to adjust your registry in order to fix problem on your PC.
XINSTALL BY CLICKING THE DOWNLOAD
FILE
Just like any other operating system, Windows has its share of problems. One particular issue that users reported was the DVD driver issues in Windows 10.
If this happens, your PC won’t recognize DVD drive, or you might experience other issues. This can be a big problem especially if you use optical media frequently, so let’s see how to fix it.
Why can’t I play DVDs on Windows 10?
Here are some of the most common reasons for DVD issues on Windows 10:
- Lack of proper software – If the DVD isn’t working in Windows 10 it’s probably due to lack of proper software. However, that can be fixed by using DVD player software.
- Drivers – CD/DVD driver for Windows 10 isn’t necessary in order to use the device. However, sometimes other drives can come into conflict with your drive.
- Loose cables – If DVD isn’t detected, it’s possible that it’s not connected properly. Check your cables and make sure that both power and SATA cables are tightly connected.
How can I fix DVD driver issues on Windows 10?
Before we dive deeper into this issue, you can do the following check to rule out any common problems:
- Check your cables – Open your PC case and check if all cables are properly connected to your drive. Loose cables are rather common problem, so we advise you to check them.
- Delete the IDE ATA/ATAPI controllers from Device Manager
- Assign a letter to DVD drive
- Create new registry keys
- Remove corrupted registry entries
1. Delete the IDE ATA/ATAPI controllers from Device Manager
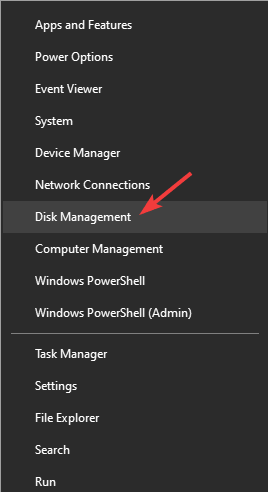
- Press Windows key + X to open Power User Menu. Select Device Manager from the list.

- Once the Device Manager opens, go to View and choose Show hidden devices.

- Locate ATA Channel controllers and uninstall them all by right-clicking them and choosing Uninstall from the menu.
- Optional: Users also suggest removing Intel (R) Serial ATA Storage Controller, so if you have it make sure that you remove it as well.
- After you’re done close Device Manager and restart your PC.
Users reported that this problem can be easily fixed by uninstalling IDE ATA/ATAPI controllers from Device Manager.
How we test, review and rate?
We have worked for the past 6 months on building a new review system on how we produce content. Using it, we have subsequently redone most of our articles to provide actual hands-on expertise on the guides we made.
For more details you can read how we test, review, and rate at WindowsReport.
If you don’t have ATA Channel available in the Device Manager, be sure to delete SATA controller and restart your computer. When your computer restarts the DVD drive should appear again.
Some users are also suggesting to remove your DVD drive from Device Manager, so you might want to try that as well.
In addition to deleting devices from Device Manager, some users are also recommending that you update drivers for your DVD drive.
To install DVD driver for Windows 10, visit the drive manufacturer’s website and download the latest drivers for your device.
Update drivers automatically
If you don’t want the hassle of updating drivers manually, we strongly suggest to do it automatically by using DriverFix.
After several tests, our team concluded that this is the best-automatized solution. Below you can find a quick guide on how to do it:
- Download and install DriverFix.
- Once installed, the program will start scanning your PC for outdated drivers automatically.
- All you need to do is wait for the scan to complete.
- Review the list and see if you want to update each driver individually or all at once.
⇒ Get DriverFix
2. Assign a letter to DVD drive
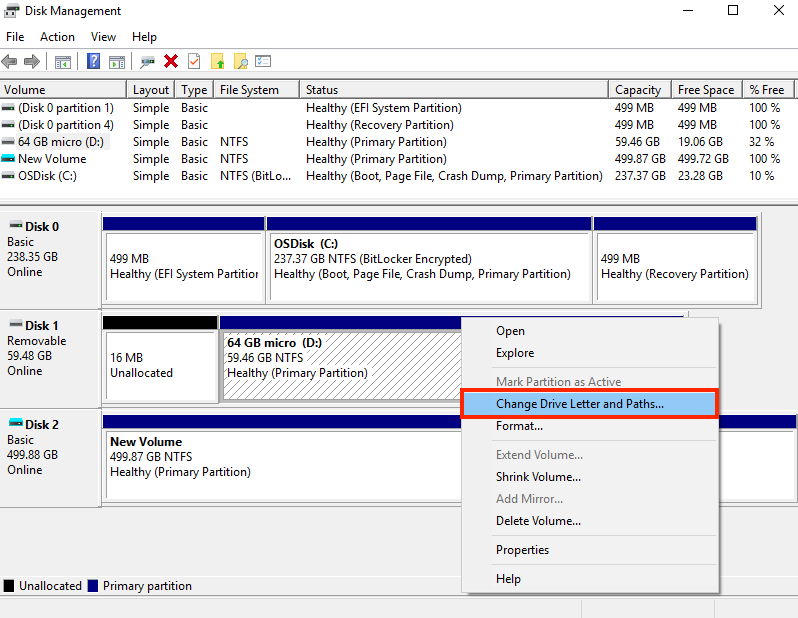
- Press Windows key + X and select Disk Management.

- Locate your DVD on the list. Right-click and choose Change drive letter.

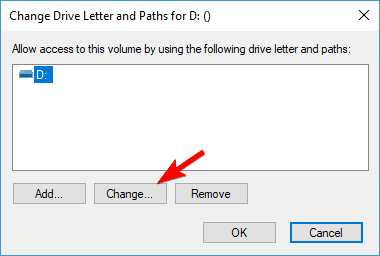
- Click on Change.

- Now select a new letter and click on OK
.

3. Create new registry keys
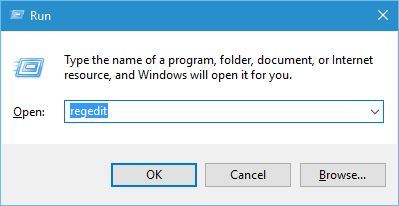
- Press Windows key + R and enter regedit.
- Press Enter or click OK to start Registry Editor.

- Once Registry Editor opens, go to the following key in the left panel:
HKEY_LOCAL_MACHINE/SYSTEM/CurrentControl/SetServicesatapi - Right-click atapi and select New and then pick Key.
- Enter Controller0 as the name of the new key.

- Select Controller0 and in the right pane right-click the empty space and select New and then DWORD (32-bit) Value. Enter EnumDevice1 as the name of new DWORD.
- Double click EnumDevice1 DWORD to open its properties. Enter 1 in Value data input field and click OK to save changes.
Once you make these changes, check if DVD drive is still not showing in Device Manager on Windows 10.
- Please insert the disk error on Windows 10/11 [Ultimate Guide]
- Fix AutoPlay not working for CDs and DVDs in Windows 10
- Fix: ATA/SATA Hard Drive not Detected in BIOS
- Spacebar, Enter, and Backspace are Not Working on Windows 11 [Fix]
4. Remove corrupted registry entries
- Press Windows key + R and enter regedit. Click OK.
- Navigate to the following path:
HKEY_LOCAL_MACHINE\SYSTEM\CurrentControlSet\Control\Class\ {4D36E965-E325-11CE-BFC1-08002BE10318}
- Locate LowerFilters and UpperFilters. Right-click each of them and choose Delete.

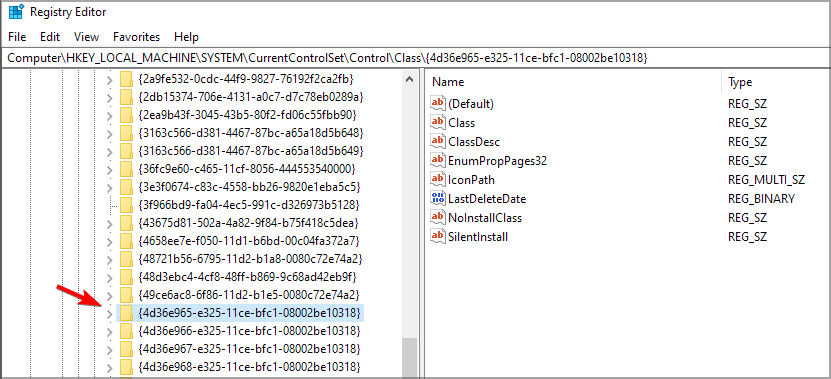
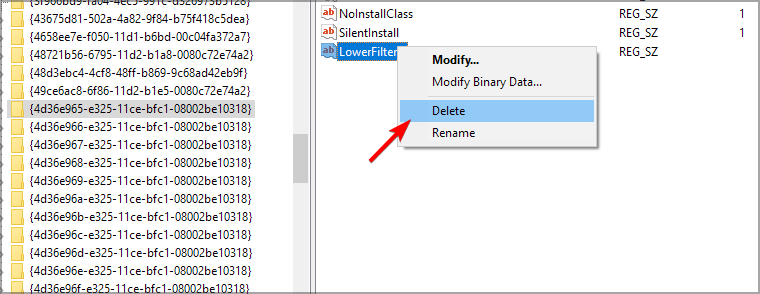
After doing that, check if the DVD drive is still not detected in Windows 10.
Missing DVD drives in Windows 10 can be a big problem, but you can easily fix it by using one of our solutions. This is a common issue, and many reported that DVD player is not working after upgrade, but hopefully these solutions should help with that.
If you have any other suggestions or questions, don’t hesitate to leave them in the comments section below and we’ll be sure to take a look.
![]()
Recommended DVD & CD Drivers Updates
 It is recommended you update your DVD & CD Drivers regularly in order to avoid conflicts. You can manually install CD and DVD drivers or you can use a driver update tool to automate this. Both options are discussed below. Driver updates will resolve any Driver conflict issues with all devices and improve the performance of your PC.
IMPORTANT NOTICE: Downloading the latest Driver releases helps resolve Driver conflicts and improve your computer’s stability and performance. Updates are recommended for all Windows 11, Windows 10, Windows 8, Windows 7, XP and Vista users.
Download and install DVD & CD Drivers
How Do I Install Driver updates?
To fix your Drivers problems you will need to know the particular model of the DVD/ CD device you are having problems with. Once you have the details you can search the manufacturers website for your drivers and, if available, download and install these drivers.
How do I know if I need to update my Drivers?
If you are unsure of whether or not you need to update your Drivers, or indeed which Drivers may need to be updated, you can run a Drivers scan using a driver update tool (you will need to pay to register this tool but usually the Drivers scan is free). This will allow you to assess your Driver needs without any commitment. Alternatively, you can use the device manager to check if there are problems with any of your hardware devices.
Can I update the Drivers myself?
In many cases the answer to this is yes, however in some cases the manufacturers no longer make the Drivers available so you need to use a Driver Update Tool to install the missing Drivers. The purpose of such as tool is to save you time and effort by automatically downloading and updating the Drivers for you.
Missing CD or DVD Device Driver?
How will a Driver Update Tool fix my DVD & CD Drivers?
A Driver Update Program will instantly resolve your drivers problems by scanning your PC for outdated, missing or corrupt drivers, which it then automatically updates to the most compatible version.
Why should I download Driver Update Software?
Apart from updating your DVD & CD Drivers, installing a Driver Update Tool gives:
- Up to 3 times faster internet connection and download speeds
- Better PC performance for games and audio applications
- Smooth-running of all your PC devices such as printers, scanners etc.
- Better all-round performance of your PC due to automatic driver updates which will
keep all your devices and your PC in top condition
Common DVD and CD Drivers Problems
The most common DVD and CD Driver problems and downloads relate to Dell DVD Drivers, HP DVD Drivers and LG DVD Drivers. DVD and CD Driver updates are available for Windows 11, Windows 10, Windows 8, Windows 7, XP and Vista. You can download the Driver update software below and run a Free Scan of your PC to see what Drivers your system requires.
Start Download