Удаленные пользователи могут подключаться к своим компьютерам Windows 10 или 11 через службу удаленных рабочих столов (RDP). Достаточно включить удаленный рабочий стол (Remote Desktop), разрешить RDP доступ для пользователя и подключиться к компьютеру с помощью любого клиента удаленного рабочего стола. Однако в десктопных версия Windows есть ограничение на количество одновременных RDP сессии. Разрешается только один активный Remote Desktop сеанс пользователя.
Если вы попробуете открыть вторую RDP сессию, появится предупреждение с запросом отключить сеанс первого пользователя.
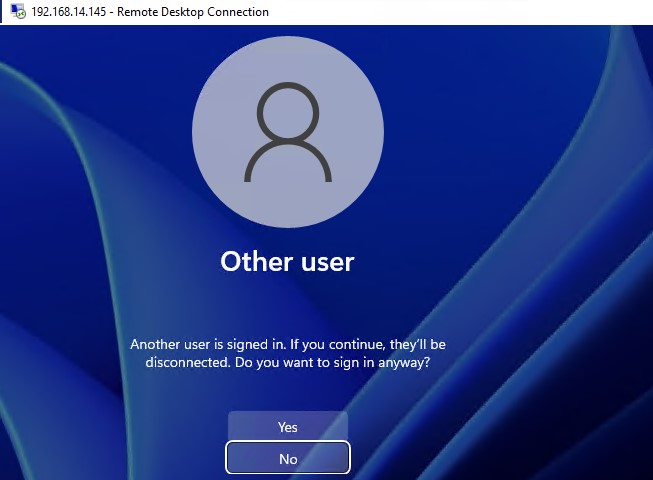
В систему вошел другой пользователь. Если вы продолжите, он будет отключен. Вы все равно хотите войти в систему?
В английской версии предупреждение такое:
Another user is signed in. If you continue, they’ll be disconnected. Do you want to sign in anyway?
Содержание:
- Ограничения на количество RDP сессий в Windows
- RDP Wrapper: разрешить несколько RDP сеансов в Windows
- Не работает RDP Wrapper в Windows
- Модификация файла termsrv.dll для снятия ограничений RDP в Windows 10 и 11
- Встроенная поддержка нескольких RDP сессий в редакции Windows 10 Enterprise Multi-session
Ограничения на количество RDP сессий в Windows
Во всех десктопных версиях Windows 10 и 11 есть ряд ограничений на использование служб удаленного рабочего стола
- Разрешено удаленно подключаться по RDP только к редакциям Windows Professional и Enterprise. В домашних редакциях (Home/Single Language) RDP доступ запрещен;
- Поддерживается только одно одновременное RDP подключение. При попытке запустить вторую RDP-сессию, пользователю будет предложено завершить активный сеанс;
- Если пользователь работает за консолью компьютера (локально), то при удаленном подключении по RDP, его локальный сеанс будет отключен (заблокирован). Также завершается и удаленный RDP сеанс, если пользователь входит в Windows через консоль компьютера.
Ограничение на количество одновременных RDP подключений в Windows является не техническим, но программным и лицензионным. Таким образом Microsoft запрещает создавать терминальный RDP сервер на базе рабочей станции для одновременной работы нескольких пользователей.
Если ваши задачи требуют развертывание терминального сервера, Microsoft предлагает пробрести Windows Server (по умолчанию разрешает 2 активных RDP подключения). Если вам нужно большее количество одновременных сессий пользователей, нужно приобрести лицензии RDS CAL, установить и настроить роль Remote Desktop Session Host (RDSH) или полноценную RDS ферму.
Технически любая редакция Windows при наличии достаточного ресурсов оперативной памяти и CPU может обслуживать одновременную работу нескольких десятков удаленных пользователей. В среднем на одну RDP сессию пользователя требуется 150-200 Мб памяти (без учета запускаемых приложений). Т.е. максимальное количество одновременных RDP сессий в теории ограничивается только ресурсами компьютера.
В этой статье мы покажем три способа убрать ограничение на количество одновременных RDP подключений в Windows 10 и 11:
- Использование RDP Wrapper
- Модификации системного файла termsrv.dll
- Апгрейд до редакции Windows 10/11 Enterprise for virtual desktops (multi-session)
Примечание. Все модификации операционной системы, описанные в этой статье, считаются нарушением лицензионного соглашения Windows, и вы можете использовать их на свой страх и риск.
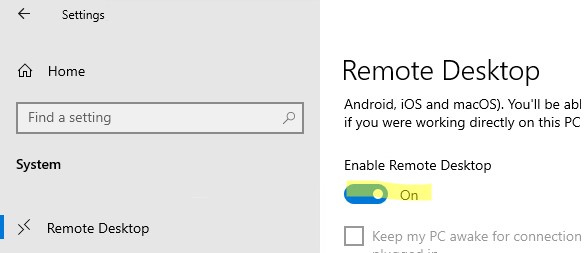
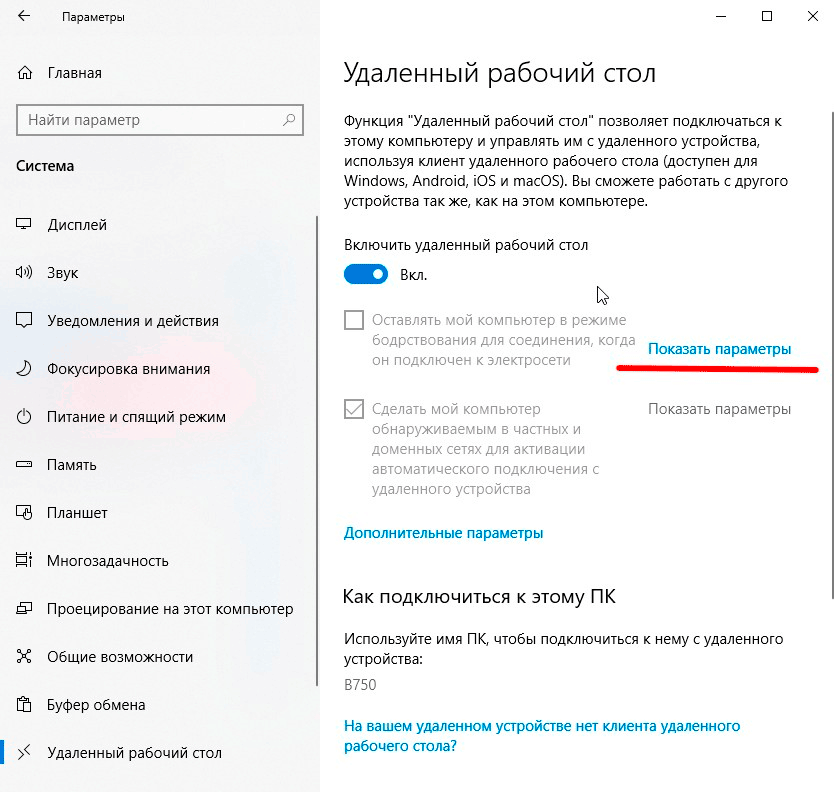
Прежде, чем продолжить, проверьте что в настройках Windows включен протокол Remote Desktop.
- Откройте панель Settings -> System —> Remote Desktop -> включите опцию Enable Remote Desktop;

- Либо воспользуйтесь классической панель управления: выполните команду SystemPropertiesRemote -> Перейдите на вкладку Remote Settings (Удаленный доступ), включите опцию Allow remote connection to this computer (Разрешить удалённые подключения к этому компьютеру).
RDP Wrapper: разрешить несколько RDP сеансов в Windows
Open-source утилита RDP Wrapper Library позволяет разрешить конкурентные RDP сессии в Windows 10/11 без замены системного файла termsrv.dll.
RDP Wrapper работает в качестве прослойки между менеджером управления службами Service Control Manager, SCM) и службой терминалов (Remote Desktop Services). RDP Wrapper не вносит никаких изменений в файл termsrv.dll, просто загружая termsrv с изменёнными параметрами.
Важно. Перед установкой RDP Wrapper важно убедится, чтобы у вас использовалась оригинальная (непропатченная) версия файл termsrv.dll. Иначе RDP Wrapper может работать не стабильно, или вообще не запускаться.
Вы можете скачать RDP Wrapper из репозитория GitHub: https://github.com/binarymaster/rdpwrap/releases (последняя доступная версия RDP Wrapper Library v1.6.2). Утилита не обновляется с 2017 года, но ее можно использовать на всех билдах Windows 10 и 11. Для работы утилиты в современных версиях Windows достаточно обновить конфигурационный файл rdpwrap.ini.
Большинство антивирусов определяют RDP Wrapper как потенциально опасную программу. Например, встроенный Microsoft Defender антивирус классифицирует программу как PUA:Win32/RDPWrap (Potentially Unwanted Software) с низким уровнем угрозы. Если настройки вашего антивируса блокируют запуск RDP Wrapper, нужно добавить его в исключения. 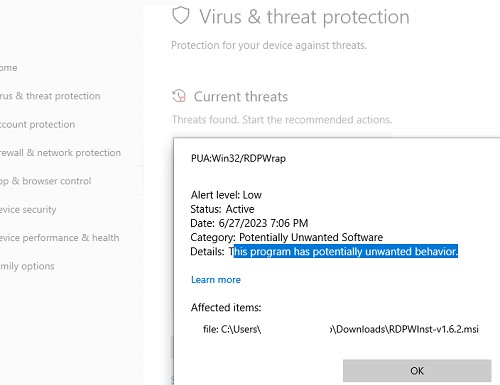
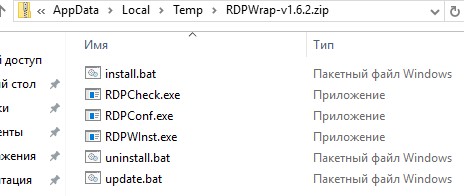
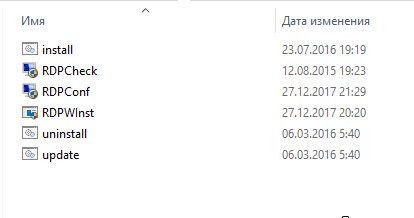
Архив RDPWrap-v1.6.2.zip содержит несколько файлов:
- RDPWinst.exe —программа установки/удаления RDP Wrapper Library;
- RDPConf.exe — утилита настройки RDP Wrapper;
- RDPCheck.exe — Local RDP Checker — утилита для проверки RDP доступа;
- install.bat, uninstall.bat, update.bat — пакетные файлы для установки, удаления и обновления RDP Wrapper.
Чтобы установить RDPWrap, запустите файл
install.bat
с правами администратора.
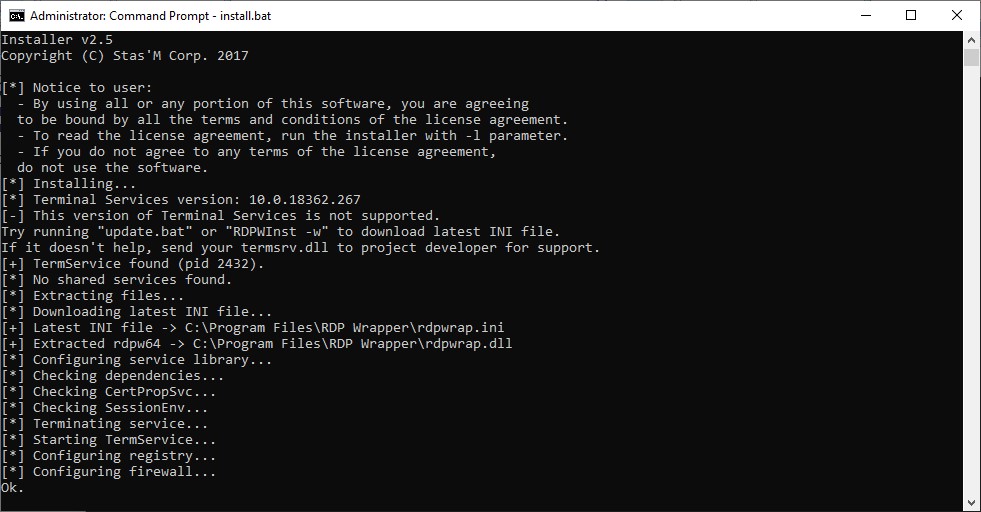
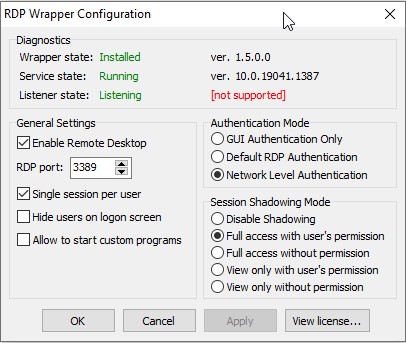
После окончания установки запустите RDPConfig.exe.
![rdp-wrapper: красная надпись не поддерживается [not supported]](https://winitpro.ru/wp-content/uploads/2015/09/rdp-wrapper-ne-podderzhivaetsya.jpg)
Скорее всего сразу после установки утилита покажет, что RDP wrapper запущен (Installed, Running, Listening), но не работает. Обратите внимание на красную надпись. Она сообщает, что данная версий Windows 10 (ver. 10.0.19041.1949) не поддерживается ([not supported]).
Причина в том, что в конфигурационном файле rdpwrap.ini отсутствует секция с настройками для вашего версии (билда) Windows. Актуальную версию файла rdpwrap.ini можно скачать здесь https://raw.githubusercontent.com/sebaxakerhtc/rdpwrap.ini/master/rdpwrap.ini
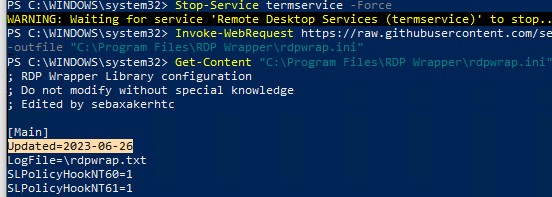
Вручную скопируйте содержимое данной страницы в файл «C:\Program Files\RDP Wrapper\rdpwrap.ini». Или скачайте файл с помощью PowerShell командлета Invoke-WebRequest (предварительно нужно остановить службу Remote Desktop):
Stop-Service termservice -Force
Invoke-WebRequest https://raw.githubusercontent.com/sebaxakerhtc/rdpwrap.ini/master/rdpwrap.ini -outfile "C:\Program Files\RDP Wrapper\rdpwrap.ini"
alert] Можно создать задание планировщика для проверки изменений в файле rdpwrap.ini и его автоматического обновления [/alert]
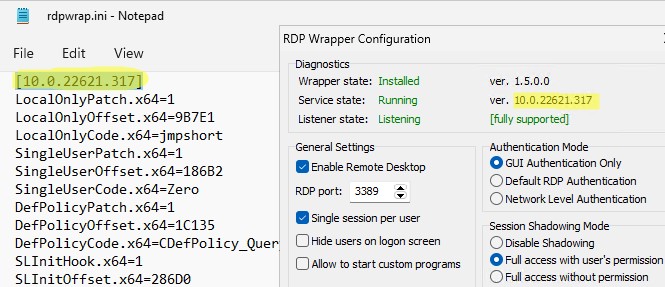
На данном скриншоте видно, что на компьютере установлена свежая версия файла rdpwrap.ini (Updated=2023-06-26).
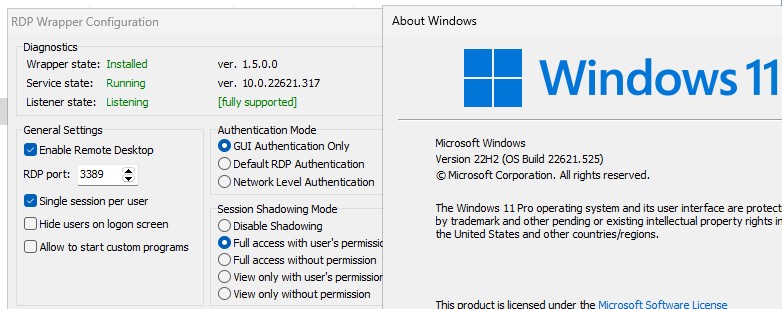
Перезагрузите компьютер, запустите утилиту RDPConfig.exe. Проверьте, что в секции Diagnostics все элементы окрашены в зеленый цвет, и появилось сообщение [Fully supported]. На скриншоте ниже показано, что RDP Wrapper с данным конфигом успешно запущен в Windows 11 22H2.
Теперь попробуйте установить несколько одновременных RDP сессий с этим компьютером под разными пользователями (воспользуйтесь любым RDP клиентом: mstsc.exe, RDCMan, mRemoteNG и т.д.).
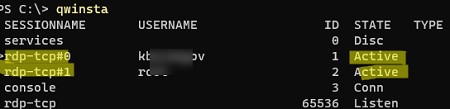
Можете проверить что на компьютере активны одновременно две RDP сессии (или более) с помощью команды:
qwinsta
rdp-tcp#0         user1                 1  Active
rdp-tcp#1         user2                 2  Active

Утилита RDPWrap поддерживается во версиях Windows (включая домашние редакции Windows Home), таким образом из любой клиентской версии Windows можно сделать полноценный сервер терминалов.
В интерфейсе RDP Wrapper доступны следующие опции:
- Enable Remote Desktop — включить/отключить Remote Desktop в Windows доступ
- RDP Port — можно изменить стандартный номера порта удаленного рабочего стола TCP 3389
- Опция Hide users on logon screen позволяет скрыть список пользователей на экране приветствия;
- Single session per user —разрешить несколько одновременных RDP сессий под одной учетной записью пользователя. Эта опция устанавливает параметр реестра fSingleSessionPerUser = 0 в ветке HKLM\SYSTEM\CurrentControlSet\Control\Terminal Server). Также этот параметр настраивается через опцию GPO Restrict Remote Desktop Services to a single Remote Desktop Services session в разделе Computer Configuration > Administrative Templates > Windows Components > Remote Desktop Services > Remote Desktop Session Host > Connections.
- В секции Session Shadowing Mode вы можете настроить режим теневого подключения к рабочему столу пользователей Windows .
Не работает RDP Wrapper в Windows
В некоторых случая утилита RDP Wrapper не работает как ожидается, и вы не можете использовать несколько RDP подключений.
Во время установки обновлений Windows может обновиться версия файла termsrv.dll. Если в файле rdpwrap.ini отсутствует описание для вашей версии Windows, значит RDP Wrapper не может применить необходимые настройки. В этом случае в окне RDP Wrapper Configuration будет указан статус [not supported].
В этом случае нужно обновить файл rdpwrap.ini как описано выше.
Если RDP Wrapper не работает после обновления файла rdpwrap.ini, попробуйте открыть файл rdpwrap.ini и найти в нем описание для вашей версии Windows.
Как понять, есть ли поддержка вашей версии Windows в конфиг файле rdpwrapper?
На скриншоте ниже показано, что для моей версии Windows 11 (10.0.22621.317) есть две секции с описаниями:
[10.0.22621.317]
...
[10.0.22621.317-SLInit]
...
Если в конфигурационном файле rdpwrap соответствующая секция отсутствует для вашей версии Windows, попробуйте поискать в сети строки rdpwrap.ini для вашего билда. Добавьте найденные строки в самый конец файла.
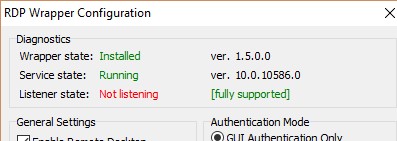
Если после установки обновлений безопасности или после апгрейда билда Windows 10, RDP Wrapper не работает, проверьте, возможно в секции Diagnostics присутствует надпись Listener state: Not listening.
Попробуйте обновить ini файл, и затем переустановить службу:
rdpwinst.exe -u
rdpwinst.exe -i
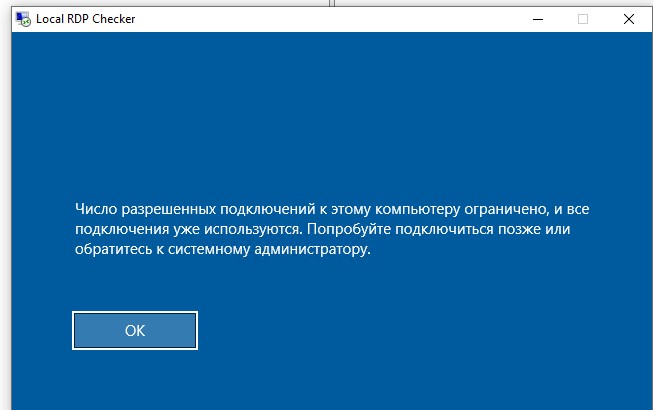
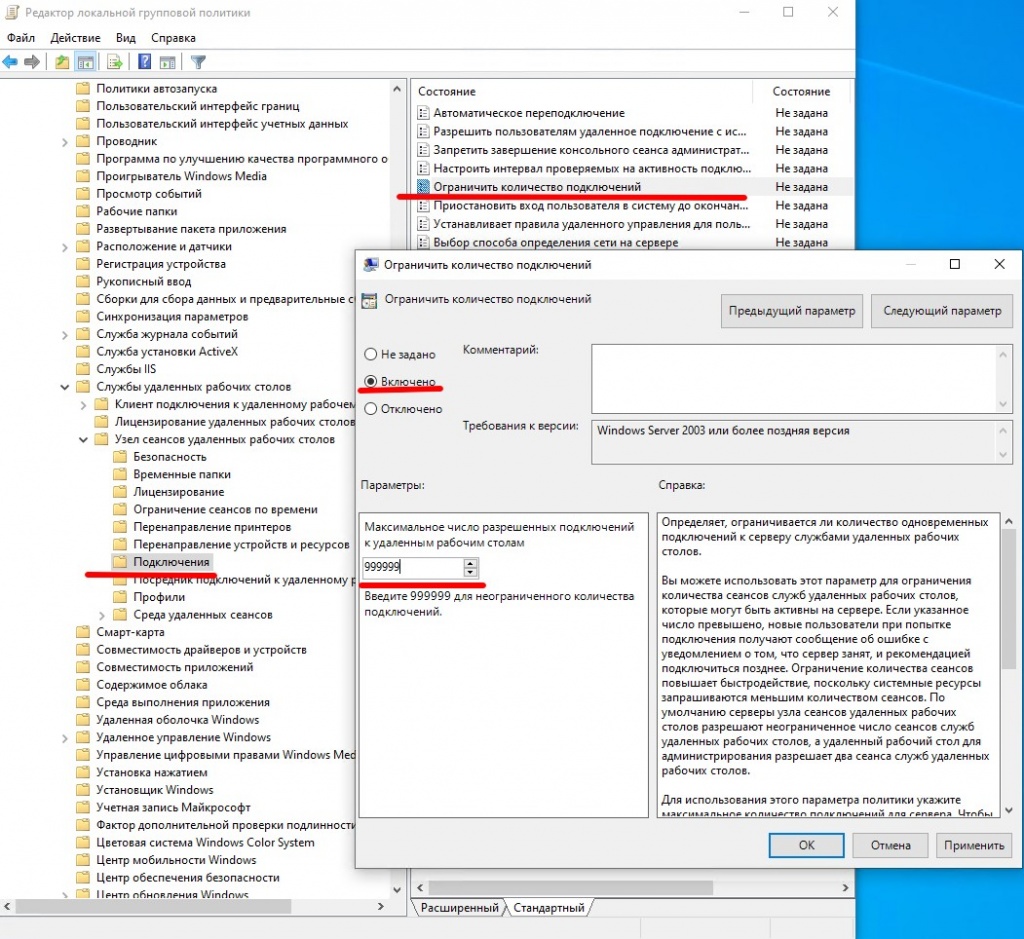
Бывает, что при попытке второго RDP подключения под другим пользователем у вас появляется надпись:
Число разрешенных подключений к этому компьютеру ограничено и все подключений уже используются. Попробуйте подключиться позже или обратитесь к системному администратору.
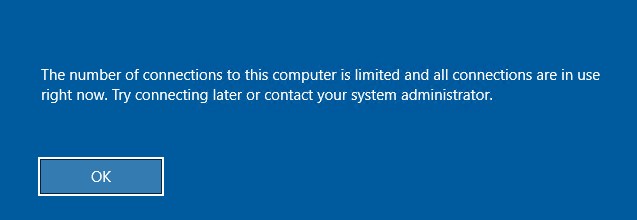
The number of connections to this computer is limited and all connections are in use right now. Try connecting later or contact your system administrator.
В этом случае нужно с помощью редактора групповых политики gpedit.msc в секции Конфигурация компьютера –> Административные шаблоны -> Компоненты Windows -> Службы удаленных рабочих столов -> Узел сеансов удаленных рабочих столов -> Подключения включить политику “Ограничить количество подключений” и изменить ее значение на 999999 (Computer Configuration -> Administrative Templates -> Windows Components ->Remote Desktop Services ->Remote Desktop Session Host -> Connections-> Limit number of connections).
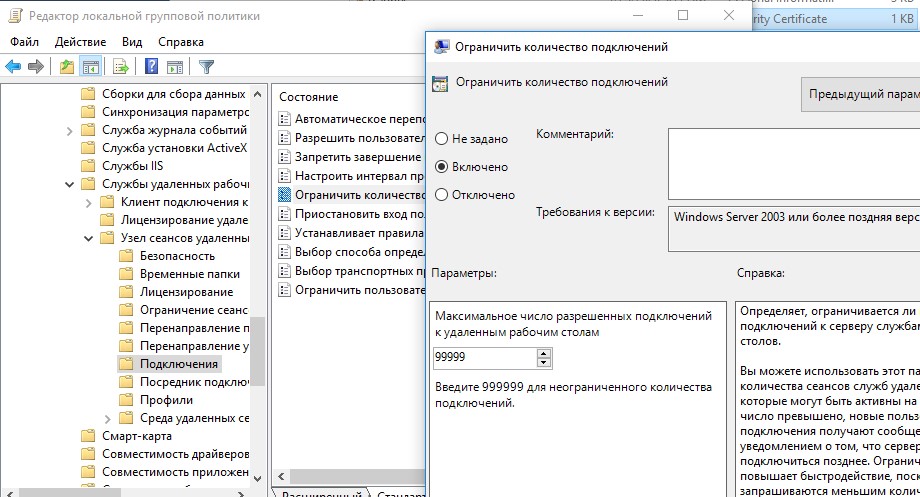
Перезагрузите компьютер для обновления настроек GPO и применения новых параметров.
Модификация файла termsrv.dll для снятия ограничений RDP в Windows 10 и 11
Чтобы убрать ограничение на количество RDP подключений пользователей в Windows без использования rdpwrapper нужно заменить файл termsrv.dll. Это файл библиотеки, которая используется службой Remote Desktop Services. Файл находится в каталоге C:\Windows\System32.
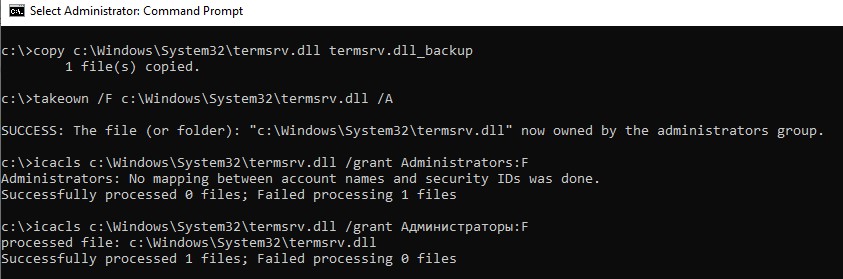
Прежде, чем править или заменять файл termsrv.dll желательно создать его резервную копию. Это поможет вам в случае необходимости можно будет вернуться к исходной версии файла. Запустите командную строку с правами администратора и выполните команду:
copy c:\Windows\System32\termsrv.dll termsrv.dll_backup
Затем нужно стать владельцем файла. Проще всего это сделать из командной строки. Чтобы сменить владельца файла с TrustedInstaller на группу локальных администраторов с помощью команды:
takeown /F c:\Windows\System32\termsrv.dll /A
Должно появится сообщение: «SUCCESS: The file (or folder): «c:\Windows\System32\termsrv.dll» now owned by the administrators group».
Теперь с помощью icacls.exe предоставьте группе локальных администраторов полные права на файл termsrv.dll (Full Control):
icacls c:\Windows\System32\termsrv.dll /grant Administrators:F
(или
Администраторы
в русской версии Windows).
Должно появится сообщение: «processed file: c:\Windows\System32\termsrv.dll Successfully processed 1 files; Failed processing 0 files«.
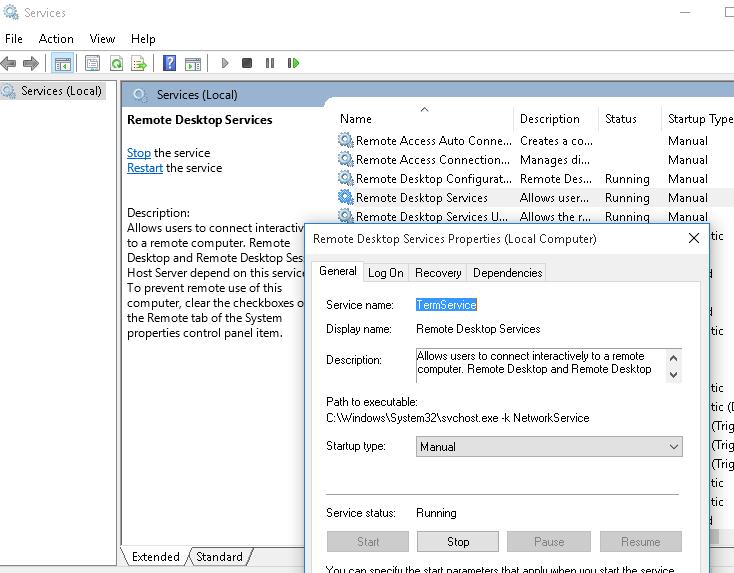
Теперь нужно остановить службу Remote Desktop Service (TermService) из консоли services.msc или из командной строки:
Net stop TermService
Вместе с ней останавливается служба Remote Desktop Services UserMode Port Redirector.
Чтобы узнать номер билда вашей Windows, выполните команду winver или следующую команды PowerShell:
Get-ComputerInfo | select WindowsProductName, WindowsVersion
В моем случае установлена Windows 10 билд 22H2.
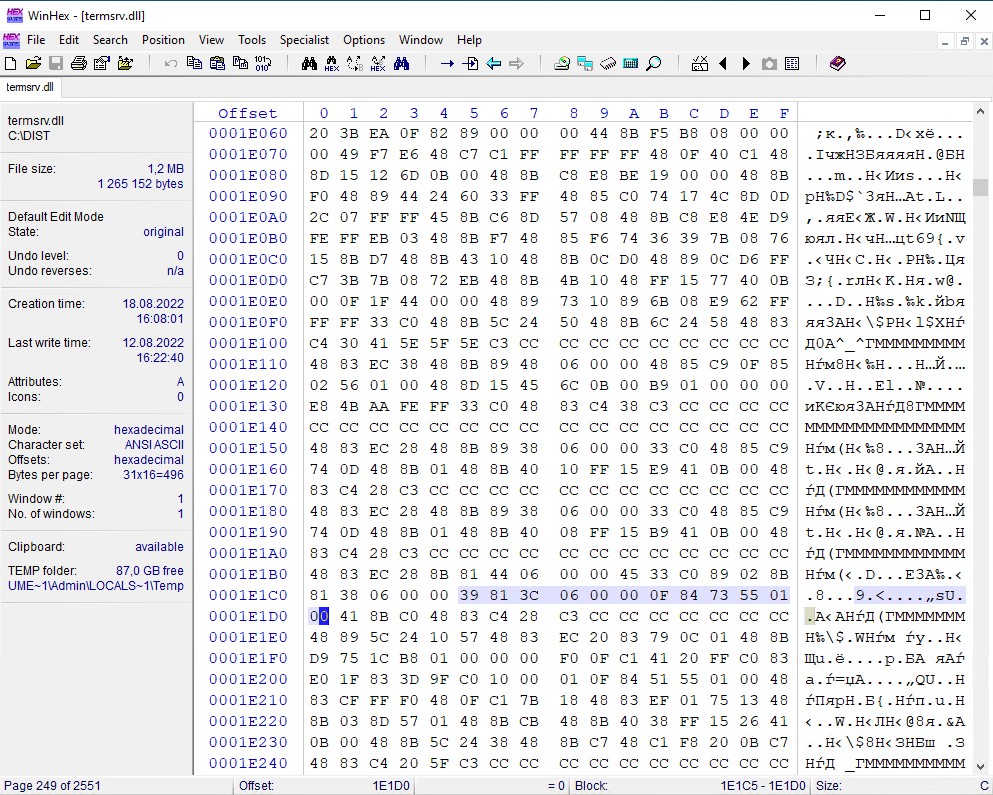
Затем откройте файл termsrv.dll с помощью любого HEX редактора (к примеру, Tiny Hexer). В зависимости от билда нужно найти и заменить строку:
| Версия Windows | Найти строку | Заменить на |
| Windows 11 22H2 | 39 81 3C 06 00 00 0F 84 75 7A 01 00 |
B8 00 01 00 00 89 81 38 06 00 00 90 |
| Windows 10 22H2 | 39 81 3C 06 00 00 0F 84 85 45 01 00 | |
| Windows 11 RTM ( 21H2 22000.258) | 39 81 3C 06 00 00 0F 84 4F 68 01 00 | |
| Windows 10 x64 21H2 | 39 81 3C 06 00 00 0F 84 DB 61 01 00 | |
| Windows 10 x64 21H1 | 39 81 3C 06 00 00 0F 84 2B 5F 01 00 | |
| Windows 10 x64 20H2 | 39 81 3C 06 00 00 0F 84 21 68 01 00 | |
| Windows 10 x64 2004 | 39 81 3C 06 00 00 0F 84 D9 51 01 00 | |
| Windows 10 x64 1909 | 39 81 3C 06 00 00 0F 84 5D 61 01 00 | |
| Windows 10 x64 1903 | 39 81 3C 06 00 00 0F 84 5D 61 01 00 | |
| Windows 10 x64 1809 | 39 81 3C 06 00 00 0F 84 3B 2B 01 00 | |
| Windows 10 x64 1803 | 8B 99 3C 06 00 00 8B B9 38 06 00 00 | |
| Windows 10 x64 1709 | 39 81 3C 06 00 00 0F 84 B1 7D 02 00 |
Редактор Tiny Hexer не позволяет редактировать файл termsvr.dll напрямую из папки system32. Скопируйте его на рабочий стол, а после модификации замените исходный файл.
Например, для самой редакции Windows 10 x64 22H2 19045.2006 (версия файла termsrv.dll — 10.0.19041.1949) нужно открыть файл termsrv.dll в Tiny Hexer. Затем найдите строку:
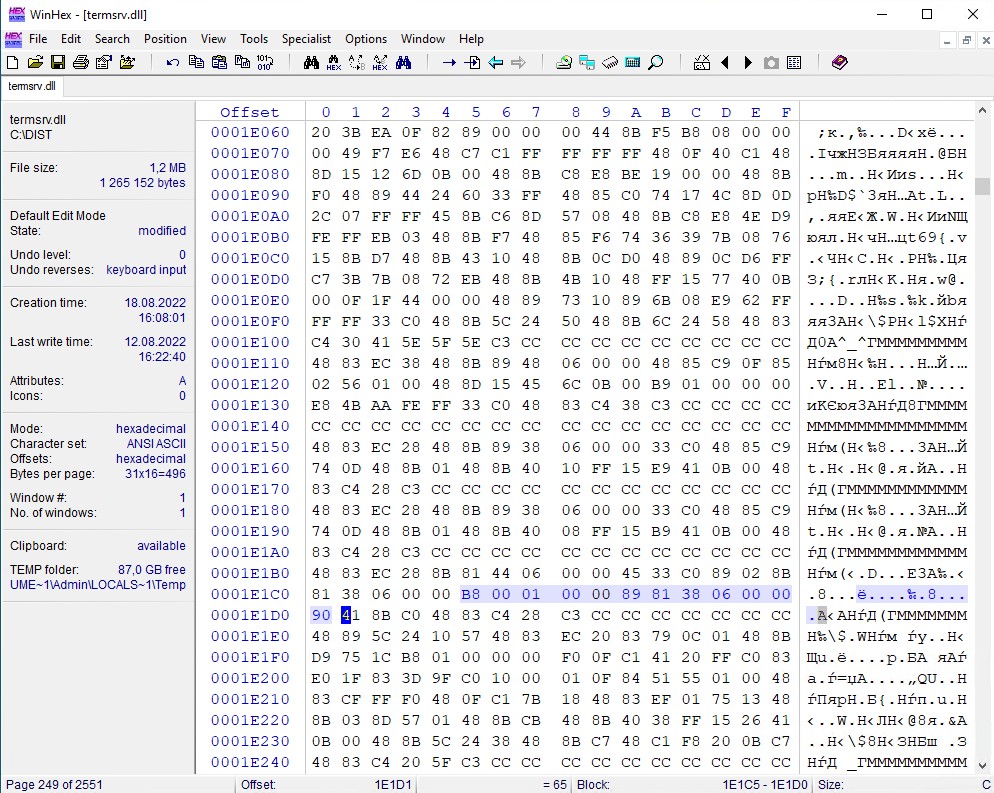
39 81 3C 06 00 00 0F 84 85 45 01 00
И замените ее на:
B8 00 01 00 00 89 81 38 06 00 00 90
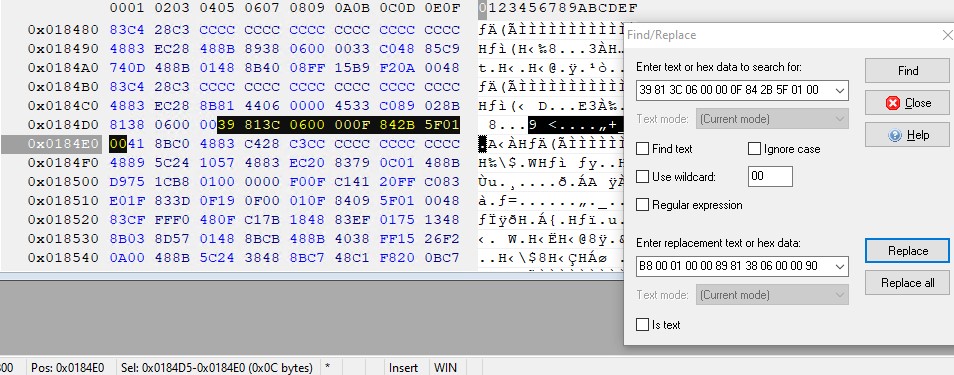
Сохраните файл и запустите службу TermService.
Если что-то пошло не так, и у вас возникнут проблемы со службой RDP, остановите службу и замените модифицированный файл termsrv.dll исходной версией:
copy termsrv.dll_backup c:\Windows\System32\termsrv.dll
Преимущество способа отключения ограничения на количество RDP сессий в Windows путем замены файла termsrv.dll в том, что на него не реагируют антивирусы. В отличии от утилиты RDPWrap, которую многие антивирусов считают Malware/HackTool/Trojan. Основной недостаток — вам придется вручную править файл после каждого обновления билда Windows (или при обновлении версии файла termsrv.dll в рамках ежемесячных кумулятивных обновлений).
Встроенная поддержка нескольких RDP сессий в редакции Windows 10 Enterprise Multi-session
Недавно Microsoft выпустило специальные Enterprise редакции Windows multi-session (ранее назывались Windows 10 Enterprise for Remote Sessions и Windows 10 Enterprise for Virtual Desktops).
Редакция Enterprise multi-session доступна как для Windows 10, так и для Windows 11.
Главная особенность этой редакции – она поддерживает множественные одновременные RDP сессии пользователей прямо из коробки. Несмотря на то, что редакцию Windows multi-session разрешено запускать только в виртуальных машинах Azure, вы можете вам установить эту редакцию в on-premises сети и использовать данный компьютер терминальный сервер (хотоя это будет нарушением лицензионной политики Microsoft).
Далее мы покажем, как обновить компьютер с Windows 10 Pro до Windows 10 Enterprise for Virtual Desktop и использовать его для одновременного подключения нескольких пользователей.
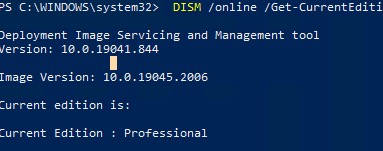
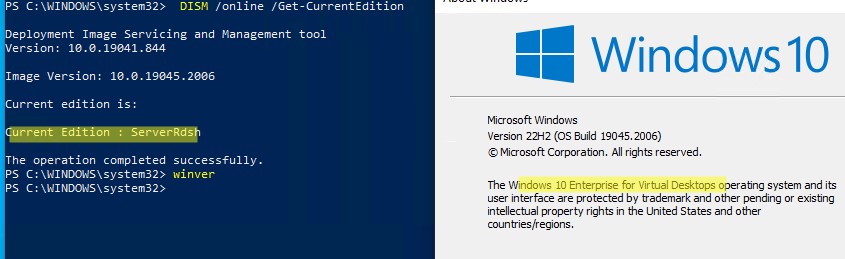
Откройте командную строку и проверьте текущую редакцию Windows (Professional в этом примере):
DISM /online /Get-CurrentEdition
Обновите вашу редакцию Windows с Pro до Enterprise:
Changepk.exe /ProductKey NPPR9-FWDCX-D2C8J-H872K-2YT43
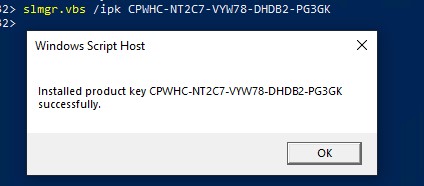
Теперь установить GVLK ключ для Windows 10 Enterprise for Remote Sessions:
slmgr.vbs /ipk CPWHC-NT2C7-VYW78-DHDB2-PG3GK
Проверьте, что теперь ваша редакция Windows 10 изменилась на
ServerRdsh
(Windows 10 Enterprise for Virtual Desktops).
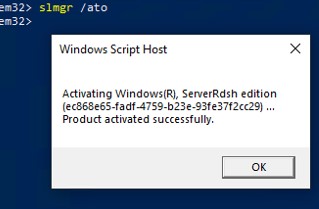
Активируйте вашу копию Windows Enterprise Multi-Session на вашем KMS сервере:
slmgr /skms msk-man02.winitpro.local:1688
slmgr /ato
Откройте редактор локальной GPO
(gpedit.msc
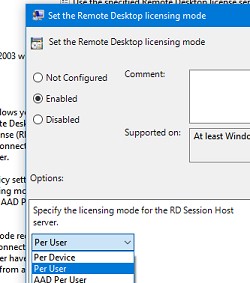
) и включите Per-User режим лицензирования в параметре Set the Remote Desktop licensing mode (Computer Configuration -> Policies -> Administrative Templates -> Windows Components -> Remote Desktop Services -> Remote Desktop Session Host -> Licensing).
После активации нужно перезагрузить Windows. Теперь попробуйте подключиться к компьютеру по RDP под несколькими пользованиями. Как вы видите, Windows 10 Enterprise multi-session одновременные RDP подключения поддерживаются прямо из коробки.
Get-ComputerInfo | select WindowsProductName, WindowsVersion, OsHardwareAbstractionLayer
Windows 10 Enterprise for Virtual Desktops 2009 10.0.19041.2728
qwinsta
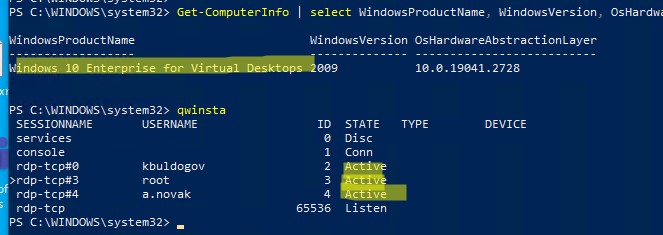
В этой статье мы рассмотрели способы, позволяющие снять ограничение на количество одновременных RDP подключений пользователей, и запустить бесплатный терминальный сервер на клиентской Windows 10 или 11. У каждого из этих способов есть свои преимущества и недостатки. Какой из них использовать — решать вам.

Удаленные пользователи могут подключаться к своим компьютерам с ОС Windows 10 и Windows 11 через службы удаленных рабочих столов (RDP). Достаточно включить RDP в настройках устройства и подключиться к компьютеру с помощью любого клиента удаленного рабочего стола, такого как MSTSC. Но существует ограничение на количество одновременных сеансов RDP – одновременно может работать только один удаленный пользователь. Если вы попытаетесь открыть второй сеанс RDP, появится предупреждение с просьбой отключить сеанс первого пользователя.
Изменения от 04.07.2023 г.
Настройка службы RDP на Windows 10
RDP работает только на Windows 10/11 Pro, в Home версии отключены нужные системные компоненты. Кроме этого, потребуется защитить паролем вашу учетную запись.
Включение доступа и добавление пользователей.
Откройте Пуск и нажмите на шестеренку Параметры.
Откройте раздел с настройкой системы.
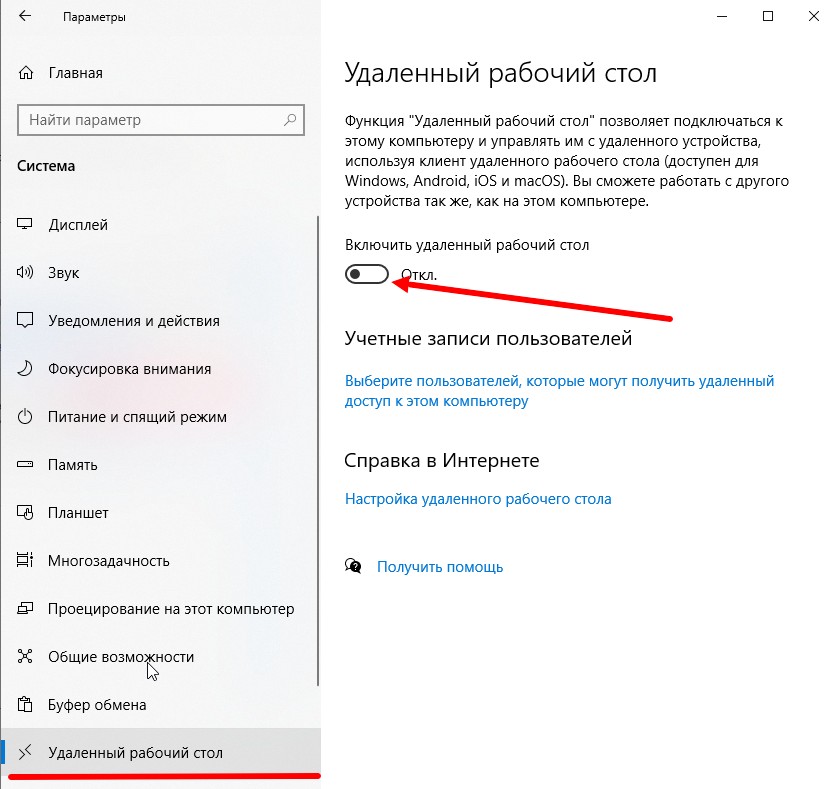
Далее перейдите к настройке удаленного рабочего стола.
Включить удаленный рабочий стол.
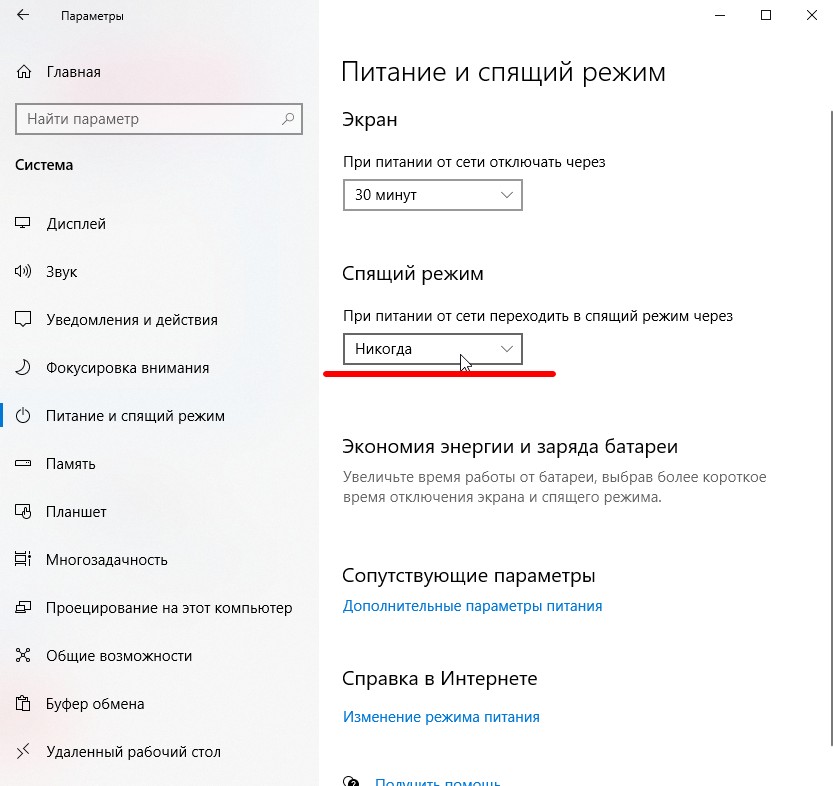
Перейти в настройки электропитания, отключить переход компьютера в спящий режим.
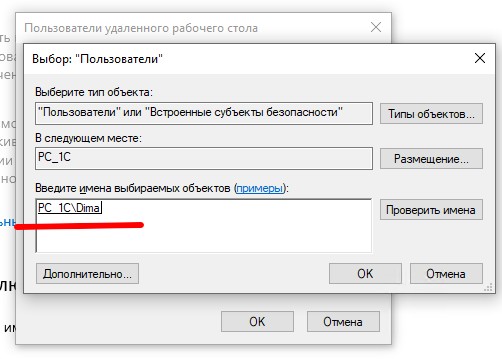
Далее необходимо пользователей, которым будет предоставлен доступ к RDP По умолчанию доступ предоставлен администратору компьютера.
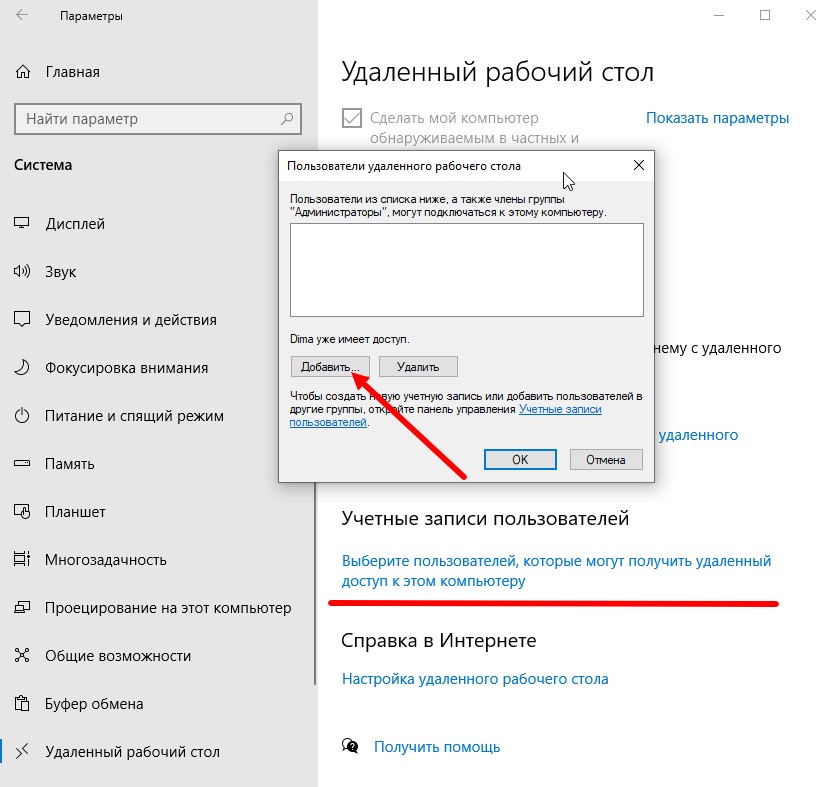
Добавляем еще пользователей.
Если вы попытаетесь открыть второй сеанс RDP, появится предупреждение с просьбой отключить сеанс первого пользователя.

На самом деле, количество одновременных подключений RDP в системе Windows ограничено лицензией, а не каким-либо техническим аспектом. Таким образом, это ограничение не позволяет создать терминальный RDP-сервер на базе компьютера с системой Windows 10/11. Логика компании Microsoft проста, если вам нужен сервер терминалов – купите лицензию Windows Server, RDS CALs, установите и настройте роль сервера сеансов удаленного рабочего стола.
Но технически, любая версия Windows, с достаточным объемом оперативной памяти может поддерживать одновременную работу нескольких удаленных пользователей. В среднем, для одного сеанса пользователя, требуется около 200 МБ оперативной памяти (без учета запущенных приложений). Т.е. максимальное количество одновременных сеансов RDP теоретически ограничено только компьютерными ресурсами.
Рассмотрим два способа разрешить одновременные RDP-подключения в Windows 10/11:
- с помощью RDP Wrapper
- исправления библиотеки termsrv.dll
RDP Wrapper
Проект RDP Wrapper – ПО с открытым исходным кодом, позволяет включить несколько сеансов RDP в Windows 10 без замены файла termsrv.dll. Этот инструмент работает как связующее звено между SCM (Service Control Manager) и службами удаленного рабочего стола. RDPWrap позволяет включить не только поддержку нескольких одновременных RDP-подключений, но и создать RDP-сервер в Windows Home. RDP Wrapper не вносит никаких изменений в termsrv.dll файл, это просто загрузка библиотеки termsrv с измененными параметрами.
Таким образом, RDPWrap будет работать даже в случае изменения файла termsrv.dll. Это позволяет не бояться обновлений Windows.
Вы можете загрузить RDP Wrapper из репозитория GitHub https://github.com/binarymaster/rdpwrap/releases (последняя доступная версия библиотеки RDP-оболочки — v1.6.2).
В RDPWrap-v1.6.2.zip содержит несколько файлов:
- RDPWinst.exe — библиотека-оболочка RDP для установки/удаления программы
- RDPConf.exe — инструмент настройки оболочки RDP
- RDPCheck.exe — утилита проверки RDP (Local RDP Checker)
- Install.bat, uninstall.bat, update.bat — пакетные файлы для установки, удаления и обновления оболочки RDP
Для установки оболочки необходимо запустить файл Install.bat с правами администратора.
RDPWrap не работает в Windows 10
После завершения установки запустите RDPConfig.exe . Скорее всего, сразу после установки инструмент покажет, что оболочка RDP запущена (установлена, запущена), но не работает. Обратите внимание на красное предупреждение [not supported]. В нем сообщается, что эта версия Windows 10 (версия 10.0.19041.1387) не поддерживается оболочкой RDP.
Дело в том, что для каждой версии Windows 10/11 должно быть описание в конфигурационном файле rdpwrap.ini. В текущем конфигурационном файле просто нет никаких настроек для вашей сборки Windows.
Текущую версию файла rdpwrap.ini можно загрузить здесь: https://raw.githubusercontent.com/sebaxakerhtc/rdpwrap.ini/master/rdpwrap.ini
Во всех источниках в интернете находятся советы, что необходимо скопировать новый файл rdpwrap.ini в “C:\Program Файл Files\RDP Wrapper\rdpwrap.ini” и перезапустить службу TermService. Но у меня это ни разу не получилось, ввиду того, что при перезапуске службы, оригинальный файл rdpwrap.ini восстанавливался на место нового.
Немного поискав решение этой проблемы, наткнулся на файл автоматического обновления rdpwrap.ini:
- С сайта GitHub
- С нашего сайта
Необходимо скопировать файлы RDPWinst.exe, RDPConf.exe, RDPCheck.exe и autoupdate.bat в каталог C:\Program Файл Files\RDP Wrapper\ и запустить autoupdate.bat.
После завершения установки запустите RDPConfig.exe

Все работает!
Обновление Параметров Групповой политики
Количество подключений к компьютеру может быть ограничено правилами групповой политики.
В этом случае вы можете использовать редактор локальной групповой политики (gpedit.msc), чтобы включить политику “Ограничить количество подключений” в разделе Конфигурация компьютера -> Административные шаблоны -> Компоненты Windows -> Службы удаленных рабочих столов -> Узел сеансов удаленных рабочих столов -> Подключения –> Ограничить количество подключений.
Измените его значение на 999999.
Модификация Termsrv.dll
Второй, более трудозатратный метод – изменение файла Termsrv.dll.
для этого нужно сделать копию файла, затем нужно стать владельцем файла.
Для начала, остановите службу удаленного рабочего стола (TermService) из командной строки:
Net stop TermService
Чтобы изменить владельца файла с TrustedInstaller на локальную группу администраторов нужно выполнить команду:
takeown /F c:\Windows\System32\termsrv.dll /A
Теперь предоставьте локальной группе администраторов разрешения на полный контроль над termsrv.dll файл с использованием icacls.exe:
icacls c:\Windows\System32\termsrv.dll /grant Администраторы:F
Затем откройте termsrv.dll файл с использованием любого шестнадцатеричного редактора (например, WinHex). В зависимости от вашей сборки Windows вам необходимо найти и заменить строку в соответствии с приведенной ниже таблицей:
| Версия Windows | Строка поиска |
|
Windows 11 RTM (21H2 – 22000.258) |
39 81 3C 06 00 00 0F 84 4F 68 01 00 |
|
Windows 10 x64 22H2 19045.2486 |
39 81 3C 06 00 00 0F 84 DB 61 01 00 |
|
Windows 10 x64 21H2 |
39 81 3C 06 00 00 0F 84 85 45 01 00 |
|
Windows 10 x64 21H1 |
39 81 3C 06 00 00 0F 84 2B 5F 01 00 |
|
Windows 10 x64 20H2 |
39 81 3C 06 00 00 0F 84 21 68 01 00 |
|
Windows 10 x64 2004 |
39 81 3C 06 00 00 0F 84 D9 51 01 00 |
|
Windows 10 x64 1909 |
39 81 3C 06 00 00 0F 84 5D 61 01 00 |
|
Windows 10 x64 1903 |
39 81 3C 06 00 00 0F 84 5D 61 01 00 |
|
Windows 10 x64 1809 |
39 81 3C 06 00 00 0F 84 3B 2B 01 00 |
|
Windows 10 x64 1803 |
8B 99 3C 06 00 00 8B B9 38 06 00 00 |
|
Windows 10 x64 1709 |
39 81 3C 06 00 00 0F 84 B1 7D 02 00 |
Строка замены
B8 00 01 00 00 89 81 38 06 00 00 90
Данную таблицу я нашел на просторах интернета. Проверка данного метода в полевых условиях привела к тому, что я не нашел данную последовательность в своем файле termsrv.dll.
Но если понять суть, то все решается достаточно легко. Необходимо искать последовательность: 39 81 3C 06 00 00 0F 84, последние 4 байта не особо важны.
Я нашел последовательность 39 81 3C 06 00 00 0F 84 73 55 01 00
Замена на
B8 00 01 00 00 89 81 38 06 00 00 90
Обновление от 27.01.2023 г.
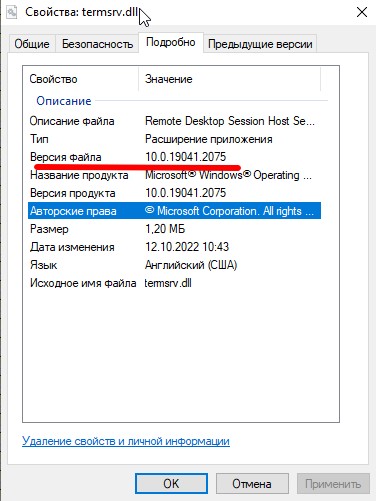
Вышло новое обновление Windows 10 22H2 версия сборки: 19045.2486 и 19045.2604
Версия файла termsrv.dll: 10.0.19041.2075
Открываем файл в WinHex, находим исходную последовательность: 39 81 3C 06 00 00 0F 84 85 45 01 00.
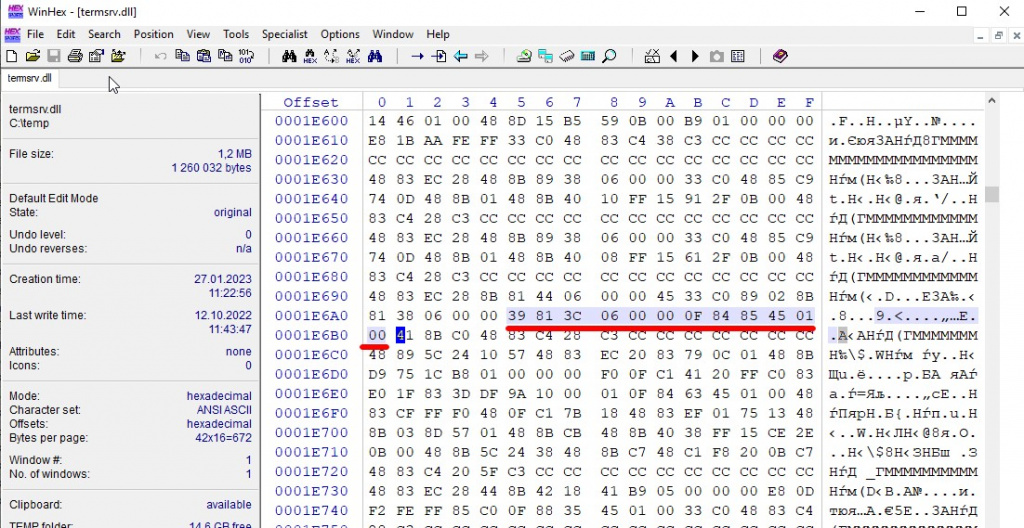
Меняем на строку замены.
Обновление от 04.07.2023 г.
Скачать измененный файл termsrv.dll для конкретной версии Windows 10 можно в данной таблице.
| Версия Windows | Скачать termsrv.dll |
|
Windows 10 x64 22H2 сборка 19045.2486 и 19045.2604 |
termsrv.dll |
|
Windows 10 x64 22H2 сборка 19045.3086 |
termsrv.dll |
Сохраните модифицированный файл и запустите службу TermService.
Если что-то пойдет не так, остановите службу и замените измененный termsrv.dll файл с оригинальной версией.
В моем случае модификация файла помогла включить несколько сеансов RDP.
Преимущество метода включения нескольких сеансов RDP в Windows 10 или 11 путем замены termsrv.dll файл заключается в том, что антивирусы на него не реагируют, в отличие от RDPWrap, который обнаруживается многими антивирусами как вредоносное ПО.
Основным недостатком является то, что вам придется вручную редактировать termsrv.dll файл при каждом обновлении сборки Windows 10/11. И если вы используете RDPWrap, вам также потребуется обновить файл rdpwrap.ini после установки обновлений Windows.
Терминальный сервер Windows 10
Как и во всех пользовательских версиях Windows, в Windows 10 присутствует ограничение на одновременное подключение нескольких пользователей по RDP (через удаленный рабочий стол). То есть, если один пользователь уже вошел в систему (не важно – через RDP или непосредственно сидя за компьютером), то никто другой уже подключиться не может. Как настроить удаленный рабочий стол Windows и как убрать ограничение на количество одновременных сессии RDP на Windows 7, было рассмотрено ранее. Теперь опишем способ, как открыть возможность одновременного подключения нескольких пользователей в Windows 10.
Напоминаю, что возможность открытия удаленного подключения к компьютеру по RDP есть только у версий Windows 10 Pro и Windows 10 Enterprise. Владельцы Windows 10 Home со своих машин могут подключаться к другим компьютерам по RDP, но организовать подключение к своему компьютеру через удаленный рабочий стол у них возможности нет.
Также напоминаю, что данное ограничение носит исключительно лицензионный характер. Действия, описанные в статье, возможно, могут быть расценены как нарушение лицензионного соглашения Windows.
Итак, чтобы снять ограничение на несколько сессий RDP в Windows 10, как и в Windows 7 необходимо было внести изменения в системный файл termsrv.dll. Однако данная процедура на Windows 10 осуществляется вручную, весьма трудоемка и длительна. Кроме того, при каждом обновлении Windows процедуру придется повторять. Поэтому в данной статье мы не будем рассматривать метод исправления файла termsrv.dll вручную, а рассмотрим использование программы RDP Wrapper Library.
RDP Wrapper Library для снятия ограничения на несколько одновременных сессий RDP в Windows 10
RDP Wrapper Library не вносит никаких физических изменений в файл termsrv.dll, а работает как своеобразная прослойка между службами. RDP Wrapper Library подгружает файл termsrv.dll с нужными параметрами, не затрагивая исходник.
Таким образом, даже при обновлении Windows 10 ограничение на количество одновременных сеансов RDP не будет восстанавливаться по умолчанию.
Внимание! Корректная работа RDP Wrapper Library не гарантируется, если используется уже пропатченный (не оригинальный) файл termsrv.dll.
Итак, приступим.
Внимание! Чтобы установить RDP Wrapper Library ваша учетная запись должна обладать правами администратора.
1. Скачиваем RDP Wrapper Library
Файлы находятся в архиве, воспользуемся архиватором. Пароль на архив: 123.
Пара слов о содержимом архива:
RDPWInst.exe – запуск установки или удаления RDP Wrapper Library
RDPConf.exe – приложение для настройки
RDPCheck.exe – приложение для проверки работы RDP
install.bat, update.bat, uninstall.bat – пакетные файлы запуска установки, обновления и удаления RDP Wrapper Library
2. Для установки RDP Wrapper Library запускаем файл install.bat под правами администратора (правой кнопкой мыши на файл и Запуск от имени администратора)
Откроется окно с командной строкой. Дожидаемся окончания установки.

3. По окончании установки запускаем файл RDPConf.exe – приложение настроек и проверки состояния
4. Необходимо убедиться, что все сообщения подсвечены зеленым.

Если у вас все, как на картинке, то поздравляю! Ваш терминальный сервер на Windows 10 готов! Можно подключаться по RDP без ограничений.
Примечание. Если одна из строк в RDPConf.exe у вас горит красным (или стала гореть после обновления Windows), как на картинке ниже, то:
1. проверьте подключение к Интернет
2. запустите пакетный файл update.bat (все есть в архиве с программой)
Снова откройте RDPConf.exe. Все должно гореть зеленым.

RDP Wrapper Library поддерживает работу на ОС Windows 7, Windows 8, Windows 8.1, Windows 10.
На этом все, всем удачи!
Оцените статью. Вам не сложно, а автору приятно
How to allow multiple Remote Desktop Connections in Windows 10 or Windows 11


Can multiple users remote desktop at the same time? This article will uncover the answer.
NOTE: Our original article targeted Windows 10 users who need to implement multiple remote desktop connections. Fortunately, the information we offer here will also work with Windows 11, the newest version of the popular operating system. Read on to learn how to get around the limitations of remote desktop on a Windows system.
Understanding Remote Desktop Connection Limitations on Windows 10/11
For users operating Windows 10 Pro and Enterprise editions (Home edition is not compatible), they are able to set up the remote desktop connections in Windows 10 via the Remote Desktop Protocol (RDP) Services. However, multiple remote desktop connections aren’t possible meaning that only one remote session can run at a time.
If an additional user attempts to run a second RDP session, they’ll receive a pop-up warning telling to disconnect the first/previous user session to proceed.
See the exact message below:
“Another user is signed in. If you continue, they’ll be disconnected. Do you want to sign in anyway?”
Now we’ll cover the Most critical limitations of Remote Desktop Service on Windows 10 (as well as any previous versions).
- Remote Desktop Protocol is only supported by specific Windows editions (Pro and Enterprise.) Alternatively, Windows Home users cannot receive incoming remote desktop connections (and this can only be solved via the RDP Wrapper Library).
- Only a single RDP session/connection is allowed at a time, and if a secondary user tries to run an additional session, they’ll either be prompted to cancel their connection or proceed and automatically close the other connection already in use.
- If users work on a local computer console, newly created RDP connections will terminate the console session (RDP sessions can also be forcibly ended if users attempt to log in locally).
In all actuality, the Windows 10 multiple remote desktop sessions limitations are restricted per license and have nothing to do with technical limitations.
Thus, the user volume restrictions don’t permit users to create terminal RDP servers based on a single workstation that could be used by multiple individuals.
Microsoft’s policy towards multiple remote desktop sessions is clear: if users want a Remote Desktop server, then they should purchase a Windows Server license, RDS CALs, and then install and configure the role of the Remote Desktop Session Host (RDSH).
From a technical perspective, any version of Windows running enough RAM can enable concurrent remote desktop sessions for multiple users. An average of 150-200 MB of memory is needed per user session (without accounting for any apps launched during the session).
Quite frankly, the only limitations surrounding remote desktop multiple users capabilities, in theory, are based entirely on computer resources.
Now it’s time to review two methods for Windows 10 to allow multiple remote desktop connections. This is done via the RDP Wrapper app, and by editing the “termsrv.dll” file.
Please Note. System modifications described in this article are considered a violation of the Microsoft License Agreement, and with all the consequences that come with it. Perform them at your own risk.
How To Set Up Multiple Remote Desktop Connections
One option to enable remote desktop for multiple users on Windows 10 is by using the RDP Wrapper Library. The RDP Wrapper project permits users to support more than one simultaneous RDP session on Windows 10 (without replacing the termsrv.dll file).
RDP Wrapper acts as a layer between the Remote Desktop Service, and Service Control Manager (SCM). RDPWrap lets users enable support for multiple simultaneous RDP sessions, as well as enabling support of RDP Hosts on previously inaccessible Windows 10 versions, like Home.
This app doesn’t alter the termsrv.dll file, only loading the “termsrv” library with the altered parameters necessary for simultaneous connection. Meaning, RDPWrap will even work if the termsrv.dll file updates, meaning that users don’t have to dread Windows updates.
Please note: Prior to the installation of the RDP Wrapper library, users must ensure they’re using the original (unpatched) version of the “termsrv.dll” file. If they don’t use the unpatched file, the app may not function properly or won’t function at all.
Users can download RDP Wrapper from the GitHub Repository (v1.6.2 is the latest available version of RDP Wrapper Library).
According to the information on the developer page, all versions of Windows are supported (Windows 10 support is available up to the 1809 build).
Users will find the following files contained within the RDPWrap-v1.6.2.zip archive:
- • RDPWinst.exe (RDP Wrapper Library installation/uninstallation program).
- • RDPConf.exe (RDP Wrapper configuration utility).
- • RDPCheck.exe (Local RDP Checker, RDP check utility).
- • install.bat, uninstall.bat, update.bat (batch files for install, uninstall, and updates for RDP Wrapper).

How to use RDP Wrapper to enabling multiple RDP Sessions in Windows 10
- Run the install.bat with the Administrator privileges to install RDPWrap. RDP Wrap will be installed in the C:\Program Files\RDP Wrapper directory.You should see the “RDP Library installation completed successfully” notification.

- Once installation is complete, users should run the RDPConfig.exe.Check that all elements in the Diagnostics pane are green. To double-check the installation process, launch the RDPCheck.exe. It should show the RDP status as [supported]. You’ll also see the maximum amount of allowed concurrent connections.
- In the “Diagnostics” section, ensure all elements are green (see below).

- Run the RDPCheck.exe, then attempt to start a secondary RDP session (or connect multiple RDP sessions from remote computers).


How to fix RDP Wrapper not working
Sometimes, you may see a notification saying that the app is running but not working. It’s a common situation, so there is no reason for panic. It means that you have an unsupported Windows version (ver. 10.0.19041.1320) or you didn’t correctly set up the RDPwrap correctly.
To resolve the issue, use this instruction:
-
Check that you’ve downloaded the RDWrap version suitable for your Windows version.
-
Ensure that your RDPWrap configuration file matches the version of termsv.dll in your Windows folder. If it’s not, download a suitable RDPWRAP.ini file.
-
If you have recently updated your system and it changed the termsrv.dll file to a new one, you have two options. You can find online a termsrv.dll file that supports the current RDWrap version, or you can download the RDPWRAP.ini that matches your current system version.
-
Restart your PC to implement those changes. Run the RDPconfig.exe to check if it helps. You should see the [fully supported] caption.
Those who’ve decided to install the most current version should look for the file on the GitHub or install the RDPWRAP.ini manually. You can copy the content of the file to C:\Program Files\RDP Wrapper\rdpwrap.ini. Or you can use the PowerShell cmdlet Invoke-WebRequest, but make sure to stop the Remote Desktop service first. Paste this command to the PowerShell, so your computer installs this file for you:
Stop-Service termservice -Force

Invoke-WebRequest

https://raw.githubusercontent.com/sebaxakerhtc/rdpwrap.ini/master/rdpwrap.ini -outfile

"C:\Program Files\RDP Wrapper\rdpwrap.ini
Note: third-party remote software may interfere with the RDP Wrapper app, so you may see the error notification even when everything is OK with your hardware and system.
That’s it! Now the Windows 10 machine should permit multiple users to access different RDP sessions simultaneously.
All Windows editions (Windows 7, Windows 8.1, and Windows 10) are supported by the RDPWrap utility. Meaning that users can establish a terminal (RDS) server on any desktop instance of Windows.
Additional noteworthy RDP Wrapper features:
- • The “Hide users on logon screen” option allows administrators to conceal user lists from the Windows Logon Screen.
- • If users disable the “Single session per user” option, more than one simultaneous RDP session will work under the same user account (the registry parameter “fSingleSessionPerUser = 0” is set under the key “HKLM\SYSTEM\ CurrentControlSet\Control\Terminal Server\fSingleSessionPerUser”).
- • Users can edit the Remote Desktop port number from 3389 to a different number of their choosing.
- • The “Session Shadowing Mode” section lets users reconfigure the remote control (shadow) connection permissions to Windows 10 RDP sessions.
Modifying Termsrv.dll File to Allow Multiple RDP Session
To disable restrictions on the number of concurrent RDP user connections in Windows 10 without RDP Wrapper, users can replace the original “termsrv.dll” file (this is the library file utilized by Remote Desktop Service).
The “termsrv.dll” file can be found in the C:\Windows\System32 directory.
Please note: Prior to editing or replacing the “termsrv.dll” file, we recommend creating a backup copy as a precaution. That way, if anything doesn’t work out how you planned, it will be easy to revert back to the original file configuration.
copy c:\Windows\System32\termsrv.dll termsrv.dll_backup
Before a user can alter the “termsrv.dll” file, they must become its owner, and give the Administrators group permission to it.
Using the Command Prompt is the simplest way to achieve this. Change the file owner from “TrustedInstaller” to a local administrators group using the command shown below:
takeown /F c:\Windows\System32\termsrv.dll /A
Users should now grant the local administrators group “Full Control” permission on the “termsrv.dll” file:
icacls c:\Windows\System32\termsrv.dll /grant Administrators:F
From there, end the Remote Desktop Service (TermService) via the services.msc console (as shown below) or from the Command Prompt:
Net stop TermService

Open the “termsrv.dll” file using any HEX editor. Dending on the Windows 10 build installed on the machine, users will need to locate and replace the line
39 81 3C 06 00 00 0F 84 XX XX XX XX
and replace it with
B8 00 01 00 00 89 81 38 06 00 00 90
The final 4 pairs are unique to each version of Windows, so remember to replace the entire 12 pairs with the whole string.
Run TermService after saving the edited file.
If anything went wrong, and/or users encounter issues with Remote Desktop service, end the service and replace the modified “termsrv.dll” file with the original version of the file:
copy termsrv.dll_backup c:\Windows\System32\termsrv.dll
The advantage of the method of enabling multiple RDP sessions in Windows 10 by replacing the termsrv.dll file is that antiviruses do not respond on it (unlike the RDPWrap, which is detected by many antiviruses as a Malware/HackTool/Trojan).
The main drawback is that you will have to manually edit the termsrv.dll file each time you upgrade the Windows 10 build (or when updating the version of the termsrv.dll file during the installation of monthly cumulative updates).
Final thoughts on both methods for enabling multiple remote desktop sessions
The advantage of enabling multiple RDP sessions in Windows 10 by replacing the “termsrv.dll” file is that antiviruses don’t respond to it (whereas RDPWrap is treated like a Malware/HackTool/Trojan by many antivirus software).
The most notable disadvantage when using the “termsrv.dll” file method, is that users must manually edit the “termsrv.dll” file each and every time they upgrade their Windows 10 build.
They also need to re-edit the file when updating the version of the termsrv.dll file during monthly cumulative update installations.
If you frequently access a remote Windows computer and get logged off because your colleague has logged on, and was unaware that you were logged on as well, then this article is for you.
By default, the Windows operating system only allows one RDP connection at a time. If another connection was made from another PC on the network, regardless if they use a different user account to sign in, you will be automatically logged off, and will get either one of the following prompts:
"You have been disconnected because another conenction was made to the remote computer"

Do you want to allow <computername/username> to connect to this machine? Click OK to disconnect your session immediately or click Cancel to stay conencted. No action will disconnect your session in 30 seconds.

Either way, both would not be allowed to be logged in on a remote PC simultaneously.
In this article, we address the issue of simultaneous RDP connections and how you can allow a client Windows PC (Windows 10 or 11) to have 2 or more RDP connections at the same time. This will increase your team’s productivity and save valuable time.
Before we begin, we would like to point out a few things.
Critical Considerations
Number one is that Microsoft wants you to use a Windows Server license instead of a Windows client license if you want to allow multiple RDP connections. This leads us to believe that the Windows OS does not technically lack any ability to be able to handle multiple RDP connections. Technically, it all comes down to the available system resources.
A typical RDP connection only requires 150-200 MBs of RAM per RDP session. If your system has the available RAM, you can allow multiple remote sessions using either one of the following methods stated below.
Secondly, we came across several websites that give a method to allow multiple RDP connections using the Group Policy editor by reconfiguring the “Restrict Remote Desktop Services user to a single Remote Desktop Services session” policy. Note that this method only works on Windows Servers.
Hence, do not waste your time editing the Group Policy, as we have already tested it out for you.
Thirdly, only the Professional and Enterprise Windows editions support RDP connections. If you have a Windows Home edition, then learn how to enable RDP or use the first method (RDPWrapper) to allow multi-user remote connection.
That being said, there is no native, straightforward method to allow multiple RDP connections on a client Windows PC. You either need to use a third-party utility or manipulate critical Windows files to enable multi-user RDP connection. Therefore, it is advised that you create a system restore point before proceeding forward with any of the two methods.
Enable Multiple RDP User Connections using RDPWrap
RDPWrap is an open-source project available on GitHub. RDPWrap enables support for numerous concurrent RDP sessions as well as RDP Hosts on previously inaccessible Windows editions, like Home.
Follow the steps below precisely as given to allow multiple RDP connections on the computer.
Note: All of the steps given below are to be performed on the remote (target) computer.
-
Download “RDPWInst.zip” from GitHub.
Note: If you are using Google Chrome to download the file, it will be flagged as malicious and blocked from downloading. Learn how to stop Chrome from blocking downloads.
-
Extract the contents of the zipped file.

Extract RDPWrap Right-click on the zipped file and click “Extract All” from the context menu. Then click “Extract” on the extraction wizard to finish the extraction.
-
Run “install.exe” with administrative privileges.
Run “install.exe” as administrator Right-click the “install.exe” file and then click “Run as administrator” from the context menu.
RDPWrap will now begin installation in a command window.
-
Press any key to continue the installation.
Press any key to finalize the installation -
Now run the “RDPConf.exe” file.
Run RDPConf.exe The RDP Wrapper Configuration window will now open.
-
Check that all elements in the Diagnostics section are green.
Ensure all elements are green Note that it states [Not Supported] in front of “Listener state” on the right. This is because the version of Windows would not be supported. To make RDPWrap support your OS version, you must replace the “rdpwrap.ini” file using the next few steps given below, which is located at “C:\Program Files\RDP Wrapper.”
-
Run an elevated PowerShell instance.
-
Run the following cmdlet:
Stop-Service termservice -Force
Stop RDP service from PowerShell This will temporarily stop the Remote Desktop service.
-
Now run the following cmdlet to replace the rdpwrap.ini file:
Invoke-WebRequest https://raw.githubusercontent.com/sebaxakerhtc/rdpwrap.ini/master/rdpwrap.ini -outfile "C:\Program Files\RDP Wrapper\rdpwrap.ini"Replace the rdpwrap.ini file -
Restart the computer.
-
Run the “RDPConf.exe” file again to confirm that the status has changed from [Not Supported] to [Fully Supported].

RDPWrap is fully supported


That’s it! You should now be able to connect to the remote PC with multiple simultaneous connections using any RDP tool, like MSTSC, Microsoft RDP, rdcman, etc. However, you can only sign in using different local user accounts.
If you sign in with the same user account, the RDC connection using the account prior will be automatically disconnected.
Enable Multiple RDP User Connections by Modifying Termsrv.dll
If you do not wish to use RDPWrap, then you can modify the Termsrv.dll file to allow multiple RDP connections at the same time. This is the library the Remote Connection Protocol uses to establish a connection and is located at “C:\Windows\System32.”
Let us remind you to create a system restore point before proceeding, so you can revert your settings if things do not go as planned.
Alternatively, we have also given steps to back up only the Termsrv.dll in the steps below so it can be replaced when needed.
Perform the following steps to modify the Termsrv.dll library and allow multiple RDP connections:
Note: All of the steps given below are to be performed on the remote (target) computer.
-
Launch an elevated Command Prompt.
-
Make a copy of the Termsrv.dll file by running this cmdlet:
copy c:\Windows\System32\termsrv.dll termsrv.dll_backupBackup termsrv.dll -
Take ownership of the original file by running the following command:
takeown /F c:\Windows\System32\termsrv.dll /ATake ownership of Termsrv.dll -
Grant the local Administrator group full control of the library by running this cmdlet:
icacls c:\Windows\System32\termsrv.dll /grant Administrators:FGrant the Administrator group full control of Termsrv.dll -
Now stop the Remote Desktop service by running this cmdlet:
Net stop TermServiceAlso, enter “Y” when asked for confirmation.
Stop the RDP service -
Determine and note down your OS version by typing in “winver” in the Run Command box.

Find your OS version This will be needed later.
-
Now open the termsrv.dll file (C:\Windows\System32\termsrv.dll) using a Hex editor.
You can download any hex editor online.
-
Search for the following string according to your OS version (determined in step 6 above) given in the table below and replace it with the following:
B8 00 01 00 00 89 81 38 06 00 00 90
Windows build String to replace Windows 11 22H2 39 81 3C 06 00 00 0F 84 75 7A 01 00 Windows 11 RTM (21H2 – 22000.258) 39 81 3C 06 00 00 0F 84 4F 68 01 00 Windows 10 x64 21H2 39 81 3C 06 00 00 0F 84 DB 61 01 00 Windows 10 x64 21H1 39 81 3C 06 00 00 0F 84 2B 5F 01 00 Windows 10 x64 20H2 39 81 3C 06 00 00 0F 84 21 68 01 00 Windows 10 x64 2004 39 81 3C 06 00 00 0F 84 D9 51 01 00 Windows 10 x64 1909 39 81 3C 06 00 00 0F 84 5D 61 01 00 Windows 10 x64 1903 39 81 3C 06 00 00 0F 84 5D 61 01 00 Windows 10 x64 1809 39 81 3C 06 00 00 0F 84 3B 2B 01 00 Windows 10 x64 1803 8B 99 3C 06 00 00 8B B9 38 06 00 00 Windows 10 x64 1709 39 81 3C 06 00 00 0F 84 B1 7D 02 00 Windows versions and corresponding hex string to replace Find and replace hex values in Termsrv.ini -
Make the changes and save the Termsrv.dll file.
Save the modified Termrv.dll file -
If prompted for confirmation or UAC, click Yes.
-
Close the hex editor.


You should now be able to connect multiple RDP sessions to the remote PC after modifying the Termsrv.dll file.
If things didn’t go as planned, you can restore the original Termsrv.dll file by running the following cmdlet in Command Prompt using the backup we had created in step 2 above:
copy termsrv.dll_backup c:\Windows\System32\termsrv.dllConclusion
Having the ability to have multiple RDP connections simultaneously on a Windows PC can result in a significant increase in productivity. Now, you and your team members can work on a client Windows PC at the same time, without having to wait on one another.
That said, the methods given in this post are tried-and-tested and you can perform them word-for-word on your Windows PC to allow simultaneous RDP sessions. However, even though the methods work, we advise you to create system backups just in case.