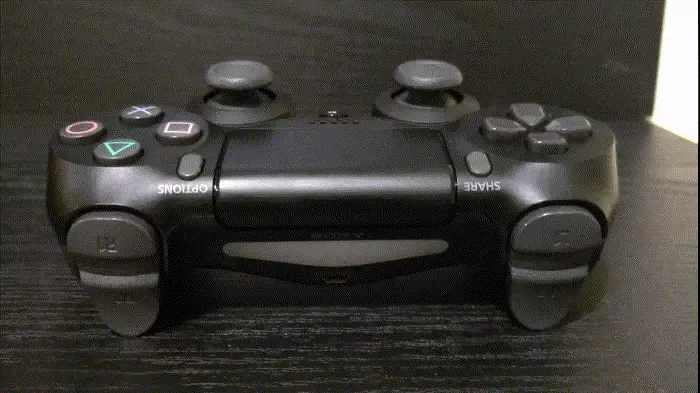
Use DUALSHOCK®4 wireless controllers with other devices
If you’d like to use your DUALSHOCK®4 wireless controller with compatible games and applications away from your console, you can connect via Bluetooth® or USB in a few steps.
- Supported connections
- Bluetooth pairing
- USB connection
- Compatible games
- Reconnect with PS4 console
- Having issues?
DUALSHOCK 4 wireless controller compatible devices
Devices using the operating systems listed below or later support DUALSHOCK 4 wireless controller Bluetooth and USB connections. Once connected, you can use your wireless controller to control compatible games and applications.
- Android™ 10
- iOS 13
- iPadOS 13
- macOS Catalina
- tvOS 13
How to pair a DUALSHOCK 4 wireless controller with a supported device
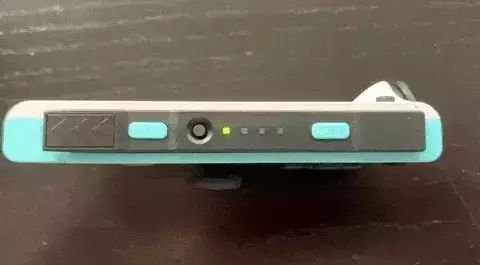
To pair your wireless controller with a supported device using Bluetooth for the first time, turn on pairing mode.
-
Make sure the player indicator on the controller is off.
If the player indicator is on, press and hold the PS button until it turns off. If a USB is connected to the controller, disconnect it. -
While pressing and holding the SHARE button, press and hold the PS Button until the light bar flashes.
-
Enable Bluetooth on your device, and then select the controller from the list of Bluetooth devices. When pairing is complete, the light bar blinks, and then the player indicator lights up.
DUALSHOCK 4 wireless controller compatible games and applications
You can use your wireless controller to play games streamed from your PS5™ console or PS4™ console to your compatible device using the PS Remote Play app.
Your wireless controller can also be used to play games that support DUALSHOCK 4 wireless controllers.
Bluetooth limitations
If you are connecting a DUALSHOCK 4 wireless controller to a compatible Sony Xperia device, all functions are available.
For other devices, some wireless controller features are not available when connected via Bluetooth.
- Touchpad is not supported.
- The color of the light bar cannot be changed.
- Rumble, motion sensor, and headphone jack audio connection are not supported.
Reconnect DUALSHOCK 4 wireless controller to your console
To reconnect your wireless controller to your PS5 console or PS4 console, connect it with a compatible USB cable and press the PS button on the wireless controller. You can then remove the USB cable and use the controller wirelessly.
Need more help with your DUALSHOCK 4 wireless controller?
If you have followed the above instructions but believe your controller is not connecting properly, please visit the PlayStation Repairs diagnostic tool.
▲
Как подключить геймпад от PS4 к PC?
Когда Sony впервые объявила о том, что джойстик DualShock 4 будет совместим с ОС Windows, геймеры по всему Интернету приветствовали это известие. К сожалению, просто подключить его к компьютеру и начать играть не всегда получится. Хотя контроллер PS4 распознаётся Windows, существующие игры могут глючить или вовсе не работают с ним автоматически.
Содержание
- Как подключить геймпад от PS4 к PC?
- Как заставить геймпад работать правильно?
-
1) Драйверы Dualshock 4 для компьютера
- После установки — настройка
-
2) Использование джойстика с помощью прграммы Xpadder
- Где скачать Xpadder?
Windows поддерживает использование геймпад PS4 для PC, но так как у Microsoft есть своя консоль, то официально они поддерживают лишь свои контроллеры, а дуалшокерам придётся немного потанцевать с бубном.
Что нужно для подключения?
- Собственно сам контроллер.
- Стандартный USB кабель.
После подключения геймпада — он будет распознан системой и вы возможно даже сможете его использовать в некоторых приложениях и играх (например Steam и некоторые игрушки).
Если просто подключить девайс к компу, то набор некоторых функций джойстика работать не будет, таких как:
- сенсорная панель (но работает как кнопка),
- гироскоп,
- вибрация,
- встроенный микрофон и динамик,
- разъем для гарнитуры.
▲
Как заставить геймпад работать правильно?
Здесь у Вас есть только один вариант — использовать специальный софт, а именно:
- драйверы;
- эмулятор джойстика (Xpadder).
Стоит понимать, что использовать при подключении джойстика PS4 для PC нужно лишь один из двух вариантов, какой именно — решать Вам. Давайте обо всём по порядку.

▲
1) Драйверы Dualshock 4 для компьютера
В большинстве случаев, используя современную операционную систему, например Windows 10 или 11, драйверы не потребуются и джойстик будет распознан автоматически.
Однако, это не всегда может быть так гладко, и для таких случаев, когда геймпад не будет распознан или будет распознан с ошибками, можно установить специализированный драйвер.
С большой долей вероятности Вам нужна 64-разрядная версия драйвера:
Если у Вас установлена 32-битная версия Windows, на которой менее 4 ГБ оперативной памяти, то скачивайте вот эту версию:
Так же можете посетить официальную страницу разработчика на Github, где новые версии могут появиться раньше, чем у нас — https://github.com/Ryochan7/DS4Windows/releases
Что делает этот драйвер: он эмулирует контроллер от Xbox, при этом сохраняются все функции контроллера от PlayStation.
Системные требования и компоненты для установки драйвера (проверьте, всё ли есть из списка):
- Windows 10.
- Microsoft .NET 6.0 Runtime Desktop x64 или x86.
- Visual C++ 2015-2019 Redistributable x64 или x86.
- Драйвер ViGEmBus (DS4Windows установит его автоматически, если его нет).
- DualShok 4.
Перед установкой:
- Закройте все приложения и игры, которые могут использовать контроллер.
- Отключите PlayStation Configuration Support и Xbox Configuration Support в Steam.
Если вы до этого ставили драйвер для Dualshock 3 — его следует удалить. Если вы хотите использовать геймпад через Bluetooth, то необходимо уставновить соответствующие драйверы и для него.
После установки — настройка
После того, как установка будет закончена, подключите DualShock 4 к компьютеру через USB или Bluetooth. Имейте в виду, USB является гораздо более надежным выбором, поскольку некоторые чипсеты Bluetooth не поддерживаются этим программным обеспечением. Контроллер распознаётся в приложении и в большинстве случаев функционирует идентично девайсу от Xbox 360. Тем не менее, некоторые игры имеют проблемы совместимости, так что может потребоваться установить флажок «Скрыть DS4 Controller».
Нажав на кнопку «Настройки», можете открыть окно с несколькими ползунками. Здесь можно изменить цвет и интенсивность световой панели DS4, переключить её на индикатор батареи, настроить вибрацию и включить тачпад, чтобы управлять указателем мыши.
Можете посмотреть данное видео, чтобы было понятнее:

▲
2) Использование джойстика с помощью прграммы Xpadder
Для начала давайте разберёмся, что это за софт. Xpadder — это программа эмулятор джойстика для компьютера. На данный момент поддерживает несколько сотен контроллеров от разных производителей, что делает её абсолютно универсальной в плане использования. Ну и конечно же для нашего дуалшока от ПС4 подойдёт.
У этого способа есть, как преимущества, так и недостатки.
Плюсы:
- не нужны драйверы;
- можно настроить каждую кнопку джойстика под себя.
Минусы:
- понадобится много времени, чтобы понять суть работы приложения и настроить всё, как надо;
- не будет поддержки вибрации, микрофона, гироскопа, сенсора и возможно чего-то ещё;
- программа официально платная (но можно очень легко найти и бесплатную версию).
Как видите, не всё так однозначно. Но, как простая альтернатива драйверам, почему бы и нет.
Где скачать Xpadder?
Как я уже сказал — программа платная, стоит 10 долларов. Вот официальный сайт — https://xpadder.com/?lang=russian&country=RU
Найти можно и бесплатно, думаю раз Вы эту страницу нашли, то и с поиском нужного файла проблем не возникнет. Только проверяйте, пожалуйста, антивирусом. Всё, что касается пиратского гейминга, часто сопровождается, как минимум майнерами. Будьте аккуратны!
Настройка Xpadder для Dualshock 4


Так же советую почитать эту статью, в которой так же представлено очень подробное описание настроек программы Xpadder для работы с Dualshock 4.
▲

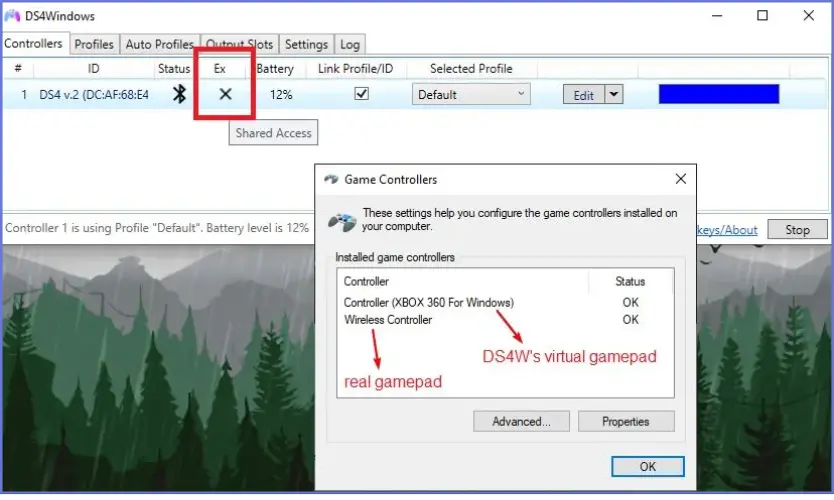
Все владельцы геймпадов DUALSHOCK 4, использующие эти замечательные контроллеры совместно с персональным компьютером, знакомы с приложением DS4Windows, которое является сильно переработанной версией утилиты ds4tools. Проблема тут в том, что автор DS4Windows (Jays2Kings) давно забросил разработку приложения, но большинство пользователей, не углубляясь в вопрос, вбивают в гугл: «Скачать DS4Windows», попадают на сайт программы и качают устаревшую версию. На самом деле, поддержка и разработка приложения активно продолжается, но уже другим энтузиастом Ryochan7. Им, со времени выхода последней версии DS4Windows от Jays2Kings, сделано немало изменений. Самым значимым является тот факт, что приложение сменило старый враппер ScpVBus на более новый и продвинутый ViGEmBus. К слову, этот же враппер использует, находящаяся в стадии вечного бета теста, утилита SC Controller, предназначенная для полноценной работы Steam Controller в отвязке от Steam. Для версии от Ryochan7, постоянно вносятся улучшения и исправления. В отличие от старой DS4Windows, в новой поддерживается не только проводное и Bluetooth сопряжение, но и подключение через родной беспроводной адаптер от Sony:

Кроме этого в приложении реализована поддержка некоторых сторонних PS4-совместимых геймпадов, например Hori Fighting Commander и Nacon Revolution Unlimited Pro. Возможно есть и другие, но я не нашёл списка совместимости.
Вернёмся к работе с DS4Windows. Первым делом скачиваем архив с актуальной версией программы. Извлекаем папку с приложением в любое место на вашем жёстком диске, желательно не в системную папку, в этом случае вам постоянно придётся запускать утилиту от администратора:

При первом запуске нам предлагается выбрать место сохранения файлов конфигурации:

Я настоятельно советую выбирать вариант Program Folder. В таком случае все настройки будут храниться в папке с программой, что позволит вам не заниматься настройкой «с нуля», каждый раз, когда вы переустановите Windows или при других форс-мажорных обстоятельствах. Такой себе вариант Portable. Достаточно просто периодически бэкапить папку с программой, целиком.
В следующем окне выбираем Step 1, для установки ViGEmBus драйвера (если он у вас не был установлен до этого):

Сам драйвер можно скачать и установить заранее:

Если у вас на ПК всё ещё стоит ОС Windows 7, дополнительно нажмите на кнопку Step 2 и установите XInput драйвер. Для Windows 10 этого делать не нужно, можно сразу нажимать на «Finished»:

Для перестраховки заглянем в диспетчер устройств и убедимся, что ViGEmBus драйвер на месте:

Всё. Приложение установлено, драйвер встал корректно и при первом запуске DS4Windows в системе появляется дополнительный XBox 360 контроллер:

Но! Сам DUALSHOCK 4 никуда не исчез из игровых устройств и остался видимым для системы. Такой «двойной расклад» может привести к проблемам с нормальной инициализацией геймпада в играх. На этот случай в приложении есть чудесный чекбокс, который называется: «Hide DS4 Controller«. При включении этого режима в системе остаётся только эмулируемый контроллер:

Далее по списку во вкладке «Settings» идут чекбоксы:
- Swipe Touchpad to Switch Profiles. Этот флажок включает\отключает возможность переключения свайпом двумя пальцами созданных вами профилей;
- Run as Startup добавляет приложение в автозагрузку;
- Show Notification предлагает выбрать варианты уведомлений в сайдбаре Windows;
- Disconnect from BT when stopping отключает геймпад при выходе из приложения;
- Flash Lightbar at High Latency позволяет выставить задержку в миллисекундах, по достижению которой световая панель геймпада начнёт моргать красным цветом;
- Start Minimized запуск приложения в свёрнутом состоянии;
- Minimize to Taskbar\Close Minimize сворачивать окно приложение в трей (окно не висит в панели задач);
- Quick Charge эта функция позволяет на лету заряжать геймпад не отрываясь от игрового процесса. Избавляет от эффекта двойного подключения, когда система видит ваш геймпад и по проводу, и по беспроводу;
- White DS4Windows включает белый цвет иконки приложения в трее;
- Check for DS4Windows Update at Startup проверка обновлений при запуске приложения (можно выбрать интервал проверки обновлений);
- UDP Server этот чекбокс нужен для подключения гироскопа в эмулятор CEMU;
- Use language pack выбор языка локализации. Есть и русский, но я привык к дефолтному, английскому, языку приложения;
- Use custom Steam Folder сюда можно прописать путь до основной папки Steam, если он установлена не в дефолтную директорию.
Вкладка «Auto Profiles» позволяет добавлять пути до папок и отдельных игр\приложений к которым будут автоматически применяться созданные вами профили:

На вкладке «Controllers» можно посмотреть статус вашего геймпада и заряд аккумулятора. Помимо этого, можно быстро включить доступный профиль и выбрать цвет подсветки:

И наконец вкладка «Profile». На этой вкладке вы можете: создать, отредактировать, удалить, скопировать, импортировать и экспортировать ваши профили:

Давайте рассмотрим возможности профайлера подробнее. Настроек огромное количество. Я не буду расписывать всё, просто пробегусь по самым значимым возможностям. На вкладке «Other» наибольший интерес представляет меню «Controller», тут можно выбрать, какой контроллер будет эмулироваться в систему: XBox 360 или проводной DUALSHOCK 4 v1. С первым вариантом всё понятно. Зачем нужен второй? Вариант с эмуляцией DUALSHOCK 4 v1 нужен для тех ПК-игр, которые нативно поддерживают DUALSHOCK 4, но только при подключении по проводу и\или только первую ревизию:


Вкладка Gyro позволяет выбрать варианты эмуляции для управления гироскопом и назначить направления осей стиков, на которые вы примените действия сенсора:

Вкладка Lightbar управляет настройкой подсветки. Кроме статического цвета профиля, можно назначить эффект радуги для процесса зарядки, изменение цвета лайтбара в зависимости от уровня заряда и световую сигнализацию для низкого заряда батареи:

Вкладка Axis Config предназначена для тонкой настройки осей:

Для любой кнопки, курка и направления стика можно назначить или записать макрос, например комбинацию кнопок клавиатуры, кликов мыши или управление курсором мыши:

Важно, что прямо «из коробки» с помощью тачпанели геймпада можно управлять курсором мыши. Включение и отключение осуществляется комбинацией PS + тап по тачпанели. По-умолчанию эта функция включена, но можно поставить галку «Start with Slide/Scroll Off» и функция будет включаться только после активации вышеуказанной комбинацией. Прочие настройки подбираются индивидуально. Вот мои:

На вкладке Special Action доступны специальные возможности, их можно назначить на сочетания кнопок геймпада:


Вкладка Controller Reading предназначена для проверки работы элементов управления, а также проверки задержки связи в миллисекундах:

Вроде всё. Вот вам моя уже сконфигурированная версия DS4Windows. В ней создано три профиля:
- Зелёная подсветка — стандартный XBox 360 controller;
- Жёлтая подсветка — проводной DUALSHOCK 4 v1;
- Синяя подсветка — профиль для управления ПК с дивана (геймпад скрыт от системы).
Управление курсором на тачпанели в положении OFF для всех профилей, кроме синего. Для переключения используйте комбинацию PS + тап по тачпанели.
Варианты Special Action видны на этом скриншоте:

Например, комбинацией PS + левый стик вверх\вниз можно управлять системной громкостью, а комбинация PS + L3 отключает системный звук. Комбинация OPTION + PS показывает заряд аккумулятора. Остальное можно удалить, там специфические настройки.
рекомендации
4070 MSI по старой цене дешевле Palit
13900K в Регарде дешевле чем при курсе 60
Ищем PHP-программиста для апгрейда конфы
Всем Ку!
Version 3.2.17
Version 3.2.16
Version 3.2.15
Version 3.2.14
Virtual DS4 trigger modes, Greek translation, Indonesia translation, HidHide inverse cloak
.NET Runtime x64
https://dotnet.microsoft.com/en-us/download/dotnet/thank-you/runtime-desktop-6.0.16-windows-x64-installer
.NET Runtime x86
https://dotnet.microsoft.com/en-us/download/dotnet/thank-you/runtime-desktop-6.0.16-windows-x86-installer
- Removed social accounts from app
- Added style resource for first launch window
- Check for inverse application cloak HidHide setting. Skip checking HidHide whitelist if option is enabled
- Allow DS4 output to not report virtual trigger button state
- Added small exception handling for single app instance check
- Updated Nefarius.ViGEm.Client.dll files with fixed userdata args for adding notification callback
- Display Windows error code for unknown ViGEmFailure in the Log
- Added Greek translation. Contribution by trlef19
- Added Indonesia translation. Contribution by Adamsw72
- Added extra user documentation to repo. Edited README.md. Contribution by Oliver-Noah
- Expose secondary joined JoyCon SideL and SideR buttons in mapper. Use DS FnL and FnR codes
- Allow DS4 trigger button output only
- Allow virtual DS4 trigger behavior combobox strings to be translatable
Version 3.2.13
Version 3.2.12
Version 3.2.11
Version 3.2.10
OSC server changes, gyro jitter compensation
.NET Runtime x64
https://dotnet.microsoft.com/en-us/download/dotnet/thank-you/runtime-desktop-6.0.16-windows-x64-installer
.NET Runtime x86
https://dotnet.microsoft.com/en-us/download/dotnet/thank-you/runtime-desktop-6.0.16-windows-x86-installer
- Added jitter compensation routine for Gyro Mouse
- Move output handler init and disconnect calls to ControlService Start and Stop routines
- Changed suspend and resume routines
- Added extra exception handling for tray notification failure
- Use DetermineConnectionType in PostInit of DS3Device. Contribution by SunnyQeen
- Fixed a crash when open device options with null option. Contribution by SunnyQeen
- Add InterpretingOscMonitoring Option. Contribution by xAdler
- Added some OSC translation strings. Contribution by xAdler
- Added OSC monitoring message interpreting. Contribution by xAdler
- Added OSC trigger control. Contribution by xAdler
- Added additional mapping checks in ProfileDTO MapFrom routine
- Changed how macros are saved from binding window. Do not reset shift trigger
- Support Horipad 4 FPS. Contribution by markguleno
- Fixed custom led mode. Contribution by MatrixDJ96
Version 3.2.9
DualSense Edge input support (FnL FnR BLP BRP), Special Actions delay tag fix
.NET Runtime x64
https://dotnet.microsoft.com/en-us/download/dotnet/thank-you/runtime-desktop-6.0.10-windows-x64-installer
.NET Runtime x86
https://dotnet.microsoft.com/en-us/download/dotnet/thank-you/runtime-desktop-6.0.10-windows-x86-installer
- Fixed changing of Trigger Effect while switching profiles with DualSense controller
- Allow LSVerticalScale and RSVerticalScale to save values > 1.0. Contribution by Katalysta
- Updated Italian translation. Contribution by MarkThat
- Increased LS and RS Vertical Scale max to 4.0
- Check for string length from HidD_GetSerialNumberString call from possible invalid response from hardware
- Added extra locking for LoggerHolder
- DualSense Edge input support (FnL FnR BLP BRP). Contribution by steffalon
- Added subtype property for DualSenseDevice class
- Added COMException catching when adding hook for power events
- Removed message regarding Middle Mouse closing app in tray menu. Windows 11 no longer supports this at least right now
- Added DualShock 3 support using DsHidMini driver (SXS) or Sony Sixaxis driver. Contribution by SunnyQeen
- Added logging when reading of Actions.xml fails
- Changed processing of Delay tags for Actions.xml. Fixes some cases where recent DS4Windows no longer reads Special Action files from older versions
- Fixed outer bounds when using smoothing for 360 Gyro Steering
- Fixed anti-dead zone interpretation for 360 Gyro Steering stick output. Applies to Xbox 360 and DS4 output (not VJoy)
- Added Playmax PS4 controller. Contribution by nzgamer41
Version 3.2.8
“This guide includes a step-by-step process on how to download, install, setup, and USE the DS4Windows software for playing games.”
What is DS4Windows and How Does It Work?
Even though if you have a knowhow of what DS4Win actually is and how it works, let us make things simpler for the newcomers.
DS4Win, in short, is a software developed by the Ryochan7 community on GitHub that allows gamers to connect their DS4/DS5 controllers to Windows 10/11 PCs virtually.
The virtual gamepad not only helps you connect the DualShock controller to the system, but it also ensures customization of the controller including setting up the lighting bar, specific buttons, other functions, etc.
Installing this software means you can get in full control of the controller (Nintendo, PlayStation 4, PlayStation 5, JoyCon, etc.) The best thing about the software is that you can even change the function of a single key with it easily.
With the introduction of the new DS4Windows app, now is the time that gamers can get into an immersive gaming experience while playing with robust PlayStation controllers.
Considering the focus of this guide, we will now get started with how you can download and install this program on your computer in 2022.
Have a look:
Important Notes to Consider Before Installing DS4Windows App
1. Before getting into installing the virtual emulator gamepad, here are some key notes that you should keep in mind:
First of all, after downloading and installing, the software should recognize your controller as soon as you open it. Two things to check in this regard are:
- Accurately installing the software (Mentioned in this guide)
- Connect your controller/gamepad to the computer correctly.
2. Right after you install the app, make sure that you hide the real controllers from the app and show only the virtual gamepad. This way, any game you play will only recognize the virtual gamepad initiated by DS4.
- This step is quite necessary and we recommend that you take it as soon as installing the software to avoid issues like Double Input or Double Controller problems.
Do not worry if you don’t know how to resolve the issue. We are going to reveal each and everything in this guide today.
Sit tight and keep your controllers ready to get customized by DS4Windows.
Other Important Notes
Default Profile
- Keep in mind that DS4 has already created the Default Profile for the controller you are about to connect.
- The Default Profile is set to an Xbox 360 controller. That said, the software will detect your real controller and convert it into an Xbox 360 controller virtually.
- Other than that the DualShock and DualSenseX touchpads are set for mouse control.
- To turn on or off this feature. Press the PS button on your controller and touch the pad once.
Important Notes about DS4 Emulation
Moving further, the DS4 Windows app also allows you to change the emulation of an Xbox controller into a DS4 gamepad.
However, we do not think that any gamer would want it since almost all games on PC such as Tekken, Need for Speed, and GTA V recognize only Xbox gamepads.
You should also note that if a PC game does not have compatibility with a DS4 controller, then your controller will not get detected. Hence, to avoid connectivity issues, let the software convert your controller to an Xbox 360 gamepad only.
Still, need to know how to convert a controller into DS4 emulation? Follow the steps:
- Create a new profile using the Gamepad option available on the app. From there, click the DS4 preset and that’s all. You can also change the settings of an existing profile to change the Virtual Controller settings.
- Rumble won’t work when you emulate a DS4 controller though. Rumble only works when you use a DualShock controller and emulate it as an Xbox 360 gamepad. If you are using any other controller and emulating it as a DS4 gamepad, then rumble won’t work on it because the controller does not have this specification.
Important Note about Output Slots Tab (Latest 3.1.3 DS4Windows Version)
Last but not the least, the latest 3.1.3 DS4 update has introduced the output slots tab although it does not have an important function. Better use the default profile to connect your controller and use it as a virtual gamepad to play games on a PC without any hassle.
The most important section of this guide!
To make sure that the latest version of the app works perfectly, follow the recommended steps:
Requirements for DS4 Windows
- Operating Software: Windows 10 and 11 only. The software won’t work on Windows 8.1 and lower versions of Windows. Better upgrade your Windows to install DS4 without any problems.
- Extra supported controller that you would connect to your gaming PC or laptop.
- Bluetooth dongle is also required for connecting the controller wirelessly.
- 6.0.6 Microsoft.NET for Desktop Applications is also a must.
Checked all options? Follow the installation guide below:
Download and Install the DS4 App
- Download the latest 3.1.3 version of DS4 Windows from GitHub. (Download either the x64 or x86 as per the OS version of your Windows)
- Extract or unzip the folder into an easily accessible folder. We would recommend you extract it on the Desktop so you can find the extracted folder easily. Use the 7zip or WinRAR softwares for extracting the zipped folder.
Warning: Never extract the folder into Windows files that require additional privileges such as Windows or Program Files. Keep everything simple.
- Open the DS4Windows.exe file and let the software run.
- The application upon the first start will ask you for the folder to save its data such as Profiles and controller settings. You can use two folders, i.e.
- AppData: We recommend it because this folder saves the data outside the software’s folder and is easy to access.
- Default Program Folder: If you choose this folder, then all user data will be saved in the exact same folder where the DS4Windows.exe application is present.
Installing Required Drivers
DS4Windows requires some of the drivers to work properly and it will prompt you to install them when you launch the application after extracting it.
Install all the recommended drivers and click on the Finish button later on to complete installation process.
| Drivers for DS4 | Recommendation | Function |
| ViGEmBus | REQUIRED | This driver allows the software to create virtual Xbox or DS4 gamepads. |
| HidHide | Strongly recommended | Installing this driver will resolve the “Double Input” problem. It will hide the real controller and show only the virtual gamepad so that the games you play may recognize only that controller. |
| FakerInput | Optional | FakerInput is recommended for using a DS4/DS5 controller as a keyboard or a mouse. Although the app can let you perform the function without a keyboard,having this driver will ensure controlling both keyboard and mouse as per your will and wish. |
Some Final Steps to Check
- Connect the controller after you install the application on your operating system.
- Click here if you are facing issues while connecting the controller via Bluetooth.
- If all goes well, you will see your controller (DS4/DS5) getting appeared on the main controllers’ tab with the Default profile already selected for it.
- Do not turn off the application while you connect your controller to the PC.
- In case the controller does not work properly, follow this guide to resolve the issue.
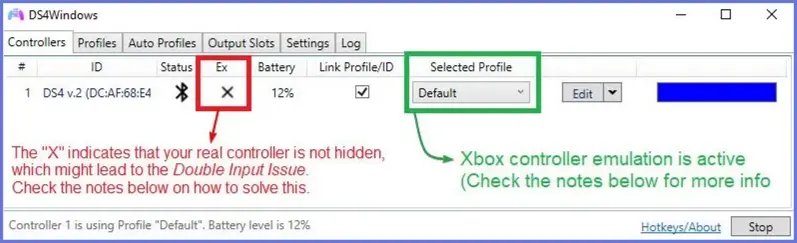
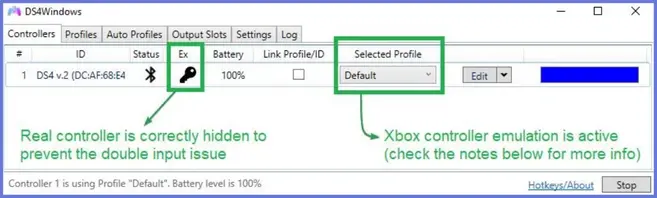
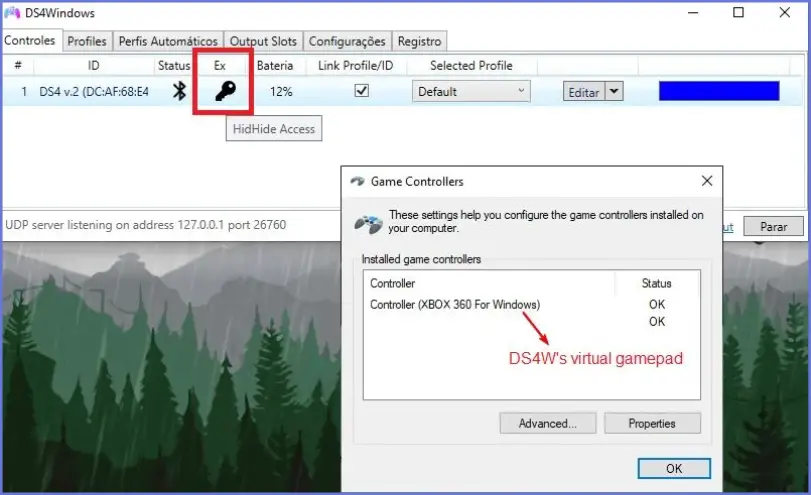
If the software shows the X problem, it means it has diagnosed the Double Controller Problem.
With no X option there, your controller would be working just fine and you can use it to play any game without any hassle.
How to Connect Controllers to PC or Laptop and DS4Windows?
As soon as you connect your controller to the software, it will detect it with Default Profile setting and you’d be able to use it at the same time.
We recommend using the USB connectivity option to avoid any problems while connecting the controller. However, if you are not a fan of clutter and extra cables on your gaming desk, Bluetooth connectivity is also an option. Keep in mind that with a reliable Bluetooth adapter, it’s possible to avoid delay in response time or input delay. You will get a stable connection with a perfect Bluetooth adapter considering there are no major radio interference problems
Two Connection Methods for Connecting DS4/DS5 Controllers
The two methods include connecting via
- USB
- Bluetooth
USB
As simple as plugging your controller into the USB input on your PC or laptop and the Windows will detect the device with a prompt. Ensure that you use a properly working USB cable and not a damaged or repaired one.
Once the device is connected, you will see the controller on the main menu of the DS4 Windows app.
Bluetooth
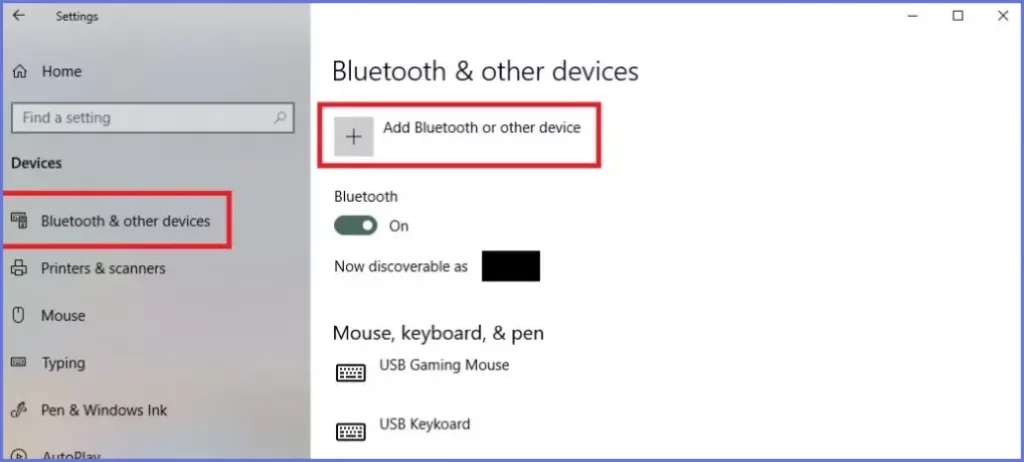
For setting up Bluetooth connectivity, you’d first need to get a BT adapter matching the specs of your controller.
Set up the Bluetooth connection with pairing mode to add a Bluetooth device to your PC. If asked for a pin, try using 0000 to check whether it connects or not.
Remove the device from the Windows Bluetooth area if the controller has been previously paired with the PC. Pair them again and check whether the controller gets shown up in the Main Menu of the software or not.
How to Setup Different Controllers in Pairing Mode on DS4Windows?
- DualShock and DualSense Controllers
- Joy Con and Switch Pro Controllers
For both these controllers, simply hold the PS + Share button until the lightbar starts flashing like that:
Connecting Switch Pro and Joy Con via Bluetooth ain’t much difficult. Simply hold the sync button long enough until the LED lights on the controllers start flashing in a sequence.
- The procedure remains the same for replica controllers, i.e. holding the PS + Share button.
- If the controller does not connect this way, read the user manual from the manufacturer and act accordingly.
You can also search for the tutorial to connect that specific controller on YouTube.
How to Use Sony DualShock 4 USB Wireless Adapter?
There’s some good news for gamers who want to connect their DS4 controllers to PC without any wired connection.
Sony DualShock 4 USB wireless adapter connects only 1 controller at a time to a PC. However, its headphone jack could be utilized for both audio and mic. You can connect your headphones to it easily.
To pair your PS4 DualShock controller to it, set up both devices in pairing mode. First, press the wireless adapter slightly towards the USB input until you feel a click. Hold it down with the same press for 3 seconds and its light will start flashing which means it’s now ready to get paired up.
Secondly, for DualShock 4, press and hold the PS+share button to set it up. It will automatically get paired up with the wireless adapter.

Final Words:
Considering that you have paired up or connected your controllers according to the guidelines we have mentioned, the DS4Windows software will have no problem setting them up.
How to Control the Double Controller/Double Input Issue While Playing Games?
When using DS4Windows for the first time, you’ll come across the problem of detecting dual controllers or dual inputs, which is quite frustrating sometimes.
To make sure that this problem does not occur in the future, follow our recommendations below:
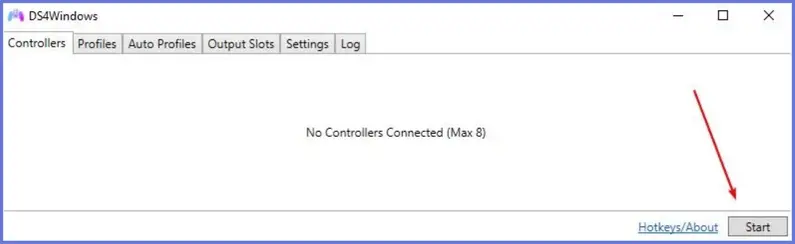
Here is how the main menu will look like once you connect your controller to the DS4Windows app:
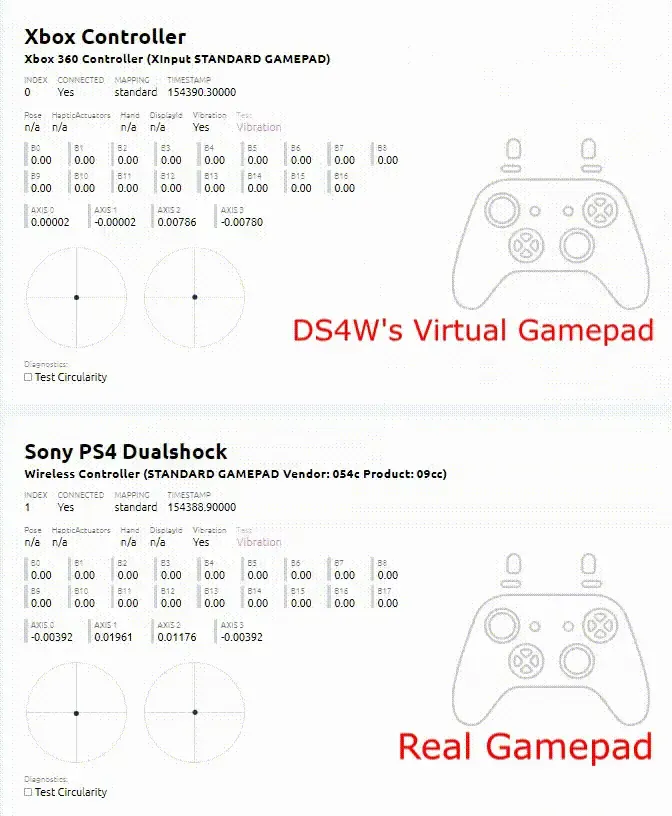
When you see that the software has detected two controllers, i.e. one real and one virtual, that means both controllers will work when you press the real controller’s buttons.
This dual input problem should be tackled or else you will not be able to play a game ideally.
Problems Caused by the Dual Input/Dual Controller Issue:
You will face issues like:
- Detecting two commands if you press a single button on the controller.
- Randomly start the 2 player mode.
- When the real controller is connected, the virtual gamepad will not work as intended.
- Responding incorrectly to the controller button because the game may correctly detect the virtual gamepad commands but not the real controller button commands.
- There might be no response at all from the controller even if you press the buttons.
- Problems Caused by the Dual Input/Dual Controller Issue:
- Example of Double Input Problem with Visual Diagram
You will face issues like:
- Detecting two commands if you press a single button on the controller.
- Randomly start the 2 player mode.
- When the real controller is connected, the virtual gamepad will not work as intended.
- Responding incorrectly to the controller button because the game may correctly detect the virtual gamepad commands but not the real controller button commands.
- There might be no response at all from the controller even if you press the buttons.
When the software gets confused between two controllers it may or may not receive the commands from both controllers as shown in the GIF below:
Different Methods to Prevent Double Input Problem
Very first thing you can do to tackle the double input or controller problem is to hide the real controller. This will enable the games to detect only the virtual gamepad created by DS4Windows.
You can hide the real controller in two ways:
HidHide
We recommend installing the HidHide driver as it can act like a wall between Windows and the controllers you’ve connected to the PC. With this driver, users can hide/show the gamepads and can allow/disallow software to detect them.
Once you install DS4Windows and HidHide, follow these steps to avoid Dual Input problem:
- Hide the real controller from the PC or laptop once connected via USB or Bluetooth.
- Make sure that you Allow DS4Win to see hidden devices or else the program will not even detect any software.
The story does not end here.
- HidHide Configuration
- Visual Concept: Hiding PS4 Controller
HidHide also has its own guidance page that you can visit to setup your controller via DS4Windows easily.
Other than that, some of the usage and tips that we will recommend you include:
HidHide Usage and Tips
General Information and Installation
- After downloading and installing the driver, reboot your system before you use it.
- If properly configured, you will see the Hide DS4 Controllers option under the settings tab of DS4Windows software. You should leave it disabled.
- For troubleshooting, simply visit this troubleshooting page made by the community for users who cannot configure the driver even after installing it.
Client Configuration in DS4Windows
- Before configuring controllers in the Client area of HidHide, close DS4Win app first. This way you can only see the real controllers connected in the Client Dashboard of the driver.
- After configuration, simply close HidHide before you re-open DS4Windows again. If you keep the Client configuration open, DS4windows will fail the Ex check.
Built-in Hider for DS4Windows
Have confusion regarding setting up HidHide configuration? Don’t worry!
The latest 3.1.3 version of DS4Windows now has the built-in hider available in it.
So, here is how it goes:
In DS4Windows Settings tab, you will see the built-in hider option, and when you enable it, the software will ask Windows to give exclusive access for detecting the devices. That simply means DS4Windows will only allow Windows to detect the virtual gamepads and not the real controllers.
However, one issue with this method is that Windows may or may not give DS4Windows the required access in case there is an open connection to the gamepad. Some of the major reasons for this request failure include:
- When a game is already running and using the real controller.
- If an internet browser such as Google Chrome and Opera Mini are open. This can also cause request failure.
- The Nvidia GeForce experience already has access of connection to real controller.
- With all these problems, even if you get successful in connecting the virtual gamepad only, in case of disconnection, you will need to reconnect the controller again.
That is the main reason we do not recommend the Hide DS4 Controller option and will suggest you use only the HidHide drivers.
How to Manage and Store DS4Windows Installation, Backups, and User Data on Your PC?
Here is a list of the user data files and folders that DS4Windows creates after you install and configure it:
- Auto Profiles.xml
- LinkedProfiles.xml
- Actions.xml
- Profiles.xml
- ControllerConfigs.xml
- Profiles folder
- OutputSlots.xml
Managing the Backup Restoration and Deletion of User Data
Managing Backup of DS4Windows:
To make sure that backup files are stored and safe on your PC, you should verify that the user data is stored in two folders i.e. inside the main software folder and in the user’s profile folder.
To carry on with backup, do the following:
- Simply click on Profile Folder under DS4 Windows Settings tab and check whether the user data files are present there or not.
- Check the user data in the main DS4Windows folder as well even if you find the data on the Profile folder previously.
- If both locations have got the user data, it means the actual location that the software uses to load User Data is the one where the Profiles.xml file is found.
- If you want to protect the backup data entirely, simply get the backup of the whole DS4Windows folder and that would do the job for you.
Restoring the Backup Data
If you want to restore old data of the software to a new PC or operating system, simply copy and paste it from the profile folder and paste it into the main DS4Windows folder accordingly.
Deleting User Data
Follow the same steps of finding user data and simply delete the folders from system as well as the Recycle Bin to delete it.
How to Uninstall DS4Windows and Its Related Folders
Considering the fact that DS4Windows is a portable application and it’s not actually installed, you will not find it under the Uninstall Program menu in the control panel.
- To get rid of it, simply Shift+Delete the entire folder and that would remove the program from your computer.
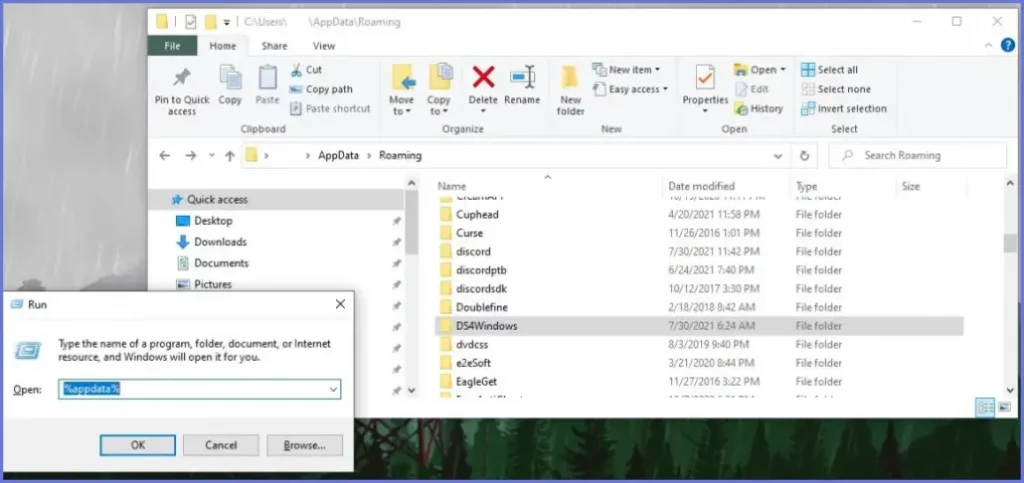
- To remove settings and user data, simply press Win+R in the box type %appdata% and press the Enter button on the keyboard. This command will open the AppData roaming folder.
- Check if DS4Windows folder exists there and delete it accordingly.
Uninstalling Related Drivers Used by DS4Windows
If you want to wipe out the drivers installed with DS4Windows, here are some steps you can follow for each driver:
ViGEmBus
Well, ViGEmBus is the required driver for DS4Windows. However, it is also required for some other apps and programs installed on the PC. Uninstalling it might not be a good idea.
- If you still want to continue, read the official guide on how to remove the ViGEmBus drivers for easy uninstallation.
HidHide Removal
- To remove HidHide, open the Windows Apps and Features section. You can use the search section on start menu to find this option.
- Search for HidHide and uninstall it.
- Reboot your PC for the changes to process.
FakerInput
- Similarly, search for FakerInput under the search section on start menu.
- Locate and uninstall the drivers. Reboot the PC and you are good to go.
How to Run DS4Windows Under a Custom .exe Name?
Even after properly configuring the software, some applications or games won’t behave properly after detecting the virtual gamepad. Some of the known softwares include:
- Steam Big Picture: DS4 controllers cannot connect with the interface of Steam Big Picture.
- Steam Input App: The app will ignore DS4 controller entirely.
- Sholve Knight: A game that also ignores all DS4 controllers.
If you want DS4Windows to work with the apps and games we have mentioned above, follow this guide to run the app under a new name instead of the default DS4Windows.exe
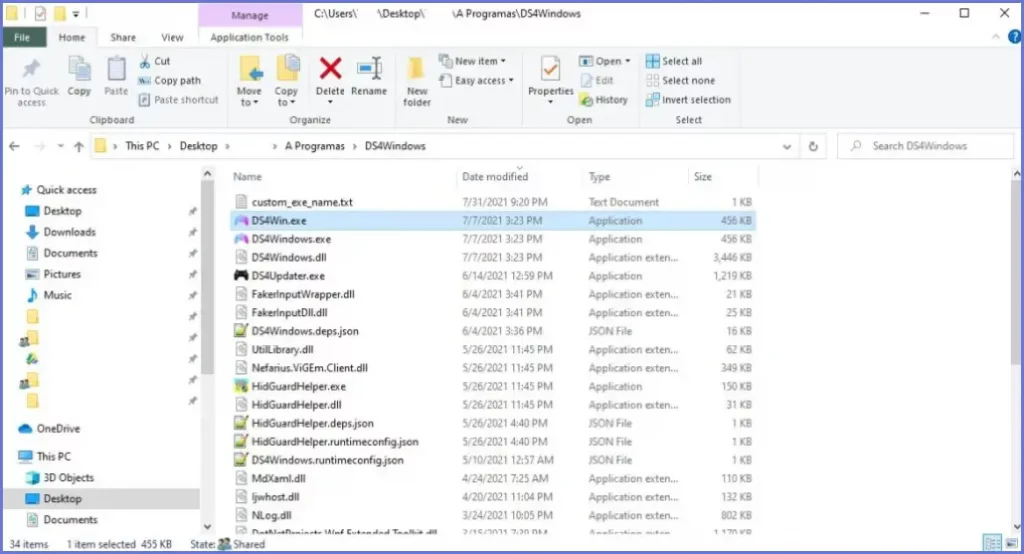
Setting Up a Custom “.exe” Name
We will be using DS4Win but you can use any name you want.
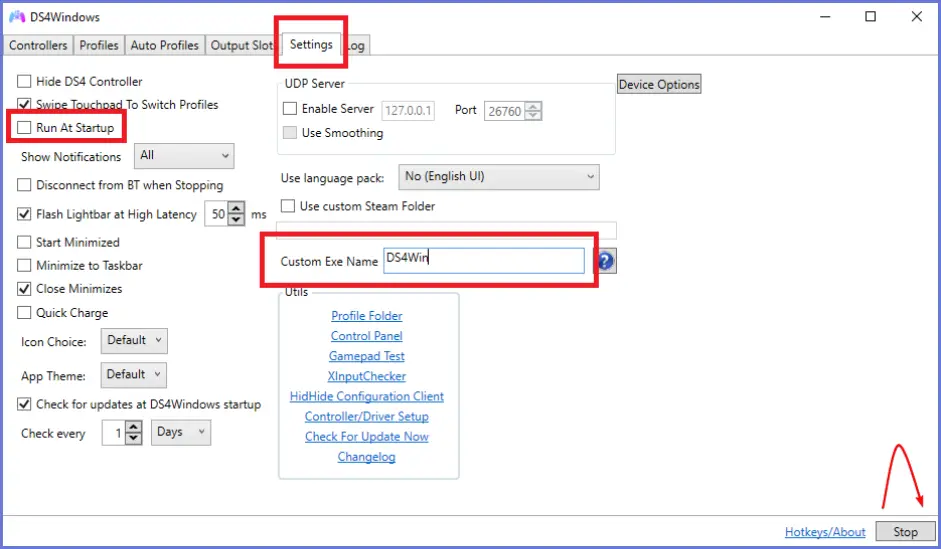
Step 1:
- Go to the Settings Tab after opening the DS4Windows app.
- Disable to run at the Startup option if it’s already enabled.
- Write any custom name (DS4Win) on the Custom Exe name box but don’t add .exe extension at the end.
- Close and then restart the program.
Step 2:
Close the DS4Windows application completely and make sure it’s not running anywhere on your PC.
Step 3:
Locate the new DS4Win.exe file that you just made in the software’s folder and open it.
Step 4:
Press the Shift+Control+Esc command to open the task manager and check whether the DS4Win.exe is running perfectly or not.
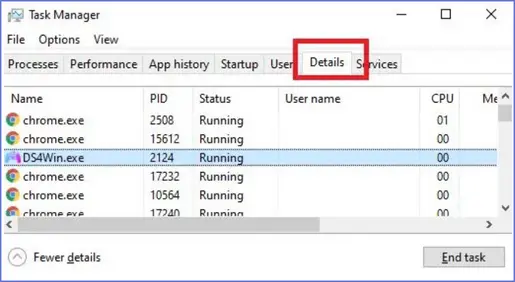
- Right after that, you should not use the older DS4Windows.exe as only DS4Win.exe should be used to configure and setup the controllers.
- In case a new update of the app comes, you’ll need to go through all 4 steps again in order to use a custom .exe name while running DS4 Windows software.
How to Stop Using the Custom .exe Name?
- To stop using the custom DS4Win.exe, close the application if it’s already running.
- Open the standard DS4Windows.exe and disable the run at Startup option if it’s enabled.
- Inside the custom Exe name box, simply remove the DS4Win name and close the program again.
- Close the app and reopen it again to use it as you were using before.
Final Takeaways:
Although the guide to install DS4Windows is long enough, it contains answers to all your queries and confusions.
Bookmark it on your browser whenever you face a problem with the software and you can resolve all your problems from here.
Good Luck!!