Время на прочтение
12 мин
Количество просмотров 217K
КДПВ. Бут-менеджер rEFInd с темой оформления Regular.
На сегодняшний день практически все уже слышали про технологию UEFI. Говорить о том, что это такое и зачем оно нужно, я не собираюсь. Сегодня я бы хотел описать простейший сценарий установки Dual Boot системы с полной поддержкой UEFI, а также рассмотреть отдельно установку и настройку бут-менеджера rEFInd. Возможно вы уже видели подобные мануалы и гайды, но я постараюсь донести весьма доходчиво суть того, что мы будем делать и зачем. В других мануалах вы лишь смотрите за «магией» картежника и пытаетесь её повторить, делая, зачастую, элементарные ошибки. Кому эта тема интересна — прошу под кат.
В целом UEFI призвана наоборот упросить процесс загрузки, а не усложнить его. К примеру, посредством этой технологии компьютер можно загружать ОС и вовсе без прослойки в лице GRUB / LILO / etc, загрузчиком может выступать сама UEFI. Однако этот метод имеет свои недостатки, например, вам придется повозиться после обновления ядра, можно, разумеется, написать скрипт, но в целом этим и занимается grub2-efi
Итак, давайте сформируем примерный список наших действий, некоторым хватит прочесть его и уже взяться за дело. Собственно тут будет всего четыре пункта. Пятый и шестой пункт опционален.
- Запись образа Windows 10 (8/8.1) на диск/флешку.
- Установка Windows 10 на часть диска.
- Запись образа Linux-дистрибутива с поддержкой EFI (большинство) на диск/флешку.
- Установка Linux-дистрибутива на оставшуюся часть диска.
- Установка и конфигурация rEFInd.
- Удаление GRUB и полный переход на rEFInd.
На первый взгляд всё очень просто, всего 4 базовых пункта, но тут есть огромное количество нюансов.
Ошибки делают на всех этапах: входят в режим Legacy-bios, указывают не тот загрузочный раздел, просто не понимают, что делают и т.д. В конечном итоге всё это приводит к массе боли и страданиям на форумах, в чатах, и т.д. На деле же всё нереально просто, нужно просто понимать, что ты делаешь на каждом этапе и проверять себя.
Сначала немного теории
UEFI видит только один специальный ESP-раздел, обычно он имеет размер 100-200 мегабайт и форматирован в FAT32 (бывает в FAT16), в нем содержаться папки с названиями а-ля Boot, Microsoft, Fedora, Ubuntu и т.д. Если вы перепробовали достаточное количество ОС и никогда не форматировали этот раздел, то там могло набраться приличное количество папок. К примеру, у меня было 2 живых оси и лежало около 6 папок.
P.S. CodeRush подсказал, что поддерживаются все FS, если на них есть соответствующие драйверы:
Это неверно. UEFI видит все разделы, для ФС которых в конкретной реализации прошивки имеются драйверы. ESP же отличается от остальных разделов только тем, что а) для FAT драйвер иметь обязательно и б) на разделе ESP осуществляется поиск загрузчиков и автоматическое создание соответсвующих переменных BootXXXX, если загрузчики нашлись.
В самих папках лежат исполняемые файлы .efi которые и выступают в роли загрузчиков ОС. В папке debian вы наверняка обнаружите файл grubx64.efi, а в папке Microsoft – bootmgr.efi.
Большинство Linux-дистрибутивов монтируют ESP-раздел к /boot/efi, то есть загрузчик Debian будет лежать примерно на таком пути: /boot/efi/EFI/debian/grubx64.efi
C директорией разобрались, а что дальше?
А дальше нужно понимать, что существует ещё порядок загрузки, которым можно руководить с помощью утилиты efibootmgr, если у вас её нет, то можете скачать через свой пакетный менеджер, во всех стандартных репозиториях она присутствует. Для начала можете просто ввести эту команду и увидеть список порядка загрузки, а также все UEFI-записи. Если хотите разобраться с утилитой, то курите ман и читайте интернеты, в целом она весьма простая. Злой Windows как раз-таки тут и затирает наш GRUB и ставит Windows Boot Manager первым приоритетом, поэтому его приходится восстанавливать. Скажу лишь как редактировать записи:
efibootmgr -b <номер записи> -<модификатор редактирования> <параметр модификатора>
К примеру, efibootmgr -b 0 -B означает удалить запись 0.
P.S. CodeRush и другие комментаторы заметили, что efibootmgr является весьма опасной утилитой и отмечают, что гораздо безопасней пользовать EFI Shell.
По факту GRUB можно вообще не трогать, потому что он наверняка так и лежит в папке EFI/<название дистрибутива>, нужно лишь восстановить запись и выставить первый приоритет, но зачем что-то копать если можно chroot’нуться и ввести grub-install? В большинстве случаев он сделает всё сам.
Кстати, стоит не забывать, что базовым функционалом efibootmgr обладает и сам, собственно, UEFI, он умеет читать эти записи и выстраивать приоритеты. Но сам просматривать ESP-разделы и добавлять новые записи он не умеет, эти обязанности возложены на EFI Shell и операционные системы.
P.S. CodeRush
Еще как умеет, и это умение требуется спецификацией начиная с UEFI 2.2 (SecureBoot появился в UEFI 2.3.1C).
И на последок: Все ваши действия в efibootmgr записываются в NVRAM! В большинстве случае UEFI умеет восстанавливать битый NVRAM каждый раз проверяя его и перезаписывая, в случая неполадок. Однако некоторые недобросовестные производители выпускают сырые прошивки и можно получить самый настоящий кирпич. К примеру ноутбуки с UEFI на базе Phoenix SCT окирпичиваются! Так что перед тем как продолжить читать, удостоверьтесь, что ваша модель материнской карты или ноутбука, устойчива к таким экспериментам.
P.S. Уже после написания большей части статьи я вспомнил про Secure Boot. Обычно UEFI тянет его за собой, но в большинстве случаев его можно весьма просто отключить в настройках UEFI. Многие Linux-дистрибутивы поддерживают его, но я всё же рекомендую его отключить, так как он может потянуть за собой массу проблем.
Базовый экскурс в теорию закончен.
Теперь можно перейти к практике
Дисклеймер: Сразу оговорю, что я предпочитаю стерильные условия и сам делаю полную переустановку с помощью проверенных лично мной утилит. Если вы будете использовать другие утилиты, то, пожалуйста, не пишите почему у вас что-то не получается на том или ином этапе. Мой вариант проверен сотнями переустановок друзьям и коллегам.
Первым делом нам нужно записать Windows
Потому что если поставить Windows второй, то она затрет загрузчик. Восстановить? Без проблем. Но зачем возня, если можно сразу сделать всё по уму? Впрочем я всё равно обговорю нюансы восстановления чуть позже в конце статьи.
В отличии от Linux, Windows записать гораздо проще, на мой взгляд. Первый способ до возможно многим знаком, нужно просто зайти в cmd.exe от имени администратора и ввести эти команды. Не сложно заметить, то тут нет абсолютно никакой магии. Мы просто форматируем флешку в FAT32:
diskpart

list disk

select disk <номер флешки>

clean

create partition primary

select partition 1

active

format fs fat32 quick

assign

exit
После этого нужно просто открыть ISO-файл архиватором и перекинуть содержимое на чистую флешку. Всё, UEFI-флешка готова. На Linux можно сделать всё аналогичным образом, просто форматируем в FAT32 и копируем содержимое.
Полученную флешка должна отлично загружаться любым ПК с поддержкой UEFI.
Кстати, обратимся к теории: наш образ с Windows 10 содержит папочку efi, в ней как раз лежит всё добро для начала загрузки, которое должен увидеть наш UEFI. Поэтому простого форматирования и копирования в большинстве случаев хватает для большинства ПК.
Однако я предпочитаю второй способ с использованием утилиты Rufus. Он меня никогда не подводил. Однако это Windows-only способ. На Linux-системах использование ddresque для создания загрузочной флешки Windows НЕ РАБОТАЕТ. Так что пробуйте другие утилиты, если первый способ с простым форматирование не помог.
Всё что вам будет нужно: выбрать вашу флешку, выставить параметр «Схема раздела и тип системного интерфейса» на «GPT для компьютеров с UEFI», и нажать старт. Остальные параметры трогать не нужно. Лучше использовать флешки помельче (на 8-16 гигабайт).
Наверняка один из способов должен был прокатить, лично я ни разу с проблемами на этом этапе не встречался, главное чтобы компьютер поддерживал UEFI.
Поэтому перейдем к этапу установки
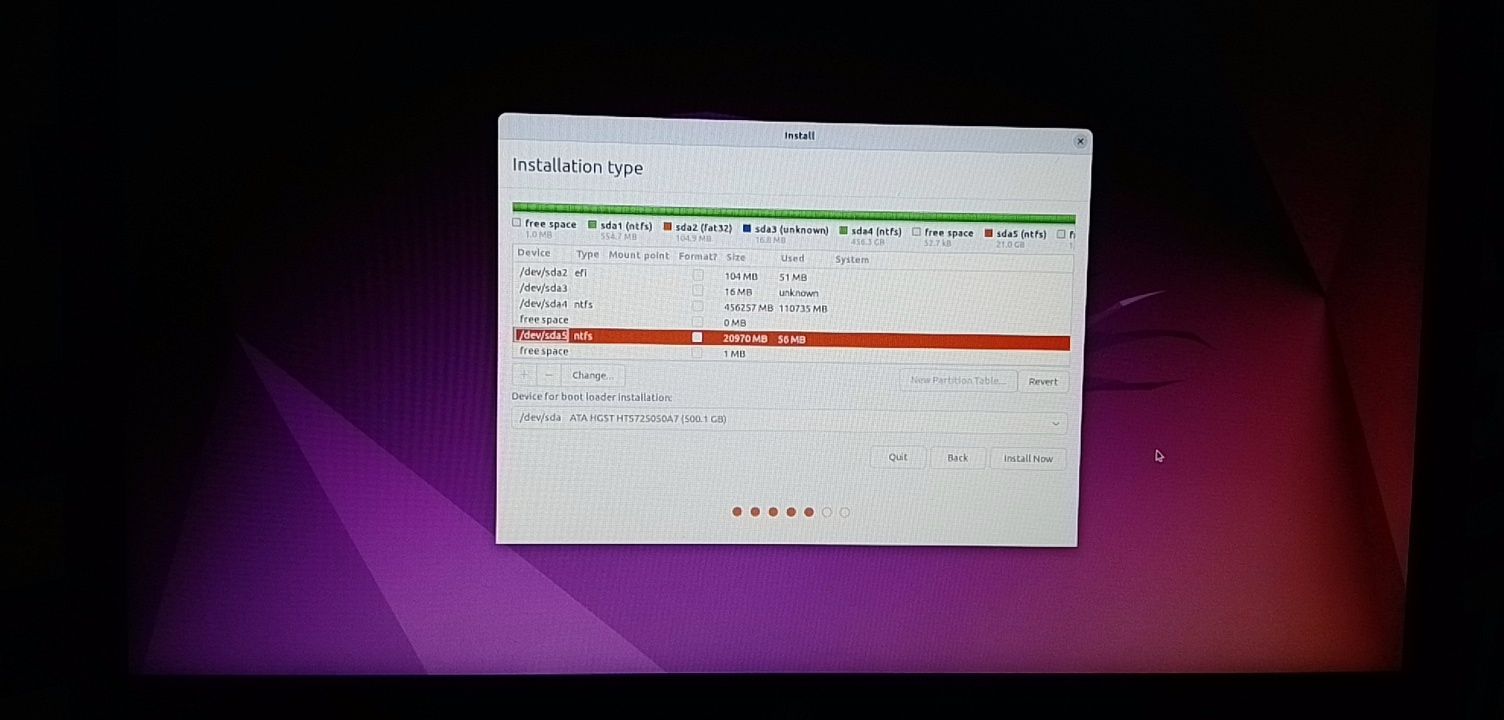
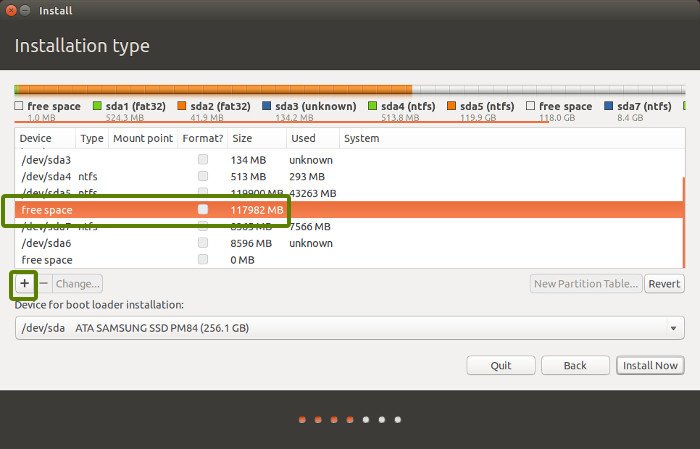
После загрузки в UEFI-режиме делаем всё по стандартной схеме, но на этапе выбора типа установки выбираем «экспертную», то есть мы разметим раздел сами. Размечать рекомендую аккуратно, особенно если дисков много. Наконец, выбрав диск, удалите все существующие разделы. Создайте один раздел с нужным вам размером, к примеру, 150 гигабайт. (Если вы предпочитаете создавать два и более разделов для ОС и файлов — без проблем, создавайте). Выберете этот раздел кликом мышки и нажмите «Далее». И если вы всё сделали верно, то Windows попросит вас создать дополнительные. Обязательно отвечайте «Да». Система создаст три раздела. Два своих для системных нужд и один тот самый нужный нам EFI-раздел. У меня он по нумерации всегда второй, всего получится 4 раздела, включая пользовательский NTFS. Если установщик не предложил создать разделы или создал всего один, то значит вы загрузились в Legacy-режиме и нужно перезаписывать флешку, что-то пошло не так. К сожалению редактор разделов Windows-установщика крайне слаб по возможностям, поэтому пробовать размечать разделы под будущий Linux тут смысла нет, оставляем это место попросту свободным. Дальше устанавливаем всё в штатном режиме.
Кстати, один из признаков правильной установки Windows в UEFI-режиме, появление логотипа производителя материнской карты / ноутбука / планшета при загрузке. Во многих UEFI (к примеру от ASUS и ASRock) есть отдельная настройка для этого. Так что если логотипа нет, но всё остальное прошло как по маслу, то ничего страшного в этом нет.
Тонко настраивать Windows на данный момент не рекомендую, так как если что-то пойдет не так, то возможно придется переустановить.
Записываем Linux?
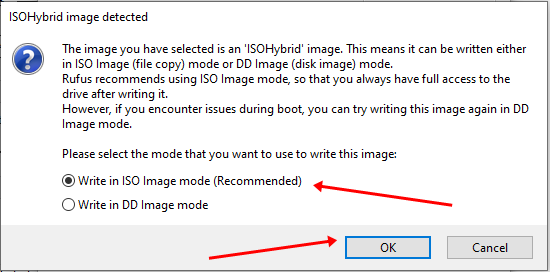
Ага. После входа в Windows рекомендую сразу скачать образ выбранного вами дистрибутива и записать его аналогичным образом через Rufus. Правда в случае с Linux-дистрибутивами Rufus может спросить массу вопросов, к примеру он может попросить подгрузить загрузчик syslinux с интернета или выбрать режим записи образа: ISO или DD. На все вопросы отвечаем «Да.», то есть да, скачиваем последнюю версию syslinux и записываем в режиме ISO. Проверено на Ubuntu (и её вариациях Server, Mate, GNOME), Fedora, RHEL7, Debian и других.
До Dual Boot буквально один шаг
В отличии от Windows большинство дистрибутивов имеют отличную индикацию UEFI-режима. К примеру Debian в своем установщике черным по белому пишет, что система запущенна в UEFI-mode. Другие дистрибутивы проявляют это странным grub-загрузчиком, который выглядит «как-то не так».
Думаю если вы собрались ставить Linux, то вы наверняка сами знаете как ставить ваш любимый дистрибутив, поэтому я не буду заострять внимание на подробностях установки отдельно взятого дистрибутива. Потому что этот этап до боли прост. Если вы уже действительно прогрузились в UEFI-режиме и установили Windows как надо, то Dual Boot уже практически в кармане.
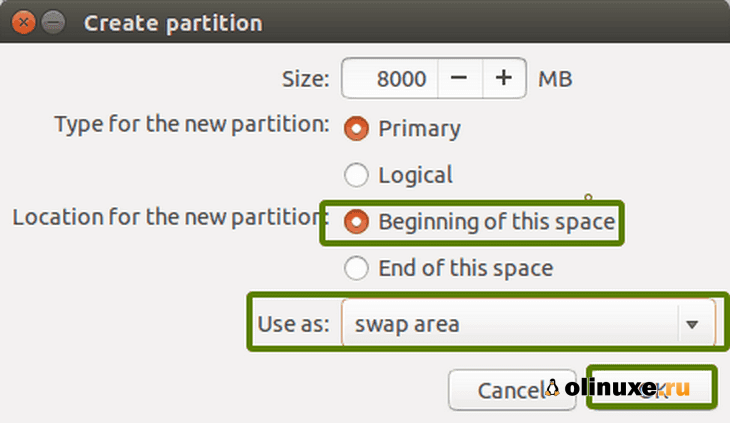
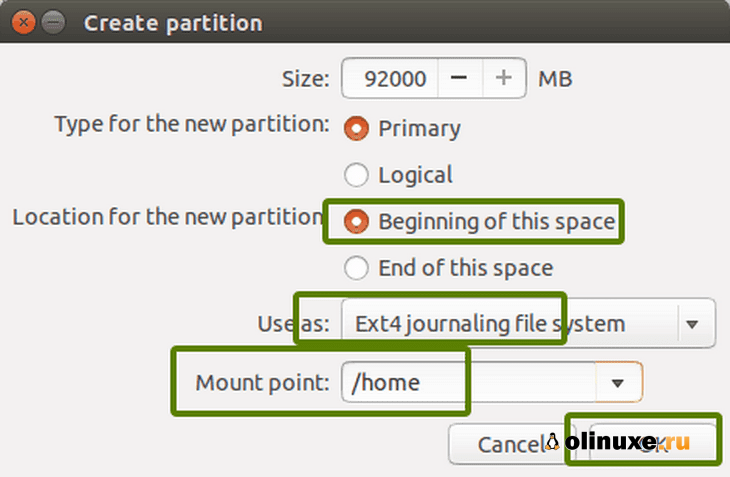
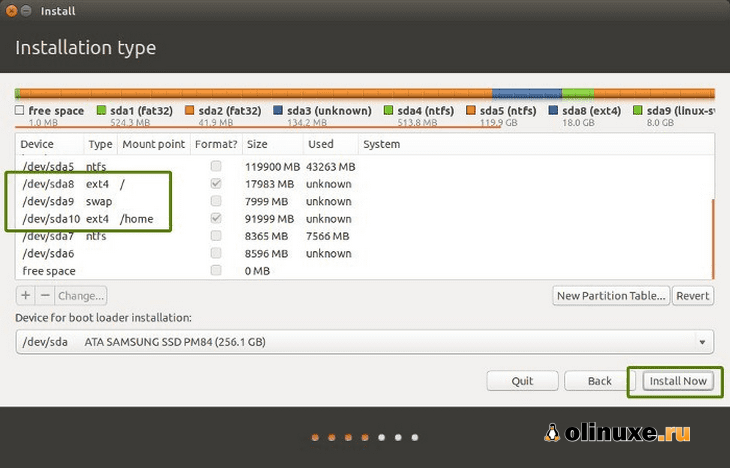
Итак всё что вам потребуется сделать при установке Linux:
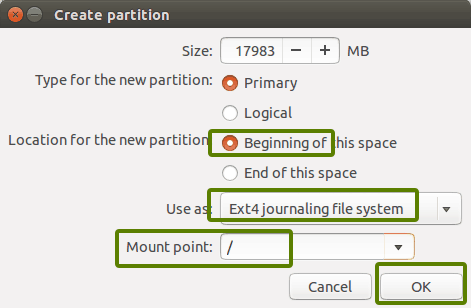
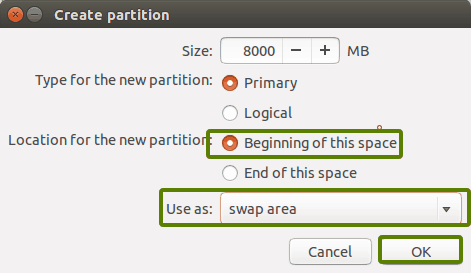
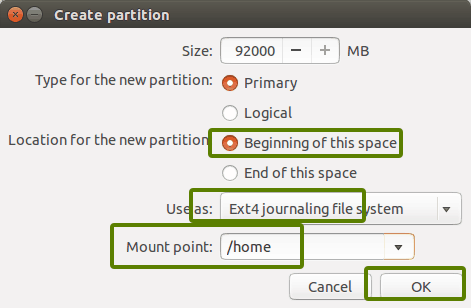
Выбрать раздел /dev/sda2 (в вашем случае это может быть другой раздел) и указать точку монтирования — /boot/efi. Всё. Нет, правда, всё. Разумеется не забудьте разметить ext4 / Btrfs / ReiserFS / XFS / JFS раздел, примонтировать его в корень /. Кому нужен swap (если нужен) создайте и его. Дальше установщик вашего дистрибутива сделает всё сам, установит в директорию EFI/<название дистрибутива> свой GRUB и найдет запись Windows (EFI/microsoft).
Данная логика была проверена во всех вышеозначенных дистрибутивах. То есть повторюсь ещё раз: Главное показать вашему дистрибутиву где у вас этот заветный ESP-раздел и куда надо ему кидать загрузчик. Он его не форматирует, а просто добавляет GRUB. А вот уже сам GRUB вершит магию, изменяет приоритеты загрузки и т.д. Замечу, что некоторые дистрибутивы сами монтируют этот раздел куда надо, так как видят флаги ESP и BOOT. К примеру в установщике Debian нужно просто создать пользовательский раздел и всё.
Наводим красоту, ставим rEFInd
К сожалению счастью я болею сильной формой перфекционизма. И простой GRUB2 меня не устраивал, больно он страшный и не красивый. Беглый гуглинг рассказал мне о BURG, «красивом» форке GRUB, но он был заброшен и на данный момент скорее мертв, чем жив. К счастью для UEFI-машин есть отличная альтернатива — rEFInd. rEFInd является форком, заброшенного ныне rEFIt, а также его логическим продолжением. Первый создавался в первую очередь для Mac’ов и работы рядом с Boot Camp, нынешний форк такой узкой специализации не имеет и подходит практически для любых конфигураций.
Стоит сразу заметить, что rEFInd НЕ является загрузчиком. Это так называемый Boot Manager, он вызвает другие .efi-бинарники к исполнению, а также может направить UEFI на запуск ядра прямо с раздела
/boot. Другими словами то есть систему загружает не он, а сам UEFI. Для Multi-Boot машин является отличным решением. Сам по себе rEFInd является .efi-приложением, собранным средствами UEFI Shell. Сам находится в директорииEFI/refind/refind_x64.efi
Помимо того, что можно выбирать между уже установленными системами на ПК, приятным плюсом можно выделить автоматическое обнаружение загрузочных флешек и дисков. На КПДВ это можно увидеть. У меня имеется загрузочная флешка с Debian (не установщиком, а полноценной ОС) и можно увидеть удобную индикацию того, что это именно флешка, а не что-то другое. Если у вас имеется несколько ядер, то их список можно увидеть по нажатию клавиши F2. Помимо этого в файле /boot/refind_linux.conf можно задать несколько вариантов с разными параметрами ядра (например первый — стандартный для загрузки GUI, второй — безопасный режим без видеодрайвера и т.д, можно сделать дюжину вариантов, по умолчанию всего три). Также в папку EFI/tools можно накидать различных .efi-бинарников, к примеру UEFI Shell или memtest86+. rEFInd их автоматически подхватит и покажет в нижнем ряду как утилиты.
Хотите также?
Процесс установки из под Linux необычайно прост. Все способы описаны на официальном сайте, устанавливать можно практически из любой ОС. Для начала посетите эту страничку и скачайте .deb- или .rpm-пакет.
Если у вас редкий дистрибутив вроде Slackware или Gentoo, то лично я вам помочь не смогу, но на сайте есть обычный .zip-архив и другие варианты установки, так что если уж вы работаете в подобных дистрибутивах, то наверняка поставить своими силами вы сможете без проблем.
Сделайте бэкап EFI-директории:
cp -r /boot/efi/EFI /boot/EFI.bkp
После загрузки пакета, выполните:
cd Downloads или cd Загрузки
И установите пакет:
sudo dpkg -i <имя пакета>.deb или sudo dnf install <имя пакета>.rpm
В моем случае dpkg не мог иногда подтянуть зависимости, если у вас возникнут такие же трудности, то установите gdebi (sudo apt-get install gdebi) и выполните sudo gdebi <имя пакета>.deb.
Если у вас RHEL или CentOS, то используйте yum вместо dnf.
В логах установки пакета можно отследить лог установки rEFInd, в котором возможно будут ошибки их надо сразу отследить. Однако по моему опыту ошибок не возникает, если всё сделать правильно. Проверить результат работы установщика rEFInd можно, воспользовавшись утилитой efibootmgr, там первым приоритетом должна должен быть именно rEFInd Boot Manager.
Установить rEFInd повторно, если пакет уже установлен, можно с помощью команды:
refind-install
Установку rEFInd первым приоритетом можно произвести в ручную, с помощью команды:
refind-mkdefault
Перезагружаемся.
Всё очень страшно и откуда у меня столько ОС?
Да, всё страшно, пока. На самом деле ОС у вас всего две. Просто rEFInd собрал все .efi-бинарники и ещё отобразил ОС с возможностью загрузки напрямую. Для исправления этого недоразумения мы удалим лишнее, напишем свой конфиг и поставим красивую тему на rEFInd.
Первым делом зайдите в Linux, выбрав один из рабочих пунктов загрузки. В меню должен быть пункт для загрузки БЕЗ использования grubx64.efi! В разделе /boot проще работать из под администратора (потому у команду cd не хватает привелегий, а sudo она не работает), так что su и вводим пароль root’а.
Этот пункт не зря опциональный, потому что если у вас недостаточно опыта, то можно очень просто что-то сломать и не заметить. Рекомендую подготовить флешку с рабочим LiveCD, чтобы проводить восстановление, в случае неожиданностей.
Наша первая задача — удалить лишние директивы загрузки, их запросто может быть штук 6, а системы всего две.
Заходим в директорию:
cd /boot/efi/EFI && ls
Вероятно тут будет пять папок:
BOOT, microsoft, <ваш дистрибутив>, refind и tools.
Если будет что-то лишнее — смело удаляйте.
Способ 1 (через очищение, опаснее):
Убедившись что вы загрузились через rEFInd (!) и НЕ использовали для этого GRUB можете смело удалить папку вашего дистрибутива. Перезагрузитесь и проверьте, можете ли вы загрузиться в ваш Linux. Если можете, то вероятно в меню загрузки осталось 4 директивы: Windows, Linux и два странных пункта, которые приводят (скорее всего) к загрузке Linux. Можно было догадаться, что это .efi-бинарники из папки EFI/BOOT. Папку можно удалить полностью. НО! Убедитесь, что у вас есть бэкап. Перазагружаемся. Всё отлично?
Удаляем GRUB:
sudo apt-get remove grub2 grub2-efi grub grub-efi
Или:
sudo dnf remove grub2
Теперь можно ставить тему.
Некоторые UEFI другие директории вовсе не видят. Поэтому небольшой work around для таких систем существует. Удаляем папку BOOT, переименовываем папку refind в папку BOOT, а также сам файл refind_x64.efi в bootx64.efi. Перезагружаемся.
Способ 2 (через конфиг rEFInd, безопаснее):
Этот способ гораздо безопаснее, потому что удалять и что либо трогать мы не будем, мы добьемся результата правильной настройкой конфига. Сам конфиг лежит тут: /boot/efi/EFI/refind/refind.conf
Чтобы настроить свой набор директив загрузки нужно использовать два параметра scanfor и menuentry, после настройки должен получится примерно такой конфиг:
# Сканируем записи созданные ручкуами, флешки и оптически приводы

scanfor manual,external,optical

# Пункт для загрузки Linux

menuentry Linux {

 loader /EFI/ubuntu/grubx64.efi

 icon /EFI/refind/icons/os_linux.png

}

# Пункт для загрузки Windows 10

menuentry "Windows 10" {

 loader \EFI\Microsoft\Boot\bootmgr.efi

 icon /EFI/refind/icons/os_win.png

}
Разумеется это только часть конфига, другие параметры можно взять из примера
Мой конфиг на базе первого способа с комментариями
# Ожидание в секундах перед авто-выбором ОС

timeout 20

# Скринсервер через 300 секунд, если ничего не выбрали,

# но нажали любую клавишу и отменили автовыбор

screensaver 300

# Разрешение бут-менеджера

resolution 1280 1024

# Использовать графику при загрузке Linux. Этот параметр позволит загружать ОС с красивой Plymouth

# заставкой в разрешении указанном выше

use_graphics_for linux

scanfor internal,external,optical,netboot,biosexternal

# Подключение темы

include themes/refind-theme-regular/theme.conf
Отдельно про Plymouth можно почитать здесь.
Включение красивой темы
С этим всё просто, чуть выше последняя строчка конфига указывает на .conf-файл темы. Сами темы желательно класть в папку /boot/efi/EFI/refind/themes. По-умолчанию её нет, создайте через mkdir.
Заходим в директорию themes и просто пишем git clone https://github.com/munlik/refind-theme-regular.git. В конфиге прописываем строку include themes/refind-theme-regular/theme.conf
Другие темы можно посмотреть на оф. сайте.
Там же можно посмотреть подробные процессы установки, параметры для тонкой настройки конфига и многое другое.
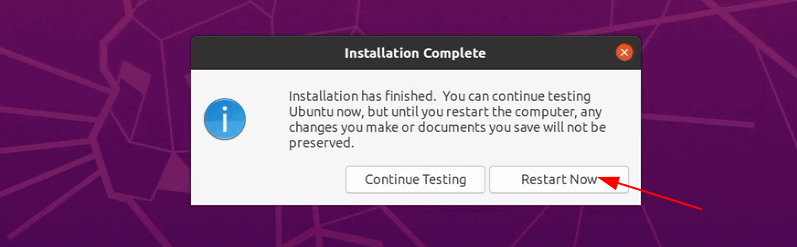
Пожалуй на этом всё. Мы получили красивый бут-менеджер для выбора нужной ОС с полной поддержкой UEFI. Пункт с установкой rEFInd наиболее сложный, а поэтому опциональный, большинству хватит grub2-efi.
Напоследок небольшое видео от меня:
Наверняка закралось приличное количество ошибок в тексте, буду рад, если вы отпишите о них мне ЛС.
UPD 28.10.2022: Друзья, статье уже 6 лет, несмотря на то, что rEFInd технически до сих пор актулен, я перешёл на systemd-boot, на мой взгляд он проще и удобней в настройке.

Приветствую, друзья!
Двойная загрузка Linux с Windows — один из самых удобных способов использования двух операционных систем на одном компьютере.
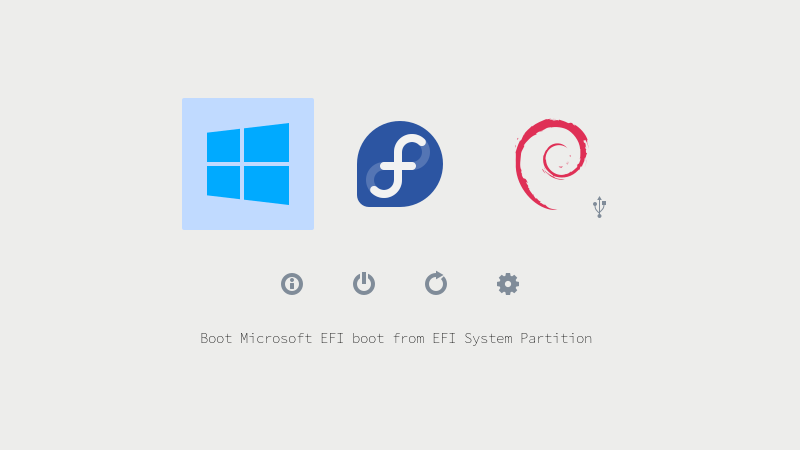
Обе ОС установлены на диске, на реальном оборудовании, и при включении системы вы можете выбрать, какую операционную систему использовать.
В режиме двойной загрузки вы можете выбрать операционную систему для загрузки
В этом руководстве я покажу вам, как установить Ubuntu с уже установленной в системе Windows 10.
Прежде чем вы начнете следовать руководству, я советую сначала полностью его прочитать.
Посмотрите, что вам нужно и что вы должны делать в этом уроке.
Как только вы получите хорошее представление о процедуре и у вас все необходимое будет под рукой, приступайте к процессу.
Двойная загрузка — не сложный процесс. Просто нужно время и терпение.
Упомянутые здесь шаги применимы к другим версиям Ubuntu, таким как Lubuntu, Kubuntu, Xubuntu и дистрибутивам Linux на основе Ubuntu, таким как Linux Mint, elementary OS и т. д.
Двойная загрузка Ubuntu Linux с Windows 10
Это руководство подходит для систем с предустановленной Windows 10 с безопасной загрузкой UEFI и системой разбиения GPT.
Пожалуйста, проверьте, использует ли ваша система GPT или MBR?
Проверки совместимости
Убедитесь, что ваша система использует UEFI: это руководство применимо только для систем с загрузкой UEFI.
Если вы купили свою систему в последние 5-6 лет, скорее всего, у вас уже должна быть система UEFI в разделе GPT.
Однако нет ничего плохого в том, чтобы убедиться, что ваша система использует UEFI.
Если в вашей системе используется устаревшая версия BIOS с системой разбиения на разделы MBR, следуйте этому руководству по двойной загрузке.
Процесс шифрования Bitlocker отличается: в новых системах с Windows 10 Pro диск зашифрован с помощью Bitlocker.
Система с SSD и HDD: если у вас есть система с SSD и HDD, то есть с двумя дисками, процесс будет почти таким же.
Предпосылки: что вам нужно?
Для простой и безопасной установки Linux вместе с Windows вам понадобятся следующие вещи:
- Компьютер с предустановленной Windows 10;
- USB-ключ (флэш-накопитель или USB-накопитель) размером не менее 4 ГБ и без данных на нем;
- Подключение к интернету (для загрузки ISO-образа Ubuntu и инструмента для создания Live USB). Вы можете сделать это в любой системе, не обязательно в системе с двойной загрузкой.
- Необязательно: внешний USB-диск для резервного копирования существующих данных;
- Необязательно: восстановление Windows или загрузочный диск (если у вас возникнут серьезные проблемы с загрузкой, их можно будет исправить).
Давайте посмотрим, как установить Ubuntu вместе с Windows 10.
Шаг 1. Сделайте резервную копию вашей системы Windows [необязательно]
Всегда приятно иметь резервную копию ваших данных, на всякий случай, если вы испортите систему при работе с разделами диска.
Я советую скопировать все важные данные, которые вы не можете позволить себе потерять, на внешний USB-диск.
Вы можете использовать внешний жесткий диск (медленнее, но дешевле) или SSD (быстрее, но дороже) и копировать на него важные файлы и папки.
Шаг 2. Загрузите Ubuntu (или любой другой дистрибутив Linux, который вы будете использовать)
Перейдите на сайт Ubuntu и загрузите файл ISO.
Размер файла должен быть около 2,5 ГБ. Если вам нужно загрузить Ubuntu через торрент, вы можете нажать «Альтернативные загрузки».
Шаг 3: Создайте live USB / диск Ubuntu
Я предполагаю, что вы используете Windows для создания Live USB.
Есть несколько бесплатных приложений, которые позволяют создать Live Ubuntu USB.
Вы можете использовать любой из этих инструментов.
Поскольку я не могу показать их все, я буду все делать с Rufus.
Загрузите Rufus бесплатно с его веб-сайта. Он загрузит файл с расширением .exe.
Подключите USB.
Это устройство будет отформатировано, поэтому убедитесь, что на нем нет важных данных.
Запустите только что загруженный инструмент Rufus.
Он автоматически определяет подключенный USB-порт, но все равно дважды проверьте его.
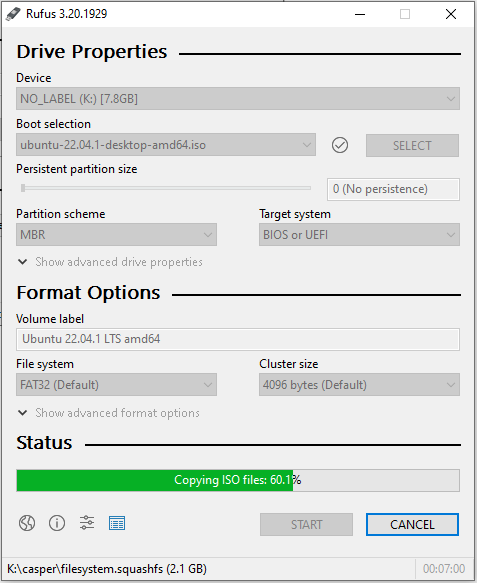
Теперь перейдите к местоположению загруженного образа ISO и убедитесь, что он использует схему разделения GPT и целевую систему UEFI.
Нажмите кнопку «Пуск» и дождитесь завершения процесса. Ваш Live Linux USB готов.
Примечание. Установить Ubuntu и создать действующий USB-процесс Ubuntu можно на любом компьютере.
Но остальная часть процесса берет на себя система, в которой вы выполняете двойную загрузку.
Шаг 4. Освободите место на диске для установки Ubuntu
Во многих системах при установке Ubuntu предоставляется возможность сделать раздел диска для Ubuntu.
Однако это не гарантия.
Поэтому перед установкой лучше освободить необходимое место на диске.
В меню Windows найдите «разделы диска» и выберите «Создать и отформатировать разделы жесткого диска».
В инструменте управления дисками щелкните правой кнопкой мыши диск, который вы хотите разделить, и выберите «Сжатый том».
Если у вас всего один такой раздел, вам нужно освободить на нем немного свободного места для Linux.
Если у вас есть несколько разделов значительного размера, используйте любой из них, кроме диска C, поскольку он может стереть данные.
На 256 ГБ в моей системе уже было несколько разделов от производителя, но в основном для резервного копирования и других целей.
Основным разделом был диск C объемом около 220 ГБ, на котором установлена Windows 10.
В моем случае я уменьшил диск C, чтобы освободить место для установки Linux.
Сколько места вам нужно для Linux при двойной загрузке?
Это зависит от того, сколько у вас общего дискового пространства.
Вы можете установить Ubuntu на 15 или 20 ГБ, но скоро у вас начнется нехватка места на диске.
В наши дни у вас должно быть не менее 120 ГБ на диске.
В этом случае выберите для Linux 30-40 ГБ диска.
Если у вас диск на 250 ГБ, выделите ему 60-80 ГБ или даже больше.
Если у вас больше места на диске, выделите ему еще больше свободного места, если хотите.
Что делать, если у вас есть диски D, E или F?
Это обычная путаница для многих людей, поскольку они думают, что Ubuntu можно установить только на диск C.
Это не правда.
Понимаете, у меня был только один диск C, поэтому я его сжал.
Если у вас есть диск D, E или F, вы можете сжать один из этих дисков.
Вы также можете удалить диск D, E или F.
НИКОГДА НЕ УДАЛЯЙТЕ ДИСК С.
Шаг 5: Загрузитесь с Live Ubuntu USB
Вы создали действующий USB-накопитель Ubuntu на шаге 3.
Подключите его к системе.
Прежде чем вы загрузитесь с Live USB-накопителя, давайте вкратце расскажем о печально известной безопасной загрузке.
Нужно ли мне отключать безопасную загрузку для установки Linux?
6-8 лет назад безопасная загрузка UEFI не поддерживалась Linux, и поэтому вам пришлось отключить безопасную загрузку перед установкой Linux.
К счастью, в наши дни Ubuntu и многие другие дистрибутивы Linux очень хорошо поддерживают безопасную загрузку.
Обычно с этим ничего делать не нужно.
Однако, если ваша система не позволяет загружаться с Live USB или если вы видите какие-либо другие связанные проблемы, вы можете отключить безопасную загрузку в Windows.
Хорошо! Посмотрим, как загрузиться с USB.
Вы можете перейти к настройкам загрузки, нажав F2 / F10 или F12 во время запуска системы, и выбрать загрузку с USB.
Однако некоторым это трудно.
Более длинный, но простой шаг — получить доступ к настройкам загрузки UEFI из Windows.
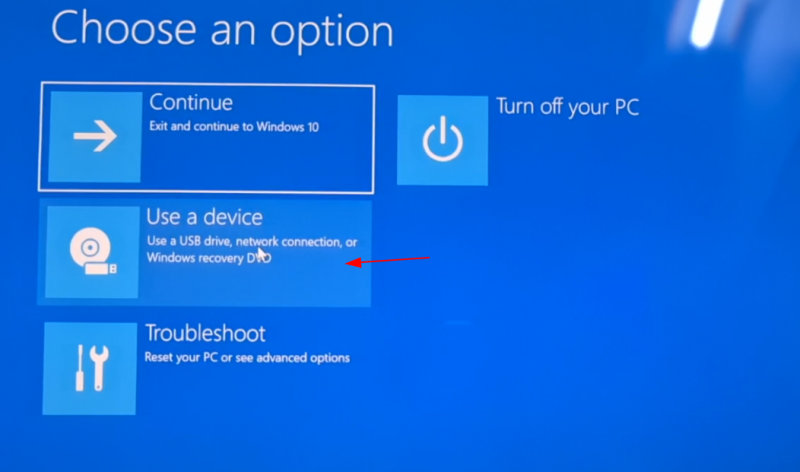
В меню Windows найдите UEFI и нажмите «Изменить дополнительные параметры запуска»:
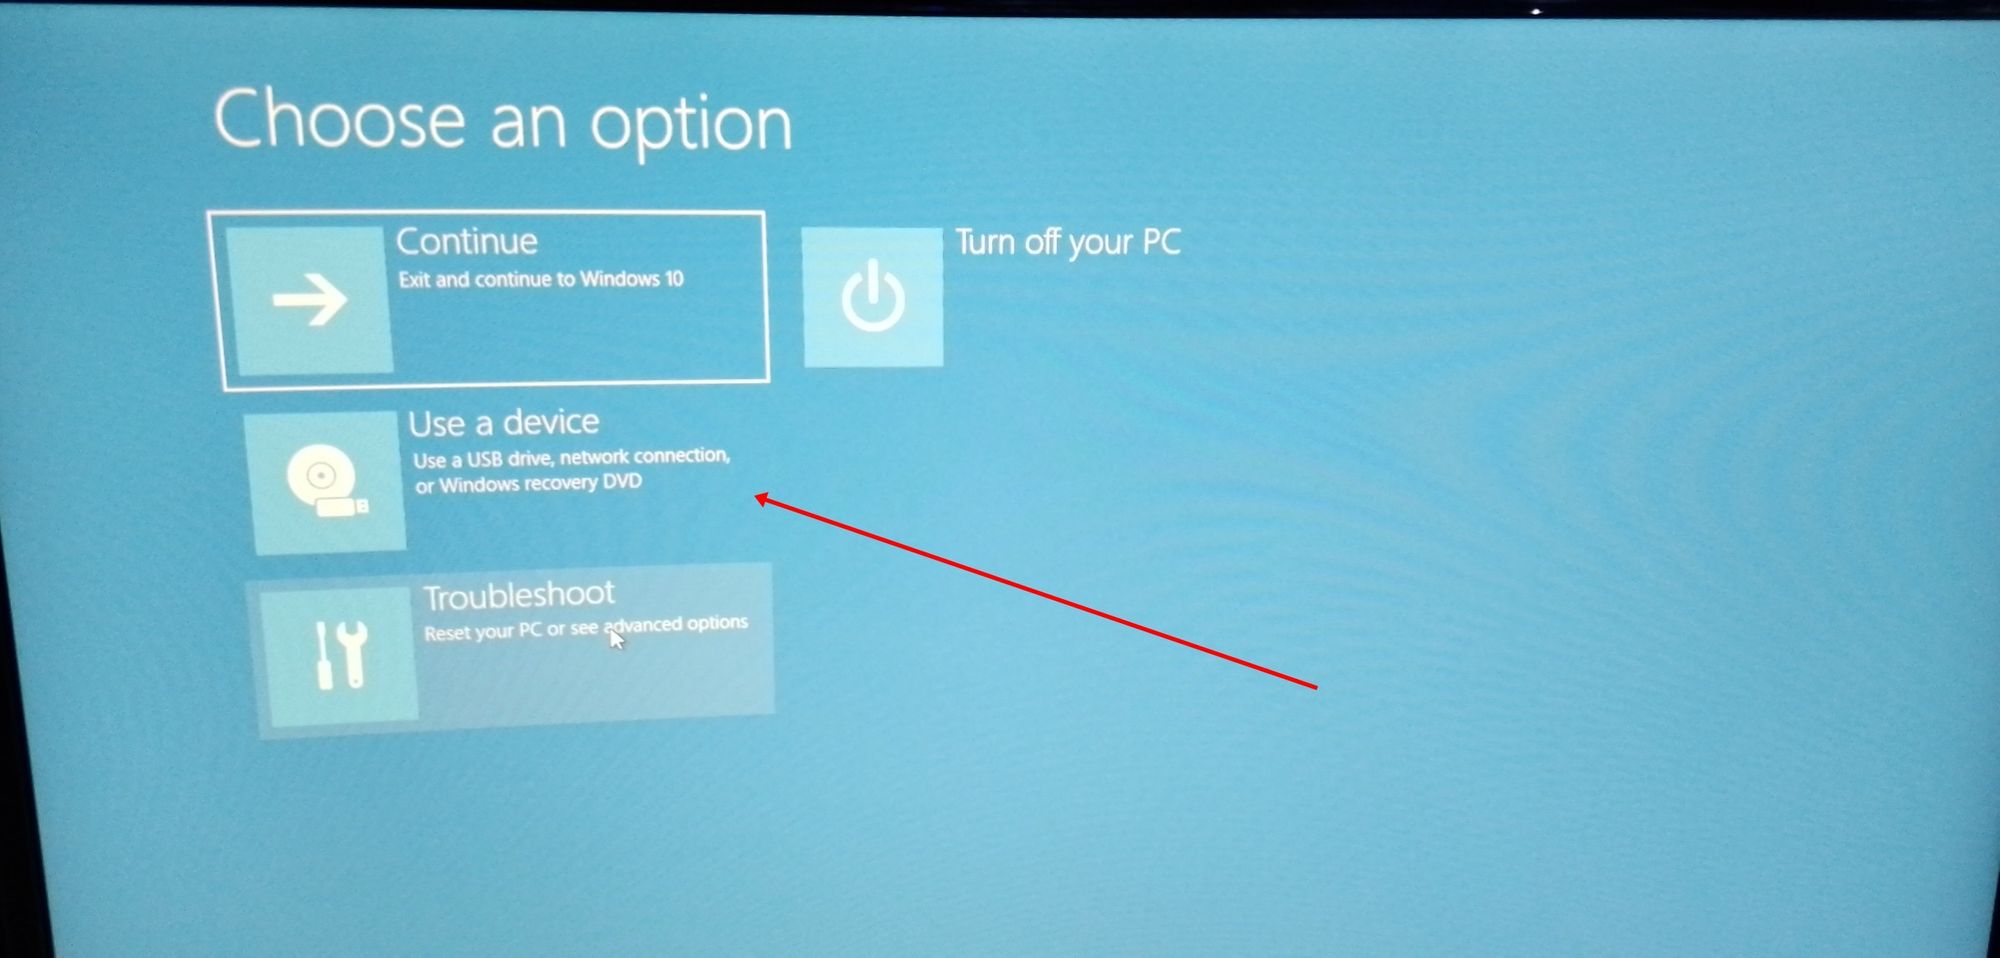
Перейдите к параметру «Расширенный запуск» и нажмите кнопку «Перезагрузить сейчас».
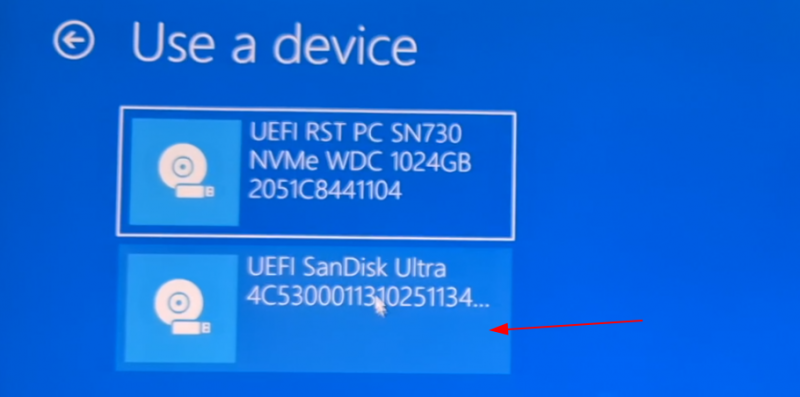
На следующем экране нажмите «Использовать устройство»:
Распознайте USB-диск по его имени и размеру.
Он также может отображаться как USB-устройство EFI.
Теперь он выключит вашу систему и перезагрузится на выбранный вами диск, который должен быть активным USB-диском.
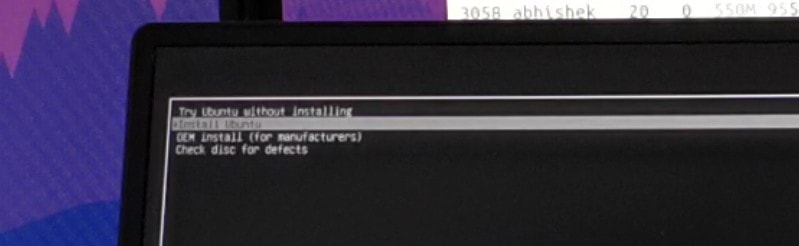
Через несколько секунд вы должны увидеть такой экран:
Опция «Попробовать Ubuntu без установки» позволяет вам испытать Ubuntu с Live диска.
Вариант установки Ubuntu можно найти на рабочем столе.
Опция «Установить Ubuntu» немедленно запустит установку Ubuntu.
Вы можете выбрать любой вариант в зависимости от ваших предпочтений.
Шаг 6: Установка Ubuntu вместе с Windows 10
Запустите процедуру установки.
Первые несколько шагов просты.
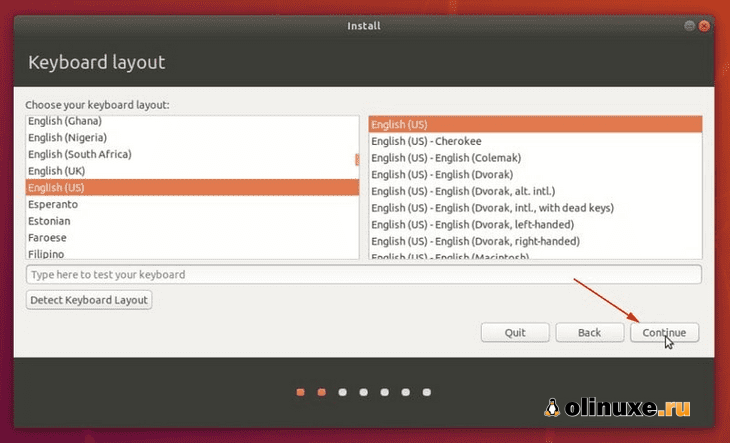
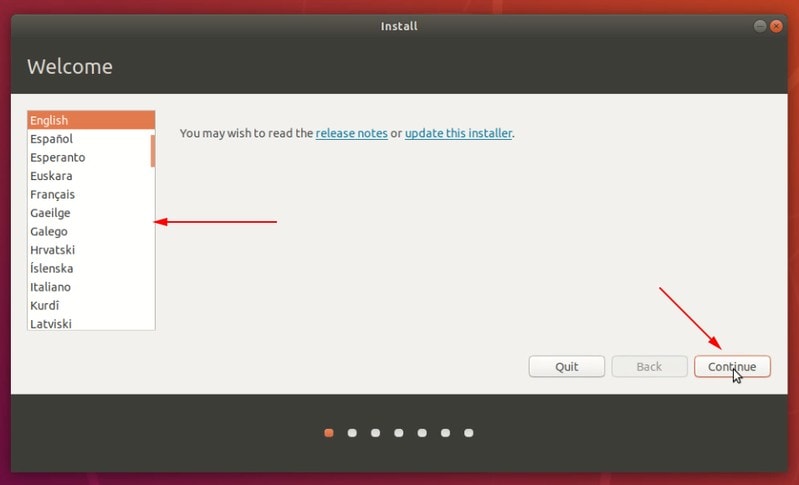
Вы выбираете язык и раскладку клавиатуры.
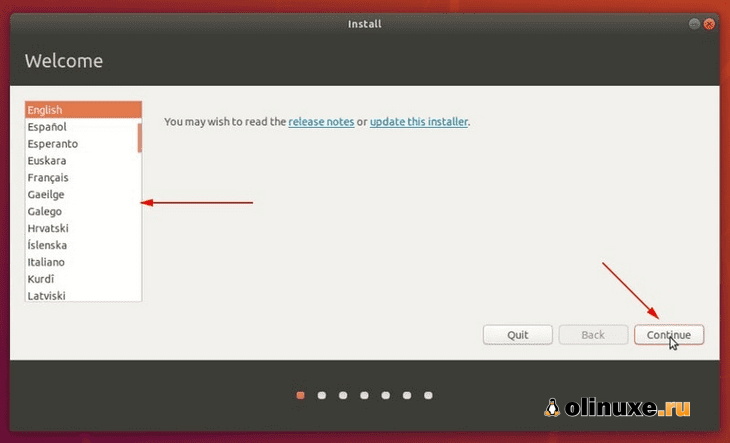
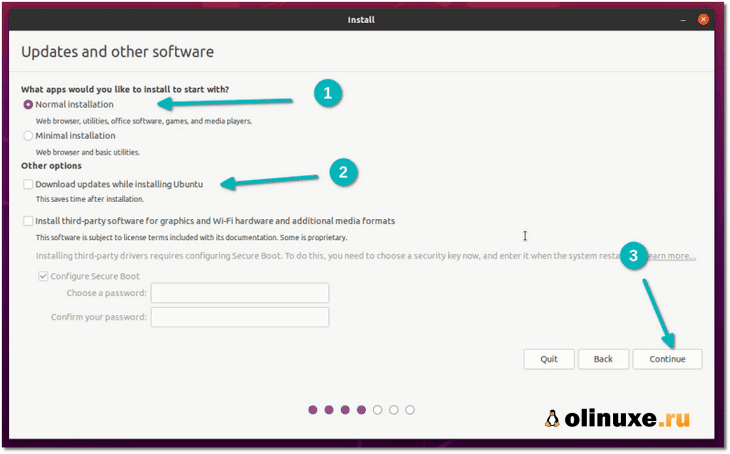
На следующем экране выберите «Обычная установка».
Пока не нужно загружать обновления или устанавливать стороннее программное обеспечение.
Вы можете сделать это после завершения установки.
Нажмите «Продолжить».
Переход к следующему шагу может занять некоторое время.
Примечание. Некоторые люди пытаются загрузить обновления и установить медиа-кодеки во время установки.
По моему опыту, это иногда создает проблемы во время установки, а также может привести к сбою установки.
По этой причине я не советую их использовать.
Важно: установка требует двух подходов в зависимости от того, что вы видите на следующем экране.
Поскольку это подробное руководство, я рассмотрю оба аспекта.
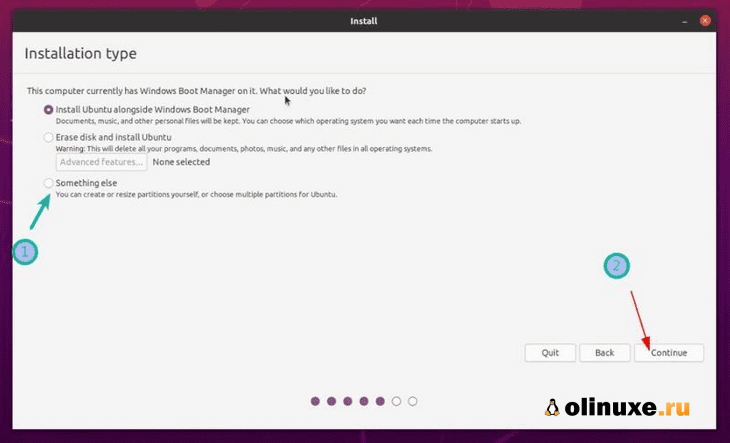
Подход 1. Вы видите «Установить Ubuntu вместе с Windows Boot Manager».
Если вы видите «Установить Ubuntu вместе с Windows Boot Manager» на экране установки, вам повезло.
Вы можете выбрать этот метод и нажать «Продолжить».
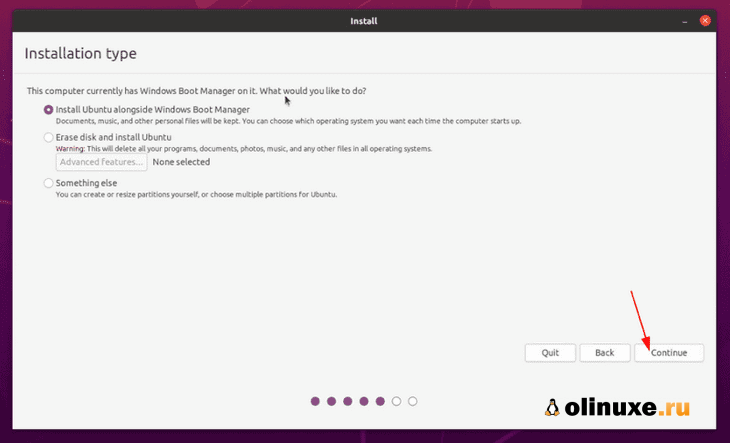
Если вы видите «Установить Ubuntu вместе с диспетчером загрузки Windows», выберите его
На следующем экране вы сможете создать раздел для Ubuntu, перетащив разделитель.
Вы можете выделить соответствующее дисковое пространство для Linux здесь.
Ubuntu создаст один раздел из выделенного дискового пространства, и у него будет root с home и swap (файл подкачки) размером 2 ГБ под root.
Подход 2: Вы не видите параметр «Установить Ubuntu вместе с диспетчером загрузки Windows» или он неактивен
Но если вы один из тех, кому не повезло, вам не о чем беспокоиться.
Для вас дела обстоят не так уж и плохо.
Вы все еще можете установить Ubuntu с Windows.
На экране «Тип установки» выберите «Что-нибудь еще».
Вы перейдете к экрану разбиения на разделы.
Помните, вы заранее создали свободное место?
Вы можете выделить все свободное пространство для root (файл подкачки и домашняя страница будут созданы автоматически под root) или вы можете разделить разделы root, swap и home.
Оба метода хороши.
Я показываю шаги для создания разделов root, swap и home по отдельности.
Но не стесняйтесь использовать один раздел для всех из них.
Выберите свободное место и нажмите на знак «+».
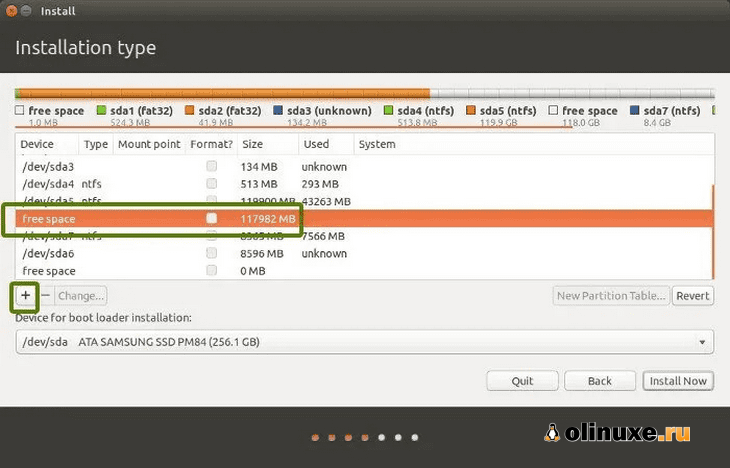
Он предоставит вам возможность создать раздел Linux.
Вы создаете корневой (root) раздел.
Для этого более чем достаточно всего, что превышает 25 ГБ.
Выберите размер, выберите «Ext4» в качестве типа файла и / (означает root) в качестве точки монтирования.
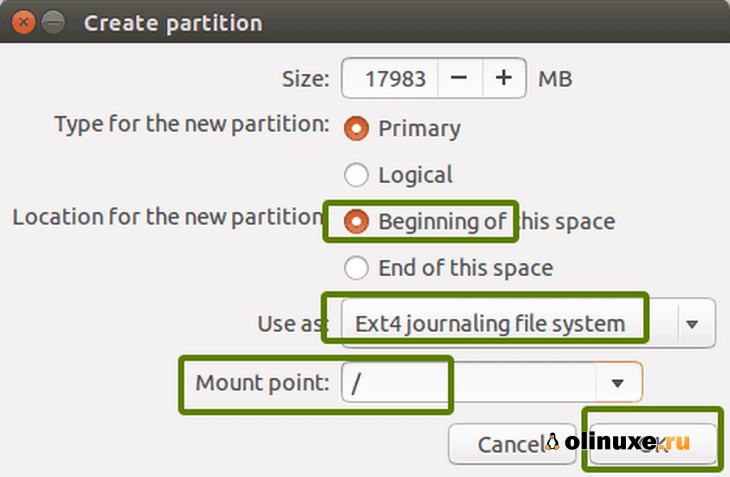
Щелкнув «OK» на предыдущем шаге, вы перейдете к экрану раздела.
Затем создайте swap.
Как и раньше, снова нажмите на знак «+».
На этот раз используйте тип файла как область подкачки.
Вопрос об идеальном размере подкачки в Linux остается спорным.
Если у вас 2 ГБ или меньше ОЗУ, используйте подкачку, вдвое превышающую размер ОЗУ.
А если у вас 3-6 ГБ ОЗУ, используйте подкачку того же размера, что и ОЗУ.
Если у вас 8 ГБ или более ОЗУ, вы можете использовать подкачку, равную половине размера ОЗУ (если у вас не достаточно места на диске, и вы хотите использовать спящий режим, и в этом случае используйте подкачку не менее того же размера, что и ОЗУ).
Если вы чувствуете, что в вашей системе меньше swap, не волнуйтесь.
Вы можете легко создать файл подкачки и добавить больше места подкачки в свои системы.
Таким же образом создайте домашний раздел.
Выделите ему максимальное пространство (фактически выделите ему остальное свободное пространство), потому что именно здесь вы будете сохранять музыку, изображения и загруженные файлы.
Когда вы будете готовы с root, swap и home, нажмите «Install Now»:
Что ж, вы почти выиграли битву.
Теперь вы чувствуете запах победы.
По запросу выберите часовой пояс.
Затем вам будет предложено ввести имя пользователя, имя хоста (имя компьютера) и пароль.
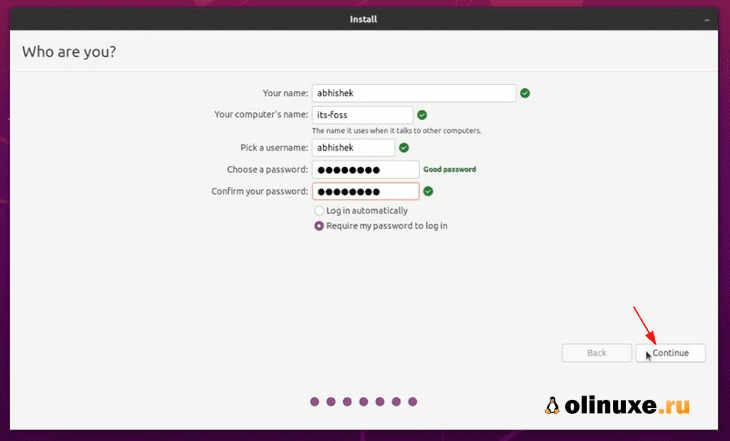
Теперь осталось только подождать.
Для завершения установки потребуется 8-10 минут.
После завершения установки перезагрузите систему.
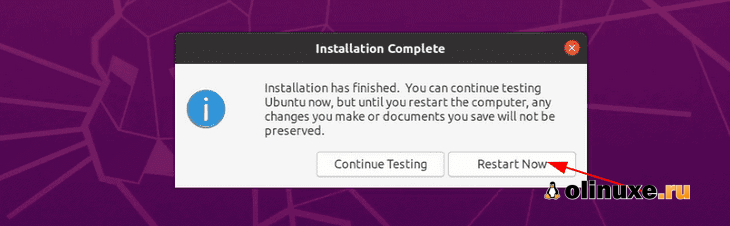
Перезагрузите компьютер после завершения установки
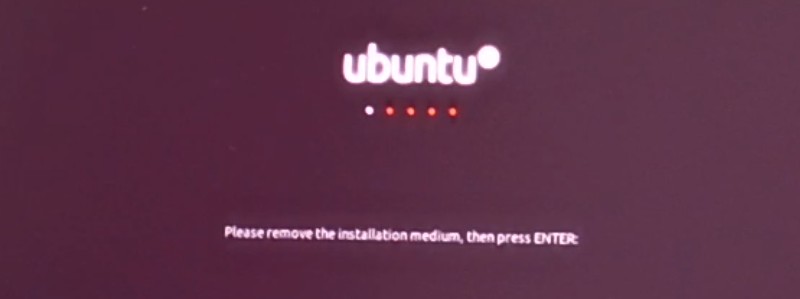
Вам будет предложено извлечь USB-диск.
На этом этапе вы можете удалить диск, не беспокоясь.
После этого система перезагрузится.

Удалите USB и нажмите ENTER
Для использования Linux вам больше не нужен Live USB-диск.
Вы установили Ubuntu на диск своего компьютера.
Удалите USB-накопитель и оставьте его на потом, если вы хотите использовать его для установки Linux в другой системе.
Вы также можете отформатировать его и использовать для обычного хранения или передачи данных.
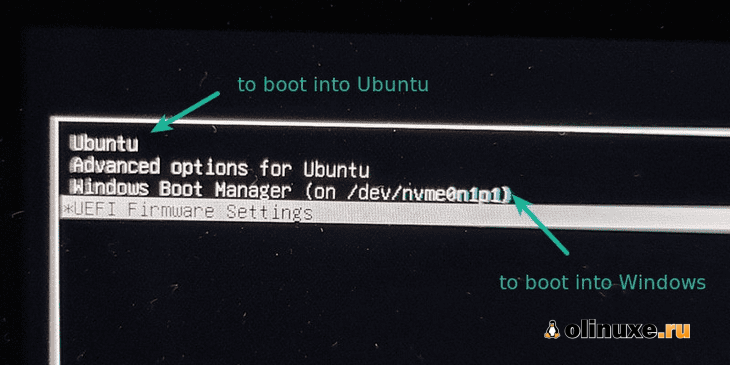
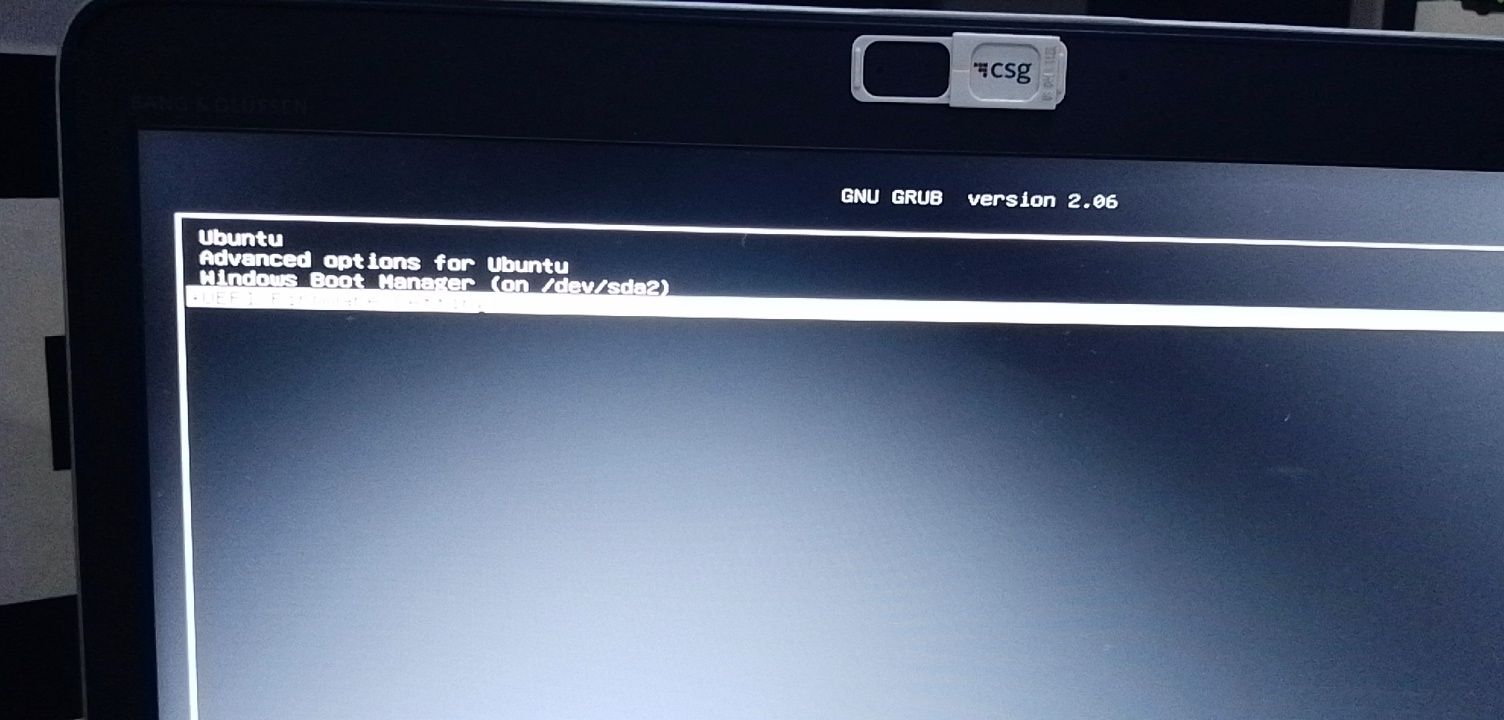
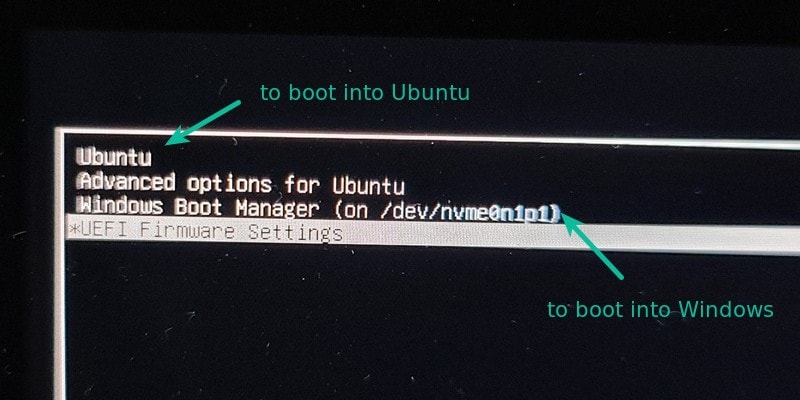
Если все прошло гладко, вы должны увидеть экран «grub» после включения системы.
Здесь вы можете выбрать Ubuntu для загрузки в Ubuntu и диспетчер загрузки Windows для загрузки в Windows.
Довольно круто, правда?
Вы можете выбрать операционную систему на экране «grub»
Двойная загрузка не удалась? Вот несколько советов по устранению неполадок
Для некоторых двойная загрузка может пока не работать.
Однако вместо того, чтобы сдаваться, вы можете следовать нескольким советам и повторить процедуру установки.
Попробуйте сменить порт USB
Это может показаться смешным, но иногда некоторые порты USB вызывают проблемы с загрузкой USB или установкой Linux.
Изменение USB-порта может быть хитростью.
Старайтесь не использовать интернет при установке Linux
Я испытал, что иногда установка Linux выдает ошибку, если он подключен к интернету.
Если вы столкнулись с ошибкой «’grub-efi-amd64-signed’ package failed to install into /target», попробуйте установить Ubuntu без интернета.
Отключите безопасную загрузку и / или быструю загрузку
В некоторых редких случаях безопасная загрузка не позволит вам загрузиться с Live USB или установить Linux.
Отключите безопасную загрузку.
В некоторых случаях вы также можете отключить быструю загрузку.
Двойная загрузка завершена, но вы не видите экран «grub» для загрузки в Ubuntu
Пожалуйста, проверьте порядок загрузки в настройках UEFI.
Вы видите Ubuntu / UEFI под диспетчером загрузки Windows?
Если да, переместите его вверх по порядку.
Надеюсь, это руководство помогло вам выполнить двойную загрузку Ubuntu с Windows 10 UEFI.
Я здесь слишком подробно остановился на деталях, но я хотел ответить на все распространенные заблуждения и показать все необходимые шаги.
Если у вас все еще есть сомнения или возникла странная ошибка, оставьте комментарий, и я постараюсь вам помочь.
До скорых встреч!
До скорых встреч! Заходите!
Подписаться на обновления блога!

You don’t have to have two different computers to use Linux and Windows 10. It’s possible to have a Linux distro installed on a computer with Windows 10 preinstalled.
In this article, I will show you how to dual boot Windows 10 and the popular Ubuntu Linux distro. But before that, you have to install Ubuntu on your Windows 10 PC.
Before you go through this process, you must backup your files. That’s because installing an OS is a risky process. Sometimes it can overwrite the existing OS and delete all your files.
N.B.: Most of the processes in this article take time to get done, so you need to be patient.
What We’ll Cover – A step-by-step Guide to Dual-Booting Windows 10 and Linux
- Prerequisites
- How to Partition your Hard Drive for Ubuntu
- How to Optimize your Hard Drive for More Partition Space (Optional)
- How to Download Ubuntu in ISO Image Format
- How to Make an Ubuntu (Linux) Bootable USB Drive
- How to Install Ubuntu Linux Distro along with Windows 10
- Now You Can Dual Boot Ubuntu and Windows 10
- Conclusion
Prerequisites
Most importantly, there are some things you must have in place if you want to use (and dual boot) Ubuntu and Windows 10 on the same PC:
- A computer preinstalled with Windows 10
- A partitioned hard drive
- A BIOS in UEFI mode (Unified Extensible Firmware Interface)
- An empty USB drive of at least 4Gig for creating a bootable disk
- An internet connection to download Ubuntu ISO image (the Linux distro) and Rufus (a bootable drive creation tool)
How to Check If Your PC BIOS is in UEFI Mode
To check if your PC BIOS comes in UEFI mode, search for “system information” and hit ENTER.
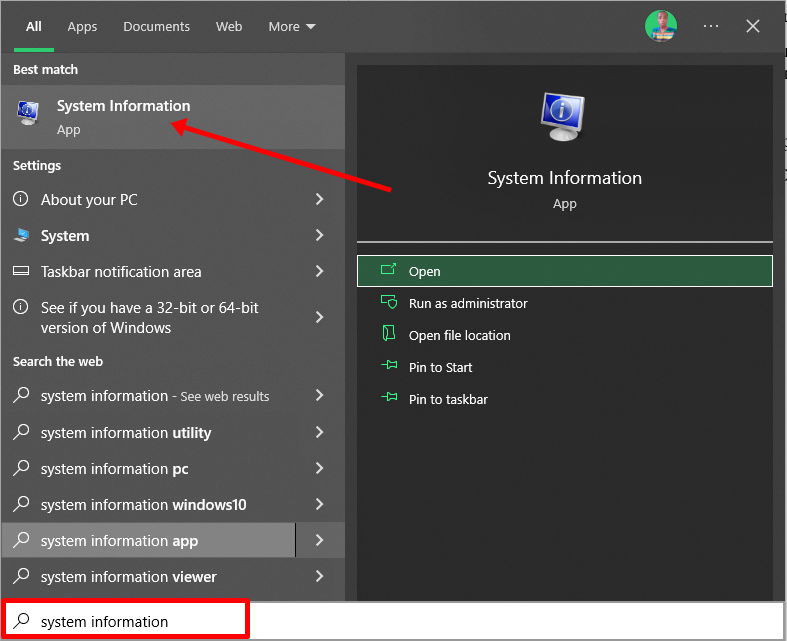
Look under BIOS mode to confirm that your PC BIOS mode comes as UEFI.
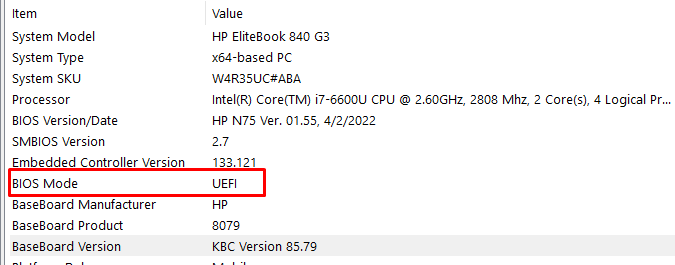
If your PC BIOS is not in UEFI mode, the two operating systems won’t see each other. You can learn more about the difference between these two modes here.
How to Partition your Hard Drive for Ubuntu
You have to partition your hard drive because you must set aside at least 20Gig for Ubuntu to live in and boot from.
To partition your hard drive, follow the steps below:
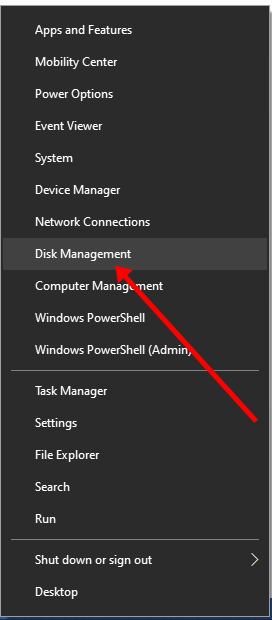
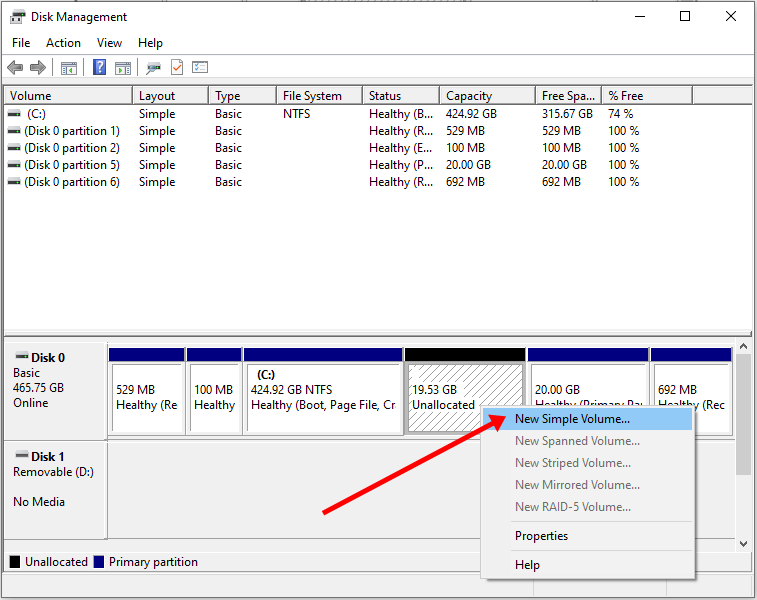
Step 1: Right-click on Start and select “Disk Management”.
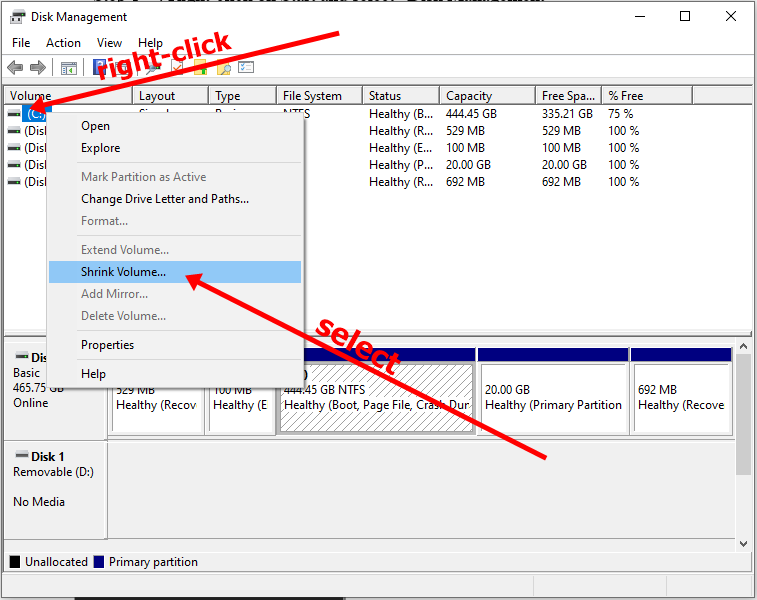
Step 2: Right-click on your C drive and select shrink volume.
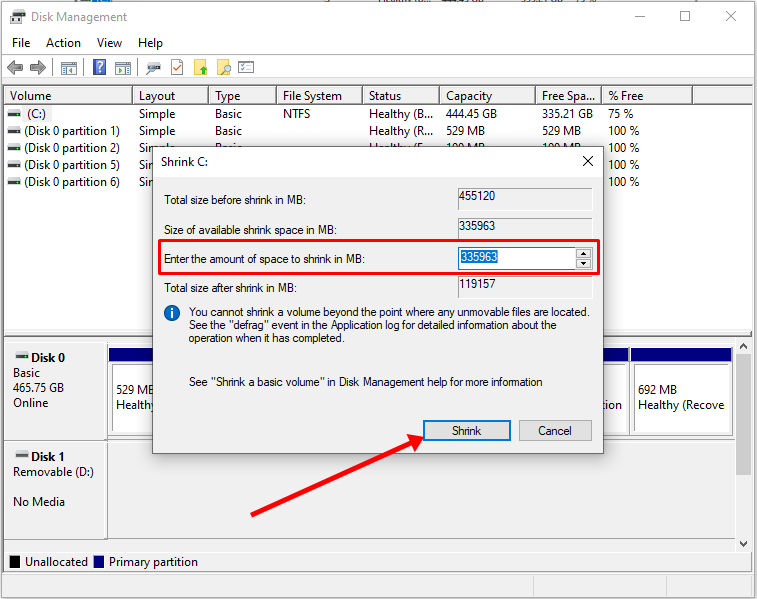
Step 3: Select at least (20000) 20Gig for Ubuntu and click “Shrink”. IT can take some time to complete, so be patient.
Step 4 (optional): You can go ahead and assign a letter to the new volume. Right-click on the unallocated space and select “New Simple Volume”.
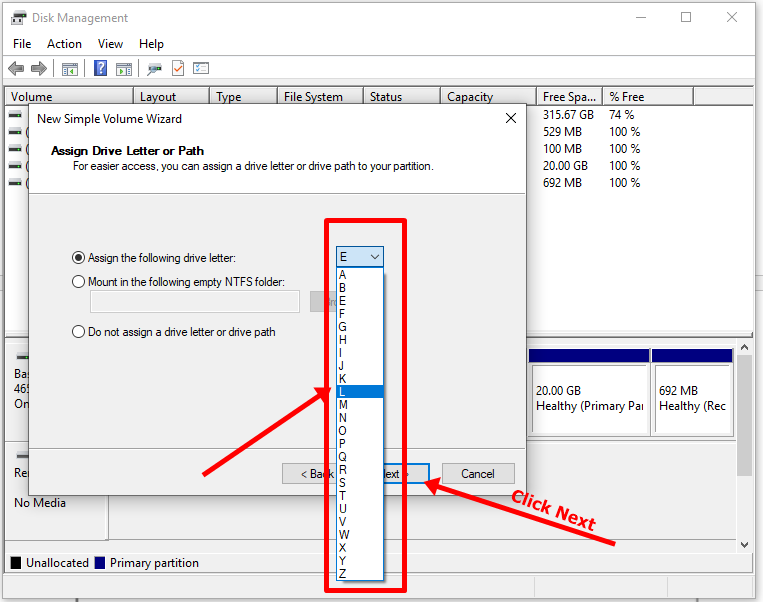
Step 5: Follow the wizard and assign a letter to the drive, then follow the rest of it.
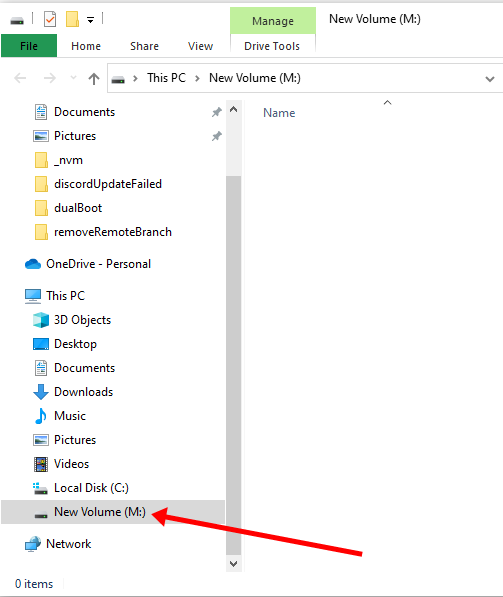
After completing the wizard, the drive should be listed on your computer.
Congrats! You’ve successfully partitioned your hard drive.
N.B.: If you have a lot of free space in your hard drive but your PC still didn’t give you up to 20Gig partition space, then you need to optimize your PC’s hard drive. Proceed to the next section of this article to do that.
How to Optimize your Hard Drive for More Partition Space (Optional)
The common purpose of hard disk optimization is to speed up your computer during boot time and make it run smoother.
At the same time, the process will defragment the hard disk and make free space more available for partitioning.
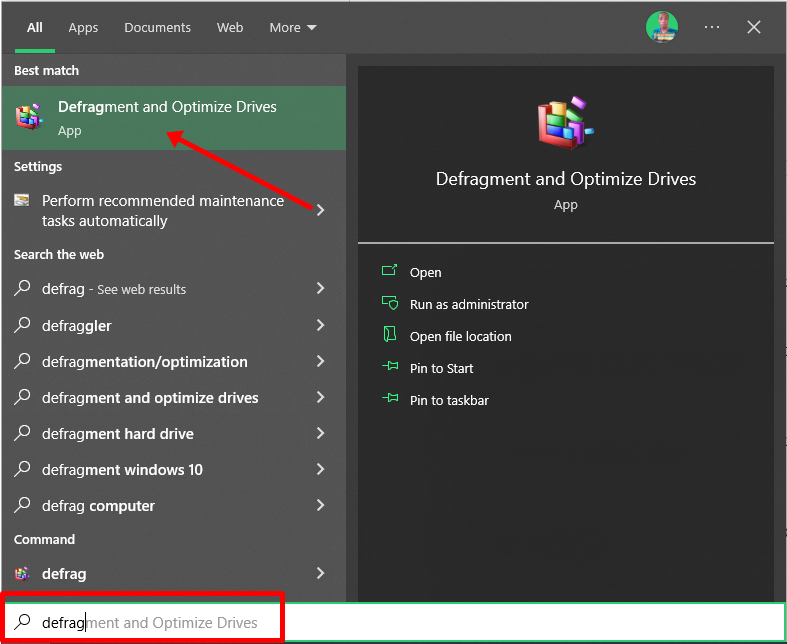
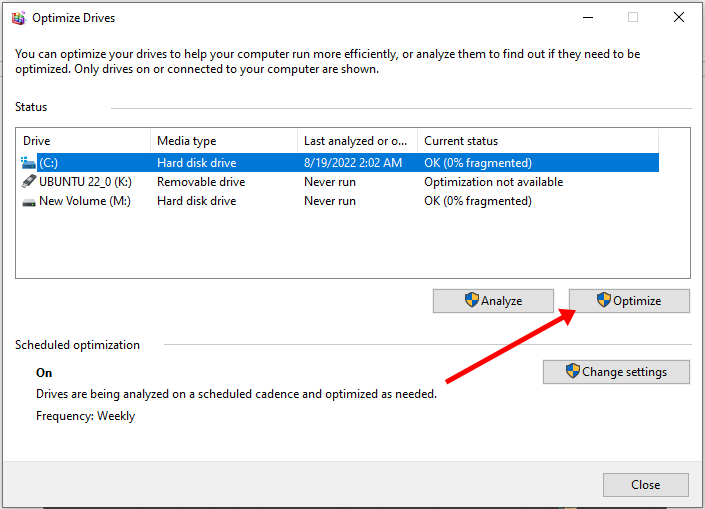
To optimize your hard drive, click Start (Windows logo key), search for “defrag” and select “Defragment and Optimize Drives”.
Make sure your C drive is highlighted, then click “Optimize”.
After you’ve been able to set aside at least 20Gig for Ubuntu by partitioning your hard drive, then it’s time to download Ubuntu and make a bootable USB.
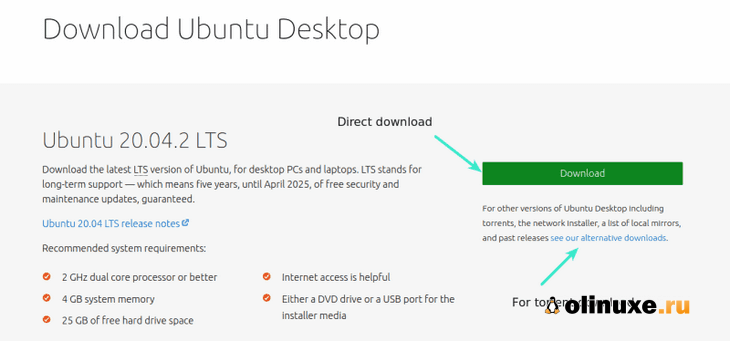
How to Download Ubuntu in ISO Image Format
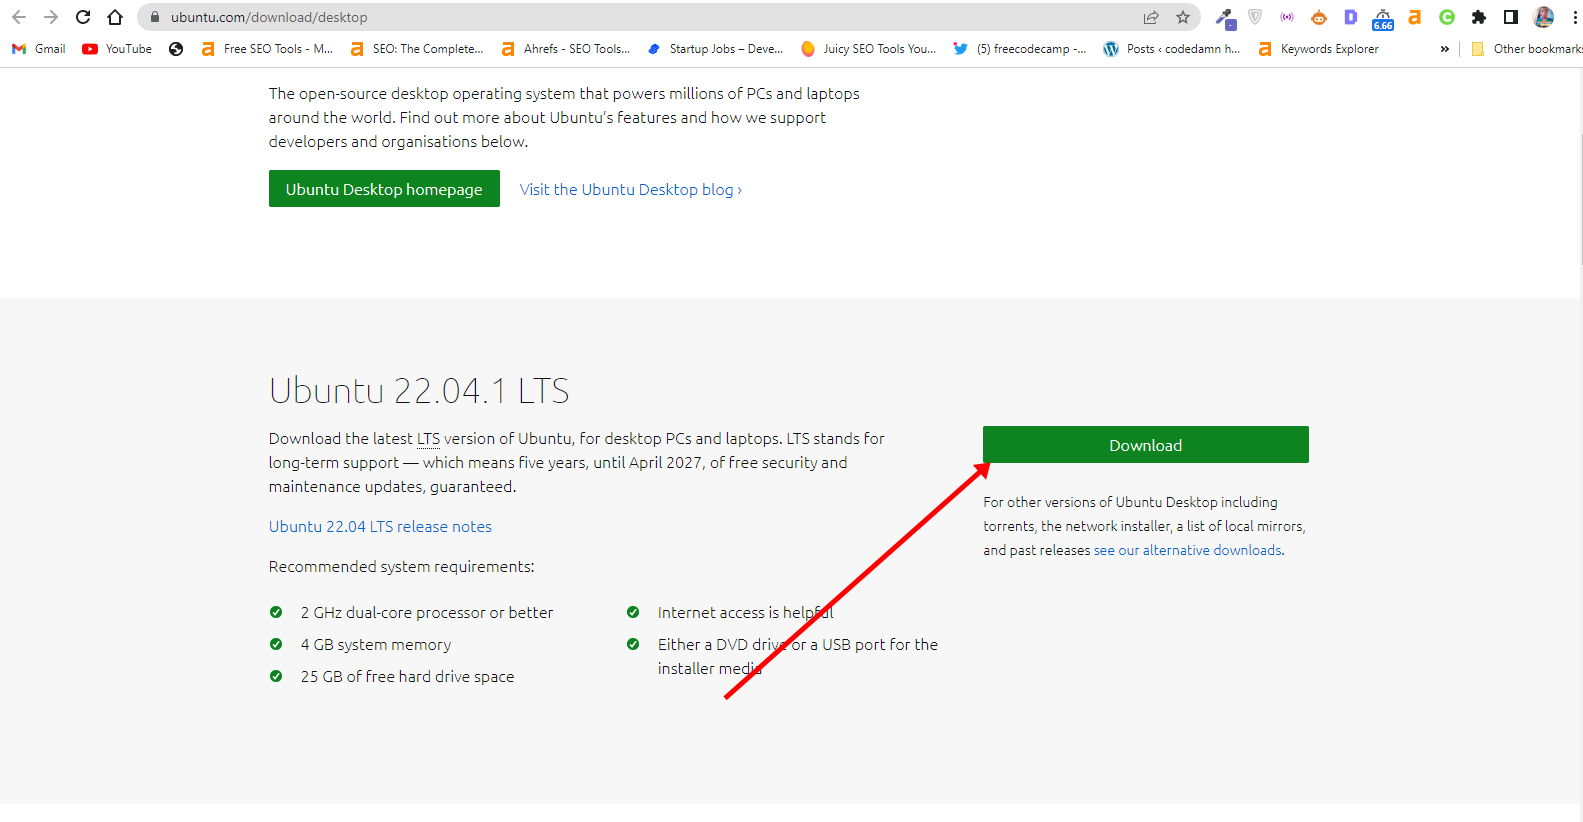
The next thing is to download Ubuntu in ISO image format so you can install Ubuntu. You can download it from the Ubuntu distro website.
After downloading Ubuntu, don’t do anything with it yet. You need to make a bootable USB and put it in there. That’s how you’ll be able to use it.
The reason you can’t install Ubuntu just like that is that it doesn’t come as an executable. It comes in form of ISO (optical disk image). That means you have to find a disk to put it in before it can work.
The next part of this guide shows how you can put the downloaded Ubuntu ISO on a USB stick.
How to Make an Ubuntu (Linux) Bootable USB Drive
You won’t be able to make a bootable USB drive for Ubuntu by just placing the downloaded ISO image in it. Follow these steps to get it done:
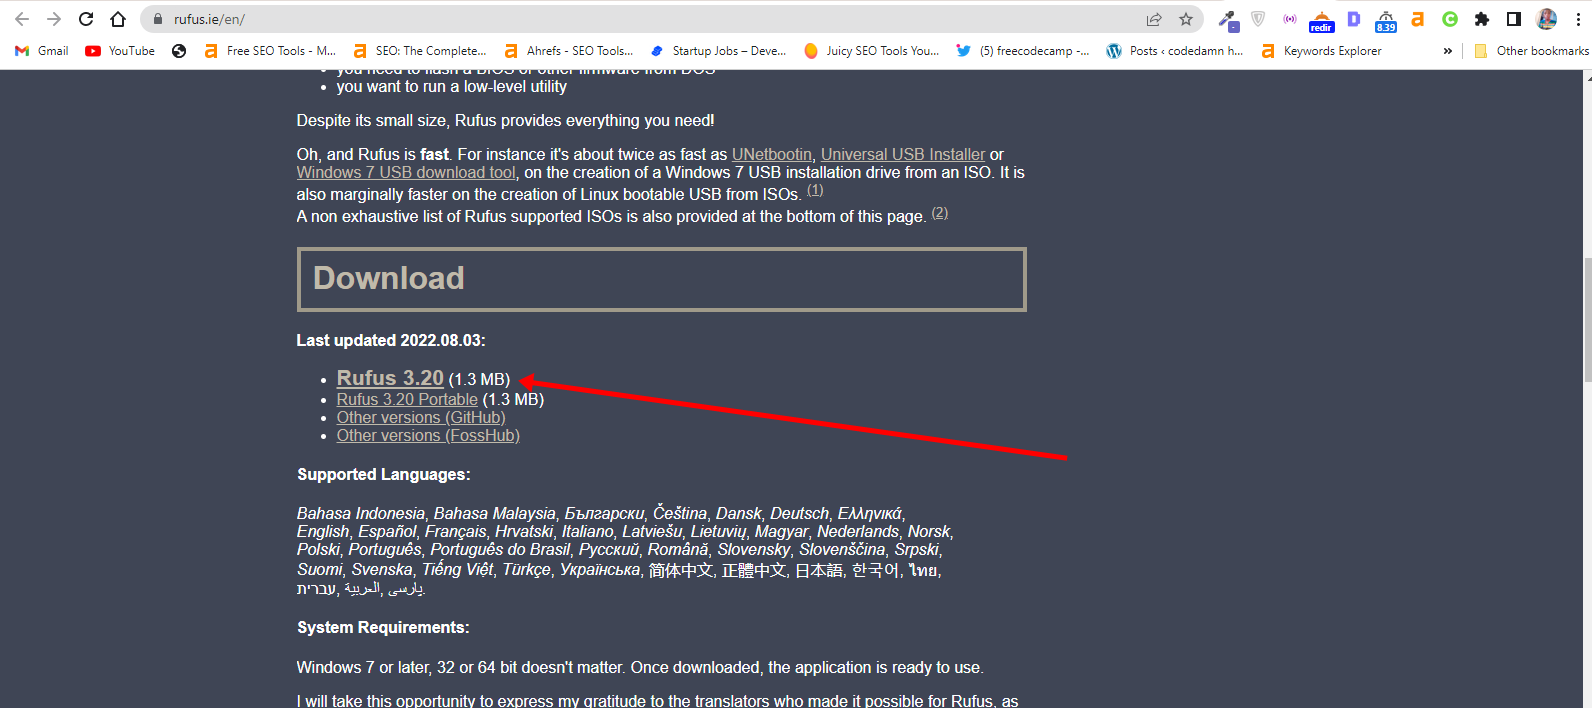
Step 1: You need to download a bootable USB drive creation tool like Rufus. You can download Rufus from their website.
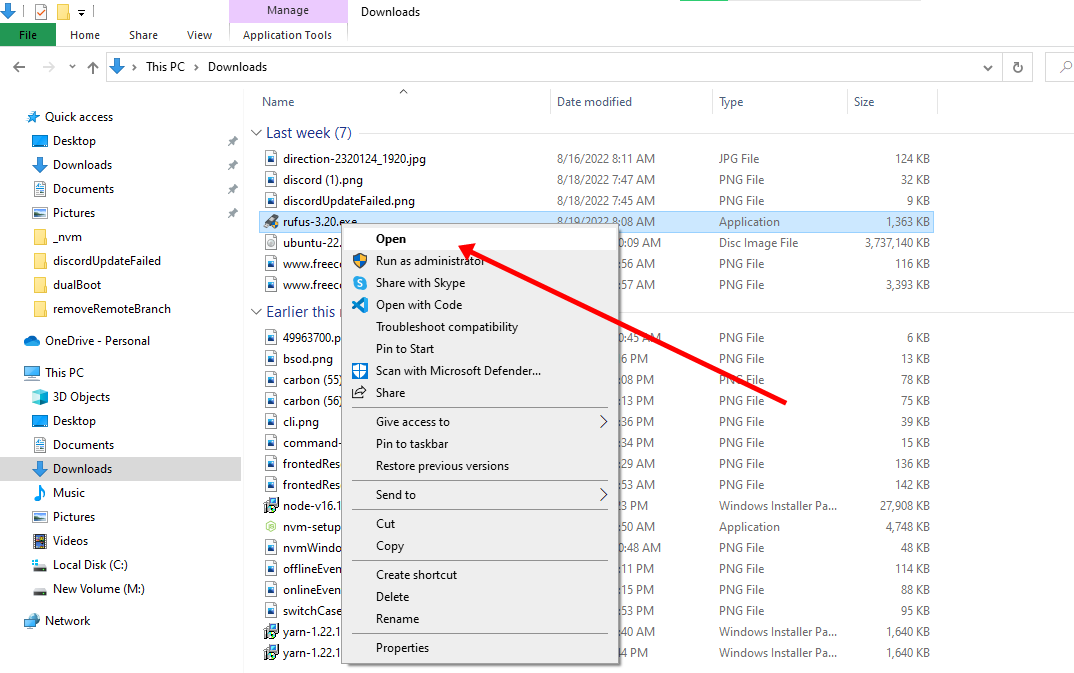
Step 2: Insert the empty USB drive into your Windows 10 PC. Right-click on Rufus and select “Open”.
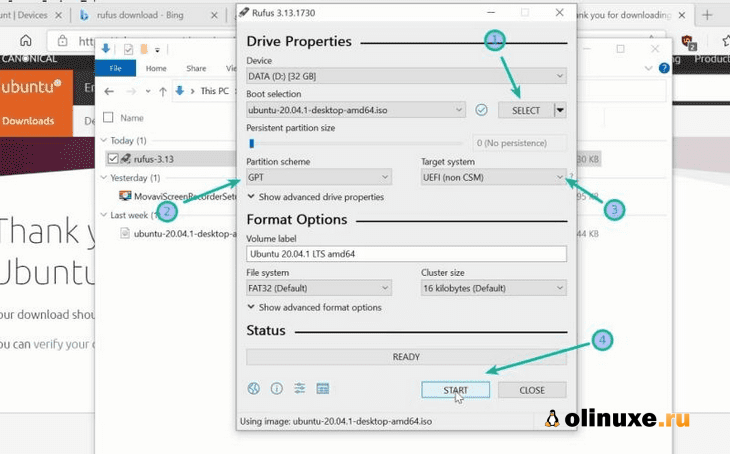
Step 3: Under “Device”, select your USB drive. And under “Boot selection”, click the “Select” button and select the Ubuntu ISO file you downloaded
Step 4: Leave every other thing as default and click the “START” button to start burning the Ubuntu distro to the drive.

Step 5: Click OK to start the process.
Once the process is done, you should see “READY” on a green background. Click the Close button. Its time to install Ubuntu.
Congrats! Now you have a bootable drive with which you can install Linux.
The next step is to install the Ubuntu distro on your Windows 10 PC. To do this, you have to boot your PC from the bootable USB drive you created.
How to Install Ubuntu Linux Distro along with Windows 10
Step 1: Ensure the bootable drive is inserted into your Windows 10 PC
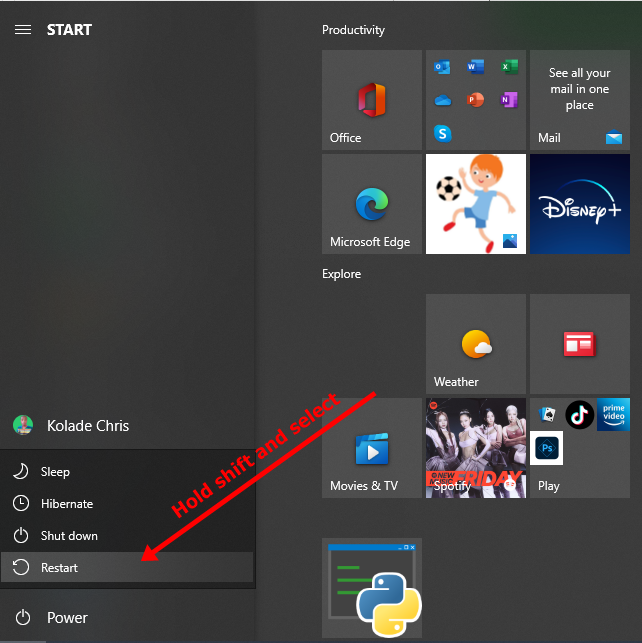
Step 2: Right-click on Start, hold SHIFT, and select Restart.
Step 2: Select “Use a Device”.
Step 3: On the next screen, you should see several devices you can boot from.
You may see the bootable drive as the name of the USB brand.
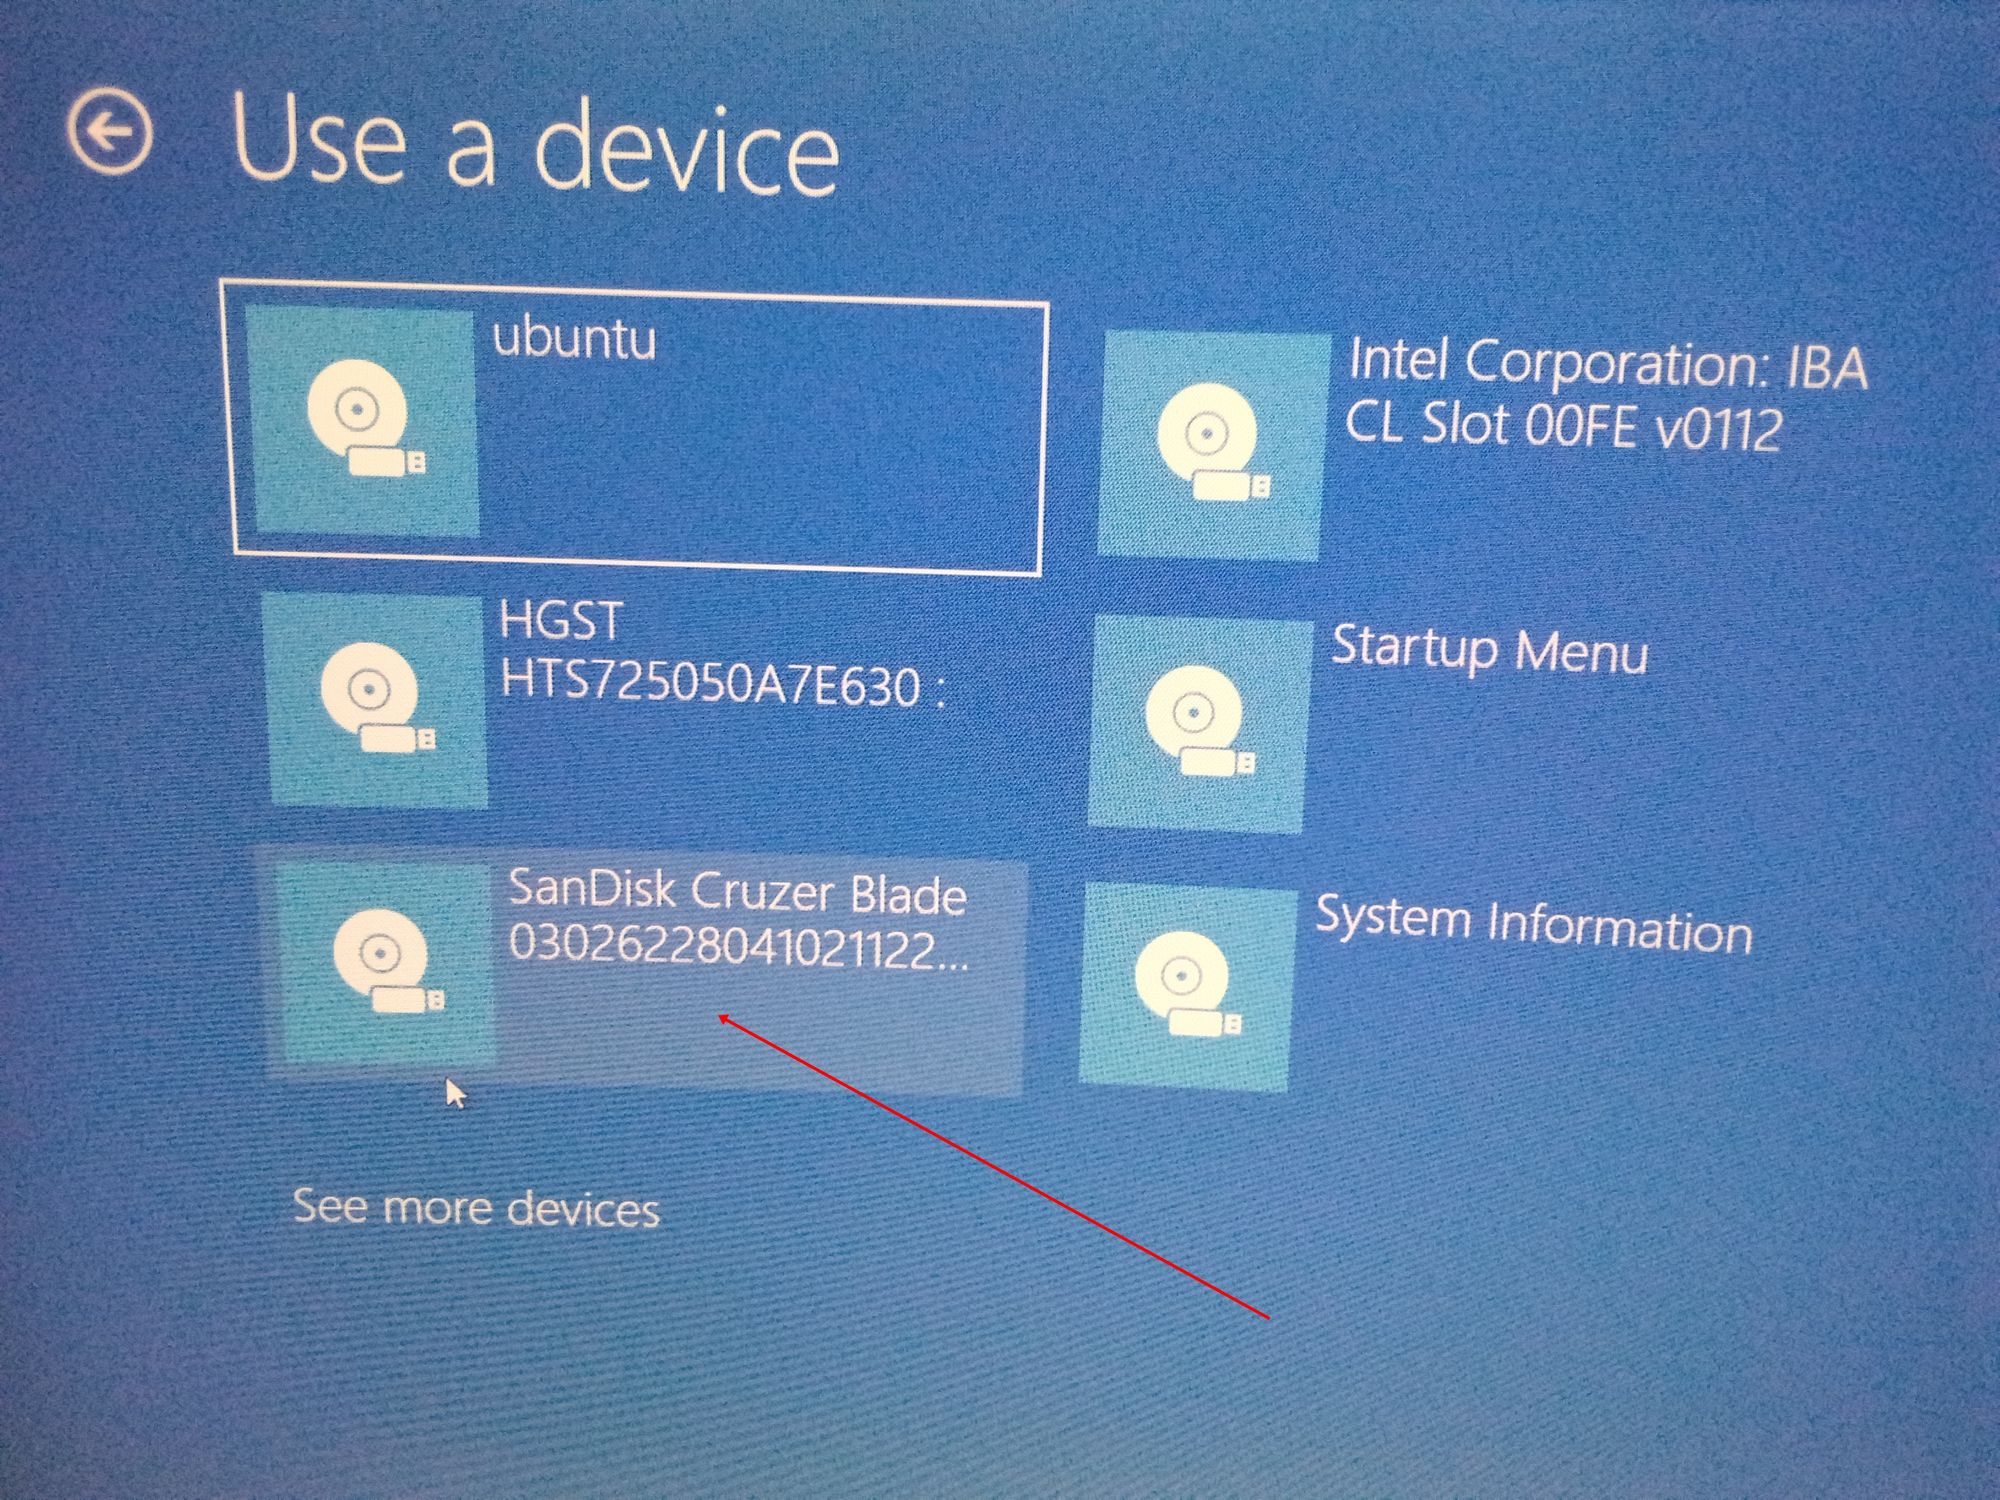
It’s possible to see it as “Ubuntu” too. Some other times, you might not see it, so you need to click on “See more devices».
If you still cannot see your bootable drive, head over to your boot menu by getting into BIOS. You will see it there.
N.B.: You should be very careful while making changes in BIOS. Whatever you do there has a lasting effect on your computer. If you are not sure of what you’re doing there, you should contact an IT professional.
Step 4: Choose «Install Ubuntu». You can also try it before installing it.
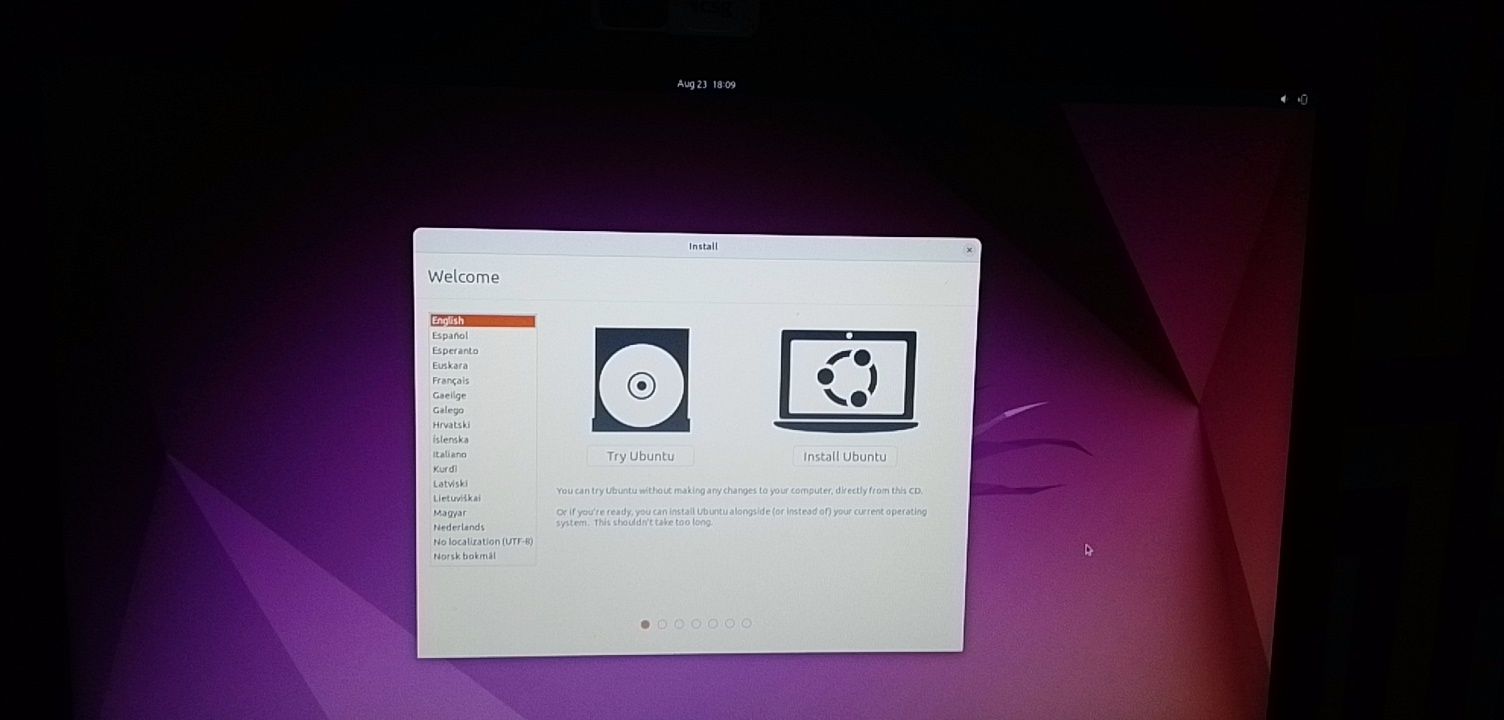
Follow other prompts of the installation wizard and make sure you don’t replace your Windows 10 OS installation with Ubuntu. This is why I suggested you back up all your files.
When you get to the point to select the partition you made, scroll to the partition you made earlier and press ENTER.
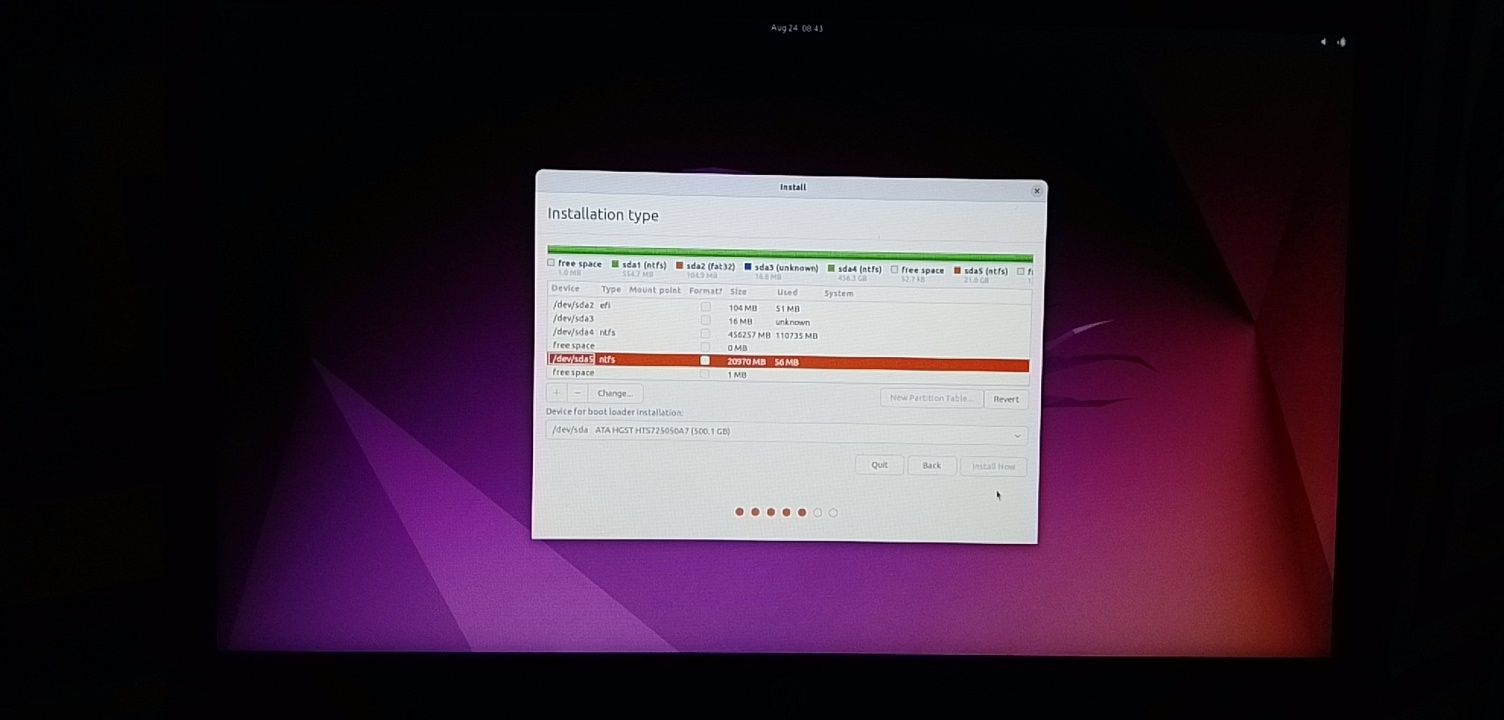
Click OK to select all the space in the partition.
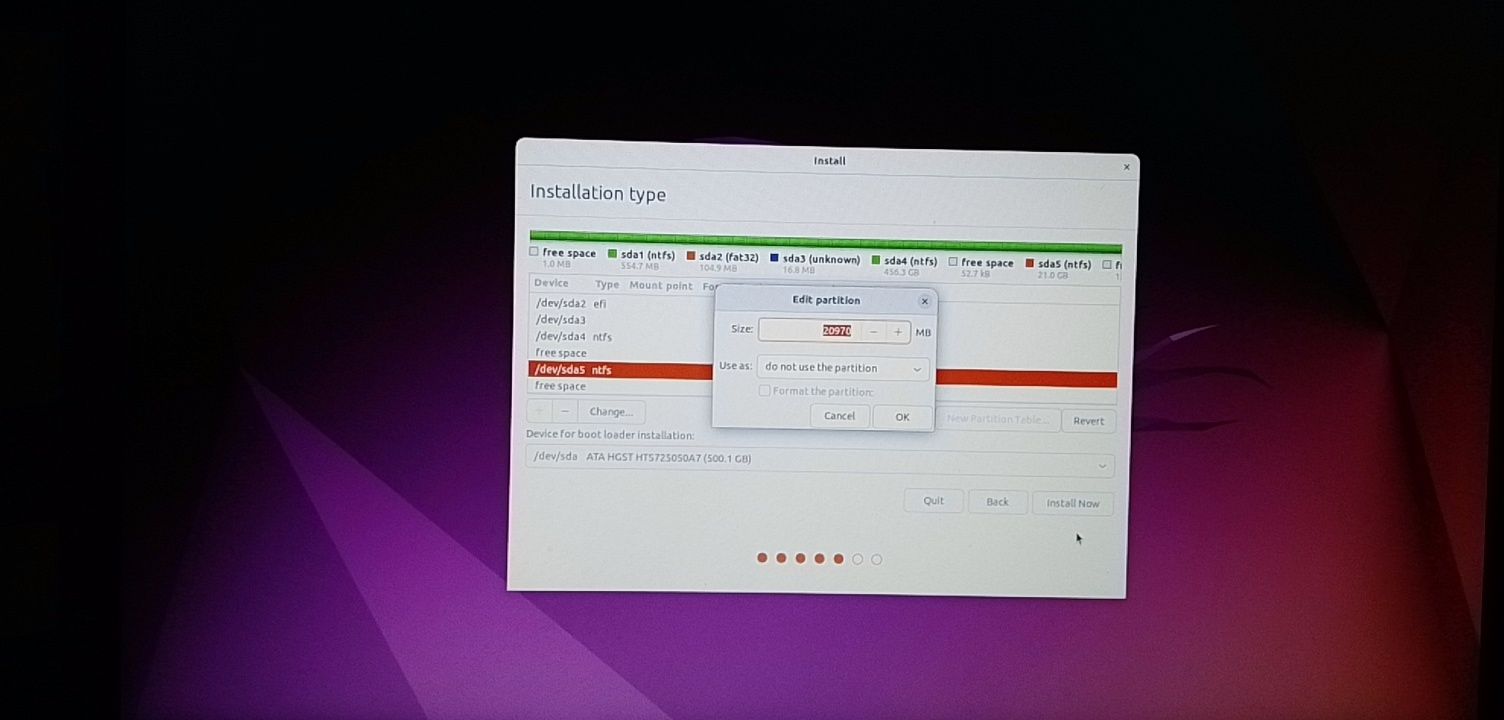
This time around, the “Install now” button will not be greyed out anymore.
Follow other prompts until Ubuntu starts installing.
After the installation is done, Ubuntu will prompt you to remove the bootable drive and press ENTER to reboot your Computer.
Now You Can Dual Boot Ubuntu and Windows 10
Immediately after you reboot the computer, you should see a screen that looks as shown below:
Now, you can select which one to boot into between Ubuntu and Windows 10.
To boot into Ubuntu, select Ubuntu. And to boot into Windows 10, select Windows boot manager.
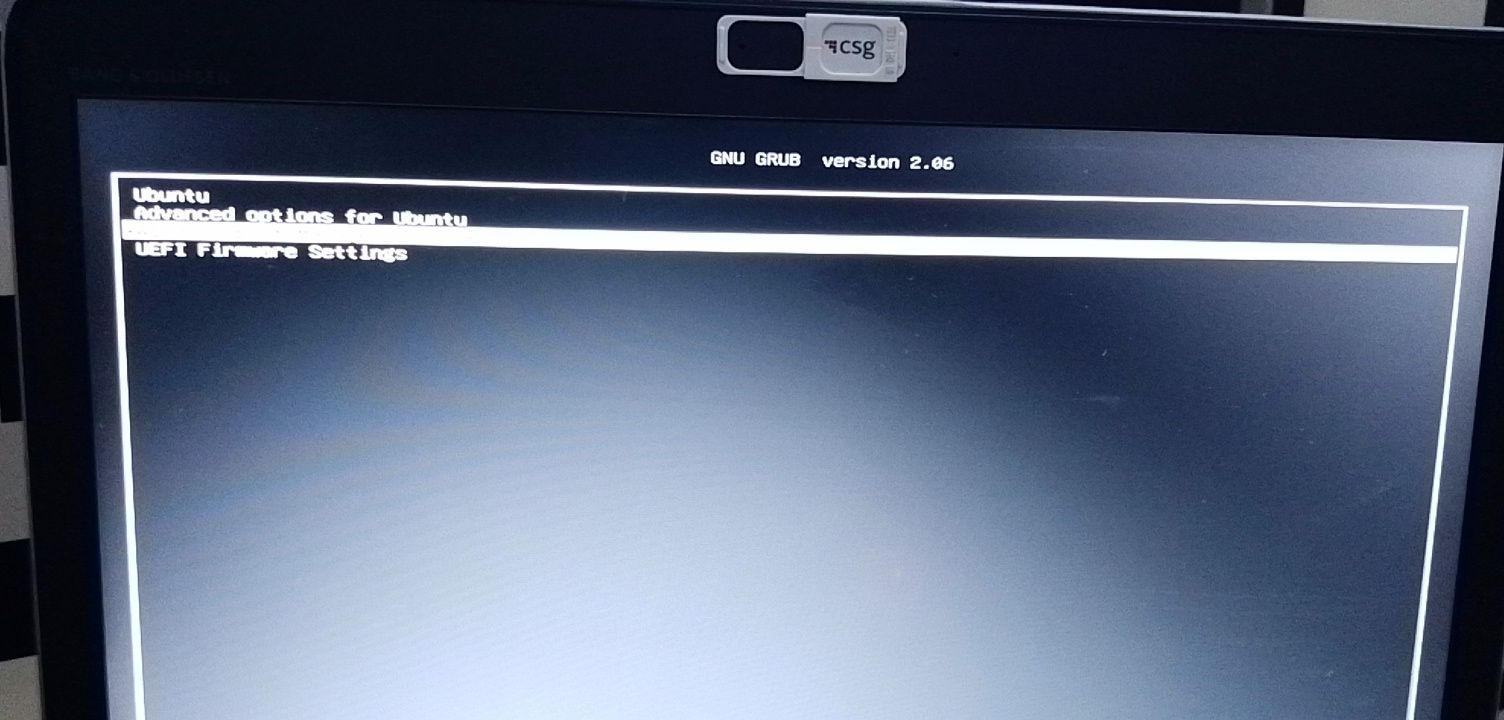
You can also get into your BIOS from the same place by choosing UEFI Firmware Settings.
Conclusion
I hope this article helps you dual boot Ubuntu and Windows 10 on your computer.
The ultimate aim of this article was to show you how to dual boot Ubuntu and Windows 10.
But the article went beyond that to show you how to:
- check if your PC’s BIOS is in UEFI mode
- partition your hard drive
- optimize your hard drive
- make a bootable USB drive
- install Ubuntu Linux Distro along with Windows on your Windows 10 PC.
If you find this article helpful, kindly share it with your friends and family.
Learn to code for free. freeCodeCamp’s open source curriculum has helped more than 40,000 people get jobs as developers. Get started
Dual booting Linux with Windows is one of the most convenient ways of enjoying the two operating systems on the same computer.
You have both OS installed on the disk, on real hardware and when you power on your system, you can choose which operating system to use.
In an earlier tutorial, I showed the steps to dual boot Ubuntu with Windows 7 which comes with an MBR partition. The steps are almost the same for the newer systems that come preinstalled with Windows 10.
In this tutorial, I’ll show you how to install Ubuntu with Windows 10 already installed on the system.
💡
Before you start following the tutorial, I advise reading it entirely first. See what you need and what you should do in this tutorial. Once you have a good idea about the procedure and have all the necessary things on hand, start the process. Dual-boot is not a complicated process. It just takes some time and patience.
The steps mentioned here apply to other Ubuntu versions such as Lubuntu, Kubuntu, Xubuntu and Ubuntu-based Linux distributions such as Linux Mint, elementary OS, etc.
Compatibility checks
This tutorial is suitable for systems that come with Windows 10 pre-installed with UEFI secure boot and GPT partitioning system. Please check whether your system uses GPT or MBR.
Make sure your system uses UEFI: This tutorial is only applicable for systems with UEFI boot. If you have bought your system in the last 5-6 years, chances are that you should already have a UEFI system on GPT partition. However, there is no harm in verifying that your system uses UEFI. If your system uses legacy BIOS with MBR partitioning system, please follow this dual boot tutorial.
Bitlocker encryption process is different: Newer systems with Windows 10 Pro have their disk encrypted with Bitlocker. If you have such a system, please follow this tutorial to dual boot with Bitclocker encryption.
Dual Booting Ubuntu With Windows 10 Pro With BitLocker Encryption
I have written about dual booting Windows and Ubuntu in the past. The process has improved so much in the last few years. Ubuntu and other Linux play very well with secure boot and UEFI now. So, why I am I writing about installing Ubuntu with Windows 10 once again?
 It’s FOSSAbhishek Prakash
System with both SSD and HDD: If you have a system with both SSD and HDD, i.e. dual disk system, the process is pretty much the same. However, you’ll be a lot better following this dedicated tutorial on dual booting dual disk system.
Dual Booting Ubuntu and Windows With a SSD and a HDD
Dual booting Ubuntu and Windows is not that complicated and I have covered it in detailed tutorial in the past. Recently, I also wrote about dual booting on a Bitlocker encrypted Windows system. And yet here I am talking about it again. Why? Because the scenario is slightly different and
It’s FOSSAbhishek Prakash

Prerequisites: What do you need?
You’ll need the following things to easily and safely install Linux alongside Windows:
- A computer that comes preinstalled with Windows 10.
- A USB key (pen drive or USB drive) of at least 4 GB in size and no data on it.
- Internet connection (for downloading Ubuntu ISO image and live USB creating tool). You can do this on any system, not necessarily on the system you are dual booting.
- Optional: External USB disk for making back up of your existing data.
- Optional: Windows recovery or bootable disk (if you encounter any major boot issues, it could be fixed).
Let’s see the steps of installing Ubuntu alongside Windows 10. I have made a video of the entire process. You may watch that as well.
Step 1: Make a backup of your Windows system [optional]
It is always nice to have a backup of your data, just in case you mess up with the system while dealing with disk partitions.
I advise copying all the essential data you cannot afford to lose on an external USB disk. You can use an external HDD (slower but cheaper) or SSD (faster but expensive) and copy the important files and folders.
Step 2: Download Ubuntu (or whichever Linux distribution you are using)
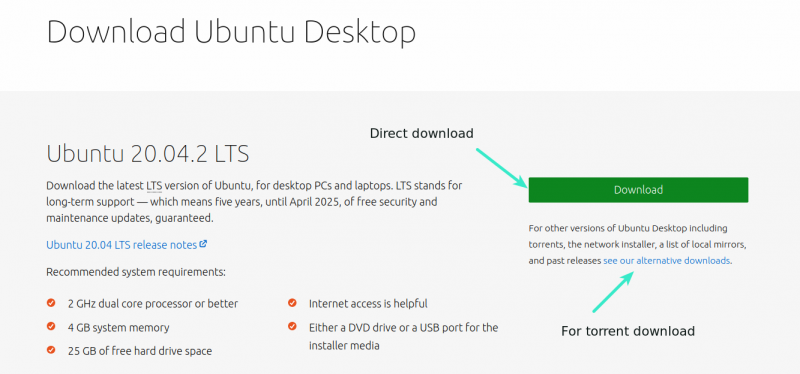
Head over to Ubuntu’s website and download the ISO file. The file should be around 2.5 GB in size. If you need to download Ubuntu via torrents, you can click the ‘alternative downloads.’
Step 3: Create a live USB/disk of Ubuntu
I presume that you are using Windows to create the live USB. Several free applications allow you to create a live Ubuntu USB. You can use any of these tools. Since I cannot show all of them, I’ll go with Rufus.
Download Rufus for free from its website. It will download a .exe file.
Plug in your USB. This device will be formatted so make sure you don’t have any important data on this USB disk.
Run the Rufus tool you just downloaded. It automatically identifies the plugged-in USB but double-check it anyway. Now, browse to the location of the downloaded ISO image and ensure that it uses GPT partitioning scheme and UEFI target system.
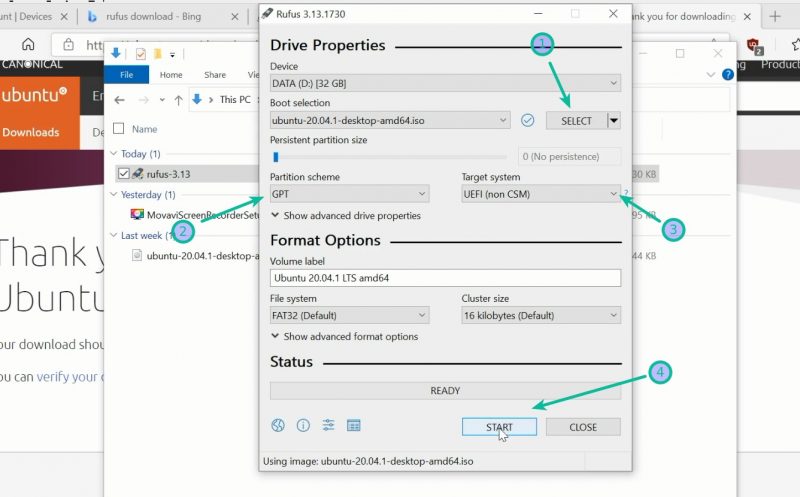
Hit the start button and wait for the process to complete. Your live Linux USB is ready.
📋
Installing Ubuntu and creating the live Ubuntu USB process can be done on any computer. But the rest of the process takes on the system on which you are dual booting.
Step 4: Make some free space on your disk for Ubuntu installation
In many systems, while installing Ubuntu, it gives the option to make a disk partition for Ubuntu. However, that is not a surety. This is why making the required free space on the disk would be better before starting the installation procedure.
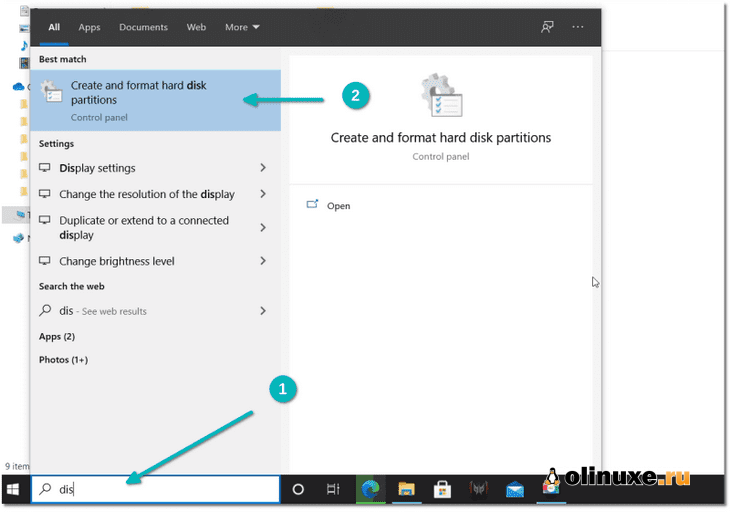
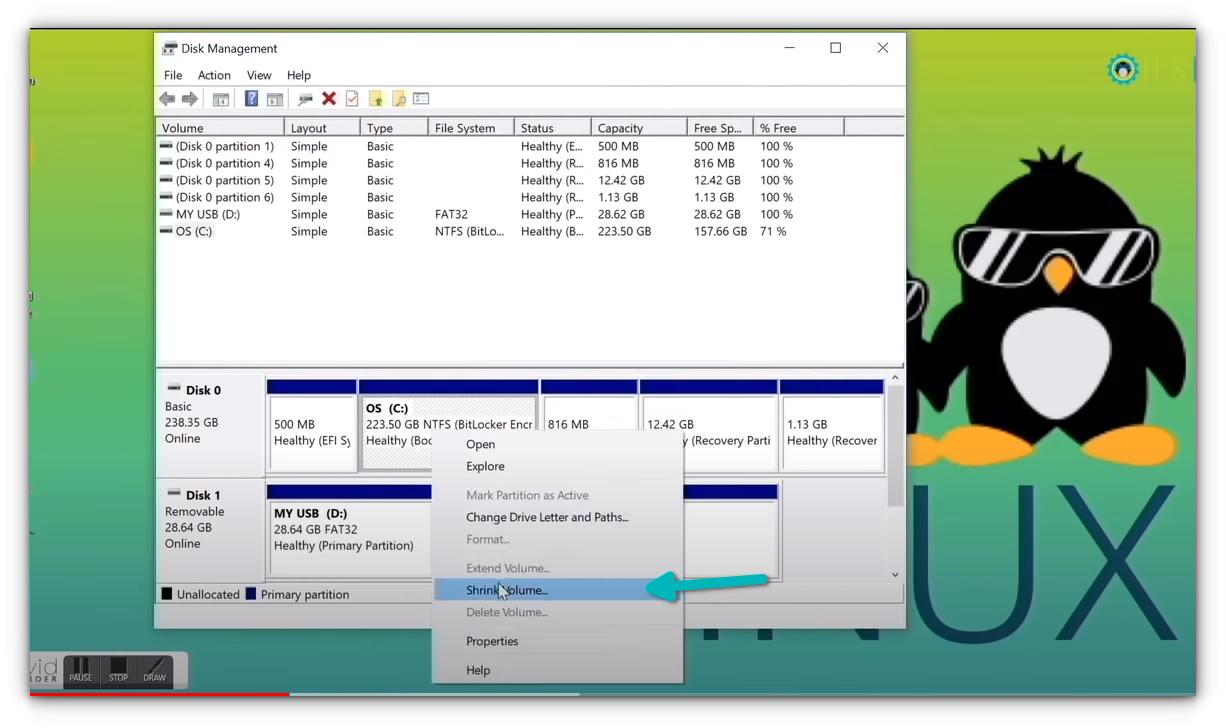
In the Windows menu, search for ‘disk partitions’ and go to ‘Create and format hard disk partitions.’
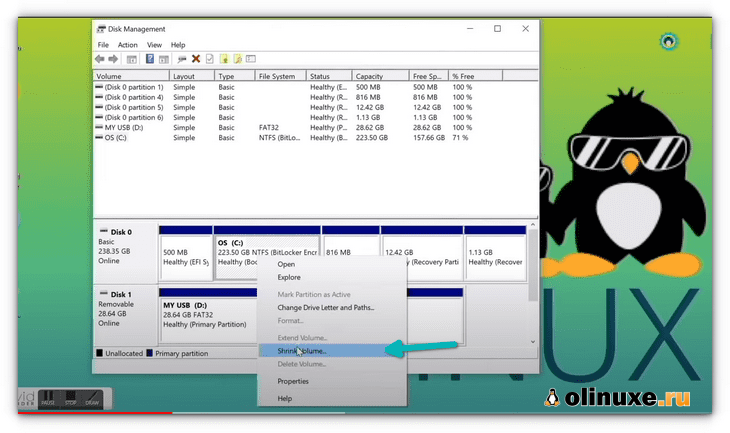
In the Disk Management tool, right-click on the drive which you want to partition and select shrink volume.
If you have just one partition like this, you need to make some free space out of it for Linux. Use any of them except C drive if you have several partitions of considerable size because it may erase the data.
The 256 GB in my system already had several partitions from the manufacturer but mainly for backup and other purposes. The primary partition was the C drive, around 220 GB, where Windows 10 is installed. In my case, I shrank the C drive to make some free space for Linux installation.
How much space do you need for Linux in dual boot?
This depends on how much total disk space you have. You may install Ubuntu on 15 or 20 GB but you’ll soon start running out of disk space. These days, you should have at least 120 GB of disk. In that case, go for 30-40 GB of disk for Linux. If you have 250 GB disk, allocate 60-80 GB or even more. If you have more disk space, allocate even more free space, if you want.
What if you have D, E or F drives?
This is a common confusion for many people as they think Ubuntu can only be installed on the C drive. That’s not true. I had only one C drive, so I shrank it. If you have D, E or F drive, you may shrink one of those drives. You may also choose to delete the D, E or F drive. NEVER DELETE C DRIVE.
Step 5: Boot from live Ubuntu USB
You created a live Ubuntu USB in step 3. Plug it into the system. Before you go and boot from the live USB, let’s have a quick word about the infamous secure boot.
Do I need to disable the secure boot for installing Linux?
6-8 years back, the UEFI secure boot was not well-supported by Linux; hence, you had to disable secure boot before installing Linux. Thankfully, Ubuntu and many other Linux distributions currently support secure boot very well. Usually, you should not need to do anything about it. However, if your system doesn’t allow booting from live USB or if you see any other related issue, you may disable the secure boot on Windows.
Alright! Let’s see how to boot from the USB. You can go to the boot settings by pressing F2/F10 or F12 at the system start time and selecting to boot from the USB. However, some people find it difficult.
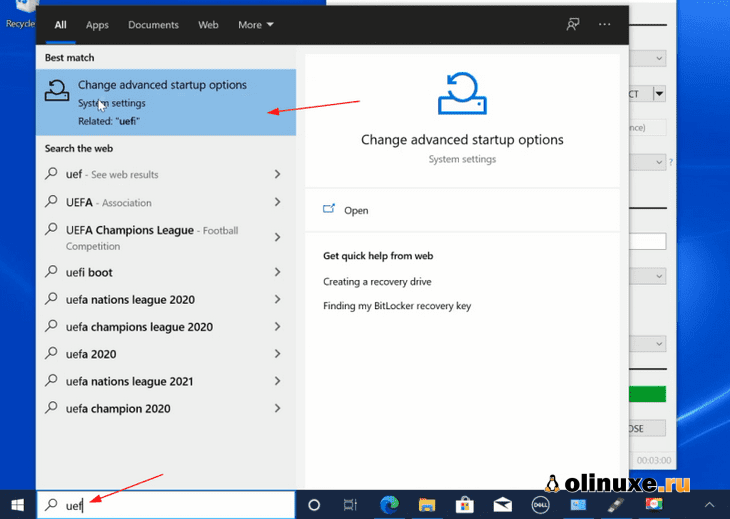
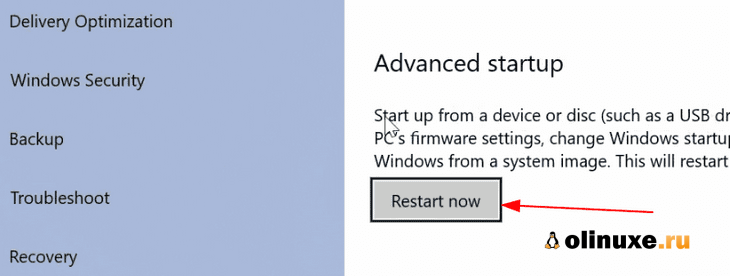
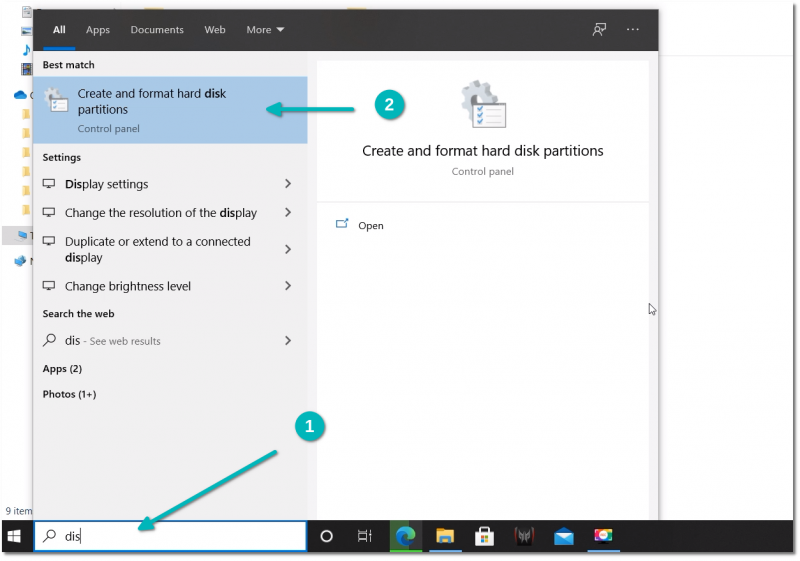
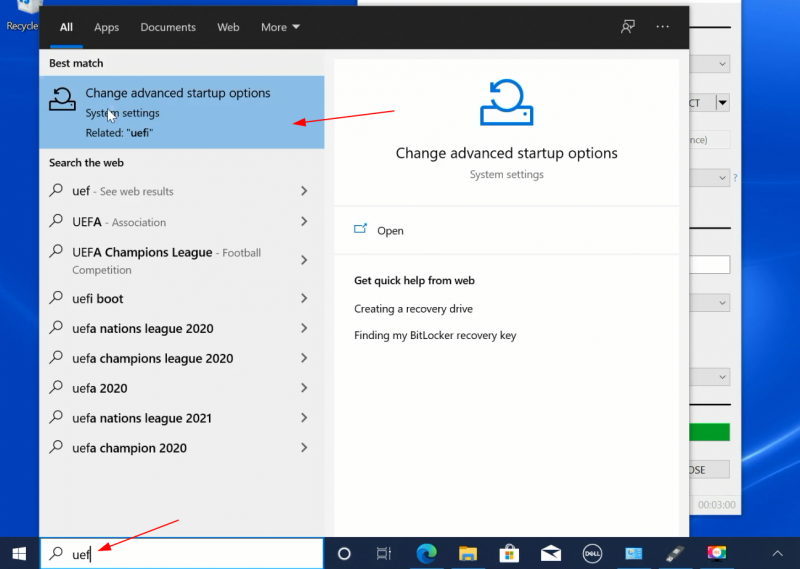
The longer but an easier step is to access the UEFI boot settings from within Windows. In the Windows menu, search for UEFI and then click on ‘Change advanced startup options’:
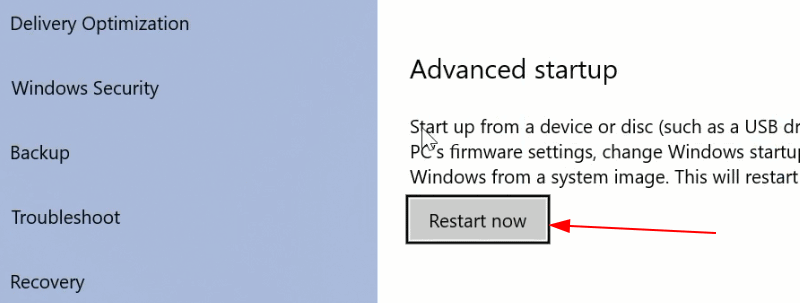
Go to the Advanced startup option and click on Restart now button.
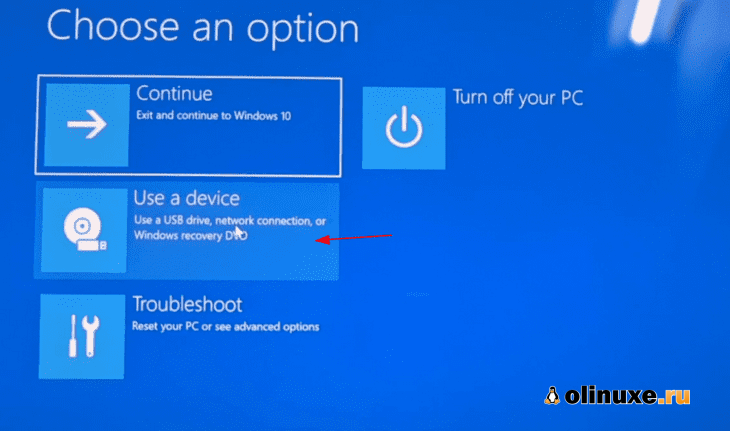
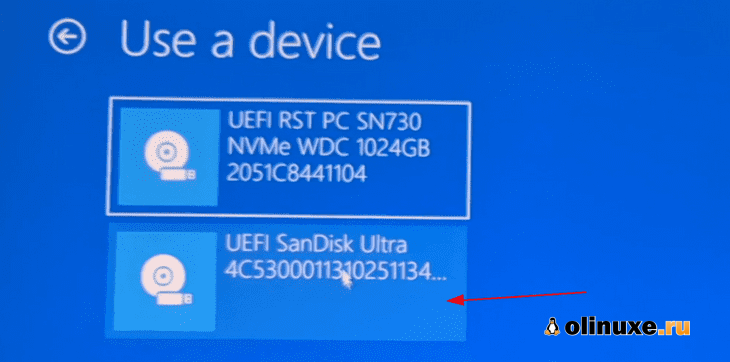
On the next screen, click on ‘Use a device’:
Recognize the USB disk with its name and size. It may also be displayed as EFI USB Device.
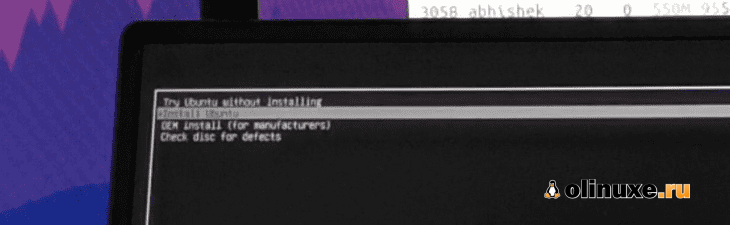
Now it will power off your system and reboot into the disk you chose which should be the live USB disk. You should see a screen like this after a few seconds:
The ‘Try Ubuntu without installing’ option allows you to experience Ubuntu from the live disk. The option to install Ubuntu can be found on the desktop.
The “Install Ubuntu” option will start the Ubuntu installation immediately.
You can opt for either option based on your preference.
Step 6: Installing Ubuntu along with Windows 10
Start the installation procedure. The first few steps are simple. You choose the language and keyboard layout.
On the next screen, choose Normal installation. No need to download updates or install third-party software just yet. You may do it after the installation completes.
Hit continue. It may take some time to go to the next step.
Note: Some people try to download updates and install media codes while installing. In my experience, it sometimes creates issues during installation and may also cause the installation to fail. For this reason, I advise against them.
Important: Installation takes two approaches based on what you see on the next screen
Since this is a detailed tutorial, I’ll cover both aspects.
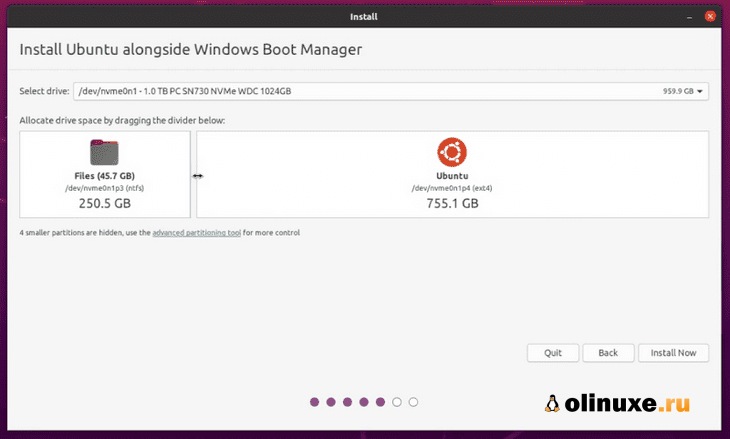
Approach 1: You see the “Install Ubuntu alongside Windows Boot Manager”
If you see the “Install Ubuntu alongside Windows Boot Manager” on the Installation type screen, you are in luck. You can select this method and hit continue.
The next screen will give you the option to create a partition for Ubuntu by dragging the divider. You can allocate appropriate disk space to Linux here. Ubuntu will create one partition of the allocated disk space and it will have root with home and a swapfile of 2 GB in size under root itself.
Approach 2: You don’t see ‘Install Ubuntu alongside Windows Boot Manager’ option or it is greyed out
But if you are one of the unlucky ones who don’t see this option, no need to worry. Things are not that bad for you. You can still install Ubuntu with Windows.
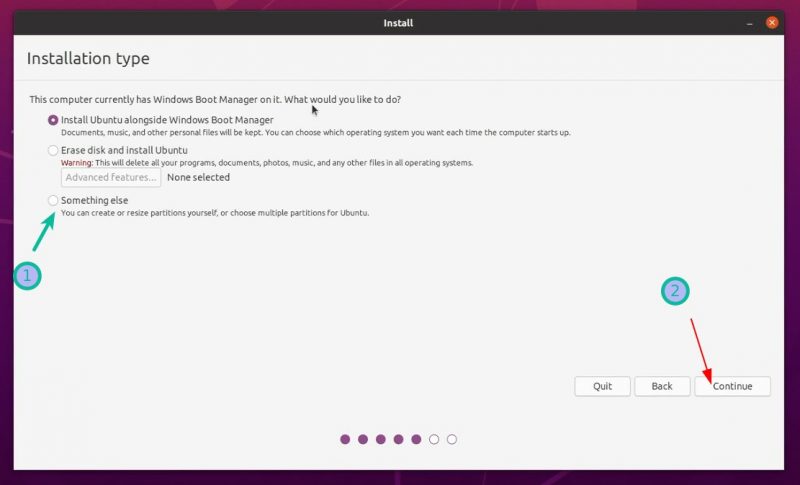
On the Installation type screen, go with Something Else.
It will take you to the partitioning screen. Remember you had created some free space beforehand?
You may allocate the entire free space to root (swapfile and home will be created automatically under root) or separate root, swap and home partitioning. Both methods are acceptable.
I show the steps for creating root, swap and home partitions separately. But feel free to use a single partition for all of them.
Select the free space and click on the + sign.
It will provide you with the option to create a Linux partition. You are creating the Root partition. Anything above 25 GB is more than sufficient for it. Choose the size, select Ext 4 as the file type and / (means root) as the mount point.
Clicking on OK in the previous step will bring you to the partition screen. Next, create a swap. Like previously, click on the + sign again. This time, use the file type as the Swap area.
Ideal swap size in Linux is debatable. If you have 2 GB or less RAM, use swap double the size of RAM. If you have 3-6 GB of RAM, use a swap of the same size as RAM. If you have 8 GB or more RAM, you may use swap half the size of RAM (unless you have plenty of disk space, and you want to use hibernation and in that case, use a swap of at least the same size as RAM).
If you feel like you have less swap on your system, don’t worry. You can easily create swapfile and add more swap space to your systems.
Similarly, create a Home partition. Allocate it maximum space (in fact allocate it the rest of the free space) because this is where you’ll save music, pictures and downloaded files.
Once you are ready with Root, Swap and Home, click on Install Now:
Well, you have almost won the battle. You can smell victory now. Select a timezone when asked.
Next, you’ll be asked to enter a username, hostname (computer’s name) and password.
Now it’s just a matter of waiting. It should take 8-10 minutes to complete the installation.
Once the installation finishes, restart the system.
You’ll be asked to remove the USB disk. You can remove the disk at this stage without worrying. The system reboots after this.
💡
You do not need the live USB disk to use Linux anymore. You have installed Ubuntu on your computer’s disk. Remove the USB and keep it for later if you want to use it for installing Linux on some other system. You may also format and use it for regular data storage or transfer.
If everything goes smoothly, you should see the grub screen once the system powers on. Here, you can choose Ubuntu to boot into Ubuntu and Windows boot manager to boot into Windows. Pretty cool, right?
Dual boot did not succeed? Here are some troubleshooting tips
Life is not even for everyone. For some, the dual boot might not succeed just yet. However, instead of giving up, you may follow a couple of tips and retry the installation procedure.
Try changing the USB port
This may sound ridiculous but sometimes some USB ports cause issue with booting the USB or installing Linux. Changing the USB port could be a trick.
Try not using internet while installing Linux
I have experienced that sometimes Linux installation throws error if it is connected to the internet. If you encountered a “‘grub-efi-amd64-signed’ package failed to install into /target” error, please try installing Ubuntu without internet.
Disable secure boot and/or fast boot
In some rare cases, secure boot would not allow you to boot from live USB or install Linux. Disable secure boot. You may also disable fast boot in some cases.
Dual boot finished but you don’t see the grub screen to boot into Ubuntu
Please check your boot order in the UEFI settings. Do you see Ubuntu/UEFI below Windows Boot Manager? If yes, move it up the order. If you don’t see grub at all, you may carefully try this or this tutorial.
Grub rescue error or no bootable device found after dual booting
Use this tutorial for no bootable device found error. And this one is for grub rescue error.
Additional Tips: You’ll notice that there is a time difference between Windows and Ubuntu You can fix the time gap issue in dual boot easily. Also, in the grub screen, Ubuntu is up the priority. You can also change the boot order to make Windows default if you are going to use Windows more often than Linux. If you want to reverse the process, follow this guide to remove Ubuntu from dual boot with Windows.

I hope this guide helped you to dual boot Ubuntu with Windows 10 UEFI. I went into too much detail here, but I wanted to answer all the typical confusion and show all the required steps.
If you still have doubts or face strange errors, please comment, and I’ll try to help you out.
Linux is a great operating system with widespread hardware and software support, but the reality is that sometimes you have to use Windows, perhaps due to key apps that won’t run on Linux. Thankfully, dual-booting Windows and Linux is very straightforward—and I’ll show you how to set it up, with Windows 10 and Ubuntu, in this article.
Before you get started, make sure you’ve backed up your computer. Although the dual-boot setup process is not very involved, accidents can still happen. So take the time to back up your important files in case chaos theory comes into play. In addition to backing up your files, consider taking an image backup of the disk as well, though that’s not required and can be a more advanced process.
Prerequisites
To get started, you will need the following five items:
1. Two USB flash drives (or DVD-Rs)
I recommend installing Windows and Ubuntu via flash drives since they’re faster than DVDs. It probably goes without saying, but creating bootable media erases everything on the flash drive. Therefore, make sure the flash drives are empty or contain data you don’t care about losing.
If your machine doesn’t support booting from USB, you can create DVD media instead. Unfortunately, because no two computers seem to have the same DVD-burning software, I can’t walk you through that process. However, if your DVD-burning application has an option to burn from an ISO image, that’s the option you need.
2. A Windows 10 license
If Windows 10 came with your PC, the license will be built into the computer, so you don’t need to worry about entering it during installation. If you bought the retail edition, you should have a product key, which you will need to enter during the installation process.
3. Windows 10 Media Creation Tool
Download and launch the Windows 10 Media Creation Tool. Once you launch the tool, it will walk you through the steps required to create the Windows media on a USB or DVD-R. Note: Even if you already have Windows 10 installed, it’s a good idea to create bootable media anyway, just in case something goes wrong and you need to reinstall it.
4. Ubuntu installation media
Download the Ubuntu ISO image.
5. Etcher software (for making a bootable Ubuntu USB drive)
For creating bootable media for any Linux distribution, I recommend Etcher. Etcher works on all three major operating systems (Linux, MacOS, and Windows) and is careful not to let you overwrite your current operating system partition.

Image by:
Les Pounder, CC-BY-SA 4.0
Once you have downloaded and launched Etcher, click Select image, and point it to the Ubuntu ISO you downloaded in step 4. Next, click Select drive to choose your flash drive, and click Flash! to start the process of turning a flash drive into an Ubuntu installer. (If you’re using a DVD-R, use your computer’s DVD-burning software instead.)
Install Windows and Ubuntu
You should be ready to begin. At this point, you should have accomplished the following:
- Backed up your important files
- Created Windows installation media
- Created Ubuntu installation media
There are two ways of going about the installation. First, if you already have Windows 10 installed, you can have the Ubuntu installer resize the partition, and the installation will proceed in the empty space. Or, if you haven’t installed Windows 10, install it on a smaller partition you can set up during the installation process. (I’ll describe how to do that below.) The second way is preferred and less error-prone. There’s a good chance you won’t have any issues either way, but installing Windows manually and giving it a smaller partition, then installing Ubuntu, is the easiest way to go.
If you already have Windows 10 on your computer, skip the following Windows installation instructions and proceed to Installing Ubuntu.
Installing Windows
Insert the Windows installation media you created into your computer and boot from it. How you do this depends on your computer, but most have a key you can press to initiate the boot menu. On a Dell PC for example, that key is F12. If the flash drive doesn’t show up as an option, you may need to restart the computer. Sometimes it will show up only if you’ve inserted the media before turning on the computer. If you see a message like, «press any key to boot from the installation media,» press a key. You should see the following screen. Select your language and keyboard style and click Next.

Click on Install now to start the Windows installer.

On the next screen, it asks for your product key. If you don’t have one because Windows 10 came with your PC, select «I don’t have a product key.» It should automatically activate after the installation once it catches up with updates. If you do have a product key, type that in and click Next.

Select which version of Windows you want to install. If you have a retail copy, the label will tell you what version you have. Otherwise, it is typically located with the documentation that came with your computer. In most cases, it’s going to be either Windows 10 Home or Windows 10 Pro. Most PCs that come with the Home edition have a label that simply reads «Windows 10,» while Pro is clearly marked.

Accept the license agreement by checking the box, then click Next.

After accepting the agreement, you have two installation options available. Choose the second option, Custom: Install Windows only (advanced).

The next screen should show your current hard disk configuration.

Your results will probably look different than mine. I have never used this hard disk before, so it’s completely unallocated. You will probably see one or more partitions for your current operating system. Highlight each partition and remove it.
At this point, your screen will show your entire disk as unallocated. To continue, create a new partition.

Here you can see that I divided the drive in half (or close enough) by creating a partition of 81,920MB (which is close to half of 160GB). Give Windows at least 40GB, preferably 64GB or more. Leave the rest of the drive unallocated, as that’s where you’ll install Ubuntu later.
Your results will look similar to this:

Confirm the partitioning looks good to you and click Next. Windows will begin installing.

If your computer successfully boots into Windows, you’re all set to move on to the next step.
Install Ubuntu
Whether it was already there or you worked through the steps above, at this point you have Windows installed. Now use the Ubuntu installation media you created earlier to boot into Ubuntu. Insert the media and boot your computer from it. Again, the exact sequence of keys to access the boot menu varies from one computer to another, so check your documentation if you’re not sure. If all goes well, you see the following screen once the media finishes loading:

Here, you can select between Try Ubuntu or Install Ubuntu. Don’t install just yet; instead, click Try Ubuntu. After it finishes loading, you should see the Ubuntu desktop.

By clicking Try Ubuntu, you opt to try out Ubuntu before you install it. Here, in Live mode, you can play around with Ubuntu and make sure everything works before you commit to the installation. Ubuntu works with most PC hardware, but it’s always better to test it out beforehand. Make sure you can access the internet and get audio and video playback. Going to YouTube and playing a video is a good way of doing all of that at once. If you need to connect to a wireless network, click on the networking icon at the top-right of the screen. There, you can find a list of wireless networks and connect to yours.
Once you’re ready to go, double-click on the Install Ubuntu 20.04 LTS icon on the desktop to launch the installer.
Choose the language you want to use for the installation process, then click Continue.

Next, choose the keyboard layout. Once you’ve made your selection, click Continue.
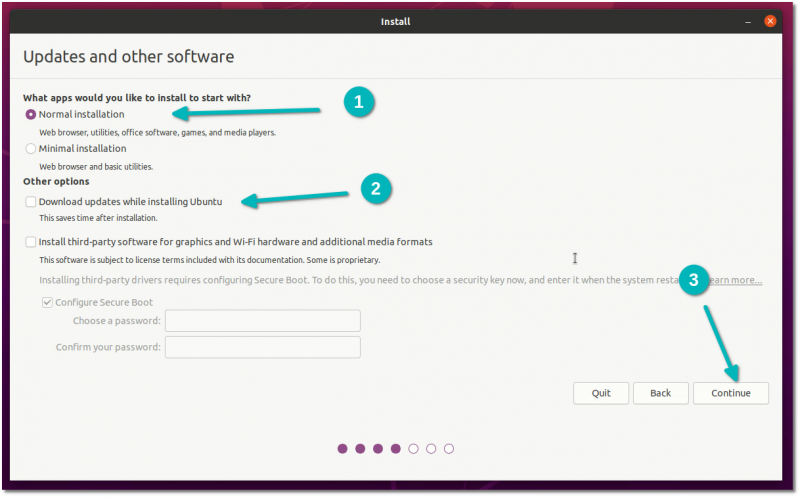
You have a few options on the next screen. You can choose a Normal or a Minimal installation. For most people, Normal installation is ideal. Advanced users may want to do a Minimal install instead, which has fewer software applications installed by default. In addition, you can choose to download updates and whether or not to include third-party software and drivers. I recommend checking both of those boxes. When done, click Continue.

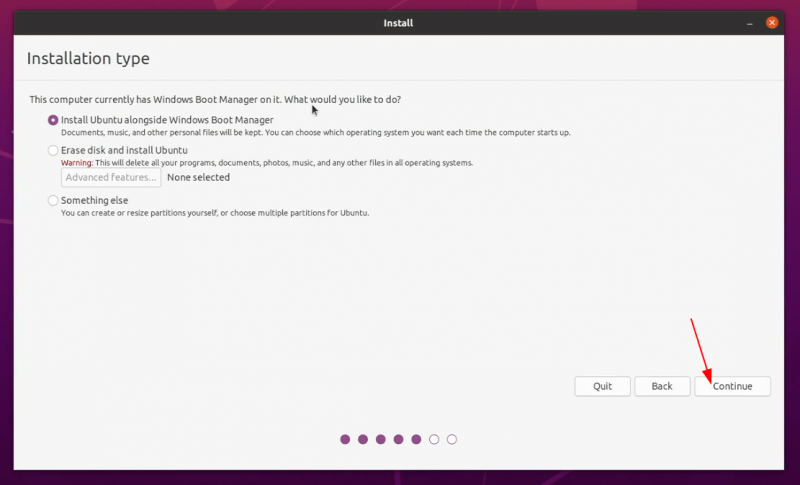
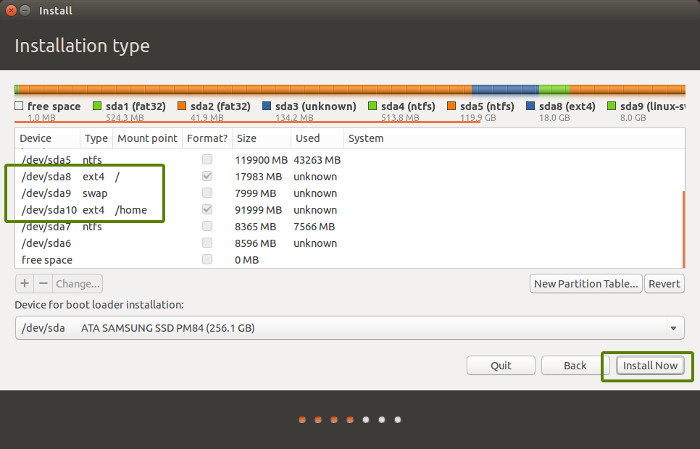
The next screen asks whether you want to erase the disk or set up a dual-boot. Since you’re dual-booting, choose Install Ubuntu alongside Windows 10. Click Install Now.

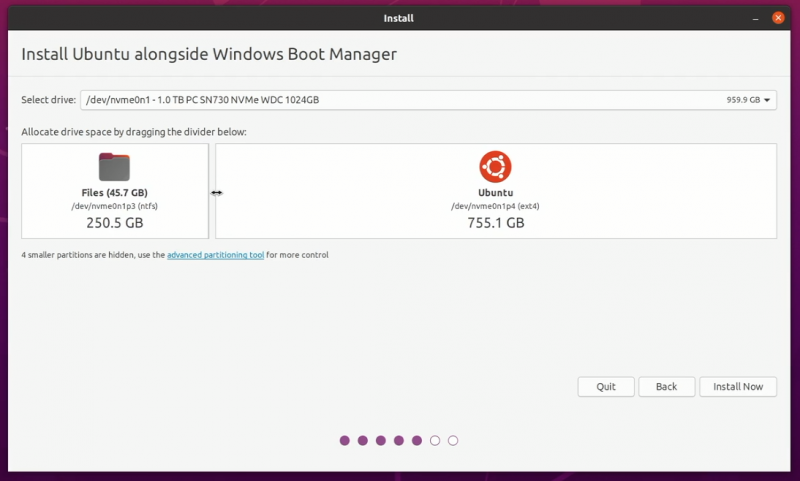
The following screen may appear. If you installed Windows from scratch and left unallocated space on the disk, Ubuntu will automatically set itself up in the empty space, so you won’t see this screen. If you already had Windows 10 installed and it’s taking up the entire drive, this screen will appear and give you an option to select a disk at the top. If you have just one disk, you can choose how much space to steal from Windows and apply to Ubuntu. You can drag the vertical line in the middle left and right with your mouse to take space away from one and gives it to the other. Adjust this exactly the way you want it, then click Install Now.

You should see a confirmation screen indicating what Ubuntu plans on doing. If everything looks right, click Continue.
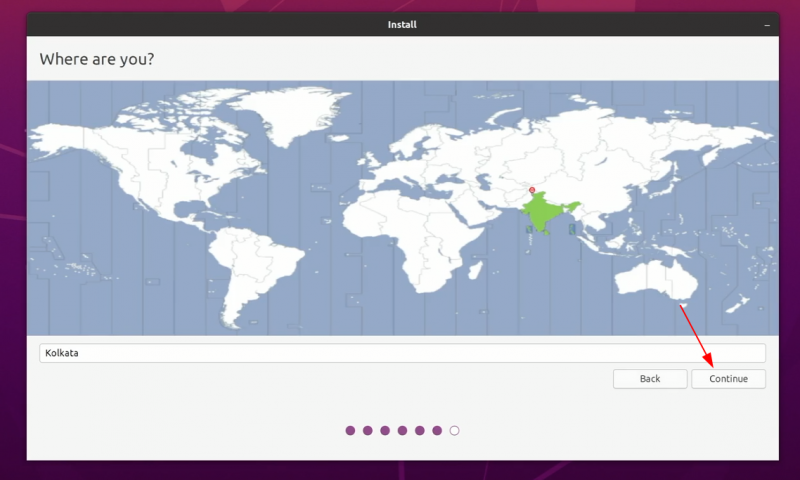
Ubuntu installs in the background, but you still have some configuration to do. While Ubuntu tries its best to figure out your location, you can click on the map to narrow it down to ensure your time zone and other things are set correctly.

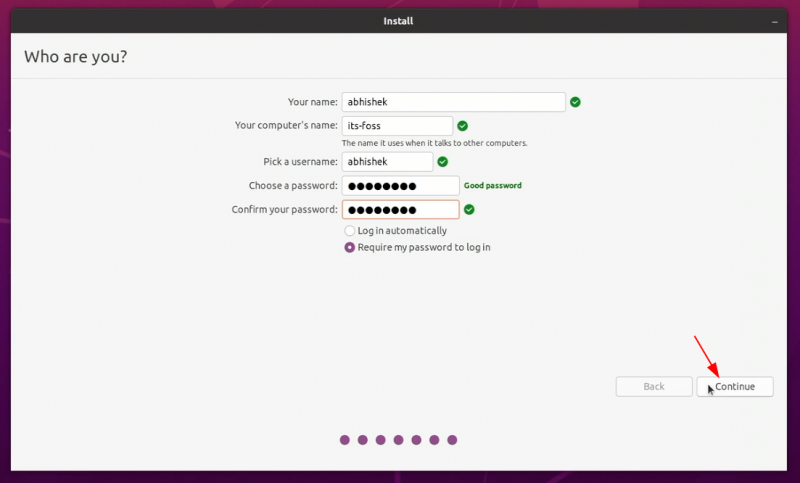
Next, fill in the user account information: your name, computer name, username, and password. Click Continue when you’re done.

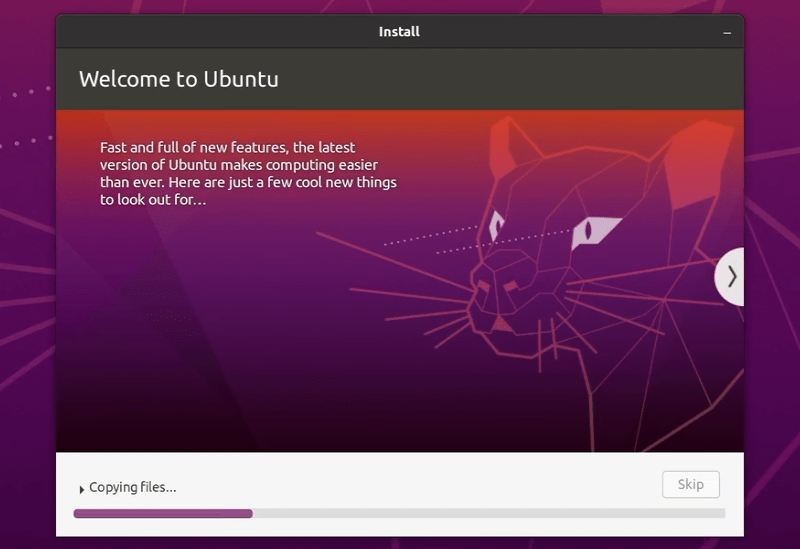
Once the installation finishes, reboot your PC.
If all went according to plan, you should see a screen similar to this when your computer restarts. Choose Ubuntu or Windows 10; the other options are for troubleshooting, so I won’t go into them.

Try booting into both Ubuntu and Windows to test them out and make sure everything works as expected. If it does, you now have both Windows and Ubuntu installed on your computer.
This article was originally published in 2018 and has been updated by Seth Kenlon.
 This work is licensed under a Creative Commons Attribution-Share Alike 4.0 International License.