Время на прочтение
12 мин
Количество просмотров 217K
КДПВ. Бут-менеджер rEFInd с темой оформления Regular.
На сегодняшний день практически все уже слышали про технологию UEFI. Говорить о том, что это такое и зачем оно нужно, я не собираюсь. Сегодня я бы хотел описать простейший сценарий установки Dual Boot системы с полной поддержкой UEFI, а также рассмотреть отдельно установку и настройку бут-менеджера rEFInd. Возможно вы уже видели подобные мануалы и гайды, но я постараюсь донести весьма доходчиво суть того, что мы будем делать и зачем. В других мануалах вы лишь смотрите за «магией» картежника и пытаетесь её повторить, делая, зачастую, элементарные ошибки. Кому эта тема интересна — прошу под кат.
В целом UEFI призвана наоборот упросить процесс загрузки, а не усложнить его. К примеру, посредством этой технологии компьютер можно загружать ОС и вовсе без прослойки в лице GRUB / LILO / etc, загрузчиком может выступать сама UEFI. Однако этот метод имеет свои недостатки, например, вам придется повозиться после обновления ядра, можно, разумеется, написать скрипт, но в целом этим и занимается grub2-efi
Итак, давайте сформируем примерный список наших действий, некоторым хватит прочесть его и уже взяться за дело. Собственно тут будет всего четыре пункта. Пятый и шестой пункт опционален.
- Запись образа Windows 10 (8/8.1) на диск/флешку.
- Установка Windows 10 на часть диска.
- Запись образа Linux-дистрибутива с поддержкой EFI (большинство) на диск/флешку.
- Установка Linux-дистрибутива на оставшуюся часть диска.
- Установка и конфигурация rEFInd.
- Удаление GRUB и полный переход на rEFInd.
На первый взгляд всё очень просто, всего 4 базовых пункта, но тут есть огромное количество нюансов.
Ошибки делают на всех этапах: входят в режим Legacy-bios, указывают не тот загрузочный раздел, просто не понимают, что делают и т.д. В конечном итоге всё это приводит к массе боли и страданиям на форумах, в чатах, и т.д. На деле же всё нереально просто, нужно просто понимать, что ты делаешь на каждом этапе и проверять себя.
Сначала немного теории
UEFI видит только один специальный ESP-раздел, обычно он имеет размер 100-200 мегабайт и форматирован в FAT32 (бывает в FAT16), в нем содержаться папки с названиями а-ля Boot, Microsoft, Fedora, Ubuntu и т.д. Если вы перепробовали достаточное количество ОС и никогда не форматировали этот раздел, то там могло набраться приличное количество папок. К примеру, у меня было 2 живых оси и лежало около 6 папок.
P.S. CodeRush подсказал, что поддерживаются все FS, если на них есть соответствующие драйверы:
Это неверно. UEFI видит все разделы, для ФС которых в конкретной реализации прошивки имеются драйверы. ESP же отличается от остальных разделов только тем, что а) для FAT драйвер иметь обязательно и б) на разделе ESP осуществляется поиск загрузчиков и автоматическое создание соответсвующих переменных BootXXXX, если загрузчики нашлись.
В самих папках лежат исполняемые файлы .efi которые и выступают в роли загрузчиков ОС. В папке debian вы наверняка обнаружите файл grubx64.efi, а в папке Microsoft – bootmgr.efi.
Большинство Linux-дистрибутивов монтируют ESP-раздел к /boot/efi, то есть загрузчик Debian будет лежать примерно на таком пути: /boot/efi/EFI/debian/grubx64.efi
C директорией разобрались, а что дальше?
А дальше нужно понимать, что существует ещё порядок загрузки, которым можно руководить с помощью утилиты efibootmgr, если у вас её нет, то можете скачать через свой пакетный менеджер, во всех стандартных репозиториях она присутствует. Для начала можете просто ввести эту команду и увидеть список порядка загрузки, а также все UEFI-записи. Если хотите разобраться с утилитой, то курите ман и читайте интернеты, в целом она весьма простая. Злой Windows как раз-таки тут и затирает наш GRUB и ставит Windows Boot Manager первым приоритетом, поэтому его приходится восстанавливать. Скажу лишь как редактировать записи:
efibootmgr -b <номер записи> -<модификатор редактирования> <параметр модификатора>
К примеру, efibootmgr -b 0 -B означает удалить запись 0.
P.S. CodeRush и другие комментаторы заметили, что efibootmgr является весьма опасной утилитой и отмечают, что гораздо безопасней пользовать EFI Shell.
По факту GRUB можно вообще не трогать, потому что он наверняка так и лежит в папке EFI/<название дистрибутива>, нужно лишь восстановить запись и выставить первый приоритет, но зачем что-то копать если можно chroot’нуться и ввести grub-install? В большинстве случаев он сделает всё сам.
Кстати, стоит не забывать, что базовым функционалом efibootmgr обладает и сам, собственно, UEFI, он умеет читать эти записи и выстраивать приоритеты. Но сам просматривать ESP-разделы и добавлять новые записи он не умеет, эти обязанности возложены на EFI Shell и операционные системы.
P.S. CodeRush
Еще как умеет, и это умение требуется спецификацией начиная с UEFI 2.2 (SecureBoot появился в UEFI 2.3.1C).
И на последок: Все ваши действия в efibootmgr записываются в NVRAM! В большинстве случае UEFI умеет восстанавливать битый NVRAM каждый раз проверяя его и перезаписывая, в случая неполадок. Однако некоторые недобросовестные производители выпускают сырые прошивки и можно получить самый настоящий кирпич. К примеру ноутбуки с UEFI на базе Phoenix SCT окирпичиваются! Так что перед тем как продолжить читать, удостоверьтесь, что ваша модель материнской карты или ноутбука, устойчива к таким экспериментам.
P.S. Уже после написания большей части статьи я вспомнил про Secure Boot. Обычно UEFI тянет его за собой, но в большинстве случаев его можно весьма просто отключить в настройках UEFI. Многие Linux-дистрибутивы поддерживают его, но я всё же рекомендую его отключить, так как он может потянуть за собой массу проблем.
Базовый экскурс в теорию закончен.
Теперь можно перейти к практике
Дисклеймер: Сразу оговорю, что я предпочитаю стерильные условия и сам делаю полную переустановку с помощью проверенных лично мной утилит. Если вы будете использовать другие утилиты, то, пожалуйста, не пишите почему у вас что-то не получается на том или ином этапе. Мой вариант проверен сотнями переустановок друзьям и коллегам.
Первым делом нам нужно записать Windows
Потому что если поставить Windows второй, то она затрет загрузчик. Восстановить? Без проблем. Но зачем возня, если можно сразу сделать всё по уму? Впрочем я всё равно обговорю нюансы восстановления чуть позже в конце статьи.
В отличии от Linux, Windows записать гораздо проще, на мой взгляд. Первый способ до возможно многим знаком, нужно просто зайти в cmd.exe от имени администратора и ввести эти команды. Не сложно заметить, то тут нет абсолютно никакой магии. Мы просто форматируем флешку в FAT32:
diskpart

list disk

select disk <номер флешки>

clean

create partition primary

select partition 1

active

format fs fat32 quick

assign

exit
После этого нужно просто открыть ISO-файл архиватором и перекинуть содержимое на чистую флешку. Всё, UEFI-флешка готова. На Linux можно сделать всё аналогичным образом, просто форматируем в FAT32 и копируем содержимое.
Полученную флешка должна отлично загружаться любым ПК с поддержкой UEFI.
Кстати, обратимся к теории: наш образ с Windows 10 содержит папочку efi, в ней как раз лежит всё добро для начала загрузки, которое должен увидеть наш UEFI. Поэтому простого форматирования и копирования в большинстве случаев хватает для большинства ПК.
Однако я предпочитаю второй способ с использованием утилиты Rufus. Он меня никогда не подводил. Однако это Windows-only способ. На Linux-системах использование ddresque для создания загрузочной флешки Windows НЕ РАБОТАЕТ. Так что пробуйте другие утилиты, если первый способ с простым форматирование не помог.
Всё что вам будет нужно: выбрать вашу флешку, выставить параметр «Схема раздела и тип системного интерфейса» на «GPT для компьютеров с UEFI», и нажать старт. Остальные параметры трогать не нужно. Лучше использовать флешки помельче (на 8-16 гигабайт).
Наверняка один из способов должен был прокатить, лично я ни разу с проблемами на этом этапе не встречался, главное чтобы компьютер поддерживал UEFI.
Поэтому перейдем к этапу установки
После загрузки в UEFI-режиме делаем всё по стандартной схеме, но на этапе выбора типа установки выбираем «экспертную», то есть мы разметим раздел сами. Размечать рекомендую аккуратно, особенно если дисков много. Наконец, выбрав диск, удалите все существующие разделы. Создайте один раздел с нужным вам размером, к примеру, 150 гигабайт. (Если вы предпочитаете создавать два и более разделов для ОС и файлов — без проблем, создавайте). Выберете этот раздел кликом мышки и нажмите «Далее». И если вы всё сделали верно, то Windows попросит вас создать дополнительные. Обязательно отвечайте «Да». Система создаст три раздела. Два своих для системных нужд и один тот самый нужный нам EFI-раздел. У меня он по нумерации всегда второй, всего получится 4 раздела, включая пользовательский NTFS. Если установщик не предложил создать разделы или создал всего один, то значит вы загрузились в Legacy-режиме и нужно перезаписывать флешку, что-то пошло не так. К сожалению редактор разделов Windows-установщика крайне слаб по возможностям, поэтому пробовать размечать разделы под будущий Linux тут смысла нет, оставляем это место попросту свободным. Дальше устанавливаем всё в штатном режиме.
Кстати, один из признаков правильной установки Windows в UEFI-режиме, появление логотипа производителя материнской карты / ноутбука / планшета при загрузке. Во многих UEFI (к примеру от ASUS и ASRock) есть отдельная настройка для этого. Так что если логотипа нет, но всё остальное прошло как по маслу, то ничего страшного в этом нет.
Тонко настраивать Windows на данный момент не рекомендую, так как если что-то пойдет не так, то возможно придется переустановить.
Записываем Linux?
Ага. После входа в Windows рекомендую сразу скачать образ выбранного вами дистрибутива и записать его аналогичным образом через Rufus. Правда в случае с Linux-дистрибутивами Rufus может спросить массу вопросов, к примеру он может попросить подгрузить загрузчик syslinux с интернета или выбрать режим записи образа: ISO или DD. На все вопросы отвечаем «Да.», то есть да, скачиваем последнюю версию syslinux и записываем в режиме ISO. Проверено на Ubuntu (и её вариациях Server, Mate, GNOME), Fedora, RHEL7, Debian и других.
До Dual Boot буквально один шаг
В отличии от Windows большинство дистрибутивов имеют отличную индикацию UEFI-режима. К примеру Debian в своем установщике черным по белому пишет, что система запущенна в UEFI-mode. Другие дистрибутивы проявляют это странным grub-загрузчиком, который выглядит «как-то не так».
Думаю если вы собрались ставить Linux, то вы наверняка сами знаете как ставить ваш любимый дистрибутив, поэтому я не буду заострять внимание на подробностях установки отдельно взятого дистрибутива. Потому что этот этап до боли прост. Если вы уже действительно прогрузились в UEFI-режиме и установили Windows как надо, то Dual Boot уже практически в кармане.
Итак всё что вам потребуется сделать при установке Linux:
Выбрать раздел /dev/sda2 (в вашем случае это может быть другой раздел) и указать точку монтирования — /boot/efi. Всё. Нет, правда, всё. Разумеется не забудьте разметить ext4 / Btrfs / ReiserFS / XFS / JFS раздел, примонтировать его в корень /. Кому нужен swap (если нужен) создайте и его. Дальше установщик вашего дистрибутива сделает всё сам, установит в директорию EFI/<название дистрибутива> свой GRUB и найдет запись Windows (EFI/microsoft).
Данная логика была проверена во всех вышеозначенных дистрибутивах. То есть повторюсь ещё раз: Главное показать вашему дистрибутиву где у вас этот заветный ESP-раздел и куда надо ему кидать загрузчик. Он его не форматирует, а просто добавляет GRUB. А вот уже сам GRUB вершит магию, изменяет приоритеты загрузки и т.д. Замечу, что некоторые дистрибутивы сами монтируют этот раздел куда надо, так как видят флаги ESP и BOOT. К примеру в установщике Debian нужно просто создать пользовательский раздел и всё.
Наводим красоту, ставим rEFInd
К сожалению счастью я болею сильной формой перфекционизма. И простой GRUB2 меня не устраивал, больно он страшный и не красивый. Беглый гуглинг рассказал мне о BURG, «красивом» форке GRUB, но он был заброшен и на данный момент скорее мертв, чем жив. К счастью для UEFI-машин есть отличная альтернатива — rEFInd. rEFInd является форком, заброшенного ныне rEFIt, а также его логическим продолжением. Первый создавался в первую очередь для Mac’ов и работы рядом с Boot Camp, нынешний форк такой узкой специализации не имеет и подходит практически для любых конфигураций.
Стоит сразу заметить, что rEFInd НЕ является загрузчиком. Это так называемый Boot Manager, он вызвает другие .efi-бинарники к исполнению, а также может направить UEFI на запуск ядра прямо с раздела
/boot. Другими словами то есть систему загружает не он, а сам UEFI. Для Multi-Boot машин является отличным решением. Сам по себе rEFInd является .efi-приложением, собранным средствами UEFI Shell. Сам находится в директорииEFI/refind/refind_x64.efi
Помимо того, что можно выбирать между уже установленными системами на ПК, приятным плюсом можно выделить автоматическое обнаружение загрузочных флешек и дисков. На КПДВ это можно увидеть. У меня имеется загрузочная флешка с Debian (не установщиком, а полноценной ОС) и можно увидеть удобную индикацию того, что это именно флешка, а не что-то другое. Если у вас имеется несколько ядер, то их список можно увидеть по нажатию клавиши F2. Помимо этого в файле /boot/refind_linux.conf можно задать несколько вариантов с разными параметрами ядра (например первый — стандартный для загрузки GUI, второй — безопасный режим без видеодрайвера и т.д, можно сделать дюжину вариантов, по умолчанию всего три). Также в папку EFI/tools можно накидать различных .efi-бинарников, к примеру UEFI Shell или memtest86+. rEFInd их автоматически подхватит и покажет в нижнем ряду как утилиты.
Хотите также?
Процесс установки из под Linux необычайно прост. Все способы описаны на официальном сайте, устанавливать можно практически из любой ОС. Для начала посетите эту страничку и скачайте .deb- или .rpm-пакет.
Если у вас редкий дистрибутив вроде Slackware или Gentoo, то лично я вам помочь не смогу, но на сайте есть обычный .zip-архив и другие варианты установки, так что если уж вы работаете в подобных дистрибутивах, то наверняка поставить своими силами вы сможете без проблем.
Сделайте бэкап EFI-директории:
cp -r /boot/efi/EFI /boot/EFI.bkp
После загрузки пакета, выполните:
cd Downloads или cd Загрузки
И установите пакет:
sudo dpkg -i <имя пакета>.deb или sudo dnf install <имя пакета>.rpm
В моем случае dpkg не мог иногда подтянуть зависимости, если у вас возникнут такие же трудности, то установите gdebi (sudo apt-get install gdebi) и выполните sudo gdebi <имя пакета>.deb.
Если у вас RHEL или CentOS, то используйте yum вместо dnf.
В логах установки пакета можно отследить лог установки rEFInd, в котором возможно будут ошибки их надо сразу отследить. Однако по моему опыту ошибок не возникает, если всё сделать правильно. Проверить результат работы установщика rEFInd можно, воспользовавшись утилитой efibootmgr, там первым приоритетом должна должен быть именно rEFInd Boot Manager.
Установить rEFInd повторно, если пакет уже установлен, можно с помощью команды:
refind-install
Установку rEFInd первым приоритетом можно произвести в ручную, с помощью команды:
refind-mkdefault
Перезагружаемся.
Всё очень страшно и откуда у меня столько ОС?
Да, всё страшно, пока. На самом деле ОС у вас всего две. Просто rEFInd собрал все .efi-бинарники и ещё отобразил ОС с возможностью загрузки напрямую. Для исправления этого недоразумения мы удалим лишнее, напишем свой конфиг и поставим красивую тему на rEFInd.
Первым делом зайдите в Linux, выбрав один из рабочих пунктов загрузки. В меню должен быть пункт для загрузки БЕЗ использования grubx64.efi! В разделе /boot проще работать из под администратора (потому у команду cd не хватает привелегий, а sudo она не работает), так что su и вводим пароль root’а.
Этот пункт не зря опциональный, потому что если у вас недостаточно опыта, то можно очень просто что-то сломать и не заметить. Рекомендую подготовить флешку с рабочим LiveCD, чтобы проводить восстановление, в случае неожиданностей.
Наша первая задача — удалить лишние директивы загрузки, их запросто может быть штук 6, а системы всего две.
Заходим в директорию:
cd /boot/efi/EFI && ls
Вероятно тут будет пять папок:
BOOT, microsoft, <ваш дистрибутив>, refind и tools.
Если будет что-то лишнее — смело удаляйте.
Способ 1 (через очищение, опаснее):
Убедившись что вы загрузились через rEFInd (!) и НЕ использовали для этого GRUB можете смело удалить папку вашего дистрибутива. Перезагрузитесь и проверьте, можете ли вы загрузиться в ваш Linux. Если можете, то вероятно в меню загрузки осталось 4 директивы: Windows, Linux и два странных пункта, которые приводят (скорее всего) к загрузке Linux. Можно было догадаться, что это .efi-бинарники из папки EFI/BOOT. Папку можно удалить полностью. НО! Убедитесь, что у вас есть бэкап. Перазагружаемся. Всё отлично?
Удаляем GRUB:
sudo apt-get remove grub2 grub2-efi grub grub-efi
Или:
sudo dnf remove grub2
Теперь можно ставить тему.
Некоторые UEFI другие директории вовсе не видят. Поэтому небольшой work around для таких систем существует. Удаляем папку BOOT, переименовываем папку refind в папку BOOT, а также сам файл refind_x64.efi в bootx64.efi. Перезагружаемся.
Способ 2 (через конфиг rEFInd, безопаснее):
Этот способ гораздо безопаснее, потому что удалять и что либо трогать мы не будем, мы добьемся результата правильной настройкой конфига. Сам конфиг лежит тут: /boot/efi/EFI/refind/refind.conf
Чтобы настроить свой набор директив загрузки нужно использовать два параметра scanfor и menuentry, после настройки должен получится примерно такой конфиг:
# Сканируем записи созданные ручкуами, флешки и оптически приводы

scanfor manual,external,optical

# Пункт для загрузки Linux

menuentry Linux {

 loader /EFI/ubuntu/grubx64.efi

 icon /EFI/refind/icons/os_linux.png

}

# Пункт для загрузки Windows 10

menuentry "Windows 10" {

 loader \EFI\Microsoft\Boot\bootmgr.efi

 icon /EFI/refind/icons/os_win.png

}
Разумеется это только часть конфига, другие параметры можно взять из примера
Мой конфиг на базе первого способа с комментариями
# Ожидание в секундах перед авто-выбором ОС

timeout 20

# Скринсервер через 300 секунд, если ничего не выбрали,

# но нажали любую клавишу и отменили автовыбор

screensaver 300

# Разрешение бут-менеджера

resolution 1280 1024

# Использовать графику при загрузке Linux. Этот параметр позволит загружать ОС с красивой Plymouth

# заставкой в разрешении указанном выше

use_graphics_for linux

scanfor internal,external,optical,netboot,biosexternal

# Подключение темы

include themes/refind-theme-regular/theme.conf
Отдельно про Plymouth можно почитать здесь.
Включение красивой темы
С этим всё просто, чуть выше последняя строчка конфига указывает на .conf-файл темы. Сами темы желательно класть в папку /boot/efi/EFI/refind/themes. По-умолчанию её нет, создайте через mkdir.
Заходим в директорию themes и просто пишем git clone https://github.com/munlik/refind-theme-regular.git. В конфиге прописываем строку include themes/refind-theme-regular/theme.conf
Другие темы можно посмотреть на оф. сайте.
Там же можно посмотреть подробные процессы установки, параметры для тонкой настройки конфига и многое другое.
Пожалуй на этом всё. Мы получили красивый бут-менеджер для выбора нужной ОС с полной поддержкой UEFI. Пункт с установкой rEFInd наиболее сложный, а поэтому опциональный, большинству хватит grub2-efi.
Напоследок небольшое видео от меня:
Наверняка закралось приличное количество ошибок в тексте, буду рад, если вы отпишите о них мне ЛС.
UPD 28.10.2022: Друзья, статье уже 6 лет, несмотря на то, что rEFInd технически до сих пор актулен, я перешёл на systemd-boot, на мой взгляд он проще и удобней в настройке.

You don’t have to have two different computers to use Linux and Windows 10. It’s possible to have a Linux distro installed on a computer with Windows 10 preinstalled.
In this article, I will show you how to dual boot Windows 10 and the popular Ubuntu Linux distro. But before that, you have to install Ubuntu on your Windows 10 PC.
Before you go through this process, you must backup your files. That’s because installing an OS is a risky process. Sometimes it can overwrite the existing OS and delete all your files.
N.B.: Most of the processes in this article take time to get done, so you need to be patient.
What We’ll Cover – A step-by-step Guide to Dual-Booting Windows 10 and Linux
- Prerequisites
- How to Partition your Hard Drive for Ubuntu
- How to Optimize your Hard Drive for More Partition Space (Optional)
- How to Download Ubuntu in ISO Image Format
- How to Make an Ubuntu (Linux) Bootable USB Drive
- How to Install Ubuntu Linux Distro along with Windows 10
- Now You Can Dual Boot Ubuntu and Windows 10
- Conclusion
Prerequisites
Most importantly, there are some things you must have in place if you want to use (and dual boot) Ubuntu and Windows 10 on the same PC:
- A computer preinstalled with Windows 10
- A partitioned hard drive
- A BIOS in UEFI mode (Unified Extensible Firmware Interface)
- An empty USB drive of at least 4Gig for creating a bootable disk
- An internet connection to download Ubuntu ISO image (the Linux distro) and Rufus (a bootable drive creation tool)
How to Check If Your PC BIOS is in UEFI Mode
To check if your PC BIOS comes in UEFI mode, search for “system information” and hit ENTER.
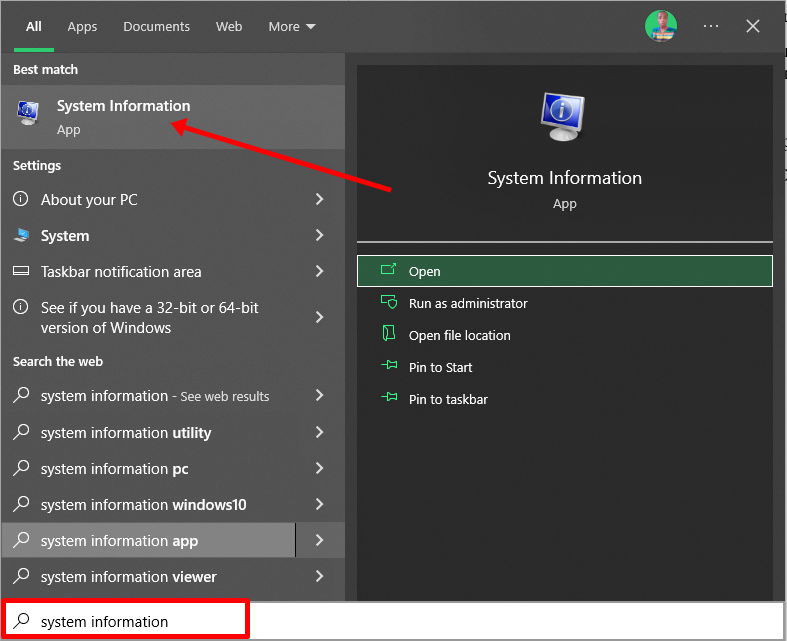
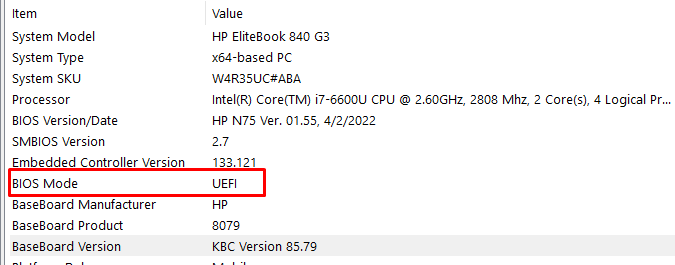
Look under BIOS mode to confirm that your PC BIOS mode comes as UEFI.
If your PC BIOS is not in UEFI mode, the two operating systems won’t see each other. You can learn more about the difference between these two modes here.
How to Partition your Hard Drive for Ubuntu
You have to partition your hard drive because you must set aside at least 20Gig for Ubuntu to live in and boot from.
To partition your hard drive, follow the steps below:
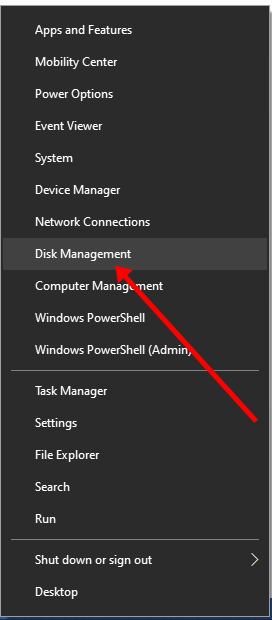
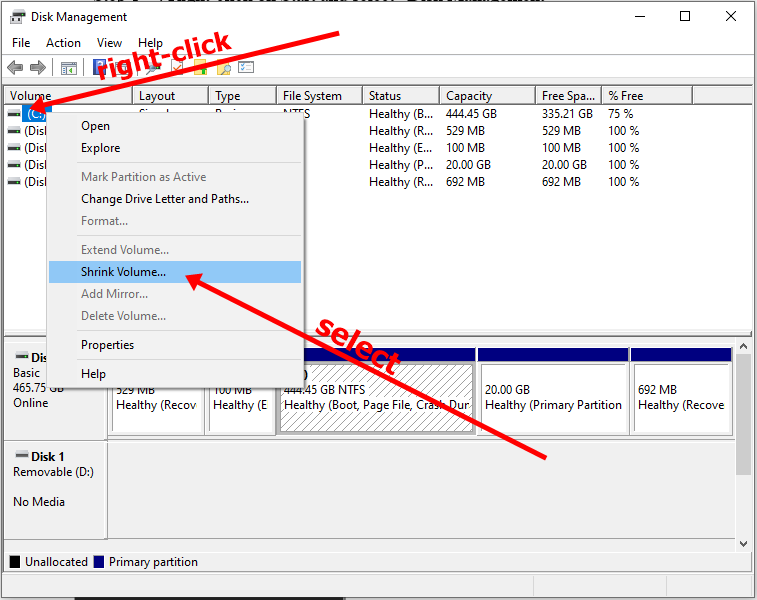
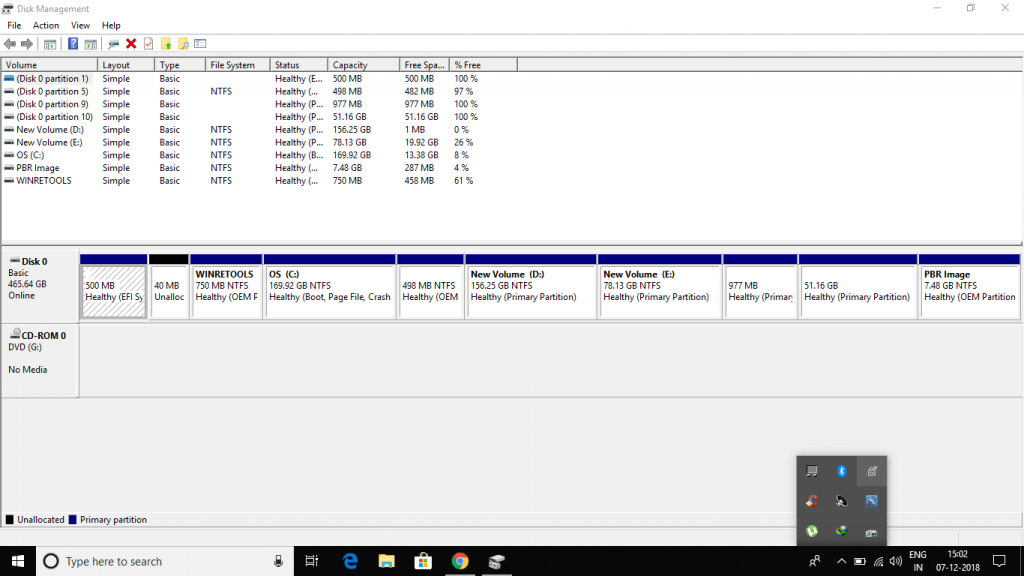
Step 1: Right-click on Start and select “Disk Management”.
Step 2: Right-click on your C drive and select shrink volume.
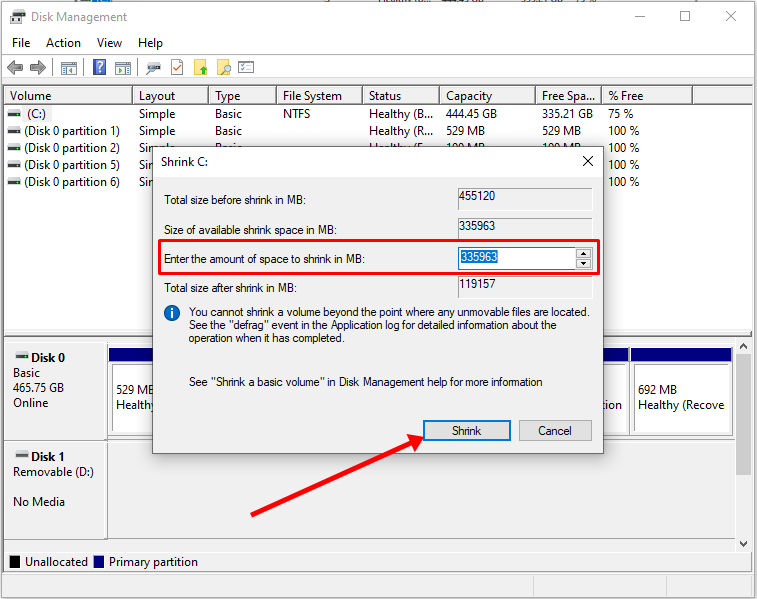
Step 3: Select at least (20000) 20Gig for Ubuntu and click “Shrink”. IT can take some time to complete, so be patient.
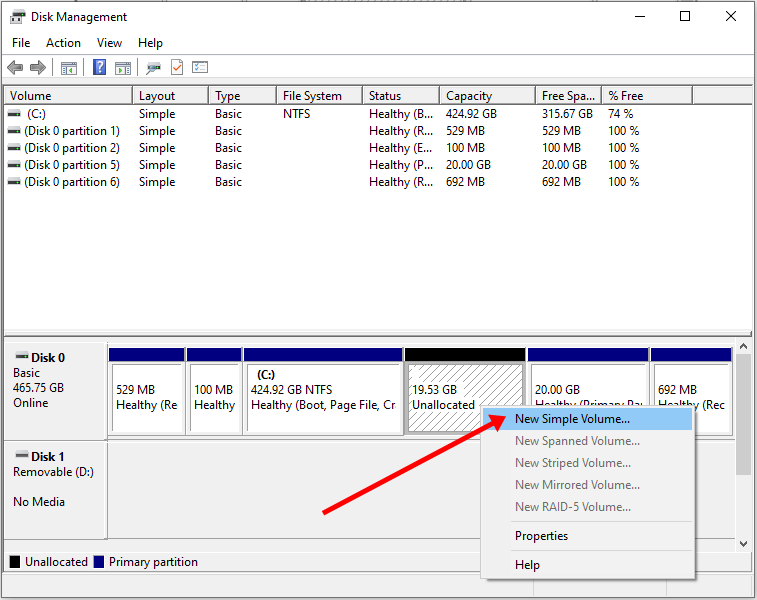
Step 4 (optional): You can go ahead and assign a letter to the new volume. Right-click on the unallocated space and select “New Simple Volume”.
Step 5: Follow the wizard and assign a letter to the drive, then follow the rest of it.
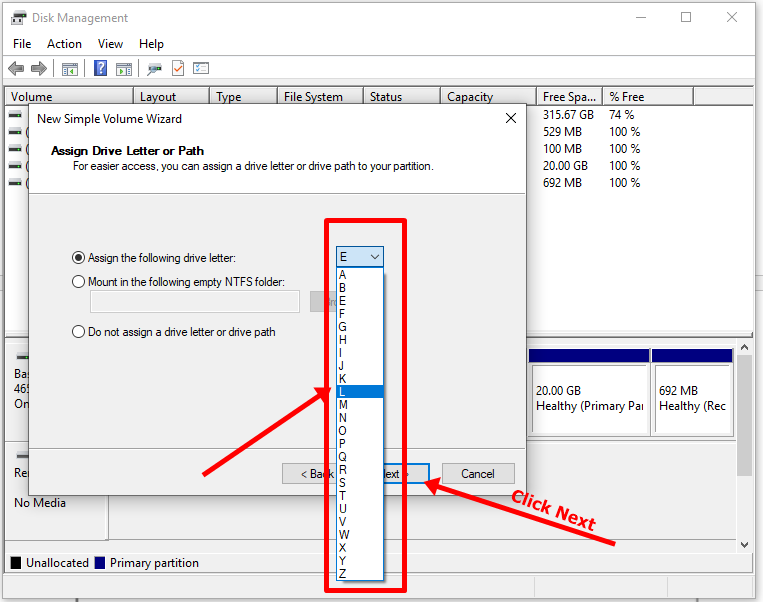
After completing the wizard, the drive should be listed on your computer.
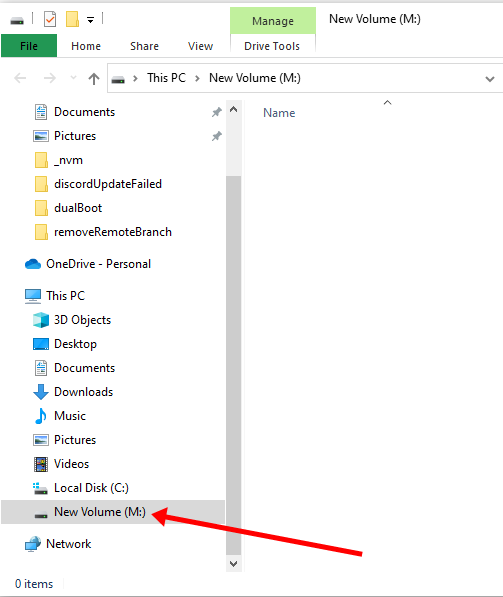
Congrats! You’ve successfully partitioned your hard drive.
N.B.: If you have a lot of free space in your hard drive but your PC still didn’t give you up to 20Gig partition space, then you need to optimize your PC’s hard drive. Proceed to the next section of this article to do that.
How to Optimize your Hard Drive for More Partition Space (Optional)
The common purpose of hard disk optimization is to speed up your computer during boot time and make it run smoother.
At the same time, the process will defragment the hard disk and make free space more available for partitioning.
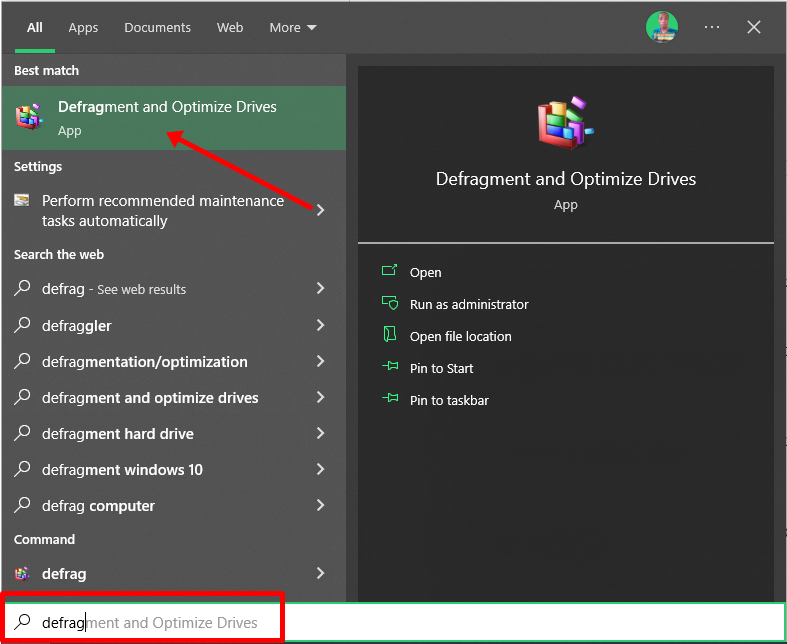
To optimize your hard drive, click Start (Windows logo key), search for “defrag” and select “Defragment and Optimize Drives”.
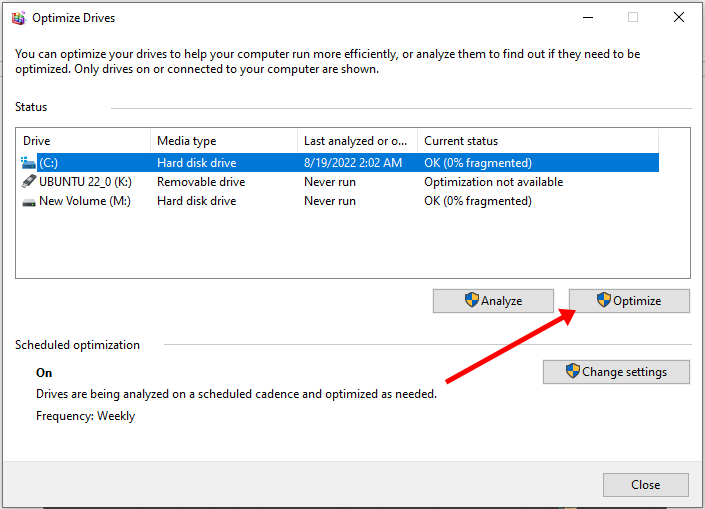
Make sure your C drive is highlighted, then click “Optimize”.
After you’ve been able to set aside at least 20Gig for Ubuntu by partitioning your hard drive, then it’s time to download Ubuntu and make a bootable USB.
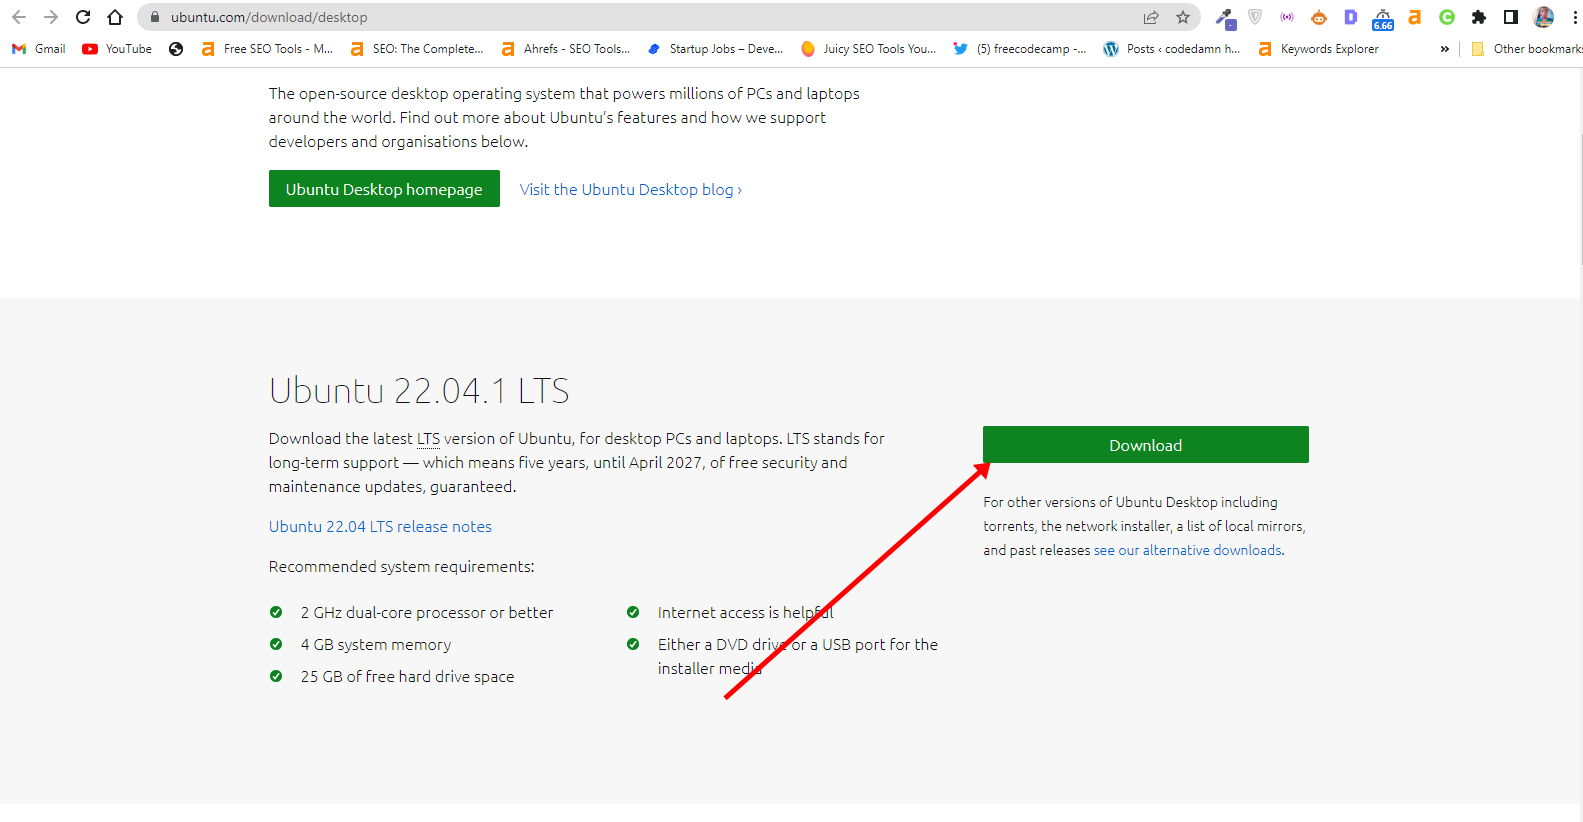
How to Download Ubuntu in ISO Image Format
The next thing is to download Ubuntu in ISO image format so you can install Ubuntu. You can download it from the Ubuntu distro website.
After downloading Ubuntu, don’t do anything with it yet. You need to make a bootable USB and put it in there. That’s how you’ll be able to use it.
The reason you can’t install Ubuntu just like that is that it doesn’t come as an executable. It comes in form of ISO (optical disk image). That means you have to find a disk to put it in before it can work.
The next part of this guide shows how you can put the downloaded Ubuntu ISO on a USB stick.
How to Make an Ubuntu (Linux) Bootable USB Drive
You won’t be able to make a bootable USB drive for Ubuntu by just placing the downloaded ISO image in it. Follow these steps to get it done:
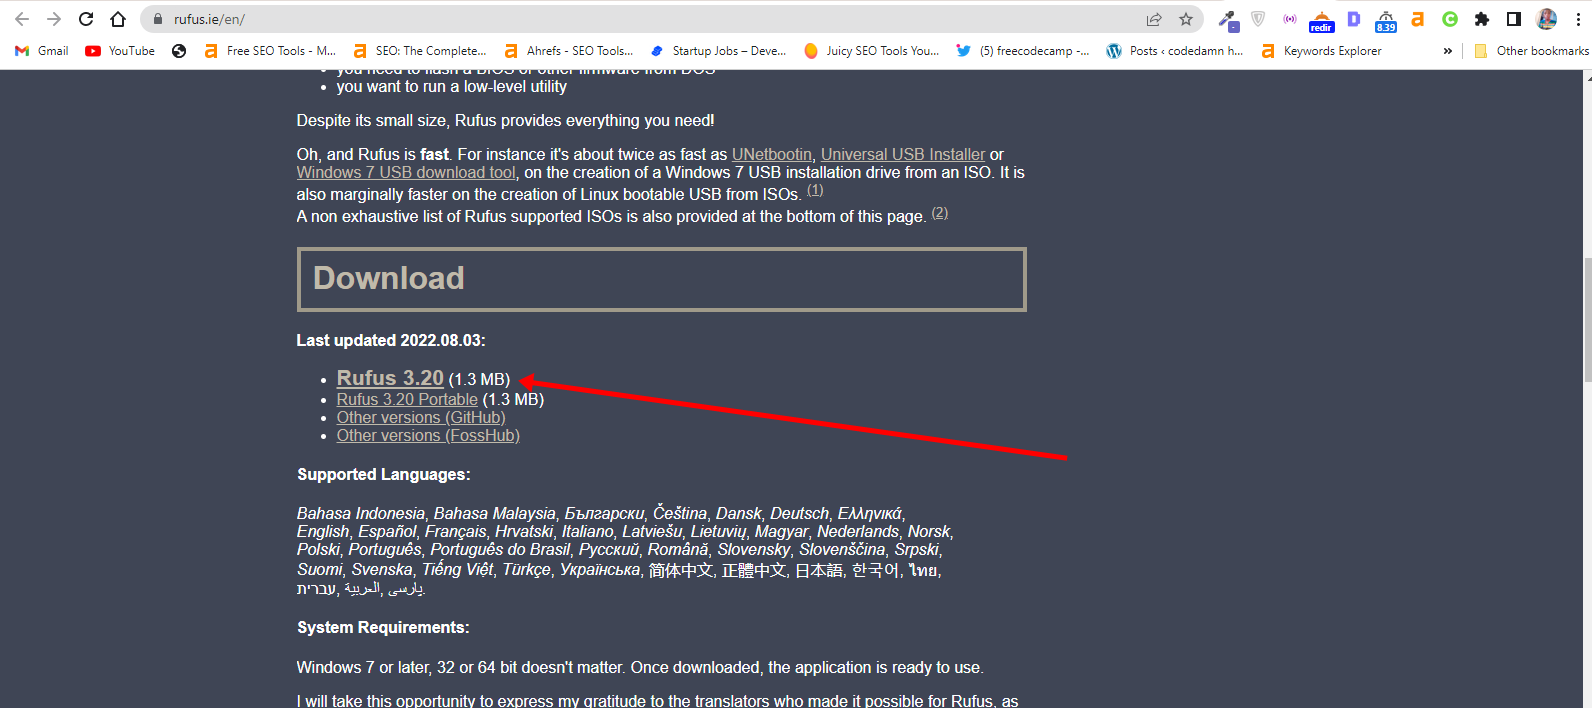
Step 1: You need to download a bootable USB drive creation tool like Rufus. You can download Rufus from their website.
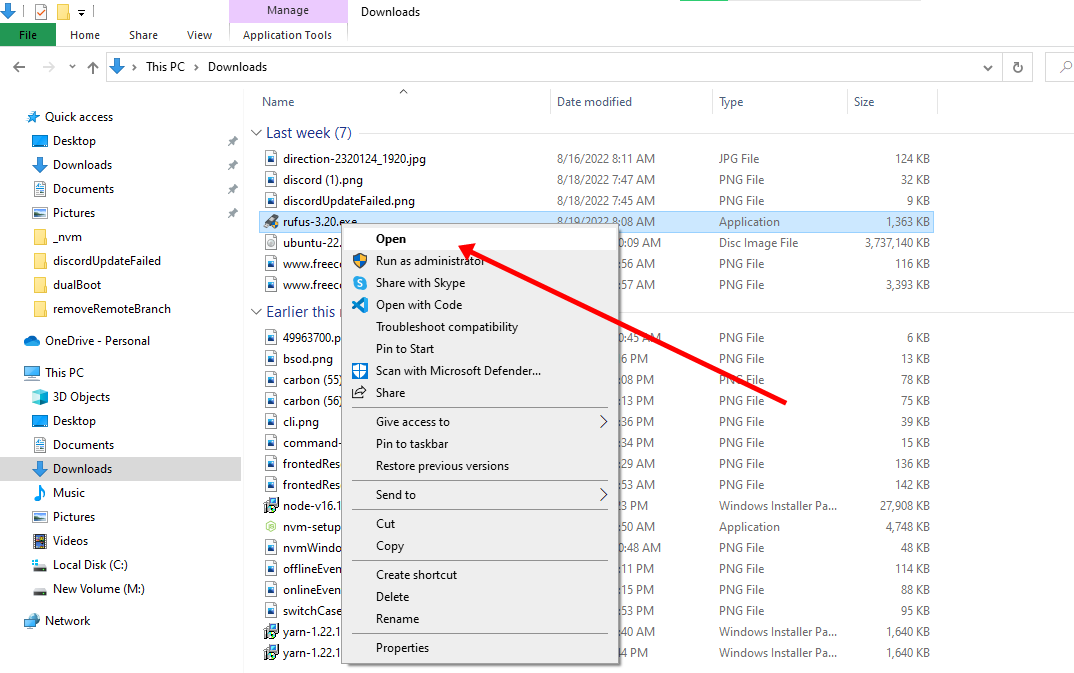
Step 2: Insert the empty USB drive into your Windows 10 PC. Right-click on Rufus and select “Open”.
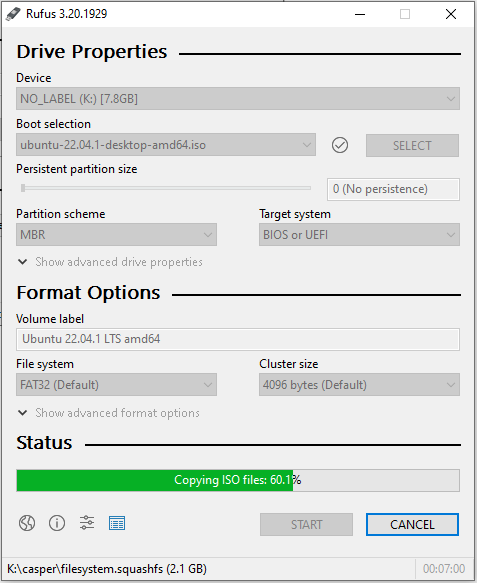
Step 3: Under “Device”, select your USB drive. And under “Boot selection”, click the “Select” button and select the Ubuntu ISO file you downloaded
Step 4: Leave every other thing as default and click the “START” button to start burning the Ubuntu distro to the drive.

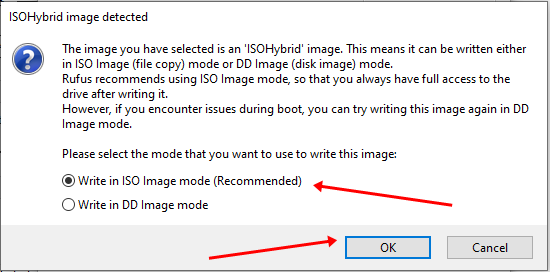
Step 5: Click OK to start the process.
Once the process is done, you should see “READY” on a green background. Click the Close button. Its time to install Ubuntu.
Congrats! Now you have a bootable drive with which you can install Linux.
The next step is to install the Ubuntu distro on your Windows 10 PC. To do this, you have to boot your PC from the bootable USB drive you created.
How to Install Ubuntu Linux Distro along with Windows 10
Step 1: Ensure the bootable drive is inserted into your Windows 10 PC
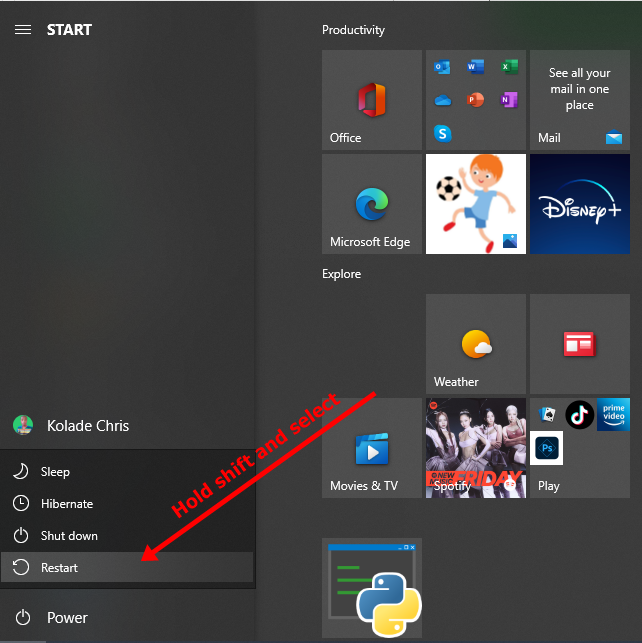
Step 2: Right-click on Start, hold SHIFT, and select Restart.
Step 2: Select “Use a Device”.
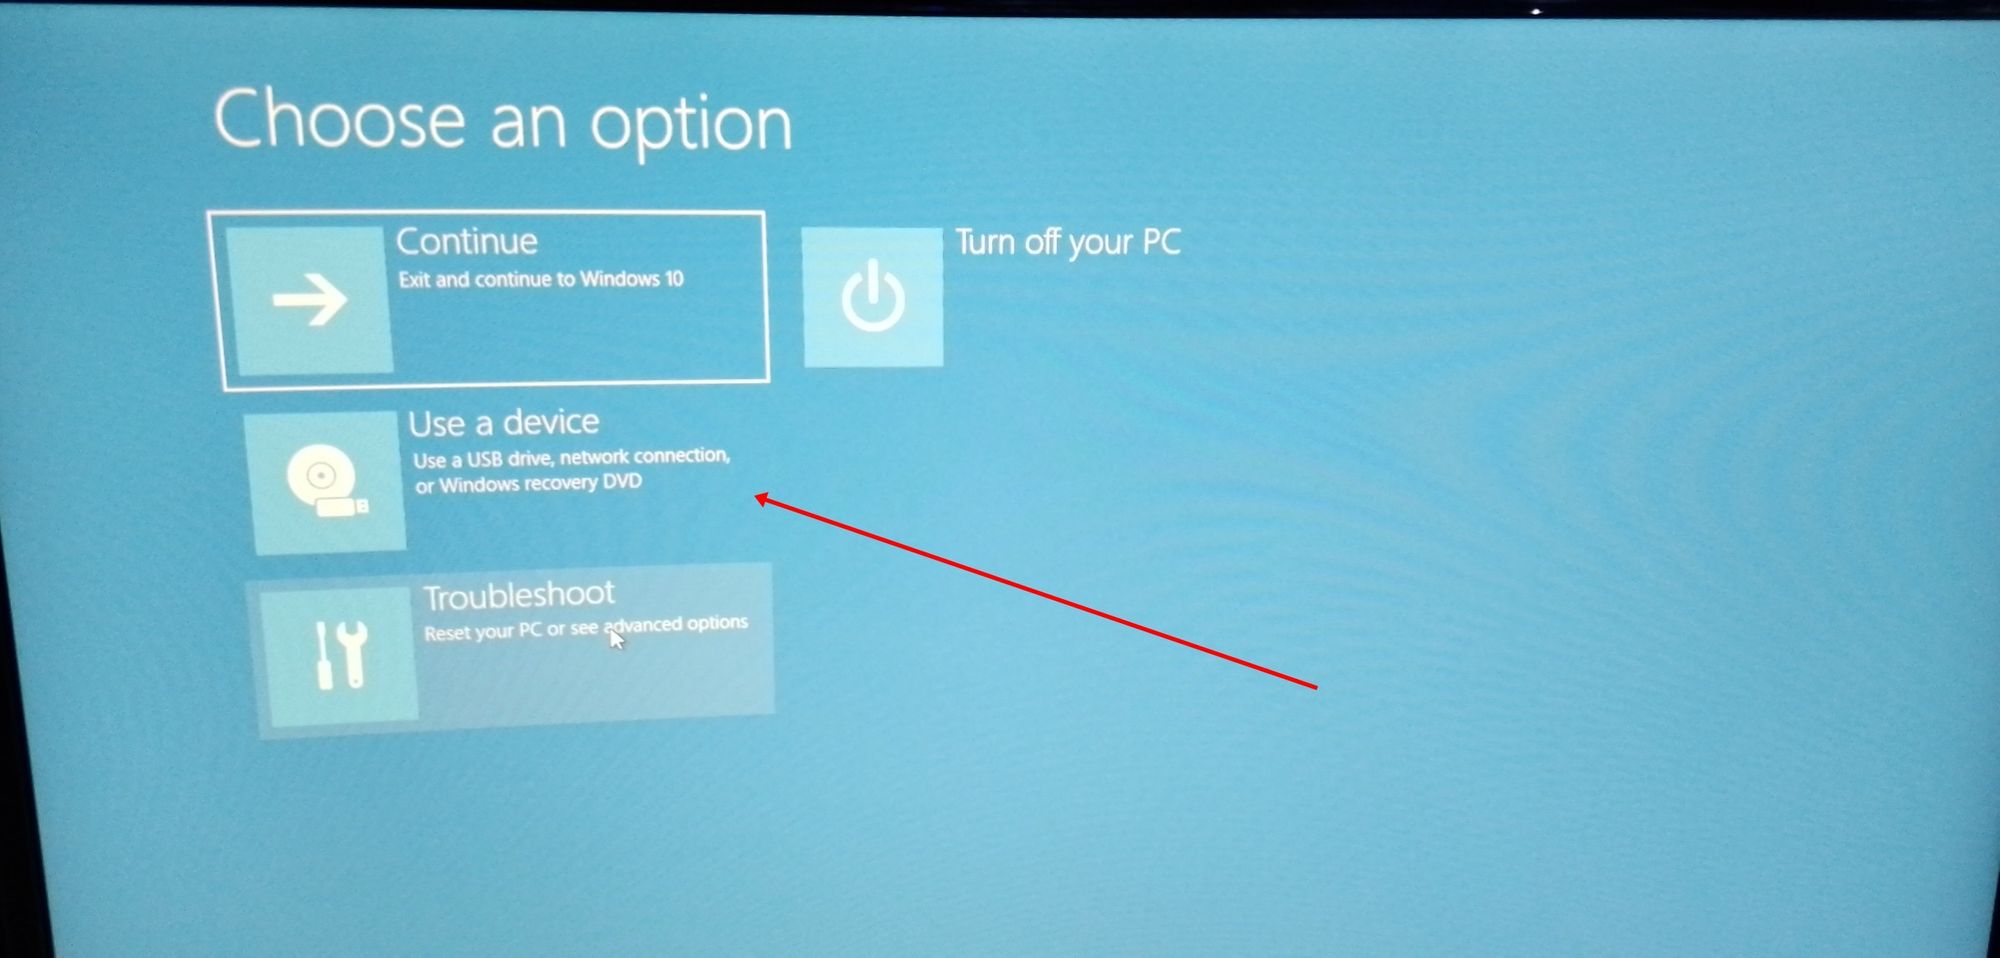
Step 3: On the next screen, you should see several devices you can boot from.
You may see the bootable drive as the name of the USB brand.
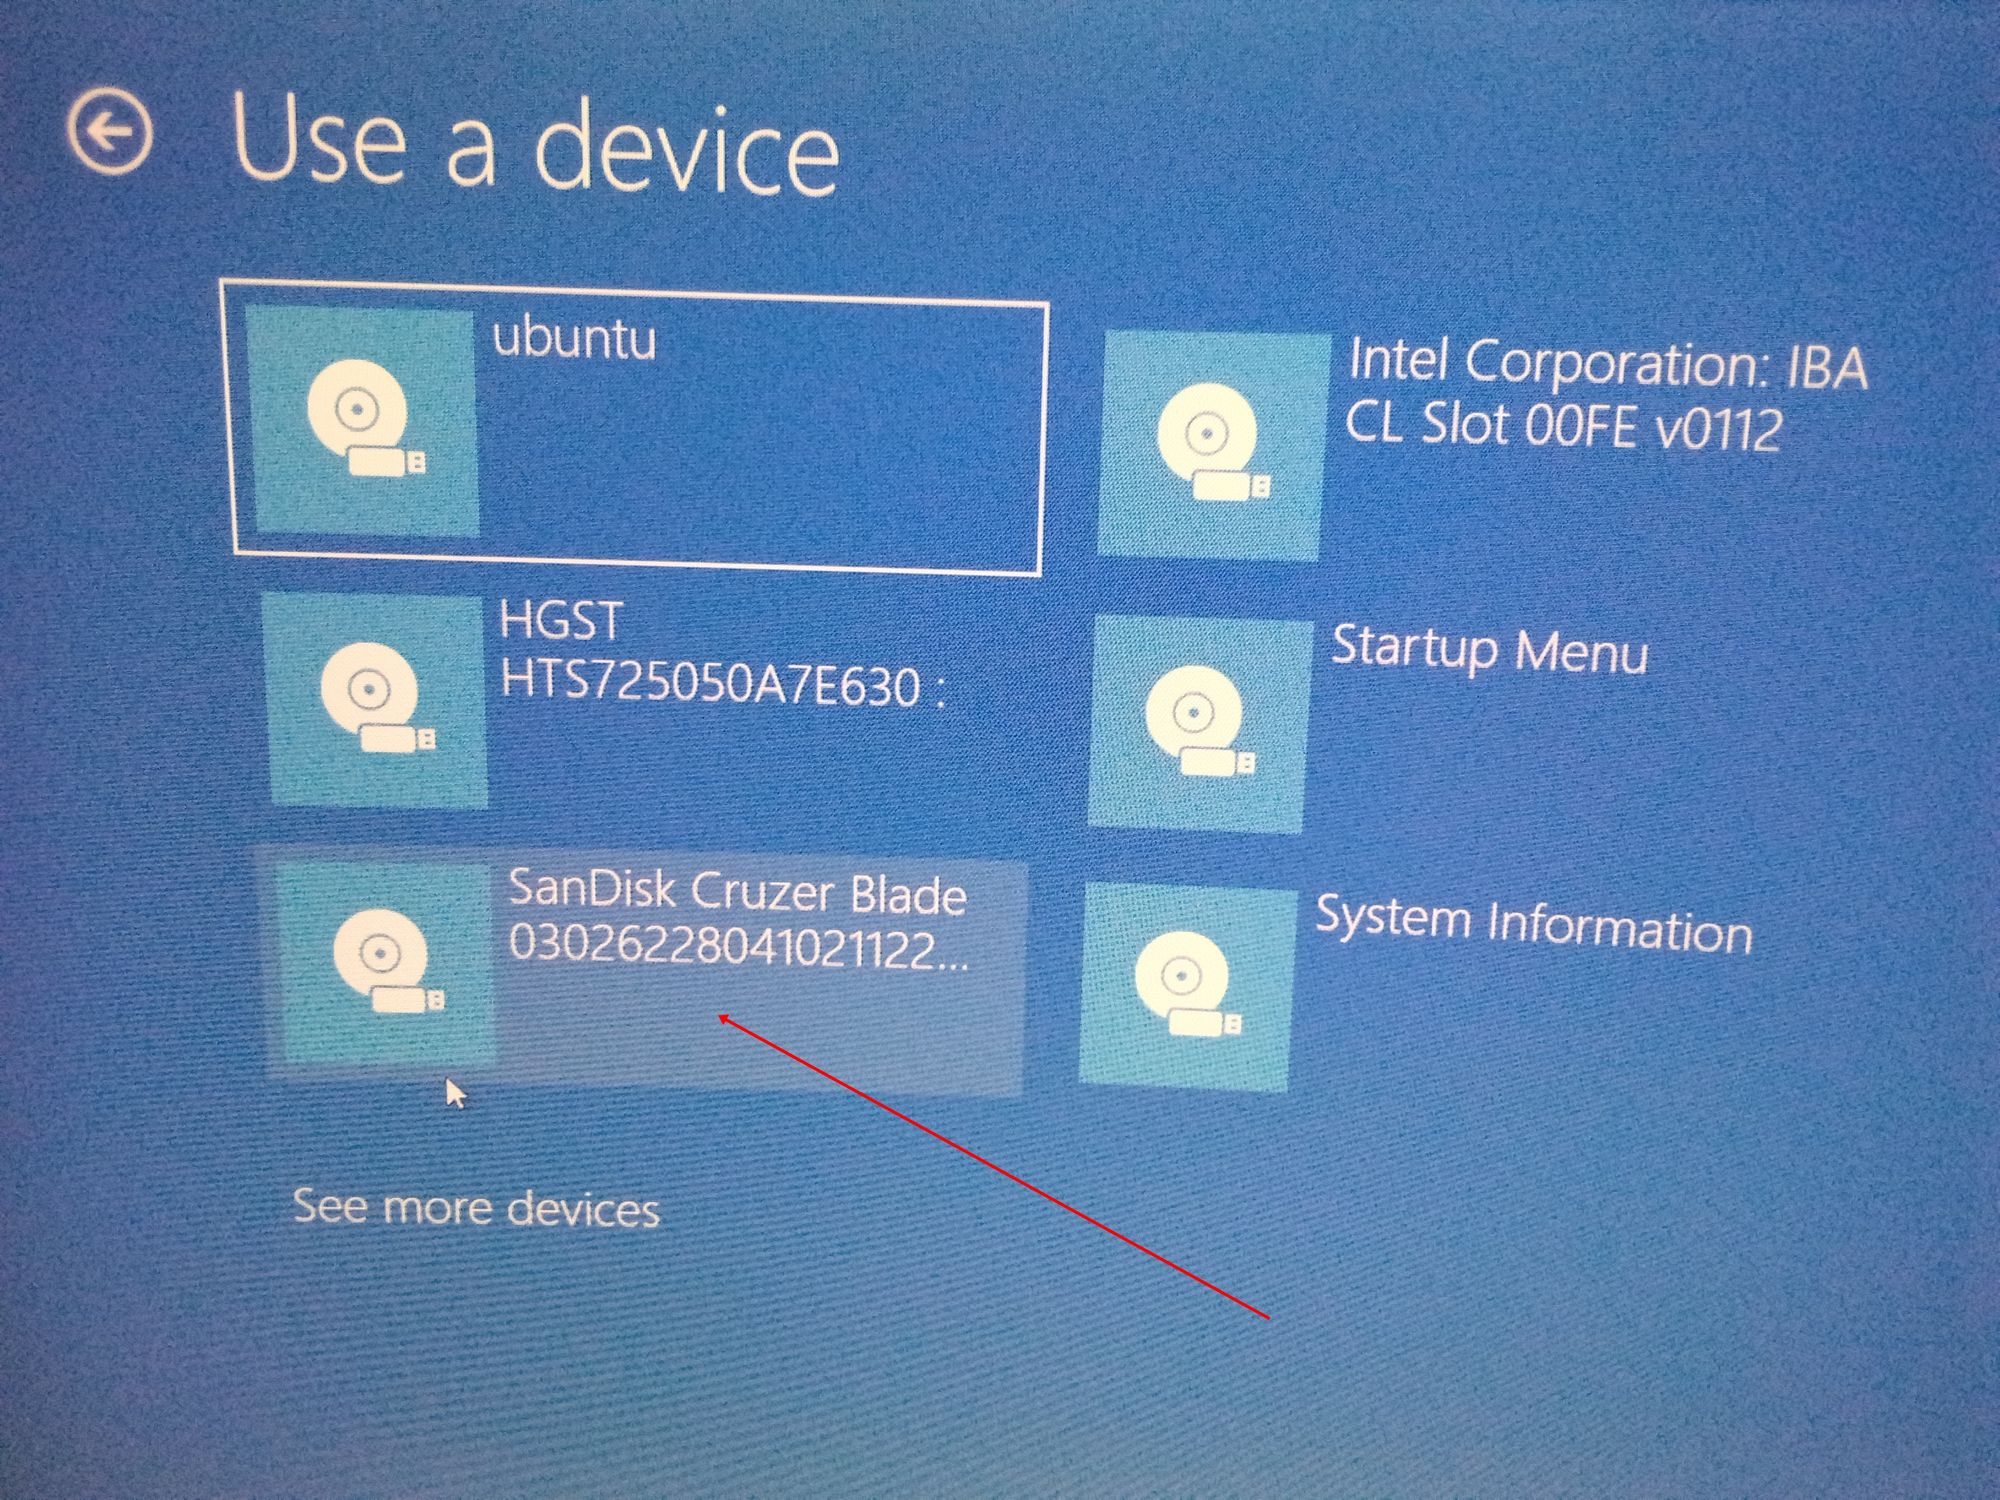
It’s possible to see it as “Ubuntu” too. Some other times, you might not see it, so you need to click on “See more devices».
If you still cannot see your bootable drive, head over to your boot menu by getting into BIOS. You will see it there.
N.B.: You should be very careful while making changes in BIOS. Whatever you do there has a lasting effect on your computer. If you are not sure of what you’re doing there, you should contact an IT professional.
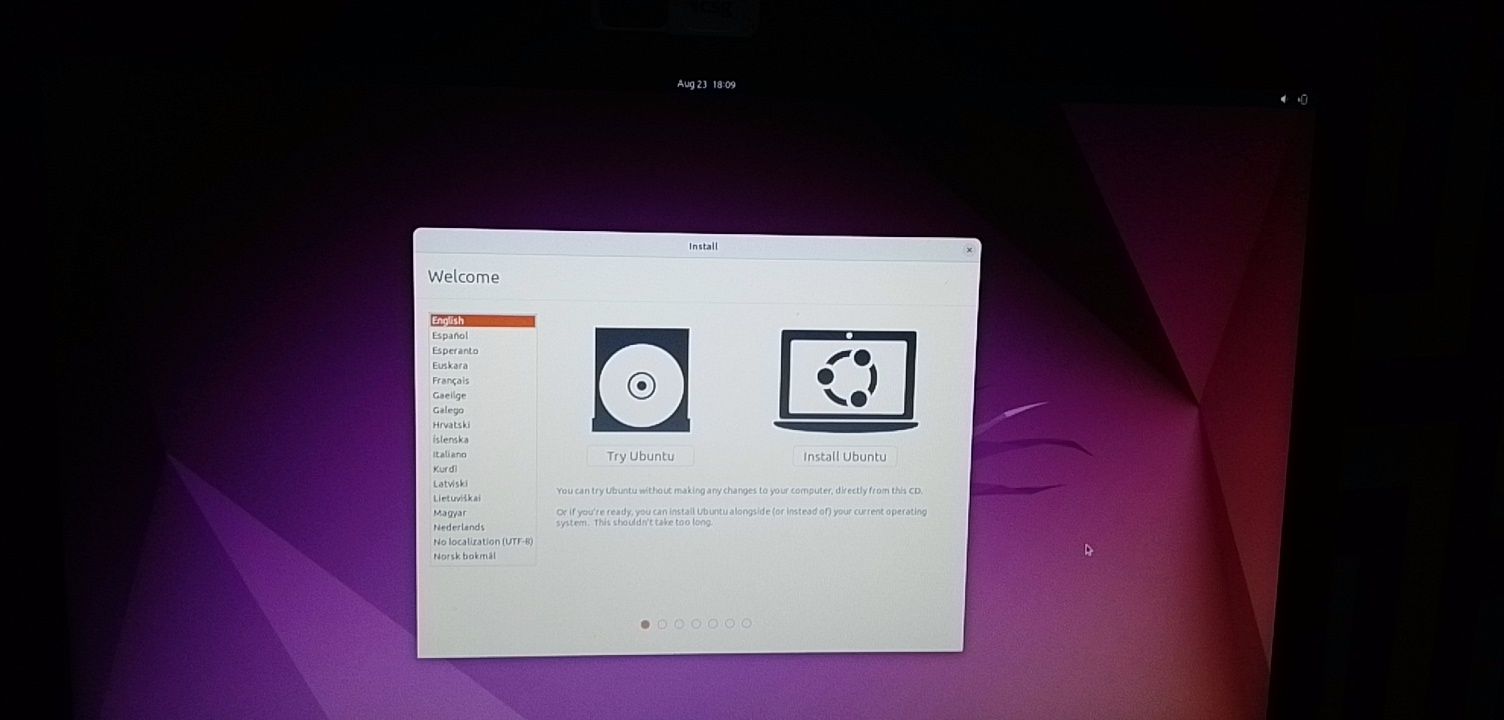
Step 4: Choose «Install Ubuntu». You can also try it before installing it.
Follow other prompts of the installation wizard and make sure you don’t replace your Windows 10 OS installation with Ubuntu. This is why I suggested you back up all your files.
When you get to the point to select the partition you made, scroll to the partition you made earlier and press ENTER.
Click OK to select all the space in the partition.
This time around, the “Install now” button will not be greyed out anymore.
Follow other prompts until Ubuntu starts installing.
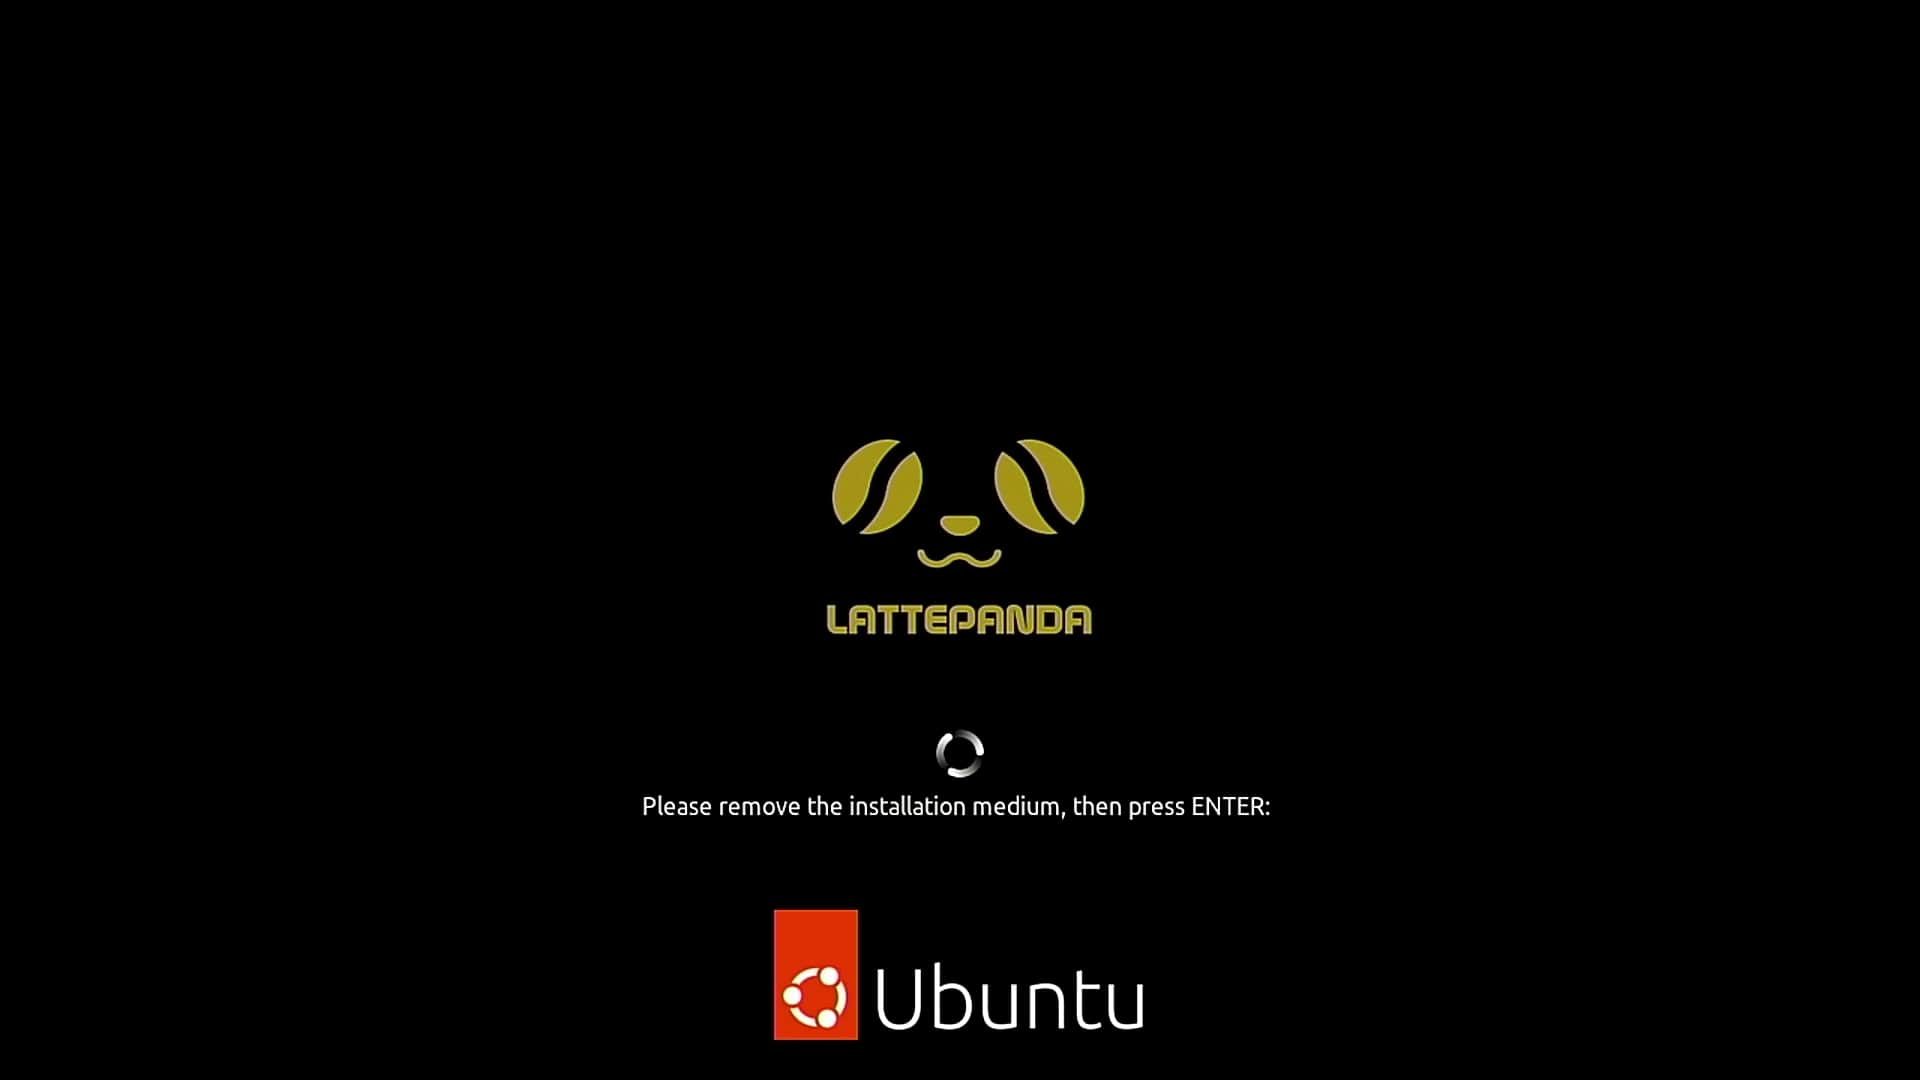
After the installation is done, Ubuntu will prompt you to remove the bootable drive and press ENTER to reboot your Computer.
Now You Can Dual Boot Ubuntu and Windows 10
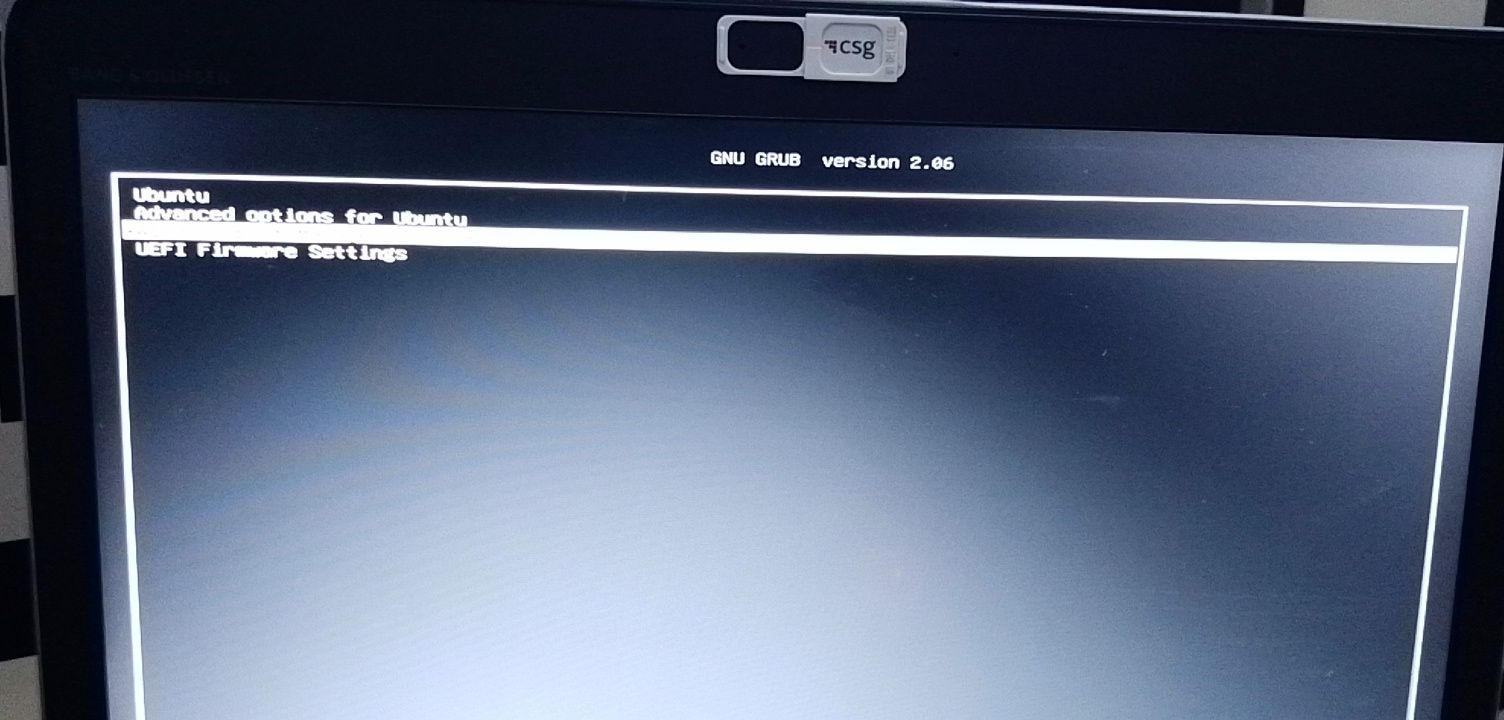
Immediately after you reboot the computer, you should see a screen that looks as shown below:
Now, you can select which one to boot into between Ubuntu and Windows 10.
To boot into Ubuntu, select Ubuntu. And to boot into Windows 10, select Windows boot manager.
You can also get into your BIOS from the same place by choosing UEFI Firmware Settings.
Conclusion
I hope this article helps you dual boot Ubuntu and Windows 10 on your computer.
The ultimate aim of this article was to show you how to dual boot Ubuntu and Windows 10.
But the article went beyond that to show you how to:
- check if your PC’s BIOS is in UEFI mode
- partition your hard drive
- optimize your hard drive
- make a bootable USB drive
- install Ubuntu Linux Distro along with Windows on your Windows 10 PC.
If you find this article helpful, kindly share it with your friends and family.
Learn to code for free. freeCodeCamp’s open source curriculum has helped more than 40,000 people get jobs as developers. Get started
In this article, we will see how to install a Linux based OS alongside a Windows OS already installed on a System. Before we begin here are some of the Advantages of a Linux OS over a Windows OS and why you should consider using a Linux System. (Purely based on my experience)
- Linux Systems are generally light on system resources and hence run faster even on old hardware setups.
- Linux has native support for the gcc compiler and python interpreter.
- Linux also has native support for Git which makes it easier for people to synchronize their work with remote repositories on GitHub.
- Linux is Open Source and hence tinkering around with its source code can give us a better understanding of the Structure of an OS.
Prerequisites, before we begin the process:
- It is recommended that you have 100 – 150 Gb of free Hard Disk space, although anything above 40 Gb would do the job. (This step is important as it is the amount of space you will be dedicated to your Linux OS, and once linux is installed you will not be able to access this space through Windows)
- A USB flash drive has a minimum space of 8 GB.
- (Optional, Only for newer machines) Making sure whether Windows is installed in UEFI mode or Legacy BIOS Mode.

Making Sure whether Windows is installed in legacy BIOS mode or UEFI mode
STEP 1: Unallocating the Required amount of Hard Disk Space
This step is required to free up some space from your NTFS formatted Hard Disk. This unallocated space will contain the Linux System Partition and hence it is necessary for you to decide carefully how much space you will be devoting to linux. To do this go to the Windows Disk Management Service. You can go to ‘Run’ enter ‘diskmgmt.msc’ and run.
Windows Disk Management Service

Shrinking an existing Volume to create unallocated space

Specifying Amount to be Shrinked
On the Disk Management Window right click on the Partition from which you want to extract the required (recommended 100 – 150 Gb) amount of free space, and click of ‘Shrink Volume’. In the Dialog Box that pops up enter the ‘amount of space to shrink’ as 102400 Mb (100 Gb) and continue. This would reduce the space of the present volume by 100 Gb and the remaining 100 Gb would be shown as Unallocated Space. This Completes the 1st Step.
STEP 2: Creating a Bootable Linux USB Drive
For the purpose of this article, I will be installing ‘Ubuntu’ as the Linux OS of choice as it is the most popular Linux OS and has a large support base. We first need to Download the Disc Image File (.iso file) of the Ubuntu OS from the Official Ubuntu website (www.ubuntu.com). The Latest LTS (Long Term Support) Version is preferred over the non-LTS version, as they provide update support for 5 years rather than 9 months for the non-LTS versions. We also need another software called Rufus for the creation of a Bootable USB Drive. A Bootable Drive is one from which the machine can load the OS without installing it. Then we need to backup all the Contents of the USB flash Drive and Start Rufus. In Rufus, we make the following settings as shown below.

Setting Up Rufus

Writing Image in ISO mode

Creation of Bootable USB
After the completion of the above Process, we are ready with our Bootable USB Drive.
STEP 3: Disabling Secureboot and Fastboot (Only for Newer Machines)
- Attention! To ensure successful installation of Ubuntu, it is important to disable BitLocker and secure boot from your bootable drive. It should be noted that in most modern machines, there is only one drive for booting and storing data, and disabling secure boot without disabling BitLocker may automatically trigger security measures that prevent the installation of Ubuntu. Therefore, to disable BitLocker, navigate to the Manage BitLocker option via the Start menu, select “Turn off BitLocker,” and follow the prompts to complete the process. You could get you recovery keys from authorised microsoft account that is logged in you machine. After creating a backup of recovery keys you can safely go to the next steps for disabling secure boot.

Bitlocker Recovery Screen (You shouldn’t be here without recovery keys)
- This step is not required for older machines say, older than 2012. In this step we need to enter the BIOS/UEFI menu of our Computer. In case you are running Windows 8.1/10, before entering the BIOS/UEFI Menu you need to disable ‘Fast Startup’. For this go to the ‘Power Options’. On the left side options go to ‘Choose what the power buttons do’ then click of ‘Change Settings that are currently unavailable’ and Untick ‘Fast Startup’ Below and save these changes.

Power Options

Choosing what the power buttons do

Turning Off Fast Startup
- Now this step of the Process is manufacturer specific. I suggest you to Google a bit to get the exact key combination you need to press during the machine startup that will get you into the BIOS/UEFI Menu. In most Cases you need to press either one of the f1, f2 or f12 keys after turning on the machine but before windows starts booting up.

Disabling Secureboot

Disabling Fastboot
STEP 4: Booting Ubuntu Linux From USB Drive
- In the next step we boot Linux from the USB Flash Drive we just created. To do this we enter into the ‘Boot Options’ during the machine starts up but before windows starts loading. The ‘Boot Options Menu’ is shown below:

Boot Options Menu

First Screen after USB Boot
- First Bootup of Ubuntu Linux:

Ubuntu Desktop
STEP 5: Installing Ubuntu Linux
- Once Ubuntu has booted off the USB Flash Drive you can try out the different applications that the linux distribution has to offer and once you verify all the basic functionality of the OS that you will be using work on your machine, we can proceed with the installation. Run the ‘Install Ubuntu’ icon shown on the Ubuntu Desktop by Double Clicking it and Follow the steps as shown below.

Selecting Language

Choosing Keyboard Layout

Choosing Type of Installation: Normal or Minimal

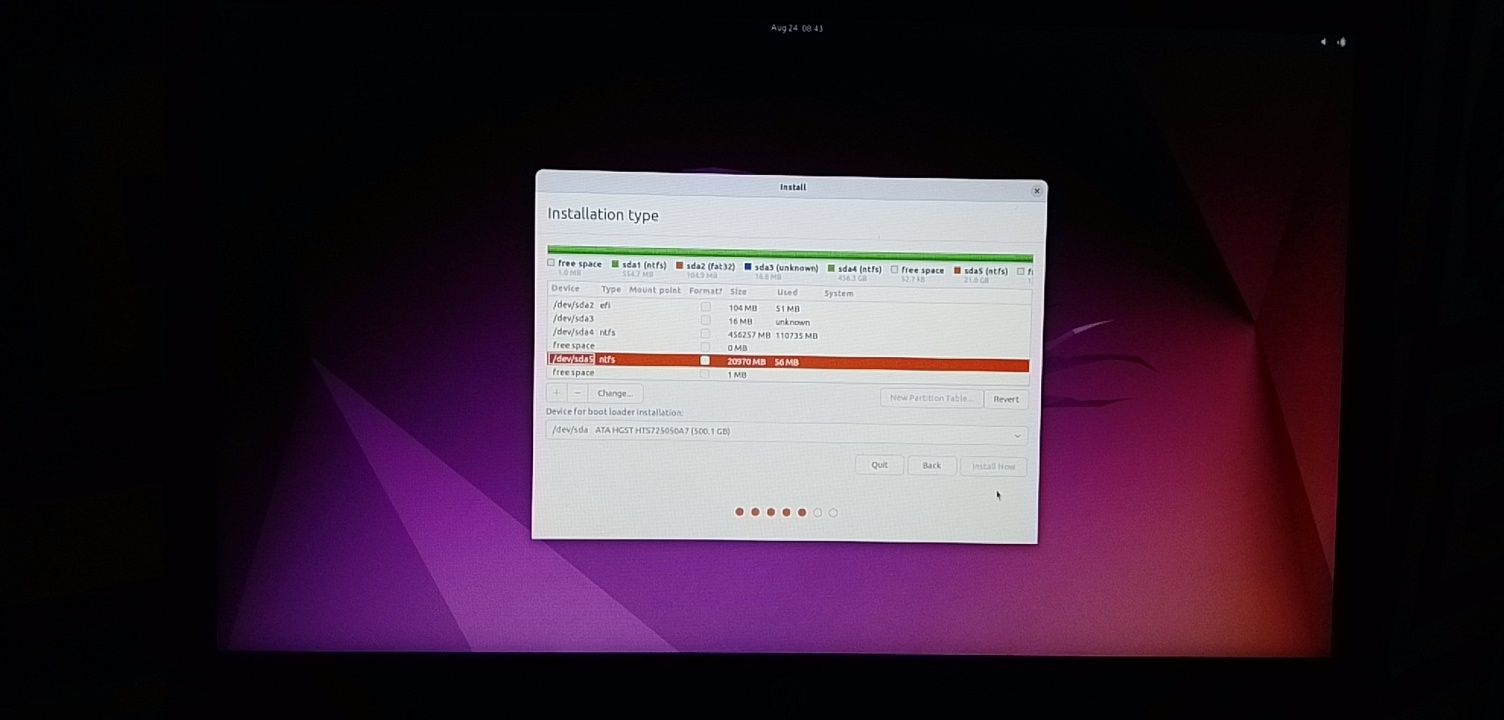
Installation Type: ‘Something Else’ is selected
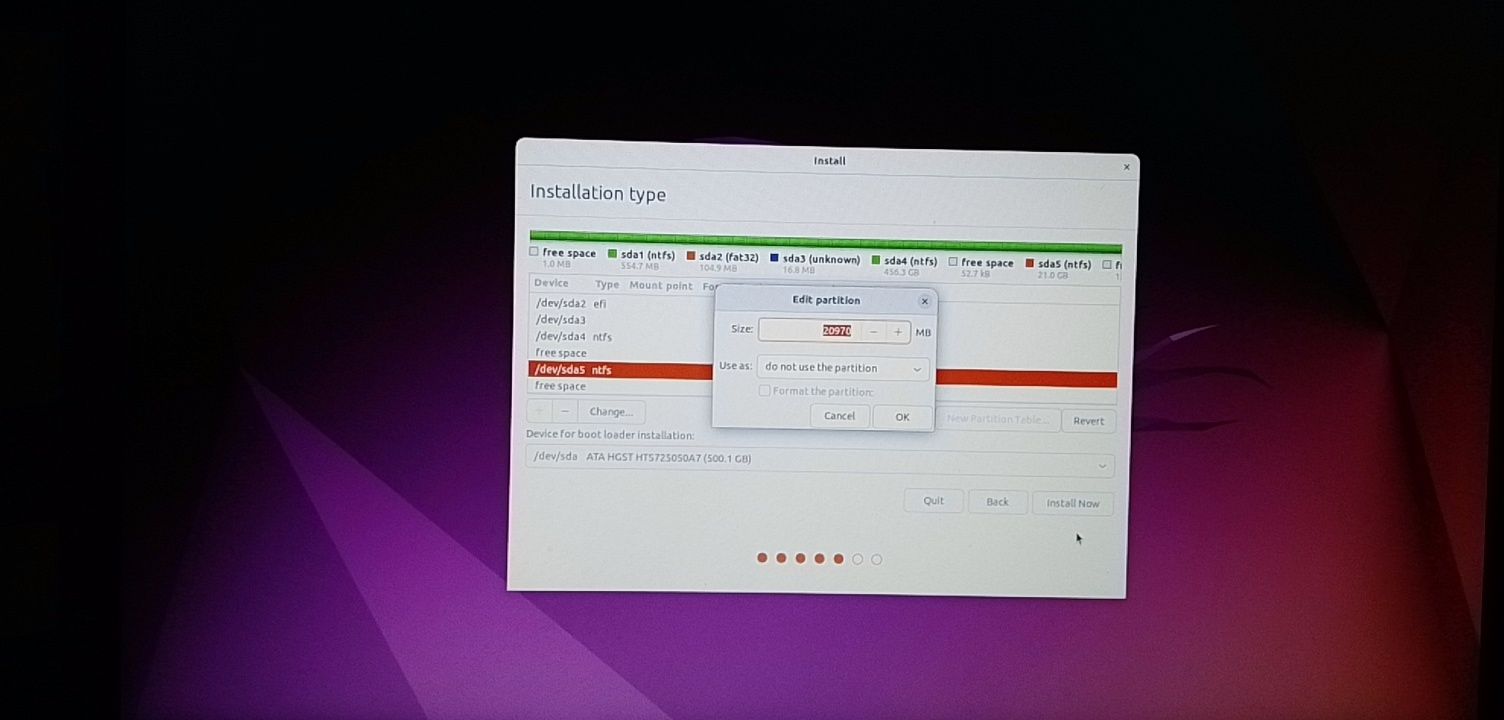
- Once You reach the Step asking you ‘How do you want to install Ubuntu’. Select ‘Something Else’ and continue. In the next screen you will see a window showing all the hard disk partitions on your machine. You need to find from among all the partitions, the one you unallocated in the 1st step, it will be labelled as free space in this window and it’s space should roughly match 102400 Mb. Highlight this ‘free space’ by left clicking it and then select the small ‘+’ sign below, this will pop a dialog box for the creation of a new Partition.

Modifying the Partition Table
- Now since i already have Linux installed on my system you see that there are 2 partitions of types ‘swap’ and ‘ext4’ these two are the Linux Partitions.But if you didn’t have Linux installed previously you would only find a portion labelled as free space as mentioned above. 1st we will be creating a ‘swap area’ we highlight the ‘free space’ open the new partition creation window and enter the amount of space for swap as equal to the amount of RAM you have. then select the ‘New Partition type’ as ‘Primary’ and finally select ‘Use as’ ‘swap area’. Now as i already mentioned since i already have linux installed, from now on i am going to continue the installation process in a virtual machine and hence the exact partition table and partition sizes may not match.

Free Space (Exact Partition Sizes would not match)

Creating swap area

‘swap area’ created

Creating Root File System Partition

Partition Table Created
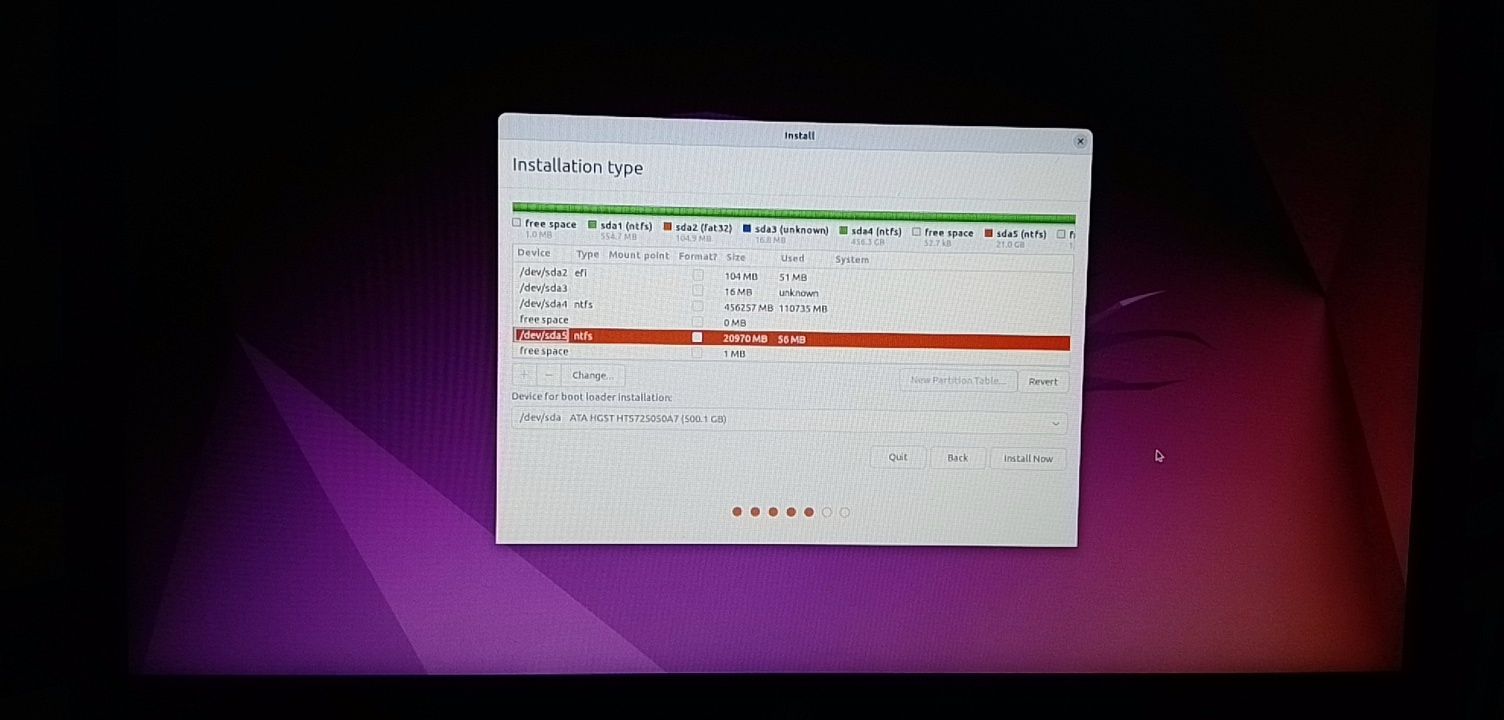
- Also make sure your ‘Device for Bootloader Installation’ is set to your internal Hard Disk Drive. (Where Windows is installed and Linux is going to be installed) in most cases this is ‘/dev/sda’

Device for Bootloader Installation
- After this is created you press ‘Install Now’ and confirm you changes to the Partition Table as shown below:

Confirmation of Modifications (Make sure both the partitions you created out of the free space are listed)
- After all this is done you simply need to proceed as follows till the installation starts:

Selecting Your Timezone
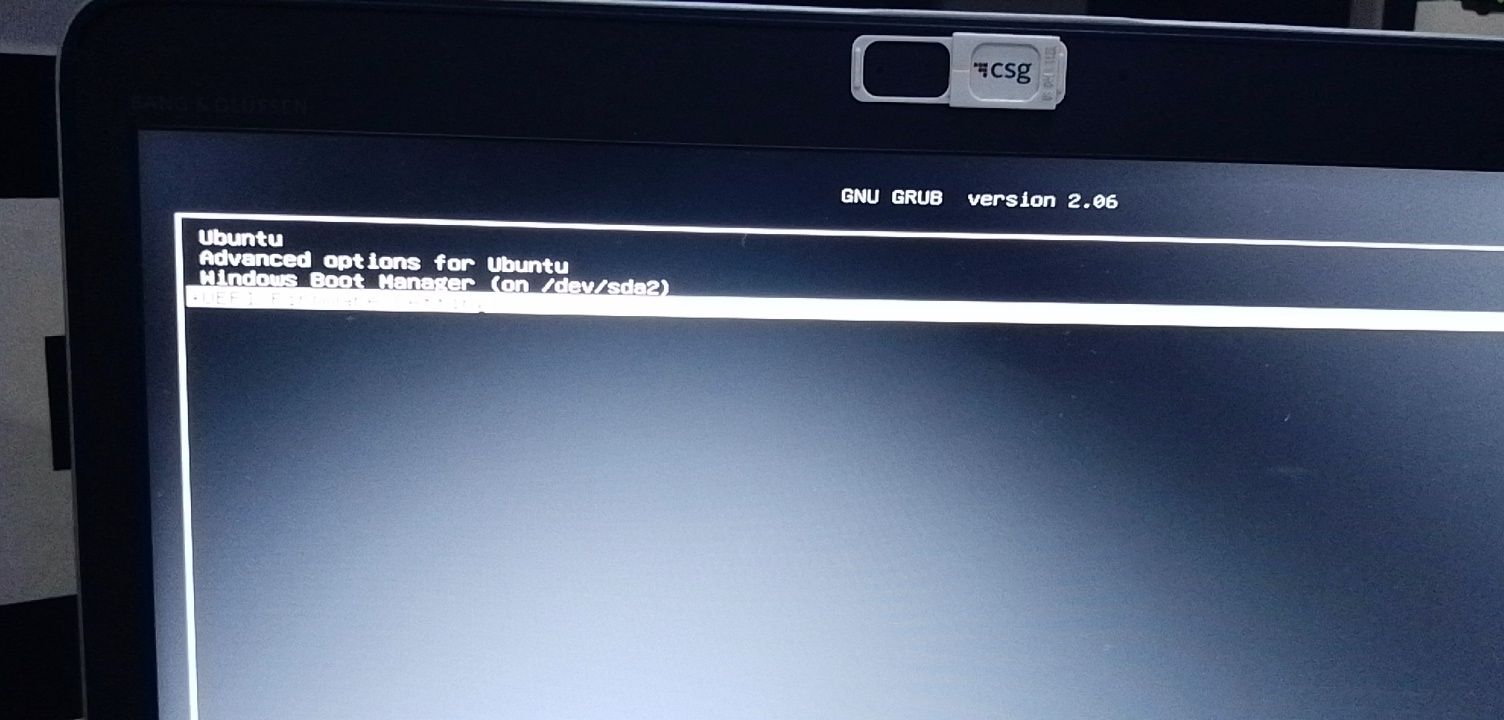
- After this you simply need to continue and give your login credentials (Username, Password) and then the installation begins. After the installation completes you can shut down your computer, remove the bootable USB drive and the next time turn on your machine you should be presented by a grub window as shown below, letting you choose between Linux (Ubuntu, 1st Option) and Windows (Windows Boot Manager). And there you have your own dual booted system.

The Grub Menu
Last Updated :
05 Apr, 2023
Like Article
Save Article
Dual boot with Windows (BIOS/MBR) — Archlinux
Simple instructions to install Arch Linux alongside Windows (Legacy-BIOS/MBR). Last update: 16/06/18.
Full documentation: Wiki
Windows UEFI vs BIOS
According to the ArchWiki:
The best way to detect the boot mode of Windows is to do the following:
- Boot into Windows
- Press Win key and ‘R’ to start the Run dialog
- In the Run dialog type «msinfo32» and press Enter
- In the System Information windows, select System Summary on the left and check the value of BIOS mode item on the right
- If the value is UEFI, Windows boots in UEFI/GPT mode. If the value is Legacy, Windows boots in BIOS/MBR mode.
Pre-installation
Windows setup
Partition
- Within the console (
Win + R) go toDisk Managementby typing: - Right click the partition you would like to expand and then choose
Extend Volume(e.g. D partition).
Fast-boot
-
Open
Power options. -
“Choose what the power buttons do”.
-
«Change settings that are currently unavailable.”
-
Under “Shutdown settings” make sure “Turn on fast startup” is disabled.
Boot usb
-
Enter
BIOS(F1, F2 or F10 during boot sequence). -
Give a USB device boot sequence priority over the hard drive
Linux setup
Network connection
-
If not using an ethernet conexion:
Pick network, enter password.
Verify it’s working by using [ping](https://en.wikipedia.org/wiki/Ping_(networking_utility):
-
Update the system clock
$ timedatectl set-ntp trueTo verify use
timedatectl status.
Installation
Partition the disks
-
Identify the disks (e.g.
/dev/sda) with fdisk:As you already have installed Windows, the output should look something like this:
Disk /dev/sda: 931.5 GiB, 1000204886016 bytes, 1953525168 sectors
Units: sectors of 1 * 512 = 512 bytes
Sector size (logical/physical): 512 bytes / 4096 bytes
I/O size (minimum/optimal): 4096 bytes / 4096 bytes
Disklabel type: dos
Disk identifier: 0xd275cc93

Device     Boot      Start        End   Sectors   Size Id Type
/dev/sda1  *          2048    1026047   1024000   500M  7 HPFS/NTFS/exFAT
/dev/sda2          1026048  437999615 436973568 208.4G  7 HPFS/NTFS/exFAT
/dev/sda3        437999616 1401948159 963948544 459.7G  7 HPFS/NTFS/exFAT
/dev/sda4       1401948160 1953525167 551577008   263G  5 Unallocated
We are going to unallocated partition (i.e.
/dev/sda4) to install Linux. -
Enter the disk
/dev/sda:With this we will enter
fdisk‘s command prompt.We will install Linux in 2 partitions (
rootandhome). To do so, we will make theTypeof the unallocated partitionExtended(source):$ Command (m for help): nSelect
Extendedpartition type. For the fist and last sector enter the default.Create the
rootpartition (ncommand). Partition type: Primary. First sector: default. Last sector: +XXXG (i.e. +63G).Create the
homepartition. Partition type: Primary. First sector: default. Last sector: default.To finalize, enter
wto write the changes.After
fdisk -l, the output should look something like this:Device Boot Start End Sectors Size Id Type /dev/sda1 * 2048 1026047 1024000 500M 7 HPFS/NTFS/exFAT /dev/sda2 1026048 437999615 436973568 208.4G 7 HPFS/NTFS/exFAT /dev/sda3 437999616 1401948159 963948544 459.7G 7 HPFS/NTFS/exFAT /dev/sda4 1401948160 1953525167 551577008 263G 5 Extended /dev/sda5 1401950208 1534070783 132120576 63G 83 Linux /dev/sda6 1534072832 1953525167 419452336 200G 83 Linux
Format the partitions
- Format both partitions to
ext4:
Mount the partitions
- We will mount
/dev/sda5to/mntand/dev/sda6to/mnt/home:We need to create the directory
/homefirst:$ mount /dev/sda6 /mnt/homeMount them all with
mount.
Install the base packages
- Use the pacstrap script to install the basic configuration:
Configure the system
- Generate the fstab. According to the wiki:
The fstab file can be used to define how disk partitions, various other block devices, or remote filesystems should be mounted into the filesystem.
```
$ genfstab -U /mnt >> /mnt/etc/fstab
```
Look at it:
```
$ cat /mnt/etc/fstab
```
-
Use
arch-chrootto enter/mntand change its privileges to root: -
Install packages using the pacman command.
$ pacman -S grub-bios linux-headers linux-lts linux-lts-headersThe
linux-lts(long term support) packages are optional. -
OPTIONAL Install these packages for wireless-card (source):
$ pacman -S dialog network-manager-applet networkmanager networkmanager-openvpn wireless_tools wpa_supplicant wpa_actiond -
Recreate the initramfs image (already done with
pacstrap):If you installed
linux-lts, run the previous command again now using the lts version. -
Uncomment localizations (i.e. en_US.UTF-8 UTF-8) in
/etc/locale.gen(usenano). Generate them with: -
Set the root password with paswd.
Grub configuration
-
Run the following command:
# grub-install --target=i386-pc --recheck /dev/sdXwhere
/dev/sdXis the partitioned disk where grub is to be installed (e.g./dev/sdaand not partition/dev/sda5). -
In the file
/etc/grub.d/40_custom(or/boot/grub/custom.cfg) copy the following (for Windows Vista/7/8/8.1/10):if [ "${grub_platform}" == "pc" ]; then menuentry "Microsoft Windows Vista/7/8/8.1/10 BIOS/MBR" { insmod part_msdos insmod ntfs insmod search_fs_uuid insmod ntldr search --fs-uuid --set=root --hint-bios=hd0,msdos1 --hint-efi=hd0,msdos1 --hint-baremetal=ahci0,msdos1 XXXXXXXXXXXXXXXX ntldr /bootmgr } fiwhere XXXXXXXXXXXXXXXX is the filesystem UUID which can be found with command
lsblk --fs(in most cases this corresponds to the first partition, i.e./dev/sda1). -
Copy the locale:
$ cp /usr/share/locale/en\@quot/LC_MESSAGES/grub.mo /boot/grub/locale/en.mo -
Generate the main configuration file:
$ grub-mkconfig -o /boot/grub/grub.cfg
Swap file
-
Create the swapfile:
$ fallocate -l XG /swapfilewhere X (e.g. 2G, 4G) is the size of the file in gigabytes.
-
Change file permissions so that only the owner has privileges (using chmod):
-
Swap format:
Add this file to
/etc/fstab:$ echo '/swapfile none swap sw 0 0' | tee -a /etc/fstab -
Exit arch-chroot with
exit. Unmount all devices withumount -a. Reboot (remove the USB).
Networking (wifi)
-
Check if you have an IP address with
ip:If not, check the status of
NetworkManagerusing systemctl:$ systemctl status NetworkManagerTo enable/start it use the following command:
$ systemctl XXXXX NetworkManagerWhere XXXXX can be start or enable.
-
Having installed
NetworkManagerwe can usenmcli, a command line interface which we will use to connect to wifi.To show a list of UUID’s:
Choose your corresponding wifi and connect using:
$ nmcli dev wifi connect <SSID> password <PASSWORD>Verify you have an IP address with
ip a.
Users
- Add an user with useradd:
Verify a user home directory has been created:
Add a password to the user with
passwd <USER>.
GUI
-
Install the display server Xorg:
-
Check which video driver you have with
lspci. For example:00:00.0 Host bridge: Intel Corporation Xeon E3-1200 v3/4th Gen Core Processor DRAM Controller (rev 06) 00:01.0 PCI bridge: Intel Corporation Xeon E3-1200 v3/4th Gen Core Processor PCI Express x16 Controller (rev 06) 00:02.0 VGA compatible controller: Intel Corporation 4th Gen Core Processor Integrated Graphics Controller (rev 06) 00:03.0 Audio device: Intel Corporation Xeon E3-1200 v3/4th Gen Core Processor HD Audio Controller (rev 06) 00:14.0 USB controller: Intel Corporation 8 Series/C220 Series Chipset Family USB xHCI (rev 04) 00:16.0 Communication controller: Intel Corporation 8 Series/C220 Series Chipset Family MEI Controller #1 (rev 04) 00:1a.0 USB controller: Intel Corporation 8 Series/C220 Series Chipset Family USB EHCI #2 (rev 04) 00:1b.0 Audio device: Intel Corporation 8 Series/C220 Series Chipset High Definition Audio Controller (rev 04) 00:1c.0 PCI bridge: Intel Corporation 8 Series/C220 Series Chipset Family PCI Express Root Port #1 (rev d4) 00:1c.2 PCI bridge: Intel Corporation 8 Series/C220 Series Chipset Family PCI Express Root Port #3 (rev d4) 00:1c.3 PCI bridge: Intel Corporation 8 Series/C220 Series Chipset Family PCI Express Root Port #4 (rev d4) 00:1d.0 USB controller: Intel Corporation 8 Series/C220 Series Chipset Family USB EHCI #1 (rev 04) 00:1f.0 ISA bridge: Intel Corporation HM86 Express LPC Controller (rev 04) 00:1f.2 SATA controller: Intel Corporation 8 Series/C220 Series Chipset Family 6-port SATA Controller 1 [AHCI mode] (rev 04) 00:1f.3 SMBus: Intel Corporation 8 Series/C220 Series Chipset Family SMBus Controller (rev 04) 01:00.0 3D controller: NVIDIA Corporation GK208M [GeForce GT 740M] (rev a1) 03:00.0 Network controller: Qualcomm Atheros QCA9565 / AR9565 Wireless Network Adapter (rev 01) 04:00.0 Ethernet controller: Qualcomm Atheros QCA8171 Gigabit Ethernet (rev 10)Check which video driver (
Inter,NVIDIA,VirtualBox, etc.) you have underVGA compatible controlleror3D controller. If you have both, I recommend installing the Intel driver.Intel:
$ pacman -S xf86-video-intel libgl mesaNVIDIA:
$ pacman -S nvidia nvidia-lts nvidia-libgl mesaVBOX:
$ pacman -S virtualbox-guest-utils virtualbox-guest-modules- arch mesa(Remember to enable the
vboxservice.serviceservice withsystemctl enable). -
Now its time to install a display manager. In this example we will install SDDM.
Enable the service (but not start it yet):
-
We will install the desktop environment. I prefer KDE:
If you want the most basic installation, install
plasmainstead (remember to install some terminal likekonsole). -
REBOOT!
Taking your first steps into the world of Linux can be a scary proposition. After all, we have a whole new world of terminal commands, desktop environments and applications to learn. Thankfully Linux installation has improved leaps and bounds from the earliest text based installers used in the late 1990s (Debian and Slackware) via graphical installers in the early 2000s (Corel Linux, Mandrake). From the 2010s we have seen better graphical installers providing reassurance as we test out Linux.
The first steps into Linux fall under two paths. A single board computer such as the Raspberry Pi. Or more traditionally a dual boot setup, where Windows and Linux are installed to the same machine, often on the same boot drive. Using a custom boot menu, GRUB, we can choose between the two operating systems when we power on our PC.
In this how to, we shall learn how to dual boot Linux with Windows, using Ubuntu and Windows 11. The steps are the same with Windows 10 or with
Creating a Linux Install USB
Our Linux distro is typically downloaded as an ISO image (ISO originally being referred to as CD / DVD sized images) of a live Linux OS that we can test on our machine. To use the ISO with a UEFI / Secure Boot system we need to use Rufus, a popular free utility that writes ISO files to USB Flash drives.
Our goal is to create a bootable USB stick containing our chosen Linux OS. A minimum capacity of 8GB is recommended for your USB drive.
For this project you will need
- Computer running Windows 10 / 11 (We tested with Windows 11)
- USB Flash drive, 8GB or larger
- Linux distro (we chose Ubuntu)
1. Download and install Rufus for your operating system.
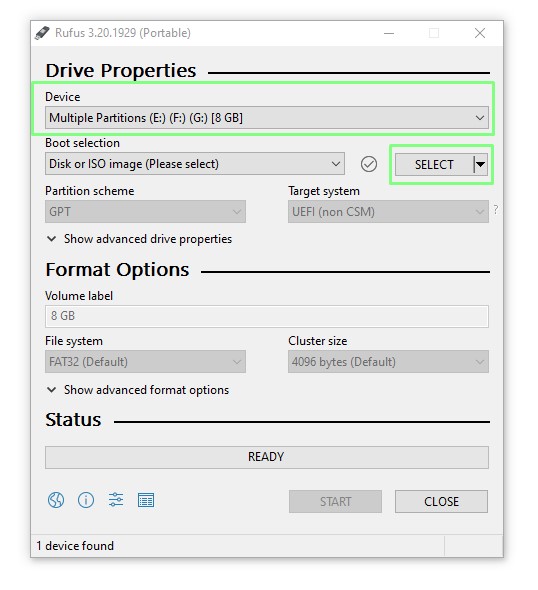
2. Insert a USB drive into your machine and open Rufus.
3. Select your USB drive using Device, and then click SELECT and select the Linux OS that you wish to install. In our case it was Ubuntu 22.04.1.
4. Select the GPT partition scheme and click START to write the OS to the USB drive. GPT is the latest partition scheme and necessary for installing Ubuntu on a UEFI system. It is gradually replacing MBR.
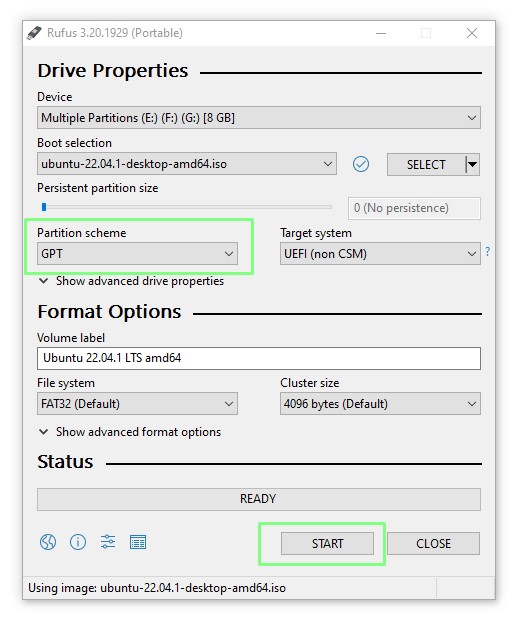
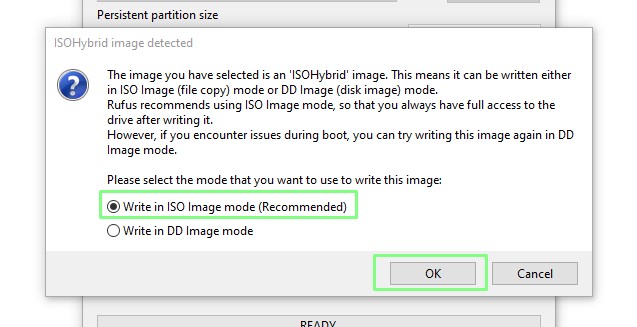
5. When prompted select “Write in ISO image mode” and click OK.
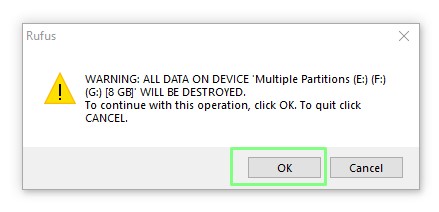
6. Read and understand the prompts to ensure that Linux OS will be written to the correct drive. There is no going back should you make a mistake.
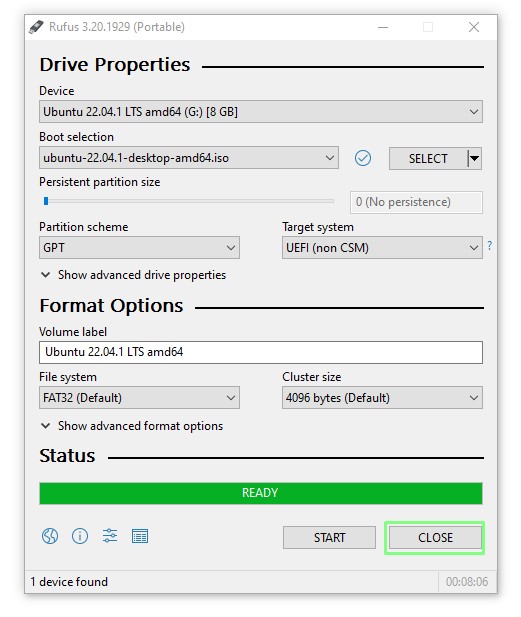
7. Click CLOSE to exit Rufus and remove the USB drive from the machine.
How to Install Linux for Dual Boot
The Linux installer has come a long way. Gone are the old days of scary user interfaces and in their place are inviting and easy to use installers that guide you through the process. We’re going to use the Ubuntu 22.04.1 installer to split our 256GB NVMe drive in half. Giving Windows and Ubuntu enough space for a basic dual boot install. Then we will follow a typical Ubuntu installation.
1. Insert the USB drive into your computer and boot from it. Each computer is a little different, Some will offer a function key to select a boot device, some need to be selected from the BIOS.
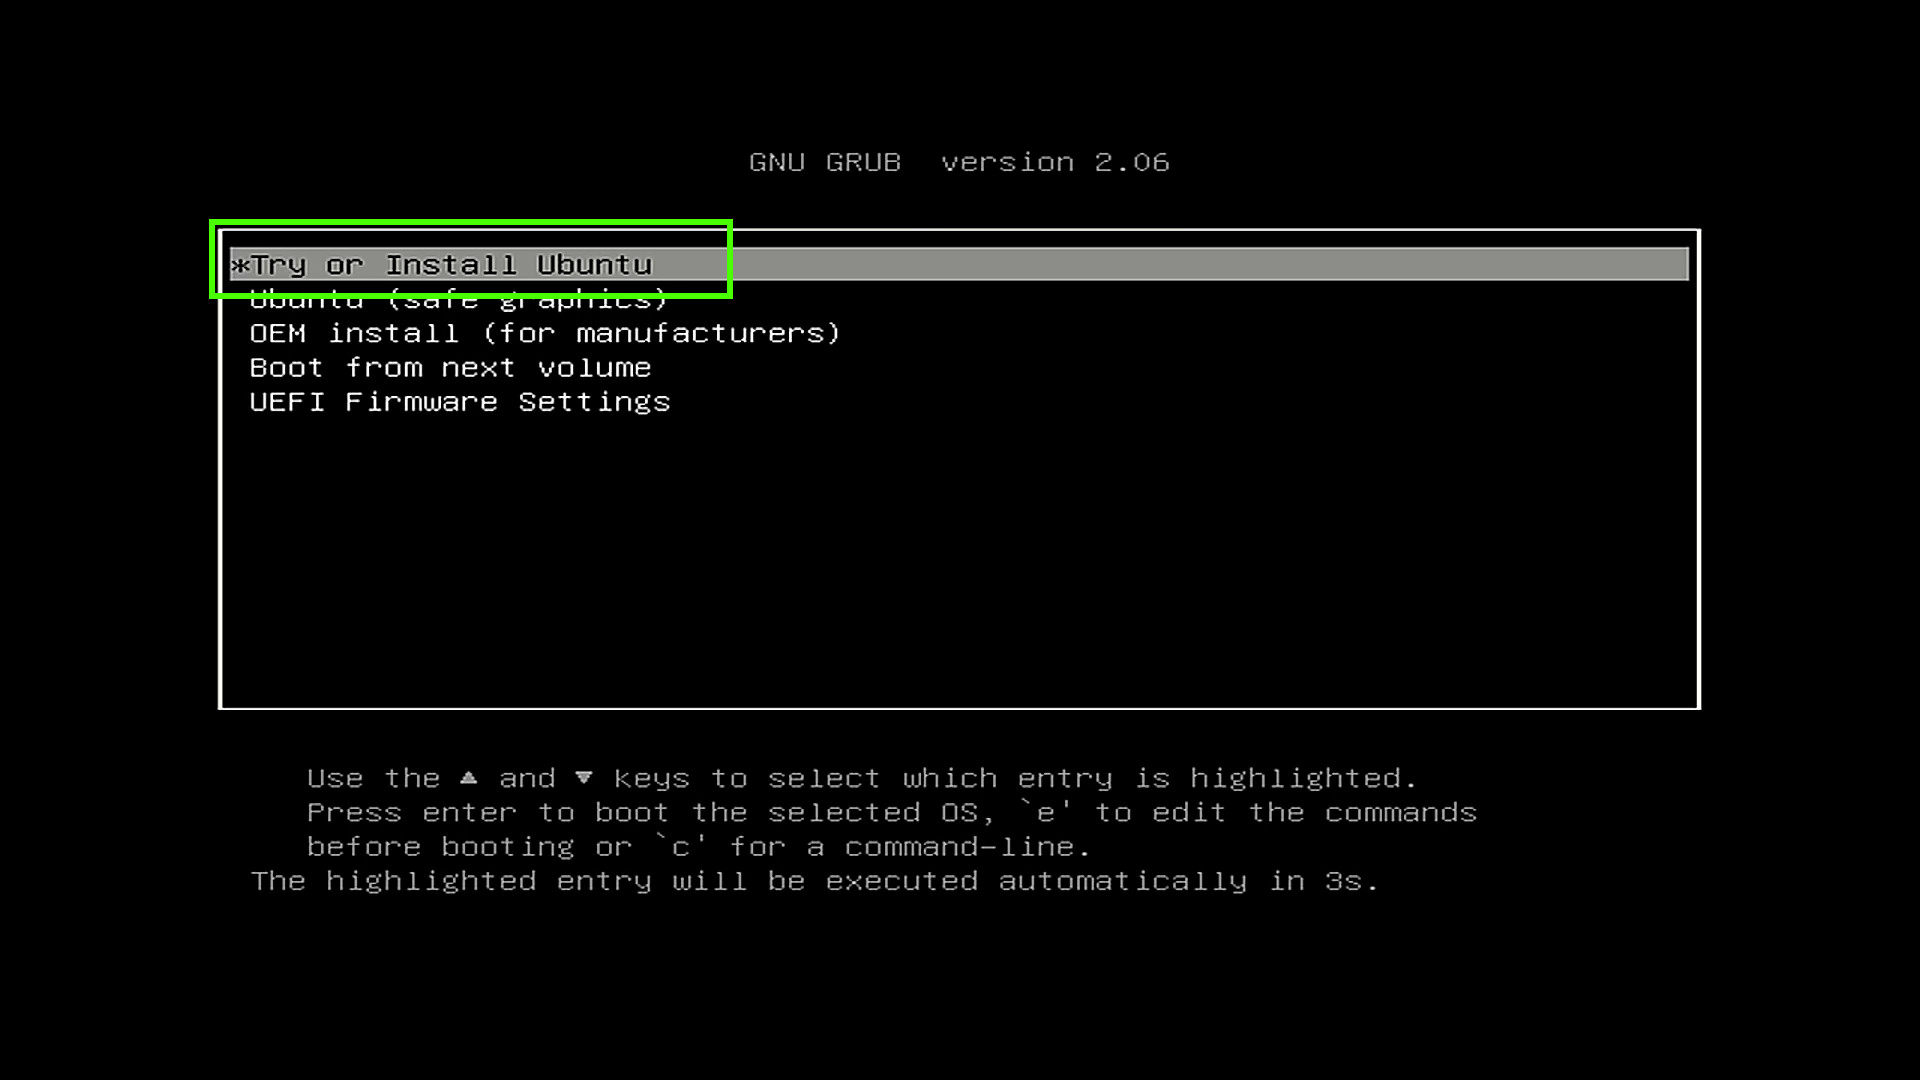
2. From the GRUB menu select “Try or Install Ubuntu” (or your Linux OS of choice) and press Enter . The GRUB menu is a custom boot menu used on Linux devices. It can also be customized to show a background image.
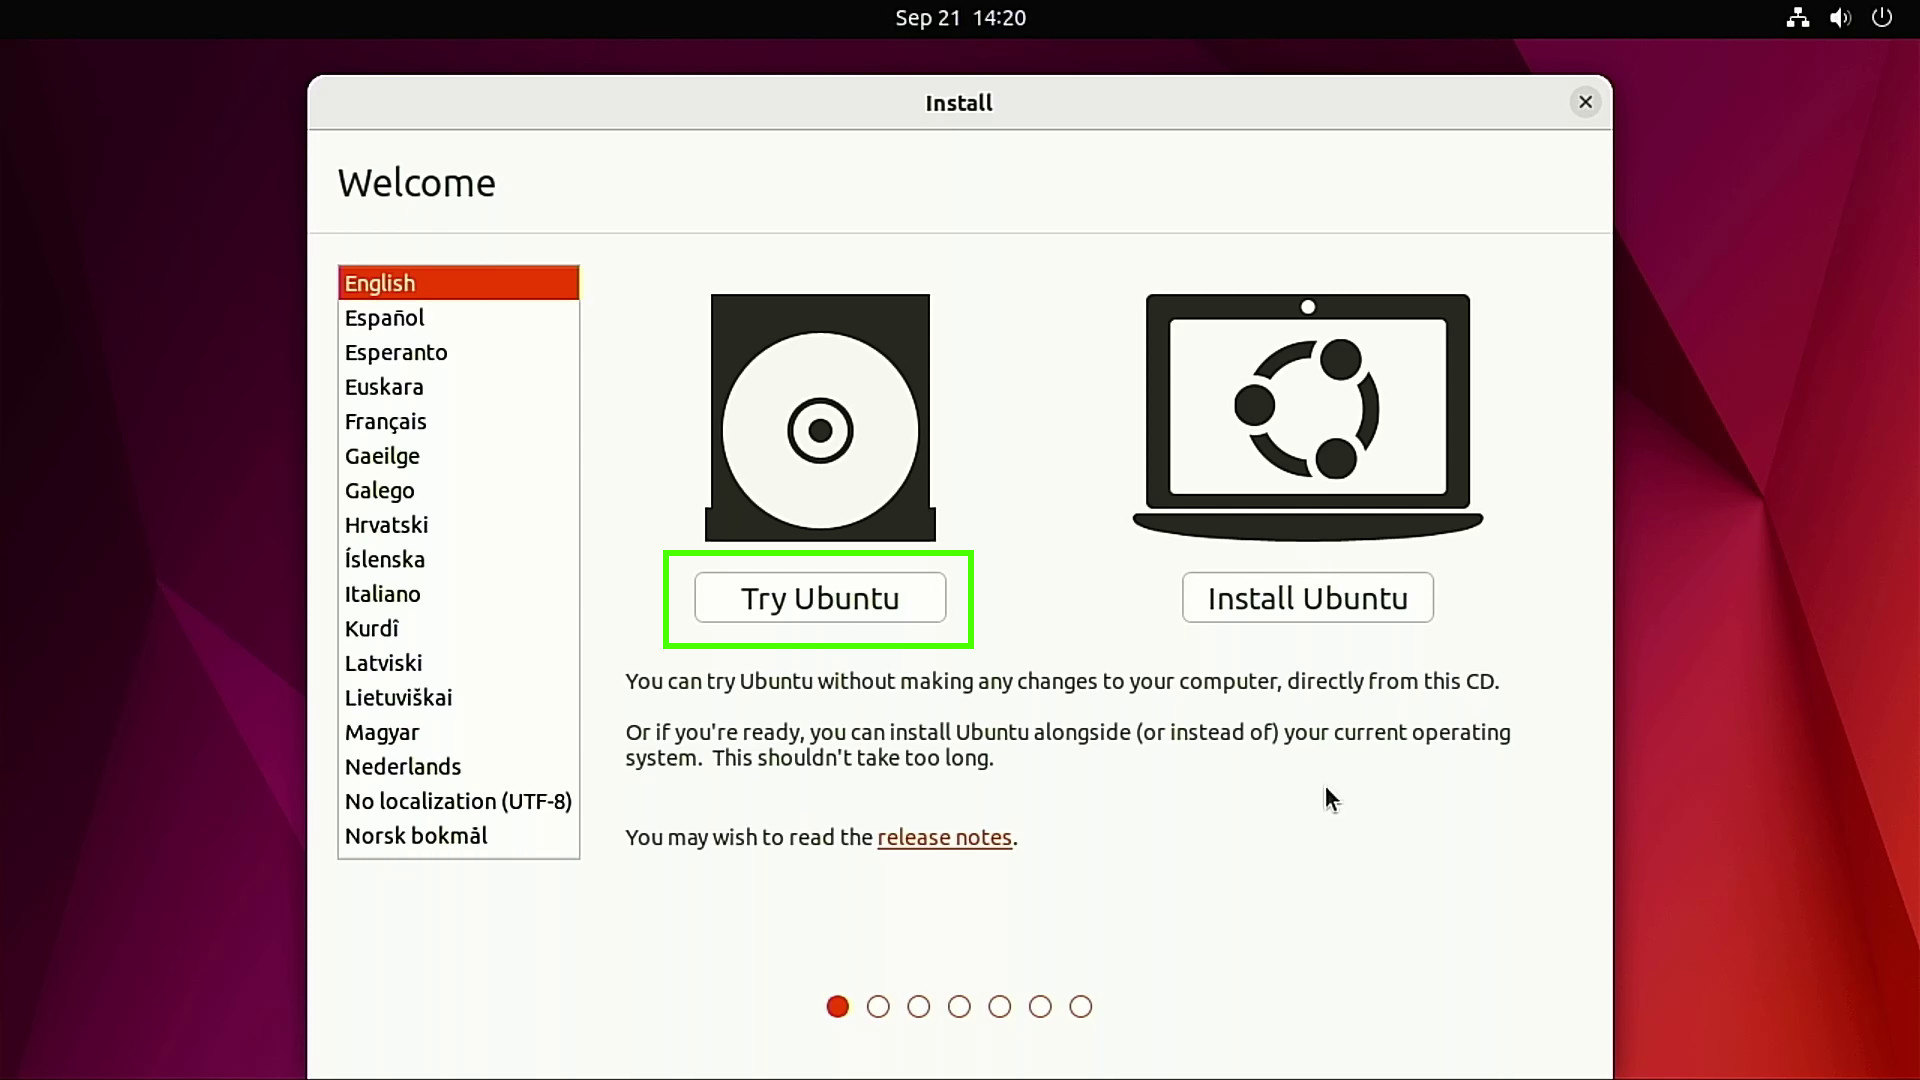
3. When prompted, click Try Ubuntu to load the OS into RAM as a “Live Distro”. Live Distros give us enough of the operating system to test on our machine without making any changes to the system. They are also useful as recovery devices to boot broken computers.
4. Test your hardware to make sure that everything you need is working. Check audio, Wi-Fi, Bluetooth etc before moving onwards.

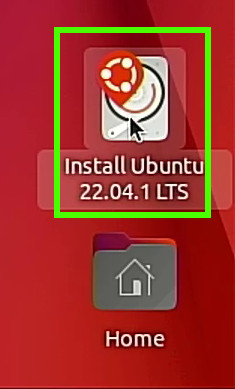
5. Double click on the Install icon to launch the installer application.
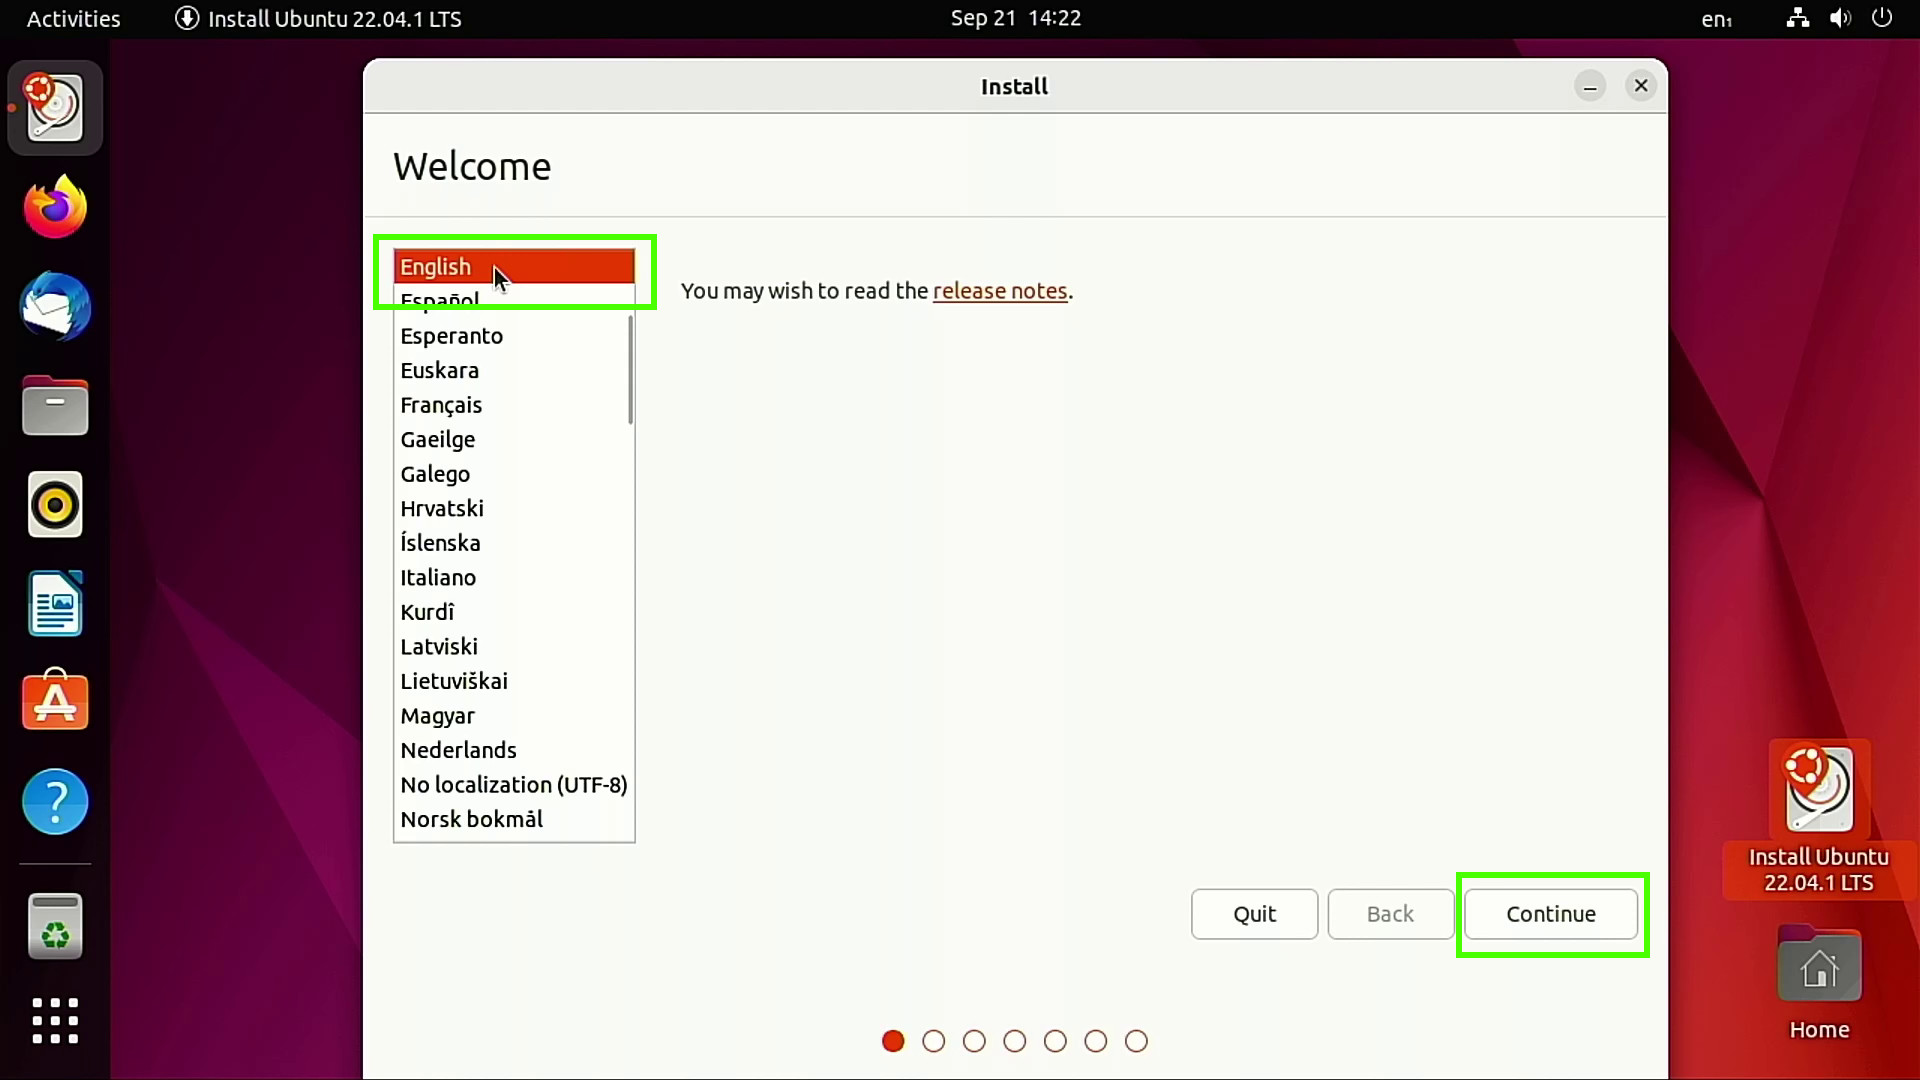
6. Select your language and click Continue.
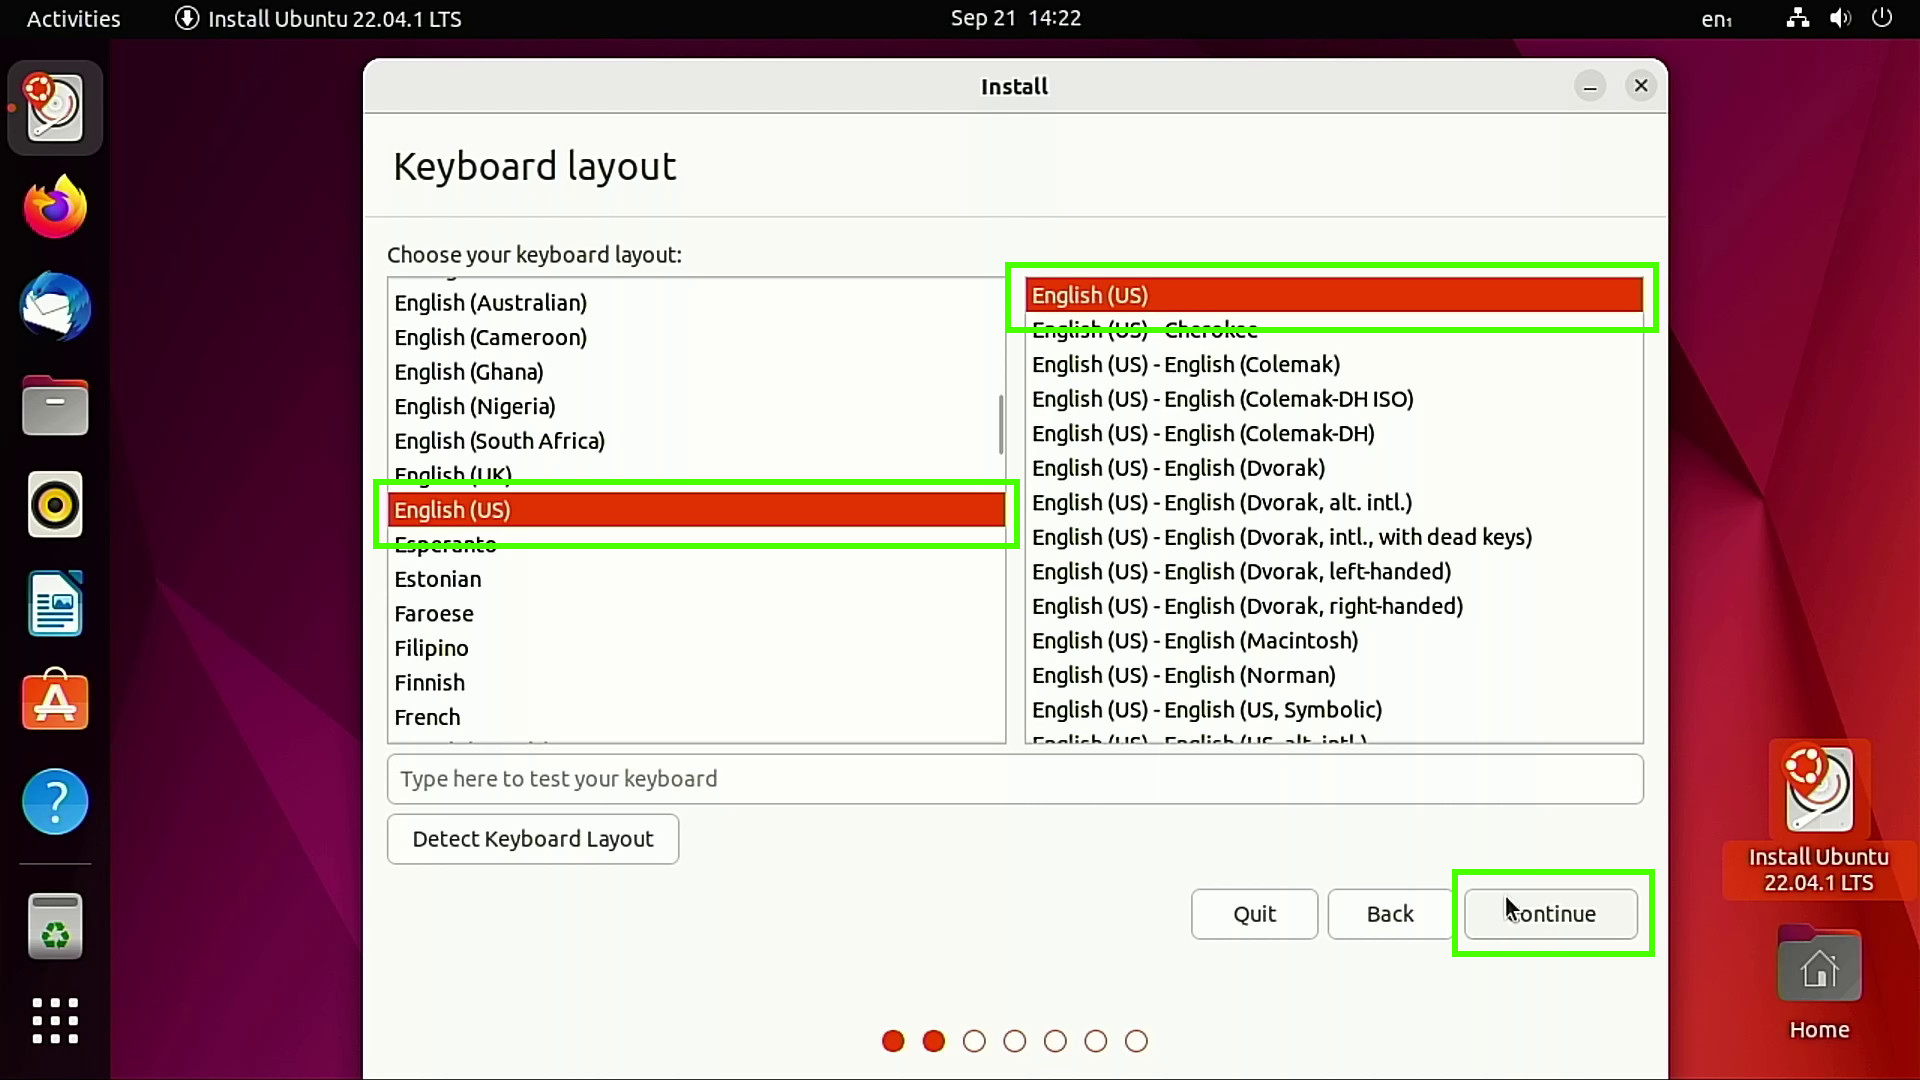
7. Select your preferred keyboard layout and click Continue.
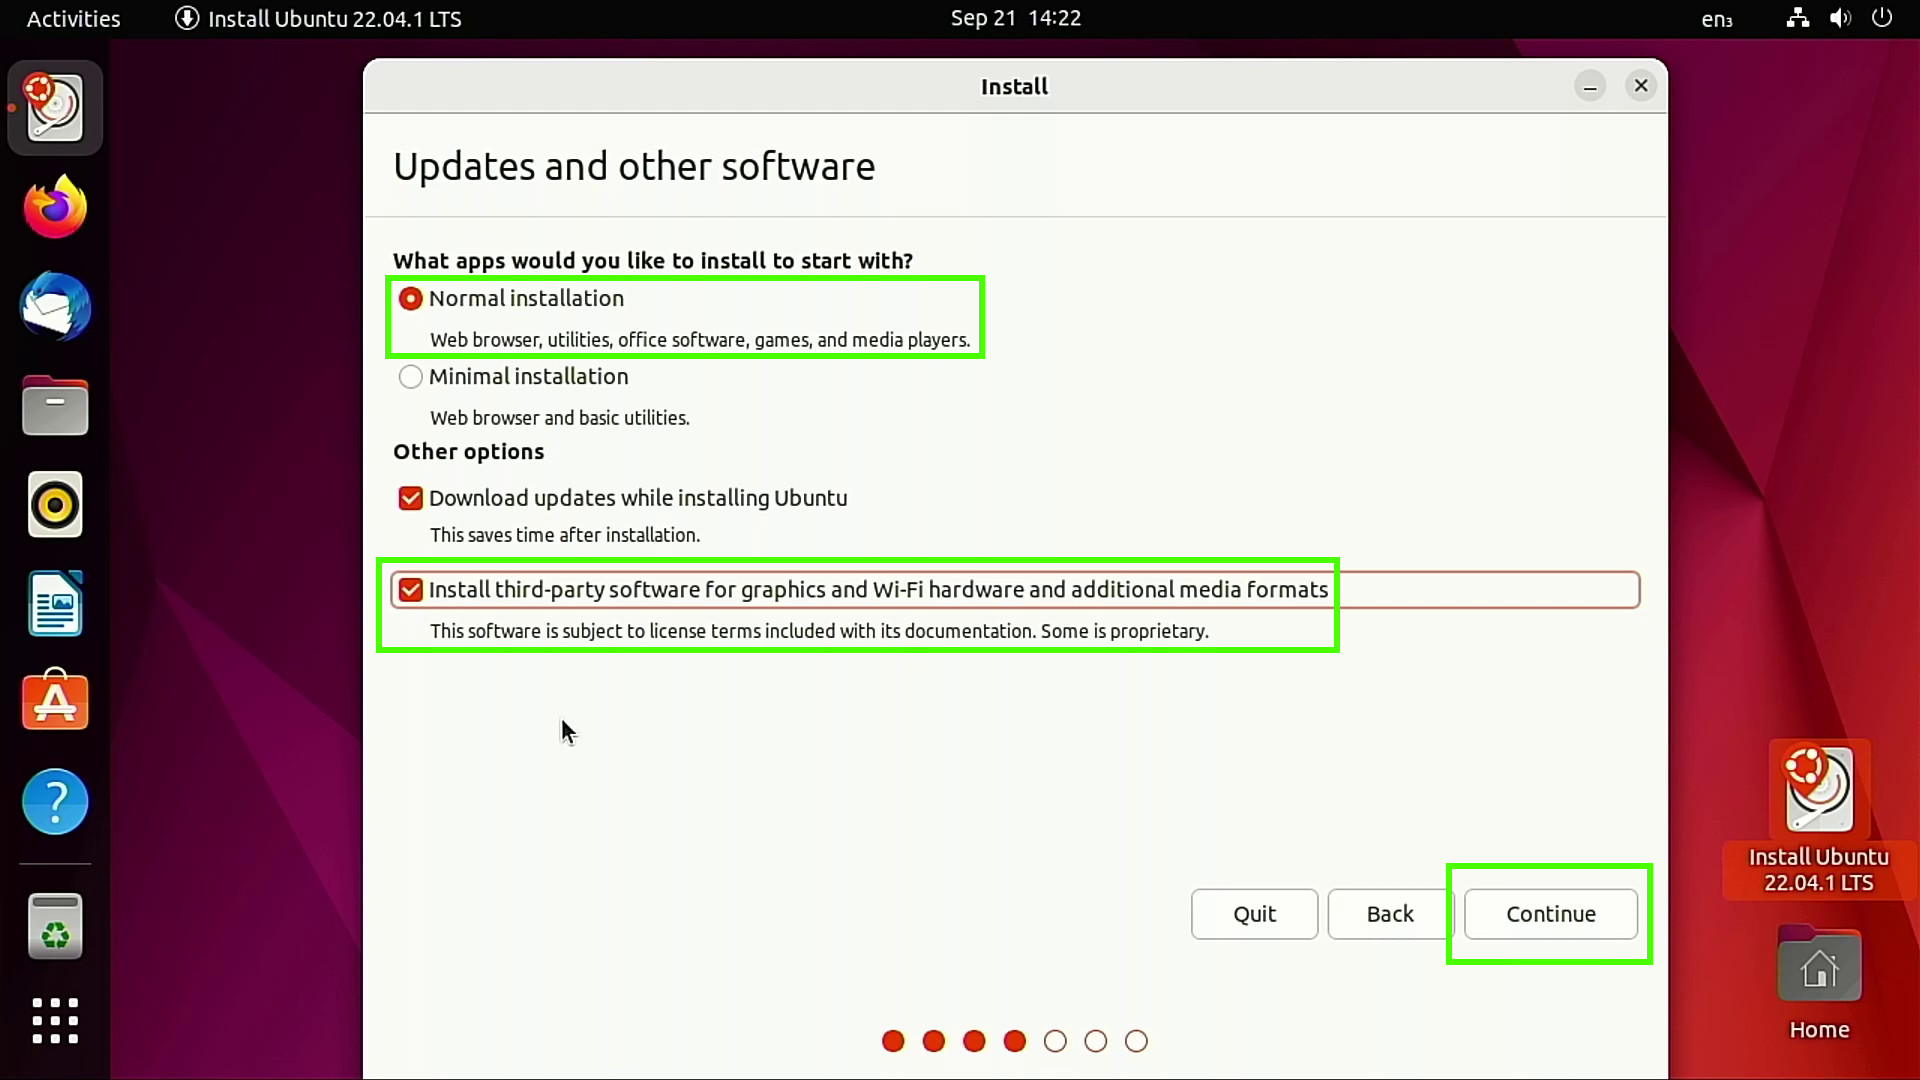
8. Select a Normal Installation and optionally install third-party software, then click Continue. Third-party software includes drivers and applications which may not match the permissive license used by your Linux distro. If you would like to know more, check the website of your chosen Linux OS.
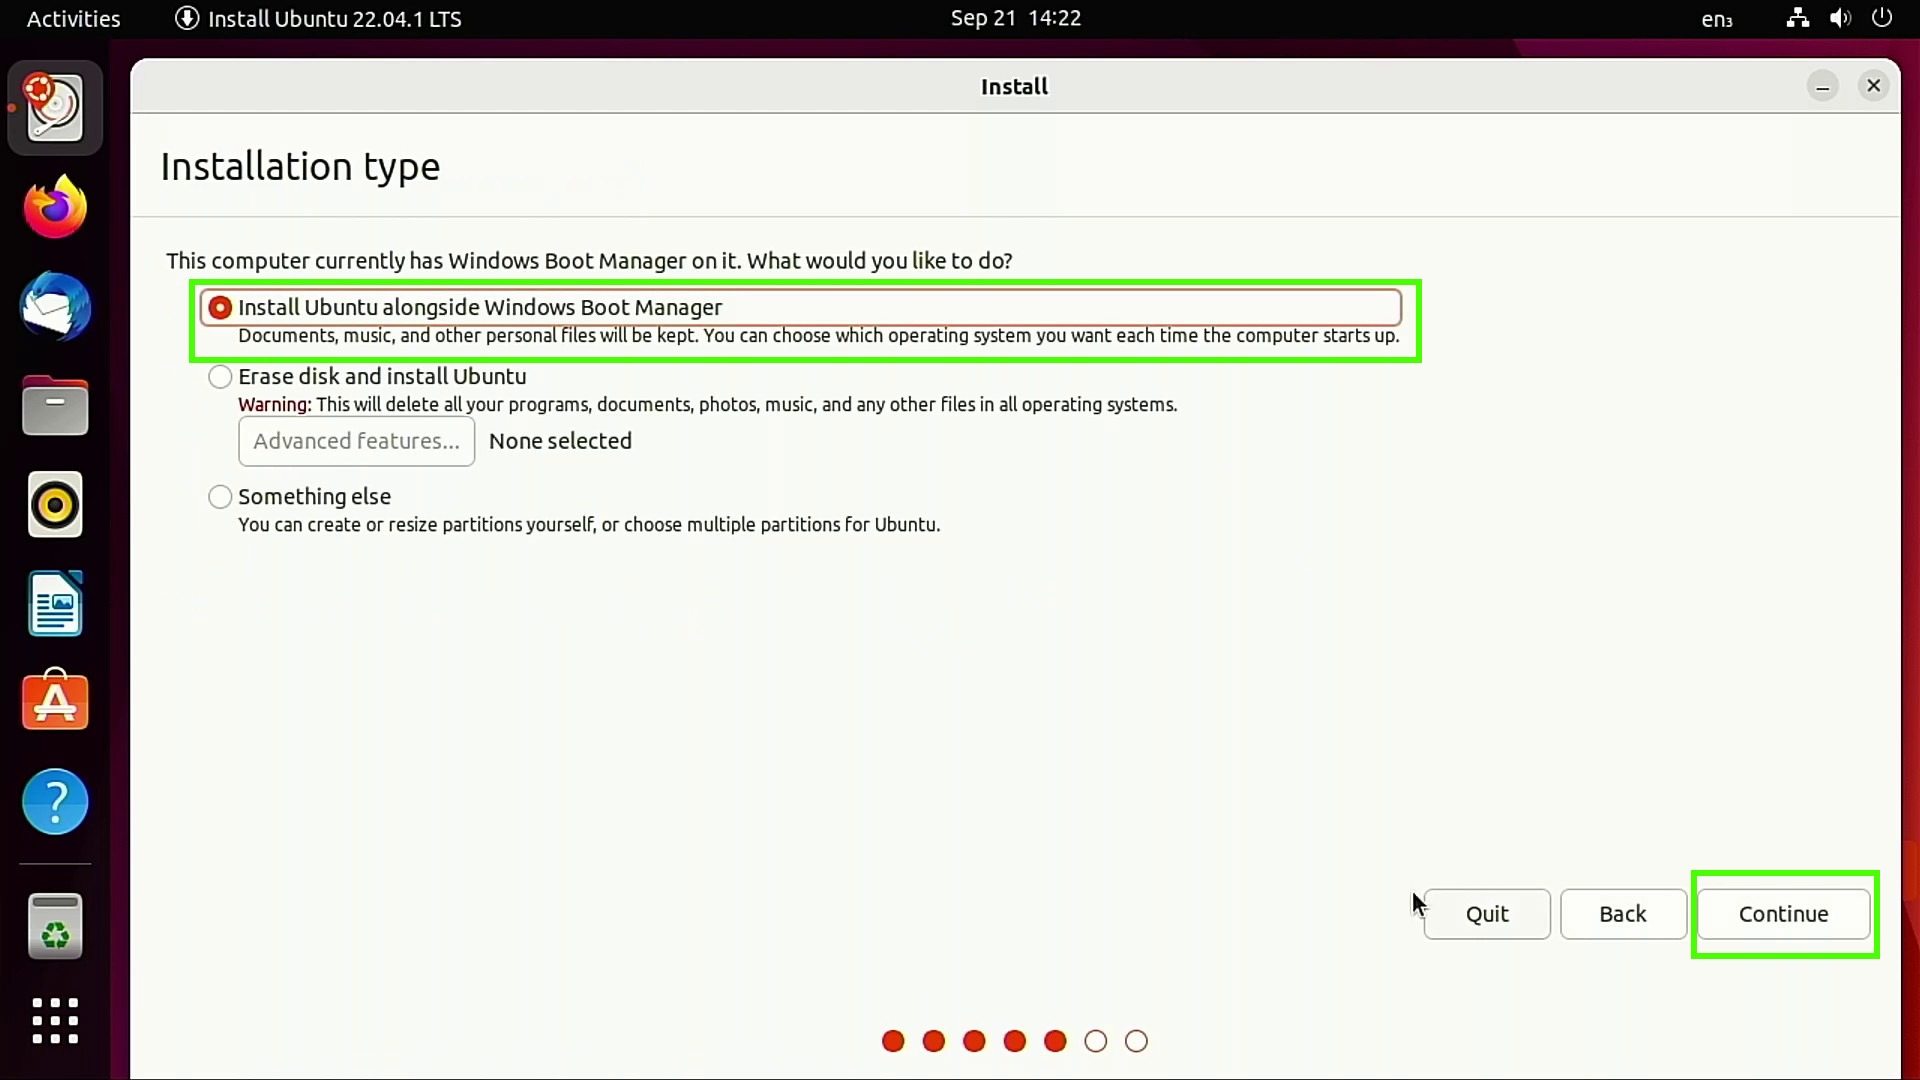
9. Select “Install Ubuntu alongside Windows Boot Manager” and click Continue. Any other option will either delete the entire contents of the drive, or require manual configuration, so take great care.
10. Ensure that the correct drive has been selected, and slide the center slider to adjust how much space each OS will have.
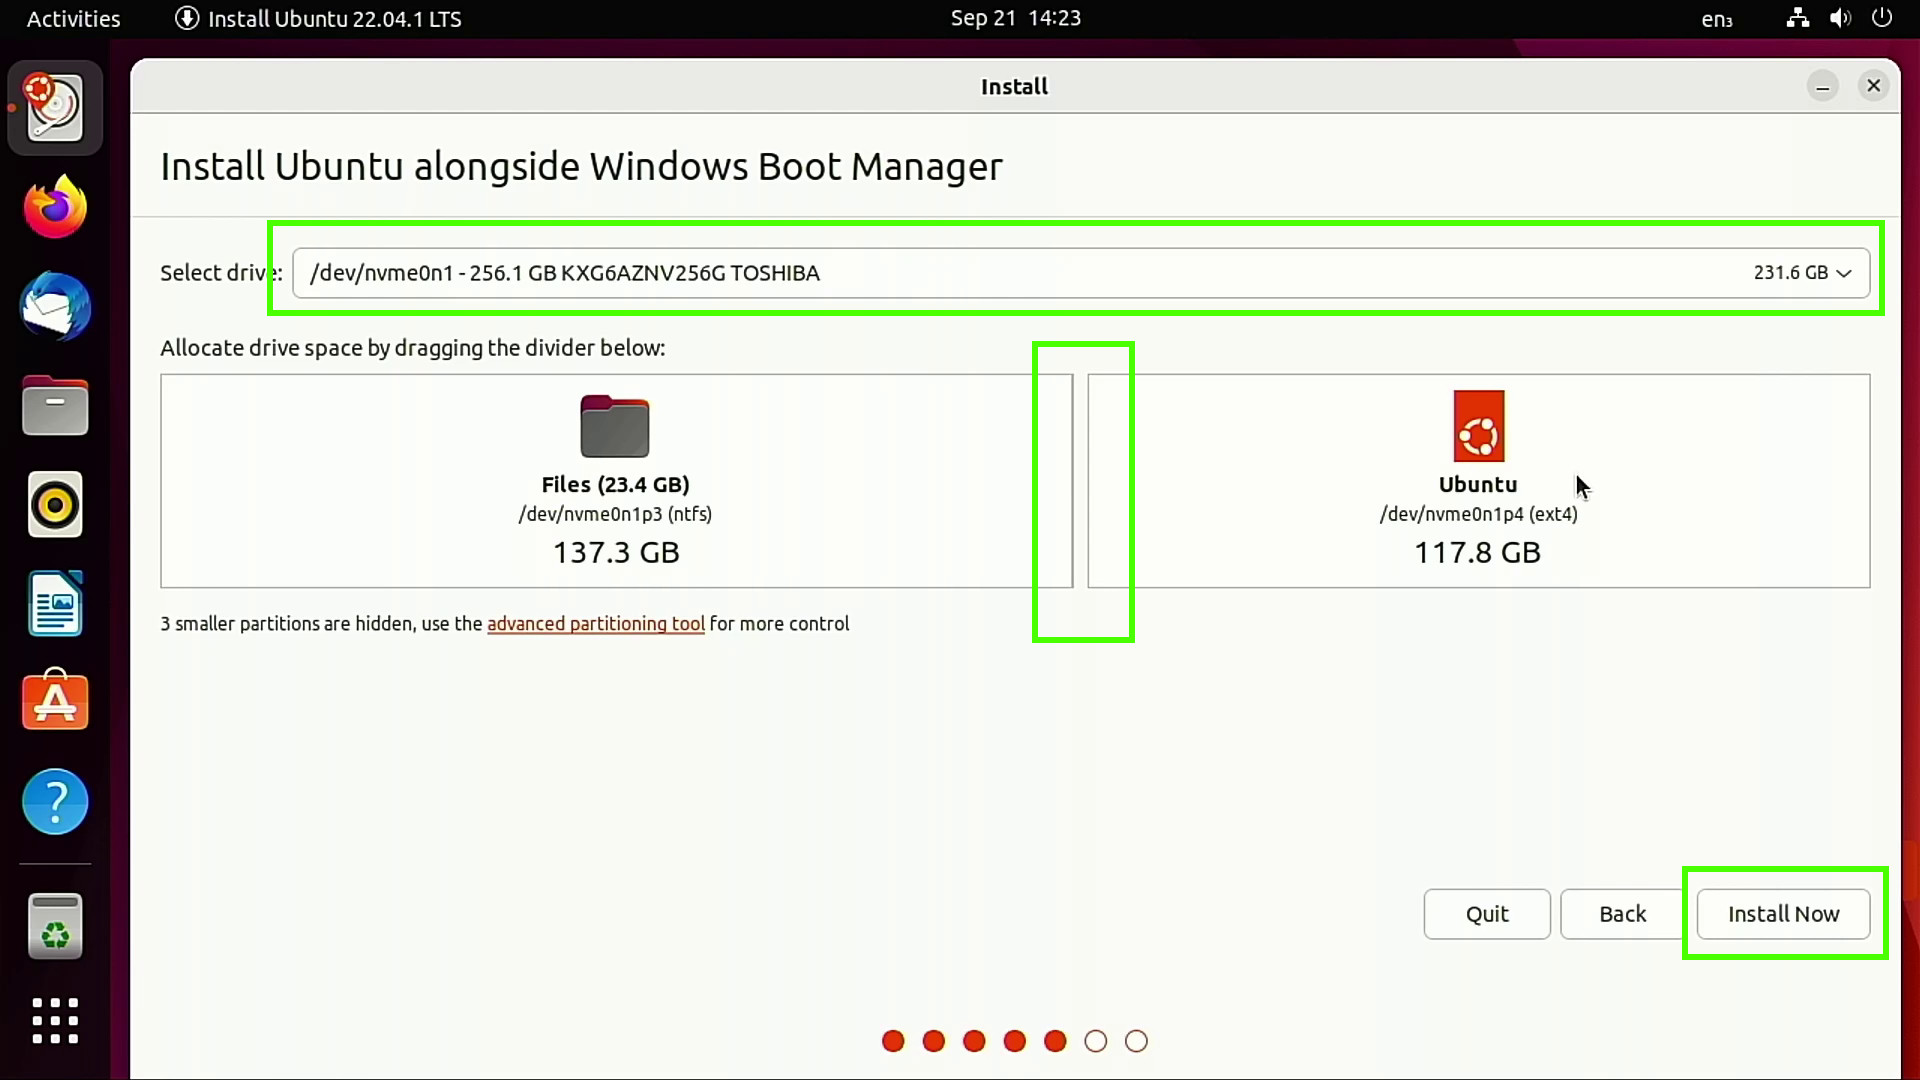
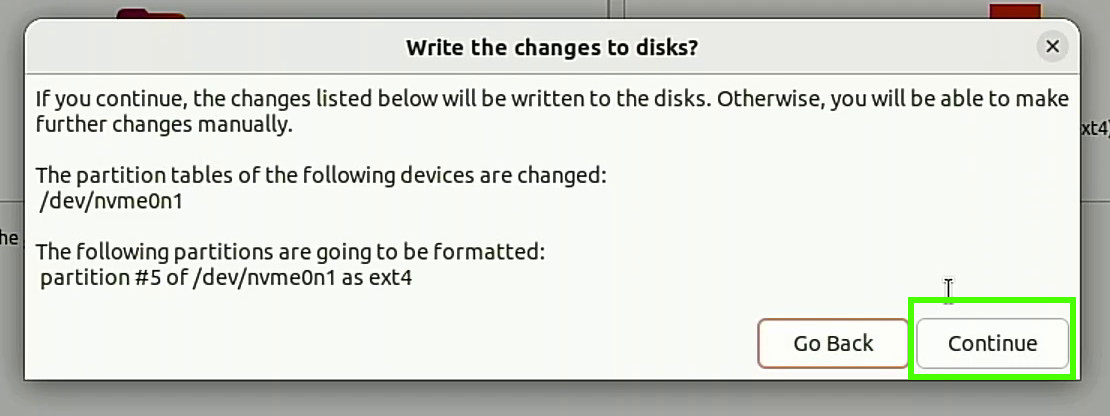
11. Click Continue to write the changes to the disk. Check that everything is correct before moving onwards. Changes made now cannot be easily remedied.
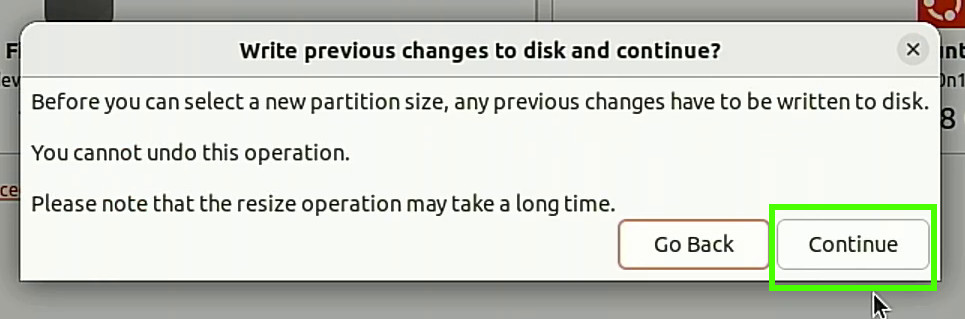
12. Click Continue when asked if you are sure.
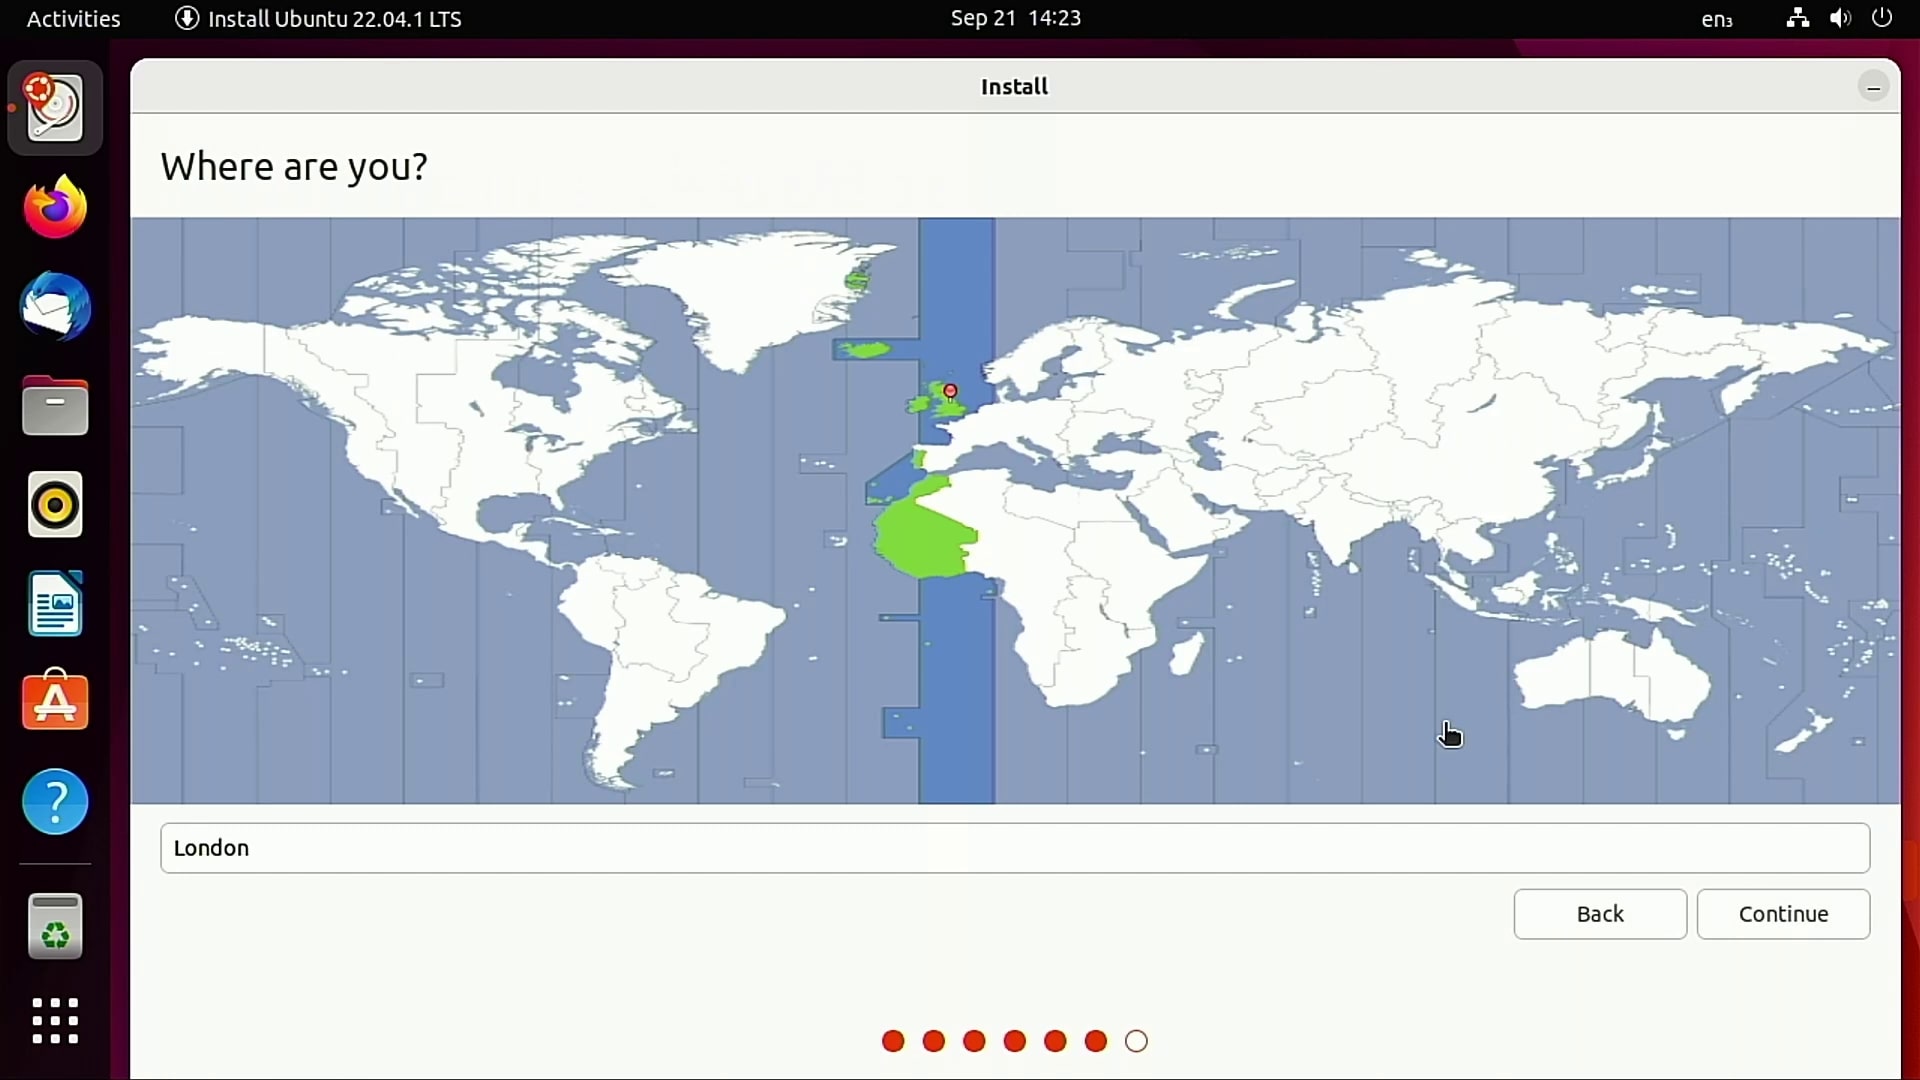
13. Set your location and click Continue.
14. Set up your user account, with your real name, computer name, username and provide a strong password. Click Continue when ready.
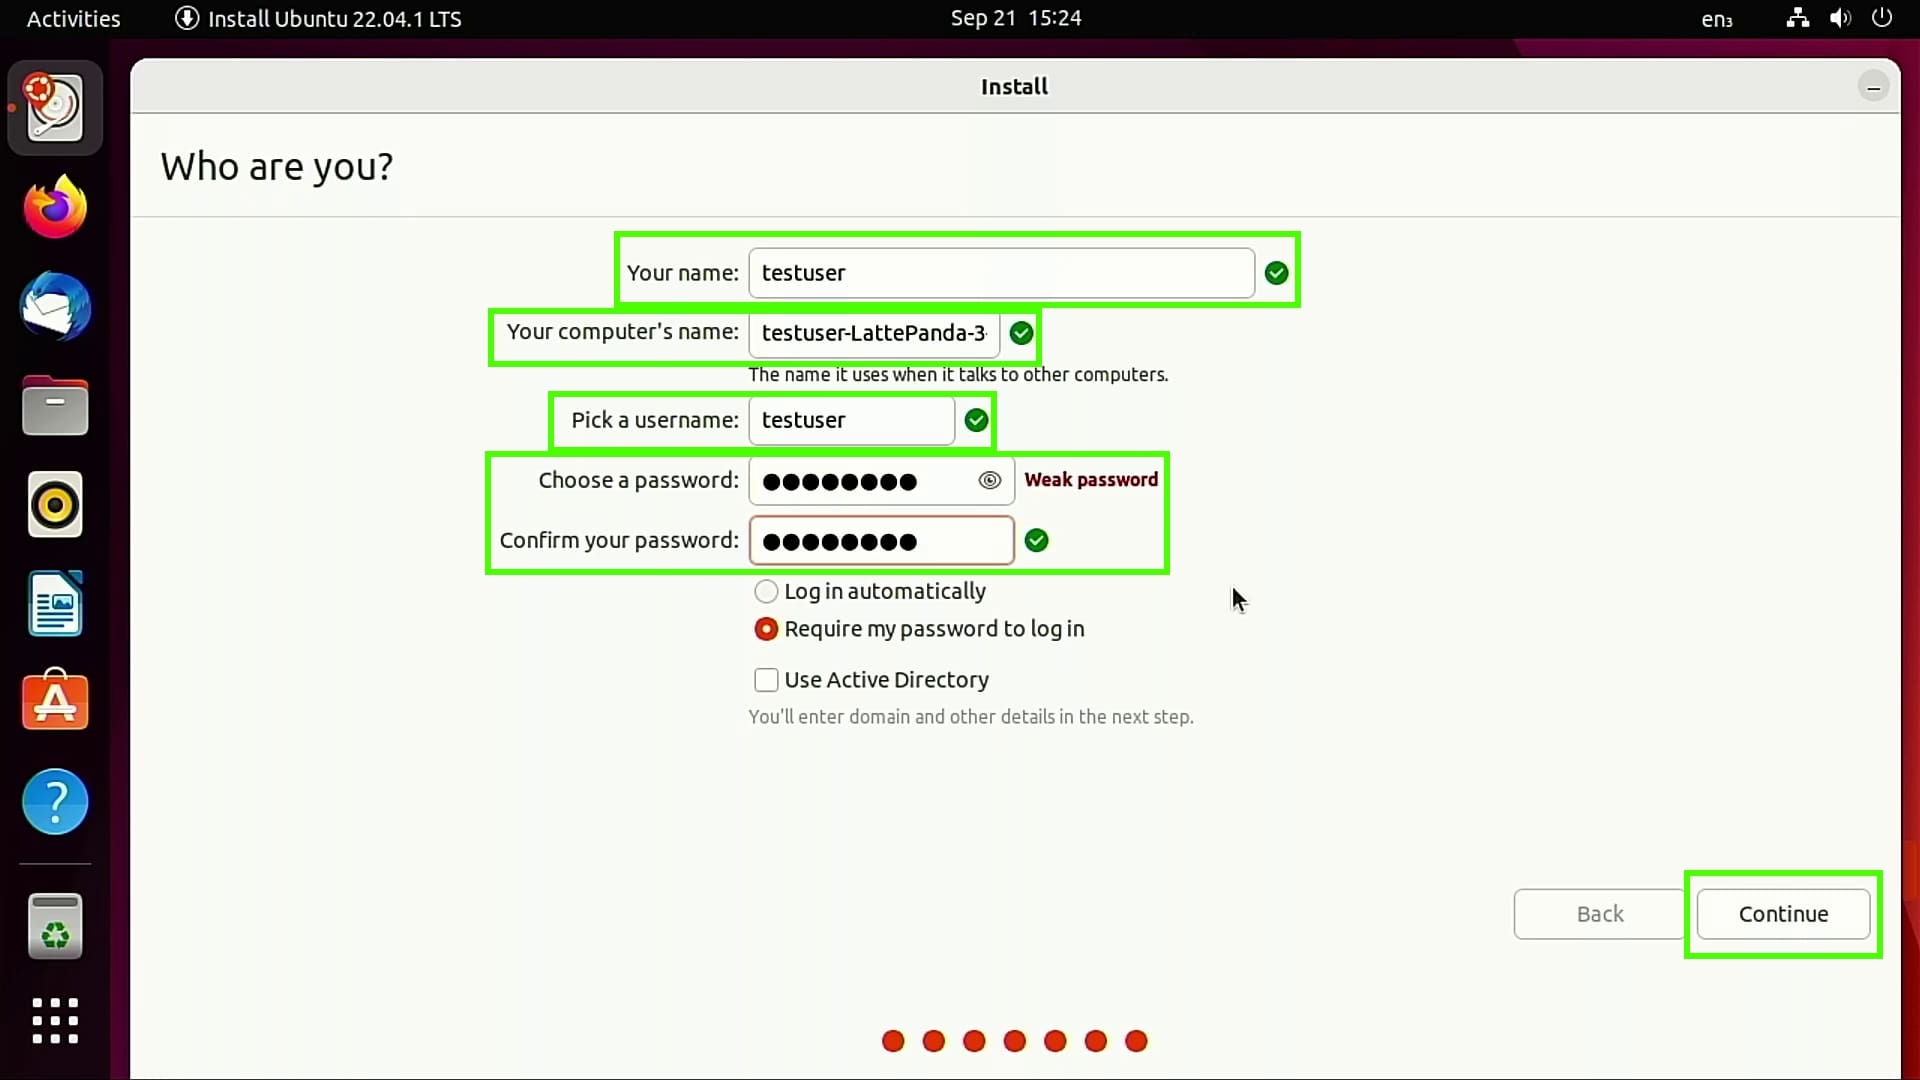
The installation will take a few minutes to complete.
15. Click on Restart Now to reboot your computer.
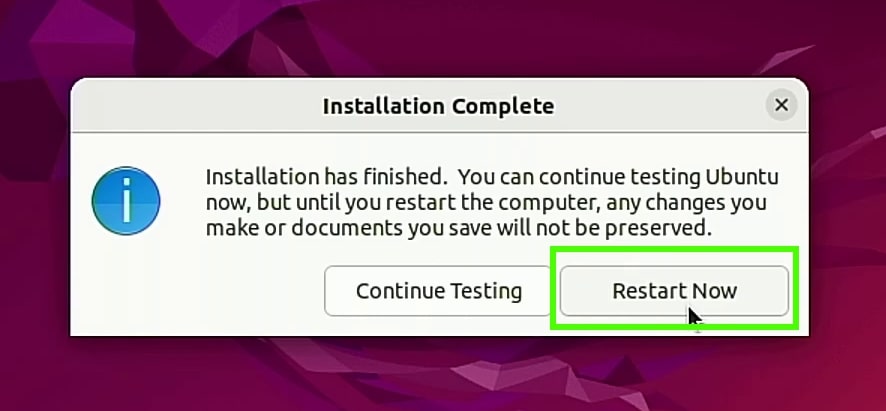
16. Remove the USB drive and press Enter when prompted.
First Linux Dual Boot
The first boot of a Linux dual boot system requires a little fine tuning in our BIOS. We need to tell the system to boot from our Linux install, which will trigger the GRUB menu to load. From there we can select an OS to boot from. Each BIOS is a little different, so use these steps as a general guide and refer to the manual for your motherboard for more specific information.
1. Open your BIOS menu. See our story on how to enter your BIOS if you don’t know how to do this already.

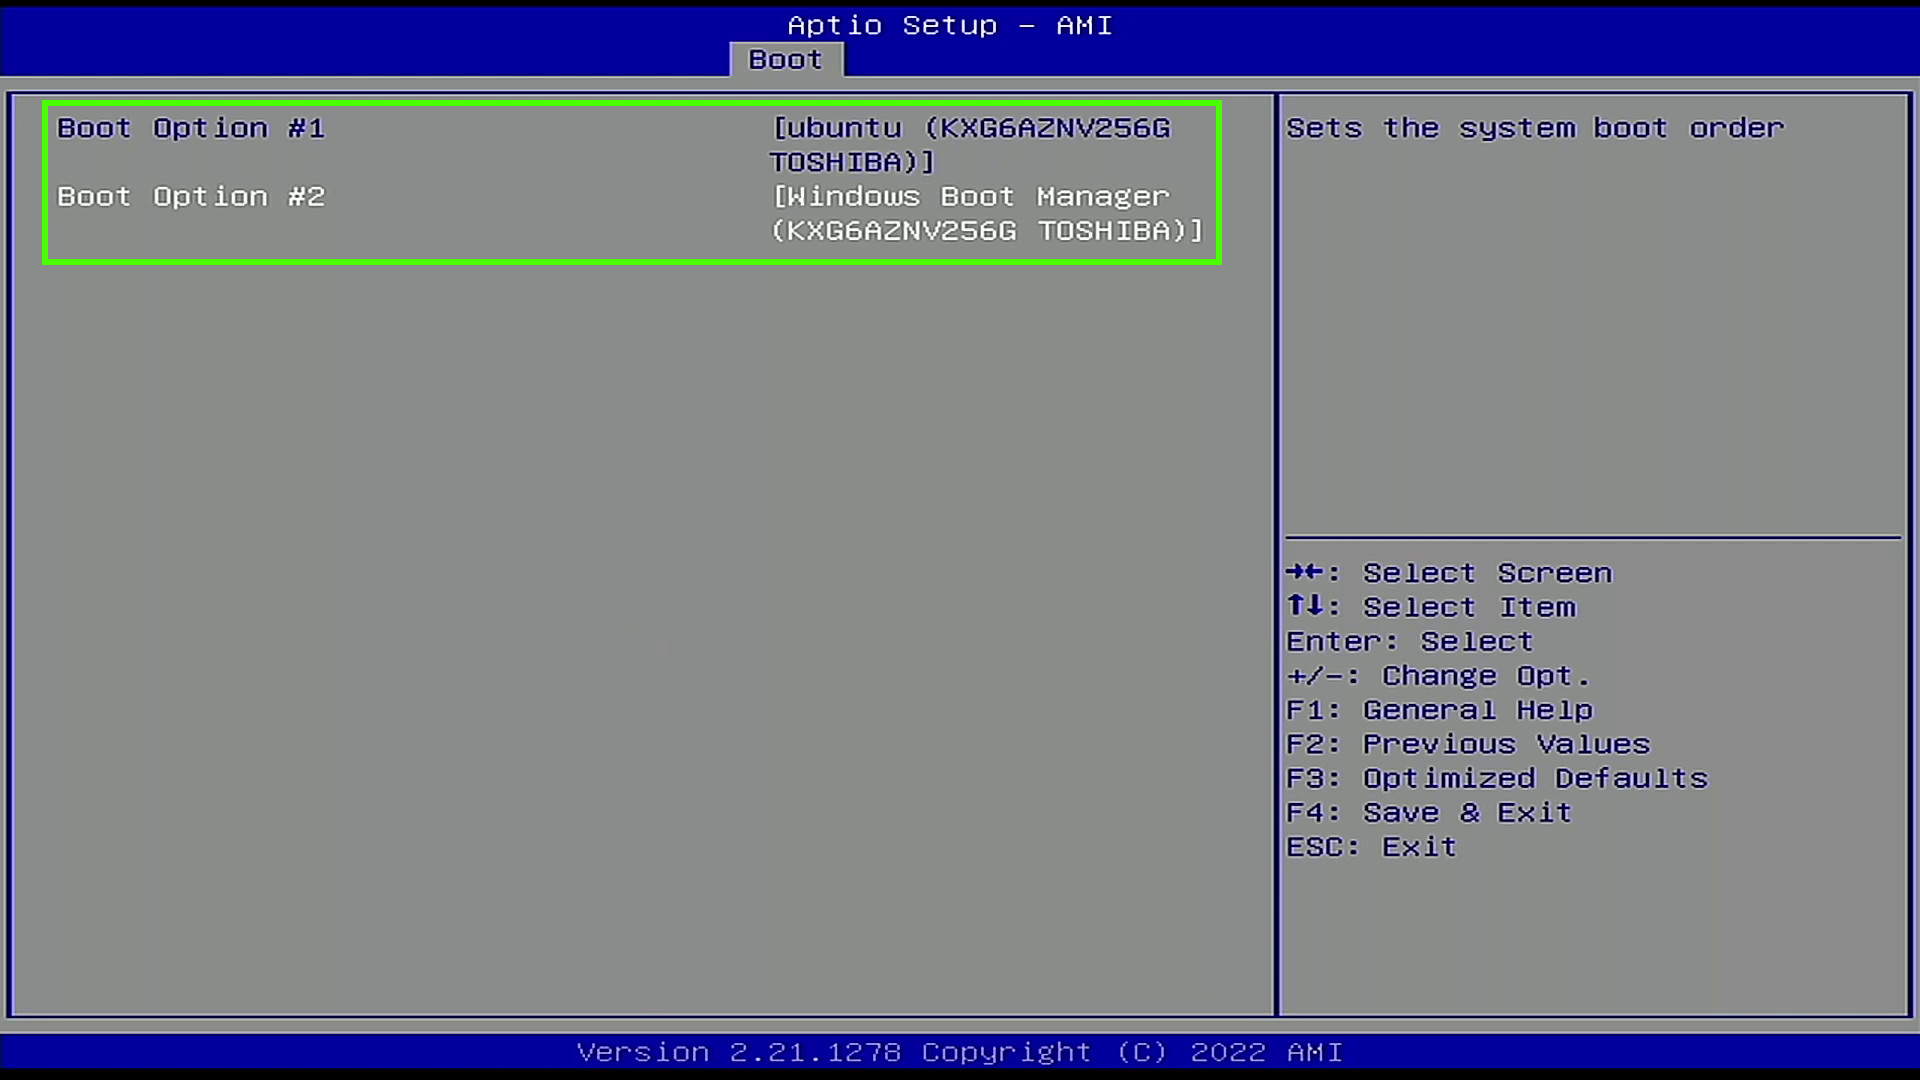
2. Select the Boot menu.
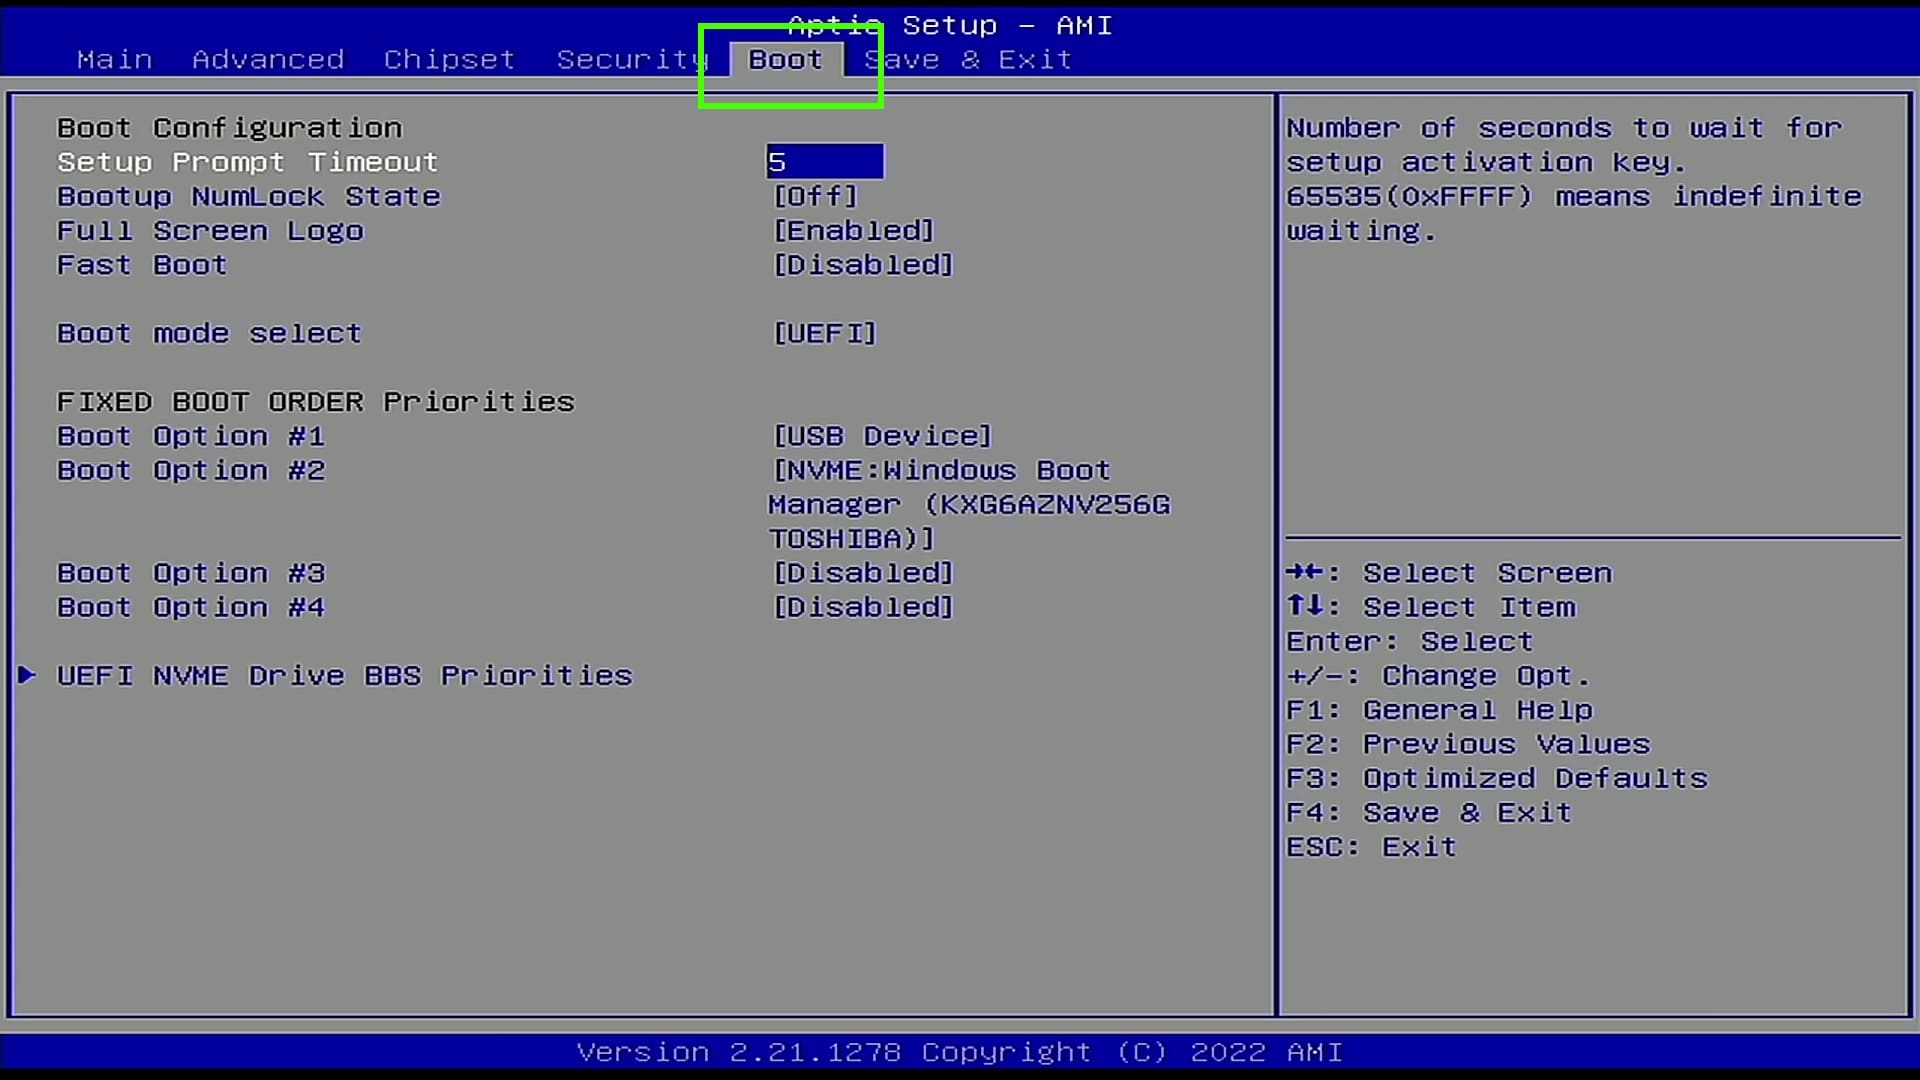
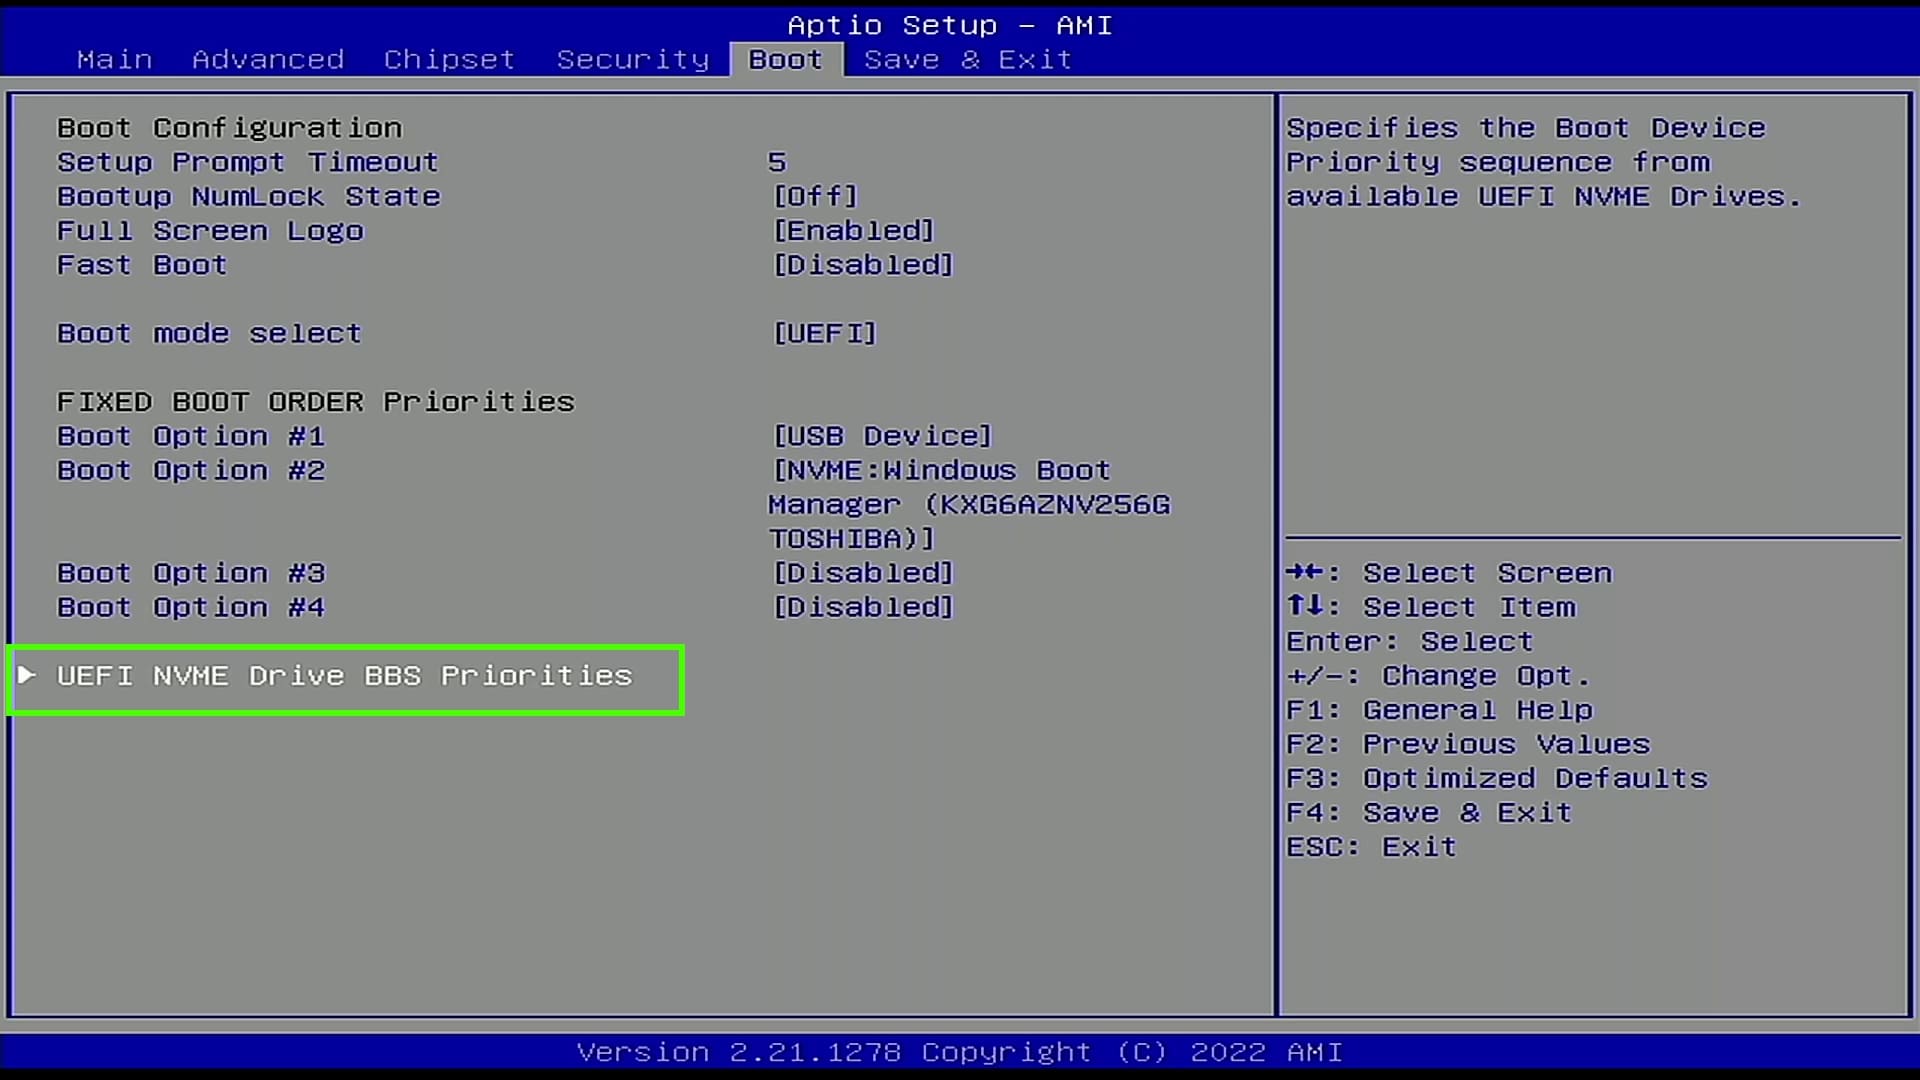
3. Select UEFI NVMe Drive BBS Priorities.
4. Set Boot Option 1 to be the Linux install.
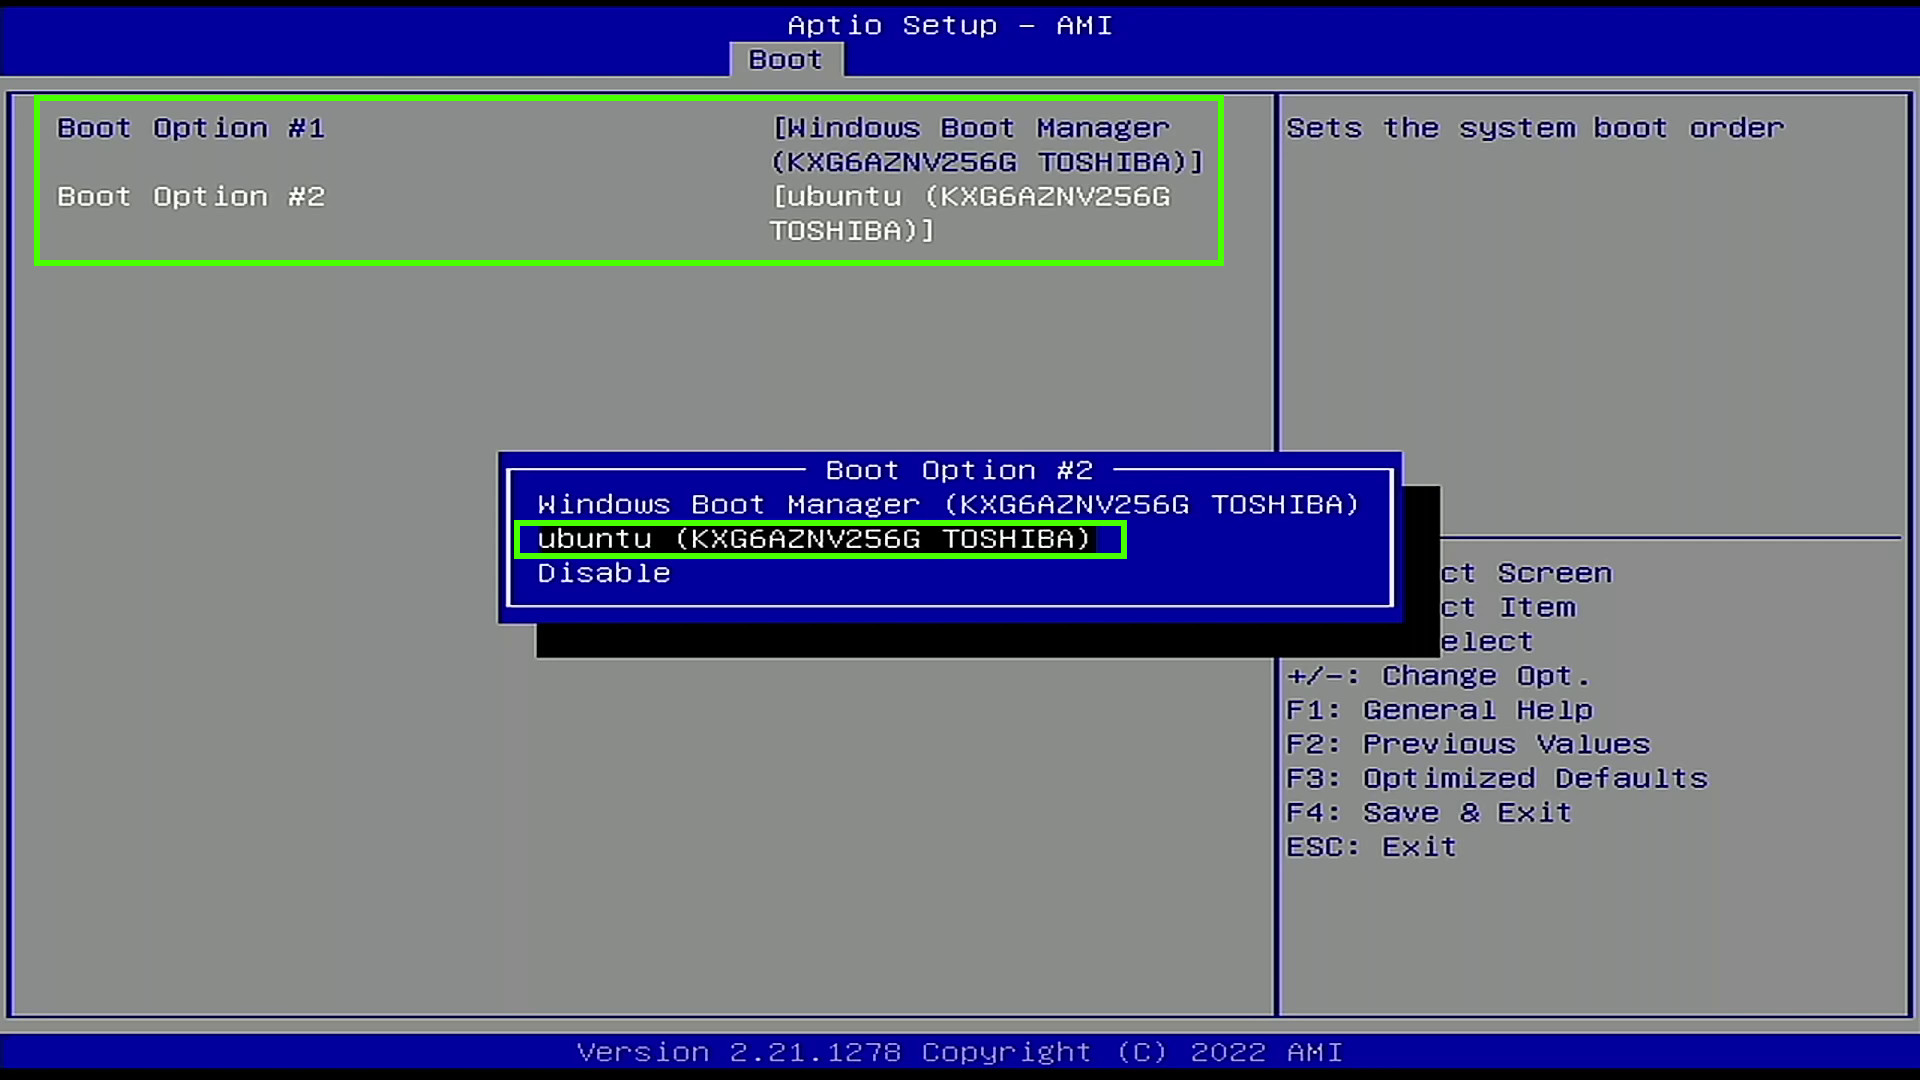
5. Check that the change has been made, then save and exit the BIOS.
6. The system will now boot to GRUB, choose your Linux OS and press Enter. If we leave GRUB for 10 seconds, it will choose the default option, typically Linux.
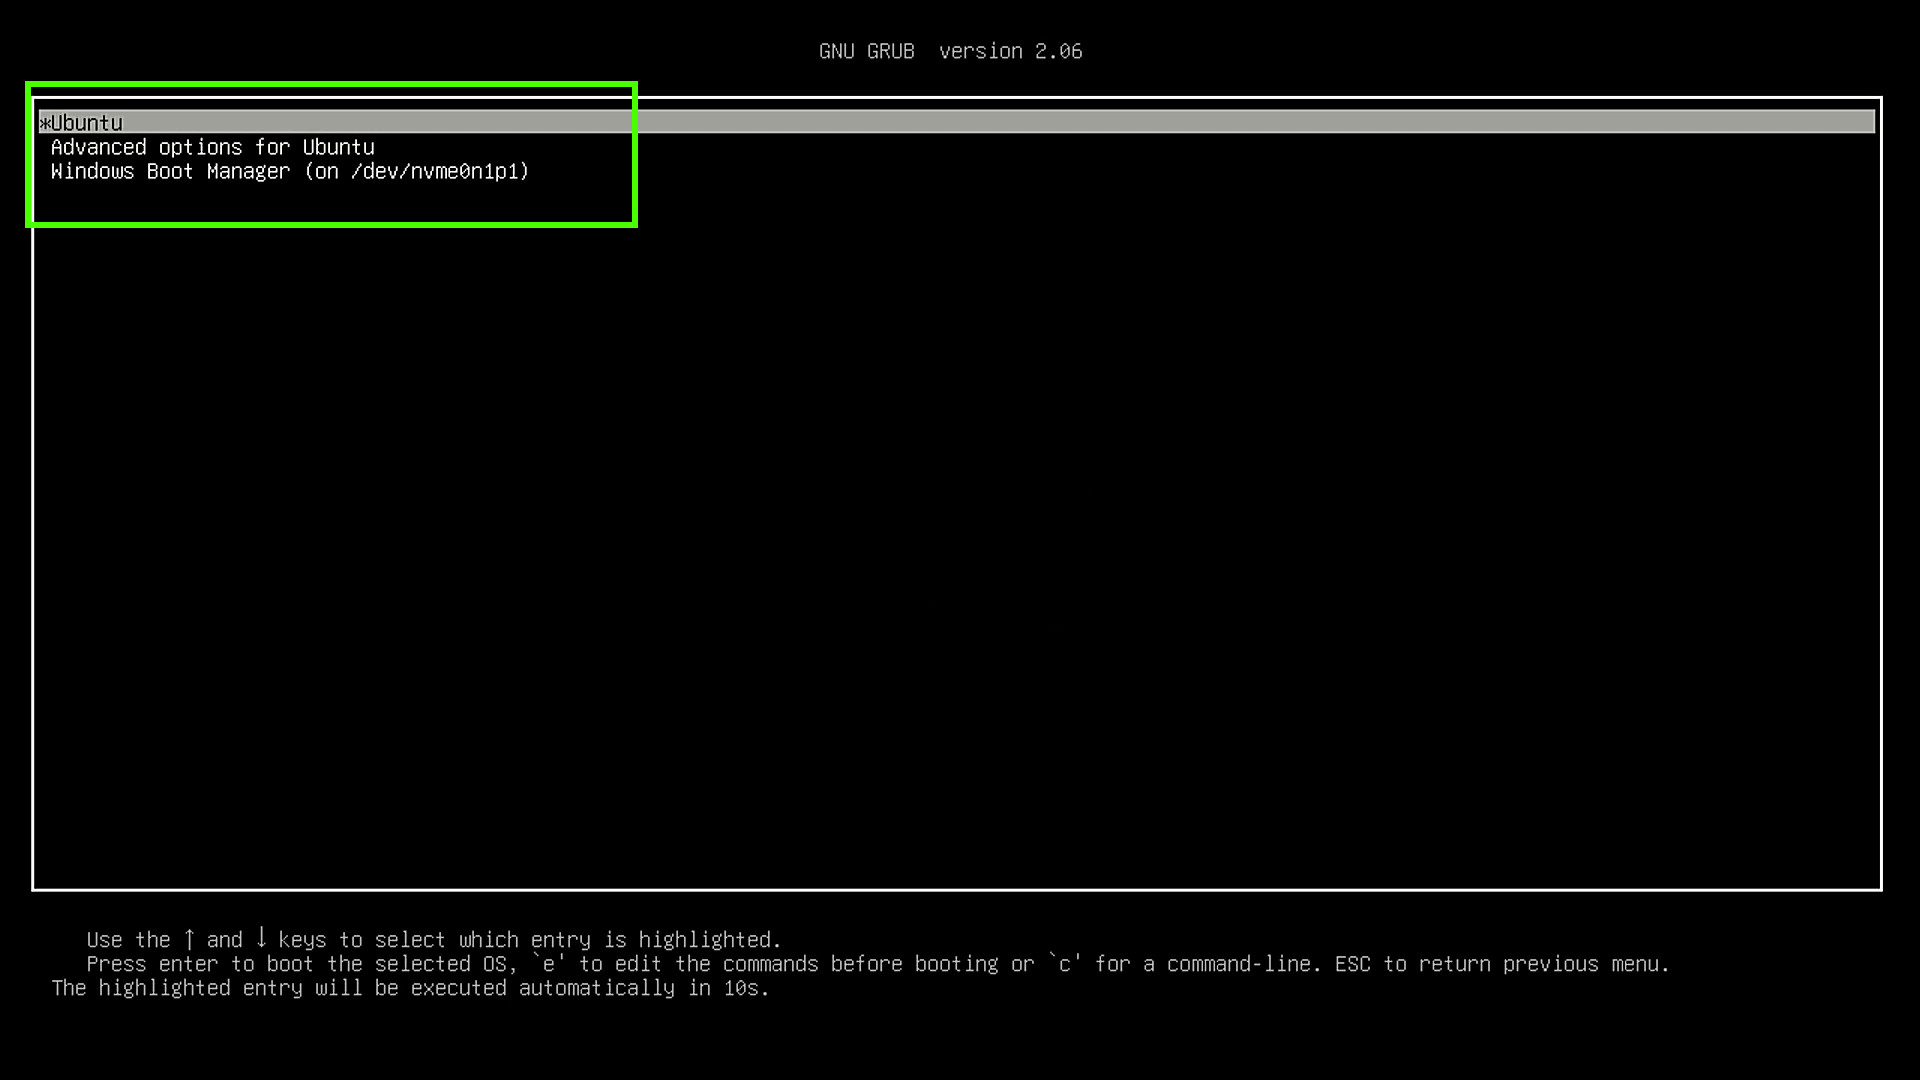
7. Boot to the Linux desktop and check that everything is correct.
8. Reboot to GRUB and select Windows to check that everything is working.
Join the experts who read Tom’s Hardware for the inside track on enthusiast PC tech news — and have for over 25 years. We’ll send breaking news and in-depth reviews of CPUs, GPUs, AI, maker hardware and more straight to your inbox.