Время на прочтение
5 мин
Количество просмотров 127K
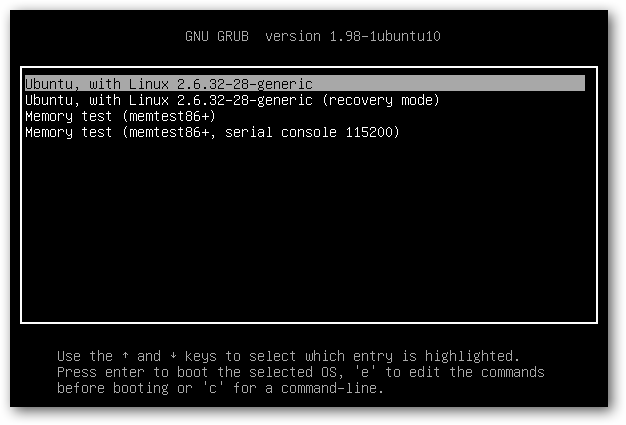
Привет, Хабр! Сегодня мы рассмотрим ситуацию, когда при двойной установке Linux & Windows загрузчик GRUB не стартует, давая возможность выбрать ОС, а автоматически загружается Windows. Немного теории:
GRUB (GRand Unified Bootloader) — программа-загрузчик операционных систем.
GRUB может загрузить любую совместимую с ней операционную систему. Среди них: Linux, FreeBSD, Solaris и многие другие. Кроме того, GRUB умеет по цепочке передавать управление другому загрузчику, что позволяет ему загружать Windows (через загрузчик NTLDR), MS-DOS, OS/2 и другие системы.
Значит с теорией мы немного разобрались (думаю этого будет достаточно), теперь же рассмотрим, какие бывают подводные камни, при установке Dual Boot Windows и Linux на одном компьютере.
Эксперимент производился на рабочей станции со следующими характеристиками:
Base Board Information
- Manufacturer: Acer
- Product Name: Aspire XC600
Memory Device
- Size: 4096 MB
- Type: DDR3
- Speed: 1333 MHz
- Manufacturer: Kingston
- Rank: 2
HDD
- product: ST500DM002-1BD14
- vendor: Seagate
- physical id: 0.0.0
- bus info: scsi@0:0.0.0
- logical name: /dev/sda
- size: 465GiB (500GB)
- capabilities: gpt-1.00 partitioned partitioned:gpt
Доказано, что проблем с установкой Debian 8.6 Jessie совместно с Windows 10 не обнаружено. Debian корректно прописывается в автозагрузке, GRUB запускается без ошибок и две ОС также работают нормально.
Но, как показала практика, не со всеми дистрибутивами такое происходит. При установке Ubuntu 16.04.1 вместо Debian на ту же рабочую станцию вылез первый подводный камень — GRUB не стартовал, и Windows 10 автоматом шла на загрузку.
Решение проблемы было найдено спустя недели три-четыре (тогда уже надоело считать, сколько времени убито на решение проблемы). Оно оказалось неожиданным, но в тоже время вся система заработала. Значит, если вы столкнулись с такой же проблемой, приведенная ниже инструкция может вам пригодится и сэкономить кучу времени.
Важно! До начала выполнения инструкции нужно подготовить LiveCD с дистрибутивом Linux Mint — все операции мы будем выполнять на нем (я выбрал этот дистрибутив из-за того, что на него спокойно можно установить Midnight Commander, что сложно сделать на LiveCD с Ubuntu, так мы получаем больше пространства для маневров). Также стоит заметить, что команда из под консоли update-grub вам не поможет, так как она рассчитана на случай, когда GRUB запускается, но не видит другие ОС кроме Линукса. Также рекомендую создавать резервные копии файлов/каталогов, над которыми вы осуществляете хоть малейшие изменения.
- Через терминал, с правами root смонтировать раздел с EFI в папку /mnt. В моем случае, это была команда mount /dev/sda2 /mnt.
- Введите команду sudo -s и подтвердите пароль (он пустой по умолчанию) для последующих операций (многие советуют не делать этого, а вводить sudo и команду для выполнения — я поддерживаю это мнение, но инструкция рассчитана на опытных пользователей системы Linux, которые понимаю, что делают все на свой страх и риск).
- Запустить Midnight Commander командой mc.
- Найти в файловой системе следующий каталог: EFI в папке /mnt.
- Переименовать каталог Microsoft во что-нибудь другое, например в Microsoft2.
- Создаем новый каталог с именем Microsoft.
- Заходим в только что созданный каталог Microsoft и частично создаем внутри его иерархию папок аналогичную старому Microsoft (тому, что переименовали). В моем случае он имел такую структуру папок: /boot/, затем куча папок и файл bootmgfw.efi рядом с ними. Нужно воссоздать структуру папок ровно до этого файла. Т.е. всё, что лежит рядом с ним — не нужно, а всё, что идет до него (т.е. родительские папки, соседние с ними тоже не нужны) воссоздаем в нашей новой папке Microsoft. В моем случае понадобилось создать только папку /boot, итоговый путь до нового каталога вышел таким: /EFI/Microsoft/boot. Можно просто скопировать все папки и файлы — проверено, это работает и можно не создавать все вручную.
- Находим в каталоге из шага 6 папку с именем нашего дистрибутива Линукса, в нашем случае это Ubuntu. Копируем (оригиналы файлов и папку ubuntu на всякий случай оставляем, не помешают) все файлы из данной в папки в итоговый каталог, созданный на предыдущем шаге: /EFI/Microsoft/boot.
- В получившейся файловой системе находим файл grubx.efi или grubx64.efi (будет только один из них: в зависимости от разрядности установленного Линукса). Переименовываем его в bootmgfw.efi.
- Находим файл /boot/grub/grub.cfg в файловой системе установленного Линукса. Открываем его для редактирования. Внутри него находим слово «Microsoft» в контексте строки, начинающейся с «chainloader» и заменяем это слово (должно быть только одно вхождение и именно в строке с «chainloader», так что не ошибетесь) на название каталога, в который мы переименовали Microsoft (т.е. на Microsoft2 в нашем примере). Сохраняем изменения в файле.
Также, в этом файле вы можете поменять названия в списке, который выводит GRUB. Например, вместо
openSUSE Leap 42.2 27.01
в части кода:
menuentry 'openSUSE Leap 42.2 27.01'  --class opensuse --class gnu-linux --class gnu --class os $menuentry_id_option 'gnulinux-simple-996b3ed5-150f-4de3-a40c-6d385e27d6de' {
	load_video
	set gfxpayload=keep
	insmod gzio
	insmod part_gpt
	insmod ext2
	set root='hd0,gpt6'
	if [ x$feature_platform_search_hint = xy ]; then
	  search --no-floppy --fs-uuid --set=root --hint-bios=hd0,gpt6 --hint-efi=hd0,gpt6 --hint-baremetal=ahci0,gpt6  996b3ed5-150f-4de3-a40c-6d385e27d6de
	else
	  search --no-floppy --fs-uuid --set=root 996b3ed5-150f-4de3-a40c-6d385e27d6de
	fi
	echo	'Загружается Linux 4.4.36-8-default …'
	linuxefi /boot/vmlinuz-4.4.36-8-default root=UUID=996b3ed5-150f-4de3-a40c-6d385e27d6de ro  resume=/dev/sda7 splash=silent quiet showopts
	echo	'Загружается начальный виртуальный диск …'
	initrdefi /boot/initrd-4.4.36-8-default
}
Написать
openSUSE The best choice!:)
:
menuentry 'openSUSE The best choice!:)'  --class opensuse --class gnu-linux --class gnu --class os $menuentry_id_option 'gnulinux-simple-996b3ed5-150f-4de3-a40c-6d385e27d6de' {
	load_video
	set gfxpayload=keep
	insmod gzio
	insmod part_gpt
	insmod ext2
	set root='hd0,gpt6'
	if [ x$feature_platform_search_hint = xy ]; then
	  search --no-floppy --fs-uuid --set=root --hint-bios=hd0,gpt6 --hint-efi=hd0,gpt6 --hint-baremetal=ahci0,gpt6  996b3ed5-150f-4de3-a40c-6d385e27d6de
	else
	  search --no-floppy --fs-uuid --set=root 996b3ed5-150f-4de3-a40c-6d385e27d6de
	fi
	echo	'Загружается Linux 4.4.36-8-default …'
	linuxefi /boot/vmlinuz-4.4.36-8-default root=UUID=996b3ed5-150f-4de3-a40c-6d385e27d6de ro  resume=/dev/sda7 splash=silent quiet showopts
	echo	'Загружается начальный виртуальный диск …'
	initrdefi /boot/initrd-4.4.36-8-default
}
Хоть мелочь, а приятно! Остальное в коде советую не трогать.
Если трудно разобраться с управлением Midnight Commander (в этом нет ничего страшного, у меня тоже в первый раз были проблемы с этой программой), все операции можно выполнить в файловом менеджере Nautilus (или в другом, не суть важно), но изначально запустив его под правами пользователя root.
После этого идем на перезагрузку и радуемся результату. Но, как оказывается, такая проблема есть и у дистрибутива OpenSUSE Leap 42.2. Как показала практика, если на компьютере установлен дистрибутив OpenSUSE с Windows 10, то приведенная выше инструкция не поможет. Точнее, она поможет, но только ее нужно дополнить. После выполнения основной части выполняем следующие шаги:
- После выполнения всех операций заходим в папку /EFI/opensuse/x86_64-efi/ (название итоговой папки x86_64-efi может быть другим в зависимости от архитектуры ПК)
- Копируем файл grub.efi (если у вас включена опция Secure Boot, там будет еще файл shim.efi, тогда советую скопировать их вместе)
- Заходим в папку /EFI/Boot и удаляем все файлы, которые там есть (при обновлении загрузчика они снова появятся, но в этом нет ничего страшного)
- Вставляем файл (или файлы), которые мы скопировали и спокойно идем на перезагрузку.
Вот и вся инструкция. Думаю, кому-то пригодится…
P.S. Если же у вас все хорошо, GRUB с OpenSUSE запускается, но не видит Windows, радуйтесь — проблема решается всего одной командной: grub2-mkconfig -o /boot/grub2/grub.cfg, а если у вас стоит Ubuntu, нужно выполнить просто update-grub.
Для тех же, кого заинтересовала данная тема, рекомендую прочитать статью: «Начальный загрузчик GRUB 2 — полное руководство».
This is an article detailing different methods of Arch/Windows coexistence.
Important information
Windows UEFI vs BIOS limitations
Microsoft imposes limitations on which firmware boot mode and partitioning style can be supported based on the version of Windows used:
Note: The following points only list configurations supported by the Windows Setup even though Windows itself may still work on these unsupported configurations. A good example of this is Windows 11 which still works on a BIOS/MBR configuration once the Windows Setup check is bypassed.
- Windows 8/8.1 and 10 x86 32-bit support booting in IA32 UEFI mode from GPT disk only, OR in BIOS mode from MBR disk only. They do not support x86_64 UEFI boot from GPT/MBR disk, x86_64 UEFI boot from MBR disk, or BIOS boot from GPT disk. On market, the only systems known to ship with IA32 (U)EFI are some old Intel Macs (pre-2010 models?) and Intel Atom System-on-Chip (Clover trail and Bay Trail) Windows Tablets, which boot ONLY in IA32 UEFI mode and ONLY from GPT disk.
- Windows 8/8.1 and 10 x86_64 versions support booting in x86_64 UEFI mode from GPT disk only, OR in BIOS mode from MBR disk only. They do not support IA32 UEFI boot, x86_64 UEFI boot from MBR disk, or BIOS boot from GPT disk.
- Windows 11 only supports x86_64 and a boot in UEFI mode from GPT disk.
In case of pre-installed Systems:
- All systems pre-installed with Windows XP, Vista or 7 32-bit, irrespective of Service Pack level, bitness, edition (SKU) or presence of UEFI support in firmware, boot in BIOS/MBR mode by default.
- MOST of the systems pre-installed with Windows 7 x86_64, irrespective of Service Pack level, bitness or edition (SKU), boot in BIOS/MBR mode by default. Very few late systems pre-installed with Windows 7 are known to boot in x86_64 UEFI/GPT mode by default.
- ALL systems pre-installed with Windows 8/8.1, 10 and 11 boot in UEFI/GPT mode. Up to Windows 10, the firmware bitness matches the bitness of Windows, ie. x86_64 Windows boot in x86_64 UEFI mode and 32-bit Windows boot in IA32 UEFI mode.
The best way to detect the boot mode of Windows is to do the following[1]:
- Boot into Windows
- Press
Win+Rkeys to start the Run dialog - In the Run dialog type
msinfo32.exeand press Enter - In the System Information windows, select System Summary on the left and check the value of BIOS mode item on the right
- If the value is
UEFI, Windows boots in UEFI/GPT mode. If the value isLegacy, Windows boots in BIOS/MBR mode.
In general, Windows forces type of partitioning depending on the firmware mode used, i.e. if Windows is booted in UEFI mode, it can be installed only to a GPT disk. If Windows is booted in Legacy BIOS mode, it can be installed only to an MBR disk. This is a limitation enforced by Windows Setup, and as of April 2014 there is no officially (Microsoft) supported way of installing Windows in UEFI/MBR or BIOS/GPT configuration. Thus Windows only supports either UEFI/GPT boot or BIOS/MBR configuration.
Tip: Windows 10 version 1703 and newer supports converting from BIOS/MBR to UEFI/GPT using MBR2GPT.EXE.
Such a limitation is not enforced by the Linux kernel, but can depend on which boot loader is used and/or how the boot loader is configured. The Windows limitation should be considered if the user wishes to boot Windows and Linux from the same disk, since installation procedure of boot loader depends on the firmware type and disk partitioning configuration. In case where Windows and Linux dual boot from the same disk, it is advisable to follow the method used by Windows, ie. either go for UEFI/GPT boot or BIOS/MBR boot. See https://support.microsoft.com/kb/2581408 for more information.
Install media limitations
Intel Atom System-on-Chip Tablets (Clover trail and Bay Trail) provide only IA32 UEFI firmware without Legacy BIOS (CSM) support (unlike most of the x86_64 UEFI systems), due to Microsoft Connected Standby Guidelines for OEMs. Due to lack of Legacy BIOS support in these systems, and the lack of 32-bit UEFI boot in Arch Official Install ISO (FS#53182), the official install media cannot boot on these systems. See Unified Extensible Firmware Interface#UEFI firmware bitness for more information and available workarounds.
Bootloader UEFI vs BIOS limitations
Most of the linux bootloaders installed for one firmware type cannot launch or chainload bootloaders of the other firmware type. That is, if Arch is installed in UEFI/GPT or UEFI/MBR mode in one disk and Windows is installed in BIOS/MBR mode in another disk, the UEFI bootloader used by Arch cannot chainload the BIOS installed Windows in the other disk. Similarly if Arch is installed in BIOS/MBR or BIOS/GPT mode in one disk and Windows is installed in UEFI/GPT in another disk , the BIOS bootloader used by Arch cannot chainload UEFI installed Windows in the other disk.
The only exceptions to this are GRUB in Apple Macs in which GRUB in UEFI mode can boot BIOS installed OS via appleloader command (does not work in non-Apple systems), and rEFInd which technically supports booting legacy BIOS OS from UEFI systems, but does not always work in non-Apple UEFI systems as per its author Rod Smith.
However if Arch is installed in BIOS/GPT in one disk and Windows is installed in BIOS/MBR mode in another disk, then the BIOS boot loader used by Arch CAN boot the Windows in the other disk, if the boot loader itself has the ability to chainload from another disk.
Note: To dual-boot with Windows on same disk, Arch should follow the same firmware boot mode and partitioning combination used by the Windows installation.
Windows Setup creates a 100 MiB EFI system partition (except for Advanced Format 4K native drives where it creates a 300 MiB ESP), so multiple kernel usage is limited. Workarounds include:
- Mount ESP to
/efiand use a boot loader that has file system drivers and is capable of launching kernels that reside on other partitions. - Expand the EFI system partition, typically either by decreasing the Recovery partition size or moving the Windows partition (UUIDs will change).
- Backup and delete unneeded fonts in
esp/EFI/Microsoft/Boot/Fonts/[2]. - Backup and delete unneeded language directories in
esp/EFI/Microsoft/Boot/(e.g. to only keepen-US). - Use a higher, but slower, compression for the initramfs images. E.g.
COMPRESSION="xz"withCOMPRESSION_OPTIONS=(-9e).
UEFI Secure Boot
All pre-installed Windows 8/8.1, 10 and 11 systems by default boot in UEFI/GPT mode and have UEFI Secure Boot enabled by default. This is mandated by Microsoft for all OEM pre-installed systems.
Arch Linux install media does not support Secure Boot yet. See Secure Boot#Booting an installation medium.
It is advisable to disable UEFI Secure Boot in the firmware setup manually before attempting to boot Arch Linux. Windows 8/8.1, 10 and 11 SHOULD continue to boot fine even if Secure boot is disabled. The only issue with regards to disabling UEFI Secure Boot support is that it requires physical access to the system to disable secure boot option in the firmware setup, as Microsoft has explicitly forbidden presence of any method to remotely or programmatically (from within OS) disable secure boot in all Windows 8/8.1 and above pre-installed systems
Note:
- If Windows used Bitlocker and stored the key in the TPM for automatic unlock on boot, it fails to boot when Secure Boot is disabled, instead showing a Bitlocker recovery screen. This is not permanent however, and you can easily boot Windows again by simply re-enabling Secure Boot.
- On Windows 11, disabling Secure Boot after install will not cause problems as long as TPM is working normally.
Fast Startup and hibernation
There are two OSs that can be hibernated, you can hibernate Windows and boot Linux (or another OS), or you can hibernate Linux and boot Windows, or hibernate both OSs.
Warning: Data loss can occur if Windows hibernates and you dual boot into another OS and make changes to files on a filesystem (such as NTFS) that can be read and written to by Windows and Linux, and that has been mounted by Windows [3]. Similarly, data loss can occur if Linux hibernates, and you dual boot into another OS etc. Windows may hibernate even when you press shutdown, see section #Windows settings.
For the same reason, if you share one EFI system partition between Windows and Linux, then the EFI system partition may be damaged if you hibernate (or shutdown with Fast Startup enabled) Windows and then start Linux, or hibernate Linux and then start Windows.
ntfs-3g added a safe-guard to prevent read-write mounting of hibernated NTFS filesystems, but the NTFS driver within the Linux kernel has no such safeguard.
Windows cannot read filesystems such as ext4 by default that are commonly used for Linux. These filesystems do not have to be considered, unless you install a Windows driver for them.
Windows settings
Fast Startup is a feature in Windows 8 and above that hibernates the computer rather than actually shutting it down to speed up boot times.
There are multiple options regarding the Windows settings for Fast Startup and hibernation that are covered in the next sections.
- disable Fast Startup and disable hibernation
- disable Fast Startup and enable hibernation
- enable Fast Startup and enable hibernation
The procedure of disabling Fast Startup is described in the tutorials for Windows 8, Windows 10 and Windows 11. In any case if you disable a setting, make sure to disable the setting and then shut down Windows, before installing Linux; note that rebooting is not sufficient.
Disable Fast Startup and disable hibernation
This is the safest option, and recommended if you are unsure about the issue, as it requires the least amount of user awareness when rebooting from one OS into the other. You may share the same EFI system partition between Windows and Linux.
Disable Fast Startup and enable hibernation
This option requires user awareness when rebooting from one OS into the other.
If you want to start Linux while Windows is hibernated, which is a common use case, then
- you must use a separate EFI system partition (ESP) for Windows and Linux, and ensure that Windows does not mount the ESP used for Linux. As there can only be one ESP per drive, the ESP used for Linux must be located on a separate drive than the ESP used for Windows. In this case Windows and Linux can still be installed on the same drive in different partitions, if you place the ESP used by linux on another drive than the Linux root partition.
- you can not read-write mount any filesystem in Linux, that is mounted by Windows while Windows is hibernated. You should be extremely careful about this, and also consider Automount behaviour.
- If you shut down Windows fully, rather than hibernating, then you can read-write mount the filesystem.
Note: You can avoid this issue for a drive by mounting a drive as an external drive in Windows and ejecting the drive in Windows before hibernating.
Enable Fast Startup and enable hibernation
The same considerations apply as in case «Disable Fast Startup and enable hibernation», but since Windows can not be shut down fully, only hibernated, you can never read-write mount any filesystem that was mounted by Windows while Windows is hibernated.
Note: Windows updates may re-enable Fast Startup, as reported in [4].
Windows filenames limitations
Windows is limited to filepaths being shorter than 260 characters.
Windows also puts certain characters off limits in filenames for reasons that run all the way back to DOS:
<(less than)>(greater than):(colon)"(double quote)/(forward slash)\(backslash)|(vertical bar or pipe)?(question mark)*(asterisk)
These are limitations of Windows and not NTFS: any other OS using the NTFS partition will be fine. Windows will fail to detect these files and running chkdsk will most likely cause them to be deleted. This can lead to potential data-loss.
NTFS-3G applies Windows restrictions to new file names through the windows_names option: ntfs-3g(8) § Windows_Filename_Compatibility (see fstab).
Installation
The recommended way to setup a Linux/Windows dual booting system is to first install Windows, only using part of the disk for its partitions. When you have finished the Windows setup, boot into the Linux install environment where you can create and resize partitions for Linux while leaving the existing Windows partitions untouched. The Windows installation will create the EFI system partition which can be used by your Linux boot loader.
Windows before Linux
BIOS systems
Using a Linux boot loader
You may use any multi-boot supporting BIOS boot loader.
Using the Windows Vista/7/8/8.1 boot loader
This section explains how to : install a linux bootloader on a partition instead of the MBR ; copy this bootloader to a partition readable by the windows bootloader ; use the windows bootloader to start said copy of the linux bootloader.
Note: Some documents state that the partition being loaded by the Windows boot loader must be a primary partition but usage of an extended partition has been documented as working.
- When installing the boot loader, install it on your
/bootpartition rather than the MBR. For details on doing this with GRUB, see GRUB/Tips and tricks#Install to partition or partitionless disk, for Syslinux, see the note at Syslinux#Manual install, for LILO see LILO#Install to partition or partitionless disk.
- Make a copy of the VBR:
dd if=/dev/disk of=/path/to/linux.bin bs=512 count=1
where
/dev/diskis the path of the partition on which your bootloader is installed and/path/to/is the mounted filesystem on which you want the copy to be readable by the Windows bootloader.
- On Windows, the linux.bin file should now be accessible. Run cmd with administrator privileges (navigate to Start > All Programs > Accessories, right-click on Command Prompt and select Run as administrator):
bcdedit /create /d "Linux" /application BOOTSECTOR
BCDEdit will return a UUID for this entry. This will be refered to as
UUIDin the remaining steps.bcdedit /set UUID device partition=c: (or the drive letter on which linux.bin is kept) bcdedit /set UUID path \path\to\linux.bin bcdedit /displayorder UUID /addlast bcdedit /timeout 30
On reboot, both Windows and Linux should now show up in the Windows bootloader.
Note: On some hardware, the Windows boot loader is used to start another OS with a second power button (e.g. Dell Precision M4500).
For more details, see https://www.iceflatline.com/2009/09/how-to-dual-boot-windows-7-and-linux-using-bcdedit/
UEFI systems
If you already have Windows installed, it will already have created some partitions on a GPT-formatted disk:
- a Windows Recovery Environment partition, generally of size 499 MiB, containing the files required to boot Windows (i.e. the equivalent of Linux’s
/boot), - an EFI system partition with a FAT32 filesystem,
- a Microsoft Reserved Partition, generally of size 128 MiB,
- a Microsoft basic data partition with a NTFS filesystem, which corresponds to
C:, - potentially system recovery and backup partitions and/or secondary data partitions (corresponding often to
D:and above).
Using the Disk Management utility in Windows, check how the partitions are labelled and which type gets reported. This will help you understand which partitions are essential to Windows, and which others you might repurpose. The Windows Disk Management utility can also be used to shrink Windows (NTFS) partitions to free up disk space for additional partitions for Linux.
Warning: The first 4 partitions in the above list are essential, do not delete them.
You can then proceed with partitioning, depending on your needs. The boot loader needs to support chainloading other EFI applications to dual boot Windows and Linux. An additional EFI system partition should not be created, as it may prevent Windows from booting.
Note: It only appears when Linux is installed on the second hard disk and a new EFI system partition is created on the second hard disk.
Simply mount the existing partition.
Tip:
- rEFInd and systemd-boot will autodetect Windows Boot Manager (
\EFI\Microsoft\Boot\bootmgfw.efi) and show it in their boot menu automatically. For GRUB follow either GRUB#Windows installed in UEFI/GPT mode to add boot menu entry manually or GRUB#Detecting other operating systems for a generated configuration file. - To save space on the EFI system partition, especially for multiple kernels, increase the initramfs compression.
Computers that come with newer versions of Windows often have Secure Boot enabled. You will need to take extra steps to either disable Secure Boot or to make your installation media compatible with secure boot (see above and in the linked page).
Linux before Windows
Even though the recommended way to setup a Linux/Windows dual booting system is to first install Windows, it can be done the other way around. In contrast to installing Windows before Linux, you will have to set aside a partition for Windows, say 40GB or larger, in advance. Or have some unpartitioned disk space, or create and resize partitions for Windows from within the Linux installation, before launching the Windows installation.
UEFI firmware
Windows will use the already existing EFI system partition. In contrast to what was stated earlier, it is unclear if a single partition for Windows, without the Windows Recovery Environment and without Microsoft Reserved Partition, will not do.
Follows an outline, assuming Secure Boot is disabled in the firmware.
- Boot into windows installation. Watch to let it use only the intended partition, but otherwise let it do its work as if there is no Linux installation.
- Follow the #Fast Startup and hibernation section.
- Fix the ability to load Linux at start up, perhaps by following #Cannot boot Linux after installing Windows. It was already mentioned in #UEFI systems that some Linux boot managers will autodetect Windows Boot Manager. Even though newer Windows installations have an advanced restart option, from which you can boot into Linux, it is advised to have other means to boot into Linux, such as an arch installation media or a live CD.
Windows 10 with GRUB
The following assumes GRUB is used as a boot loader (although the process is likely similar for other boot loaders) and that Windows 10 will be installed on a GPT block device with an existing EFI system partition (see the «System partition» section in the Microsoft documentation for more information).
Create with program gdisk on the block device the following three new partitions. See [5] for more precise partition sizes.
| Min size | Code | Name | File system |
|---|---|---|---|
| 16 MB | 0C01 | Microsoft reserved | N/A |
| ~40 GB | 0700 | Microsoft basic data | NTFS |
| 300 MB | 2700 | Windows RE | NTFS |
Create NTFS file systems on the new Microsoft basic data and Windows RE (recovery) partitions using the mkntfs program from package ntfs-3g.
Reboot the system into a Windows 10 installation media. When prompted to install select the custom install option and install Windows on the Microsoft basic data partition created earlier. This should also install Microsoft EFI files in the EFI system partition.
After installation (set up of and logging into Windows not required), reboot into Linux and generate a GRUB configuration for the Windows boot manager to be available in the GRUB menu on next boot.
Troubleshooting
Couldn’t create a new partition or locate an existing one
See #Windows UEFI vs BIOS limitations.
Cannot boot Linux after installing Windows
See Unified Extensible Firmware Interface#Windows changes boot order.
Restoring a Windows boot record
By convention (and for ease of installation), Windows is usually installed on the first partition and installs its partition table and reference to its bootloader to the first sector of that partition. If you accidentally install a bootloader like GRUB to the Windows partition or damage the boot record in some other way, you will need to use a utility to repair it. Microsoft includes a boot sector fix utility FIXBOOT and an MBR fix utility called FIXMBR on their recovery discs, or sometimes on their install discs. Using this method, you can fix the reference on the boot sector of the first partition to the bootloader file and fix the reference on the MBR to the first partition, respectively. After doing this you will have to reinstall GRUB to the MBR as was originally intended (that is, the GRUB bootloader can be assigned to chainload the Windows bootloader).
If you wish to revert back to using Windows, you can use the FIXBOOT command which chains from the MBR to the boot sector of the first partition to restore normal, automatic loading of the Windows operating system.
Of note, there is a Linux utility called ms-sys (package ms-sysAUR in AUR) that can install MBR’s. However, this utility is only currently capable of writing new MBRs (all OS’s and file systems supported) and boot sectors (a.k.a. boot record; equivalent to using FIXBOOT) for FAT file systems. Most LiveCDs do not have this utility by default, so it will need to be installed first, or you can look at a rescue CD that does have it, such as Parted Magic.
First, write the partition info (table) again by:
# ms-sys --partition /dev/sda1
Next, write a Windows 2000/XP/2003 MBR:
# ms-sys --mbr /dev/sda # Read options for different versions
Then, write the new boot sector (boot record):
# ms-sys -(1-6) # Read options to discover the correct FAT record type
ms-sys can also write Windows 98, ME, Vista, and 7 MBRs as well, see ms-sys -h.
Restoring an accidentally deleted EFI system partition
If you have a GPT-partitioned disk and erased (e.g. with mkfs.fat -F32 /dev/sdx) the EFI system partition, you will notice that Windows Boot Manager will either disappear from your boot options, or selecting it will send you back to the UEFI.
To remedy it, boot with a Windows installation media, press Shift+F10 to open the console (or click NEXT > Repair Computer > Troubleshoot… > Advanced > Command Prompt), then start the diskpart utility:
X:\Sources> diskpart
DISKPART> list disk
Select the appropriate hard drive by typing:
DISKPART> select disk number
Make sure that there is a partition of type system (the EFI system partition):
DISKPART> list partition
Select this partition:
DISKPART> select partition number
and assign a temporary drive letter to it:
DISKPART> assign letter=G:
DiskPart successfully assigned the drive letter or mount point.
To make sure that drive letter is correctly assigned:
DISKPART> list vol
 Volume ###  Ltr  Label        Fs     Type        Size     Status     Info
 ----------  ---  -----------  -----  ----------  -------  ---------  --------
 Volume 0     E                       DVD-ROM         0 B  No Media
 Volume 1     C                NTFS   Partition    195 GB  Healthy    Boot
 Volume 2         WINRE        NTFS   Partition    400 MB  Healthy    Hidden
 Volume 3     G                FAT32  Partition    499 MB  Healthy    System
Close diskpart:
DISKPART> exit
Navigate to C:\ (or what your system drive letter is):
X:\Sources> cd /d C:\
Next is the «magic» command, which recreate the BCD store (with /s for the mount point, /f for firmware type, optionally add /v for verbose):
C:\> bcdboot C:\Windows /s G: /f UEFI
Tip: If it hangs up after a minute, hit Ctrl+c. This happens sometimes, but you will get a message like boot files successfully created and it will have worked just fine.
You should now have Windows Boot Manager working as a boot option, and thus have access to Windows. Just make sure to never format your EFI system partition again!
Note: Remove the drive letter G assigned to the EFI system partition to keep it from showing up in My Computer.
See [6], [7] and [8].
The EFI system partition created by Windows Setup is too small
By default, Windows Setup creates a 100 MiB EFI system partition (except for Advanced Format 4K native drives where it creates a 300 MiB ESP). This is generally too small to fit everything you need. You can try different tools to resize this partition, but there are usually other partitions in the way, making it, at the very least, difficult.
If you are installing Windows from scratch, you can dictate the size of the EFI system partition during installation[9]:
- Select your installation target and make sure it has no partitions.
- Click New and then the Apply buttons. The Windows installer will then generate the expected partitions (allocating nearly everything to its primary partition) and just 100MB to the EFI.
- Use the UI to delete the
System,MSR, andPrimarypartitions. Leave theRecoverypartition (if present) alone. - Press
Shift+F10to open the Command Prompt. - Type
diskpart.exeand pressEnterto open the disk partitioning tool. - Type
list diskand pressEnterto list your disks. Find the one you intend to modify and note its disk number. - Type
select disk disk_numberwith the disk number to modify. - Type
create partition efi size=sizewith the desired size of the ESP in Mebibytes (MiB), and pressEnter. See the note at EFI system partition#Create the partition for the recommended sizes. - Type
format quick fs=fat32 label=Systemand pressEnterto format the ESP - Type
exitand pressEnterto exit the disk partitioning tool andexitfollowed byEnteragain.
Once Windows is installed, you can resize the primary partition down within Windows and then reboot and go about your usual Arch install, filling the space you just created.
Alternatively, you can use the Arch install media to create a single EFI system partition of your preferred size before you install Windows on the drive. Windows Setup will use the EFI system partition you made instead of creating its own.
Unable to install Windows Cumulative Update on BIOS system
On BIOS systems, Windows cumulative updates may fail with the error We couldn’t complete the updates. Undoing changes. Don’t turn off your computer. In such case, while in Windows, you need to set the Windows partition as active.
C:\> diskpart
DISKPART> list disk
DISKPART> select disk number
DISKPART> list partition
DISKPART> select partition number
DISKPART> active
DISKPART> exit
After successfully installing the Windows update, mark back your Linux partition as active, using commands above.
Time standard
- Recommended: Set both Arch Linux and Windows to use UTC, following System time#UTC in Microsoft Windows. Some versions of Windows revert the hardware clock back to localtime if they are set to synchronize the time online. This issue appears to be fixed in Windows 10.
- Not recommended: Set Arch Linux to localtime and disable all time synchronization daemons. This will let Windows take care of hardware clock corrections and you will need to remember to boot into Windows at least two times a year (in Spring and Autumn) when DST kicks in. So please do not ask on the forums why the clock is one hour behind or ahead if you usually go for days or weeks without booting into Windows.
Bluetooth pairing
When it comes to pairing Bluetooth devices with both the Linux and Windows installation, both systems have the same MAC address, but will use different link keys generated during the pairing process. This results in the device being unable to connect to one installation, after it has been paired with the other. To allow a device to connect to either installation without re-pairing, follow Bluetooth#Dual boot pairing.
See also
- Booting Windows from a desktop shortcut
- One-time boot into Windows partition from desktop shortcut
- Windows 7/8/8.1/10 ISO to Flash Drive burning utility for Linux (MBR/GPT, BIOS/UEFI, FAT32/NTFS)
В этой статье разберём разные варианты установки двух систем на один компьютер используя загрузчик GRUB 2, это называется Dual boot.
Что такое dual boot или multi boot
Multi boot (множественная загрузка) — это когда вы можете на одном компьютере на свой выбор загружать разные операционные системы. Чаще всего это Windows и различные Linux системы. На одном компьютере можно разместить две и более операционных систем.
Dual boot (двойная загрузка) — это вариант Multi boot, если используется всего 2 системы.
Зачем вообще держать на своём компьютере несколько систем? Давайте я приведу несколько примеров использования dual boot.
Если у вас установлена Windows, но вы хотите попробовать какой-нибудь Linux. Для этого вы рядом со своей Windows устанавливаете Linux и загружаетесь в Linux. Если вы что-то случайно поломаете в Linux, то вы всегда сможете загрузиться в привычную Windows. Или если вам нужно срочно выполнить какую-нибудь работу и вы знаете как это делается на Windows, то и в этом случае вы можете загрузить Windows.
Еще вам может понадобиться Dual boot, если вам удобно работать на Linux. А Windows вы используете только для игр. Ну или одними программами вы пользуетесь на Linux, а другими на Windows. В обоих случаях вы можете загружать иногда Linux, а иногда Windows.
Ну и третий вариант. У вас дома один компьютер. Вы предпочитаете работать в Linux, а другие члены вашей семьи используют Windows.
Минусы двойной загрузки
Каждая система будет занимать место на жёстком диске. И если Linux обычно занимает не так много (8 — 16 GB), то Windows будет занимать 50-60 GB.
Из Linux системы вы можете получить доступ ко всем файлам в Windows. Вы даже можете случайно повредить Windows, так как у вас будет доступ ко всем её файлам. А вот из WIndows получить доступ к файлам Linux нельзя, более того Windows будет предлагать отформатировать разделы на которых расположена Linux. Главное не забыть для чего эти разделы и не согласиться с форматированием.
Ну и конечно две системы усложняют весь процесс настройки.
Принципы работы
Причины использовать Dual boot могут быть разные. Но нужно знать некоторые базовые вещи для использования такой загрузки.
- Каждая система устанавливается либо на разные разделы одного диска, либо на разные диски.
- Компьютер может работать под управлением BIOS и искать загрузчик на загрузочном диске в MBR. А может работать под управлением UEFI и искать ESP или EFI раздел для запуска загрузчика от туда.
- Различные операционные системы используют различные установщики.
- Например Windows при установки затрет GRUB 2 своим загрузчиком, который не умеет загружать Linux системы. Тогда нужно будет восстанавливать GRUB 2. Кстати GRUB 2 умеет загружать и Linux и Windows.
- Ubuntu также устанавливает свой GRUB 2 не спрашивая и затирает установленный ранее загрузчик от другой системы.
- А вот Debian при установки спрашивает, нужно ли устанавливать GRUB 2 или нет. И если у вас уже используется другой загрузчик, от другой системы, то вы можете и отказаться от установки GRUB 2.
- При двойной загрузки вам понадобится специальный загрузчик, который может запускать различные системы на выбор. Например уже изученный нами GRUB 2. Есть и другие загрузчики, но в этом курсе они не рассматриваются.
Я понимаю что самый распространённый вариант использования Dual Boot это Windows + Linux. Но так как у нас курс по администрированию LInux (Ubuntu и Debian). То в следующих статьях я покажу как установить Ubuntu 22.04 рядом с Debian 11. А установку Ubuntu рядом с Windows тоже планирую описать, но в отдельной статье.
Сводка

Имя статьи
GRUB 2 Dual boot (Две системы на одном компьютере)
Описание
В этой статье разберём разные варианты установки двух систем на один компьютер используя загрузчик GRUB 2, это называется Dual boot
I use Arch Linux as my main operating system. Linux works very well, but sometimes you need that one tool which only works on Windows, and while Wine and the like work, the most reliable solution to this problem is to dual boot your machine with Windows and whatever Linux distribution you prefer.
In this guide, we’ll first install Windows 11 with a custom sized boot partition, and then dual boot it with Arch Linux using the Grub bootloader.
Prerequisites
- A stable internet connection (around 6GB of data will be used)
- A USB drive or similar to create a bootable medium
- Basic knowledge of CLIs and a CLI text editor like
vimornano - It’ll be helpful if you have some experience with installing Arch Linux before
If you get stuck at some part in this blog, you can always refer to the Arch Wiki or Google.
The images used in the blog are taken from Google Images along with my own system (after installation — so they are not completely correct but it should give an idea of how things look like), I’ll update them whenever I dual-boot again.
Pre-Installation
Getting Disk Images
We start by getting the disk images or ISOs for both the operating systems.
Window 11 ISO
Arch Linux ISO
Prepare Installation Image
A bootable live USB is an external storage device that contains everything required to boot into a live environment/setup. There are multiple ways to create such a live environment; but here we’ll do it the plain old way with a USB drive.
We’ll be installing Windows first so we need a USB drive with the Windows environment. You can «flash» Windows to your USB drive using some software like Rufus or Balena Etcher.
Alternatively if you are on Linux you can use dd to create a bootable USB. Moreover, this arch guide explains other ways to create a bootable medium.
There’s also Ventoy which can be used to create a bootable disk with multiple operating systems — I personally use Ventoy since it’s very efficient to be able to have multiple ISOs on the same drive at the same time.
Once you finish installing Windows, you can re-format the drive and flash the Arch ISO onto it to continue.
Installation
After getting the bootable USB ready, plug it into your computer and boot the system. While its booting up, you need to enter the Boot Menu. Common keys to enter boot menu are Esc, F2, F10 and F12, and you can refer to Google for the proper key for your laptop/PC. You need to press one of these while the system is booting up.
Windows 11
Once you are in boot menu, select the boot option corresponding to the USB drive, and it should start Windows Setup.
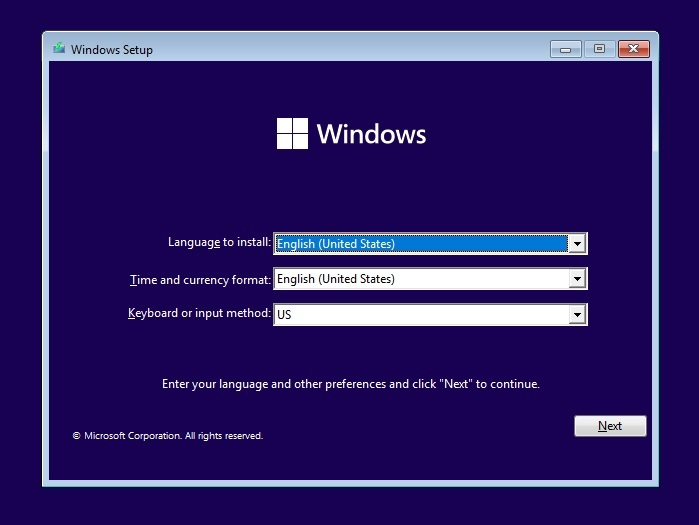
Select the appropriate language, time and keyboard options, and click on the «Next» button to continue with the installation. Then, insert a product key if you have one.
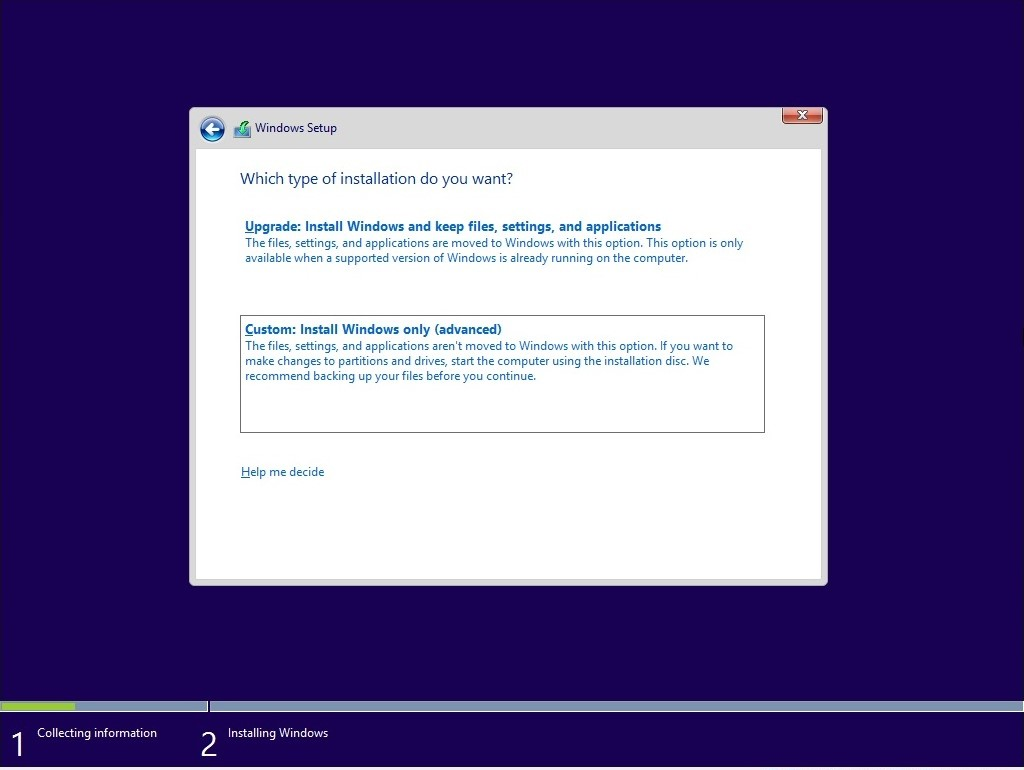
On this screen you want to select the option Custom: Install windows only (advanced) option to be able to format the disks as you wish.
You’ll see a similar screen where Windows will show you the available drives and partitions. On this screen, you can delete and create partitions as you like.
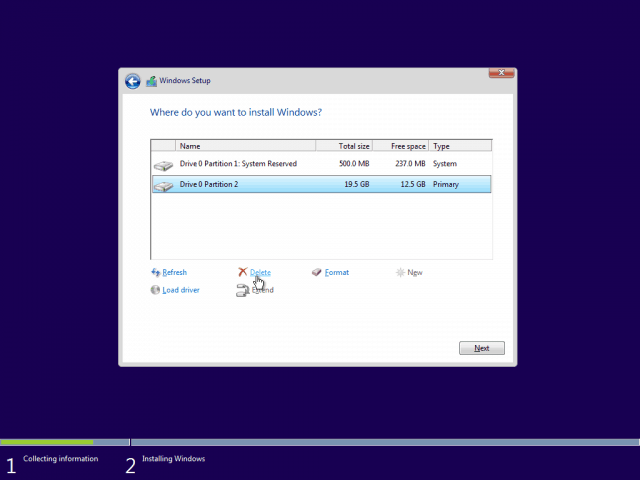
Windows creates 4 partitions:
- System — also known as boot partition or EFI System
- Windows reserved
- Recovery — Windows recovery environment
- Primary — the primary partition on which operating system is installed
(don’t worry if you only see three partitions after creating primary partition, as one of the windows generated partition was hidden for me in the setup as well for some reason)
In my case, I have a 255GB SSD and would like to split it into four main parts:
- [EFI] System(1GB) — boot partition
- [WIN] C: Primary (100GB) for Windows 11
- [WIN] D: Data (20GB) for other files in Windows 11
- [ARCH] 120GB
The boot partition (EFI System Partition or ESP) contains the bootloader which is responsible for booting the system. When dual booting, we create a single boot partition and load the entries for both the operating systems in one bootloader so that it’s easier to select the option we want.
When creating a primary partition in the Windows setup, Windows will create the 4 partitions mentioned above, one of them is System boot partition.
Windows usually generates the boot partition with a default size of 100 or 260 MiB, which is too small for multiple bootloaders.
It is suggested to make the boot partition atleast 500MiB for multiple bootloaders. We cannot customize the size of the boot partition once it’s created in the Windows setup, so we’ll manually create one using diskpart from the setup.
(Note: you’d want to play a little with the Windows setup to understand how it creates partitions in order to be able to understand it well. I assume you have a basic understanding of what partitions and mounting are, along with some other general filesystem related terms).
It’s also very hard to increase the boot partition size after you have dual-booted the system, since it requires free space immediately succeeding the partition, which is usually not the case.
Let’s start by deleting all the partitions in the setup window by clicking each partition and then pressing the delete button. Once done, the setup should only show Unallocated Space. We are now ready to create the boot partition manually:
- Press
Shift + F10to open the Command Prompt. - Type
diskpartand press Enter to open the disk partitioning tool. - Type
list diskto list the available disks and note the number in front of the disk on which you are installing Windows - Type
sel disk nwherenis the number you noted, re-check it and make sure it isn’t the USB’s number :)) - After selecting the correct disk, Type
create partition efi size=1000where 1000 is size of the System partition in Mebibytes(MiB) and pressEnter(you can keep it 500 if you want, I»ll go with 1000MiB). - Type
format quick fs=fat32 label=Systemand pressEnterto format the partition with FAT32 filesystem with the System label (used by Windows) - Type
exitto exit the partitioning tool andexitagain to exit the command prompt.
Yay, we have created ourselves a custom sized boot partition! Now press refresh button in the setup and it should show the partition we just created.
Now we have the System partition and unallocated space, you can have as many partitions for windows as you want according to your available storage, but make sure to keep at least 100GB unallocated space left for Arch Linux.
First create a new partition (which will be the primary partition, make sure to select appropriate size) and that should create the Primary partition with recovery partition. Notice how Windows detected the System partition and did not create a new one. Now create the other partitions or drives (D:, E:) if you want to, and continue with the setup on finishing installing Windows.
Arch Linux
After installing Windows and leaving space for the Linux root partition, flash the Arch ISO to your installation medium and boot into the USB from the boot menu like you did before.
Internet
Arch Linux downloads the required packages and base system for the installation, so we need to set up a network connection. Note that to test a connection, you can always use the command ping 8.8.8.8. To stop the command, press CTRL+C.
Ethernet
Plug the cable and test the connection.
WiFi
To connect to WiFi, you can use the iwd daemon. Steps to connect are:
- Type
iwdto enter the daemon prompt
$ iwd
[iwd]#
- For help, use the
helpcommand
[iwd]# help
- List the devices (interfaces) — this will show the available wireless devices. In my case, it was
wlan0
[iwd]# device list
- Start the network scan (replace with device name)
[iwd]# station <device> scan
- List the networks (note the SSID of the network you want to connect to)
[iwd]# station device get-networks
- Connect to the network. You will need to enter the passphrase/password after pressing
Enter.
[iwd]# station device connect SSID
Test the connection with the ping command as mentioned above.
Partitioning
[Warning: Be careful here, do not touch the Windows partitions]
In order to install a Linux system we need two main partitions:
- Boot (mounted on
/mnt/boot) — contains bootloader (we have already created this in Windows setup) - Root (mounted on
/mnt) — the Linux root (/) where everything is installed
There are many ways to partition the disks. Since we already have some unallocated space, we just need to create a data partition from it and format it. You can use fdisk or cfdisk for creating a partition.
Run lsblk to list the drives and partitions with their mountpoints, size and other information:
$ lsblk
NAME        MAJ:MIN RM   SIZE RO TYPE MOUNTPOINTS
nvme0n1     259:0    0 238.5G  0 disk
├─nvme0n1p1 259:1    0     1G  0 part
├─nvme0n1p2 259:2    0    16M  0 part
├─nvme0n1p3 259:3    0  97.1G  0 part
├─nvme0n1p4 259:4    0   593M  0 part
└─nvme0n1p5 259:5    0  19.3G  0 part
Here, I have a drive named nvme0n1, and then some partition names followed by it. You may have sda or something else as the drive name. The partitions are as follows —
- nvme01np1 — Boot partition
- nvme0n1p2 — Microsoft reserved
- nvme0n1p3 — Primary Windows Parittion (C: drive)
- nvme0n1p4 — Windows recovery environment
- nvme0n1p5 — Extra data partition for windows
Remember the boot partition name (nvme0n1p1in my case).
We don’t see the unallocated space we left for Arch because we haven’t created a partition from the unallocated space yet. To do that, type in cfdisk /dev/<drive_name>
$ cfdisk /dev/nvme0n1
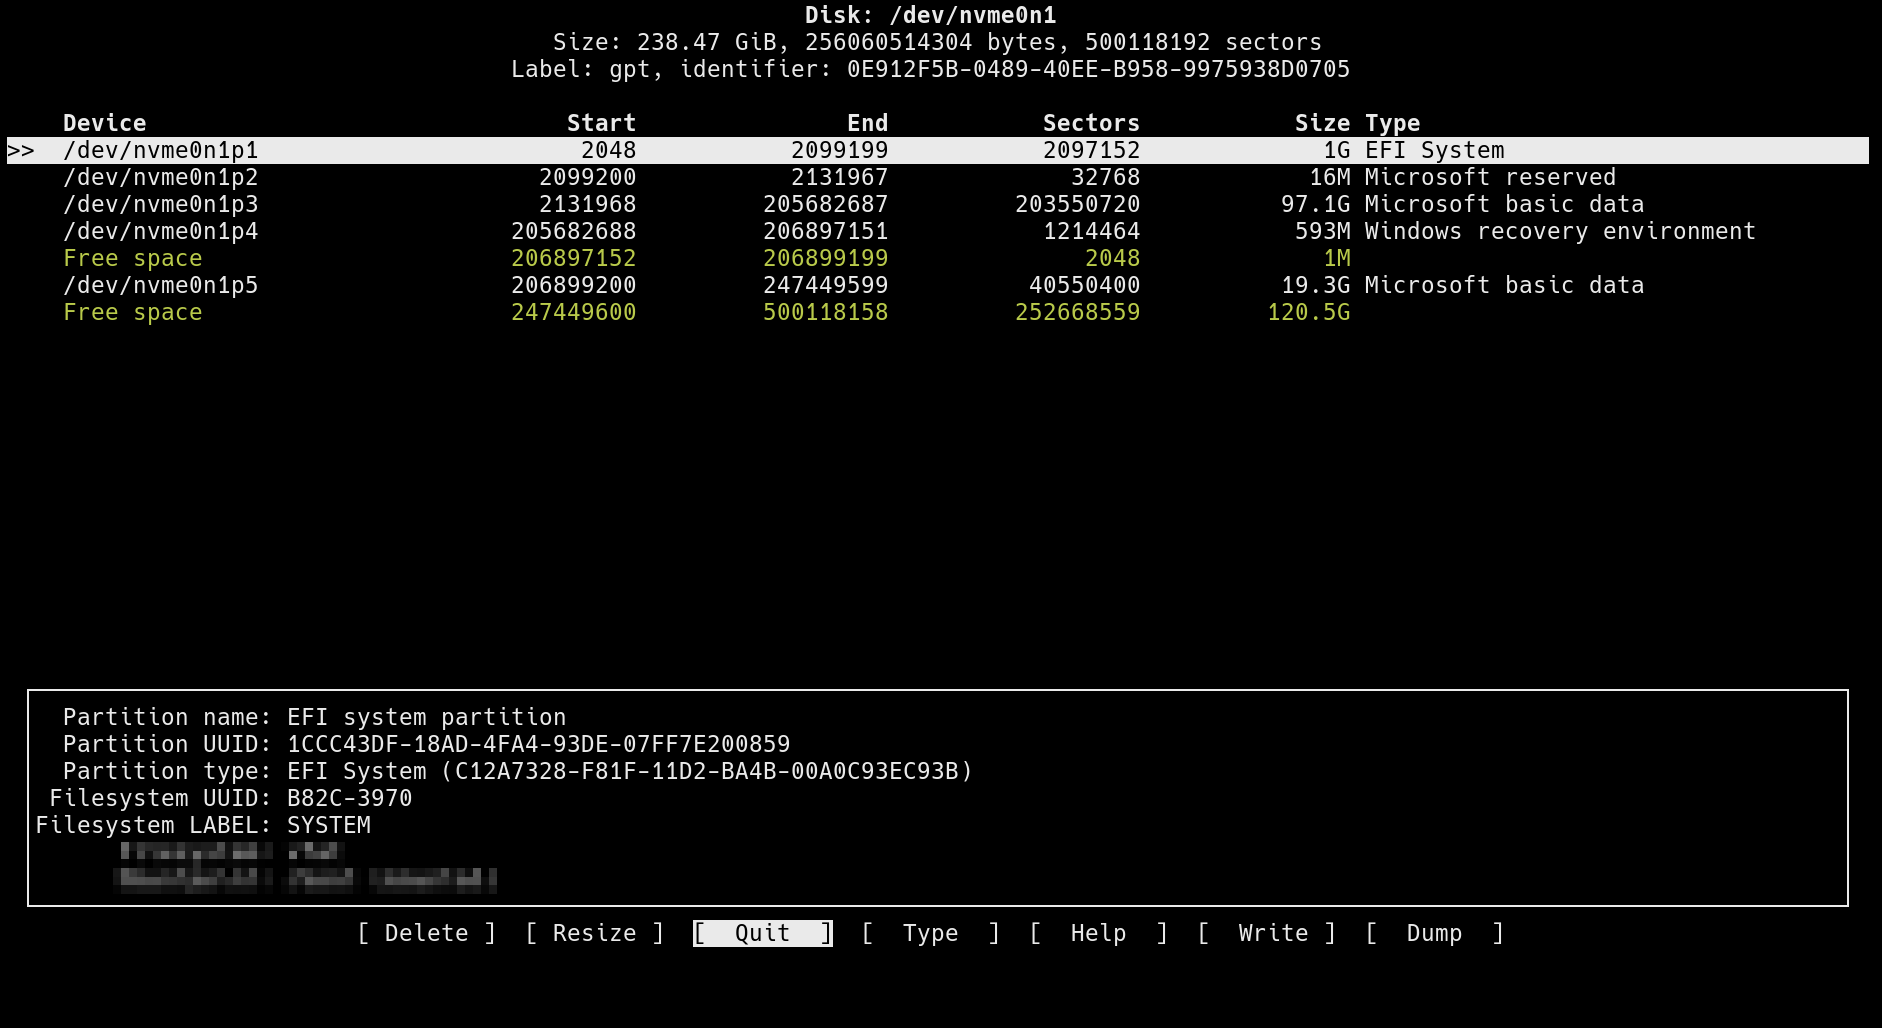
This will open up cfdisk, which is an easy to use TUI application. Use up/down arrow keys to select the unallocated space.
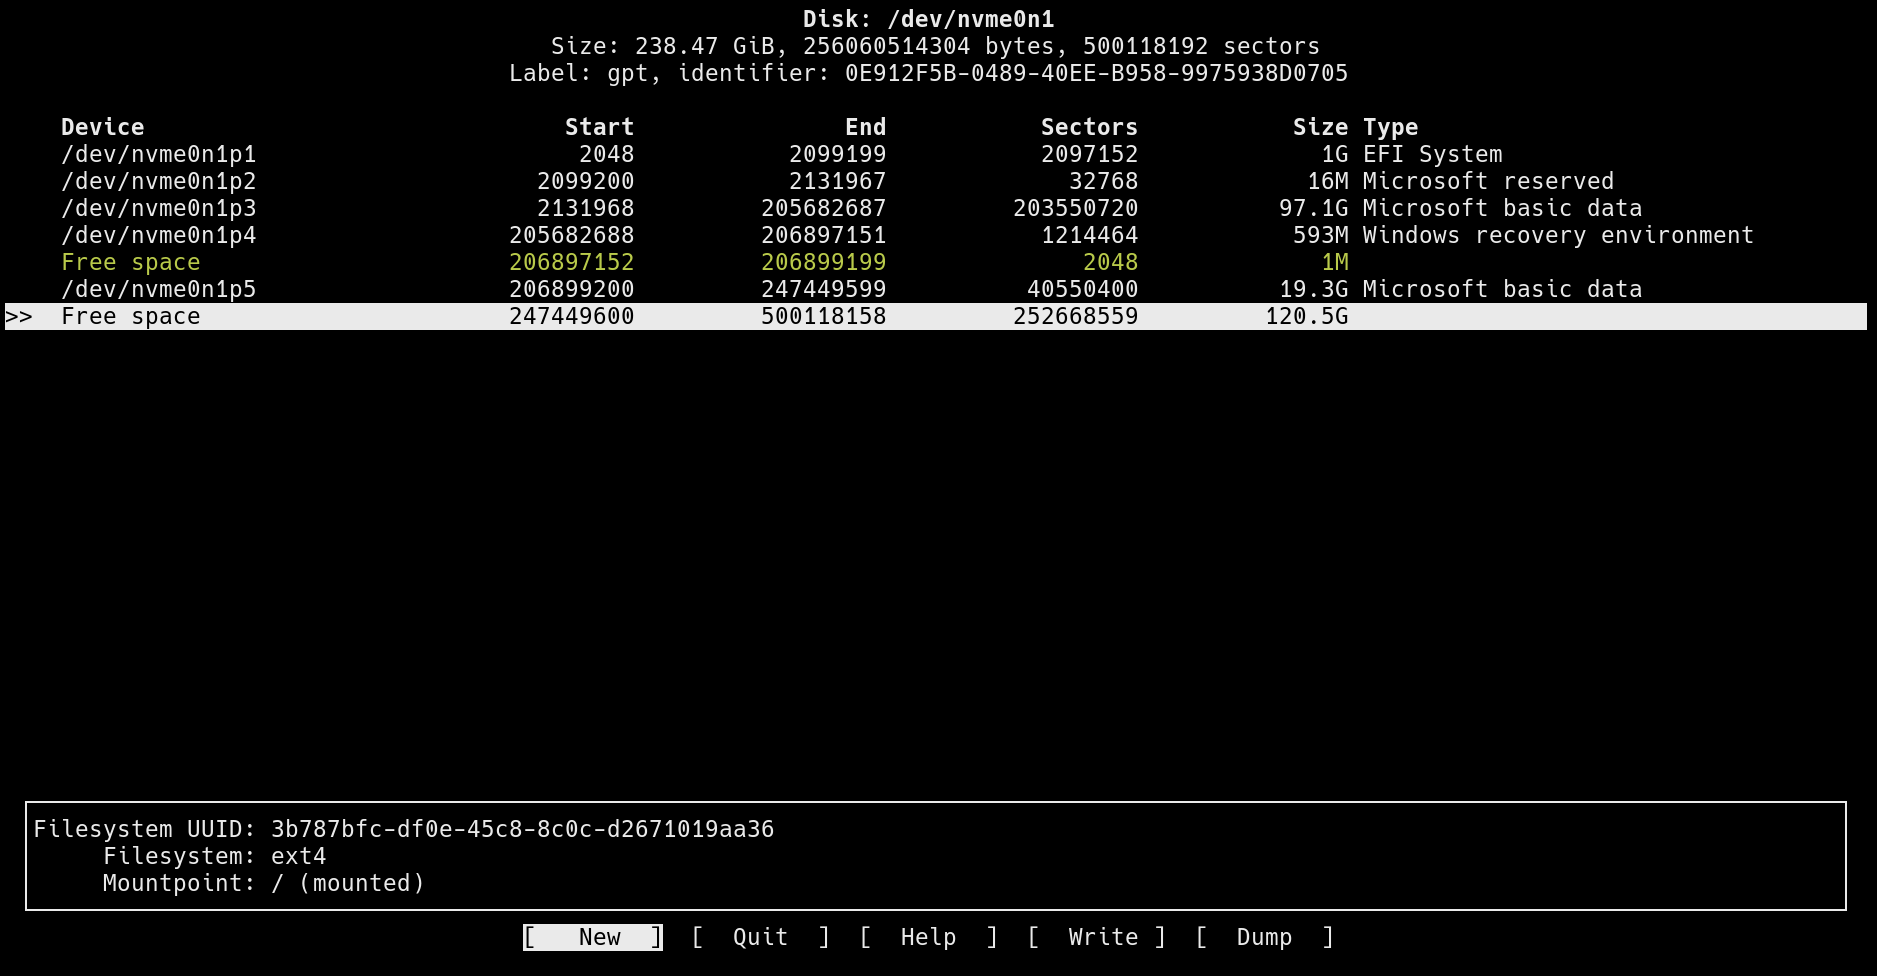
Now use left/right arrow keys to select new and press enter to create a new partition with the remaining space. After you are done partitioning select the Write button and write the changes to disk and Quit cfdisk.
Now the partition should be listed when you run lsblk again.
(Important: you could also use fdisk to create a partition, just make sure to not format the EFI parittion or touch the other partitions)
After creating the root partition, we need to format it with a filesystem type — I’ll make it an ext4 partition.
Run mkfs.ext4 to format the partition with the ext4 filesystem —
$ mkfs.ext4 /dev/nvme0n1p6
(replace nvme0n1p6 with your root partition name)
We could also create a swap partition here if needed, however, a swapfile is usually the better option.
Mount the file systems
The base system is installed on /mnt, which is a mount point that exists in the Arch USB. We’ll mount /mnt to the root partition and create a new directory /mnt/boot in the USB which has the boot partition mounted to it.
You could also use a different path for mounting boot directory. If you do, change it in grub installation command later as well.
Mount the root partition (replace nvme0n1p6 with your root partition) to /mnt
$ mount /dev/nvme0n1p6 /mnt
Mount the boot partition (the one we created in windows, nvme0n1p1 in my case)
$ mount --mkdir /dev/nvme0n1p1 /mnt/boot
Installation
Mirrors
Synchronize the package databases and update the keyring (sometimes keyring can be a issue if the archiso is very old):
$ pacman -Syy archlinux-keyring
Arch linux packages are installed from mirrors defined in /etc/pacman.d/mirrorlist, if the download speed in the above command was slow, it could be an issue related to the mirrors.
We can fix that by updating the mirrors, which you can do either manually or using reflector to automatically update the mirrors.
Install reflector with pacman:
$ pacman -Sy reflector
Backup the default mirrolist:
$ cp /etc/pacman.d/mirrorlist /etc/pacman.d/mirrorlist.bak
Get the latest 6 mirrors sorted by speed and save using reflector:
$ reflector --latest 6 --sort rate --download-timeout 100 --save /etc/pacman.d/mirrorlist
You can also add the -c <Country> flag if you want to, which will only select mirrors from .
Base Install
Use the pacstrap script to install the base and linux packages:
$ pacstrap /mnt base linux linux-firmware base-devel neovim
The above command installs the base group, linux and linux firmware, packages necessary for building and development (base-devel) and neovim (CLI text editor) on the system.
Fstab
Fstab (filesystem table) located in /etc/fstab is a file that keeps track of all the partitions that a distro requires to boot along with their mountpoints.
Generate the fstab file from /mnt and append into /mnt/etc/fstab :
$ genfstab -U /mnt >> /mnt/etc/fstab
Chroot and other configuration
After installing the base group and generating the fstab, we will chroot into the Arch installation and configure some other things like the locale, timezone and bootloader.
Enter the installation using:
$ arch-chroot /mnt
After entering the installation the prompt should change as now you are no longer in the live USB, although installation is not finished yet, you wouldn’t be able to boot until you have setup a bootloader. At this point Arch is technically installed. If you make a mistake or your machine forcefully powers off for some reason, you can continue the installation later. All you need to do is boot into live USB and mount and chroot like before. This can also be handy if you break the installation, since you can always fix the system by just chrooting into it from the live USB.
Update timezone (replace Region/City with your timezone):
[root@archiso]$ ln -sf /usr/share/zoneinfo/Region/City /etc/localtime
(you can use $ ls /usr/share/zoneinfo to find your region and city in case you’re unsure)
Sync system clock to hardware clock:
[root@archiso]$ hwclock --systohc
Generate locale:
[root@archiso]$ locale-gen
Set the LANG variable in the locale.conf file:
[root@archiso]$ echo "LANG=en_US.UTF-8" >> /etc/locale.conf
hostname is a unique name to identify a machine on a network.
Create hostname file and add a hostname:
[root@archiso]$ echo "my-machine" >> /etc/hostname
Give root user a password:
[root@archiso]$ passwd
Follow the instructions and type a password.
Bootloader
Install the bootloader and networking packages:
[root@archiso]$ pacman -S grub efibootmgr os-prober networkmanager wireless_tools wpa_supplicant
grub is the bootloader.
os-prober package is used to detect the other installed operating systems and create their entries in grub.
efibootmgr is a userspace application used to modify the UEFI Boot Manager.
Install grub:
[root@archiso]$ grub-install --target=x86_64-efi --efi-directory=/boot --bootloader-id=GRUB
This installs the grub on /boot which is mounted on nvme0n1p1, our boot partition. If you chose a different mount point for boot partition, replace /boot with your mountpoint (without /mnt).
Enable os-prober on grub:
By default, os-prober is disabled in the grub config, hence it won’t detect Windows. When generating config in next step, you’ll get a warning saying os-prober is disabled. Simply uncomment/add GRUB_DISABLE_OS_PROBER=false in /etc/default/grub.
Generate grub config:
[root@archiso] grub-mkconfig -o /boot/grub/grub.cfg
Here grub will generate the config and write it to grub.cfg. Make sure Linux and Windows both are detected here.
Enable network manager service:
[root@archiso] systemctl enable NetworkManager && exit
Reboot
exit from the chroot, unmount /mnt, and restart the system
$ umount -R /mnt && reboot
If everything went well, then you should now see a grub window on boot.
Post Installation
We haven’t created a user yet, so login with root user and then create a user :
User (with superuser)
Create user with wheel gropu (replace username with name)
[root@alok-pc]$ usermod -mG wheel username
Give a password to user:
[root@alok-pc]$ passwd username
Add user to sudoers file:
Uncomment %wheel ALL=(ALL:ALL) ALL from
[root@alok-pc]$ EDITOR=nvim visudo
save and exit.
Congratulations — you’re now the owner of a dual-booting machine! So far!
You will learn everything you need to know about dual-booting Linux and Windows.
I assume you already have Windows installed on your computer and you only need to install Linux to dual boot. This post will guide you through the following key points of the dual boot installation:
- Essential BIOS settings for successful dual boot.
- How to shrink your Windows partition to get free space for Linux.
- How to install Linux, using Linux Mint as an example.
- How to set the boot order in your computer to see the menu where you can choose between Linux and Windows to boot.
- Finally, I will explain why I am not a fan of dual-booting and why I recommend using Windows in a virtual machine as I showed in this post.
*NOTE: Before you apply any actions from in this post, please back up all your important data.*
BIOS settings
Unfortunately, most of the computers have BIOS configured specifically for Windows, and likely you won’t be able to install Linux on it without changing some settings. BIOS interface may differ from one computer to another but the main settings are the same.
I will use the BIOS of my Acer Swift 1 laptop as an example here.
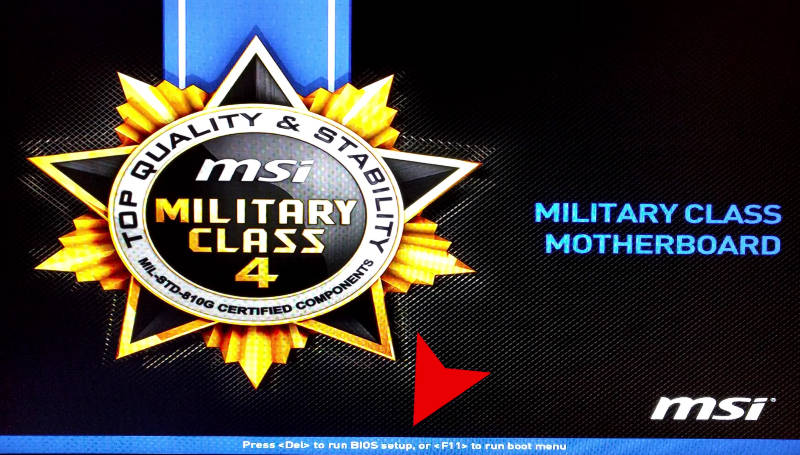
Get into BIOS
First, you need to get into BIOS, usually, you just need to press a specific key during the boot. In my Acer Swift 1, I press F2. Just google your computer model and bios key term, and you will find the key you need to press. Sometimes, you may also see it on the screen during the boot:
Set the BIOS password
Next, you may need to set a password in your BIOS because it won’t allow you to change any security settings without a password. This is the menu to set the password on my Acer Swift 1:
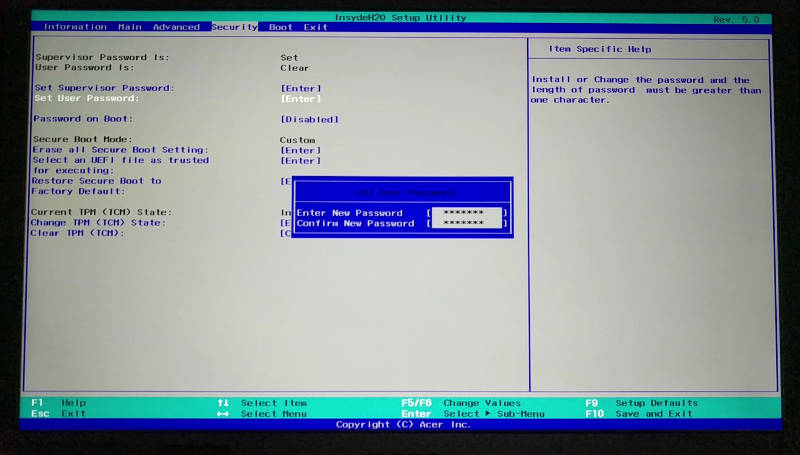
You should be able to find the same in your BIOS. It is also possible that you can proceed without setting a password.
Disable Secure booting and change the Boot order
Next, you need to go to the Boot menu and disable Secure booting and move your bootable USB flash drive to the first place in the boot order:
Check this description of the commands on the right or bottom of your BIOS interface, it explains how to navigate and change options in your BIOS.
I am not going to stop here on how to create a bootable USB drive. I have already explained how to create a bootable USB from the command line or using graphical programs.
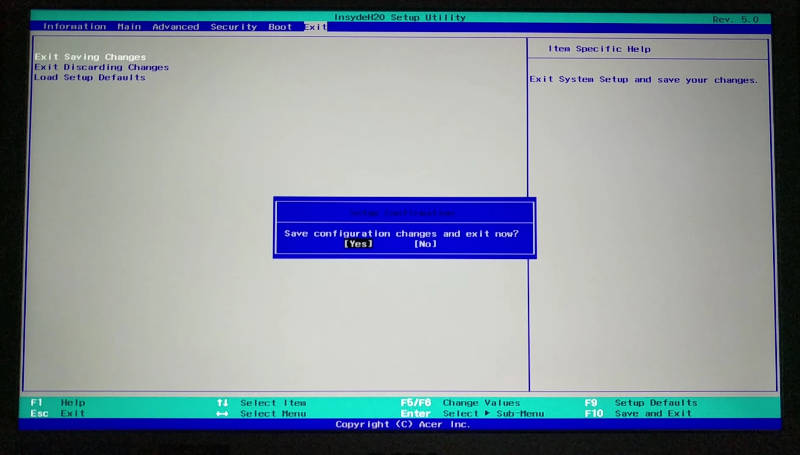
Save BIOS settings
In the end, go to the exit menu and exit BIOS with saving the changes:
If you have done everything correctly, you should boot in your Live USB Linux system:
Get free space for Linux
Boot into Live Linux session
Boot from the Live Linux USB. I will use Linux Mint installer as an example here, if you use Ubuntu or any Ubuntu-based distro, the process will not differ at all. If your distro is not Ubuntu-based, you still need to do the same steps as you will see in this post but the installer may look slightly different.
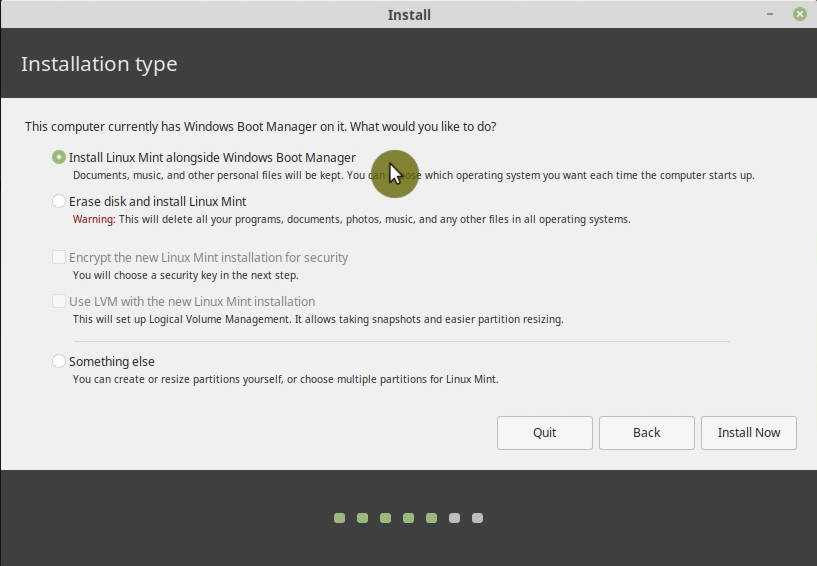
To install Linux alongside Windows, you can actually select such an option in the installation wizard:
It will automatically find free space on your hard drive and install Linux there. However, if you want to have little more control over how much space you allocate to Windows and Linux, you can get free space and assign it for Linux manually.
Shrink the Windows partition with GParted
Most of the Linux distros have GParted included in a Live ISO. If it is not, install it from the Software Center. Then open GParted and select the hard drive with your Windows installed:
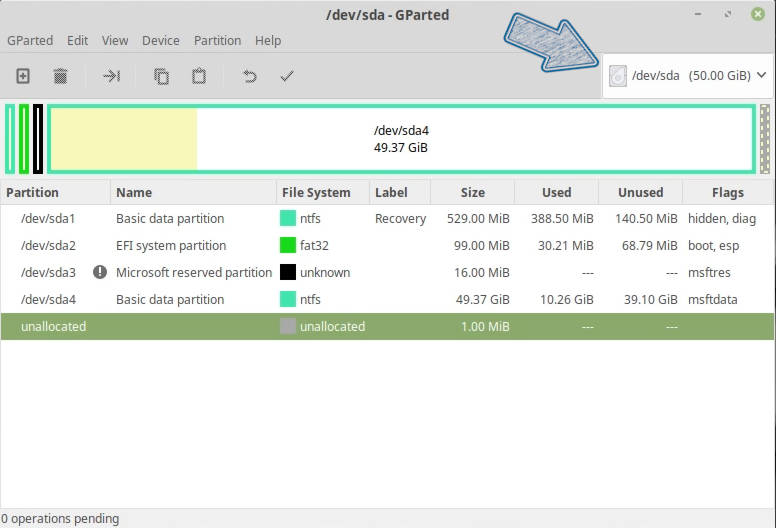
Your Windows hard drive will be partitioned similarly to the one you see above. Most likely it will have the EFI partition, and this means you need to install Linux in the EFI mode too.
To shrink the Windows partition to get free space for Linux, you need to select the largest partition, click on the Partition menu in GParted, and select resize.
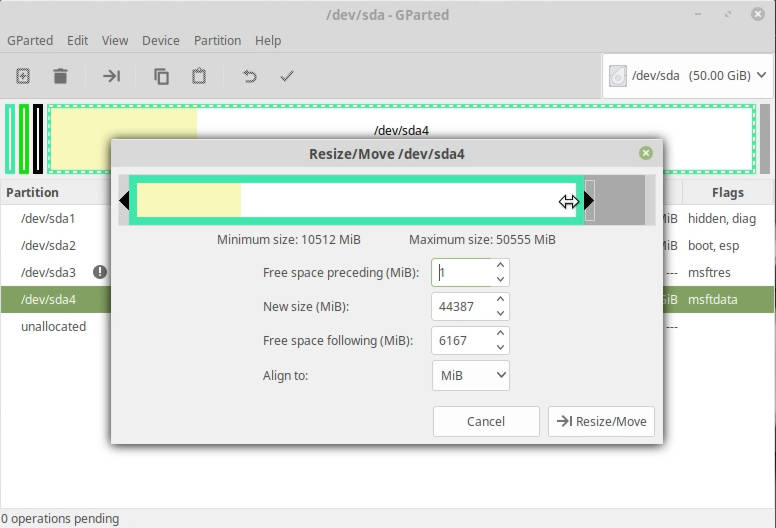
All white space is free space. So, you can shrink this partition with your mouse, or by selecting its size precisely with the number. You can take a maximum of free space for Linux if you aim to use mainly Linux, but leave some free space for Windows too, because it may not be able to work without free space left.
Click resize. Read this warning to know the risk and click OK. You will see how your partitions will look like after you apply the resizing:
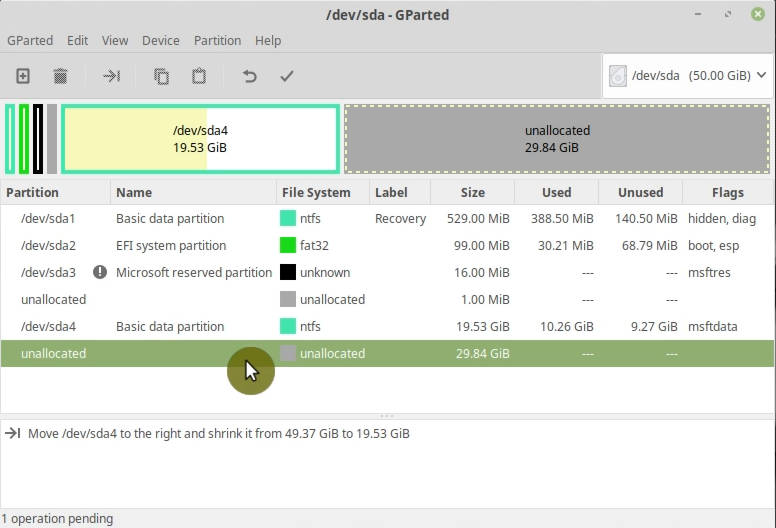
So far, no changes to your hard drive have been applied. It is only a plan of action. You still can cancel everything, if you have done a mistake somewhere. However, if you are happy with this partition table. Click apply. This action will be irreversible.

Resizing will take some time. Hopefully, it will finish successfully and you can proceed with the installation.
Install Linux
To install Linux, click on the Install icons on your desktop or in your menu.
The installation process is pretty standard.
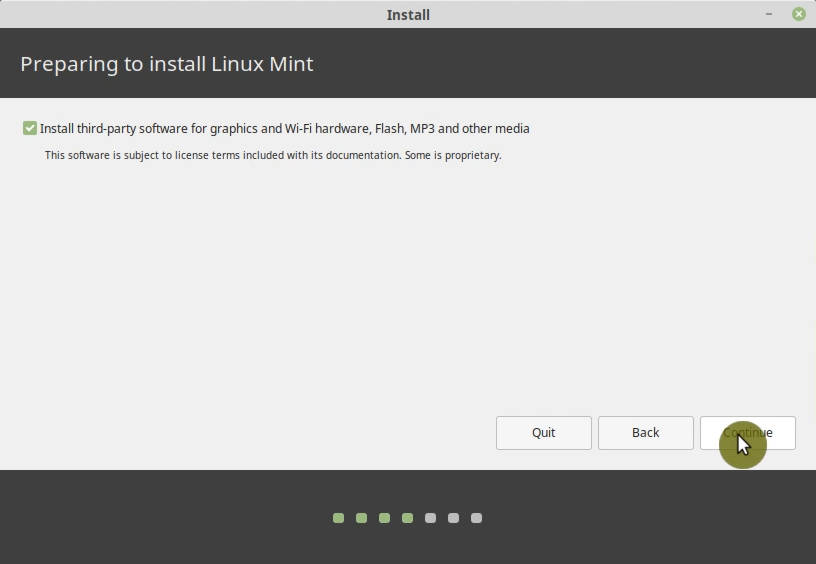
I recommend to include the third party software in the installation:
Select Manual partitioning
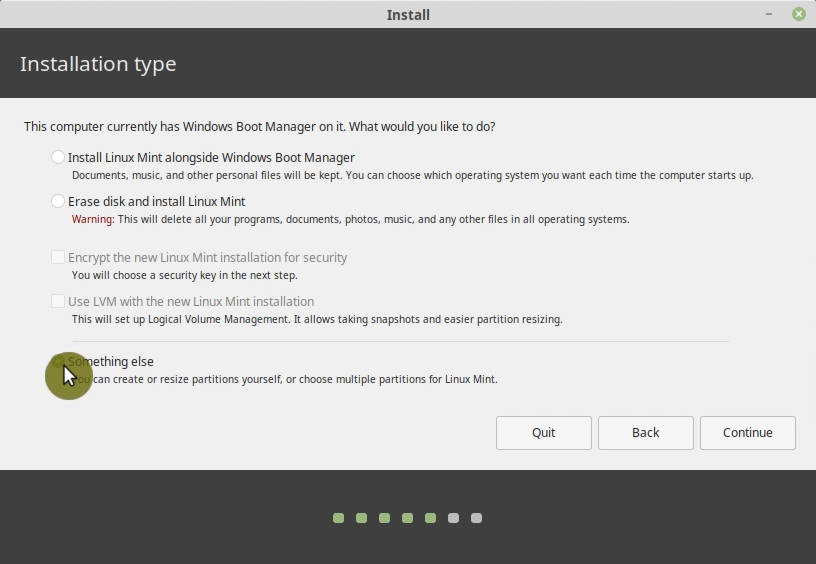
As I mentioned before, you can select the option to Install Linux alongside Windows automatically, but I personally prefer the manual way. That’s why we shrank the Windows partition and released some free space for Linux. Manual way not only gives more control but it also helps to understand what happens to your system when you install two systems alongside each other. So, select Something else here:
Create Linux Partition
The new screen will show you the partitions of your hard drive. You need to select the free space we have created in the previous step. Then click on the add sign, to create a Linux partition in this free space:
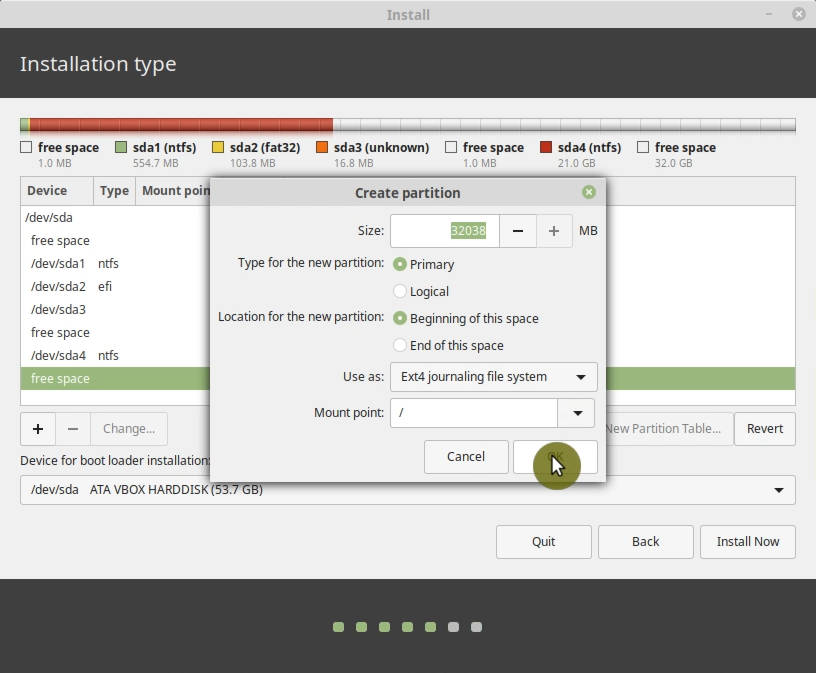
You can keep all the options at default here but importantly you need to assign / as a mounting point to this partition.
You can also split this free space into two parts and assign one to the system / and one to /swap. But I believe it is much better to use a swap file instead. Ubuntu installer creates a swap file by default.
I already explained the difference between a swap file and swap partition previously.
Check the EFI partition
Next, you need to select the EFI partition, it is usually of several hundred megabytes in size. Make sure it is detected as EFI:
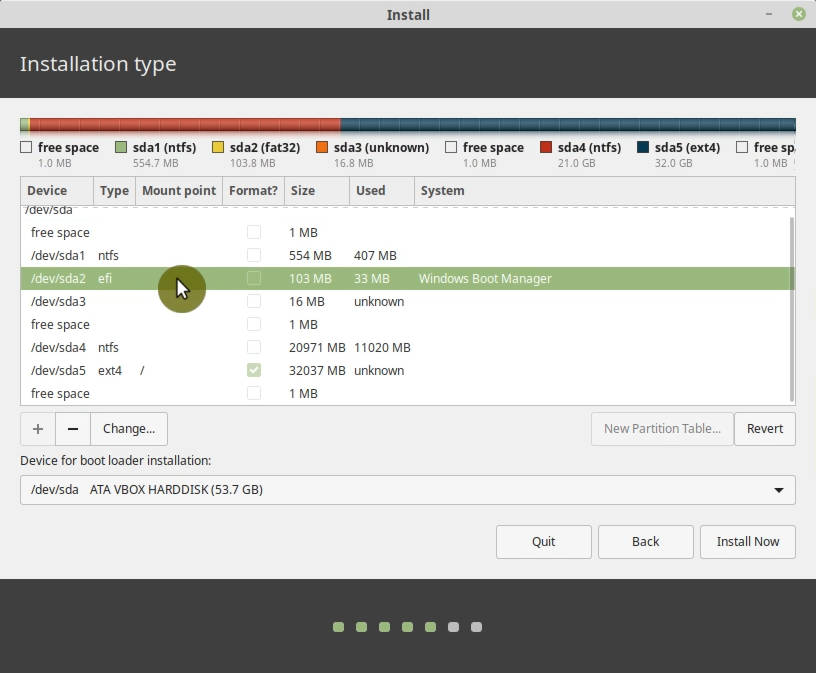
Boot loader installation
Boot loader installation doesn’t matter here because it will be UEFI installation, so the boot loader will be installed in the EFI partition. You can keep the default selection.
Format column
Finally, check that only the new Linux partition will be formatted in the Format column. Because if you have other partitions selected for formatting, be careful you will lose all the data stored in those partitions. If everything is fine, click Install.
Finalize the installation
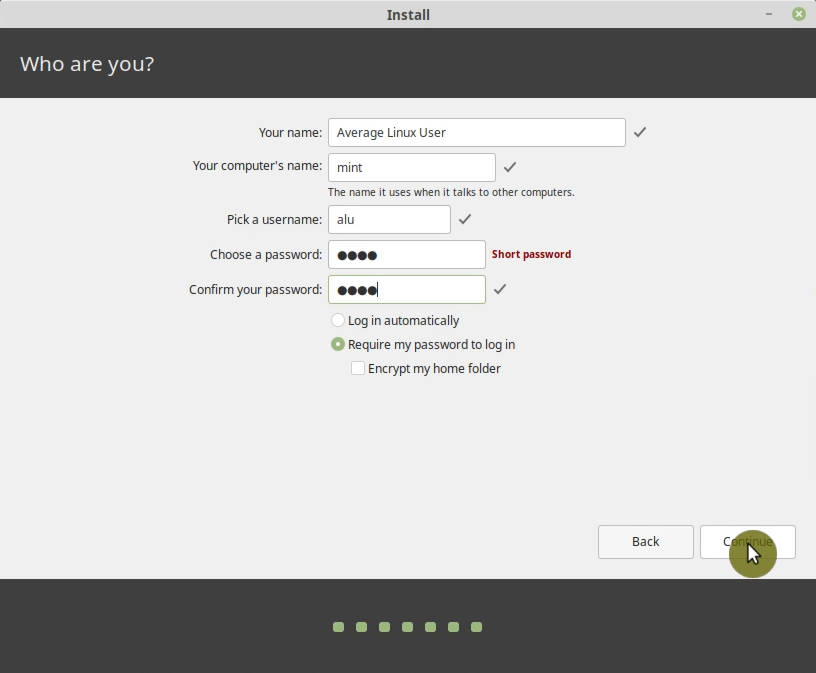
While the system is installing, select your location, provide your user information, set the password, etc.:
And then just wait until the system is installed.
After the installation, reboot the system and do not forget to remove your installation USB when you are requested to do so:
Boot into the new system
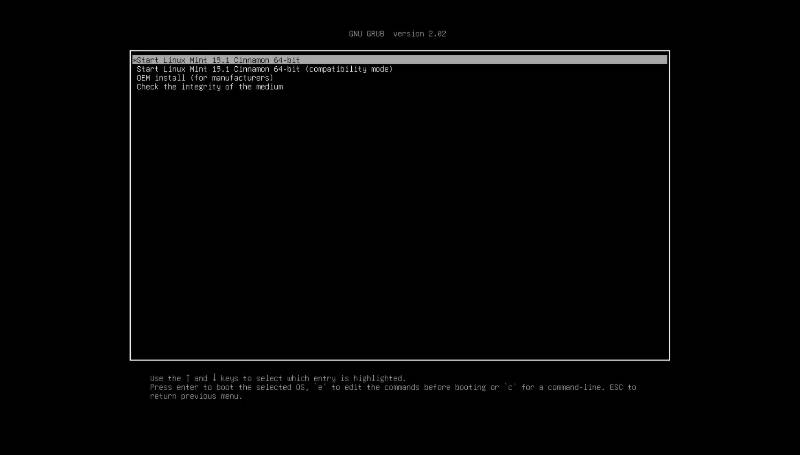
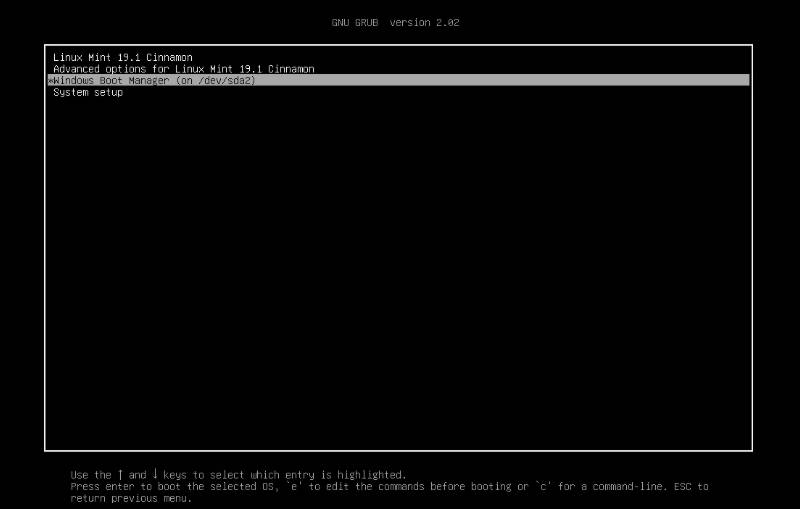
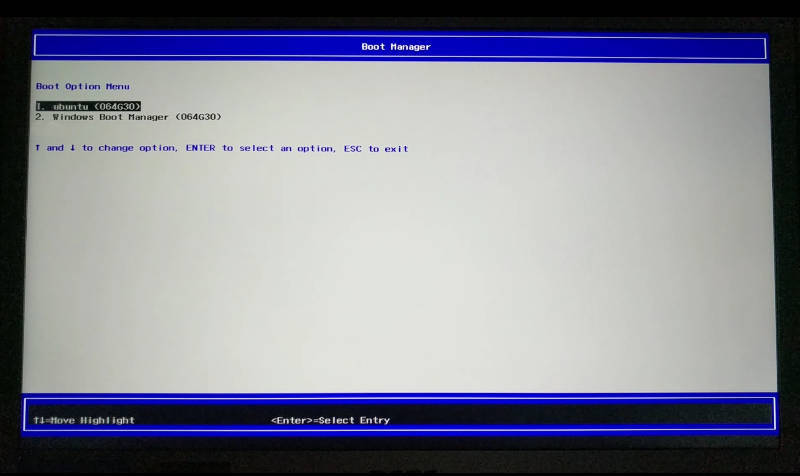
You should see this GRUB menu after the reboot. Here you can select between Linux, which will boot by default in 10 sec, and Windows:
Boot options in BIOS
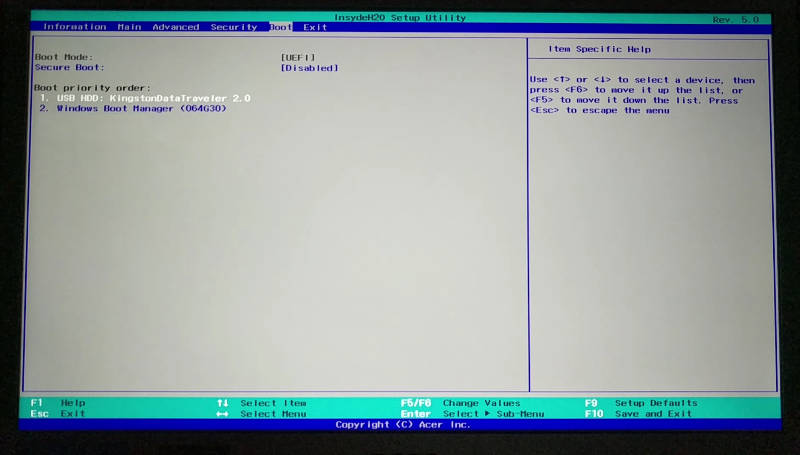
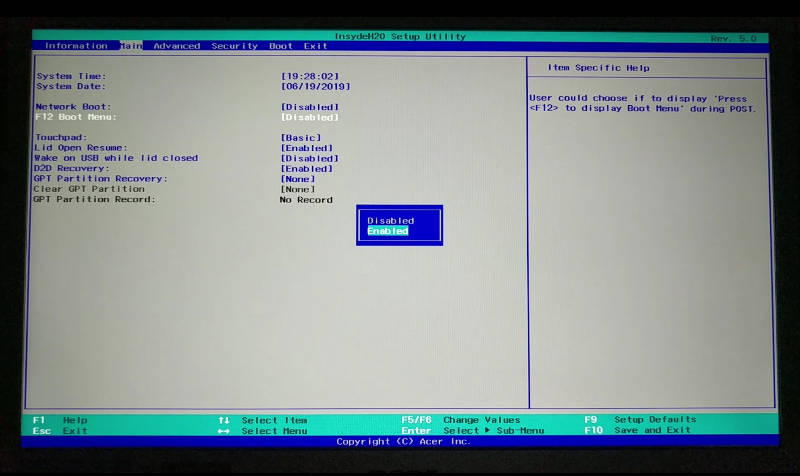
If it happened that after the reboot, you booted directly in your Windows and you did not see any Linux menu, do not get upset. Likely, you have done everything right and you just need to change the boot order in your BIOS. Like I had to do in my Acer Swift 1.
In the Main tab, find the Boot menu and enable it:
Change the Boot order
Then go to the Boot order and you should see an additional boot option there that appeared after you installed Linux. In my case, it is still called Windows Boot Manager without the code in brackets. This is actually my Linux boot file. I do not know why BIOS branded it as Windows. So, I make it a first boot option:
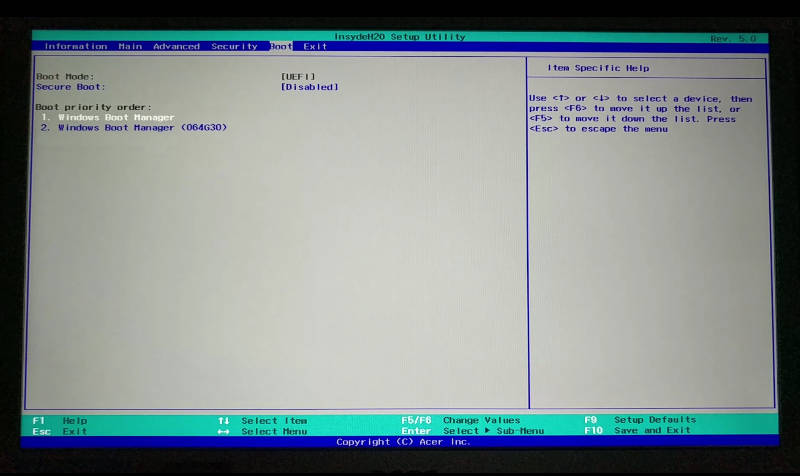
And save the BIOS changes. After the reboot, you should see the GRUB menu with the choice of boot options.
If you still boot into Windows by default, try to open the boot menu during the start of your system by pressing the F12 key (or whatever key is assigned to your BIOS Boot menu). It should bring this BIOS boot menu:
Where I can choose Ubuntu and my Linux Mint will boot. So, the BIOS Boot menu helps to make sure that Linux works, you just need to check your boot order settings, maybe Linux is not the first option there. Try different orders until you get Linux booting the first.
Why I do not recommend dual-booting
There are three main reasons I stopped dual-booting and this is also why I do not recommend dual boot.
-
If you use Windows in dual boot, it is possible that some updates of Windows may break your Linux installation. Theoretically, it should not happen, but it happens. Maybe Windows changes the Linux bootloader in the UEFI partition. I do not know.
-
If you dual boot, you will never switch to Linux. If you are used to Windows, you will tend to boot into Windows more often and you won’t like to reboot to get to Linux. So, you will not use Linux much and thus will never switch to Linux completely.
-
On the other hand, if you prefer Linux, Windows will just take too much space on your hard drive that is never used. So, this is not good either.
I recommend using Windows in a Virtual machine such as VirtualBox. This way your Windows can be accessed from within Linux. Windows will be less powerful than if it was installed in dual boot, but you still can do most of the things you would normally do. A virtual machine also isolates your Windows file system and this provides better protection against viruses. You can read my post on how to install Windows 10 in VirtualBox and maybe you will like that option more than dual-booting.