In this article, we are going to learn how can you dual boot windows 10 and Linux Mint and switch between them as per your needs. Although it is laced with many features, Linux isn’t perfect yet. You still might need your Windows installation because of some proprietary software programs or games that just cannot run on Linux.
Note: This only works if you install Windows 10 first, or you already have a Windows installation on your hardware first. You cannot install Linux Mint first and then Install Windows, Windows installer will simply remove your Linux Installation.
Let’s get right into the steps to dual boot windows 10 and Linux mint on your system. You can replace Linux Mint with Ubuntu and follow the partitioning section below.
1. Download Linux Mint ISO.
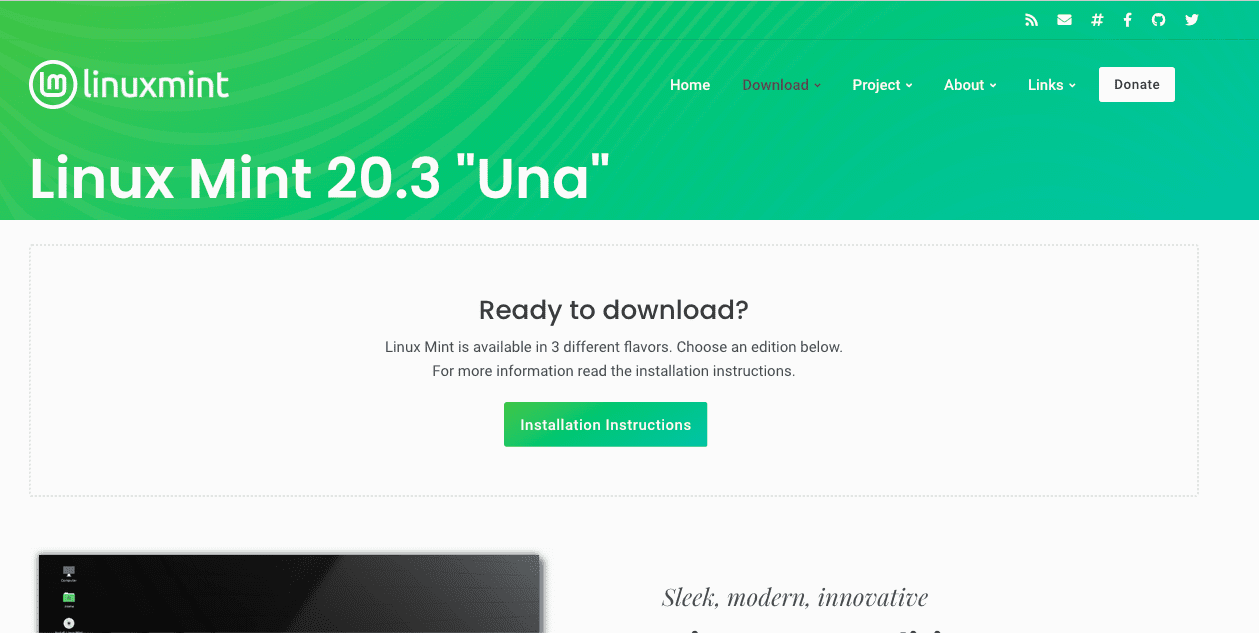
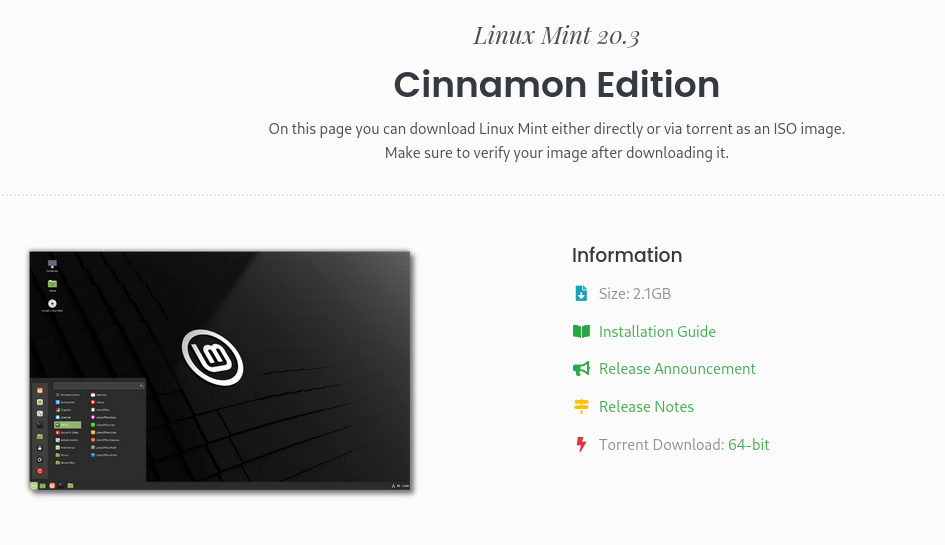
Go to Linux Mint’s official website, and download the edition of Mint that you prefer. No matter which edition you pick, the installation method will be the same. For the sake of this tutorial, I’m using Linux Mint – Cinnamon edition.
2. Create a bootable USB stick using Ventoy.
Pick any USB drive of at least 4 GB capacity and make sure that you have no important data in it, as this process will erase it. From Ventoy’s official GitHub page, download the latest version of the Ventoy-Windows.zip file.
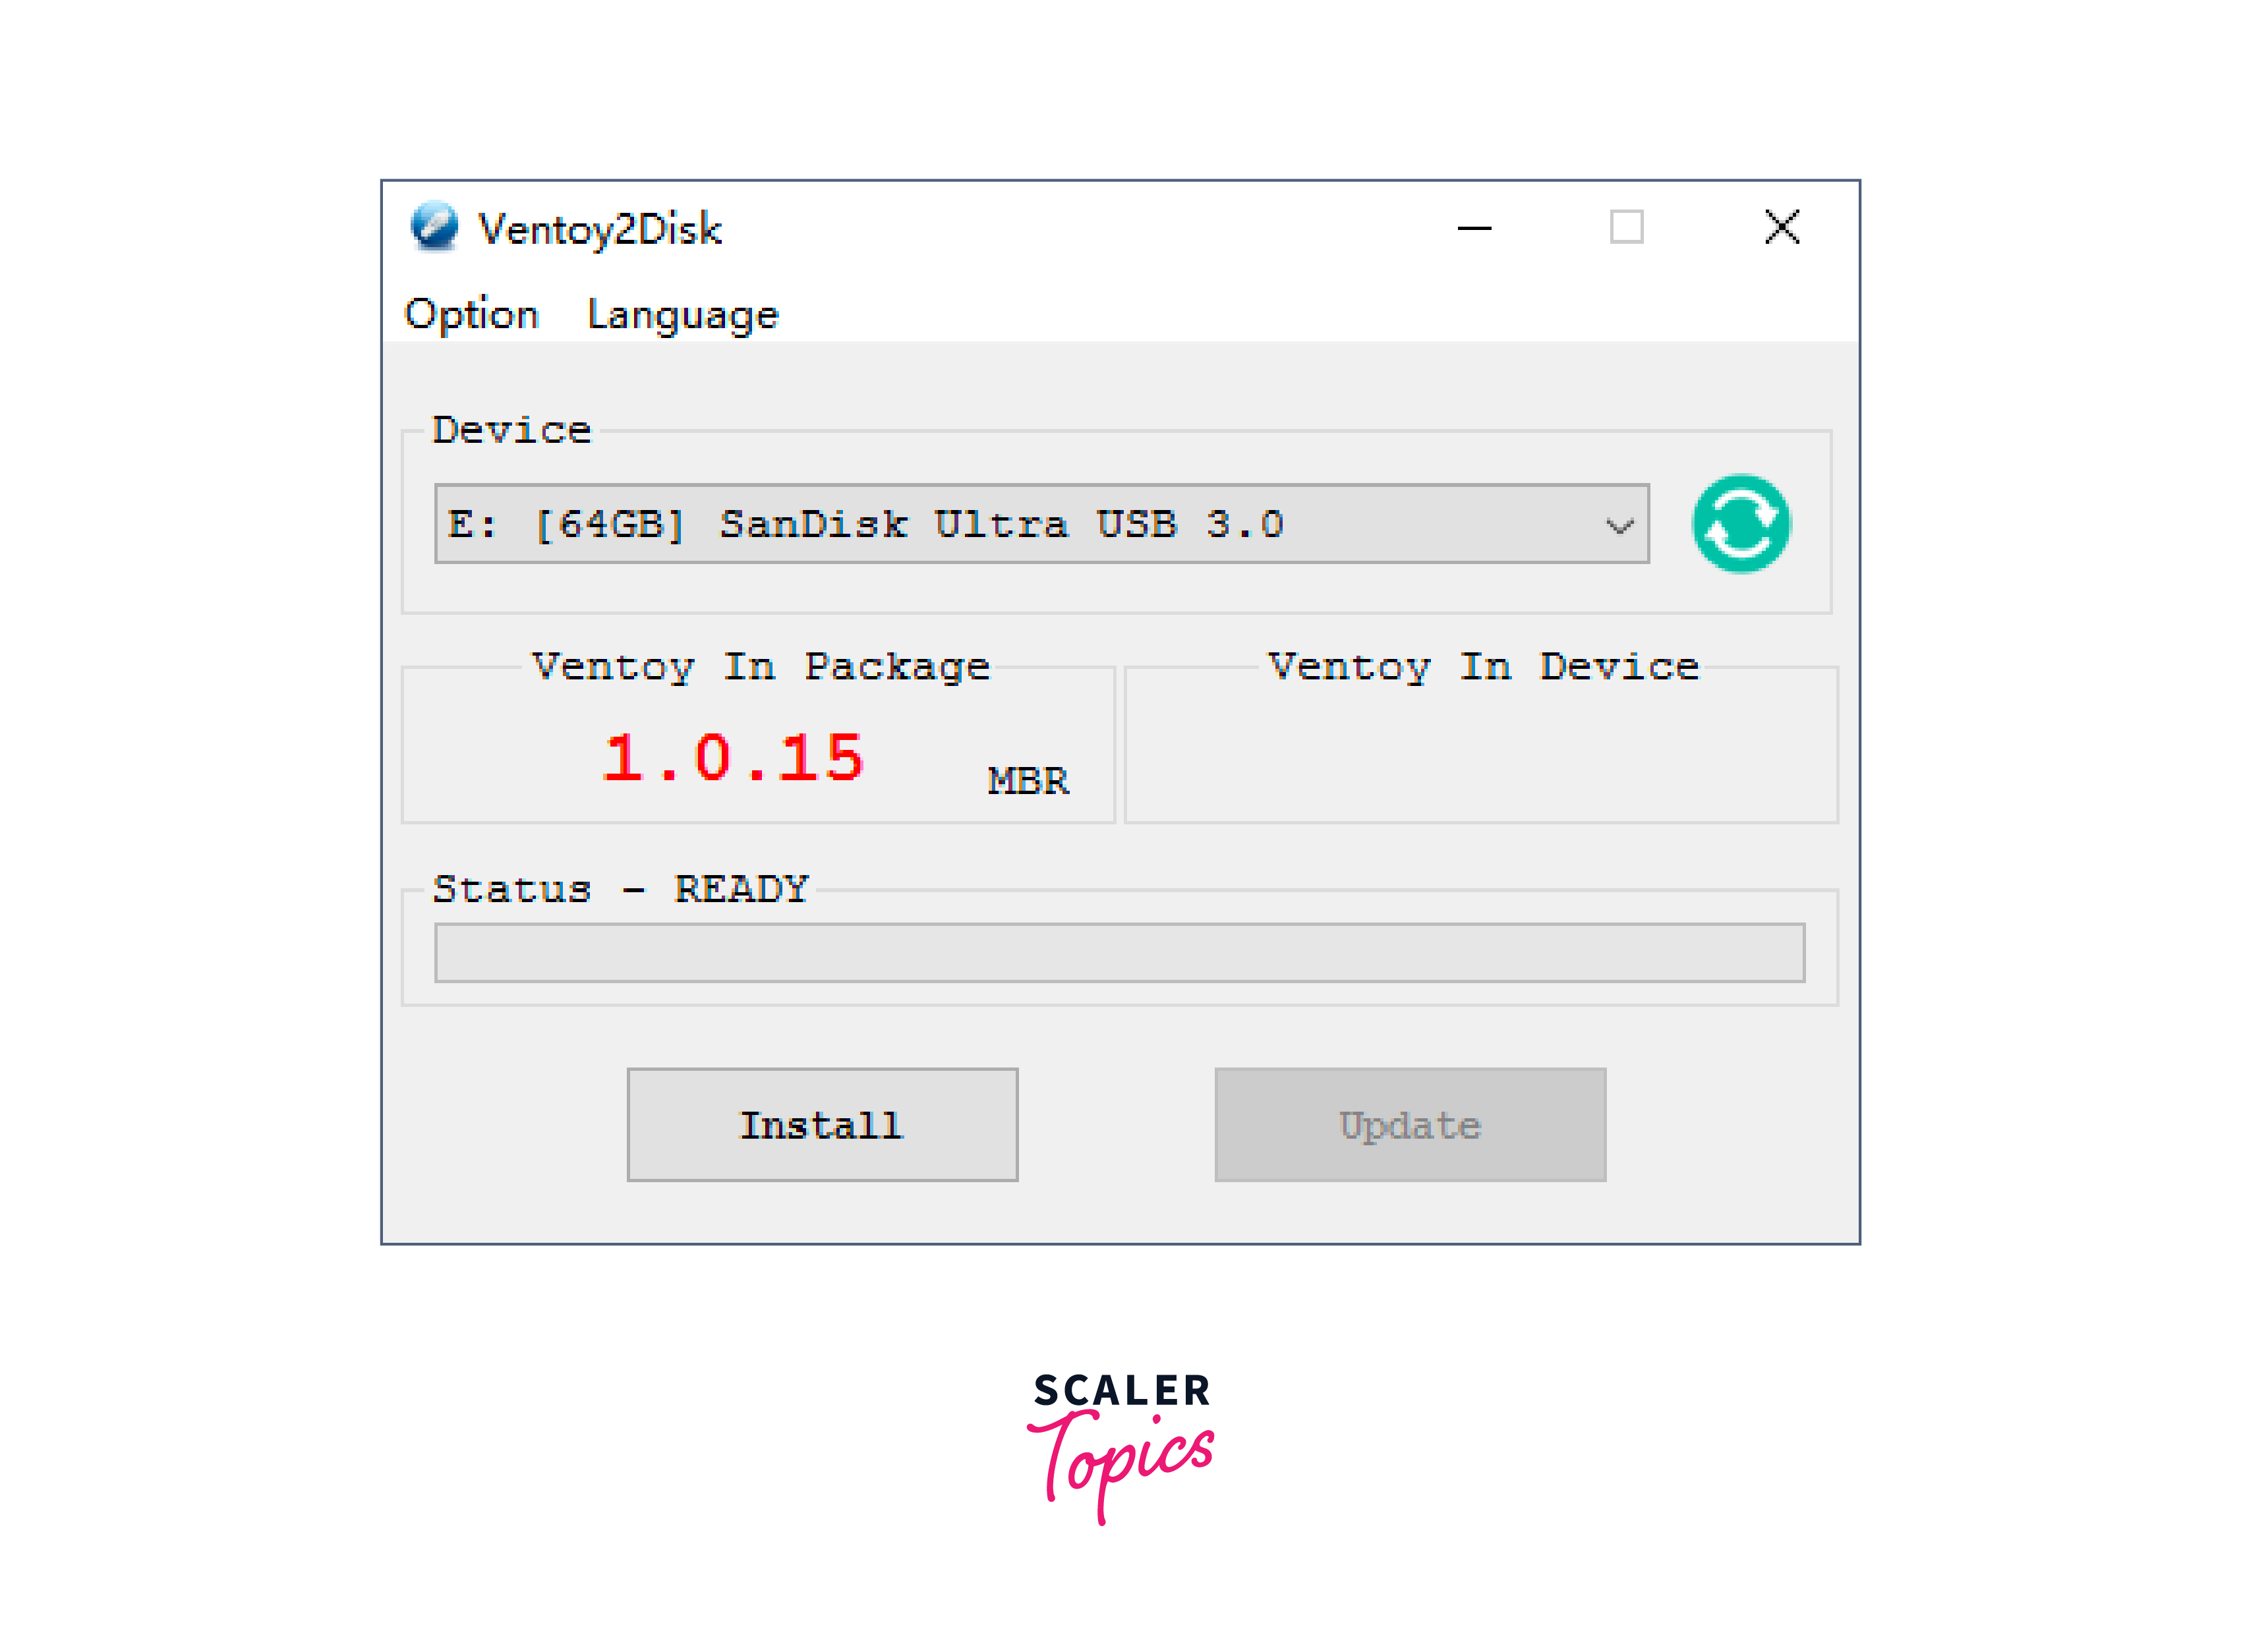
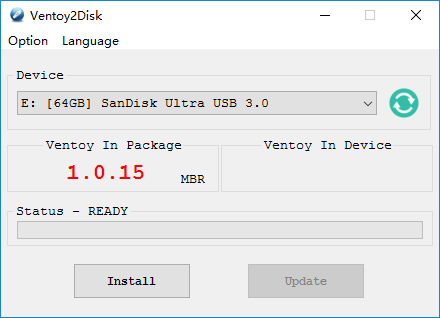
Open your downloads folder and extract it there. Now, insert your Flash drive and open Ventoy2Disk.exe. Make sure that your USB stick is selected, if not, click on the refresh button, Now click on install.
3. Transfer the ISO file to the Flash Drive
Navigate to your Downloads folder and look for the Linux Mint ISO you just downloaded. Copy the ISO using Ctrl + C, now navigate to the Ventoy USB and simply paste it there by pressing Ctrl + V.
4. Disable Secure Boot
Check your Laptop/Motherboard manufacturer website for the key you need to press to access the BIOS menu. It is different for each manufacturer. Don’t worry if you can’t find it, it’s usually one of these keys – DEL, Esc, F2, F10 or F12.
Restart your PC and press the key which will lead you to the BIOS menu when the manufacturer logo comes on the screen. Navigate to ‘Boot Options’ using the arrow keys on your keyboard and there, disable ‘Secure Boot’, and using the F5 & F6 keys, change the boot priority order so that your Ventoy USB will be on top and hence booted first. Press F10 key to save and exit.
Now, on the next screen, select Linux Mint and press enter. In a few seconds, you will be greeted with Mint’s Cinnamon desktop interface
5. Free Up Space
Now, before we proceed to the installation, press the ‘Super’ key (or Windows key) on your keyboard look for software named GParted, and launch it. We have to free up some space where we will install Linux Mint.
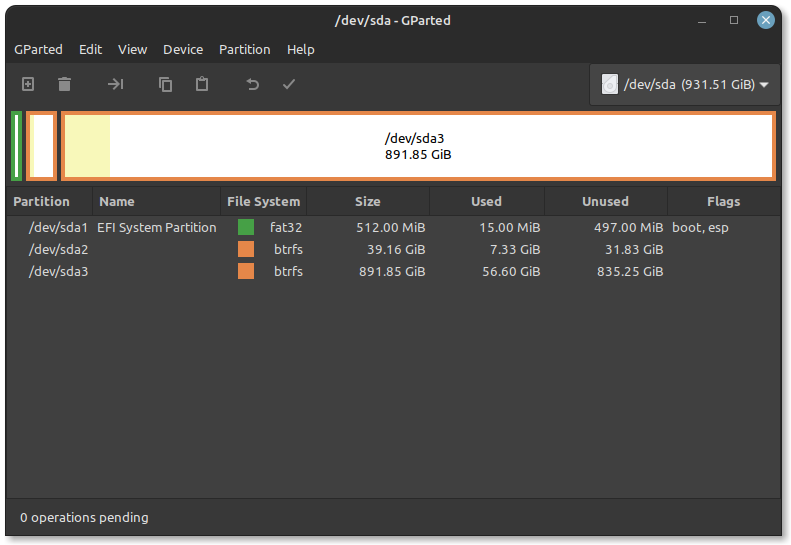
Select any partition and right click, resize your other partition so that you have at least 50 GB – 60 GB of unallocated disk space.
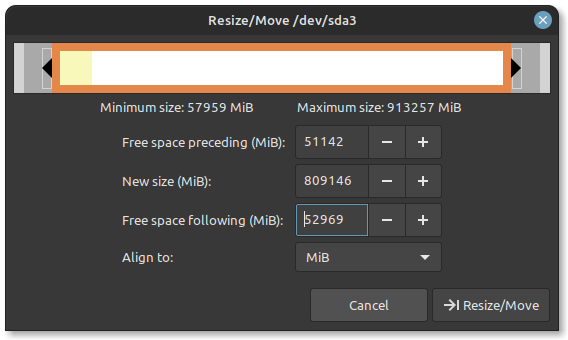
Click on Resize and hit apply changes, this process will take some time if the partition you are shrinking has any Data on it. Although not always, this process can corrupt your files.
When the process is complete, close GParted. Now we are ready to install Linux Mint on your device alongside Windows.
6. Begin Installation
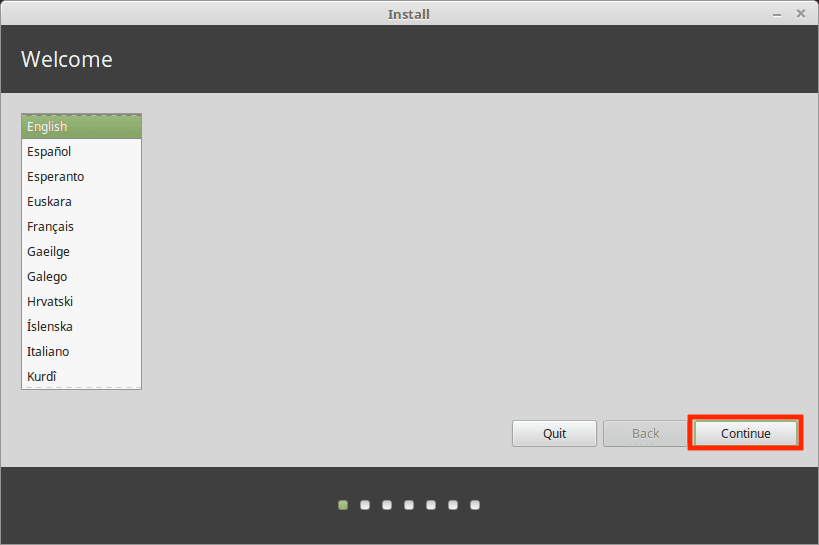
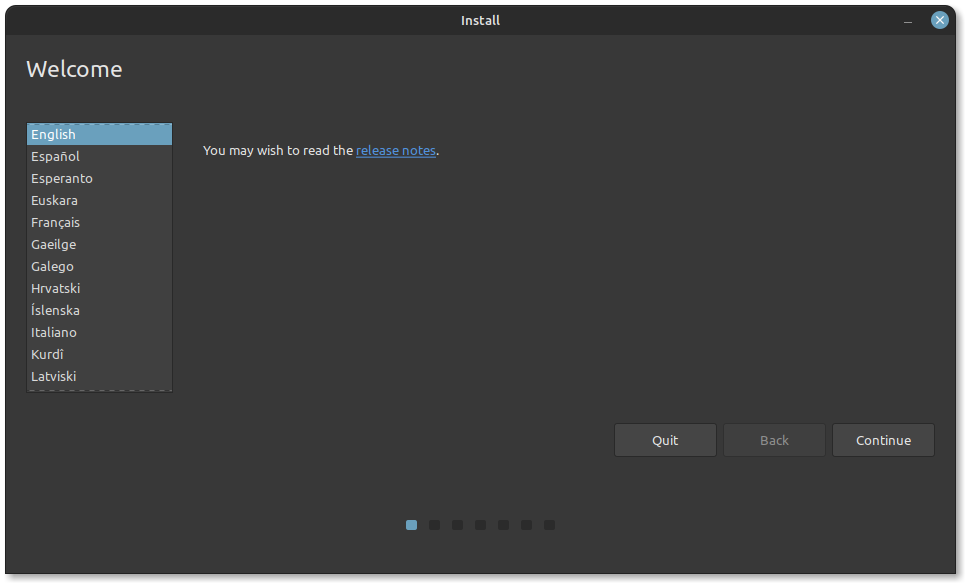
Launch the Installer, select your Language and hit continue.
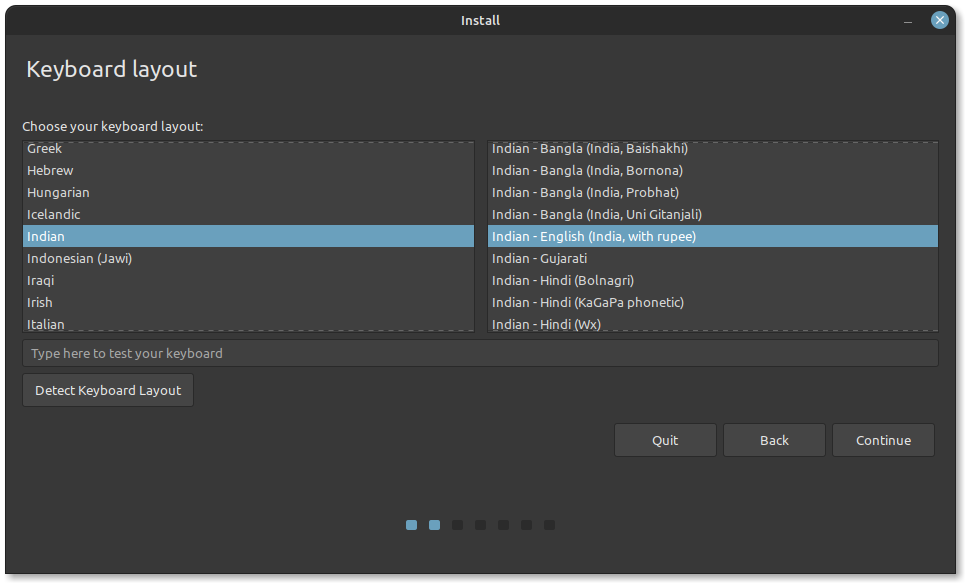
On this step, you need to select your keyboard layout.
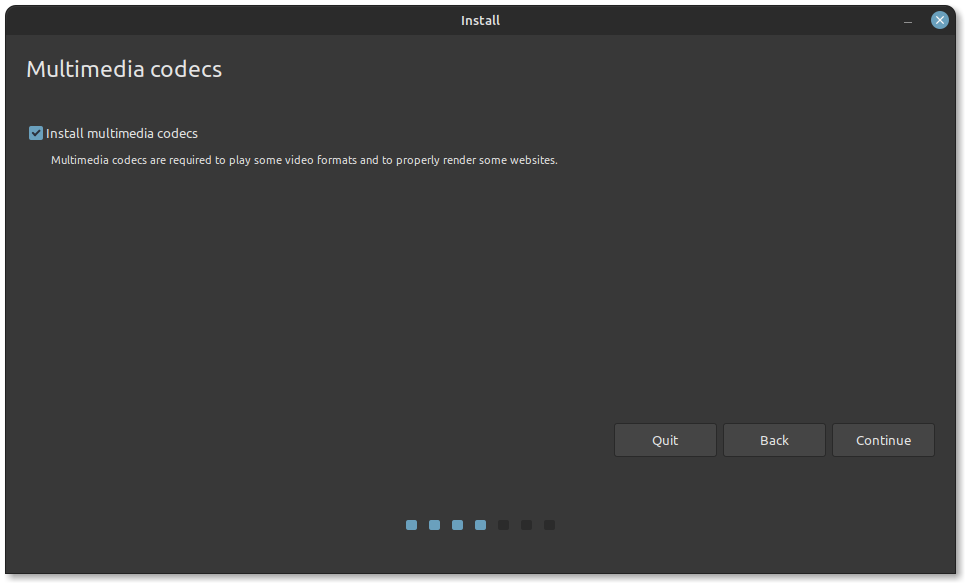
If you are connected to the Internet, the Installer will give you an option to Install Multimedia codecs, click on the checkbox and hit continue.
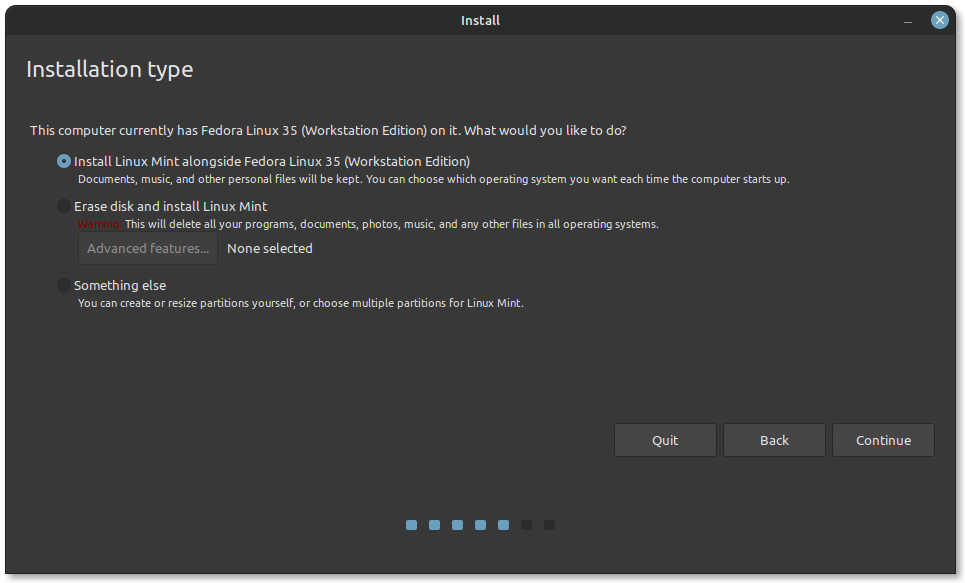
In this step, if the installer detects your Windows installation, then great! Just hit continue, select the unallocated space we just created, and click on the Install button.
7. Drive Partitions For Dual Boot
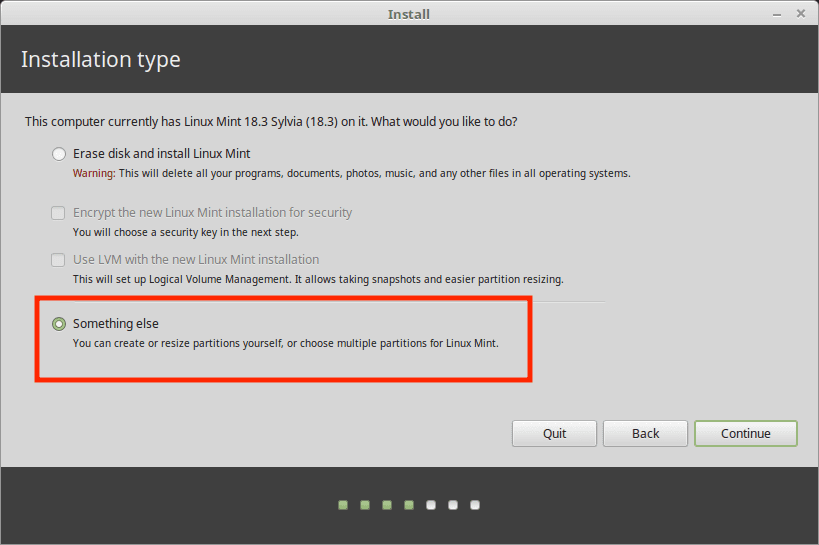
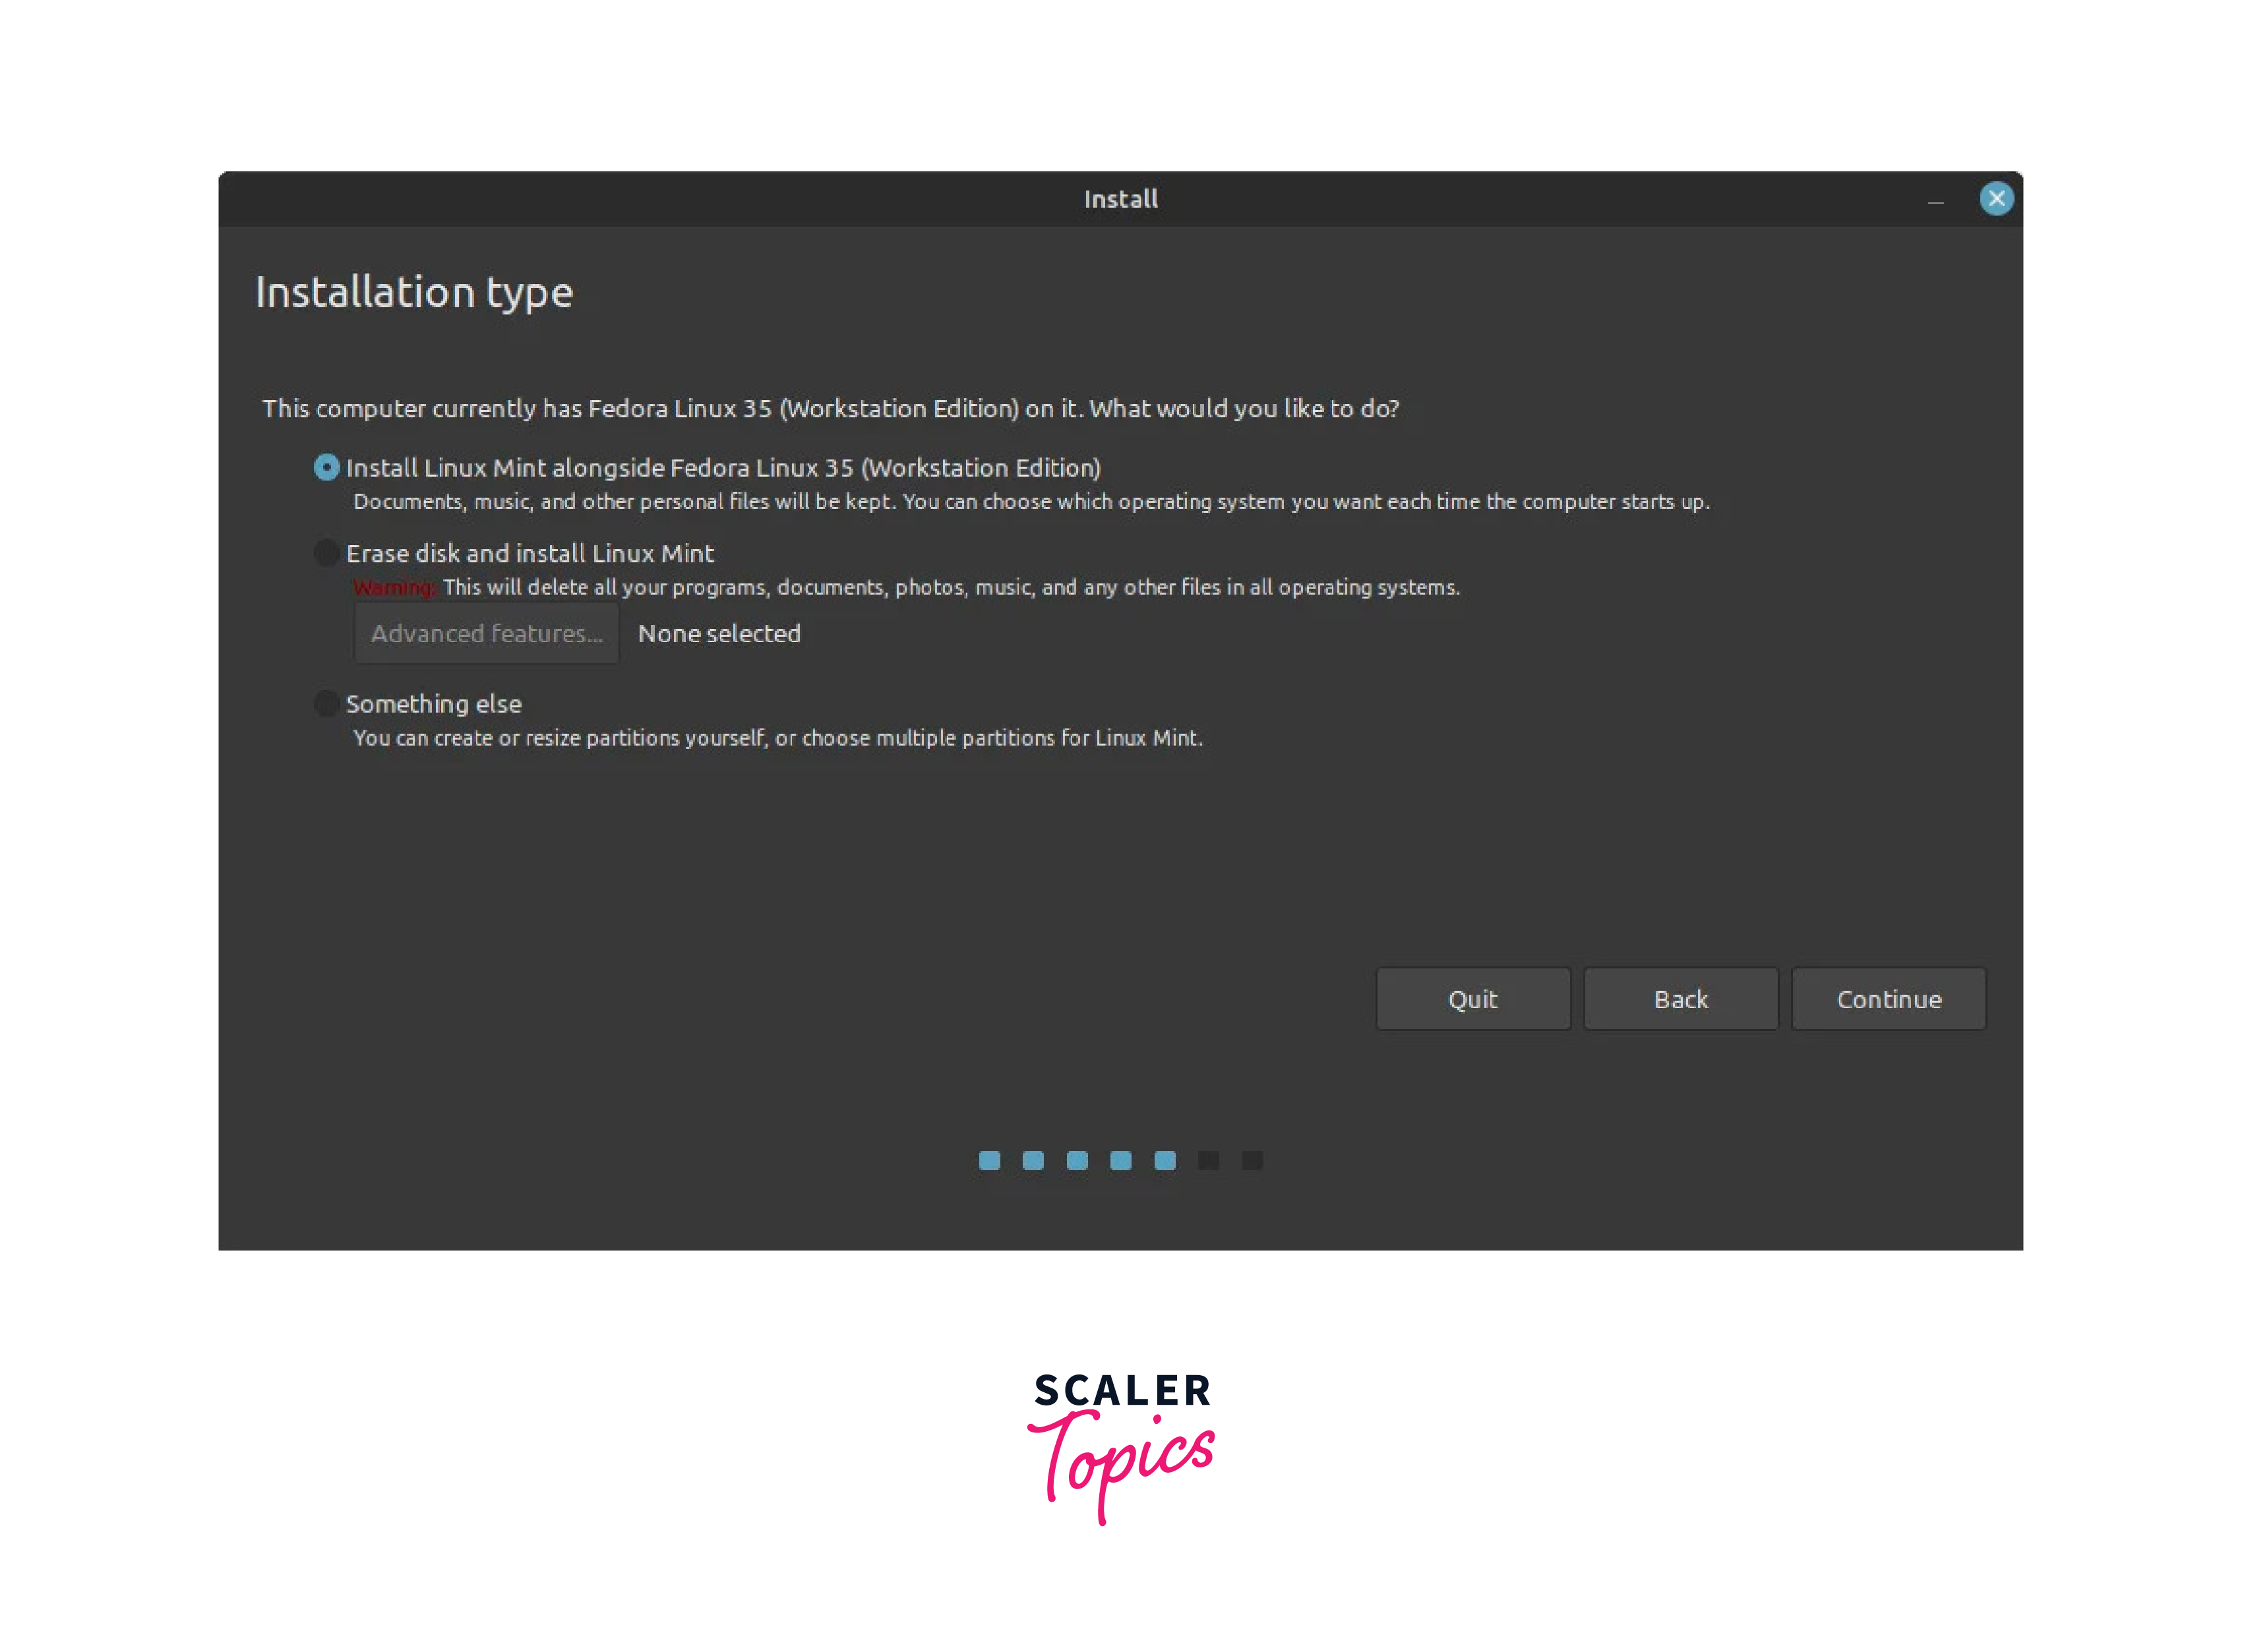
For some reason, if the installer does not detect Windows, select ‘Something else’ as the installation type and hit continue.
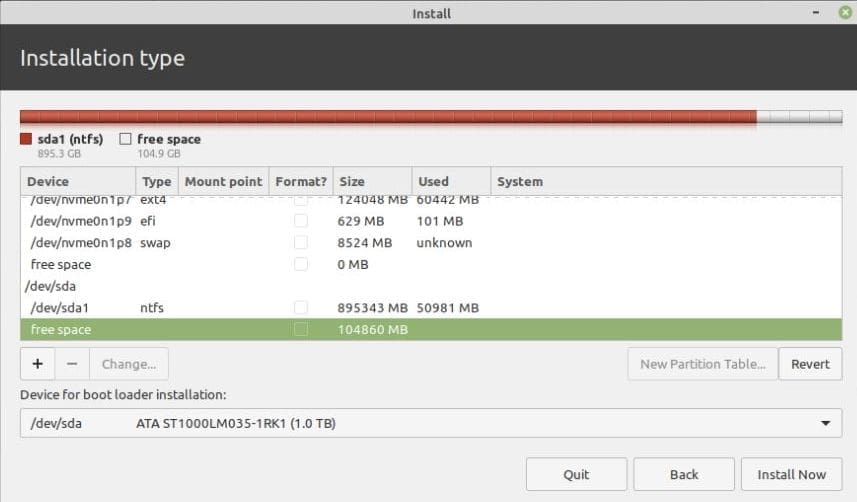
Next, you’ll see an NTFS partition within the list. This is your Windows partition.
Make sure you do not make any modifications to these NTFS partitions as they will contain Windows system files unless you know exactly which drives are non-Windows drives.
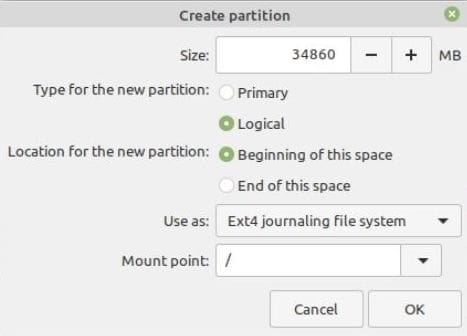
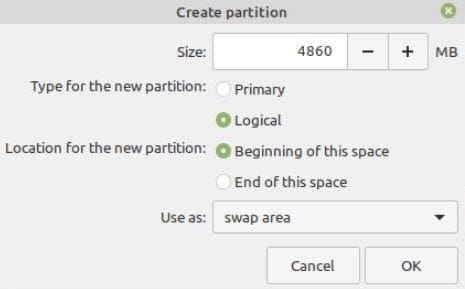
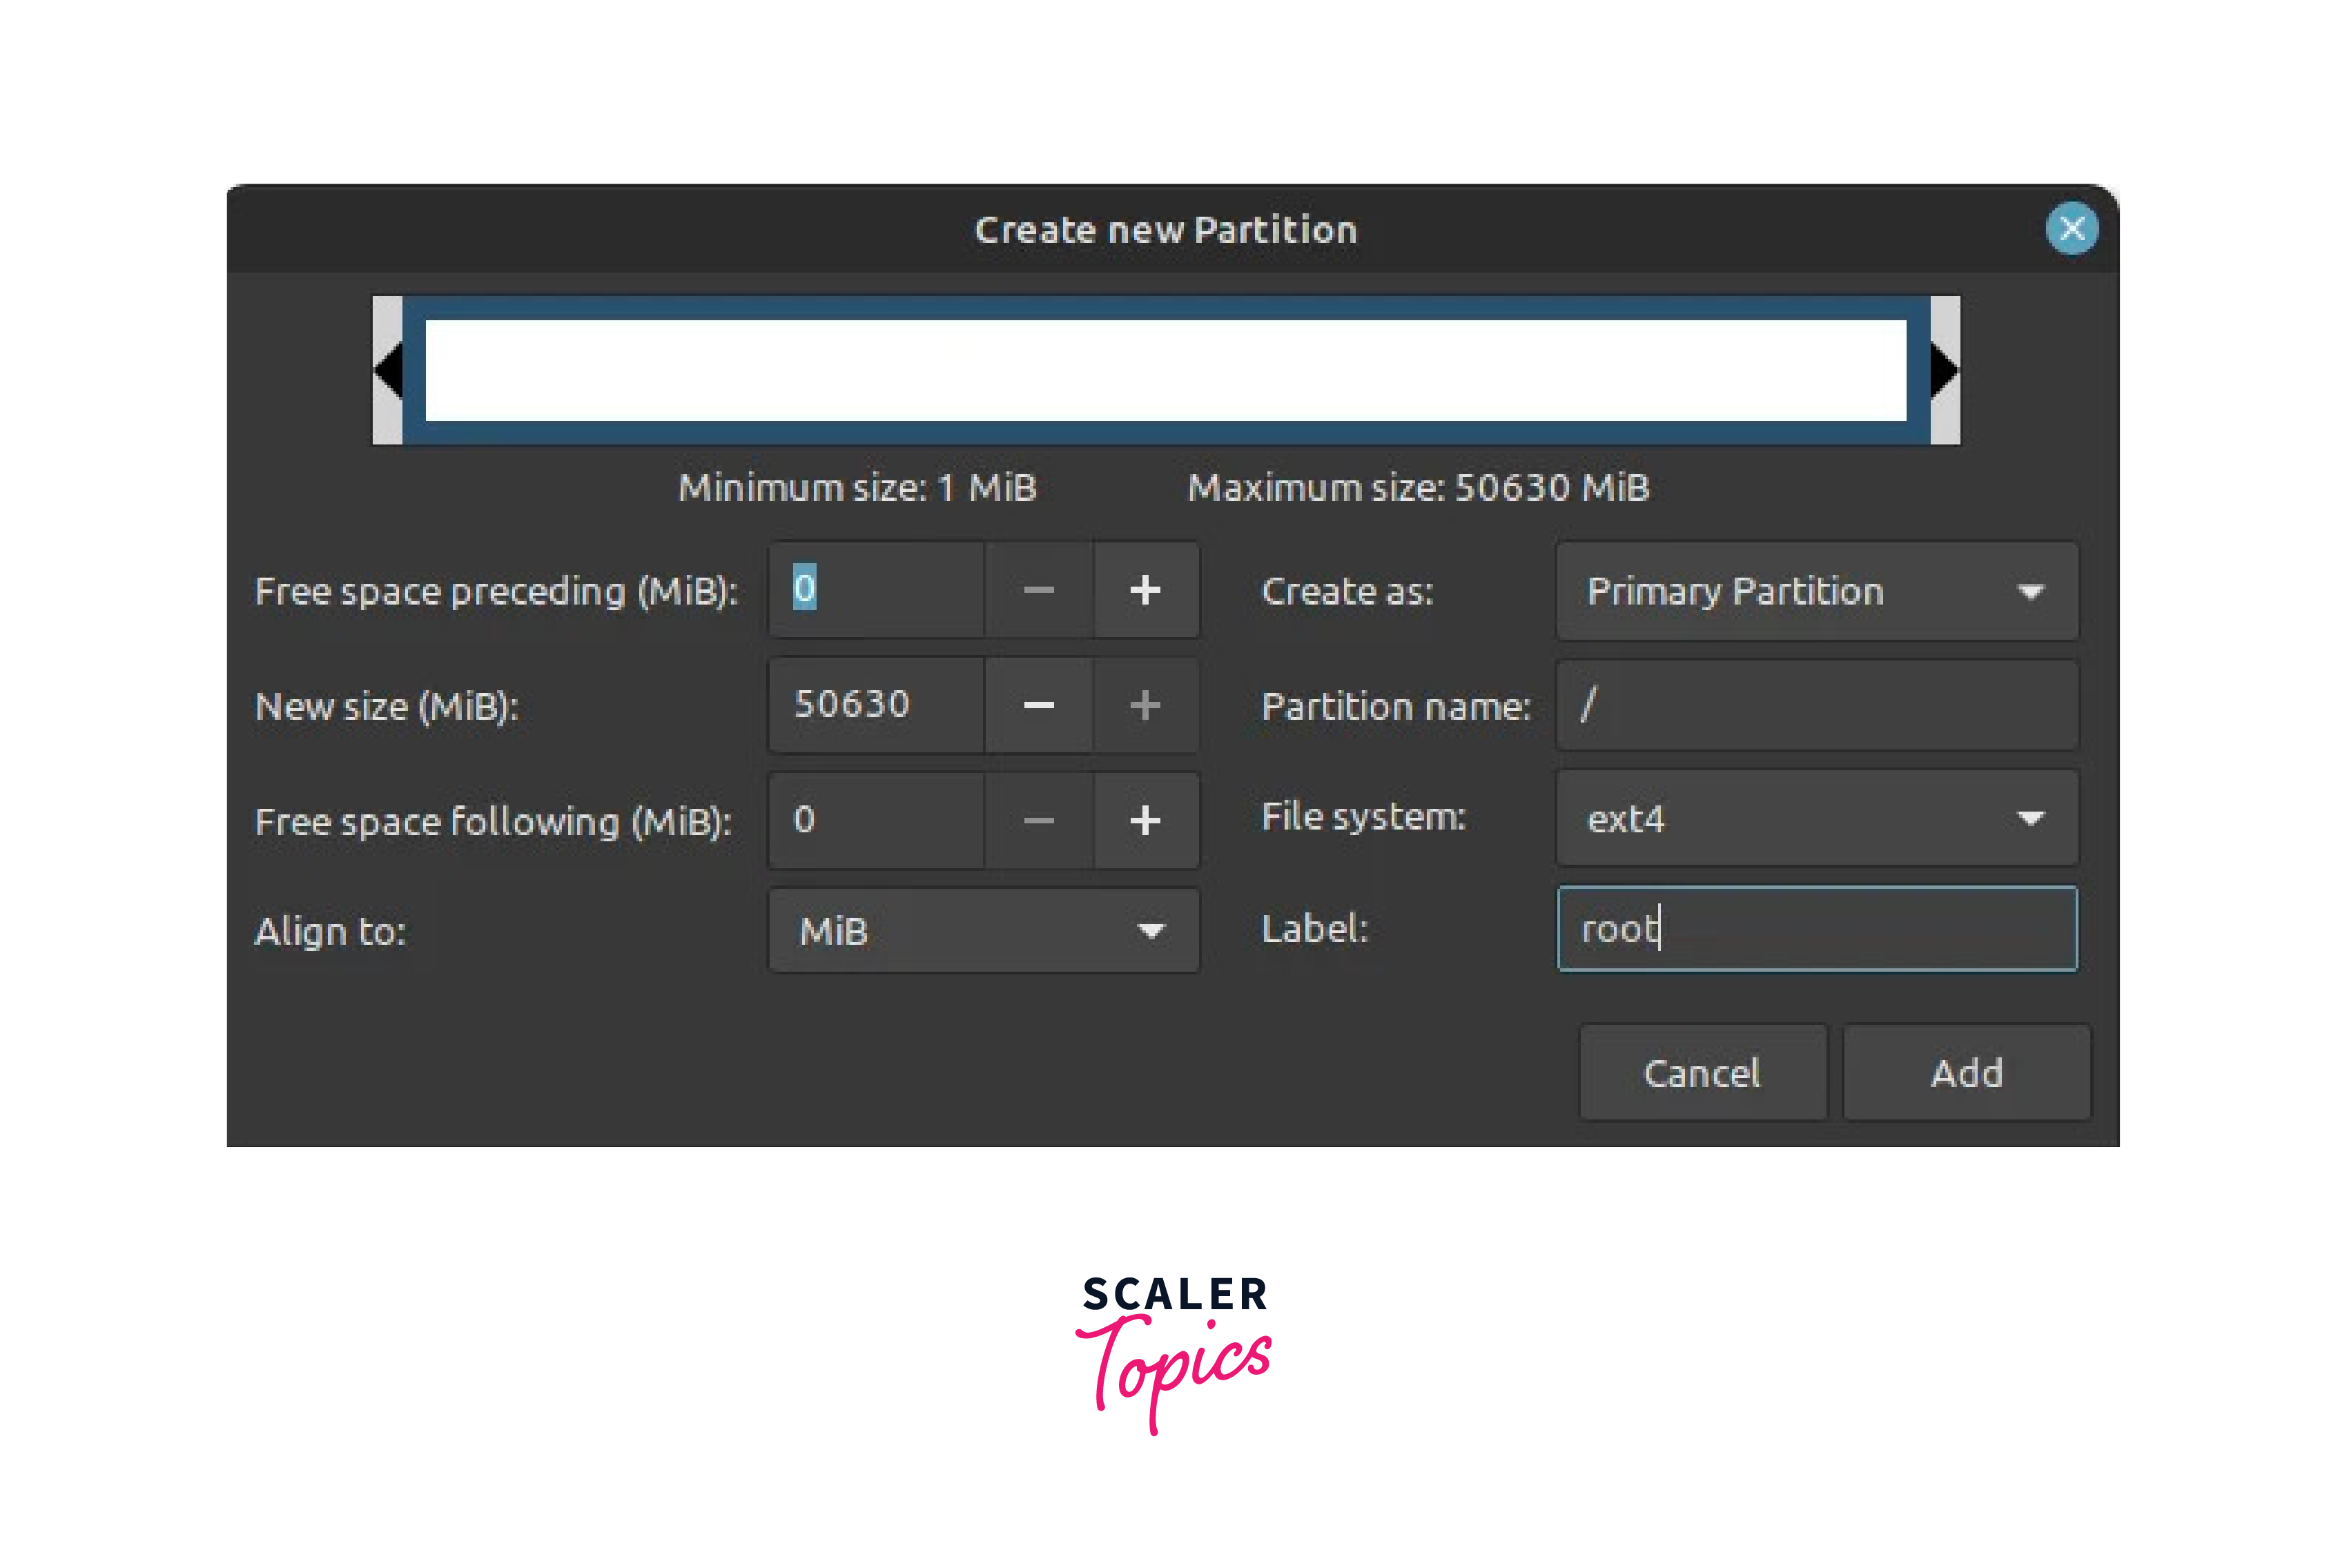
We’ll only work on partitioning the unallocated spaces. So go ahead and right-click on the unallocated space and select create a partition.
I’m dedicating my full 50 GB to this partition, but if you want, you can also create a /home partition. Finally, when you are sure of the changes you are going to make, click on Install now.
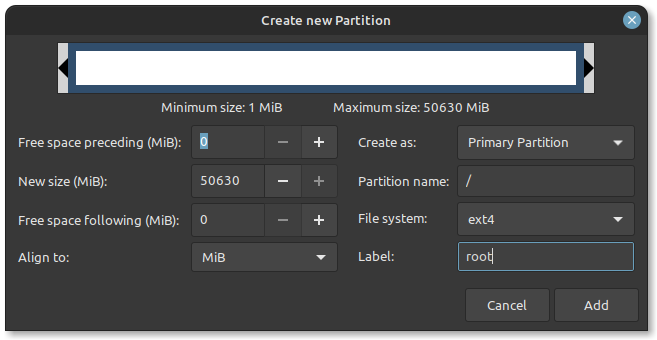
8. Complete The Installation
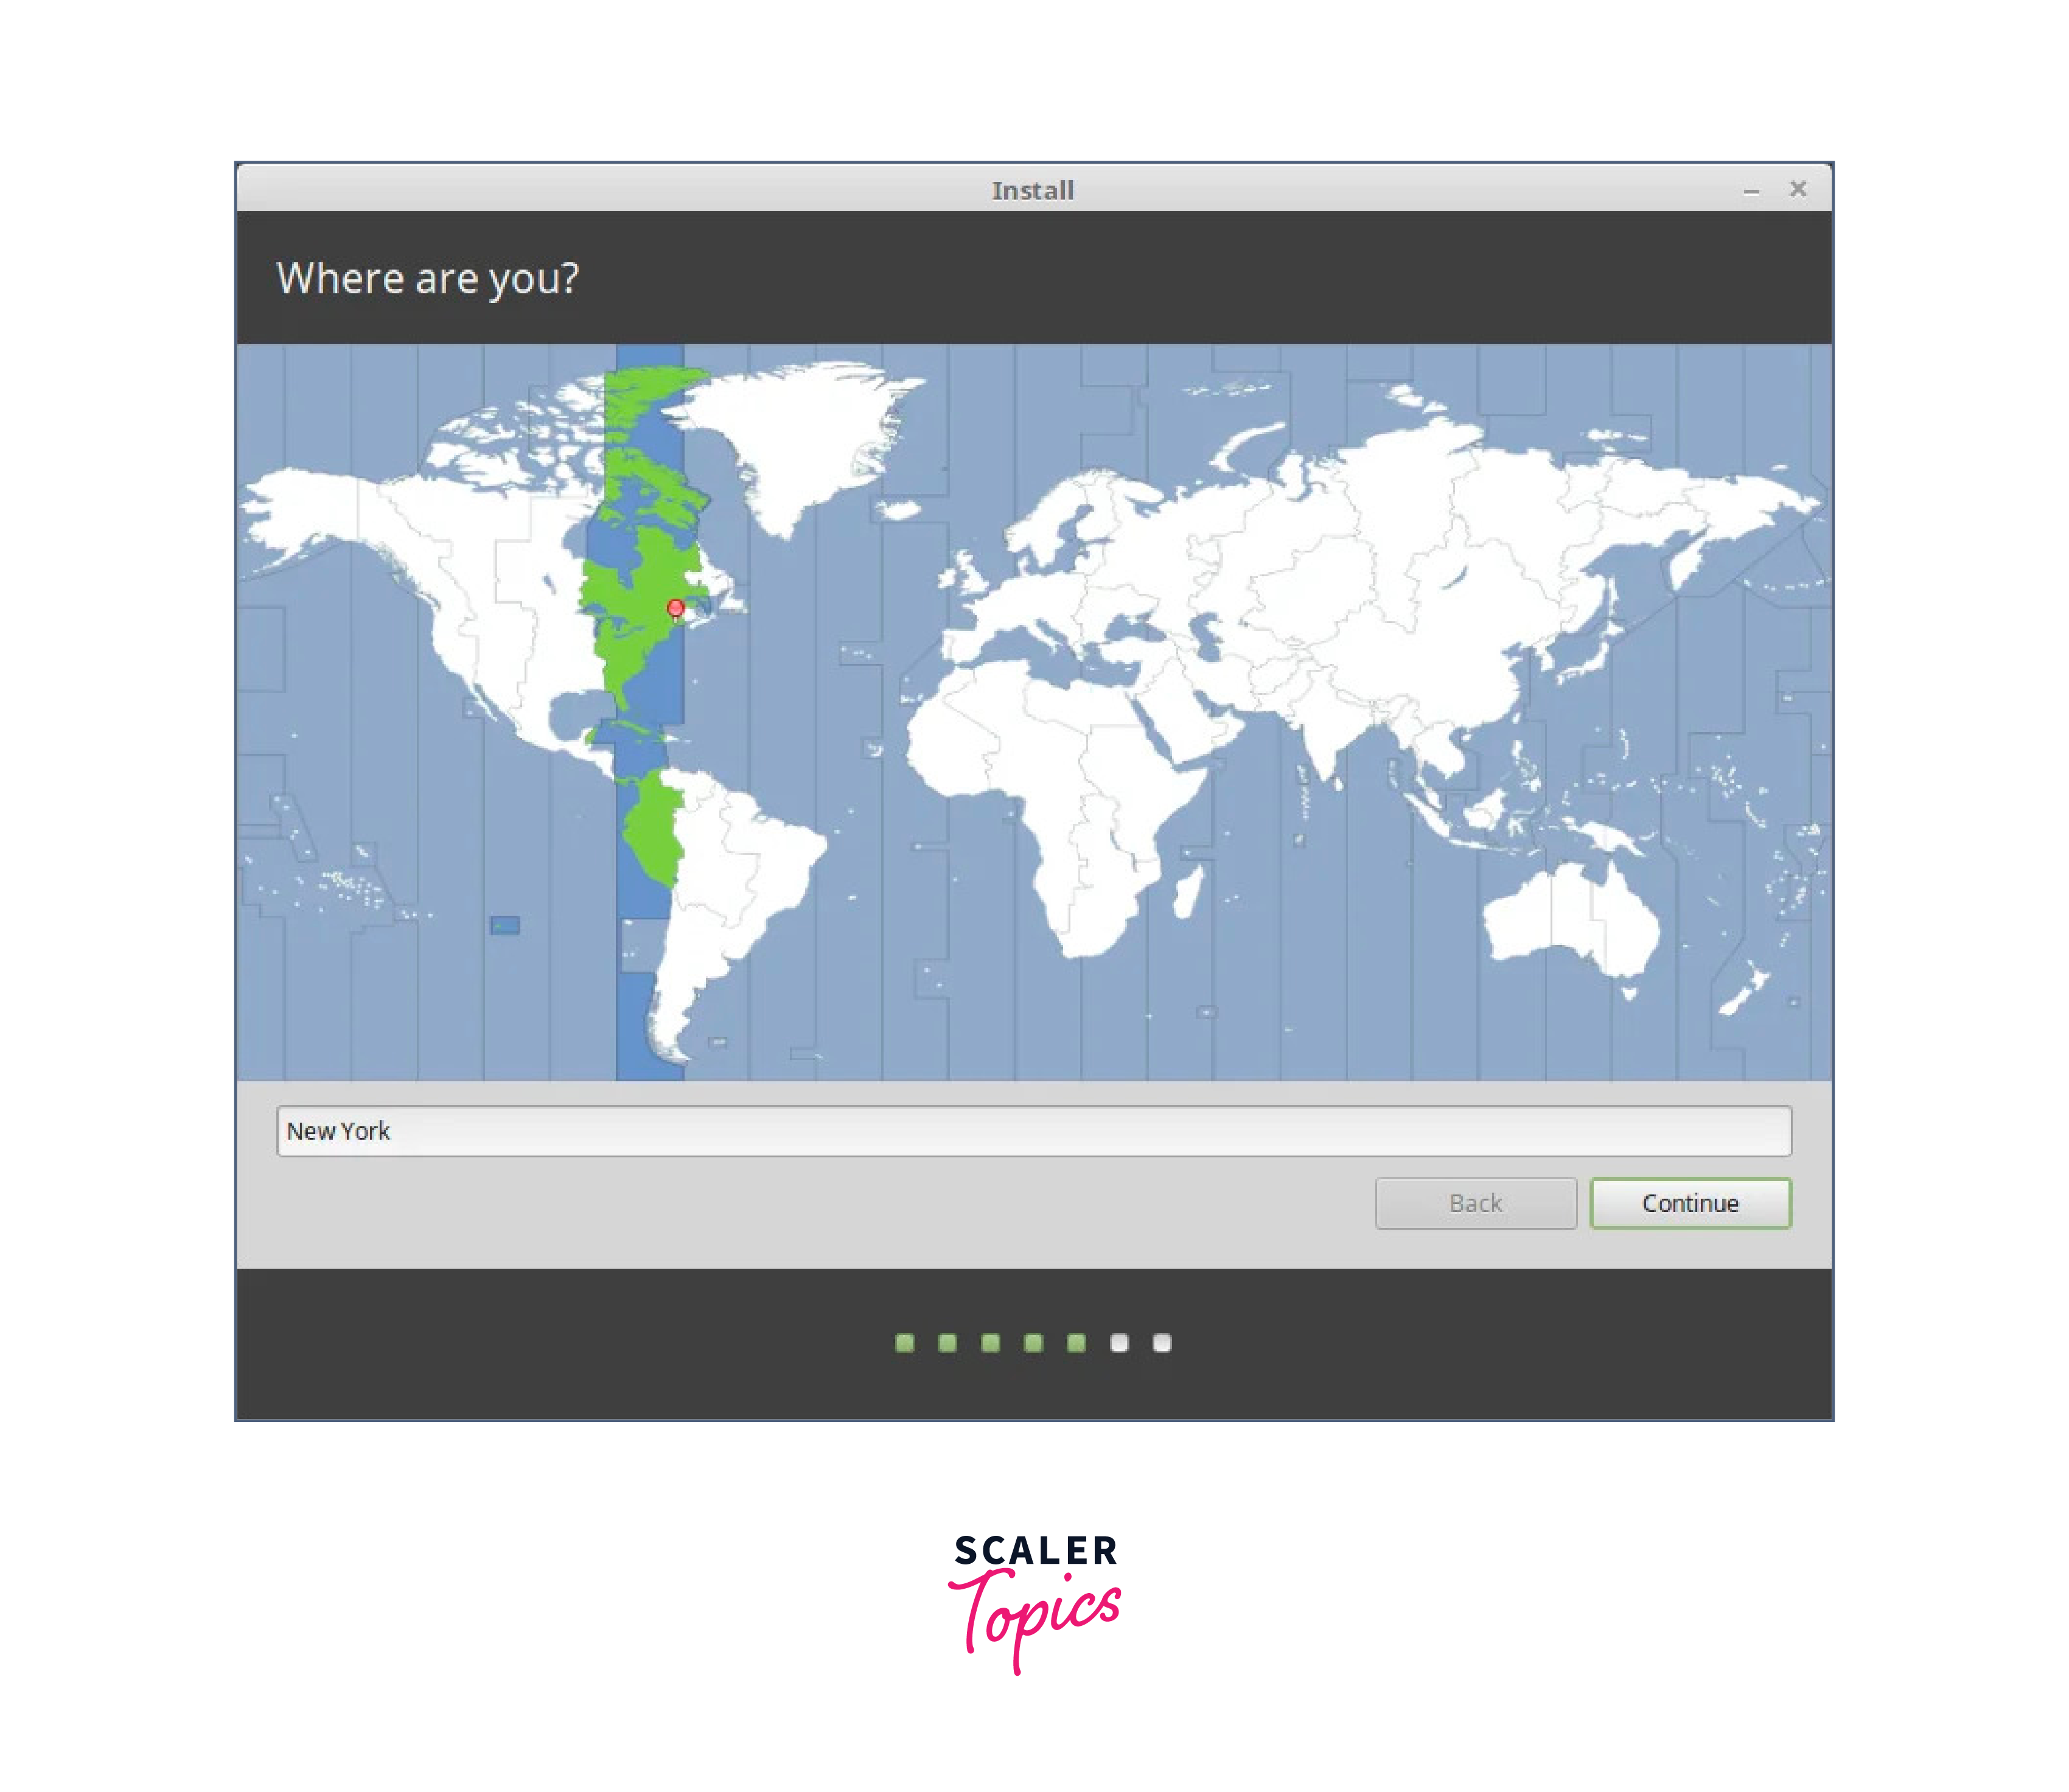
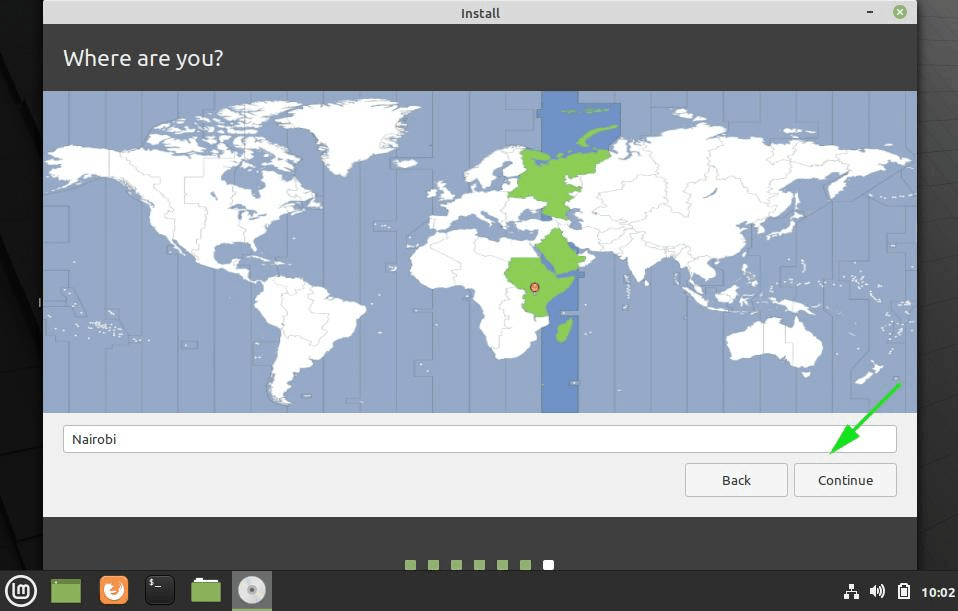
Choose your Time-Zone in the next section and hit next.
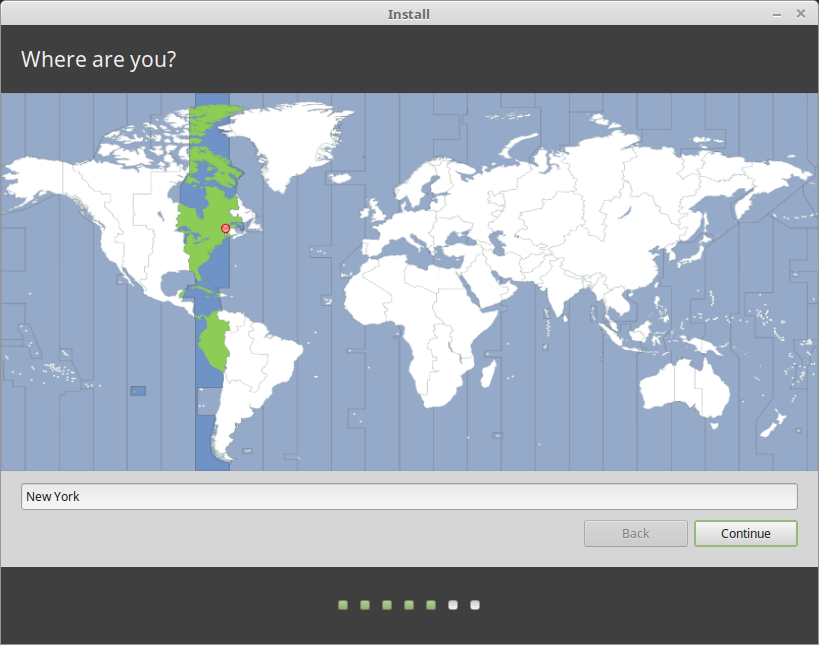
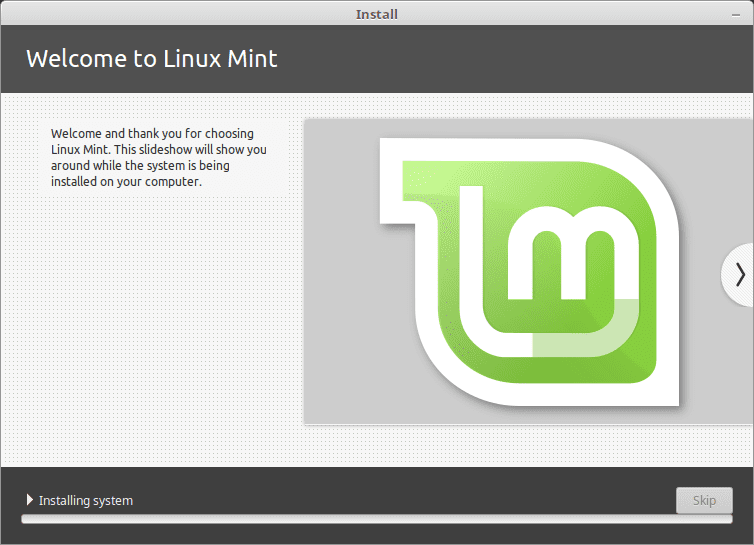
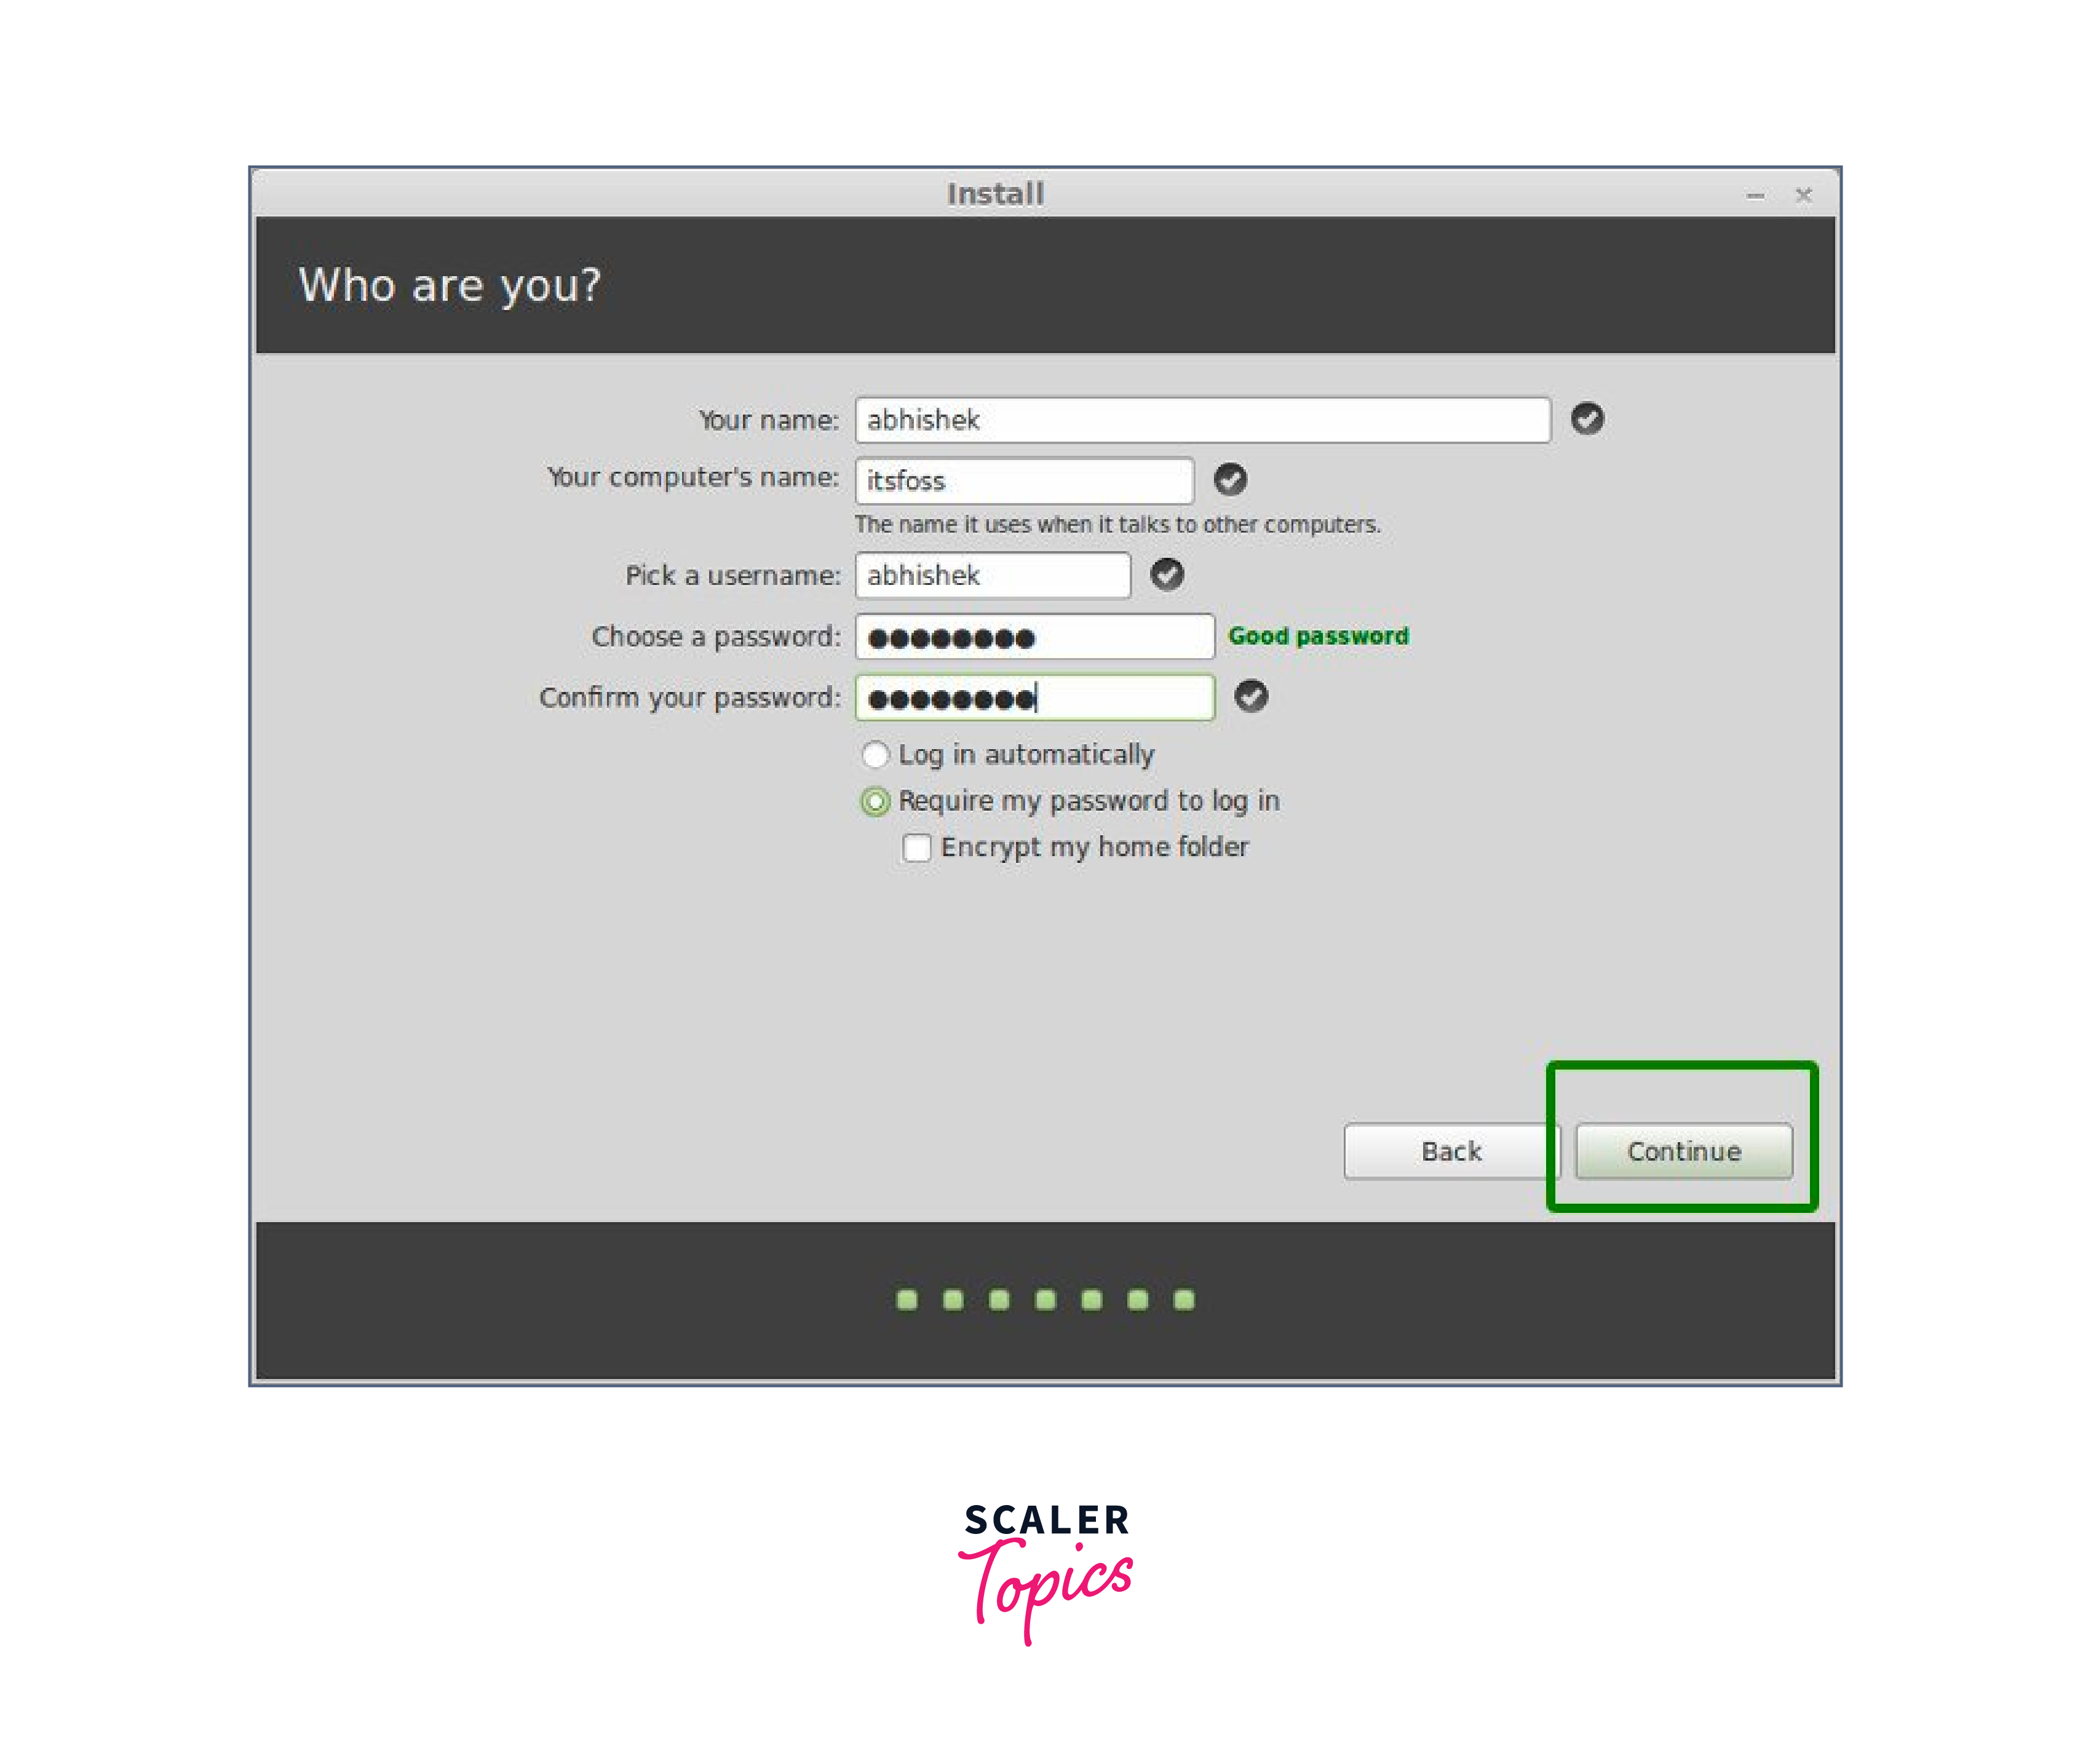
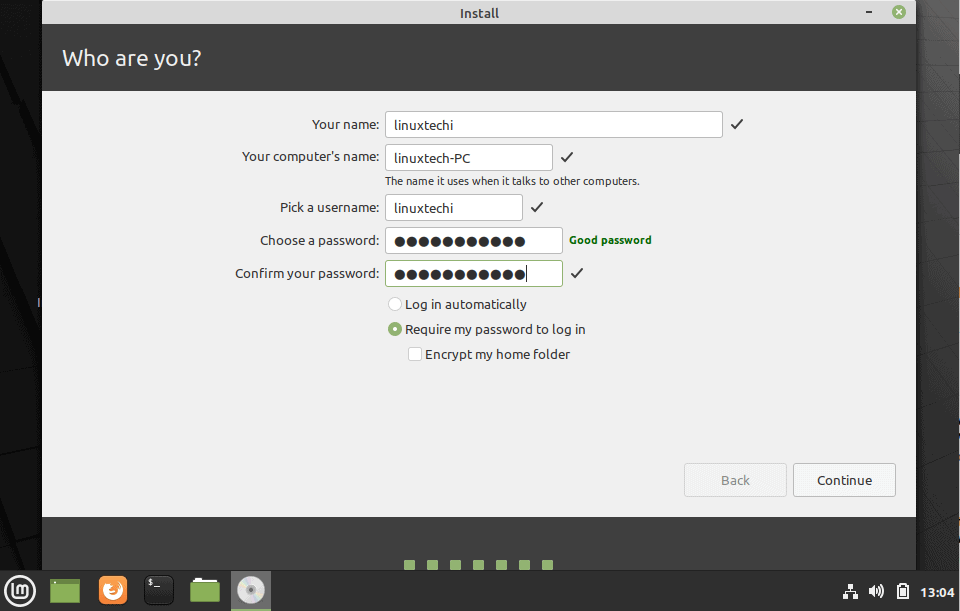
Lastly, set up your Username and a desktop password. Click on continue. This installation will take 10-15 minutes from this point. The installer will then ask you to restart your PC and then remove your Installation media and press Enter.

9. Update your Installation
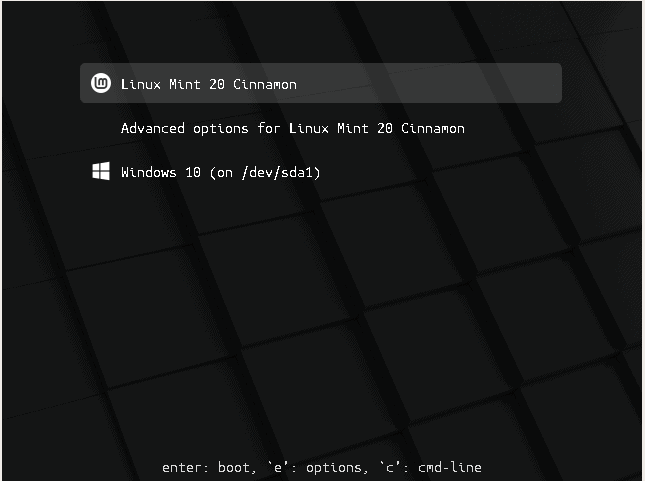
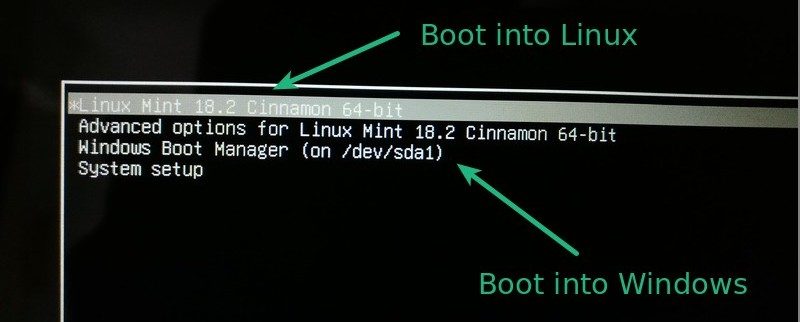
The next time you start your PC, the GRUB bootloader will ask you to pick between Linux Mint and Windows 10. Boot once into Linux mint, open Terminal, and type in the following commands to update your system.
$ sudo apt update && sudo apt full-upgrade
If you do not see Windows 10 or any other operating system that you have installed alongside Linux, go ahead and run the following command on your terminal:
Conclusion
You have successfully installed & updated Linux Mint 20.3 alongside Windows 10.
Brief: This guide shows you how to dual boot Linux Mint with Windows 10 and enjoy both Linux and Windows together in one system.
So you have decided to switch to Linux. Good decision! And if you chose to use Linux Mint, that’s even a better decision.
Linux Mint is one of the best Linux distributions for beginners. Using Linux Mint is fairly easy and installing Linux Mint is no rocket science either. In this tutorial, we’ll see how to install Linux Mint along side Windows 10.
Before that let me recap you a few things about installing Linux Mint. There are a few ways you can start using any Linux based operating system.
- Use Linux inside Windows in a virtual machine: This runs a Linux OS like any other application within Windows. This is also one of the safest ways to get a feel of Linux. However, this will utilize your system resources and if you have less than 4Gb of RAM, I won’t advise using it extensively.
- Use a live version of Linux: In this method, you put Linux on a USB or DVD and you boot from it. This is usually slow and your changes done to the Linux system are (normally) not saved. This is particularly useful if you just want to see what Linux feels like.
- Remove Windows and Linux: If you have backed up your data and have a recovery or installation disk of Windows ready with you or if you are determined that you are not going back to Windows, you can remove Windows completely and use only Linux.
- Install Linux alongside Windows: This method is called dual booting Linux with Windows. Here, you install Linux on a system that already has Windows. And when your system powers up, you can choose if you want to use Windows or Linux. This involves touching the disk partition and sometimes boot order. Absolute beginners often find it complicated but this is the best way to use Linux and Windows together in one system. And in this article, we’ll see how to dual boot Linux Mint with Windows 10.
Will dual booting Linux with Windows slow down your system?
I was asked this question several times in the Linux Users Group. So, the short answer is no. Dual booting Linux and Windows won’t slow your system in any way.
The only delay is in boot time that too because you get 10 seconds of buffer time to select between Linux and Windows. Once you have booted into either of Linux or Windows, it will work the same as if it is the only OS in the system. No impact on the usability of your system. Dual boot won’t slow down your system.
Install Linux Mint in dual boot with Windows:
Before we proceed to see the procedure to dual boot Linux Mint with Windows, let me give you some optional yet recommended safety instructions:
- Back up your data: You are going to touch disk partitions. Normally, it’s not a big issue but just in case if you touched wrong partition etc, you may lose data. So my advice is to back up your important files, documents, music, movies etc to an external disk or cloud, whichever suits you.
- Have a boot repair disk: If your boot gets messed up, you can try to repair it with boot repair disk. If you have an extra USB or CD, you can use that to create boot repair disk.
- Have a live or recovery disk of Windows ready: If your boot gets messed up and despite all efforts, you ended with an unbootable system, you can use the Windows disk to reinstall Windows.
I am not discouraging you. I am asking you to be prepared for the worst case scenario.
Remember that this article applies to computers that have Windows 10 already installed on the system. You are installing Linux Mint on an already installed Windows system, not the other way round.
I have created a detailed video tutorial on installing Linux Mint alongside Windows 10. You can refer to it if you want to see all the steps in even more details. I also advise you to subscribe to our YouTube channel for more Linux tutorials.
Follow the steps below to install Linux Mint in dual boot with Windows:
Step 1: Create a live USB or disk
Go to Linux Mint website and download ISO file. This ISO file is the disk image that you can burn to a USB or DVD.
There are several versions of Linux Mint available. The default is Cinnamon. If your computer supports 64 bit, go with 64 bit Linux Mint 19.3 Cinnamon. If you know about other desktop environments, you can make your mind and choose whichever Mint version you want.
Once you have downloaded the Linux Mint ISO, you need a tool to write the image to a disk. I recommend using a free tool called Universal USB Installer in Windows:
It’s an executable exe file. Just double click on it to run the software and browse it to the ISO. Make sure that you have your USB key plugged in:
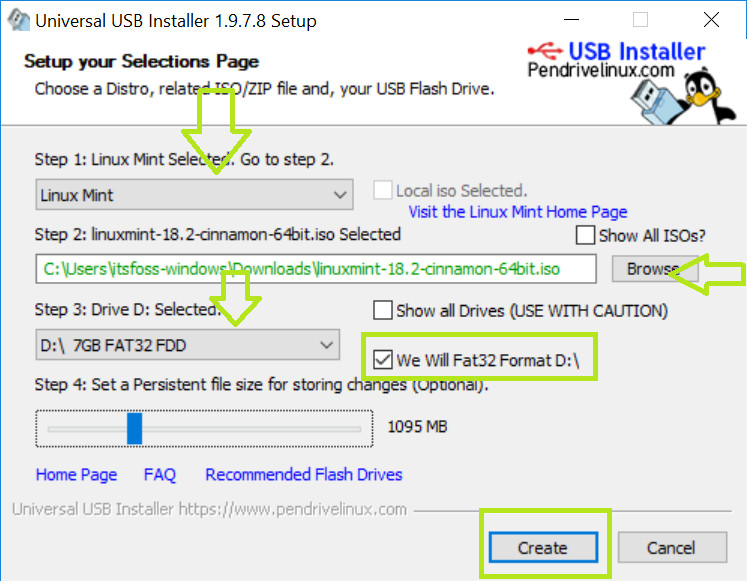
If you need more hints, here is a screenshot tutorial on how to create a live USB for Linux.
Step 2: Make a new partition for Linux Mint
This is where you have to be cautious. If you have multiple partitions (not the recovery ones), you can either use one of them or create a new partition from an existing partition. Your existing data will be safe if you have enough free space. Typically, you install Linux in under 10 Gb, however, if disk space if not a concern, I advise using 30-40Gb at least. This way you can have more space at your disposal for downloading and keeping various files.
In Windows 10, go to start menu and type ‘partition’. This will bring up Disk Management utility. Now carefully select the disk in which you’ll make some free space by shrinking the volume:
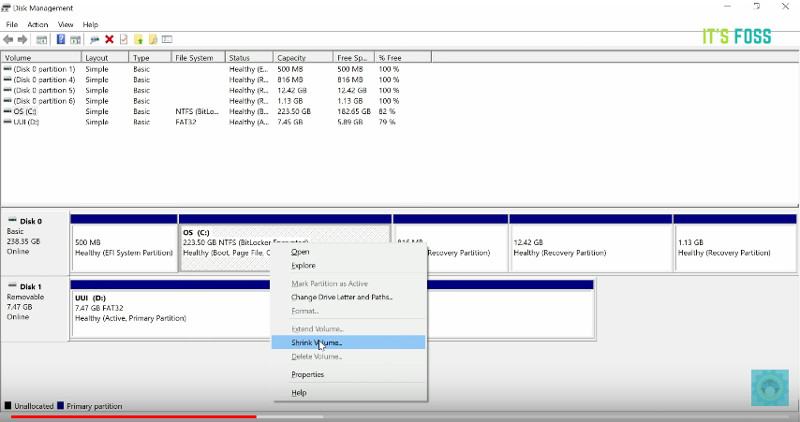
In my case, I only had the C Drive with 223Gb of space on it. So I shrunk it to make 110Gb of free partition on it. I recommend watch the video to see the exact steps you need more hint.
Step 3: Boot in to live USB
Plug the live USB or disk into the computer and restart the computer. While booting the computer press F10 or F12 function key (defers from computer to computer) to go to the boot menu. Now, choose the option to boot from USB or Removable Media.
Important Note: If your computer came with Windows 8 or Windows 8.1 and you upgraded your system to Windows 10, you may have to disable secure boot. Most modern system with Windows 10 should not need this step, especially with Linux Mint or Ubuntu.
Step 4: Start the installation
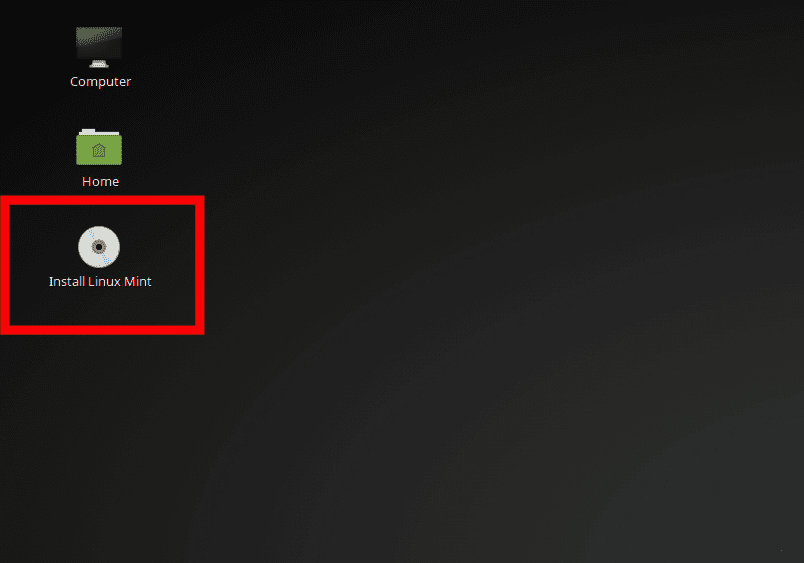
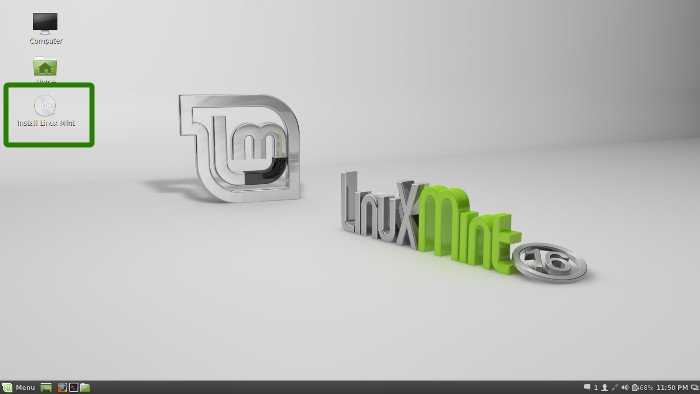
It takes some time to boot from the live USB or disk. Have some patience. Once it boots in to live disk, you’ll be provided to Try Linux Mint or Install Linux Mint. Even if you choose to try it, you can find the install option on the desktop:
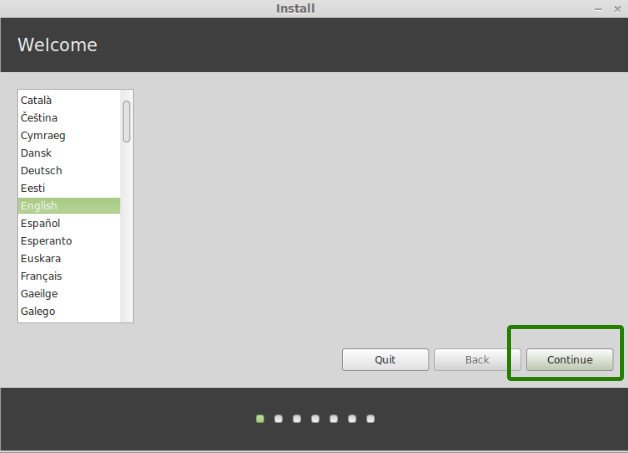
In next few screens, you’ll be asked to choose the language of the operating system. It will then do some checks on available space, battery and Internet connection.
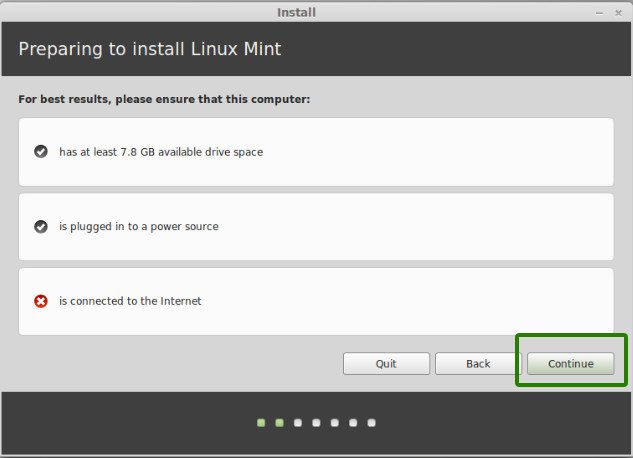
Step 5: Prepare the partition
This is the most important part of the whole installation. Where to install Linux Mint?
If you see the option to Install Linux Mint alongside Windows, you can select that. Linux Mint will handle things on its own. If you do that, skip step 5 and step 6.
But as mentioned before, I prefer separate partitions for Windows and Linux. Windows is already installed here, we’ll prepare a new partition for Linux Mint. In the Installation Type window, choose Something Else:
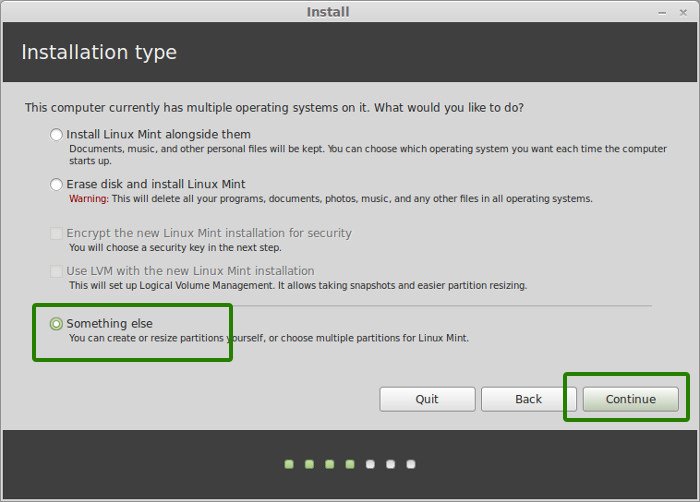
Step 6: Create root, swap and home
Since you already created a new partition in Windows, it’s time to install Linux Mint on it. Now, there are several ways to do it. But here, I’ll show you my favorite way and that is to have a Root, a Swap and a Home.
Create a root partition first. Choose the free space available and click on +.
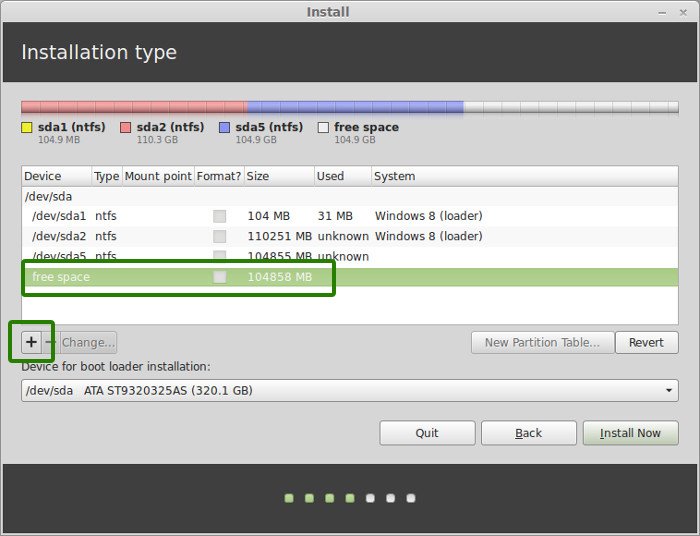
Here, choose the size of the root. Root is like your C drive in Windows. Installed software, updates and other system files are under this root partition. Home partition is for your personal documents, music, downloads etc.
If you have total 100 GB at disposal, give 30 GB to root. In any case, don’t give it less than 15 GB because if root runs out of space, your system will slow down and you’ll run into issues.
I opted to have 20 GB, choose ext4 file system, and mount point as / (i.e. root):
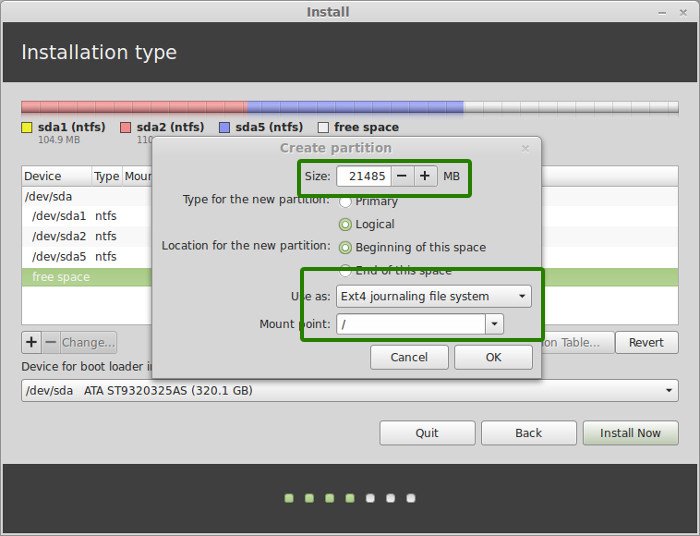
Now, next is to create the swap partition. Now the question is what should be the swap size for Linux Mint installation?
The answer depends upon your RAM size, your needs, available disk space and whether you would use hibernation or not. You can use the below suggestion:
- RAM less than 2 GB: Swap should be double the size of RAM
- RAM between 2 to 4 GB: Swap should be RAM size + 2 GB
- RAM between 6 GB to 8 GB: Swap should be size of RAM
- RAM more than 8 GB: Swap should be half the size of RAM or less
Don’t spend too much time thinking about swap. It is helpful for systems with less memory. For system with more than 8 GB of RAM and SSD, the less the swap, the better it is.
Newer version of Linux Mint utilize Swap file. It creates a special file under root and utilizes it as swap area. You can have both swap partition and swap file in a system.
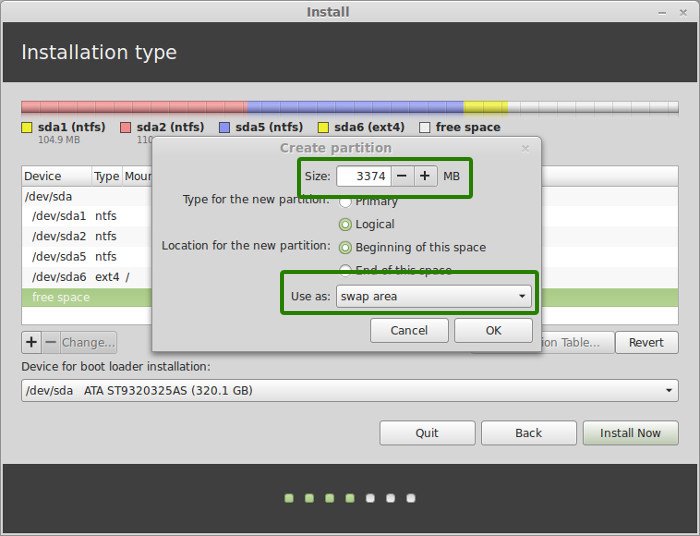
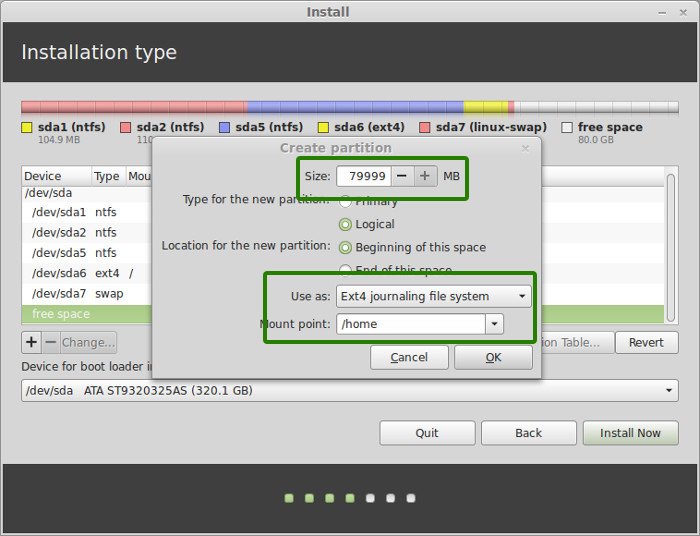
The next step is to create Home. Try to allocate the maximum size to Home because this is where you’ll be downloading and keeping the files.
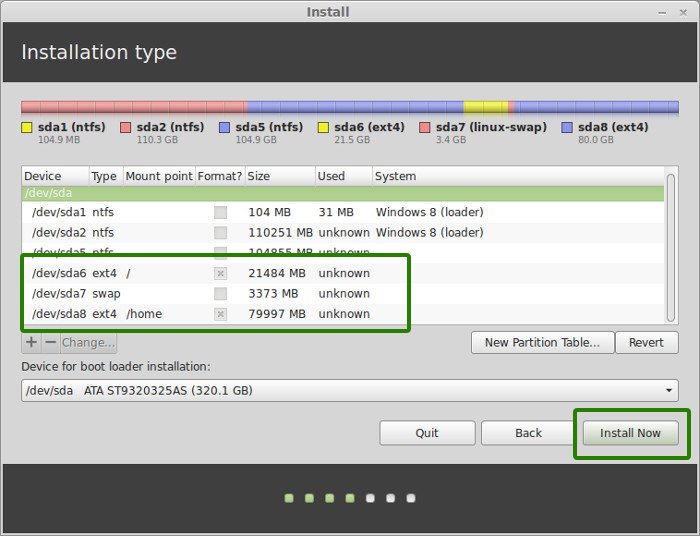
Once you have created Root, Swap and Home partitions, click on Install Now button.
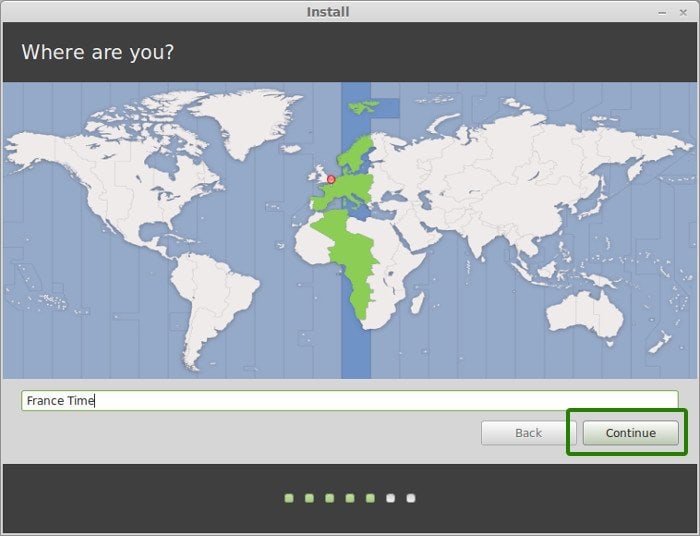
Step 7: Follow the trivial instructions
Technically, you have crossed the main hurdle if you reached this point successfully. Now you will be taken through a number of screens to select options like keyboard layout, login credentials etc. You don’t need to be a genius to figure out what to do here afterward. I have attached screenshots for reference purpose here.
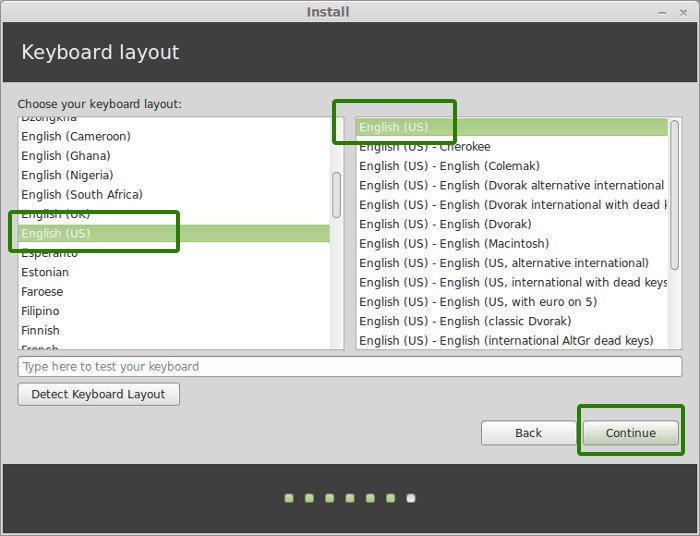
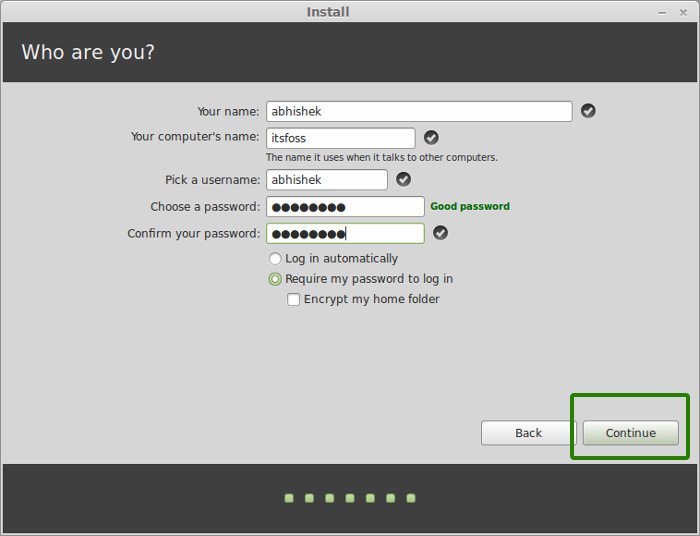
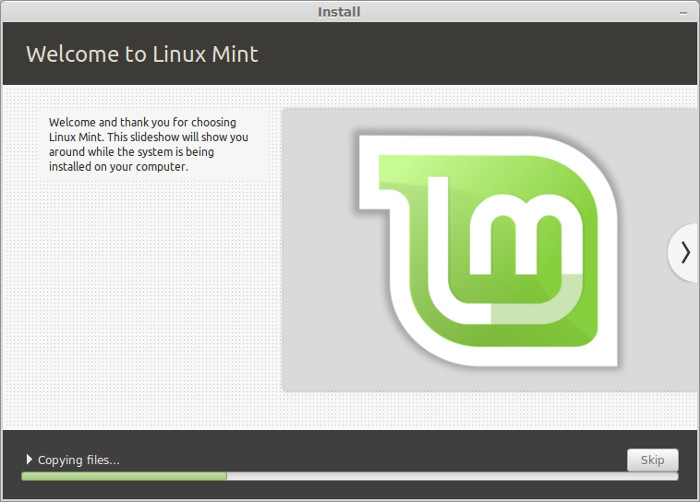
Once the installation is over, you will be presented with the option to keep trying live version or to restart the system.

And that would be it. On next boot, you will see the option of Linux Mint on the grub screen. And thus you can enjoy the beautiful and beginner-friendly Linux distribution. I hope you found this guide to Linux Mint dual boot with Windows helpful.
Here are a few common troubleshoot you might have to do after dual booting Linux Mint:
- Fix Grub Not Showing For Windows 10 Linux Dual Boot
- Fix No Bootable Device Found Error After Installing Ubuntu
- error: no such partition grub rescue in Ubuntu Linux
- Fix Minimal BASH like line editing is supported GRUB Error In Linux
I strongly advise you to read things to do after installing Linux Mint so that you can have a good start.
If you want to remove, you can follow this guide to uninstall Linux Mint from Windows 8 dual boot.
If you have questions, suggestions or a word of thanks, feel free to drop a comment. Stay tuned for more Linux Mint tutorials. Ciao 

Linux Mint 20, also referred to as Ulyana, was released in June 2020 and packs with a basket of new features and enhancements to improve your overall user experience. If you have Windows 10 already on your PC and would like to reap the full benefits of the latest Mint release, you can install it alongside Windows 10.
Upon booting, you will be presented with the option of booting into either Linux Mint 20 or Windows 10. In this guide, we show you how to dual boot Windows 10 and Linux Mint 20.
Prerequisites
Before embarking on configuring the dual-boot setup, ensure that the following requirements are met:
- A bootable installation medium of Linux Mint 20 (Either USB or DVD)
- A fast and stable internet connection
Note : In Windows 10, we can make a bootable USB drive from ISO file using Rufus software. Use the following URL to download Linux Mint 20:
- Download Linux Mint 20
Step 1) Create a free partition on Windows for Linux installation
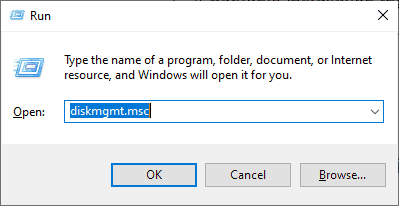
To start off, we need to partition the hard drive and create a separate partition for installation of Linux Mint. So, launch the disk management utility by pressing ‘Windows key + R’ to open the run dialogue. Then type diskmgmt.msc and hit ‘ENTER’.
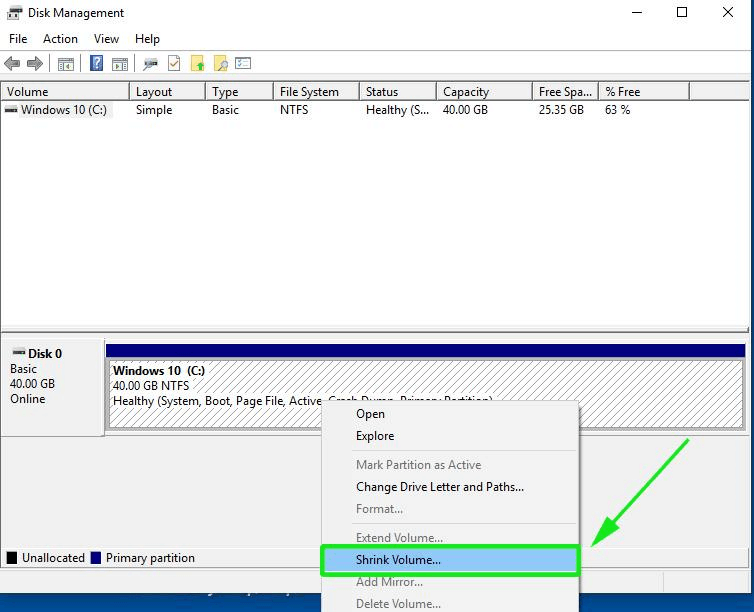
The Disk Management utility lists all the hard drives attached to the PC and their partitions. In our example, we only have a single hard drive with one partition. We are going to shrink this partition and create a free partition for our Linux Mint 20 installation. Right click on the partition and select the ‘Shrink’ option
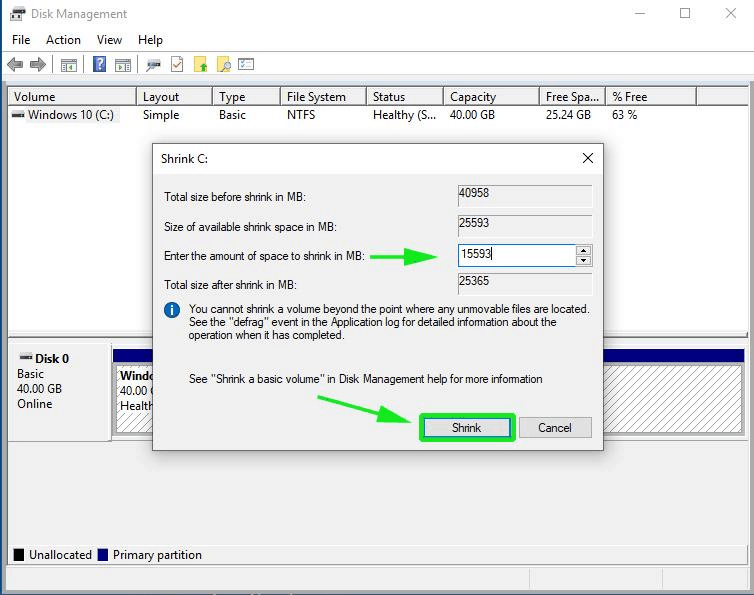
On the pop-up that appears, specify the amount of space that you’d like to shrink the partition to. In this case, we have allocated 15593 MB to the partition that we are going to install Linux Mint on. Once done, click on the ‘Shrink’ button to shrink the volume and create the free partition.
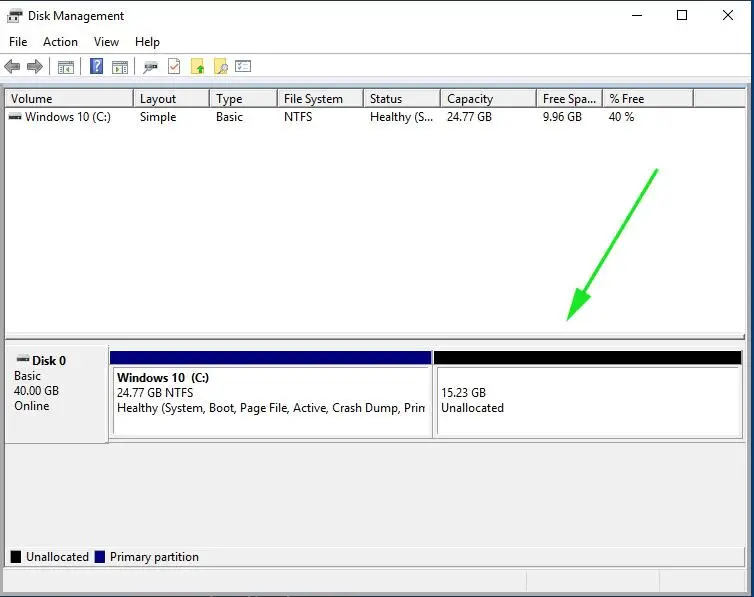
The unallocated space is now ready to be used for the installation of Linux Mint.
All you have to do now is to plug in your bootable USB drive and reboot your PC. Be sure to change the BIOS settings and assign your USB/DVD medium the highest boot priority. Thereafter, save the changes and once again, reboot your system.
Step 2) Begin the Installation of Linux Mint 20
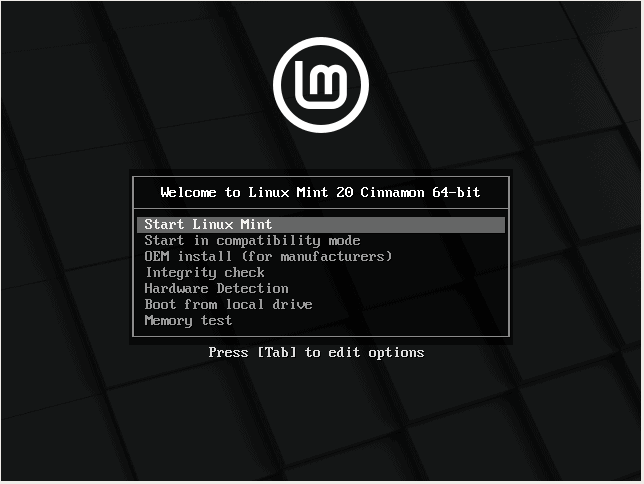
Upon rebooting, a grub menu will be displayed with a list of options shown. Select the first option to begin the installation.
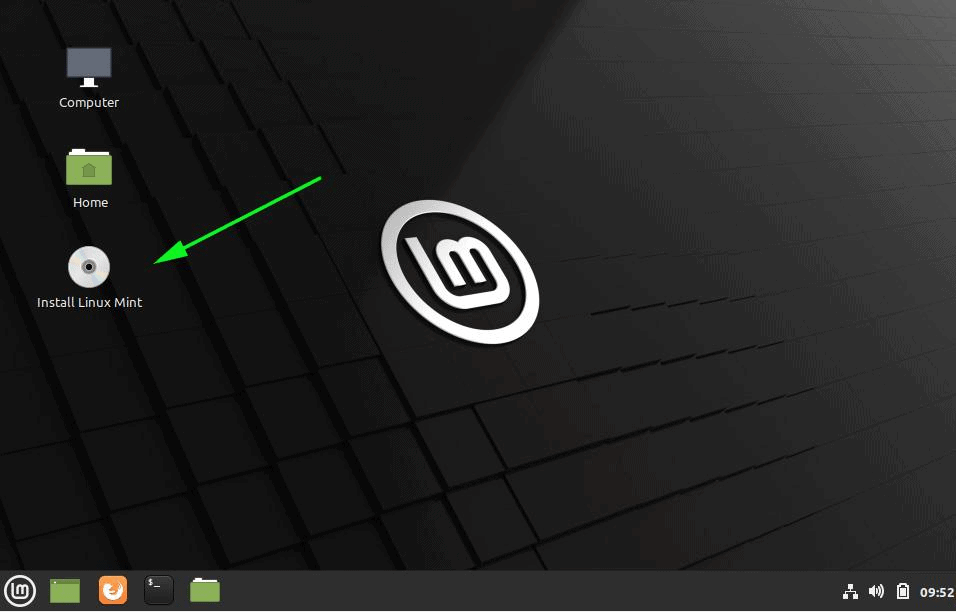
This ushers you to the Linux Mint 20 desktop. Mint gives you an option to try out Mint without necessarily installing it. You can explore the new look and various features. But since we are interested in installing Mint, simply click on the ‘Install Linux Mint’ icon as shown.
Step 3) Choose Language and Keyboard Layout
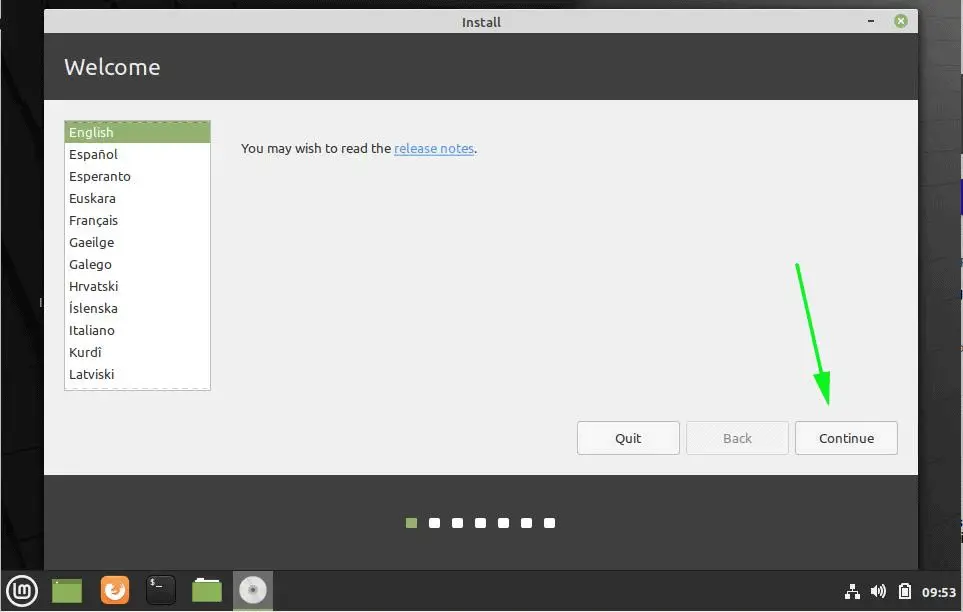
On the welcome page, select your preferred installation language and click on the ‘Continue’ button.
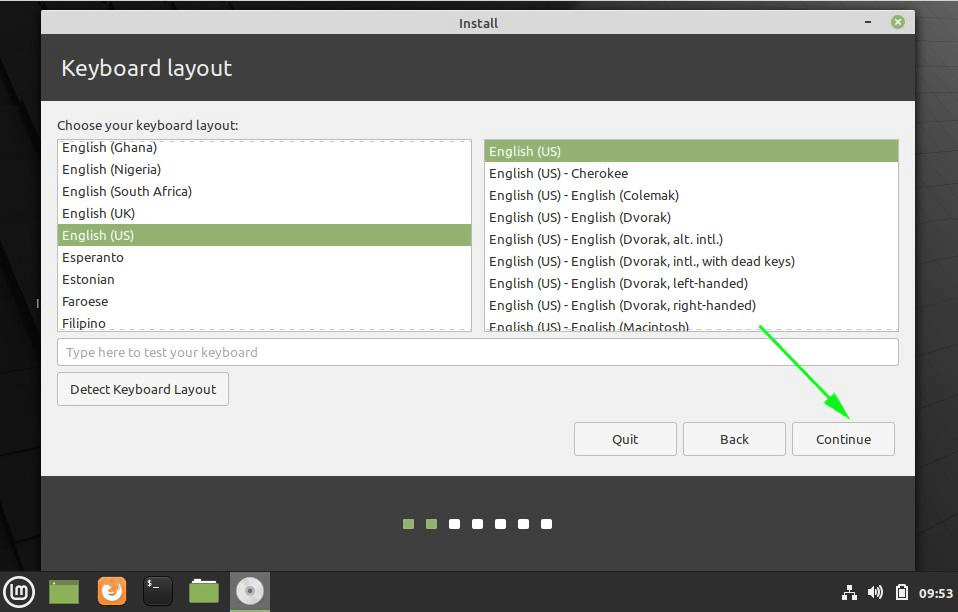
Next, select your keyboard layout as shown and click ‘Continue’.
Step 4) Choose to ‘Install multimedia codecs’ during the installation
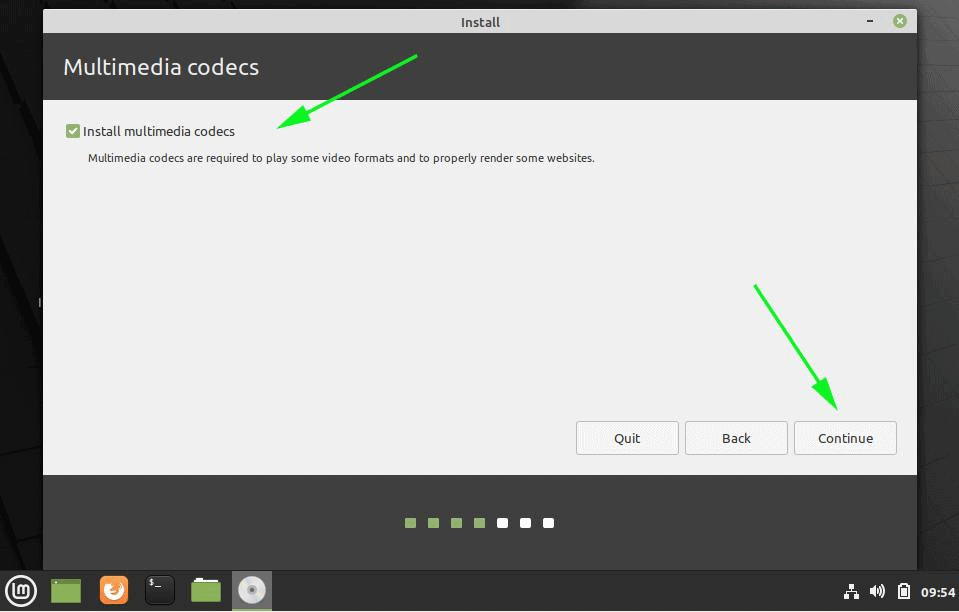
In the this step, check off the ‘Install multimedia codecs’ checkbox to install the latest multimedia codecs to enable you to play specific video formats such as MPEG-4, AVI and WMA.
Step 5) Choose Installation type
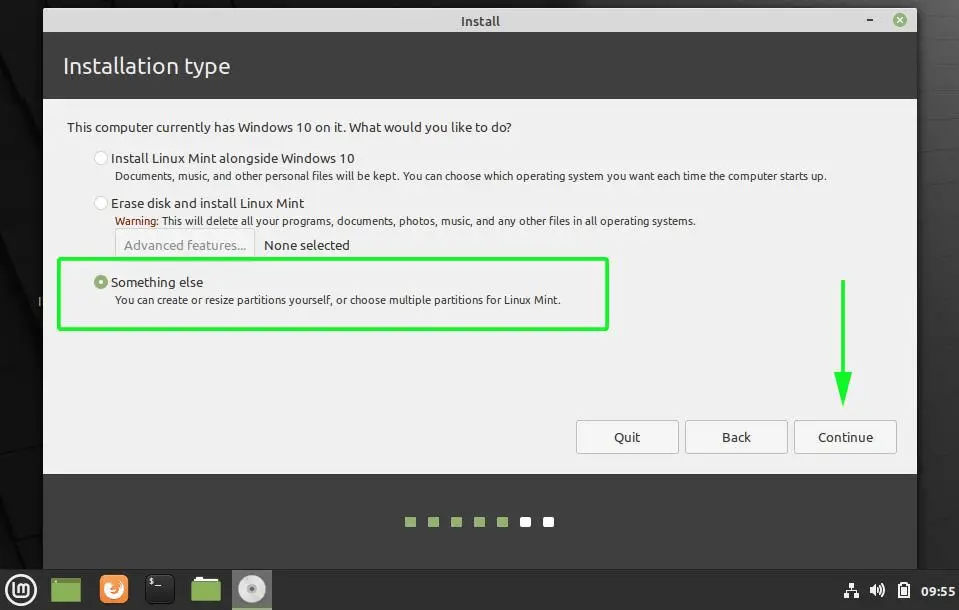
This step gives you 3 options of how you’d like to install Linux Mint.
The first option allows you to Install Linux Mint alongside Windows 10. The installer will intelligently partition the hard drive to accommodate all the Linux partitions and reserve the NTFS partitions used by Windows 10. Select this option if you are not familiar with manual partitioning.
The second option – ‘Erase Disk and install Linux Mint’ – entirely erases the hard drive and lets you install Linux Mint. But that’s not what we want. We want to have a dual-boot setup where we shall have an option of booting into either Windows or Linux Mint upon rebooting. So steer clear from this option.
The last option ‘Something else’ , allows you to manually partition the hard drive. It gives you the flexibility to determine which partitions to create for your Mint installation and the disk space to assign those partitions. This opt is recommended for seasoned Linux users who are familiar with manual partitioning.
For this guide, we will go with this option since the first option is fairly easy. So click on ‘Something else’ and click the ‘Continue’ button.
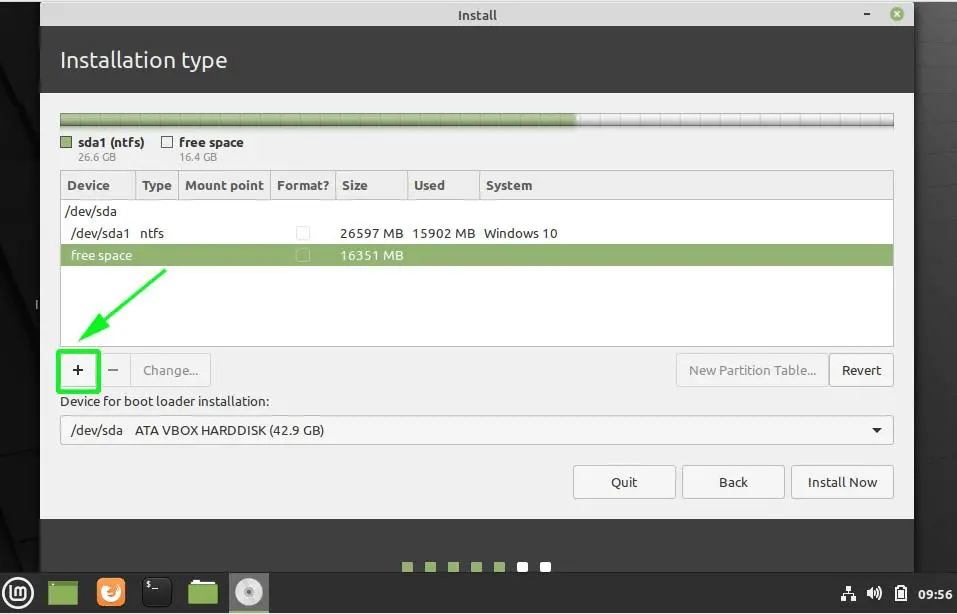
The next window will list all the partitions on your hard drive. As you will notice, you already have the Windows 10 NTFS partition and the free space we created earlier on by shrinking the hard drive.
We will use the free space to create partitions for Linux Mint 20. Therefore, select the free space entry and click on the plus sign [ + ] button.
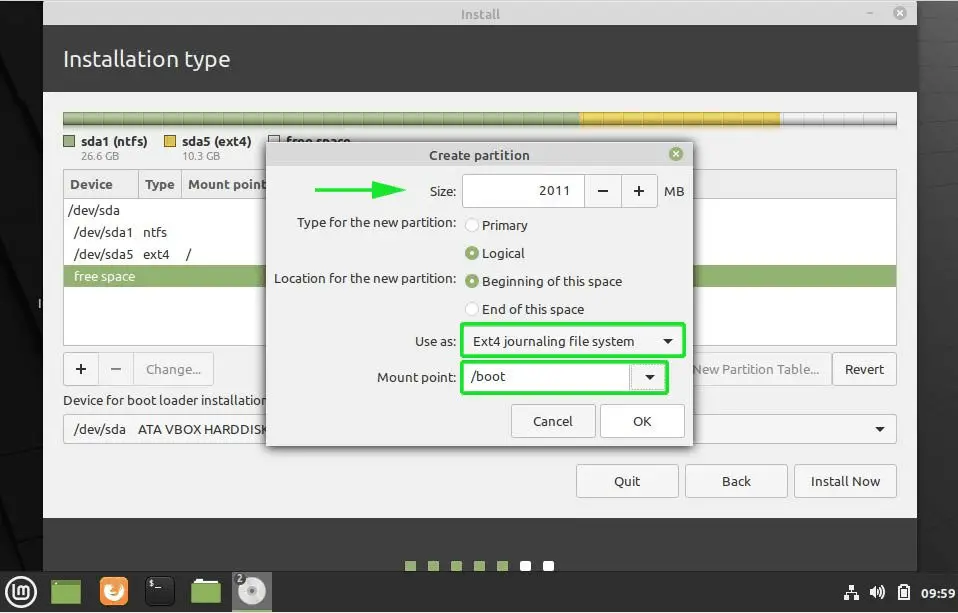
We are going to create the following mount points (Partitions)
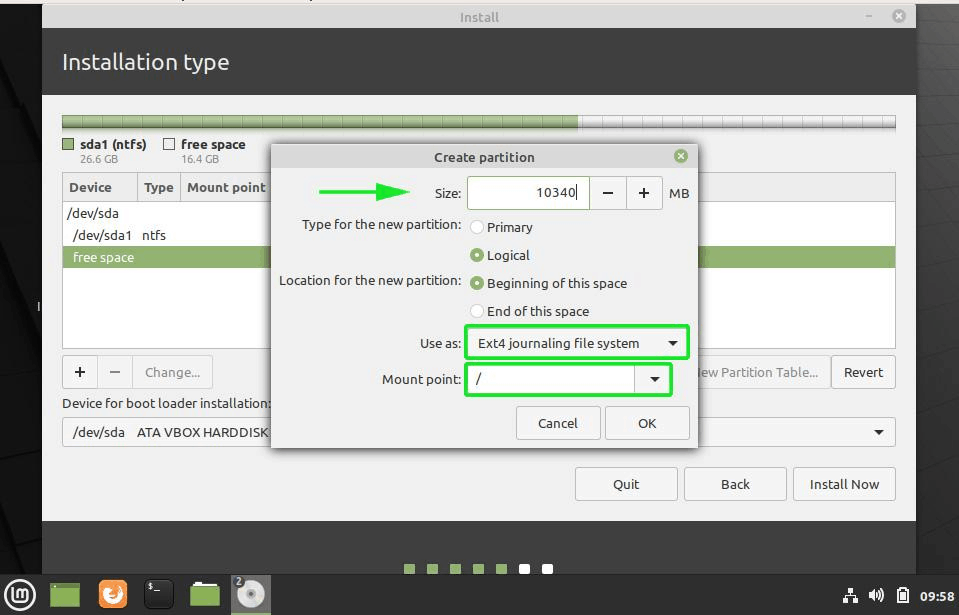
- Root partition – / – 10340 MB
- Boot partition – /boot – 2000 MB
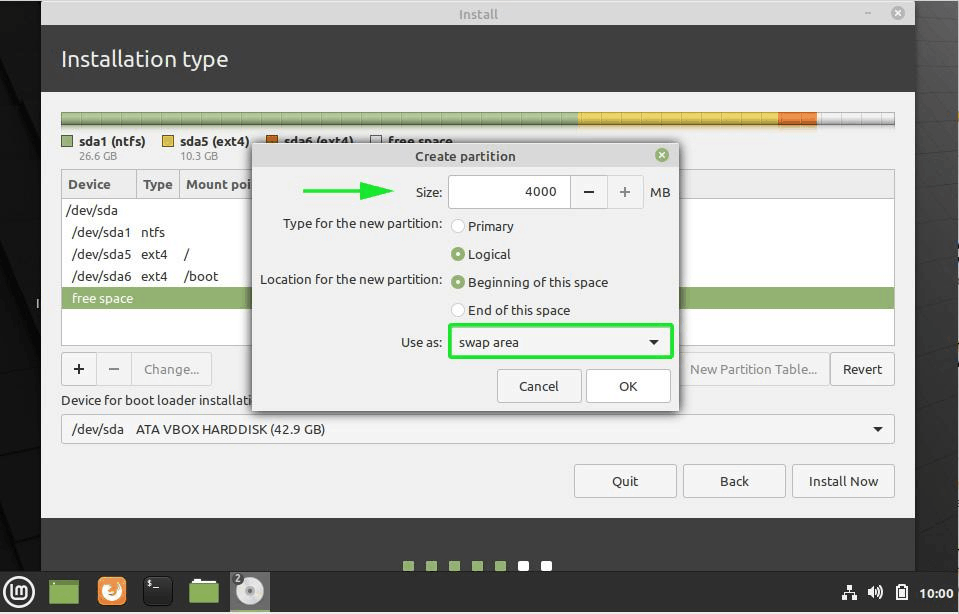
- Swap filesystem – 4000 MB
On the ‘create partition’ pop-up, specify the size of the root partition, filesystem to be used and mount point ( / ). Then Click ‘OK’
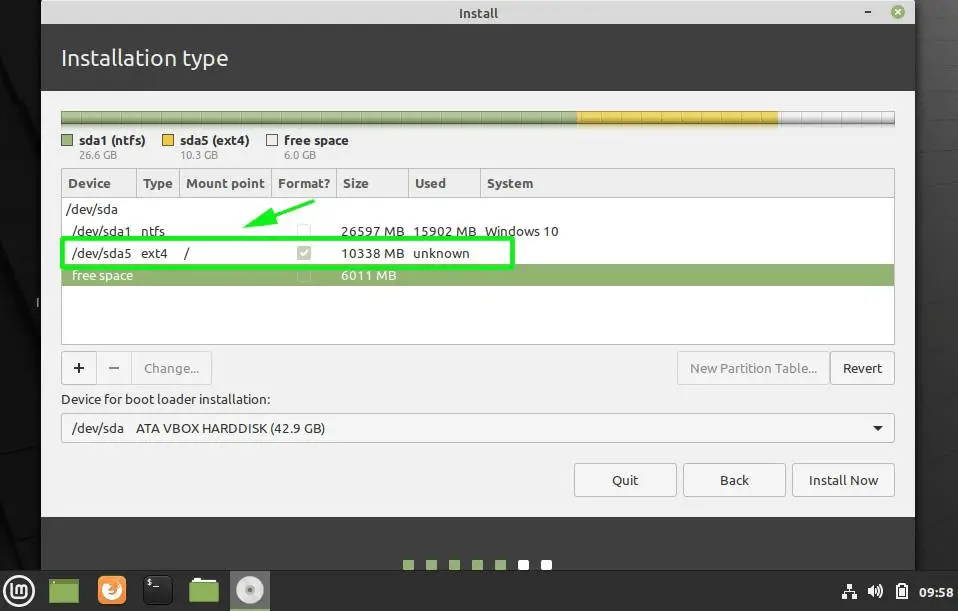
If you look closely, the root partition, labelled /dev/sda5 has been created.
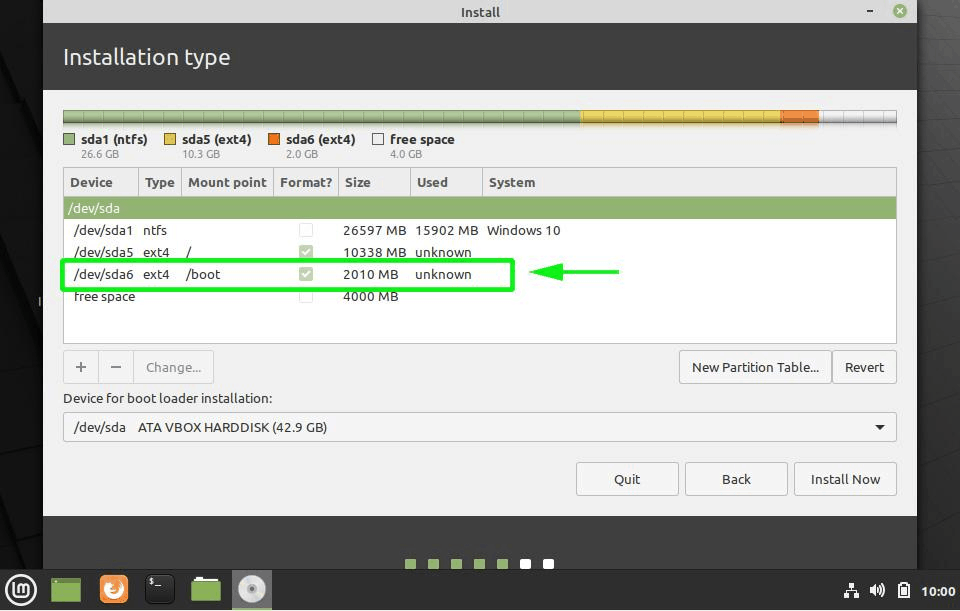
To create the boot partition, repeat the same procedure by clicking the plus sign [ + ] and once again specifying the size of the partition, file system and choosing the partition type as /boot as shown.
The boot partition will be created labelled as /dev/sda6.
Finally create the swap filesystem. Swap is a virtual space that is created on the hard disk and comes in handy when the RAM is almost getting depleted. It supplements the RAM and avoids instances of processes getting killed when the RAM is overwhelmed.
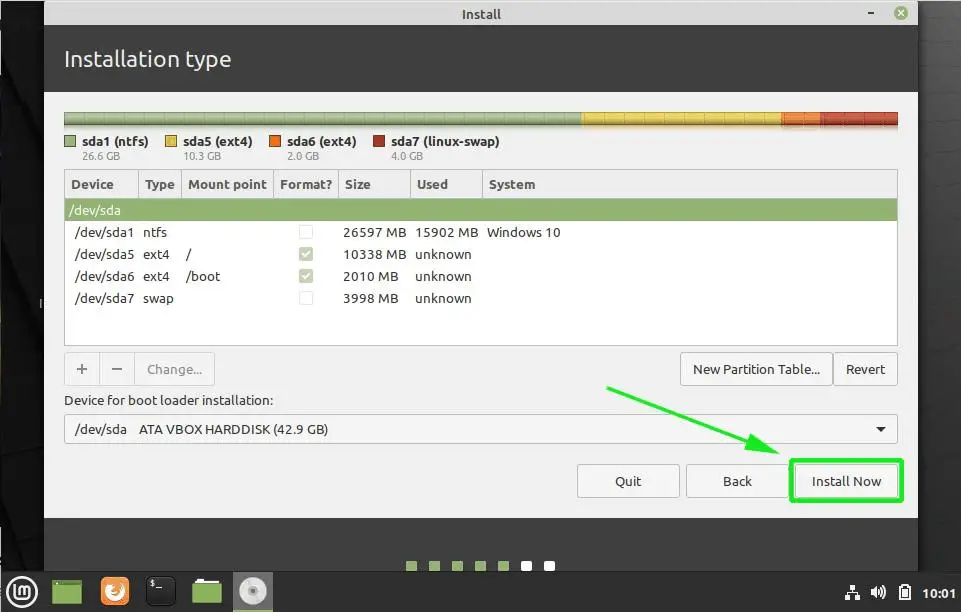
The complete partition table should resemble what we have below with both Windows and Linux partitions. To proceed with the installation click the ‘Install Now’ button.
Next, you will be prompted to write changes to the disk. Click on the ‘Continue’ button to save the partitions on your hard drive.
Step 6) Choose your preferred language and user credentials
In this step, you will be required to select your location on the world map. If you are connected to the internet during the installation process, your location will be auto-detected. Otherwise, simply click on the world map provided to select your location and click on the ‘Continue’ button.
Thereafter, create a default user account by providing your username, your PC’s name and your preferred password. Then click ‘Continue’.
Step 7) Linux Mint 20 Installation begins
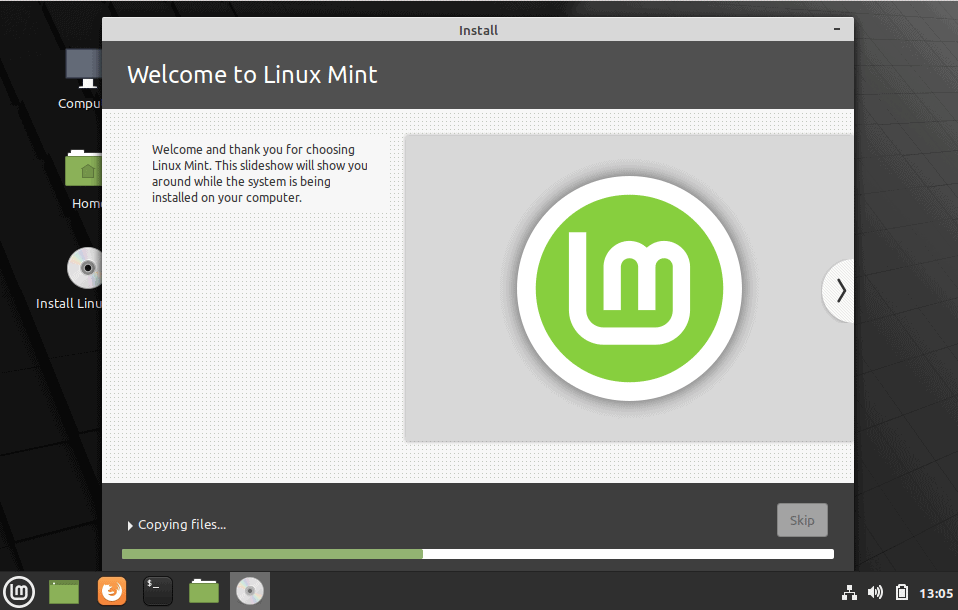
The installer will begin downloading, copying and installing software packages on your system. This will take a while, and this would be an awesome moment to take a break and grab a cup of tea.
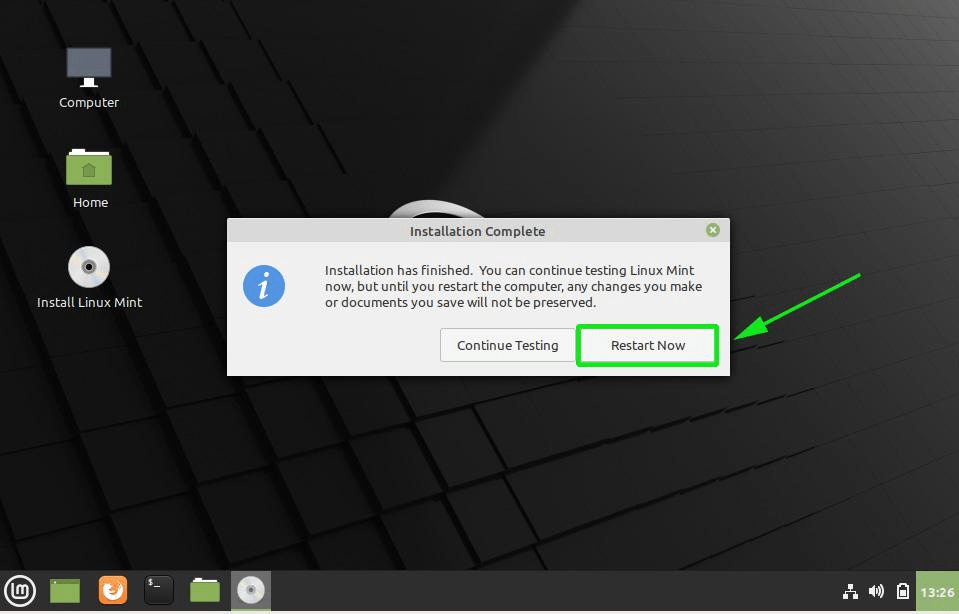
Once the installation is complete, click on the ‘Restart Now’ button to reboot the system.
Step  Choose Operating System to boot (Windows or Linux Mint 20)
Upon rebooting, notice that you now have 2 operating systems you can pick to boot into: Linux Mint 20 and Windows 10. Feel free to scroll up and down using the up/down arrow keys to select the OS you want to boot into.
To boot into Linux, simply hit ‘ENTER’
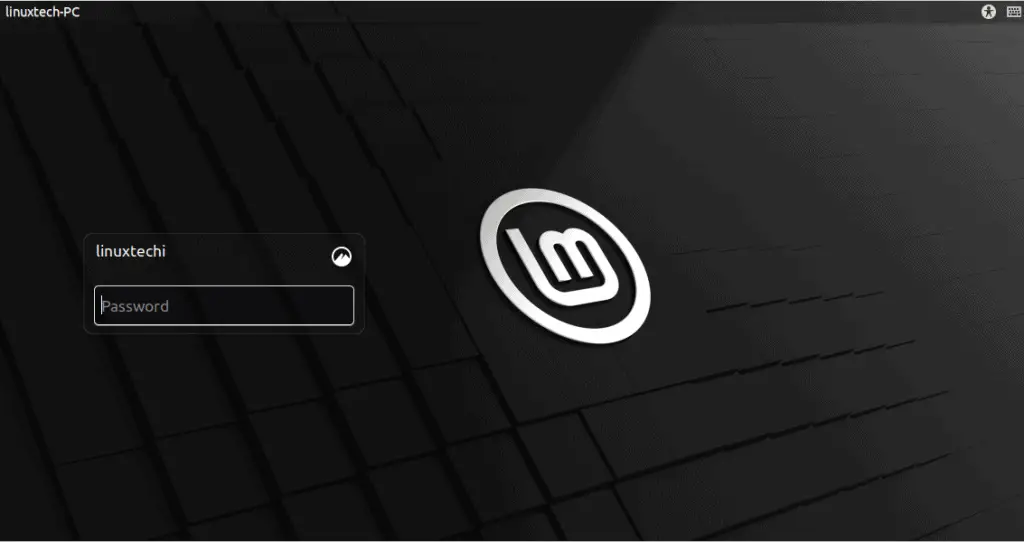
Provide your password and hit ‘ENTER’ to log into the system.
And this wraps up this guide on how to dual boot Windows 10 and Linux Mint 20. We do hope that you can now comfortably set up a dual boot system on your PC. Your feedback is much appreciated.
The user-friendliness of the Mint desktop makes it one of the most prevalent Ubuntu-based variants. Besides, it has an easy-to-use interface making it a charm for beginners. Moreover, Mint can run at full speed on even the most outdated computers. Cinnamon, MATE, and Xfce are the three most popular desktop environments on the Mint download website, with Cinnamon being the flagship version.
Linux Mint is an excellent option if you’re wondering where to begin your Linux journey. See the magic when you install Linux Mint on a computer that can barely run Windows.
Dual-booting Linux Mint with Windows
In this article tutorial, we’ll look at how to get Linux Mint up and run quickly. In addition, we’ll look at how you may run it alongside Windows 10 in a dual-boot configuration.
Note: We don’t advocate messing with your computer’s hard disk unless you’re an expert. Don’t neglect to back up your data before you begin!
Prerequisites
- An 8GB or more flash memory device
- Free disk space (at least 100GB)
- Patience
If your laptop or desktop already has Windows 10, you must disable the following options in the UEFI menu:
- Fast Boot and
- Secure Boot options.
If the machine doesn’t already have an operating system installed, install Microsoft Windows first and then proceed with the installation of Linux Mint.
As a newbie, Linux Mint is one of the better options. Linux Mint is simple to use, and getting it up and running isn’t difficult either. This guide will teach us how to install Linux Mint alongside Windows 10.
Here are a few things you need to know about installing Linux Mint before getting started. You may begin using any Linux-based operating system in a few different ways, as shown below:
- Virtualization: You may run a Linux operating system on a Windows environment using a virtual machine. Using this method, you may gain a feel for Linux safely and securely. You may want to avoid this if you have less than 4 GB of RAM.
- Linux live version: Consider running Linux off a USB stick instead of a hard drive: You may boot Linux from a USB or DVD using this approach. In most cases, this process takes a long time, and your Linux system modifications aren’t stored. If you only want to get a feel of Linux, this is a great option.
- Remove Linux and Windows: It is possible to delete both Windows and Linux if you back up your data and have a Windows recovery CD on hand or are determined not to reinstall Windows in the future.
- Concurrently install and run Linux and Windows: Dual booting Linux and Windows is a term for this procedure. Rather than beginning from scratch, you can use an existing Windows PC to run the Linux operating system. There is a choice between Windows and Linux when your computer starts up. This may necessitate changing the boot order or partitioning the hard drive. Using Linux and Windows together on one system might be confusing for those just getting started, but there is no better approach.
Before starting, there is one question we must answer that most newbies and existing users are concerned about.
Will dual-booting slow down your system?
This question has been trending in the Linux Users Group for quite a while. Hence, this section’s essence is to provide a clear answer. To put it plainly: No. Your PC will not be decelerated by running Linux and Windows simultaneously.
The only hiccup is that you receive 10 seconds of buffer time to choose between Linux and Windows when you power up your computer. You may use Linux or Windows as your sole operating system after booting into any of them. Your system’s usefulness is unaffected. Therefore, dual-booting does not slow down your computer.
Installing Linux Mint alongside Windows 10
Recommended precautions
Before we examine how to dual boot Linux Mint and Windows, I’d like to provide you with a few more safety tips:
- Back up your information: Disk partitions will be on your to-do list. This isn’t a significant deal, but you might lose data if you accidentally touch the wrong partition. To be safe, I recommend regularly backing up your vital data to an external hard drive or cloud storage service such as Google Drive or Amazon Cloud Storage, whichever you choose.
- A boot repair disk is a must-have. You can use a boot repair CD to fix a broken boot. You can construct a boot repair disk from an additional USB or CD if you have one around.
- Make sure you have a Windows live or recovery CD on hand: You may utilize the Windows CD to reinstall Windows if your boot gets screwed up and you wind up with an unbootable PC.
I’m not trying to discourage you, and I hope you understand that. This section prepares you for the worst-case situation.
For machines with Windows 10 already installed, please refer to this article. Linux Mint is being installed on a Windows machine, not the other way round.
Making a USB Drive Bootable with Rufus
The first step is creating a USB drive that can boot into the distribution. Rufus is the program we’ll be using in this article to create a bootable USB drive, which you can get here.
- Linux Mint may be downloaded from this page. Once you have downloaded it, save it as an iso file on your hard drive.
Linux Mint Download page
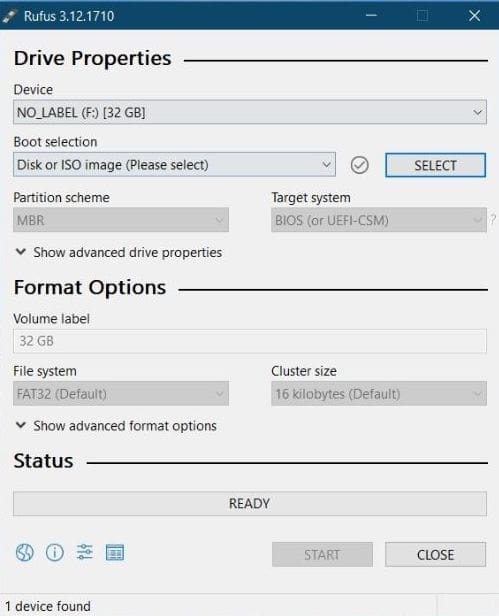
- Plugin your USB flash drive to your computer’s USB port and open Rufus
Rufus
- Rufus will instantly recognize your flash drive. Choose the “Select” option.
- Navigate to your desktop and pick the ISO file. Now, click on the start button.
- If asked, allow Rufus to obtain Syslinux and wait for the formatting procedure to complete.
Creating a Linux Mint partition
- In the Windows Start menu’s search field, type “partitions” and select the first result that says “Create and Format Hard disk Partitions.”
- Your computer’s partitions and disks will be visible. Since my laptop contains both an SSD and a hard drive, this window may appear differently on your machine. I’m going to install Mint on the HDD.
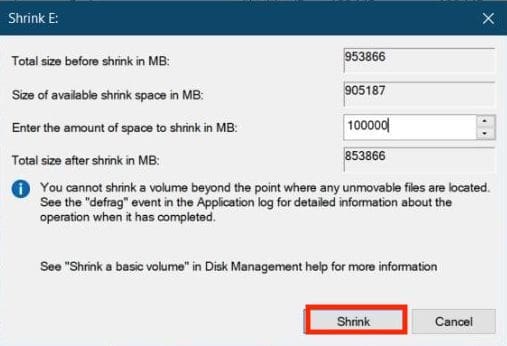
- To shrink the volume of your drive, right-click on it and select “Shrink Volume.” Next, enter the desired quantity of shrinkage (in my instance, 100GB) and click “Shrink.”
Partition hard disk
This will result in the creation of an empty segment on the drive. You will now notice a partition labeled “Unallocated.”
- At the moment, Connect the USB device to which you flashed Mint, restart your computer, and continue pressing F2, F5, F8, F10, or F12 to access the BIOS. The key used to access BIOS is OEM-specific; therefore, try another if one key does not work. It’s F2 in my situation (for Lenovo).
BIOS Configuration
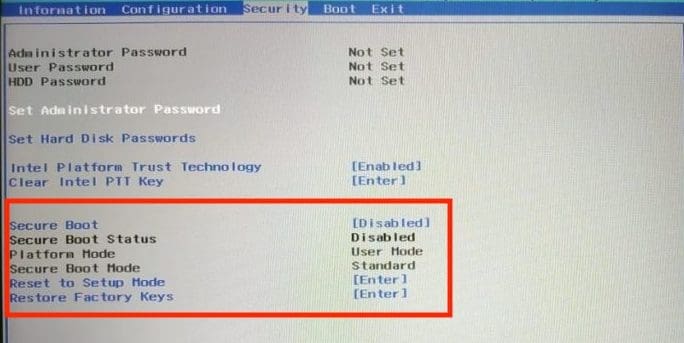
- Ensure that secure boot is deactivated under security.
Disable Secure Boot
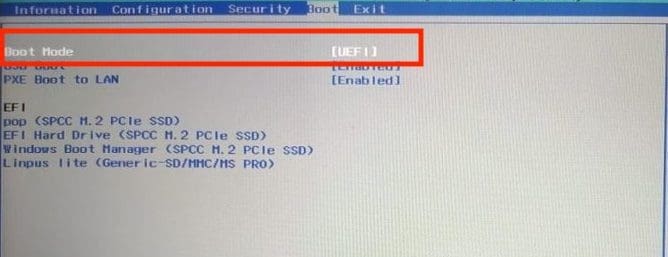
Ascertain that UEFI is selected in the boot options.
UEFI boot mode
While not every interface may look precisely like this, the terminology will almost certainly be the same. Save your preferences and leave BIOS (typically, the functions of each button are available under the BIOS options, as seen in both images).
Installing and booting Linux Mint
Here are some of the tutorial’s most critical phases to ensure you don’t miss anything.
1. Entering the Boot Entering the Boot
Turn on your computer, and before the manufacturer’s logo shows, press the OEM-specific key to boot into Boot choices. Look for the key on Google or in your PC’s manual, or press F2, F5, F8, F10, or F12. The menu will appear as follows.
Boot Manager
2. Navigate and key in
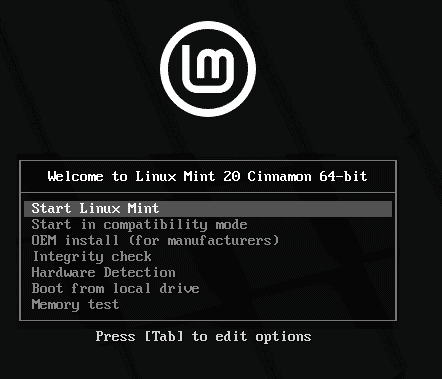
As you can see in the following image, your USB drive will be displayed last, as I’m using an SD card in an SDHC adaptor. Pressing Enter brings you to the Linux Mint desktop. You may experiment with Mint before installing it.
Linux Mint
3. Launch the program “Install Linux Mint.”
On the desktop, look for the “Install Linux Mint Application.” And fire it up
Install Linux Mint
4. Configure the language preferences
Configure the keyboard and operating system language selections until you reach the “Installation Type” option.
Language preferences
5. Choose “something else.”
Continue your installation adventure by selecting the “Something else” option. Alternatively, you may choose “Erase everything and install Mint” if you have previously backed up all of your files.
Something else
Note: If Windows Boot Manager is identified automatically, you can install Linux Mint alongside it. This option guarantees that the installer partitions the hard drive automatically without causing data loss.
The second choice, “Erase the drive and install Linux Mint,” should be disregarded for dual-booting purposes because it is potentially harmful and will wipe your disk clean.
Select the “Something else” option and click the Continue button to proceed with a more flexible partition plan.
6. Additional partitions!
Phew! It’s been a hard road here so far; you don’t want to give up now, do you? Four more steps, and you’ll have Linux Mint all to yourself. Remember how much space we saved by installing Mint in Windows? First, locate a partition called “Free Space” in the list of partitions. Then, create new partitions by double-clicking on them.
Additional partitions
7. Root
The Root directory is where your system’s critical components are kept. Consider it to be Windows’ “C: Drive.”
The minimum space suggested for root is 30GB (considering we only have 100GB space to use). Select “/” from the list of Mount points. Assemble everything precisely, as shown in the image.
Root partition
8. Home
Home is where most of your downloaded items and folders will be stored. In our situation, the bare minimum suggested space for the Home sector is 60GB. Therefore, ensure that “/home” is selected from the list of mount locations.
Home
9. Swap
If you have below 2GB of RAM, swap memory is required. To begin, swap memory is utilized when your RAM runs out of space, allowing you to continue working.
Swap
Note: The swap partition is now ready to be created. What size swap partition should be used for the Linux Mint installation.
The answer is dependent on your RAM capacity, your requirements, accessible disk space, and whether or not you want to employ hibernation. You may like to consider the following suggestion:
- RAM less than two gigabytes: Swap should be twice the amount of RAM.
- RAM between 2 and 4 GB: Swap should equal the RAM capacity.
- RAM between 6 and 8 gigabytes: Swap should be more than RAM
- RAM greater than 8 GB: Swap should be at least half the RAM.
Avoid spending an excessive amount of time contemplating the swap. It is advantageous for computers with little memory. The less swap space used by a machine with more than 8 GB of RAM and an SSD, the better.
Swap files are used in newer versions of Linux Mint to create a custom file in the root directory and use it as the swap area. A system can have both a swap partition and a swap file.
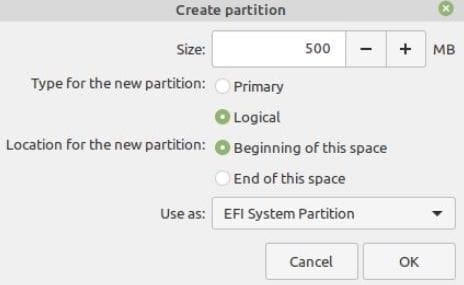
10. How to create an EFI partition
EFI saves your Grub, enabling you to boot into Windows or Mint during the boot process. The suggested minimum amount of space to assign is 500MB.
Create EFI Partition
11. The final step!
After creating the partitions, ensure that you choose the Root partition (it will be highlighted) and click the “Install Now” option.
The installation process usually takes up to 30 minutes, dependent on your hard drive’s speed. After that, you’ll be prompted to reboot, and after the process, you’ll have a dual-boot machine with Windows and Linux Mint installed.
Installer running
After rebooting, the system will initially boot into Grub, with Linux Mint as the first boot choice. After ten seconds, the machine will automatically launch Linux Mint. Additionally, you may direct the device to boot into Windows or Linux at this point.
The Grub boot loader is disabled by default on PCs with more recent UEFI firmware, and the system boots directly into Windows.
To boot into Linux after a restart, you must hit the special function boot key and then pick the operating system you wish to start.
Navigate to the UEFI settings, choose your preferred operating system, and save the changes to alter the default boot order. Then, consult the vendor’s handbook to see whether special function keys are needed to boot or enter UEFI settings.
After the system has finished loading, log in with the credentials generated during the installation procedure.
That is all! You have now successfully installed Linux Mint on your computer. You’ll find the Linux Mint ecosystem to be extremely strong, quick, versatile, pleasant, simple to use, pre-installed with the majority of applications necessary by a typical user, and relatively stable.
Conclusion
That concludes our how to install Linux Mint tutorial. Pat yourself on the back if you’ve made it this far, and for those who are still stuck in the process, don’t hesitate to get in touch with us with the issue(s) you’re having, and we’ll do our best to assist you. Thank you for reading.
Overview
Dual booting allows users to run two operating systems on the same computer, giving them the flexibility to choose between different platforms based on their needs. In this article, we will explore the process of dual-booting Linux Mint and Windows 10, enabling you to enjoy the best of both worlds. Whether you’re interested in Linux or need specific applications available on Windows, this guide will help you set up a dual boot configuration seamlessly.
Introduction
Dual booting is the practice of installing two operating systems on a single computer, each residing on its dedicated partition. Dual booting involves partitioning the computer’s hard drive into multiple sections, with each partition dedicated to a different operating system. By dual booting Linux Mint and Windows 10, you can switch between the two operating systems at startup, granting you access to their respective features, applications, and capabilities.
Use Linux Inside Windows in a Virtual Machine
If you want to explore the features of Linux without a full installation, running Linux inside a virtual machine is an excellent option. Virtual machines enable you to create a virtual environment within your Windows operating system, where you can install and run Linux Mint. Follow the steps,
- Select and download a virtualization software that suits your needs. Popular options include Oracle VirtualBox, VMware Workstation, and Hyper-V.
- Download the ISO file of the Linux Mint from the official website.
- Open the VM software and click on the option to create a new virtual machine. Follow the on-screen options like name and location.
- Allocate the desired amount of RAM and storage for the virtual machine. Select the ISO file for installation to set up the virtual machine. Please ensure that there is at least 20 GB of space allocated for the VM machine.
- Start the virtual machine. It will typically boot from the Linux distribution ISO file. Follow the installation process of the Linux distribution within the virtual machine.
- After the Linux installation is complete, the virtual machine will reboot, and we can use the Linux OS within the virtual machine.
The virtualization feature should be enabled in Windows to use the virtual machines. You can check if this option is enabled from the control panel. If it is not enabled, we can use the BIOS menu to enable virtualization.
Use a Live Version of Linux
Another way to experience Linux without installing it alongside Windows is by using a live version of the Linux distribution. Using a live version allows you to run the operating system directly from a USB drive or DVD without installing it on your computer. This allows you to run Linux Mint from the external media without making any changes to your existing Windows installation. Follow the steps,
- Download the ISO file and Linux Mint and also Obtain a USB drive with sufficient capacity. You will also need to download any of the tools like Rufus, UNetbootin, or Etcher to create the bootable USB.
- Insert the bootable USB drive with sufficient capacity into your computer.
- Restart your computer and access the BIOS or UEFI settings by pressing the appropriate key during startup.
- In the BIOS settings, navigate to the boot options and change the boot order to prioritize the USB drive.
- Save the changes and exit the BIOS/UEFI settings. A clear explanation of the BIOS menu is given in the dual boot section.
- Restart your computer, and it should now boot from the USB. The computer will load the live Linux environment from the USB.
Now you can use the live version of Linux through USB. The system will return to its default OS when the USB is removed.
Remove Windows and Linux
If you decide that dual booting is no longer necessary, you can remove either Windows or Linux from your system.
- Before proceeding with the removal of an OS in the boot setup, it’s important to back up the data that you want to keep.
- In the BIOS/UEFI settings, navigate to the boot options and change the boot order to prioritize the Windows installation media.
- Boot into the operating system that you intend to keep.
- Open the Disk Management utility in Windows by right-clicking on the Start button, and selecting Disk Management from the menu.
- Identify the partition associated with the operating system you wish to remove. Right-click on the partition and select Delete Volume to delete the partition.
- For removing the Linux OS, the partition will typically be in ext4 or another Linux filesystem format.
- Now, we will have unallocated space. Select the unallocated space on your hard drive and click New. Windows will automatically allocate the entire unallocated space for the Windows partition.
We can also perform the above space allocation manually through the following steps,
- In Windows, open the Command Prompt as an administrator. Run the command bcdedit to display the current boot entries.
- Identify the entry corresponding to the deleted operating system. Use the following command to remove the entry,
We have successfully deleted the Linux from the dual-booted system.
Install Linux Alongside Windows
For those who want to keep both Linux Mint and Windows 10 on their computer, installing Linux alongside Windows is the best approach. This method allows you to choose the desired operating system each time you start your computer. For this, we can go with a dual boot which is explained in the next section.
Will dual-booting Linux With Windows Slow Down Your System?
Dual booting Linux with Windows generally does not slow down your system. However, it’s important to consider your hardware specifications and the impact of running multiple operating systems simultaneously. Allocating sufficient resources to each operating system, such as disk space, RAM, and CPU power, will ensure optimal performance. Additionally, having a solid-state drive (SSD) can enhance overall system responsiveness and reduce any potential slowdowns.
Install Linux Mint in Dual Boot With Windows
To dual-boot Linux Mint with Windows 10, you need to perform the following steps,
- Go to the Linux Mint official website and download the Linux Mint ISO file for the desired version of Linux Mint.
[IMAGE 1 An image showing the home page of Linux Mint. START SAMPLE]

[IMAGE 1 FINISH SAMPLE]
- Visit the Ventoy website and download the latest version of Ventoy for your operating system or you could also download the Ventoy zip file from the official GitHub link.
- Insert the USB drive that you want to use for the dual boot installation. Note that all data on the USB drive will be erased, so make sure to back up any important files. Plug in the USB device and launch Ventoy.
- The Vectoy2Disk window will appear, select the USB drive from the drop-down menu. Click on the Install button to install Ventoy on the USB drive.
- After Ventoy is installed, navigate to the USB drive and copy the Linux Mint ISO file from your computer and paste it into the root directory of the USB drive.
You can follow the 6 a) and 7 a) steps for partition of space using the Disk Management utility in Windows or else you can also follow the 6 b) and 7 b) steps to partition the space using the GParted tool in Linux.
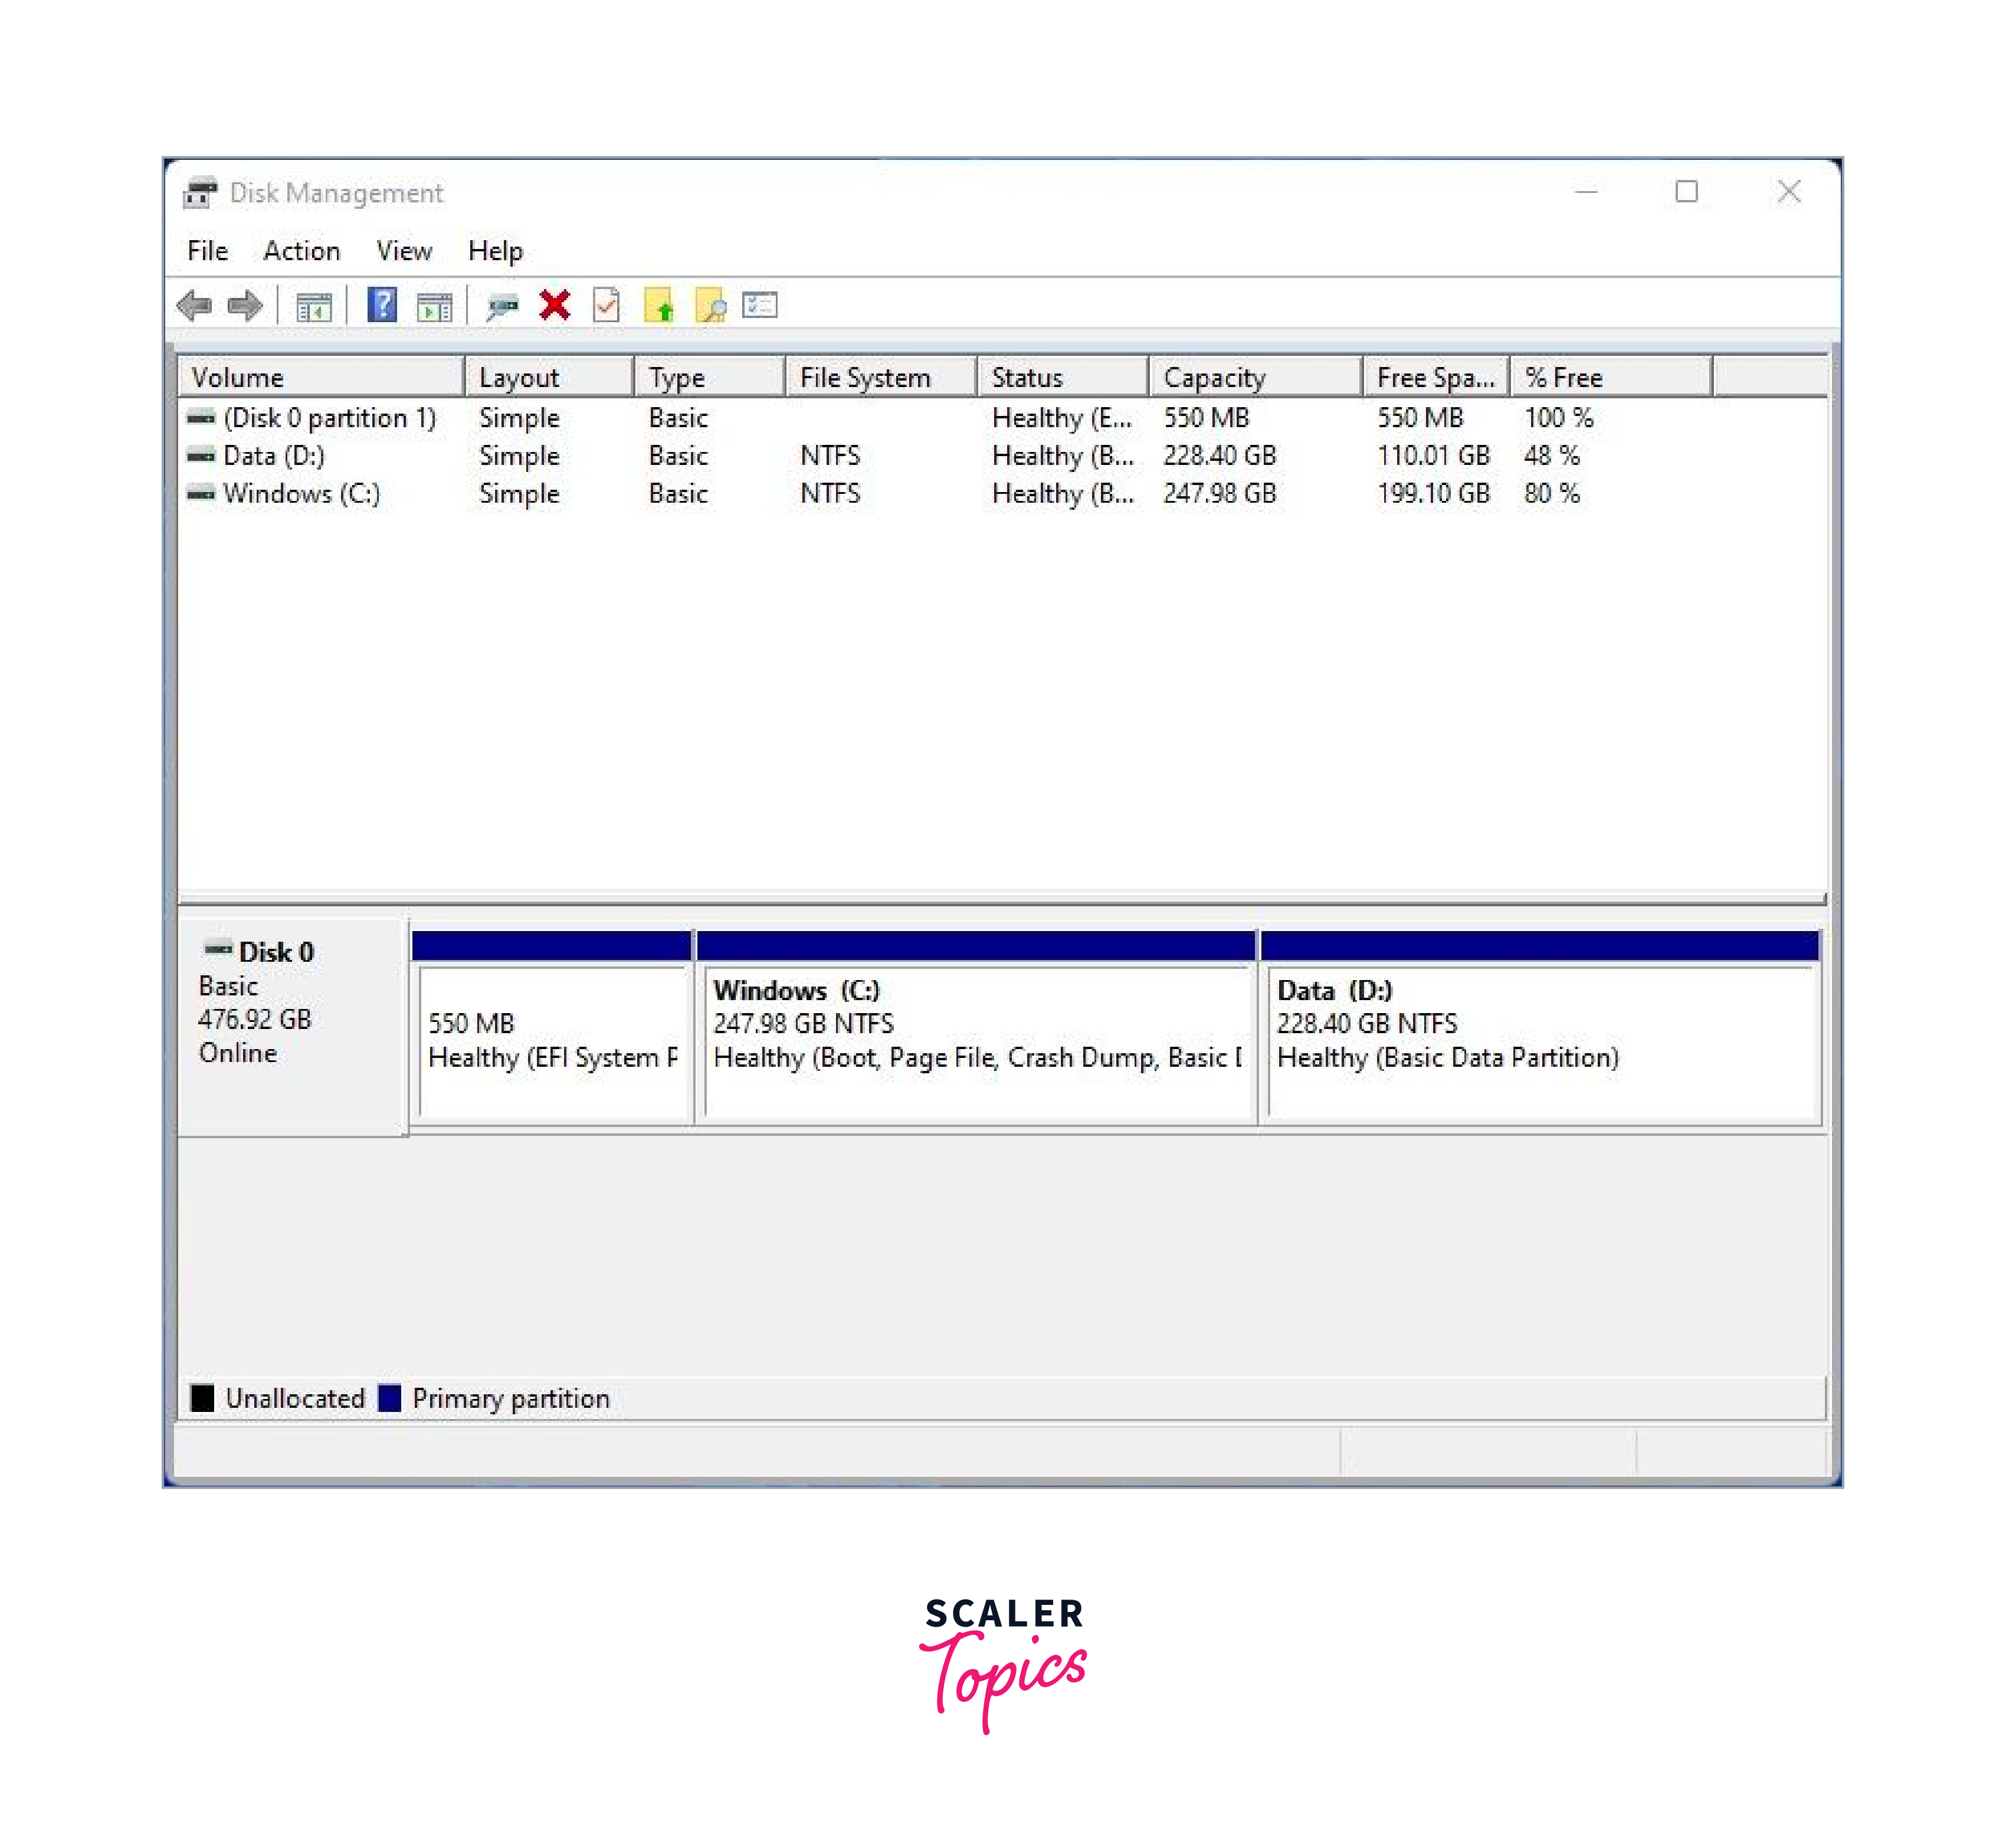
- a) On your Windows 10 system, press the Windows key and type Disk Management. Open the Disk Management utility.
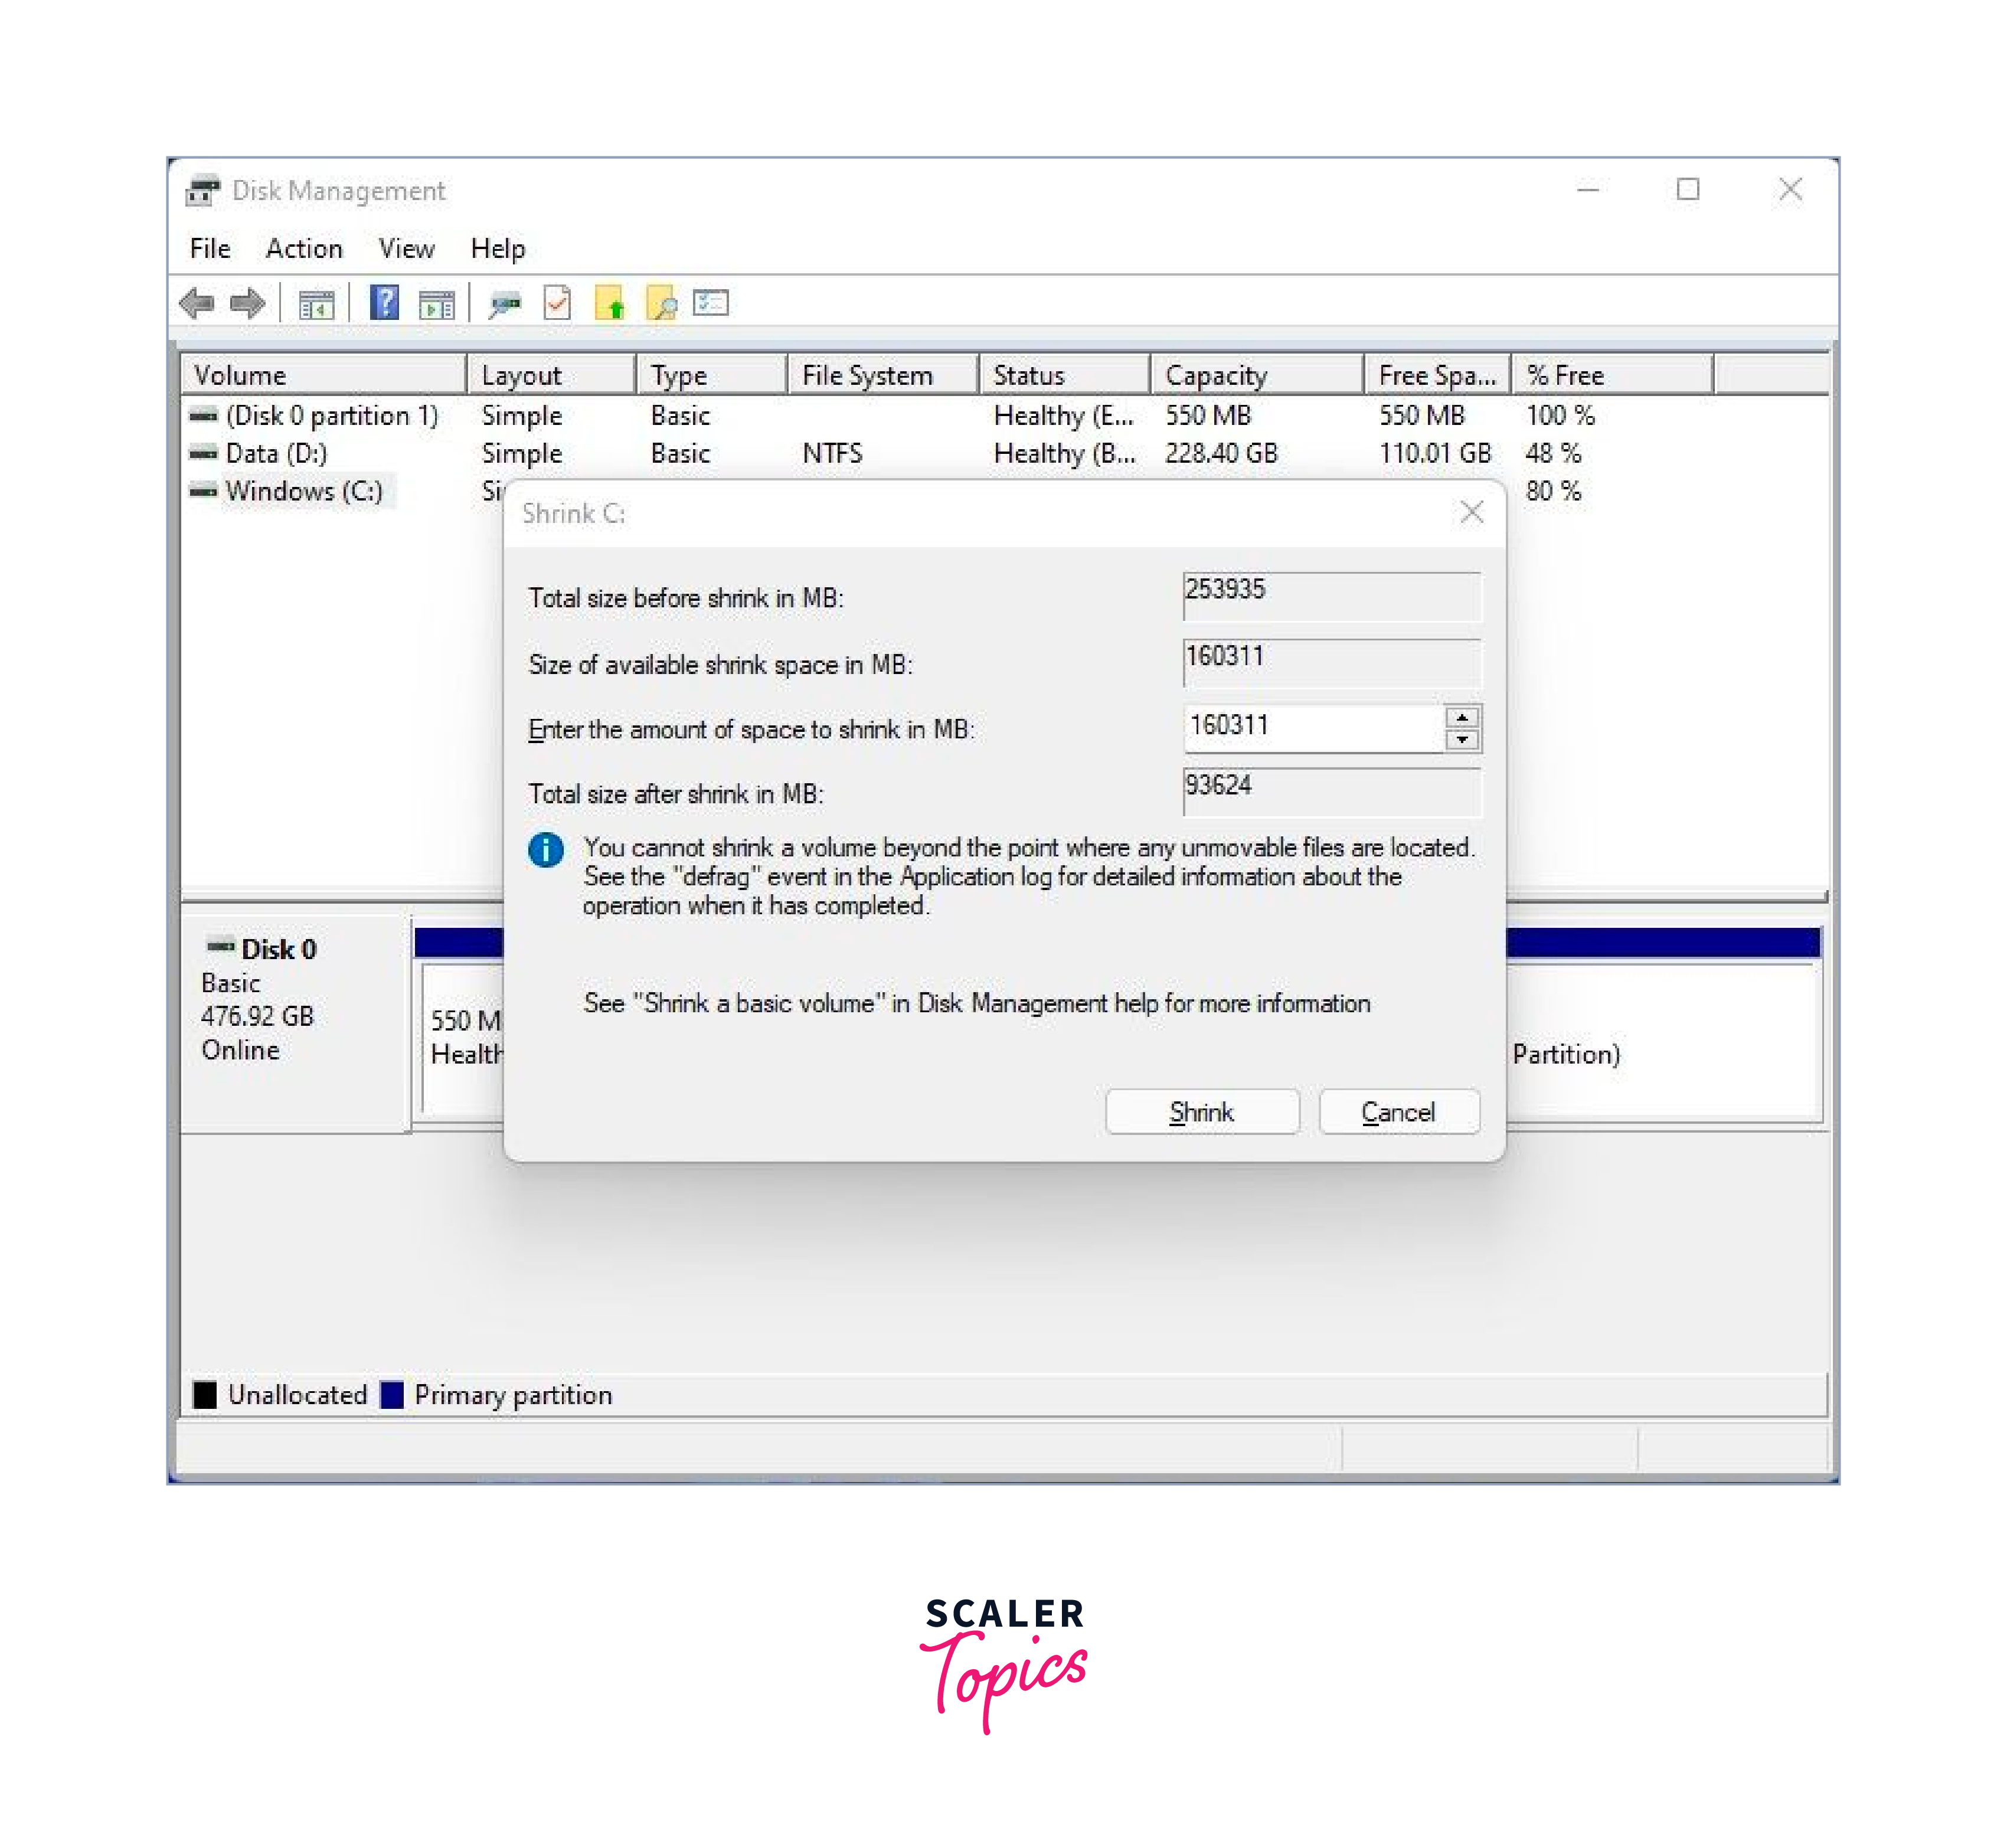
- a) Right-click on the Windows partition, select Shrink Volume, and specify the desired size for the Linux Mint partition. Click Shrink to create unallocated space for the Linux Mint installation.
- Restart your computer to enter the BIOS or UEFI settings.
- To enter the BIOS settings, you have to know the key to access the BIOS or UEFI settings. It may be F2, F10, F12, Esc, or Del keys depending on your computer. To access the BIOS menu, press it repeatedly before the operating system starts loading or the logo is displayed. If you miss the time, you can restart the computer and try again.
- To configure the boot order to prioritize booting from USB devices, navigate to Boot Options and disable the Secure Boot option for this system. Also, use the F5 and F6 keys to change the boot priority order(first) of ventoy USB to use it as the primary boot option.
- Then save the BIOS options and exit using the F10 or F12 keys.
- Then the Ventoy boot menu appears; you will see both the Windows 10 and Linux Mint options. Use the arrow keys to select Linux Mint and press Enter
Perform the following steps only if you haven’t performed the steps 6a and 7a. These steps show how to partition the disk using the Gparted tool in Linux,
- b) Then we need to free up space for installation; we can use the GParted tool in Linux for this purpose. Search for the Gparted tool and launch it. You may need to enter your password to authenticate.
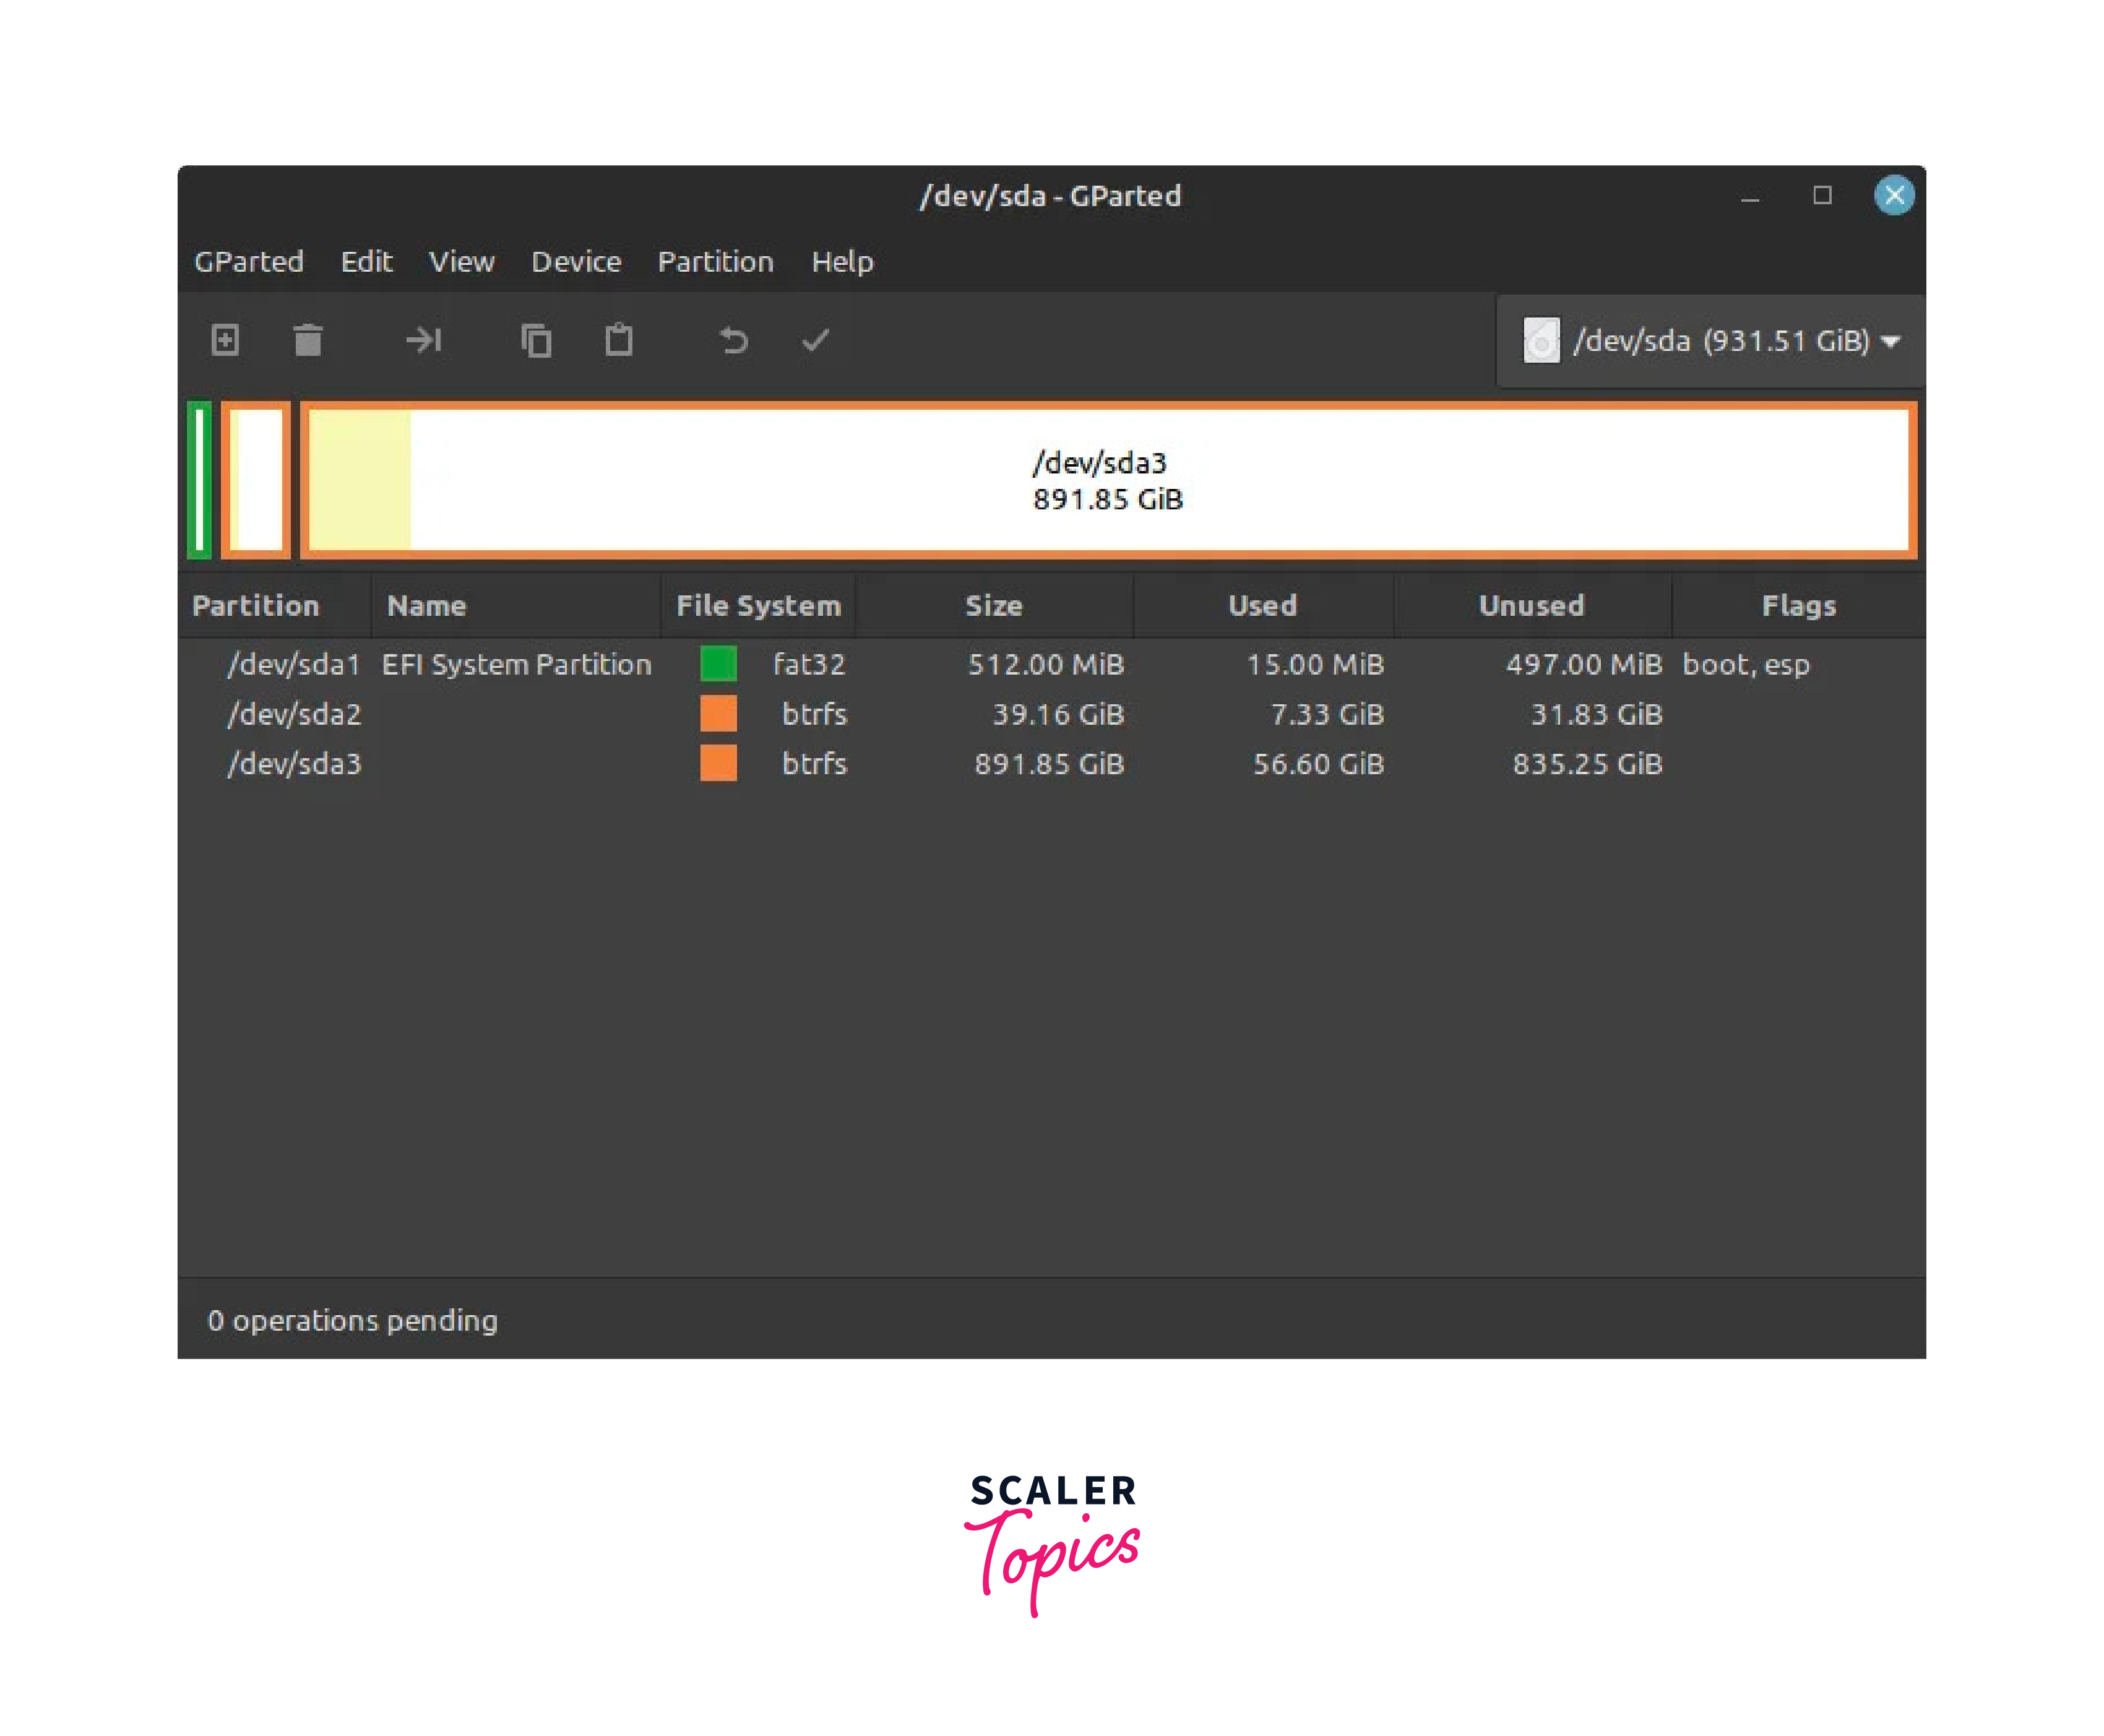
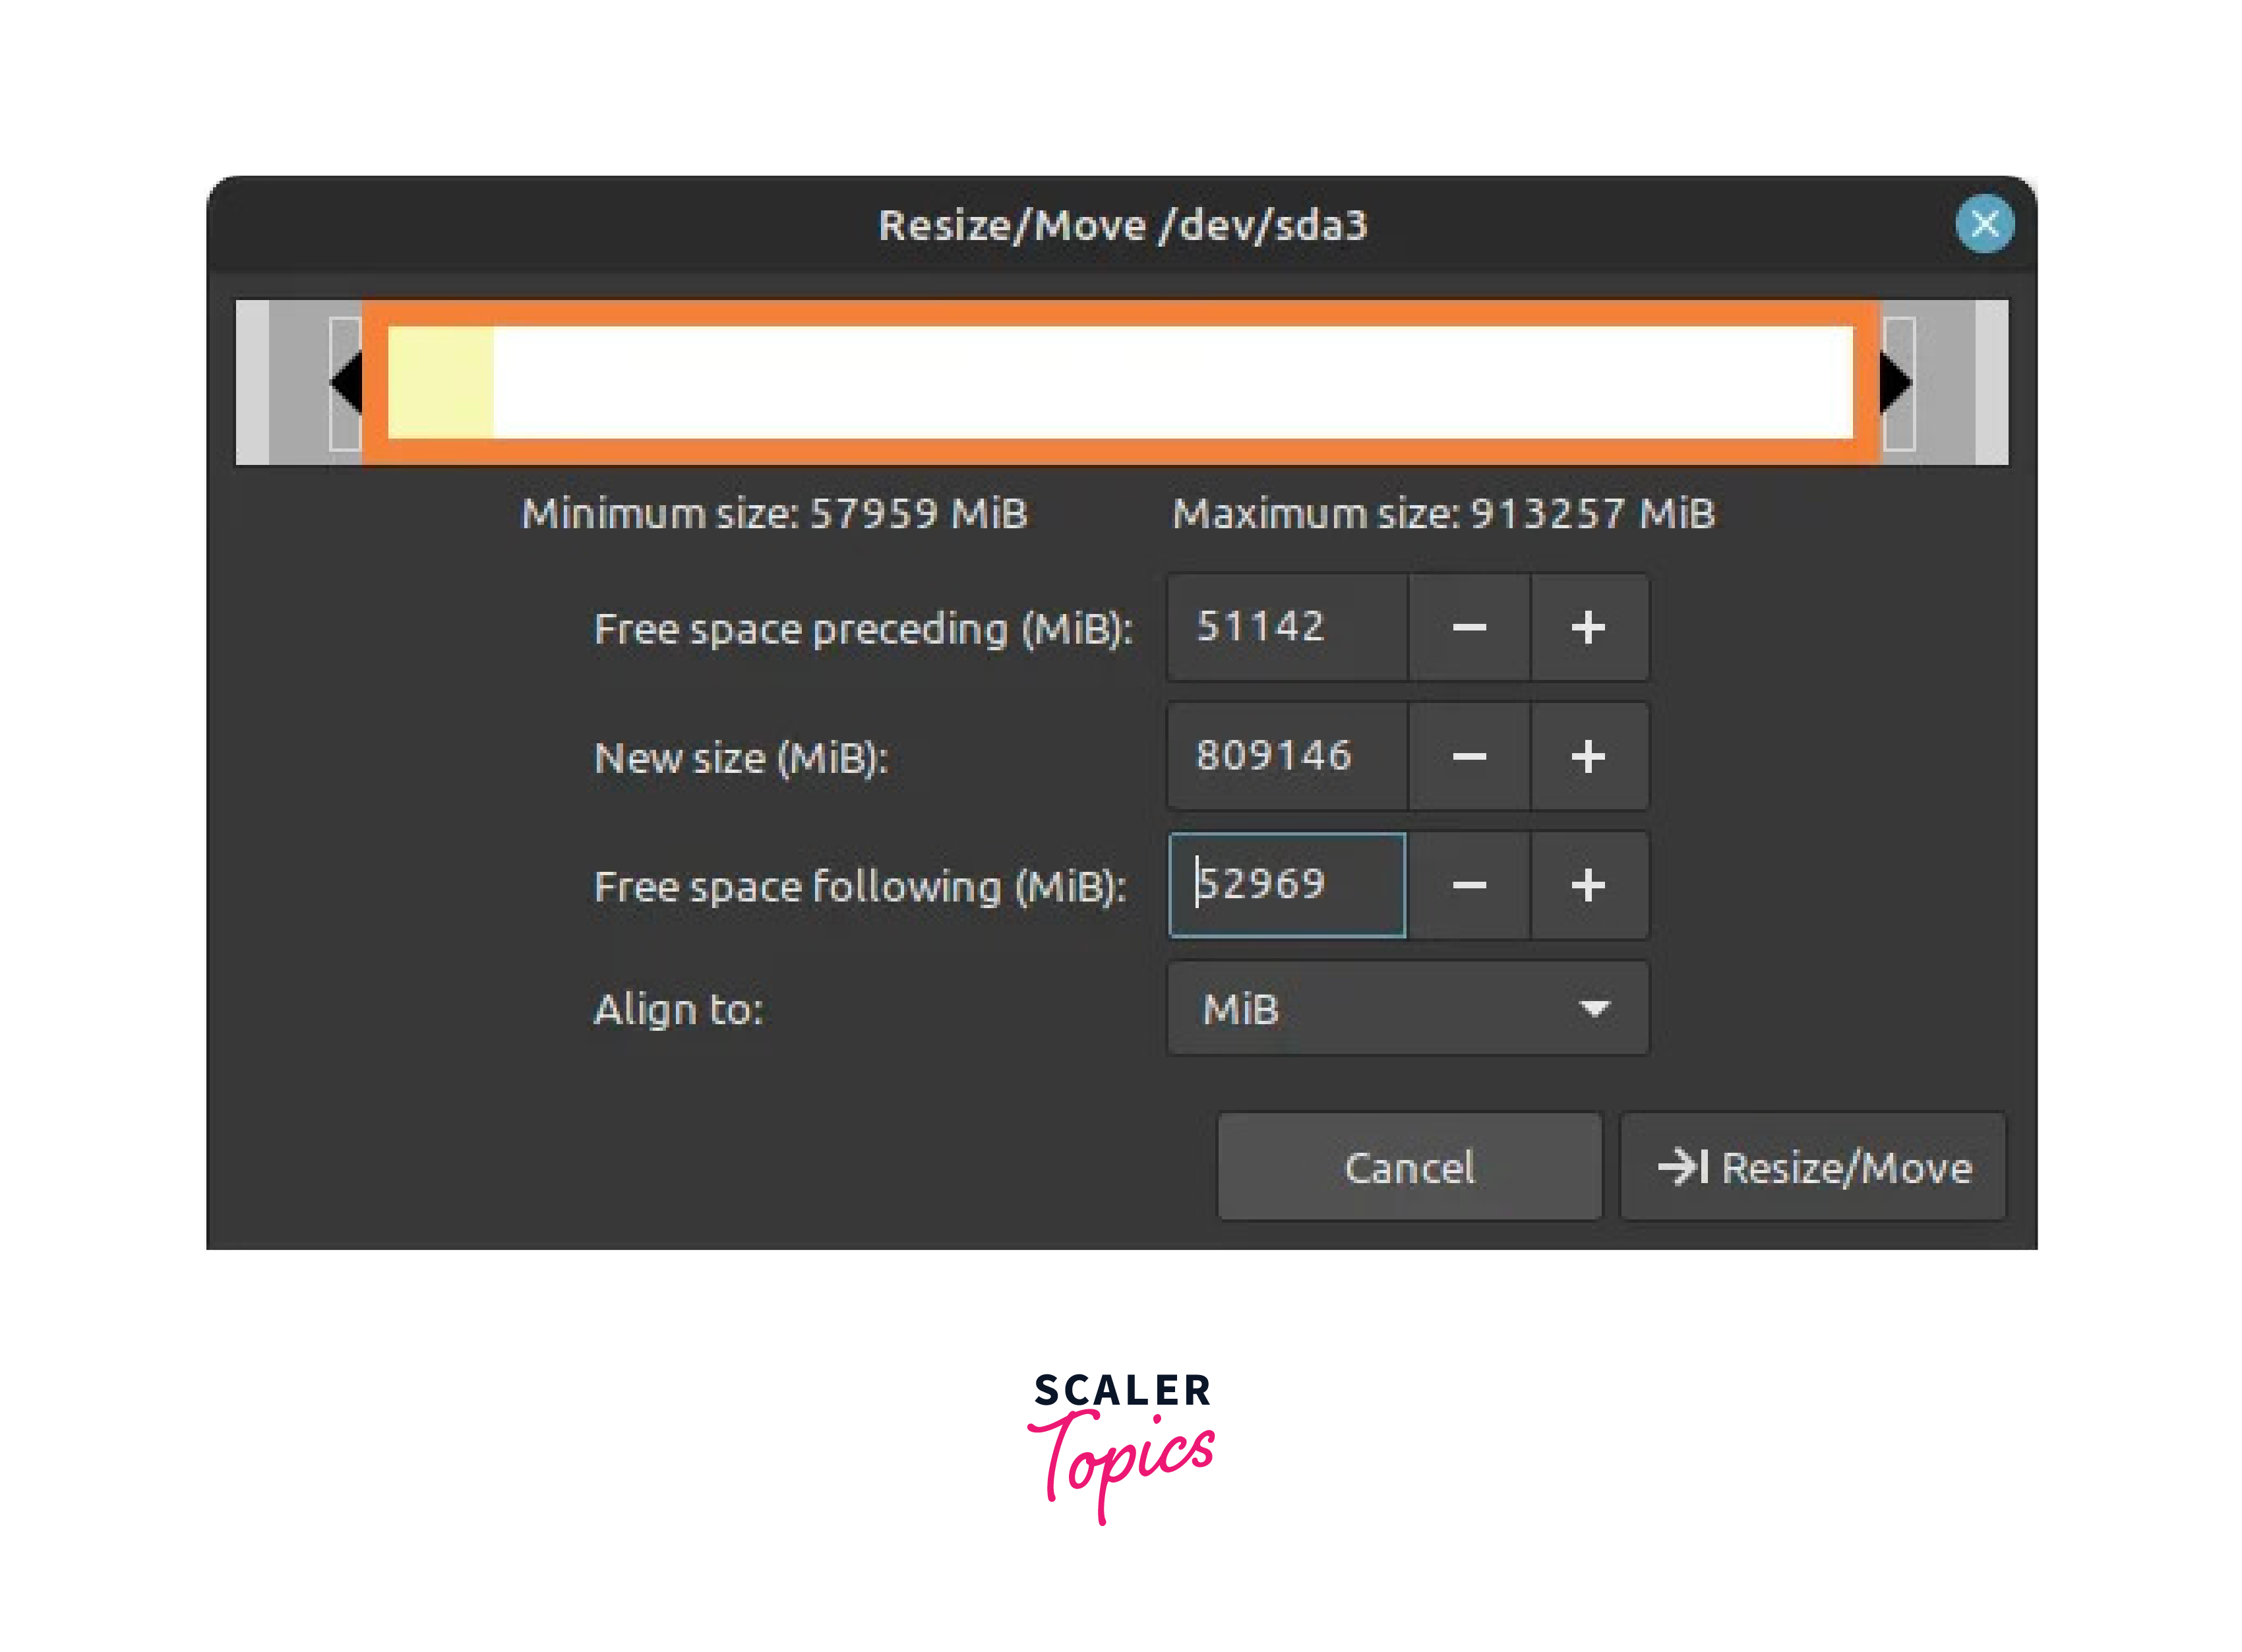
- b) In GParted, you will see a list of available disks in the top right corner of the window. Locate the partition that contains the Windows operating system files. This partition is typically the largest one (e.g.,/dev/sda3). Right-click on the Windows partition(s) and select Resize/Move.
The EFI (Extensible Firmware Interface) boot process is a modern method of booting computers that replaces the traditional BIOS. In our sample, the /dev/sda1 has the programs required for utilizing the EFI boot in Linux.
In the resize dialog, adjust the partition size to free up space for Linux Mint. Ensure you leave enough space for Windows as well. You must have at least 50 GB of unallocated disk space to proceed. Click Resize/Move to apply the changes. You should now see unallocated space created from resizing the Windows partition.
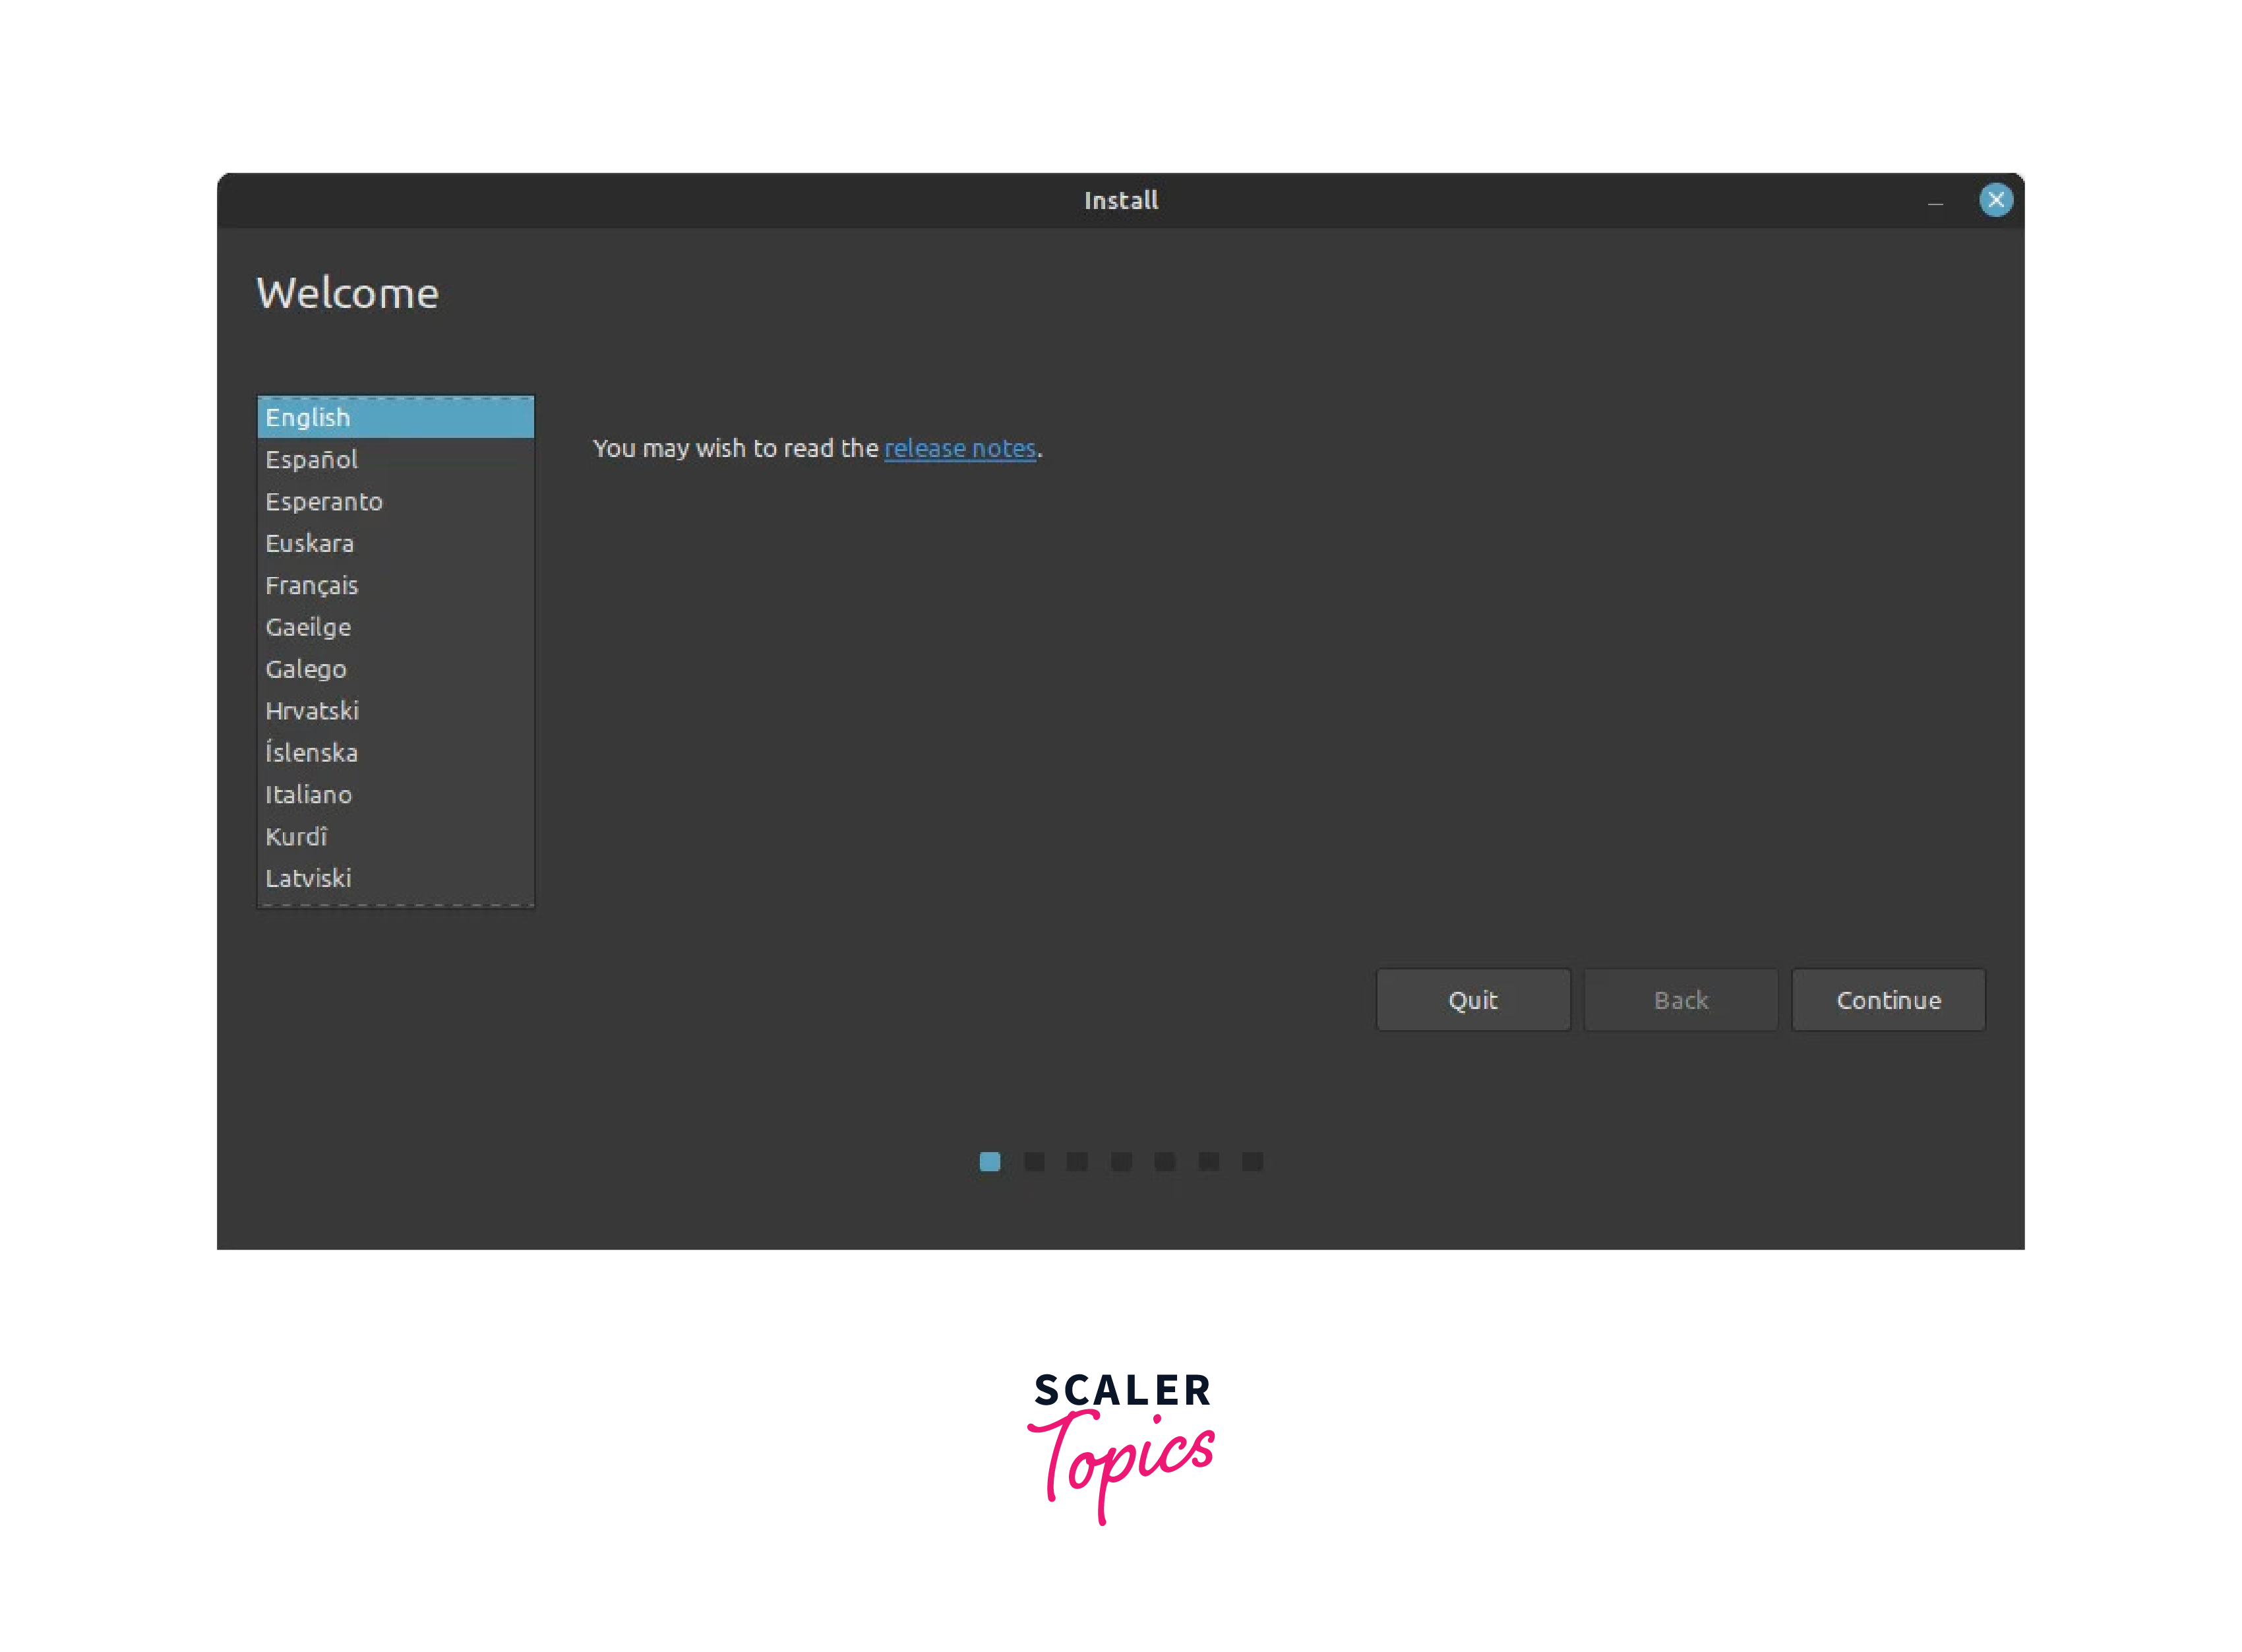
- Now on the desktop, click on the Install Linux Mint icon. The installer will open, and you will be prompted to select your preferred language. Choose the language from the drop-down menu.
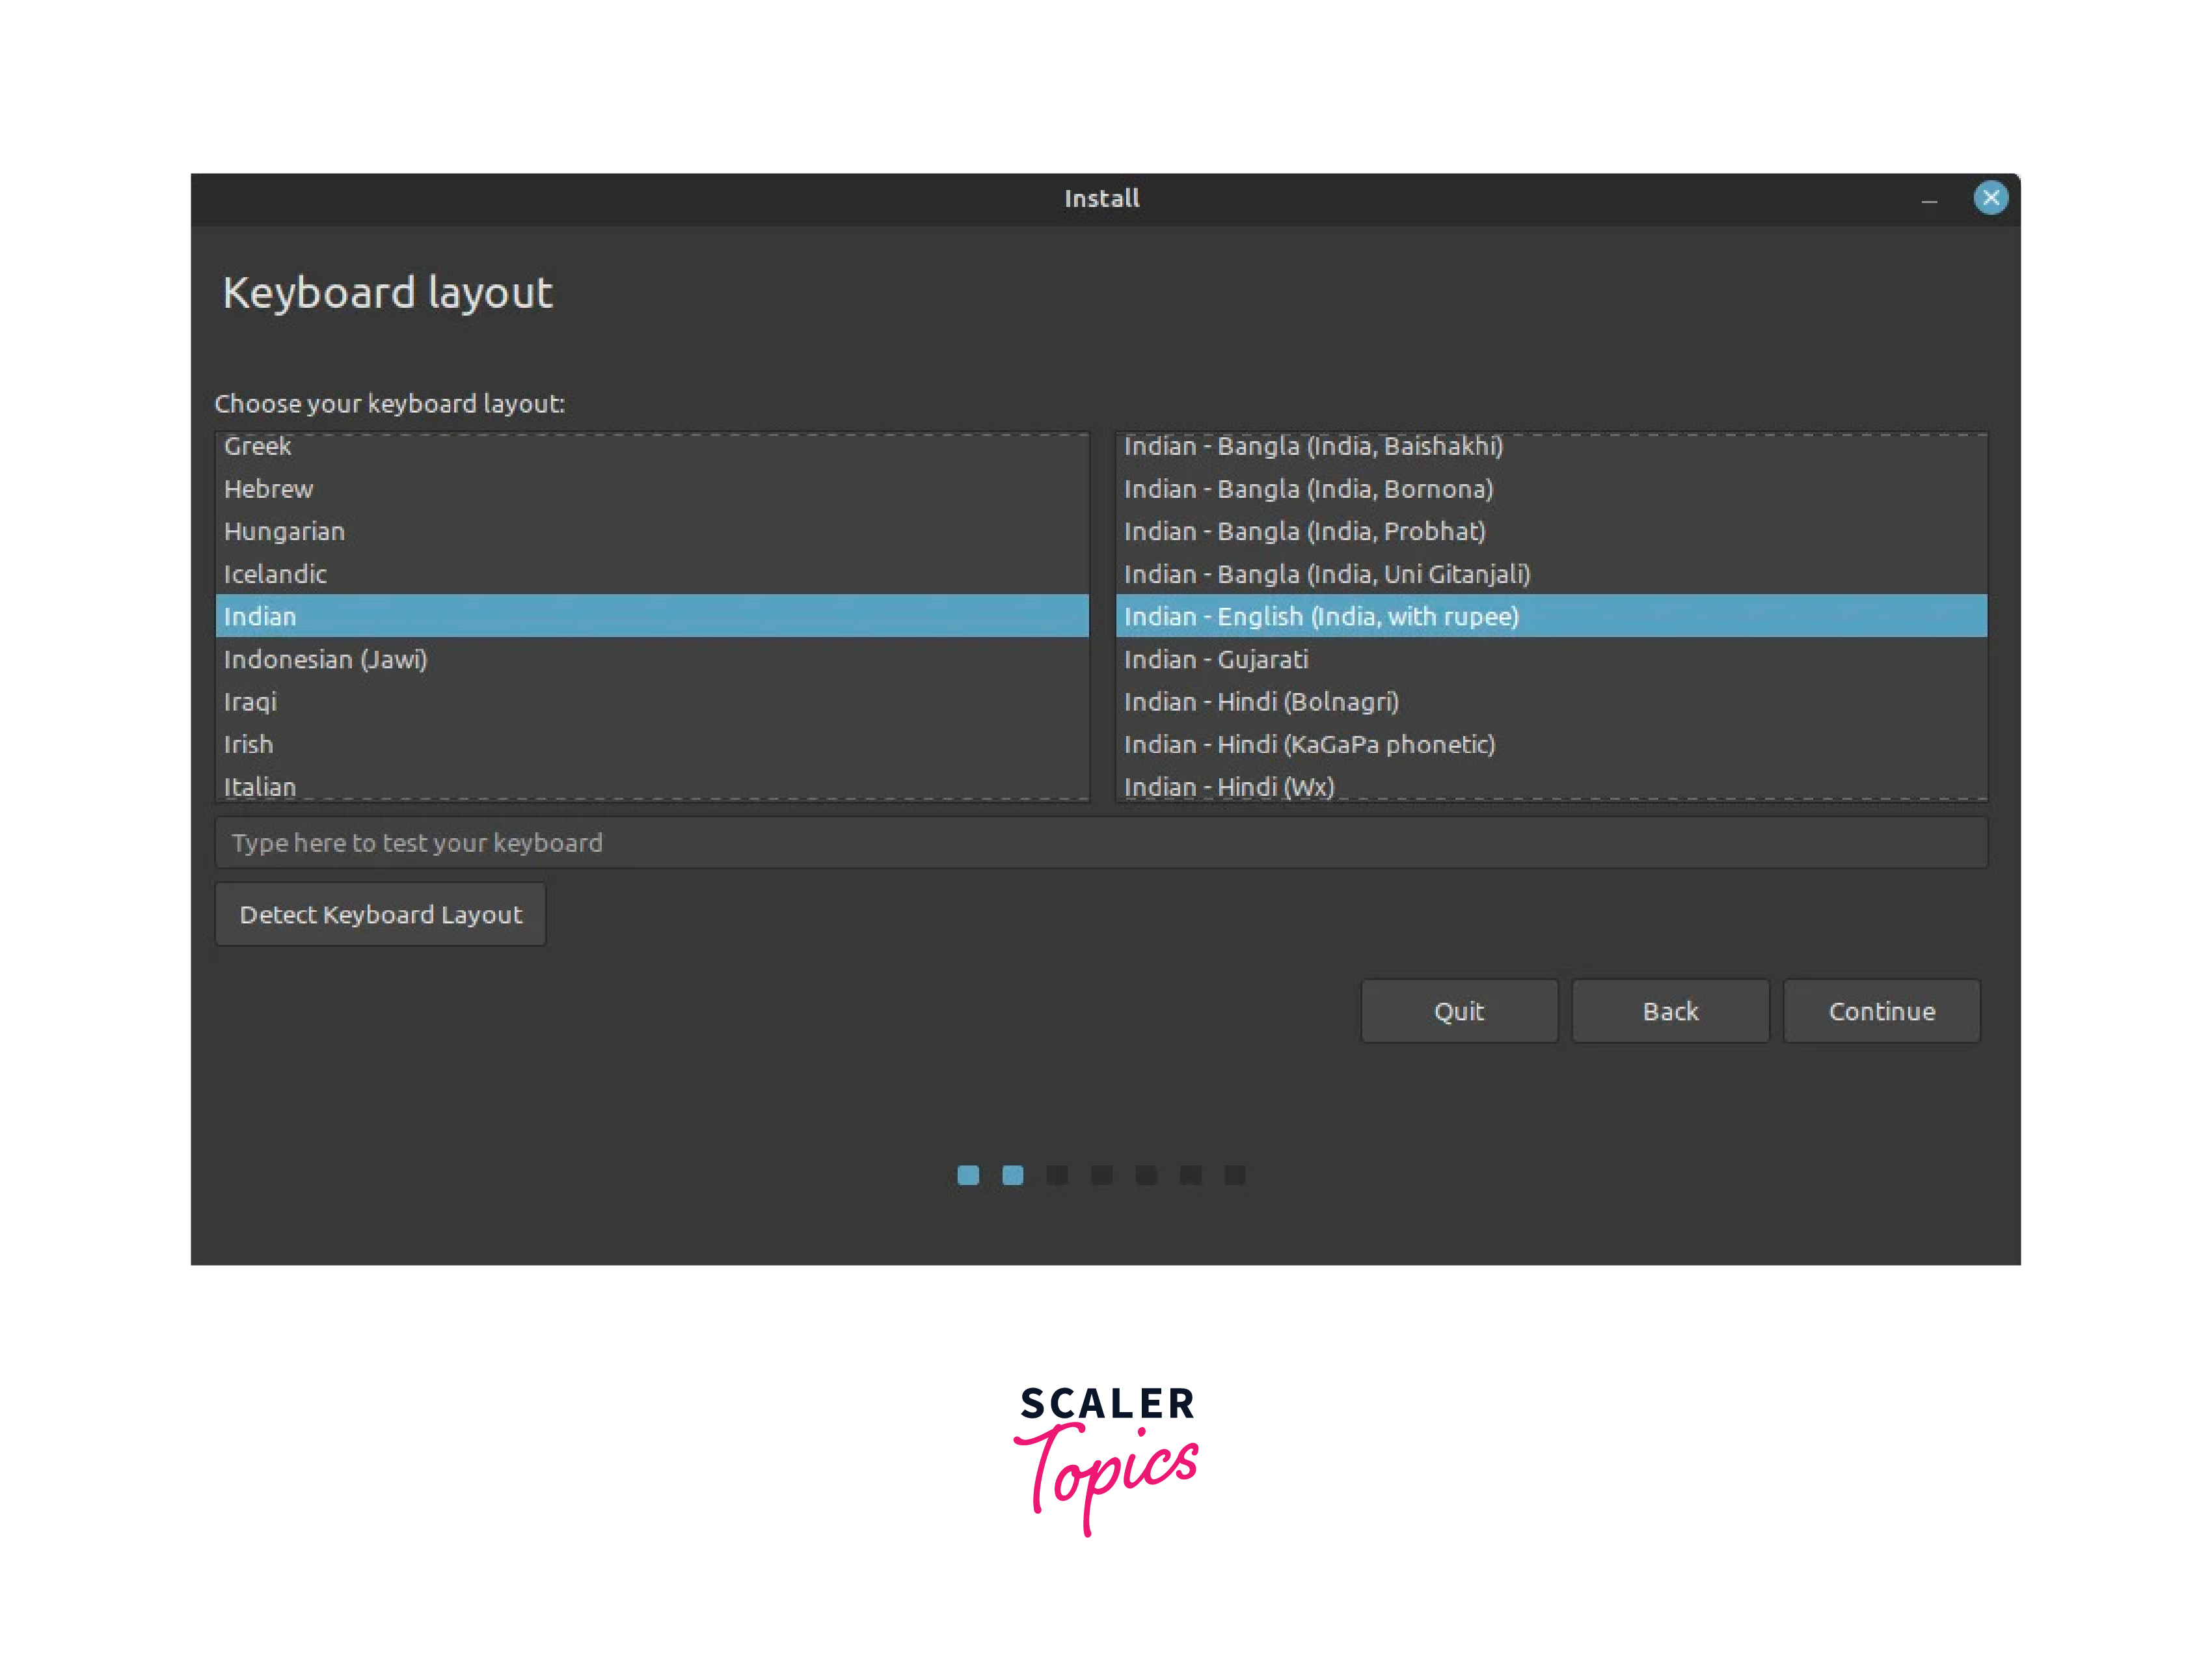
- Select the keyboard layout that matches your keyboard configuration. Click Continue to proceed.
-
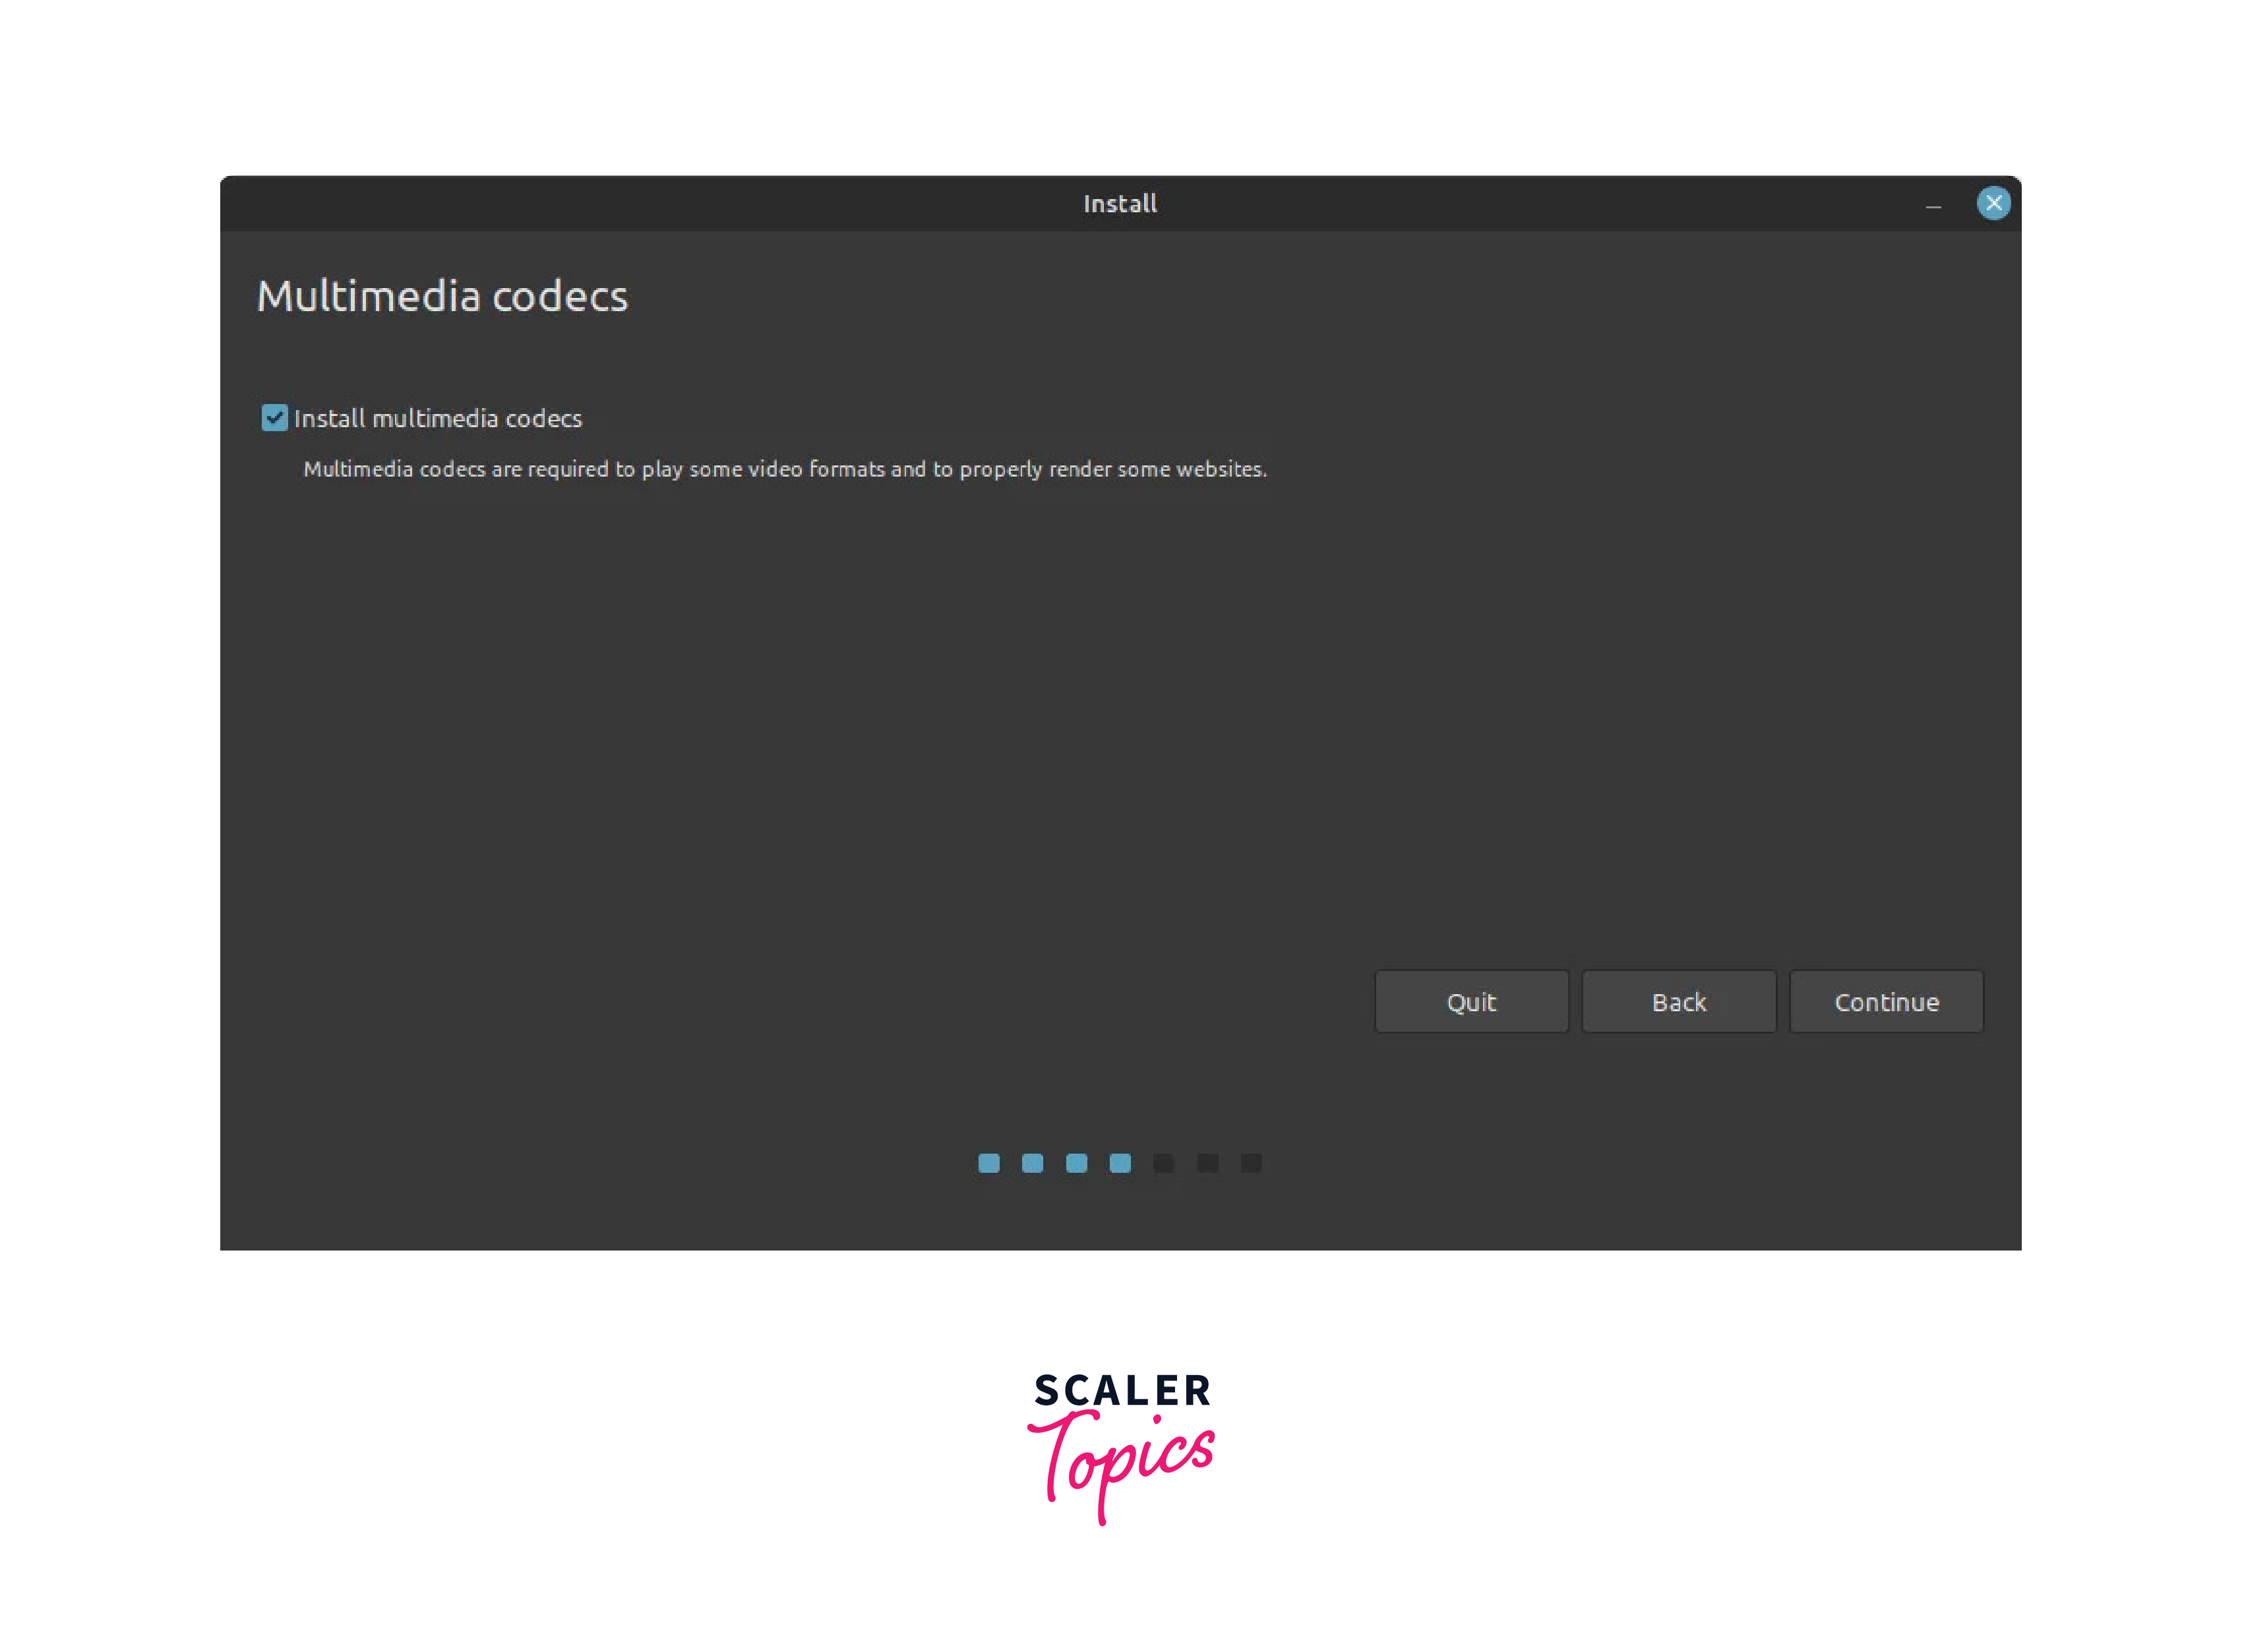
The next step asks you for permission to install multimedia codecs, which are software components that enable the playback and encoding of multimedia files, including audio and video formats, in Linux operating systems. This is optional, and remember that you will need a network connection to install this.
-
Following the previous step, if the system automatically detects the Windows, you can click on continue and then click on the Install button to complete the process and continue from step 20 or else follow the next steps.
-
In the next step, the Installation Type window opens, select Something else to manually partition the disk and customize the installation.
- Identify the unallocated space you created earlier using GParted or Windows Disk Management tools. Right-click on the unallocated space and select New. Create a new partition with the desired size for Linux Mint. Set the partition type to ext4 and the mount point to /(root).
- After creating the partition, you will see it listed in the partition manager. Select the new partition and click Install Now to proceed with the Linux Mint installation. Follow the remaining on-screen instructions to set the location.
- On the next screen, you will be asked to provide your user information, such as your full name, username, and password. Fill in the required fields and choose a strong password for your user account.
- The installer will now show a summary of the installation settings and partition layout. Review the information to ensure it is accurate and matches your preferences. If you are ready to proceed, click Install to begin the Linux Mint installation process.
You have successfully dual-booted Linux mint and Windows 10. Now, you can restart your system and select the type of OS to use.
Conclusion
- Dual-booting Linux Mint and Windows 10 provides you with the flexibility to use both operating systems on the same computer.
- Virtual machine is an excellent and easier option for exploring the features of Linux.
- We can use a live version of Linux to run the operating system directly from a USB drive without installation or utilization of space from our main OS.
- To remove an OS in the dual-booted system, we can delete the partition associated with the operating system.
- Dual booting Linux with Windows does not slow down your system unless you don’t have a good hard drive space.
- The important step in dual booting is specifying the desired size for partitioning.
- Remember to follow the necessary precautions, such as backing up your data, before making any changes to your system, as partitioning may result in data loss in some cases.
 Choose Operating System to boot (Windows or Linux Mint 20)