Android is one of the most popular operating systems out there. We use it on our smartphones all the time and the freedom of installing apps and modding is what makes it so fun. Now we can use Android on our laptop as well, using the Android x86 Project. So let us see how to Install and Dual Boot Android x86 and Windows 10/11 on our Laptop.
What is Android x86 Project?
The Android x86 Project is one of the most popular Android OS ported for the Windows system. They started out hosting patches for Android but later realized how much more they can achieve with their codes. Android x86 has ported many Android versions for laptops and PC, like Android Nougat, Oreo, and Pie. I tried all three versions of Android x86. And In my personal usage, I found the Android Oreo to be the most stable out of the bunch.
The testing was done on my HP laptop with an intel i5 6th gen processor and on a Ryzen 5 2500U chipset Asus laptop. But still, the performance might vary for different devices. It was quite easy to Dual Boot Android x86 with my Windows 10 laptop. The GRUB menu was easily created and I could easily choose to boot between Windows or Android x86. I will explain more about its features and stability in the experience part of the post.
1.2. Requirements
- 32-bit or 64-bit System
- 8GB or Above USB
- Intel or AMD Chipset
- UEFI or MBR Boot System
1.3. Downloading and Creating Image
If you have a 64-bit system then download from this link and for 32-bit systems use this link. The download speeds from the servers are quite fast. After the download is complete we need to create a bootable USB drive. We will be using a program called Rufus to do this task. You can get the Rufus program from this link.
Now install and open the program, we need to first locate our downloaded ISO image. We need at least an 8GB or above USB drive for this process. Select your USB drive from the drop-down. Then under the partition scheme select GPT and now we are good to go for the bootable process.
We can also use this on MBR devices as there is no mention of it is not supported. To check our partition scheme, we need to open the Windows search bar and type “Create Partition”.Open the “Create Partition and Format Hard Disk Partition” program.
Here right-click on disk 0, and select properties. Under the volume tab, we can see our partition scheme. Now that we know our partition we can proceed with the Rufus program. Hit the start option and it will format the USB and create an Android x86 bootable drive.
1.4 Creating Partitions
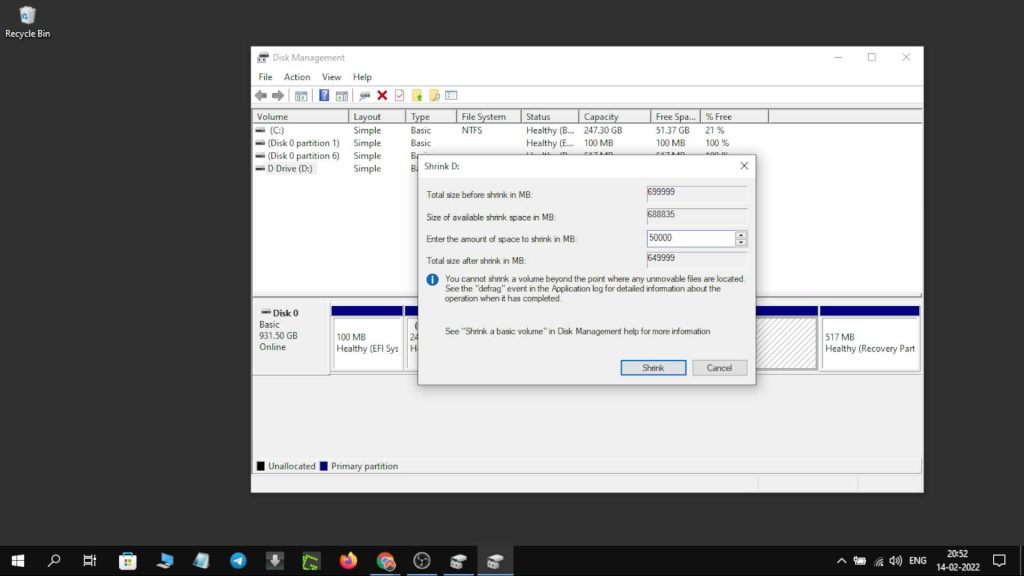
On our hard drive or internal storage, we need to create a partition to install Android x86 OS. We can make a partition size of upward 15GB. Search for “Create Partition” again and in the Windows search bar and open the Create Partition and Format Hard Disk program.
In the program right click on the D Drive and then select the Shrink option. You can choose the partition size of 15GB and up, so type 15000MB for 15GB. Now hit next and your new partition will be created. We can then right-click on the new Unallocated space and create a New Volume. Just follow the on-screen steps and then finish.
1.5 BIOS and Android x86 Installation
Now to continue the Dual Boot Android x86 process, we need to boot into our laptop’s BIOS menu. We can do that by pressing the BIOS key while the device is booting. Check out the image below to find your model’s BIOS key.
Now after booting into the BIOS, we need to select Boot Device Options and then select our USB drive. This will open up the interface where can choose whether to check the Android OS before installing with the LIVE demo mode. Or just go with the installation process.
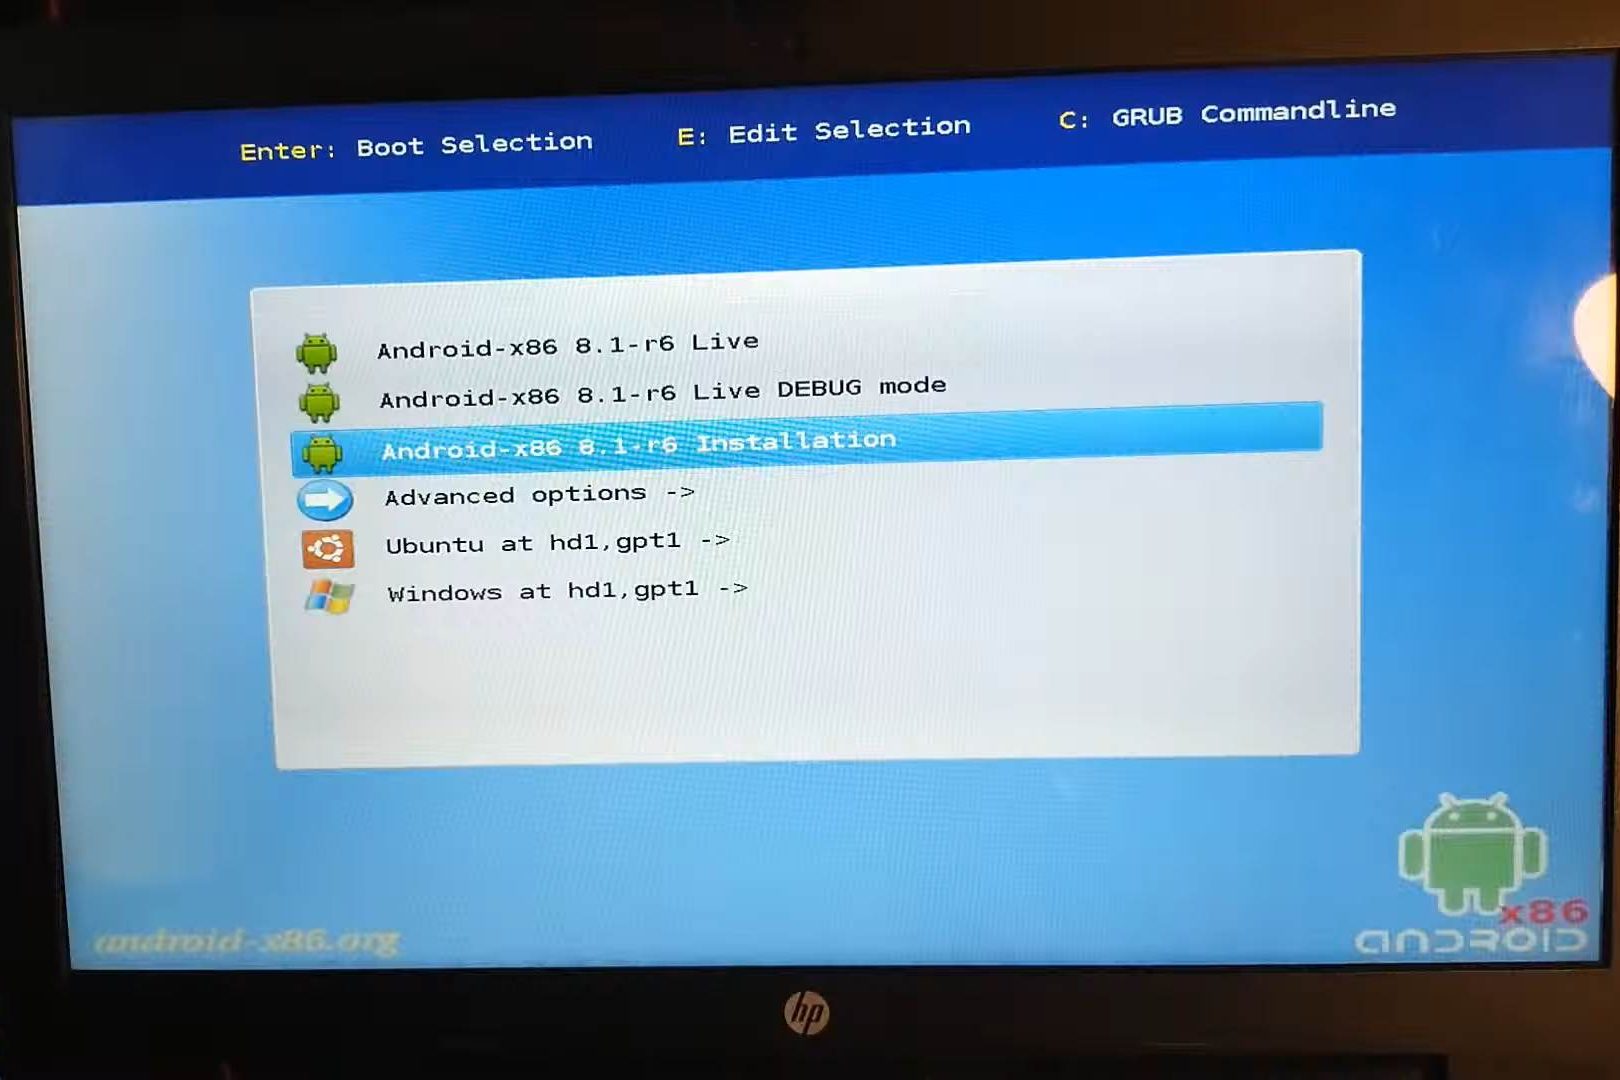
It is always better to test the LIVE demo of the operating system before installing. We get an idea about the compatibility of the OS with our system. And also to see if there is an issue with the Wi-FI or such. So we will now proceed with the process to Dual Boot Android x86 and Windows 10/11.
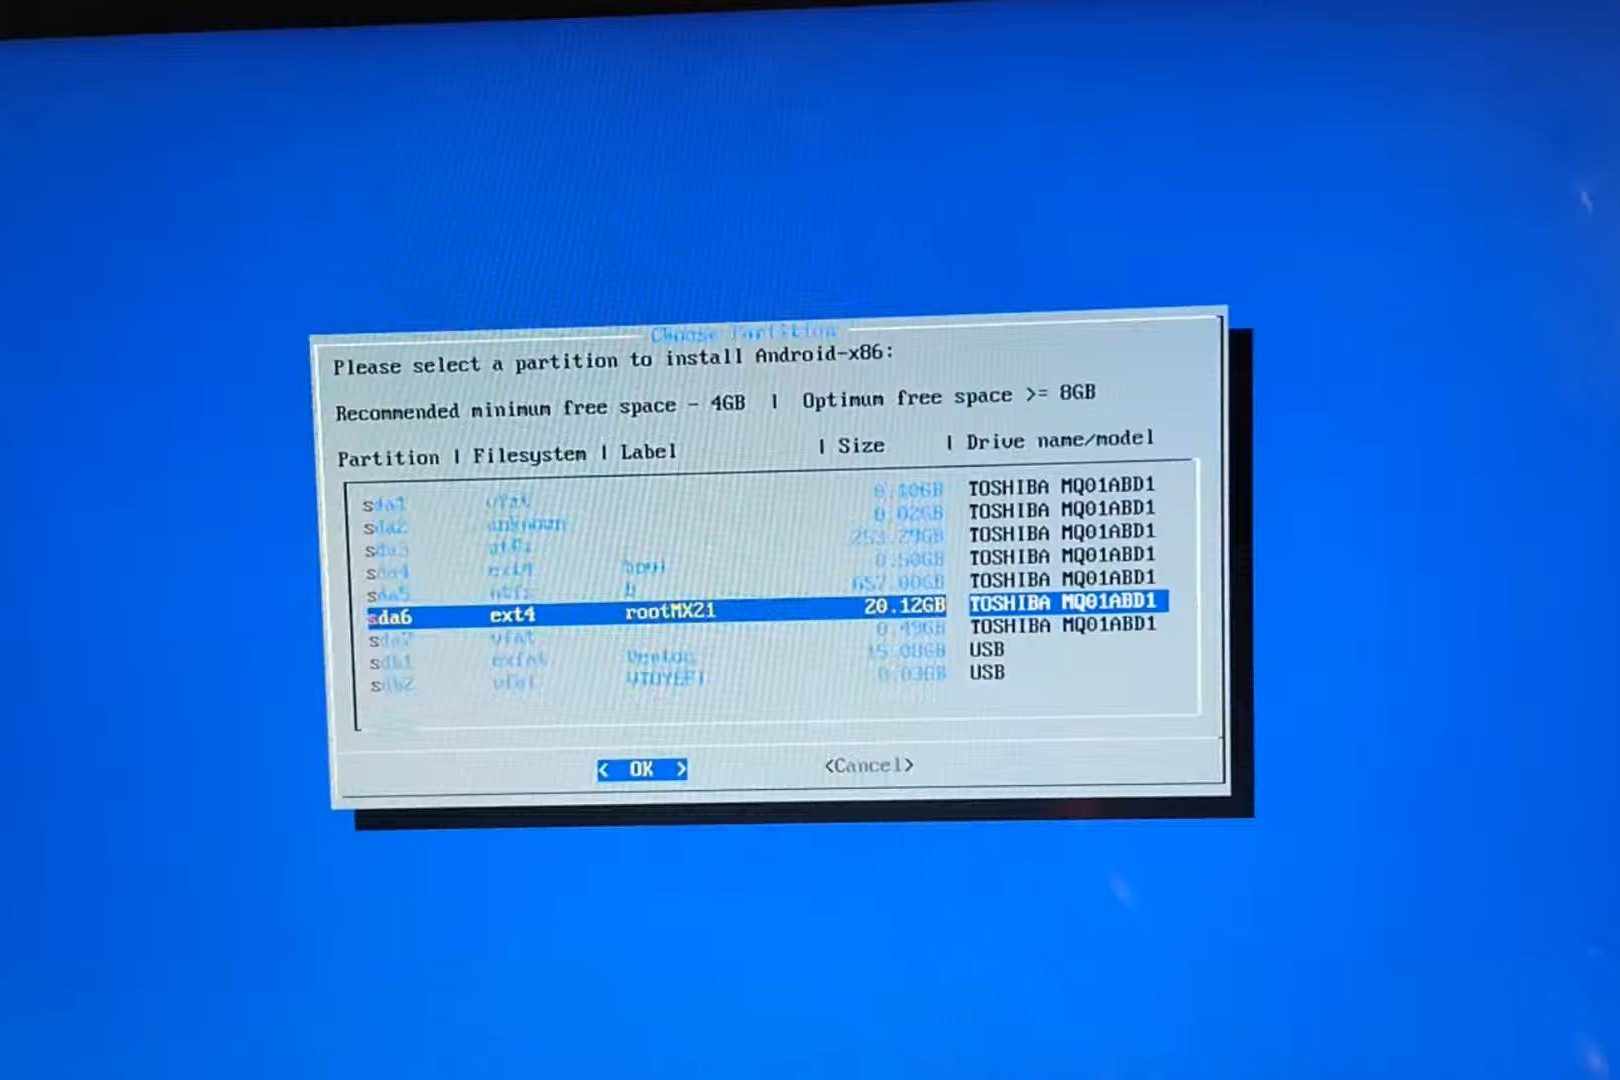
Select the partition that we created earlier by observing the size. Now we have to format it in Ext4 format to proceed.
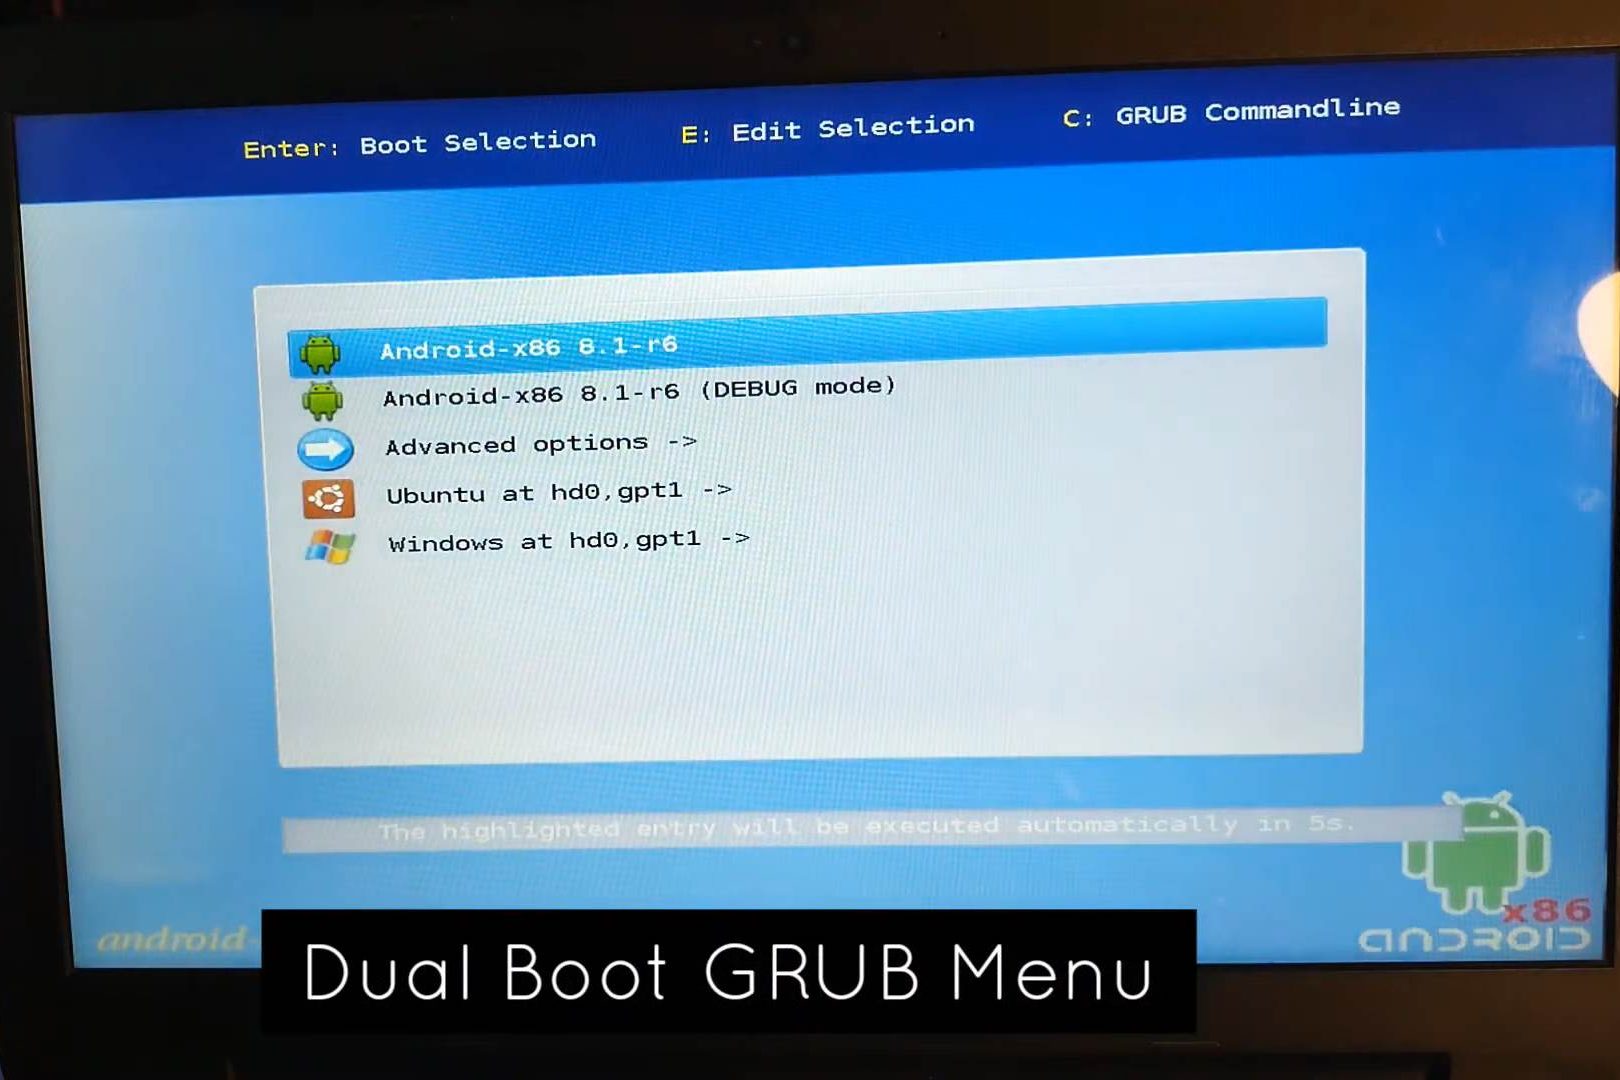
Then allow creating the EFI Grub menu to see the dual boot menu when rebooting the laptop. Also, allow any other prompt permissions and proceed. After it is done syncing the installation and everything we can either Reboot or start Android x86. You can reboot to check the dual boot menu and then chose the Android x86.
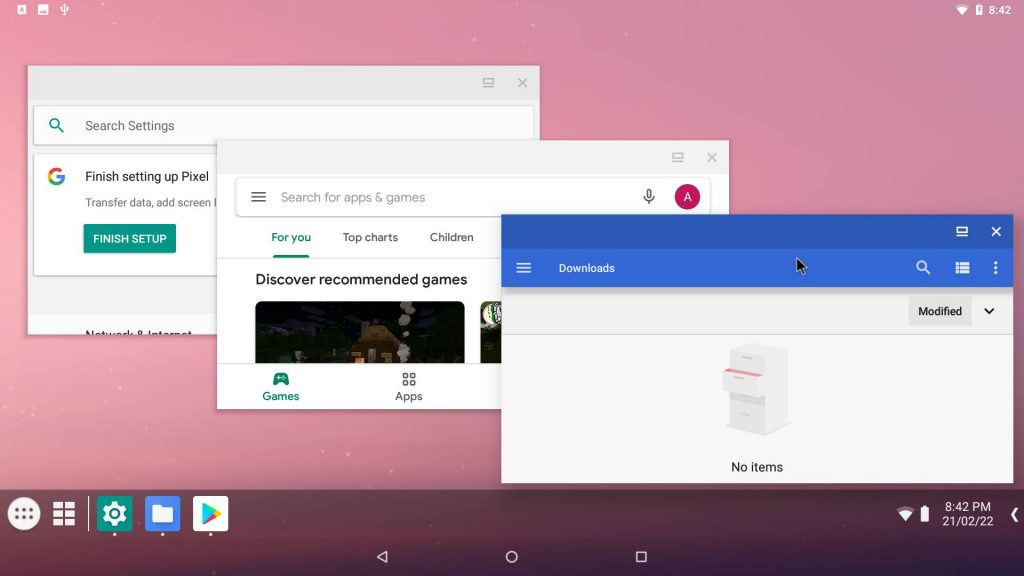
2. Experience with Android x86 for Laptop and Desktops
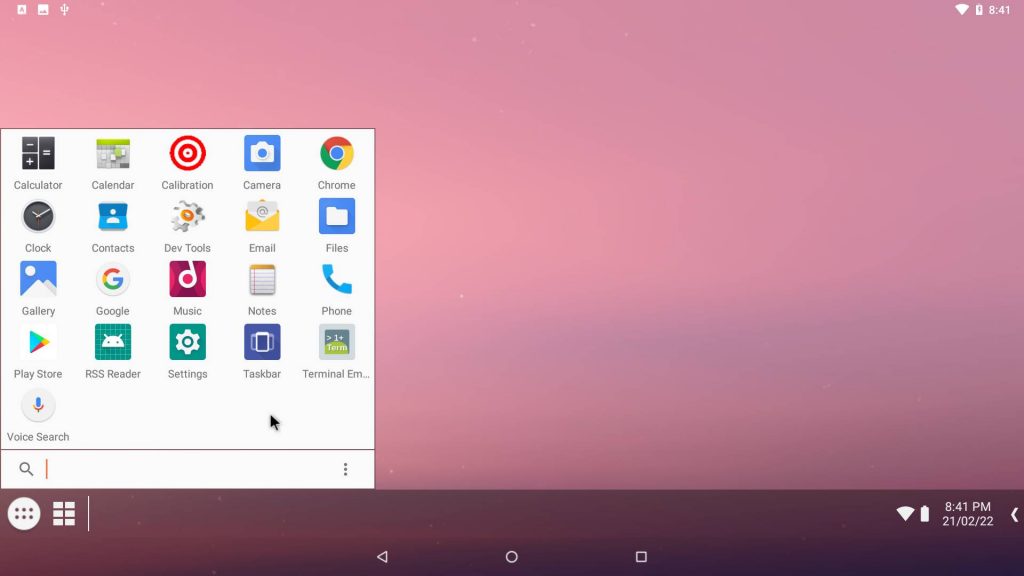
The review is going to cover the Android x86 v8.1 version, as it’s the most stable out of the bunch. When we boot into the Android x86 for the first time, we are given the choice between two launchers. Either Launcher 3 or Taskbar launcher. Launcher 3 provides the same desktop experience as we get in smartphones and tablets.
The Taskbar however is meant to give a Desktop feeling, with a Windows-like Start menu comprising of all the apps installed on the device. The startup was smooth and I did not get any kind of errors. But I prefer the usual Tablet-like user interface.
I tried multiple screen recording apps and none of them worked. Screen recording has issues in most Android OS for PCs and laptops. In the Android x86 options, we need to enable the Native Bridge. This will allow the ARM-based apps to run well. We can then install games and various apps from the Google Play Store.
I tried playing a game called Subway Surfers but it was not registering the mouse click as touch. In Android OS like Prime OS, which is mainly built for Android games. The keyboard and mouse can be used to play various Android games. However, in a game called Candy Crush, the mouse seemed to work well. So I guess it depends upon the type of game.
3. Is Dual Booting Android x86 Worth it?
We can enable the developer options and then turn on the Root option. We can then use apps like root explorer or apps that required root access and tinker around. Android apps like YouTube and Chrome worked like a charm. We can use apps like InShot and Kinemaster to edit videos and take advantage of the larger laptop screen.
Overall Android x86 8.1 is pretty smooth and can be used for daily usage. For people who would like a stable, minimal, and lightweight Android OS on their old or new laptop. Android x86 Oreo version is a great option. You can even try the Fyde OS, again a great Android OS but it’s more similar to Chrome OS.

A majority of people run Android apps on Windows using emulators like Bluestacks. Still, there are those who prefer to dual boot Windows and Android.
But you might be one of the few who would rather use both Operating Systems on one machine. Here’s some information that can help you to learn how to dual boot Android and Windows.
Advantages of Dual-booting Android and Windows
Even though the process of dual booting is time-consuming, the overall performance is better than running Android apps using an emulator. Moreover, not all apps can run on an emulator.

How to Dual Boot Windows and Android
1. Download Android x86 ISO File
You can find the Android x86 ISO file on the official website of the Android x86 operating system. Go to the mirror page of the latest release of Android x86.
Choose either the Fosshub mirror or OSDN mirror to get the download link. On the OSDN ISO page, select android-x86-9.0-r2.iso, which is the 64-bit Android x86 ISO file. Then proceed to download it.
On the Fosshub ISO page, select Android-x86 64-bit ISO file and proceed to download it. The ISO files you download on the mirror pages are basically the same.
2. Download a Flashing tool
After the Android x86 ISO file download is done, the next thing you need to do is download a flashing tool. The best flashing tool for this process is the Rufus flashing tool.
To download it, go to the official Rufus website. The flashing tool is useful for creating a bootable flash drive. On the official download page, select the latest version of Rufus and download it.

3. Flash Android x86 ISO to a USB Flash Drive
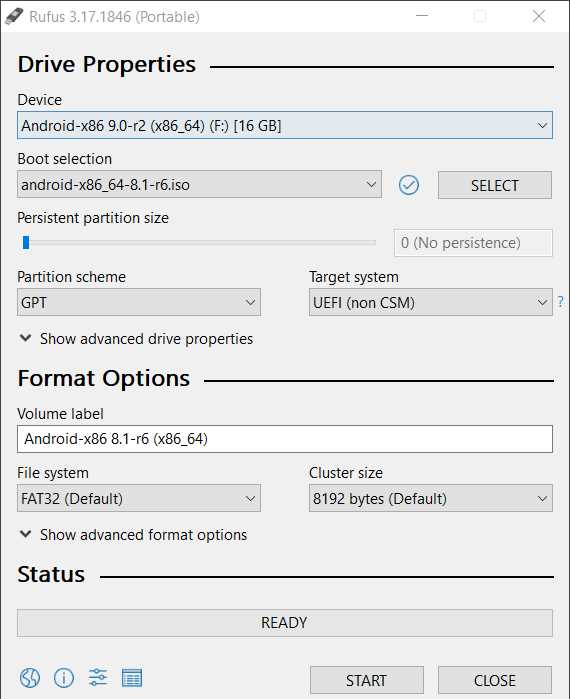
To flash, go to downloads, open the downloaded Rufus flashing tool, and run it. Once the file is executed, it will show you an empty device dropdown box. The next thing you’ll do is insert a Flash Drive in the USB slot on your computer.
The flashing tool will detect the inserted Flash Drive, and you’ll see it listed under the “Device” dropdown box. After that, click on “Select” and go to the earlier downloaded Android x86 ISO file from downloads.
Choose on the default label for the Flash Drive or rename it if you want, then click on “Start.” For compatibility, allow Rufus to download additional system files then click “OK” to proceed. Choose the “Write in ISO image mode” and click “OK” to flash the Flash Drive.
When the Flash Drive is successfully flashed, click on “Close” when the window displays “Ready” status.
4. Partition Windows to free up disk space
Partitioning helps in organizing files, applications, and folders into multiple virtual drives and gives your system multi-drive functionality. Go to Disk Management by clicking “Windows key + X” then select “Create and Format Hard Disk Partitions.”
From the list of hard drives, choose the one you want to partition—Right-click on it and select the “Shrink” option to free up the disk space. Input how much free space you want to allocate then wait for the process to be completed. You’ll see a new unallocated space next to the corresponding physical drive.
5. Boot from bootable Flash Drive
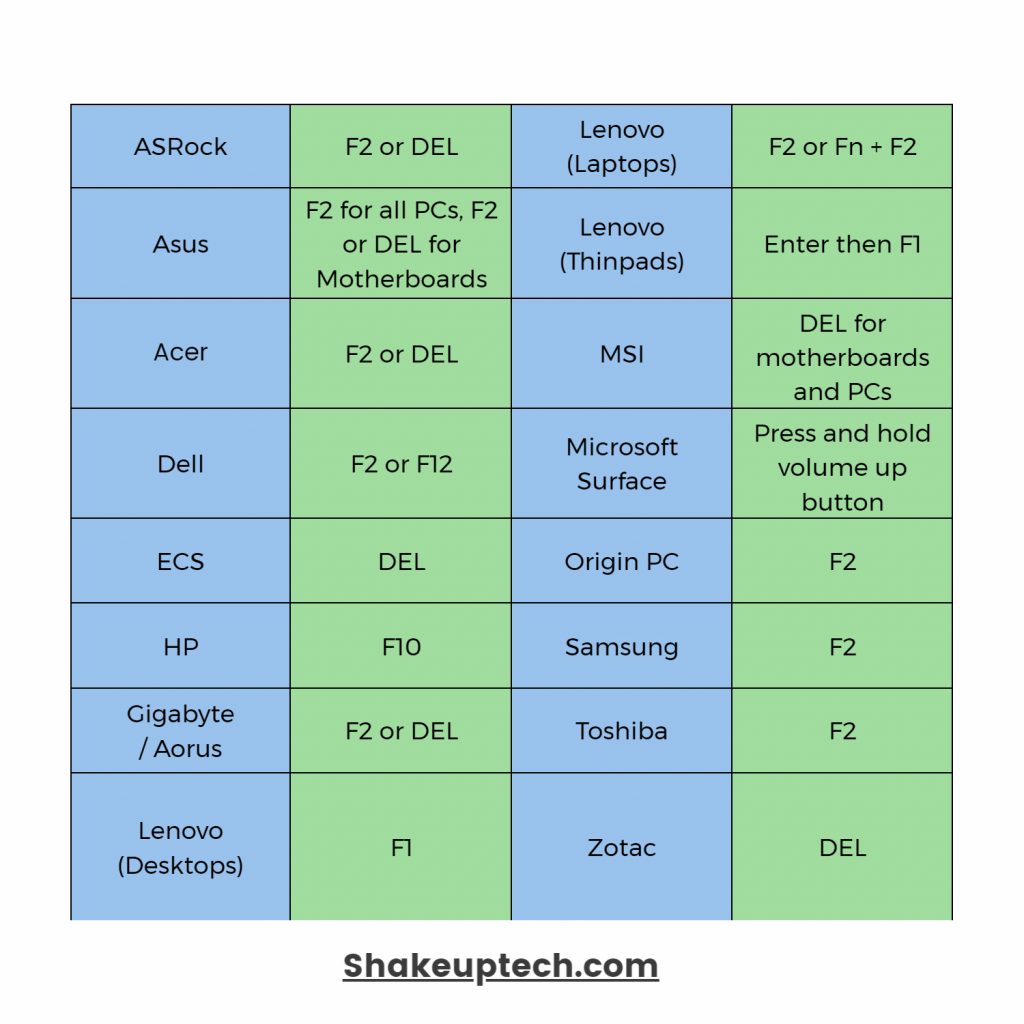
To do this, restart your machine. Enter BIOS or UEFI setup on system boot by pressing a designated key (F12, F10, Esc, or F9) depending on the PC model you’re using. Go to booting device settings and choose to boot from the USB Drive.
Save the settings, then press “Esc” to exit BIOS/UEFI setup. Your machine will restart and then display a list of bootable devices. Choose “USB Drive” as the boot device, then click on Enter.
6. Finally, Install Android x86 on PC
Once the system boots from the USB Drive successfully, you’ll see an Android x86 splash screen displayed. Click on “Enter” then proceed to installation by pressing “Install Android-x86 to hard disk”. It will start the installation process, and a list of existing partitions displayed.
Choose the partition you’d created earlier and click on “Enter.” Select “ext4” as the filesystem for formatting and continue. Press to install boot loader GRUB and select “Yes” to boot an item in the Grub boot loader. Accept the default settings and begin the installation.
When you finish, you’ll be given the option of “Reboot” or “Run Android x86.” Eject the Flash Drive then reboot the system. Upon Reboot, the system will ask you whether to boot into Android x86 or the Windows OS.
Alternatives to dual-booting Android and Windows
Use Bluestacks
Bluestacks is the most popular emulator that runs Android-specific apps or games. It runs on Windows just like any other Windows Program. Once you installed it, you can open it and run it within a Window in your PC. It allows for an easy and seamless installation of apps from Google Play.
The performance is not up to par compared to dual-booting Android and Windows, but it is rather stable and suitable for an average user. Unlike many other emulators, the main advantages of a Bluestacks emulator are the ease of installation and fairly good speed. You can also try other emulators like YouWave and Windroy, which are also fairly stable.
Google’s Official Android Emulator
This emulator is part of the Android SDK and is mostly used by Android developers to test their apps. It gives you access to the complete Android operating system set up, and you can run it within a Window in your PC.
The emulator is specially made for testing apps and the latest Android versions but not for normal app usage. It is rather slow, so you can’t use it for activities such as playing games. To install and run it, download Google’s Android SDK.
Android on Intel Architecture
New Intel-based PCs with UEFI firmware uses this architecture to run Android. Android-IA comes with an Installer that allows you dual boot Android and Windows on the same PC.
The project is still new and not yet stable. Also, it doesn’t work on all devices. The only officially supported devices are the Lenovo X220T and X230T, Acer Iconia W700, and Samsung XE700T. I don’t recommend installing the Android-IA unless you have a supported device.
Conclusion
Dual-booting Android and Windows to work on the same PC is not that complicated. But, it doesn’t mean that you can run both operating systems simultaneously. You are only capable of booting into one operating system at a time.
This article describes the process to install latest version Android x86 as a Dual Boot Host Operating System on a Computer by creating a bootable Android x86 USB Flash Drive on an existing Windows System. Android x86 will be installed alongside the existing Windows operating system. Both the operating systems will exist in your PC but you can boot into one of them at a time. You can use a Flash Drive of 2 GB or more to make it bootable.To create an Android x86 bootable Flash Drive on a Windows system and install it as a dual boot host operating system alongside Windows, follow the six easy steps below:
Step 1: Download Android x86 ISO File
Login to your Windows System, open a web browser and navigate to official website of Android x86 Operating System. On the Home Page, click on “Download” button to navigate to download mirror page of latest release of Android x86 Operating System.
Choose one of the given mirrors either “Fosshub” or “OSDN” to get ISO download link. On OSDN ISO download page click on “android-x86-9.0-r2.iso” file name link to download 64-bit Android x86 ISO file. Whereas, on Fosshub ISO download page click on “Android-x86 64-bit ISO file” file name link to download 64-bit Android x86 ISO file. Both these mirrors will provide you the same ISO file. The browser will prompt to save the ISO file. Save the ISO file to your computer. Wait for the download to finish.
Step 2: Download Rufus Flashing tool
In the meantime, while the Android x86 ISO file is downloading, navigate to official web site of Rufus to download Rufus flashing Software tool for creating a bootable Flash Drive. Scroll down the page and click on the link to download latest version of Rufus tool under download section. Wait for the download to finish and close the web browser.
Step 3: Flash Android x86 ISO to USB Flash Drive
Go to the download location and open Rufus tool by executing downloaded Rufus file. The “Device” dropdown box will be empty. Insert a Flash Drive in the USB slot of your computer. Rufus will detect the Flash and display in “Device” dropdown box. Now browse and select the Android x86 ISO file from download location by clicking on “Select” button. Type in Label for the flash drive of your choice such as “Android x86 Flash Drive” or continue with default label. Keep other options with default values and click on “Start”. Click “Yes” to allow Rufus to download additional system files for compatibility with the given ISO file. Click “OK” and continue with recommended option to “Write in ISO Image mode”. Ensure that there is no important data on the Flash Drive (as it will be erased) and click “Ok” to continue flashing the drive. Wait for the flashing to finish. Click “Close” when Rufus window display “Ready” as status to close the Rufus Tool on successful flashing of Flash Drive.
Step 4: Resize Windows Partition to free up disk space
Open “Computer Management” application by searching from Start Menu or selecting “Manage” from context menu while right clicking on “This PC” in File Explorer. In Computer Management, click on “Disk Management” under “Storage” category. Right Click on an existing partition and use “shrink” option to free up disk space. The free disk space will appear as unallocated space in Disk Management.
Step 5: Set and Boot from bootable Flash Drive
Restart your system. On system boot, press a designated key (F10, F12, F2, Del, Esc, F9) to enter BIOS or UEFI Setup. It could be different on different make and model. Try other keys as per Make and Model of your computer. Search for the booting device settings and select USB Drive as the Booting Device. Save and Exit BIOS / UEFI setup. The system will restart. While booting, press the designated key (F9, F10, F12, F2, Del, Esc) to display Boot Menu. It will display the list of booting devices. Select USB Drive as Boot Device and Hit Enter.
Step 6: Install Android x86 on PC
If the system will boot from the flash drive, it will display Android x86 splash screen on your computer screen. Press “Enter” on “Installation – Install Android-x86 to harddisk” option to begin installation of Android x86 operating system. The setup will display a list of partitions existing on your computer. Move to “Create/ Modify Partitions” and hit Enter to open cfdisk utility. Move to “Free Space” under FS type, move cursor to [New] and hit Enter. Select [Primary] → keep default size → Select [Write] → type “yes” and hit ENTER. cfdisk utility will write the new partition table to disk. Select [Quit] and hit ENTER.
Choose the new created partition and hit “Enter”. The setup will ask the filesystem for formatting. Select “ext4” and continue. After formatting, setup ask whether you want to install boot loader GRUB. Press “Yes”. The installer will ask if you want a boot item for Windows in the Grub boot Loader. Press “Yes” as we are installing Android alongside Windows. Continue further with the default settings. The installation will begin.
Wait till installation process is on-going. Upon completion, installation setup will provide the option to “Run Android-x86” or “Reboot”. Remove the Flash Drive and click on “Reboot”. The system will reboot. Wait while system is rebooting.
Upon reboot, boot loader will display options to boot into Android x86 or Windows operating system. You may select either Windows (generally last item on list) or Android x86 (generally first item on list) to boot into and use as per your requirements.
Watch the practical demonstration of the above process in following video:
A majority of people run Android apps on Windows using emulators like Bluestacks. Still, there are those who prefer to dual boot Windows and Android.
Benefits of dual boot Android and Windows
Even though the dual-boot process takes time, the overall performance is better than running Android apps using an emulator. Also, not all apps can run on an emulator.
How to dual boot Windows and Android
1. Download the Android x86 ISO file
You can find the Android x86 ISO file on the official website of the Android x86 operating system. Go to the mirror page for the latest version of Android x86.
Choose Fosshub mirror or OSDN mirror to get the download link. On the ISO OSDN page, select android-x86-9.0-r2.iso, which is the Android x86 64-bit ISO file. Then download it.
On the Fosshub ISO page, select the Android-x86 64-bit ISO file and download. The ISO files you upload to the mirror pages are basically the same.
2. Download a Flashing tool
After the Android x86 ISO file download is complete, the next thing to do is download a flashing tool. The best flashing tool for this process is the Rufus flashing tool.

3.Android x86 ISO Flash to USB Flash Drive
To flash, go to downloads, open the downloaded Rufus flash tool and run it. Once the file is executed, it will show you an empty device drop-down list. The next thing you will do is insert a USB drive into your computer’s USB slot.
The flashing tool will detect the inserted flash drive and you will see it listed in the “Device” drop-down list. After that, click “Select” and navigate to the previously downloaded Android x86 ISO file from downloads.
Choose the default Flash player label or rename it if you want, then click “Start.” For compatibility reasons, allow Rufus to download additional system files, then click “OK” to continue. Choose “Write in ISO image mode” and click “OK” to flash the flash drive.
4. Partition Windows to free up disk space
Partitioning helps organize files, applications and folders in multiple virtual drives and gives your system multi-drive functionality. Go to Disk Management by clicking “Windows Key + X”, then select “Create and format hard drive partitions”.
From the list of hard drives, choose the one you want to partition. Right-click on it and select “Shrink” option to free up disk space. Enter the amount of free space you want to allocate, then wait for the process to complete. You will see a new unallocated space next to the corresponding physical drive.
5. Boot from the bootable flash drive
To do this, restart your machine. Enter BIOS or UEFI setup at system startup by pressing a designated key (F12, F10, Esc, or F9) depending on the PC model you are using. Go to boot device settings and choose to boot from USB drive.
6. Finally, install Android x86 on PC
After the system boots from the USB drive successfully, an Android x86 boot screen is displayed. Click on “Enter” then proceed with the installation by pressing “Install Android-x86 to hard disk”. It will start the installation process and a list of existing partitions will be displayed.
Choose the partition you created earlier and click “Enter”. Select “ext4” as the file system for formatting and continue. Press to install the GRUB boot loader and select “Yes” to boot an item in the Grub boot loader. Accept the default settings and start the installation.

Alternatives to dual boot Android and Windows
Use Bluestacks
Bluestacks is the most popular emulator that runs Android specific apps or games. It works in Windows like any other Windows program. Once you’ve installed it, you can open and run it in a window on your PC. It allows easy and seamless installation of applications from Google Play.
The performance is not up to par with Android and dual-booted Windows, but it is rather stable and suitable for an average user. Unlike many other emulators, the main advantages of a Bluestacks emulator are ease of installation and fairly good speed. You can also try other emulators like YouWave and Windroy which are also quite stable.
Official Google Android Emulator
This emulator is part of the Android SDK and is mainly used by Android developers to test their apps. It gives you access to the full configuration of the Android operating system and you can run it in a window of your PC.
The emulator is specially designed for testing apps and the latest versions of Android, but not for normal app usage. It is rather slow, so you cannot use it for activities like playing games. To install and run it, download the Android SDK from Google.
Newer Intel PCs with UEFI firmware use this architecture to run Android. Android-IA comes with an installer that lets you dual boot Android and Windows on the same PC.
The project is still new and not yet stable. Also, it doesn’t work on all devices. The only officially supported devices are the Lenovo X220T and X230T, Acer Iconia W700, and Samsung XE700T. I don’t recommend installing Android-IA unless you have a supported device.
Conclusion
Dual booting Android and Windows to run on the same PC isn’t that complicated. But that doesn’t mean you can run both operating systems simultaneously. You can only start on one operating system at a time.
Android mobile operating system is an open source system software available for various smartphone and tablet devices. But now Android can…
Android mobile operating system is an open source system software available for various smartphone and tablet devices. But now Android can also be installed on computers and laptops running Windows operating systems i.e. Windows 8.1, 8, 7, Vista, XP etc. with multi-dual boots capability. Below you find method, guide and tutorial on How to Download and Install Android 4.4 KitKat on Your Windows PC and Laptops as Dual Boot.

Users can also multi Dual Boot Android with Windows on PC and Laptops powered by x86 (32-bit) computer architecture hardware. Users are required to Download Android x86 ISO File for Windows and can install it via bootable USB flash drive or bootable CD/DVD. We are providing full tutorial and guide on How to Install Android on Windows PC and Laptops below.
Supported Android x86 ISO Files for Windows:
- Android Froyo — v2.2 to v2.2.3
- Android Gingerbread — v2.3 to v2.3.7
- Android Honeycomb — v3.0 to v3.2.6
- Android Ice Cream Sandwich — v4.0 to v4.0.4
- Android Jelly Bean — v4.2 to v4.3
- Android KitKat — v4.4.2
Supported Windows OS for Android x86 ISO Installation:
- Windows 8.1
- Windows 8
- Windows 7
- Windows Vista
- Windows XP
Prerequisites Downloads and Instructions for Android x86 ISO Installation:
- Download Android x86 ISO Files (Select most appropriate version)
- Download UNetbootin Tool to create bootable USB thumb drive (Link 2)
- 1 USB Flash Drive or Bootable CD/DVD
- 10GB Free Hard Disk Space for Android KitKat v4.4.2
- 8GB Free Hard Disk Space for Android Jelly Bean v4.2 to v4.3
- 2GB Free Hard Disk Space for Android Froyo to ICS
How to Install Android on Windows PC and Laptops as Dual Boot
Step 1: First, You need to Download the appropriate version of Android-x86 ISO and UNetbootin Tool on your PC / Laptop.
Step 2: Now, By using UNetbootin Tool, Make a bootable USB flash drive and the ISO image file that you downloaded from above links. Simply click on the Diskimage button as shown in the following image and point it towards the ISO you downloaded in Step 1.

Step 3: After that, Restart your PC / Laptop via USB flash drive as the source. (Make USB to boot first and before CD/DVD ROM under your system’s BIOS settings)
Step 4: Now, When the menu appears, just select Install Android x86 to hard disk.
Step 5: Select your appropriate hard disk partition to install Android x86 i.e. C:\ or D:\ or you can install on any new partition.
Step 6: Now, You will get a few prompts messages pertaining to installation of GRUB Bootloader. Make sure to allow it.
Step 7: Now, another prompt message will ask you to make system /r/w. Hit Yes on this as well, especially if you’d like to modify your Android x86 installation later.
Step 8: After that, If you’re installing ICS or earlier Android firmwares, you will get another prompt to install virtual SD card. Use 1800 MB for space, as that’s the maximum supported.
Step 9: Now, You can Restart your Windows PC / Laptops. After Reboot, You can select to either boot to Android or Windows. Voilah! You’re done. Congratulations!!
Note: For any troubleshooting and help, Click here.