
Все владельцы геймпадов DUALSHOCK 4, использующие эти замечательные контроллеры совместно с персональным компьютером, знакомы с приложением DS4Windows, которое является сильно переработанной версией утилиты ds4tools. Проблема тут в том, что автор DS4Windows (Jays2Kings) давно забросил разработку приложения, но большинство пользователей, не углубляясь в вопрос, вбивают в гугл: «Скачать DS4Windows», попадают на сайт программы и качают устаревшую версию. На самом деле, поддержка и разработка приложения активно продолжается, но уже другим энтузиастом Ryochan7. Им, со времени выхода последней версии DS4Windows от Jays2Kings, сделано немало изменений. Самым значимым является тот факт, что приложение сменило старый враппер ScpVBus на более новый и продвинутый ViGEmBus. К слову, этот же враппер использует, находящаяся в стадии вечного бета теста, утилита SC Controller, предназначенная для полноценной работы Steam Controller в отвязке от Steam. Для версии от Ryochan7, постоянно вносятся улучшения и исправления. В отличие от старой DS4Windows, в новой поддерживается не только проводное и Bluetooth сопряжение, но и подключение через родной беспроводной адаптер от Sony:

Кроме этого в приложении реализована поддержка некоторых сторонних PS4-совместимых геймпадов, например Hori Fighting Commander и Nacon Revolution Unlimited Pro. Возможно есть и другие, но я не нашёл списка совместимости.
Вернёмся к работе с DS4Windows. Первым делом скачиваем архив с актуальной версией программы. Извлекаем папку с приложением в любое место на вашем жёстком диске, желательно не в системную папку, в этом случае вам постоянно придётся запускать утилиту от администратора:

При первом запуске нам предлагается выбрать место сохранения файлов конфигурации:

Я настоятельно советую выбирать вариант Program Folder. В таком случае все настройки будут храниться в папке с программой, что позволит вам не заниматься настройкой «с нуля», каждый раз, когда вы переустановите Windows или при других форс-мажорных обстоятельствах. Такой себе вариант Portable. Достаточно просто периодически бэкапить папку с программой, целиком.
В следующем окне выбираем Step 1, для установки ViGEmBus драйвера (если он у вас не был установлен до этого):

Сам драйвер можно скачать и установить заранее:

Если у вас на ПК всё ещё стоит ОС Windows 7, дополнительно нажмите на кнопку Step 2 и установите XInput драйвер. Для Windows 10 этого делать не нужно, можно сразу нажимать на «Finished»:

Для перестраховки заглянем в диспетчер устройств и убедимся, что ViGEmBus драйвер на месте:

Всё. Приложение установлено, драйвер встал корректно и при первом запуске DS4Windows в системе появляется дополнительный XBox 360 контроллер:

Но! Сам DUALSHOCK 4 никуда не исчез из игровых устройств и остался видимым для системы. Такой «двойной расклад» может привести к проблемам с нормальной инициализацией геймпада в играх. На этот случай в приложении есть чудесный чекбокс, который называется: «Hide DS4 Controller«. При включении этого режима в системе остаётся только эмулируемый контроллер:

Далее по списку во вкладке «Settings» идут чекбоксы:
- Swipe Touchpad to Switch Profiles. Этот флажок включает\отключает возможность переключения свайпом двумя пальцами созданных вами профилей;
- Run as Startup добавляет приложение в автозагрузку;
- Show Notification предлагает выбрать варианты уведомлений в сайдбаре Windows;
- Disconnect from BT when stopping отключает геймпад при выходе из приложения;
- Flash Lightbar at High Latency позволяет выставить задержку в миллисекундах, по достижению которой световая панель геймпада начнёт моргать красным цветом;
- Start Minimized запуск приложения в свёрнутом состоянии;
- Minimize to Taskbar\Close Minimize сворачивать окно приложение в трей (окно не висит в панели задач);
- Quick Charge эта функция позволяет на лету заряжать геймпад не отрываясь от игрового процесса. Избавляет от эффекта двойного подключения, когда система видит ваш геймпад и по проводу, и по беспроводу;
- White DS4Windows включает белый цвет иконки приложения в трее;
- Check for DS4Windows Update at Startup проверка обновлений при запуске приложения (можно выбрать интервал проверки обновлений);
- UDP Server этот чекбокс нужен для подключения гироскопа в эмулятор CEMU;
- Use language pack выбор языка локализации. Есть и русский, но я привык к дефолтному, английскому, языку приложения;
- Use custom Steam Folder сюда можно прописать путь до основной папки Steam, если он установлена не в дефолтную директорию.
Вкладка «Auto Profiles» позволяет добавлять пути до папок и отдельных игр\приложений к которым будут автоматически применяться созданные вами профили:

На вкладке «Controllers» можно посмотреть статус вашего геймпада и заряд аккумулятора. Помимо этого, можно быстро включить доступный профиль и выбрать цвет подсветки:

И наконец вкладка «Profile». На этой вкладке вы можете: создать, отредактировать, удалить, скопировать, импортировать и экспортировать ваши профили:

Давайте рассмотрим возможности профайлера подробнее. Настроек огромное количество. Я не буду расписывать всё, просто пробегусь по самым значимым возможностям. На вкладке «Other» наибольший интерес представляет меню «Controller», тут можно выбрать, какой контроллер будет эмулироваться в систему: XBox 360 или проводной DUALSHOCK 4 v1. С первым вариантом всё понятно. Зачем нужен второй? Вариант с эмуляцией DUALSHOCK 4 v1 нужен для тех ПК-игр, которые нативно поддерживают DUALSHOCK 4, но только при подключении по проводу и\или только первую ревизию:


Вкладка Gyro позволяет выбрать варианты эмуляции для управления гироскопом и назначить направления осей стиков, на которые вы примените действия сенсора:

Вкладка Lightbar управляет настройкой подсветки. Кроме статического цвета профиля, можно назначить эффект радуги для процесса зарядки, изменение цвета лайтбара в зависимости от уровня заряда и световую сигнализацию для низкого заряда батареи:

Вкладка Axis Config предназначена для тонкой настройки осей:

Для любой кнопки, курка и направления стика можно назначить или записать макрос, например комбинацию кнопок клавиатуры, кликов мыши или управление курсором мыши:

Важно, что прямо «из коробки» с помощью тачпанели геймпада можно управлять курсором мыши. Включение и отключение осуществляется комбинацией PS + тап по тачпанели. По-умолчанию эта функция включена, но можно поставить галку «Start with Slide/Scroll Off» и функция будет включаться только после активации вышеуказанной комбинацией. Прочие настройки подбираются индивидуально. Вот мои:

На вкладке Special Action доступны специальные возможности, их можно назначить на сочетания кнопок геймпада:


Вкладка Controller Reading предназначена для проверки работы элементов управления, а также проверки задержки связи в миллисекундах:

Вроде всё. Вот вам моя уже сконфигурированная версия DS4Windows. В ней создано три профиля:
- Зелёная подсветка — стандартный XBox 360 controller;
- Жёлтая подсветка — проводной DUALSHOCK 4 v1;
- Синяя подсветка — профиль для управления ПК с дивана (геймпад скрыт от системы).
Управление курсором на тачпанели в положении OFF для всех профилей, кроме синего. Для переключения используйте комбинацию PS + тап по тачпанели.
Варианты Special Action видны на этом скриншоте:

Например, комбинацией PS + левый стик вверх\вниз можно управлять системной громкостью, а комбинация PS + L3 отключает системный звук. Комбинация OPTION + PS показывает заряд аккумулятора. Остальное можно удалить, там специфические настройки.
рекомендации
4070 MSI по старой цене дешевле Palit
13900K в Регарде дешевле чем при курсе 60
Ищем PHP-программиста для апгрейда конфы
Всем Ку!
This is the guide with all necessary information about general information, directions to install / setup drivers, connect the controllers, fixing input issues, etc. We have shared a lot more important information in this guide only for the aspirants like you. Just go ahead and get started with the ds4windows on your pc right away.
Why Only DS4Windows?
It is a leader in the industry and has no competition from any other tools so far. Of course, there are some tools such as DS4Tool, DualsenseX, Xpadder, AntiMicroX, InputMapper but the number of features that DS4Windows has had can’t be beaten by any of them.
It supports a wide range of controllers such as Nintendo Switch / Pro, Playstation, Joycons, etc. Users can either connect their controllers to pc via wired connection or wireless connection. So that you can remap your mouse and keyboard keys to the controller keys to be able to play a countless number of pc games without any restrictions. The tool also has the profile system which allows you create multiple profiles for each game that you play.
Installation & Setup
The DS4 Windows software and the drivers required for it are not available on the windows store. Don’t worry, you can download them from this site. Check out the complete details that you should know about the requirements, drivers, setup instructions, etc. We have shared all the instructions for x64 bit computers. If you are using x86 (32 bit) pc or a desktop, you can download and install the 32 bit based drivers, that’s it.
Requirements:
Below are the must have requirements for it to work smoothly.
- Windows 10 / Windows 11 or Windows 8.1 operating system. Windows 7/xp/vista and older versions are not supported.
- One or more supported Gamepads / Controllers (Check Supported Gamepads List)
- Bluetooth USB Dongle to connect the controllers / gamepads wirelessly (optional only).
- Download and Install .Net 6.0 Runtime (x64 Bit) on your Windows 10/11/8.1/ pc (or) desktop.
Download & Run DS4Windows:
It’s time to download and install the tool on your personal computer / laptop.
- Download DS4Windows for your pc from our Download Page or from it’s official github page.
- The file will be downloaded either in .7z format or in .zip format. Download 7Zip software in order to extract the zip file to a folder.
- Now, install the 7zip software and extract the ds4win tool’s zip file. Make sure to extraact the file on desktop / documents folder / downloads folder.
- Open the extracted folder and scroll down till you see DS4Windows.exe file. Select the file and double click it to launch it.
- Once you launch the tool for the first time on your pc, you will be asked to choose the path to save the profiles and settings of the tool.
- Select the path (of your choice between AppData folder and Program folder) and proceed to futher steps below. We generally recommend you to select the AppData folder because that is where all your settings / profiles data is safe.
Download & Install Drivers:
Some drivers are crucial for the DS4W to work properly. Without them, it’s not at all possible to perform some important tasks such as hinding the name/nature of your real controller, etc.
| Driver Name | Recommendation | Download | Driver Function |
| ViGEmBUS | REQUIRED | Download Link | It is a must have driver which allows the DS4W tool to create X Box 360 / DS4 Controllers on your Windows pc. |
| HidHide | Strongly Recommended | Download Link | It is a highly recommended driver because it can easily hide your real controller. If you don’t use the driver, you may end up facing the double controller input because your pc will easily detect both your real controller and the virtual controller created by ViGEmBUS in combination with DS4W. |
| FakerInput | Optional | Download Link | It is an option driver but has a handful of uses. One of them is the ability to use your controller as the keyboard and mouse with better peformance and features. |
Connect The Controller To Your PC & DS4Windows Tool
The time has come now, you need to connect the controller to your personal computer and the ds4w tool. Check out the below instructions to connect it safely through USB / Bluetooth connection and avoid double input issues.
Connection Method: USB
Connecting the controller through an USB connection with an USB Cable is the most reliable thing. It helps you avoid latency issues and to get the best of the haptic feedback, rumble effects and adaptive triggers as well. Of course, you will get only them those are provided by the DS4W such as Rumble, haptic feedback, etc.
- Plug a goodle USB cable to your controller (DS4 or Dualsense or any other gamepad).
- Connect the other end to your personal computer.
- “Device has been detected” should be displayed as a notification when the controller is connected to your pc successfully.
- If you don’t see that message on your personal computer, then you must change the USB cable. Becuase, some cables are used only for charging the devices through an USB connection. Make sure to select the right one, which is capable of transferring data between the connected devices.
Connection Method: Bluetooth
Bluetooth is another great way of connecting devices safely without having to use any cables. It is recommended to use a bluetooth adapater to avoid high latency issues between your bluetooth controller and pc. Check out the below instructions to establish a strong bluetooth connection for your controller, with your pc.
- Turn on Bluetooth on your personal computer or laptop.
- Now, make sure that the controller is in the “Pairing Mode”. Don’t you know how to turn on the pairing mode on your controller? check out the below table for the tips and steps.
DualShock 4 (DS4)
DualSense (DS5)
DualShock 3
Joy-Con / Switch Pro Controller
Replicas
DualShock 4 (DS4)
DualSense (DS5)
DualShock 3
Joy-Con / Switch Pro Controller
Replicas
- Search for the available bluetooth devices on your personal computer.
- Click the name of your controller and enter “0000” without quotes, if asked for a pin.
- If you have previously conneccted your wireless controller to the pc, you don’t need to worry about entering the pin again.
- If you are unable to connect the controller via bluetooth, remove the device from the known devices list on your pc and re-connect it again.
Connection Method: DualShock 4 USB Wireless Adaptor
Here is an alternative method for the dualshock 4 users. Now, you can connect your DS4 device to your pc with the help of a USB Wireless Adaptor. The biggest advantage of connecting the controller through USB wireless adaptor is the support for usage of the headphone jack for both Audio and Mic. Want to know how to pair it with your devices? check below.
- First and foremost, plug in the DualShock 4 USB Wireless Adaptor to your pc.
- Now, press the button of the adaptor towards the usb port and hold it for 1 to 3 seconds until you see the light starts blinking. It means that it is now in the parining mode.

- Press the required buttons of the dualshock 4 to enable the pairing mode.
- Establish the connection between the DualShock 4 and the USB Wireless Adaptor and you are good to go if both are connected to each other.
Important Steps To Use DS4Windows Correctly W/O Any Issues
It’s highly important to be cautious when using it for the first time. Make sure to install required drivers first hand and connect the controller to pc on the other hand. Then, follow the below instructions (only if needed).
- Hit “Start” button to enable the DS4W if it’s not yet started by default.
- When you connect your real controller to your pc through bluetooth / usb connection, there are chances that your pc detects it.
- If you have installed hidhide driver, you don’t need to worry about it. But, it’s important to cross check the things to avoid double controller input issues.
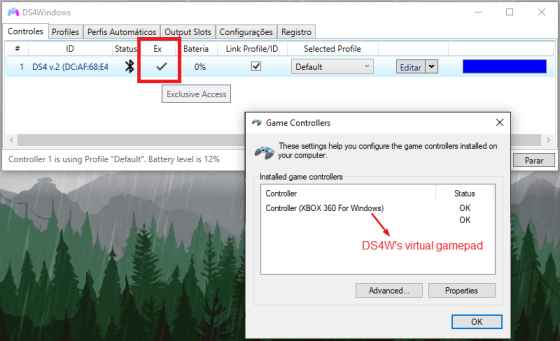
- If you can see the “Key” icon as indicated in the above image, the real controller is hiden successfully.
- If you see the “X” mark, it means that your real controller is not hidden. Do not worry about it, you can actually fix it and go ahead. In case if you are facing any other issue, refer the Guide To Fix DS4Windows Not Working Guide.
You can see “Default” under the “Selected Profile” menu. Which means that the xbox virtual controller emulation is active. For more information, read the important information available below.
About The Default Profile:
- The default profile mode enables the x box 360 emulation and makes your computer / games thinking that the connected dualshock 4 or dualsense is actually a real x box controller.
- In the default profile mode, DualSense / DualShock 4 (DS4)’s touch pad is set for the mouse control by default.
- If you want to turn off / on the mouse control, press and hold the “PS button” and touch the touchpad once.
You can actually create a bunch of profiles with various settings and options. On top of that, it’s very easy to switch between the created profiles.
About The DS4 Controller Emulation:
You can actually emulate both X Box gamepad and DS4 gamepad virtually. But most of the games support only x box gamepad and a very few games support the native DS4 controller. Still you can do that but with a custom profile. Want to know more? check out the below instructions.
- If the selected game doesn’t support DS4, you will not be able to use the DS4/Dualsense with DS4 Emulation.
- In case if the selected game allows DS4 emulation, you can switch to it from the xbox gamepad emulation by creating a new profile. On the other hand, you may also edit the already created profile to make it suitable for DS4 emulation.
- To do that, create a new profile by using Gamepad > DualShock 4 Preset.
- Or, you can edit the existing profile and then change the Virtual Controller Settings in the Others tab of the Profile Editor.
Important Note: Rumble won’t work when emulating the DS4 Controller. Don’t worry, you can enjoy Rumble effect with DS4 Controller in combination with the X Box Emulation but not with DS4 Emulation.
How To Prevent Double Controller / Double Input Issue In Games?
What Is Double Input (Controller) Issue?
Double Input issue arise when a game detects your real controller and the virtual xbox controller at the same time. In general, the DS4W tool will make your pc and games think that there is only one controller that is xbox 360 controller. That is better controlled by the Hidhide driver but some games will detect both the real controller and the virtual controller.
That leads to a lot of confusions in terms of in-game commands with your controller. You can see how any pc game detects both the controllers as shown in the below image.
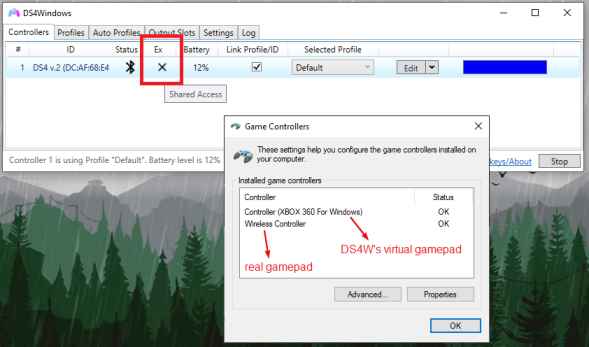
You can clearly see in the above image that the “X” mark is displayed right besides the bluetooth icon. It means that your real controller is not hidden. So that, it will be a cakewalk for the games to detect both the controllers as shown in the second part of the above image.
Whenever this conflict arise, the games and apps on your pc will receive inputs from both the controllers (real & virtual). Which will cause a lot of input issues and you won’t be able to play games in a way that you wanted.
Problems Caused By The Double Input Issue
Clear illustration Of The Double Input Issue
Problems Caused By The Double Input Issue
Clear illustration Of The Double Input Issue
Best Methods To Prevent Double Input Issue:
Below are the best methods that you may follow in order to prevent the double input and double controller issue.
HidHide (Recommended Method)
HidHide is the driver that has all the capabilities to hide any connected controller. It can hide as many connected controllers as you may want. Having it installed, the users can take full control over the connected gamepads and virtual controllers.
If you haven’t installed the HidHide driver on your windows pc, you can follow the below steps to solve the double input issue. The user / gamer has to set the HidHide to the following purposes.
- Hide the real controllers when connected via USB and Bluetooth.
- Allow DS4Windows to detect all the connected hidden devices in order for it to be able to realize there are real controllers connected for the X Box emulation.
HidHide Result
HidHide Configuration Client
Hiding A DS4 Controller
HidHide Result
HidHide Configuration Client
Hiding A DS4 Controller
Some Important Tips To Use HidHide:
Below are some of the tips for you to make use of the HidHide driver. I am pretty sure that these tips will make a big difference in it’s usage for sure.
Tips For General Usage:
- After finishing the installation process of the HidHide driver on your pc, you must restart your pc in order to be able to use it without any issues. Make sure to restart the pc instantly right after you finish it’s installation.
- If you are done with the configuration of the HidHide driver, you don’t need to enable the Hide DS4 Controllers option under Settings tab of the DS4W tool. If it is turned on for some reason, make sure to turn it off because, you don’t need it now.
- If you are facing any issues with hiding your real controller, you may uninstall the hidhide driver from pc and re-install the same again and restart the pc.
Tips For Configuration:
- When you want to configure HidHide, make sure to close the DS4Windows tool to view only the real controller. If it is open, HidHid will detect the real controller and the virtual controller leading to confusions at the end of the day.
- Make sure that you shoud not Hide controllers with the name “Sony COMPUTER (…)” because they are nothing but the virtual DS4 Controllers.
- Once you are done with whatever settings and changes that you wanted to make, you should close it right away before opening the DS4W tool. In case if you do not close the HidHide driver before launching the DS4W tool, you will definitely face controller identification related issues on your windows pc.
Everything You Need To know About Hide DS4 Controllers Option (Legacy | Not Recommended)
You need to know the fact that you don’t need to rely upon Hide DS4 Controllers option if you’ve already installed HidHide driver and set it up correctly. In fact, it is required to set it disabled by default when you are ready with the correct configuration of the HidHide driver’s client.
Note: The option “Hide DS4 Controllers” is not only applicable for the DualShock controllers but also for any other controller detected by the DS4 Windows tool.
About The Legacy «Hide DS4 Controllers» Option:
You will be able to see this option under the Settings of the DS4Win tool. When you enable this option, the tool will ask the windows os on your pc for the access to the detected controllers. That will help the tool to detect all the connected controllers/gamepads thus avoiding the double input issues.
Windows may deny the permission access to the connected controllers due to the following reasons.
- A gamepad might be already running.
- Any web browser is running (for example: Google Chrome, Opera or Microsoft Edge, etc).
- If there is any issue with the NVidia Graphic cards on your pc.
- If there is any issues with the connection of the controller to the pc (USB or Bluetooth).
In case if windows allows exclusive access to the connected gamepads, the connection may be dropped if a controller is disconnected while playing a game for whatever reasons. So, if you want to get access to it again, close the game and reconnect the gamepad to the pc and launch the game again.
This is somewhat a hectic process and the gamers need to close the game always when they face any such an issue. That’s the reason why the option “Hide DS4 Controllers” option is not recommended and completely optional to the users. In fact, you do not need this option becuase you can go ahead with the HidHide driver.
Everything You Need To Know About Axis Config
Check out how the Dead Zones and Anti Dead Zones work for the given Input and the Output. When the input is inside the Dead Zone (Red Area), the output is properly centered. Do not forget to check out the anti dead zones as well.
Dead Zone Selection
0
0.10
0.20
0.40
0.60
0.80
0
0.10
0.20
0.40
0.60
0.80
Anti Dead Zone Selection
0
0.10
0.20
0.40
0.60
0.80
0
0.10
0.20
0.40
0.60
0.80
Manage Backups, Restoring, Delete User Data & Settings
It’s time to talk about the technicalities such as backups, restoring and managing user data, etc. Check out the valuable information shared below about them.
User Data [Files & Folders]:
Following are the list of important user data related files.
- Profiles folder
- Profiles.xml
- OutputSlots.xml
- Auto Profiles.xml
- LinkedProfiles.xml
- ControllerConfigs.xml
- Actions.xml
How To Take Backup Of The User Data?
Taking a backup of the user data like profiles, settings and other important data would be helpful. If you want to take the backup, you need to be sure about the location of the data files. Following are the step by step instructions that you can follow in order to take the backup without any issues.
- Launch DS4Win tool on your personal computer and go to Settings tab. Tap Profile Folder to see if the user data is saved there.
- Make sure to check out the main folder of the DS4Win tool if the user data is also present here.
- In you don’t find the data in any of the aforementioned folders, you can proceed with the folder where the data is present.
- In case if you have found the user data in both the folders, you should consider the folder which contains the file “Profiles.xml”.
- On the other hand, if you want to take backup of the entire DS4Windows tool and the backup files are also present there, you are good to go.
How To Restore The User Data?
- If you have taken the backup of the user data by following the above steps, you can now restore the same data very easily.
- Copy the data and paste it into the folder where a Profiles.xml temp file is saved. Do not forget to delete the already existing profiles.xml file and paste the backup data.
- On the other hand, if you want to restore the user data to the main folder of the DS4Win tool, you can do that as well.
Note: If you have restored the data to both the folders, DS4Win will select the right folder to use the restored data. On top of that the other folder’s user data will be deleted sooner or later.
How To Delete The User Data?
If you want to delete any user data such as settings, profiles or gamepad configurations, you can do that very easily. First, go to the folder where everything is saved. Select the data that you want to delete and hit delete button or press Shift + Delete button at a time to delete them permanently.
How To Uninstall DS4Windows & Drivers?
Below are the instructions that you can follow in order to uninstall the ds4win and all the associated drivers that you have installed. Make sure to follow the steps to be able to uninstall, delete / remove the installed software and drivers successfully.
Steps To Uninstall DS4Windows:
- It is a portable and standalone software which is not actually installed on your personal computer. So, when you want to uninstall it, you don’t need to go to control panel and follow the old procedure.
- Simply, select the extracted folder and delete the same and you are done.
- In case if you want to install it again, you can extract the zip file that you have already downloaded and double tap the exe file to start using it.
Steps To Remove Settings and User Data:
- Hit Windows Key + R and type %appdata% in the Run Command window and hit enter.
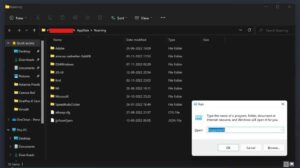
- Now you can see that a folder opens up on your pc. The path of the opened folder is appdata/roaming.
- You can see various folders right there. If you can see the DS4Windows folder, select it and delete it from there.
Steps To Uninstall ViGEmBus Driver:
- ViGEmBus driver is not just used along with the DS4W but also with a lot of other applications.
- If are using ViGEmBus driver for any other purpose apart from the DS4W, you may not need to uninstall it. Otherwise, you can follow the below steps carefully.
- Go to Start Menu on your windows pc and type “Control Panel” in the search bar, hit enter.
- Tap “Uninstall a program” option which is available right below the heading “Programs”.
- Scroll down a bit and select the ViGEmBus driver and double tap the same to start uninstalling it.
- Follow the on-screen instructions to finish uninstalling it from your personal computer.
Steps To Uninstall HidHide Driver:
- Go to start menu of your windows pc and click the “Settings” icon to launch the settings.
- Select “Apps” section on the left hand side menu.
- Tap “Apps & Features” option on the right hand side.
- Type “HidHide” in the search bar and hit enter.
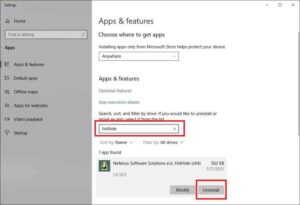
- Now, hit “Uninstall” button as shown in the above image and you are done.
- Restart your windows pc to apply the changes that you have made.
Steps To Uninstall FakerInput Driver:
- Open Apps & Features section by going by the path Windows Start Menu > Settings > Apps > Apps & Features.
- Search for “FakerInput” and hit “Uninstall” button and follow the on-screen instructions.
- Restart your computer now and you are done with it.
Steps To Uninstall Legacy Drivers:
Legacy drivers are of no use now with the latest version of ds4 windows. But if you have been using it from a very long time, you don’t need them anymore. If you want to uninstall them, below tips will help you for sure.
- Go to Control Panel > Programs > Uninstall a program.
- Select the HidGuardian driver and uninstall it.
- In the same manner, select the ScpVBus driver and uninstall it as well.
Now, you should restart your windows laptop/desktop and you are done with it.
How To Prevent Conflicts Between Steam and DS4Windows?
We all know the fact that Steam has the controller remapping functionalities. So, whenever you use DS4W on your pc while actually making use of the Steams controller remapping features, there are good chances to get conflicts between both of them. If this is unsolved, it’s hard for any user to play games and it should be fixed first.
If a user want to avoid the conflicts, the user have to either alter the controller settings of the Steam app or the DS4Win app. Check out the below tips to avoid the conflicts like a pro.
- Launch the Steam app on your windows pc and go to settings.
- Disable the Steam’s Remapping Functions completely.
- Disabiling the configuration settings is really important to fully disable steam input.
- Restart your pc and you are good to go with the DS4W’s remapping settings.
Actually, there is a method to use both DS4W’s and Steam’s remapping settings without any conflicts. But, it’s not a recommended method since it might cause some issues with steam.
How To Use Steam’s Big Picture Mode With DS4 Controller Emulation?
As we have already mentioned, there will be an issue with the steam’s big picture mode when using the emulated DS4 Controllers. To avoid that and use the big picture mode properly, it is recommended to run DS4 Windows under a custom “.exe” name.
If the user is not ready to go with this method, it will not be possible for them to use the big picture mode without any conflicts.
How To Run DS4Windows Under A Custom «.exe» Name?
When you are using DS4Win on your pc, a lot of applications or games may not respond well when they detect the tool. Some examples of those applications/games (or) instances are as follows.
- Shovel Knight: This game will ignore DS4 Controllers.
- Yuzu/Cemu Emulators: These emulators will ignore Playstation Controllers.
- Steam Big Picture: It cannot interact with the steam’s big picture interface while using playstation controllers such as (DS4/DS3/DualSense).
- Steam Input: It will ignore the inputs from the Playstation Controllers no matter even if the PlayStation Configuration Support is turned on.
In order to avoid all the above issues and some other unknown issues, you can run DS4Windows.exe with a differently named exe file. Want to learn how? do not skip the below section where we have shared a step by step procedure for it.
You can use any name of your choice but we have chosen “DS4Win” in this article to show you how you can also do it yourself.
Step 1
Step 2
Step 3
Final Step
Step 1
Step 2
Step 3
Final Step
How To Stop Using A Custom «.exe» Name?
- Make sure to close the software completely if it is open still. You should check if the app is running in the background and close it from there too.
- Launch the original file “DS4Windows.exe” file on your personal computer.
- Disable the option “Run At Startup” if it is turned on by default.
- It’s time to remove the name that you have entered at Custom Exe Name field.
- Hit “Stop” button once and hit the “Start” button again as you do it always.
- Now, you will have to Re-Enable the option “Run At Startup”.
That is all about the guide to getting started with DS4Windows. We have tried our best to explain everything which is helpful to our blog visitors. If you feel that we have missed anything important, kindly let us know in the comments below this page.
DualShock 4 — отличный и качественный контроллер, он удобно лежит в руке и приятен на ощупь, есть множество встроенных функций, включая микрофон, блютуз, гироскоп и вибрацию. Многие предпочитают клавиатуре и мыши именно его, и такая возможность появилась благодаря DS4Windows, настройкой этой программы мы и будем заниматься.
UPD: Статья обновлена 21.08.2023
Важно
- Гайд пишется по версии DS4Windows 3.2.13
- Как узнать разрядность системы: правой кнопкой мыши на мой компьютер → свойства → строка тип системы. Для 32-разрядных систем программы для скачивания помечаются, как x86
- Не все игры могут видеть геймпад, в основном старые, тут нужна другая программа JoyToKey или эмуляция через steam
- При подключении через провод, достаточно просто подключить контроллер. Для подключения через блютуз зажимаем кнопку PS+Share и ждем, пока панель не замигает белым, затем переходим в настройки Bluetooth и подключаем геймпад Wireless Controller:

Софт для работы DS4Windows
Первым делом нам понадобится скачать и установить программы и библиотеки:
https://github.com/Ryochan7/DS4Windows/releases/ — сам эмулятор контроллера
Библиотеки С++ — Visual C++ 2015-2019 Redistributable. скачать x64 or скачать x86
https://dotnet.microsoft.com/en-us/download — NET Framework (скачиваем и SDK и Desktop Runtime). Если у вас x32 система, то ссылка тут

Если вы играете через Steam, отключаем пользовательские настройки, если они есть. Переходим в Steam → Настройки → Контроллер и снимаем все чекбоксы.

Так же ниже нажмите «Раскладка при зажатой кнопке Guide» и отключите все действия раскладки, это понадобится для назначения своих комбинаций клавиш.
————————————-
Устанавливаем все библиотеки, которые вы скачали.
Установка необходимого софта
Распаковываем архив и переносим в нужное место (например C:\Program Files), который мы скачали ранее, запускаем DS4Windows.exe.
При первом запуске, программа предложит выбрать вам папку настроек, выбираем Program Folder.

Первым делом переходим на вкладку settings и выбираем русский язык, затем перезапускаем программу, окно откроется уже на русском.

Переходим на вкладку «Настройки», кликаем «Настройка драйвера контроллера» и устанавливаем все пункты (кроме второго, если он неактивен, как на скриншоте), после чего перезагружаем ПК.

Настройка DS4Windows
После перезагрузки снова запускаем DS4Windows.exe.
При подключении контроллера, программа автоматически его подхватит, и вы увидите что-то вроде этого, панель загорится синим и вы сразу же можете трогать тачпад, он будет имитировать мышь, клик по левой или правой части = левая кнопка мыши, клик по левой и правой частям одновременно = правая кнопка мыши, клик сверху = средняя кнопка мыши.

Далее необходимо снова перейти на вкладку «Настройки», нажать «Панель управления» и «Клиент конфигурации HidHide».

Сделайте как на скринах: добавьте приложение на вкладке «Applications» и поставьте флажок около физического контроллера на вкладке «Devices», после чего он пропадёт из игровых устройств, это необходимо, что исключить дублирования нажатий, что может вызвать непредвиденные проблемы в играх.
Не забудьте отметить чекбокс Enable Device Hiding

Настройка профилей
Уже сейчас вы можете ничего не трогать и заходить в игру, по умолчанию выставлены оптимальные настройки. Ниже будет приведен более глубокий разбор настроек программы.
Перейдите на вкладку «Профили», нажмите на профиль «Default», затем «Редактировать».
Вы увидите 8 вкладок (слева направо):
Вкладка Controls
Здесь можно посмотреть названия кнопок (наведите на геймпад мышью и увидите обозначения) и переназначить их, кликаем на кнопку на картинке и выбираем в открывшемся окне новую (с клавиатуры, мыши или геймпада). Часто, переназначить управление можно в самой игре, и делать это в программе необязательно.

Если вы решили менять стандартные кнопки, я рекомендую сначала скопировать профиль и менять его, чтобы у вас всегда оставался пример профиля по-умолчанию.
Вкладка Special Actions — настройка своих комбинаций клавиш и макросов
С помощью своих комбинаций можно достичь того, что вообще не придется использовать ни мышь ни клавиатуру, за исключенем запуска самой программы.
По умолчанию уже есть одна комбинация «PS+Options» — быстрое отключение контроллера, что очень умно, ведь стандартный функционал рассчитан на зажатие кнопки PS в течении 10 секунд.
Как пользоваться макросами. Примеры
Двойной клик на кнопку Y или треугольник по нажатию на R3
На вкладке Controls кликаем на нужную нам кнопку (R3)

Откроется панель с клавиатурой, нажимаем Record A Macro

Обязательно ставим чекбокс Record Delays, чтобы записать задержки между нажатиями, и кликаем Запись или Record

Далее, соответственно, набираем нужный нам макрос (то есть нажимаем порядок кнопок, который должен выполняться при клике на R3, или любую другую клавишу, на которую вы назначаете макрос), нажимаем Stop

Редактируем задержки до 10-50мс и нажимаем Сохранить. Задержки между нажатиями необходимо указывать для всех макросов, иначе работать они не будут. Чем ниже задержка, тем быстрее будет срабатывать макрос, в 1 секунде 1000 миллисекунд.

То же самое действие можно проделать на вкладке Special Actions, но другим способом. Нажимаем Новое действие

Даём название макросу, выбираем в левой колонке кнопку или их комбинацию, выбираем тип действия в правой колонке (подробнее чуть ниже) Multi-action Button и в разделе Tap Trigger записываем этот же самый макрос (два клика по Y или треугольнику). Сохраняем макрос, сохраняем комбинацию.

После всех действий не забывайте сохранить сам профиль
Подробнее о создании своих комбинаций клавиш
Нажав Новое действие вы попадаете в новое окно, где слева надо выбрать одну или несколько кнопок, при нажатии которых будет происходить дествие выбранное в правой колонке:
- Record a macro — как записывать макрос, вы уже знаете, а из чекбоксов могу сказать только за 2: run on trigger release это стандартный запуск по нажатию, repeat while held повторяет макрос при удерживании комбинации, отметьте ту, которая вам нужна
- Launch a program — запустить указанную программу, понятно из названия
- Load a profile — сменить профиль на указанный
- Press/Toggle key — нажать выбранную клавишу, возможно, наиболее часто используемая возможность
- Disconnect from Bluetooth — отключить контроллер, по умолчанию уже есть такая комбинация PS+Options, но вы можете её удалить и назначить другую
- Check Battery Life — судя по всему моргнет лайтбар, чем ближе к красному, тем разряженнее батарея, можно назначить свои цвета, сам не пользовался этим пунктом
- Multi-action Button — второй по важности пункт: Tap Trigger — запуск макроса по клику, Hold Trigger — запуск макроса при зажатии клавиши / комбинации клавиш, Double Tap Trigger — запуск макроса при двойном клике
- Последний пункт Calibration… — откалибровать контроллер, если судить по названию, не приходилось пользоваться
Готовый файл настроек
Рекомендую использовать комбинации с клавишей PS, т.к. она не пересекается с другими действиями в играх.

- Alt+F1 — PS+L1
- Alt+F3 — PS+R1
- Alt+F5 — PS+L2
- Alt+F9 — PS+R2
- F1 — Share+L1
- F3 — Share+R1
- F5 — Share+L2
- F9 — Share+R2
- Отключить контроллер — PS+Options
- Enter — PS+крестик
- Escape — PS+треугольник
- Ctrl+C — PS+вверх
- Ctrl+V — PS+вниз
- Alt — PS+Квадрат
- Tab — PS+вправо (зажмите пс+квадрат и нажимайте вправо, чтобы переключаться между окнами)
СКАЧАТЬ АРХИВ ZIP
Распакуйте архив, все содержимое архива скопируйте в папку программы с заменой (это заменит все ваши настройки!).
Примечание: чтобы активировать/деактивировать комбинацию, отметьте чекбокс слева от неё и сохраните профиль.
Вкладка Controller Readings
Проверить, как реагируют стики, курки и гироскоп.
Вкладка Axis Config
Настройка стиков и курков. Мертвые зоны и чувствительность. По умолчанию все работает очень хорошо.
Вкладка Lightbar
Цвет панели. Если отметить «Color By Battery %» — появится вторая колонка с настройкой цвета, где можно указать к какому цвету стремится панель при разряде. Если, к примеру, укажете красный, то чем разряженее контроллер, тем ближе к красному будет полоска, а по середине цвет будет примерно сиреневый.

Вкладка Touchpad
Единственный пункт, это Output Mode, но очень важный, режимы:
- Mouse — настройка по умолчанию, имитирует движение мышью, как тачпад ноутбука
- Controls — можно назначить свои клавиши или макросы на свайпы тачпада, так же есть настройка Passthru Click Action, она превращает клик по тачпаду в нативный (родной) клик контроллера, это необходимо, например, в игре Horizon Zero Dawn, чтобы открыть игровое меню (карта/цели/инвентарь и тд)
- Absolute Mouse — то же, что и mouse, но при касании курсор на экране перемещается в место касания пальца с тачпадом (если вы коснулись тачпада в правом верхнем углу, курсор на экране окажется в правом верхнем углу и будет двигать дальше оттуда)
- Passthru — оставить тачпад нативным, тогда он будет использоваться только так, как был предусмотрен разработчиками PlayStation (как в примере выше с Horizon Zero Dawn)
Вкладка Gyro
Не приходилось трогать настройки гироскопа, единственная игра, в которой он мне пока пригодился, это Heavy Rain, и вроде все работало не плохо.
Вкладка Other

Тут нас интересует флажок «Enable Touchpad Toogle» — при клике на ps + задеть touchpad движения мышью отключатся, бывает удобно, чтобы во время игры курсор случайно не появился на экране.
И самое интересное и очень важное «Emulated Controller: XBox360 & DualShock4».
Режим XBox360 стоит по умолчанию, соответственно геймпад распознается как искбоксовский (XInput) и это работает в большинстве современных игр.
Но есть игры, которые поддерживают DualShock, такие как Witcher 3, Dark Souls Remastered, Cyberpunk 2077 и множество других и даже некоторые платформеры, вот для этого нам и нужен второй режим.
Не все игры поддерживают иконки от PS, некоторые игры могут воспринимать режим DualShock как Xbox360, некоторые просто не будут видеть контроллер (переключитесь на режим Xbox360).
Есть одно но, вибрации в режиме DualShock 4 не будет.
Чтобы каждый раз не переключаться между режимами, настройте один профиль, скопируйте его, и во втором профиле поменяйте цвет и режим на Dualshock. Тогда вы сможете быстро переключаться между ними, прислонив два пальца к тачпаду и проведя вбок.
P.S.: вы можете посмотреть игры, которые поддерживают геймпады в подборке Игры с поддержкой геймпада на ПК.
———————————————-
Вот и все, инструкция получилась совсем небольшая, если учитывать, что вторая часть уже необязательна, но если у вас остались вопросы, пишите их в комментариях.
Контроллер DualShock 4, созданный для использования с игровой консолью PlayStation 4, также может быть подключен к компьютеру с операционной системой Windows 10. Для этого необходимо настроить соответствующее программное обеспечение, такое как DS4Windows.
DS4Windows — это небольшая, но мощная программа, которая позволяет использовать беспроводной контроллер DualShock 4 с ПК. С ее помощью вы сможете настроить контроллер таким образом, чтобы использовать его не только для игр, но и для управления различными приложениями и программами.
Установка DS4Windows довольно простая. Вам просто нужно скачать и запустить программу. После установки подключите беспроводной контроллер DualShock 4 к компьютеру с помощью кабеля USB или через Bluetooth, если ваш ПК поддерживает эту функцию. Затем запустите программу DS4Windows и следуйте инструкциям на экране, чтобы завершить процесс настройки.
После завершения настройки вы сможете использовать беспроводной контроллер DualShock 4 для игр и других приложений на ПК. Вы также сможете настроить различные параметры, такие как чувствительность стиков, функцию вибрации и многое другое, чтобы адаптировать контроллер к вашим предпочтениям.
Содержание
- Ds4windows windows 10 на русском
- Настройка контроллера DualShock 4 для ПК
- Шаг 1: Скачайте и установите программу DS4Windows
- Шаг 2: Подключите беспроводной контроллер DualShock 4 к ПК
- Шаг 3: Запустите программу DS4Windows и выполните настройки
- Шаг 4: Настройка кнопок и функций контроллера
- Инструкция по установке программы Ds4windows
- Подключение DualShock 4 к ПК по Bluetooth
Ds4windows windows 10 на русском
Использование беспроводного контроллера DualShock 4 на ПК с операционной системой Windows 10 возможно благодаря программе DS4Windows. Она позволяет подключить геймпад к компьютеру и настроить его работу с помощью драйверов и дополнительных настроек.
Для начала необходимо скачать программу DS4Windows с официального сайта и установить ее на компьютер. После установки запустите программу и следуйте инструкциям по подключению контроллера.
Во время подключения контроллера DS4Windows автоматически найдет его и установит соответствующие драйверы. После успешной установки драйверов настройте работу геймпада с помощью настроек программы.
В программе DS4Windows доступны различные настройки, которые позволяют настроить работу контроллера под ваши предпочтения. Вы можете настроить кнопки геймпада, аналоговые стики, гироскоп и другие функции контроллера.
Также в DS4Windows есть возможность использовать программу в режиме эксклюзивного доступа, что позволяет полностью контролировать работу геймпада и обеспечить максимальную совместимость с играми.
| Преимущества DS4Windows: | Недостатки DS4Windows: |
|---|---|
| Поддержка беспроводного контроллера DualShock 4 на ПК | Требуется установка и настройка специальной программы |
| Возможность настройки работы геймпада под индивидуальные предпочтения | Могут возникать проблемы совместимости с некоторыми играми |
| Режим эксклюзивного доступа для полного контроля над работой геймпада | Требует наличия операционной системы Windows 10 |
Использование программы DS4Windows позволяет получить полный контроль над беспроводным контроллером DualShock 4 на ПК с операционной системой Windows 10. Благодаря настройкам программы можно полностью индивидуализировать работу геймпада и насладиться играми с максимальным комфортом.
Настройка контроллера DualShock 4 для ПК
Шаг 1: Скачайте и установите программу DS4Windows
Первым шагом, чтобы настроить контроллер DualShock 4 для ПК, необходимо скачать и установить программу DS4Windows. Программа доступна на официальном сайте разработчика и может быть загружена бесплатно. После скачивания запустите установщик и следуйте инструкциям по установке.
Шаг 2: Подключите беспроводной контроллер DualShock 4 к ПК
После установки программы DS4Windows подключите беспроводной контроллер DualShock 4 к ПК с помощью USB-кабеля. Подключение контроллера поможет установить драйверы и настроить контроллер для работы на ПК.
Шаг 3: Запустите программу DS4Windows и выполните настройки
После подключения контроллера DualShock 4 запустите программу DS4Windows. Она будет пытаться автоматически распознать контроллер и установить необходимые драйверы. Если программа не распознает контроллер автоматически, нажмите на кнопку «Add a new device» в окне программы и следуйте инструкциям по установке драйверов для DualShock 4.
После успешного распознавания контроллера и установки драйверов вы сможете выполнить дополнительные настройки для удобного управления играми на ПК с помощью DualShock 4. Настройки включают настройку кнопок, аналоговых стиков, геймпада и других функций контроллера.
Шаг 4: Настройка кнопок и функций контроллера
В программе DS4Windows вы сможете настроить кнопки и функции контроллера DualShock 4 в соответствии с вашими предпочтениями. Вы можете изменить расположение кнопок, настроить чувствительность аналоговых стиков, настроить вибрацию контроллера и многое другое. Чтобы выполнить настройку, выберите в программе соответствующую функцию и выполните необходимые изменения.
После завершения настроек сохраните изменения и закройте программу DS4Windows. Теперь ваш контроллер DualShock 4 полностью настроен для работы с ПК и вы можете наслаждаться играми на ПК с удобным управлением.
Инструкция по установке программы Ds4windows
Для настройки беспроводного контроллера DualShock 4 для ПК на операционной системе Windows 10 вам потребуется установить программу Ds4windows. В этой инструкции мы рассмотрим шаги по установке программы Ds4windows на ваш компьютер.
Шаг 1: Перейдите на официальный веб-сайт программы Ds4windows, чтобы скачать инсталлятор. Вы можете воспользоваться поисковиком, чтобы найти официальный сайт.
Шаг 2: На официальном сайте найдите раздел загрузок или скачайте сразу инсталлятор Ds4windows.
Шаг 3: После скачивания инсталлятора Ds4windows откройте его. Вы можете найти его в вашей папке Загрузки или в папке, которую вы указали при сохранении файла.
Шаг 4: Запустите инсталлятор. В процессе установки программа Ds4windows может запросить ваши разрешения для исполнения некоторых действий. Рекомендуется прочитать информацию в окне установки и согласиться на все необходимые разрешения.
Шаг 5: После завершения инсталляции запустите программу Ds4windows. Возможно, вам потребуется перезагрузить компьютер после установки программы.
Шаг 6: Подключите беспроводной контроллер DualShock 4 к вашему компьютеру с помощью USB-кабеля или Bluetooth-адаптера.
Шаг 7: При первом подключении контроллера к компьютеру, программа Ds4windows может вывести на экран окно настройки контроллера. В этом окне вы можете настроить различные параметры контроллера, такие как кнопки и дополнительные функции. Следуйте инструкциям на экране, чтобы завершить настройку контроллера.
Шаг 8: После завершения настройки вы можете использовать беспроводной контроллер DualShock 4 для игры на вашем ПК с помощью программы Ds4windows.
Теперь вы знаете, как установить программу Ds4windows и настроить беспроводной контроллер DualShock 4 для ПК на операционной системе Windows 10. Наслаждайтесь игровым процессом с вашим контроллером!
Подключение DualShock 4 к ПК по Bluetooth
Для подключения беспроводного контроллера DualShock 4 к ПК по Bluetooth вам понадобится специальный адаптер Bluetooth или встроенный модуль Bluetooth на вашем компьютере или ноутбуке.
Чтобы начать процесс подключения, следуйте этим шагам:
- Убедитесь, что ваш DualShock 4 полностью заряжен или подключен к ПК с помощью USB-кабеля.
- Включите Bluetooth на вашем компьютере или ноутбуке. Обычно это можно сделать в настройках системы.
- На контроллере DualShock 4 нажмите и удерживайте кнопку «Share» вместе с кнопкой «PS» до тех пор, пока индикатор светодиода не начнет мигать быстро.
- На вашем компьютере или ноутбуке запустите программу DS4Windows, если у вас уже установлена. В противном случае, загрузите ее с официального сайта и выполните установку.
- В программе DS4Windows нажмите на кнопку «Подключить контроллер по Bluetooth» и дождитесь, пока ваш компьютер обнаружит контроллер DualShock 4.
- После того, как контроллер будет обнаружен, вы сможете начать использовать его для игр на вашем ПК.
Теперь вы можете играть со своим беспроводным контроллером DualShock 4 на ПК, используя Bluetooth-соединение. Обратите внимание, что некоторые игры могут не поддерживать контроллеры DualShock 4 по умолчанию, поэтому вам может потребоваться настроить контроллер в настройках игры или с помощью программы DS4Windows.
Getting Started with DS4Windows
Here we will go through the installation steps, whats required for the application and how to download and setup DS4Windows correctly.
What is DS4Windows?
For those that are still not sure what DS4windows is or why they need this application. See our about us page and FAQ for more information.
In summary, DS4 Windows makes it possible for your to use your PlayStation and Nintendo controllers on a Windows 10/11 PC by emulating a virtual Xbox/DS4 controller. With it, comes added features where you can remap or rebind the keys to your liking (buttons, joysticks, keyboard + mouse etc) and making it possible to play much more games with your controller. No need to buy a supported controller or forcefully play only with keyboard and mouse. Go ahead, take control!
Important Steps to use DS4 correctly
- Downloading, running and getting your gamepads detected by DS4Windows
- Installation and Setup guide
- Correctly connecting gamepads to the PC
- “Hiding” the real gamepads being used so only DS4Windows’ virtual controllers remain visible to games in order to prevent the infamous Double Controller or Double Input Issue
- This is THE major recomendation to be followed in order to prevent problems in games
- Check the Preventing the double controller / double input issue in games guide for more info about the issue and instructions on how to proceed
Important Notes
About the default Profile
- Xbox 360 emulation is the default mode: your gamepad will be recognized as if it were an Xbox 360 controller by the system and games
- DS4/DualSense’s touchpad is set for mouse control
- To quickly turn off or on this feature you can hold the
PSbutton then touch the Touchpad once
- To quickly turn off or on this feature you can hold the
About DS4 Controller emulation
- Though it’s possible to change from Xbox to DS4 emulation, keep in mind that most games support only Xbox gamepads! If the game itself doesn’t have native support for DS4 controllers then your gamepad won’t be detected if you switch to DS4 emulation
- To switch to DS4 emulation you can create a new profile using a
Gamepad -> DualShock 4preset or edit an existing profile and then change theVirtual controller settingsin the profile editor’sOthertab
- To switch to DS4 emulation you can create a new profile using a
- Rumble is currently disabled when emulating a DS4 controller
- Do not confuse things: using a real DS4 while doing Xbox emulation will have rumble working as normal. Using any real controller + DS4 emulation will have rumble disabled
About the output slots tab (Latest DS4 version)
It’s better that nothing is changed on this tab unless you really know what you are doing. The default configurations (everything set to dynamic) is the better choice for most users.
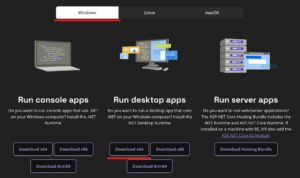
Prerequisites
- Windows 10 or 11. Windows versions from 8.1 and below are NOT supported anymore and support will not be given to users running older builds
- One or more supported controllers (check the list) PS4 Controller
- (Optional) Bluetooth dongle for connecting wirelessly
- Microsoft .NET 6.0.6 FOR DESKTOP APPS
Downloading and starting DS4Windows
- Download the latest DS4Windows x64 package
- The .7zip package is smaller but requires the 7zip software in order to open/extract it
- Extract the package in a easily accessible folder (e.g.: Desktop, Documents, Download etc)
- DO NOT extract it inside a folder the requires elevated privilegies (e.g.: Program Files, Windows)
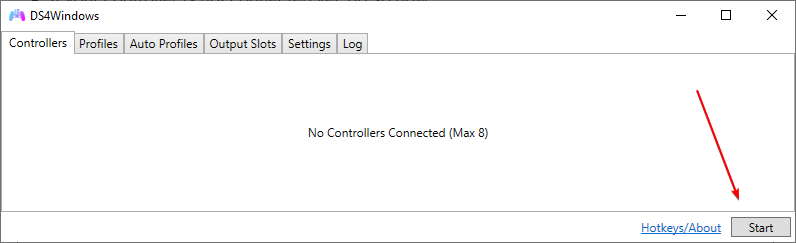
- Execute the
DS4Windows.exefile to run DS4Windows - On first launch DS4Windows may ask you where to save its user data (settings and profiles):
- AppData folder (recommended): user data is stored outside of the program folder, inside a special folder reserved to your Windows user
- Program folder: user data is stored inside the same folder
DS4Windows.exeis located
Drivers Setup
When running DS4Windows for the first time it may prompt you to install some drivers, with the first one being essential. Install them accordingly to your needs then hit the Finished button after.
| Driver | Recommended? | Driver function |
|---|---|---|
| ViGEmBUS | REQUIRED | Allows DS4Windows to create virtual Xbox/DS4 controllers |
| HidHide | Strongly recommended | Used to “hide” your real controller in order to prevent games from simultaneously recognizing both your real controller and the virtual controller created by DS4Windows, a situation that can lead to the infamous double controller input issue |
| FakerInput | Optional | Useful for users who want to use their controllers as keyboard and mouse. Though DS4Windows can do so by itself, the FakerInput has better performance and can work in more games and situations where Windows might prevent the usage ofDS4Windows’ normal keyboard/mouse handler |
Final steps
- If your controller is not connected yet, do so now
- Check here if you are having trouble connecting them via bluetooth
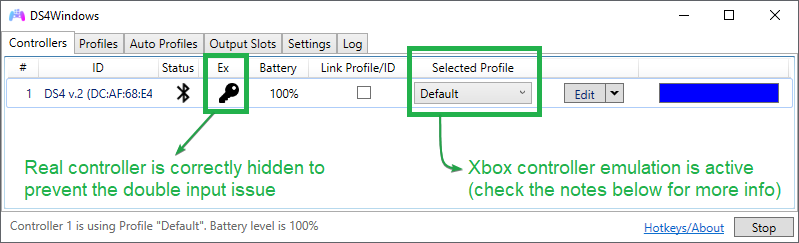
- If everything is ok then your controller will appear on the main
controllerstab with theDefaultprofile selected- Make sure DS4Windows is not stopped
- Check here if DS4Windows has not detected your controller
Assuming your controller has been detected then Xbox Controller emulation should already be working and you are all set. Good Luck and Have Fun!
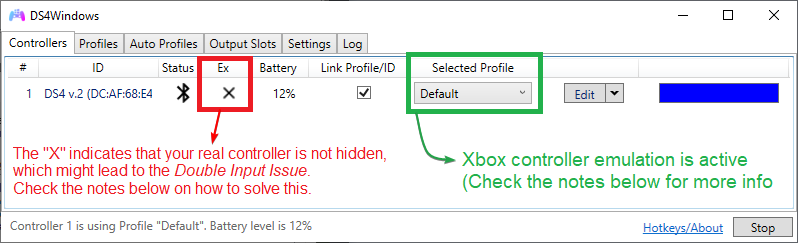
About the X
If the «X» check is present, then you may suffer from the infamous Double Input Issue which might cause several gameplay problems. Read more about how to fix it below.
Connecting controllers to the PC and DS4Windows
DS4Windows should immediatly recognize any controllers properly connected to the PC.
Though USB cables are the most reliable, connecting controller wirelessly via Bluetooth will offer similar response times (input delay) and stable connections as long as a good quality BT adapter is being used and no major radio interference is affecting the connection.
Connection methods
USB
- Should be as simple as just plugging your controller with a good, working USB cable
- Windows should play a “device has been detected” sound when the controller is plugged in
- Keep in mind that some USB cables can only be used for charging. If the cable does not support data transfer then it won’t be of use
Bluetooth
- Make sure your BT adapter has the minimum specs for your controller
- The controller needs to be set into
pairing modeto be added as a Bluetooth device through Windows’ settings. If a pin is asked try0000 - If a controller has already been previously paired and you can’t reconnect, try removing the device from Windows’ Bluetooth devices list and repairing them
Setting Controller in pairing mode
DualShock / DualSense
Joy Con / Switch Pro
Copy-Cats / Replicas
DualShock / DualSense
Joy Con / Switch Pro
Copy-Cats / Replicas
Sony DualShock 4 USB Wireless adapter
The official adapter from Sony supports only 1 controller, but allows the headphone jack to be used wireless for both audio and mic.
To pair a DualShock 4 to it, both must be set to pairing mode. For the Wireless Adapter, its main body must be slightly pressed towards the USB port (until a “click” is felt) then hold it down in this position for 3 seconds, with its LED flashing in a heartbeat pattern indicating that it’s in pairing mode. Set then DualShock 4 into pairing mode (check the previous section) and it it should connect to the adapter.
Final Checks
Assuming everything is working as expected then DS4Windows should have no trouble detecting your controller, just make sure you haven’t accidentally stopped DS4Windows (in case you have, just press DS4Windows’ start button)
If for whatever reason DS4Windows is failing to detect your controller or you are not sure if it has been properly connected, check the Controller Detection troubleshoot page.
Preventing the double controller / double input issue in games
About the double input (controller) issue
DS4Windows does not magically transform your gamepad from one type to another. It creates a virtual gamepad that is associated to your real one. This means that if you have 1 real gamepad connected then windows will actually detect 2 gamepads. If 2 real then 4 and so on.
The image below shows how Windows behaves when a DS4v2 (Wireless Controller) is connected to the system while DS4Windows is emulating a Xbox gamepad:
If the game detects both the real and the virtual gamepad at the same time then it will receive commands from 2 different devices at every button press and stick movement, which can lead to the infamous double-input issue that can make games unplayable. Check the examples below:
Problems Caused by Double Input Issue
GIF Showcasing Double Input issue
Problems Caused by Double Input Issue
GIF Showcasing Double Input issue
Methods to prevent Double Input
To prevent or fix this issue it’s necessary to hide the real controller in order to make only DS4Windows’ virtual controller visible to games. This can be done in two ways:
- HidHide (recommended)
- DS4Windows’
Hide DS4 Controllersoption (legacy, non-recommended option)
HidHide (recommended)
HidHide is a driver that acts as a barrier between Windows and game controllers connected to the system. It allows the user to selectively hide gamepads and only allow specific software to still detect them.
It is the recommended method because once it has been properly setup the double input issue is solved for good for the hidden controller.
In DS4Windows case, the user needs to set HidHide to:
- Hide the real controllers from the system once when connected via USB and once when via Bluetooth
- Allow DS4Windows to see all hidden devices, otherwise it would think there are no supported gamepads connected
HidHide Result
HidHide Configuration
Proof of Concept: Hiding PS4 Controller
HidHide Result
HidHide Configuration
Proof of Concept: Hiding PS4 Controller
HidHide has its own dedicated setup page. Users who know more or less what they are doing can follow the quick setup section and for the ones having trouble there is also the step-by-step section.
HidHide Usage & Tips
General Info
- After installing the HidHide driver you MUST reboot your system before using it
- If HidHide is properly configured then the
Hide DS4 controllersoption under DS4Windows’Settingstab is redundant and should be left disabled - Though HidHide’s own setup guide should cover everything the user needs, this site also has a dedicated HidHide usage troubleshooting page for users having trouble configuring it or confirming if their real controllers are actually hidden.
Client Configuration
- In order to avoid confusion, make sure DS4Windows is stopped or fully closed BEFORE opening HidHide’s Client so only real controllers appear on its devices list
- Remember to close HidHide’s Client before re-opening DS4Windows, otherwise the
Excheck will fail even if the controller is correctly hidden
DS4Windows Built-in Hider
Though it is written “DS4 Controllers” it applies to any real controller detected by DS4Windows
Note to HidHide Users.
If you have HidHide installed and correctly setup then this option is redudant and should be left disabled to prevent issues or confusion.
This option exists on DS4Windows’ Settings tab. When enabled, DS4Windows will kindly ask Windows for exclusive access to detected devices, meaning the later would only allow DS4Windows to detect the gamepads and preventing the double input issue.
The problem with this method is that Windows can deny the exclusive access request when another process already has a open connection to the gamepad. Common reasons for this request to fail are:
- A game already is running
- Google chrome/Opera is running (why does it have a connection to the gamepad you ask? A mystery)
- Nvidia Geforce experience process having a hold of the gamepad
- Random non-obvious process having a hold of the gamepad
- etc
Even if it works initially, if your gamepad disconnects in the middle of a game chances are that you’ll lose exclusive access upon reconnection, requiring you to close the game to try again.
For the reasons explained above, the Hide DS4 Controllers option is NOT RECOMMENDED, though it remains available to users that need to use it for whatever reason. HidHide is the better option all around for those who can use it.
Managing DS4W’s Installation, Backups and User Data
User data’s files and folders
The complete list of user data related files and folders is the following:
- Actions.xml
- Auto Profiles.xml
- ControllerConfigs.xml
- LinkedProfiles.xml
- OutputSlots.xml
- Profiles.xml
- Profiles folder
Backup, Restore & Delete
Backup
It’s necessary to verify if there are user related data in two different folders: inside the main DS4Windows folder and in the user’s Profile folder. To do so:
- Click on the
Profile Folderoption under DS4Windows’Settingstab and confirm if the user related data is there - Also check if the user data is on DS4Windows’ main folder, even if you found data previously on the Profile folder
- If both locations contains user data related files then the actual location used by DS4Windows load User Data is the one that cointains the
Profiles.xmlfile- If the user plans to backup the entirity of DS4Windows and the User Data location is on the DS4Windows folder itself then they can just backup the whole folder
- After finding the actual location User Data is loaded from, backup the related files and folders presented on the main section’s list
Restore
- Copy the user data back to the profile folder or to the main DS4Windows folder accordingly to your use case, then restart DS4Windows if it’s open
- If both locations contain user data DS4Windows will prompt the user to choose which place to load from. Most of the user data on the unused location will then be deleted
Delete
Follow the same steps as on the Backup section, but delete the found User Data.
Uninstalling DS4Windows and related drivers
Want a Backup?
If you plan on using DS4Windows again, use the backup section above to make a copy/restore point.
DS4Windows Program
DS4Windows is a portable application, meaning it is not actually “installed”. To get rid of DS4Windows just delete its folder. Simple as that.
Settings and user data
- Press Win+R, type
%appdata%and then select OK. This should open windowsappdata/Roaming/folder - Verify if the DS4Windows folder exists there and delete it if found
Related drivers
These are companion drivers that are currently used by DS4Windows. If you are looking for more info on what they are and their purpose, check the about companion drivers page.
ViGEmBus
Keep in mind that the Nefarius’ ViGEmBus is used by a good number of other applications, with the most known one being Parsec. If you have other programs that make use of the ViGEmBUS, then uninstalling it may break their functionality, though the program might just prompt you to install it again
- Check ViGEmBus’s removal section on the original ViGEmBus’ documentation
HidHide
- Open Windows’
Apps & Features(search for it on the start menu) - Search for/locate “HidHide”
- Uninstall it and then reboot your PC
FakerInput
- Open Windows’
Apps & Features(search for it on the start menu) - Search for/locate “FakerInput” and uninstall it
Running DS4Windows under a custom «.exe» name
General info
There are some aplications and games that behave differently when they detect DS4Windows is running on the users system. The known ones are:
- Steam Big Picture: cannot interact with the Big Picture interface using DS4 controllers
- Steam Input: will ignore DS4 controllers, breaking their usage with Steam’s
Playstation Configuration Support - Sholve Knight: game will ignore DS4 controllers
This guide will make DS4Windows run under a new process name instead of the standard DS4Windows.exe in order to make it run undetectable.
How to set a custom «.exe» name
The name DS4Win will be used as an example for this guide, but any other name can be used:
Step 1
- Open DS4Windows and go to the
Settingstab - If the
run at Startupoption is enabled then disable it for now - On the
Custom Exe namebox write the desired custom name (DS4Win) without adding “.exe” in the end - Stop and then start DS4Windows again
Step 2
Fully close DS4Windows, make sure it’s not running on the background or in the system tray
Step 3
On DS4Windows’ folder, locate the new TheNameYouChose.exe (DS4Win.exe) file and execute it
Step 4
To check if everything is alright, press Ctrl + Shift + Esc top open Windows’ Task Manager, go into the Details tab and confirm that TheNameYouChose.exe (“DS4Win.exe”) is running instead of DS4Windows.exe.
- From this point forward the original
DS4Windows.exeshould not be used anymore - If the
run at Startupoption has been disabled in the beggining then re-enable it now - Sometimes this process needs to be re-done after a DS4Windows update, though DS4Windows updates should work as long as the name inside the
Custom Exe namebox is exactly the same as the actual “.exe” file (not including the actual “.exe” text)
Stop using a custom «.exe» name
- Fully close DS4Windows in case it is open. Make sure it’s not running in the background or at the system tray
- Open the original
DS4Windows.exefile - If the
run at Startupoption is enabled then disable it for now - Erase the name inside the
Custom Exe namebox - Stop and then start DS4Windows again
- If the
run at Startupoption has been disabled in the beggining then re-enable it now