Download Windows Speedup Tool to fix errors and make PC run faster
If your Windows freezes frequently or is encountering frequent Stop Errors or BSOD’s then, it is advisable to check if the problem is being caused by a faulty Driver. While in most cases, its usually the unsigned drivers which create problems, one cannot rule out the signed drivers too! Nevertheless, you can troubleshoot, identify & resolve common device driver problems with the help of the built-in Driver Verifier Manager.
Windows has, what is called, Driver Verifier Manager. It’s a very useful tool to identify problematic drivers.

To open it type verifier in Start menu search box and hit Enter. The Driver Verifier Manager tests each specified driver at startup. If it detects a problem, it identifies it and then stops it from running.
The tool allows you to verify any category of drivers to verify:
- Unsigned drivers
- Drivers built for older versions of Windows
- All drivers
- Select specified drivers only.
To use the Driver Verifier Manager:
- Type verifier in the search box and hit Enter to open Driver Verifier Manager
- Select Create Standard Settings
- Click Next
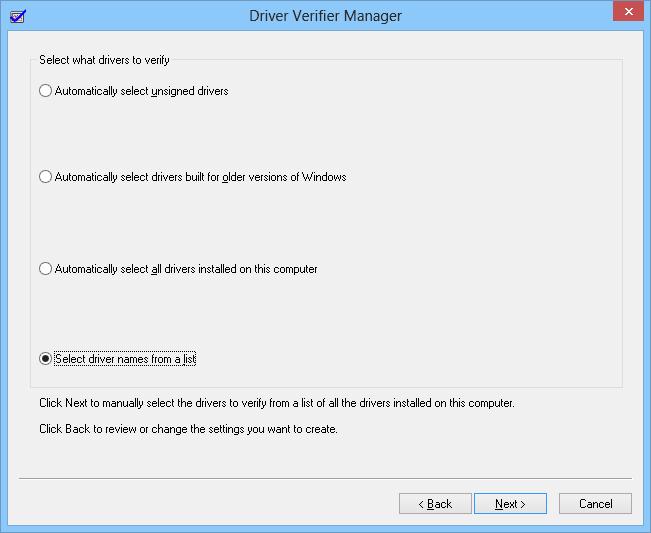
- Select Automatically select unsigned drivers
- Click Next.
- You will see a dialog box ‘Loading driver information‘ at the end of which you will be presented with a list of unsigned drivers.
There are other options, too, to select at every step. Choose what you think would be most appropriate in your case. I have only mentioned unsigned drivers as they are usually suspect. This way Standard Settings will first be created. This helps you in identifying what might be a buggy driver.
In the last stage of the wizard, you have two options: to click Cancel or to click Finish.
- It’s best to click Cancel. This way no changes are made to your system configuration. From the list which is presented, you can manually try to Rollback, Update, Disable or Uninstall the Driver.
- But if you click Finish, then on the re-start of the PC, you may be presented with an error message. This will include the name of the buggy driver along with an error code. Note down the driver’s name and the error code.
Next reboot, but this time in Safe Mode. Now you can choose to Rollback, Update, Disable or Uninstall the particular Driver.
Finally, you have to disable Windows Driver Verifier.
How do I disable Windows Driver Verifier?
To disable the Driver Verifier Manager, type the following in Windows Start Menu Search and hit Enter:
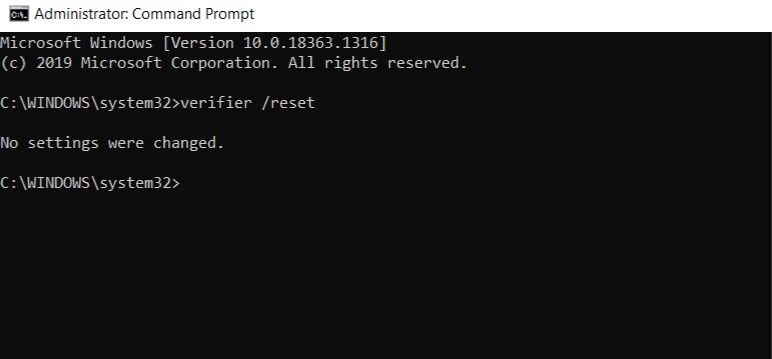
verifier /reset
Once done, it will reset all the verified driver information it holds, and also no more verify drivers’ digital certificates in the future until enabled.
I hope this helps.
Cannot boot into Windows normally with Driver Verifier Manager enabled
If you face issues booting normally into Windows with Driver Verifier enabled, do the following:
- Start your PC, just as Windows attempts to load, press and hold down the Power Button for 10 seconds to perform a Hard Shut Down
- Do this twice
- The third time, Windows will boot into the Recovery Environment or Advanced Startup Options.
- Now, Go to Troubleshoot > Advanced Option > Startup Settings and click Restart
- On restart, press 4 to enter Safe Mode
- Finally, open Command Prompt as Administrator and run these two commands
verifier /reset
verifier /bootmode resetonbootfail
Restart your PC.
Additional resources:
- How to use Device Manager to troubleshoot driver issues
- List of Windows Device Manager Error Codes & their solutions
- How to identify or verify unsigned/signed Drivers
- Identify computer hardware problems with Hardware Identify software.
Anand Khanse is the Admin of TheWindowsClub.com, a 10-year Microsoft MVP (2006-16) & a Windows Insider MVP (2016-2022). Please read the entire post & the comments first, create a System Restore Point before making any changes to your system & be careful about any 3rd-party offers while installing freeware.
- Blog>
- Windows 10>
- 4 Methods to Turn on Driver Verifier Manager in Windows 10
The driver verifier manager is a utility built into Windows 10. Not only does it help monitor the kernel-mode drivers in Windows, but also it can detect the improper work with various Windows drivers. If you want to use it, you have to open Driver verifier manager in Windows 10. To make it easier for you to work, we’ve introduced four methods for you. Let’s see how it works!
- Method 1: via a Run dialog box
- Method 2: by searching
- Method 3: from Command Prompt(Admin)
- Method 4: from Windows PowerShell(Admin)
- Method 5: through File Explorer
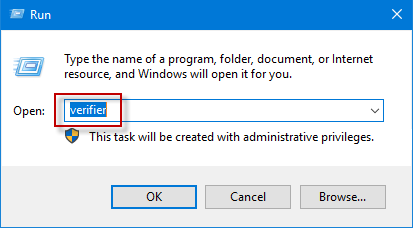
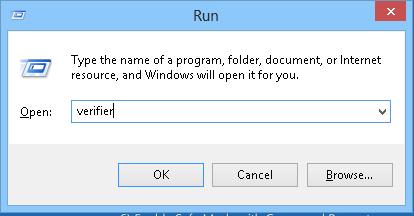
Method 1: Access Windows 10 Driver Verifier Manager via the Run dialog box
Press Win+ R keyboard shortcuts to launch Run dialog box, type verifier in the box and click OK/press Enter to turn on Driver Verifier Manager.
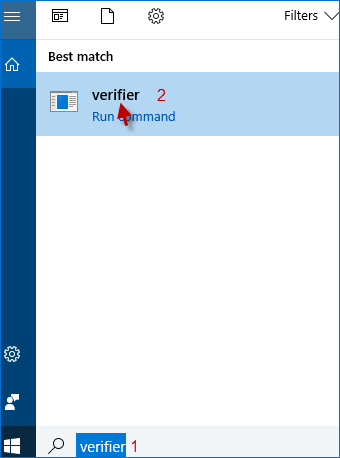
Method 2: Open Windows 10 Driver Verifier Manager by searching
Type verifier in Taskbar Search box and click the verifier/verifiergui.exe in the Search result to turn on Driver Verifier Manager.
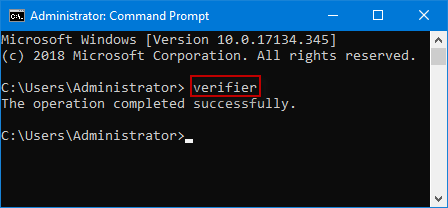
Method 3: Turn on Windows 10 Driver Verifier Manager from Command Prompt(Admin)
Step 1: Run Command Prompt as an administrator in Windows 10.
Step 2: After the Command Prompt(Admin) window opens, type verifier and press Enter to launch Driver Verifier Manager.
Method 4: Launch Windows 10 Driver Verifier Manager from Windows PowerShell(Admin)
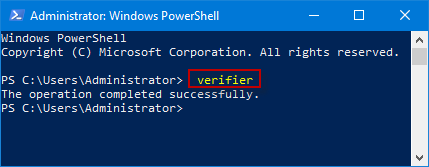
Step 1: Run Windows PowerShell as an administrator in Windows 10.
Step 2: When the Windows PowerShell window has been opened, input verifier and press Enter to turn on Driver Verifier Manager.
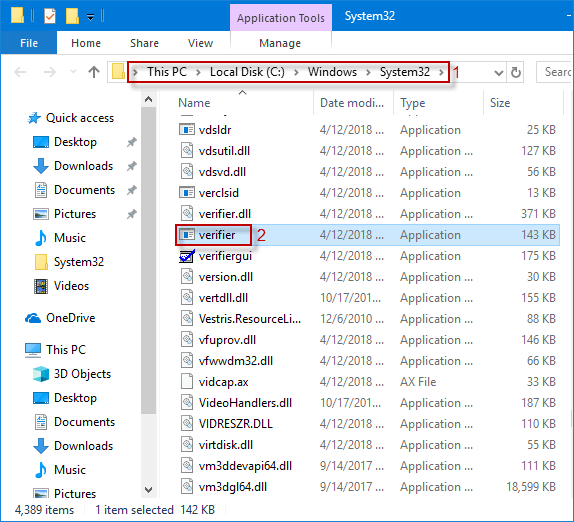
Method 5: Start Windows 10 Driver Verifier Manager through File Explorer
Step 1: Open File Explorer in Windows 10.
Step 2: In the File Explorer window, go to This PC >Local Disk (C:) > Windows > System32 folder. In the System32 directory, slide the mouse wheel to find and double-click verifier/verifiergui application to turn on Driver Verifier Manager.
open Windows 10 Driver Verifier Manager
Утилита Driver Verifier входит в состав всех версий Windows, начиная с Windows XP, и позволяет выполнять проверку драйверов, выявлять проблемные драйвера, являющиеся причиной синего экрана смерти (BSOD — Blue Screen of Death) и записывать подробную информацию о проблемном драйвере в дамп памяти для дальнейшего анализа. Утилита подвергает проверяемые драйвера различным «стресс-тестам», имитируя различные экстремальные условия: нехватка памяти, контроль I/O, IRQL, взаимные блокировки, проверки DMA, IRP и пр. Т.е. имитируются ситуации, которые на продуктивных системах случаются нечасто, и отслеживается поведения драйвера в них. Цель работы утилиты – выявить ситуации, при которых драйвер может привести к аварийному завершению работы системы с BSOD.
Исполняемый файл утилиты Driver Verifier называется Verifier.exe и находится в каталоге %windir%\system32. Есть два варианта использования утилиты: из командой строки или с помощью графического интерфейса.
Важно! Перед выполненном проверки драйверов настоятельно рекомендуем создать точку восстановления системы и добавить безопасный режим в меню загрузки Windows 8. Это поможет отключить режим отладки и вернуться к исходному состоянию системы, если что-то пойдет не так.
Чтобы включить режим проверки драйверов в Windows 8, запустите утилиту Driver Verifier, набрав
verifier
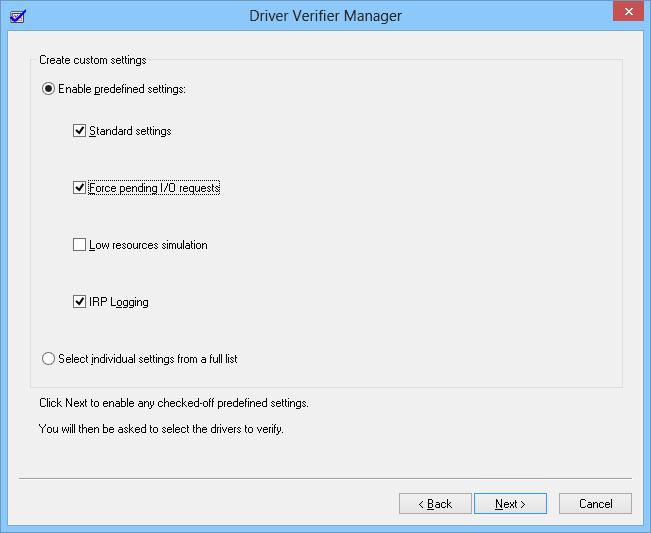
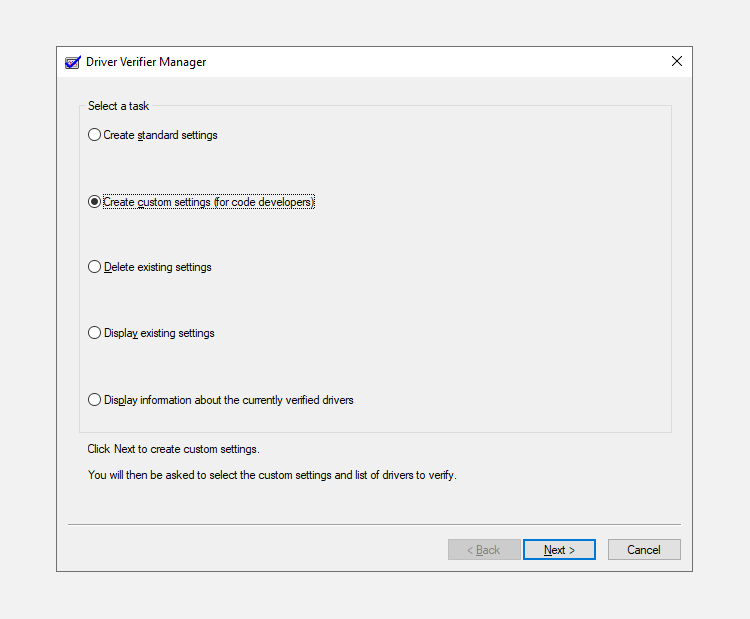
 В списке задач выберите Create custom settings (for code developers) и нажмите Next.
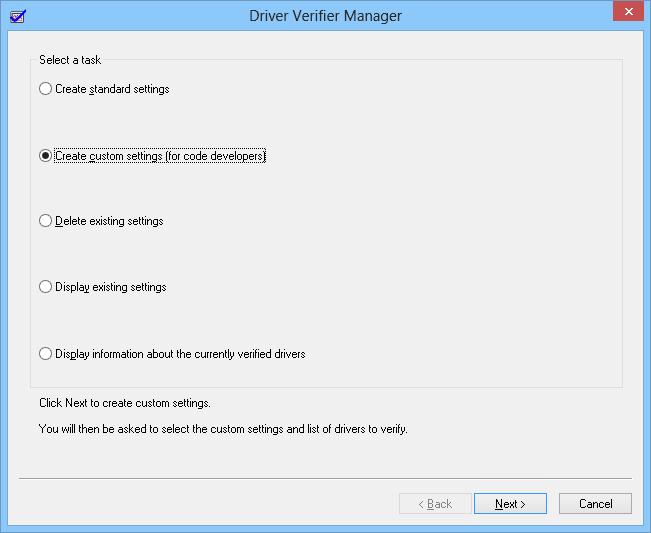 Убедитесь, что выбраны опции Standard settings, Force pending I/O requests и IRP Logging. Нажмите Next.
 Далее выберите Select driver names From a list.
 Отсортируйте содержимое таблицы, щелкнув по заголовку столбца «Provider» и в списке драйверов выберите те, которые необходимо протестировать. В нашем примере мы запустим проверку для всех драйверов, разработчиком которых не является Microsoft Corporation. Мы выбрали драйвера: e1g6032e.sys (Intel) и lsi_sas.sys (LSI).
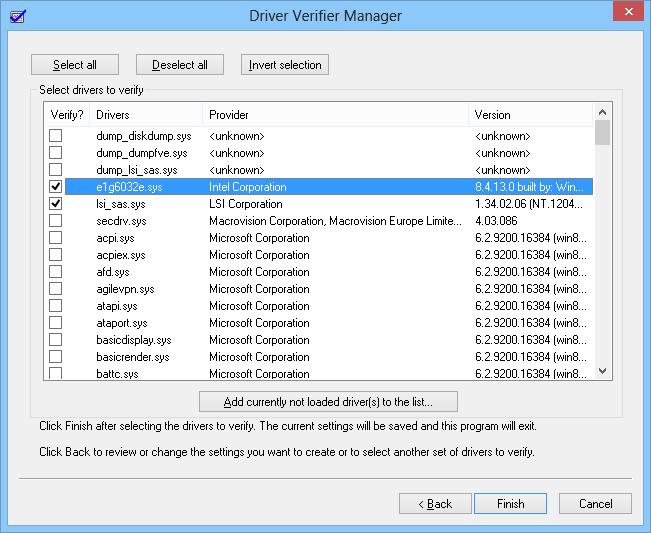
Примечание. Наличие у драйвера цифровой подписи Microsoft свидетельствует, о том, что драйвер протестирован определенным образом на стабильность работы и его код не был модифицирован после этого. Именно поэтому не рекомендуется отключать проверку цифровой подписи драйверов или пользоваться самоподписанными драйверами.
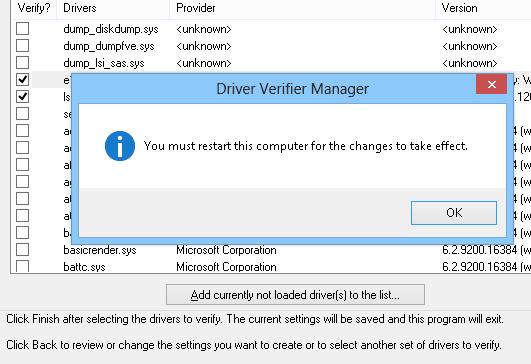
Осталось нажать Finish и появится информационно окно о том, что для вступления изменений в силу нужно перезагрузить систему.
Совет. Режим проверки для драйвера можно включить и из командной строки. Например, чтобы запустить Driver Verifier со стандартными настройками для драйвера myPCDriver.sys, команда будет выглядеть так:
verifier /standard /driver myPCDriver.sys
После перезагрузки система загружается в режиме проверки драйверов. Driver Verifier работает в фоновом режиме, выполняя различные виды тестирования выбранных драйверов на предмет выявления ошибок. Используйте компьютер как обычно и дождитесь появления BSOD. Если вы знаете, какие действия приводили ранее к аварийному завершению работы системы, повторите их. В случае появления BSOD необходимо скопировать файл дампа памяти (по умолчанию сохраняются в каталоге C:\Windows\Minidump\*.dmp) и проанализировать его с помощью Windbg или аналога.
Важно! После активации режима отладки драйверов с помощью Driver Verifier, этот режим будет работать до тех пор, пока не будет отключен принудительно.
В том случае, если в течении 1-2 дней проблема не повторилась, то с определенной степенью достоверности можно сделать вывод, что проверяемые драйвера не являются причиной падения системы и режим проверки для них можно отключить.
Совет. Использование средства проверки драйверов Windows существенно замедляет работу Windows, поэтому не рекомендуется постоянно работать в таком режиме.
Отключить проверку Driver Verifier можно из командной строки:
Verifier /reset
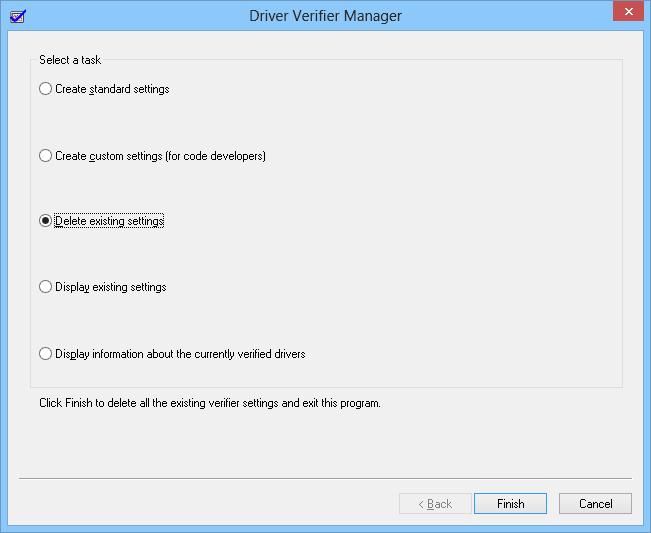
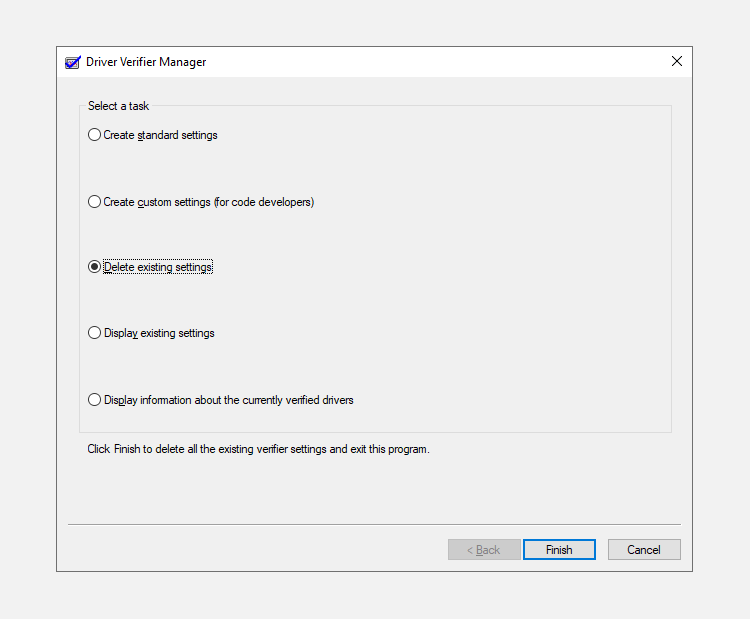
Или из графического интерфейса, выбрав пункт Delete existing settings.
 В том случае, если в нормальном режиме войти в систему не получается, отключить режим отладки можно и из безопасного режима.
В том случае, если и в безопасном режиме система не загружается, попробуйте удалить следующие ключи в реестре в офлайн режиме, загрузившись с загрузочного диска:
- HKEY_LOCAL_MACHINE\SYSTEM\CurrentControlSet\Control\Session Manager\Memory Management\VerifyDrivers
- HKEY_LOCAL_MACHINE\SYSTEM\CurrentControlSet\Control\Session Manager\Memory Management\VerifyDriverLevel
Проверить текущий статус утилиты Driver Verifier можно так:
verifier /query
Tearing your hair out? Use the Driver Verifier tool as a last resort.

Windows contains a slew of in-built tools that help to diagnose and fix common errors. While most people are aware of these troubleshooting techniques, there are some that can be swept under the rug. Driver Verifier is one of these lesser-known utilities.
Here’s how you fix your Windows 10 errors with Driver Verifier.
What is Driver Verifier?
Driver Verifier, just like the name suggests, is a utility that helps in figuring out which driver is malfunctioning. Unlike SFC, CHDSK, and other troubleshooting utilities, it doesn’t fix the problem but rather helps narrow down if and which driver is responsible for the error. This isn’t a new utility either, it has been around since Windows 2000.
The reason for its relative obscurity is that it’s mostly used as a tool by developers to test out new drivers.
Precautions to Take Before Running the Utility
Driver Verifier puts the computer through various stress checks. You should note that there have been reports of it bricking systems as well.
But there are some precautions users can take to prevent this from happening:
- Remember only to use it when you’ve exhausted ALL other options for diagnosing a blue screen error.
- It’s advisable to not use it in safe mode because Windows doesn’t load all drivers when in safe mode.
- We strongly suggest creating a Restore Point and backing-up important data in case things go south.
- Ensure you have administrator privileges before running the utility.
Enable Minidumps
Before running Driver Verifier, users should enable minidumps. Minidumps (.DMP) are files in which Windows stores information about a crash and the events leading to it. Since Driver Verifier doesn’t always display the driver which is malfunctioning, it does store all this information in a DMP file. This step is critical and shouldn’t be overlooked.
Here’s how users can enable minidumps:
- Press Windows Key + R to launch the Run command. Type sysdm.cpl in the text box and hit Enter.
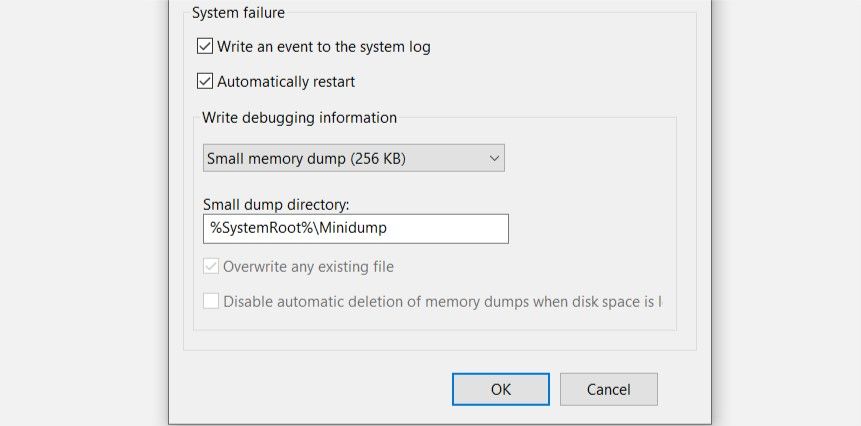
- In the Advanced tab, under Startup and Recovery, click on Settings
- Uncheck Automatically restart.
- Under the Write debugging information section, select Small memory dump (256 KB) from the drop-down menu.
- Ensure that the Small dump directory is set to %SystemRoot%\Minidump
- Click on OK and then restart your computer.
How to Run Driver Verifier
After enabling minidumps, users can safely run Driver Verifier and diagnose the BSOD. Running Driver Verifier is fairly simple, here’s how you can do it:
- In the Start menu search bar, type cmd and right-click on Command Prompt > Run as administrator.
- In the console type verifier and press Enter.
- The Driver Verifier application window will open.
- Select the Create custom settings (for code developers) and click on Next.
- In the next window, check all options from the list except Randomized low resources simulation and DDI compliance checking. Click on Next.
- Now click the Select driver names from a list option and click Next.
- From the driver list, select all drivers except the ones provided by Microsoft Corporation. Microsoft advises against selecting all drivers and running the Driver Verifier utility.
- Click on Finish.
After following the aforementioned steps, users need to reboot their computer and use it as they normally would.
Driver Verifier will run in the background and diagnose the drivers. Wait for your system to crash, or if there are some actions that triggered the blue screen earlier, repeat those. Driver Verifier needs to experience a crash in order to determine which driver failed and led to the crash. Sometimes this may take as long as seven hours, so hang in there.
You can also ensure whether Driver Verifier is running or not by entering the verifier /querysettings command in an elevated Command Prompt. If the utility is running, the Command Prompt will return a list of drivers and their status.
How to Read DMP Files
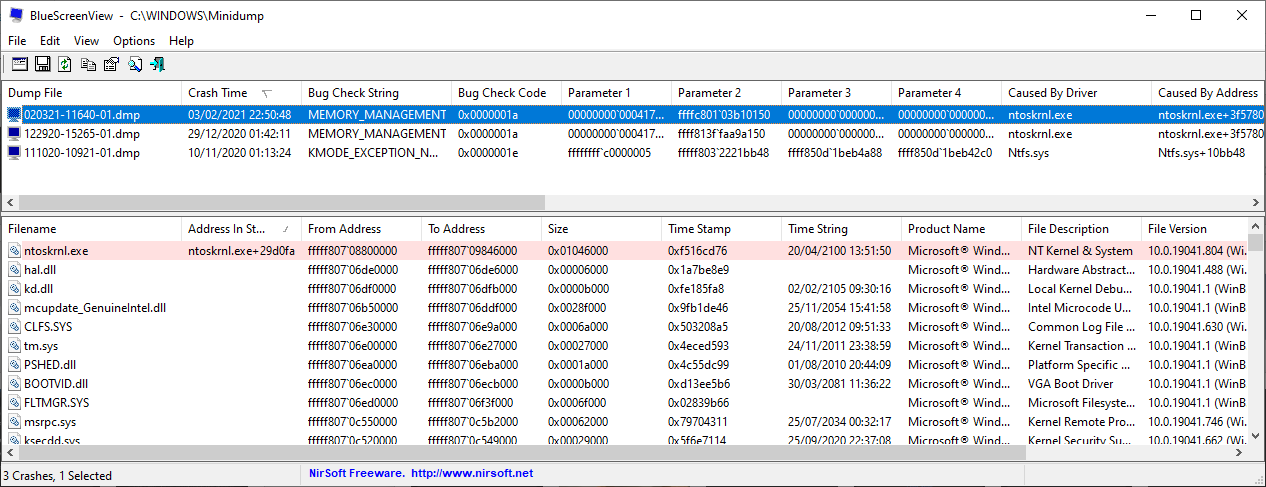
When your computer crashes, Driver Verifier will automatically store all information about the crash into a DMP file. You can either upload these files to the Microsoft forums and wait for their response, or you can read them yourselves using software called BlueScreenViewer.
This is how you can read the DMP files:
- Download BlueScreenView from here.
- Run the application and it will automatically load all DMP files from the C:\Windows\Minidump directory.
- Click on the most recent dump file and scroll sideways until you get to the Caused by driver section.
- Copy the filename and a quick internet search will reveal the device with which the driver is associated.
- You can accordingly update the driver or roll -back the changes.
How to Update a Driver
The first step users should take after finding out the culprit for the crash, is to update the driver. It’s fairly simple, just follow these steps:
- Press Windows Key + R and in the Run command, type devmgmt.msc and press Enter.
- In the Device Manager, navigate to the required device and expand the menu.
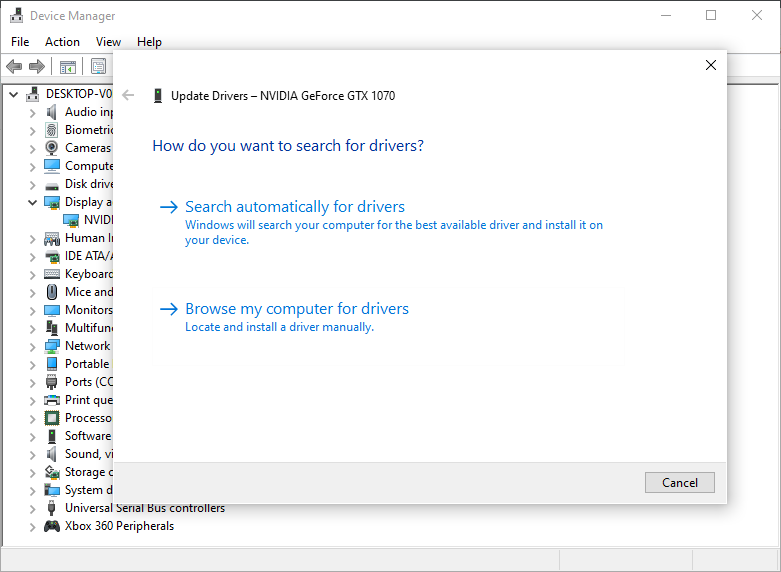
- Right-click on the driver and click on Update driver.
- Click on Search automatically for updated driver software and Windows will automatically download and install the latest drivers.
How to Roll Back a Driver
- Follow steps one and two mentioned in the section above to open Device Manager.
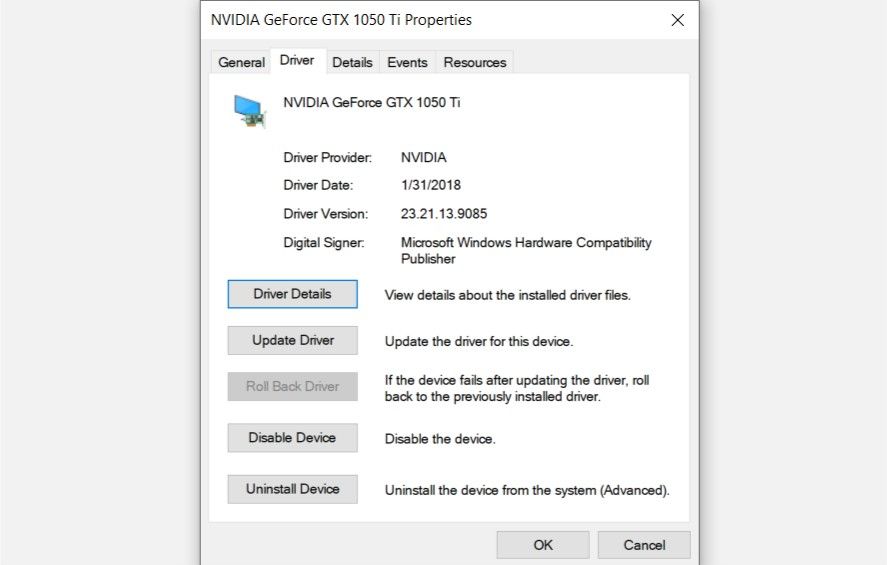
- Navigate to the required driver, right-click on it and click on Properties.
- Under the Driver tab, click on Roll Back Driver.
- Reboot your computer.
Alternatively, you can avoid this whole ordeal by already replacing outdated drivers before they cause a problem.
How to Stop Driver Verifier
Contrary to how you start Driver Verifier, it’s recommended that users stop it when their computer is booted into safe mode.
This is because safe mode disables all third-party drivers and earlier all Microsoft Drivers were unselected before running Driver Verifier. Thus, Driver Verifier will have minimal to no impact on your system in safe mode.
How to Boot Into Safe Mode

- Press Windows Key + R and enter msconfig in the run command.
- In the System Configuration window, click on the Boot tab.
- Check the Safe boot option and select your preferences.
- Apply the settings and reboot your computer.
There are various other ways of booting into safe mode as well.
After booting into safe mode, there are two ways to disable Driver Verifier. These are via the Command Prompt or the Driver Verifier Manager.
How to Disable Driver Verifier via Command Prompt
- In the Start menu search bar, type cmd and then right-click on Command Prompt > Run as administrator.
- In the console type verifier /reset and hit Enter.
- Reboot your computer normally.
How to Disable Driver Verifier via Driver Verifier Manager
- Run Driver Verifier. You can refer to the Running Driver Verifier section in this article for this.
- In the Driver Verifier window, select Delete Existing Settings and click on Finish.
- Reboot your computer.
You can use System Configuration to subsequently uncheck the Safe boot option and reboot your computer normally.
Checked and Verified
Driver Verifier is a nifty tool when a pesky blue screen error won’t go away and it’s difficult to narrow down the suspects. But users should always be wary of the risks that come with using a powerful developer tool. Remember to create a System Restore Point before running the Driver Verifier utility.
Windows have a built-in tool called “Driver Verifier Manager“. This tool is built to verify and validate device drivers installed on Windows System. Driver Verifier Manager is capable of a variety of functions such as displaying all drivers installed on the computer, Signed and unsigned driver list, schedule & verifying drivers, etc.
Read More: How to backup printer drivers?
How to Open Windows Driver Verifier?
Click the Windows Start button and type in “Verifier“

Select Verifier from the result.

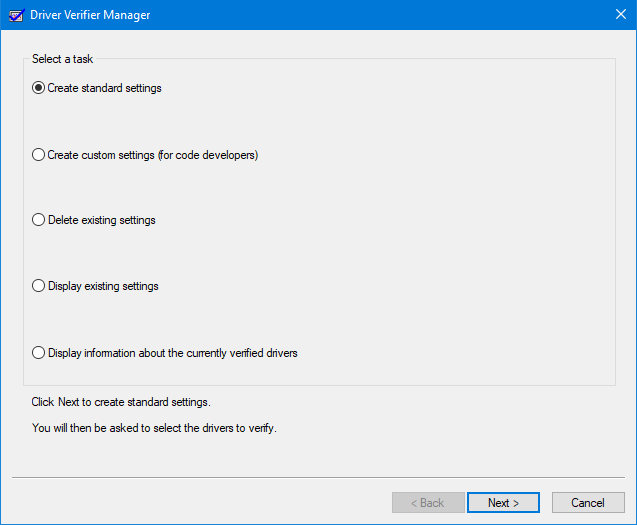
Now Driver Verifer Manager is open. Several tasks/options are listed in the first window.
- Create standard settings
- Create custom settings (for code developers)
- Delete existing settings
- Display existing setings
- Dislplay information abount the curently verified drivers.
How to verify all drivers installed on your computer using Driver Verifer Manager?
Open verifier and select “Create standard settings”, then click the “Next” button. Select “Automatically select all drivers installed on this computer” and click the Next button. Now you can see a message saying that “You must restart this computer for the changes to take effect”. Restart your computer to start all driver verification.


How to get verified drivers list in Windows?


Driver Verifier – Command Line Usage And Syntax
Command: verifier

Copyright (c) Microsoft Corporation. All rights reserved.

SYNTAX:

    verifier {/? | /help}
    verifier /standard /all
    verifier /standard /driver <name> [<name> ...]
    verifier {/ruleclasses | /rc} <options> [<ruleclass_1> <ruleclass_2> ...] /all
    verifier /flags <options> [<options> ...] /all
    verifier /flags <options> [<options> ...] /driver <name> [<name> ...]
    verifier /rules {query | reset | default <id> | disable <id>}
    verifier /query
    verifier /querysettings
    verifier /bootmode {persistent | resetonbootfail | oneboot | resetonunusualshutdown}
    verifier /persistthroughupgrade
    verifier /reset
    verifier /faults [probability [pool_tags [applications [delay_minutes]]]]
    verifier /faultssystematic [<options> ...]
    verifier /log <file_name> [/interval <seconds>]
    verifier /volatile /flags <options> [<options> ...]
    verifier /volatile /adddriver <name> [<name> ...]
    verifier /volatile /removedriver <name> [<name> ...]
    verifier /volatile /faults [probability [pool_tags [applications
                [delay_minutes]]]]
    verifier /domain {wdm | ndis | ks | audio} [rules.all | rules.default ]
                /driver ... [/logging | /livedump]
    verifier /logging
    verifier /livedump

PARAMETERS:

    /? or /help
        Displays this help message.

    /standard
        Specifies standard Driver Verifier flags.

    /all
        Specifies that all installed drivers will be verified after the next
        boot.

    /driver <name> [<name> ...]
        Specifies one or more drivers (image names) that will be verified.
        Wildcard values (e.g. n*.sys) are not supported.

    /driver.exclude <name> [<name> ...]
        Specifies one or more drivers (image names) that will be excluded
        from verification. This parameter is applicable only if all drivers
        are selected for verification. Wildcard values (e.g. n*.sys) are not
        supported.

    /flags <options> [<options> ...]
        Specifies one or more options that should be enabled for verification.
        Flags are applied to all drivers being checked by Driver Verifier. The
        provided options values must be either in decimal, hexadecimal ("0x"
        prefix), octal ("0o" prefix) or binary ("0b" prefix) format.

        Standard Flags:
          Standard Driver Verifier options can be specified using '/standard'.
          WDF verification is included in /standard but is not shown here.

          0x00000001 (bit  0) - Special pool
          0x00000002 (bit  1) - Force IRQL checking
          0x00000008 (bit  3) - Pool tracking
          0x00000010 (bit  4) - I/O verification
          0x00000020 (bit  5) - Deadlock detection
          0x00000080 (bit  7) - DMA checking
          0x00000100 (bit  8) - Security checks
          0x00000800 (bit 11) - Miscellaneous checks
          0x00020000 (bit 17) - DDI compliance checking

        Additional Flags:
          These flags are intended for specific scenario testing. Flags marked
          with (*) require I/O Verification (bit 4) that will be automatically
          enabled. Flags marked with (**) support disabling of individual
          rules.

          0x00000004 (bit  2) - Randomized low resources simulation
          0x00000200 (bit  9) - Force pending I/O requests (*)
          0x00000400 (bit 10) - IRP logging (*)
          0x00002000 (bit 13) - Invariant MDL checking for stack (*)
          0x00004000 (bit 14) - Invariant MDL checking for driver (*)
          0x00008000 (bit 15) - Power framework delay fuzzing
          0x00010000 (bit 16) - Port/miniport interface checking
          0x00040000 (bit 18) - Systematic low resources simulation
          0x00080000 (bit 19) - DDI compliance checking (additional)
          0x00200000 (bit 21) - NDIS/WIFI verification (**)
          0x00800000 (bit 23) - Kernel synchronization delay fuzzing
          0x01000000 (bit 24) - VM switch verification
          0x02000000 (bit 25) - Code integrity checks

    /ruleclasses or /rc [<ruleclass_1> <ruleclass_2> ... <ruleclass_k>]
        This parameter is larger set of '/flags' above. While '/flags' is
        limited to 32 bit bitmap expression, this can include more than 32
        verification classes. Each positive decimal integer represents a
        verification class. Multiple classes can be expressed by separating
        each class id with space character. Following rule classes IDs are
        available and leading 0's can be omitted.

        Standard Rule Classes:

                   1 - Special pool
                   2 - Force IRQL checking
                   4 - Pool tracking
                   5 - I/O verification
                   6 - Deadlock detection
                   8 - DMA checking
                   9 - Security checks
                  12 - Miscellaneous checks
                  18 - DDI compliance checking
                  34 - WDF Verification

        Additional Rule Classes:
          These rule classes are intended for specific scenario testing. Rule
          classes are marked with (*) require I/O Verification (5) that will
          be automatically enabled. Flags marked with (**) support disabling
          of individual rules.

                   3 - Randomized low resources simulation
                  10 - Force pending I/O requests (*)
                  11 - IRP logging (*)
                  14 - Invariant MDL checking for stack (*)
                  15 - Invariant MDL checking for driver (*)
                  16 - Power framework delay fuzzing
                  17 - Port/miniport interface checking
                  19 - Systematic low resources simulation
                  20 - DDI compliance checking (additional)
                  22 - NDIS/WIFI verification (**)
                  24 - Kernel synchronization delay fuzzing
                  25 - VM switch verification
                  26 - Code integrity checks

    /log.code_integrity
        This option suppresses Code Integrity violation breaks and collects
        only statistics for verified drivers. Statistics could be extracted
        via /log option or kernel debugger. This parameter is applicable only
        if Code Integrity checks are enabled.

    /rules {query | reset | default <id> | disable <id>}
        Specifies rules level control (advanced).

          query           Shows current status of controllable rules.
          reset           Resets all rules to their default state.
          default <id>    Sets rule ID to its default state.
          disable <id>    Disables specified rule ID.

    /query
        Display runtime Driver Verifier statistics and settings.

    /querysettings
        Displays a summary of the options and drivers that are currently
        enabled, or options and drivers that will be verified after the
        next boot. The display does not include drivers and options added
        using /volatile.

    /bootmode
        Specifies the Driver Verifier boot mode. This option requires system
        reboot to take effect.

          persistent        Ensures that Driver Verifier settings are
                            persistent across reboots. This is the default
                            value.
          resetonbootfail   Disables Driver Verifier for subsequent reboots
                            if the system failed to start.
          resetonunusualshutdown
                            Driver Verifier persists until unusual shutdown
                            happens. Its abbrevation, 'rous', can be used.
          oneboot           Enables Driver Verifier only for the next boot.

    /persistthroughupgrade
        Makes the Driver Verifier settings persist through upgrade. Driver
        Verifier will be active during system upgrade.

    /reset
        Clears Driver Verifier flags and driver settings. This option requires
        system reboot to take effect.

    /faults [probability [pool_tags [applications [delay_minutes]]]]
        Enable the Randomized low resources simulation feature and optionally
        control parameters for the Randomized low resources simulation.

          Probability     Specifies the probability that Driver Verifier will
                          fail a given allocation. The value represents the
                          number of chances in 10,000 that Driver Verifier will
                          fail the allocation. The default value 600, means
                          600/10000 or 6.
          Pool Tags:      Specifies a space separated list of the pool tags to
                          be injected with faults. By default, any pool
                          allocation can be injected with faults.
          Applications    Specifies a space separated list of image file names
                          (an executable) that will be injected with faults. By
                          default, any pool allocation can be injected with
                          faults.
          DelayMinutes    Specifies the number of minutes after booting during
                          which Driver Verifier does not intentionally fail any
                          allocations. This delay allows the drivers to load
                          and the system to stabilize before the test begins.
                          The default value is 8 minutes.

    /faultssystematic [<options> ...]
        Controls the Systematic low resources simulation parameters.

          enableboottime          Enables fault injections across reboots.
          disableboottime         Disables fault injections across reboots.
                                  This is the default value.
          recordboottime          Enables fault injections in 'what if' mode
                                  across reboots.
          resetboottime           Disables fault injections across reboots and
                                  clears the stack exclusion list.
          enableruntime           Dynamically enables fault injections.
          disableruntime          Dynamically disables fault injections.
          recordruntime           Dynamically enables fault injections in
                                  'what if' mode.
          resetruntime            Dynamically disables fault injections and
                                  clears the previously faulted stack list.
          querystatistics         Shows the current fault injection statistics.
          incrementcounter        Increments the test pass counter used to
                                  identify when a fault was injected.
          getstackid <counter>    Retrieves the indicated injected stack id.
          excludestack <stack_id> Excludes the stack from fault injection.

    /log <file_name> [/interval <seconds>]
        Creates a log file with the specified name and periodically writes the
        runtime statistics to this file. The interval between log file updates
        is controlled by the '/interval' parameter. The default value is 30
        seconds. Use CTRL+C to close the log and return.

    /volatile
        Changes Driver Verifier settings without rebooting the computer.
        Volatile settings take effect immediately and are in effect until the
        next system reboot.

    /volatile /adddriver <name> [<name> ...]
        Starts the verification for the specified driver or drivers.

    /volatile /removedriver <name> [<name> ...]
        Stops the verification for the specified driver or drivers.

    /domain {wdm | ndis | ks | audio} [rules.all | rules.default] /driver ...
        [/logging | /livedump]
        Controls the verifier extension settings. The following verifier
        extension types are supported:

          wdm               Enabled verifier extension for WDM drivers.
          ndis              Enabled verifier extension for networking drivers.
          ks                Enabled verifier extension for kernel mode
                            streaming drivers.
          audio             Enabled verifier extension for audio drivers.

        The following extension options are supported:

          rules.default     Enables default validation rules for the selected
                            verifier extension.
          rules.all         Enables all validation rules for the selected
                            verifier extension.

        /logging
          Enables logging for violated rules detected by the selected verifier
          extensions.

        /livedump
          Enables live memory dump collection for violated rules detected by
          the selected verifier extensions.