С ошибкой DRIVER PNP WATCHDOG пользователи сталкиваются при переходе на Windows 10 из предыдущей версии или в ходе установки новой сборки. Обновление системы неожиданно прерывается синим экраном в середине установки.

Причины ошибки
Ошибка DRIVER PNP WATCHDOG возникает из-за неполадок, связанных с программным обеспечением. Наиболее распространенные из них:
- Заражение компьютера вирусами и вредоносными программами.
- Блокировка компонентов системы антивирусом.
- Установлен неправильный режим контроллера SATA в настройках BIOS.
- Сбой службы теневого копирования тома, которая ограничила разрешения доступа к файлам и диску установкой атрибута «только для чтения».
- Повреждены компоненты Центра обновления Windows
- Ошибки в работе оперативной памяти.
- Устаревшие или неисправные драйверы.
Изменение режима контроллера SATA
Во многих случаях причиной синего экрана DRIVER PNP WATCHDOG является неправильно установленный режим работы контроллера SATA. Его изменение может решить проблему.
Включите компьютер и при появлении первого экрана нажмите клавишу для входа в BIOS, которая отображается внизу в строке «Press _ to enter Setup». Это может быть F2, F8, ESC, Del и прочие. Если вместо экрана POST-процедур отображается заставка, то узнать клавишу можно по запросу в интернет по модели материнской платы.
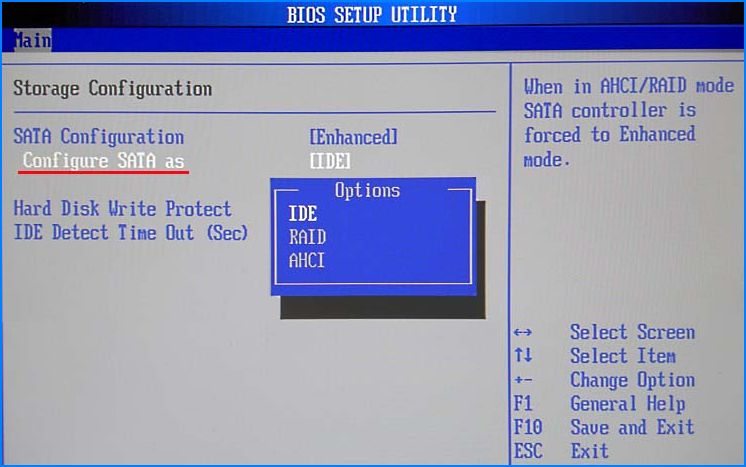
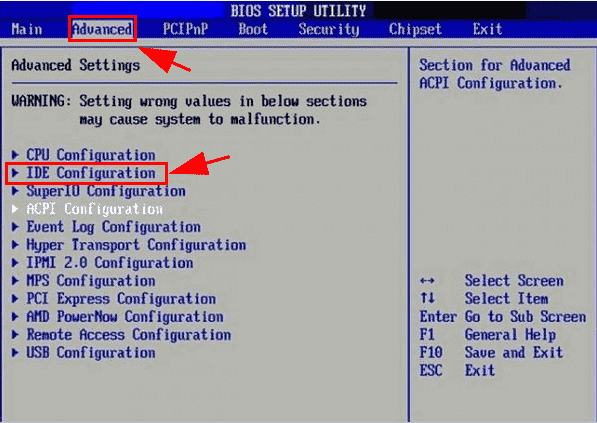
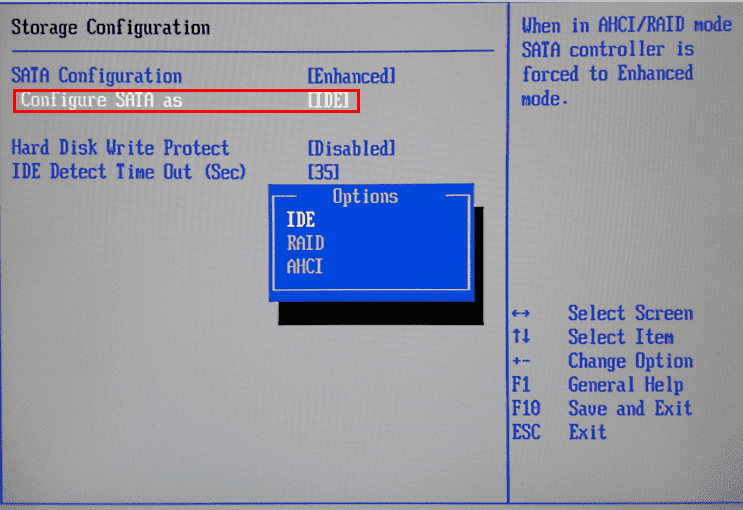
В настройках BIOS найдите опцию IDE Configuration или Drive Configuration. Затем найдите параметр Configure SATA или похожий. Измените его значение на IDE, ATA или Compatible.
Сохраните изменения и выйдите из BIOS.
Перезапуск службы теневого копирования тома
Перед обновлением служба теневого копирования тома задействована в создании снимков системы (точек восстановления). В результате ее сбоя доступ к файлам может быть ограничен атрибутом «только для чтения», из-за которого ОС не может их обновить и выбрасывает ошибку DRIVER PNP WATCHDOG.
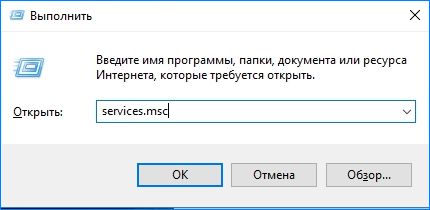
Откройте системные службы командой services.msc из окна «Выполнить» (Win + R).
Найдите в списке службу Теневого копирования тома, затем двойным щелчком откройте ее свойства.
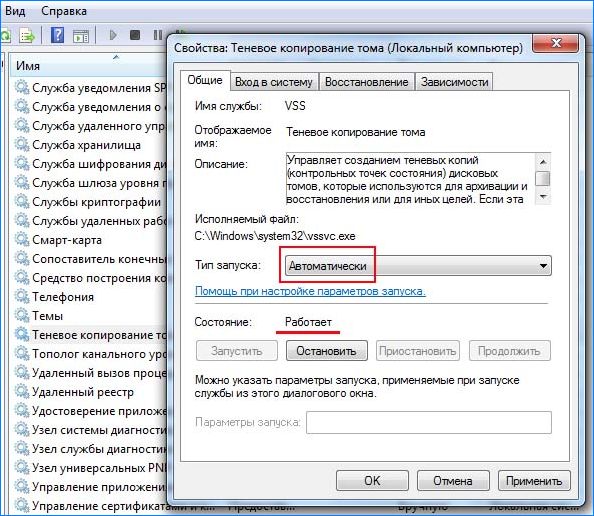
Проверьте, чтобы тип запуска был установлен на «автоматический», а в состоянии было указано значение «работает». Если вносили изменения, сохраните их нажатием на кнопку «Применить».
Перезагрузите компьютер и попробуйте установить обновление.
Полная проверка системы антивирусом
Вирусы и вредоносные программы также причастны к возникновению синего экрана с кодом остановки DRIVER PNP WATCHDOG, так как могут повлиять на любой компонент, который требуется Windows для связи с оборудованием.
Если используете встроенный Защитник Windows, выполните следующие шаги:
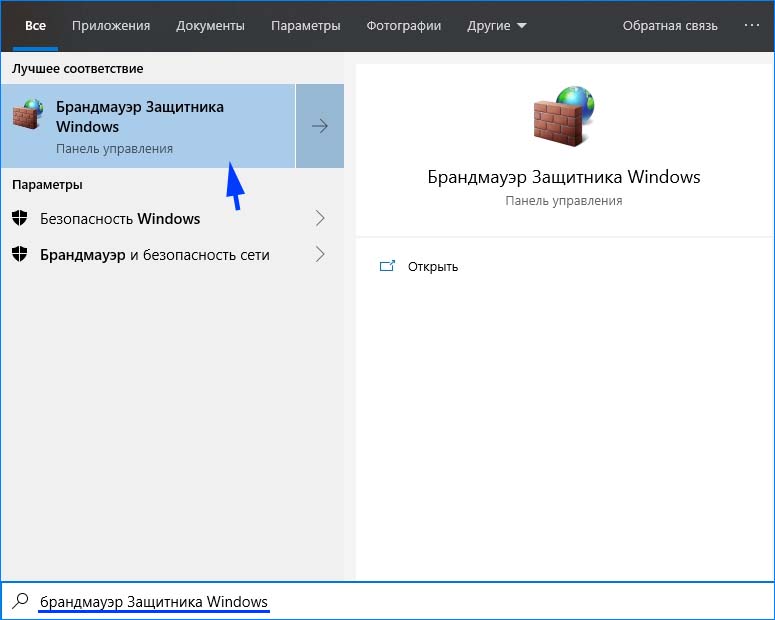
В строке системного поиска наберите «брандмауэр защитника Windows» и щелкните на «Открыть».
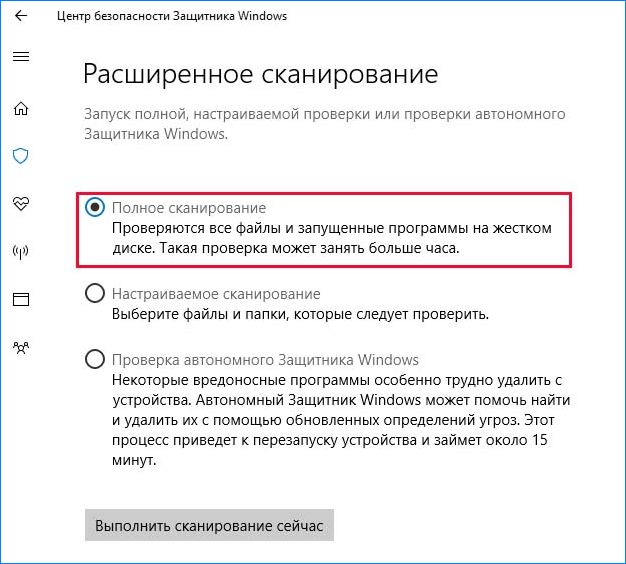
Нажмите на кнопку «Проверить», выберите «Полное сканирование» и подтвердите его запуск в следующем окне.
После перезагрузите компьютер и проверьте, решена ли проблема.
Часто проблемы с обновлением возникают из-за повреждения содержимого папки SoftwareDistribution. Для ее очистки и перезапуска служб выполните следующие шаги:
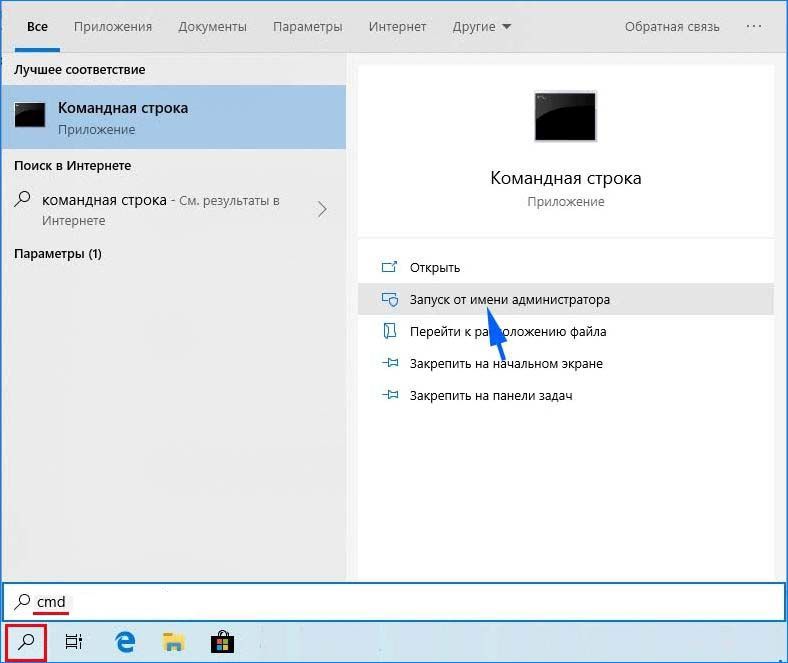
В поле системного поиска наберите «командная строка», затем нажмите на кнопку «Запуск от имени администратора».
В консоли запустите по очереди следующие команды, подтверждая каждую на Enter:
- net stop wuauserv
- net stop cryptSvc
- net stop bits
- net stop msiserver
- ren C:\Windows\SoftwareDistribution SoftwareDistribution.old
- ren C:\Windows\System32\catroot2 Catroot2.old
- net start wuauserv
- net start cryptSvc
- net start bits
- net start msiserver
После успешного выполнения команд закройте командную строку.
Теперь в строке системного поиска наберите PowerShell и нажмите на «Запуск от имени администратора».
В окне PowerShell запустите команду:
wuauclt.exe /updatenow
После выполнения перезагрузите систему.
Проверка диска
Если продолжаете сталкиваться с ошибкой Driver PNP Watchdog, запустите проверку диска инструментом CHKDSK. Возможно, система не может считать некоторые файлы из-за образования сбойных секторов и выбрасывает синий экран.
Запустите командную строку от имени администратора с помощью системного поиска или из контекстного меню Win + X.
В консоли выполните команду:
chkdsk.exe /f /r
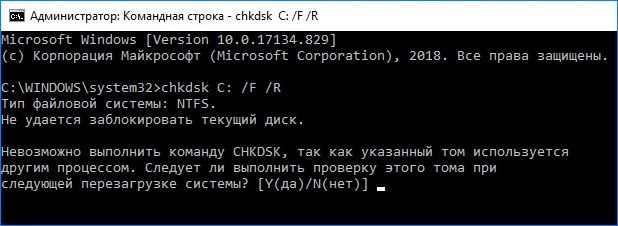
Нажмите на «Y», чтобы подтвердить запуск сканирования после перезагрузки компьютера. После завершения попробуйте обновить ОС.
Восстановление при загрузке
Если не удается избавиться от синего экрана попробуйте выполнить восстановление ОС при загрузке.
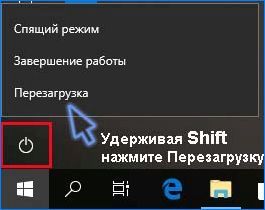
В меню Пуск нажмите на кнопку «Питания», затем удерживая Shift, кликните на кнопку «Перезагрузка». Откроется окно выбора действия среды восстановления.
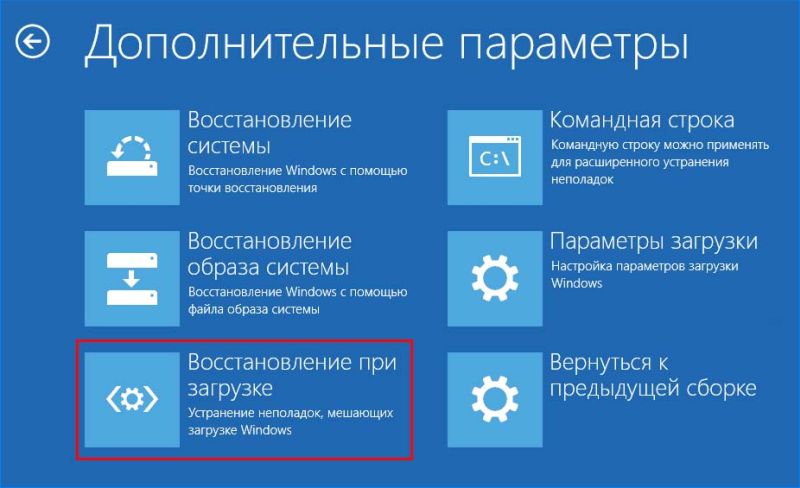
Перейдите по пути: Поиск и устранение неисправностей – Дополнительные параметры.

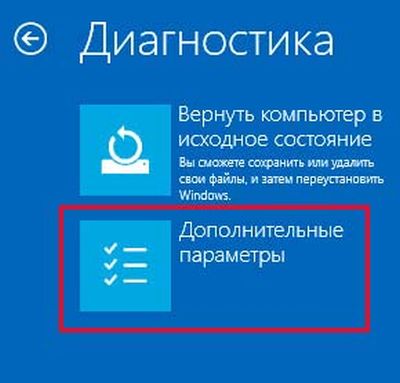
Кликните на «Восстановление при загрузке» и следуйте инструкциям на экране.
После попробуйте обновить Windows и посмотрите, удалось ли устранить ошибку.

Ошибка Driver PNP Watchdog возникла не сама по себе. Я разбираю ноутбук ASUS k540l. Компьютер запускался с бесконечной диагностикой. Этот драйвер чаще всего показывает ошибку шлейфа клавиатуры. Так и оказалось. Я разобрал ноут и очистил контакты шлейфа от пролитой воды им компьютер заработал без ошибки.
Параллельно с этим я провел общую чистку ноутбука от пыли, заменил термопасту.
В этом случае с ошибкой Driver PNP Watchdog не нужно торопиться переустанавливать Windows или искать какие то слетевшие драйвера. Знайте — ошибка эта возникает лишь вследствие механических повреждений, как и в моем случае. Компьютер выдал ошибку после пролития жидкости на клавиатуру. Чтобы устранить неисправность, не нужно обращаться в сервисные центры. Достаточно разобрать компьютер и прочистить все контакты. Как только Вы проделаете эти манипуляции — ошибка больше не будет беспокоить Вас.
-
Метки
drivet, pnp, watchdog, windows10, ошибка
DRIVER_PNP_WATCHDOG — это одна из ошибок BSoD (синий экран смерти), которая появляется во время установки обновления. Это означает, что во время процесса система зависла и в конечном итоге вышла из строя, столкнувшись с синим экраном. Таким образом, синий экран говорит о том, что Windows собирает дополнительную информацию о проблеме, чтобы автоматически решить ее. Он также отображает код ошибки внизу, который можно использовать для ручного поиска решения. Однако Windows не всегда решает такие проблемы, даже если это удается, ошибка будет сохраняться и появляться время от времени. DRIVER_PNP_WATCHDOG может быть связан с несколькими причинами, такими как проблемы с драйверами, обновлениями, дисками и конфигурацией. Таким образом, вам придется потратить некоторое время на тестирование каждого из перечисленных ниже решений, чтобы исправить досадную ошибку.

Автоматическое восстановление
Скачать утилиту восстановления Windows
Скачать средство восстановления Windows

Существуют специальные утилиты для восстановления Windows, которые могут решить проблемы, связанные с повреждением реестра, неисправностью файловой системы, нестабильностью драйверов Windows. Мы рекомендуем вам использовать Advanced System Repair Pro, чтобы исправить ошибку «DRIVER_PNP_WATCHDOG» в Windows 10.
1. Сканирование на наличие вредоносных программ.
Прежде чем мы начнем, я бы порекомендовал просканировать ваш компьютер на наличие вредоносных программ. Вредоносное ПО — предвестник всех бед. Различные инфекции могут изменить настройки, повредить или даже удалить жизненно важные сегменты. Таким образом, вы должны выполнить сканирование предпочтительной утилитой защиты от вредоносных программ. Чтобы сэкономить ваше время, мы прикрепили ссылку для загрузки антивируса Norton, который легко обнаруживает подозрительные приложения и угрозы, которые могут использовать вашу систему не по назначению.
Скачать антивирус Norton
2. Запустите средство устранения неполадок Центра обновления Windows.
Если вы один из тех людей, у которых при обновлении системы появляется синий экран, то этот метод вам подходит. Просто следуйте инструкциям ниже:
- Щелкните левой кнопкой мыши на Меню Пуск в левом нижнем углу экрана и выберите Настройки, Вы также можете использовать Windows + I сочетания клавиш.
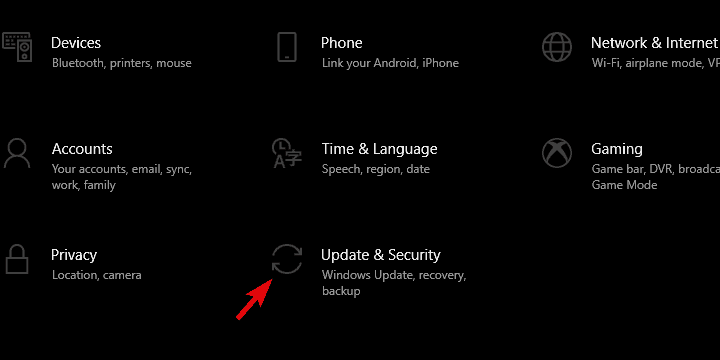
- Затем выберите Обновление и безопасность.
- В открывшейся вкладке перейдите в меню левой панели, найдите и нажмите Устранение неполадок.
- После этого найдите Центр обновления Windows и нажмите на него.
- В раскрывшемся меню нажмите на Запустить средство устранения неполадок кнопку.
- Подождите, пока Windows найдет проблемы и исправит их. После завершения перезагрузите компьютер и попробуйте установить обновление снова.
3. Приостановите автоматические обновления.
Еще один хороший способ избежать появления ошибки — временно отложить автоматические обновления. Обратите внимание, что это не устранит проблему полностью, однако отложит ее на некоторое время.
- Щелкните левой кнопкой мыши на Меню Пуск в левом нижнем углу экрана и выберите Настройки.
- Выберите Обновление и безопасность, затем перейдите на правую панель.
- Нажмите Дополнительные параметры ссылку.
- Перейдите в Приостановка обновлений раздел, затем щелкните Выберите дату.
- Когда появится раскрывающийся список, вы можете выбрать дату для отсрочки автоматических обновлений.
4. Запустите проверку системных файлов (SFC).
Иногда ошибки BSoD могут быть вызваны повреждением файлов. Поэтому мы просканируем вашу систему на наличие поврежденных или отсутствующих данных, которые могут вызвать проблему. Для этого:
- Открытые Командная строка , введя
cmdво вкладку поиска рядом с Меню Пуск кнопку. - Щелкните правой кнопкой мыши по Командная строка , а затем выбрать Запуск от имени администратора.
- После открытия введите
sfc /scannowкоманду и нажмите Enter. - Когда процесс восстановления будет завершен, перезагрузите компьютер.
5. Поврежденные фрагменты диска
Часто оборудование может быть повреждено сторонними программами, вредоносным ПО или собственным вмешательством. Следовательно, этот конкретный метод подразумевает сканирование локального диска на предмет потенциальных ошибок и исправления их. Для этого мы должны запустить консоль, как и раньше.
- НАЙДЕМ Командная строка , введя
cmdв поле поиска. Затем щелкните правой кнопкой мыши и выберите Запуск от имени администратора. - В черной консоли вы должны вставить
chkdsk /f /r C:команду и нажмите Enter. При необходимости замените «C» буквой вашего жесткого диска. - Система выполнит сканирование на правильность конфигурации и физические ошибки, после чего автоматически исправит их.
6. Обновите драйверы
Наконец, название ошибки может логически указывать на проблемы с драйверами. Хотя это не всегда так, устаревшие или неисправные драйверы действительно могут вызвать эту и подобные ошибки. Таким образом, вам необходимо найти и установить новые драйверы, если они есть. Если вы хотите сделать это автоматически, вы можете предоставить эту задачу для IObit Driver Booster, который обнаружит устаревшие или отсутствующие драйверы и в результате заменит их. Вот кнопка для загрузки утилиты.
Скачать Driver Booster
Инструкция по ручному обновлению:
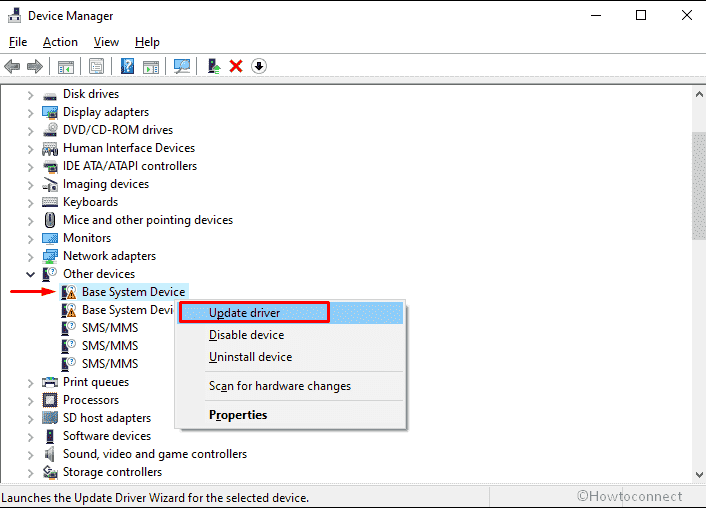
- Щелкните левой кнопкой мыши на Меню Пуск и выберите Диспетчер устройств.
- Если вы не знаете, какой драйвер вызывает проблему, обновите их один за другим. Щелкните на каждый из них правой кнопкой мыши и выберите Обновить драйвер. Иногда неисправные драйверы помечаются желтым треугольником.
- Позвольте Windows найти новые драйверы и загрузить их, следуя инструкциям на экране.
Надеемся, наше руководство помогло вам перестать сталкиваться с ошибкой DRIVER_PNP_WATCHDOG. По сути, все проблемы BSOD имеют аналогичные решения, все сводится только к мелким деталям, которые могут отличаться друг от друга.
If you are facing ‘Driver pnp watchdog error Windows 10’ or ‘DRIVER PNP WATCHDOG BSOD error’ error in your Windows 10 computer while working on Windows computer or when start/restart computer, then you are in right-place for the solution. Let’s starts the discussion.
‘DRIVER PNP WATCHDOG BSOD error’: It is common Windows Problem considered as Blue Screen of Death (BSOD) error. This BSOD error is appeared with message saying ‘Your PC ran into a problem and needs to restart. We’re just collecting some error info, and then we’ll restart for you’ along with Windows Stop Code DRIVER PNP WATCHDOG error.
This BSOD error is usually occurred due to wrong SATA Controller settings in BIOS, broken registry settings, volume shadow services issues, malware or viruses infections, corrupted system files or registry and others. This problem can be occurred if SATA controller mode is wrongly configured in BIOS. You can re-configure SATA controller settings in order to fix the issue.
Another possible reason behind the issue can be the faculty system services, corrupted system files and hard disk system image. You can run SFC scan and DISM scan in computer in order to repair the corruption in system files or registry and resolve this error. This issue can be occurred due to outdated Window OS and Windows Device Drivers. You can update device drivers and Windows OS in order to fix the issue. Let’s go for the solution.
How to fix Driver pnp watchdog error Windows 10?
Method 1: Fix DRIVER PNP WATCHDOG BSOD error with PC Repair Tool
‘PC Repair Tool’ is easy & quick way to find and fix BSOD errors, DLL errors, EXE errors, problems with programs/applications, malware or viruses issues, system files or registry issues, and other system issues with just few clicks.
Method 2: Change SATA Controller settings in BIOS
One possible way to fix the issue is to change SATA Controller settings in BIOS in computer.
Step 1: Restart your computer and when booting process initiate, press ‘F2’ or BIOS key to open BIOS menu
Step 2: Once BIOS setting page appeared, go to ‘Advanced’ or ‘Main’ menu and find ‘IDE Configuration, Storage Configuration, or ‘Drive Configuration’, and then hit ‘Enter’ key
Step 3: Now, find ‘Configure SATA, SATA Mode’ or ‘SATA Configuration’ or similar
Step 4: Change the particular option to ‘ATA, IDE or Compatible’, and save the changes and exit BIOS’, restart your computer and check if it works.
Method 3: Check Volume Shadow Copy Service
Step 1: Open ‘Services’ app in Windows PC via Windows Search Box
Step 2: Find and double-click on ‘Volume Shadow Copy’ to open its ‘Properties’
Step 3: In ‘Properties’ window, select ‘Automatic’ option from ‘Startup’ dropdown, and hit ‘Start’ option under ‘Service Status’ section, and then hit ‘Apply’ and ‘Ok’ button to save the changes, and restart your computer and check if the issue is resolved.
Method 4: Changes with some required services
Step 1: Type ‘cmd’ in Windows Search Box and press ‘SHIFT + ENTER’ keys on keyboard to open ‘Command Prompt as Administrator’
Step 2: Type the following commands one-by-one and hit ‘Enter’ key after each to execute
net stop wuauserv
net stop cryptSvc
net stop bits
net stop appIDSvc
Step 3: Once executed, now go to ‘c:\Windows\’ path, find and ‘SoftwareDistribution’ folder and rename it to ‘SoftwareDistribution.old’
Step 4: Now, go to ‘c:\WIndows\System32\’ folder, find ‘Catroot2’ and rename to ‘catroo2.old’
Step 5: Now, execute the following commands in Command Prompt window
net start wuauserv
net start cryptSvc
net start bits
net start msiserver
net start appIDsvc
Step 6: Once executed, close Command Prompt. Now, type ‘PowerShell’ in Windows Search Box, right-click on Windows PowerShell and select ‘Run as Administrator’
Step 7: Execute ‘wuauclt.exe /updatenow’ command in Windows Powershell and then restart your computer, and check if it works for you.
Method 5: Run Windows Update troubleshooter

You can run Windows built-in Windows Update troubleshooter in order to fix the issue.
Step 1: Open ‘Settings’ App in Windows PC via Windows Search Box and go to ‘Update & Security > Troubleshoot > Additional Troubleshooter’
Step 2: Find and select ‘Windows Update’ troubleshooter, and click ‘Run the troubleshooter’ button. Once troubleshooting finished, please check if the issue is resolved.
Method 6: Reset Windows PC to its default settings
If the issue is still persist, then you can perform Windows 10 reset to its default settings in order to fix the issue.
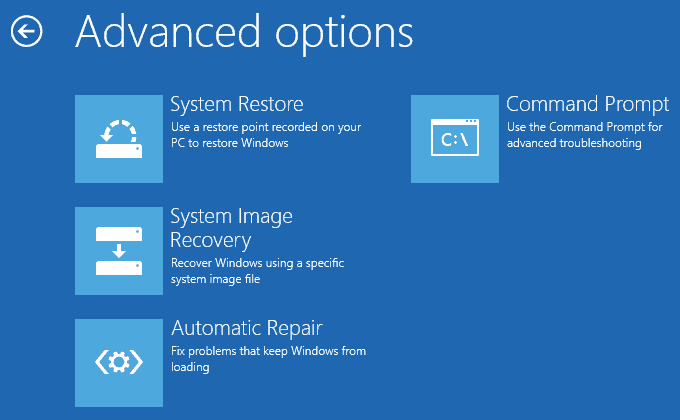
Step 1: Restart your computer several times until Windows Automatic Repair screen is appeared. Once appeared, select ‘Advanced Options > Troubleshoot’ in Windows Recovery Environment
Step 2: Now, select ‘Reset this PC’, select if you want to keep your files or ‘Delete’ them and click ‘Reset’ option and proceed with resetting process. Once finished, check if the issue is resolved.
Method 7: Update Device Drivers
Updating Device drivers in computer can resolve the issue.
Step 1: Open ‘Device Manager’ in Windows PC via Windows Search Box and look for device driver that is outdated/corrupted
Step 2: Right-click on device driver that is causing issue, and select ‘Update Driver’, and follow on-screen instructions to finish update process.
Step 3: Repeat the same step to update all other necessary drivers. Once updated, restart your computer and check if the issue is resolved.
Download or reinstall Device Drivers in Windows PC [Automatically]
You can also try to update all Windows drivers using Automatic Driver Update Tool. You can get this tool through button/link below.
Method 8: Update Windows 10 OS
Updating Windows OS to latest update version can resolve the issue.
Step 1: Open ‘Settings’ App in Windows PC and go to ‘Update & Security > Windows Update’ and click ‘Check for updates’ button
Step 2: Download and install all available updates in computer, and once updated, restart your computer and check if it works for you.
Conclusion
I am sure this post helped you on How to fix Driver pnp watchdog error Windows 10 with several easy steps/methods. You can read & follow our instructions to do so. That’s all. For any suggestions or queries, please write on comment box below.
Are you finding a blue screen on your computer all of a sudden and got astonished? When DRIVER PNP WATCHDOG occurs you might get yourself in a peculiar situation because even after using Windows 11 or 10 USB stick the system mightn’t boot. This BSOD mostly shows up when you attempt to install new patches of Windows or upgrade the OS to a higher version. With bug check code 0x000001D5, this BSOD points out that a driver failed to carry out a PnP operation within the fixed time frame.
Though there might be thousands of reasons for which DRIVER PNP WATCHDOG error can occur, invalid SATA controller setting in BIOS, Touchpad, missing system elements due to virus attack, outdated device drivers, and broken registry are mainly responsible. Besides, corruption in Windows update, issues with volume shadow services, damaged hard disk drive, faulty system services, and bad RAM is equally accountable for.
Here is how to Fix DRIVER PNP WATCHDOG Error Windows 11 or 10 –
1] Unplug Touchpad
The process is a little complex but worth trying as most of the people fix DRIVER PNP WATCHDOG by unplugging the touchpad cable only. To do it on your own, take the service manual that comes with your device. Such manual includes guidelines for the benefit of in-house technicians or licensed service agents with step by step procedure of common repair as well as replacing or disassembling process.
Unfortunately, most of the device doesn’t provide service manual nowadays but you still can manage one by navigating the manufactures website. The manufacture posts Standard PDF format online for free so that their user can take the help of these when needed. You can download it to mobile or other devices in order to get the guidance while disassembling the laptop for unplugging touchpad. However, it’s better to take help from professionals if you are not confident enough.
2] Modify SATA controller settings in BIOS
BIOS is the first thing that starts when you power on your PC and anything wrong with its settings can lead to DRIVER PNP WATCHDOG error. Usually, inappropriate SATA controller mode in the BIOS is found to cause such blue screen error as it prevents the communication system between OS and the device. However, when you change the SATA controller mode from AHCI to IDE, this particular BSOD error oftentimes goes away. Here is the procedure to do so –
- Shut down your Windows 11 or 10 PC.
- When the device is fully turned off, press the power button to turn it on again.
- While powering up, keep pressing the F2 key or the one that lets you enter into the BIOS settings.
- Once there, use the arrow keys to choose an option Advanced or Main, then press Enter to access the same.
- Look for options Storage Configuration, IDE Configuration, or Drive Configuration. After getting any, select the same by using arrow keys and then press the Enter.
- Subsequently, look for any of Configure SATA, SATA Mode, or SATA Configuration.
- Change that option to [IDE].
- Save the changes and exit from the BIOS settings page.
3] Replace SSD to fix DRIVER PNP WATCHDOG
Many users who were struggling with DRIVER PNP WATCHDOG said that changing the SSD worked for them to resolve the blue screen error. Simply, take the SSD drive out and reboot the device using Media creation tool iso. Though it’s not sure why SSD drive throws such an issue, giving it a try is a must to resolve the error.
4] Run a full scan to eliminate existing threats
All malware attacks your system is not dangerous always, some enter as a weak one and then start replicating themselves to gather more strength. If you don’t break the chain in between, they will replace all the genuine system files and give rise to unexpected error codes such as DRIVER PNP WATCHDOG. To eliminate the existing threats, Windows Security is pretty convenient as the utility provides real-time protection against Trojans, Spywares, and any kind of malware. Let’s check out the step by step guide to use the built-in antimalware tool –
- Press Win+I hotkey to bring forward Windows Settings app.
- Click on Update & Security.
- Select Windows Security from the left sidebar.
- Move to alongside right and opt for the option Virus & threat protection.
- When a separate window shows up, click Scan options link from the right pane.
- From the next page, click the radio button located alongside Full scan.
- Subsequently, hit the button Scan now.
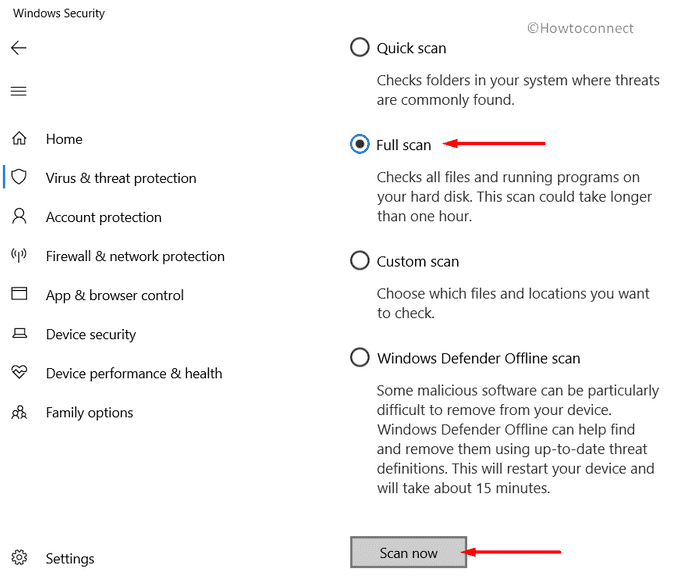
- After completion of the scanning process, click Clean threats option if the utility traces out any virus.
- From the consequent page, click Remove first followed by Start actions.
- When the removing process ends, reboot Windows 11 or 10.
5] Check the startup type of Volume Shadow Copy service
Volume Shadow Copy Service or VSS lets the Windows to continue the backup against a specific disk drive without causing any significant changes in it while the operation is going on. This also implements the volume shadow copies necessary for backing up and manages other associated processes. VSS while creating a backup usually locks the file or the drive as read-only for the proper execution of the task.
When the service stuck in an unexpected loop or launched in an improper way, you may lose access to that file or the drive precisely resulting in blue screen error DRIVER PNP WATCHDOG. The same can also be triggered when the service isn’t running properly. To fix the problem, follow the below steps –
- Click the search icon from the taskbar and type in services.msc.
- When you see Services at top of search result, hit Enter.
- From the dedicated console, look for Volume Shadow Copy that you will get under Name column.
- Once found, double-click the same to bring forth its properties.
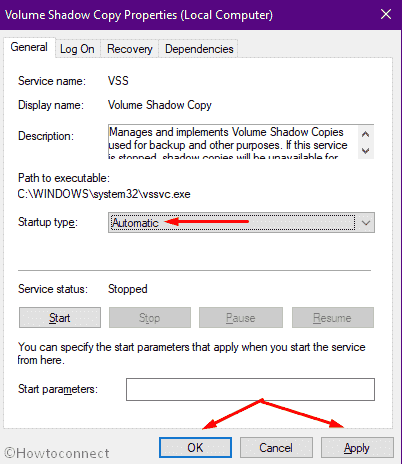
- Reach to Startup type and click the drop-down list located aside.
- Choose Automatic.
- Finally, click on Apply followed by OK to make the changes effective.
6] Take help of Windows update troubleshooter
Update issues are pretty common in Windows 11 or 10 and resolving them is not hard at all every time. But often such an issue ends up causing blue screen error DRIVER PNP WATCHDOG from which it’s hard to recover. This happens if the Windows update fails to operate a particular task. However, you can fix up the things by using built-in Windows update troubleshooter which not only scans the full system for related errors but also resolve them automatically. Here is how to proceed –
- Right-click on Start button and choose Settings.
- From the app interface, opt for Update & Security.
- Select Troubleshoot from the left sidebar.
- Shift to alongside right and click on Windows Update.
- From the expanded tray, hit the button Run the troubleshooter.
- When the utility ends up scanning for the trouble that is causing BSOD, comply with on-screen guidelines to eradicate the found issue fully.
7] Update system drivers to fix DRIVER PNP WATCHDOG
Drivers are the sole component of any operating system and corruption in them gives rise to unexpected error codes that are stubborn enough to fix. Whenever a device driver becomes outdated or faulty, they affect the compatibility at the same time performance. As a result, the system performs slower than ever and keeps freezing time and again. These are the early signs you will come across if corruption takes place in any driver. Generally, drivers get corrupted if any recent change made the registry entries whacked moreover removed essential system elements.
You may also confront driver corruption if the version you are using is incompatible itself in Windows 10 or 11. To get rid of such an issue, all you need is update and install a compatible system driver. In order to update all drivers at once, you may think of third-party software but to be honest, nothing comes handy than the built-in Device Manager. This utility presents outdated drivers with yellow exclamation marks, so it becomes easy to find the corrupt one.
- Bring forth Run dialog by pressing Win+R hotkeys at the same time.
- Type devmgmt.msc in the command box and hit Enter.
- When the Device Manager floats up, look for any mark of exclamation beside a device.
- After getting the same, double-click on it to expand the driver lists.
- Right-click on the driver with yellow indication and then choose Update driver.
- From the next pop-up, opt for Search automatically for updated driver software option.
- Doing so will commence the searching process online.
- If any newer version found, the downloading and installing process will take place automatically.
- After completion, do the same procedure for all outdated drivers.
- Once done, restart Windows 10 for bringing these changes into effect.
Note – If the system fails to get an updated version for the faulty driver, visit the manufactures website, and search for the driver manually. When you find a recent and of course compatible one, download as well as install the same.
8] Uninstall third-party antimalware program
In this internet-based era, keeping your system safe from potential malware is a real challenge. To make the process easier, thousands of third-party antivirus programs are available in the market that not only warn you about existing threats but also resolves them if detected after real-time scanning. Though they do a great job, all software found on the web is not trustworthy and instead of protecting the system, they give rise to blue screen error like DRIVER PNP WATCHDOG.
Furthermore, when you install an additional antimalware program often it ends up conflicting with the built-in one. During such conflicts, they lost their own components at the same time essential system elements that are very much needed to run the Windows 11 or 10 error-free. To avoid such collision, it’s always better to keep one antimalware active and disable the other ones. We suggest keeping the Windows Security as it is as powerful as any other third-party programs moreover it will not create unnecessary trouble. Let’s see the procedure to uninstall the third-party antimalware program –
- Press Windows key to invoke Start menu.
- Click the Settings cog from the bottom left corner.
- When the dedicated window shows up, select Apps.
- Go through the app lists from the right-pane and search for the installed antimalware program.
- Once found, click on the same and choose Uninstall from the expanded pane.
- If UAC prompts for permission, choose Yes to continue.
- Keep following on-screen instructions to remove the app completely.
- After completion, restart the device.
9] Repair broken registry
Whatever you do in your Windows PC from installing an app to surf the web, all these things are stored in the registry. If they are not maintained properly or you set their value incorrectly, unwanted issues may occur including blue screen error. Mainly, registry entries get broken when you forcefully end a task such as installation or uninstallation process in between just because the procedure is taking a long time. Also, missing system elements due to virus attack are equally responsible to cause broken registry.
There are various ways to get rid of registry corruption but running System file checker followed by the DISM command is the most reliable one. Once executed in elevated Command Prompt, this will recover the missing system components also repair the broken registry as well. Here is how to proceed –
- Press Win and X simultaneously and choose Run from Power user menu.
- In the command box, type in cmd.
- Press Ctrl+Shift+Enter altogether to launch Command Prompt as admin.
- If a UAC prompts for asking permission, click the Yes button.
- On the appearing black panel, put
sfc /scannowand hit the Enter key to execute the command. - Let the process hits 100% without any interruption.
- When System File Checker finishes its work, insert
DISM /Online /Cleanup-Image /ScanHealthin the same Command Prompt panel followed by hitting Enter. - Once the process ends successfully, reboot the device and check if DRIVER PNP WATCHDOG still throws.
10] Try for automatic repair to fix DRIVER PNP WATCHDOG
When the system generates unexpected error codes, a special feature called automatic repair becomes active by Windows in its third boot. But there might be an instance when this feature is turned off as often the self-repair mechanism gets stuck in a loop itself from where its difficult to get back in normal state. In such a case, you need to perform it manually.
This process takes a good amount of time as a lot of tests are carried out to diagnose the issue you are struggling with. Hence, be patient and follow the below steps –
- Open Windows Settings and click on Update & Security.
- From the appearing page, choose Recovery option from the left pane.
- Shift to the adjacent right side.
- Click Restart now button you will get under Advanced startup section.
- When system powers up after the reboot, choose Troubleshoot =>Advanced options => Startup Repair respectively.
- Once Automatic Repair page shows up, provide valid Microsoft account credentials.
- Thereafter, click on Continue to initiate the repairing process.
11] Tweak Windows update service
As DRIVER PNP WATCHDOG mostly shows up while installing an update, there is a high chance that corrupted Windows update service is causing the issue. This mainly happens when Windows Update fails to connect to the Microsoft servers due to some inconvenience. Resetting the component may help to recover yourself from such a state. To do so –
- Press the Windows key and type cmd.exe.
- When the Command Prompt arrives at the top, click the option Run as Administrator from the right flyout.
- Click Yes for the User Account Control.
- In the Command Prompt, insert the following commands one after another and press enter after each one –
net stop wuauserv
net stop cryptSvc
net stop bits
net stop appIDSvc
- After execution, open File Explorer by pressing Win+E and navigate the following directory –
C:\Windows
- From the available folder lists, locate SoftwareDistribution and then rename it to SoftwareDistribution.old.
- Now go to the following path –
C:\WIndows\System32\
- Rename catroot2 folder to Catroot2.old.
- Get back to Command Prompt and execute the below command-lines one by one –
net start wuauserv
net start cryptSvc
net start bits
net start msiserver
net start appIDsvc
- Thereafter type in
exitafter winking cursor and hit the Enter key. - Later on, right-click on Start icon and choose Windows PowerShell (Admin).
- When the console becomes ready to execute a command, insert the below line and press Enter –
wuauclt.exe /updatenow
- Finally, restart the system to make the changes effective.
12] Check for hard disk error
A hard disk is often compared to the soul of a system as it holds all information and data of your computer. When you use it for a long time, bad areas may form in it which mostly ends up causing blue screen error. However, there are many tips and tricks to maintain the hard disk in healthy condition but if bad areas are already formed you need to check for the error and solve it as well.
To do so, Disk Checking Tool comes handy which activates in the elevated Command Prompt. Here is how to use the tool –
- Manage access to the elevated Command Prompt.
- When in the black window, enter the following command at the base of winking cursor –
chkdsk C: /f /r /x
- Hit Enter key to let the system execute the command-line.
- Let Disk Checking Tool finds out corruption existing in the hard drive.
- Usually, the utility fix up found issue automatically but if it doesn’t, check the diagnosis report and take further steps.
13] Unplug external hardware accessories
In the recent past, a new weird issue has come up to cause blue screen errors like DRIVER PNP WATCHDOG. Connecting hardware accessories like mouse, keyboard, speaker or printer is becoming serious trouble to cause the BSOD error. Though the drawback may evolve from the USB adapters, the primary reason is yet to be known precisely.
However, there is an easy fix that came up to resolve this issue as well and many users have eliminated blue screen error by disconnecting these hardware peripherals temporarily. You can deport them for instance and then restart Windows 11 or 10 in the usual method. If the error is resolved afterward, connect those again and use them like before. During the process, also check if any specific accessory is causing the BSOD. If yes, you might need to change the peripheral itself.
14] Fix RAM issues to fix DRIVER PNP WATCHDOG
Oftentimes memory problems are treated as one of the most prominent causes behind DRIVER PNP WATCHDOG BSOD error in Windows 11 or 10. Memory issues are associated with a defective RAM stick mostly. Usually, these cases come up when the device falls on the ground and become physically damaged. When a blue screen error is evolved from bad RAM, you may need to replace it fully which is not suitable always. Before going that far, you can use the Windows Memory Diagnostic tool. Here is how to use the utility –
- Pressing Win+I key at once.
- In the search bar of Windows Settings, type memory.
- From the search result, pick the option Diagnose your computer’s memory problems.
- When the assigned pop-up becomes visible, click Restart now and check for problems (recommended).
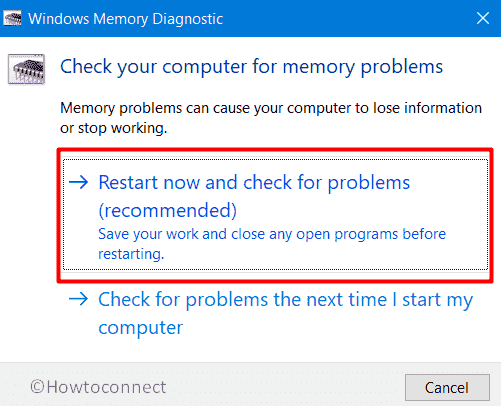
- After completing the first cycle of the reboot, a blue screen will show up detecting memory issues.
- Once the progress hits 100%, the device will go for the second restart.
- After signing back in, check the diagnostic result you will get in the notification area.
15] Run online blue screen troubleshooter
Blue screen error is usually irrecoverable mostly and often comes with unknown causes of origin. This makes the troubleshooting very much difficult so as to resolve the error from the system. Microsoft technicians took this fatality into account and introduced a new utility so that users can easily get rid of BSOD errors.
Since the internet is much reachable nowadays, Microsoft released a new online version and you can access it directly using a browser. Here are the steps to access this online tool –
- Launch a browser and navigate the dedicated page of Microsoft’s online troubleshooting by clicking this link.
- Once there, scroll down to When did you get the error? section.
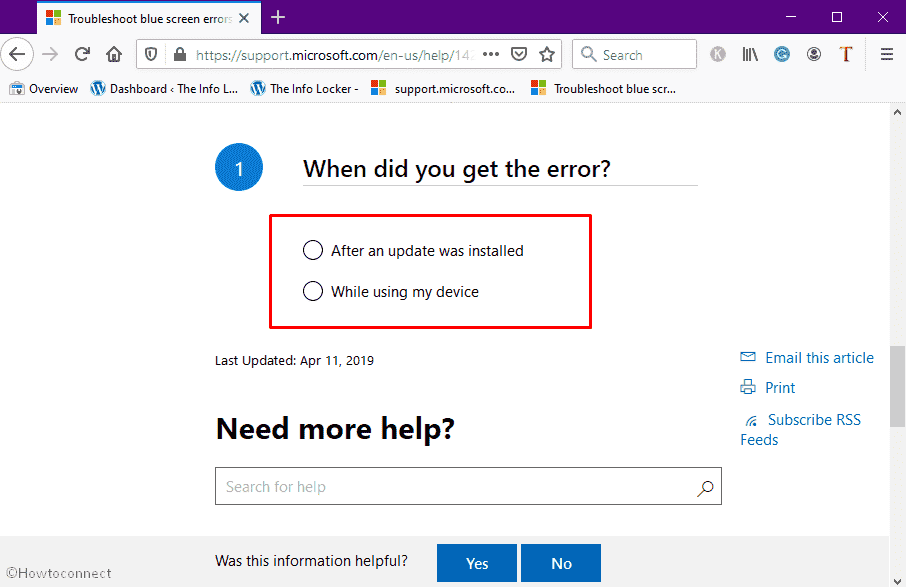
- Opt for a radio button depending on your scenario.
- Doing so will stretch out stepwise tasks to resolve the existing issue.
- Follow them to fix DRIVER PNP WATCHDOG blue screen error.
16] Restore the PC to its default state to fix DRIVER PNP WATCHDOG
Making changes in system settings, services, and registry entries are pretty common to make the Windows 11 or 10 device more user-friendly. But when it is done in the wrong way, various issues may rise up including blue screen error.
To revert back any recent change you made, perform system restore. It will take you back to a point where there was no error. Here is how to proceed –
- Press Win+R and type rstrui in the dialog box.
- Click OK button open System Restore wizard.
- Hit the Next button from the bottom.
- Go for the most recent restore point and click on Next.
- Comply with the on-screen instruction if any and lastly, click on Finish.
Methods:
1] Unplug Touchpad
2] Modify SATA controller settings in BIOS
3] Replace SSD
4] Run a full scan to eliminate existing threats
5] Check the startup type of Volume Shadow Copy service
6] Take help of Windows update troubleshooter
7] Update system drivers
8] Uninstall third-party antimalware program
9] Repair broken registry
10] Try for automatic repair
11] Tweak Windows update service
12] Check for hard disk error
13] Unplug external hardware accessories
14] Fix RAM issues
15] Run online blue screen troubleshooter
16] Restore the PC to its default state
That’s all!!
Repair any Windows problems such as Blue/Black Screen, DLL, Exe, application, Regisrty error and quickly recover system from issues using Reimage.