Introduction
VirtIO Drivers are paravirtualized drivers for kvm/Linux (see http://www.linux-kvm.org/page/Virtio). In short, they enable direct (paravirtualized) access to devices and peripherals for virtual machines using them, instead of slower, emulated, ones.
A quite extended explanation about VirtIO drivers can be found here http://www.ibm.com/developerworks/library/l-virtio.
At the moment these kind of devices are supported:
- block (disks drives), see Paravirtualized Block Drivers for Windows
- network (ethernet cards), see Paravirtualized Network Drivers for Windows
- balloon (dynamic memory management), see Dynamic Memory Management
You can maximize performances by using VirtIO drivers. The availability and status of the VirtIO drivers depends on the guest OS and platform.
Windows OS Support
Windows does not have native support for VirtIO devices included.
But, there is excellent external support through opensource drivers, which are available compiled and signed for Windows:
https://fedorapeople.org/groups/virt/virtio-win/direct-downloads/archive-virtio/?C=M;O=D
Note that this repository provides not only the most recent, but also many older versions.
Those older versions can still be useful when a Windows VM shows instability or incompatibility with a newer driver version.
The binary drivers are digitally signed by Red Hat, and will work on 32-bit and 64-bit versions of Windows
Installation
Using the ISO
You can download the latest stable or you can download the most recent build of the ISO.
Normally the drivers are pretty stable, so one should try out the most recent release first.
You can access the ISO in a VM by mounting the ISO with a virtual CD-ROM/DVD drive on that VM.
Wizard Installation
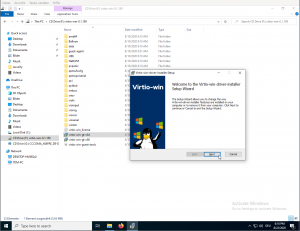
You can use an easy wizard to install all, or a selection, of VirtIO drivers.
- Open the Windows Explorer and navigate to the CD-ROM drive.
- Simply execute (double-click on) virtio-win-gt-x64
- Follow its instructions.
- (Optional) use the virtio-win-guest-tools wizard to install the QEMU Guest Agent and the SPICE agent for an improved remote-viewer experience.
- Reboot VM
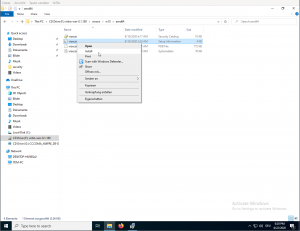
Manual Installation
- Open the Windows Explorer and navigate to the CD-ROM drive.
- There you can see that the ISO consists of several directories, each having sub-directories for supported OS version (for example, 2k19, 2k12R2, w7, w8.1, w10, …).
- Balloon
- guest-agent
- NetKVM
- qxl
- vioscsi
- …
- Navigate to the desired driver directories and respective Windows Version
- Right-click on the file with type «Setup Information»
- A context menu opens, select «Install» here.
- Repeat that process for all desired drivers
- Reboot VM.
Downloading the Wizard in the VM
You can also just download the most recent virtio-win-gt-x64.msi or virtio-win-gt-x86.msi from inside the VM, if you have already network access.
Then just execute it and follow the installation process.
Troubleshooting
Try an older version of the drivers first, if that does not help ask in one of our support channels:
https://pve.proxmox.com/wiki/Get_support
Further Reading
https://docs.fedoraproject.org/en-US/quick-docs/creating-windows-virtual-machines-using-virtio-drivers/index.html
http://www.linux-kvm.org/page/WindowsGuestDrivers
The source code of those drivers can be found here: https://github.com/virtio-win/kvm-guest-drivers-windows
http://www.linux-kvm.org/page/WindowsGuestDrivers/Download_Drivers
See also
- Paravirtualized Block Drivers for Windows
- Paravirtualized Network Drivers for Windows
- Dynamic Memory Management
После установки гостевой Windows в виртуальную машину на хосте KVM, нужно добавить корректные драйвера (kvm virtio driver). Без этих драйверов гостевая Windows не сможет определить виртуальные сетевые адаптеры и ряд другого оборудования.
Скачайте актуальную версию ISO образа с драйверами KVM для Windows (около 500 Мб):
$ wget https://fedorapeople.org/groups/virt/virtio-win/direct-downloads/stable-virtio/virtio-win.iso -P /vm/kvm/iso/
Создайте конфигурационной файл для монтирования iso образа в виртуальную машину:
$ vi /etc/libvirt/qemu/guest-virtio-drivers.xml
Добавьте в него следующую конфигурацию:
<disk type='file' device='cdrom'>
 <driver name='qemu' type='raw'/>
 <source file='/vm/kvm/iso/virtio-win.iso'/>
 <target dev='hdb' bus='ide'/>
 <readonly/>
 <address type='drive' controller='0' bus='0' target='0' unit='1'/>
</disk>
Чтобы смонтировать ISO образ в виртуальную машину KVM, выполните:
$ virsh update-device test-win1 /etc/libvirt/qemu/guest-virtio-drivers.xml
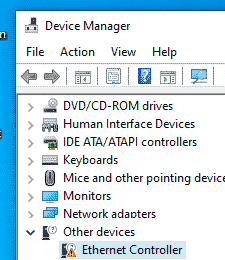
Подключитесь к консоли виртуальной машины Windows, запустите диспетчер устройств и найдите оборудование Ethernet Controller в секции Other Device. Как вы видите, Windows не нашла драйвер для сетевой карты.
Щелкните по контроллеру правой клавишей и выберите: Update Driver -> Browse my computer for driver software, укажите путь к виртуальному CD диску, в который смонтирован ISO образ.
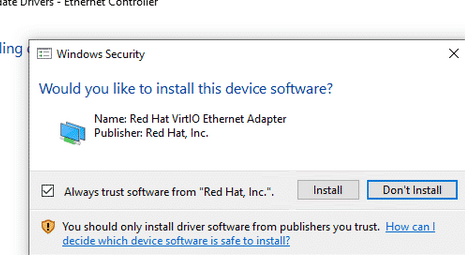
Подтвердите установку драйвера Red Hat VirtIO Ethernet Adapter.
Аналогичным образом установите все остальные драйвера, для оборудования, которое Windows не смогла обнаружить.
VirtIO Drivers are paravirtualized drivers for kvm/Linux (see http://www.linux-kvm.org/page/Virtio).
In short, they enable direct (paravirtualized) access to devices and peripherals for virtual machines using them, instead of slower, emulated, ones.
A quite extended explanation about VirtIO drivers can be found here http://www.ibm.com/developerworks/library/l-virtio.
Windows does not have VirtIO drivers included. However, the Fedora project provides CD ISO images with compiled and signed VirtIO drivers. These drivers must be downloaded and manually added during the Windows 10 installation.
This walkthrough details how to inject (slipstream) the drivers into your Windows 10 image – making installation a breeze!
Note: To complete this walkthrough, you will need a woking installation of Windows 10
Warning: The created ISO file currently does not support EFI BIOS. I am in the process of debugging this problem. Until resolved use the default SEABIOS option in Proxmox.
Download and install the Windows ADK
In order to modify the Windows Imaging Format (WIM) we need to install some tools that are part fo the Windows Assessment and Deployment Kit (Windows ADK).
Download the Windows ADK for Windows 10, version 2004
When you run the ADK installation tool, you will be presented with the following wizard steps.
Specify Location

Windows Kits Privacy

License Agreement

Select the features you want to install
De-select all options except for “Deployment Tools”.

Installing features

Installation complete

Download Windows 10
The next step is to download an ISO of the Windows 10 installation media. If you are running Windows the easiest way to do this is to use the Windows 10 Media Creation Tool.
Head to https://www.microsoft.com/en-ca/software-download/windows10

Click the Download tool now button.
Running the Media Creation Tool

Accept the License Agreement


Create installation media

Select Language, architecture and edition
Select 64-bit(x86) only, otherwise slipstreaming becomes more complicated.

Choose which media to use

Downloading…
After selecting the location to save the ISO (desktop is fine), the ISO file will be downloaded. This step will take some time because the file is close to 4gb.

Download complete
When the download is complete, click finish. We do not need to burn the ISO because Proxmox can read the file directly.
Download Windows 10 (on a non Windows machine)
If you try to download the Windows 10 ISO (https://www.microsoft.com/en-ca/software-download/windows10) on a machine that is not running Windows, the process is much simpler. You will automatically be redirected to the following page.
Select edition

Select product language

Finally select 64-bit Download

Downloading the VirtIO drivers
An ISO of the VirtIO drivers can be downloaded from:
https://fedorapeople.org/groups/virt/virtio-win/direct-downloads/stable-virtio/virtio-win.iso
Creating the working folder
- Create a working folder – I tend to use c:\win10.
- Mount the Windows 10 ISO file by double clicking it.
- Copy all the files from the Windows 10 ISO into your working folder.
- Create a folder called drivers inside your working folder
- Mount the VirtIO drivers ISO by double clicking it.
- Copy all the files from the VirtIO ISO into the drivers folder.
After completing these steps, you will have a folder structure that looks like this –


Install.esd vs Install.wim
Microsoft has started distributing Windows 10 builds in the install.esd format as opposed to insall.wim. The ESD (Electronic Software Download) is better for most end users because the file is significantly smaller due to better compression; however it is problematic for us because it cannot be directly modified.
Note: If you did not download the Windows 10 ISO using the above method and your working folder already contains a file called install.wim in the sources folder, you can skip the following step.
Converting install.esd to install.wim
Right click the new Start Menu item “Deployment and Imaging Tools Environment” and choose “Run as Administrator“.
Note: This item is inside the Windows Kits folder.
CD to the sources directory inside your working folder.
cd c:\win10\sourcesThe install.esd file can contain multiple Windows editions. Run the following command to list all the editions inside your image.
dism /Get-WimInfo /WimFile:install.esdYour output will look something like this ..

Find the index number of the Windows 10 edition that you need. In the above example I want Windows 10 Pro; therefore Index 6.
Extract the desired Windows edition and convert it to the WIM file format.
dism /export-image /SourceImageFile:install.esd /SourceIndex:6 /DestinationImageFile:install.wim /Compress:max /CheckIntegrityImage exporting can take a long time. Depending on your computer hardware, it takes about 10-30 minutes to complete. Go and make a cup of tea.
Optional: You can add multiple editions to your install.wim file ..
dism /export-image /SourceImageFile:install.esd /SourceIndex:1 /DestinationImageFile:install.wim /Compress:max /CheckIntegrityNow delete the install.esd file (we no longer need it)
del c:\win10\sources\install.esdInjecting the drivers
Now that we have an install.wim file, we can inject the VirtIO drivers into it. The basic process is –
- Mount the Windows Edition (Index) inside the WIM file to a folder – this extracts all the files inside the WIM
- Add the drivers to the mounted folder
- Unmount the image, committing the changes made to the folder back to the image.
This process needs to be done to all the editions inside both boot.wim and install.wim.
Note: Boot.wim is the Windows Pre-installation (WinPE) environment that is used to run setup. It is basically a cutdown version of Windows that does not contain any of the shell. Boot.wim contains two images one for 32bit and one for 64bit.
We need to inject the VirtIO drivers into the boot image so that the devices can be detected in WinPE and install.wim so that the devices can be installed.
Using the Script
To simplify this process, I have created a script. If you wish to run these commands one by one, obviously you can – the script just makes things easier.
Create a file called virtioslip.cmd
notepad c:\virtioslip.cmdPaste following script into the file
@echo off
rem //----------------------------------------------------------------------------
rem // virtioslip.cmd
rem //----------------------------------------------------------------------------
rem // my script to automate arch installations
rem //----------------------------------------------------------------------------
rem // Gareth Jones - gareth@gareth.com
rem //----------------------------------------------------------------------------

set WIN10=%1
set DRIVERS=%2
set EDITIONS=%3
set MOUNT=%temp%\mount

rem //----------------------------------------------------------------------------
rem // create temporary mount directory
rem //----------------------------------------------------------------------------
md %MOUNT%

rem //----------------------------------------------------------------------------
rem // iterate through images in boot.wim injecting drivers
rem //----------------------------------------------------------------------------
for /l %%x in (1, 1, 2) do (
    dism /Mount-Image   /ImageFile:%WIN10%\sources\boot.wim /MountDir:%MOUNT% /Index:%%x
    dism /Add-Driver    /Image:%MOUNT% /Driver:%DRIVERS% /Recurse /ForceUnsigned
    dism /Unmount-Image /MountDir:%MOUNT% /Commit
)

rem //----------------------------------------------------------------------------
rem // iterate through images in install.wim injecting drivers
rem //----------------------------------------------------------------------------
for /l %%x in (1, 1, %EDITIONS%) do (
    dism /Mount-Image   /ImageFile:%WIN10%\sources\install.wim /MountDir:%MOUNT% /Index:%%x
    dism /Add-Driver    /Image:%MOUNT% /Driver:%DRIVERS% /Recurse /ForceUnsigned
    dism /Unmount-Image /MountDir:%MOUNT% /Commit
)

rem //----------------------------------------------------------------------------
rem // remove temporary mount directory
rem //----------------------------------------------------------------------------
rd %MOUNT%

rem //----------------------------------------------------------------------------
rem // make iso
rem //----------------------------------------------------------------------------
oscdimg -b%WIN10%\boot\etfsboot.com -m -o -u2 -lWinVirtio -udfver102 -bootdata:2#p0,e,b"%WIN10%\boot\etfsboot.com"#pEF,e,b"%WIN10%\efi\microsoft\boot\efisys_noprompt.bin" %WIN10% winvirtio.iso
Running the script to add the VirtIO drivers and create a new ISO image
Inside your Deployment and Imaging Tools Environment, run the virtioslip.cmd, passing in your working folder, drivers folder and the number of editions you exported. For example-
c:\virtioslip.cmd c:\win10 c:\win10\drivers 1After some time a new file called winvirtio.iso will be created in you current folder.
Installing Windows in Proxmox
Copy this file to your Proxmox server and run your Windows installation.
scp win10virtio.iso root@IP:/var/lib/vz/template/iso/Job done.
References:
1. Virtio: An I/O virtualization framework for Linux – https://developer.ibm.com/articles/l-virtio/
2. Paravirtualized drivers for kvm/Linux – http://www.linux-kvm.org/page/Virtio
3. Proxmox : Windows VirtIO Drivers – https://pve.proxmox.com/wiki/Windows_VirtIO_Drivers
2. Download and install the Windows ADK – https://docs.microsoft.com/en-us/windows-hardware/get-started/adk-install
3. Download Windows 10 – https://www.microsoft.com/en-ca/software-download/windows10
4. How to Convert ESD to WIM File on Windows 10 – https://theitbros.com/convert-windows-esd-file-to-windows-wim-file/
KVM/QEMU Windows guest drivers (virtio-win)
This repository contains KVM/QEMU Windows guest drivers, for both
paravirtual and emulated hardware. The code builds and ships as part
of the virtio-win RPM on Fedora and Red Hat Enterprise Linux, and the
binaries are also available in the form of distribution-neutral ISO
and VFD images. If all you want is use virtio-win in your Windows
virtual machines, go to the
Fedora virtIO-win documentation
for information on obtaining the binaries.
If you’d like to build virtio-win from sources, clone this repo and
follow the instructions in Building the Drivers.
Note that the drivers you build will be either unsigned or test-signed
with Tools/VirtIOTestCert.cer, which means that Windows will not load
them by default. See Microsoft’s driver signing page
for more information on test-signing.
If you want to build cross-signed binaries (like the ones that ship in
the Fedora RPM), you’ll need your own code-signing certificate.
Cross-signed drivers can be used on all versions of Windows except for
the latest Windows 10 with secure boot enabled. However, systems with
cross-signed drivers will not receive Microsoft support.
If you want to produce Microsoft-signed binaries (fully supported,
like the ones that ship in the Red Hat Enterprise Linux RPM), you’ll
need to submit the drivers to Microsoft along with a set of test
results (so called WHQL process). If you decide to WHQL the drivers,
make sure to base them on commit eb2996de or newer, since the GPL
license used prior to this commit is not compatible with WHQL.
Additionally, we ask that you make a change to the Hardware IDs so
that your drivers will not match devices exposed by the upstream
versions of KVM/QEMU. This is especially important if you plan to
distribute the drivers with Windows Update, see the
Microsoft publishing restrictions for more details.
VirtIO Windows Drivers (Proxmox, KVM, VPS)
VirtIO Drivers for kvm/Linux commonly needed for Prroxmox, CentOS, RedHat, and many vitural private server (VPS) companies virtualized Windows environments. The drivers enable direct (paravirtualized) access to devices and peripherals for virtual machines using them, instead of slower, emulated, ones.
Windows OS Support
Windows doesn’t have native support for VirtIO devices. But, there are excellent opensource drivers, which are available compiled and signed for Windows, they can be downloaded from our mirrors below.
More information about Windows VirtIO Drivers
Extended explanation about VirtIO drivers
VirtIO Storage Drivers for Microsoft Windows
Windows Storage Drivers, Needed to install Windows
VirtIO Storage Drivers for Microsoft Windows
File: SahliTech_Windows_VirtIO_Storage_23.1.zip
MD5: 7D10D63C4348789E92F976EDF6903CBC
SHA-1: 67AB4FB5F0EA7FCF3D280B188F33306907B6E036
Description: VirtIO storage driver pack for installing Microsoft Windows on KVM/Linux VM’s. Includes drivers for Microsoft Windows 7-11
OS Supported: Microsoft Windows: 7, 8, 8.1, 10, 11
CPU Architecture Supported: Windows 7 through 8.1 include x86 & x64 drivers, Windows 10 includes x86, x64, and ARM64 drivers, and Windows 11 includes x64 and ARM64 drivers
Download
Download
More Download Links (Mirrors)
VirtIO Storage Drivers for Microsoft Windows Server
Windows Server Storage Drivers, Needed to install Windows
VirtIO Storage Drivers for Microsoft Windows Server
File: SahliTech_Windows_Server_VirtIO_Storage_23.1.zip
MD5: 4284C3BE96356DADD7D84AA536398DB0
SHA-1: 419CE03F518A3A451491D5EB6E2142342675F066
Description: VirtIO storage driver pack for installing Microsoft Windows Server on KVM/Linux VM’s. Includes drivers for Microsoft Windows Server 2008-2022
OS Supported: Microsoft Windows Server: 2008, 2008 R2, 2012, 2012 R2, 2016, 2019, 2022
CPU Architecture Supported: Server 2008 x86/x64, Server 2008 R2 through 2022 all only include x64 64 bit drivers
Download
Download
More Download Links (Mirrors)
VirtIO Guest Drivers & Tools for Microsoft Windows
Windows Drivers for VirtIO, LAN, VGA, CHIPSET, etc.
VirtIO Guest Drivers & Tools for Microsoft Windows
File: SahliTech_Windows_VirtIO_guest_tools_drivers_23.1.zip
MD5: 8D4F1B14FF580DBC8ABAFC70FE89C193
SHA-1: 6ADD4A3169E83F494E76EADB02D78061892EF9F7
Description: VirtIO guest driver and tool pack for using Microsoft Windows on KVM/Linux VM’s, includes drivers for LAN, VGA, Chipset, etc.
OS Supported: Microsoft Windows: 7, 8, 8.1, 10, 11
Microsoft Windows Server: 2008, 2008 R2, 2012, 2012 R2, 2016, 2019, 2022
CPU Architecture Supported: Windows 7 through 8.1 include x86 & x64 drivers, Windows 10 includes x86, x64, and ARM64 drivers, and Windows 11 includes x64 and ARM64 drivers
Server 2008 x86/x64, Server 2008 R2 through 2022 all only include x64 64 bit drivers
Download
Download
More Download Links (Mirrors)