23.09.2022
Данная инструкция идет в дополнение к инструкции по установке ODIS Service 7.2.1, с которой Вы можете ознакомиться, перейдя по ссылке.
Важно! Патч применяется при установки ODIS на Windows 10.
Этот метод установки распространяется только на приборы VAS 5054A и VAS5054 Pro, приобретенные в интернет-магазине xdiag.by. Внимание! Мы не несем ответственности за Ваши приборы, купленные в других магазинах.
Приступаем к установки драйверов к VAS5054 A и VAS 5054 Pro на Windows 10
1. Скачиваем установочные файлы по ссылке
2. Открываем папку 3.PDU-API_fix. (папка в архиве и под паролем. Пароль выдается покупатеям нашего магазина)
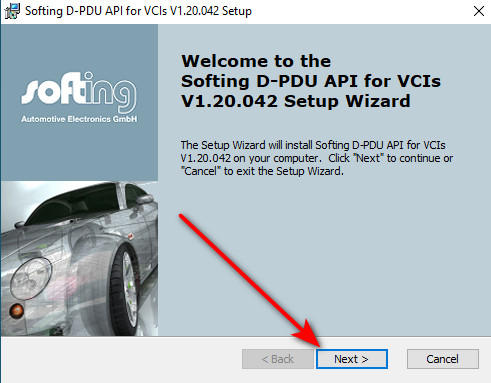
3. Запускаем ярлык D-PDU_APISetup.
4. После загрузки библиотек в появившемся окне «Next >».
5. Далее откроется окно с указанием пути установки. Рекомендуем Вам его не изменять. Переходим вперед кнопкой «Next >».

6. Следующий шаг жмем «Next >» и за тем «Install». Начнётся установка.

7. В промежуточном окне жмем кнопку «Установить».

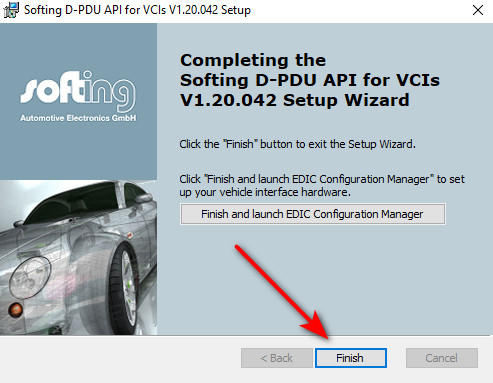
8. После завершения установки кликаем «Finish».
9. Переходим в папку, которую мы скачали (пункт 1) и находим папку 1.20.042. Копируем всю папку целиком и открываем в проводнике папку по следующему пути – «C:\Program Files (x86)\Softing\D-PDU API\».
10. Вставляем скопированную папку 1.20.042 (пункт 9) обязательно с заменой.

11. Далее возвращаемся в папку с установочными файлами (пункт 1) и копируем файл pdu_api_root.xml.
12. Вставляем его по следующему пути — C:\ProgramData\D-PDU API\. Внимание! Вставляем обязательно с заменой.
13. Снова возвращаемся в изначальную папку и запускаем ярлык D-PDU_API_root_path.reg. Согласитесь с внесением в реестор нажав кнопку «Да».

14. Перезагрузите Ваш компьютер.
Настройка завершена! Далее подключаете Ваш прибор к компьютеру и запускаете программное обеспечение ODIS Service 7.2.1.
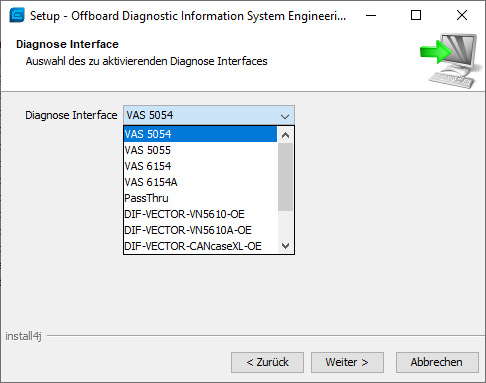
15. Во вкладке «Инструменты» выбираем пункт «Диагностический интерфейс».

16. В окне оборудования убеждаемся, что присутствует VAS5054, нажимаем на кнопку «Использовать выбранный интерфейс VCI».

Если Вы все сделали правильно, то в программе сверху должно отобразиться соединение как показано на рисунке. Картинка автомобиля не должна быть перечеркнута.
ВНИМАНИЕ! прибор должен быть подключен к автомобилю и включено зажигание.

Оборудование и программа готовы к работе!
После VCP и VCDS пришло время познакомиться с ODIS. Для оффлайн прошивок лучше всего подходит ПО ODIS Engineering. Наиболее актуальной на данный момент считается версия 9.2.2. А наиболее доступным адаптером (шнурком) — клон оригинального VAS5054A. Выбор хорошего клона — отдельная, сложная история, здорово описанная Александром BrianOConner333 в записи Выбор качественного адаптера VAS 5054A. Всё про чипы и проверку прибора.
Вооружившись ей, прошерстил ali, российские и белорусские магазины, avito (80+ объявлений). Наиболее убедительные фото и разумная цена оказались в предложении допиленного клона от Сергея sng. После получения адаптера встал вопрос установки ПО на ноутбук (Windows 10 x64 в моём случае) и неожиданно пришлось бороться со множеством проблем. Во-первых, ODIS официально не поддерживает старые адаптеры 5054 будучи установленным в Windows 10 (при этом, под windows 7 ограничений нет). Во-вторых, общедоступный дистрибутив не имеет вменяемого кряка (качал с православного рутрекера [org]). Вообще, вопрос покупки взломанного ПО (не железа, а именно ПО) можно обсуждать долго (тот же Вася уже много лет успешно продаётся на нашем рынке). Я считаю, что авторам оригиналов следует разделять частных пользователей, подключающихся к одной-двум машинам в месяц, и коммерсантов, зарабатывающих на этом деньги — мастерские. Уважаю модель лицензирования программы для видео SmoothVideo Project (онлайн привязка к оборудованию; в случае замены оборудования или переустановки операционки, меняется id — тогда отменяем предыдущую регистрацию и делаем новую, тем самым легально используя свою единственную лицензию; если нужно на двух компах сразу — тут уж будь добр купи ещё одну лицензию, благо цена вменяема за предоставляемое качество функционала).
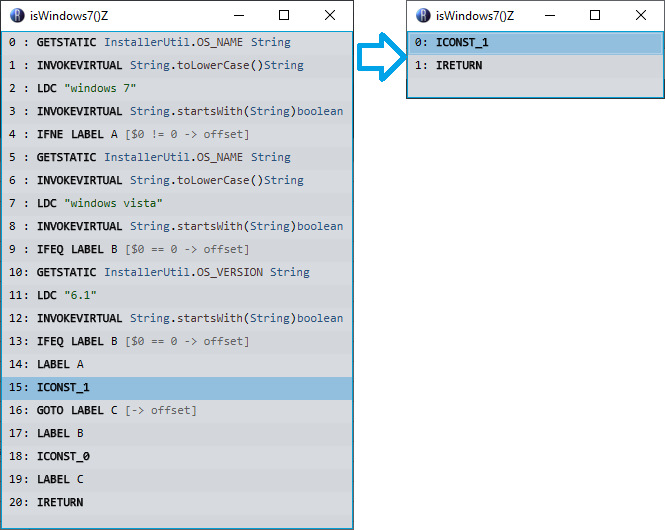
Итак, наконец раскрою способ обмануть установщик и установить ODIS 9.2.2 в Windows 10 для VAS 5054 без последующих приседаний с драйверами.
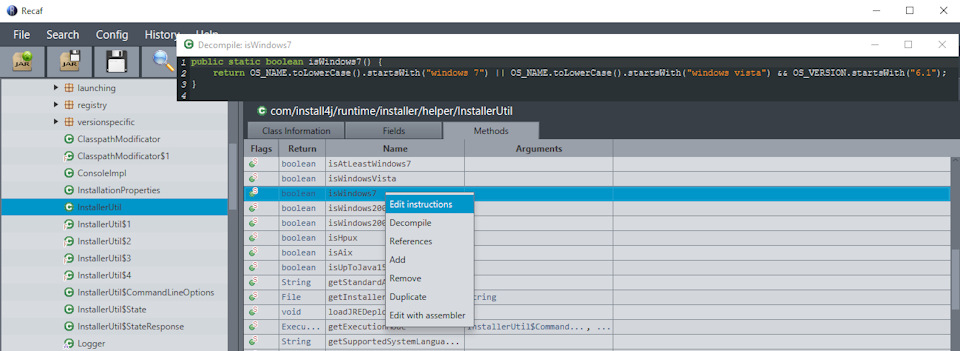
Решение заключается в подмене функции определения версии Windows.
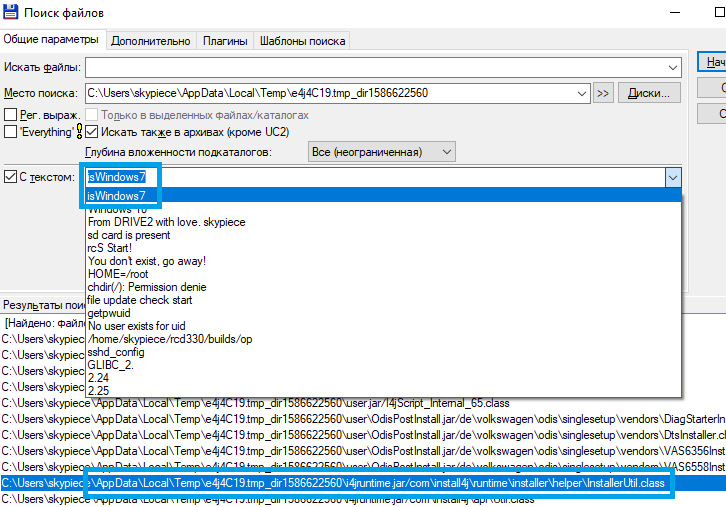
На себя обращает внимание тот факт, что при запуске OffboardDiagSetup-Engineering_9_2_2-B92_2_5_8.exe происходит некая загрузка, а потом появляется выбор языка установки. Во время этой загрузки установщик распаковывается во временную папку пользователя (например, %TEMP%\e4j4C19.tmp_dir1586622560\). Полнотекстовый поиск по всему каталогу разных комбинаций слов про версию операционки чаще всего приводил к файлу i4jruntime.jar, а именно классу \com\install4j\runtime\installer\helper\InstallerUtil.class. Удобнее всего смотреть содержимое через программу JD-GUI, но редактировать рекомендую через Recaf.
Исправленный файл можно сразу скачать с Я.Диска. Подменить его во временном каталоге ДО выбора языка. Либо поправить самостоятельно:
После завершения установки, при подключении адаптера к ноутбуку и автомобилю (питанию) устанавливается драйвер Softing D-PDU и хороший адаптер успешно проходит проверку в Softing D-PDUAPI Test Application. Если железо плохое, не забываем про патчи от veloseeped (второй или третий, в зависимости от степени неоригинальности).
На этом, понятное дело, полное счастье не наступает в виду того, что сам ODIS-E отказывается видеть 5054, но это наскоком за вечер не решилось (IDA, защита от debugger’а, шифрованные class’ы), да и вообще это уже чужой хлеб. Обновление 2020-04-19. Решение этой проблемы описано ansi2k в записи ODIS Engineering 9.2.2, VAS5054, Windows 10, а именно, для того, чтобы ODIS-E увидел VAS5054 необходимо подложить исправленный плагин поближе к загрузчику — ODIS-E-9.2.2-VAS5054.
Ну и остаётся последнее — launcher. Тут либо откатываем дату в 19 год, либо запрашиваем ключ у товарищей по инструкции.

С недавнего времени появилась возможность использовать VAS5054 вместе с Windows 10, независимо от разрядности системы, работает с 32 и 64 битными. Решение работает как с Одис Сервис, так и с Одис Инженеринг.
Ссылку с необходимыми файлами получают все наши клиенты при покупке VAS5054.
Настройка VAS5054А для ODIS Service Windows 10:
- устанавливаем Microsoft Visual C++ 2010 Redistributable Package
- устанавливаем ODIS как для ПК, при установке выбираем адаптер 6154, указываем папку с лицензией
- копируем содержимое папки (2) в «C:\Program Files (x86)\Offboard_Diagnostic_Information_System_Service»
- инсталлируем D-PDU_APISetup.exe из папки (3) (содержит версию 1.20.042) в зависимости от разрядности системы (32 или 64).
- копируем 1.20.042 dir в «C:\Program Files (x86)\Softing\D-PDU API\»
- копируем pdu_api_root.xml into «C:\ProgramData\D-PDU API\»
- запускаем D-PDU_API_root_path.reg
- применяем патч №1
- установка Postsetup по стандартной инструкции.
Настройка VAS5054А для ODIS Engineering Windows 10:
- устанавливаем ODIS Service по инструкции выше
-
запускаем D-PDU_API-ODIS-E.bat
-
копируем с заменой папку «plugins» в «C:\Program Files (x86)\Offboard_Diagnostic_Information_System_Engineering\»
- запускаем ODIS Engineering
- выбираем VAS5054 в настройках.
Скачать патчи для необходимой программы можно из папки Windows 10. Для каждой программы свой набор файлов.
Купить VAS5054 можно в нашем магазине.
Купить VAS5054 PRO можно также у нас.
13 Марта, 2020
Topic: VAS5054A PassThru Driver for Xentry PassThru on Windows 10 x64
Xentry PassThru needs to be installed on Windows x64 to support new models, such as Euro5/6, W205, W213, W222 … However, VAS5054A didn’t work on 64bits as passthru. There was 64bits device driver for VAS5054A but there was no PassThru driver working on 64bits.
This is a 64bit device drivers along with a patched PassThru API files working on Windows 10 x64. Xentry recognizes it and works with W205 (confirmed), etc.
WARNING: Use it on your own risk, only for test purpose.
What you need:
(1) VAS5054A hardware.
(2) (option) VAS5054A EDIC_PDU_API 1.20.4x driver installation file. You can find it somewhere on this forum (see below).
(3) (option) New firmware. The firmware included here is version 1.20.41 for better compatibility, not 1.20.42.
(4) Softing_VAS5054A_PassThru_Driver_x64_v3.zip (attached here)
(5) 64bit Windows 10
(6) (option) DC 12V 1A power adapter, 2 jumper wires for temporary power.
Pre Installation:
(1) Install Xentry PassThru and all patches.
(2) (option) Install EDIC_PDU_API 1_20_42 driver (or EDIC_PDU_API 1_20_41). It’s for installing .NET framework or VC++ redistribution files.
If you are going to do clean install on fresh Windows 10, you might want to install the EDIC_PDU_API driver. It installs .NET framework, VC++ files, some EDIC DLLs on /Windows/System32 or SysWow64. Other files will be overwritten by the following manual installation. If you don’t know where to find it, one version is https://mega.nz/#!Q9QGQYaQ!CrilUUH-IS8QJqoWPfVkHeYai8C6QxX3EB8j_Ta4Uz8 (your own risk).
Installation:
(1) Copy “Program Files (x86)\Softing\*” to your HDD “C:\Program Files (x86)\Softing\*”
(2) Copy “Program Data\D-PDU API” to your HDD “C:\Program Data\D-PDU API”.
(3) Double click on “Softing_VAS5054A_PassThru_1_20_042.reg” and install it.
(4) Make a shortcut of “SftngCM.exe” on Desktop.
(5) Right click on “C:\Program Files (x86)\Softing\EdicDriver\win7\softingedic7_ntamd64.inf” and install.
(6) Connect the VAS5054A hardware using an USB cable. Connect it to a temporary power(12V DC adapter) or OBD-2 port of your vehicle.
(7) Check “Control Panel/Devices Manager/Softing…”. If it’s not installed correctly, update the device driver manually.
(8) Make a shortcut of “EDICConfig.exe” on Desktop.
(9) (option) If you have newer version than EDIC_PDU_API 1_20_42 driver and genuine VAS5054A hardware, you may install the API driver now.
Post Installation:
(1) Connect the VAS5054a to a temporary power(12V DC adapter) or ODB-2 port of your vehicle.
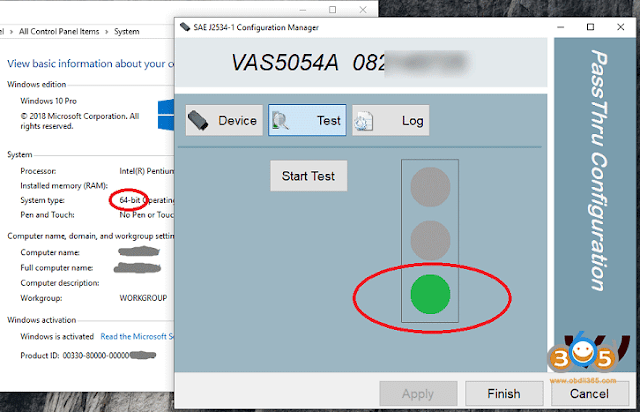
(2) Run “SftngCM.exe” on desktop as administrator. Make a “C:\Temp” directory if not exists. This is for saving log files. If not exists, SftingCM.exe will cause error when doing test.
(3) Choose “VAS5054A” and type the serial number (maybe 0821xxxxx).
(4) Select “Test” and click on “Start Test”.
– RED dot : PC <-> VAS5054A does not communicate. Something wrong on your driver.
– YELLOW dot : PC <-> VAS5054A communicates.
– GREEN dot : PC <-> VAS5054A <-> Vehicle communicates.
Tip:
(1) “.NET Framework 2.0/3.0/3.5” needs to be installed if not installed automatically. You can install it by selecting on “Control Panel/Programs and Features/Turn Windows features on or off/.NET Framework 3.5(includes .NET 2.0 and 3.0)”. You also need to install VC++ redistributions if not done yet. (MSVCR100.dll, mfc100.dll, … errors)
(2) Temporary power to VAS5054A for test purpose : Ground to either pin 4 or 5. 12V DC to pin 16.
(3) You can upgrade the EDICDriver in “Program Files (x86)\Softing\EDICDriver” if you have newer version. Update the device driver on control panel.
(4) If you installed newer version EDIC_PDU_API driver than 1.20.42, edit the *.reg and change the number 1_20_42 to your number (for example, “EDIC_D_PDU_API_1_20_042” to “EDIC_D_PDU_API_1_20_0XX”). After editing, double click on it and install it again.
(5) If your device has different serial number but SftngCM.exe doesn’t allow the change, edit the *.reg file with text editor, double click on it and install it again.
Note: How to set up bluetooth connection for VAS5054a
1.Pairing device and assign for COMport from windows.
(note. Device need disconnect via USB when pairing device)
2.Run “EDIC Hardware Installation.exe” and ADD device.
(see picture)
[attachment=84460]
3.Run “EDIC Configuration Manager.exe” and confirm assigned COM port in bluetooth.
(see picture)
[attachment=84461]
4.Run “SftngCM.exe” and connection test. So green signal is OK.
Again, it’s on your own risk! No one holds any responsibility of it.
For sake of security, you’re advised to use Xentry with sd connect c4 mux and odis with vas5054a head.
I’m hoping that this will be helpful.
(Credits to medianjoe)
by Alex Carter Mechanic Assistant
Something good to help you to make Xentry PassThru on Windows 10 x64 support new Mercedes models (Euro5/6, W205, W213, W222). Done with VAS5054A PassThru Driver
Xentry PassThru needs to be installed on Windows x64 to support new models, such as Euro5/6, W205, W213, W222 … However, VAS5054A didn’t work on 64bits as passthru. There is 64bits device driver for VAS5054A but there is no PassThru driver working on 64bits. You may try Actia driver instead but this is a patched 32bits PassThru API files with 64bit device drivers working on Windows 10 x64. Xentry recognizes it and works with W205 (confirmed), etc.
WARNING: Use it on your own risk, only for test purpose.
What you need:
(1) VAS5054A Bluetooth hardware. (genuine and good clone… both ok)
(2) (option) VAS5054A EDIC_PDU_API 1.20.4x driver installation file. You can find it somewhere on this forum.
(3) (option) New firmware. The firmware included here is version 1.20.41 for better compatibility, not 1.20.42.
(4) Softing_VAS5054A_PassThru_Driver_x64_v3.zip (attached here)
(5) 64bit Windows 10
(6) (option) DC 12V power adapter, 2 jumper wires for temporary power.
Pre Installation:
(1) Install Xentry PassThru and do all patches.
(2) (option) Install EDIC_PDU_API 1_20_42 driver (or EDIC_PDU_API 1_20_41). It’s for installing .NET framework or VC++ redistribution files.
If you are going to do clean install on fresh Windows 10, you might want to install the EDIC_PDU driver first. It installs .NET framework, VC++ files, some EDIC DLLs on /Windows/System32 or SysWow64. Other files will be overwritten by the below manual installation.
Installation:
(1) Copy “Program Files (x86)\Softing\*” to your HDD “C:\Program Files (x86)\Softing\*”
(2) Copy “Program Data\D-PDU API” to your HDD “C:\Program Data\D-PDU API”.
(3) Double click on “Softing_VAS5054A_PassThru_1_20_042.reg” and install it.
(4) Make a shortcut of “SftngCM.exe” on Desktop.
(5) Right click on “C:\Program Files (x86)\Softing\EdicDriver\win7\softingedic7_ntamd64.inf” and install.
(6) Connect the VAS5054A hardware using an USB cable. Connect it to a temporary power(12V DC adapter) or OBD-2 port.
(7) Check “Control Panel/Devices Manager/Softing…”. If not installed correctly, update the device driver manually.
(8) Make a shortcut of “EDICConfig.exe” on Desktop.
(9) (option) If you have newer version than EDIC_PDU_API 1_20_42 driver and genuine VAS5054A hardware, you may install the API driver now.
Post Installation:
(1) Connect the VAS 5054a to a temporary power(12V DC adapter) or ODB-2 port.
(2) Run “SftngCM.exe” on desktop as administrator. Make a “C:\Temp” directory if not exists. This is for saving log files. If not exists, SftingCM.exe will cause error when doing test.
(3) Choose “VAS5054A” and type the serial number (maybe 0821xxxxx).
(4) Select “Test” and click on “Start Test”.
– RED dot : PC <-> VAS5054A does not communicate. Something wrong on your driver.
– YELLOW dot : PC <-> VAS5054A communicates.
– GREEN dot : PC <-> VAS5054A <-> Vehicle communicates.
Tip:
(1) “.NET Framework 2.0/3.0/3.5” needs to be installed if not installed automatically. You can install it by selecting on “Control Panel/Programs and Features/Turn Windows features on or off/.NET Framework 3.5(includes .NET 2.0 and 3.0)”. You also need to install VC++ redistributions if not done yet. (MSVCR100.dll, mfc100.dll, … errors)
(2) Temporary power to VAS5054A for test purpose : Ground to either pin 4 or 5. 12V DC to pin 16.
(3) You can upgrade the EDICDriver in “Program Files (x86)\Softing\EDICDriver” if you have newer version. Update the device driver on control panel.
(4) If you installed newer version EDIC_PDU_API driver than 1.20.42, edit the *.reg and change the number 1_20_42 to your number (for example, “EDIC_D_PDU_API_1_20_042” to “EDIC_D_PDU_API_1_20_0XX”). After editing, double click on it and install it again.
(5) If your device has different serial number but SftngCM.exe doesn’t allow the change, edit the *.reg file with text editor, double click on it and install it again.
Download:
Softing_VAS5054A_PassThru_Driver_x64_v3.zip
http://blog.obdii365.com/2019/03/10/make-xentry-passthru-work-for-new-models/
Sponsor Ads
- Ad Space Available — Rent it Now!
About Alex Carter  Mechanic Assistant
45 connections, 0 recommendations, 438 honor points.
Joined APSense since, July 23rd, 2015, From Carlifornia, United States.
Created on Mar 11th 2019 01:08. Viewed 11,085 times.
Comments
Please sign in before you comment.