MacBook Pro 2012 является популярным компьютером от Apple, который работает на операционной системе macOS. Однако, многие пользователи задаются вопросом, можно ли установить на него Windows 10 и какие возможности по настройке звука будут доступны в этом случае. В данной статье мы рассмотрим, как установить и настроить драйвер звука для Windows 10 на MacBook Pro 2012.
Установка Windows 10 на MacBook Pro 2012 возможна благодаря использованию программ Boot Camp Assistant, которая предоставляет возможность установки и настройки операционной системы Windows на компьютерах Mac. После установки Windows 10 на MacBook Pro 2012, звук может не работать, так как операционная система не распознает аудиоустройство. Для корректной работы звука необходимо установить драйвер звука для Windows 10.
Чтобы установить драйвер звука для Windows 10 на MacBook Pro 2012, необходимо выполнить следующие шаги: сначала, откройте веб-браузер и перейдите на официальный сайт Apple. Затем, найдите раздел поддержки и перейдите в него. В разделе поддержки вам необходимо найти и скачать последнюю версию Boot Camp. После скачивания и установки Boot Camp Assistant, следуйте инструкциям программы, чтобы создать загрузочный USB-диск с драйверами для Windows 10. Подключите USB-диск к MacBook Pro и выполните установку драйвера звука для Windows 10.
Содержание
- Драйвер звука для MacBook Pro 2012 под Windows 10: инструкция по установке и настройке
- Подготовка к установке драйвера звука
- Скачивание и установка необходимых программ для драйвера звука
- Установка драйвера звука на MacBook Pro 2012 под Windows 10
- Настройка драйвера звука после установки на MacBook Pro 2012 под Windows 10
- 1. Проверка уровня громкости
- 2. Выбор аудиодевайса по умолчанию
- 3. Настройка звуковых эффектов
- 4. Проверка обновлений драйвера
- 5. Проверка настроек баланса звука
- 6. Переустановка драйвера звука
Драйвер звука для MacBook Pro 2012 под Windows 10: инструкция по установке и настройке
Установка драйвера звука для MacBook Pro 2012 под управлением операционной системы Windows 10 может потребоваться, если вы хотите использовать эту модель ноутбука с операционной системой Windows. В этой статье мы рассмотрим, как установить и настроить драйвер звука для MacBook Pro 2012 под Windows 10.
1. Проверьте доступные драйверы
- Перейдите на официальный веб-сайт Apple;
- Найдите страницу поддержки для MacBook Pro 2012;
- Выберите операционную систему Windows 10;
- Проверьте, есть ли доступные драйверы звука для вашей модели MacBook Pro 2012 под Windows 10.
2. Установка драйвера звука
- Скачайте последнюю версию драйвера звука для вашей модели MacBook Pro 2012;
- Запустите загруженный файл драйвера;
- Следуйте инструкциям мастера установки;
- После завершения установки перезагрузите ноутбук.
3. Настройка драйвера звука
- Правый щелчок на значке звука в панели задач и выберите «Звуковые настройки»;
- Перейдите на вкладку «Воспроизведение»;
- Выберите драйвер звука для MacBook Pro 2012 из списка доступных устройств;
- Нажмите кнопку «Установить по умолчанию»;
- Проверьте наличие звука, воспроизведя тестовый звуковой файл или открыв любое аудио-видео устройство.
Теперь вы должны иметь работающий звук на вашем MacBook Pro 2012 под управлением Windows 10. Если проблемы с звуком все еще существуют, вы можете обратиться за поддержкой на официальный веб-сайт Apple или в форумы, где пользователи сопоставят проблему и предложат возможные решения.
Подготовка к установке драйвера звука
Перед тем, как установить драйвер звука для Windows 10 на MacBook Pro 2012, необходимо выполнить несколько подготовительных шагов:
1. Убедитесь, что ваш MacBook Pro 2012 имеет операционную систему Windows 10. Если у вас установлена другая версия Windows, обновите систему до Windows 10.
2. Закройте все запущенные приложения и сохраните все открытые документы. Установка драйвера потребует перезагрузки компьютера, поэтому важно не сохраниться.
3. Скачайте драйвер звука для MacBook Pro 2012 с официального сайта производителя или с надежного источника. Убедитесь, что загруженный файл соответствует операционной системе Windows 10 и модели MacBook Pro 2012.
4. Распакуйте скачанный файл драйвера в любую удобную папку на вашем компьютере.
Теперь, когда вы выполнили все подготовительные шаги, вы готовы приступить к установке драйвера звука для MacBook Pro 2012 на Windows 10.
Скачивание и установка необходимых программ для драйвера звука
Для установки драйвера звука на MacBook Pro 2012 под управлением Windows 10 необходимо скачать и установить следующие программы:
1. Boot Camp Assistant
Boot Camp Assistant — это утилита, предоставляемая Apple, которая позволяет управлять установкой Windows на Mac компьютерах. Вы можете скачать последнюю версию Boot Camp Assistant на официальном сайте Apple.
Примечание: Убедитесь, что вы выбираете версию Boot Camp Assistant, соответствующую вашей операционной системе Windows 10.
2. Драйвер звука Realtek High Definition Audio
Драйвер звука Realtek High Definition Audio — это программное обеспечение, которое обеспечивает функциональность звука на вашем MacBook Pro под управлением Windows 10. Вы можете скачать драйвер звука Realtek High Definition Audio с официального сайта Realtek.
Примечание: Убедитесь, что вы выбираете соответствующую версию драйвера для вашей системы (32-бит или 64-бит).
После того, как вы скачали необходимые программы, следуйте инструкциям по установке каждой программы последовательно. Обратите внимание, что для установки драйвера звука Realtek High Definition Audio вам может потребоваться переход в режим безопасного загрузки в Windows 10.
Установка драйвера звука на MacBook Pro 2012 под Windows 10
Установка драйвера звука на MacBook Pro 2012 под операционную систему Windows 10 может быть несколько сложнее, чем на других устройствах. Тем не менее, следуя определенной последовательности действий, вы сможете настроить звук на своем устройстве.
- Первым шагом является загрузка драйвера звука с официального веб-сайта Apple. Перейдите на сайт Apple и найдите страницу поддержки для MacBook Pro 2012.
- На странице поддержки найдите раздел «Загрузки». В этом разделе вы должны найти драйвер звука для вашей модели MacBook Pro 2012, совместимый с операционной системой Windows 10. Скачайте его на свое устройство.
- После того, как драйвер звука загружен на ваш компьютер, откройте файл установки.
- Следуйте инструкциям на экране, чтобы завершить установку драйвера звука. При необходимости перезагрузите компьютер.
- После перезагрузки компьютера драйвер звука должен быть успешно установлен. Для проверки звука откройте настройки звука на вашем MacBook Pro 2012 и убедитесь, что звук работает корректно.
Установка драйвера звука на MacBook Pro 2012 под операционную систему Windows 10 может быть сложной задачей, но следуя указанным шагам, вы сможете настроить звук на своем устройстве. Убедитесь, что предварительно загрузили соответствующий драйвер звука с официального веб-сайта Apple и внимательно следовали инструкциям установки. Если у вас все еще возникают проблемы со звуком, рекомендуется обратиться в службу поддержки Apple или обратиться к сообществу пользователей для получения дополнительной помощи.
Настройка драйвера звука после установки на MacBook Pro 2012 под Windows 10
После установки драйвера звука на MacBook Pro 2012 под операционную систему Windows 10, вам может потребоваться осуществить некоторую настройку для оптимальной работы звука на вашем устройстве. В этом разделе мы рассмотрим основные шаги для настройки драйвера звука.
1. Проверка уровня громкости
Перед началом настройки рекомендуется проверить уровень громкости на вашем устройстве. Для этого кликните на значок громкости в системном трее и убедитесь, что уровень громкости выставлен на желаемое значение.
2. Выбор аудиодевайса по умолчанию
Если у вас подключено несколько аудиоустройств, таких как наушники или внешние колонки, вам может понадобиться выбрать аудиодевайс по умолчанию. Чтобы это сделать, перейдите в настройки звука Windows, выберите раздел «Воспроизведение» и установите галочку рядом с нужным аудиодевайсом.
3. Настройка звуковых эффектов
Windows 10 предлагает различные звуковые эффекты, которые можно настроить в соответствии с вашими предпочтениями. Чтобы настроить звуковые эффекты, перейдите в настройки звука Windows, выберите раздел «Уровни» и отрегулируйте параметры в соответствии с вашими потребностями.
4. Проверка обновлений драйвера
Чтобы убедиться, что у вас установлена последняя версия драйвера звука, рекомендуется проверить наличие обновлений. Для этого перейдите в настройки звука Windows, выберите раздел «Обновления» и выполните проверку на наличие доступных обновлений.
5. Проверка настроек баланса звука
Если у вас возникли проблемы с балансом звука, например, звук слышится только с одной стороны, рекомендуется проверить настройки баланса. Для этого перейдите в настройки звука Windows, выберите раздел «Уровни», затем «Баланс» и отрегулируйте параметры баланса в соответствии с вашими предпочтениями.
6. Переустановка драйвера звука
Если после проведения всех вышеуказанных действий проблемы с звуком все еще не устраняются, попробуйте переустановить драйвер звука. Для этого перейдите в диспетчер устройств Windows, найдите аудиодрайвер в списке устройств, щелкните правой кнопкой мыши и выберите опцию «Удалить устройство». После этого перезагрузите компьютер и повторно установите драйвер звука.
Следуя этим простым шагам, вы сможете настроить драйвер звука после установки на MacBook Pro 2012 под операционную систему Windows 10 и наслаждаться качественным звуком на вашем устройстве.
BOOT CAMP SUPPORT DOWNLOADS DIRECT LINKS FROM APPLE
If you own a Mac and you wanted to install Windows on it to run maybe some Windows software or games, Apple makes it possible by releasing Windows drivers which will allow Windows to run on your Mac computer.
Since 123myIT has some videos on how to install Windows on your Mac we thought it fitting that we create a page which contains all the versions of the Windows Support Software in one place.
The following downloads contain the Windows Support Software (Windows Drivers) needed to run Windows on your Mac.
Windows Support Software Downloads
Boot Camp Drivers Download 5.1.5640
Boot Camp Drivers Download 5.1.5621
Boot Camp Drivers Download 5.0.5033
Boot Camp Drivers Download 4.0.4326
Boot Camp Drivers Download 4.0.4255
Boot Camp Drivers Download 4.0.4033
Which Boot Camp supports your model of Mac?
Click the links below to see which version of Boot Camp you need for your Model of Mac.
MacBook Pro
MacBook Air
MacBook
iMac
Mac mini
Mac Pro
Want to know how to install Windows on a Mac check out the videos below.
Install Windows 8.1 on a MacBook Air no DVD drive
How to install Windows 8.1 on a Mac running OS X Mavericks
How to install Windows 8 on a Mac with Boot Camp Easy Version
General Boot Camp questions about installing Windows 8 on a Mac
The list above should be up to date. If we have missed any version please contact us.
Table of Contents
Bootcamp Drivers Windows 10:
If you own Mac OS X, and you want to install new boot camp drivers on your Mac, then this article is for you. Specifically, we’ll discuss the steps required to download Bootcamp drivers for a Mac laptop or computer that does not have a USB port. Before starting, it’s best to know that older laptops that do not have USB ports may be damaged or infected with malware that prevents them from being able to use certain programs or file types. In such cases, it’s a good idea to obtain a USB port.
How to install Bootcamp drivers?
To install Bootcamp drivers on a Mac, you can follow the steps below. First, download the driver package from our website. After downloading it, open the Finder and click on the application folder in which you want to install the driver. Next, locate the folder where you want to install the driver. Once the installation is complete, click on the Apple icon in the bottom-right corner of the window. Then, double-click the downloaded file to install it.
Then, insert the USB flash drive and run Windows Support software that will load drivers for Apple hardware. Select the USB flash drive from the Windows Start menu. The USB flash drive will have a D or E drive letter. Click on the Bootcamp folder and run the Setup app. After installation, reboot and verify that the new device is working. If not, try reinstalling your Bootcamp drivers. After installing them, you can use your Apple hardware to use it.
Install the latest version of Bootcamp Drivers:
If the drivers are outdated, try running the Windows program that came with the computer. This is called Driver Detective. Go to /System/Library/VCames/list. From there, click the Driver Detective icon. It will display a list of all available drivers. Choose the working Windows 10 driver and click Upload. Then, restart your computer and your Apple hardware should now work. When you’re done, you can now use your Mac’s USB flash drive to use your Mac.
First, let’s begin by examining how to install drivers. To do this, follow the prompts, and follow the instructions. For example, if you’re searching for Bootcamp drivers, then at the “Support” menu, select “Downloads/drivers.” Next, under “Downloads/drivers,” go to the Bootcamp website and find the appropriate driver. Once you find the one you need, save it to your system. Then repeat the process as written above, but this time, select “Software/driver” and choose the software that was just available.
Install the drivers manually:
Now let’s examine what steps you need to take if you don’t have a USB port and need to install drivers manually. To do this, first, disconnect the laptop’s power adapter, and then plug the USB cable into a USB port on your Mac computer. Open the driver manager on your Mac by going to System/ Utilities and clicking on the “Bluetooth Devices.” Click “Check now” to ensure that your driver is updated.
Still, having difficulty?
If you are still having difficulty, then I recommend using the Windows program that helps you update your drivers. This program is Driver Detective. It’s located in /System/Library/VCames/list, then click on Driver Detective. Follow the prompts, and you will see all of your drivers. For Bootcamp, select “Working Windows 10”, then click “Upload“.
The only possible hitch with this method is that if you’re not an advanced user, then you may not know how to extract the Bootcamp files. Luckily, there are program “order tools” which will do this automatically for you. Open up the program, and follow the easy steps to extract the boot files. Once you’ve successfully extracted them, restart your Mac OS X machine. Your old bootup should be gone!
Online tutorials:
All of this is about using the online tutorial site known as Puckett. Download your Bootcamp Drivers Windows 10, and you’re ready to try out your new operating system. See how well that Bootcamp setup worked for you? Now, just fire up your favorite internet browser, and view the sites that would have been unavailable.
How to Download Bootcamp Drivers?
Fortunately, there are a couple of ways to download the latest Bootcamp drivers for your Mac. First, you can use the support disk included with your iMac, or you can go to Apple’s website and search for “Downloads/drivers.” After you locate the appropriate driver, you can download it and save it to your system. From there, you can follow the instructions for installing it in your operating system.
The first way is to download the Bootcamp drivers from Apple’s website. This includes everything from the hardware to the software. The process of downloading the drivers is very easy, and the software does not require advanced computer skills. The software is available for free at sites like Puckett.com. You can also download the latest version of the Bootcamp drivers from the Apple website. After that, you can install them on your computer.
If you have advanced knowledge, you can try downloading the drivers from Apple’s website. The process is simple enough, and it’s free! However, it can be a little tricky for beginners. For this reason, you should use an all-in-one driver utility, such as Driver Talent. It can download all Mac drivers, including Bootcamp. You can find the latest drivers in just a few clicks.
Jun. 24, 2022 / Updated by
Bessie Shaw to
Windows Driver Solutions
Install Windows 10 or update to Windows 10 on your MacBook Pro, MacBook Air? Drivers are missing for Windows 10 on MacBook Pro Renina? You need the correct and compatible MacBook drivers for Windows 10. Get the 64-bit or 32-bit Windows 10 drivers for your MacBook (Retina, 12-inch Early 2015), MacBook Pro, MacBook Pro Retina, MacBook Air, etc. Here are the contents in this post.
-
Part 1. Why You Need to Download, Install or Update MacBook Drivers for Windows 10
-
Part 2. Can You Get BootCamp Drivers Direct Download for Win 10
-
Part 3. How to Free Download or Update Windows 10 Drivers for MacBook Laptop or Desktop
-
Part 4. The Most Common MacBook Drivers for Windows 10
Part 1. Why You Need to Download, Install or Update MacBook Drivers for Windows 10
Drivers are the important software to make computer and hardware work properly. If the drivers are outdated, corrupted, damaged, missing, or incompatible with Windows 10, your devices will have issues and corrupts. Downloading the best-matched drivers for your MacBook computer can easily solve the driver issues. Furthermore, Windows 10 requires the exact Windows 10 Mac computer drivers to match it in order to work in your Mac, both 64-bit and 32-bit.
Therefore, if your MacBook has issues after Windows 10 install, fix the drivers for Windows 10 by getting the correct MacBook laptop drivers or MacBook desktop drivers for Windows 10.
Part 2. Can You Get BootCamp Drivers Direct Download for Win 10?
Yes, you can get the Windows Support Software drivers for BootCamp, printer, sound (audio) card, graphics card, Wi-Fi (wireless) adapter, Bluetooth, keyboard, mouse, as well as other hardware and devices. Read the “Boot Camp requirements by Mac model” carefully in Apple’s official website, and you need to know exactly your MacBook model. Some users have reported that the .pkg file download Apple has given can’t be open, 64-bit drivers are needed but you get the 32-bit drivers (or vice versa), or your MacBook model is not listed on Apple’s page to download drivers.
We suggest 1-clcik solution to quickly and easily get all Windows 10 drivers for MacBook downloads and updates. And that’s Driver Talent (former name: DriveTheLife). It’s all-in-one, free, safe and clean without ads, pop ups, and virus.
Free download and install Driver Talent on Windows 10 on your MacBook laptop or desktop.
Download Now
Updated: DriveTheLife has been updated to the new version called Driver Talent with a fresh new look.
Part 3. How to Free Download or Update Windows 10 Drivers for MacBook Laptop or Desktop
Driver Talent works on 64-bit and 32-bit Windows 10 and helps to download all drivers for MacBook computers, including:
-
MacBook Pro (Retina, 15-inch, Mid 2015)
-
MacBook Pro (Retina, 13-inch, Early 2015)
-
MacBook Pro (Retina, 15-inch, Mid 2014)
-
MacBook Pro (Retina, 13-inch, Mid 2014)
-
MacBook Pro (Retina, 15-inch, Late 2013)
-
MacBook Pro (Retina, 13-inch, Late 2013)
-
MacBook Pro (Retina, 15-inch, Early 2013)
-
MacBook Pro (Retina, 13-inch, Early 2013)
-
MacBook Pro (Retina, 13-inch, Late 2012)
-
MacBook Pro (Retina, Mid 2012)
-
MacBook Pro (13-inch, Mid 2012)
-
MacBook Pro (15-inch, Mid 2012)
-
MacBook (Retina, 12-inch, Early 2015)
-
MacBook Air (13-inch, Early 2015)
-
MacBook Air (11-inch, Early 2015)
-
MacBook Air (13-inch, Early 2014)
-
MacBook Air (11-inch, Early 2014)
-
MacBook Air (13-inch, Mid 2013)
-
MacBook Air (11-inch, Mid 2013)
-
MacBook Air (13-inch, Mid 2012)
-
MacBook Air (11-inch, Mid 2012)
There are only 3 steps to get all Windows 10 MacBook Pro or MacBook Air driver downloads and updates.
Step 1. Launch Driver Talent on Windows 10 on your MacBook, and click «Scan».
Step 2. You can download or update all MacBook drivers for Windows 10 with 1 click. Alternatively, you can download the drivers one by one. It’s up to you.
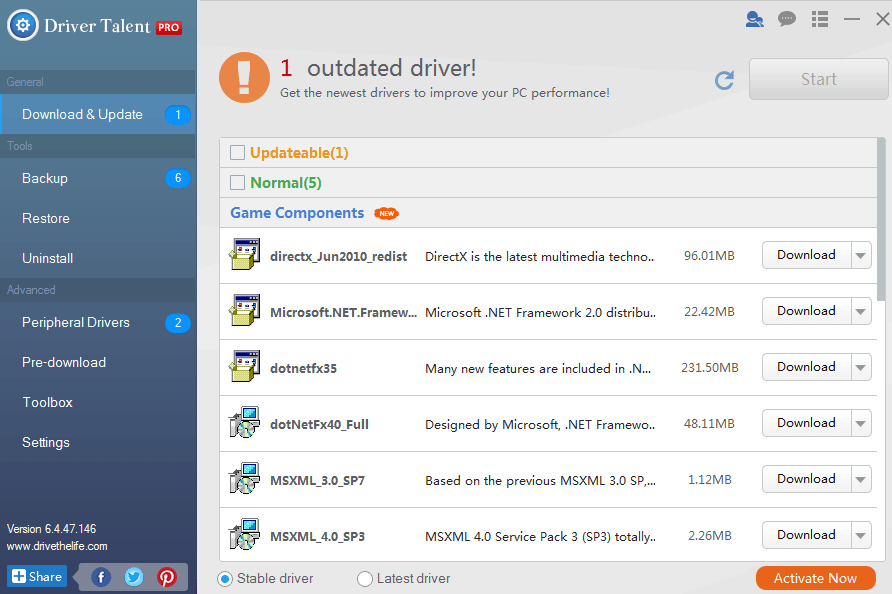
Step 3. After all is done, restart the computer.
Part 4. The Most Common Apple MacBook Drivers for Windows 10
Here are the most common Apple MacBook Drivers for Windows 10 you may search. Driver Talent can download and install all the drivers.
|
MacBook Pro Retina drivers for Windows 10 |
MacBook Pro drivers for Windows 10 |
MacBook Retina drivers for Windows 10 |
|
MacBook Air drivers for Windows 10 |
Windows 10 drivers for MacBook Pro Retina 2015 |
Windows 10 drivers for MacBook Pro Retina 2014 |
|
Windows 10 drivers for MacBook Pro Retina 2013 |
Windows 10 drivers for MacBook Pro Retina 2012 |
Windows 10 drivers for MacBook Pro 2012 |
|
Windows 10 drivers for MacBook Retina 2015 |
Windows 10 drivers for MacBook Air 2015 |
Windows 10 drivers for MacBook Air 2014 |
|
Windows 10 drivers for MacBook Air 2013 |
Windows 10 drivers for MacBook Air 2012 |
Windows 10 sound drivers for MacBook |
|
Windows 10 printer drivers for MacBook |
Windows 10 Nvidia drivers for MacBook |
Windows 10 Intel drivers for MacBook |
|
Windows 10 Cannon drivers for MacBook |
Windows 10 HP drivers for MacBook |
Windows 10 game drivers for MacBook |
|
Windows 10 ntfs drivers for MacBook |
Windows 10 Asio drivers for MacBook |
Windows 10 Bootcamp drivers for MacBook |
|
Windows 10 laptop drivers for MacBook |
Windows 10 desktop drivers for MacBook |
Logitech MacBook drivers for Windows 10 |
|
MacBook keyboard driver for Windows 10 |
MacBook mouse driver for Windows 10 |
MacBook graphics driver for Windows 10 |
|
MacBook audio/sound driver for Windows 10 |
MacBook trackpad driver for Windows 10 |
MacBook touchpad driver for Windows 10 |
|
MacBook network driver for Windows 10 |
MacBook Wi-Fi driver for Windows 10 |
MacBook Bluetooth driver for Windows 10 |
|
MacBook Xbox 360 controller drivers for Windows 10 |
Cannon mp560 MacBook driver Windows 10 |
And more |
For more Mac drivers on Windows OS, go to the post: Mac drivers download on Windows 10/8/7/XP/Vista.
Recommended Download

|
ExplorerMax |

|
Driver Talent for Network Card | |
| Smart and advanced file explorer tool for Windows platforms | Download & Install Network Drivers without Internet Connection | |||
|
30-day Free Trial |
Free Download |
From this page you can easily download the latest setup of Bootcamp driver. Basically, Bootcamp driver is a program that enables Macs to run Windows on a Windows OS. You can use the BootCamp software to partition your hard drive and install Windows support software. To install BootCamp driver on Mac, you must have a Mac with Windows installed. Then, you can boot into Windows.
Installing Windows on a Mac
Bootcamp driver allows you to install Windows on your Mac. Bootcamp is a Windows installer software that you can install from a USB memory stick. Once the Windows installation program is on the memory stick, the Mac will reboot. Pressing Alt will allow you to switch back and forth between Windows and macOS.
The Windows installer will ask you to select a partition size and set minimum storage requirements. Make sure to choose a size that is adequate for your needs. If you need to make changes, you can do so later. The Windows installer will then start, and will ask you to select the Boot Camp partition. Once it’s ready, you can follow the onscreen instructions.
==> Download Bootcamp Driver <==
If you’re looking for a way to run Windows without affecting the Mac’s native operating system, you can use a virtual machine. This method is faster than using the traditional Mac boot camp driver, and it allows you to run two operating systems at once. However, you’ll need to make sure you have enough RAM to run both operating systems.
Boot Camp Assistant
If you want to run Windows on your Mac, you can download and install the Boot Camp Assistant. This tool is found in the Utilities folder inside your Applications folder. It will detect your Mac’s current firmware version and download any necessary support software for your Mac.
It will also check the status of your Mac’s power adapter and download the latest Windows drivers and support software. You can then use the disk created by Boot Camp Assistant to install Windows on your Mac. Alternatively, you can also use a USB flash drive or an ISO image downloaded from Apple.
Boot Camp Assistant is not available on all Macs. It is not compatible with M1 or M2 Macs. If you’re on an M1 or M2 Mac, you’ll need to use virtualization software, such as Parallels Desktop. However, note that Parallels Desktop only works with ARM-based Windows, so you’ll need to make sure to install the latest version before installing Boot Camp Assistant.
Partitioning your Mac’s hard drive
Partitioning your Mac’s hard drive is a process that requires you to erase all data from the active drive. Fortunately, it’s not a difficult task. With the help of the Boot Camp Assistant, the process of partitioning your Mac’s hard drive is easy. Once you’ve selected a partition size, you’ll see a list of hard drives connected to your Mac. Select the drive you’d like to partition.
Partitioning your Mac’s hard drive allows you to run different operating systems, including Windows. It divides the hard drive into two separate partitions: one for Mac OS X, the other for Windows. The Windows partition is 32 GB. Make sure you have enough free space on your hard drive to accommodate the partition.
Then, you can click on the «+» icon to create a new partition. Choose the partition size that matches your needs and give it a name. When you are finished, make sure to lock the new partition. Your new partition will appear on your main drive. You can also change the size of the partition later if you need to.
Installing Windows support software
The first step in installing Windows support software with Bootcamp driver is to connect your Mac to an internet connection. Once connected, disable FileVault on your Mac in Security & Privacy or System Preferences. Then, disconnect any USB flash drives that are not necessary and reconnect it to Windows. If the process fails, try again later.
The Windows support software can be downloaded from Apple’s support website. This software is installed on the selected device. It may ask you to enter the administrator password. The software will also change the permissions on your USB flash drive. Once it’s done, you can close Boot Camp Assistant.
You should also make sure that your Mac’s USB drive is formatted as MS-DOS (FAT). To install this software, you will need to connect a 16GB USB flash drive. Make sure that the drive is formatted as MS-DOS so that it will work with Windows. Open the Disk Utility application located in the Applications folder. Choose «Windows Support Software» from the Action menu. Click on «OK» when prompted.