
On this page, we have managed to share the official USB driver of the Tecno Pova 2 Device. If you were already searching for the USB driver of the device, then this page will help you out.
There are 2 USB drivers available for the device, i.e., Mediatek Driver and ADB Driver. The Mediatek Driver is compatible with all the Mediatek Flash Tool, and the ADB Driver can be useful for establishing a connection between the mobile and the computer.
Tecno Pova 2 Mediatek Driver
The Mediatek Driver is compatible with the SP Flash Tool, MTK Flash Tool, SP MDT Tool, and the SN Write Tool and can be helpful if you are trying to install firmware (ROM) on the device.
Driver Name: Mediatek Driver
Package Name: Mediatek_Driver_Auto_Installer_v1.1352.zip
Driver Size: 10 MB
How to Install: Follow Guidelines
Get Driver
Tecno Pova 2 ADB Driver
You can use the ADB Driver to connect the mobile (powered by android) to the computer and transfer data between the mobile and the computer.
Driver Name: Android ADB Driver
Package Name: usb_driver_r13-windows.zip
Driver Size: 8.27 MB
How to Install: Follow Guidelines
Get Driver
How to Install any USB Driver Manually
- Download and extract the USB driver on the computer.
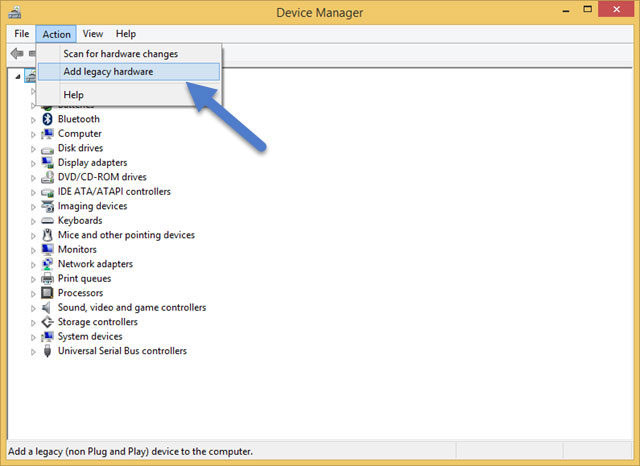
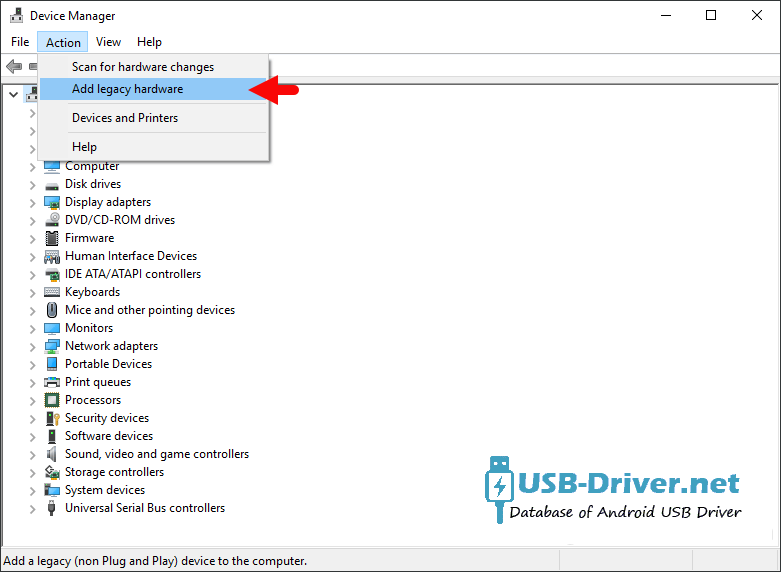
- Open Device Manager (devmgmt.msc) and Click on the Computer Name > Action Menu > Add Legacy Hardware.
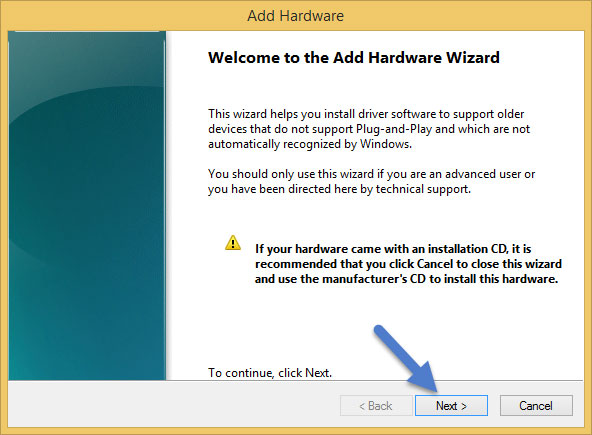
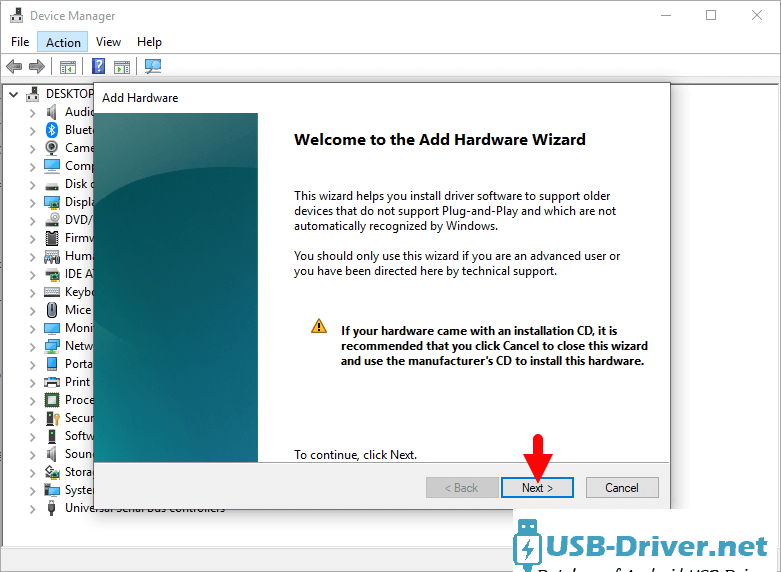
- Click on the Next button.
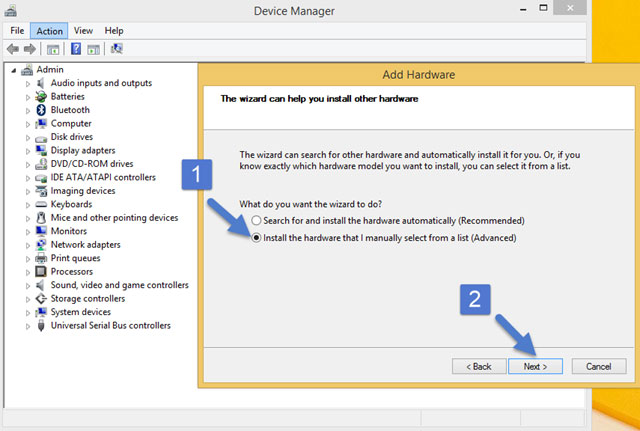
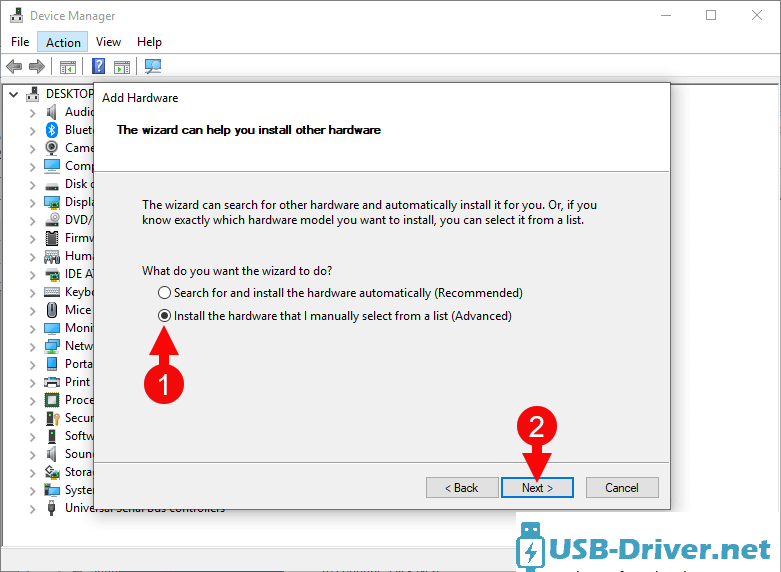
- Select the Install the hardware that I manually Select from a list checkbox and Click on the Next button.
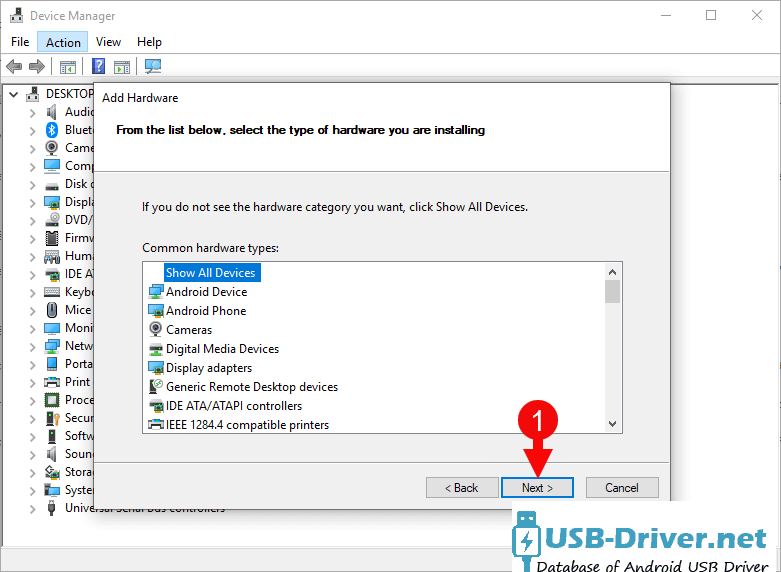
- Again, Click on the Next button.
- Click on the Have Disk > Browse > Locate the .inf file (found in the extracted driver folder) and Click on Open Button.
- Click on the Finish button to complete the installation.
Follow Complete Guidelines
Readme Once:
[*] Driver Signature Error: If you are facing Driver Signature Error while installing the USB Driver, then head over to How to Fix Driver Signature Error page.
[*] Driver Easy: We recommend you to use Driver Easy application to update all the computer drivers in a Single Click.
[*] Stock Firmware: If you are looking for the Tecno Pova 2 Stock Firmware, then head over to the Tecno Firmware page.
Home » Tecno Pova 2 USB Driver
If you are an owner of Tecno Pova 2 and looking out for usb drivers to connect your Android device with the Windows computer, then you have landed in the right place. Download Tecno Pova 2 USB driver from here, install it in your computer and connect your device with a PC or Laptop successfully.
Here, we have provided two usb drivers for your Tecno Pova 2 Android device.
USB Driver Type: Mediatek Driver
USB Driver Purpose: For flashing Stock firmware on your device
File Size: 10 MB
Download Now
USB Driver Type: ADB Driver
USB Driver Purpose: For connecting your device to a computer
File Size: 8.3 MB
Download Now
Steps To Install Tecno Pova 2 Mediatek Driver In Computer
Video Tutorial
If you don’t like this video tutorial or if you would like to get more instructions, then continue reading.
Step 1: To get started, download MediaTek driver and extract it on your desktop.

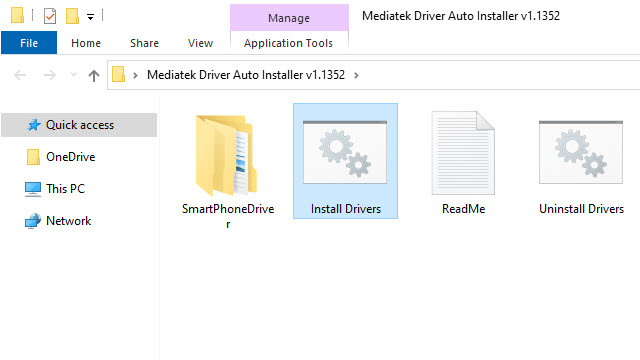
Step 2: Now, open the driver folder and click «Install Drivers» to initiate the installation process.
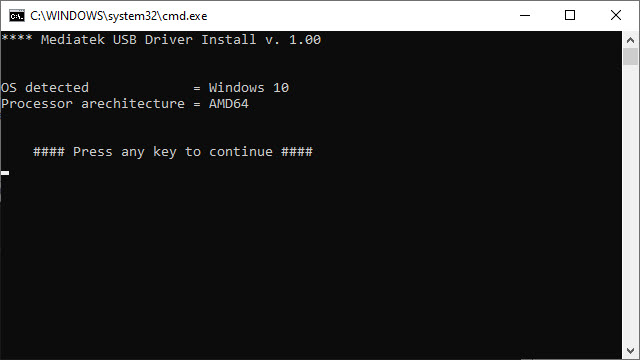
Step 3: In the Setup Command Prompt Window, press any key from the keyboard to start the installation process.
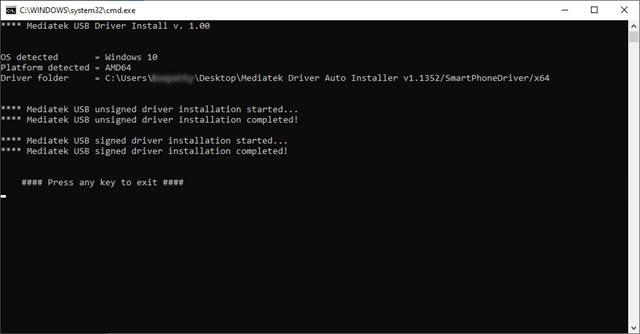
Step 4: You will see the Driver Installation Completed message, after successful installation of the MediaTek Driver on your Windows computer.
Step 5: Now, press any key from the keyboard to exit the Setup Window.
Step 6: To finish, restart your computer.
That’s it. You have successfully installed the MediaTek Driver on your Windows computer.
Steps To Install Tecno Pova 2 ADB Driver In Computer
Video Tutorial
If you don’t like this video tutorial or if you would like to get more instructions, then continue reading.
Step 1: To get started, download ADB driver and extract it on your desktop.

Step 2: Now, open Device Manager > Action > Add legacy hardware.
Step 3: Next, click «Next» in the Add legacy hardware wizard.
Step 4: Now choose «Install the hardware that I manually select from the list (Advanced)» and click «Next«.
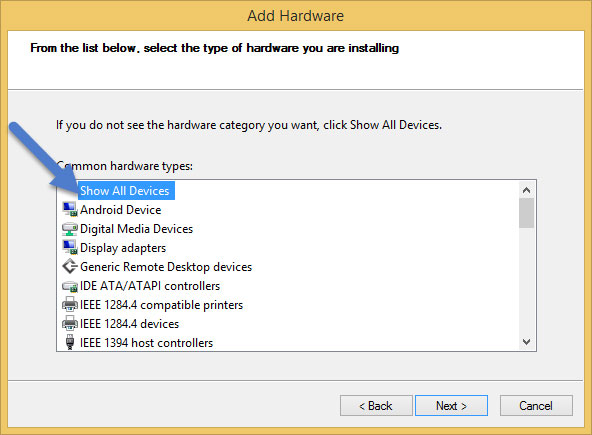
Step 5: Once done, choose «Show all devices«, click «Next» and select the extracted file manually from your computer.
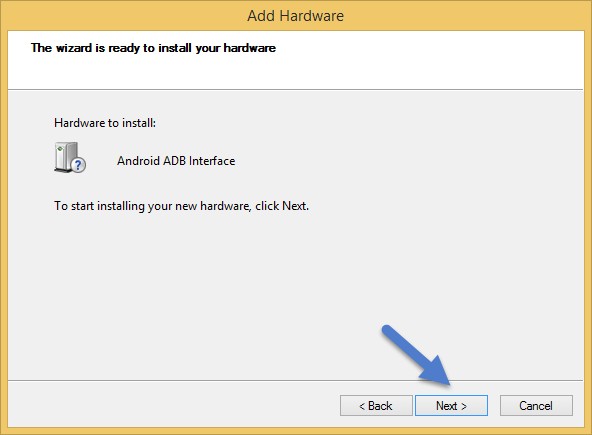
Step 6: Now to start installing your new hardware, click «Next» again.
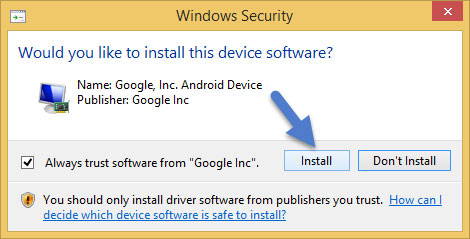
Step 7: Click «Install» in the Windows security prompt window.
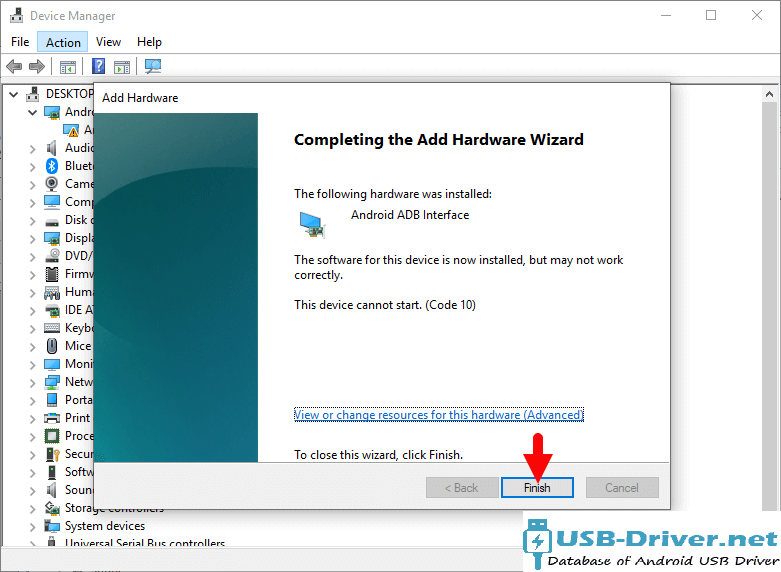
Step 8: Next, click «Finish» to complete installation.

That’s it. Now you have successfully finished installing ADB driver on your computer. If you encounter any issues while following this tutorial, do let me know via comments.

Boopathy Sundaramoorthy is a tech and Android enthusiast working for AllUSBDrivers.com from 2018. He loves helping Android users to find the right USB drivers for their devices so that they can connect their smartphone or tablet to a computer.
Reader Interactions
Do you own Tecno Pova 2? If yes, then this article is for you. Here, you will find all the required drivers for your smartphone. In addition, you will also find the pc suite software.
Tecno Pova 2 operates on Android 11 including HIOS 7.6 powered by an Octa-Core processor. Moreover, It is equipped with 6.9 inches IPS LCD touchscreen display.

Drivers are very important and need to be installed before connecting your smartphone to a computer. Or, if you want to flash the firmware file and executing the ADB & fastboot commands on your device.
All these aforementioned operations require specific drivers for a particular smartphone model. All these drivers along with official PC suite software is available in this post.
- Download (ADB) Drivers for Connecting purposes.
- Download (CDC) Drivers for flashing firmware.
- Download (VCOM) Drivers for flashing firmware.
- Download (SPD Drivers) for flashing firmware.
- Download Qualcomm USB Drivers for flashing firmware.
- Download MTP Drivers for Tecno Pova 2.
- Download MediaTek Drivers for Tecno Pova 2.
- Download ADB & Fastboot Setup For Tecno Pova 2.
- Download PC Suite software For Tecno Pova 2.
Instructions To Install Drivers
- Simply, download all the drivers on your computer.
- Once, you are done with downloading, now extract the zip files and then run the installation process.
- Moreover, In case of exe files, simply run the file and start the installation process.
How To Install Tecno Pova 2 USB Drivers on Computer
Step 1: First of all, download the ADB drivers for your Tecno Pova 2.
Step 2: After that, extract the zip file and go to the device manager.
Step 3: Now, select your PC or computer in device manager.
Step 4: After that, click on the “Action” tab and then click on “Add Legacy Hardware”.
Step 5: Now, proceed with “Next” until you see the below interface.
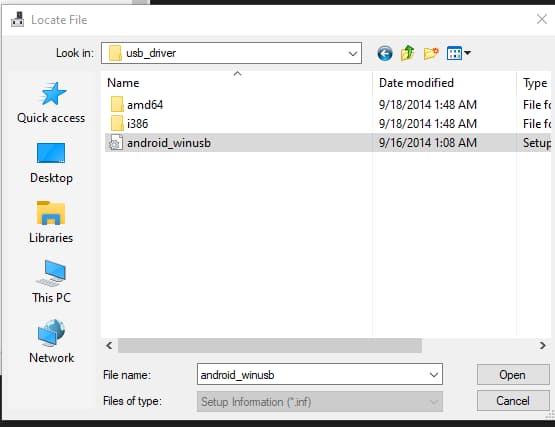
Step 6: Click on “Next” and you will see the interface like below. This time click on the “browse” button and go to the extracted ADB folder that you have downloaded before and then select the android_winusb file.
Step 7: Once, you have selected the file, then follow the on-screen instruction and proceed to install the ADB drivers on your computer.
That’s it, you have successfully installed the Tecno Pova 2 ADB drivers on your computer.
Importance of Installing The Drivers
- Drivers provide a software interface to the hardware components.
- For connectivity purposes, you must install the ADB drivers on your computer.
- Similarly, for flashing the firmware, you must install the SPD, VCOM, CDC, Qualcomm drivers according to your smartphone chipset.
- There are different drivers for different purposes, It is recommended to download and install all the drivers provided above on your computer.
- PC suite software or other third-party software also requires drivers.
Supported on All Version of Windows OS
| Windows 11 x32 bit/ x64 bit | Supported |
| Windows 10 x32 bit/ x64 bit | Supported |
| Windows 8.1 x32 bit/ x64 bit | Supported |
| Windows 8 x32 bit/ x64 bit | Supported |
| Windows 7 x32 bit/ x64 bit | Supported |
| Windows Vista x32 bit/ x64 bit | Supported |
| Windows XP x32 bit/ x64 bit | Supported |
Tecno Pova 2 Specifications
Display:
The phone is equipped with 6.9 inches IPS LCD touchscreen, providing the resolution of 1080 x 2460 pixels
Software Version:
It operates on Android 11 including HIOS 7.6 powered by an Octa-Core processor
Storage:
The internal memory of the phone includes 64GB with 4GB RAM, or 128GB with 6GB RAM and also support micro-SD card
Camera:
The camera features Quad 48MP + 2MP + 2MP + 2MP primary lens with Quad-LED flash including other features. In addition, 8MP secondary lens with Dual-LED flash for selfies is available at front
Battery:
It is powered by Li-Po 7000 mAh battery
Color:
Officially available in Polar Silver, Power Blue, and Dazzle Black colors
Price:
Price of Tecno Pova 2 in India starts from 10,999 INR.

I am an experienced Software Engineer and freelance app developer. Here at USBDriversPie, I help you find latest USB drivers for your smartphone and tablet.
Tecno Pova 2 phone not connecting to PC only charging? Computer having trouble detecting the Tecno Pova 2 Android phone? It may be caused by the missing Tecno Pova 2 USB Driver or corrupted drivers. To fix Tecno Pova 2 phone not showing up on PC, download Tecno Pova 2 USB Drivers and install them on your computer.
Tecno USB Drivers are essential to seamlessly connect Tecno Pova 2 to a Computer or Laptop over USB. Without the Tecno Pova 2 drivers, the connection will not work, and your computer will have a hard time detecting your phone. On this page, you can download official Tecno Pova 2 USB Drivers for Windows 11, Windows 10, Windows 7, Windows 8.1, and Windows 8, along with Tecno Pova 2 ADB interface drivers and Fastboot drivers.
The Tecno Pova 2 Android USB Drivers allows you to establish a secure and reliable connection between your phone and the computer over the USB connection. It will enable you to connect your phone as an MTP USB device (Media Transfer Protocol) and transfer files and data like images, videos, and documents between your phone and the computer.
The Tecno Pova 2 ADB Driver and Fastboot Driver allows you to pass ADB commands and Fastboot commands right from your computer and perform certain operations on your phone.
The Tecno Mobile Drivers provided here allow you to flash stock firmware, stock recovery, TWRP recovery, CWM recovery, Unlock Bootloader, etc. It also allows you to transfer media, documents, and other files to and from your phone to your computer.
Tecno Pova 2 CDC Driver for Flashing Firmware
Download Now
How to install: Follow Tutorial
Tecno Pova 2 VCOM Driver for Flashing Firmware
Download Now
How to install: Follow Tutorial
Tecno Pova 2 USB Driver for normal connecting to PC
Download Now
How to install: Follow Tutorial
The Tecno Pova 2 Fastboot and ADB drivers can be downloaded below.
Tecno Pova 2 ADB and Fastboot Drivers
Download Now
How to install: Follow Tutorial
[!] Note: If you face Driver Signature Error while installing the USB Driver, then watch this video to fix the problem.
Also Download: Tecno T701 USB Drivers
How to Install Tecno Pova 2 CDC Drivers
- Download and extract the android-cdc-driver.zip file on your computer.

- Open Device Manager on your computer by right-clicking the Windows Start Button and selecting Device Manager.

- Once the Device Manager loads, click on your Computer name.

- Now click on Action and then on Add legacy hardware.

- Now Add Hardware Wizard window should open. Click Next to continue.

- Now select Install the hardware that I manually select from a list (Advanced) option and click on Next.
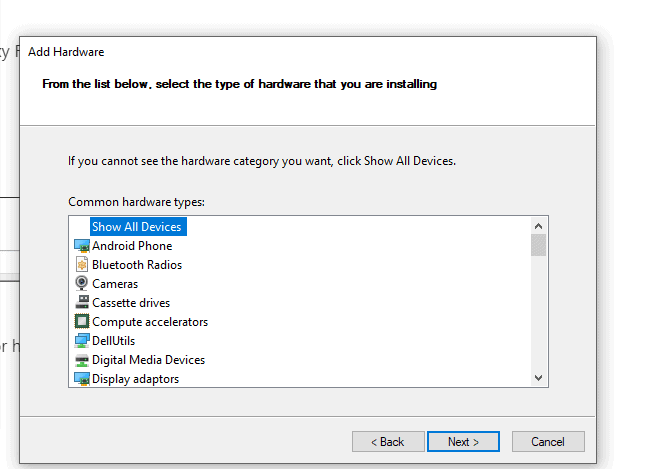
- In the next screen, select Show All Devices from the list and click on Next.
- Now click on Have Disk… to launch Install From Disk window.
- Click on Browse… and navigate to the folder where you have extracted the Android CDC drivers in Step #1.

- Now select Android_Gadget_CDC_driver.inf file and click on Open and then on OK.

- Select Android Gadget VCOM Driver from the list and click on Next.
- Confirm the Hardware driver to install and click on Next to begin the installation process.
- Once installed, click on Finish.
- Follow Steps #3 to #13 again and install the Gadget Serial, MediaTek PreLoader USB VCOM (Android), and MediaTek USB Port drivers.
- Once all the listed drivers are installed, reboot your computer.


How to Install Tecno Pova 2 VCOM Drivers
- Download and extract the latest Android VCOM Driver (android-vcom-driver.zip) file to Desktop on your computer.

- Now open the Device Manager on your computer by right-clicking Windows Start Button and selecting Device Manager.
- Now click on your Computer name in the Device Manager window.
- Now click on Action and then click on Add legacy hardware.
- Now Add Hardware Wizard window should open. Click on Next to continue.
- Select Install the hardware that I manually select from a list (Advanced) option and click on Next.
- Select Show All Devices from the list and click on Next.
- In the next screen, click on Have Disk… to open the Install From Disk window.
- In the Install From Disk window, click on Browse… and navigate to the folder where you have extracted the drivers in Step #1.
- Now open Win 7 folder and select usb2ser_Win764.inf driver file if you have the 64-bit version of Windows, otherwise choose usb2ser_Win7.inf file if you have the 32-bit version of Windows. When selected, click on Open and then on OK.
- Now select the MediaTek DA USB VCOM Port from the list and click on Next.
- Confirm the Hardware driver to install and click on Next to begin the installation process.
- Once installed, click on Finish.
- Follow Steps #3 to #13 again and install the MediaTek PreLoader USB VCOM Port, MTK USB Debug Port, MTK USB Modem Port, and MTK USB Port drivers.
- Once all the listed drivers are installed, restart your computer.


How to Install Tecno Pova 2 USB Drivers Manually
- Download the latest_usb_driver_windows.zip file on your computer and extract it on Desktop.

- Open the Device Manager on your computer by searching device manager from Windows Start Menu.

- Now click on your Computer name in the Device Manager window.
- Now click on Action and then select Add legacy hardware.
- Add Hardware Wizard window should open, click on Next to continue.
- Now select Install the hardware that I manually select from a list (Advanced) option and click on Next.
- Select Show All Devices from the list and click on Next.
- On the next screen, click on Have Disk… to open the Install From Disk window.
- Click on Browse… and navigate to the folder where you have extracted the drivers in Step #1.
- Now select android_winusb.inf file and click on Open and then on OK.
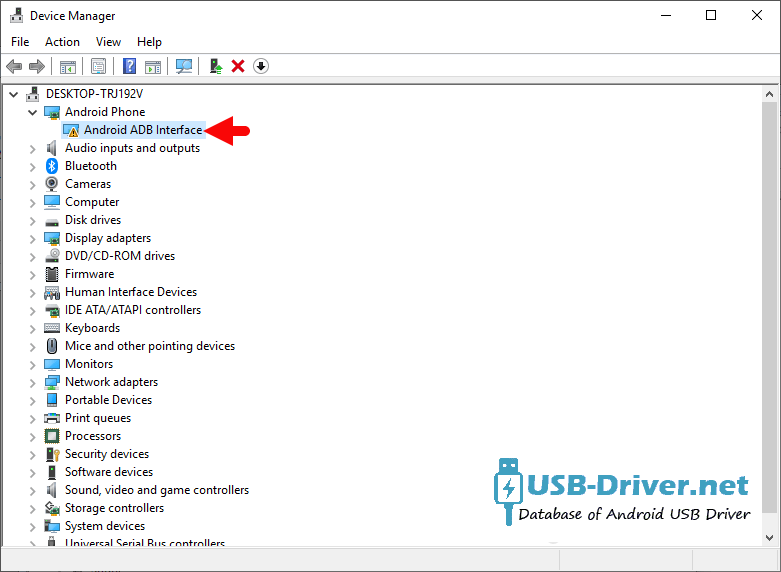
- Select the Android ADB Interface driver from the list and click on Next.
- Confirm the Hardware driver to install and click on Next to begin the installation process.
- Once installed, click on Finish.
- Follow Steps #3 to #13 again and install the Android Bootloader Interface driver and Android Composite ADB Interface driver.
- Once all the listed drivers are installed, restart your computer.


Video Tutorial: How to Install Tecno Pova 2 Android USB Drivers
Subscribe to Android USB Drivers
How to Install Tecno Pova 2 ADB and Fastboot Drivers
- Download and extract 15 seconds ADB installer on your computer.
- Now right click on the adb driver installer setup file (adb-setup.exe) and click on Run as administrator.

- Now a command prompt window with a blue background and white text should open.

- It should ask whether you want to install ADB and Fastboot? Press the Y key on your keyboard and hit Enter.
- Now, it should ask whether you want to install ADB system-wide? Again press the Y key and hit Enter.
- Now, the ADB driver and Fastboot driver installation process should begin.
- When finished, it should ask whether you want to install device drivers? Press the Y key and hit Enter.
- Now the «Device Driver Installation Wizard» window should open.
- Click on Next to continue installing the Google USB Drivers (WinUSB).

- Once installed, click on Finish and reboot your computer.


Video Tutorial: How to Install Tecno Pova 2 ADB and Fastboot Drivers
Subscribe to Android USB Drivers
Important Notes:
[*] Driver Signature Error: If you got Driver Signature Error While installing the Driver then See this Video to fix this problem.
[*] Broken link: Report here.
[*] Have we missed any device model? Let us know by contacting us via Contact Us page.
Reader Interactions
Tecno Pova 2 USB Driver for Windows Computer
Tecno Pova 2 USB Driver helps you to connect your Tecno Device to the Windows Computer and transfer data between the device and the computer. It also allows you to Flash Tecno Pova 2 Stock Firmware on your Tecno Device using the preloader drivers. Here on this page, we have managed to share the official Tecno Pova 2 USB Driver.
It is very necessary to have Tecno Pova 2 USB drivers whenever you have to connect Tecno Pova 2 to the Pc for the purpose of transferring data or important files. Also, when it comes to updating your Tecno Pova 2 manually, it’s necessary to have them on your PC. While you are installing or flashing Fastboot firmware on the device, then Tecno USB Drivers are required. Check out the download links given in this post to simply keep up the pace in this matter.

Tecno Pova 2 Mediatek Driver for Windows (11,10,8,7,XP)
Driver Package Name : Mediatek Driver for windows
Package File Name: Mediatek_Driver_Auto_Installer_v1.1352_(USB-Driver.NET).zip
Driver File Size: 10 MB
Download Driver File Now
How to install Tecno Pova 2 Mediatek Driver official on Windows
Tecno Pova 2 Mediatek Driver is compatible with the SP Flash Tool, MTK Flash Tool, SP MDT Tool, and the SN Write Tool and can be useful if you are trying to install firmware (ROM) on the Tecno Pova 2.
Step 1 : Download and extract Tecno Pova 2 Mediatek Driver Auto Installer package on the Computer. If in case, you have already downloaded and extracted the driver package, then SKIP this step.

Step 2 : Once you have extracted the driver package, you will be able to see the following files:
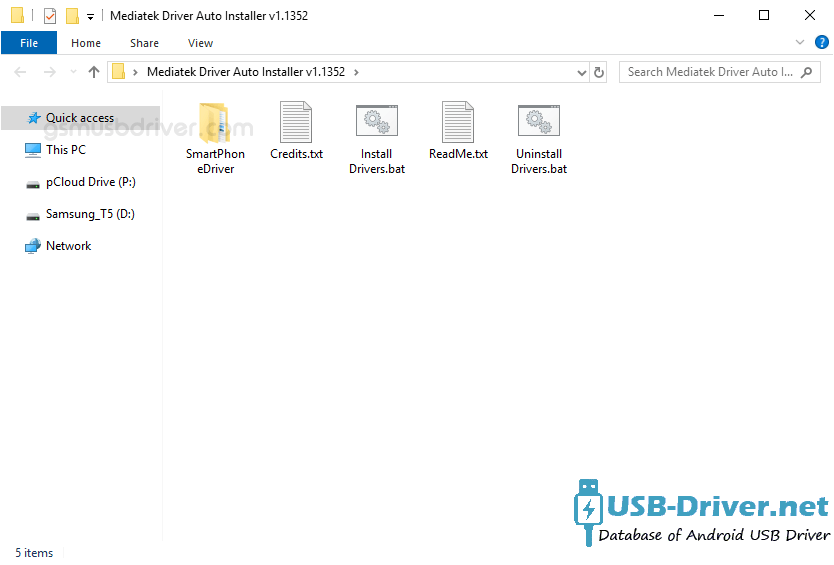
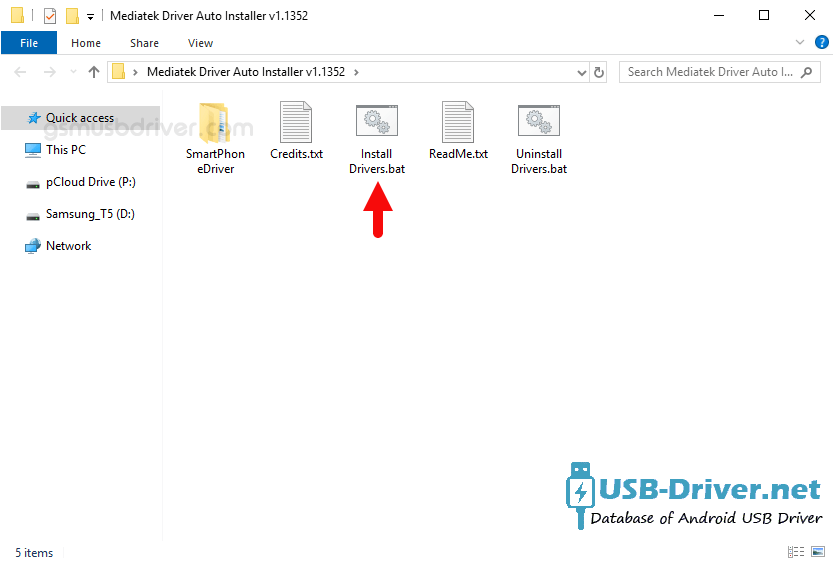
Step 3 : Open Install Drivers.bat to Launch the Setup Dialog Box:
Step 4 : Once the Driver Setup Dialog Box is Launched, you will be able to see the following window:
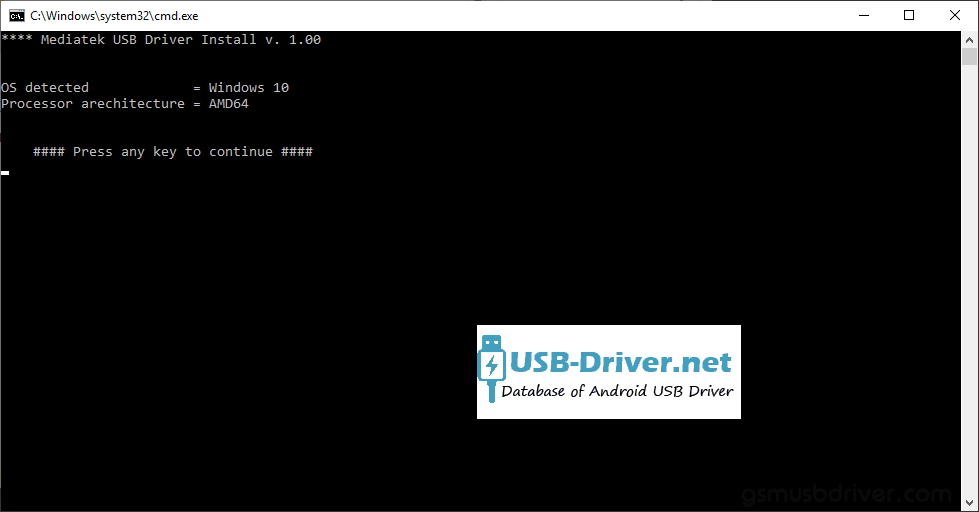
Step 5 : Now, Press any Key (from keyboard) to begin the installation process.
Step 6 : Once the installation process is completed, you will be able to see the Driver installation Completed Message:
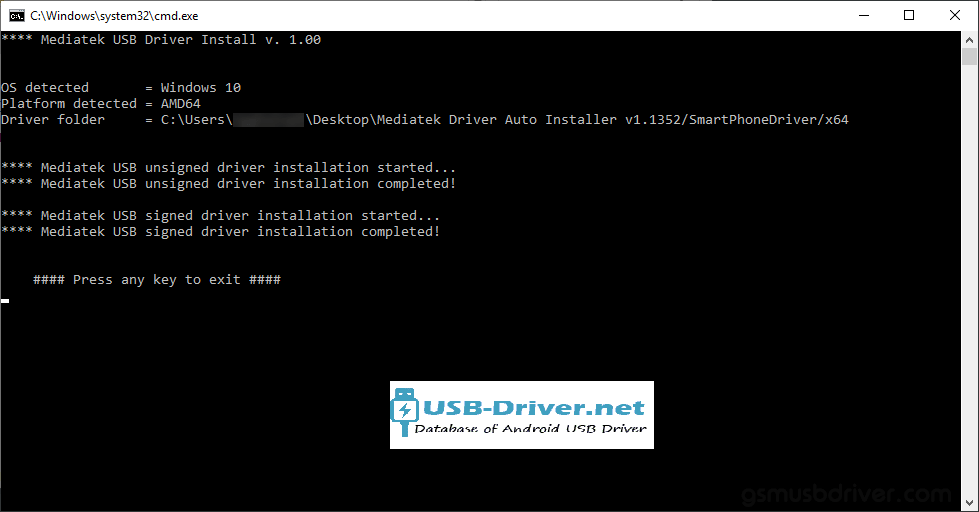
Step 7 : Now, Press any Key (from keyboard) to exit the Setup Window.
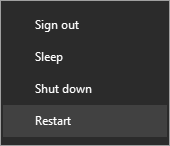
Step 8 : Restart your Computer:
Step 9 : Once the Computer is restarted, you can easily connect your Tecno Pova 2 MediaTek the computer without facing any issue.
Tecno Pova 2 ADB Driver for Windows (11,10,8,7,XP)
Driver Package Name : Android ADB Driver for windows
Package File Name: usb_driver_r13-windows_(USB-Driver.NET).zip
Driver File Size: 8.27 MB
Download Driver File Now
[•] Download Stock Firmware: If you are looking for the Tecno Pova 2 Stock Firmware, then head over to the Tecno Firmware page.
How4 to install Tecno Pova 2 USB drivers
The Tecno Pova 2 USB driver makes almost every task that needs to be performed by connecting the device to PC easier. All the files can be transferred in no time without worrying about anything. Also, there are certain benefits to having it. Before you proceed to download, it is suggested to you to remove the previously installed Tecno Pova 2 from your PC in case you have installed it. Once you are done, click the below link to download Tecno USB Drivers on your PC.
How to install Tecno Pova 2 ADB Driver on Windows
Tecno ADB Driver can be used to connect the Tecno to the computer and transfer data between the mobile and the computer.
Step 1 : Download and extract Tecno Pova 2 ADB Driver (.inf based) (The link is above) on the Computer. If in case, you have already downloaded and extracted the driver, then SKIP this step.
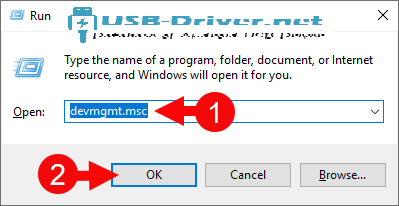
Step 2 : Open Device Manager on the Computer. Press Win + R key from the keyboard and type devmgmt.msc and Click on OK Button:
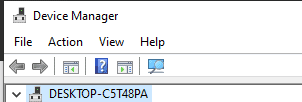
Step 3 : Once the Device Manager is Launched, Click on the Computer Name (name can vary from the image below):

Step 4 : Click on the Action Menu and Select Add Legacy Hardware option:
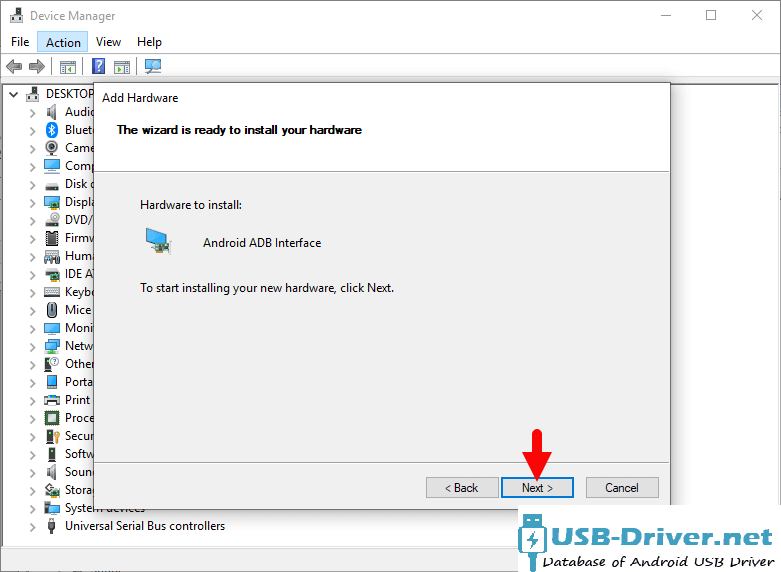
Step 5 : Under Add hardware Dialog Box, Click on the Next Button:
Step 6 : Tick on the Install the hardware that I manually select from a list checkbox and Click on the Next Button:
Step 7 : Click on the Next Button:
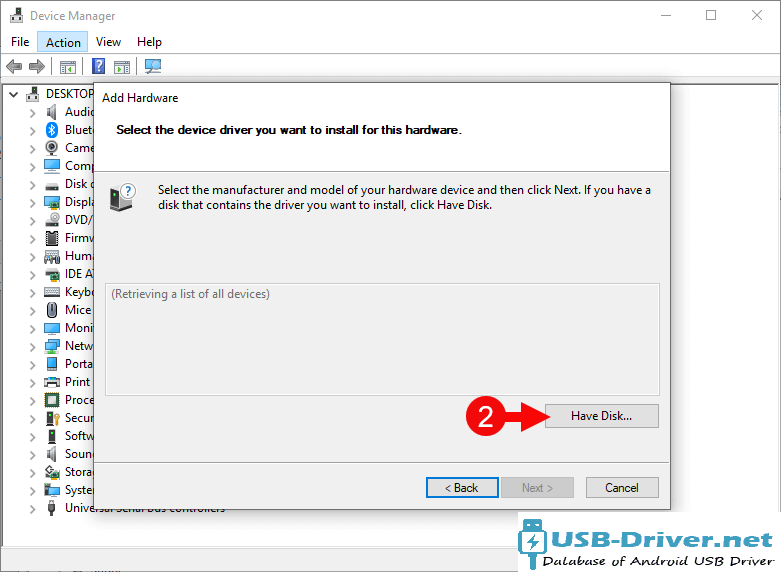
Step 8 : Then Click on the Have Disk Button:
Step 9 : Click on the Browse Button:
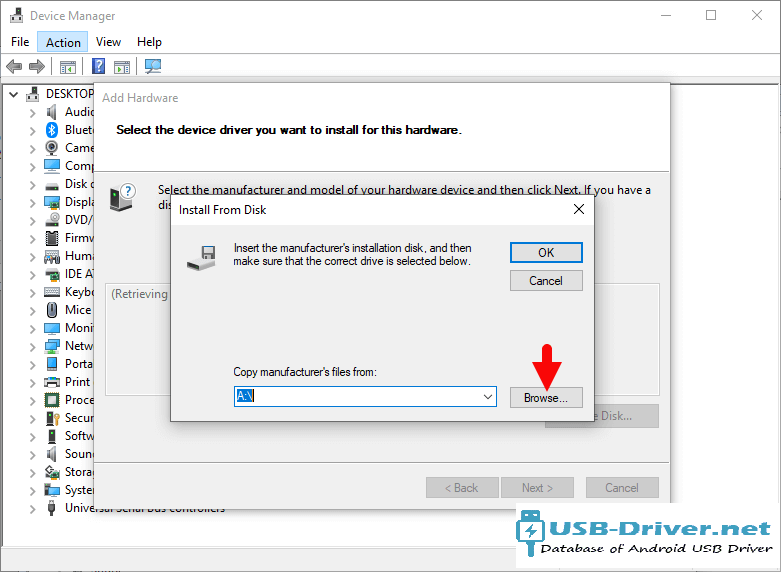
Step 10 : Locate the .inf file from the computer (this file can be found in the extracted driver folder).
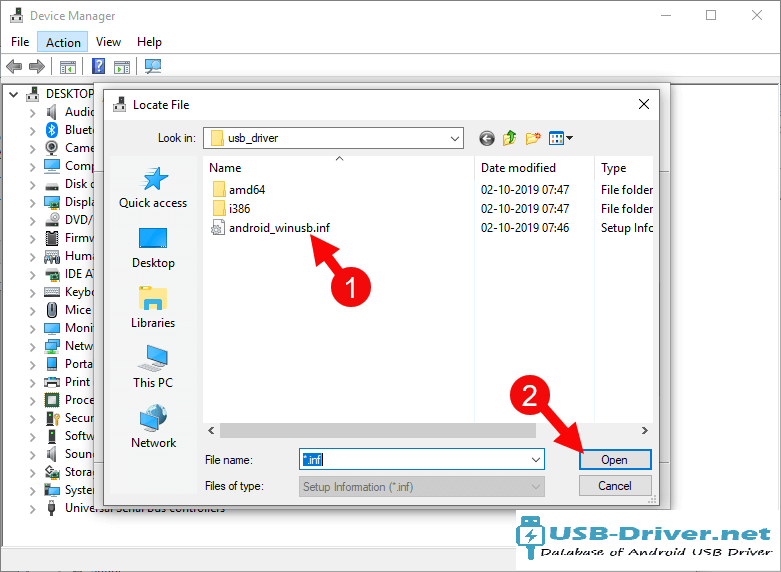
Step 11 : Click on the OK Button:
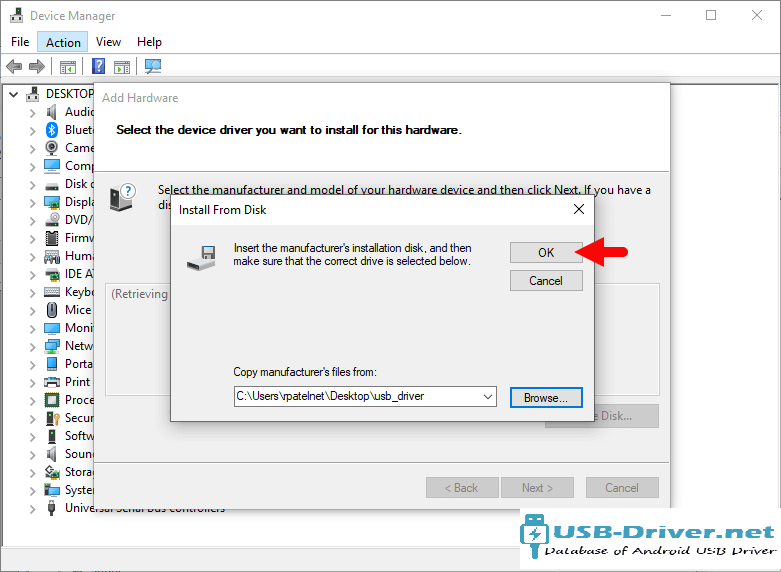
Step 12 : Click on the Next button:
Step 13 : Again Click on the Next button:
Step 14 : Click on the Finish button to complete the installation process (ignore Code 10; it will be gone post restarting the computer).
Step 15 : Your Tecno Pova 2 driver is listed in the Device Manager.
Step 16 : Now, Restart the Computer. Once the computer is restarted, you can easily connect your Tecno Pova 2 device to the computer.
[•] Driver Signature Error: If you got Driver Signature Error While installing the Tecno Pova 2 Driver then See this Video to fix this problem.
[•] Request Tecno Driver: If you are looking for any specific Tecno drivers that is not listed above, then you can request it through the comment box below (do not request driver from the contact page, or else it will be ignored).