The Nvidia ION chipset was used in affordable Intel Atom based Nettop PC’s released in 2009 onwards. Although not very powerful compared to PC’s of the time Nvidia ION based Nettop PC’s such as the Acer Revo R3600 series and the AsRock ION 330 where very popular for playing HD video. Using XBMC 720p and 1080p HD video decoding could be offloaded from the Intel Atom processor to the Nvidia ION GPU, allowing 1080p High Definition video to played back with ease on a very low powered device.
If you want to install a more modern version of Windows on an Intel Atom / Nvidia ION based desktop that is perfectly possible. Windows 8 works perfectly, as does the Windows 10 preview. Windows Update contains all the drives you require to get the system running with the exception of the Nvidia ION Coprocessor Driver.
Thankfully though the Windows 7 Nvidia ION Coprocessor Driver still works perfectly on Windows 8 and 10, and can be installed without installing any other older drivers.
Download Nvidia ION Coprocessor Driver For Windows 8 and 10 32bit
Download Nvidia ION Coprocessor Driver For Windows 8 and 10 64bit
The download links above are simply the System Management Controller drivers extracted from the 15.51 ION chipset drivers released on the 01.10.2009
Nvidia ION Coprocessor Driver For Windows 8 / 10 Install:
To install the Nvidia ION Coprocessor Driver For Windows 8 / 10 simply extract either the 32bit or 64bit driver linked to above depending on the edition of Windows you have installed.
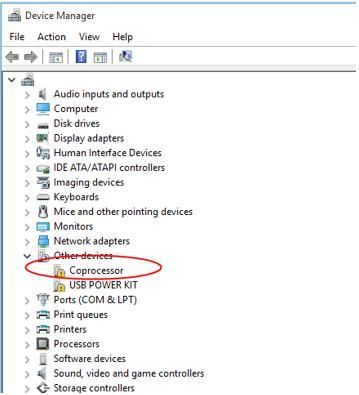
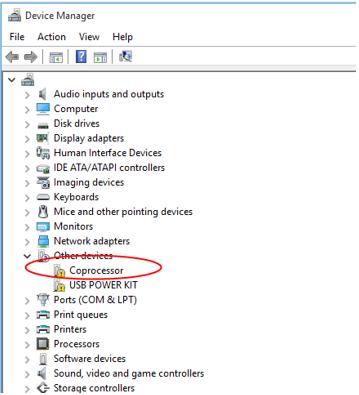
Next you want to open device manager (Right click on Computer, select properties then click Device Manager), under Other Devices you will see Coprocessor. Right click on Coprocessor then select update driver:

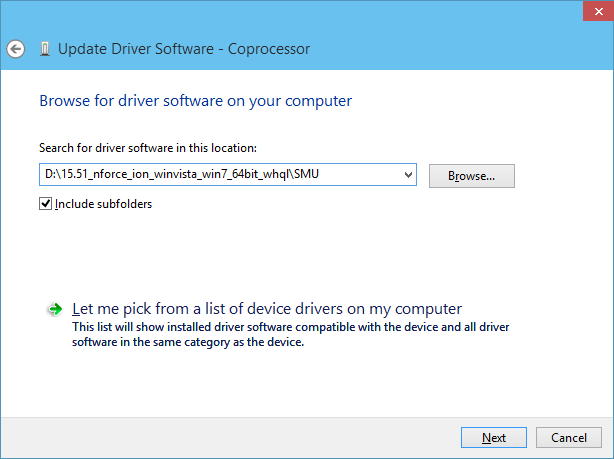
You will be asked where the Nvidia ION Coprocessor driver is located, simply browse for the location you unzipped the driver to, then select next:
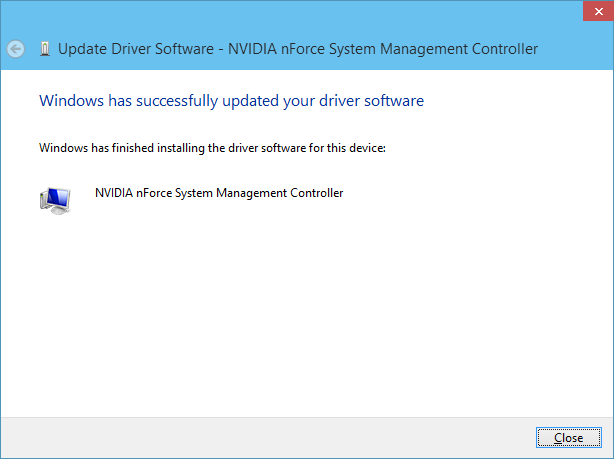
You should then see Windows will successfully install the Nvidia System Managment Controller driver:
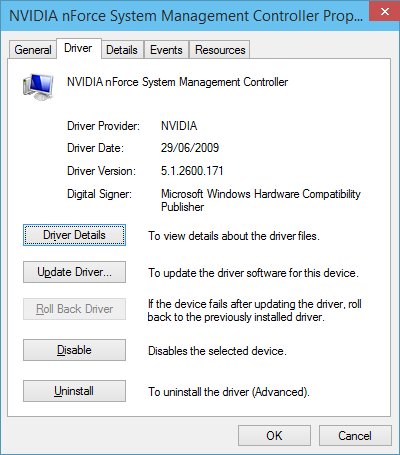
That’s basically it, the Coprocessor driver has been installed and is working fine:
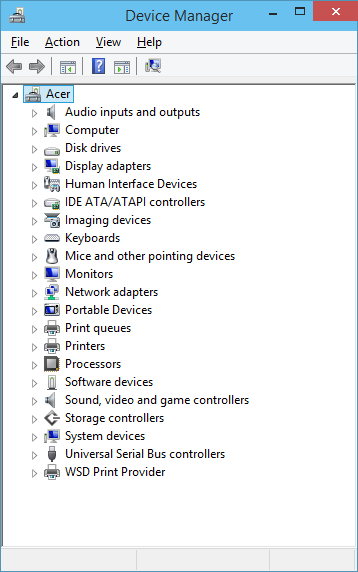
As you can see the Device Manager now has no missing drivers for an Nvidia ION based Nettop that is running Windows 8 or Windows 10
Basically all you require is the drivers on Windows Update and the Coprocessor driver from this blog post, enjoy using a modern version of Windows on your legacy Nvidia ION Nettop.
Попробуйте наш инструмент устранения неполадок
Выберите операционную систему
Выберите язык програмирования (опционально)
‘>
После обновления системы до Windows 10 с Windows 7 или Windows 8 ваш компьютер может работать медленно. Затем вы проверили статус драйвера в диспетчере устройств и увидели устройство с именем Сопроцессор с желтым восклицательным знаком рядом с ним. Вы не представляете, что это за устройство и как убрать желтую метку. Не волнуйся. Вы можете исправить эту проблему с драйвером с помощью методов, описанных в этой публикации.
Сопроцессор с желтой меткой в диспетчере устройств означает, что проблема с драйвером чипсета , в основном драйвер чипсета Nvidia nForce. Чтобы решить эту проблему, достаточно обновить драйвер набора микросхем.
Есть два простых способа обновить драйвер набора микросхем. Вы можете попробовать оба из них, пока не решите проблему.
- Обновите драйвер вручную через диспетчер устройств
- Обновите драйвер автоматически с помощью Driver Easy
Метод 1. Обновите драйвер вручную через диспетчер устройств.
Если у вас есть проблемы с драйверами, такие как проблемы с драйверами набора микросхем, вы можете легко обновить драйвер из Windows. Вы можете обновить драйвер через Центр обновления Windows или Диспетчер устройств. Тогда вам не нужно заходить на сайт производителя, чтобы проверить наличие последней версии драйвера. Поскольку вы знаете, как открыть диспетчер устройств, вы можете обновить драйвер через диспетчер устройств.
Возможно, Windows не предоставляет последнюю версию драйвера. Если вы пробовали этот метод, но он вам не подходит, попробуйте метод 2.
Чтобы обновить драйвер сопроцессора в диспетчере устройств, вам просто нужно выполнить следующие шаги (следующие снимки экрана приведены только для справки.):
1) Открыть Диспетчер устройств .
2) Дважды щелкните Сопроцессор , чтобы открыть окно свойств драйвера.
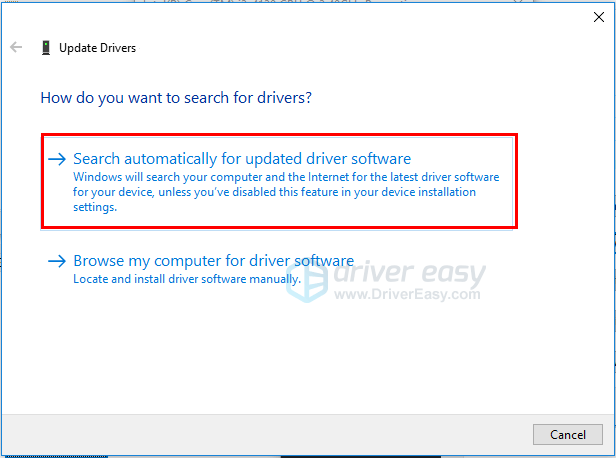
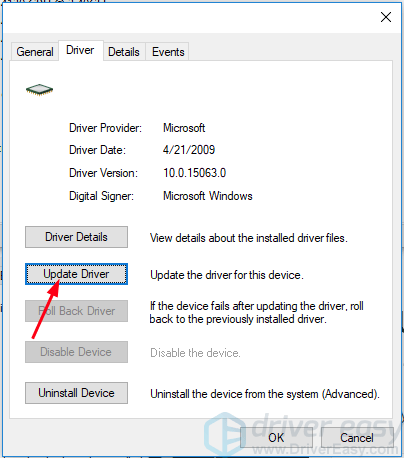
3) Перейти к Водитель вкладку и щелкните Обновить драйвер .

4) Нажмите Автоматический поиск обновленного программного обеспечения драйвера .
5) После завершения обновления проверьте, по-прежнему ли вы видите Сопроцессор с желтой меткой в диспетчере устройств.
Метод 2: обновите драйвер автоматически с помощью Driver Easy
Метод 1 может решить проблему, но если это не так или вы не уверены, что играете с драйверами вручную,вы можете сделать это автоматически с Водитель Easy .
Driver Easy автоматически распознает вашу систему и найдет для нее подходящие драйверы. Вам не нужно точно знать, в какой системе работает ваш компьютер, вам не нужно рисковать, загружая и устанавливая неправильный драйвер, и вам не нужно беспокоиться о том, что вы ошиблись при установке.
Вы можете автоматически обновлять драйверы с помощью БЕСПЛАТНОЙ или Pro версии Driver Easy. Но с версией Pro требуется всего 2 клика (и вы получаете полную поддержку и 30-дневную гарантию возврата денег):
1) Скачать и установите Driver Easy.
2) Запустите Driver Easy и нажмите Сканировать сейчас . Затем Driver Easy просканирует ваш компьютер и обнаружит проблемы с драйверами.

3) Щелкните значок Обновить рядом с отмеченным драйвером набора микросхем, чтобы автоматически загрузить и установить правильную версию этого драйвера (вы можете сделать это в БЕСПЛАТНОЙ версии).
Или нажмите Обновить все для автоматической загрузки и установки правильной версии все драйверы, которые отсутствуют или устарели в вашей системе (для этого требуется Pro версия — вам будет предложено выполнить обновление, когда вы нажмете «Обновить все»).

4) После обновления драйвера проверьте, по-прежнему ли вы видите сопроцессор с желтой меткой в диспетчере устройств.
Надеюсь, вы сможете легко исправить проблему с драйвером сопроцессора в Windows 10 с помощью описанных выше методов. Если у вас есть вопросы или идеи, оставьте свой комментарий ниже. 😛
After you upgraded your system to Windows 10 from Windows 7 or Windows 8, you might find your computer run slowly. Then you checked for the driver status in Device Manager, and saw a device named Coprocessor with a yellow exclamation mark next to it. You have no idea what the device is and how to remove the yellow mark. Don’t worry. You can fix this driver issue with the methods in this post.
The Coprocessor with a yellow mark in Device Manager means there is problem with chipset driver, mostly Nvidia nForce chipset driver. To fix the problem, you just need to update the chipset driver.
There are two simple methods to update the chipset driver. You can try both of them until you resolve the problem.
- Update the driver manually via Device Manager
- Update the driver automatically using Driver Easy
Method 1: Update the driver manually via Device Manager
When you have driver problems like chipset driver issues, you can update the driver from Windows easily. You can update the driver via Windows Update or Device Manager. Then you don’t need to go to manufacturer’s website to check for the latest driver. Since you know how to open Device Manager, you can update the driver via Device Manager.
It’s possible that Windows doesn’t provide the latest driver. If you’ve tried this method but it doesn’t work for you, try Method 2.
To update the Coprocessor driver in Device Manager, you just need to follow steps below (Following screen shots are just for your reference.):
1) Open Device Manager.
2) Double click Coprocessor to open the driver Properties window.
3) Go to Driver tab and click Update Driver.
4) Click Search automatically for updated driver software.

5) After the updating completes, check to see if you still see Coprocessor with a yellow mark in Device Manager.
Method 2: Update the driver automatically using Driver Easy
Method 1 may resolve the problem, but if it doesn’t, or you’re not confident playing around with drivers manually, you can do it automatically with Driver Easy.
Driver Easy will automatically recognize your system and find the correct drivers for it. You don’t need to know exactly what system your computer is running, you don’t need to risk downloading and installing the wrong driver, and you don’t need to worry about making a mistake when installing.
You can update your drivers automatically with either the FREE or the Pro version of Driver Easy. But with the Pro version it takes just 2 clicks (and you get full support and a 30-day money back guarantee):
1) Download and install Driver Easy.
2) Run Driver Easy and click Scan Now. Driver Easy will then scan your computer and detect any problem drivers.

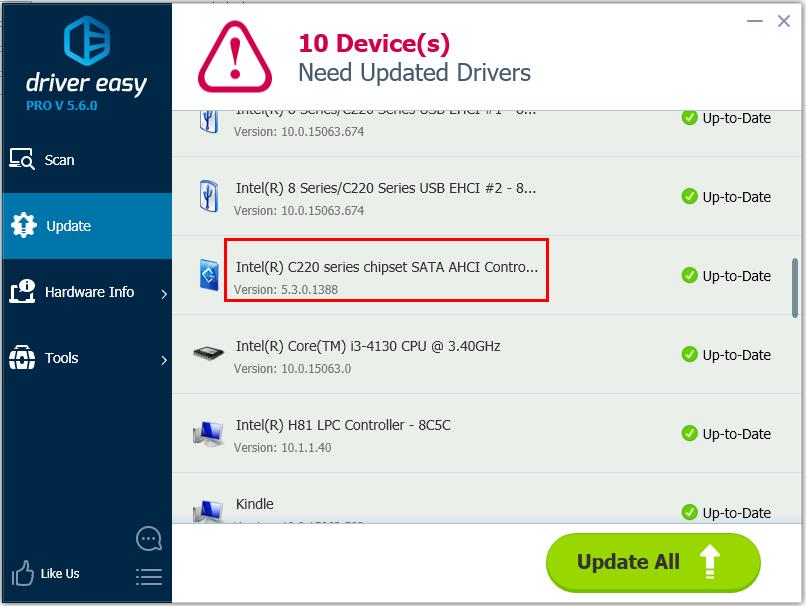
3) Click the Update button next to a flagged chipset driver to automatically download and install the correct version of this driver (you can do this with the FREE version).
Or click Update All to automatically download and install the correct version of all the drivers that are missing or out of date on your system (this requires the Pro version – you’ll be prompted to upgrade when you click Update All).
4) After updating the driver, check to see if you still see Coprocessor with a yellow mark in Device Manager.
Hope you can fix the Coprocessor driver issue in Windows 10 easily with the methods above. If you have any questions or ideas, please leave your comment below. 😛