Download Windows Speedup Tool to fix errors and make PC run faster
If you want to perform an Android Debug Bridge (ADB) debugging with Google devices, the Google USB Driver is required for Windows. For all other devices, Windows drivers are provided by the respective hardware manufacturer. In this post, we walk you through the steps on how to download and install Google USB Driver on Windows 11 or Windows 10 computer.

Google USB Drivers are required to connect Google Pixel or Nexus devices to Windows PC using a USB cable. Google USB drivers act as Android ADB and Fastboot Drivers that allow your computer to communicate with your Android device over the Android Bootloader Interface (Fastboot Mode) as well as Android Composite ADB Interface. So, you can install them on your PC to use ADB (Android Debug Bridge) for debugging apps and ROMs, boot your device into Bootloader/Recovery modes, or use Fastboot to unlock the bootloader and flash factory images on your Google device.
In essence, the drivers are useful in various situations, as you will need these drivers to transfer files or sync data on your Google device, especially when working with the Android ADB and Fastboot tools.
We will discuss this topic under the subheadings as follows.
- How to download the Google USB Driver
- Download the driver manually
- Download via Android SDK Manager
- How to install Google USB Driver
How to Download the Google USB Driver
You can download the Google USB Driver on your Windows 11/10 computer in either of two ways. You can download the driver manually or use the Android SDK Manager.
To download the driver manually, follow these steps:
- Head over to developer.android.com.
- Click the link to download the Google USB Driver ZIP file (ZIP).
- Scroll down on the page that appears.
- Accept the Terms and Conditions.
- Finally, click the Download the Google USB Driver button.
To download the driver via Android SDK Manager, do the following:

- If you haven’t already, download and install the Android SDK Manager on your PC.
- Launch Android Studio.
- Click Tools > SDK Manager.
- Click the SDK Tools tab.
- Select Google USB Driver.
- Click OK.
The driver files are downloaded into the android_sdk\extras\google\usb_driver\ directory on your computer. Using the SDK Manager helps you keep the driver up to date by notifying you when your current driver is out of date.
Read: Windows does not recognize or detect Android Device
How to Install Google USB Driver
Once you have the Google USB Driver downloaded to your Windows 11/10 computer, you can proceed to install the driver INF file as follows:
- Connect your Android device to your computer’s USB port.
- Extract the ZIP archive file you downloaded to any location on your local drive.
The Google USB Driver comes in the form of an android_winusb.inf setup information file, rather than a Windows executable.
- Next, press the Windows key + X to open the Power User Menu.
- Tap the M key on the keyboard to open Device Manager. Alternatively, open the Run dialog box, type devmgmt.msc, and hit Enter.
- In the Device Manager right pane, locate and expand Portable Devices or Other Devices, depending on which one you see.
- Next, right-click the name of the device you connected.
- Select Update Driver Software.
- In the Hardware Update wizard, select Browse my computer for the driver software option.
- In the next window, click the Let me pick from a list of device drivers on my computer option.
- Next, click on Have Disk.
- Click Browse.
- Now, locate the USB driver folder. For example, the Google USB Driver is located in
android_sdk\extras\google\usb_driver\or the folder you extracted the INF file to. - Select the .inf file.
- Finally, click on Open and follow the prompts to install the driver.
Read: The INF file you selected does not support this method of installation
That’s it on how to download and install Google USB Driver in Windows!
Also read:
- How to download & install Fastboot drivers on Windows
- Fastboot not working or detecting device on Windows
What is USB Driver for Android?
The Android USB driver on your machine will make it easy for you to transfer files from an Android phone to your computer. However, you’ll need to keep the driver properly updated, which you can also do using any third-party Driver Updater Software.
Read: Fix Android file transfer not working on Windows
What is a USB device driver?
A USB client driver is software installed on the computer that communicates with the hardware to make the device function. If the device belongs to a device class supported by Microsoft, Windows loads one of the Microsoft-provided USB drivers (in-box class drivers) for the device.
Why are USB ports not working?
If the USB ports are not working on your Windows 11/10 device, it could be due to the Selective Suspend feature. The Selective Suspend feature suspends the USB device to efficiently maintain battery power by enabling the computer to turn off the USB device. However, sometimes this feature may not correctly wake up the USB device.
Read: Selective Suspend causes USB devices on a USB hub to stop working.
Obinna has completed B.Tech in Information & Communication Technology. He has worked as a System Support Engineer, primarily on User Endpoint Administration, as well as a Technical Analyst, primarily on Server/System Administration. He also has experience as a Network and Communications Officer. He has been a Windows Insider MVP (2020) and currently owns and runs a Computer Clinic.
Google USB Drivers are required to connect Google Pixel or Nexus devices to Windows PC using a USB cable. You will need these drivers to transfer files or sync data on your Pixel/Nexus device, and especially when working with the Android ADB and Fastboot tools.
You can download the latest Google USB Drivers from here and follow the instructions on how to manually install them on your Windows PC. Furthermore, we have also provided instructions on how to modify the ‘android_winusb.inf‘ file included in the drivers to support other Android devices.
Normally, the said USB drivers come bundled with SDK Manager in the Android Studio IDE, which is constantly updated with the latest available drivers. But if you’re an average Android user, chances are that you might not have the IDE set up on your PC. That’s because it is used mostly by experienced developers and enthusiasts. In that case, you can use the standalone USB drivers, which as provided directly by Google for users who might face issues of Windows not recognizing their phone over a USB connection.
Google USB drivers also act as ‘Android ADB and Fastboot Drivers‘ that allow your computer to communicate with your Android device over the Android Bootloader Interface (Fastboot Mode) as well as Android Composite ADB Interface. So you can install them on your PC to use ADB (Android Debug Bridge) for debugging apps and ROMs, boot your device into Bootloader/Recovery modes, or use Fastboot to unlock the bootloader and flash factory images on your Pixel/Nexus device.
To sum up, the drivers are useful in various situations. With that in mind, go ahead to download the latest version of the USB Drivers from below and follow the instructions on how to install them on your Windows PC.
Table of Contents
- Download Google USB Drivers
- Direct Download
- Download via Android Studio
- How to Install Google USB Drivers
- On Windows 11 and Windows 10
- On Windows 7 and Windows 8/8.1
- How to Modify Google USB Drivers to Support Other Android Devices
- Step 1: Get the VID and PID of your Android Device
- Step 2: Modify ‘android_winusb.inf’ file
- Step 3: Install the Modified USB Drivers
Download Google USB Drivers
Now, there are two different ways/methods to download the USB driver on Windows. You can either download the Google USB Driver ZIP file manually. Or, you can use the SDK Manager in the Android Studio to download it.
The latter gives an added benefit, that is the SDK Manager will automatically notify you when a newer version is available. The former method, on the contrary, will require you to manually check if a newer driver version is available and download it again.
In our personal experience, downloading the ZIP package directly is easier than using the Android Studio. But the choice is solely up to you. We have covered both the methods below.
Note: If you’re using macOS or Linux, you would not need these drivers.
Direct Download
Just click on the link below to download the Google USB Driver ZIP file to your PC.
- Latest version: usb_driver_r13-windows.zip
- Previous versions:
- usb_driver_r12-windows.zip
- usb_driver_r11-windows.zip
- usb_driver_r10-windows.zip
Once downloaded, extract the ZIP file to a suitable location on your computer. The extracted ‘usb_drivers’ folder should contain the required ‘android_winusb.inf’ driver file.
Download via Android Studio
First of all, make sure that you have downloaded and installed the latest version of Android Studio on your Windows PC. Once you have it installed, follow the instructions below:
Android Studio will now download the Google USB drivers to ‘android_sdk\extras\google\usb_driver\‘ on your PC. Here ‘android_sdk‘ is the folder where the Android SDK is installed on your PC.
How to Install Google USB Drivers
The Google USB Drivers come in the form of an ‘android_winusb.inf‘ setup information file, rather than a Windows executable. So, you will need to manually install it on your Windows PC. The same steps can also be used to upgrade the existing drivers installed on your PC to the latest version available.
Now follow the installation guide below according to the Windows OS version you’re using. It’s quite easy and wouldn’t take more than a minute to install them.
On Windows 11 and Windows 10
To install Google Android USB Drivers on Windows 10, follow the instructions below.
- First, connect your Android device to the PC’s USB port.
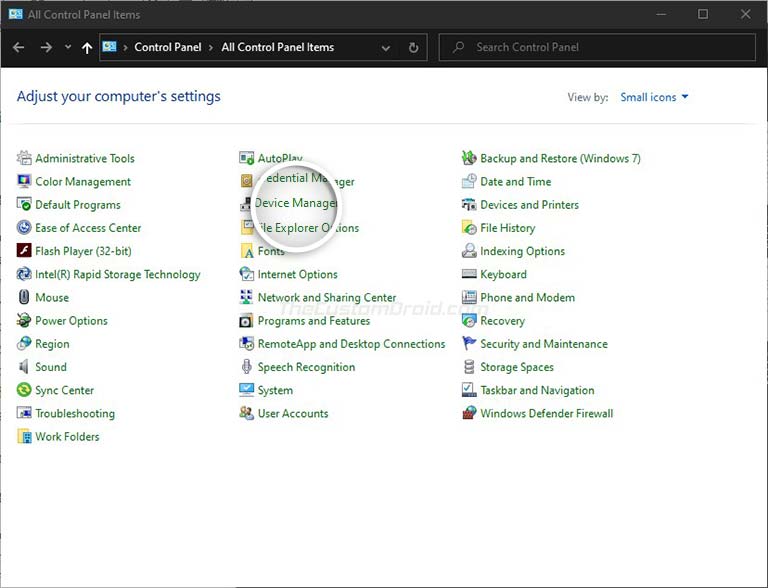
- Go to the ‘Control Panel‘ and click on ‘Device Manager‘.

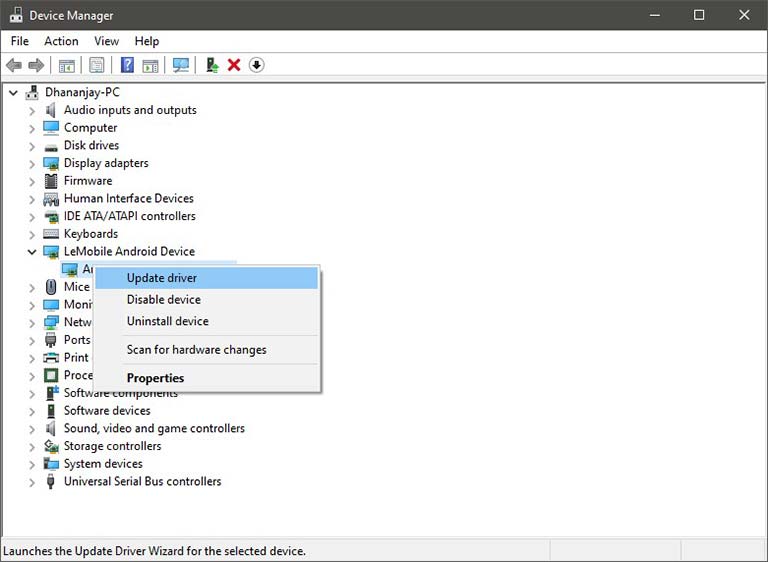
- Double-click on your device category to expand the list of connected devices.
- Right-click on your Android device’s name and click on ‘Update driver‘.

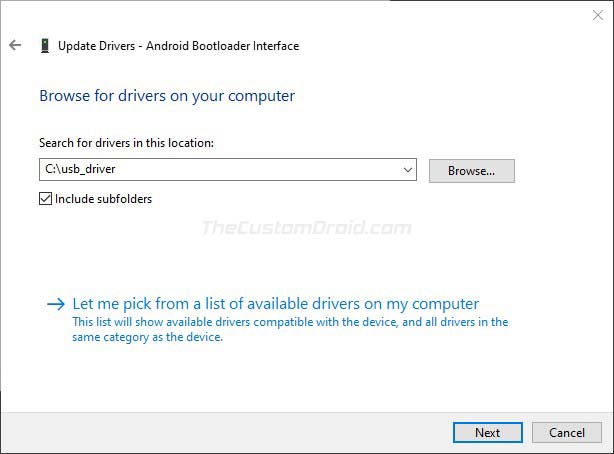
- Click on ‘Browse my computer for driver software‘ in the Hardware Update wizard.
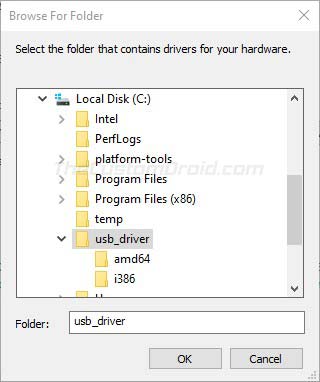
- Click ‘Browse‘ and select the ‘usb_driver‘ folder.
- For example: If you downloaded the drivers using Android Studio, the folder should be located in ‘android_sdk\extras\google\’ on the PC. Or, if you downloaded the ZIP file, then just locate the extracted ‘usb_driver’ folder.

- For example: If you downloaded the drivers using Android Studio, the folder should be located in ‘android_sdk\extras\google\’ on the PC. Or, if you downloaded the ZIP file, then just locate the extracted ‘usb_driver’ folder.
- Finally, click ‘Next‘ to install the drivers.

On Windows 7 and Windows 8/8.1
To install Google Android USB drivers on Windows 7, Windows 8, and Windows 8.1 PC, follow the instructions below.
- First, connect your Android device to the Windows PC’s USB port.
- Then right-click on ‘Computer‘ and select ‘Manage‘.
- Select Devices in the left pane.
- Double-click on ‘Other device‘ in the right pane to expand it.
- Right-click on the device name (e.g. Google Pixel) and select the ‘Update Driver‘ option.
- Click on ‘Browse my computer for driver software‘ in the Hardware Update wizard.
- Click ‘Browse‘ and locate the ‘usb_driver’ folder.
- Finally, click on ‘Next‘ to install the USB drivers.
You should now have the Google USB Drivers installed. Your Windows PC should now detect and recognize your Android device over the USB connection.
Important Note
If the drivers fail to install even after following the steps, OR the ADB/Fastboot commands do no work even if the drivers are installed, then it could be because you’re using a USB 3.0/3.1/3.2 port or an AMD based PC. This is an issue faced by a lot of users recently.
To fix it, simply try using a USB 2.0 port (If it’s not available, you can also use a USB 2.0 hub) on your PC. Also, try using an Intel-based PC for especially when using ADB/Fastboot tools.
How to Modify Google USB Drivers to Support Other Android Devices
Like we mentioned above, Google USB Drivers also work as ‘ADB Drivers’. But by default, they only support the Google Pixel and Nexus devices.
While Android OEMs do provide their own drivers, but it’s more often than they miss to include the required ADB USB drivers in them. In such cases, you can easily modify the ‘android_winusb.inf’ file in Google USB Drivers to support any other Android device to use the ADB and Fastboot tools.
In order for the drivers to support your non-Pixel/Nexus device, you will first need to acquire the Vendor ID (VID) and Product ID (PID) of your device. Once you have them, the second step is to edit the ‘android_winusb.inf’ file and add a new device section with the VID and PID of your own device. And finally, the third and last step is to install the modified drivers.
Sounds confusing? It’s quite simple actually. Just follow the step-by-step instructions below.
Step 1: Get the VID and PID of your Android Device
- First, connect your Android device to the PC using the USB cable.
- Go to ‘Control Panel‘ > ‘Device Manager‘ on the PC.
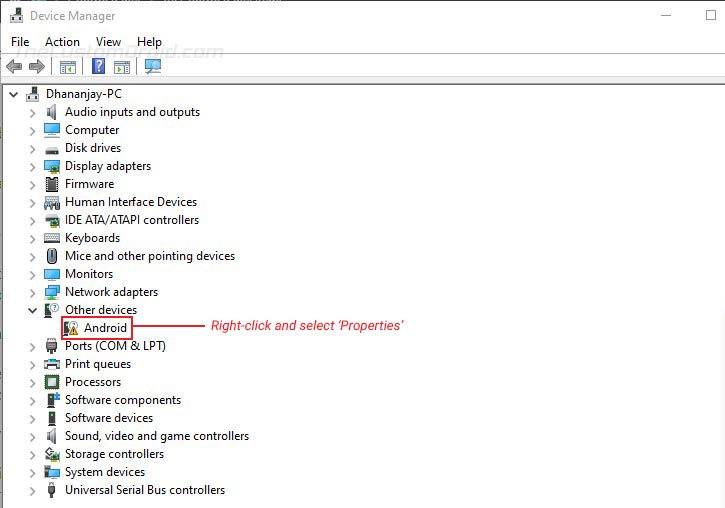
- Locate your unrecognized Android device. An unrecognized device can normally be located under the ‘Universal Serial Bus controllers‘ OR ‘Other devices‘ sections in Device Manager. You would see a yellow-colored triangle warning icon beside the connected device.

- Right-click on the device name and click on ‘Properties‘.
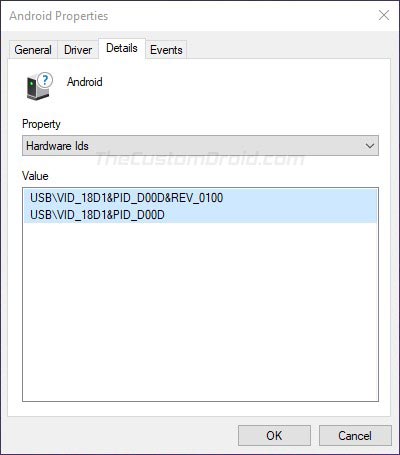
- Go to the ‘Details‘ tab and select ‘Hardware Ids‘ from the dropdown menu.

- You should now see the Vendor and Product IDs of your Android device.
Step 2: Modify ‘android_winusb.inf’ file
Now that you have the required IDs, you can modify/edit the ‘android_winusb.inf’ file to add your device to the supported list.
- First, locate the ‘usb_driver‘ folder on your PC. Inside the folder, you should have the ‘android_winusb.inf‘ file.
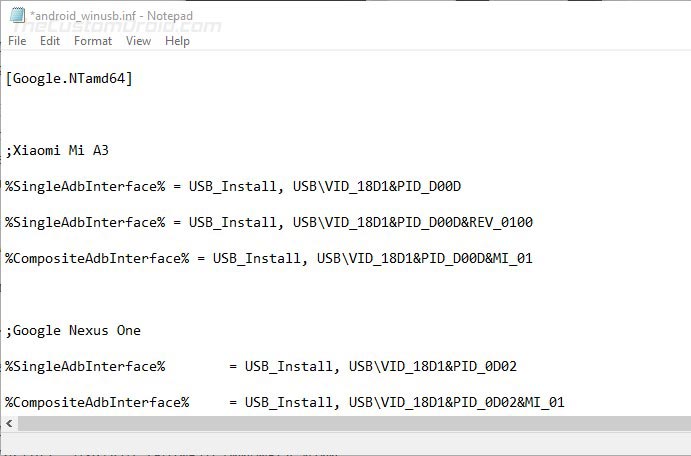
- Open the file using a text editor and locate the ‘[Google.NTx86]‘ section if your Windows PC is 32-bit (x86) or the ‘[Google.NTamd64]‘ section if your Windows PC is 64-bit (x64).
- In the said section, you will see a number of items with the following format:
;[device name]
%SingleAdbInterface% = USB_Install, USB\VID_xxxx&PID_xxxx
%CompositeAdbInterface% = USB_Install, USB\VID_xxxx&PID_xxxx&MI_xx
- You can copy the above lines into the respective section and edit it accordingly.
- The first thing to do is to replace the ‘[device name]‘ item with your actual device name (Nothing specific, it could be anything).
- Next, you have to add your device’s VID and PID values to the %SingleAdbInterface% and %CompositeAdbInterface% items.
- In case your device also has a REV_xxxx ID, you will need to add two lines for the %SingleAdbInterface% item. One without and another with the REV ID. The line with the REV ID should look like:
USB\VID_xxxx&PID_xxxx&REV_xxxx
- For the %CompositeAdbInterface% item, you will further need to add ‘MI_01‘ ID towards the end. With the MI_01 ID, the line should look like:
USB\VID_xxxx&PID_xxxx&MI_01
- In case your device also has a REV_xxxx ID, you will need to add two lines for the %SingleAdbInterface% item. One without and another with the REV ID. The line with the REV ID should look like:
- For example, my Xiaomi Mi A3 has a VID and PID as ‘USB\VID_18D1&PID_D00D’ & ‘USB\VID_18D1&PID_D00D&REV_0100’. In that case, the lines should look like the following:
;Xiaomi Mi A3
%SingleAdbInterface% = USB_Install, USB\VID_18D1&PID_D00D
%SingleAdbInterface% = USB_Install, USB\VID_18D1&PID_D00D&REV_0100
%CompositeAdbInterface% = USB_Install, USB\VID_18D1&PID_D00D&MI_01

Once you have added the lines under the proper section (depending on your PC’s architecture), save the file and exit.
Step 3: Install the Modified USB Drivers
You have now successfully modified the Google USB Drivers to support your Android device. The last step is to install these modified drivers for your device.
Important information:
The android_winusb.inf file is signed by Google and making changes to it (although intentional, such as we did here) will directly affects its digital signature. Once the file has been modified, the “Driver Signature Enforcement” feature of Windows (11/10/8.1/8) will prevent you from installing the modified USB driver.
To bypass this, you will need to temporarily disable Driver Signature Verification by enabling Test Mode. How-to-Geek has a pretty good explanatory piece on how to do it using two different methods.
Thanks Hamid for pointing it out!
Now, to install the modified Google USB drivers: go to ‘Control Panel’ > ‘Device Manager’ and right-click on your device’s name. Then select ‘Update drivers’ to launch the Hardware Update wizard. Click on ‘Browse my computer for driver software’ and select ‘Browse’. Now locate the ‘usb_driver’ folder that contains the modified android_winusb.inf file and select it.
Finally, click ‘Next’ to install the modified drivers for your device. That’s it! Reboot your Windows computer and it should now recognize your Android device over ADB or Fastboot.
Installing the Google USB Drivers is the easiest solution to make your Windows PC successfully recognize your Android device. And while it should work for most other Android devices too, it’s not a hundred percent guaranteed. And if this happens, you may want to install your device’s OEM specific drivers from this page or by clicking your device manufacturer link below.
- Huawei
- Realme
- Samsung
- OnePlus
- LG
- Xiaomi
For low-level firmware flashing, you could also use MediaTek or Qualcomm USB drivers.
If you face any issues installing the drivers on your PC, feel free to ask us through the comments.
Drivers source: Google
Android USB Driver is most important to connect your device to the computer. If your smartphone doesn’t detect your computer then read the article below to fix USB problems. Download Google USB Drivers to connect a Pixel or Nexus Android device with a Windows PC. This Google USB driver package will help you to connect your Pixel or Nexus device which is on Android Debugging Mode. Here we share to download and install the latest version of Google USB Drivers on Windows 11, Windows 10, and Windows 7.
Google USB Drivers For Windows:
If you love to customize your Android device. If you have been with the Android family for a long then know that if you want to customize your device then need to install Custom Recovery like TWRP or need to Root your device. So before going through all those steps, first need to unlock the bootloader of your Android device. Android smartphone needs to be connected to a computer to unlock the bootloader. The Android device’s connection to the computer needs to be correct so that the communication between the two devices is proper. To confirm whether this connection is correct or not need to install proper Android USB Drivers on Windows.
Android USB Drivers For Windows:
Here we provide the latest Google USB Drivers for Windows and also guide you on how to install Google USB Driver on your computer so that the Android device can connect with the computer. This Google USB Driver ware was released for Google Pixel or Google Nexus smartphones. Google USB Driver package mainly works with Google Pixel or Google Nexus Phones but it actually works smoothly with most Android devices.
If you have ever installed the OEM Android driver on your computer, you are not able to detect your device then you should follow this guide. Through this complete guide, we have solved your phone’s ADB and Fastboot problems for detecting with the computer.
LATEST_USB_DRIVER_WINDOWS.ZIP
Install Google USB Driver on Windows 10:
- First, connect your Android device to the computer via USB cable.
- Right-tap the bottom-left corner, or press Windows+X > Computer Management.
- After opening the Computer, Management clicks on Device Manager from the left panel.

- In the Device Manager > locate and expand Portable Devices from the right panel.
- In Portable Devices, right-click on the device name, and then select Update Driver Software.

- A popup box will show now click on “Browse my computer for driver software“.

- Click on browse and then locate the Google USB Drivers folder that you download before.

- Now click Next to install the driver.
Install Google USB Driver on Windows 11/Windows 8:
- First, connect your Android device to the computer via a USB cable.
- Right-tap the bottom-left corner, or press Windows+X > Computer Management.
- After opening the Computer, Management clicks on Device Manager from the left panel.
- In the Device Manager,> locate and expand “Other devices” from the right panel.
- In Portable Devices, right-click on the device name, and then select Update Driver Software.
- A popup box will show now click on “Browse my computer for driver software“.
- Click on browse and then locate the USB driver folder that you download before.
- Now click Next to install the driver.
Note: The process more or less the same as Windows 10 driver install method, so if you face problem then see Windows 10 screenshot from the above method.
This was the entire guide to installing Google USB Drivers. Hope these instructions assist you well. If you consider contributing anything to this page, please feel free to write in the comment section below.
Перейти к содержимому
После ряда обновлений Windows 10 установка драйвера для отладки Android приложений на реальном устройстве может оказаться невозможной, если использовать обычный способ. При попытке установить драйвер система сама выбирает нужный драйвер по своему усмотрению, а при установке для устройства драйвера от Google выдаёт сообщение об ошибке.
О том как windows 10 отключить проверку подписи драйверов читайте в дополнительном материале
Однако есть несложный альтернативный метод.
Его суть в том, что в Windows 10 драйвер от Google можно установить без подключения устройства, что исключает ошибки, связанные с неверным автоматическим распознаванием.
Алгоритм действий:
- В диспетчере устройств выбрать «Установить старое устройство».
- Выбрать установку вручную.
- Выбрать пункт «Показать все устройства» и нажать кнопку «Далее».
- В открывшемся окне нажать кнопку «Установить с диска».
- В появившемся окне указываем путь к inf файлу драйвера и далее устанавливаем его как обычно.
- По окончании установки в диспетчере появится неработающее устройство Android ADB Interface. Просто удалите его.
- Драйвер установлен. Теперь при подключении Android устройства можно выбрать для него драйвер в общем списке.
Установленный таким образом драйвер работает полностью корректно. Поэтому если при установке Google USB Driver в Windows 10 возникают сложности можно воспользоваться приведённым способом для решения данной проблемы.
If you have a Google Pixel or Nexus phone and want to connect it with a PC then you may need to download Google USB Driver on Windows 11/10/8/7.
USB drivers are one of the utility tools that are required to connect or operate phones with computers. Earlier we shared Samsung USB Drivers and now that Google Pixel is a trending phone with stock UI which is a favorite UI for most users. So this will help a number of Pixel users who are in development and for other tasks. One more important thing is that the Google USB driver also works for Nexus devices.
If you are a person who likes to root their phone and install custom recoveries, custom ROMs then you definitely need the Google USB driver in the case of Pixel and Nexus devices. And if you are a developer who uses Android Studio then again you need to have Google USB Driver on PC. Rooting a phone with TWRP recovery or any other recovery also requires USB drivers. Everything related to development or changes is required to connecting phone with PC using the USB cable. So now you know the need for Google USB Driver, so let’s go on with download links and procedure to install it.
Download Google USB Driver
- File Name – Google USB Driver Latest.zip
- File Size – 8 MB
- Format – Zip
- Link Platform – MediaFire
Download Google USB Driver using Android Studio
If you have Android Studio and want to download Google USB driver then you don’t need to manually download from any link. Just follow few simple steps to get directly on PC through Android SDK Manager. Using this method you will get notifications if an update is available.
- Open Android Studio on PC.
- Go to Tools > SDK Manager.
- Now go to SDK tools.
- Scroll to find and select Google USB Driver.
- Then click on OK and Install the package.
How to Install Google USB Driver
The installation process is easy and you don’t have to waste much time on it. However, there is a small difference in installing Google USB drivers on Windows 10, Windows 8, and Windows 7. So we will be splitting the installation section accordingly so that you can easily follow the instructions for your OS.
How to Install Google USB Driver on Windows 10/11
- Extract the downloaded Google USB Driver.zip file.
- Connect your Pixel or Nexus device with PC using USB.
- Right-click on windows icon in the lower-left corner and open Device Manager.

- Expand the Portable Devices section.

- Right-click on the connected device name and select Update Driver Software.

- In Hardware Update Wizard, click on Browse my computer for driver software.

- Now click on Browse and locate to the extracted folder and click Next to install the driver.


How to Install Google USB Driver on Windows 7/Windows 8
- Extract the downloaded Google USB Driver.zip file.
- Connect the Google device with PC via USB.
- Right-click on Computer icon from desktop or Windows Explorer and select Manage.
- Computer Management will open, select Device Manager from the left pane.
- Expand Other Devices in the right pane.
- Right-click on the connected device and select Update Driver Software.
- Now click on Browse my computer for driver software.
- Click the Browse option and locate the extracted folder and click Next.
- The installation process will begin and after a few seconds, it will be installed on your Windows PC.
Between Windows 10, Windows 8, Windows 7 there is only a small difference in terms of installing Google USB Drivers. At last, you have to find Device Manager and the connected google device. And then you can Install or Update USB drivers.
Related Articles:
- How to Root Google Pixel 5a and Unlock Bootloader
- How to Download and use LG Flash Tool
- Download Odin Flash Tool to Flash Firmware

By Ashutosh singh
Computer Science graduate and tech enthusiast. Love testing new tech gadgets ever since my first windows phone from Samsung. Working as a technical writer for more than five years, and I believe I have also developed good SEO skills. In my spare time, I like watching movies, and playing games.