1.
Немного про видео режимы для Windows
98 в VirtualBox
По умолчанию, после инсталляции в VirtualBox,
Windows
98 будет запущена с разрешением экрана 640x480
и 16 цветами (4-х битный режим).
 |
| Разрешение экрана для Windows 98 в VirtualBox |
Видеокарта
определяется Стандартный видеоадаптер PCI(VGA):
 |
| Видеоадаптер Windows 98 в VirtualBox по умолчанию |
VirtualBox
не оптимизирован для 16-ти цветовой (4-х битный) эмуляции, в которой запускается
Windows
98. Эта эмуляция будет работать очень медленно.
Имея
32 битный True
Color
драйвер можно сделать Windows
98 ,запускаемую в VirtualBox,
намного быстрее
Если
вы хотите True
color
или высокое разрешение, вы должны загрузить специальные
драйвера
2.
Универсальный VESA/VBE Видеодрайвер
Драйвер
в формате ISO
скачать можно здесь: Vbe9x.iso или здесь: Vbe9x.iso. Можно сразу присоединить, как образ, к
оптическому диску и ставить его в
Windows
98.
3.
Установка Универсального VESA/VBE Видеодрайвера
Перейти
Экран-Настройка-Дополнительно-Адаптер-Изменить-Далее
На
окошке Обновление драйверов (Какое действие должна выполнить Windows) выбрать:
 |
| Какое действие должна выполнить Windows |
Далее на следующем окошке Обновление драйверов ( Выбор местонахождения драйверов ) выбрать путь к
драйверу в файле ISO, который на оптическом диске ( в примере это диск D: ) :
 |
| Выбор местонахождения драйверов |
Windows 98
найдет драйвер на диске и в следующем окне Обновление драйверов (Поиск драйвера Windows для устройства) сообщит :
 |
| Поиск драйвера Windows для устройства |
По
окончанию установки в окошке Обновление драйверов следующее сообщение Завершена установка обновленного драйвера для данного оборудования :
 |
| Завершена установка обновленного драйвера |
Потребуется
перезагрузка Windows 98. После перезагрузки можно установить нужный монитор, нужную глубину
цвета и нужное разрешение:
 |
| Новое разрешение экрана для Windows 98 в VirtualBox |
Теперь
видеокарта определяется как VBE
Miniport—
Standart
PCI
Grafics
Adapter(VGA):
 |
| Новый видеоадаптер Windows 98 в VirtualBox |
Why do this?
If you feel nostalgic for a bit of Windows 9x action, or you just want to play some old games that are between DOS and Windows XP, you can either build a retro PC gaming rig, or you can test the water with VirtualBox.
Once it’s all done, you too can see how pointless it all is. 🙂
Update March 2019: Due to popularity of this post, I’ve run through this again on OSX with Virtualbox 6. I’ve also added some new content and will continue to do so.
What you will need:
- Windows 98SE ISO (link here, and key – HQ23F-WXWFF-7V3HJ-KCVXT-4FRRM)
- SCITech Display Doctor (this will be the video driver) – https://docs.google.com/file/d/0BycgkMZbeQOzWXE5NUhnWGRycVE/edit?pli=1
- VirtualBox (https://www.virtualbox.org/wiki/Downloads)
- Opera 9.6 (http://www.oldversion.com/windows/opera-9-64)
- Unofficial Windows 98 SE update roll up pack (http://files.platesteel.net/win98/U98SESP3.exe)
- Some other software from http://files.platesteel.net/win98se
Create the VM and Install Windows 98 SE
- Create new VM on Virtualbox

- Type: Microsoft Windows
- Version: Windows 98
- RAM: 512MB
- Create new fixed size HDD – 2GB (VDI is fine)
- Edit the settings of the VM:
- Display -> Video Memory ->
- 128MB
- Enable 2D Acceleration – Yes
- Enable 3D Acceleration – Yes
- Display -> Video Memory ->
- Install Windows 98SE
- Boot with your 98SE ISO mounted (you’ll have to find this yourself)
- Boot with option 2 – Start computer with CD-ROM support
- Run fdisk and accept all the defaults to create an 8GB partition on your virtual drive.
- Restart the virtual machine
- Boot with option 2 – Start computer with CD-ROM support
- Format the virtual drive using format on the Windows CD
- D:\win98\format c:
- Run: D:\setup.exe /ie /im /is /nr
- /ie Disables create a boot disk (causes crashing on VBox and 98SE installer)
- /im Disables checking conventional RAM
- /is Disables scandisk
- /iv Don’t disable billboards
- /nr Disable registry check
- Run through the Windows installer with all the defaults
- After reboot – Boot from Hard Disk
- Enter your name and the CD key for Win98SE (DMWRC-T9XP4-GJ2P8-26G66-V9WBB); install will continue.
- If everything went well, you should see Windows 98 desktop and hear some tragic music. 🙂
- I recommend that you take a snapshot of the VM and call it “BASE INSTALL”


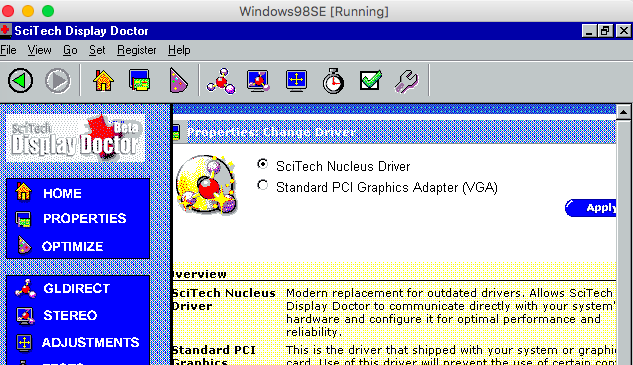
Install Video Driver
- Shutdown Windows (and the VM)
- Edit Settings of the VM -> Storage -> Add another device to the IDE controller (click the CD with the green plus) and mount the scitech-display-doctor-7.iso file you downloaded earlier.
- You should see a CD drive with Sdd7 – double click that then run the scitech-display-doctor-win-7.0 installer – Express installation is fine.
- Register the Sci-Tech Display driver with either the name/serial in the text file on the mounted ISO, or use:
- Name: CSCKnight
- Serial: 0B5E-12B4-A8A4-0B
- Register the Sci-Tech Display driver with either the name/serial in the text file on the mounted ISO, or use:
- OS will restart, when it returns, SciTech Display Doctor will load. Either register it or start the 21 day trial.
- On the HOME page, underneath Current Configuration, there is a section called Active Features. Click ‘Disabled’ next to SciTech Display Driver then select SciTech Nucleus Driver and apply.
- OS will reboot again (remember how annoying this used to be?)
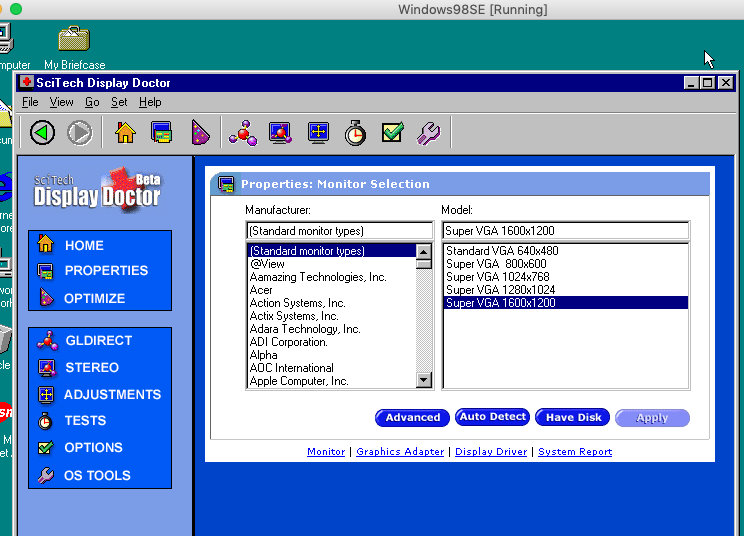
- SciTech reloads and you’ll see that VESA VBE 2.0 Oracle VM VirtualBox VBE Adapter is now selected.
- Once the SciTech window returns; click the ‘Monitor not selected!’ link and choose SuperVGA 1600×1200, then reboot Windows.
- Once back into Windows after the reboot; right click Desktop then Properties then Settings
- Here you should see Default Monitor on SciTech Display Doctor 7.0
- Click the monitor model, and select Super VGA 1600×1200.
(Strangely, I wasn’t able to pick anything higher than 1024×768, so select that, it’ll make you reboot. Once you return, go back into the settings, and you’ll now see 1600×1200 32bit)- I’ve had issues trying to change resolution at the same time.
- I’ve also had issues when the restart didn’t work – if so, restart the VM yourself – no need to go into safe mode, it should boot the second time OK.
- Right click Desktop -> Properties -> Settings; now you can select 1600×1200 32bit True Color no problem.
- Reboot one more time to be sure.
- Hello accelerated Windows desktop!
- Take another VM snapshot and call it something like “Display Driver Installed”


Configure for basic Internet access (NAT)
This will allow you to access the Internet, albeit in a basic and broken way.
- Start -> Settings -> Control Panel -> Internet Options -> Connections -> Setup
- I want to set up my Internet connection manually … or local area network (LAN).
- I connect through a local area network (LAN).
- Accept everything except for setting up a mail account.
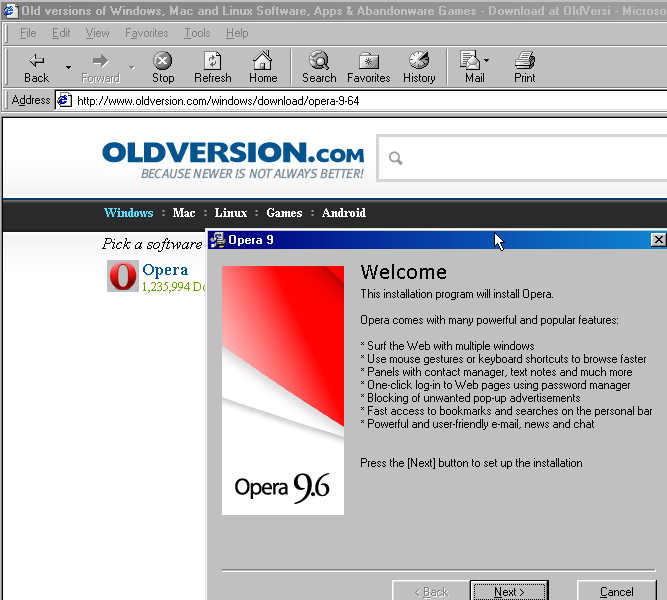
- Internet Explorer 5 will load. I recommend that you download Opera 9.64 (Opera 10 and above doesn’t support Windows 9x) – http://www.oldversion.com/windows/opera-9-64
- It will download it as a IFHDIH.PHP file that’s about 5MB – don’t worry. Just rename this to opera.exe and it *will* run.
- It will complain that Msimg32.dll is missing or too old. Don’t worry, it’ll still work and we’ll come back to fix this later.
Install Mouse Driver
- Not strictly necessary, but I find that the mouse works better with this driver/software installed.
- Download and run Belkin PS2 Mouse Driver 1.0 from http://files.platesteel.net/win98se/F8E850_SW_v1.exe
- Select PS/2 connection type. It will make you reboot again.
- Driver installed will look like:


Install some Essential Applications and Tools
- Install 7zip – http://files.platesteel.net/win98se/7z920.exe
- Download, unzip and install TweakUI – http://files.platesteel.net/win98se/7z920.exe
- Right click the inf file then install; it will ask you for a disk. Just browse to the directory that it was decompressed in, and select the catalog file.
Install Internet Explorer 6
- Not a strict necessity, but it’s better than having IE5.
- Probably a good idea to snapshot here – “Pre-IE6”
- Download, unzip, and install from – http://files.platesteel.net/win98se/ie60sp1.7z

Customizations
- In Explorer/Folder window -> View -> Folder Options -> View
- Show all files
- Display the full path in title bar
- Don’t hide file extensions for known file types
- Show window contents while dragging
- Smooth edges of screen fonts
- Click Apply then Like Current Folder
Install AC97 soundcard
The default VM setting is SoundBlaster 16 compatible. You can use the Windows Midi Synth, but I’ve seen some issues with games. In turn, we can use 9x drivers for AC97. Warning: lots of these drivers don’t work, so use mine.
- Download my Win 95 AC97 driver from http://files.platesteel.net/win98se/0001-VXD_A406.exe but do *NOT* run it.. simply right click and use 7zip to extract it to a directory.
- Shutdown the VM and go into Settings -> Audio, and change the audio hardware to ICH AC97, then boot up the machine.
- It will complain about no driver, select find driver and point it at the 0001-VXD_A406\Win95 directory. It will find and install the driver for you without crashing/or no audio, possibly after a reboot. You will also see it installing Realtek SB Emulation.
- Should have audio and wavetable MIDI when it returns.
- You can test this by running C:\windows\system\dxdiag.exe again.


Install Unofficial Windows 98SE Update Roll Up Pack (pseudo SP3)
- Download Windows 98SE SP3from http://files.platesteel.net/win98se/
- Instructions aren’t very good, it will pop up a Windows Help file. You can close this, then it’ll show you the install menu.
- Install DirectX 9.0c by itself, it will require a reboot after, then run installer again.
- Install Main Updates/System Core Files by itself. When complete, it will return with “Installation is now complete” and reboot, then run installer again (remember close the help window each time).
- At this point, I install (all at the same time) (with a reboot at the end):
- Adaptec ASPI Layer
- Animated Boot Up and Shutdown Logos
- DMA for all hard disks
- Microsoft Pain Graphic Filters
- Microsoft Word 97 SR-2
- Performance Tweaks
- Remote Desktop Connection
- Time Zone Update
- TrueType Fonts
- Universal Plug-n-PLay
- WinTop
- Snapshot! Call this “Windows 98SE Updated All Drivers and Clean”

Optional: Install 98SE2ME
- 98SE2ME will update over 700 of the system files with the newer versions from Windows ME. I don’t personally install it, at this time, but you can read more about it from the installer. http://www.mdgx.com/9s2m/read1st.php
- You will need a Windows ME ISO to use this.
Optional: Install KernelEx
- KernelEx adds an open source compatibility layer to Windows 98 that will let you run more modern software (like later versions of Opera, Firefox, etc).
I don’t personally have it installed, at this time, but you can read more about it here: http://kernelex.sourceforge.net/
Optional: Install Revolution Pack 9
- Revolution Pack makes the 98SE installation look more like XP/Vista. I don’t personally install it, but you can read more about it here: http://rp9.win98.nl/
Info: Resizing Windows 98SE Partition
If you get into a situation where you don’t have enough disk space. You can solve it by extending the virtual disk within VirtualBox, then grow the fat32 partition with gparted live ISO. The only caveat is that you need to remove all snapshots first.
To resize the VDI:
/Applications/VirtualBox.app/Contents/Resources/VirtualBoxVM.app/Contents/MacOS/VboxManage modifyhd –resize <MEGABYTES> <PATH TO VDI>
Then, boot from the gparted ISO.. you should see the total disk size and utilized. Right click the partition and hit resize, then apply. Once it’s complete, Windows 98 should have the extra space available. I would run scandisk just to be sure everything is OK, too.
Software
Games
The biggest problem with VirtualBox and Windows 9x is the lack of Guest Additions. This prevents any hardware emulation for Direct3D.
N – Does not work
Y – Does work
P – Works, with issues.
- N – C&C Gold 95
- Y – Civilization 2 Ultimate Collection – works perfect (dx5 game)
- N – Star Trek: Birth of the Federation 1.0.2 Software Emulation (video)
Applications
- Y – Visual Studio 6 Enterprise
Vesa Video Display Driver ISO Image for Windows 9x
Installation video drivers for:
Windows 95, 98(SE), Me
ISO image for easier installation in VirtualBox
From:
http://bearwindows.zcm.com.au/vbe9x.htm
comment
Reviews
Reviewer:
Uploader419
—
—
September 9, 2023
Subject:
how to install
right click on the desktop.
click propreties.
click Tab named «settings»
click Advanced.
click Tab named «adapter»
click next.
click next(again).
check option «specify location».
write down where INF file is(per example: D:\64mb).
click next until it asks you to restart the machine.
Reviewer:
AWEsome5199
—
—
July 4, 2023
Subject:
Help
Ok, how do I install it, like there’s no .EXE file in there.
Reviewer:
Fliggle Giggle
—
favoritefavoritefavoritefavoritefavorite —
February 8, 2023
Subject:
very amazing
good but the dingus windows 95 wasn’t able to become 16:9 aspect
Reviewer:
Wish13
—
favoritefavoritefavoritefavoritefavorite —
December 4, 2022
Subject:
Remember
Change «D:/WIN95» to «D:/064mb» otherwise, great!
Reviewer:
Zeromega801
—
favoritefavoritefavoritefavoritefavorite —
June 22, 2022
Subject:
works in oracle vm with 9x prohect install of win 95
Absolute perfection, the 064mb worked for me
-
whatsupdoc
- Posts: 1
- Joined: 26. Dec 2015, 07:25
Win98 Guest Graphics driver or Adapter
Hi — I wanted to run my old MS flight simulator 98, So I thought using a VB Guest with Win 98SE would be good.
But — the Flight simulator needs 256 colours and when I install Win98 second edition the VGA only offers 2 or 16 colours and a fixed screen resolution.
Is there any way to «upgrade the video card» in a virtual machine?
or get it to offer some more options?
So far I tried just changing the adapter to SVGA under the Windows settings — that crashed.
I’m running Virtual box 5.010 on Win 7 64 bit machine.
Thanks
-
mpack
- Site Moderator
- Posts: 38868
- Joined: 4. Sep 2008, 17:09
- Primary OS: MS Windows 10
- VBox Version: PUEL
- Guest OSses: Mostly XP
Re: Win98 Guest Graphics driver or Adapter
Post
by mpack »
VirtualBox emulates a VESA compatible graphics card, so yes, you can install a VESA graphics driver. Please see the «Howtos and Tutorials» section. I prefer the BearWindows Universal driver, as the Display Doctor one is trialware and you can never register it now.
-
mpack
- Site Moderator
- Posts: 38868
- Joined: 4. Sep 2008, 17:09
- Primary OS: MS Windows 10
- VBox Version: PUEL
- Guest OSses: Mostly XP
Re: Win98 Guest Graphics driver or Adapter
Post
by mpack »
dlharper wrote:Note that the original URL for downloading the Bearwindows driver will no longer work. It is currently available from http://bearwindows.zcm.com.au/.
Thanks, but I’m pretty sure I changed the tutorials in mid year to correct the broken BearWindows links (edit: yes I did).
-
dlharper
- Posts: 291
- Joined: 25. Aug 2011, 19:17
- Primary OS: MS Windows 10
- VBox Version: PUEL
- Guest OSses: MS Windows (several versions); DOS
Re: Win98 Guest Graphics driver or Adapter
Post
by dlharper »
Some of the links have indeed been changed (possibly most of them) but some still point to the old address. I noticed the one in Section 10 of viewtopic.php?f=28&t=59559. I have not been through all of the tutorials in detail, so this may be the only one left, as far as I know.
-
mpack
- Site Moderator
- Posts: 38868
- Joined: 4. Sep 2008, 17:09
- Primary OS: MS Windows 10
- VBox Version: PUEL
- Guest OSses: Mostly XP
Re: Win98 Guest Graphics driver or Adapter
Post
by mpack »
I see, thanks. I don’t really care for that tutorial — too much sprawling detail packed into one post — so I’ve never done more than skim content. Link fixed now.
SoftGPU: SW and HW accelerated driver for Windows 9x Virtual Machines

This is ready-to-use compilation of my 4 projects:
- VMDisp9x: https://github.com/JHRobotics/vmdisp9x
- Mesa3D for 9x: https://github.com/JHRobotics/mesa9x
- WineD3D for 9x: https://github.com/JHRobotics/wine9x
- OpenGlide for 9x: https://github.com/JHRobotics/openglide9x
Requirements
- Virtual machine with one of these VGA adapter support:
- A) Bochs VBE (Bochs, VirtualBox, Qemu)
- B) VMware SVGA-II (VMware, VirtualBox, Qemu)
- Windows 95/98/Me as VM guest system
- A) Windows 98/Me — required is last version of DirectX 9 (included in package)
- B) Windows 95
- Last version of DirectX 8 (included in package)
- Visual C runtime (version 6 included in package)
- OpenGL 95 for versions without
opengl32.dll(included in package)
Feature support
| Hypervisor | Version | Adapter | VGA driver | 32 bpp | 16 bpp | 8 bpp | HW 3D | Sound drivers |
|---|---|---|---|---|---|---|---|---|
| Oracle VirtualBox | 6.1, 7.0 | VboxVGA | ✔ | ✔ | ✔ | ✔ | ❌ | SB16, AC97 |
| Oracle VirtualBox | 6.1, 7.0 | VboxSVGA | ✔ | ✔ | ✔ | ✔ | ✔ | SB16, AC97 |
| Oracle VirtualBox | 6.1, 7.0 | VMSVGA | ✔ | ✔ | ✔ | ✔ | ✔ | SB16, AC97 |
| VMware Workstation | 16, 17 | — | ✔ | ✔ | ✔ | ⚠ | ✔ | SBPCI128 |
| QEMU | 7.x, 8.0 | std | ✔ | ✔ | ✔ | ✔ | ❌ | adlib, SB16, AC97 |
| QEMU | 7.x, 8.0 | vmware | ✔ | ✔ | ❌ | ❌ | ❌ | adlib, SB16, AC97 |
SoftGPU can use 3 render drivers:
- softpipe: software Mesa3D reference renderer
- llvmlipe: software LLVM accelerated 3D renderer
- SVGA3D: HW renderer for virtual GPU adapter VMWare SVGA-II (sometimes called VMSVGA, VboxSVGA or SVGA-III)
Not all renderers supporting all application/games, performance expectation is in 1024×768 32bit:
| Renderer | Requirements | OpenGL version | DX9 | DX9 shaders | DX8 | DX8 shaders | DX6-7 | OpenGL | Glide | Glide DOS | Expected FPS |
|---|---|---|---|---|---|---|---|---|---|---|---|
| softpipe | — | 3.3 | ✔ | ✔ | ✔ | ✔ | ✔ | ✔ | ✔ | ❌ | 1-3 |
| llvmlipe (128 bits) | SSE | 3.3 | ✔ | ✔ | ✔ | ✔ | ✔ | ✔ | ✔ | ❌ | 10-15 |
| llvmlipe (256 bits) | SSE, AVX | 3.3 | ✔ | ✔ | ✔ | ✔ | ✔ | ✔ | ✔ | ❌ | 12-20 |
| SVGA3D | SVGA-II (gen9) | 2.1 | ✔ | ❌ | ✔ | ❌ | ✔ | ✔ | ✔ | ❌ | 30-60 |
| SVGA3D | SVGA-II (gen10) | 4.1 | ✔ | ✔ | ⚠ | ✔ | ❌ | ❌ | ❌ | ❌ | 35-80 |
Hypervisor translation to real HW GPU:
| Renderer | Host technology | Hypervisor support |
|---|---|---|
| softpipe | framebuffer | all |
| llvmlipe | framebuffer | all |
| SVGA3D (gen 9) | DX9/OpenGL 2.1 | VirtualBox 6+7, VMware Workstation |
| SVGA3D (gen 10) | DX11/Vulkan | VirtualBox 7 |
Download
ISO image or ZIP package can be downloaded on release page: https://github.com/JHRobotics/softgpu/releases/
Installation
- Setup the Virtual Machine
- Copy installation files on formatted HDD and apply patcher9x [Optional but recommended]
- Install the Windows 95/98/Me [Windows 98 SE is recommended]
- Run setup with
softgpu.exe - [optional] Install audio drivers (if using AC97 sound card) and USB (if you added USB controller)
- [only if you have AC97 sound card] Reinstall DirectX again = AC97 replacing some DX files, but they are not working with newer DX versions
- Have fun!
Update
If you have an older version of SoftGPU installed, you can update without any problem: insert the CD with the latest version into the VM and click install. The installer will take care of all the necessary modifications, only to increase compatibility it is necessary to do some steps manually:
Update to version v0.4.2023.19
- Only applies to 95/98 not Me
- Fixes occasional problem with DirectDraw detection (3DMark99)
- Find the following key in the registry:
HKEY_LOCAL_MACHINE\System\CurrentControlSet\Control\SessionManager\KnownDLLs
- And remove the value named
DDRAW(with dataddrawme.dll) - Don’t do these steps in Windows Me, in Me is still this registry key necessary to make DDraw and DX 7 and lower to work!
SoftGPU in action
- 3DMark03 in version v0.4.2023.19
- 3DMark03 in version v0.4.2023.18
- 3DMark2001
- 3DMark2000
- 3DMark99
For comparison, video from real end-of-era PC is here. So, some work still needs to be done 
VirtualBox VM setup with HW acceleration
- Create new VM selecting Machine -> New in menu
- Type: Microsoft Windows, Version: Windows 98
- Base memory: 512 MB (256 MB is minimum, but more 512 MB isn’t recommended without additional patches!), CPU: 1
- Disk size: recommended is at least 20 GB for 98/Me (you can select less, but HDD becomes full faster). Select 2 GB if you plan install Windows 95. Tip: If you storing virtual machine on classic HDD, check Pre-allocate Full Size, because it leads to lower disk image fragmentation.
- Finish wizard
- Open VM setting
- In General change type to Linux and version to Other Linux (32-bit) => This setting haven’t any effect to hardware configuration but allow you to set GPU type through GUI.
- Now in Display
- Set Graphic Controller to VMSVGA
- set video memory to 128 MB (VBox sometimes turn off GPU HW acceleration if this value is lower). More on this issue and more about VRAM usability.
- Check enable 3D Acceleration
- Optional adjustment
- set USB controller to USB 1.1 (OHCI) for 98/Me, or turn USB off for 95
- Audio controller set to SoundBlaster 16 for 95 and 98 or AC 97 for 98 and Me (working drivers for Windows 98 are below.
- Disable VMSVGA10 (VirtualBox >= 7.0 only!)
- Open command line
- (on Windows) navigate to VirtualBox installation directory (default: C:\Program Files\Oracle\VirtualBox)
- Enter this command where My Windows 98 is your Virtual Machine name
VBoxManage setextradata "My Windows 98" "VBoxInternal/Devices/vga/0/Config/VMSVGA10" "0"
- Install system — Windows 98 SE is highly recommended (for newer CPU, you need my patch: https://github.com/JHRobotics/patcher9x)
- Insert SoftGPU iso (can be downloaded in Releases) and run
softgpu.exe - Click on Install!
- You maybe need some reboots (after MSVCRT and DX installation) and run
softgpu.exeagain. - After complete and final reboot system should start in 640×480 in 256 colours
- Right click on desktop, Properties -> Settings and set the resolution (which you wish for) and colours:
- to 32 bits for 98/Me, because only in 32 bit real HW screen acceleration works and applications are much faster
- to 16 bits for 95, because 95 can’t set colour depth on runtime (reboot is required) and lots of old applications can’t start in 32 bits (all Glide for example)
- Verify settings:
- OpenGL: run
glchecker.exeintoolson SoftGPU CD- If renderer is SVGA3D, you have HW acceleration, congratulation! If you OpenGL version is 2.1, you done all right. If OpenGL version is 4.1 you have GPU gen 10 active, it isn’t wrong, but you may see graphical glitches in lots of games = navigate back to 8. to turn it off.
- If renderer is llvmpipe, you have still SW acceleration, but at least accelerated by SSE (128 bits) or AVX (256 bit). GPU acceleration is disabled or you real GPU isn’t sporting HW acceleration.
- If renderer is softpipe, you have SW acceleration and running on reference (but slow) renderer, SIMD ins’t accesable somehow, or you on 95, where is softpipe renderer by default, even if SIMD hack is installed (more in Mesa9x documentation: https://github.com/JHRobotics/mesa9x).
- If renderer is Generic, then ICD OpenGL DLL is not loaded. Something is wrong with system or you installed SSE instrumented binaries on no SSE enabled/supported guest.
- If program can’t start by missing
MSVCRT.DLLinstall MSVCRT (part of Internet Explorer >= 4 too)
- DirectX:
- On 98 you can run dxdiag (Start -> Run -> type
dxdiag) and check all tests - On Me you can still run dxdiag, but you can only check DX8 and DX9, because we cannot easily replace system
DDRAW.DLL. But DX6 and DX7 games should usually run without problems - On 95 you can still run dxdiag, but if you run test, you only see black screens, but again, games (if supporting 95) games should usually run
- On 98 you can run dxdiag (Start -> Run -> type
AMD Zen, 11th Generation Intel Core and newer
Newer CPU have excellent performance but needs some extra tune:
- apply patcher9x — this is required!
- Change TSC (Time Stamp Counter) behaviour (Warning: this options is not available when VirtualBox is using Hyper-V as execution, engine!)
VBoxManage setextradata "My Windows 98" "VBoxInternal/TM/TSCTiedToExecution" 1
- (AMD ZEN 2+ only) Change too complex CPUID to something simpler (Windows itself is OK, but some programs may be confused — 3DMark for example)
VBoxManage modifyvm "My Windows 98" --cpu-profile "AMD Ryzen 7 1800X Eight-Core"
VMware Workstation setup with HW acceleration
SoftGPU with HW acceleration was tested only with lasted version of VMware Workstation (17.0.0 build-20800274), if you’ll be successful with older version or free VMware player, please let me know.
General information
- Use Windows 98 SE, newer Mesa is not currently working in 95 and Windows 98 FE (first edition) hasn’t supporting WDM sound cards so you might have a problem with sound.
- Fresh install, Windows 9x doesn’t like hardware changes and if you import import VM from somewhere, strange problems may occur.
- no VMware additions, because they only contain basic display driver, contain mouse integration driver and tray program which is replacing display driver to VMware default display driver and some integration utilities. If you want mouse integration driver (but is useless for gaming with mouse) alone driver is listed below.
- set as hardware compatibility Workstation 9.x and VM type Windows 2000 Server. VMware in other cases is comparing installed addition tools version and features with hypervisor version and if they don’t match refuses to expose SVGA 3D commands to guest.
Step by step guide
- Create new VM — from menu File->New Virtual Machine
- In wizard choose Custom (advanced) click on next:
- As Hardware compatibility select Workstation 9.x (important)

- Select I will install the operating system later.
- As Guest operating system choice Microsoft Windows and as Version select Windows 2000 Server (important)

- Type VM name and number of processors keep on 1
- Set the memory to 512 MB (but without additional patches not more!)
- Network choice is your own (default NAT should work all cases) and SCSI Controller keep on BusLogic
- set Virtual disk type to IDE (important)
- create new virtual disk and set space at last at 20 GB (but lower than 127 GB without extra patches!)
- type or keep HDD file name and at last page before finish click on Customize Hardware
- Now VM needs to be a bit reconfigure:
- click on Add… and Floppy drive

- click on USB Controller and set USB compatibility to USB 1.1 or remove USB controller completely
- click on Display and check Accelerate 3D graphics

- (optional) click on Printer and click Remove (if you don’t plan to use this feature, you’ll save yourself from a pointless warning message)
- click on New CD/DVD (IDE) and point Use ISO image file to your Windows 98 installation CD ISO.
- (optional) click on Floppy and point Use floppy image file to your boot floppy (only if you plan boot floppy)
- Click on Close, Finish and Power on machine
- TIP: if you wish customize boot order, right click on the new VM, choose Power and Power on to Firmware — VM will boot to environment very close to common PC BIOS.

- Install the Windows 98 — this step is really pain, VMware VM in BIOS VGA mode is hyper slow and mouse isn’t usable — you have navigate through installation by keyboard (
TAB,Shift+TAB, cursor keys,Enter).- TIP: apply patcher9x. If you have Intel 11th gen. CPU or newer or AMD Ryzen (any model) or other AMD ZEN architecture CPU and newer, this is necessary.
- After installation isn’t system very usable until you’ll install GPU driver! So, insert SoftGPU iso (can be downloaded in Releases) and run
softgpu.exe. - Click on Install!
- You maybe need some reboots (after MSVCRT and DX installation) and run
softgpu.exeagain. - After complete and final reboot system should start in 640×480 in 32 bits per pixel colors.
- If you have still mouse trouble, open Device Manager (by cursor keys select My Computer and press
Alt+Enterto open properties), then disable all HID-compliant mouse. Reboot VM after done!

- Use
glchecker.exeto verify settings
VMware Workstation Player
VMware Workstation Player hasn’t GUI option to select virtual machine version. But you can set it manually by editing *.vmx file:
- Turn VM off
- Open folder with Virtual Machine (How to locate: Right click on VM -> setting… -> tab Options -> General -> Working directory)
- Open file
*Virtual machine name*.vmxin text editor (for example in Notepad if you haven’t something better) - Search for
virtualHW.version - Modify line to:
(Original values are 18 for VMware 16 or 19 for VMware 17)
- Save file, start VM and run glchecker to verify setting:

QEMU
Hardware 3D support isn’t available yet with QEMU. 2D driver now works with QEMU -vga std or -vga vmware. But main problem with QEMU is bad detection of a PCI bus. If the PCI bus is detected badly, system won’t enumerate most of device — VGA adapter, sound and network card and even IDE bus.
PCI bus detection fix
- Open Device Manager and locate Plug and Play BIOS (Exclamation mark should be on it)

- With this device selected click on Properties, select Driver tab and click on Update driver

- In Wizard select second option (Display a list of all drivers in specific location, …)

- Select Show all hadrware and from models list choose PCI bus, click on next, confirm
warning message and reboot computer.


- After reboot, system will ask you for drive on every new discovered device. All you need to do, is select Search for the best driver… and clicking on next. Please don’t select new or updated drivers here — you can do it later. You may need reboot computer several times.


- You will be asked for VGA driver and unknown device drivers. Still select default generic driver here!


- After last reboot open Device manager again — as you see, you have 2 VGA cards now, so select Standard Display Adapter (VGA) (the working one) and click on Remove.

- After reboot (again), you have working system now and you can install SoftGPU and other drivers.
Virtual GPU gen. 10
VirtualBox 7.0 is supporting newer technology for rendering. It is supporting pixel/vertex/computing shaders but it is still incomplete. You can turn in by this command.
VBoxManage setextradata "My Windows 98" "VBoxInternal/Devices/vga/0/Config/VMSVGA10" "1"
On most configurations this is turn on by default (allows for example Windows 7-11 desktop composition aka «aero») but for legacy technologies isn’t ready yet — you can probably see some serious graphical glitches if you use it with pre DirectX 9 application/games. But if you want run 3DMark03 or 2001 you’ll have to turn this on. If you application or game work with this configuration, it usually runs smoother than with GPU gen. 9.
Bugs
Currently there are known these limitations:
Vertex Shaders
Vertex shaders not working correctly with HW acceleration. You can see it, for example, with 3D Mark 2001/2003 tests. Using shaders is very rare in DirectX 8 games, but very common in DirectX 9 games (on other hand, these are usually games after Windows 9x era). As temporary solution you can turn off HW acceleration (but rendering will be much slower). Some games also has failback technology if GPU hasn’t shader support (for example GTA SA). You can globally disable Vertex Shaders inserting this to registry:
REGEDIT4

[HKEY_LOCAL_MACHINE\Software\Wine\global]
"MaxShaderModelVS"=dword:00000000
Windows 95 support
Windows 95 support is limited — SoftGPU works, but there lots of extra bugs will appear and if you haven’t any special reasons for using Windows 95 use recommended Windows 98 Second edition instead.
Other bugs
There are many bugs in individual components, please post them to individual repositories based on bugged application (DirectX, Glide, OpenGL).
But still, please be patient. SoftGPU compatibility target is about a decade of intensive HW and SW development (from DOS direct VGA/VESA access, SW rendering through GDI, DirectDraw, OpenGL, Glide, DirectX, OpenGL again). After all, there will still applications that cannot be run anyway because there are written for very individual SW/HW combinations.
General tips
There are some tips without direct relation to SoftGPU but they can improve the user experience with MS Windows 9x OS.
Fresh install
Prefer new installation over copy older installations done on different (even virtual) HW.
Copy Installation to HDD before run setup
If you installed Windows 9x from CD, on near every system change your will be asked to insert Install CD. You can avoid it if you prepare HDD manually, copy installation from CD and run setup.exe from C: drive.
All utilities you need are on patcher9x boot floppy. The short procedure follows:
- insert patcher9x floppy to floppy driver and Windows Installation CD to CD driver. Boot from floppy drive
- run
fdiskand create primary dos partition (it wizard type program, just keep pressing1,Yand finallyESC). - reboot after
fdiskfinish - format HDD, copy files, install necessary patches and run the setup using following commands:
format C:
xcopy /v D:\win98\ C:\install\win98\
patch9x C:\install\win98 -auto
C:
cd install\win98
setup /ie /nm
Explanation: The /v switch with xcopy means verify. The /ie switch with setup means skip recovery floppy creation and /nm means no machine check — this is necessary because in Patcher9x boot floppy is using FreeDOS and MS setup program cannot determine RAM size without MS memory manager.
Now setup automatically runs scandisk and after complete it you can continue with installer GUI. You can also remove floppy and CD from drive at this point.
Turn on DMA
Windows by default using interrupts to access HDD and CD drive. This is especially slow in the HW accelerated virtual machines because every interrupt will stop executing visualisation engine and hand over access to hypervisor to solve it and after that it’ll be need to restart visualisation engine again. Time consumed by interrupts depends on visualization technology for example in QEMU + kvm is HDD access very slow equally VirtualBox + Hyper-V and combination QEMU + Hyper-V is downright painful. Fortunately there is DMA transfer of whole memory block instead of individual bytes. Unfortunately you have to enable it manually.
You can turn it on in Device Manager on HDD properties enable DMA checkbox. Do it the same for CD driver and reboot VM for applying changes.

Change logon to Windows Logon
After install network card you are asked every time to enter the credentials — but this is not credentials to the computer but to the network (you can also skip this by press ESC). If you don’t plan to install NT server as other VM and runs ancient network sharing, this is only annoying thing. You can turn it off in Control panel -> Network and change Primary network logon to Windows Logon.

Extra drivers
These are links to some extra drivers for VM:
- AC97 (version 3.62) — for QEMU and VirtualBox
- SB PCI 128 — for VMware Workstation
- VMware mouse driver (floppy version)
If you wish download these drivers from Windows 9x directly, you can use these links (simply replace https -> http):
http://files.emulace.cz/ac97_362.zip
http://files.emulace.cz/sbpci_98se.exe
http://files.emulace.cz/vmmouse.zip
If you need tool for decompressing ZIP and other archives, there is 7-Zip in version with Windows 98 compatible:
http://files.emulace.cz/7z920.exe
Compilation from source
- You need MINGW and GNU make to build softgpu.exe
- You need all development tool to compile all other component (see README.md in individual repositories)
- Compile softgpu.exe by type
make - Compile VMDisp9x and copy files
boxvmini.drv,vmwsmini.drv,qemumini.drv,vmwsmini.vxd,vmdisp9x.infand place them todriver/win95anddriver/win98mefolder - Compile Mesa9x for Windows 95 (e.g., without SSE) and copy and rename files to following schema
vmwsgl32.dll=>driver/win95/vmwsgl32.dllopengl32.w98me.dll=>driver/win95/extra/opengl32.dllmesa3d.w98me.dll=>driver/win95/mesa3d.dllglchecker.exe=>tools/glchecker.exeicdtest.exe=>tools/icdtest.exewgltest.exe=>tools/wgltest.exe- [folder]
glchecker=>tools/glchecker
- Compile Mesa9x for Windows 98 and Me (eq. with SSE, optimized for Core2 or Westmere) and copy these files
vmwsgl32.dll=>driver/win98me/vmwsgl32.dllopengl32.w98me.dll=>driver/win98me/extra/opengl32.dllmesa3d.w98me.dll=>driver/win98me/mesa3d.dll
- Compile Wine9x for Windows 95 and copy
ddraw.dll=>driver/win95/ddraw.dllddrawme.dll=>driver/win95/ddrawme.dlld3d8.dll=>driver/win95/d3d8.dlld3d9.dll=>driver/win95/d3d9.dlldwine.dll=>driver/win95/dwine.dllwined3d.dll=>driver/win95/wined3d.dll
- Compile Wine9x for Windows 98+Me and copy
ddraw.dll=>driver/win98me/ddraw.dllddrawme.dll=>driver/win95/ddrawme.dlld3d8.dll=>driver/win98me/d3d8.dlld3d9.dll=>driver/win98me/d3d9.dlldwine.dll=>driver/win98me/dwine.dllwined3d.dll=>driver/win98me/wined3d.dll
- make
ddreplacer.exe(by typing make ddreplacer.exe in Wine9x) - Extract original ddraw.dll from DX8 redistributable for W95 and type
ddreplacer path/to/extracted/ddraw.dll ddr95.dll
- copy
ddr95.dll=>driver/win95/dx/ddr95.dll - copy
ddr95.dll=>driver/win98me/dx/ddr95.dll
- Extract original ddraw.dll from newer DX9 redistributable (doesn’t matter if it’s final one, this file doesn’t seem to change often) and type
ddreplacer path/to/extracted/ddraw.dll ddr98.dll
- copy
ddr98.dll=>driver/win95/dx/ddr98.dll - copy
ddr98.dll=>driver/win98me/dx/ddr98.dll
- Compile OpenGlide9x for Windows 95 and copy
glide2x.dll=>driver/win95/glide2x.dllglide3x.dll=>driver/win95/glide3x.dll
- Compile OpenGlide9x for Windows 98 and copy
glide2x.dll=>driver/win98me/glide2x.dllglide3x.dll=>driver/win98me/glide3x.dll
- Edit both
driver/win95/vmdisp9x.infanddriver/win98me/vmdisp9x.infand uncomment files and that you added. CopyFiles options have to look like:
CopyFiles=VBox.Copy,Dx.Copy,DX.CopyBackup,Voodoo.Copy
and
CopyFiles=VMSvga.Copy,Dx.Copy,DX.CopyBackup,Voodoo.Copy
and
CopyFiles=Qemu.Copy,Dx.Copy,DX.CopyBackup,Voodoo.Copy
- place redistributable to redist folder
- Edit
softgpu.inifor final paths review - Create ISO file place to it:
- file
softgpu.exe - file
softgpu.ini - folder
driver - folder
redist - folder
tools - readme and licence file
- Mount ISO to virtual machine and enjoy it!