Apple Input Device Drivers for Windows 10 & 11
Re-packaged official driver support software enabling the native usage of various Apple accessories and peripherals—including keyboards, mice, and trackpads.
Version
Built with Windows Support version 6.1.7071 (latest version).
Information
Apple has released drivers enabling the native usage of their proprietary interface and peripheral devices on Microsoft Windows operating systems.
To protect its users, Apple began requiring their driver downloads to occur through a controlled utility—known as Boot Camp Assistant—available only on macOS to automate the process and prevent the user from accidental misconfiguration of critical system drivers, but this also restricted the accessibility to non-critical and necessary device drivers such as human interface devices. This repository aims to provide access to device drivers in the event that they cannot be acquired via Boot Camp Assistant.
Compatibility
The drivers listed here are compatible with Windows 10 and 11. Though Apple has not made an official comment on Windows 11 compatibility, testing demonstrates they still function as intended.
Compatible devices include all versions of Apple Magic Mouse, Apple Magic Keyboard, Apple Magic Trackpad, and all Apple proprietary wired keyboards and mice.
Usage
To install the desired device driver, open the folder name corresponding to the device type, right-click the .inf file and choose Install. Upon completion you will need to disconnect and reconnect your device.
The Apple Magic Keyboard will require you to install the .inf files in both the AppleKeyboard and AppleMagicKeyboard2 folders.
Settings
Function Key Reversal
To reverse the function of the Fn key, change the following DWORD (32-bit) Values in the Registry Editor from 0 to 1:
HKEY_LOCAL_MACHINE\SYSTEM\ControlSet001\Services\KeyMagic\OSXFnBehavior
HKEY_LOCAL_MACHINE\SYSTEM\CurrentControlSet\Services\KeyMagic\OSXFnBehavior
Inverted Scrolling
To reverse the direction of the scroll wheel the same way macOS does, change the following DWORD (32-bit) Value in the Registry Editor from 0 to 1 and restart your PC:
HKEY_LOCAL_MACHINE\SYSTEM\CurrentControlSet\Enum\HID\xxxxx\yyyyy\Device Parameters\FlipFlopWheel
Let xxxxx respresent the device instance ID (this can be found through Device Manager) and yyyyy the next (only) available registry key.
Remapping the ⌘ Key
To make the command key ⌘ function as a control CTRL the same way macOS does, you will need to use a utility like Sharpkeys or Microsoft PowerToys.
License
Apple has not provided any software license agreement for the use of its Windows Support Software—only Boot Camp Utility, which provides no specifications on proprietary driver usage. Since no usage license has been explicitly declared, the content here is intended only for those running Windows on a genuine macOS product via Boot Camp but have issues downloading the drivers via Boot Camp Assistant.
Resources
brigadier — Utility for downloading Windows Support Software on Windows natively.
Sharpkeys and Microsoft PowerToys — GitHub utilities that can assist in remapping the ⌘ key to emulate macOS.
Boot Camp Support Software — Versions 5.1.5621 and 4.0.4033 for Windows 7 installs (use this table to find out which version you need).
Boot Camp Utility — Software License Agreement (PDF)
How to use Apple Magic Trackpad 2 on Windows 10, 11
If you have an Apple Magic Trackpad 2 and want to use it on Windows 10 or Windows 11, this tutorial is for you.
As we all know, Apple Magic Trackpad is a good companion to Apple Products like iMac, Mac mini and iPad.
In fact, Apple Magic Trackpad 2 can also be used on Windows 10 & Windows 11, and it supports almost all the gestures available on macOS.
If you frequently switch between macOS and Windows 10 or Windows 11, and you’re using Apple Magic Trackpad 2, just read on and follow the instructions in this article to set your trackpad on Windows 10 and Windows 11.
You may also like:
How does it work
Actually, Apple Magic Trackpad 2 is not designed for Windows machines, and Apple doesn’t provide any support on it. However, a genius has already implemented Windows Precision Touchpad for Apple MacBook family / Apple Magic Trackpad 2 on Windows 10 / 11.
The method of getting Apple Magic Trackpad 2 working on your Windows PC is quite straightforward: you just need to download the driver file on GitHub and manually install it on your computer, then your Mac trackpad will work like a charm on your Windows 10 machine.
This method also supports the following devices:
- Non-Retina MacBook
- Some non-Retina MacBook Pro (2011 and 2012)
- MacBook Pro with Retina Display (MacBookPro 10,1, MacBookPro10,2 & MacBookPro11,1)
- All recent MacBook Air (Please report if your model is not supported)
- MacBook Pro with Retina Display (2013, 2014, 2015, 13-inch & 15-inch)
- New MacBook (12-inch)
- MacBook Pro 2015, 2016, 2017 (a few SPI devices are in work-in-progress state)
- T2-based devices: MacBook Air 2018, MacBook Pro 2017/2018/2019/2020: Use default fallback, experience might not be optimal. Open a issue if you encountered dead touch regions.
- Magic Trackpad 2 (USB)
- Magic Trackpad 2 (Bluetooth connection)
Source: https://github.com/imbushuo/mac-precision-touchpad#device-support
Note: In the latest release (Release 3979), the developer introduces initial Bluetooth connectivity support for Magic Trackpad 2. Work is still in-progress so you might experience certain issues such as input lag or system crash.
Use Apple Magic Trackpad 2 on Windows 10 and Windows 11: step-by-step guide
Follow the simple steps below to set your Trackpad on your Windows PC:
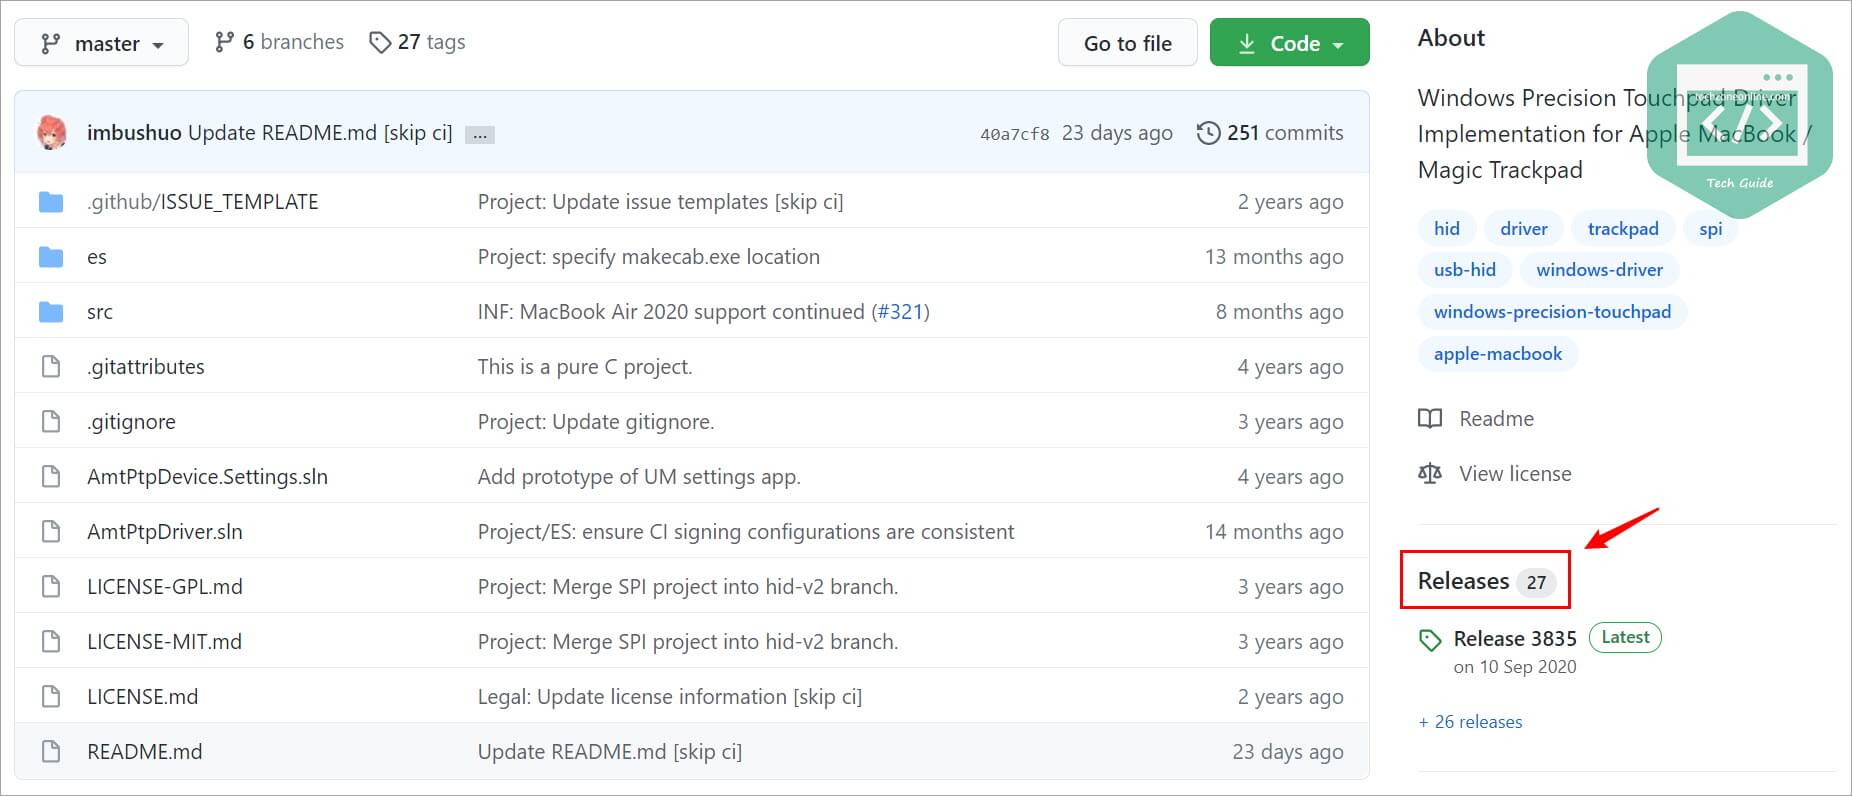
- Go to this GitHub page. Then click Releases on the right side of the page.
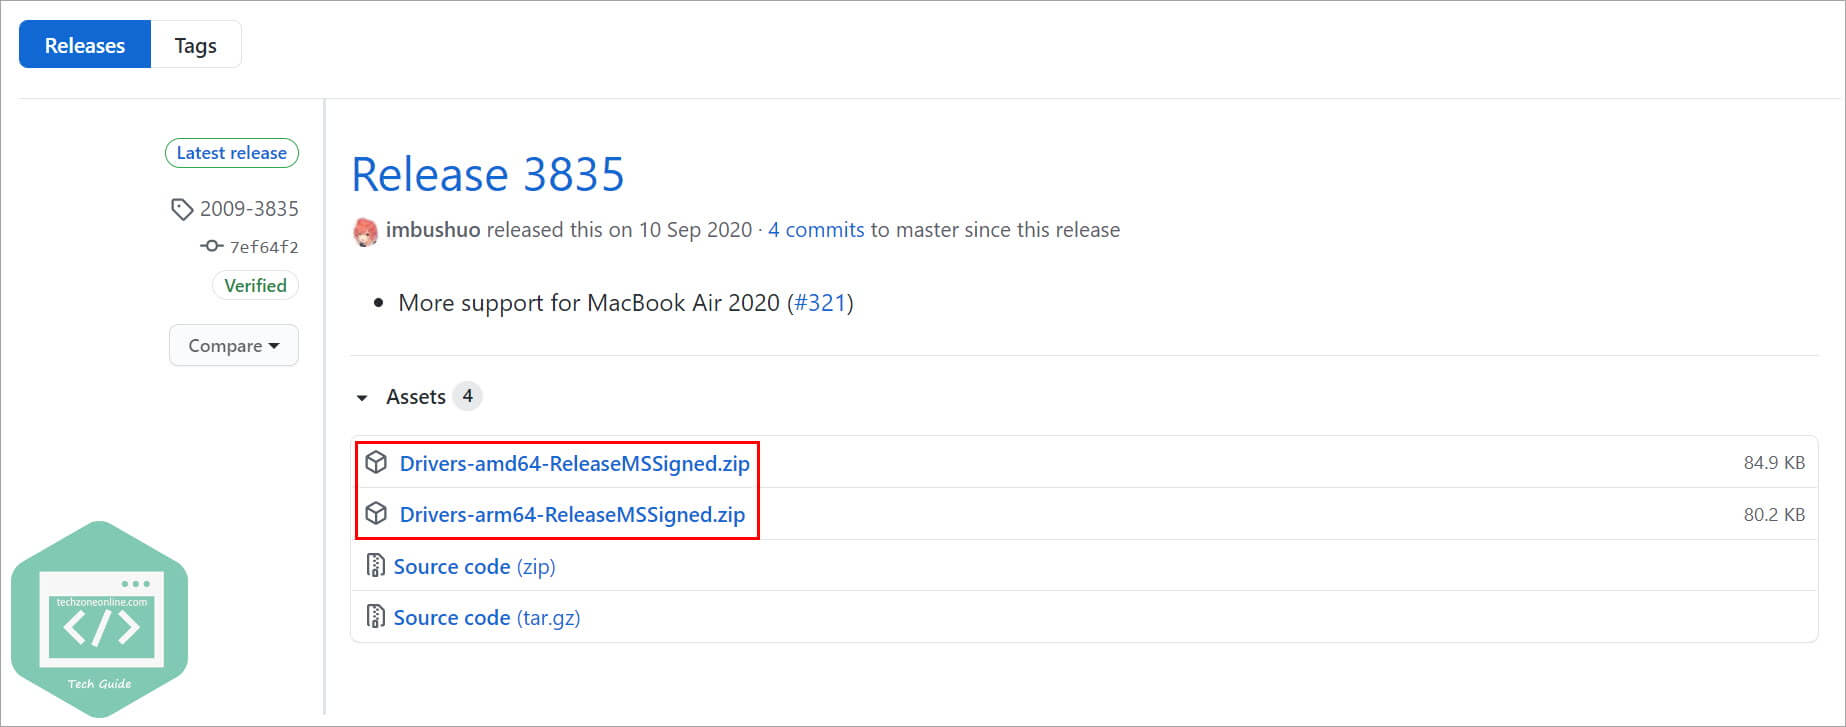
- Select the driver file that suits your device. Click on it to download it on your computer.
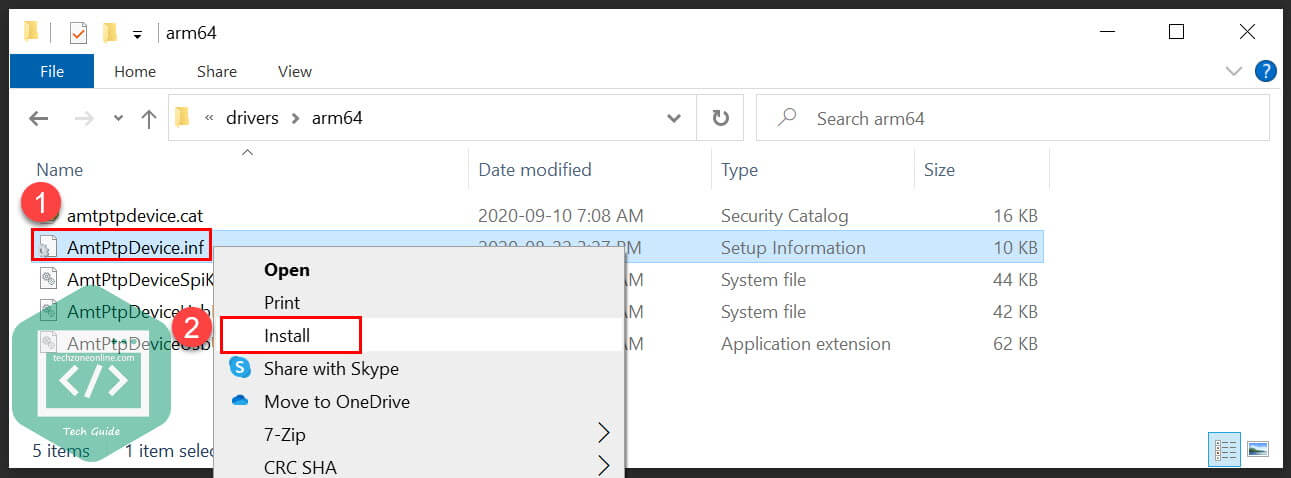
- Extract the .zip driver file you downloaded. Double-click the folder you extracted and go to drivers > arm64 (or amd64).
- Right-click the file AmtPtpDevice.inf and select Install to manually install the driver on your PC.
Note: If there is no “Install” option when you right-click on AmtPtpDevice.inf, you can install the driver via Command Prompt.
- Click Yes when Windows 10 prompts for consent.
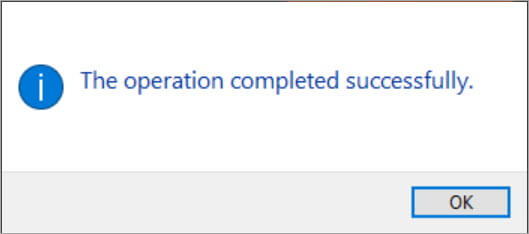
- Wait several seconds and you’ll be informed that the driver has been installed successfully.
Now you’ve installed the driver on your Windows computer.
If you’d like to connect your Magic Trackpad 2 to your computer via Bluetooth, then just go to Windows Settings > Bluetooth settings and pair your trackpad. If you prefer a wired connection, simply connect your trackpad to your PC with an Apple Lightning to USB cable.
How to install the driver via Command Prompt
You can install the driver using Command Prompt when there is no “Install” option after you right-clicked the .inf driver file. To do so:
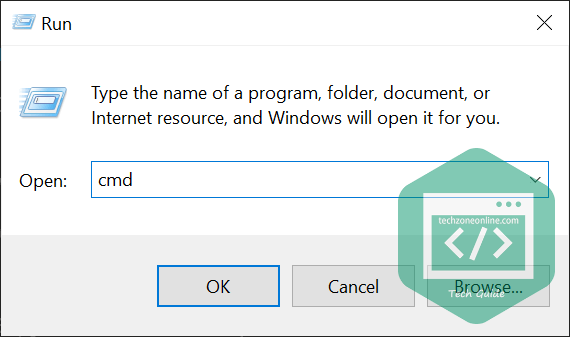
- On your keyboard, press the Windows logo key and R and the same time to invoke the Run dialog. Type
cmdand press Shift, Ctrl and Enter at the same time to run Command Prompt as administrator. - At the Command Prompt, type the following command and press Enter to install the driver file:
RUNDLL32.EXE SETUPAPI.DLL,InstallHinfSection DefaultInstall 132 path-to-inf\infname.infNote: you need to replace the
path-to-inf\infname.infpart with the path to the file AmtPtpDevice.inf on your computer.For example, the AmtPtpDevice.inf file on my computer is in the following path:
D:\Desktop\Drivers-amd64-ReleaseMSSigned\drivers\amd64\AmtPtpDevice.inf, so the command should be:RUNDLL32.EXE SETUPAPI.DLL,InstallHinfSection DefaultInstall 132D:\Desktop\Drivers-amd64-ReleaseMSSigned\drivers\amd64\AmtPtpDevice.inf
Known Caveats for Bluetooth connection:
- On certain devices such as Surface Pro X, the first time Bluetooth connectivity might take a long time to finish (5-10 seconds.) Please wait patiently. A toast prompting “restart system” might show up, which is a false-positive message, and you can safely ignore that.
- It doesn’t work well with VMware workstation Bluetooth controller passthrough.
Read on and follow the steps below to customize your Mac trackpad / Apple Magic Trackpad 2.
Customize Mac precision touchpad on Windows 10 & Windows 11
After you successfully installed the driver on your Windows PC, you can head to the Windows Settings to customize your trackpad. Here’s how to do it:
For Windows 10 users:
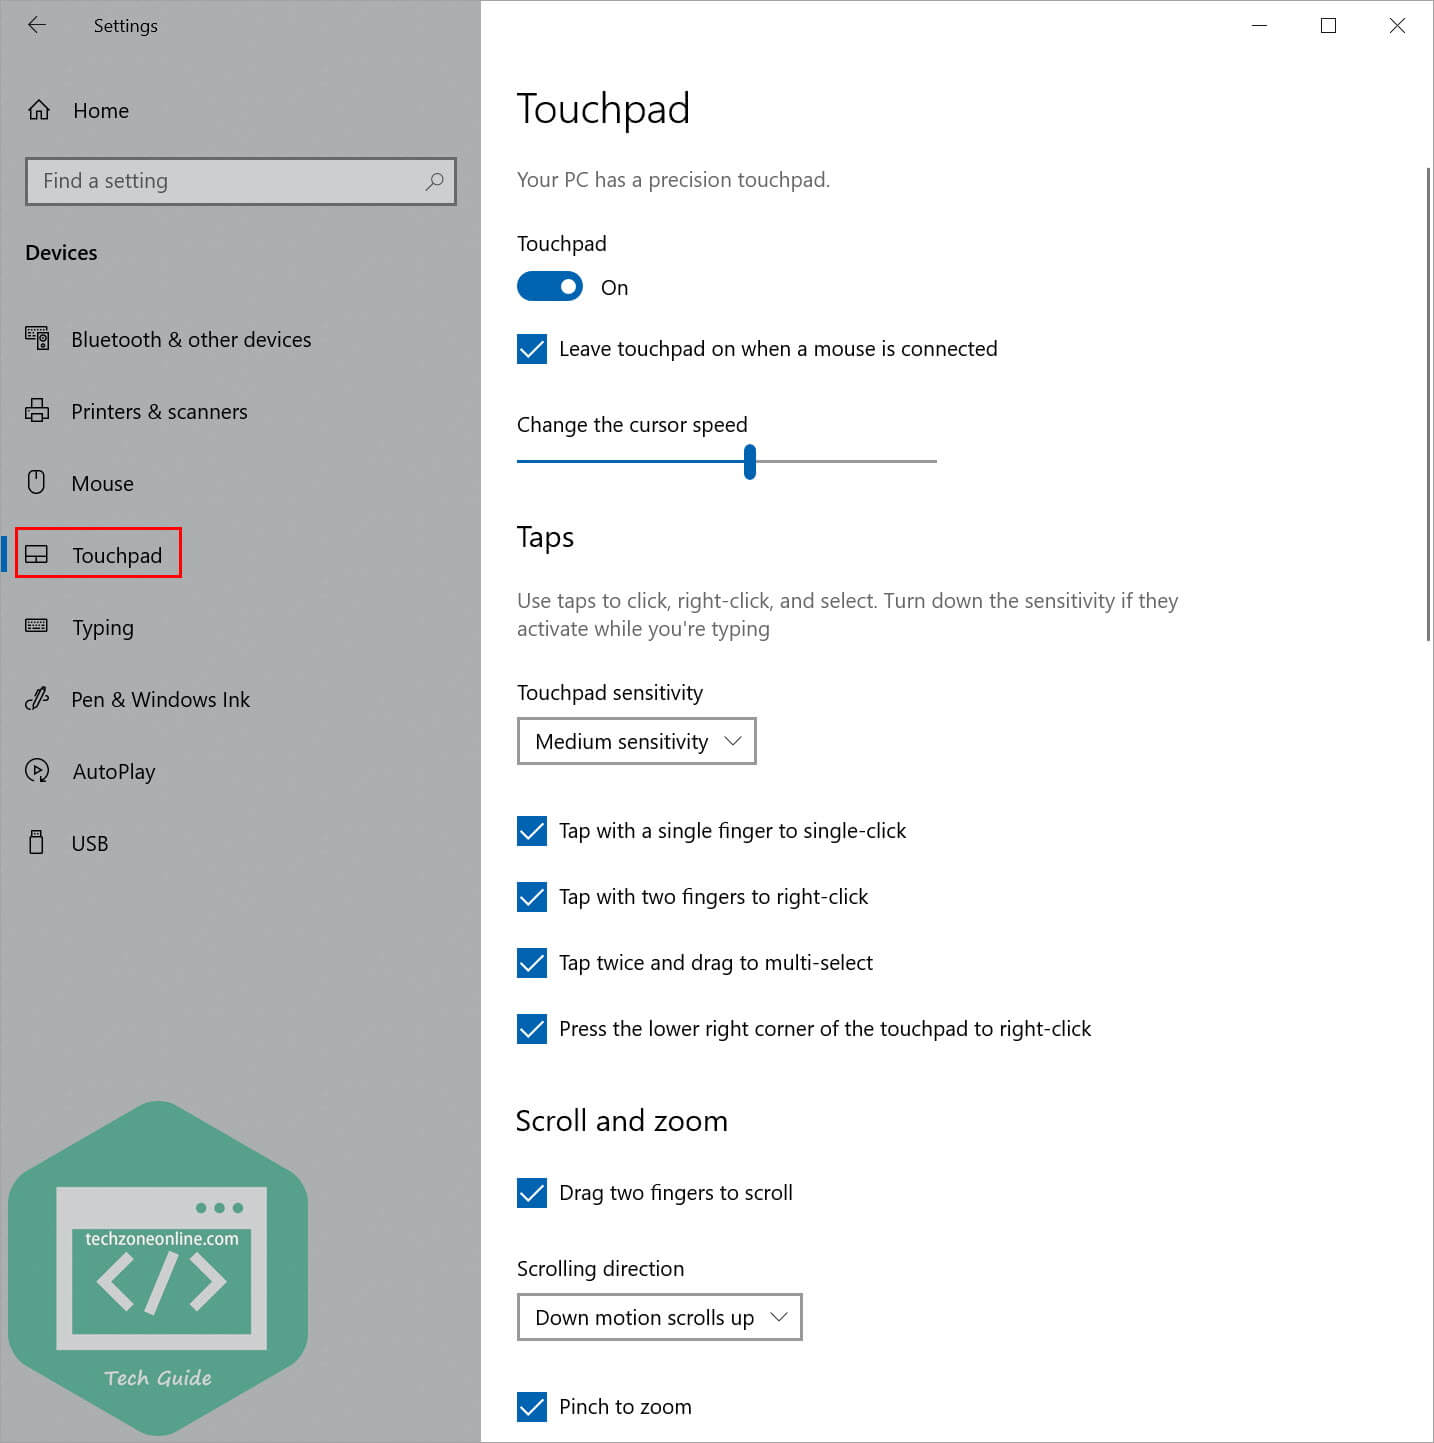
- On your keyboard, press the Windows logo key and I at the same time to invoke the Windows Settings.
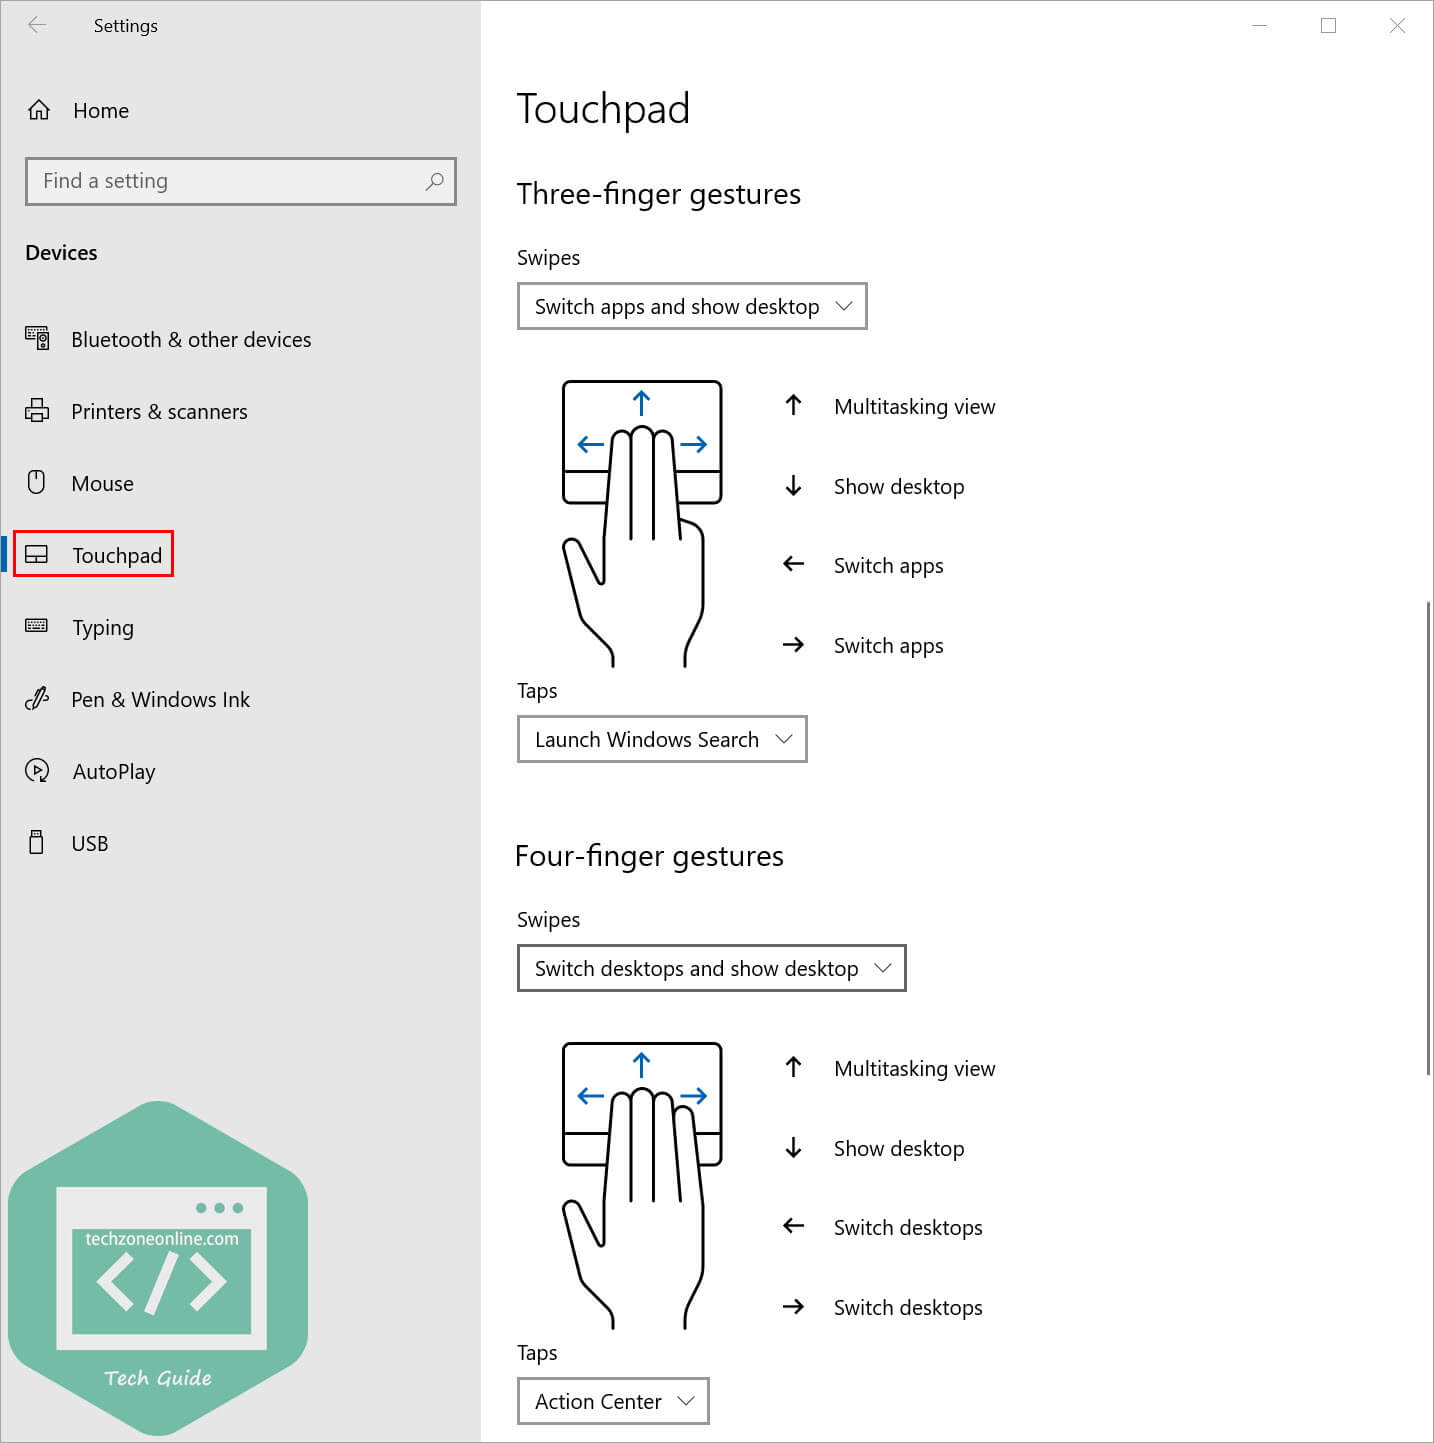
- Go to Devices > Touchpad to customize your trackpad.
If you’re using Windows 11:
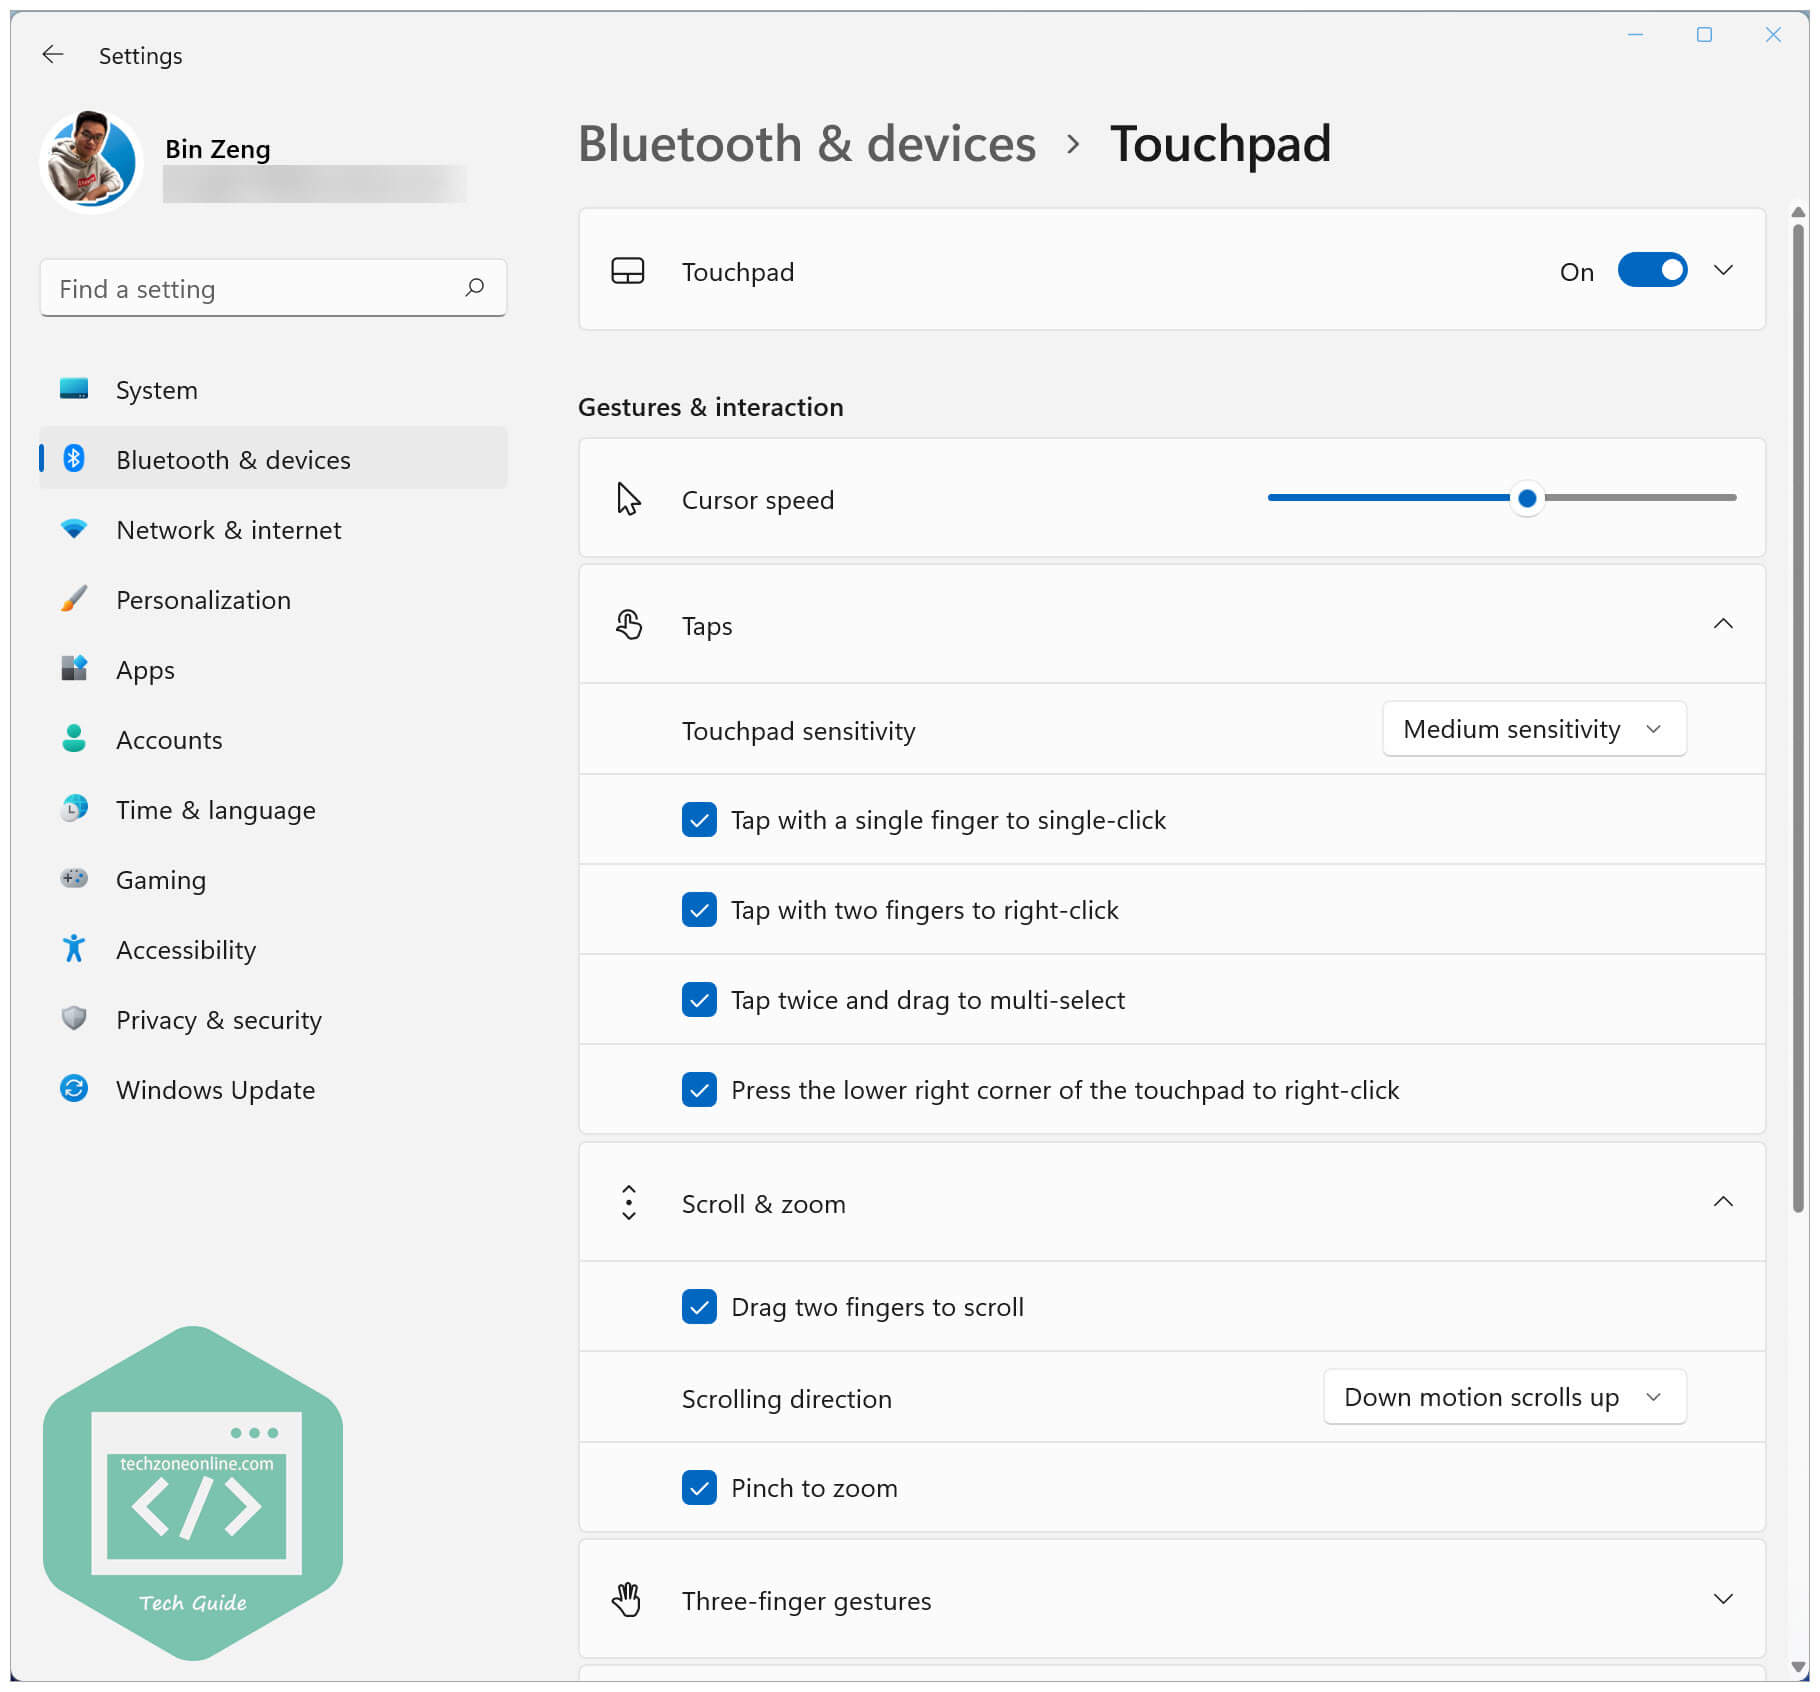
- On your keyboard, press the Windows logo key and I at the same time to invoke the Windows Settings.
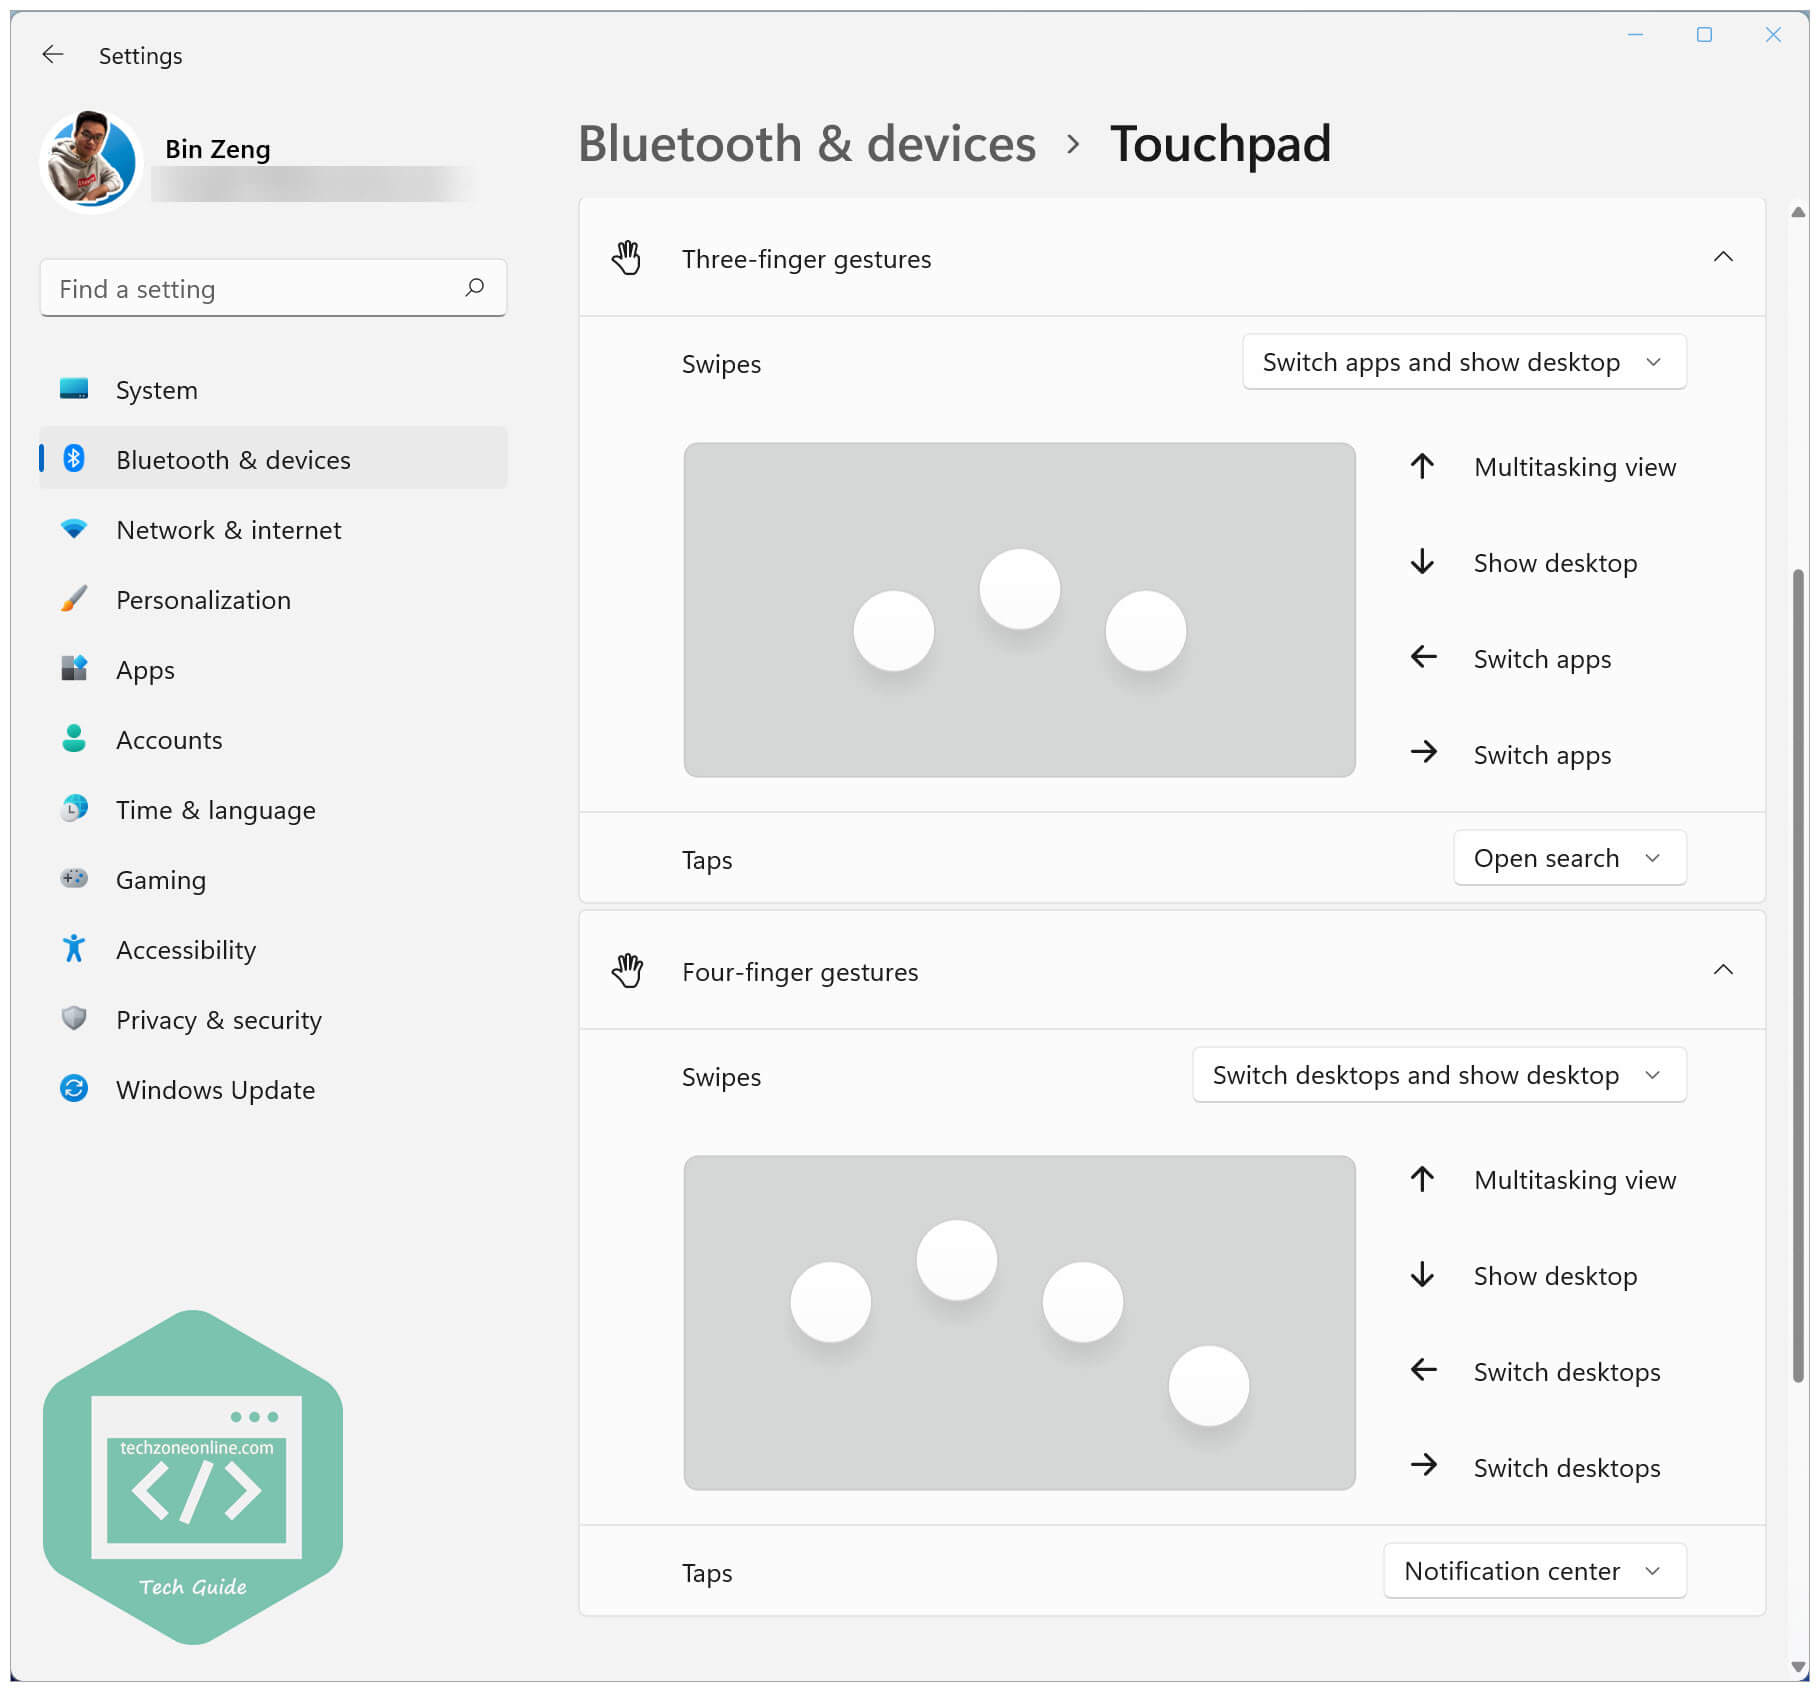
- Go to Bluetooth & devices > Touchpad to customize your trackpad.
On Windows 10 & 11, you can use taps to click, right-click, select and more:
- single-click: tap with a finger
- right-click: tap with 2 fingers, or press the lower right corner of the touchpad
- multi-select: tap twice and drag
- launch Windows Search: tap with 3 fingers
- view Action Center: tap with 4 fingers
You can also drag 2 fingers to scroll and pinch to zoom, and use multi-finger gestures:
- multitasking view: swipe up with 3 fingers
- show desktop: swipe down with 3 fingers
- switch apps: swipe left / right with 3 fingers
In the Touchpad settings, you can not only modify the the cursor speed, touchpad sensitivity, but also customize the functions of different kinds of taps, finger gestures!
Similarities and differences: on Windows 11 & 10 vs. on macOS
Taps, scroll and zoom on Windows 10:
Taps, scroll and zoom on Windows 11:
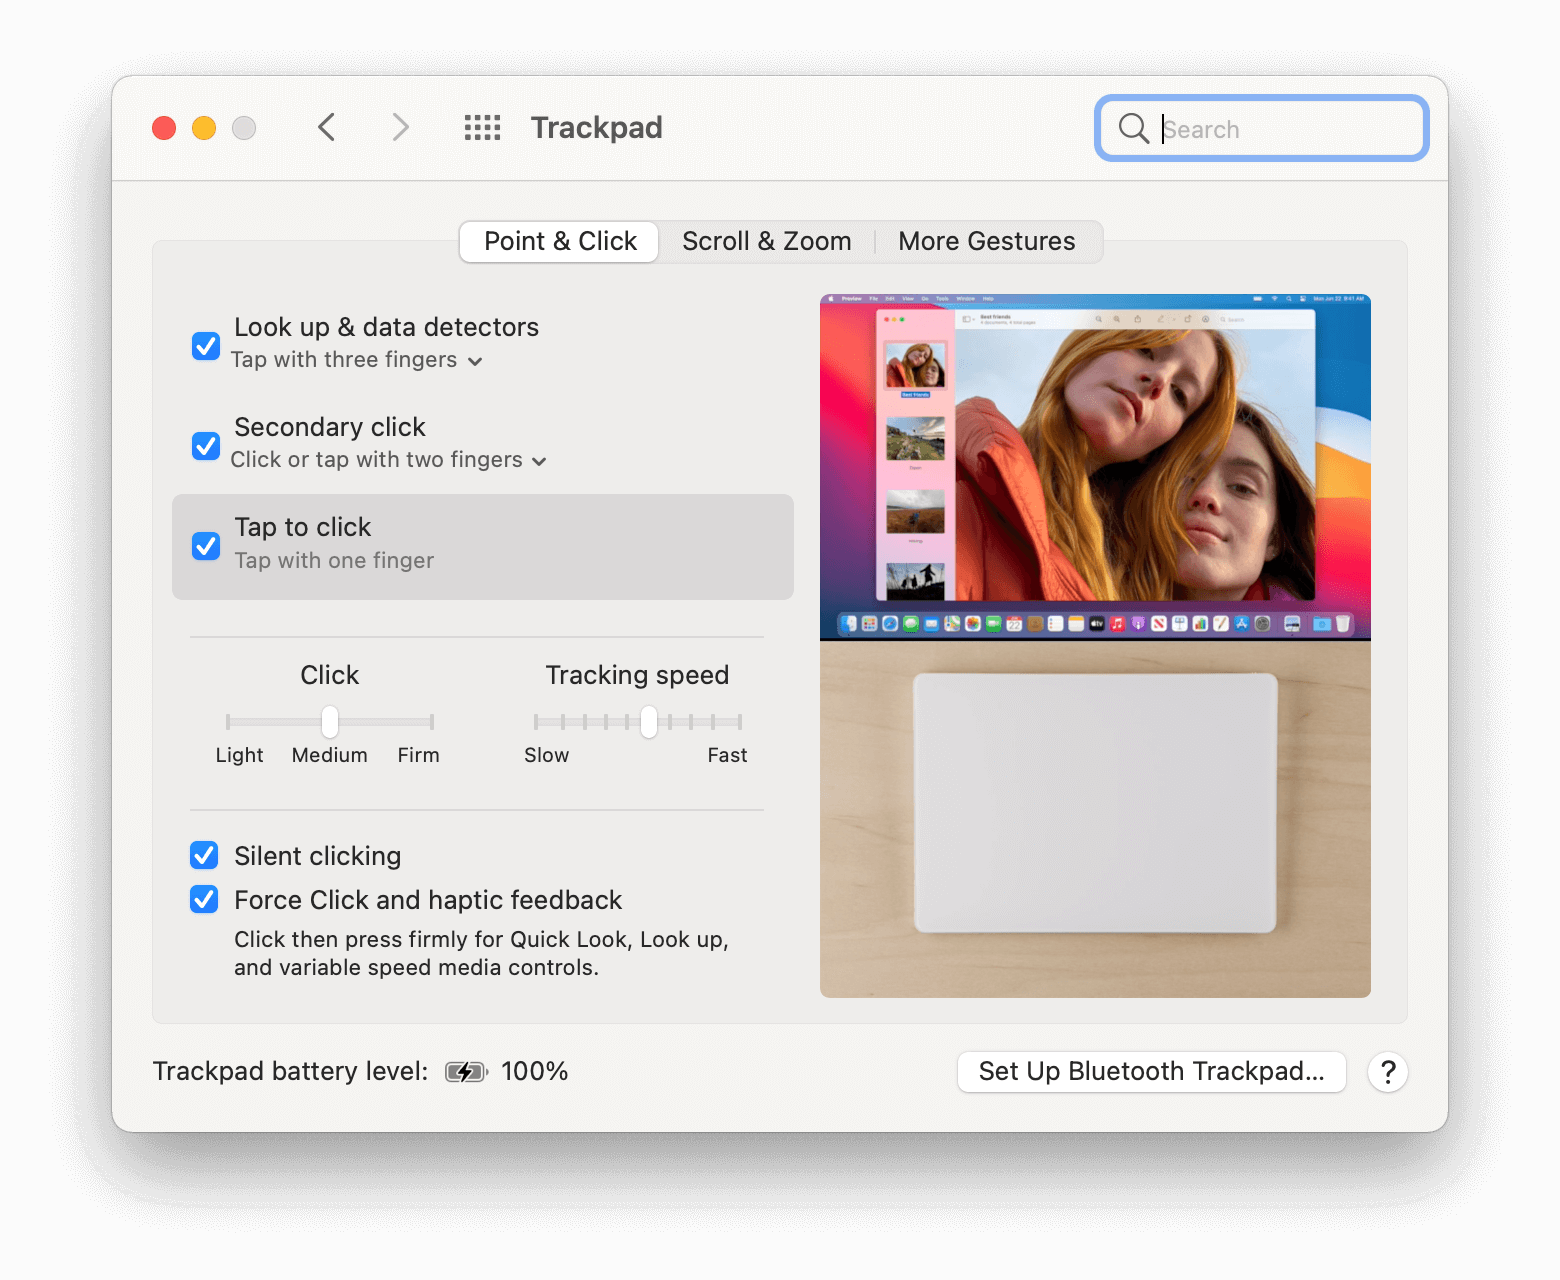
Point and clicks on macOS:
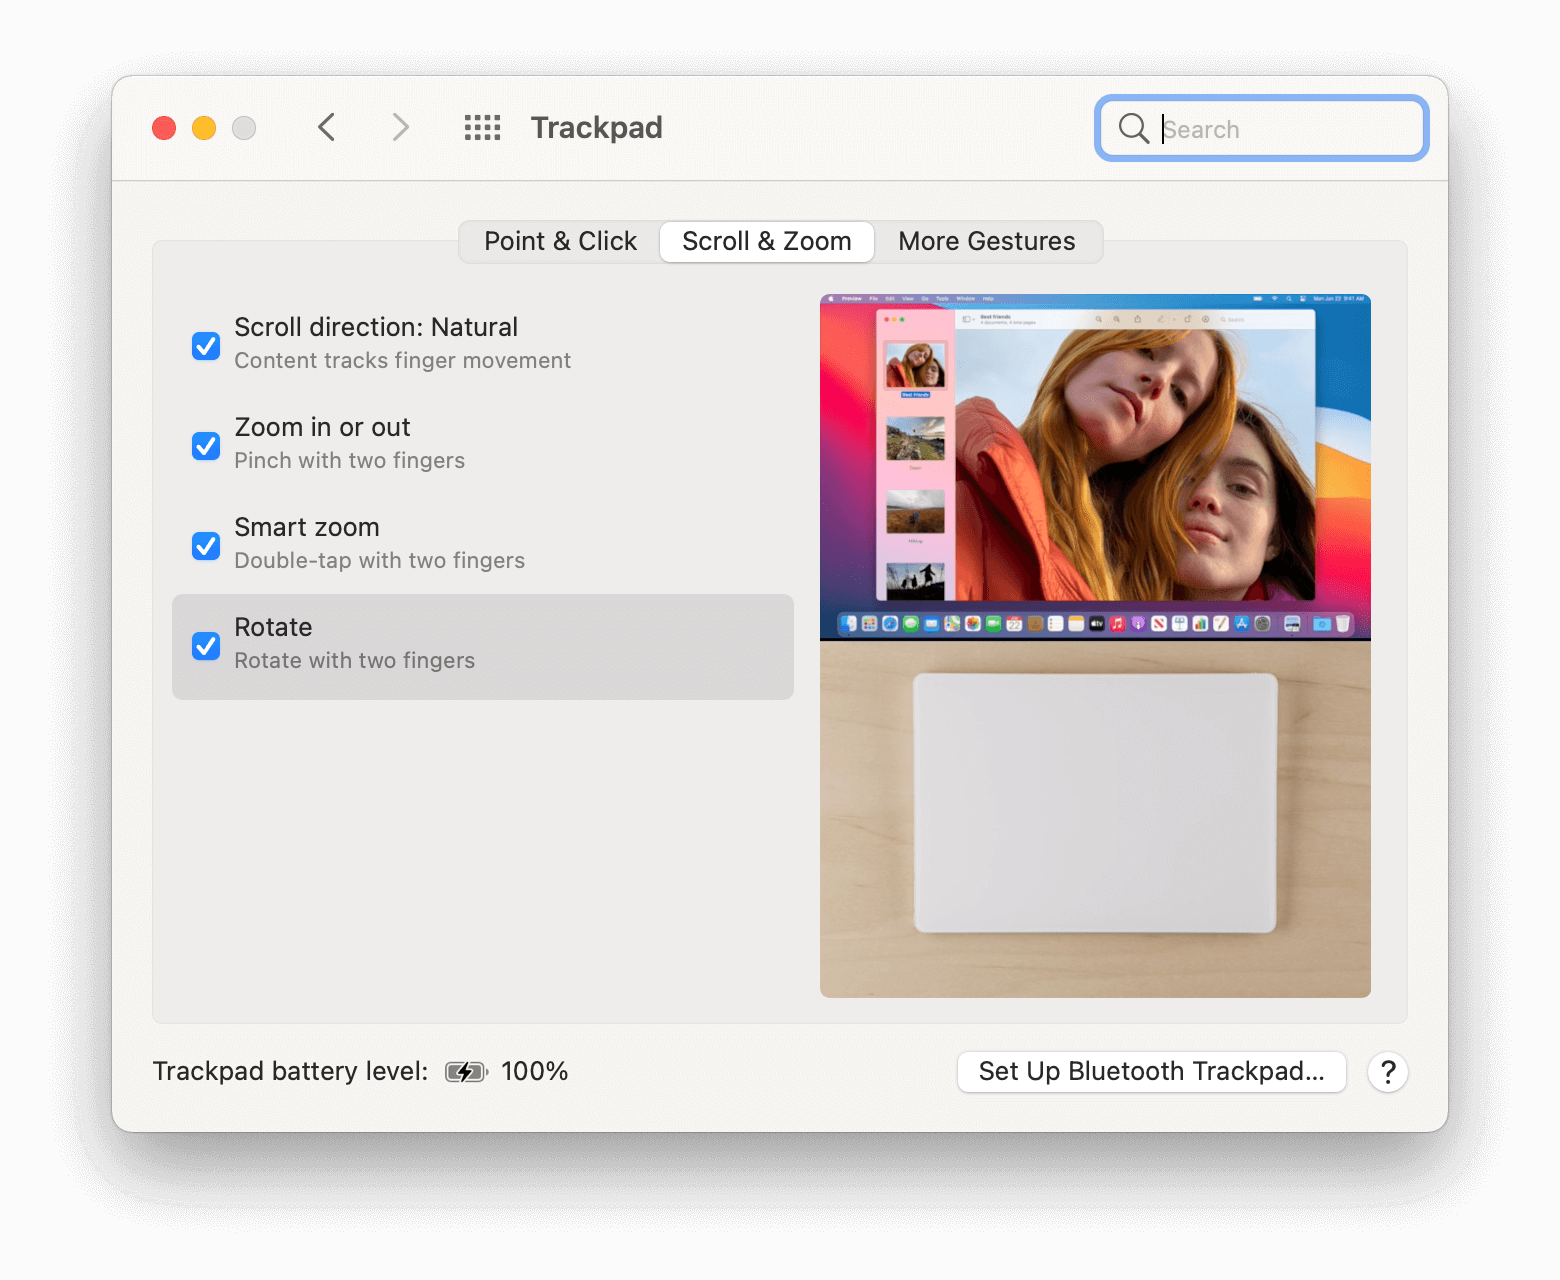
Scroll and zoom on macOS:
Multi-finger gestures on Windows 10:
Multi-finger gestures on Windows 11:
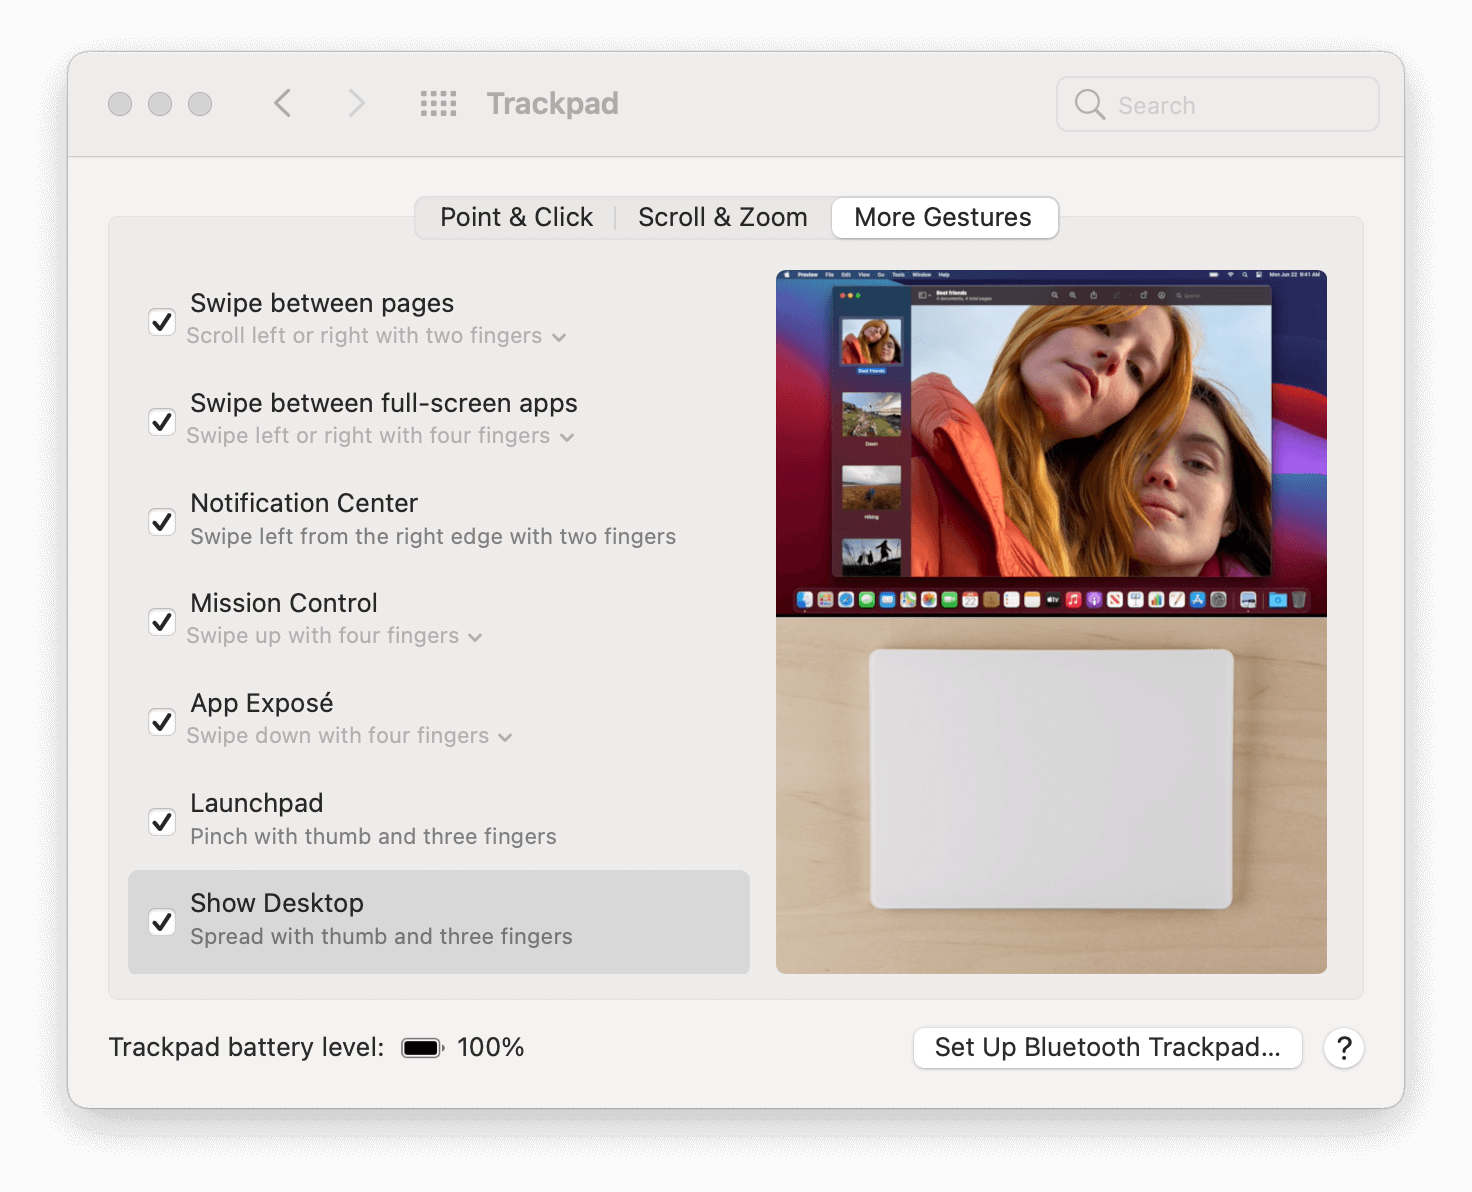
More gestures on macOS:
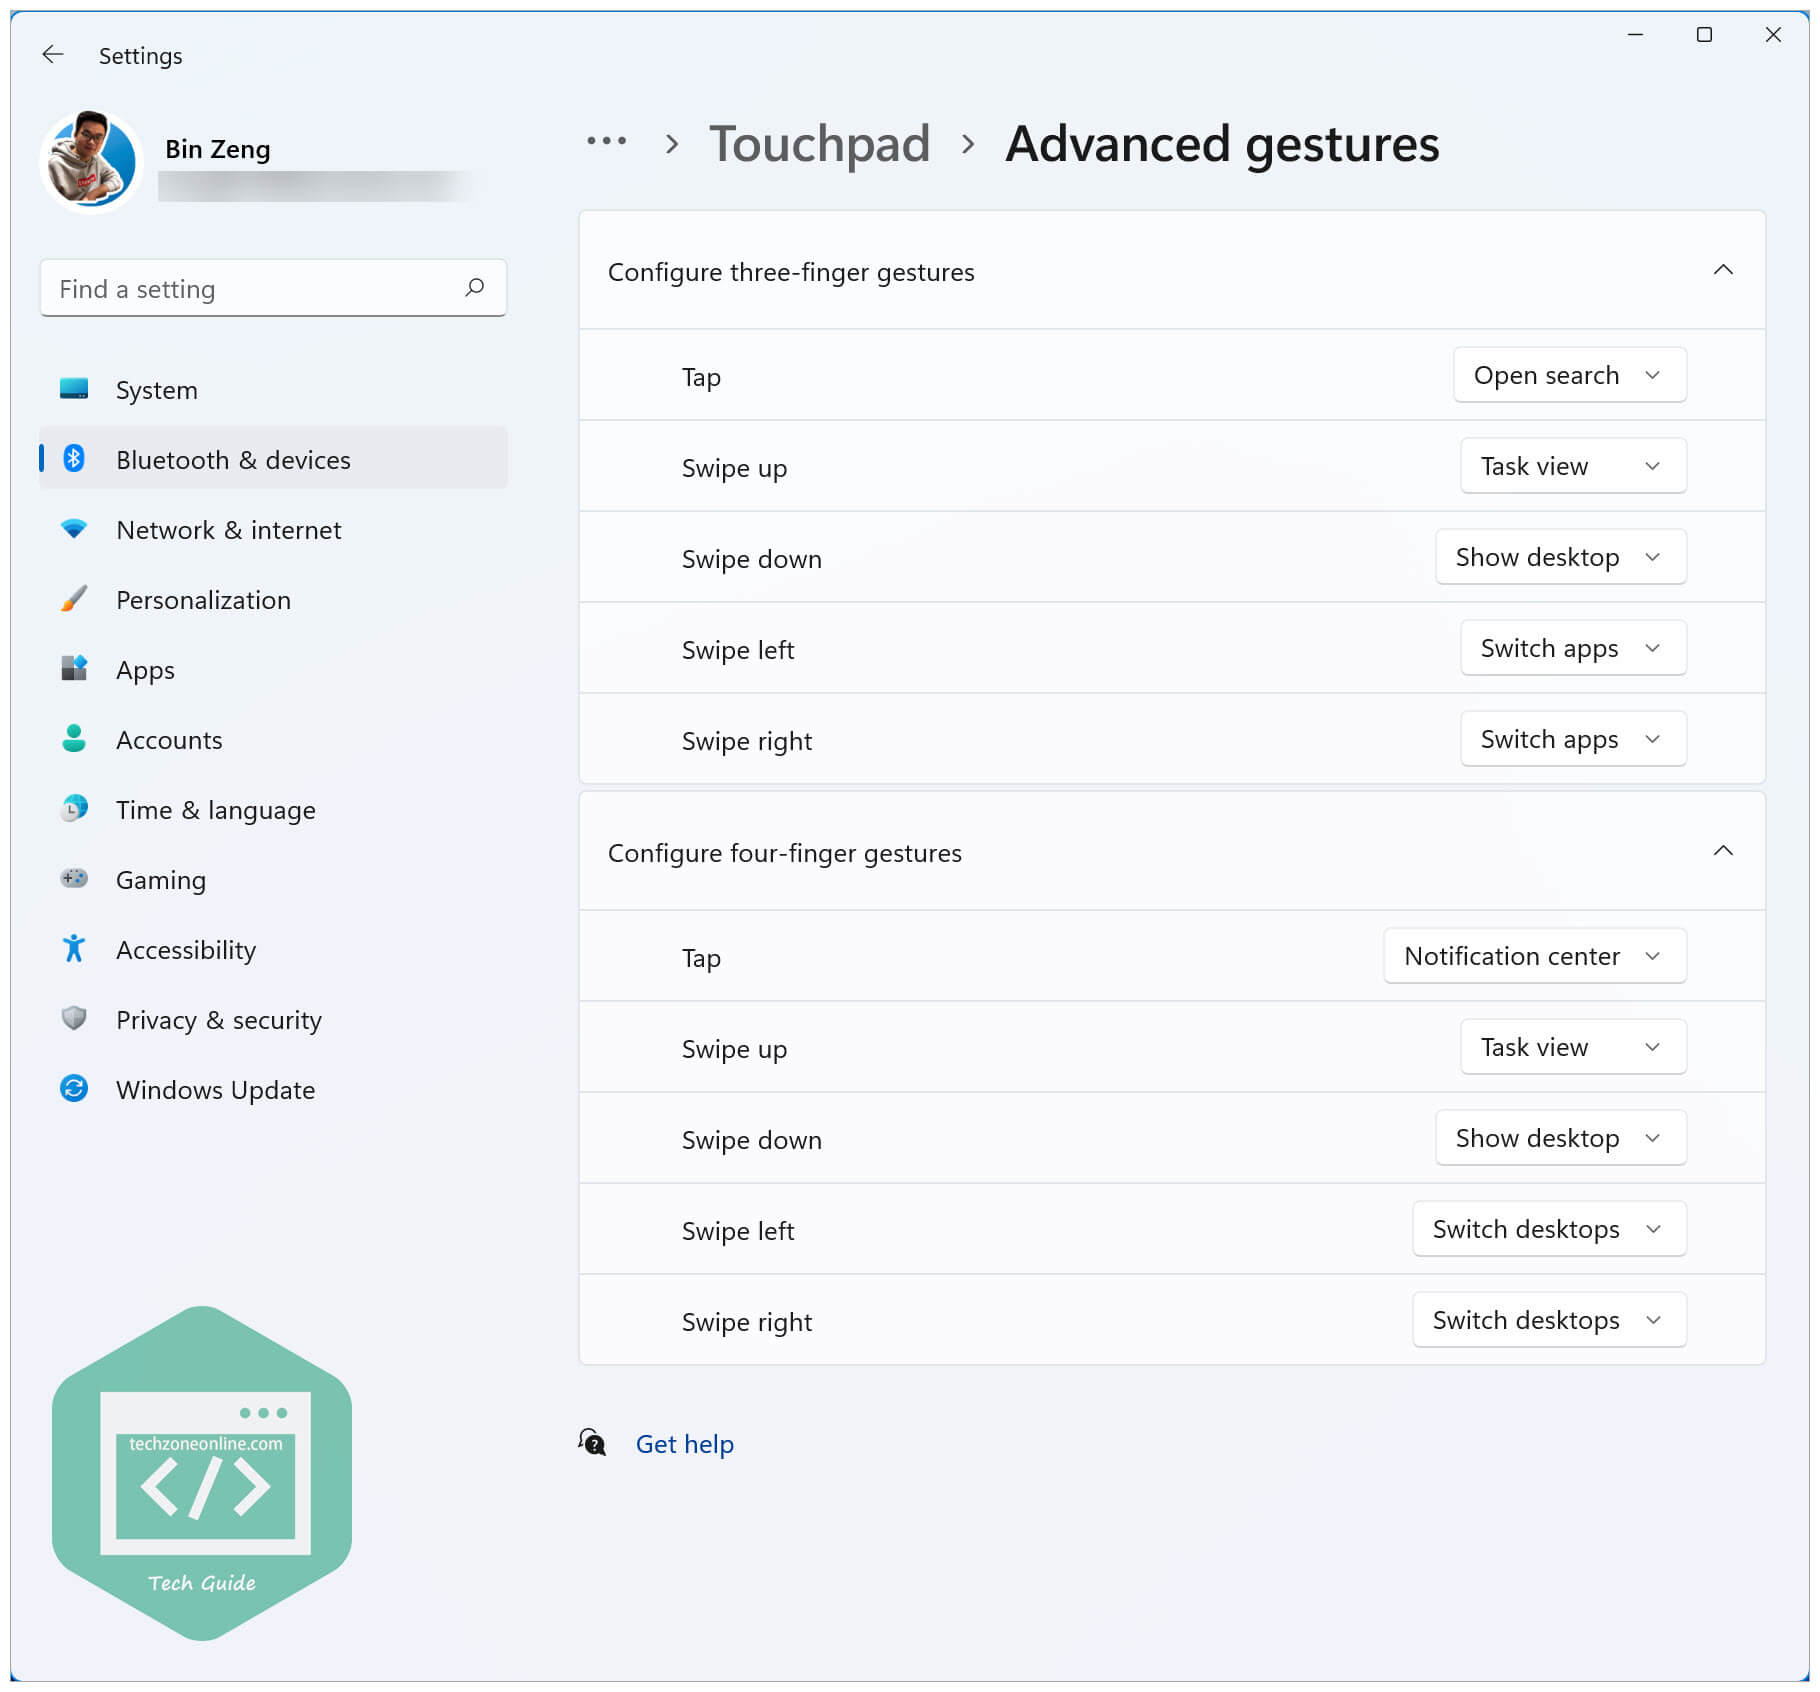
Advanced gestures on Windows 11:
Conclusion
After implementing Windows Precision Touchpad for Apple MacBook family / Apple Magic Trackpad 2 on Windows 10, you’ll find that your trackpad works perfectly on Windows 10.
If you find this post helpful, just drop a line in the comment area, share it to your friends, or buy me a cup of coffee, which will be of great help to me! 😄

Использование MacBook на операционной системе Windows 10 может быть удобным решением для многих пользователей. Однако, неработающий или неправильно функционирующий тачпад может стать проблемой. Чтобы решить эту проблему, необходимо установить драйвер тачпада MacBook.
Установка драйвера тачпада на Windows 10 может быть сложной задачей для новичков. Однако, с помощью подробной инструкции вы сможете справиться с этой задачей даже без предварительного опыта работы с драйверами.
В данной статье мы рассмотрим все необходимые шаги для установки драйвера тачпада MacBook на Windows 10. Вы узнаете, как найти правильный драйвер, как его установить и настроить для оптимальной работы.
Содержание
- Как установить драйвер тачпада MacBook на Windows 10
- Почему важно установить драйвер тачпада MacBook на Windows 10
- Где найти драйвер тачпада MacBook для Windows 10
- Проверка работы тачпада после установки драйвера на MacBook для Windows 10
Как установить драйвер тачпада MacBook на Windows 10
Чтобы установить драйвер тачпада MacBook на Windows 10, следуйте инструкциям, перечисленным ниже:
- Зайдите на официальный веб-сайт Apple и перейдите на страницу с загрузками драйверов.
- Найдите раздел «Поддержка Boot Camp» и выберите свою модель MacBook и версию операционной системы Windows 10.
- Скачайте соответствующий драйвер для тачпада.
- Откройте скачанный файл и следуйте инструкциям мастера установки.
- После завершения установки перезагрузите компьютер.
- Теперь драйверы тачпада должны быть правильно установлены, и тачпад MacBook должен работать на Windows 10.
После установки драйвера тачпада MacBook необходимо проверить его работоспособность. Попробуйте провести различные жесты на тачпаде, чтобы убедиться, что он работает корректно. Если тачпад не работает или работает неправильно после установки драйвера, попробуйте повторить процесс установки или обратитесь в службу поддержки Apple для получения дополнительной помощи.
Установка драйвера тачпада MacBook на Windows 10 может занять некоторое время, но это должно восстановить функциональность тачпада и обеспечить более комфортное пользование ноутбуком MacBook на операционной системе Windows 10.
Почему важно установить драйвер тачпада MacBook на Windows 10
Драйвер тачпада — это программное обеспечение, которое позволяет контролировать и настраивать работу тачпада MacBook на Windows 10. Без правильно установленного драйвера тачпада, ноутбук может работать некорректно или вовсе не отвечать на команды пользователя.
При установке драйвера тачпада MacBook на Windows 10 пользователь получает доступ к таким возможностям, как мульти-тач жесты (например, скроллинг, масштабирование, перемещение), настройка чувствительности тачпада, отключение тачпада при подключении внешней мыши и другие функции, которые делают использование ноутбука более удобным и эффективным.
Кроме того, правильно установленный драйвер тачпада поможет избежать возможных проблем с совместимостью между MacBook и Windows 10. Например, некорректно работающий тачпад может привести к замедлению работы ноутбука, ошибкам при выполнении задач или даже полной неработоспособности тачпада.
В целом, установка драйвера тачпада MacBook на Windows 10 является неотъемлемым шагом для обеспечения корректной и удобной работы с ноутбуком, а также для избежания возможных проблем с совместимостью.
Где найти драйвер тачпада MacBook для Windows 10
Если у вас установлена операционная система Windows 10 на MacBook и вам необходимо установить драйвер для тачпада, вы можете найти его на официальном веб-сайте Apple. Это обеспечит вам полную совместимость и функциональность вашего тачпада на Windows 10.
Чтобы найти драйвер тачпада MacBook для Windows 10, перейдите на официальный веб-сайт Apple по адресу www.apple.com/ru/. Пройдите к разделу поддержки и найдите страницу поддержки для вашей модели MacBook.
На странице поддержки вы найдете различные драйверы и программное обеспечение для вашей модели MacBook. Вам потребуется использовать фильтры, чтобы найти драйверы для Windows 10. Выберите операционную систему Windows и вашу модель MacBook.
Apple предоставляет драйверы для различных компонентов, включая тачпад. Найдите и выберите драйвер для тачпада соответствующей версии Windows 10.
После выбора драйвера для тачпада, загрузите его на ваш компьютер. Далее, выполните установку драйвера, следуя инструкциям, предоставленным Apple.
После установки драйвера, перезагрузите компьютер и ваш тачпад MacBook должен работать полностью на Windows 10.
Обратите внимание, что совместимость драйвера тачпада MacBook с операционной системой Windows 10 может быть обеспечена только официальными драйверами, предоставленными Apple. Использование сторонних драйверов может привести к нестабильной работе тачпада или отсутствию некоторых функций.
Проверка работы тачпада после установки драйвера на MacBook для Windows 10
После успешной установки драйвера тачпада на MacBook для Windows 10, необходимо проверить его работу, чтобы убедиться, что все функции работают корректно. Вот несколько шагов, которые помогут вам проверить работу тачпада:
- Откройте меню Пуск и выберите «Настройки».
- В настройках выберите раздел «Устройства».
- В левой части окна выберите «Тачпад» или «Сенсорная панель».
- Проверьте настройки тачпада. Убедитесь, что все необходимые опции включены, например, прокрутка с двумя пальцами, жесты с тремя пальцами и т.д.
- Попробуйте использовать тачпад. Проверьте, работает ли курсор, отзывается ли на нажатия и жесты. Проверьте прокрутку, установка курсора, масштабирование и другие функции тачпада.
- Если вы обнаружили какие-либо проблемы с работой тачпада, попробуйте перезагрузить компьютер и повторно проверить его работу.
Если после всех шагов тачпад продолжает работать неправильно или не работает вообще, то возможно, вам понадобится обновить или переустановить драйвер тачпада. Вы можете найти последнюю версию драйвера на официальном сайте производителя вашего устройства.
