About Lenovo
-
Our Company
-
News
-
Investor Relations
-
Sustainability
-
Product Compliance
-
Product Security
-
Lenovo Open Source
-
Legal Information
-
Jobs at Lenovo
Shop
-
Laptops & Ultrabooks
-
Tablets
-
Desktops & All-in-Ones
-
Workstations
-
Accessories & Software
-
Servers
-
Storage
-
Networking
-
Laptop Deals
-
Outlet
Support
-
Drivers & Software
-
How To’s
-
Warranty Lookup
-
Parts Lookup
-
Contact Us
-
Repair Status Check
-
Imaging & Security Resources
-
Glossary
Resources
-
Where to Buy
-
Shopping Help
-
Track Order Status
-
Product Specifications (PSREF)
-
Forums
-
Registration
-
Product Accessibility
-
Environmental Information
-
Gaming Community
-
LenovoEDU Community
-
LenovoPRO Community
©
Lenovo.
|
|
|
|
О LENOVO
+
О LENOVO
-
Наша компания
-
Новости
-
Контакт
-
Соответствие продукта
-
Работа в Lenovo
-
Общедоступное программное обеспечение Lenovo
КУПИТЬ
+
КУПИТЬ
-
Где купить
-
Рекомендованные магазины
-
Стать партнером
Поддержка
+
Поддержка
-
Драйверы и Программное обеспечение
-
Инструкция
-
Инструкция
-
Поиск гарантии
-
Свяжитесь с нами
-
Поддержка хранилища
РЕСУРСЫ
+
РЕСУРСЫ
-
Тренинги
-
Спецификации продуктов ((PSREF)
-
Доступность продукта
-
Информация об окружающей среде
©
Lenovo.
|
|
|
|
If you find the fingerprint reader on your Lenovo laptop doesn’t work any more, don’t panic. It’s often quite easy to fix…
Here’re 5 fixes that have helped other users resolve the Lenovo Fingerprint Reader Not Working Windows 10 problem. Just work your way down the list until you find the fix that does the trick.
In case you cannot log into Windows at the moment, you can follow this tutorial to enter Safe Mode With Networking.
- Check the fingerprint scanner
- Update your fingerprint reader driver
- Uninstall Lenovo Finerprint Manager and use the default fingerprint driver
- Re-enroll your fingerprints
- Restore system files
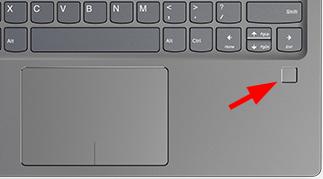
Fix 1: Check the fingerprint scanner
Before addressing the fingerprint reader not working problem, you might want to check the fingerprint scanner for possible hardware issues.
- Check if there’s any grease or dust on the scanner. If yes, then gently wipe it off with a piece of clean cloth.
- Check if there’re any scratches on the sensor. If it’s been badly scratched, then send it to a trustworthy computer repair shop or the computer vendor for repair. If the sensor is in good condition but the fingerprint reader doesn’t work, please move on to Fix 2, below.
Fix 2: Update your fingerprint reader driver
This problem may occur if you are using the wrong fingerprint reader driver or it’s out of date. So you should update your fingerprint reader driver to see if it fixes your problem. If you don’t have the time, patience or skills to update the driver manually, you can do it automatically with Driver Easy.
Driver Easy will automatically recognize your system and find the correct drivers for it. You don’t need to know exactly what system your computer is running, you don’t need to risk downloading and installing the wrong driver, and you don’t need to worry about making a mistake when installing. Driver Easy handles it all.
You can update your drivers automatically with either the FREE or the Pro version of Driver Easy. But with the Pro version it takes just 2 clicks:
- Download and install Driver Easy.
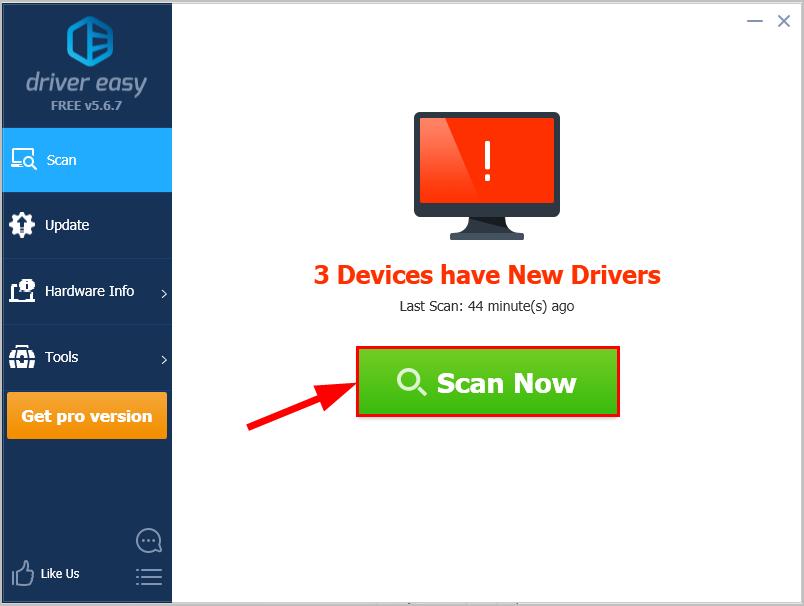
- Run Driver Easy and click the Scan Now button. Driver Easy will then scan your computer and detect any problem drivers.

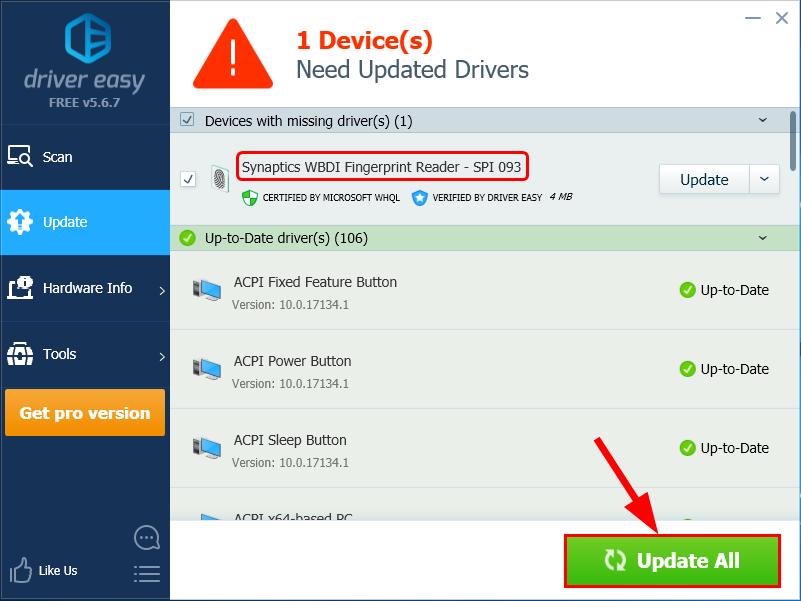
- Click Update All to automatically download and install the correct version of all the drivers that are missing or out of date on your system (this requires the Pro version – you’ll be prompted to upgrade when you click Update All).

You can also click Update to do it for free if you like, but it’s partly manual. - Restart your computer and see if the fingerprint reader works properly this time. If it works, then great. But if it doesn’t, move on to Fix 3, below.
Fix 3: Uninstall Lenovo Finerprint Manager and use the default fingerprint driver
If Fix 2 doesn’t work for you, then you’d probably have to uninstall the lenovo fingerprint software and the fingerprint driver (so that Windows will install the default generic one for you) to see if it works.
Here’s how:
1) – 3) right below are steps to uninstall Lenovo Finerprint Manager.
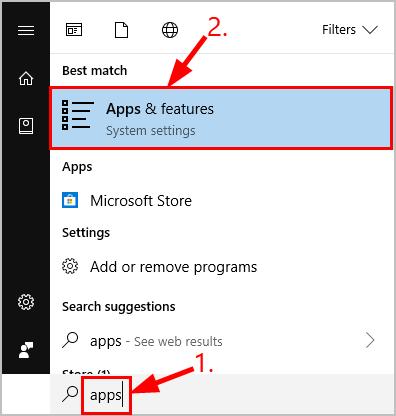
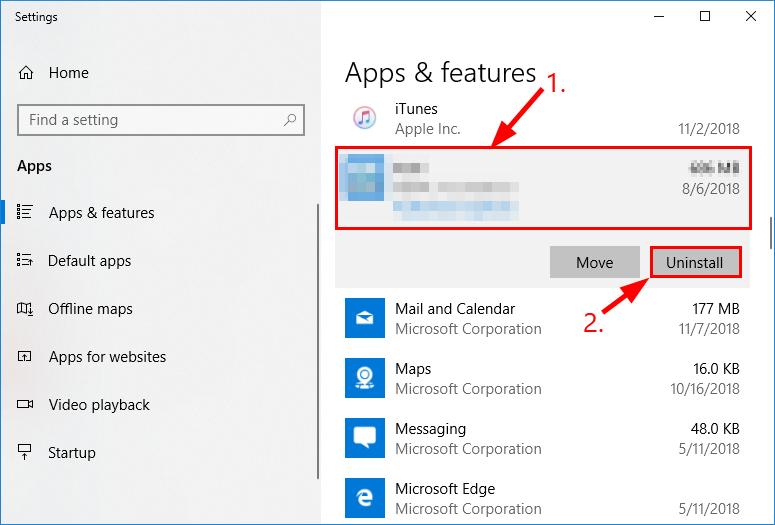
- On your keyboard, press the Windows logo key, then type apps and click on Apps & features.

- Locate and click on Lenovo Finerprint Manager (or, Lenovo Finerprint Manager Pro)and click Uninstall.

- Click Uninstall to confirm.


1) – 4) right below are steps to uninstall the fingerprint driver.
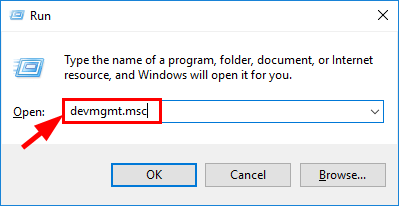
- On your keyboard, press the Windows logo key and type devmgmt.msc, then press Enter.

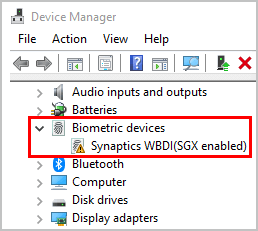
- Double-click on Biometric devices and then right-click on your Lenovo fingerprint device and click Uninstall device.

- Click Uninstall to confirm.
- Restart your computer, then test to see if the fingerprint reader not working problem has been solved.
Fix 4: Re-enroll your fingerprints
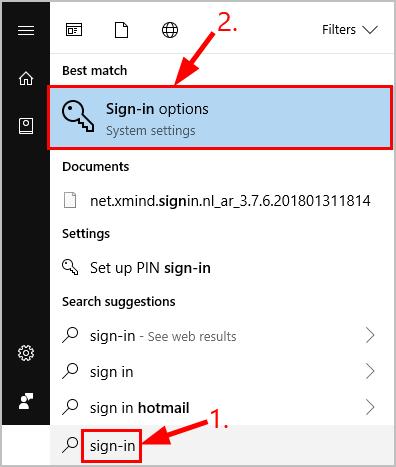
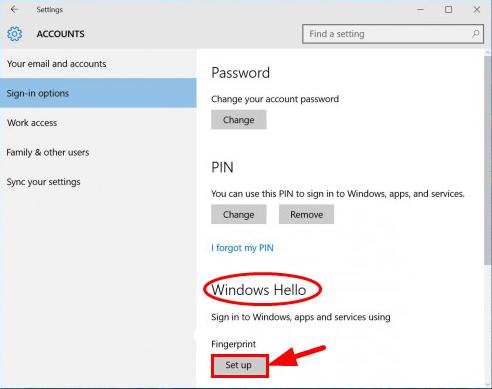
- On your keyboard, press the Windows logo key and type sign-in, then click on Sign-in options.

- Scroll down to Windows Hello, and click Set up under the Fingerprint section.

- Follow the on-screen instructions to set up the fingerprint login.
- Don’t forget to test if the fingerprint reader works normally this time.
Fix 5: Repair system files
Missing, corrupt, or damaged system files may cause Lenovo fingerprint reader to stop working. To eliminate this issue as a possible cause, you can try the 2 ways below to repair possible system file issues.
- Repair & replace corrupt system files with Fortect
- Run SFC scan
Repair & replace corrupt system files with Fortect
The Lenovo fingerprint not working issue could be caused by corrupt system files. Fortect is a tool that specializes in Windows repairing and fixing corrupt files automatically.
With Fortect, the preliminary will scan your computer’s operating system for viruses, malware, and missing, damaged, or corrupt files, then it removes all problematic files found and replaces them with new healthy files. It’s like a clean reinstall of your operating system, except that you won’t lose any user data, and all programs, and settings are exactly as they are before the repair.
Here’s how to use Fortect to repair system files on your PC:
1) Download and install Fortect.
2) Fire up Fortect and run a free scan.
3) Once finished, Fortect will generate a detailed report of your computer health, which includes all issues detected.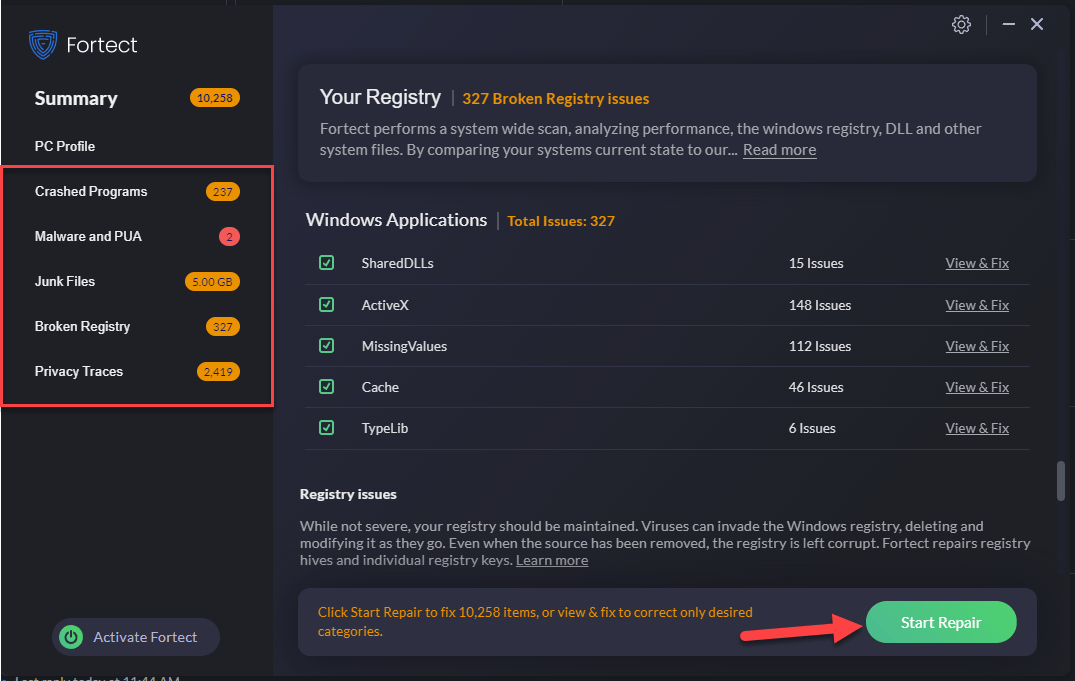
To fix all the issues automatically, click Start Repair (You’ll need to purchase the full version. It comes with a 60-day Money-Back Guarantee so you can refund anytime if Fortect doesn’t fix your problem).
If you run into any problems while using Fortect, or if it doesn’t work for you, don’t hesitate to contact Fortect support team.
5) Restart your computer for the changes to take effect.
6) Check your computer to see if the issue is fixed.
Run SFC scan
System File Checker (SFC) is a handy feature in Windows that helps scan your system files and repair missing or corrupted system files. To run the SFC scan:
1) On your keyboard, press the Windows logo key and type cmd. Then right-click on Command Prompt and click Run as administrator.
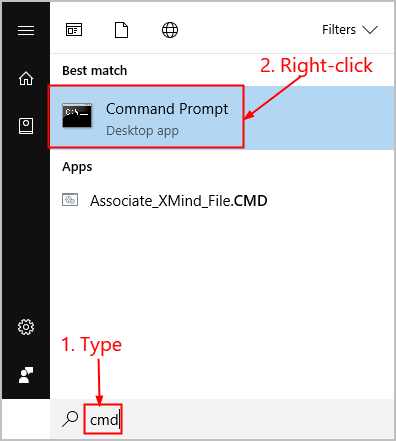
2) Click Yes when prompted to confirm.
3) In the command prompt window, type sfc /scannow and press Enter.
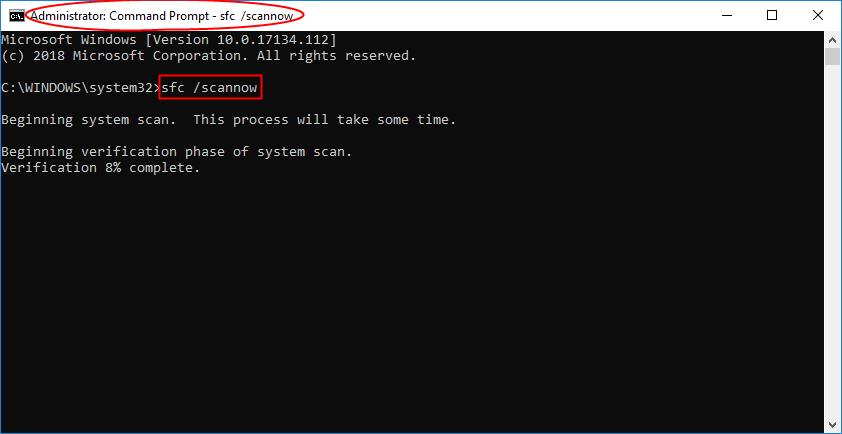
It’ll take some time for the SFC to replace the corrupted system files with new ones if it detects any, so please be patient.
4) Restart your computer for the changes to take effect.
5) Check your computer to see if the problem has been fixed.
How have the fixes above helped you with your troubleshooting? Do you have any experiences or ideas to share with us? Feel free to leave us a comment below and let us know your thoughts.
Featured image by Olena Sergienko on Unsplash
78
78 people found this helpful
На этой странице вы можете бесплатно скачать Lenovo ThinkPad Synaptics Fingerprint Драйвер v.4.5.519.0
Категория:Notebooks
Производитель:Lenovo
Оборудование:Lenovo ThinkPad
Тип программы:Драйвер
Название:Synaptics Fingerprint Driver
Версия:4.5.519.0
Размер файла:2.98Mb
Тип архива:InstallShield
Дата выхода:16 May 2018
Система:Windows 10 64-bit
Status:Free
Загрузок:417
Описание:Synaptics Fingerprint Driver for Lenovo ThinkPad
Synaptics Raptor USB Fingerprint Reader Driver
Правовая информация:Все програмное обеспечение, размещённое на Driver.ru является бесплатным. Все названия и торговые марки принадлежат их владельцам.
Внимание:Некоторые программы получены из непроверенных источников. Мы не гарантируем их совместимость и работоспособность. Всегда проверяйте загруженные файлы с помощью антивирусных программ. Мы не несём никакой ответственности за возможные потери, возникшие в результате установки загруженных программ. Загрузка файла с Driver.ru обозначает вашу информированность об этом и согласие с данными условиями.
Похожие файлы:
Тип программы:Intel PROSet/Wireless Software for Bluetooth Technology
Версия:17.1.1411.0658/17.1.1411.504
Система:Windows 7Windows 7 64-bit
Название:Realtek CardReader Driver
Версия:6.2.8400.29034
Система:Windows 8Windows 8 64-bit
Описание:Realtek CardReader Driver for Lenovo ThinkPad
This package installs the software (JMicron Multi Card Reader) to enable the following device. Device name ———————— Realtek CardReader
Скачать Lenovo ThinkPad Realtek CardReader Драйвер v.6.2.8400.29034
Тип программы:README for Intel Chipset Device Software
Версия:9.2.0.1019
Система:Windows 7, Windows 7 64-bit, Windows Vista, Windows Vista 64-bit, Windows XPWindows XP 64-bit
Название:ThinkPad Wireless LAN (11bgn, bg)
Версия:1.00.0048.0
Система:Windows 8Windows 8 64-bit
Название:AmdEHCI NULL Filter Driver for AMD USB EHCI Controller
Версия:1.0.0.5
Система:Windows 7Windows 7 64-bit
Название:Communications Utility Program
Версия:3.1.10.0
Система:Windows XP
Тип программы:BIOS Update (Bootable CD)
Версия:1.05
Система:Windows 10 64-bit
Тип программы:BIOS Update Utility
Версия:1.17
Система:Windows 8, Windows 8 64-bit, Windows 7, Windows 7 64-bitWindows XP
Описание:BIOS Update Utility for Lenovo ThinkPad
This package updates the UEFI BIOS (including system program and Embedded Controller program) stored in the Lenovo computer to fix problems, add new functions, or expand functions as noted below.
Скачать Lenovo ThinkPad BIOS Update Utility v.1.17
Название:Realtek High Definition Audio Driver
Версия:6.0.1.7076
Система:Windows 8.1, Windows 8, Windows 8 64-bit, Windows 7Windows 7 64-bit
Описание:Realtek High Definition Audio Driver for Lenovo ThinkPad
This package installs the software (Realtek audio driver) to enable the following device. Device name Device name in the Device Manager —————————— ———————————— Realtek High Definition Audio Realtek High Definition Audio
Скачать Lenovo ThinkPad Realtek High Definition Audio Драйвер v.6.0.1.7076
Тип программы:Realtek Audio Features driver Software
Версия:6.0.1.7266
Система:Windows 8.1 64-bit
Lenovo Fingerprint Manager Pro – это удобный инструмент, который позволяет использовать отпечаток пальцев для входа в систему Windows 10. Он обеспечивает быстрый и безопасный способ аутентификации, заменяя традиционный пароль.
Установка Lenovo Fingerprint Manager Pro на Windows 10 осуществляется в несколько простых шагов. Сначала необходимо загрузить программу с официального сайта Lenovo. После этого следует запустить установочный файл и следовать инструкциям на экране. После завершения установки необходимо перезагрузить компьютер.
После установки и перезагрузки системы пользователь должен настроить отпечаток пальцев для использования с Lenovo Fingerprint Manager Pro. Для этого необходимо открыть программу и выбрать опцию для добавления нового отпечатка пальца. Затем следует следовать инструкциям на экране и несколько раз поместить палец на датчике отпечатка пальца, чтобы программа смогла его распознать.
Программа Lenovo Fingerprint Manager Pro предлагает возможность сохранить несколько отпечатков пальцев, чтобы разные члены семьи или коллеги могли использовать устройство без необходимости предоставления пароля.
После настройки отпечатка пальца пользователь сможет использовать его для входа в систему Windows 10. Для этого достаточно приложить палец к датчику отпечатка пальца на компьютере или ноутбуке Lenovo. Система автоматически распознает отпечаток и выполняет вход в систему без необходимости вводить пароль.
Lenovo Fingerprint Manager Pro предоставляет удобный и безопасный способ аутентификации на компьютерах и ноутбуках Lenovo. Благодаря использованию отпечатка пальца пользователи могут ускорить процесс входа в систему и обеспечить безопасность своих данных. Установка и использование этой программы на Windows 10 – это просто и эффективно.
Содержание
- Установка Lenovo Fingerprint Manager Pro
- Шаги по установке Lenovo Fingerprint Manager Pro на Windows 10
- Совместимые устройства и операционные системы
- Настройка и использование Lenovo Fingerprint Manager Pro на Windows 10
Установка Lenovo Fingerprint Manager Pro
| Шаг 1: | Посетите веб-сайт поддержки Lenovo и найдите страницу загрузки Lenovo Fingerprint Manager Pro. |
| Шаг 2: | Выберите версию программного обеспечения, соответствующую вашей операционной системе Windows 10. |
| Шаг 3: | Нажмите на ссылку «Скачать», чтобы начать загрузку программного обеспечения. |
| Шаг 4: | После завершения загрузки откройте файл установщика Lenovo Fingerprint Manager Pro. |
| Шаг 5: | Следуйте инструкциям установщика и принимайте необходимые условия лицензионного соглашения. |
| Шаг 6: | После завершения установки перезагрузите систему. |
Поздравляем! Теперь Lenovo Fingerprint Manager Pro успешно установлен и готов к использованию. Вы можете воспользоваться сканером отпечатков пальцев, чтобы удобно и безопасно аутентифицироваться на вашем устройстве Lenovo.
Шаги по установке Lenovo Fingerprint Manager Pro на Windows 10
Шаг 1: Перейдите на официальный сайт Lenovo и найдите страницу поддержки для вашей модели компьютера.
Шаг 2: На странице поддержки найдите раздел «Драйверы и загружаемые материалы» или что-то похожее, где вы сможете найти драйверы для вашей модели компьютера.
Шаг 3: В списке драйверов найдите «Lenovo Fingerprint Manager Pro» и нажмите на ссылку для скачивания.
Шаг 4: После завершения загрузки откройте скачанный файл. Если система запрашивает разрешение на выполнение файла, подтвердите это.
Шаг 5: Следуйте инструкциям мастера установки. Обычно вам нужно будет согласиться с условиями использования и выбрать путь для установки программы.
Шаг 6: По окончании установки перезагрузите компьютер для завершения процесса.
Шаг 7: После перезагрузки откройте Lenovo Fingerprint Manager Pro и следуйте инструкциям для настройки отпечатка пальца.
Примечание: Убедитесь, что ваш компьютер поддерживает сканер отпечатков пальцев или другую биометрическую технологию для использования Lenovo Fingerprint Manager Pro.
Совместимые устройства и операционные системы
- Ноутбуки Lenovo, оснащенные сканером отпечатков пальцев.
- Приложение также работает с дополнительными устройствами вроде клавиатур и мышей, которые поддерживают технологию сканирования отпечатков пальцев.
Совместимые операционные системы включают:
- Windows 10 (32-битная и 64-битная версии)
Если ваше устройство и операционная система удовлетворяют этим требованиям, вы можете установить и использовать Lenovo Fingerprint Manager Pro для повышения уровня безопасности вашего устройства.
Настройка и использование Lenovo Fingerprint Manager Pro на Windows 10
Для настройки и использования Lenovo Fingerprint Manager Pro на Windows 10 следуйте этим шагам:
- Убедитесь, что ваш компьютер Lenovo поддерживает отпечаток пальца. Убедитесь, что на вашем компьютере установлен датчик отпечатка пальца или встроенный веб-камера с функцией сканирования отпечатка пальца.
- Загрузите и установите Lenovo Fingerprint Manager Pro с официального сайта Lenovo или с диска, поставляемого с компьютером. Следуйте инструкциям на экране для установки программы.
- После установки перезагрузите компьютер.
- После перезагрузки откройте Lenovo Fingerprint Manager Pro. Обычно это можно сделать, щелкнув на иконке программы на панели задач или через меню «Пуск».
- В Lenovo Fingerprint Manager Pro создайте свой отпечаток пальца. Следуйте инструкциям на экране, чтобы зарегистрировать свой отпечаток пальца. Сделайте несколько сканирований для повышения точности и безопасности.
- После регистрации отпечатка пальца установите его как метод авторизации. Выберите отпечаток пальца в меню настроек Windows 10 и установите его для входа в систему вместо пароля.
- Теперь вы можете использовать отпечаток пальца для входа в систему Windows 10. Просто поместите палец на датчик или веб-камеру с функцией сканирования отпечатка пальца, и ваш компьютер Lenovo разблокируется.
Настройка и использование Lenovo Fingerprint Manager Pro на Windows 10 позволяет обеспечить безопасный и удобный способ входа в систему, особенно если вы не хотите запоминать и вводить пароли.