Support for Windows 7 ended on January 14, 2020
We recommend you move to a Windows 11 PC to continue to receive security updates from Microsoft.
Learn more
The recommended (and easiest) way to get SP1 is to turn on automatic updating in Windows Update in Control Panel and wait for Windows 7 to notify you that SP1 is ready to install. It takes about 30 minutes to install, and you’ll need to restart your computer about halfway through the installation.
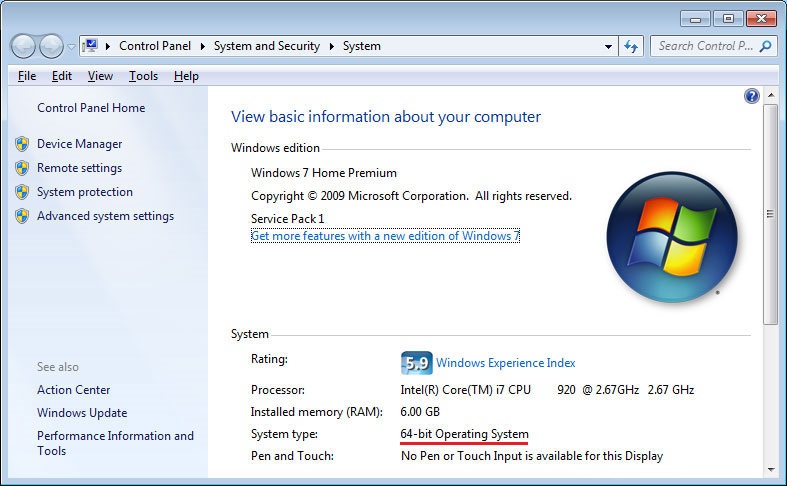
To check if Windows 7 SP1 is already installed on your PC, select the Start button, right-click Computer, and then select Properties.
If Service Pack 1 is listed under Windows edition, SP1 is already installed on your PC.
Before you begin
Check if your PC is 32-bit or 64-bit
You’ll need to know if your PC is running a 32-bit (x86) or 64-bit (x64) version of Windows 7. Select the Start button, right-click Computer, and then select Properties. The version of Windows 7 is displayed next to System type.
Disk space requirements
Check to make sure your PC has enough free disk space to install SP1.
|
Installation method |
Estimated amount of free disk space needed |
|---|---|
|
Windows update |
x86-based (32-bit): 750 MB x64-based (64-bit): 1050 MB |
|
Downloading SP1 from the Microsoft website |
x86-based (32-bit): 4100 MB x64-based (64-bit): 7400 MB |
Back up important files
It’s a good idea to back up your important files, photos, and videos to an external hard disk, USB flash drive, or the cloud before installing the update.
Plug in and connect to the Internet
Make sure your PC is plugged in to power and you’re connected to the Internet.
Disable antivirus software
Some antivirus software might prevent SP1 from installing or slow down the installation. You can temporarily disable your antivirus software before the installation. If you do so, make sure you’re aware of the risks that might be involved and re-enable the antivirus software as soon as SP1 is done installing.
Installing Windows 7 SP1 using Windows Update (recommended)
If your PC is set to automatically install updates, you’ll be prompted by Windows Update to install SP1. Follow the instructions to install the update.
To manually install SP1 from Windows Update:
-
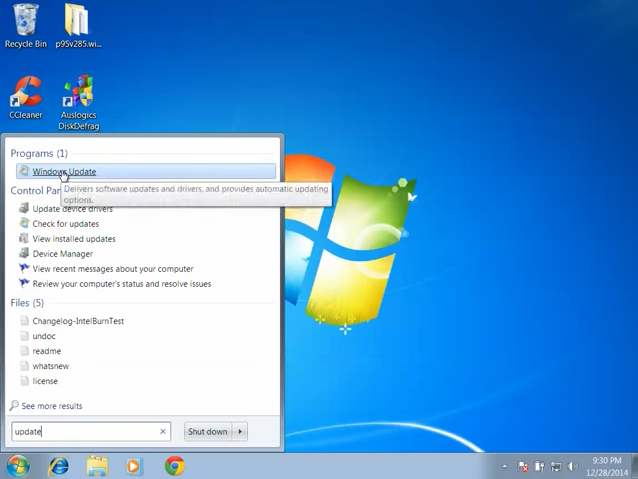
Select the Start button > All programs > Windows Update.
-
In the left pane, select Check for updates.
-
If any important updates are found, select the link to view available updates. In the list of updates, select Service Pack for Microsoft Windows (KB976932) and then select OK.
Note: If SP1 isn’t listed, you might need to install some other updates before installing SP1. Install any important updates and then follow these steps again to check for SP1.
-
Select Install updates.
 You might be asked for an admin password or to confirm your choice.
 -
Follow the instructions to install SP1.
-
After SP1 is installed, sign in to your PC. You might see a notification indicating whether the update was successful. If you disabled your antivirus software before the installation, make sure you turn it back on.
 You might be asked for an admin password or to confirm your choice.
Downloading and installing Windows SP1 from the Microsoft Update Catalog
If you’re unable to install SP1 from Windows Update, you can download the installation package from the Microsoft Update Catalog and then install SP1 manually.
-
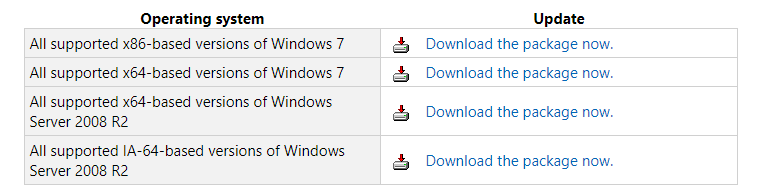
Go to the Windows 7 Service Pack 1 download page on the Microsoft website.
-
Select the Download link that corresponds to your version of Windows 7.
-
Select each of the download links and save them to your PC. When you’re ready to install SP1, run the .exe file you downloaded from the site. Then follow the instructions to install SP1. Your PC might restart a few times during the installation.
-
After SP1 is installed, sign in to your PC. You might see a notification indicating whether the update was successful. If you disabled your antivirus software before the installation, make sure you turn it back on.
Troubleshoot problems installing Windows SP1
If you try to install SP1 and see an error message that the installation wasn’t successful, this might be because there’s a problem with the Windows Servicing Store that is used to install updates or because your antivirus software is preventing the update from being installed.
To try and fix the problem, follow these steps and then try to install SP1 again.
Run the Windows Update troubleshooter
If your PC isn’t able to find or install updates, the Windows Update troubleshooter might be able to fix the problem.
-
Select the Start button, and then select Control Panel.
-
In the search box, enter troubleshooter and then select Troubleshooting from the list of results.
-
Under System and Security, select Fix problems with Windows Update and then follow the instructions.
-
After the troubleshooter is done, try installing the service pack again.
Need more help?
Want more options?
Explore subscription benefits, browse training courses, learn how to secure your device, and more.
Communities help you ask and answer questions, give feedback, and hear from experts with rich knowledge.
Find solutions to common problems or get help from a support agent.
How to Download & Install
Windows 7 Service Pack 1 (SP1)
The recommended (and easiest) way to get SP1 is to turn on automatic updating in Windows Update in Control Panel and wait for Windows 7 to notify you that SP1 is ready to install. It takes about 30 minutes to install, and you’ll need to restart your computer about halfway through the installation.
To check if Windows 7 SP1 is already installed on your PC, select the Start button, right-click Computer, and then select Properties.
If Service Pack 1 is listed under Windows edition, SP1 is already installed on your PC.
Before you begin Check if your PC is 32-bit or 64-bit:
You’ll need to know if your PC is running a 32-bit (x86) or 64-bit (x64) version of Windows 7. Select the Start button, right-click Computer, and then select Properties. The version of Windows 7 is displayed next to System type.
Downloading and installing Windows SP1 from below mention link:
Download Windows 7 Service Pack 1 for 32bit OS
Download Windows 7 Service Pack 1 for 64bit OS
Troubleshoot problems installing Windows SP1:
If you try to install SP1 and see an error message that the installation wasn’t successful, this might be because there’s a problem with the Windows Servicing Store that is used to install updates or because your antivirus software is preventing the update from being installed.
This is a .iso of service pack 1 for Windows 7. No operating system, just the service pack. Adds compatibility for several programs.
- Addeddate
- 2021-07-10 03:21:22
- Identifier
- windows-7-service-pack-1
- Scanner
- Internet Archive HTML5 Uploader 1.6.4
comment
Reviews
Reviewer:
HKlowss123
—
favoritefavoritefavorite —
January 14, 2022
Subject:
3
Would be better if this was 64-bit and not 32-bit as most computers are 64-bit.
Reviewer:
Nope2021
—
favoritefavoritefavorite —
November 25, 2021
Subject:
32 Bit version ONLY
Thank you.
13,239
Views
12
Favorites
2
Reviews
DOWNLOAD OPTIONS
Uploaded by
EsotericUsername
on
Windows 7 Service Pack 1 (SP1) 64-bit is one of the major important system updates for the Windows 7 64-bit operating system. It contains several new updates that improve Windows performance, provide stability to the computer system, and increase system security by patching the security holes and fixing bugs in the operating system. Windows 7 SP1 also contains all the previously released updates delivered over Windows Update for the OS. You can download the Windows 7 Service Pack 1 offline installer for Windows 7 32-bit and 64-bit platforms for free. Get Windows 7 SP1 KB976932 update from Microsoft’s official site on SoftShareNet.

Windows 7 Service Pack 1 is a single installation package (standalone installer) that contains a set of updates and security features to make the computer system safer and more reliable. This service pack will keep your computer system up to date and make it secure and more compatible with new software.
How to Download Windows 7 Service Pack 1:
There are two versions of this Windows Service pack, 32-bit (x86) and 64-bit (x64). Each version is developed for the specific platform of Windows. The 32-bit version of Windows required the Service pack 32-bit (x86) and the 64-bit Windows required the Service pack 64-bit (x64). Therefore, before downloading any service pack, you’ll need to know if your PC is running a 32-bit (x86) or 64-bit (x64) version of Windows 7.
To check your Windows version (platform), first, click the Start button, then right-click Computer, and then select Properties. The version of Windows 7 is displayed next to the System type. (See image below)

You can download this Service pack (Windows 7 SP1) by using the download links listed on this page. Since the Windows 7 Service Pack 1 offline installer files are quite large, it is recommended to use a download manager app like IDM or Free Download Manager (FDM) to download the service pack.
Related Software:
Windows XP Service Pack 3
How to Install Windows 7 Service Pack 1:
First, download the appropriate version of the service pack according to your operating system. After downloading the setup file, find it in the download folder and then double-click on it. Now click Yes on the next pop-up window to allow this program to make changes to the computer and then click Next. There are a few steps where you need to click Next or have to accept the software terms and conditions to start the installation process of Windows 7 Service Pack 1. It takes about 30 minutes or more to install, and your computer will restart in the middle of the installation.
Technical Details of the Program:
- Program Name: Windows 7 SP1
- Developer: Microsoft.
- Version: KB976932
- Category: System Update
- Installer Type: Offline Installer
- File size: —
- OS Required: Windows 7 (64-bit)
- Rating:
Download SP1 for Windows 7 64-bit, Size: 903 MB
DOWNLOAD
Or
Download for Windows 7 SP1 32-bit
DOWNLOAD
Or
Service Pack 1 for x64-based Windows Server 2008 R2 Systems
Size: 903 MB
DOWNLOAD
Download Windows 7 Service Pack 1 (32-bit) offline installer from its official website using the above downloads and make your computer up-to-date, faster, and secure. This Windows 7 SP1 offline installer does not require an active internet connection to install it. Also, you can use this installer file to install this program on other computers again and again.


After the stable release of Windows 7 Convenience Rollup (SP2), everyone has waited long for the release of Windows 7 Service Pack 3 (SP3) for both 32 bit and 64 bit Windows. Windows 7 Service Pack 3 update was expected by January 2020 but Microsoft has already ended the Windows 7 support on 14th January 2020. We have got your back and will guide you best on how to install the latest Windows 7 updates without official support.
You need to make sure that all Windows Convenience Updates are installed before upgrading to Windows 7 Service Pack 3 (SP3). Windows 7 Service Pack update is highly beneficial for your PC in the terms of performance and security patches.
So first you need to make sure that Service Pack 1 (SP1) is already installed on your Windows then you have to install a services stack update and then install Service Pack 2 (SP2) or Convenience Rollup Update on your Windows for the latest Windows 7 Update of Service Pack 3.
Read Also, Fix – Windows Update cannot currently check for updates on Windows 7
Contents
- 1 Step 1: Check Your Windows 7 Version (32 bit or 64 bit)
- 2 Step 2: Windows 7 Service Pack 1 (SP1) Update
- 3 Step 3: Install Servicing Stack Update on Windows 7
- 4 Step 4: Windows 7 Service Pack 2 (SP2) or Convenience Rollup Update
- 5 Step 5: Download Windows 7 Service Pack 3 (SP3) Update – (32 bit or 64 bit)
Step 1: Check Your Windows 7 Version (32 bit or 64 bit)
You need to verify your PCs Windows 7 version, whether 32 bit or 64 bit Windows installed on your PC. 32 Bit computers can install only 32 bit Windows but you can install both the versions on the 64 bit Windows. It is recommended to install the same version as your PC supports for the better performance of Service Pack 3 (SP3) on your Windows.
- Open Start Menu.
- Right click on Computer and open properties.
- Verify your Windows Versions.

Now you have to proceed accordingly while installing the Windows update.
Step 2: Windows 7 Service Pack 1 (SP1) Update
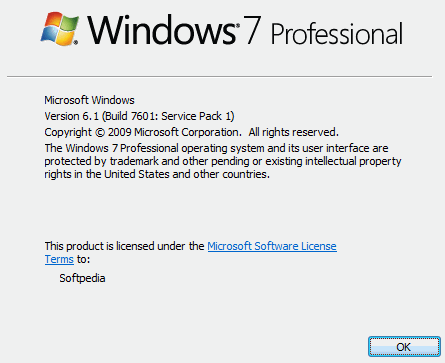
You need to make sure that Windows 7 Service Pack 1 (SP1) Update is completely installed on your system. First, check out the current Windows Service Pack update, you can skip to the next step in case Service Pack 1 (SP1) is already installed on your Windows. Search for winver in the Windows Start Menu to verify the Service Pack update on your Windows, go to step 3 if Service Pack 1 (SP1) update already installed and step 4 if Service Pack 2 (SP2) is already installed on your Windows 7.
Carry on to download and install Windows 7 Service Pack 1 Update.
Now we will download Windows 7 Offline Installer Update from the official Microsoft site.
Installing Windows 7 Service Pack 1 Update.
Once the offline installation is complete and you are able to access the desktop, check out the windows update in winver, Service Pack Update is successfully installed on your Windows. Now let’s install Servicing Stack update on your Windows.
Step 3: Install Servicing Stack Update on Windows 7
Servicing Stack Update is necessary before installing Windows 7 Service Pack 3 update as it ensures all windows inbuilt services. It is a must for the better performance of your Windows. It is all together bundled with the service libraries, packages, and other resources.
- Download Servicing Stack Update from the Microsoft site.

- Simply install it on your PC.
It will ensure safe passage to further Service Pack Update. Also, fix unusual traffic from your computer error on your pc.
Step 4: Windows 7 Service Pack 2 (SP2) or Convenience Rollup Update
All the previous steps are must in order to install Windows 7 Service Pack 2 (SP2) or Convenience Rollup Update as it includes all the latest updates after previously installed service pack updates. This update includes all the major security bug fixes and adobe flash player errors hence it is also included in the custom windows image creation. It requires three to four GB of free space depending on the 32 bit or 64 bit processor.
- Download Windows 7 Service Pack Update for 32 bit PC
- Download Windows 7 Service Pack Update for 64 bit PC
Double click on the downloaded file to begin the update installation.
Step 5: Download Windows 7 Service Pack 3 (SP3) Update – (32 bit or 64 bit)
You need to enable Windows 7 Auto Update to automatically download Windows 7 Service Pack 3 (SP3) Update. Turning on Windows 7 Auto Update will keep your Windows 7 up to date and further you won’t need to manually search, download and install the latest available update, your PC will do it by itself. Even you won’t need to worry about errors and fixes of missing drivers and updates. Now make sure that Windows 7 Auto Update is enabled from the beginning itself.
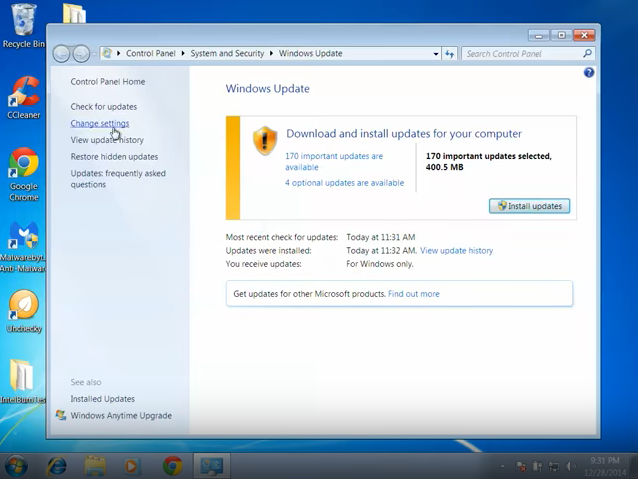
- Press Start Button and Search for Windows Update.

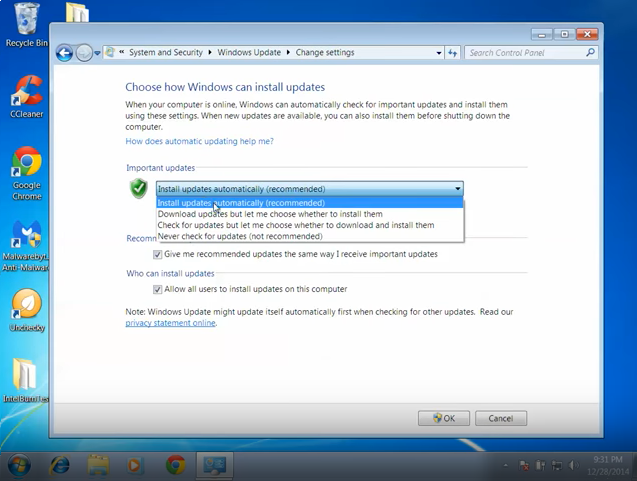
- Click on the Change Settings in the left menu.
- Drop down the option of Important Update and change it to the ‘Install updates automatically (recommended)’.

That’s It, Now you won’t miss any Windows 7 Service Pack 3 Update. Hopefully, your PC is updated to the latest SP3 update.