Если вы считаете, что GIMP не ровня Photoshop, и не можете жить без офиса от Microsoft.

1. Wine
Название Wine расшифровывается как Wine Is Not an Emulator. Это своего рода прослойка между приложениями Windows и системой Linux. Он позволяет устанавливать и запускать многие популярные Windows-программы и работать с ними так, как будто это родные приложения Linux.
Чтобы установить Wine, воспользуйтесь соответствующей командой.
1. Ubuntu, Debian, Mint:
sudo dpkg --add-architecture i386
wget -nc https://dl.winehq.org/wine-builds/Release.key
sudo apt-key add Release.key
sudo add-apt-repository "deb https://dl.winehq.org/wine-builds/ubuntu/ artful main"
sudo apt-get update
sudo apt-get install --install-recommends winehq-stable
2. Fedora:
sudo dnf install winehq-stable
3. openSUSE:
sudo zypper install wine
4. Arch, Manjaro:
sudo pacman -S wine
Когда Wine установлен, откройте его через ваше меню приложений или с помощью команды winecfg. При первом запуске Wine может попросить установить некоторые дополнительные пакеты — позвольте ему это сделать. После этого все Windows-программы формата EXE ассоциируются в системе с Wine.
Теперь скачайте установщик нужного вам приложения Windows, найдите папку с ним в вашем файловом менеджере и откройте файл. Либо введите команду wine путь_к_приложению.
Windows-приложение запустится и будет работать так же, как и всегда. Если вы открыли установочный файл, начнётся установка приложения — как в Windows. Если программа не требует установки, вы сможете начать работать с ней немедленно.
Не все приложения могут быть установлены и запущены в Wine, хотя количество поддерживаемых впечатляет. Полный список можно посмотреть здесь.
2. Winetricks
Wine — неплохой инструмент, однако интерфейс у него оставляет желать лучшего. Если вы намучились с этой программой, но так и не добились результата, попробуйте Winetricks. У неё приятный графический интерфейс для установки и запуска Windows-приложений, в котором куда проще разобраться новичку.
Установить Winetricks можно так:
1. Ubuntu, Debian, Mint:
sudo apt-get install winetricks
2. Fedora:
sudo dnf install winetricks
3. openSUSE:
sudo zypper install winetricks
4. Arch, Manjaro:
sudo pacman -S winetricks
Winetricks позволяет установить различные версии Microsoft Office и Photoshop, плеер foobar2000 и множество других программ. Поддерживаются и такие популярные игры, как Call of Duty, Call of Duty 4, Call of Duty 5, Biohazard и Grand Theft Auto: Vice City. Некоторые программы загружаются автоматически, для других будет предложено вставить установочный носитель. И, естественно, вы можете открывать собственноручно скачанные файлы формата EXE.
3. PlayOnLinux
PlayOnLinux — ещё один удобный инструмент для запуска Windows-приложений в Linux. Как и Winetricks, он обладает простым графическим интерфейсом. Но, в отличие от него, PlayOnLinux позволяет вам выбирать конкретную версию Wine для того или иного приложения. Это полезно, если какая-то из нужных вам программ некорректно работает с новыми версиями Wine. В целом PlayOnLinux выглядит куда симпатичнее и практичнее, чем Winetricks.
Чтобы установить PlayOnLinux, выполните в терминале одну из следующих команд:
1. Ubuntu, Debian, Mint:
sudo apt-get install playonlinux
2. Fedora:
sudo dnf install playonlinux
3. OpenSUSE:
sudo zypper install playonlinux
4. Arch, Manjaro:
sudo pacman -S playonlinux
В меню установки PlayOnLinux можно найти множество предварительно сконфигурированных приложений и игр, которые вы можете загрузить и установить парой щелчков. Кроме того, PlayOnLinux можно скармливать собственные EXE-установщики. Приложение заботливо выберет за вас версию Wine и создаст значок установленной программы на рабочем столе.
4. Crossover
Изредка бесплатные PlayOnLinux и Winetricks не справляются с установкой какого-нибудь особенно привередливого приложения. В таком случае вам может помочь Crossover. Эта программа очень проста в использовании. Вам достаточно указать, какое приложение вы хотите установить, и подсунуть Crossover установочный файл. Всё остальное будет сделано за вас.
Лицензия Crossover на год стоит 39,95 доллара, но у программы есть и бесплатная пробная версия. Рекомендуется сначала установить необходимое вам приложение в ней, чтобы убедиться, что оно работает корректно.
Crossover →
5. VirtualBox
Если ваше приложение упорно отказывается запускаться в перечисленных выше программах, можно пойти на решительные меры и установить его в виртуальной машине. Учтите, что она отнимает гораздо больше системных ресурсов, поэтому использовать её стоит в крайних случаях.
Для запуска приложения в виртуалке вам понадобится установочный образ Windows в формате ISO. Загрузите и установите VirtualBox, создайте в нём виртуальную машину, укажите ей ISO с Windows, а затем просто установите систему как обычно.
Неоспоримый плюс виртуальной машины — в ней работает полноценная операционная система, а значит, запустится абсолютно всё. Минус — прожорливость в плане системных ресурсов, да и тратиться на лицензию Windows для виртуалки накладно.
VirtualBox →
Читайте также 🧐
- 6 задач, с которыми Linux справляется лучше, чем Windows
- Как реанимировать Windows и сохранить данные с помощью live-дистрибутива Linux
- Как обмениваться файлами по воздуху между Windows, macOS, Linux, iOS и Android
As you’re here, I’m going to assume that you’re a Linux user. And every once in a while, you find yourself asking: can I run windows applications on Linux?
The answer to that question is yes. Yes, you can run Windows applications in Linux. Here are some of the ways for running Windows programs with Linux:
- Installing Windows on a separate HDD partition
- Installing Windows as a virtual machine on Linux
Both of them work just fine. But they are somewhat resource hungry.
If you only need to use a small Windows application, installing Windows on a separate HDD partition or as a Virtual Machine is not efficient. Moreover, Virtual Machine can’t utilize the total power of your machine. So, what is the solution?
No worries, there is another way to use Windows software on Linux. It’s called Wine. If you aren’t yet familiar with it or you are a beginner in the world of Linux, this article is for you.
In this beginner’s guide, I’ll show you what Wine is and how to use it to run Windows software on Linux. I have used Ubuntu here as Ubuntu is one of the best Linux distros for beginners, but any other Linux distribution will have more or less the same steps (except for the commands in Arch or Fedora-based distros).
Using Wine to run Windows programs in Linux
Wine stands for Wine Is Not an Emulator. And WINE is actually an acronym for that. And as previously stated, it’s not even a virtual machine.
Rather it is a compatibility layer for running Windows applications on UNIX-like, POSIX-compliant operating systems (e.g. Linux, Mac, BSD). While a virtual machine or emulator simulates internal Windows logic, Wine translates those Windows logic to native UNIX/POSIX-complaint logic.
In simple and non-technical words, Wine converts internal Windows commands to commands your Linux system can natively understand.
Installing Wine
There are various ways to install Wine on your system. Almost all the Linux distros come with Wine in their package repository. Most of the time the latest stable version of Wine is available via the package repository.
If you are using a 64-bit installation of Ubuntu, you will need to add 32-bit architecture support on your distro which will benefit you in installing specific software. If you don’t know whether you have a 32-bit installation or 64-bit, check this article on how to check if you have a 32-Bit or 64-Bit Computer.
Once confirmed, do this by executing the following command:
sudo dpkg --add-architecture i386In Ubuntu, you can install Wine by:
sudo apt update
sudo apt install wine
Get the latest WINE version (optional)
But in the case of Ubuntu 22.04 LTS, the available package in the repo is Wine v6.0.3, while the latest stable release is v7.0.1. In the case of software like Wine, which receives significant updates frequently, always try to remain in the latest stable release. To do this in Ubuntu, first, you need to add the 32-bit architecture with the above step. Then download and add the repository key:
sudo mkdir -pm755 /etc/apt/keyrings
sudo wget -O /etc/apt/keyrings/winehq-archive.key https://dl.winehq.org/wine-builds/winehq.key
In the next step, you need to download the Wine source file. For that, you need wget installed.
sudo apt install wgetAlso, you should know which version of Ubuntu is running on your system. In my case, I was running Ubuntu 22.04 Jammy Jellyfish.
To know your version, run this command in a terminal window:
lsb_release -csOnce you get your version name, replace this in place of jammy and execute the command below:
sudo wget -NP /etc/apt/sources.list.d/ https://dl.winehq.org/wine-builds/ubuntu/dists/jammy/winehq-jammy.sourcesNow update the package information.
sudo apt updateFinally, install the latest stable version of Wine with:
sudo apt install --install-recommends winehq-stableYou can use winehq-devel or winehq-staging for Development and Staging branch respectively.
Getting Started with Wine
Before we go on installing and running applications in Wine, we should have a clear idea about a few things and about how to configure Wine for usage:
WinePrefix
Windows applications need a C: drive. Wine uses a virtual C: drive for this purpose. The directory of this virtual C: drive is called wineprefix. First of all, you need to create a wineprefix. To do that, fire up a terminal and enter this command:
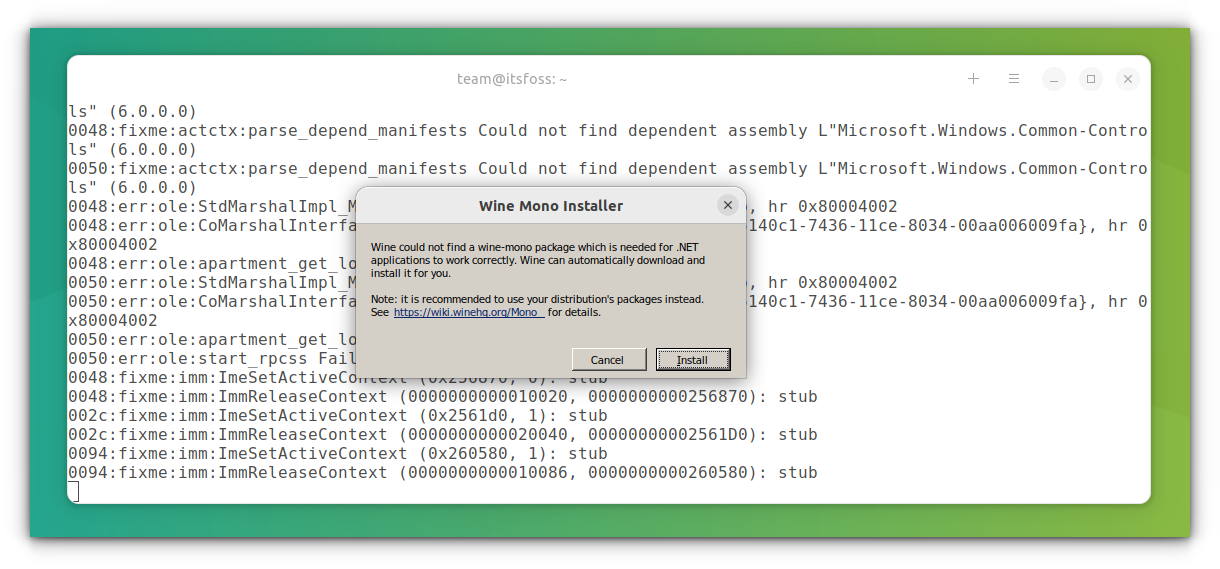
winecfgHere it prompts you to install the Wine Mono package needed for the .NET application to work properly. You can press the Install button to do this job.
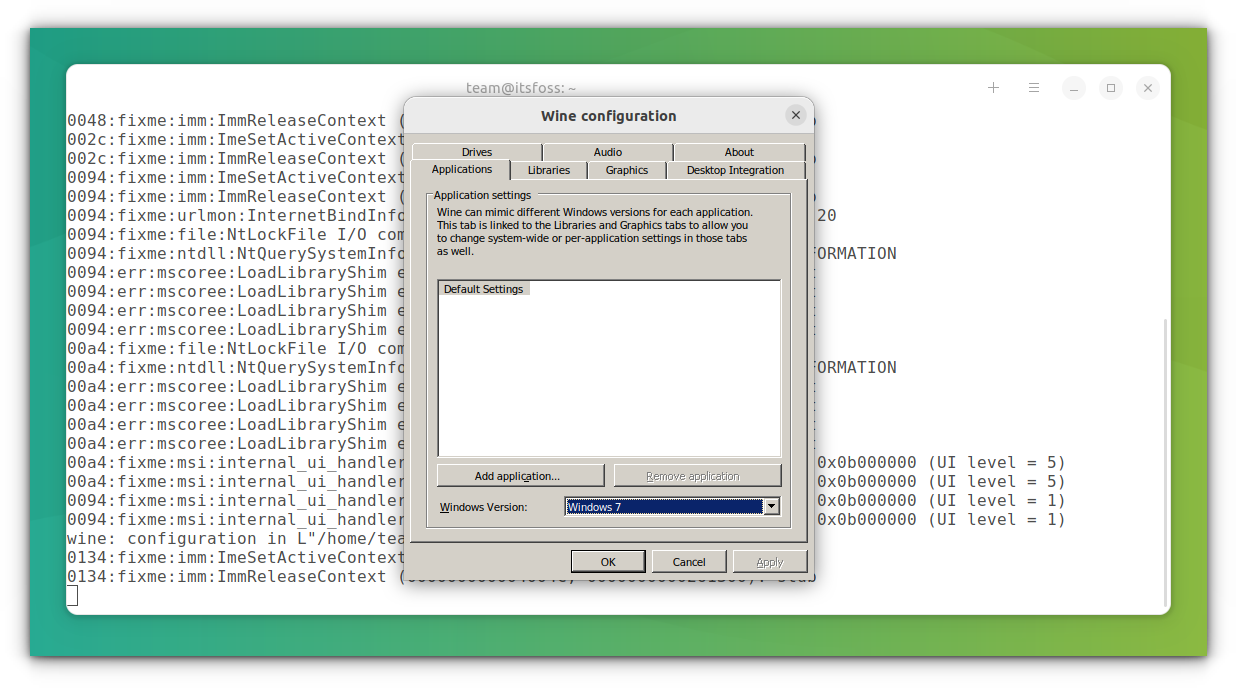
This will create a wineprefix and open the configuration window for Wine. You can change the configuration options or let it be as it is and close it.
Now, you can locate the virtual C: drive at
$HOME/.wine/c_drive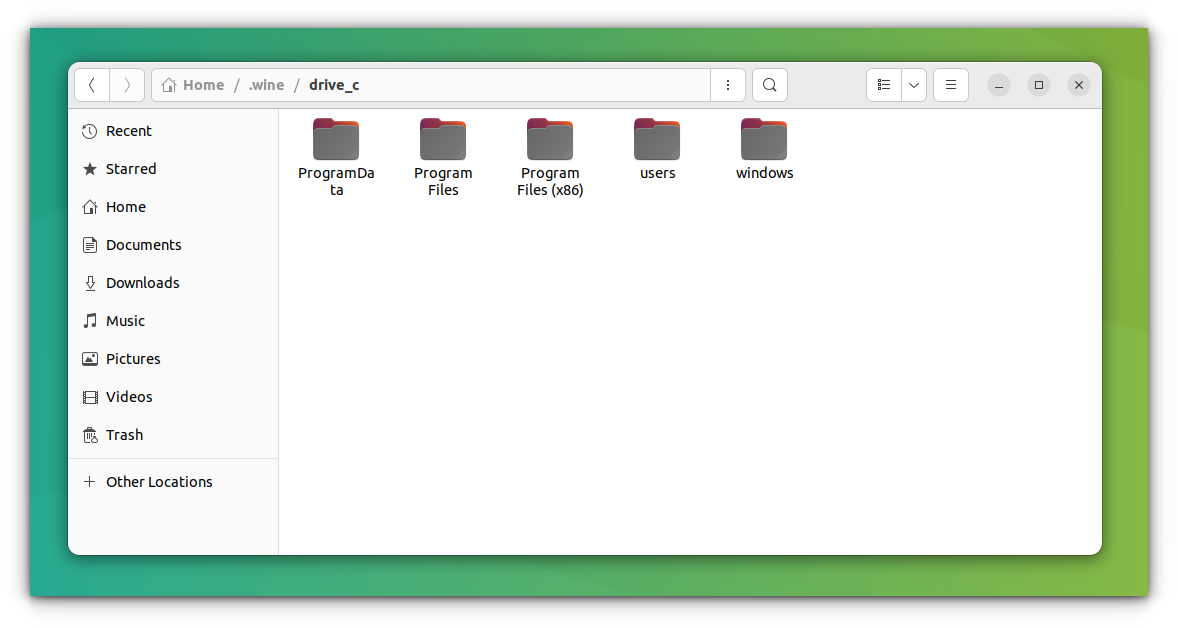
The general rule is to install each new application into a fresh wineprefix. You can create and maintain multiple wineprefix manually. But that task would seem rather tedious for beginners. So, we will skip that part for now. But, later I will show how to do that part with ease.
Which Windows applications are supported by Wine?
A large number of Windows applications are currently fully supported by Wine. They will run without any hassle.
However, new Windows applications are being developed every day. Many of them wouldn’t function as we want on Wine. But the development pace of Wine is also rapid, and support for new applications is being added all the time.
And there is a dedicated database for keeping track of just that.
Wine Application Database has almost 28,000+ applications rated with different statuses depending upon how well those applications run in Wine. If you want to quickly check the rating of the application you want to use in Wine, you can take a look there. Here is the meaning of those ratings:
- Platinum: These applications install and run flawlessly in out-of-the-box Wine.
- Gold: These applications work flawlessly with some special configurations.
- Silver: Applications with minor issues are tagged as Silver.
- Bronze: The Bronze ones have major issues that seriously affect usage.
- Garbage: These simply won’t run on Wine.
Reviews, Installation Procedure, which Wine version it was tested against and various useful data are also available for each application here.
Of course, Wine Application Database is mostly user-generated data, so you are always welcome to try running an application with a different version of Wine and share your result with the rest of the community.
Finding an Application in Wine Application Database
Let’s see how we can find an application in Wine Application Database.
Go to Wine Application Database. Click Browse Apps from the left sidebar.
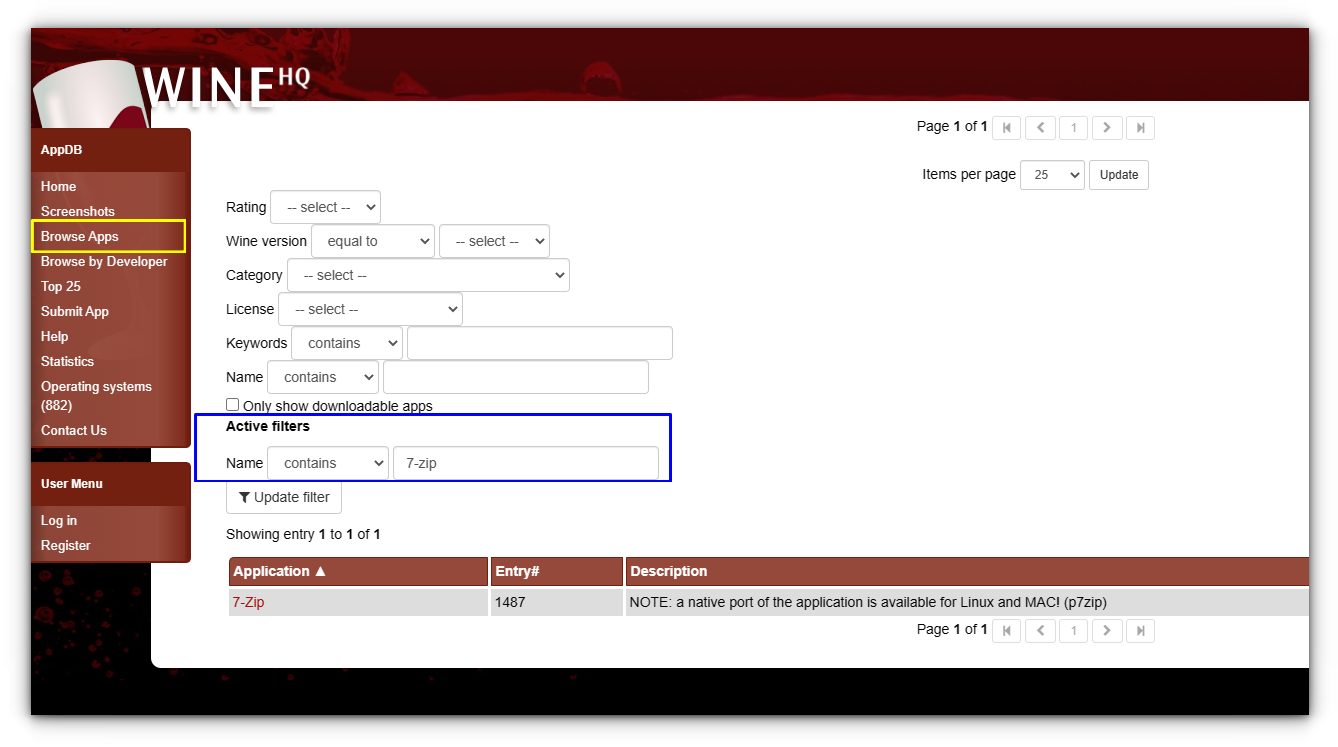
Click on the link to the application from the search result. You’ll see a description of the application. There will be a list of various versions with their compatibility rating with a specific Wine version.
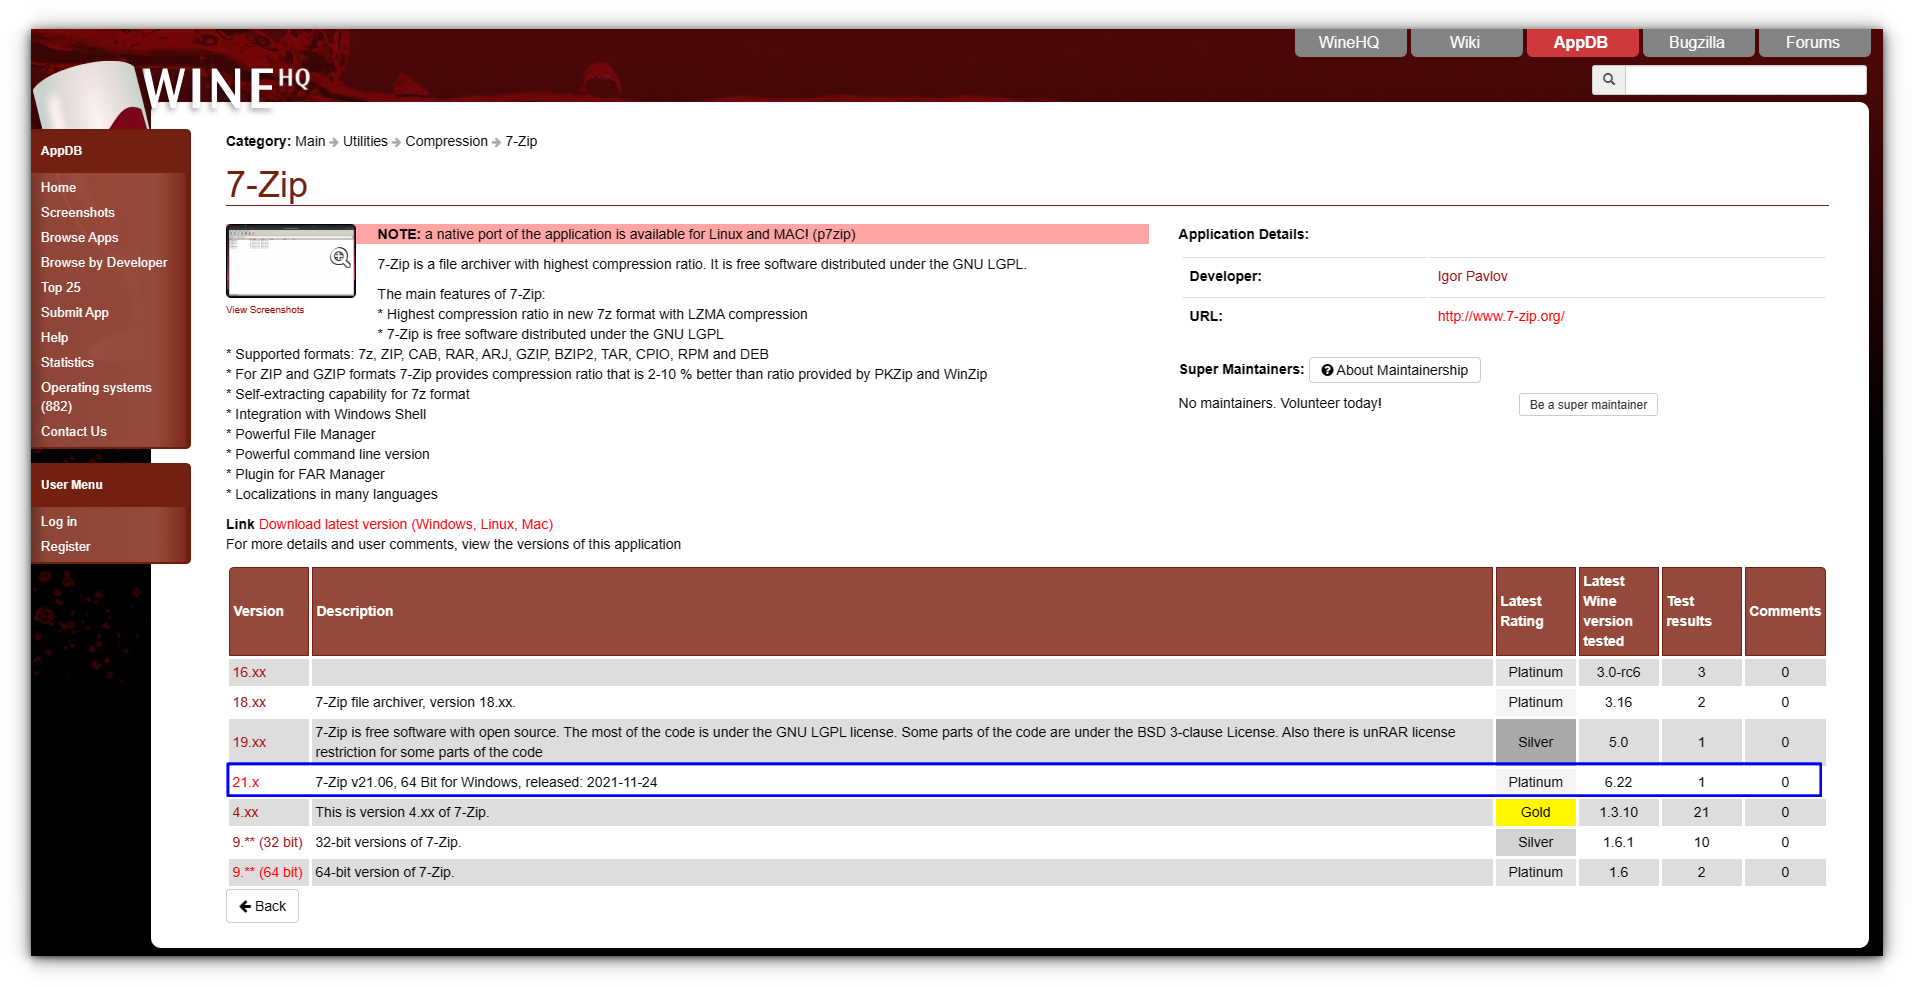
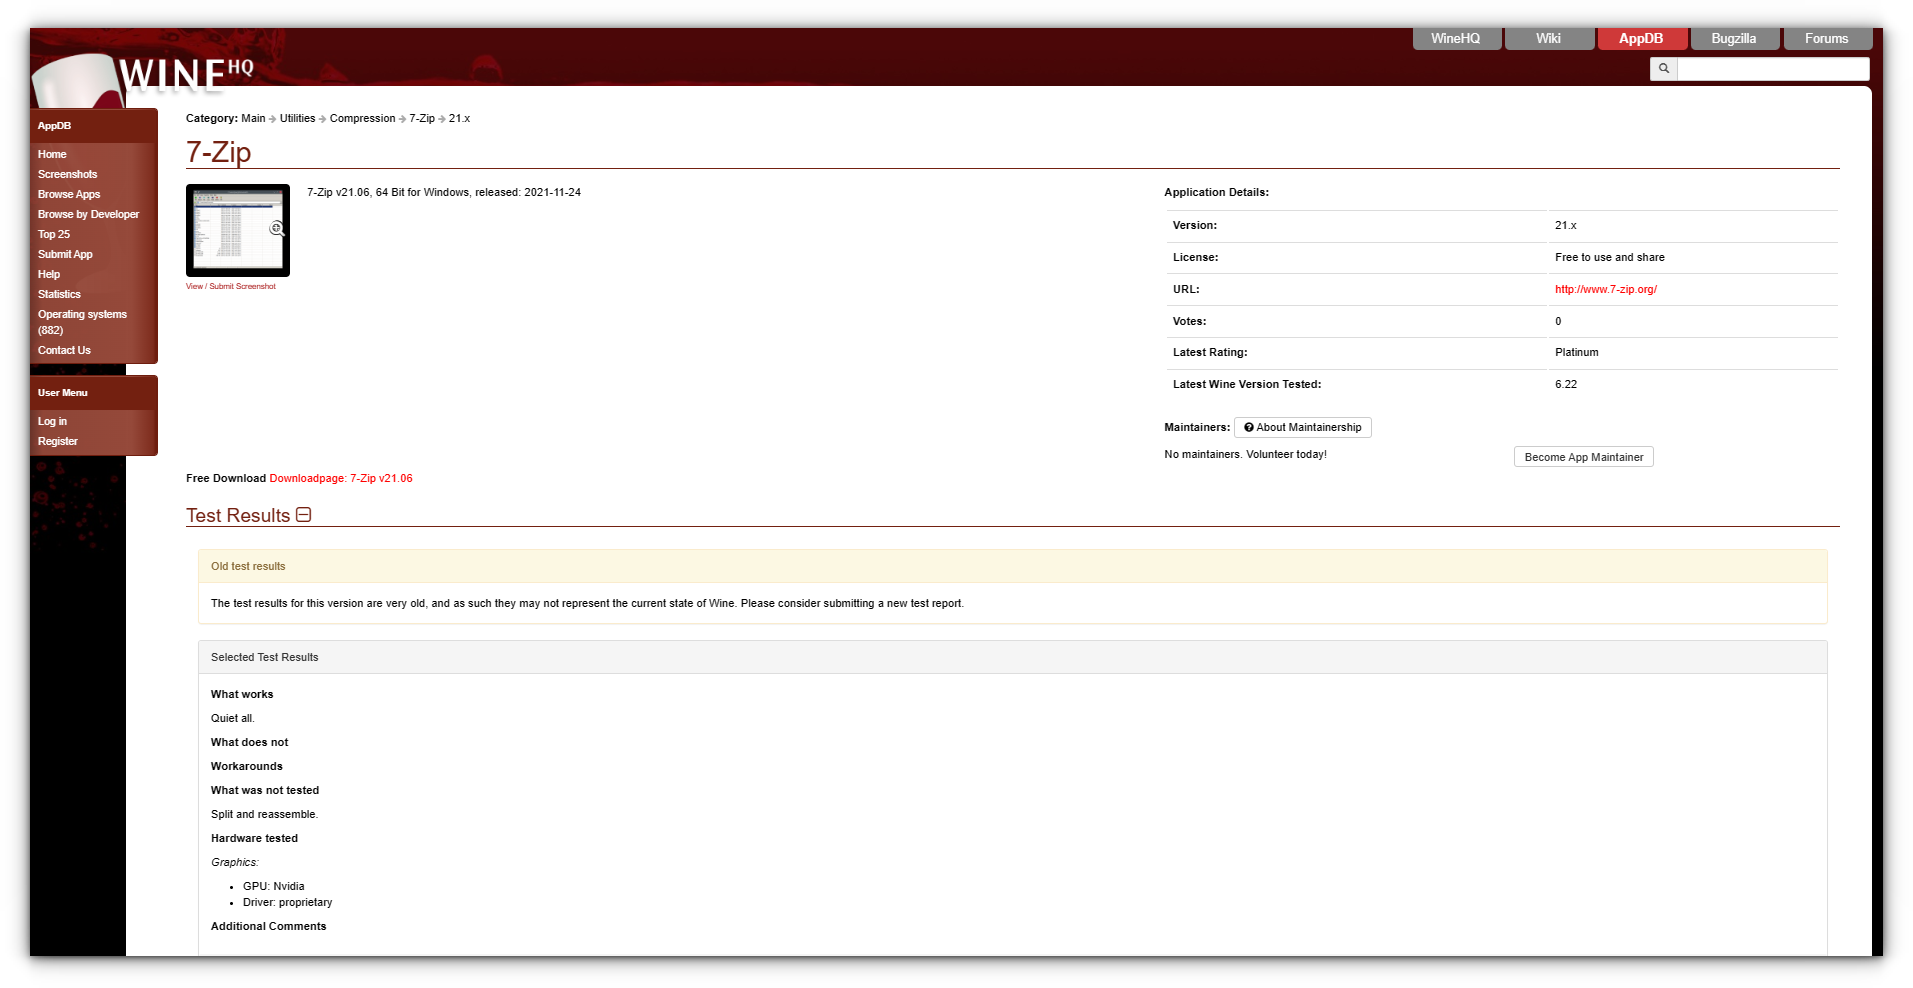
Let’s click on the latest version link. This is the main page you need to check. There will be detailed information about that specific version.
Installing an Application with Wine
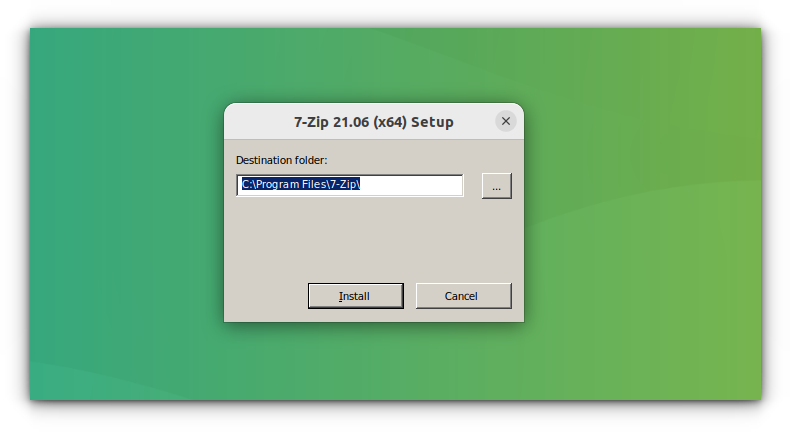
Installing a supported application in Wine is generally as easy as double-clicking on the installation file. However, you will now see a step-by-step guide for installing 7-zip on Wine.
First of all, check for 7-zip rating on Wine Application Database. It has a Platinum rating, so we are good to go. Open Wine configuration ( winecfg ) and set the Windows Version to Windows 7 (Shown in the above screenshot).
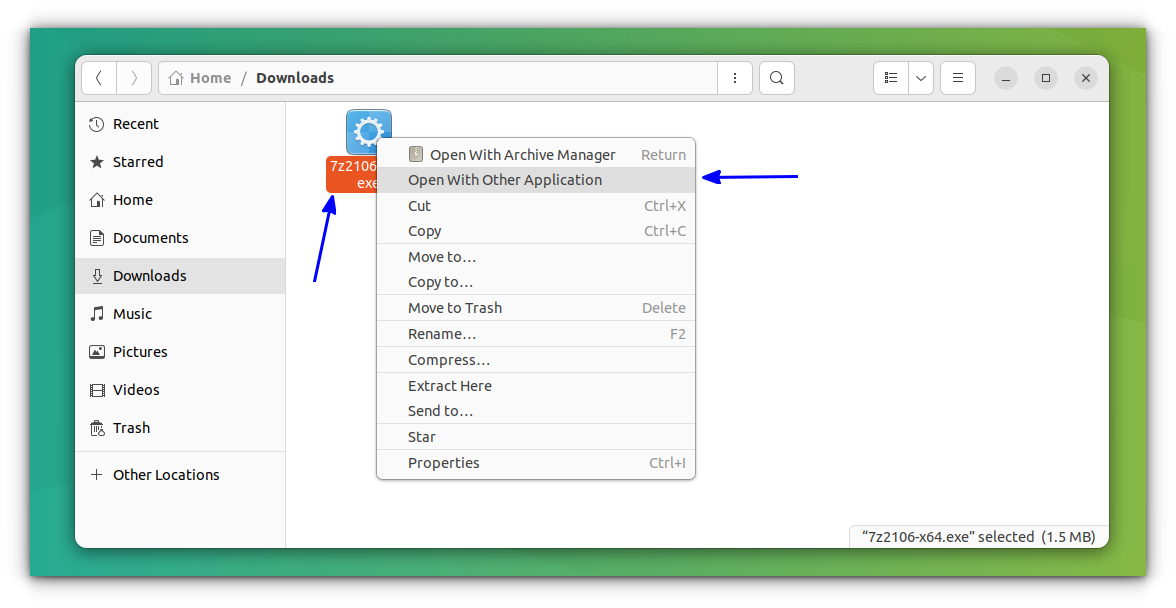
Right-click on the 7-zip installation file and select the Open With Other Application option.
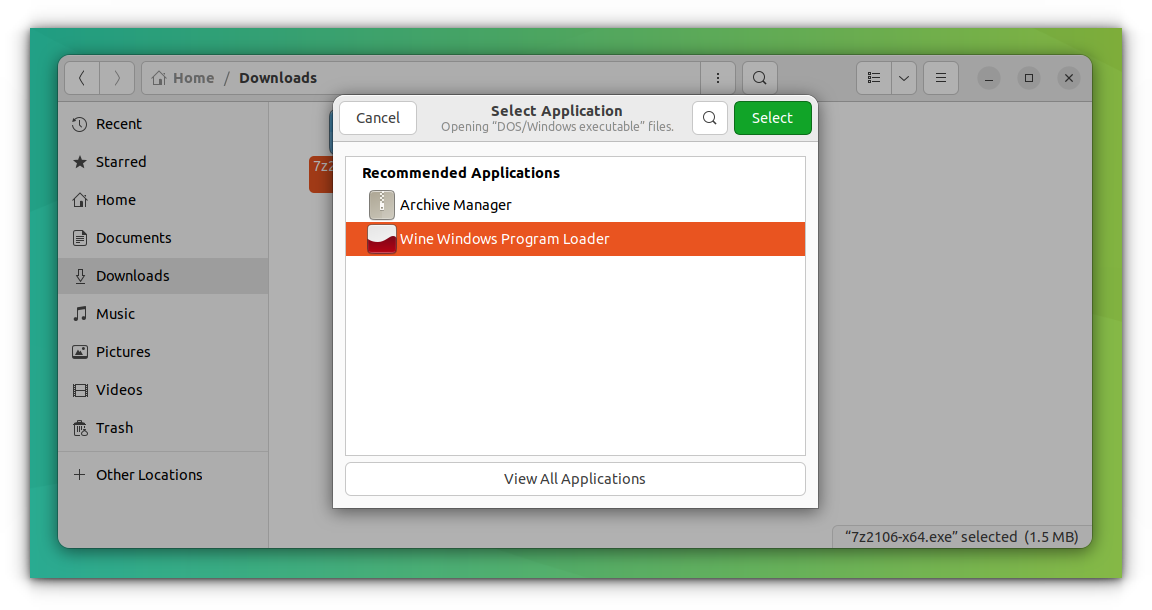
After that, select Wine Windows Program Loader.
See that destination folder path? The 7-zip installation has recognized the virtual C: drive from wineprefix.
Finish the installation and you can now open the 7-zip application from the Ubuntu Activities overview.
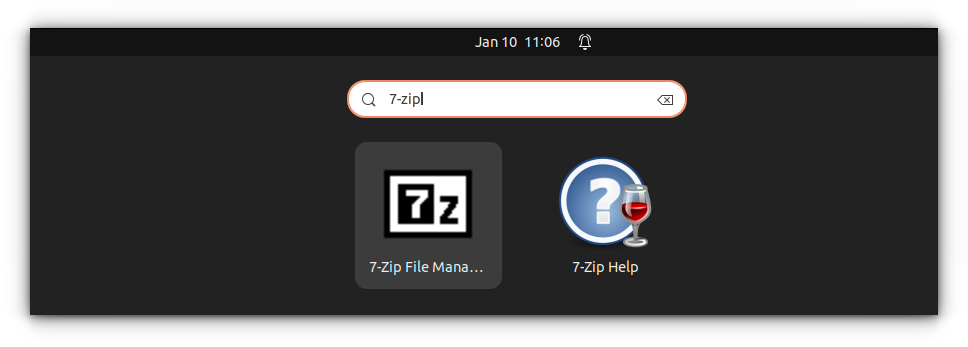
All you have to do is click on the icon. If you want to access your files on Linux, they are generally located in Z: Drive.
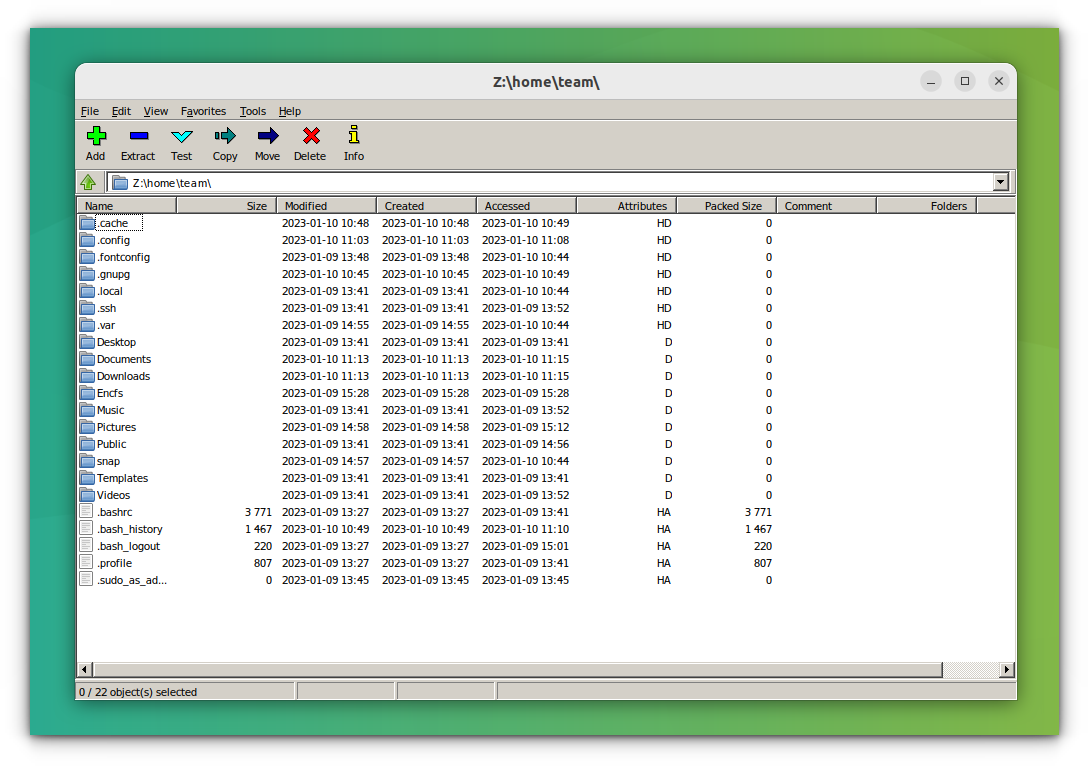
You can use the 7-zip just as you would use it on Windows – for extracting and creating archives and such.
Uninstalling an Application with Wine
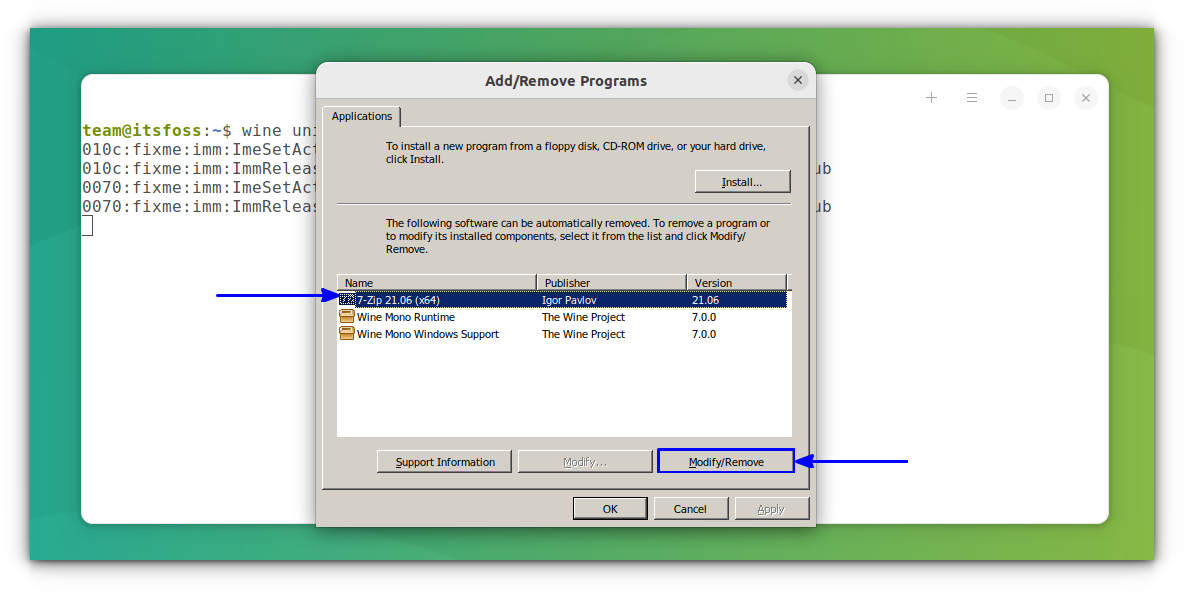
As said above, installing an application is easier with Wine. To uninstall an application, you have a Wine Uninstaller tool. You can access this tool by entering the terminal:
wine uninstallerThis will open the uninstaller window. Here, the list of installed applications will be present. You need to select the application, 7-zip in this case, and press Modify/Remove button as shown below:
This will initiate the uninstall process and can be completed easily on an application basis.
Let’s make things (a lot) Easier
You might have noticed that, in Wine Application Database, a specific Wine version is mentioned with every version of the application reviews.
It is because of the rapid development rate of Wine. Though an application runs with the current version of Wine, it might not run with a future version, because of the changes made.
Also, I’ve mentioned installing each application in its own fresh wineprefix. So, an application has no chance of interfering with another. And doing all these manually, usually from the terminal, is time-consuming, tiresome, and sometimes confusing.
PlayOnLinux is here to rescue you. It provides a nice interface for doing all these things easily. For installing PlayOnLinux on Ubuntu, simply run this command:
sudo apt install playonlinux
You can easily perform every task related to Wine with PlayOnLinux from a beautiful and intuitive graphical interface:
- Installing & Uninstalling applications.
- Creating, Updating & Removing wineprefixes.
- Maintain Wine of different architecture and versions.
- Run & Create shortcuts for installed applications.
- And so on…
But still, you will need to check Wine Application Database for reviews, installation procedures, and such.
Advantages of using Wine
When it comes to running Windows applications on Linux systems, Wine provides many advantages over using emulators or virtual machines.
- Performance: Wine is immune to the performance loss that otherwise occurs while emulating.
- Native Experience: There is no need to open Wine before running a Windows application. Exactly how Wine works will be clear from this quote from the official site,
Wine can be thought of as a Windows emulator in much the same way that Windows Vista can be thought of as a Windows XP emulator: both allow you to run the same applications by translating system calls in much the same way. Setting Wine to mimic Windows XP is not much different from setting Vista to launch an application in XP compatibility mode.
Wine Derivatives
There are quite a number of projects for running Windows applications on other platforms, based on Wine:
- CrossOver: CrossOver is developed by the company named CodeWeavers. It is directly based on Wine with a few tweaks and proprietary add-ons. In fact, CodeWeavers employs a large portion of Wine developers. Unlike the rapid releases of Wine, CrossOver releases are more stable. The one major downside is that Crossover is not free.
- PlayOnLinux: PlayOnLinux is completely based on Wine. And provides an easier route for installing and managing applications with Wine. PlayOnLinux is free. It is also available for Mac as PlayOnMac.
- Bottles: Bottles app got huge popularity recently, because of its ease of use and various other life-saving features. It is available as a flatpak to install on all Linux distributions. You can run Applications and Games inside bottles.
- ReactOS: ReactOS is an entirely different open-source operating system for running Windows applications. It reuses a considerable amount of codes from Wine. However, this is a project under development for more than a decade and I won’t recommend it.
Purchase CrossOver Through the CodeWeavers Store Today!
Buy CrossOver Mac and CrossOver Linux through the CodeWeavers store. Choose from 12 month and lifetime license plans. Renewals are also available for purchase.
![]() CodeWeavers
CodeWeavers
Additional Tips on using Wine
Winetricks
This is another important part of using Wine. Winetricks is a helper script to download and install various redistributable runtime libraries needed to run some applications in Wine. These may include replacements for components of Wine using closed-source libraries. Winetricks comes with Wine installation on Ubuntu through the package manager.
For starting winetricks, run this command:
winetricksIf you have installed Wine from Wine official repository, you may need to install winetricks separately.
To do this, open a terminal and enter the following commands:
cd "${HOME}/Downloads"
wget  https://raw.githubusercontent.com/Winetricks/winetricks/master/src/winetricks
chmod +x winetricks
Now open Winetricks with:
./winetricks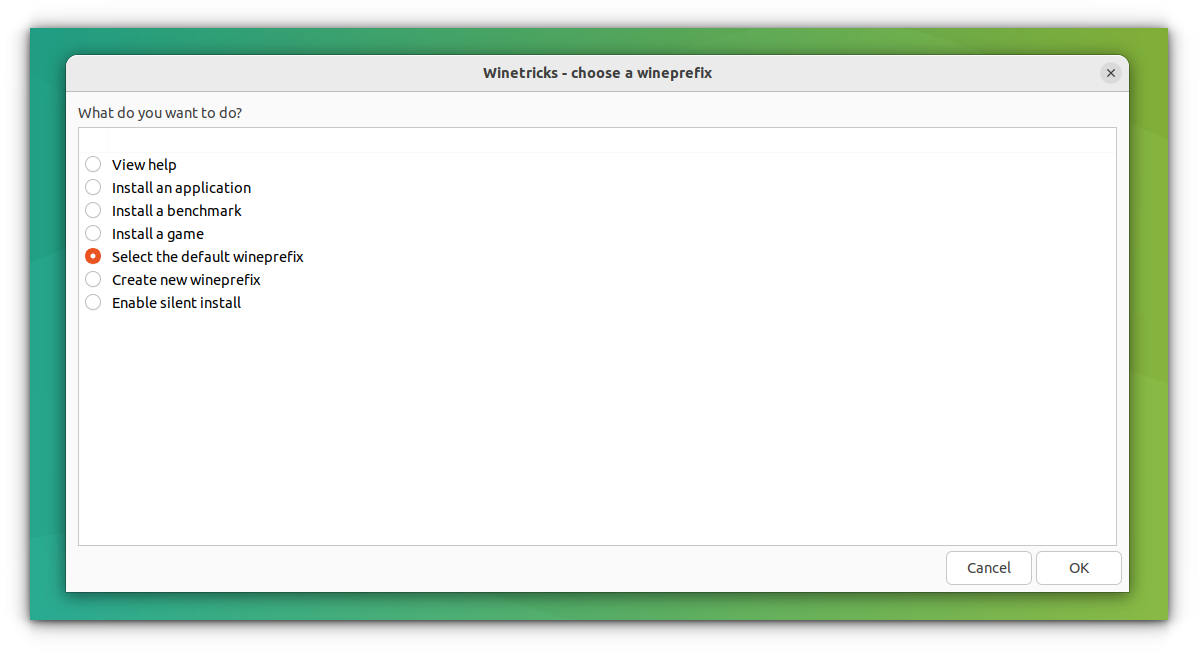
There are many options for helping you with various tasks.
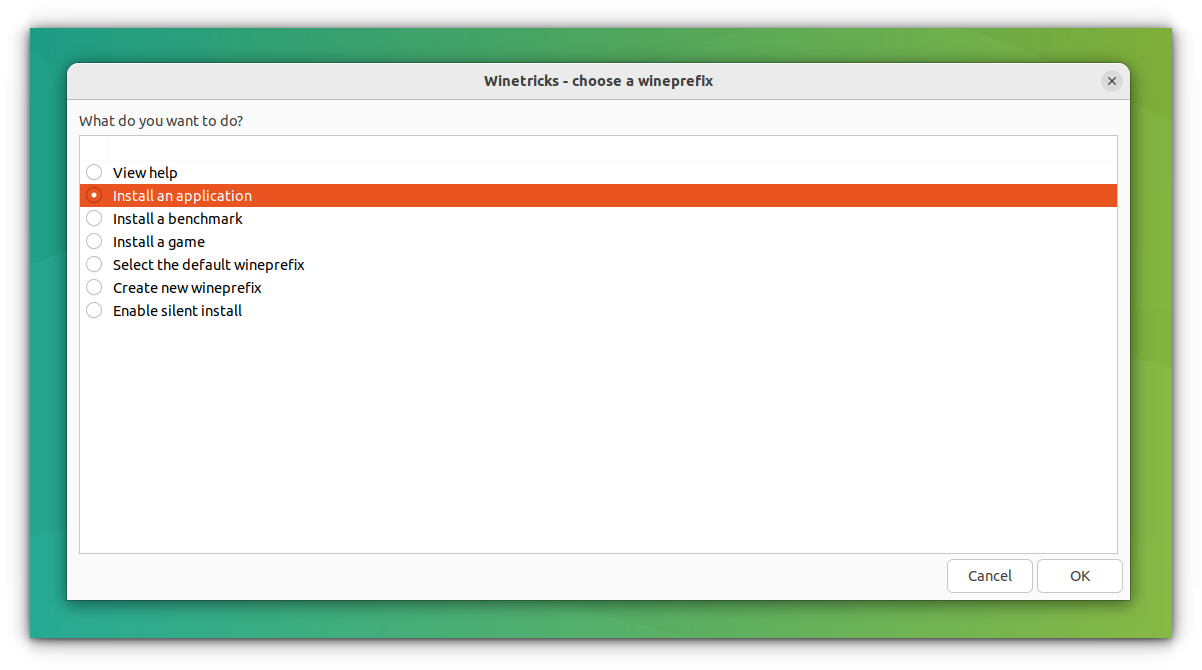
Installing an Application with Winetricks
If you Install an app from winetricks, it will be installed in a separate wineprefix. Let’s install VLC:
So, select install an app from the options and click OK:
Now select VLC from this list:
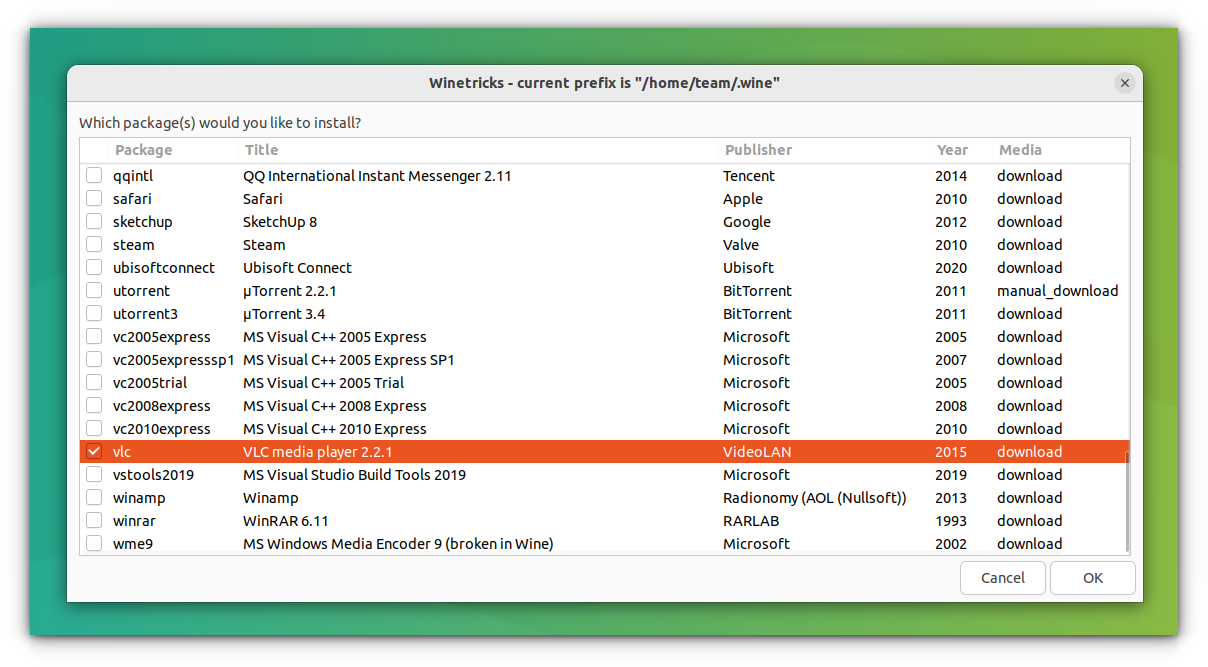
It will then begin to download the VLC installation files. And then guide you through the rest of the process. It’s pretty simple.
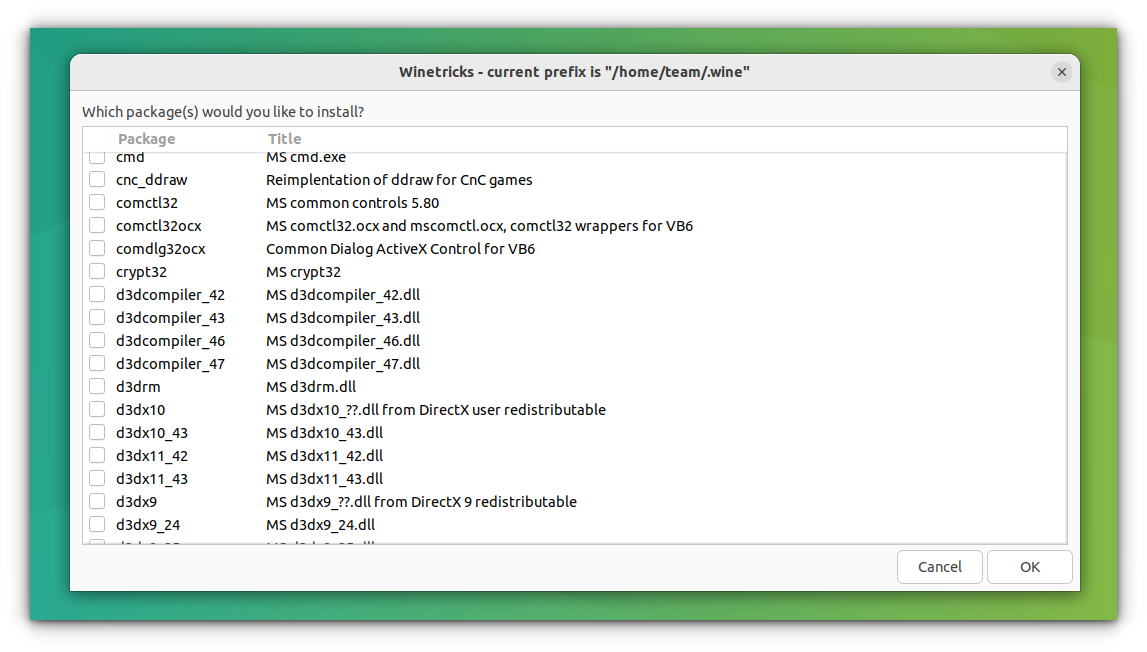
Install Windows DLL or components and others
You can select a wineprefix from winetricks and install various libraries and components required by the application you want to run and also perform other operations.
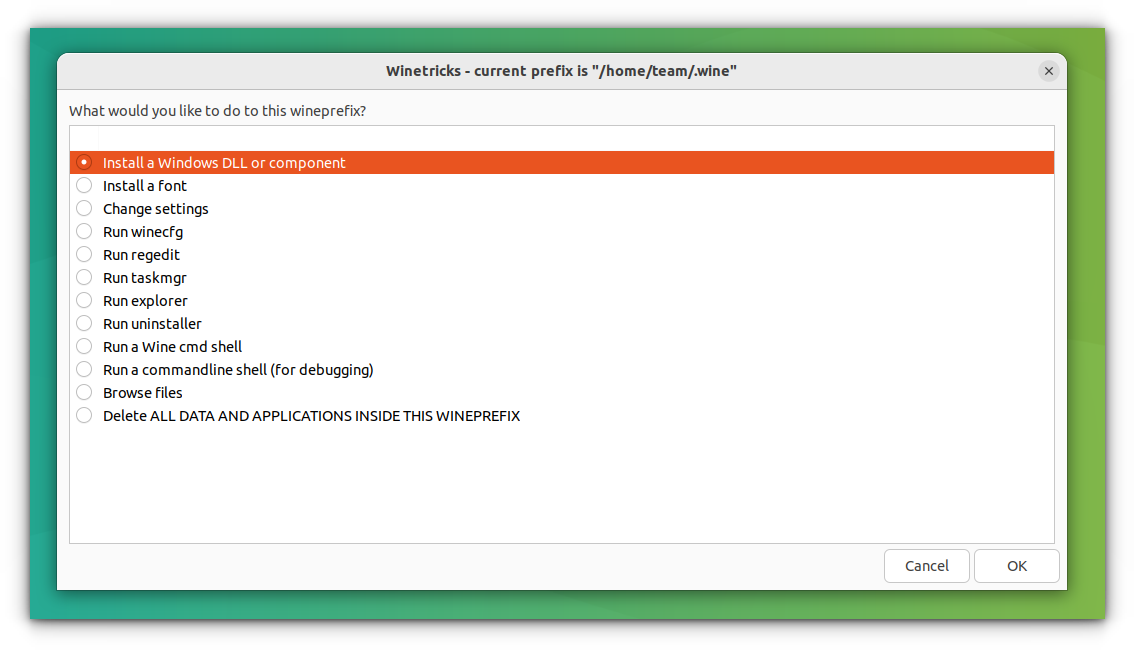
And then select the required DLL or component to install:
📋
N.B.: If using winetricks seems complicated to you, it’s perfectly okay. I feel the same way too. I always use PlayOnLinux for this reason. PlayOnLinux can do everything you might need to do from winetricks.
For more information, you can check Wine FAQ and Documentation.
I hope you find this complete beginner’s guide to using Wine in Linux helpful. Now you can run Windows programs in Linux without installing a virtual machine or dual booting.
Let us know if you have any questions or opinions in the comment section below.
Short answer
.exe files are not binary-compatible with Ubuntu. There are, however, compatibility layers for Linux, such as Wine, that are capable of running .exe.
Detailed answer and solutions
The underlying problem:
Ubuntu is a completely different system than MS Windows. Not only it looks differently, but it also uses different mechanisms for its core functions.
The problem with .exe files is that they are specific to Windows. No other system is capable of running them, because their contents are designed to work on a Microsoft’s system. Linux uses different standards, different concepts, and therefore Ubuntu applications need to be adapted to them to work correctly.
If you have just migrated from Windows and are doing your baby steps with Ubuntu, you may be indeed surprised that .exe files fail to run. There may be different symptoms, either an error message may appear, or there may be no effect at all when double-clicking an .exe. This all happens, because Ubuntu has no idea what should it do to run that file. Ubuntu is not knowledgeable about how MS Windows works «behind the curtain», and therefore it can’t execute the code that’s within them. In technical jargon, one says that Windows and Linux executables are not binary-compatible.
Looking for alternatives
The first thing you should do is to realise that most likely you do not want to run that .exe file. Most Windows applications you are used to have their Ubuntu alternatives in Ubuntu Software Center.
Therefore the very first step when you try to run an .exe file is to check whether there is a Ubuntu version of the same application (like Firefox — it has both a Windows and Ubuntu edition), or a close alternative, which is not the same app, but does 99% the same stuff. For example, if you want to compose a document, instead of MS Office you will want to use LibreOffice.
How can I find an alternative?
Here are some tips.
- Search Ubuntu Software Center.
- Launch the Ubuntu Software Center, type in the search box what kind of application you are looking for. For example, typing in «photoshop» finds The GIMP, which is a great advanced image editing tool, and is a great substitute for Adobe Photoshop.
- Many Windows applications are also available for Ubuntu, and have their identical version in Ubuntu Software Center, which is the preferred way of installing software in Ubuntu.
- Search Ask Ubuntu (this very site).
- There are many questions here that explain what applications can be used as substitutes. Also, do not forget to ask a question if you need software-recommendation.
- This Ubuntu Help page contains great tips when seeking for alternatives.
- http://ubuntuguide.org/wiki/Alternatives
- http://alternativeto.net/
Okay, but not all applications have alternatives. There are a number of cases where you will want to run the .exe program anyway. Examples include:
- You are trying to run an application of which alternative makes no sense. In case of most video games you will want to run them and not an alternative.
- You may want to run the original application instead of an alternative, because the alternative is not good enough. For example, many people consider Photoshop to be a much better editor than The GIMP.
- This is a very Windows-specific program, that makes little sense on Linux.
Luckily, you can get .exe files to run on Ubuntu.
Running .exe files on Ubuntu with WINE
What is Wine? Well, technically it’s a compatibility layer. What it means is that it provides an environment similar to Windows to any .exe application you try to run. Therefore, with WINE .exe files will run on Ubuntu.
WINE is not installed by default. You can get it either by:
- Searching for «wine» in Ubuntu Software Center.
- Running the command:
sudo apt-get install wine.
Details on installing WINE can be found in this question.
Okay, so I installed WINE. Now what?
Proceed to launching your .exe file! Double-click it, and with a bit of luck everything will seem like on Windows. Voilà!
WARNING: Not all applications will behave correctly when run with WINE. WINE is by no means perfect, and because it pretends to be a Windows environment instead of actually being a real one, some applications may malfunction. Common problems may include incorrectly displayed fields, fullscreen issues with video games, copy-protection problems. Some of them can be solved with litte hassle, make sure to check the WINE application database and use google to find hints in case your .exe does not work correctly.
Running Windows applications on Ubuntu with PlayOnLinux
There is another tool you may like which aids you in running Windows applications.
It’s called PlayOnLinux (website) and it supports quite a wide range of software (browse).
What it does is it runs a specific version of Wine which is known to work best with the application you are willing to run. It also installs additional paths to provide maximum compatibility with Ubuntu. But you don’t need to know about that; everything is done automatically.
Because of that, PlayOnLinux tends to provide the best results in case of running a widely known piece of software, including many video games.
Installing PlayOnLinux:
- Find it in Ubuntu Software Center, or
- Run
sudo apt-get install playonlinux
Using PlayOnLinux:
Instead of double-clicking the .exe (which launches it with WINE), run PlayOnLinux application. Select «Install» button on the toolbar, and choose what application you wish to install. PlayOnLinux will guide you through the installation process (of course you will need installation media).
Once it’s done, your installed application will be displayed in PlayOnLinux main window. Double click to launch it!
Commercial solutions
If you are not satisfied with WINE, there are some commercial softwares that runs Windows applications on Linux. One of the most well-known is CrossOver. In some cases it has significantly better results, yet it is not available for free.
Do you want to switch to Linux but don’t want to lose your favorite Windows apps? Now you can have the best of both worlds. Linux knows how to handle most species of Windows software and with a few tweaks can run just about anything you throw at it.
If you are not interested in dual-booting (having both systems in your computer) or you just want to experiment with the kinds of capabilities that Linux has for running Windows software, this article will give you a good overview of what you need to know.
Try Wine
Wine is an open-source compatibility layer that enables users to run Windows apps directly from their Linux desktop.
There are currently thousands of fully supported applications that run on Wine. Wine is very user-friendly.
Note that if a program requires a license key to legally run on Windows, you must have a license key for the program or app to legally run it through Wine.
For this article, we will use Ubuntu. However, the installation for other Linux distros should be very similar.
How To Install Wine On Ubuntu Linux Via GUI
You can find Wine in your Ubuntu Software Center. However, the version available by default might not be the latest one.
To avoid installing an older version of Wine, you will want to add the official Wine repository. You can use the command-line or Graphical User Interface (GUI) to add it to your system. Below are the steps to follow using the GUI method.
Type software into the Applications menu.
The next step is to click on Software & Updates, then the Other Software tab and select Add. In the APT line section, add the following and then click Add Source.
ppa:ubuntu-wine/ppa
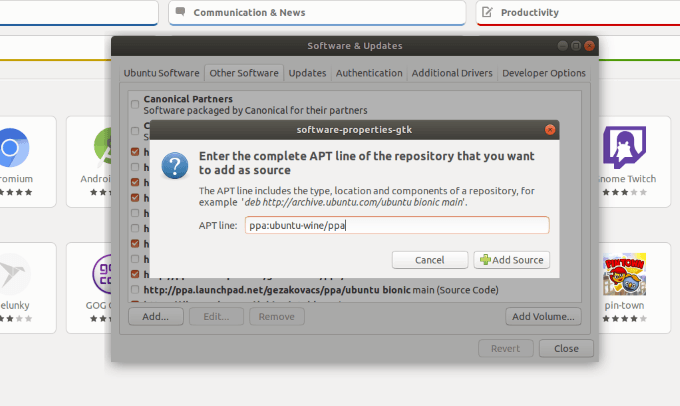
Enter your sudo password, which is the same password that you set when you installed Ubuntu. It is usually the same one you used to log in.
Click Authenticate and then Close.
You will then be prompted to Reload and then open the Software Center. Do a search for Wine and then click install. Wait for the installation to be completed.
Installing Via Command Line
Installation via command line can be done in just a few steps.
First, download the wine repository key and add it to your system.
wget -nc https://dl.winehq.org/wine-builds/winehq.key
sudo apt-key add winehq.key
Then add the PPA to your package lists. The PPA address that you need to use may differ depending on what version of Linux you are using. For Ubuntu 18.04, you want the bionic one.
sudo apt-add-repository 'deb https://dl.winehq.org/wine-builds/ubuntu/ bionic main'
sudo apt update
Then to install win, run the following command:
sudo apt install --install-recommends winehq-stable
After that command completes, the installation is finished. You can open the Wine program.
If the final install step complains that it cannot find the correct wine packages or about incorrect architectures, enable the 32-bit extra libraries by running the following command. Then try the install again.
sudo dpkg --add-architecture i386
Select Your Windows Application
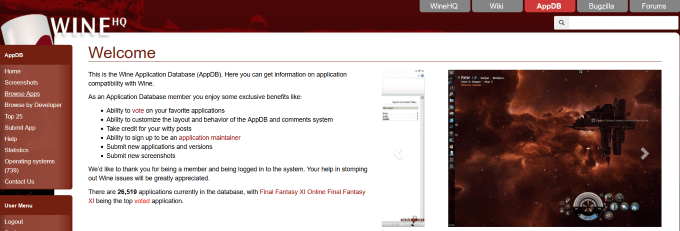
As mentioned above, Wine has a database of approximately 24,000 known apps. You can find this database on the WineHQ website.
They are sorted or ranked by how well they work when running in Wine and are as follows:
- Platinum: runs seamlessly
- Gold: requires some special configuration
- Silver: some minor issues have been reported
- Bronze: significant problems that affect usage
- Garbage: doesn’t run at all on Wine
Let’s show you how to use an app that is included in the Platinum category.
Click Browse Apps from the left sidebar in the Application Database.
Type the name of the app you are looking for in the Name field. We are going to choose the Platinum rating and search for Notepad++.
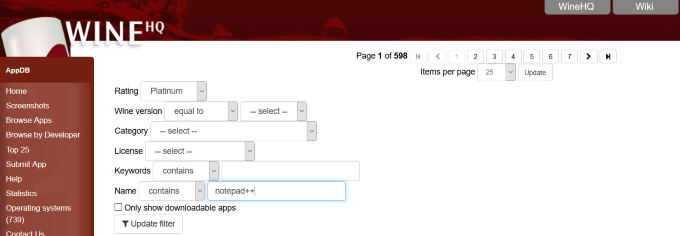
Look at the screenshot below where you will see your search results.
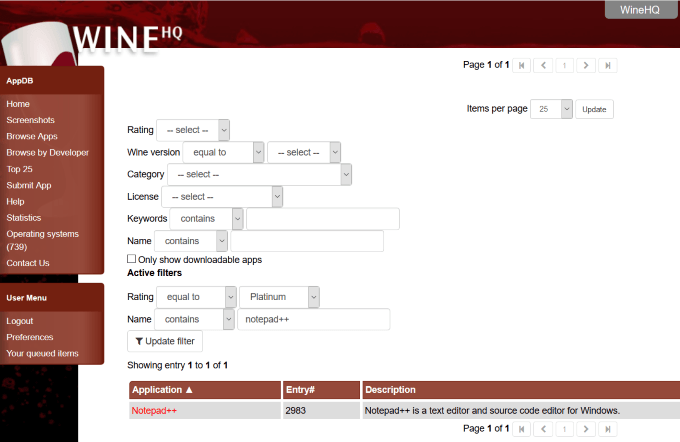
When you click on Notepad++, you will see the application description, a list of available versions (if more than one), and how compatible it is with the version of Wine.
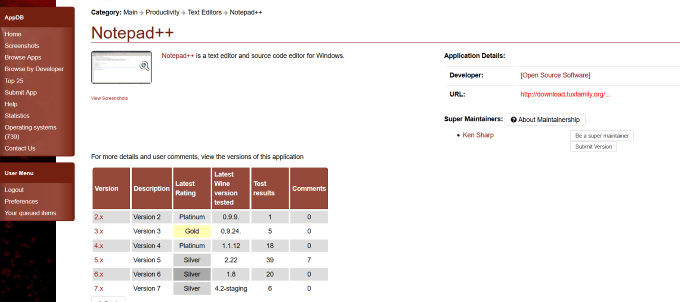
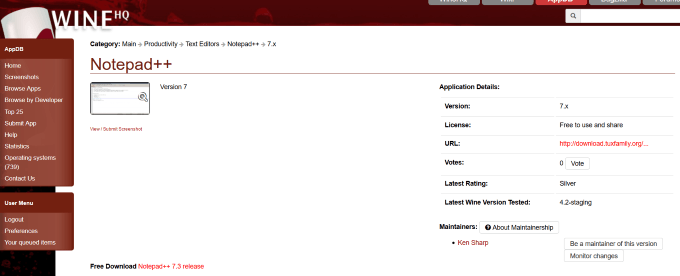
Once you select the version of the app you want to download, click on it. In this case, we will choose version 7.x. Note in the screenshot below that you are provided with a clickable download link.
How To Download & Use An App With Wine
Select the version you want to install. This is usually the latest version. In this case, it is version 7.7.1. Once you download the application, by default, it will be saved in your downloads folder.
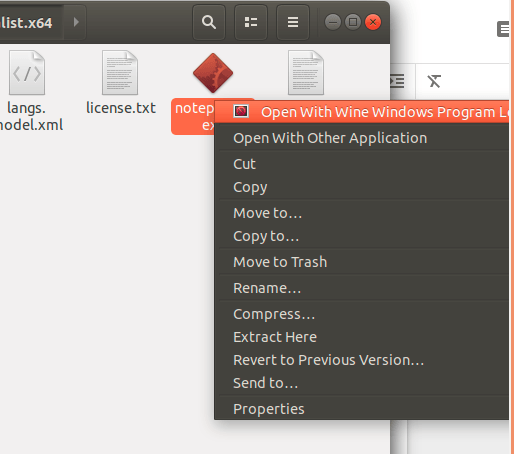
Find the file (it will be a zipped file), right-click on it and choose Extract here from the menu options.
After you have extracted the files, find the notepad++.exe file. Right-click on it and then select Open with Wine Windows Program Loader.
After you open the file, you will be able to use the Windows app Notepad++ on your Linux machine.
Since Wine doesn’t always run the latest version of Windows apps and some run sluggishly, you might want to consider using CrossOver.
Use CrossOver In Ubuntu Distribution
CrossOver is a commercial product from CodeWeavers. It costs $41.97 and has a fully functional 14-day free trial. It is based on Wine, as explained above.
CrossOver has enhanced functionality that:
- Adds configuration tools
- Modifies Wine source code
- Applies compatibility patches
Compared to Wine, CrossOver is more user-friendly, automated, and provides technical support.
To start your free trial, go to CodeWeavers, select your Linux Distribution, and enter your name and email.
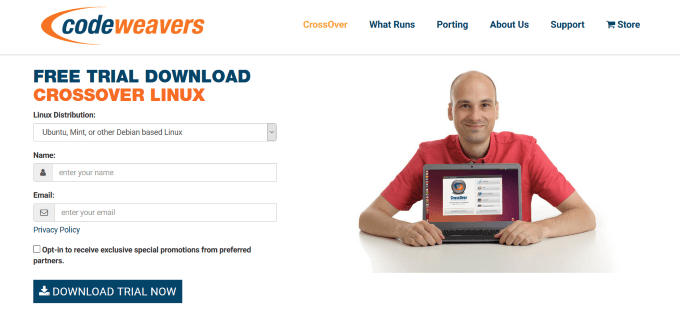
There are many Linux distributions available. The default package management system or install software tool will depend upon the type of Linux you are using.
Download CrossOver
You should install CrossOver from the appropriate .DEB or .RPM file using your system’s default installer program. For Ubuntu, you want the .DEB format.
Most of the time, all you need to do is download the CrossOver installer package and double-click on it. Be sure to select the appropriate package, 32 or 64-bit.
When you double-click on the downloaded file, it will launch the Ubuntu software center (the default package manager.)
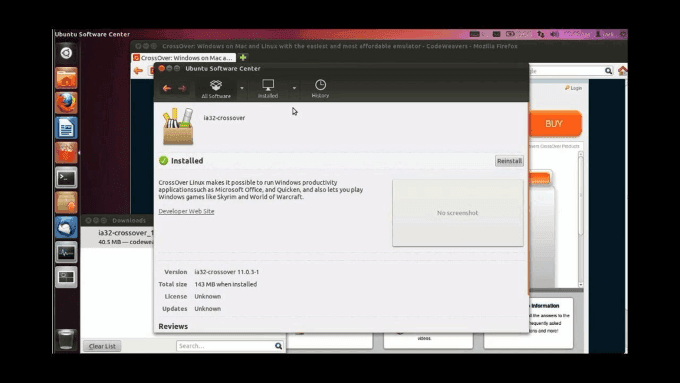
Click on Install and put in your root or sudo password when prompted to authenticate.

Once the installation is complete, close the Ubuntu Software Center.
The CrossOver menu items in Ubuntu’s Utility Desktop Manager are alphabetically organized by first name.Typing in CrossOver won’t help. You will need to bring up the installer menu. Type install in the search box.
You will have to search manually for CrossOver menu items. To learn more about different CrossOver menu items, read the FAQs.
During the installation process, be sure to select Always Update to ensure that the software installer is up to date. You are now ready to install and use Windows apps on your Ubuntu Linux machine.
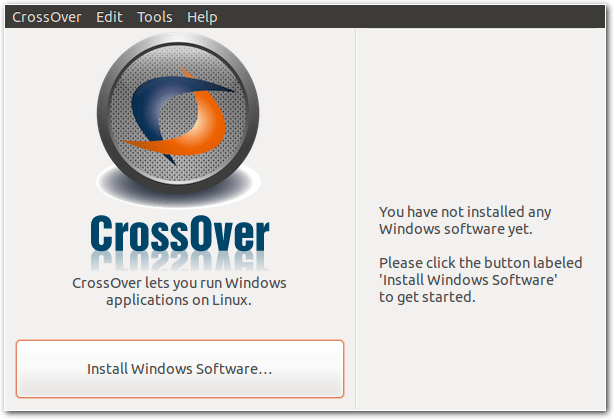
Install Windows Software Using CrossOver
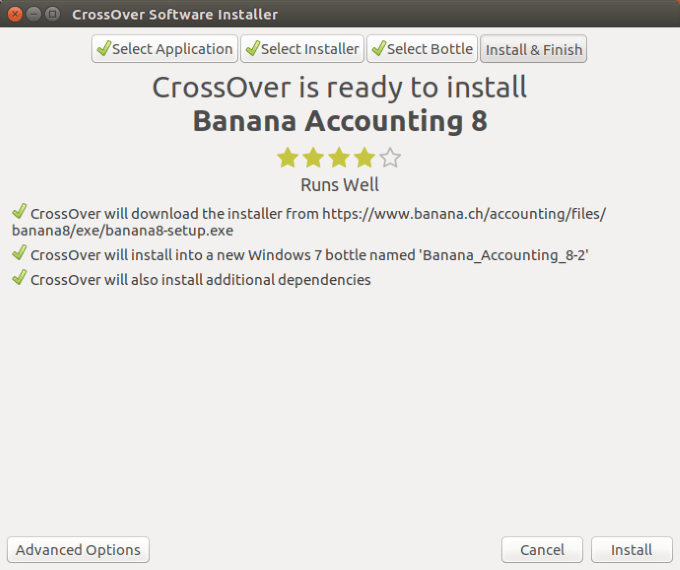
Once you have completed the installation, CrossOver will auto-start. You will only see one button. It says Install Windows Software.
When you click the button, there will be three steps to follow. In step one, search for your desired app in the database.
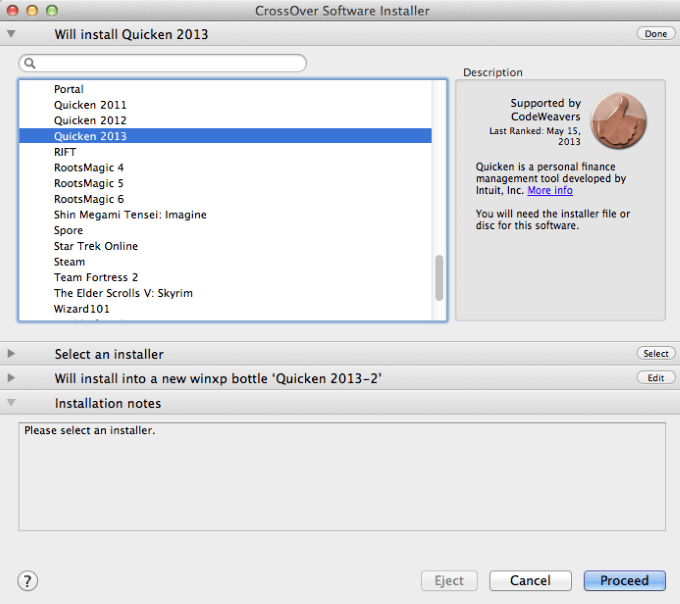
If your desired app is in the database, you will benefit from the special configurations already loaded and tested, and your app will work well. If the installer is not in your system, you can choose to let CrossOver download it for you.
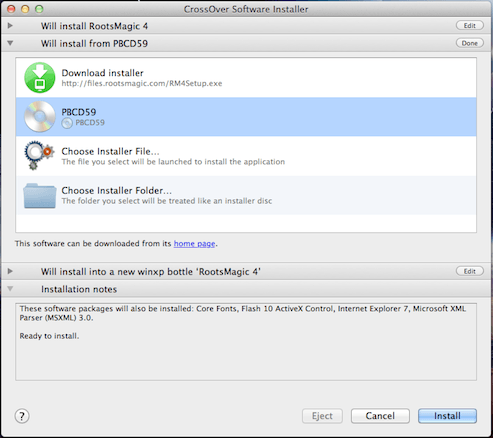
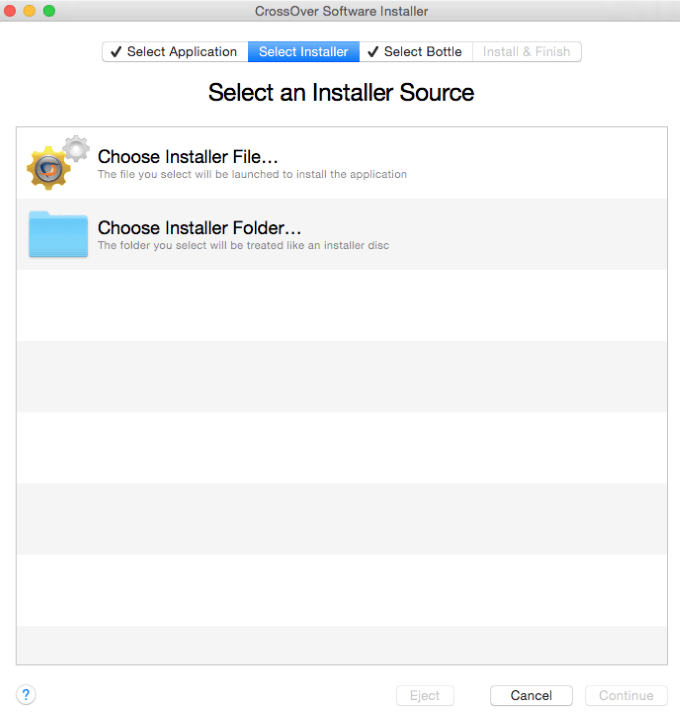
If you want to install and use an application that isn’t included in the database, type it in step one and then choose Select Installer as step two.
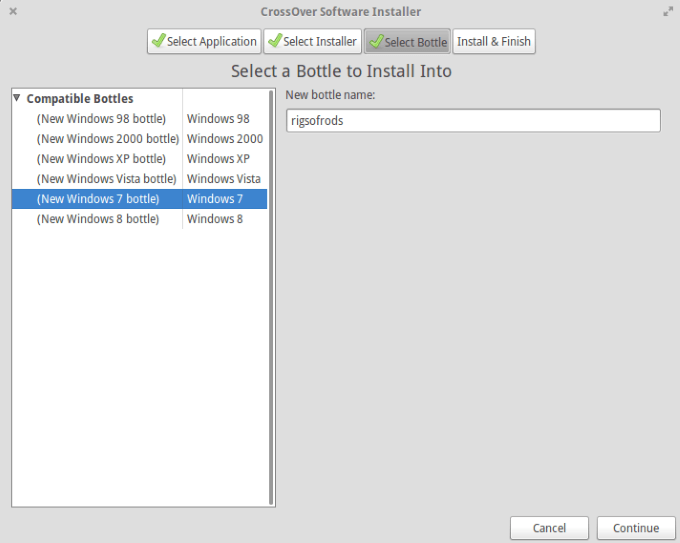
Step three involves the bottle selection. Bottles are app containers with unique configurations. The different bottles in Crossover allow for compatibility diversity for different versions of Windows.
You will next see a summary screen. Click on Install to start the installation of the app you have chosen.
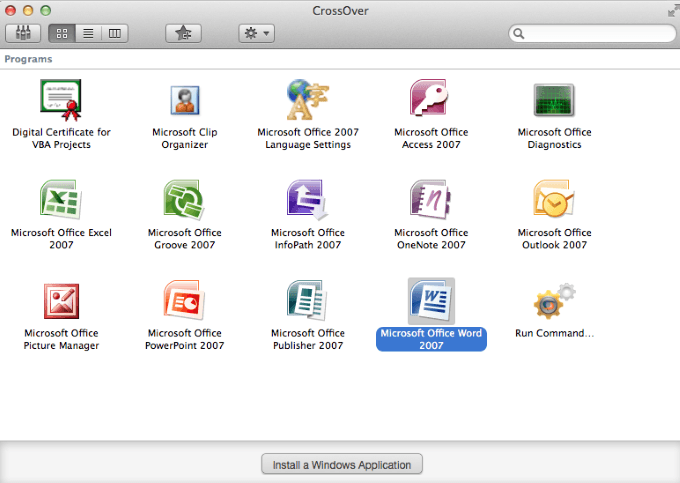
Once you have installed the Windows apps you want to use, a new bottle is created with the same name. Click on the bottles button. Then click Run Command.
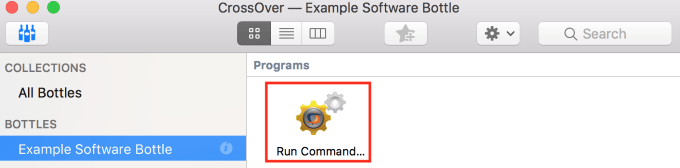
You will now be able to locate the executable files in installed applications in the “c:” partition.
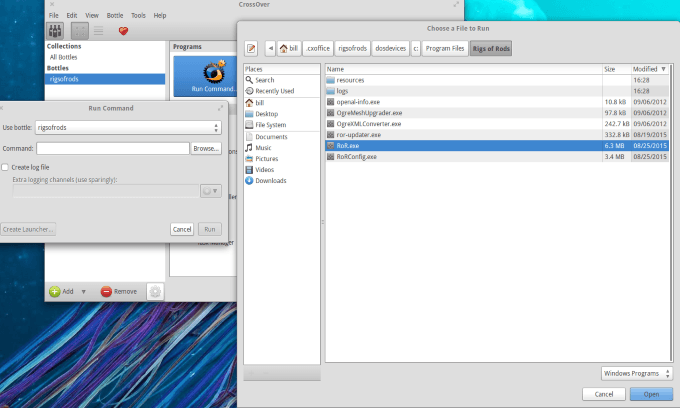
Once you choose the executable file you want to run, you can do so by creating a Launcher for it or running it directly.
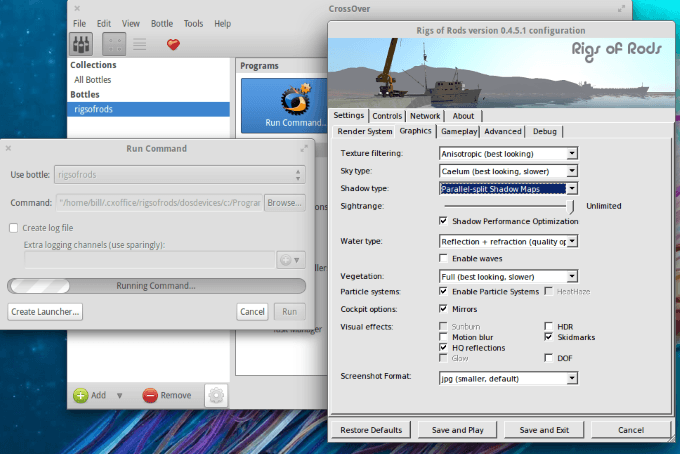
You can find the launcher in the Programs section next to Run Command. You can also see in the screenshot below the configuration tool for a specific bottle.
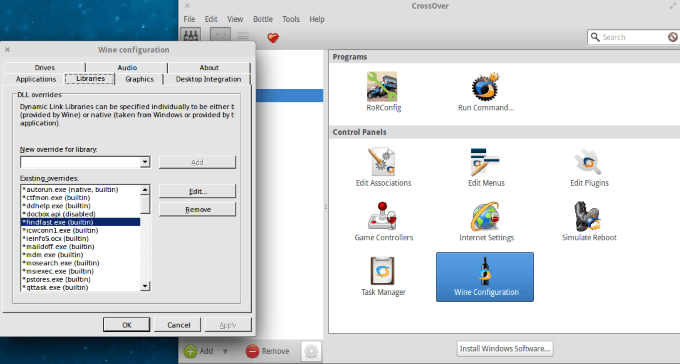
If you click on Wine configuration, it will enable you to set new configurations for any chosen bottle. This can be helpful if you want to run a specific application that isn’t running well.
For more information on configurations and to get advice for library overrides, visit winehq.org.

Если вы считаете, что GIMP не ровня Photoshop, и не можете жить без офиса от Microsoft.
1. Wine

Название Wine расшифровывается как Wine Is Not an Emulator. Это своего рода прослойка между приложениями Windows и системой Linux. Он позволяет устанавливать и запускать многие популярные Windows-программы и работать с ними так, как будто это родные приложения Linux.
Чтобы установить Wine, воспользуйтесь соответствующей командой.
1. Ubuntu, Debian, Mint:
sudo dpkg --add-architecture i386
wget -nc https://dl.winehq.org/wine-builds/Release.key
sudo apt-key add Release.key
sudo add-apt-repository "deb https://dl.winehq.org/wine-builds/ubuntu/ artful main"
sudo apt-get update
sudo apt-get install --install-recommends winehq-stable
2. Fedora:
sudo dnf install winehq-stable
3. openSUSE:
sudo zypper install wine
4. Arch, Manjaro:
sudo pacman -S wine
Когда Wine установлен, откройте его через ваше меню приложений или с помощью команды winecfg. При первом запуске Wine может попросить установить некоторые дополнительные пакеты — позвольте ему это сделать. После этого все Windows-программы формата EXE ассоциируются в системе с Wine.
Теперь скачайте установщик нужного вам приложения Windows, найдите папку с ним в вашем файловом менеджере и откройте файл. Либо введите команду wine путь_к_приложению.
Windows-приложение запустится и будет работать так же, как и всегда. Если вы открыли установочный файл, начнётся установка приложения — как в Windows. Если программа не требует установки, вы сможете начать работать с ней немедленно.
Не все приложения могут быть установлены и запущены в Wine, хотя количество поддерживаемых впечатляет. Полный список можно посмотреть здесь.
2. Winetricks

Wine — неплохой инструмент, однако интерфейс у него оставляет желать лучшего. Если вы намучились с этой программой, но так и не добились результата, попробуйте Winetricks. У неё приятный графический интерфейс для установки и запуска Windows-приложений, в котором куда проще разобраться новичку.
Установить Winetricks можно так:
1. Ubuntu, Debian, Mint:
sudo apt-get install winetricks
2. Fedora:
sudo dnf install winetricks
3. openSUSE:
sudo zypper install winetricks
4. Arch, Manjaro:
sudo pacman -S winetricks
Winetricks позволяет установить различные версии Microsoft Office и Photoshop, плеер foobar2000 и множество других программ. Поддерживаются и такие популярные игры, как Call of Duty, Call of Duty 4, Call of Duty 5, Biohazard и Grand Theft Auto: Vice City. Некоторые программы загружаются автоматически, для других будет предложено вставить установочный носитель. И, естественно, вы можете открывать собственноручно скачанные файлы формата EXE.
3. PlayOnLinux

PlayOnLinux — ещё один удобный инструмент для запуска Windows-приложений в Linux. Как и Winetricks, он обладает простым графическим интерфейсом. Но, в отличие от него, PlayOnLinux позволяет вам выбирать конкретную версию Wine для того или иного приложения. Это полезно, если какая-то из нужных вам программ некорректно работает с новыми версиями Wine. В целом PlayOnLinux выглядит куда симпатичнее и практичнее, чем Winetricks.
Чтобы установить PlayOnLinux, выполните в терминале одну из следующих команд:
1. Ubuntu, Debian, Mint:
sudo apt-get install playonlinux
2. Fedora:
sudo dnf install playonlinux
3. OpenSUSE:
sudo zypper install playonlinux
4. Arch, Manjaro:
sudo pacman -S playonlinux
В меню установки PlayOnLinux можно найти множество предварительно сконфигурированных приложений и игр, которые вы можете загрузить и установить парой щелчков. Кроме того, PlayOnLinux можно скармливать собственные EXE-установщики. Приложение заботливо выберет за вас версию Wine и создаст значок установленной программы на рабочем столе.
4. Crossover

Изредка бесплатные PlayOnLinux и Winetricks не справляются с установкой какого-нибудь особенно привередливого приложения. В таком случае вам может помочь Crossover. Эта программа очень проста в использовании. Вам достаточно указать, какое приложение вы хотите установить, и подсунуть Crossover установочный файл. Всё остальное будет сделано за вас.
Лицензия Crossover на год стоит 39,95 доллара, но у программы есть и бесплатная пробная версия. Рекомендуется сначала установить необходимое вам приложение в ней, чтобы убедиться, что оно работает корректно.
Crossover ?
5. VirtualBox

Если ваше приложение упорно отказывается запускаться в перечисленных выше программах, можно пойти на решительные меры и установить его в виртуальной машине. Учтите, что она отнимает гораздо больше системных ресурсов, поэтому использовать её стоит в крайних случаях.
Для запуска приложения в виртуалке вам понадобится установочный образ Windows в формате ISO. Загрузите и установите VirtualBox, создайте в нём виртуальную машину, укажите ей ISO с Windows, а затем просто установите систему как обычно.
Неоспоримый плюс виртуальной машины — в ней работает полноценная операционная система, а значит, запустится абсолютно всё. Минус — прожорливость в плане системных ресурсов, да и тратиться на лицензию Windows для виртуалки накладно.
VirtualBox ?
