If you want to enjoy Windows 10 /11 on your Mac computer, you can download Windows 10/11 ISO for Mac, then install Windows on Mac via Boot Camp Assistant. In this article, MiniTool Software will show you how to download Windows ISO for Mac free for installation.
Can you run macOS on a Windows computer? Of course, the answer is yes. You can run macOS on a Windows PC using VMware. On the other hand, can you run Windows on a Mac computer? The answer is also yes. You can easily install Windows on your Mac computer with the help of Boot Camp Assistant. After that, you can switch between macOS and Windows as per your needs.
Before installing Windows 10/11 on your Mac computer, you need to download Windows 10/11 ISO for Mac. Now, let’s first talk about downloading Windows 10/11 ISO images for Mac.
Download Windows ISO for Mac Free
In this part, we will introduce how to download Windows 10 ISO for Mac and download Windows 11 ISO for Mac separately.
Download Windows 10 ISO for Mac Free
To protect your computer from viruses, malware, and spyware, you should download a Windows 10 ISO image for Mac using a reliable download source. Fortunately, Microsoft now enables you to directly download Windows 10 ISO image files for free from its official site. The Windows 10 ISO image direct download is only available when your computer agent is not Windows. So, it is very lucky. You can directly download a Windows 10 ISO image from Microsoft’s official site on your Mac computer and use it to install Windows 11 on Mac.
Tips:
If you are using a Windows PC, you can also directly download a Windows 10 ISO file from Microsoft by changing the user agent under the developer mode of your Chromium browser like Google Chrome or Microsoft Edge. See this post: Windows 10 ISO Images Direct Download via Microsoft’s Website.
Step 1: Go to the Download Windows 10 Disc Image (ISO File) page from Microsoft’s official site on your Mac.
Step 2: Click the Select edition menu and select Windows 10 (multi-edition ISO) option from the drop-down list.

Step 3: Click the Confirm button and wait for your request to be verified
Step 4: Choose your language and click the Confirm button to continue.
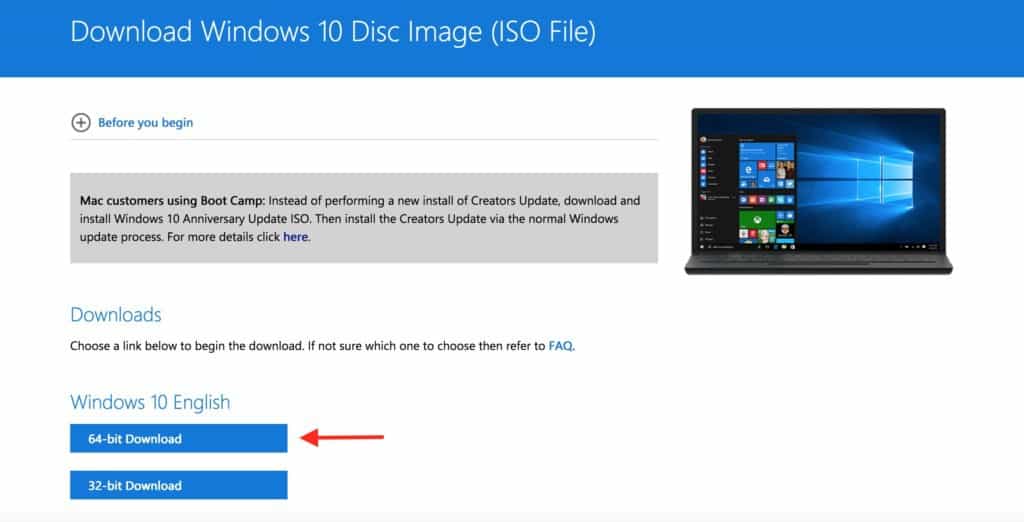
Step 5: On the next page, you will see two available download buttons: 64-bit Download and 32-bit Download. Your Mac computer only allows you to install Windows 10 Home 64-bit edition or Windows 10 Pro 64-bit edition. So, you need to click the 64-bit Download button to start downloading Windows 10 ISO file for Mac.
Step 6: The size of the Windows 10 64-bit ISO file is about 5.8 GB. So, it will take a while to complete the whole downloading process. You should wait patiently.
After downloading the Windows 10 ISO file on Mac, you should let it stay in the download folder, move to the install section, and follow the steps to install Windows 10 on your Mac computer.
Download Windows 11 ISO for Mac Free
Microsoft has released a direct download link for all users since the official initial release of Windows 11. It is also free to download a Windows 11 ISO file for Mac from Microsoft.
Step 1: Go to the Download Windows 11 Disc Image (ISO File) page from Microsoft’s official site using your Mac.
Step 2: Scroll down to the Download Windows 11 Disk Image (ISO) section. Then, click the Select Download menu and select Windows 11 option from the drop-down list.
Step 3: Click the Download button and wait for your request to be verified.

Step 4: Choose your language and click the Confirm button to continue.
Step 5: Windows 11 only has 64-bit editions. So, there is only one available download button: 64-bit Download. Click that button to download the Windows 11 ISO file on your Mac.
Step 6: The Windows 11 64-bit ISO file is 5.1 GB in size. You should wait patiently until the whole download progress ends.
Likewise, you should let the downloaded Windows 11 ISO image stay in the download folder, move to the install section, and follow the steps to install Windows 10 on your Mac computer.
Want to download Windows 10/11 ISO for Mac? This post introduces how to directly download one from Microsoft’s official site.Click to Tweet
Install Windows 10/11 on a Mac Computer
How to Install Windows 10 on Mac?
Preparations:
1. Windows 10 installation on Mac needs a Boot Camp Assistant and Boot Camp requires a Mac with an Intel processor. So, you need to have one of the following Mac computers:
- MacBook released in 2015 or later
- MacBook Air released in 2012 or later
- MacBook Pro released in 2012 or later
- Mac mini released in 2012 or later
- Mac Pro released in 2013 or later
- iMac released in 2012 or later1
- iMac Pro (all models)
2. You also need to install the latest macOS updates because they include the updates to Boot Camp Assistant.
3. To store the Windows 10 installation files, your Mac startup disk should have at least 64 GB of free storage space. Of course, more is better. For example, 128 GB of available storage space can provide the best experience because Windows updates will take up more space.
4. An external USB flash drive, which has at least 16 GB of space. However, if you are using one of the following Mac computers, it will not need a USB flash drive to install Windows 10:
- MacBook released in 2015 or later
- MacBook Air released in 2017 or later3
- MacBook Pro released in 2015 or later3
- Mac Pro released in late 2013 or later
- iMac released in 2015 or later
- iMac Pro (all models)
5. A Windows 10 Home 64-bit ISO file or Windows 10 Pro 64-bit ISO file. We have mentioned the download method above. If it is the first time to install Windows 10 on your Mac, you need to have a full version of Windows 10 rather than an upgrade.
Steps to install Windows 10 on Mac
To install Windows, use Boot Camp Assistant, which is included with your Mac.
Step 1: Change the Secure Boot settings if necessary. You need to use Full Security to install Windows 10 on Mac. After the Windows 10 installation, the Secure Boot setting will not affect the Windows startup.
Step 2: Open the Utilities folder of the Application folder. Then, open Boot Camp Assistant.
Step 3: Connect your external USB flash drive to your computer if you are required.
Step 4: Boot Camp Assistant will begin to create a Windows 10 bootable USB flash drive for installation.
Step 5: Boot Camp Assistant needs to create a BOOTCAMP partition for the Windows installation, which size should be at least 64 GB. You should not forget this. However, you should set the partition size as large as possible because you can’t change the size later.
Step 6: When Boot Camp Assistant ends the process, you need to restart your Mac to the Windows installer. In general, the installer will automatically select and format the BOOTCAMP partition. If not, the installer will ask where to install Windows. Then, you should select the BOOTCAMP partition manually and click Format to format it.
Step 7: Remove all unnecessary external drives from your Mac. Then, click the Next button and follow the onscreen instruction to install Windows 10.
Step 8: When the installation ends, your Mac machine will start up in Windows with a Welcome to the Boot Camp installer window. You need to follow the instructions to install Boot Camp and the necessary Windows support software drivers on Mac. You will be asked to restart your Mac when everything is done. Just do it.
Here is how to install Windows 10 on Mac.Click to Tweet
How to Install Windows 11 on Mac?
Windows 11 has new hardware and system requirements. Is it possible to install Windows 11 on your Mac computer? Of course, yes. But you need to use some extra steps to make the installation think your Mac device is compatible with Windows 11.
Step 1: You can also use the steps introduced in the How to Install Windows 10 on Mac section to install Windows 11 on Mac, but only when you see the Windows Setup interface pops up, you need to press Shift+F10 to call out the Command Prompt to make some changes to the related Registry key.
Step 2: Type regedit in Command Prompt and press enter to open Registry Editor.
Step 3: Go to HKEY_LOCAL_MACHINE\SYSTEM\Setup.
Step 4: Right-click the Setup folder and then select New > Key.
Step 5: Name the new key LabConfig.
Step 6: Right-click the newly created key and go to New > DWORD (32-bit). Then, name it BypassTPMCheck. After that, you should open this key and set the value to 1.
Step 7: Repeat the above steps to create two other new keys to bypass the RAM check and Secure Boot check. These two new keys should be named ByPassRAMCheck and ByPass SecureBootCheck. And their values should also be 1.
Step 8: Close the Registry Editor and Command Prompt to go back to the Windows setup interface. Then, click the Install Now button and follow the onscreen instructions to install Windows 11 on your Mac.
Here is how to install Windows 11 on Mac.Click to Tweet
Recover Lost and Deleted Files on Windows 10/11
MiniTool Power Data Recovery is a piece of professional data recovery software that works on all Windows versions, including Windows 11, Windows 10, Windows 8/8.1, and Windows 7. You can use it to recover all types of files like images, videos, music files, documents, and more.
This MiniTool data recovery software can recover data from different kinds of data storage devices like computer internal hard drives, external hard drives, memory cards, USB flash drives, pen drives, and more.
This software has a trial edition. If you are not sure if it can find the files you want to recover, you can use this trial edition to scan the drive you want to recover data from and then check the scan results for your needed files.
MiniTool Power Data Recovery TrialClick to Download100%Clean & Safe
Here is how to use this free file recovery tool to scan your drive for lost files:
Step 1: Download and install MiniTool Power Data Recovery Trial on your device.
Step 2: Open it to enter its main interface.
Step 3: Find the drive you want to recover data from under the Drives section. Hover over it and click the Scan button to start scanning that drive. If you don’t know which the target drive is, you can switch to the Devices section and select the entire disk to scan.

Step 4: Wait until the scanning ends. Then, check the scan results to find your needed files.

If you want to use this tool to recover your files, you need to use a full edition. You can just upgrade the software to a full edition in the scan results interface. So, you don’t need to take time to scan the drive again. After that, you can select all your needed files at once, click the Save button, and select a suitable folder to save files.
The End
Want to download Windows 10 ISO for Mac or download Windows 11 ISO for Mac? You can just get a Windows 10/11 ISO file from Microsoft’s official site on your Mac computer. This article shows you two related guides.
Additionally, you can also know how to install Windows 10 on Mac and how to install Windows 11 on Mac separately.
If you have other related issues to be fixed or have other good suggestions, you can let us know in the comment. You can also contact us via [email protected].
Windows 10 Version 1909 [3 in 1][10.2019] [BootCamp драйверы for MAC] v1

Сборка популярных редакций Windows 10 построена на оригинальном образе MSDN за Октябрь и предназначена для установки на MAC.
Компьютер для системы:
Apple MAC 2012-2015г
Windows 10 Version 1909 [3 in 1][10.2019] [BootCamp драйверы for MAC] v1 торрент, изменения:
В iso сборки добавлены драйверы BootComp а системы перепакованы без изменений.
Активаторы присутствуют на рабочем столе если не сработает авто-активация.
Контрольная сумма:
MD5: 48b1180c5cf821d4d02a999567796d76
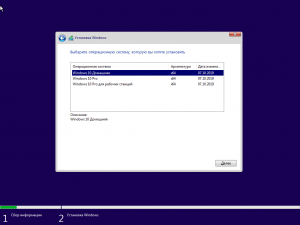
Скачать с сервера напрямую
21:23 БронеКот: all-pers, Тебе не верят, фотку давай
22:03 rutenii: БронеКот, Ну расскажете, я подожду.
21:47 nicks57: Сладких снов всем, покеда

21:42 nicks57: rutenii, Химический элемент 8-й группы, пятого периода периодической системы химических элементов Д. И. Менделеева, с атомным номером 44.
21:39 rutenii: БронеКот, Смешной?
21:37 БронеКот: rutenii, нашел вроде…. Долго торрент стоял… первые 3 серии пока наскреб
21:36 nicks57: БронеКот, а ты один ? везунчик, не женись никогда, руки работают если
21:33 nicks57: БронеКот, ну а…живём вместе

21:32 rutenii: БронеКот, Надо чёль? Поскребём если чё.
21:30 БронеКот: БронеКот, Подкаблучник 
21:29 nicks57: БронеКот, что ещё за каблук?я по вашему татарскому не понимаю
21:26 БронеКот: rutenii, Чет сериал Открывай, полиция! найти не могу 
21:25 БронеКот: nicks57, Каблук чтоле?
21:24 nicks57: БронеКот, сиськи, тот еще предмет вот у меныя — жена, теща, дочка..и все правят миром
21:06 БронеКот: nicks57, А я за сиськи во всей галактике 
21:00 nicks57: БронеКот, я за мир во всём мире
20:58 nicks57: БронеКот, ладно, ты не обижайся, если что
20:57 nicks57: БронеКот, железо только в рукелевой
20:56 nicks57: БронеКот, да пиндык, лучше бы усыпили сразу
20:54 БронеКот: nicks57, Железный капут? )
20:53 nicks57: БронеКот, просто — драма
20:51 nicks57: БронеКот, Я вообщем железный человекполовник хз, не пробовал
20:43 БронеКот: nicks57, Ты вроде говорил что в тебе кило стали спрятано…. Ты что, неудачно сковородку облизывал и засосал случайно ? У меня так с половником было….
20:37 nicks57: БронеКот, Аллейхем, брателло:yes:
20:24 БронеКот: Продам телевизор Сони, пылесос Сони, комбайн Сони. Только быстро, пока Сони нету дома 
20:04 nicks57: БронеКот, Броненосец
19:08 БронеКот: Adobe: — «Фотошоп» снова можно купить на территории России! Россияне: — В смысле, купить?
18:38 БронеКот: Интересный факт: средний размер пенсии в РФ за 10 лет вырос с 7476р до 16400 р… Т.е. с 246$ до 224 $ 
14:47 БронеКот: Все будет хорошо. На помощь летит астероид 
11:11 БронеКот: black_smoke, Ага, один нюанс… В твои тапки Заказывай эвакуатор
10:49 black_smoke: санитаров срочно… кот тут обосрался
09:45 БронеКот: rutenii, озови меня тихо по имени, шашлыком с руки покорми меня… 
20:35 rutenii: БронеКот, Видимо это очень большой секрет, их наверно SEAL перехватывают и удаляют.
Только зарегистрированные могу писать в чате!
Регистрация аккаунта
Introduction
I’ve recently tried UTM on my Apple Silicon MBP to test Windows 11. To install Windows 11, I needed a recent iso image. This blog post explains how to download the iso files for Windows 10 or 11.
Get Windows 11 Insider Preview
Go to UUP dump. This page lists all available UUP files from Windows Update servers.
Search for “feature update Windows 10” or “Windows 11 Insider Preview” and select a recent version for the required architecture (e.g. x64). Click on next.
Select a language and click next.
Select an edition, like “Windows Pro” and click next.
Select Download method “Download and convert to ISO”. Check “Include updates” and click on “Create download package”.
Extract the resulting file. You’ll see three scripts:
- Windows:
uup_download_windows.cmd - Linux:
uup_download_linux.sh - macOS:
uup_download_macos.sh
Make the uup_download_macos.sh executable by using “chmod +x uup_download_macos.sh” and try to execute it.
It will probably complain about missing files. But at the same time, it offers help on what you’ll need to install using homebrew, e.g.:
brew tap sidneys/homebrew
brew install aria2 cabextract wimlib cdrtools sidneys/homebrew/chntpw
Fix for Apple Silicon Macs
On my M1/Apple Silicon Mac, chntpw complained about a non working SSL. I’ve found this issue on Github, which has some easy installation recommendations:
curl -LO https://gist.github.com/minacle/e9dedb8c17025a23a453f8f30eced3da/raw/908b944b3fe2e9f348fbe8b8800daebd87b5966c/openssl@1.0.rb
curl -LO https://gist.github.com/minacle/e9dedb8c17025a23a453f8f30eced3da/raw/908b944b3fe2e9f348fbe8b8800daebd87b5966c/chntpw.rb
brew install --formula --build-from-source ./openssl@1.0.rb
brew install --formula --build-from-source ./chntpw.rb
rm ./openssl@1.0.rb ./chntpw.rb
Now try to execute the uup_download_macos.sh script again. It will now download the requested update files and will create automatically a nice ISO file, which can be used to install Windows.
Legal disclaimers
As we’re using the official Windows Server Update files, this method should be legal. There is a more detailed report available at win10.guru which explains, that most of the tool was developed by analyzing the network traffic of a Windows installation running updates. It’s also a good way to get the versions including the latest updates including the Insider builds. Of course there’s still the official download page from Microsoft.
Many Mac users are still unaware that you can install Windows 10 on a Mac for free from Microsoft perfectly legally, including on Apple Silicon M1 and M2 Macs.
The same is true for Windows 11 meaning you can also install Windows 11 on a Mac for free.
Microsoft doesn’t actually require users to activate Windows 10 or Windows 11 with a product key unless you want to customize the look of it.
In fact you can no longer buy a Windows 10 license from Microsoft although you can still buy a Windows 11 license for $139.99.
The only advantage of buying a Windows license though it is that it allows you to customize the look for Windows such as the desktop, lock screen, styling, removal of watermarks etc.
For most Mac users that just want to install Windows only programs or play Windows games on a Mac, this is not necessary and so you can enjoy Windows 10 for free on your Mac.
Here we show you how you can easily get Windows 10 on your Mac for free, including Apple Silicon M1 and M2 Macs including those running macOS Ventura in little more than 10 minutes.
Quick Navigation
- How To Install Windows 10 on Mac For Free
- Virtual Machine vs Boot Camp For Windows 10
- Can You Install Windows 11 on a Mac?
- How To Run Windows 10 on Mac For Free
How To Install Windows 10 on Mac For Free
There are two ways we recommend to install Windows 10 for free on a Mac:
- Using a Virtual Machine (Both Intel and Apple Silicon M1/M2 Macs)
- Using Boot Camp (Intel Macs only)
The best way to run Windows on a Mac is to install it in a virtual machine.
A virtual machine allows you to run Windows and macOS at the same time so that you can switch between the two at any moment with just one click.
By far the best virtual environment on Mac is Parallels which makes it extremely easy to install Windows on macOS.
You can download a free trial of Parallels to install Windows 10 for free with it although you will need to subscribe after 14 days if you want to continue using it.
With Parallels, you can switch between Windows games or apps and macOS instantly in just a click.
In fact, Parallels is the only way to run Windows on a Mac that is officially endorsed by Microsoft.
Parallels is also the best way to run Windows on M1 & M2 Macs and was the first virtual machine to support Apple Silicon Macs.
Note however that like all virtual machines, Parallels can only install Windows for ARM on M1/M2 Macs which is a specially adapted version of Windows for ARM processors like the M1 and M2 chip.
Windows 10 for ARM is no longer being developed by Microsoft however so you have to download an old Windows Insider Preview version of Windows 10 for ARM to install on M1/M2 Macs which is more complicated.
Parallels can however automatically install and download Windows 11 for ARM from Microsoft.
You can download a free trial of Parallels and you can can read our full Parallels review for a more detailed look.
Virtual Machine vs Boot Camp For Windows 10
If you’ve got an Intel chip Mac, the alternative to a using a virtual machine is to install Windows 10 in a separate partition on your hard drive using Apple’s Boot Camp.
Boot Camp is a free tool in macOS that allows you to install Windows on a separate partition on your Mac’s hard drive.
However this means that you can only boot your Mac in either macOS or Windows at one time. You can’t run them simultaneously like you can in a virtual machine.
The other big disadvantage is that Boot Camp also does not work with Apple Silicon M1 or M2 Macs.
The advantage of Boot Camp however that it is completely free whereas Parallels is only free for 14 days.
For the needs of most Mac users that want to run Windows only programs on Mac, using a virtual machine is by far your best option.
The only reason you may want to use Boot Camp is if the Windows program or game you want to use either doesn’t work in virtual environments or requires a lot of graphics processing power.
Examples include games such as Valorant or Hogwarts Legacy which won’t work in virtual environments due to the anti-cheat software that the games come with.
Boot Camp may also be a better solution to run powerful CAD applications or graphic design software which are highly demanding on your Mac’s resources and don’t run well in virtual environments.
Can You Install Windows 11 on a Mac?
Windows 11 was released by Microsoft on October 5th 2021 and you can now install Windows 11 on a Mac including Apple Silicon M1/M2 Macs.
Windows 11 requires a physical TPM chip to run and although Macs don’t have one, Parallels can now emulate a virtual TPM chip so that Windows 11 will run on both Intel and M-Series Macs.
You can find full instructions on how to run Windows 11 on a Mac here.
How To Run Windows 10 on Mac For Free
Here we show you how to run Windows 10 on a Mac for free using the free trial of Parallels.
If you have an Intel Mac and want a completely free solution, then you should check out our guide to how to install Windows on a Mac with Boot Camp.
Before you start, you should have at least:
- At least 4GB of RAM but we recommend 8GB of RAM if possible
- At least 40GB of hard drive space free just to run Parallels and Windows. However, if you intend to install lots of games and software we recommend at least double this.
If you don’t have enough space, you can also recover storage space on your Mac.
Alternatively, you can get an external drive for your Mac and install Windows on that although it’s generally better to install it on your Mac hard drive if possible.
Note that If you want to install Windows 10 on an M1 or M2 Mac, the following procedure is slightly different and you can find instructions how to install Windows on an M1 Mac for free here.
With this in mind, follow these instructions to install Windows 10 on any Intel Mac for free.
- Download a free trial of Parallels for Mac.
- Double click on the Parallels installer. Note that you can’t just drag it into your Applications folder – you need to run the installer for Parallels to install in macOS. You may see a warning that “Parallels is an application downloaded from the internet. Are you sure you want to open it?” Click Open and you will then need to enter your Mac admin password in order to allow the installer to run.
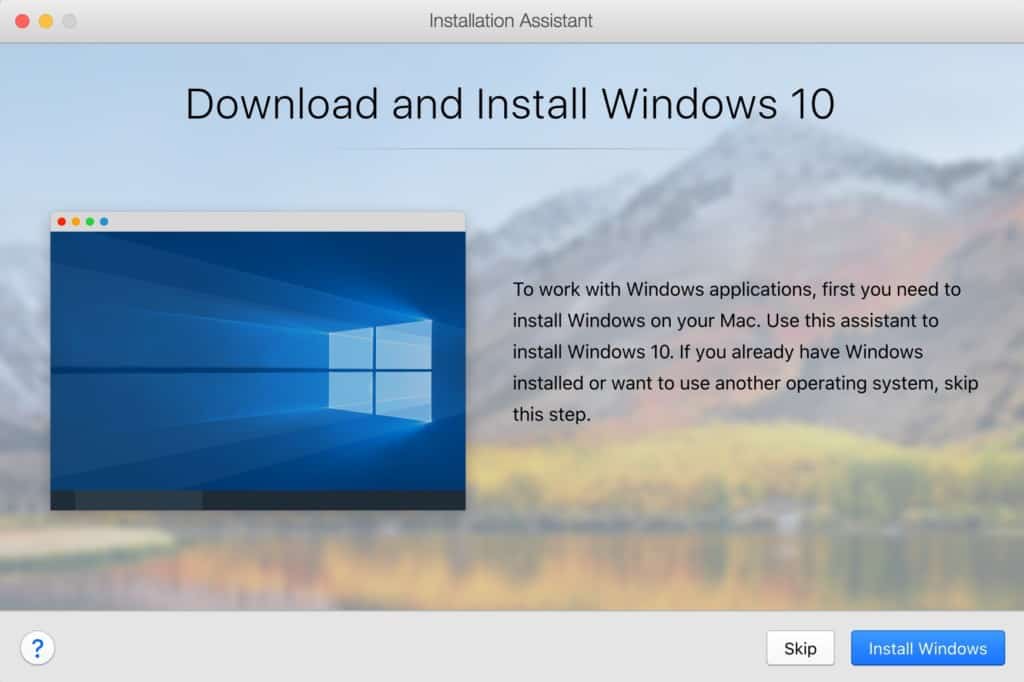
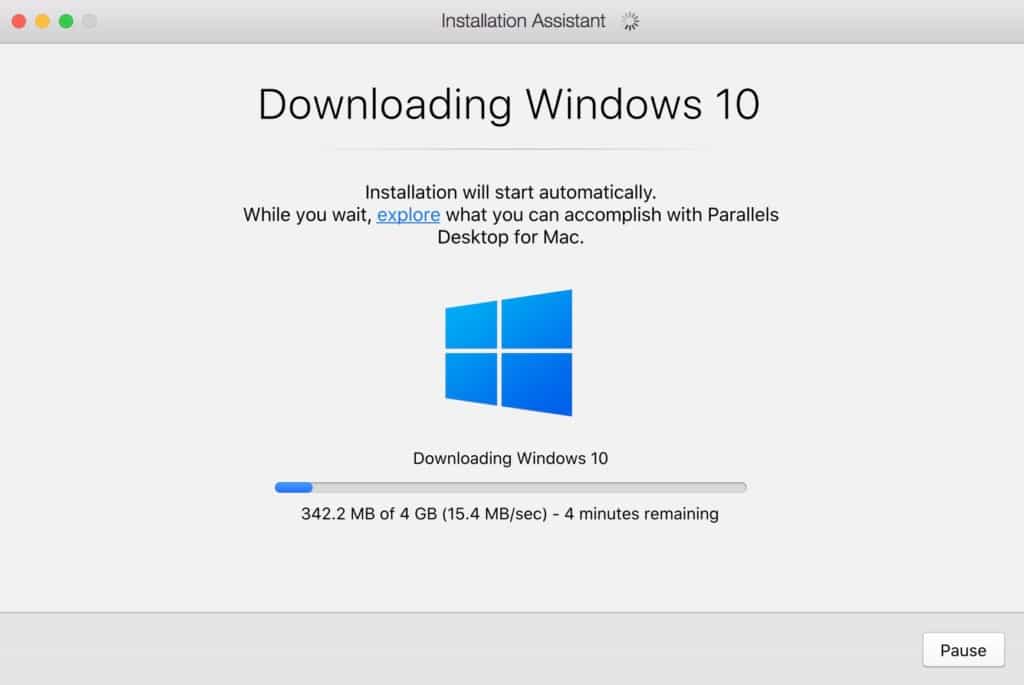
- If you’ve never installed Parallels on your Mac before, when the installer is complete it will automatically launch the Windows 10 installation wizard. This conveniently installs Windows 10 on your Mac with no further action needed from you. Simply click Install Windows at the bottom and then skip to step 5 and sit back for about 10 minutes while Windows 10 downloads and installs.
- If you have previously tried installing Parallels on your Mac before, Parallels will detect this and you may not see the auto-installer above. Instead you will see the New Virtual Machine installation assistant below. Click on Get Windows 10 From Microsoft.
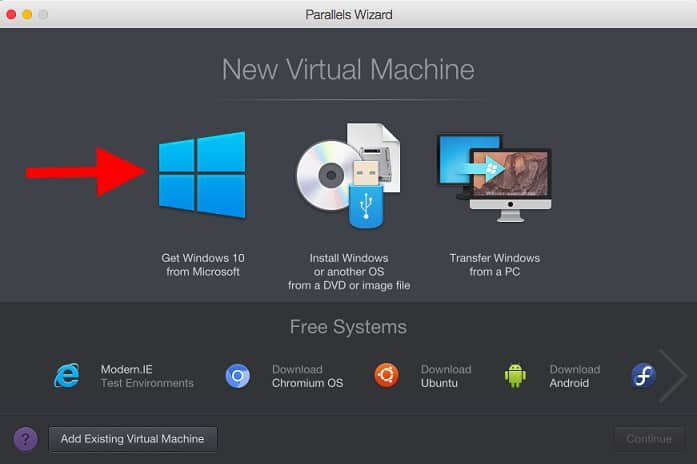
- You’ll be given a choice of Windows versions to choose from. Select the last option Download Windows 10 – don’t worry about the “If you have a license key” warning because as highlighted in the introduction to this tutorial, you no longer need to activate Windows 10 to actually use it.

- Parallels will then download a free ISO image of Windows 10. The ISO image is a fully functional free “unactivated” version of Windows 10. The only benefit that activation offers is the ability to customize Windows 10 with wallpapers, themes, lock screens etc and it also removes a small watermark on the lower right hand corner of Windows so you really don’t have to pay for an license if you don’t want to.
- If for any reason Parallels can’t download Windows 10, you can download the free ISO image of Windows 10 from Microsoft yourself and put it on a Pen Drive with at least 5GB of space. You would then have to select the second option in the Virtual Machine Wizard Install Windows from a DVD or Image File. If you go this route, make sure you download the 64-bit version of Windows and not the 32-bit version.
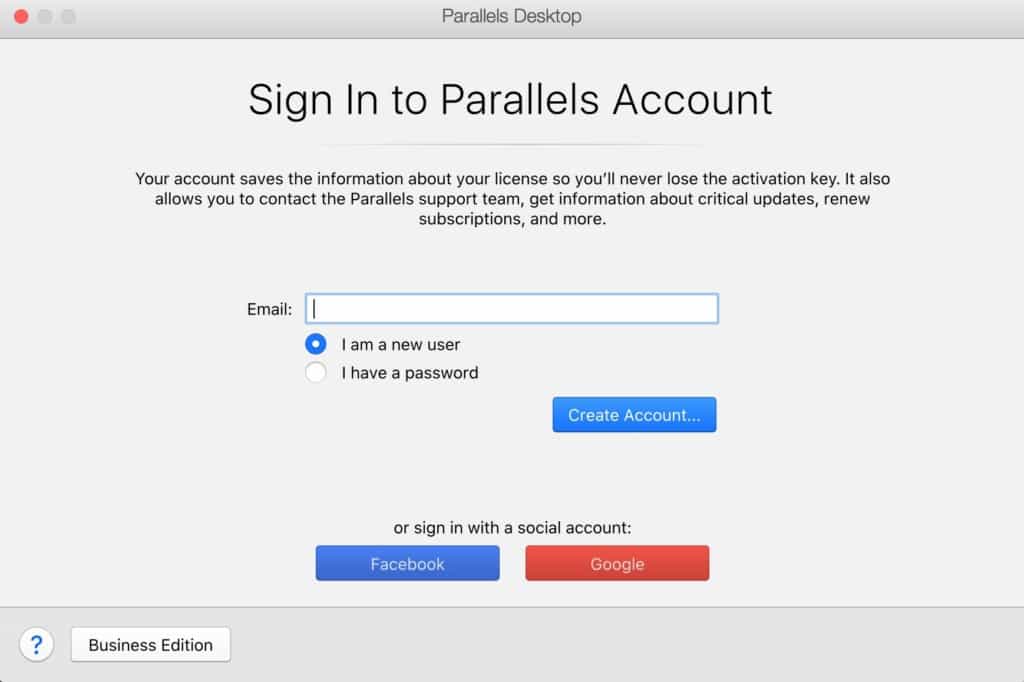
- Before the Windows installer starts, you will be prompted to create a Parallels account. This is done instantly when you enter your email and click Create Account – you don’t have to wait for any confirmation emails or anything, you just have to choose a password. You can also use your Facebook or Google account to sign-up instead.
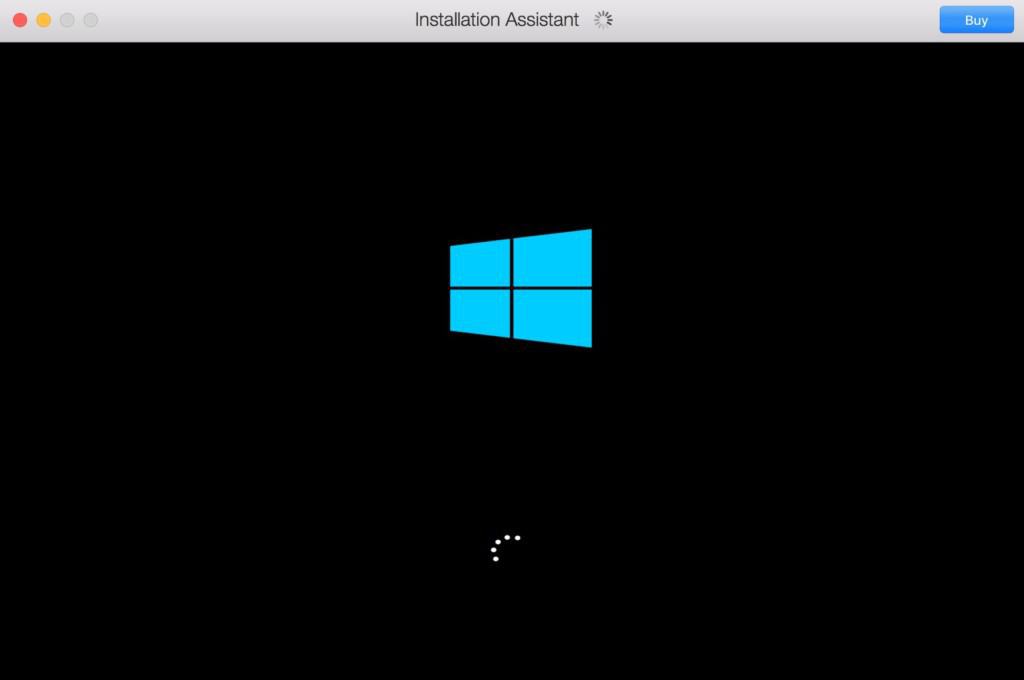
- When you’ve created a Parallels account, you will see Windows being setup just as if you were installing it on a PC. This can take up to to ten minutes to complete and you’ll see a progress bar across the bottom.
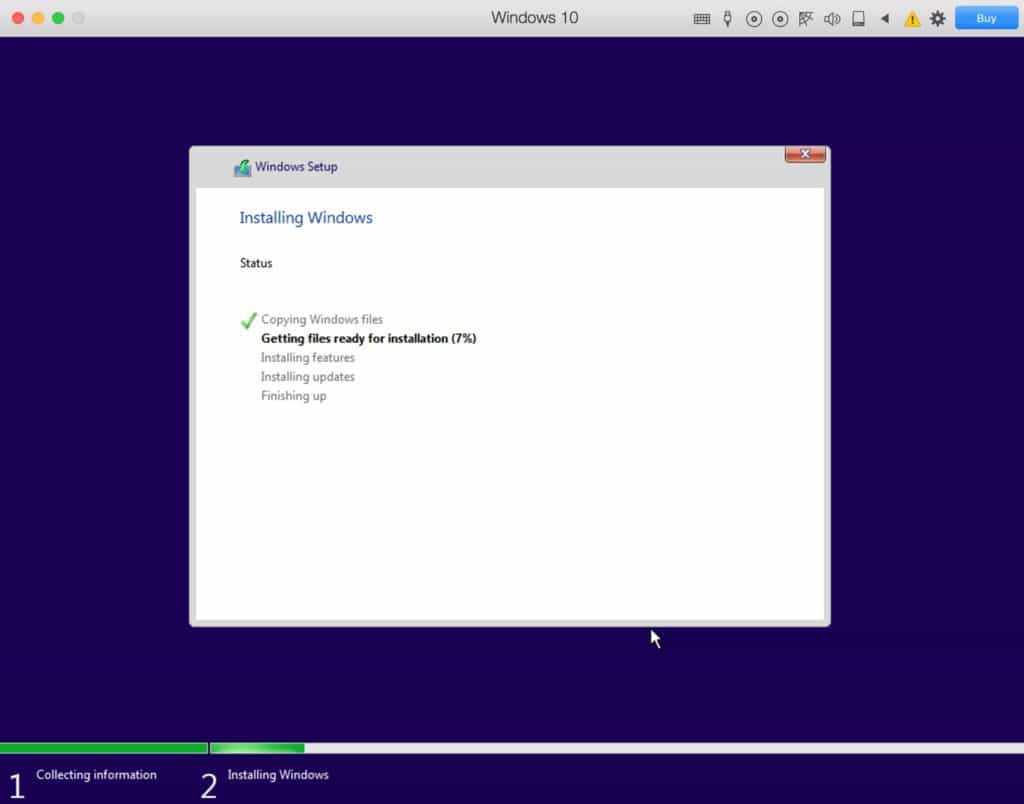
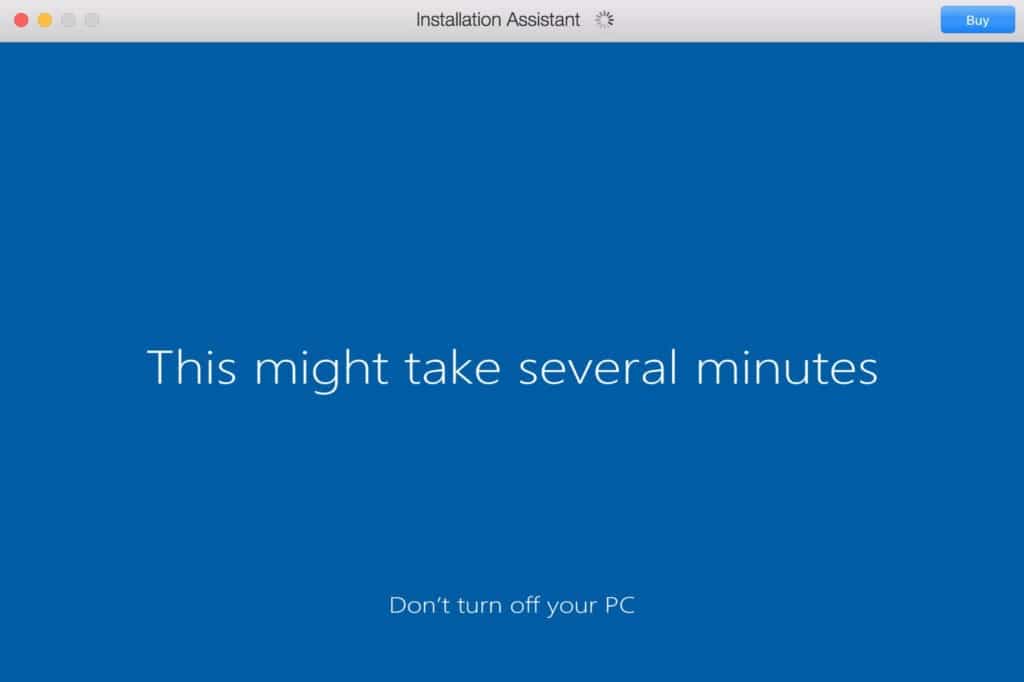
- After the installer has run, Windows will start the final setup phase. Don’t worry if it seems to hang as it’s still working.
- Windows will then go into the final setup phase and you’ll then be warned it could take several minutes (although it should only be a few minutes at most). Make sure you don’t turn off your Mac or press anything.
- Finally, you’ll see an “Installation Complete” message and hey presto, you’ve got Windows 10 on your Mac.
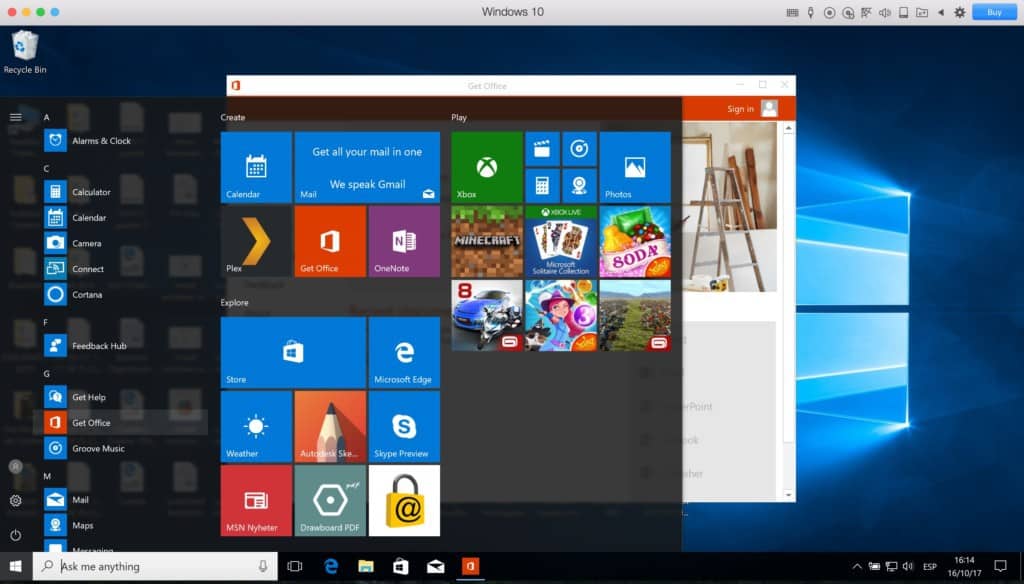
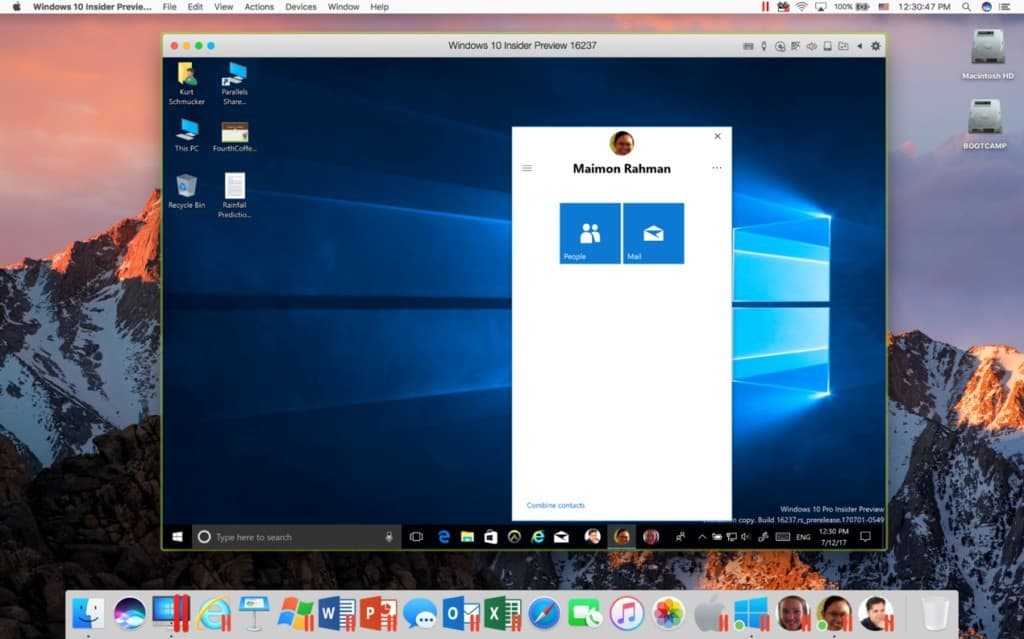
- When you use Windows for the first time, you will hear and see various pop-ups in Windows as Parallels automatically detects hardware on your Mac. This is one of the best things about Parallels as it instantly integrates Windows with your Mac. With other virtual environments, you usually have to manually configure ports, hardware and sharing between your Mac and PC but Parallels automates the entire process so that your Mac and PC work in harmony from the start. You’ll even see all of your Mac desktop documents on your Windows desktop without having to do anything.
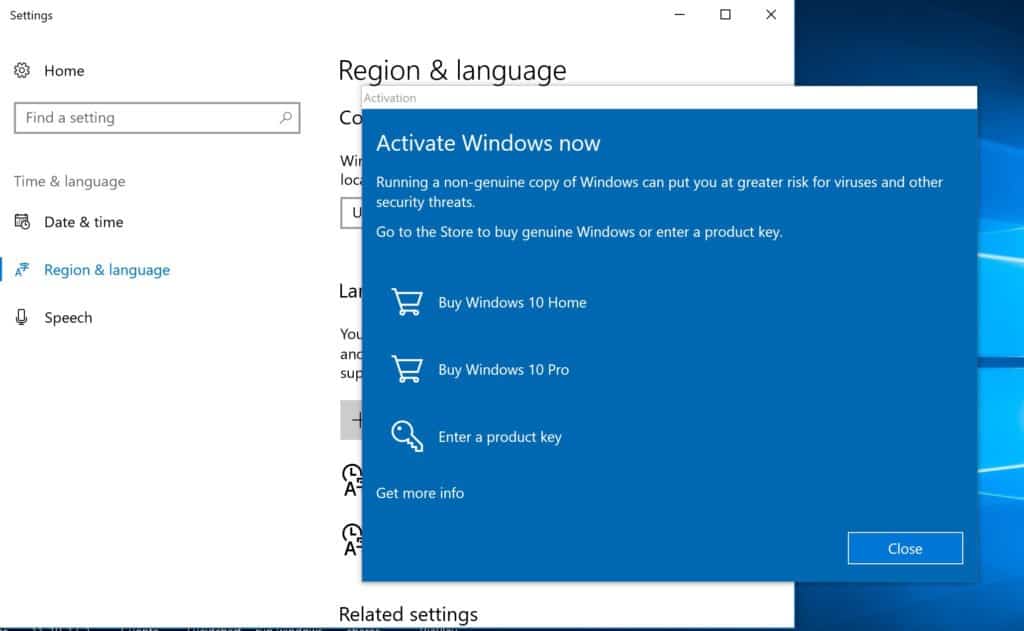
- You may also see a Windows Activation screen pop-up but you can simply click Close it unless you’ve bought a full license for Windows and have a product key.
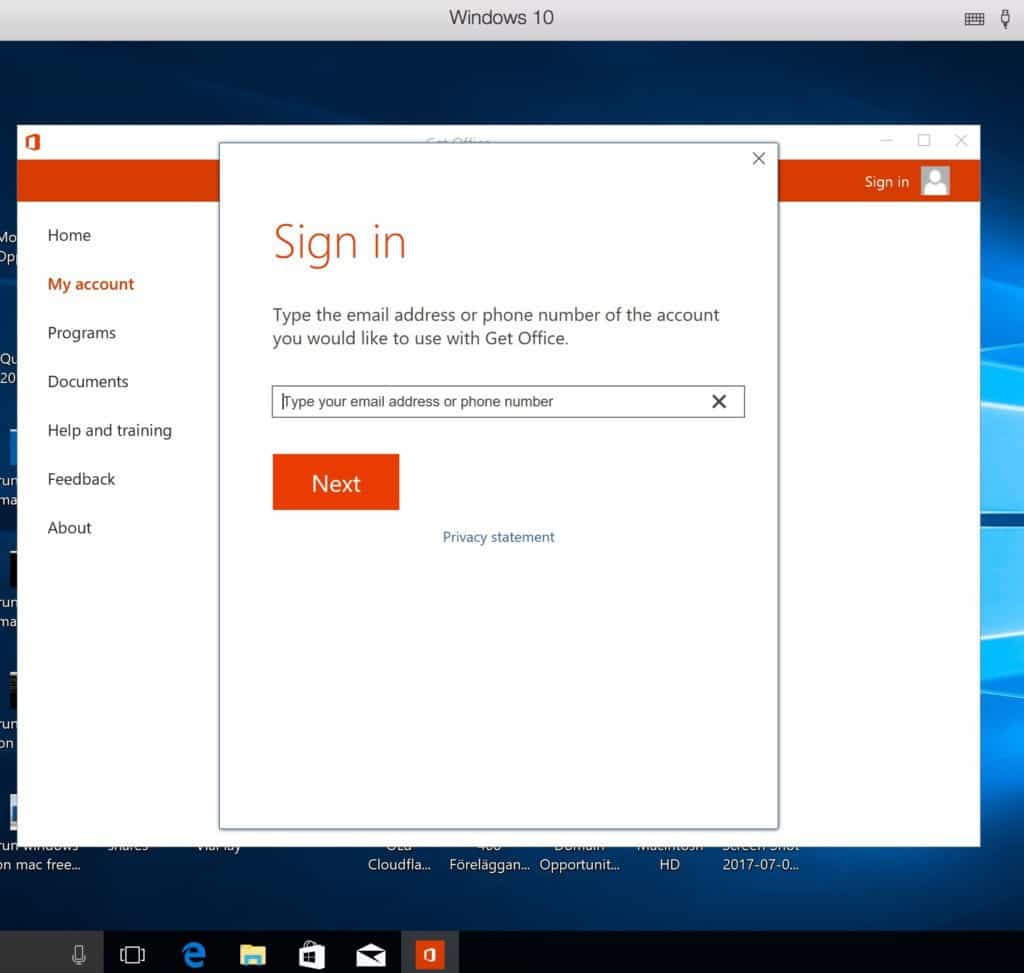
- You can also install Office by going to the Windows 10 Start Menu and selecting Get Office. You may also find our guide on how to get Microsoft Office for free useful too.
And that’s it – you’ve installed Windows 10 on your Mac for free!
The only cost you’ll face is that after 14 days, the free trial of Parallels will expire.
You’ll then have to buy a license for $79.99 which includes free upgrades.
Parallels is updated frequently to keep apace of updates to macOS and Windows so this may work out cheaper in the long run than having to buy a new version every year if new versions of macOS and Windows are released.
You don’t have to upgrade every year but the likelihood is you’ll need to upgrade at least every 2-3 years or so as Macs, macOS and Windows evolve.
One thing to be aware of is that you may notice that your Mac’s cooling fans go into overdrive when installing Windows via Parallels and running Windows on your Mac.
This is because running a virtual environment is a very intensive process for your Mac’s resources and Windows will need a lot of RAM and CPU power to run on your Mac.
The system requirements for Parallels are an Intel Core processor with a minimum of 4GB of RAM but it recommends 8GB of RAM.
However, even when running it on a MacBook Pro with a 2.3 GHz Intel Core iZ with 8GB, it’s still pushing it. If you check Activity Monitor, you may notice that Windows 10 sometimes uses all of your CPU resources.
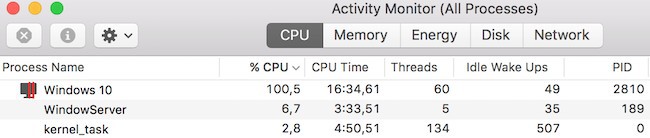
Don’t be alarmed by this – your Mac can handle it but you should reduce the number of applications running on your Mac to a minimum to help Parallels and Windows operate as smoothly as possible.
The best advice is basically to use Parallels on the newest Mac possible with the most RAM possible.
The latest versions of Parallels support macOS features like Dark Mode and there’s also a handy picture-in-picture mode that allows you to keep your Windows desktop window in view at all times while you work in macOS.
Parallels is also the only virtual machine for Mac that works with Touch Bar MacBook Pros.
You can configure the Touch Bar to launch Windows apps such as Internet Explorer, OneNote, Chrome etc or change volume, brightness and other settings.
You can see the full set of pre-configured actions and configurations built into Parallels by default below:

You can even configure it so that your Windows Task Bar:

is the same as your Touch Bar for easier launching of apps:
![]()
You can pretty much configure the Touch Bar to work however you want although it can get quite complicated to setup specific actions as you need to know a little about XML code but you can find full instructions how to do so here.
Parallels can be used to install any operating system including Linux and older versions of Windows and macOS (note however that you can’t install older versions of macOS or Windows on M1 Macs).
However, we don’t advise installing older versions of Windows unless you really need them, especially as old as Windows XP because it is no longer supported by Microsoft.
We hope this tutorial has shown you how easy it is to install Windows 10 on your Mac for free but if you have any questions, problems or suggestions, let us know in the comments below.