Можно использовать установочный носитель (USB-накопитель или DVD-диск), чтобы установить новую копию Windows, выполнить чистую установку или переустановить Windows.
Чтобы создать установочный носитель, перейдите на веб-сайт скачивания ПО, где вы найдете пошаговые инструкции. На этом веб-сайте вы можете выбрать версию Windows и создать собственный установочный носитель с помощью USB-устройства флэш-памяти или DVD-диска. Чтобы перейти непосредственно к одной из версий, выберите одну из следующих ссылок:
-
Windows 7
-
Windows 8.1
-
Windows 10 (Затем выберите Скачать средство сейчас.)
-
Windows 11 (затем выберите Скачать средство сейчас.)
Важно: Создайте резервную копию файлов перед установкой и переустановкой Windows на компьютере. Узнайте, как это сделать.
Чтобы создать установочный носитель, необходимо следующее:
-
Компьютер с надежным подключением к Интернету. Время скачивания зависит от скорости подключения к Интернету.
-
USB-устройство флэш-памяти, внешний жесткий диск или DVD-диск. Пустое USB-устройство флэш-памяти или внешний жесткий диск объемом не менее 8 ГБ либо пустой DVD-диск (и устройство для записи на DVD-диски). Рекомендуем использовать чистый носитель, поскольку все его содержимое будет удалено. Если при записи DVD-диска из ISO-файла отображается сообщение о том, что файл образа диска слишком большой, необходимо использовать DVD-носитель с двумя слоями (DL).
-
Ключ продукта. 25-значный ключ продукта (не требуется для цифровых лицензий). Если вам требуется помощь, см. раздел Как найти ключ продукта Windows.
После создания установочного носителя вы можете сбросить или переустановить Windows. Дополнительные сведения см. в статье Параметры восстановления в Windows.
Нужна дополнительная помощь?
Нужны дополнительные параметры?
Изучите преимущества подписки, просмотрите учебные курсы, узнайте, как защитить свое устройство и т. д.
В сообществах можно задавать вопросы и отвечать на них, отправлять отзывы и консультироваться с экспертами разных профилей.
Найдите решения распространенных проблем или получите помощь от агента поддержки.
You can use installation media (a USB flash drive or DVD) to install a new copy of Windows, perform a clean installation, or reinstall Windows.
To create installation media, go to the software download website, where you’ll find step-by-step instructions. On that website, you can select a version of Windows and create your own installation media using either a USB flash drive or a DVD. To go directly to one of the versions, select one of these links:
-
Windows 7
-
Windows 8.1
-
Windows 10 (Then select Download tool now.)
-
Windows 11 (Then select Download tool now.)
Important: Back up your files before you install or reinstall Windows on your PC. Learn how.
To create the installation media, here’s what you’ll need:
-
A PC with a reliable internet connection. The download time will vary, depending on your internet connection.
-
A USB flash drive, external hard drive, or DVD. A blank USB flash drive or external hard drive with at least 8 GB of space, or a blank DVD (and DVD burner). We recommend using a blank USB or blank DVD because any content on it will be deleted. When burning a DVD from an ISO file, if you’re told the disc image file is too large, you’ll need to use dual layer (DL) DVD media.
-
A product key. Your 25-character product key (not required for digital licenses). For help finding it, go to Find your Windows product key.
After you’ve created the installation media, you can reset or reinstall Windows. To learn more, go to Recovery options in Windows.
Need more help?
Want more options?
Explore subscription benefits, browse training courses, learn how to secure your device, and more.
Communities help you ask and answer questions, give feedback, and hear from experts with rich knowledge.
Find solutions to common problems or get help from a support agent.
Иногда из-за сбоев в работе приходится переустанавливать операционную систему. Для этого под рукой желательно всегда держать готовую флешку с образом актуальной системы Windows 10 или Windows 11.
Подготовка флешки
Microsoft указывает на вместимость накопителя от 8 ГБ. На практике лучше использовать 16 ГБ и более.
Все флешки в каталоге DNS на любой вкус и цвет.
Чтобы подготовить флешку к работе, ее нужно отформатировать в FAT32. Обратите внимание, что все хранимые на ней данные будут стерты. Зайдите в «мой компьютер», кликом правой кнопкой мыши по накопители, форматирование.
Для записи Windows в автоматическом режиме Microsoft предлагает собственную утилиту под названием Media Creation Tool (MCT). Помимо флешки потребуется стабильное Интернет-подключение: в противном случае образ с ошибками приведет к проблемам при записи или установке системы. Скачиваем с официальной страницы Microsoft.

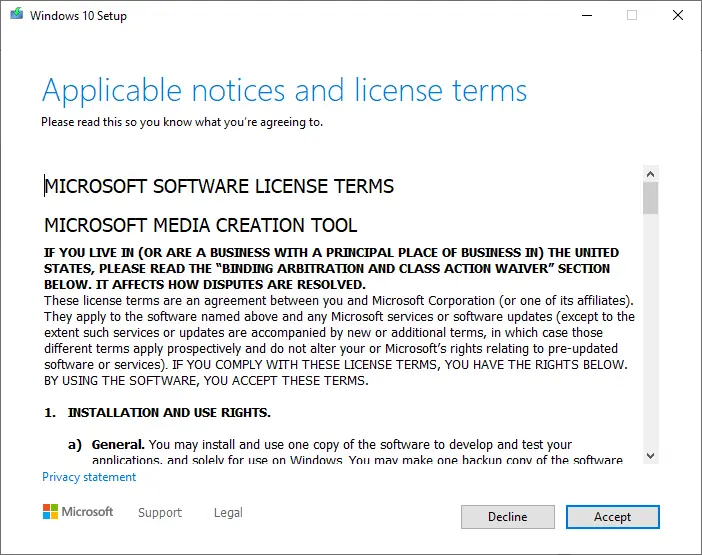
После запуска Media Creation Tool выведет экран с лицензионным соглашением. Нажмите кнопку «Принять». После этого программа предложит выбрать язык и версию системы. По умолчанию язык системы русский, версия — Windows 11.

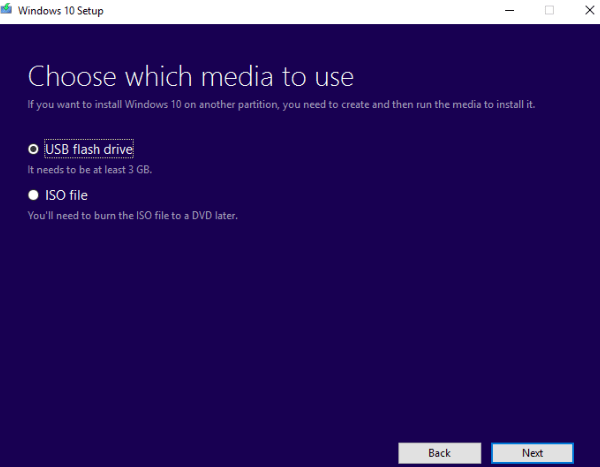
Далее следует выбрать носитель, на который будет записан образ Windows 11. Поскольку мы создаем загрузочную флешку, следует выбрать первый вариант: «USB-устройство флеш-памяти».

После этого выберите букву диска, к которому подключена флешка. Имейте в виду, что все данные, находящиеся на флеш-накопителе, будут безвозвратно стерты.
На следующем этапе утилита скачает образ Windows 11 с сайта Microsoft и запишет его на флешку. Процесс зависит от скорости Интернет-соединения и может занять длительное время.

После завершения скачивания образа и записи его на флешку вы увидите сообщение «USB-устройство флеш-памяти готово».
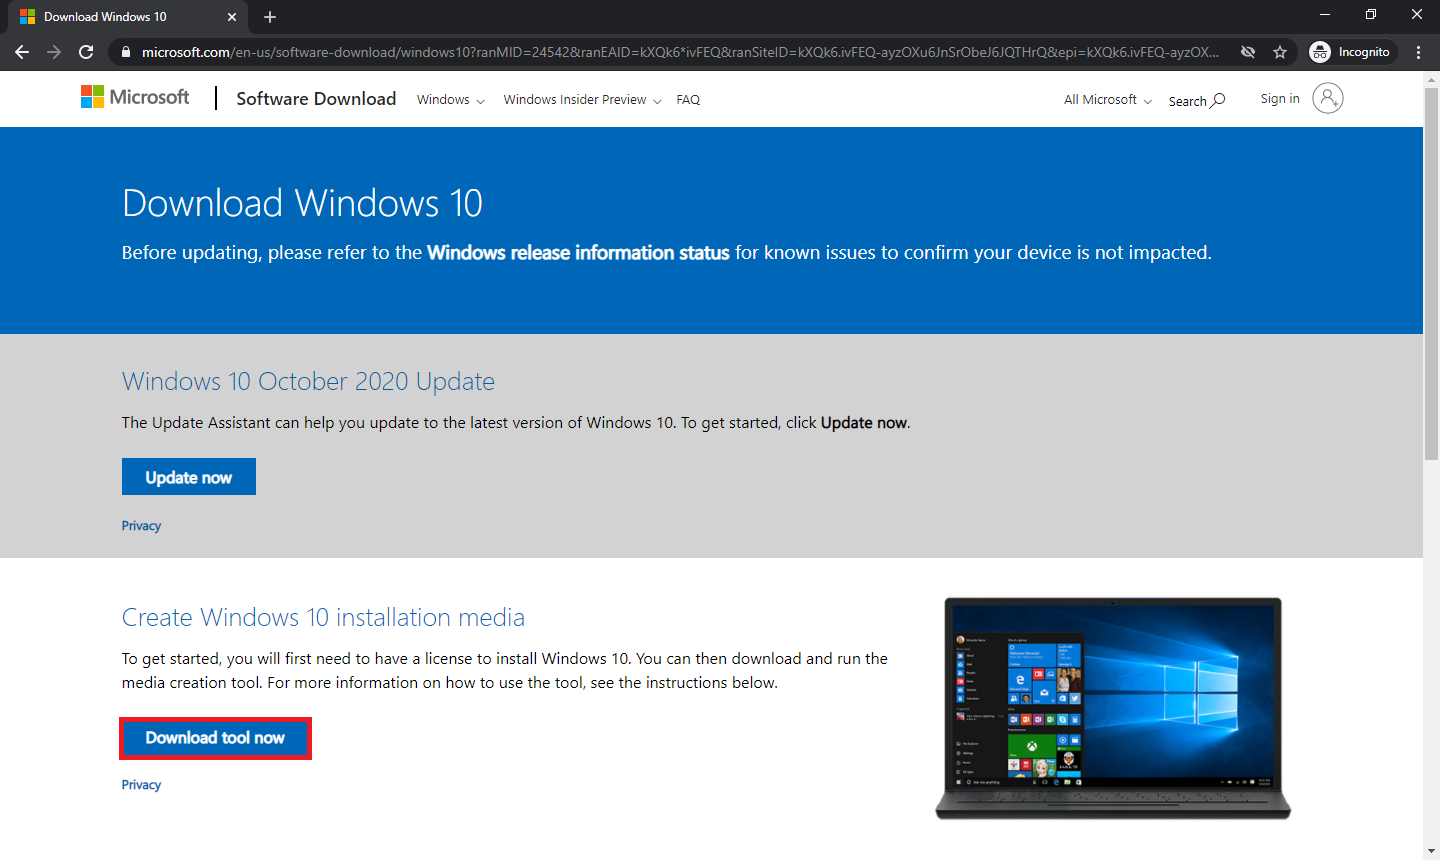
Перейдите на официальный сайт Microsoft по ссылке и кликнете по кнопке «Скачать средство сейчас».
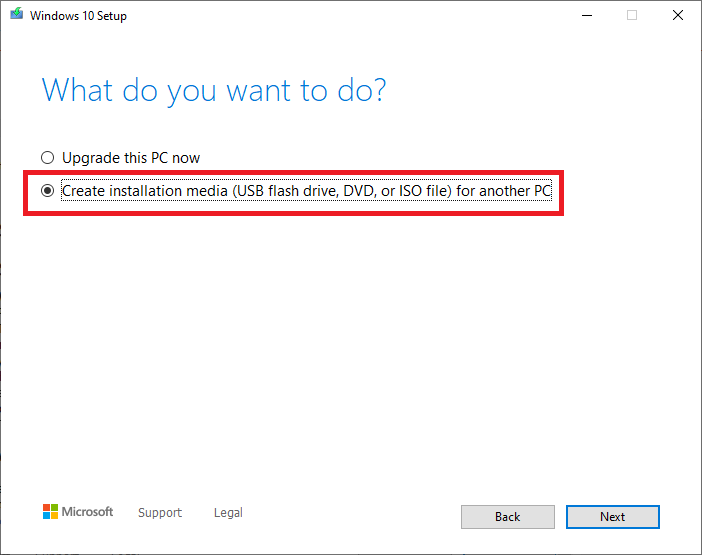
Выбираем создание установочного носителя.

Если загрузочная флешка создается для этого ПК или ноутбука, то лучше оставить все как есть и нажать «Далее». Если же Widows 10 нужно поставить на другое устройство, то нужно снять галочку, и выбрать соответствующую архитектуру: 32-разрядная, 64-разрядная или обе сразу.

Для дальнейшего создания загрузочной флешки через утилиту MCT в новом окне нужно выбрать «USB-устройство флэш-памяти», и нажать «Далее».

Выбираем в меню наш носитель. Если в списке его нет, то нажать «Обновить список дисков».

Ждем завершения выполнения процедуры. На этом этапе происходит загрузка, проверка и создание Windows 10 на флешке.

Как скачать официальный ISO-образ Windows
Для этого существует 2 основных способа. Варианты со скачиванием образа через сторонние сайты и приложения в этом пункте рассматриваться не будут.
Первый способ. Пользуясь инструкцией по созданию загрузочной флешки через утилиту MCT, выполнить первые 4 пункта. На 5-м пункте вместо «USB-устройство флэш-памяти» выбрать пункт «ISO-файл».

После этого указываем директорию для скачивания образа и ждем завершения процедуры.
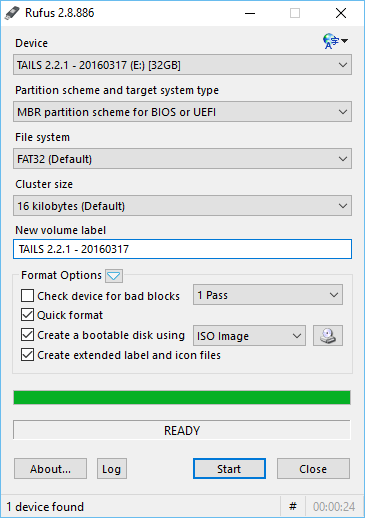
Создание установочной флешки с помощью Rufus
Rufus — это многофункциональная утилита для создания загрузочной флешки, которая позволяет настроить все необходимые параметры.
Порядок действий.
- Скачать установщик или Portable-версию (без установки) программы с официального сайта.
- Запустить утилиту с правами Администратора. Разрешить проверку обновлений — это решает некоторые проблемы, связанные с отображением отдельных пунктов выбора.
- В поле «Устройство» выбрать нужный накопитель. Если флешка не отображается, то выбрать «Показать расширенные свойства диска» и поставить галочку возле пункта «Список USB-дисков».
- В строке «Метод загрузки» кликнуть по кнопке «Выбрать», и указать путь к сохраненному ISO-образу.
- В графе «Схема раздела» отметить соответствующую таблицу разделов: MBR или GPT. Это повлияет на пункт «Целевая система».
- В поле «Новая метка тома» можно задать название для флешки.
- В строке «Файловая система» отобразится доступный вариант, который зависит от выбора «Схемы раздела» в пункте 5. Для MBR — только NTFS, для GPT — NTFS или FAT32 (приоритетный).
- Нажать кнопку «Готов». Подтвердить намерение форматирования в окне предупреждения. Дождаться завершения процедуры.

Rufus умеет работать с образами других ОС, а еще программа выполняет нужные действия быстрее других.
Создание загрузочной флешки с Windows 11 для компьютеров без TPM и Secure Boot
Многие неофициальные сборки Windows 11 могут быть установлены на любой компьютер — лишь бы производительности хватило. Но лицензионный образ Windows 11 требует поддержки компьютером ТРМ 2.0 и Secure Boot. TPM Trusted Platform Module (Доверенный Платформенный Модуль) — это специальный чип, обеспечивающий хранение ключей шифрования. Он необязательно должен быть физическим, на многих материнских платах ТРМ реализован через программную симуляцию. Проверить поддержку компьютером TPM 2.0 можно, нажав Win+R и запустив «tpm.msc».

Компьютер может поддерживать ТРМ 2.0, но поддержка может быть отключена в BIOS-е.

Утилита rufus способна создавать загрузочную флешку для компьютеров, не поддерживающих ТРМ 2.0 и Secure Boot. Когда утилита распознает образ Windows 11, в окне программы появляется дополнительный пункт — «Параметры образа». В этом пункте нужно выбрать «Extended Windows 11 Installation (no TPM/no Secure Boot)».

В последней версии rufus эта опция вынесена в отдельное окно, появляющееся после нажатия кнопки «СТАРТ».
Создать загрузочную флешку Windows 11 несложно, причем можно сделать так, чтобы она работала на компьютерах, не поддерживающих TPM и Secure Boot. Не забудьте включить приоритетную загрузку с USB-носителей в BIOS компьютера при использовании полученной флешки.
Этот метод подойдет продвинутым пользователям, а его преимущество заключается в возможности скачивания образа без MCT. Для этого нужно подменить данные user-agent в браузере через режим эмуляции мобильных устройств или установку соответствующих расширений: User Agent Switcher, User-Agent Switcher или User-Agent Switcher for Chrome. Таким образом имитируется посещение сайта с устройства не на Windows. После этого нужно перейти по ссылке, откуда раньше качали MCT, и где Microsoft любезно предложит перейти на темную сторону скачать образ Windows, как это выглядит на скрине ниже.

После подтверждения действий сайт предлагает выбрать язык.

На заключительном этапе выбираем интересующую разрядность.

После клика начнется загрузка. Ссылка действительна в течение суток.
Что делать в случае возникновения ошибки
Среди возможных проблем часто упоминается код ошибки 0x80042405 — 0xa001a, который появляется на середине финального этапа создания носителя.

Список действий, которые могут помочь в решении этой и других проблем.
- Проверка Интернет-соединения.
- Использование другого носителя.
- Перенос установочного файла с MCT на саму флешку с последующим запуском из новой директории.
- Запуск утилиты от имени Администратора.
- Включение режима «Высокая производительность» с отменой отключения USB-портов в настройке плана электропитания.
- Отключение антивируса.
- Форматирование флешки в формат NTFS вместо FAT32 или удаление разделов на накопителе с последующим созданием раздела NTFS. Для этого подходят встроенный инструмент Diskpart, сторонние утилиты BOOTICE, MiniTool Partition Wizard или Acronis Disk Director.
- Изменение таблицы разделов с GPT на MBR.
If you plan to install a fresh copy of Windows 10 on your computer, it is better to create a bootable USB flash drive. USB flash drive is also useful when it comes to storage. It can handle a lot of data on a small USB disk.
If you have a computer that features a UEFI (Unified Extensible Firmware Interface) BIOS instead of the legacy Basic Input/Output System (BIOS), you have to be more careful in choosing the appropriate media for the motherboard firmware type.
On Windows 10, you can use two methods to create bootable media to install the OS from USB on a UEFI-based computer. You can either use the Microsoft Media Creation Tool to download the files onto removable storage with support for both firmware types (UEFI and legacy BIOS) or use a third-party tool, Rufus.
Both of the software allow downloading the latest Windows 10 ISO file directly from the Microsoft server. This week Microsoft updated Windows 10 to the 20H2 version. Hence, if you plan to install a fresh copy of Windows 10, it is better to download an updated version of Windows 10 from the Microsoft Store.
This post will go through the steps, including downloading and installing the latest version of Windows 10 20H2.
How to download and create a Windows 10 UEFI boot media using the Media Creation Tool?
Follow these steps to download and create a Windows 10 UEFI boot media using the Media Creation Tool:-
Step 1. Browse the Windows 10 download page.
Step 2. Under the “Create Windows 10 installation media” section, click the Download tool now button to save the file on your computer.
Step 3. Double-click the downloaded MediaCreationTool file to launch it.
Step 4. It may take a few minutes to get ready. Click the Accept button to agree to the Microsoft terms and conditions.
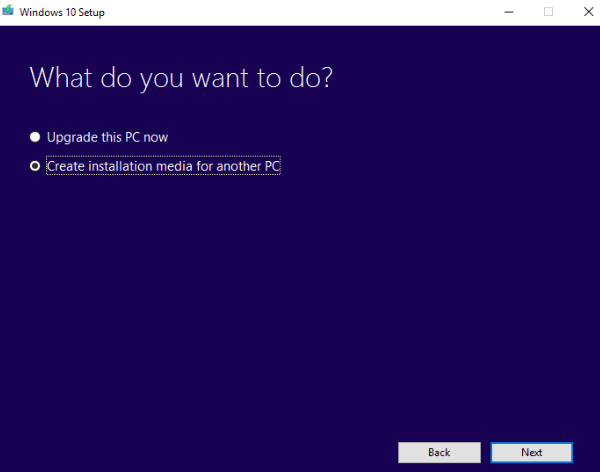
Step 5. Select the option “Create installation media (USB flash drive, DVD, or ISO file) for another PC.”
Step 6. Click on the Next button.
Step 7. Uncheck the Use the recommended options for this PC option.
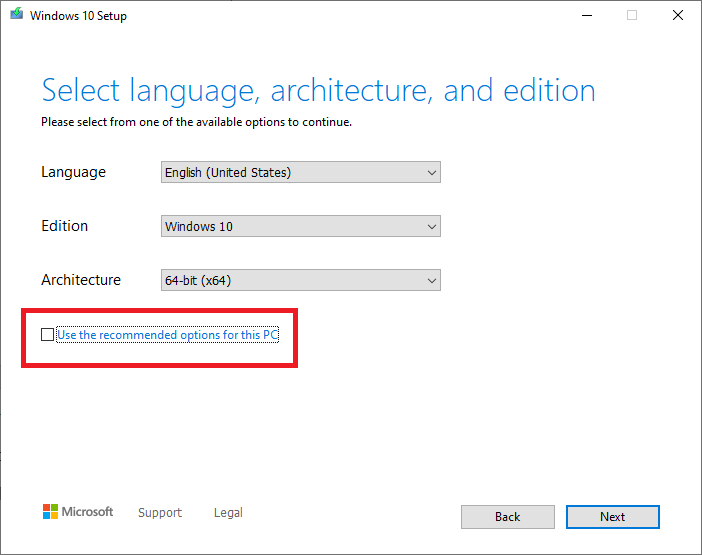
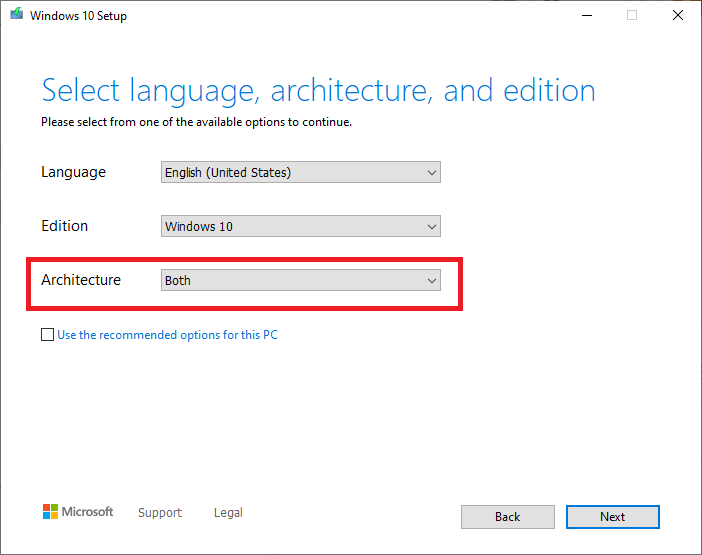
Step 8. Select the language, architecture, and edition of Windows 10 for which you want to create a bootable USB flash drive.
Note: If you plan to install both 32-bit and 64-bit versions of Windows 10 on different PCs, then select the Architecture as Both.
Step 9. Once you have selected the correct options, click the Next button.
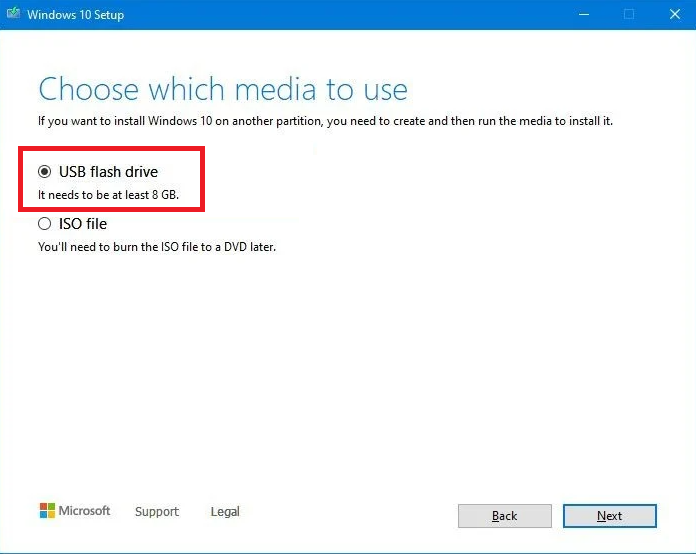
Step 10. Select the USB flash drive option (depending upon the selection, it may require up to 16GB of free space on the hard disk).
Step 11. Click the Next button.
Step 12. Select your USB flash drive.
Step 13. Click the Next button.
Step 14. Click the Finish button.
Once the above-mentioned steps are completed, the tool will start downloading the required files from the Microsoft servers, and it’ll create a bootable USB flash drive with support for UEFI and BIOS.
How to download and create a Windows 10 UEFI bootable USB flash drive using Rufus?
If you prefer to use a third-party freeware tool, then Rufus is the best option for you. The latest version of Rufus lets you download and create a bootable USB flash drive with UEFI support.
To download and create a Windows 10 UEFI bootable USB flash drive using Rufus, do the following:-
Step 1. Download the latest version of the Rufus utility from this page.
Step 2. Run the Rufus tool.
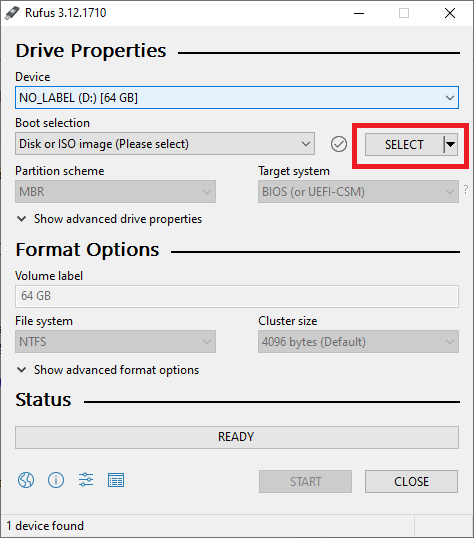
Step 3. Under the Device section, select the USB flash drive.
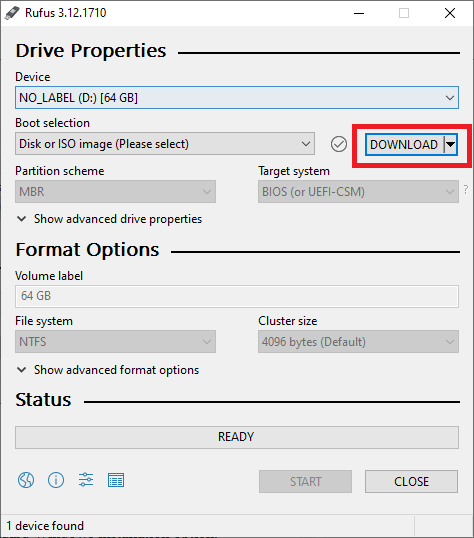
Step 4. Under the Boot selection section, click the SELECT drop-down and select the DOWNLOAD option. Then click on the DOWNLOAD option to download a fresh copy of Windows ISO.
Step 5. Download ISO Image window opens; you can select here Windows 10 or Windows 8.1.
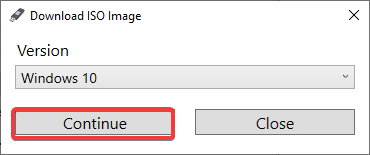
Step 6. Once you have selected the correct Windows, click on the Continue button.
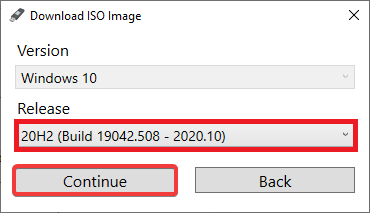
Step 7. Select the latest release of Windows OS and click on the Continue button.
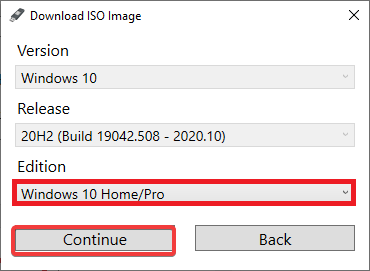
Step 8. Now select the Edition of Windows and click on the Continue button.
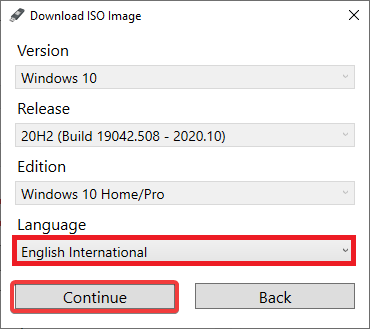
Step 9. Now select the correct language of Windows and click on the Continue button.
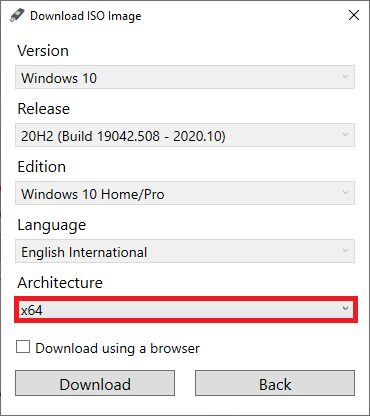
Step 10. Select the Architecture (32-bit or 64-bit) of Windows.
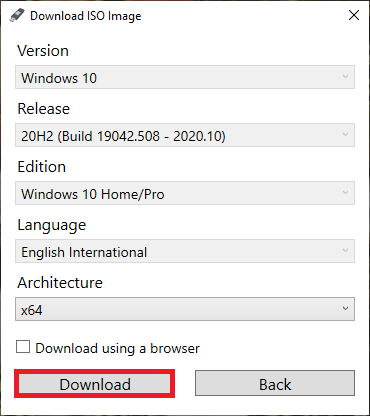
Step 11. Click on the Download button to save the Windows 10 ISO file on your PC.
Step 12. Once you are ready with Windows 10 ISO file, select the Windows ISO file under Boot Selection.
Step 13. Under the Image Option, select the Standard Windows installation option.
Step 14. Use the “Partition scheme” drop-down menu, and select the GPT option.
Step 15. Under the Target system drop-down menu, select the UEFI (non CSM) option.
Step 16. Leave other settings as default; it should look something like this:-
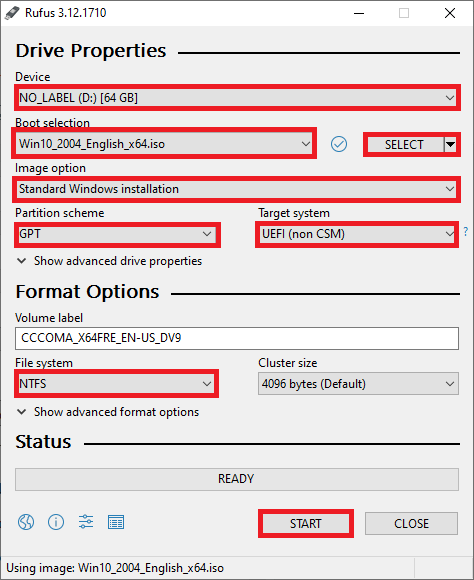
Step 17. Once you are ready with the above-mentioned options, click on the START button.
Your USB flash drive will be formatted to make it bootable.
Once you are ready with a bootable USB flash drive, make the changes in BIOS and install a fresh Windows 10 on your machine.
Above are the two methods through which you can download the latest version of Windows 10 to create a bootable USB flash drive with UEFI support.
Once you have created a bootable USB flash drive, you can test it without installing it on your computer or laptop.
Conclusion
In conclusion, creating a bootable USB flash drive with UEFI support is the best option for installing a fresh copy of Windows 10 on a computer. Both Microsoft Media Creation Tool and Rufus are effective methods to download and create bootable media. It is important to choose the appropriate firmware type for the motherboard, especially when using a UEFI BIOS. By following the steps mentioned in this post, you can easily download and create a bootable USB flash drive with UEFI support for installing the latest version of Windows 10. With a bootable USB flash drive, you can also test the operating system without installing it on your machine.
Bootable disk is required when we need to do a fresh Windows installation. Bootable disk is a disk which contains special files to boot up or startup the computer to start a utility or program. In this case to install a Windows 10 operating system we require a bootable disk to start the installation process of Windows 10.
A bootable disk is not required when we upgrade from older operating system like Windows 7 to Windows 10. But if we downloaded an ISO file to install it on a different PC or for a clean install we must have to create a bootable disk.
Lets learn how we can create a bootable Windows 10 disk.
Microsoft has provided official tools to create a bootable disk without using any third party software. We here explain the 3 main methods.
1. Using Windows Media Creation Tool by Microsoft
This is the easiest and most reliable method. The utility automatically downloads Windows 10 and copy the files from a USB disk by making it a bootable disk. This method can also be used to download ISO files only. Follow the steps below.
- Download the Windows Media Creation Tool: Click here to download media creation tool.
- Double-click on the downloaded file.
- Select “create installation media for another PC“.
- Select Language / Edition and Architecture as per your requirement.
To learn more about it, go to https://www.microsoft.com/en-in/software-download/windows10 - Select USB flash drive for USB or ISO file for DVD.
- Your disk will be ready after the completion of the process. It requires atleast 8 GB of pen drive. Make sure there will not be any important data in the disk as it will format the disk during the creation of the bootable disk.

- Select “USB Flash Drive” option and click on Next.

You can download Windows 10 ISO files for free directly from Microsoft using this media creation tool. An activation key will be required during the installation process.
2. Using Windows USB / DVD Download Tool
This is an old and still working method to create a bootable media for Windows Installation. The name can confuse you but it is also working perfectly for Windows 10 as well. However, this method requires an ISO image of Windows 10. So first you have to download the Windows 10 iso file.
- This process requires an empty USB stick (Min: 8GB). Quickly format the USB drive first.
- Download Windows USB / DVD Download Tool & Install it on your computer.
- After finishing of its installation, Run it.
- It requires an ISO image file for Windows. Select the ISO image and start the process. you can download the ISO file of windows 10 using the media creation tool as mentioned in method 1.
- Start Windows USB / DVD Download Tool to create a bootable disk
- Select the Windows 10 ISO file by clicking on the browse button.
- Then click on Next.

- After that, it will ask you to select the USB drive.
- It will prompt you to format the USB drive. Please allow it to format the USB flash drive and start making the Windows 10 USB. Follow the remaining on-screen instructions too.
- After completion of the process, your Windows 10 bootable USB / DVD installer USB will be ready to use.


3. Create Bootable Windows 10 disk with the help of third party software.
However, you will not be required to go with this method (third party tool) because the above given two methods will work for sure. Under any circumstances, you’ll only go with the option if the above two have not worked for you.
Making a boot-able flash drive becomes pretty easy with a third party software, named Rufus. Here are the essential guidelines when using Rufus to make a bootable Windows 10 flash drive. Let’s learn the same.
- Download Rufus.
- Open Rufus.exe
- When the software launches on the screen, plug in your USB flash drive.
- Find the option Create a bootable USB drive.
- From the menu that follows, select an ISO image.
- Now click on next button to this menu and click on the Windows 10 ISO you want to install on your computer.
- Now click on the start button at the bottom, and it will begin to create a bootable USB flash drive.
- Once completed, your USB will become bootable and you will be ready to install / reinstall Windows 10 on any computer using this Windows 10 USB flash drive.
4. Create Bootable Windows 10 USB through Command Prompt
This method is useful for advanced users. Sometimes users only have access to command prompts only and are unable to start Windows. If you have an ISO file, you can create a bootable pen drive using this method. Follow the given guidelines carefully as this method is a little complicated:
- Plug in your USB drive to your computer.
- Open “Command Prompt” (Admin).
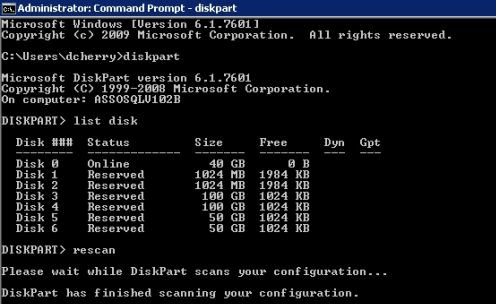
- In the Command prompt, type in the following command: diskpart and press the enter key from your keyboard.

- Now type list disk and press enter key. This will display a list of available connected disks.
- From this list, you need to select your USB drive. To do this, type select disk # and press Enter (Replace # with your disk number from the list). You will get a message saying “Disk 1 is now the selected disk’
- The next step is to clean the USB drive. To do this, type clean and press enter.
- Now create a bootable partition, simply type Create partition primary and press Enter.
- You need to select the partition you just created. Type select partition 1 and then type active and hit Enter.
- Now format the USB drive by typing “format fs=ntfs quick”. After this, press Enter.
- Assign drive letter. To assign a letter to your USB drive, just type assign. You may skip this step.
- Now get exit from disk part command by typing EXIT command. Go back to the command prompt on the main screen.
- Now minimize it for a while.
Copy the Windows 10 files to USB flash drive
Copy all the files of Windows 10 and paste them in the USB drive manually. Files can be copied from a Windows 10 disk or by extraction from an ISO file.
- Open the Windows 10 Disk / saved Windows 10 folder. If you do not have this, then download the Windows 10 ISO file from the Microsoft website and extract the ISO file to a folder, then open the extracted folder.
- Select all the files of Windows 10 and copy them.
- Now open the USB flash drive and paste all the copied files there.
Now make the USB flash drive bootable
Let’s suppose that the F: drive would be your USB drive and the E: drive is your DVD drive. Make sure the Windows 10 bootable DVD is inserted into the DVD drive from where the data is copied to the USB bootable drive.
Change the Windows active directory to the F: drive (DVD Drive). The default active directory is “C:\Windows\System32” in CMD. That Windows 10 DVD should be inserted into the DVD drive.
- Open the command prompt (admin) once again.
- Type E: and then press enter. The active directory will be changed immediately.
- Now type in the CD boot command and press enter.
- To create the bootsector in the F: drive (USB Pen Drive), type bootsect/nt60 F: into the command line.
- That’s it!! Your flash drive is now a Windows 10 bootable USB drive
And that is all there is to know about the manual creation of a bootable Windows 10 USB flash drive. all the methods are equally useful. If you’re an expert you can use the manual method without taking help from software, but beginners are advised to seek software help to avoid any complications. The best and easy method is using the Windows Media Creation Tool .
Are you still using the Windows 7? Microsoft has ended the windows 7 support.
Upgrade to Windows 10 as early as possible.
Why we need to create a bootable Windows 10 USB drive?
Since the availability of USB drives, the use of CD and DVD has prominently declined. The major reasons behind this are the ease of use, portability, larger capacity and faster copying of data files by the USB drives in comparison to the older methods. All you need is a flash drive with a capacity of more than 4GB, although 6 to 12 GB of available space is ideal for storing additional files as well. Create a bootable USB drive and keep it in a safe place that you can use this disk to easily fix the installation issues.
How to download windows 10 bootable USB or ISO image for clean windows installation.
Given above method 1 can be used to easily download the ISO image file. We didn’t found any other direct link to download ISO image for offline purpose. So downloading it using the media creation tool is the only method to get it directly from the Microsoft.
You can also upgrade to Windows 10 for Free using windows 7 license key.
Please share your experience with the creation of bootable windows 10 disk using the below comment box.