Как устанавливается программа (процесс установки наглядно) ↓
OBS Studio на любой компьютер или ноутбук
OBS Studio – это кроссплатформенное решение для Windows, MacOS и Linux, которое используется для проведения стримов на YouTube, Hitbox, Facebook Live и на других популярных платформах. Программа поддерживает русский язык. За счет установки плагинов можно расширить функционал OBS Studio и коллекцию спецэффектов (для аудио и видео), созданную разработчиками. Доступ к возможностям программы осуществляется через меню, возможно назначение определенных функций на горячие клавиши. Гибкая система настройки эквалайзера представлена в отдельном окне. Возможности OBS Studio позволяют использовать неограниченное количество сцен.

В программе имеется функция записи видео. Если выбран формат mp4 или flv, то прерванную трансляцию можно будет начать с того же места, на котором произошла ошибка. Разработчиками предусмотрена возможность накладывать фильтры и переходы на источники видео. Битрейт настраивается пользователем с учетом рекомендаций сервиса, в котором ведется трансляция (например, для Twich – это 4500-6000 kbps). Уровень детализации и другие настройки видео находятся в разделе Вывод. Если для трансляции используется один из популярных сервисов, то в этом случае достаточно выбрать соответствующий пресет и указать базовые опции.
Основные возможности OBS Studio
Онлайн стриминг

Запись видео с экрана

Минимум нагрузки на ПК

Множество настроек

Как установить OBS Studio на ПК:
Запуск программы происходит с помощью распаковщика OpenBox
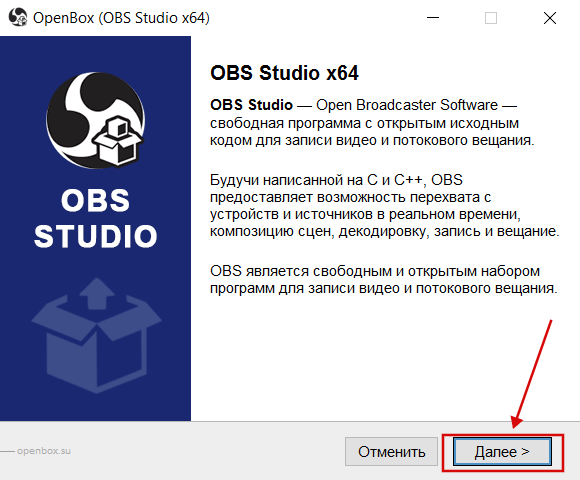
Запустите файл.

Ознакомьтесь с информацией и нажмите «Далее».
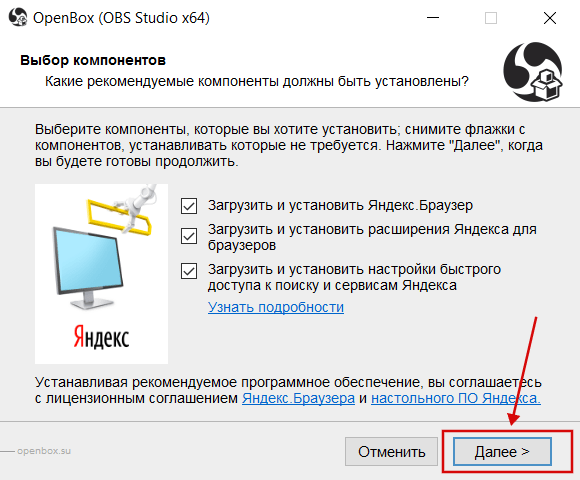
Нажмите «Далее», или снимите галочки с рекомендуемого ПО и нажмите «Далее». Если снять все галочки, рекомендуемое ПО не установится!
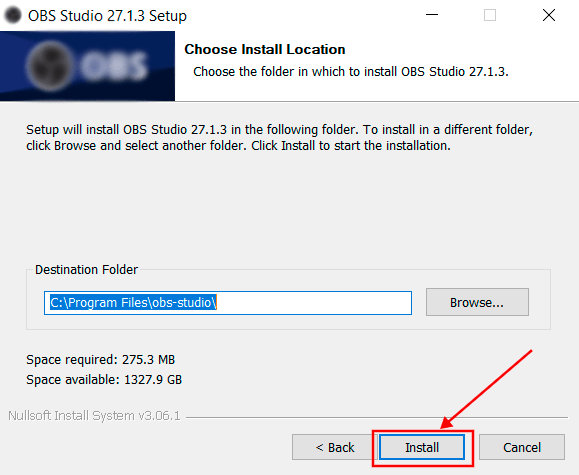
После всех шагов нажмите «Установить».
OBS Studio для версий windows:
|
|
OBS Studio поддерживает широкий спектр оборудования, в том числе и Elgato Stream Deck. Программа стабильно работает даже при высоком битрейте – ошибки, приводящие к остановке трансляции, возникают крайне редко, а видео передается как есть на протяжении многих часов. Для исключения задержек при передачи видео рекомендуется использовать выделенный ПК – этот способ позволяет решить все проблемы даже при очень большой битрейте и высоком разрешении. На нашем портале можно скачать последнюю версию OBS Studio – одного из лучших инструментов для онлайн-трансляций, который стал выбором номер один для миллионов пользователей.
Ready to dive into the exciting world of live streaming and content creation?
Look no further than OBS Studio! Want to get started? Our simple step-by-step guide will help you to download and install OBS Studio onto your Windows in no time.
Step 1 – Visit the OBS Studio
Begin by visiting the website of OBS Studio. You can do this by opening your preferred web browser and searching for “OBS Studio“

Step 2 – Navigate to the Download Page:
Once you’re on the OBS Studio website, navigate to the “Download” button or go to the “Download” page. This is where you’ll find the latest version of the software available for various operating systems.

Step 3 – Choose Your Operating System:
OBS Studio is available for Windows, macOS, and Linux. As we are getting it for Windows, Select Windows from the available options.

Step 4 – Start the Download:
Click on the download link for your chosen operating system. The download should start automatically. If prompted, choose a location on your computer to save the installation file.

Step 5 – Install OBS Studio:
Once the download is complete, locate the installation file on your computer and double-click it to start the installation process.

Step 6 – Configure Installation Settings:
Follow the on-screen prompts to configure the installation settings. You may be asked to choose the installation location, create shortcuts, and customize preferences. Review and confirm your selections as you wish.


Step 7 – Complete the Installation:
Click the “Install” button to begin the installation process. OBS Studio will be installed on your Windows.

Step 8 – Launch OBS Studio:
Once the installation is complete, you can choose to launch OBS Studio immediately or find its shortcut on your Windows desktop or in your applications folder.

Step 9 – Set Up OBS Studio:
When you launch OBS Studio for the first time, you’ll be prompted to configure your settings, including stream preferences, audio devices, and more. Follow the setup wizard to customize OBS Studio according to your preferences.

Step 10 – Start Creating:
With OBS Studio successfully installed and configured, you’re ready to start creating captivating live streams, recording videos, and enhancing your content with its powerful features.

Step-by-Step Guide to Download and Install OBS Studio for Mac
OBS Studio (Open Broadcaster Software) is a powerful tool for live streaming and recording content on various platforms.
If you’re a MAC user looking to dive into the world of content creation, this guide will walk you through the process of downloading and installing OBS Studio on your Mac.
Step 1 – Visit the OBS Studio Website:
Open your preferred web browser and navigate to the OBS Studio website at “https://obsstudio.net“.
Step 2 – Download OBS Studio:
On the OBS Studio website’s homepage, locate the “Download” button. Click on it to initiate the download process.
Step 3 – Select Your Operating System:
Once the download page opens, you’ll be prompted to select your operating system. You can Choose from the two available options which are “macOS(Intel)” or “macOS(Apple Silicon)“
Step 4 – Download OBS Studio for Mac:
After selecting your option, the download for OBS Studio Mac will start automatically. You’ll see the progress of the download in your browser.
Step 5 – Locate the Downloaded File:
Once the download is complete, locate the downloaded file in your browser’s default download location or the folder you specified.
Step 6 – Install OBS Studio:
- Double-click the downloaded file to start the installation process. A new window will appear with the OBS Studio icon and an “Applications” folder icon.
- Drag and drop the OBS Studio icon onto the “Applications” folder icon to install the software. This will copy OBS Studio into your Applications folder.
Step 7 – Open OBS Studio:
After the installation is complete, navigate to your Applications folder. Locate the OBS Studio icon and double-click on it to launch the software.
Step 8 – Configure OBS Studio:
Once OBS Studio is open, you’ll be prompted to configure your settings. You can choose to optimize settings based on your usage, or you can manually adjust them according to your preferences.
Step 9 – Start Creating:
With OBS Studio successfully installed, you’re ready to start creating content. Explore the software’s features, set up scenes, add sources, and configure settings to begin your live streaming or recording journey.
Step-by-Step Guide to Download and Install OBS Studio for Linux
OBS Studio (Open Broadcaster Software) is a versatile tool used for live streaming and content creation.
If you’re a Linux user eager to explore live streaming, this guide will walk you through the process to download and install OBS Studio for your Linux system.
Step 1 – Access the Terminal:
Launch the terminal on your Linux system. You can typically find the terminal application in your applications menu or by using the shortcut “Ctrl + Alt + T“
Step 2 – Update Repositories:
Type the command sudo apt update in the terminal and press “Enter” This updates the package repositories on your system.
Step 3 – Install OBS Studio:
To install OBS Studio, enter the command sudo apt install obs-studio in the terminal and press “Enter”
Step 4 – Confirm Installation:
During the installation process, you’ll be prompted to confirm the installation by typing “Y” and pressing “Enter”
Step 5 – Wait for Installation:
The terminal will begin downloading and installing OBS Studio along with its dependencies. Wait for the process to complete.
Step 6 – Launch OBS Studio:
Once the installation is finished, you can launch OBS Studio. You can do this by searching for “OBS Studio” in your applications menu or by using the terminal command obs-studio.
Step 7 – Configure OBS Studio:
When OBS Studio opens, you’ll have the option to configure settings based on your needs. You can adjust streaming settings, video and audio preferences, and more.
Step 8 – Start Creating:
With OBS Studio successfully installed, you’re ready to start creating content. Set up scenes, add sources, and customize your stream or recording settings to bring your creative vision to life.
OBS Studio
by Jim — Freeware
OBS Studio 64 bit Download [Free]
Download OBS Studio for Windows 11 64 bit. Install OBS Studio latest (2023) full setup on your PC and laptop from FileHonor.com (100% Safe).
Free and open source software for video recording and live streaming.

OBS Studio is a Video Recording software. Free and open source software for video recording and live streaming.
Download OBS Studio latest version 2023 free for Windows 11 and 10. Official direct download (64 bit).
How to Download and Install for Windows 11?
- Click on the GREEN Download button above
- Choose your favorable download option. Usually go for the first download link
- Save OBS Studio installer to your local drive
- Double Click on the installer to start the installation
- Accept OBS Studio end user agreement license
- Follow intructions till you finish
- Have Fun
Technical Details
- Rating
- / 10
- Category
- Video Recording
- Version
- Latest
- License
- Freeware
- OS
- Windows 11 64 Bit
- Size
- 70 Mb
- Updated
How to install the latest version of OBS Studio:
- Download OBS Studio setup file from the above download button
- Double click on the downloaded setup file
- A smart screen will appear asking for confirmation to install the software, Click «Yes»
- Finally, follow the installation instructions provided by the setup file
How to uninstall — remove — OBS Studio from Windows 11?
- Open Windows Start Menu, then open Settings
- From Settings >> Open Apps section
- All installed apps appear, then navigate to the desired app and click Uninstall
- Confirm, and you are done
Quick Review
OBS Studio is a free software for video recording and live streaming. It is equipped with a powerful API, enabling plugins and scripts to provide further customization and functionality specific to your needs. High performance real time video/audio capturing and mixing. Create scenes made up of multiple sources including window captures, images, text, browser windows, webcams, capture cards and more.
Filters for video sources such as image masking, color correction, chroma/color keying, and more. Set up an unlimited number of scenes you can switch between seamlessly via custom transitions.
Intuitive audio mixer with per-source filters such as noise gate, noise suppression, and gain. Take full control with VST plugin support. Powerful and easy to use configuration options. Add new Sources, duplicate existing ones, and adjust their properties effortlessly. Streamlined Settings panel gives you access to a wide array of configuration options to tweak every aspect of your broadcast or recording.
Disclaimer
OBS Studio for Windows 11 is developed and updated by Jim. All registered trademarks, product names and company names or logos are the property of their respective owners.
Similar Software
by Matthew Adams
Matthew is a freelancer who has produced a variety of articles on various topics related to technology. His main focus is the Windows OS and all the things… read more
Updated on
- OBS Studio for Windows 11 is among the most highly-rated recording software tools you can enjoy on this platform and not only.
- Feel free to download and install OBS Studio in Windows 11 in just a few minutes.
- Selecting OBS Studio’s Display Capture option gives you the chance to record desktop activity for tutorial videos.
- There are also loads of handy plugins available for OBS on the Open Broadcast Software Studio website.

XINSTALL BY CLICKING THE DOWNLOAD
FILE
Now that Microsoft has officially released Windows 11, more users are embracing the latest desktop platform. Note that it retains the same built-in recording feature as its predecessor, namely Game Bar DVR.
Yet, some users might be disappointed it doesn’t have an enhanced recording utility. For starters, you can’t record the Windows 11 desktop or File Explorer with Game Bar DVR, which has primarily been designed for game recording.
Game Bar is restricted to recording one full-screen app at a time. Furthermore, the built-in recorder’s configuration settings are somewhat limited.
Therefore, some users will no doubt prefer to find a better alternative to Windows 11’s Game Bar DVR. If you’re among them, look no further than OBS Studio. This is one of the best open-source recording software for Windows.
What do I need OBS Studio for?
To put it simply, you need OBS Studio for recording anything on your PC’s monitor. Aside from its video and audio capturing, the software enables users to mix audio, set up scenes with custom transitions, and broadcast live streams to different servers.
As mentioned, the Game Bar DVR isn’t much good for recording the Windows desktop. So, you’ll need OBS Studio for recording videos that include some desktop activity.
How we test, review and rate?
We have worked for the past 6 months on building a new review system on how we produce content. Using it, we have subsequently redone most of our articles to provide actual hands-on expertise on the guides we made.
For more details you can read how we test, review, and rate at WindowsReport.
Live game streaming is prevalent on the likes of YouTube and Twitch. OBS Studio is the software of choice for many players who stream their gaming. With the software, players can switch between cams and games and even incorporate comments in their streams.
Those who want more options to pick from can also take a look at this list including the best game recording software for low-end PCs. Even if this is a Windows 10 guide, the options presented work without problems on Windows 11 too.
So, OBS Studio is a pretty cool piece of kit for recording software on your PC live or not. You can run that software on Windows 11 if you need something more advanced than the Game Bar DVR and find the best OBS settings for recording.
This is how you can download and install OBS Studio in Windows 11.
How can I download and install OBS Studio in Windows 11?
1. Download OBS Studio
- First, open the OBS Studio homepage.
- Click the Download link on that website.

- Select the Windows logo on the download page if it’s not selected.
- Then press the Download Installer button (for the 64-bit version installer).

- Next, choose a folder to download the OBS Studio installer in.
- Press the Save button to download OBS Studio’s installer to the chosen folder.


2. Install OBS Studio
- To open File Explorer’s window, click its folder taskbar button.

- Next, open the folder you downloaded OBS Studio’s installer to.
- Click Next on OBS Studio’s setup window to bring up the license info.
- Select Next again to proceed to the directory selection options.
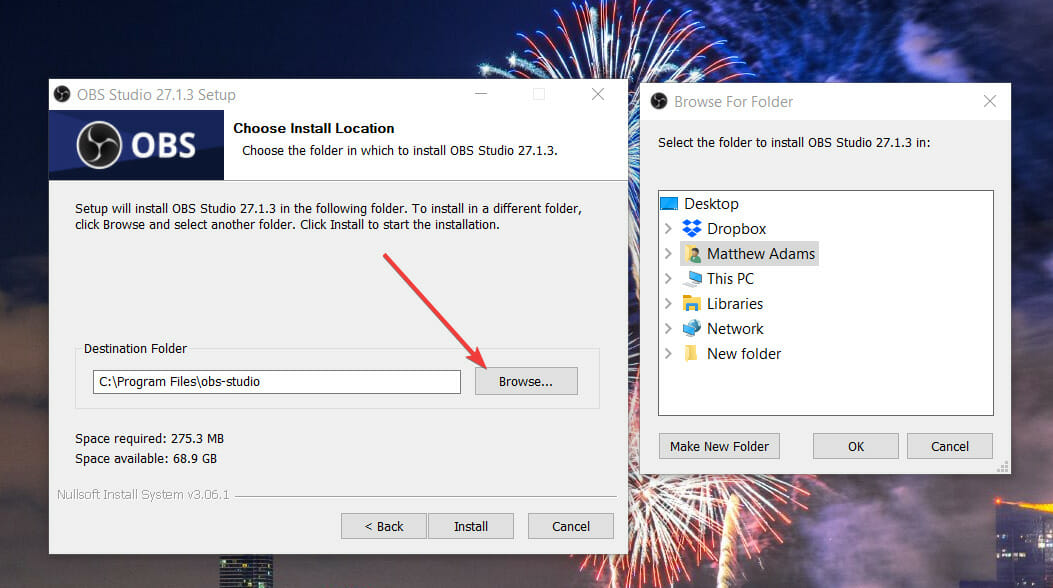
- To choose a folder to install the software, click the Browse button. Then select a directory for the software on the Browse for Folder window, and click the OK option.

- Press the Install button.

- Thereafter, select the Launch OBS Studio checkbox.
- Click Finish to confirm.
- When OBS Studios starts, an Auto-Configuration Wizard window will also open. Select either Optimize for streaming or Optimize just for recording depending on your user requirements.

- Select the Next option.
- Then choose your preferred video settings on the window that you can see below, and click the Next button.

- Finally, select the Apply Settings option.


How can I record my PC’s screen with OBS Studio?
When you’ve installed OBS Studio as outlined above, you can start recording to your heart’s content! The standard recording for non-live videos is relatively straightforward in OBS Studios. This is how you can record the Windows 11 desktop with that software:
- Click the + button for sources in OBS Studios.

- Select the Display Capture option on the menu.

- Enter a source name in the Create source window that pops up, and press the OK button.
- Press the OK button on the Properties window that opens. Users with multiple monitors can also select alternative displays with the Display setting on that window.

- Then press the Start Recording button to begin.

- Minimize the OBS Studio window, and record everything you need to.
- When you’re done, press the Stop Recording button in OBS Studio.

- To find where you’re recorded output is saved, click the Settings button.
- Select the Output tab on the Settings window. Your video will be saved in the recording path specified on that tab.


Where can I get plugins for OBS Studio?
As its open-source software, there are plenty of useful plugins for OBS Studio. Those plugins add additional features and options to take advantage of.
The Resources section on the OBS Studio website is the best place to find plug-ins for the software. The OBS Studio Plugins section there includes several pages of plug-ins for the software. Click a link for a listed plugin there to read further details for it.
To download a plugin, click the Go to download button for it on its details page. Then either a Save As window or a GitHub download page will open. If a GitHub page opens, select to download an EXE installer file from there if you can.

However, you’ll have to download some plugins as ZIP archives, which you’ll need to extract within File Explorer. Then you’ll need to drag and drop the plugin’s obs-plugins folder into your OBS Studio installation folder. Make sure it merges with the obs-plugins folder there.
Overall, the installation for OBS Studio is a very quick and straightforward process. You can have it up and running in Windows 11 in just a few minutes. As it takes up about 261 megabytes of drive storage space, you probably won’t need to make any space for it.
- OBS keeps crashing? Here’s how to fix it on Windows 10 & 11
- Microsoft Paint Cocreator: A complete guide on the new AI tool
- Windows 11 adds more apps to the share links feature
- How to Make a Program Available to All Users on Windows 11
OBS Studio has all the tools you’ll need to record appealing software videos on your desktop or laptop. You probably won’t find any better freely available recording tools for Windows 11 at the moment. So, it’s certainly worth installing OBS Studio if you need to record something on your PC.
Worried about OBS crashing issues? They are often caused by the graphics card app or outdated versions so don’t hesitate to apply the tips found in this guide on how to fix OBS crashing issues in Windows 10. Rest assured that all of them may be taken into consideration by Windows 11 users too.
Things are no different when it comes to OBS not recording game audio. We’ve got a few confirmed solutions to start resolving this annying problem.
What do you think about OBS Studio? Feel free to use the comments section below and tell us your opinion.
![]()
An open-source video recorder and live streaming software. Free download OBS Studio latest version 2023 for Windows 11/10/8/7 (32-bit/64-bit).
Latest Version Overview
Yes, OBS Studio allows you to record videos and create live streaming very quickly. It supports all of your favourite streaming platforms including Twitch, TikTok Live, Mixer, Mixcloud, Instagram Live, YouTube live, Facebook Live etc.
You can use it to capture from a variety of sources, including window capture, images, browsers, webcams, text and more. This will help you to work with an unlimited number of scenes.
Table of Contents
Key Features and Highlights
Live Streaming
If you want you can configure the stream destination in the settings area of the stream tab services. Once you have configured the streaming destination settings, OBS will live stream to this destination. Just click the start streaming button.
Custom Scenes
You can create custom scenes with a variety of layouts to display all of your audio and video sources.
Monitoring Audio and Video
You can monitor your video in the main OBS window. You can also monitor the audio using the audio mixer level.
Record Gameplay
This software is an awesome platform for any gameplay record. Simply download, install and start recording games with the software.
You can record your game in 1080p or a higher resolution. It will be very smooth, especially with games where there’s a lot of movement like FPS games etc.
OBS Plugins
OBS plugins are used to extend the functionality of OBS Studio full version. By adding custom code written to do specific tasks.
NewTek NDI Plugin
The most popular OBS plugin is NDI which is an IP video production protocol. Anyone can easily set up a third-party NDI plugin and broadcast via the NDI source.
VirtualCam Plugin
Another popular plugin is called OBS VirtualCam which allows you to take any video inside of obs and connect it to another camera input via a virtual webcam source. This is great for pumping video from obs into applications like Zoom Meetings or Skype.
Remote Control Plugin
Another popular plugin is an OBS remote control which provides an IP server to control obs remotely.
VST Plugin
You can also install VST 2.x and 3.x plugins in your screen recorder. VST compatibility opens the door for a huge variety of tools. It’s really gonna make it sound good.
It comes to streaming and making better content for your viewers. This feature is only supported on the Windows 64-bit version.
Conclusion
In addition, it has some rich premium tools that make it easy to organize your video. Using this software you can create a professional video in a very short time.
OBS Studio Software is the first choice for those who specially create a series of tutorials, guides, notes, News videos, etc.
Advantage and Disadvantage
|
Pros
|
Cons
|
How to Install?
If you have Microsoft Visual C++ you can easily install it. But you do not have this you do not install OBS studio. You must have Microsoft DotNet Framework software installed on your PC to install this software.
- Click on this executable file which you downloaded now.
- There was a setup window and click Next.
- Here you can see the Terms and conditions. Just click I agree.
- You can see the destination folder and set this default.
- Check on Plugins and real sense Sources and Click Install.
After a while, your OBS Studio for Mac or Windows is installed successfully enjoy it.
How to Setup?
I am very impressed with its flexible setup capabilities. Now I will show you how to set up OBS studio to record your computer screen. Open your software. If you open it the first time it provides a popup window and clicks Yes. Then you can see two radio buttons and that button is:
- Optimize for streaming, recording is secondary.
- Optimize for recording, I will not be streaming.
It is depended on you why you use this software. Select a button which you want. Just click Next. There were video settings you can easily set video resolution and set FPS. Set this and click Next. Now your setting was processing after a while it was completed and just click Apply Settings. Now your first settings are done.
How to record computer screens?
- Right-click on the Sources section and just click add
- Here you can see Display Capture just click on it
- There was a new window press OK
- Now you can see the Properties window you see it and click ok
- On the right bottom side, you can see Controls. In Controls you can see the Start Recording button and click on it.
Now your recording is started and you record anything enjoy it.
What’s New/ Version history/ Changelog in v29.1.3 ?
Fixed:
- Service selection resetting for services that are not shown by default
- Crash when properties are deleted in callback, e.g. with the Source Record plugin
- Keyboard shortcuts not being displayed for some context menu items
- Crash with Freetype 2 text sources with non-ASCII text
- AMF encoder reconfiguration and dynamic bitrate not working
- AMF preset fallback not taking the GPUs reported throughput into account
- Preventing properties dialogs from being closed with the “Cancel” button
- Window capture/game capture compatibility notices being displayed erroneously
- Potential crash on exit with obs-websocket
- A crash when unloading Lua scripts
- Unnecessary undo/redo entries being created for text sources
- MacOS capture showing a white background on macOS 14 Beta
- MacOS graphics thread timer accuracy
- Where the checkable “Source Toolbar” menu item in the View menu wouldn’t update when you used the “Show Source Toolbar” and “Hide Source Toolbar” hotkeys
- Where switching between “Fade” and “Fade to Black” for a quick transition would not work properly Fixed a bug in audio settings where Audio Channels, Sample Rate, and Low Latency Audio Buffer Mode would sometimes not save properly
- Where the placeholder text for “Group” when adding a new group wouldn’t be properly localized
OBS Studio 32-bit/ 64-bit Technical Details
| Latest Version: | OBS Studio 29.1.3 |
| Update Released: | 19 June 2023 |
| License: | Free |
| Publisher: | OBS Team |
| Main Category: | Media Player |
| Operating Systems: | Windows 11, Windows 10, Windows 8, Windows 7 OS x86/ x64 | macOS 10.15 and newer |
| 32-bit Setup File: | OBS-Studio-27.2.4-Full-Installer-x86.exe – 103 MB |
| 64-bit Setup File: | OBS-Studio-29.1.3-Full-Installer-x64.exe – 127.87 MB |
| Uploaded: | GitHub |
Screenshots: