Apache Maven is a software project management and comprehension tool. It’s not pre-installed software with any Operating System, explicitly we need to download and install it. In this article, we are going to download Maven for Windows and install Maven on Windows 10 (64-bit) operating system.
Table of Contents
Software Dependency
- Apache Maven 3.6.3
- JDK 1.8
- Windows 10
Steps to install Maven in Windows 10:
- Install JDK
- Download Apache Maven
- Configure JAVA_HOME and M2_HOME in the environment variable
- Set the maven path in the environment variable
- Check Maven Installation
Install JDK (Java Development Kit)
In order to install Maven software, it required Java. So make sure that your system already has JDK installed. If it’s not installed, then you have to install JDK first. Visit another article for this: JDK installation on Windows 10 operating system.
For Example: jdk1.8.0_144 is installed at ‘C:\Program Files\Java\jdk1.8.0_144’
Download Maven for Windows
To install apache maven on Windows, you need to download Maven for Windows. You can download it from its official website: Download Apache Maven. For example, here we have downloaded the apache-maven-3.6.3-bin.zip as shown in the below image:

Now extract the downloaded zip files into some folder. The extracted file looks like the below image:

Set maven path in an environment variable in Windows 10
We have to configure two environment variables JAVA_HOME and M2_HOME in Windows. JAVA_HOME is used by many Java-based applications to define the place of Java Runtime Environment (JRE) installation. And M2_HOME is used by Maven, and again it tells the program where to find Maven installation. These configurations need to be added to System Environment Variables.
System Environment Variables path:
Right click on MyComputer -> properties -> Advanced System Settings -> Environment variables

Now click on the Environment Variables button > add JAVA_HOME & M2_HOME one by one like the below images:


Set maven path in Windows 10
The Path variable is used to find applications (executables, and scripts) and DLLs on Windows. If the Path variable is already there then click on Edit to add a Maven path like the below image:

How to check whether Maven is installed or not?
To verify whether Maven is installed or not, open the command prompt by pressing Window Key+R, type “cmd” and then press Enter Key.
After opening a command prompt type the maven command “mvn -version” then press Enter and see the below output:

This is how you can find out which version of Maven is installed in your system now.
Conclusion
In this article, you have seen how you download apache maven and install it on the Windows 10 operating system.
FAQ
mvn is not recognized as an internal or external command
C:\Windows\System32>mvn -version'mvn' is not recognized as an internal or external command, operable program or batch file.
This means that the installation of maven is not done properly, make sure %M2_HOME%\bin is prepended to the PATH variable the right way.
JAVA_HOME environment variable is not defined correctly
C:\Windows\System32>mvn -versionThe JAVA_HOME environment variable is not defined correctly This environment variable is needed to run this program NB: JAVA_HOME should point to a JDK not a JRE
This simply means that JDK is not installed and the JAVA_HOME variable is not properly configured.
Related Article:
- JDK 8 Installation on Windows 10 Operating System
- How to Download and Install JDK 11 on Windows 10?
- JDK 17 Installation on Windows 10 [step-by-step]
- Install MySQL Server 8.0.27 [zip Archive] on Windows 10
- Install MySQL Workbench 8.0.27 on Windows 10[step-by-step]
You may also like:
- Creating a Spring Boot Project with Eclipse and Maven
- File Upload in Java Servlet Example
- How to write Excel files in Java using Apache POI?
- How to create password-protected Excel in Java?
Apache Maven

Apache Maven is a software project management and comprehension tool. Based on
the concept of a project object model (POM), Maven can manage a project’s
build, reporting and documentation from a central piece of information.
If you think you have found a bug, please file an issue in the Maven Issue Tracker.
Documentation
More information can be found on Apache Maven Homepage.
Questions related to the usage of Maven should be posted on
the Maven User List.
Where can I get the latest release?
You can download the release source from our download page.
Contributing
If you are interested in the development of Maven, please consult the
documentation first and afterward you are welcome to join the developers
mailing list to ask questions or discuss new ideas/features/bugs etc.
Take a look into the contribution guidelines.
License
This code is under the Apache License, Version 2.0, January 2004.
See the NOTICE file for required notices and attributions.
Donations
Do you like Apache Maven? Then donate back to the ASF to support the development.
Quick Build
If you want to bootstrap Maven, you’ll need:
- Java 8+
- Maven 3.2.5 or later
- Run Maven, specifying a location into which the completed Maven distro should be installed:
mvn -DdistributionTargetDir="$HOME/app/maven/apache-maven-4.0.x-SNAPSHOT" clean package
В данной статье вы найдёте инструкцию по установке Maven из архива,
настройке переменных окружения для возможности запуска команд Maven
в командной строке операционной системы Windows.
Требования
#
Предварительно у вас должен быть установлен JDK версии не ниже 8 и настроена
переменная окружения $JAVA_HOME. Проверьте в PowerShell
командами java --version и echo $env:JAVA_HOME. На скриншоте пример вывода,
который удовлетворяет дальнейшим действиям.

Если у вас ошибки и команда java не найдена, а JAVA_HOME ничего не выводит, скачайте
и установите JDK.
На странице необходимо выбрать операционную систему,
скачать файл MSI и запустить.
Это обычный установщик, в котором достаточно будет нажать «Далее».
После установки закройте все окна PowerShell и откройте заново,
попробуйте выполнить команды. Перезагрузку тоже можете попробовать 🙂
⏬ Скачивание архива
#
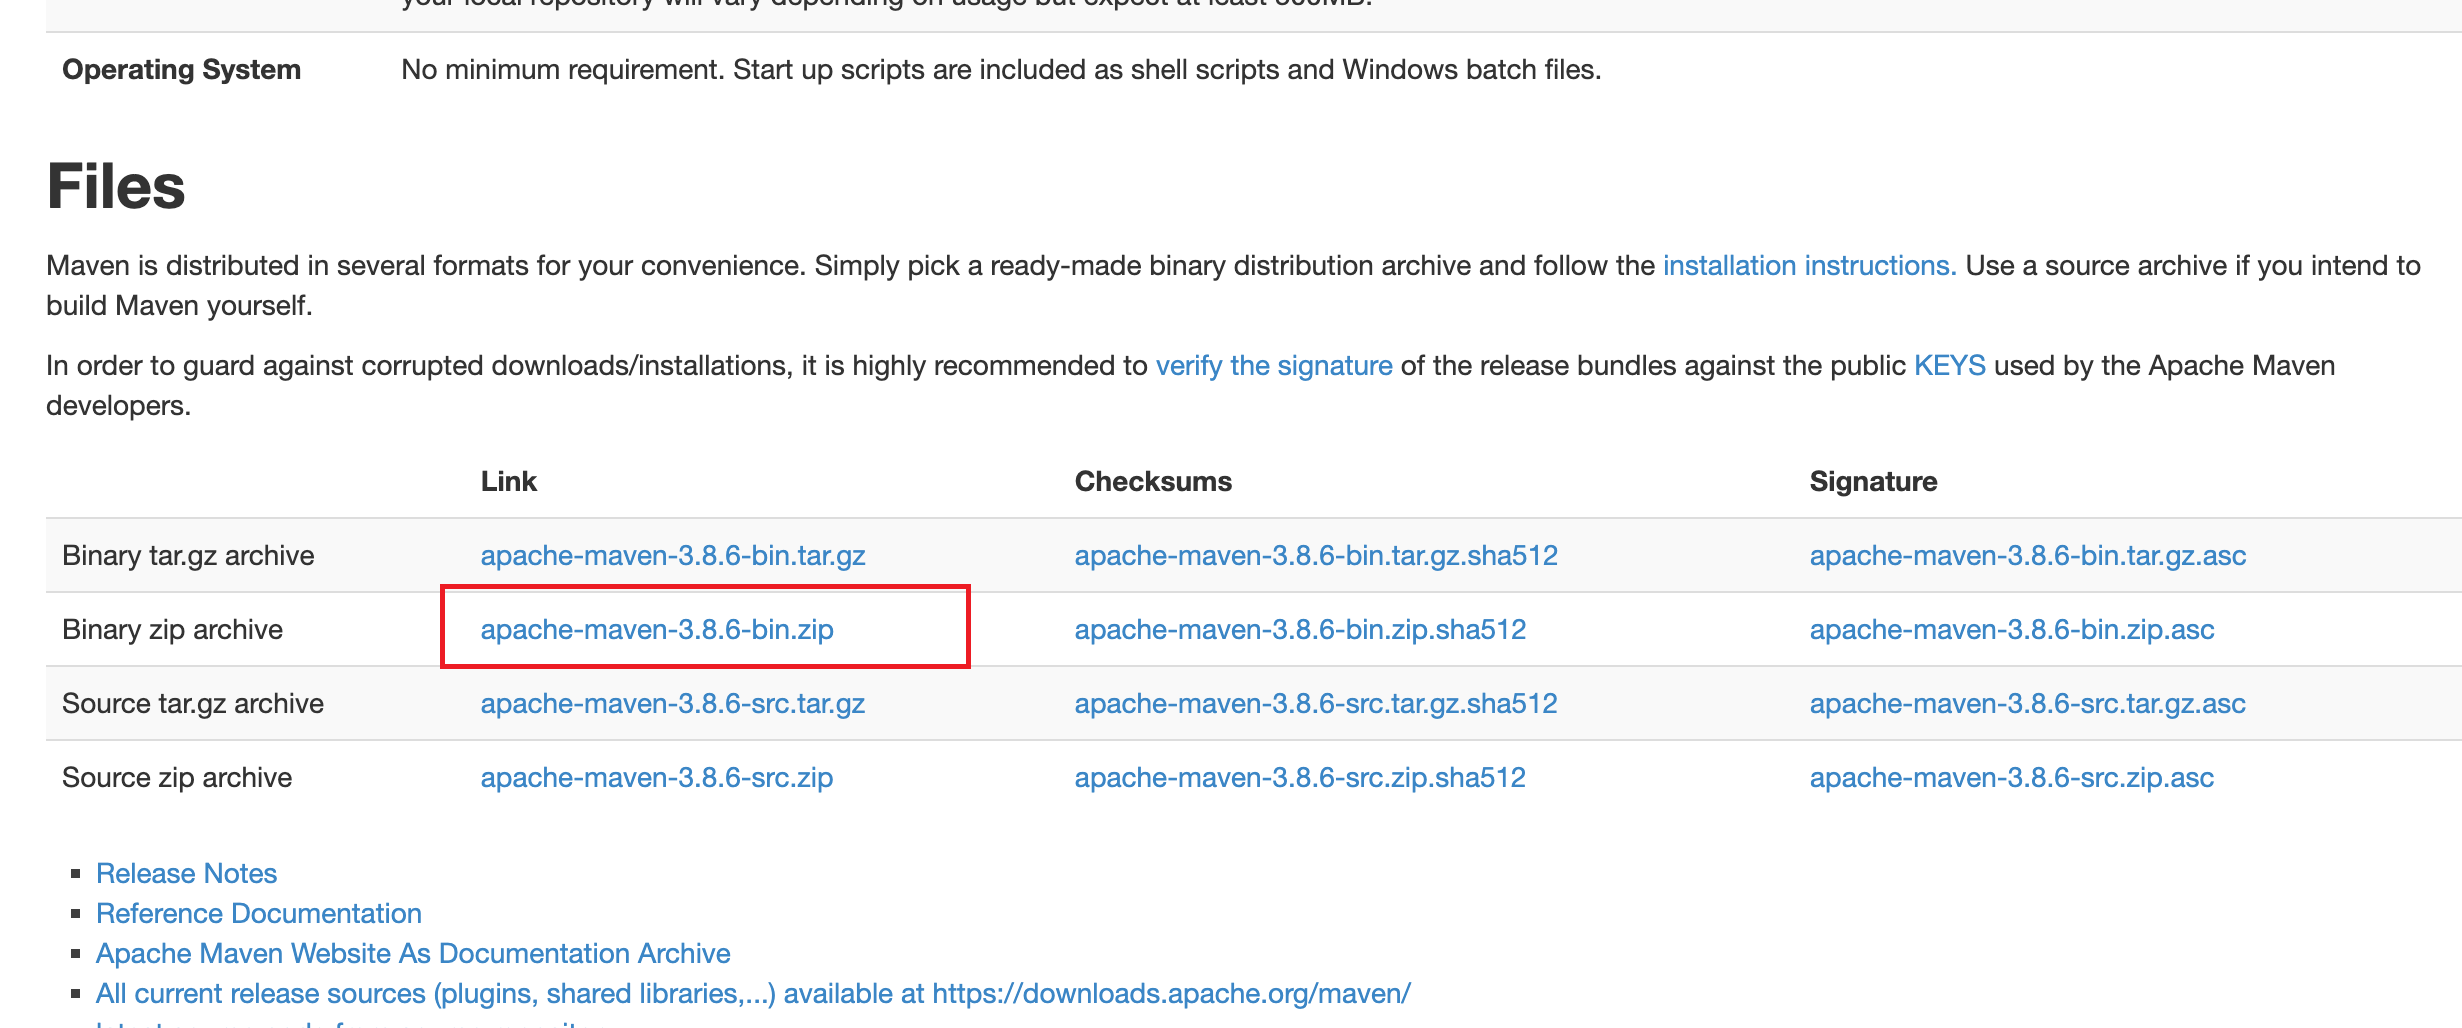
Перейдите на официальный сайт проекта Maven и скачайте архив
Downloading Apache Maven
На странице найдите секцию Files и скачайте Binary Zip Archive.
📤 Распаковка архива
#
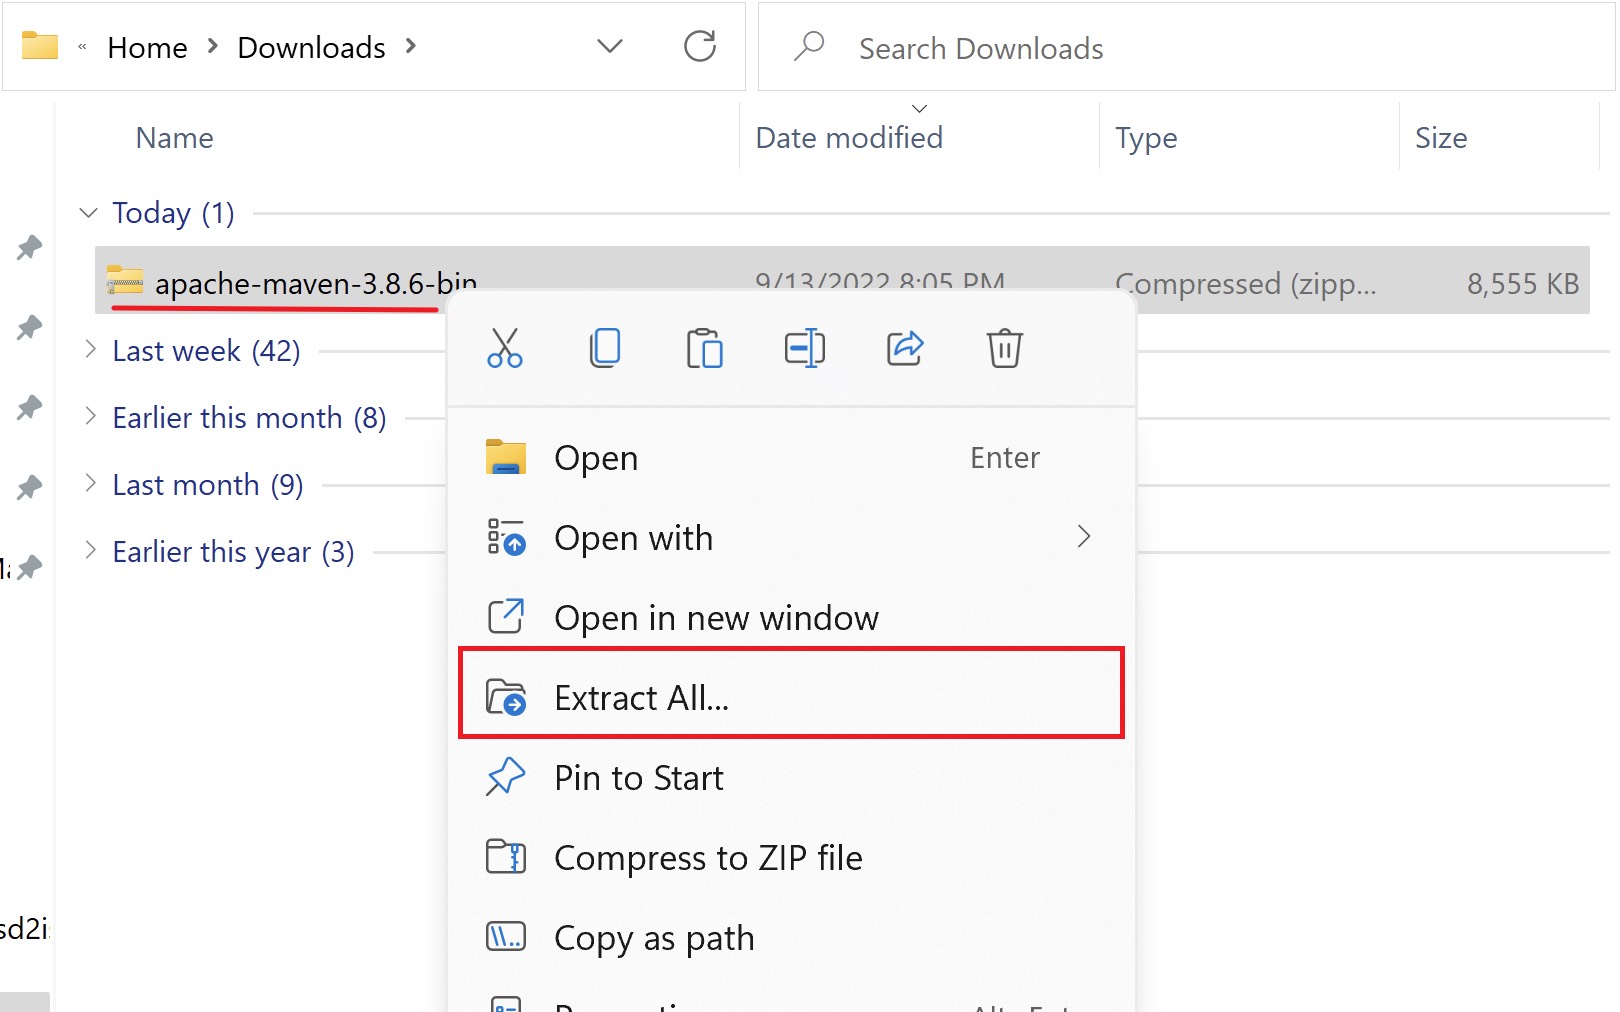
Найдите файл со скачанным архивом. Нажмите на него правой клавишей мыши
и выберите «Извлечь всё…» (Extract All…).
В предложенном окне установите путь, куда будет распакован архив. Вы можете распаковать в удобное для вас место. При этом в пути не должно быть пробелов, кириллицы или специальных символов.
В примере будем устанавливать в корень диска C:\, можете вписать или
выбрать через кнопку «Обзор…» (Browse…).
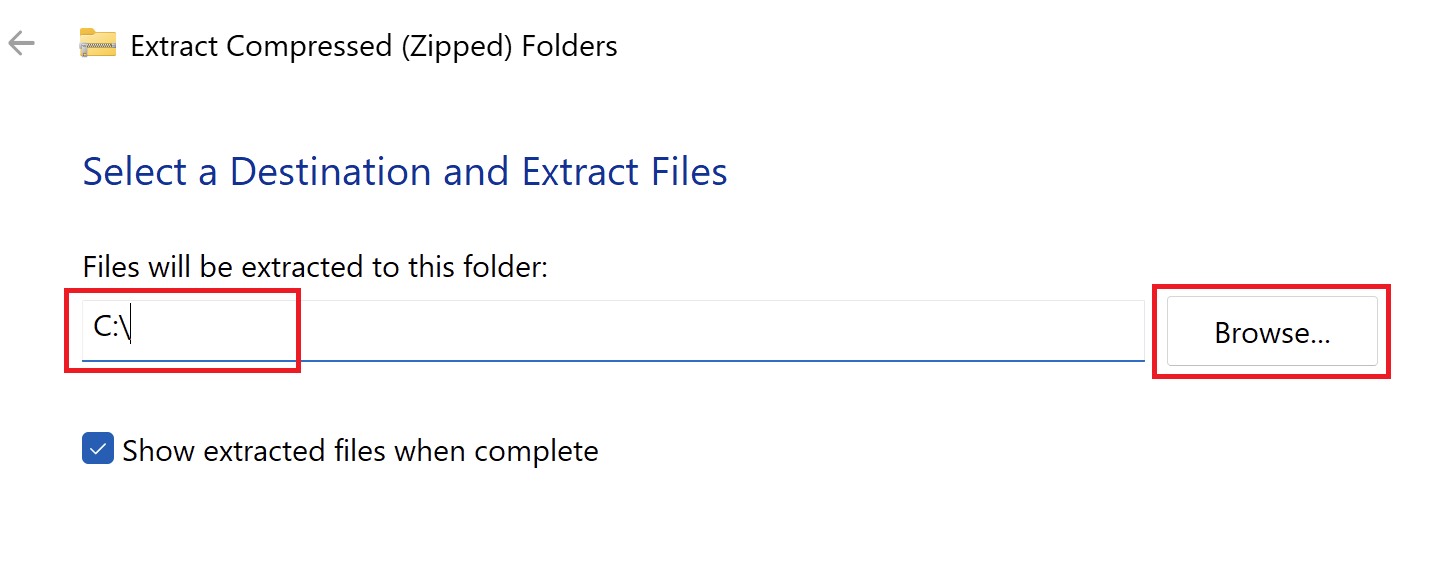
Нажмите кнопку «Распаковать» (Extract).
☑️ Проверка запуска
#
Содержимое архива представляет собой набор библиотек и исполняемых файлов.
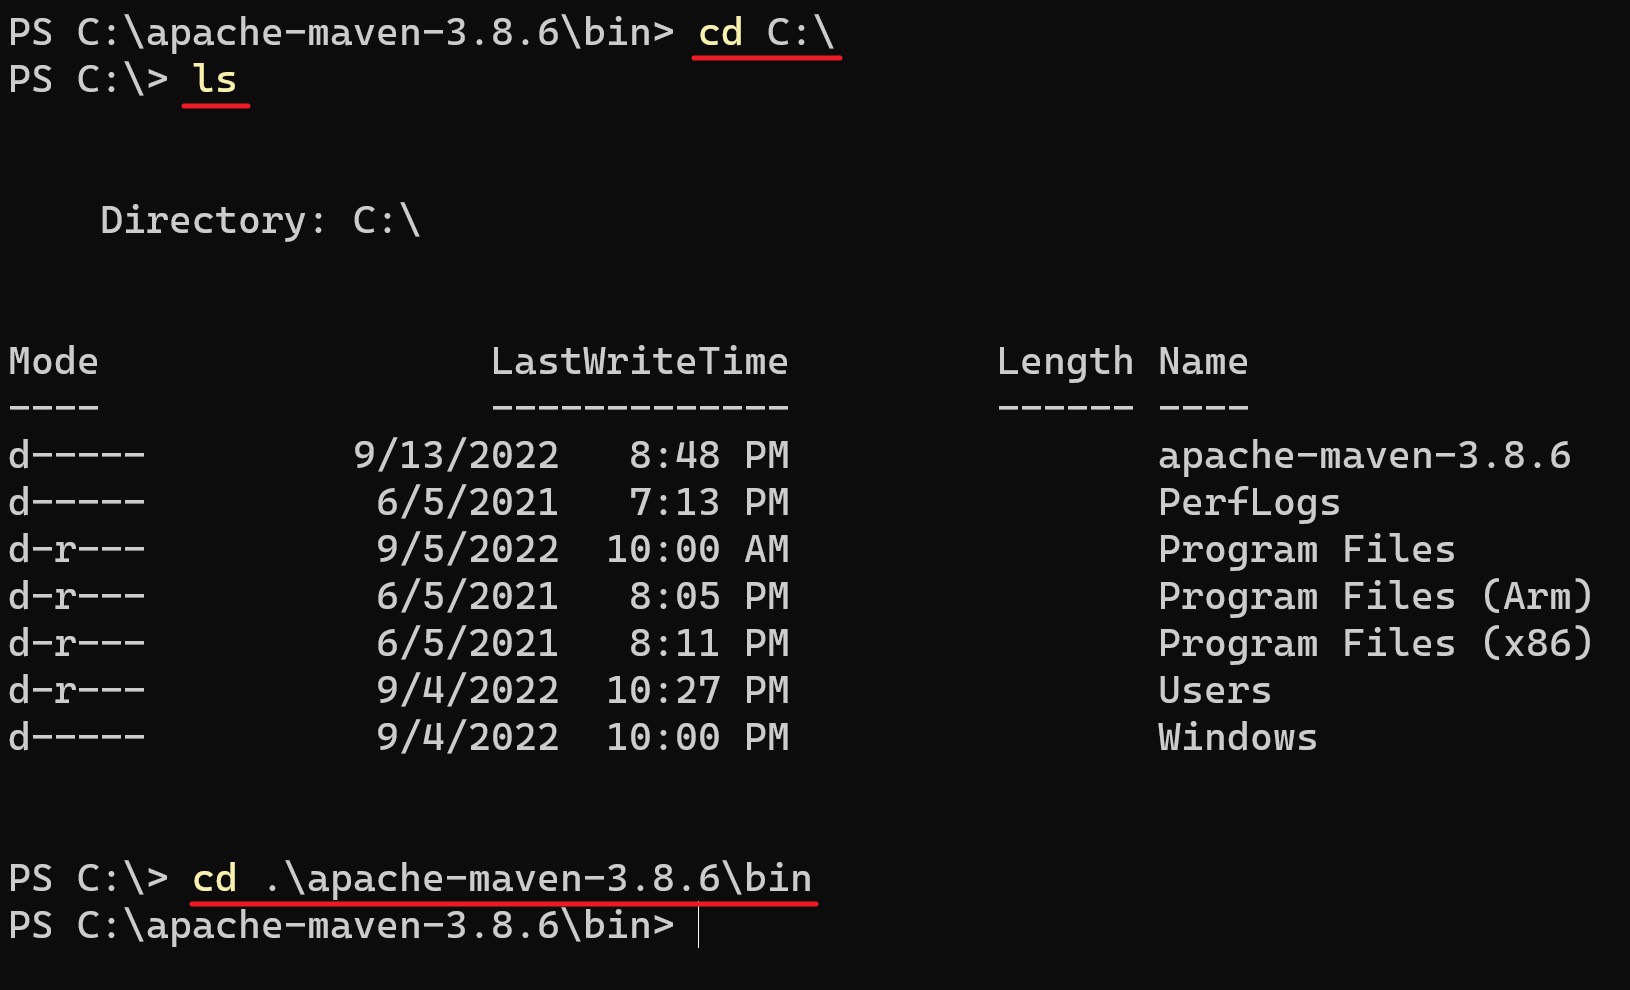
Мы можем попробовать его запустить. Для этого откройте командную строку
(Windows PowerShell) и перейдите в директорию, в которую распаковали архив.
Если распаковали в C:, то команда будет cd C:\
Далее посмотрите список файлов и найдите директорию apache-maven-3.x.x.
У вас версия может отличаться, так как Maven активно обновляется.
В примере это директория apache-maven-3.8.6.
Перейдите в директорию apache-maven-3.8.6 и далее в директорию bin. Это можно сделать одной командой:
cd C:\apache-maven-3.8.6\bin
Выполните команду ./mvn -version. Если переменная окружения JAVA_HOME ведёт на JDK, то вы увидите версию Maven:

Если у вас выводится версия, значит, Maven готов к работе. Если нет, то убедитесь, что находитесь в директории bin, там есть файл mvn и выполнены требования перед установкой.
🏗️ Настройка PATH
#
Конечно, на данном этапе уже можно пользоваться Maven,
но придётся постоянно писать полный путь до файла mvn, и это неудобно.
Для того чтобы команда работала в любой директории,
необходимо добавить папку C:\apache-maven-3.8.6\bin
в системную переменную PATH. Это важная переменная, в ней перечислены
директории, в которых Windows ищет исполняемые файлы,
когда мы набираем в консоли имя файла.
Чтобы посмотреть её содержание, выполните команду в PowerShell:
echo $env:PATH

В результате будет выведена строка с директориями, разделёнными точкой с запятой.
Как это работает?
Например, если мы в терминале наберём команду calc, откроется приложение
«Калькулятор». Так как операционная система прошлась по очереди по всем папкам
и нашла в одной из них приложение calc.exe, его и запустила.
Операционная система всегда запускает первый попавшийся подходящий
исполняемый файл, даже если их несколько в разных директориях.
Таким же образом директории проходятся по очереди записи в строке PATH.
Это значит, что нам надо добавить в этот список и папку с исполняемым файлом mvn.
Сделайте это из консоли. Только на всякий случай сохраните в текстовый файл
все директории, которые получили командой echo $env:PATH.
Если вы ошибётесь в команде и удалите данные, то сможете восстановить их
из файла. Чтобы сохранить сразу в файл, используйте команду
$env:PATH >> path.txt. Значение сохранится в папке, в которой вы находитесь.
Команда для добавления директории bin:
setx PATH "$env:PATH;C:\apache-maven-3.8.6\bin"
❗ Не ставьте в конце пути \ (обратный слеш), так как это будет экранировать кавычку, и кавычка станет частью строки.
Эта команда записывает в PATH cамо значение PATH и добавляет нашу строку. Важно на забыть поставить разделитель ; в начале нашего пути до bin.
По сути, мы склеиваем текущее значение с нашей директорией и записываем в эту же переменную.

После выполнения команды закройте все терминалы и откройте заново.
Проверьте, что сохранилось в PATH echo $env:PATH.
Если путь до Maven есть в списке — время проверить работу команды mvn.

Теперь вы можете запускать mvn в любой директории,
для этого вам не будет требоваться среда разработки.
🎉 Поздравляю с успешной установкой!
Learn the steps in the guide to download and how to install Apache Maven on Windows 10 or 111 using PowerShell or a Command prompt.
Maven is based on a model-based, declarative approach to realizing the build process. Instead of implementing the individual build goals. With the “Apache Maven” tool, the building management of software projects becomes significantly more efficient, secure, and transparent.
Especially when proceeding according to the continuous integration model, a software project requires a permanently stable version of the code. With the Maven build tool, you can automate the process of creating a stable build version.
The process follows a fixed cycle that you can adapt to your specifications, i.e. you do not have to fully integrate it. However, it is particularly advisable to include all components in distributed project teams. The process is configured using so-called POM files. These are XML files that define the process and dependencies.
In addition to tests, dependency resolution, and of course compiling, you can always monitor the current build status thanks to Maven. In this way, you and other developers always know the quality and completeness of the current version.
1. Open Powershell or Windows Terminal
As we are here going to use the pure command-line method to download and install Apache Maven, hence as per your Windows system run the command-line app under administrative rights.
To run the CLI app, simply right-click on the Windows Start Menu, and then on Windows 10, you will have PowerShell (Admin) to select whereas the Windows 11 user will get Windows Terminal (Admin), by default.

2. Install Chocolatey on Windows 10/11
Now, simply on your Windows terminal or Powershell, copy & paste the below-given command, and hit the enter key. This will install the Chocolatey package manager on your system.
Set-ExecutionPolicy Bypass -Scope Process -Force; [System.Net.ServicePointManager]::SecurityProtocol = [System.Net.ServicePointManager]::SecurityProtocol -bor 3072; iex ((New-Object System.Net.WebClient).DownloadString('https://community.chocolatey.org/install.ps1'))
Once the installation is completed, close the Powershell (Admin) or Terminal (Admin) and open it again.
3. Command to Install OpenJDK
As we know Apache Maven needs Java, as it is the only key system requirement to run this tool properly on your system. Hence, if you already have JAVA on your Windows system then you can skip this step. However, make sure the Java_Home path is in your system environment variable. If you don’t have JDK, then run the below-given command:
choco install openjdk

Once the process is completed, close the PowerShell (admin) or Windows terminal (admin) you are using and open it again so that it can recognize the Java path.
4. Download & Install Apache Maven on Windows 10/11
Now, run the final command that will automatically download and install the Apache Maven on your Windows system without any struggle. This will also recognize the installed Java and its environment variable.
choco install maven

5. Check the Maven version or command
First, after the installation, restart your Windows Terminal. Then to check whether the Maven has been installed on our system successfully or not and to know its version you can go for the following commands.
mvn --version
mvn --help

6. Create your first project
Well, those who are familiar with Maven would already know what to do for creating a project, whereas the new ones can check out the official Apache Maven website to know more to fiddle with it around. Nevertheless, just to give an idea of how to start with this tool, here are the commands:
Create a project
Paste the given commanding your terminal. You replace the group ID, artifact ID, and other values as per your choice.
mvn archetype:generate “-DgroupId=com.mycompany.app” “-DartifactId=my-app” “-DarchetypeArtifactId=maven-archetype-quickstart” “-DarchetypeVersion=1.4” “-DinteractiveMode=false”
Note: In Windows, we have to use every parameter inside quotes otherwise you will face the following errors:
[ERROR] The goal you specified requires a project to execute but there is no POM in this directory (C:\Users\h2s\raj). Please verify you invoked Maven from the correct directory. -> [Help 1]
[ERROR]
[ERROR] To see the full stack trace of the errors, re-run Maven with the -e switch.
[ERROR] Re-run Maven using the -X switch to enable full debug logging.
[ERROR]
[ERROR] For more information about the errors and possible solutions, please read the following articles:
[ERROR] [Help 1] http://cwiki.apache.org/confluence/display/MAVEN/MissingProjectException
Switch to your App directory: Here is my-app
cd my-app
For further information, please see the official documentation on the building of the Maven project.

Заметки
1 Minute
- По ссылке скачиваем актуальную версию bin-архива (Binary zip archive)
- Необходимо убедиться, что установлен актуальный jdk. Если его нет, то можно скачать jdk 12 по этой ссылке.
- JDK устанавливаем по предложенному пути C:\Program Files. Сам Maven разархивируем в любое удобное место.
- Открываем консоль и вбиваем в нее sysdm.cpl. В появившемся окне «Свойства системы» выберите «Переменные среды» (кнопка внизу).
- Убедитесь, что в разделе «Переменные среды пользователя для User» присутствует переменная JAVA_HOME. Если ее нет, то создайте, указав в значение переменной путь, где лежит JDK (например, C:\Program Files\Java\jdk-13).
- В разделе «Переменные среды пользователя для User» создайте переменную M2_HOME. В значение переменной укажите путь до места, куда был разархивирован Maven (например, E:\Maven\apache-maven-3.6.2).
- Следом создаем переменную M2 со значением %M2_HOME%\bin
- Убедитесь, что в разделе «Системные переменные» присутствует переменная JAVA_HOME. Если ее нет, то создайте ее (см. п. 5).
- Следом добавьте в переменную Path значения %M2_HOME%\bin и %JAVA_HOME%.
- Закройте и откройте заново консоль.
- Настройка завершена. Теперь в cmd выполните команду mvn -v. Если все предыдущие шаги были выполнены верно, то в результате выполнения команды, вы увидите следующее
C:\Users\User>mvn -v
Apache Maven 3.6.2 (40f52333136460af0dc0d7232c0dc0bcf0d9e117; 2019-08-27T18:06:16+03:00)
Maven home: E:\Maven\apache-maven-3.6.2\bin\..
Java version: 13, vendor: Oracle Corporation, runtime: C:\Program Files\Java\jdk-13
Default locale: ru_RU, platform encoding: Cp1251
OS name: «windows 10», version: «10.0», arch: «amd64», family: «windows»
Опубликовано