GCC is distributed via git and via
HTTPS as tarballs compressed with gzip or bzip2.
Please refer to the releases web page
for information on how to obtain GCC.
The source distribution includes the C, C++, Objective-C, Fortran,
and Ada (in the case of GCC 3.1 and later) compilers, as well as
runtime libraries for C++, Objective-C, and Fortran.
For previous versions these were downloadable as separate components such
as the core GCC distribution, which included the C language front end and
shared components, and language-specific distributions including the
language front end and the language runtime (where appropriate).
If you also intend to build binutils (either to upgrade an existing
installation or for use in place of the corresponding tools of your
OS), unpack the binutils distribution either in the same directory or
a separate one. In the latter case, add symbolic links to any
components of the binutils you intend to build alongside the compiler
(bfd, binutils, gas, gprof, ld,
opcodes, …) to the directory containing the GCC sources.
Likewise the GMP, MPFR and MPC libraries can be automatically built
together with GCC. You may simply run the
contrib/download_prerequisites script in the GCC source directory
to set up everything.
Otherwise unpack the GMP, MPFR and/or MPC source
distributions in the directory containing the GCC sources and rename
their directories to gmp, mpfr and mpc,
respectively (or use symbolic links with the same name).
Return to the GCC Installation page
Download
GCC releases may be downloaded from our
mirror sites.
Important: these are source releases, so will be of little
use if you do not already have a C++ compiler installed.
As one option, there are
pre-compiled
binaries. for various platforms.
You can also retrieve our sources using Git.
GCC Timeline
The table is sorted by date. Please refer to our
development plan for future
releases and an alternative view of the release history.
| Release | Release date |
|---|---|
| GCC 13.2 | July 27, 2023 |
| GCC 10.5 | July 7, 2023 |
| GCC 11.4 | May 29, 2023 |
| GCC 12.3 | May 8, 2023 |
| GCC 13.1 | April 26, 2023 |
| GCC 12.2 | August 19, 2022 |
| GCC 10.4 | June 28, 2022 |
| GCC 9.5 | May 27, 2022 |
| GCC 12.1 | May 6, 2022 |
| GCC 11.3 | April 21, 2022 |
| GCC 11.2 | July 28, 2021 |
| GCC 9.4 | June 1, 2021 |
| GCC 8.5 | May 14, 2021 |
| GCC 11.1 | April 27, 2021 |
| GCC 10.3 | April 8, 2021 |
| GCC 10.2 | July 23, 2020 |
| GCC 10.1 | May 7, 2020 |
| GCC 9.3 | March 12, 2020 |
| GCC 8.4 | March 4, 2020 |
| GCC 7.5 | November 14, 2019 |
| GCC 9.2 | August 12, 2019 |
| GCC 9.1 | May 3, 2019 |
| GCC 8.3 | February 22, 2019 |
| GCC 7.4 | December 6, 2018 |
| GCC 6.5 | October 26, 2018 |
| GCC 8.2 | July 26, 2018 |
| GCC 8.1 | May 2, 2018 |
| GCC 7.3 | January 25, 2018 |
| GCC 5.5 | October 10, 2017 |
| GCC 7.2 | August 14, 2017 |
| GCC 6.4 | July 4, 2017 |
| GCC 7.1 | May 2, 2017 |
| GCC 6.3 | December 21, 2016 |
| GCC 6.2 | August 22, 2016 |
| GCC 4.9.4 | August 3, 2016 |
| GCC 5.4 | June 3, 2016 |
| GCC 6.1 | April 27, 2016 |
| GCC 5.3 | December 4, 2015 |
| GCC 5.2 | July 16, 2015 |
| GCC 4.9.3 | June 26, 2015 |
| GCC 4.8.5 | June 23, 2015 |
| GCC 5.1 | April 22, 2015 |
| GCC 4.8.4 | December 19, 2014 |
| GCC 4.9.2 | October 30, 2014 |
| GCC 4.9.1 | July 16, 2014 |
| GCC 4.7.4 | June 12, 2014 |
| GCC 4.8.3 | May 22, 2014 |
| GCC 4.9.0 | April 22, 2014 |
| GCC 4.8.2 | October 16, 2013 |
| GCC 4.8.1 | May 31, 2013 |
| GCC 4.6.4 | April 12, 2013 |
| GCC 4.7.3 | April 11, 2013 |
| GCC 4.8.0 | March 22, 2013 |
| GCC 4.7.2 | September 20, 2012 |
| GCC 4.5.4 | July 2, 2012 |
| GCC 4.7.1 | June 14, 2012 |
| GCC 4.7.0 | March 22, 2012 |
| GCC 4.4.7 | March 13, 2012 |
| GCC 4.6.3 | March 1, 2012 |
| GCC 4.6.2 | October 26, 2011 |
| GCC 4.6.1 | June 27, 2011 |
| GCC 4.3.6 | June 27, 2011 |
| GCC 4.5.3 | April 28, 2011 |
| GCC 4.4.6 | April 16, 2011 |
| GCC 4.6.0 | March 25, 2011 |
| GCC 4.5.2 | December 16, 2010 |
| GCC 4.4.5 | October 1, 2010 |
| GCC 4.5.1 | July 31, 2010 |
| GCC 4.3.5 | May 22, 2010 |
| GCC 4.4.4 | April 29, 2010 |
| GCC 4.5.0 | April 14, 2010 |
| GCC 4.4.3 | January 21, 2010 |
| GCC 4.4.2 | October 15, 2009 |
| GCC 4.3.4 | August 4, 2009 |
| GCC 4.4.1 | July 22, 2009 |
| GCC 4.4.0 | April 21, 2009 |
| GCC 4.3.3 | January 24, 2009 |
| GCC 4.3.2 | August 27, 2008 |
| GCC 4.3.1 | June 6, 2008 |
| GCC 4.2.4 | May 19, 2008 |
| GCC 4.3.0 | March 5, 2008 |
| GCC 4.2.3 | February 1, 2008 |
| GCC 4.2.2 | October 7, 2007 |
| GCC 4.2.1 | July 18, 2007 |
| GCC 4.2.0 | May 13, 2007 |
| GCC 4.1.2 | February 13, 2007 |
| GCC 4.0.4 | January 31, 2007 |
| GCC 4.1.1 | May 24, 2006 |
| GCC 4.0.3 | March 10, 2006 |
| GCC 3.4.6 | March 06, 2006 |
| GCC 4.1.0 | February 28, 2006 |
| GCC 3.4.5 | November 30, 2005 |
| GCC 4.0.2 | September 28, 2005 |
| GCC 4.0.1 | July 7, 2005 |
| GCC 3.4.4 | May 18, 2005 |
| GCC 3.3.6 | May 3, 2005 |
| GCC 4.0.0 | April 20, 2005 |
| GCC 3.4.3 | November 4, 2004 |
| GCC 3.3.5 | September 30, 2004 |
| GCC 3.4.2 | September 6, 2004 |
| GCC 3.4.1 | July 1, 2004 |
| GCC 3.3.4 | May 31, 2004 |
| GCC 3.4.0 | April 18, 2004 |
| GCC 3.3.3 | February 14, 2004 |
| GCC 3.3.2 | October 17, 2003 |
| GCC 3.3.1 | August 8, 2003 |
| GCC 3.3 | May 13, 2003 |
| GCC 3.2.3 | April 22, 2003 |
| GCC 3.2.2 | February 05, 2003 |
| GCC 3.2.1 | November 19, 2002 |
| GCC 3.2 | August 14, 2002 |
| GCC 3.1.1 | July 25, 2002 |
| GCC 3.1 | May 15, 2002 |
| GCC 3.0.4 | February 20, 2002 |
| GCC 3.0.3 | December 20, 2001 |
| GCC 3.0.2 | October 25, 2001 |
| GCC 3.0.1 | August 20, 2001 |
| GCC 3.0 | June 18, 2001 |
| GCC 2.95.3 | March 16, 2001 |
| GCC 2.95.2 | October 24, 1999 |
| GCC 2.95.1 | August 19, 1999 |
| GCC 2.95 | July 31, 1999 |
| EGCS 1.1.2 | March 15, 1999 |
| EGCS 1.1.1 | December 1, 1998 |
| EGCS 1.1 | September 3, 1998 |
| EGCS 1.0.3 | May 15, 1998 |
| EGCS 1.0.2 | March 16, 1998 |
| gcc 2.8.1 | March 2, 1998 |
| gcc 2.8.0 | January 7, 1998 |
| EGCS 1.0.1 | January 6, 1998 |
| EGCS 1.0 | December 3, 1997 |
| 2.7.2.3 | August 22, 1997 |
| 2.7.2.2 | January 29, 1997 |
| 2.7.2.1 | June 29, 1996 |
| 2.7.2 | November 26, 1995 |
| 2.7.1 | November 12, 1995 |
| 2.7.0 | June 16, 1995 |
| 2.6.3 | November 30, 1994 |
| 2.6.2 | November 12, 1994 |
| 2.6.1 | November 1, 1994 |
| 2.6.0 | July 14, 1994 |
| 2.5.8 | January 24, 1994 |
| 2.5.7 | December 12, 1993 |
| 2.5.6 | December 3, 1993 |
| 2.5.5 | November 27, 1993 |
| 2.5.4 | November 16, 1993 |
| 2.5.3 | November 11, 1993 |
| 2.5.2 | November 1, 1993 |
| 2.5.1 | October 31, 1993 |
| 2.5.0 | October 22, 1993 |
| 2.4.5 | June 20, 1993 |
| 2.4.4 | June 19, 1993 |
| 2.4.3 | June 1, 1993 |
| 2.4.2 | May 31, 1993 |
| 2.4.1 | May 26, 1993 |
| 2.4.0 | May 17, 1993 |
| 2.3.3 | December 26, 1992 |
| 2.3.2 | November 27, 1992 |
| 2.3.1 | November 1, 1992 |
| 2.3 | October 31, 1992 |
| 2.2.2 | June 14, 1992 |
| 2.2.1 | June 9, 1992 |
| 2.2 | June 8, 1992 |
| 2.1 | March 24, 1992 |
| 2.0 | February 22, 1992 |
| 1.42.0 (g++) | September 20, 1992 |
| 1.42 | September 20, 1992 |
| 1.41 | August 27, 1992 |
| 1.41.0 (g++) | July 13, 1992 |
| 1.40.3 (g++) | October 19, 1991 |
| 1.40 | June 1, 1991 |
| 1.39.1 (g++) | May 4, 1991 |
| 1.39 | January 16, 1991 |
| 1.38 | December 21, 1990 |
| 1.37.1 (g++) | March 1, 1990 |
| 1.37.0 (g++) | February 28, 1990 |
| 1.37.1 | February 21, 1990 |
| 1.37 | February 11, 1990 |
| 1.36.4 (g++) | January 30, 1990 |
| 1.36.3 (g++) | January 16, 1990 |
| 1.36 | September 24, 1989 |
| 1.35 | April 26, 1989 |
| 1.34 | February 23, 1989 |
| 1.33 | February 1, 1989 |
| 1.32 | December 21, 1988 |
| 1.31 | November 19, 1988 |
| 1.30 | October 13, 1988 |
| 1.29 | October 6, 1988 |
| 1.28 | September 14, 1988 |
| 1.27 | September 5, 1988 |
| 1.26 | August 18, 1988 |
| 1.25 | August 3, 1988 |
| 1.24 | July 2, 1988 |
| 1.23 | June 26, 1988 |
| 1.22 | May 22, 1988 |
| 1.21 | May 1, 1988 |
| 1.20 | April 19, 1988 |
| 1.19 | March 29, 1988 |
| 1.18 | February 4, 1988 |
| 1.17 | January 9, 1988 |
| 1.16 | December 19, 1987 |
| 1.15.3 (g++) | December 18, 1987 |
| 1.15 | November 28, 1987 |
| 1.14 | November 6, 1987 |
| 1.13 | October 12, 1987 |
| 1.12 | October 3, 1987 |
| 1.11 | September 5, 1987 (announced late) |
| 1.10 | August 22, 1987 |
| 1.9 | August 18, 1987 (never announced) |
| 1.8 | August 10, 1987 |
| 1.7 | July 21, 1987 |
| 1.6 | July 2, 1987 |
| 1.5 | June 18, 1987 |
| 1.4 | June 13, 1987 |
| 1.3 | June 10, 1987 |
| 1.2 | June 1, 1987 |
| 1.1 | May 24, 1987 |
| 1.0 | May 23, 1987 |
| 0.9 (first beta release) | March 22, 1987 |
Для того, чтобы писать программы на C/C++ обычно достаточно установить какую-нибудь интерактивную среду разработки (IDE), например, Visual Studio или Eclipse, однако иногда (обычно в целях обучения студентов) требуется создавать программы в обыкновенном текстовом редакторе и компилировать приложение, используя консоль и компилятор gcc. В Unix системах он обычно установлен прямо «из коробки», а вот на Windows системах такой роскоши не наблюдается. Более того, у многих пользователей возникает множество проблем при установке компилятора. Поэтому нами было принято решение написать данную статью, чтобы помочь всем тем, кому пришлось или приходится мучаться с установкой этого компилятора на Windows.
Кстати, если вдруг на вашей Unix системе не установлен GCC, то поставить его можно командой sudo apt install gcc, введя свой пароль и согласившись на установку.
0. Прежде чем поставить компилятор GCC
Перед тем как приступить к установке этого компилятора на ваш компьютер, убедитесь в том, что GCC ещё не установлен на нём. Для этого откройте консоль (нажмите Win + R, введите в появившемся окне cmd и нажмите клавишу Enter) и введите следующую команду: gcc --version и нажмите Enter. Если компилятор уже установлен, то выполненная команда выдаст примерно следующую информацию:
gcc (GCC) 8.1.0
Copyright (C) 2018 Free Software Foundation, Inc.
This is free software; see the source for copying conditions.  There is NO
warranty; not even for MERCHANTABILITY or FITNESS FOR A PARTICULAR PURPOSE.
Если в окне консоли появилось сообщение с версией компилятора и другая информация о GCC (второй скриншот), значит компилятор уже установлен и больше дополнительно ничего делать не нужно. А вот если вывод командной строки такой:
"gcc" не является внутренней или внешней
командой, исполняемой программой или пакетным файлом
— значит GCC ещё не установлен в системе, поэтому двигаемся дальше.

Появившееся окно консоли
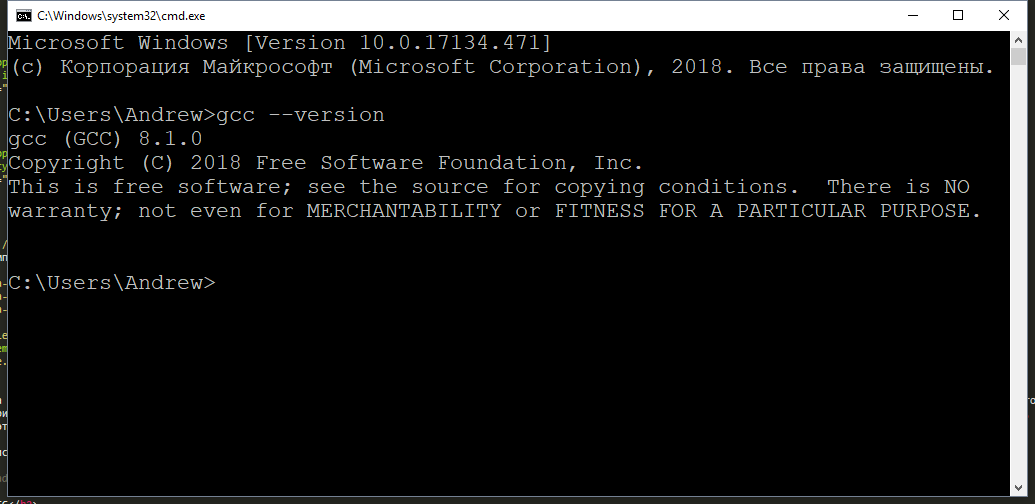
GCC уже установлен
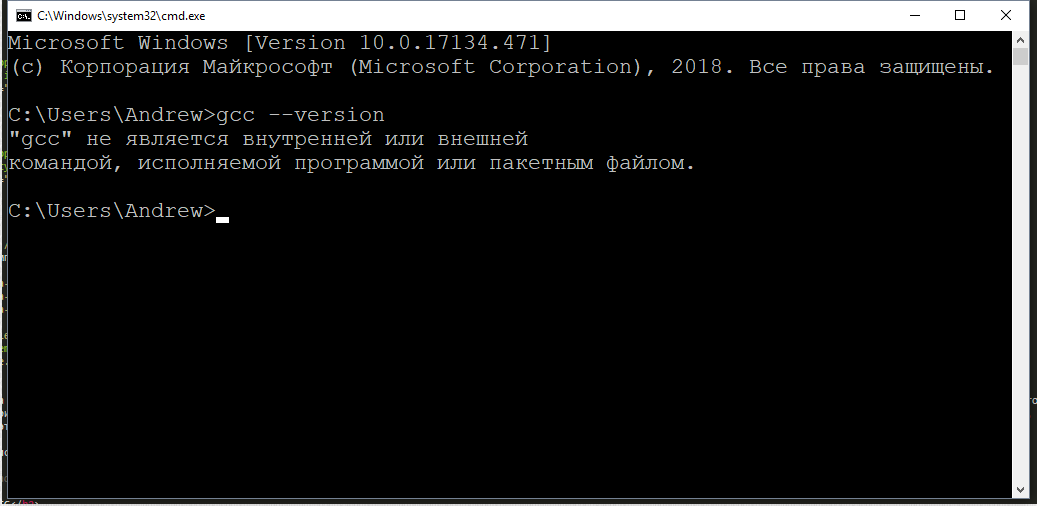
GCC не установлен
1. Скачиваем установщик компилятора
Чтобы поставить GCC на операционную систему Windows, необходимо скачать установочный файл для него. Сделать это можно здесь: equation.com/servlet/equation.cmd?fa=fortran. Найдите в таблице версию компилятора, которая вам больше нравится (мы рекомендуем скачивать самую последнюю, на текущий момент — это версия 8.2.0) и скачайте установщик для вашей системы (32 или 64 бит).
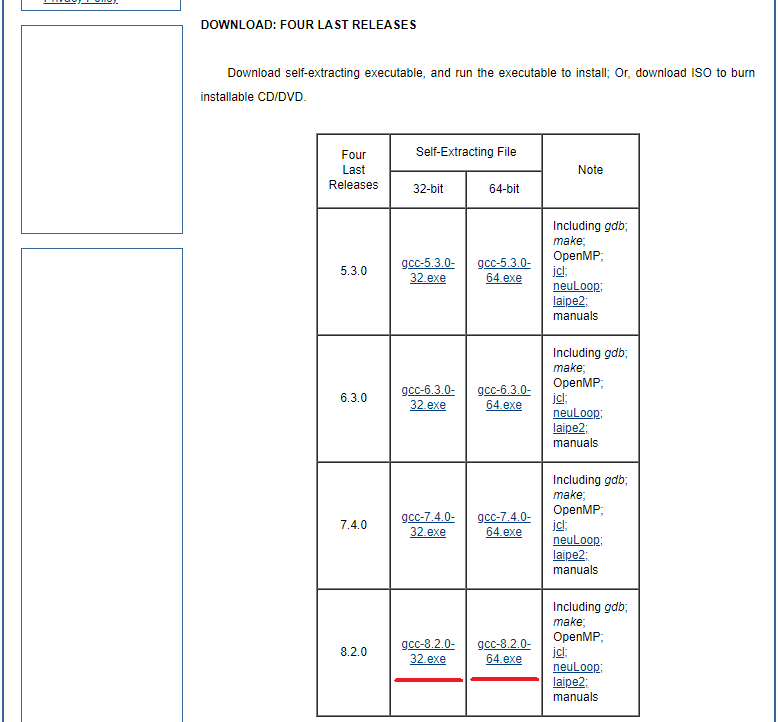
Выбор установочного файла
2. Установка GCC
После того, как файл был скачан, откройте в проводнике папку, в которую был скачан установщик и запустите его, кликнув по файлу дважды левой кнопкой мыши. Появится окно, требующее подтверждения действия. В нём нужно выбрать да (иначе ничего ставиться не будет).
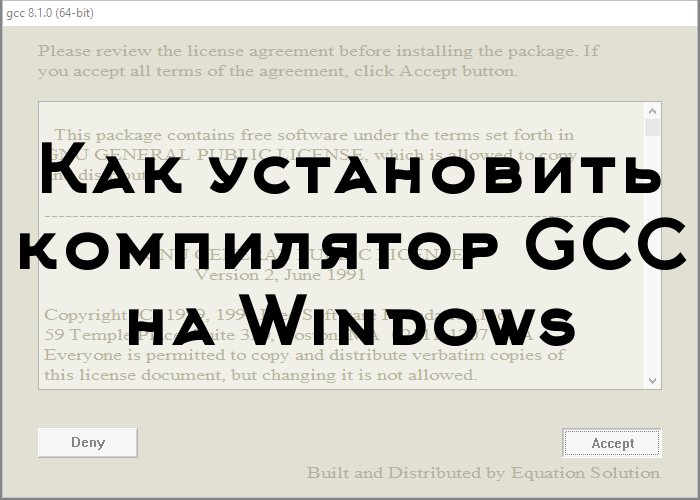
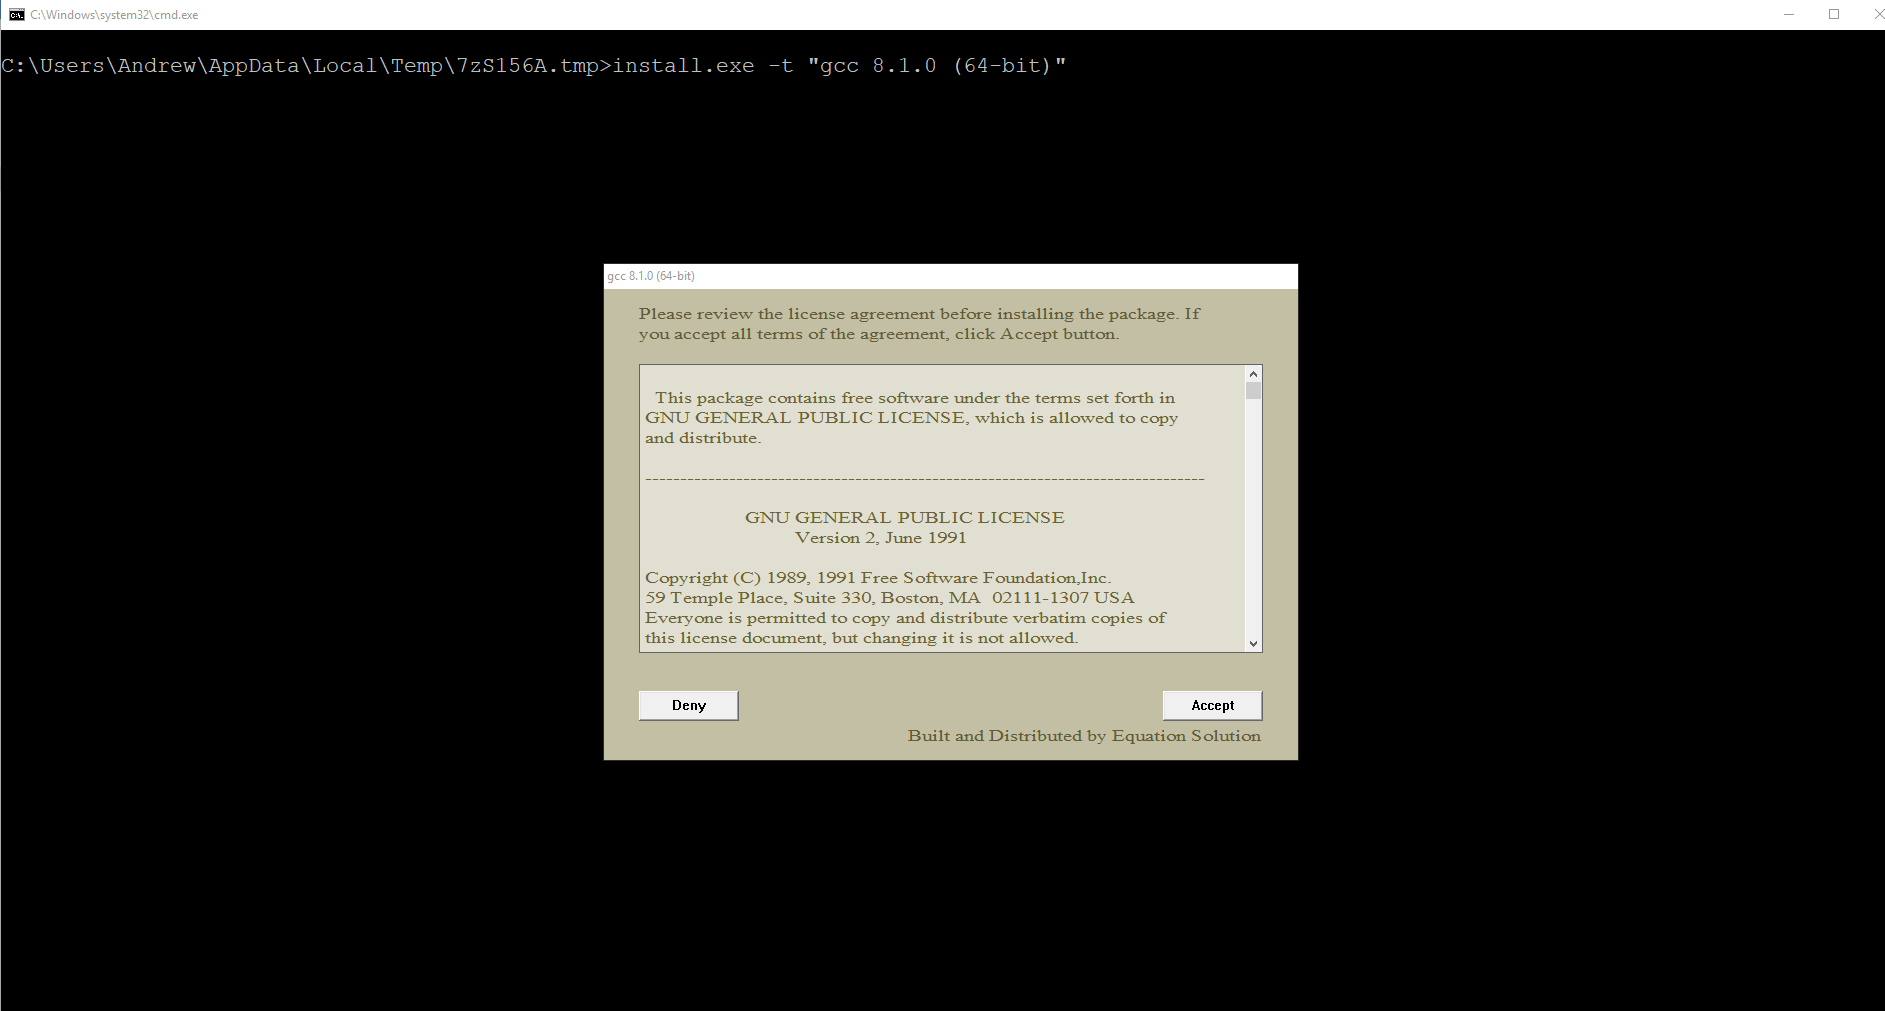
Установщик начнёт работу и отобразит окно с консолью, а также окно с бежевым фоном, в котором попросит прочесть и принять (или отклонить) лицензионное соглашение. Нажимаем Accept.
Открывшееся окно с установщиком
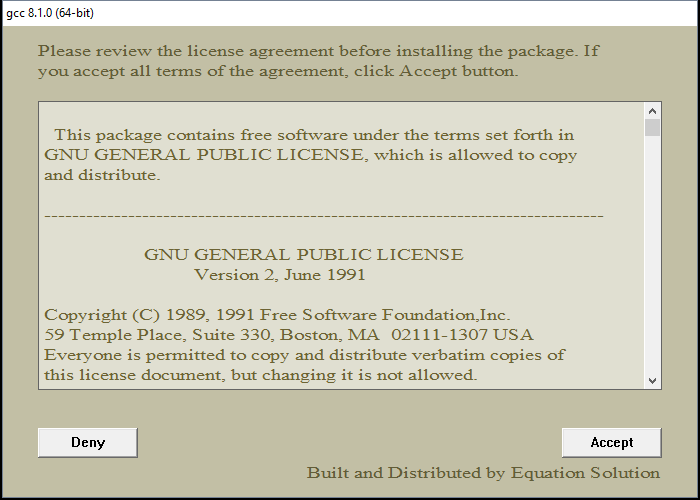
Принимаем лицензионное соглашение
После этого установщик попросит выбрать путь для установки, предложив по умолчанию путь C:\mingw. Если вам категорически не нравится этот путь — измените его на более подходящий на ваш взгляд, в противном же случае просто нажмите Install.
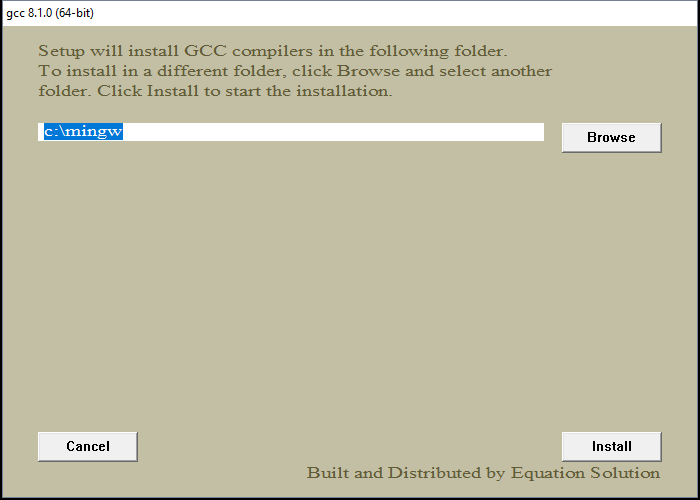
Выбор папки для установки
Теперь остаётся только дождаться окончания распаковки архивов и установки их на компьютер. Как только все файлы будут установлены, инсталятор сообщит об этом, после чего нужно будет нажать на кнопку Finish.
Распаковка файлов и установка
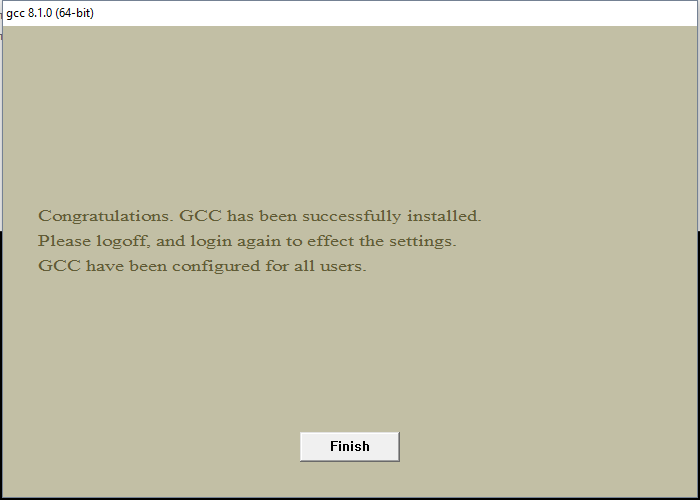
Окончание установки
3. Проверка установки
По завершении работы установщика перезагрузите компьютер и вновь откройте окно командной строки, введите команду gcc --version и нажмите Enter. На этот раз ответ от этой команды должен будет совпадать со вторым скриншотом из пункта 0. Если это не так, то скорее всего работа установщика была некорректно или преждевременно завершена, так что просто начните установку заново.
GCC установлен
Поздравляем! Теперь на вашем компьютере установлен компилятор GCC и вы можете писать программы на языках C и C++, а компилировать их через командную строку!
4. Бонус. Компиляция программ с помощью GCC
Теперь, когда у вас установлен компилятор GCC, вы можете создавать программы на C/C++, используя только текстовый редактор и консоль. Для этого создайте новый файл и назовите его как угодно (например, hello_world). Задайте ему расширение .c вместо .txt. Напишите (или скопируйте) текст программы на С в этот файл. Откройте командную строку (Win + R, cmd) и введите следующую команду gcc hello_world.c и нажмите Enter. Если код не содержит ошибок, то результатом команды будет пустота. В противном же случае вы увидите все ошибки, который нашёл компилятор в программе с указанием места этой ошибки. При этом в проводнике появится файл a.out.exe, который будет являться исполняемым файлом для написанной программы. Чтобы запустить его введите в консоли a.out (для Unix-систем нужно писать ./a.out) и нажмите Enter.
Что ещё за a.out? Непонятно!
По умолчанию при компиляции программ GCC в качестве результата создаём исполняемый файл с именем a.out (если такой уже есть, то b.out и т.д.). Это может быть не очень удобно, если у вас в папке лежит сразу много программ, которые нужно скомпилировать и затем запустить. Неудобно хотя бы тем, что разобраться, что такое a.out, а что такое b.out и c.out может быть непросто. Именно поэтому мы рекомендуем компилировать программы с явным указанием имени выходного файла. делается это так: gcc имя_файла.c -o имя_программы.
В результате выполнения такой программы вместо a.out будет создаваться файл с именем, заданным в имя_программы. Например, если для файла hello_world.c мы хотим получить программу hello, то компилировать нужно такой командой: gcc hello_world.c -o hello.
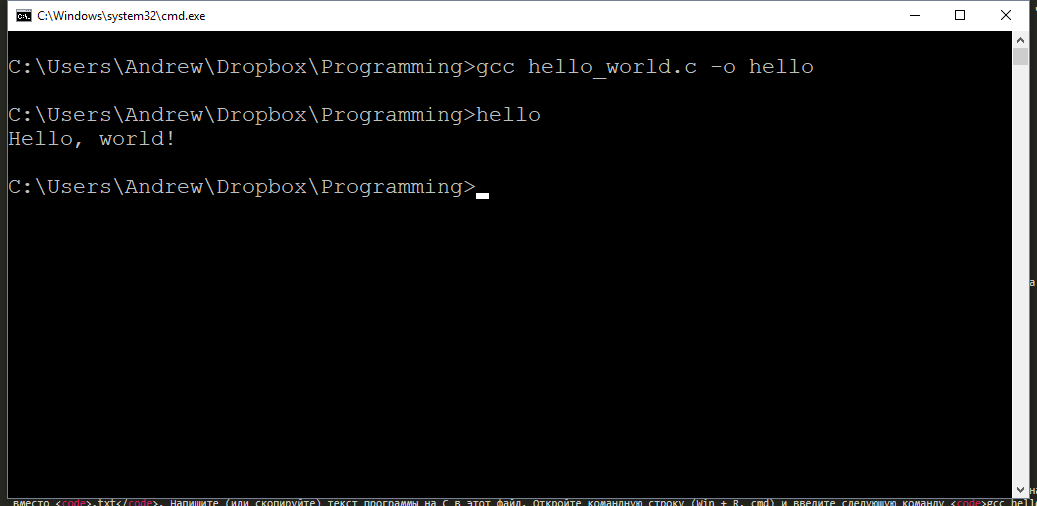
Результат компиляции и запуска программы
Используя понятные имена выходных программ (исполняемых файлов), вы гарантируете себе простоту работы и сокращение времени на разбирательство спустя долгое время.
Возможно, также будет интересно: как установить Sublime Text для работы с C/C++.

Программист, сооснователь programforyou.ru, в постоянном поиске новых задач и алгоритмов
Языки программирования: Python, C, C++, Pascal, C#, Javascript
Выпускник МГУ им. М.В. Ломоносова

x64 C/C++ compiler for Windows using:
— gmp
— mpfr
— mpc
— isl
— cloog
— mingw-w64
— gcc
— seh
You need at least core2 command set support to run this application.
License
GNU General Public License version 3.0 (GPLv3), GNU Library or Lesser General Public License version 3.0 (LGPLv3)
We created ARMATURE Fabric™ to make it easier for organizations to manage and monitor the impact of their governance, risk, and compliance programs. For some customers this means streamlining their data collection methods and processes. For others, it means moving them from paper, email, and spreadsheets, to an automated system. In some cases, it helps customers reduce the number of software applications they are using to conduct their risk and compliance activities.
User Ratings
2.3
out of 5 stars
★★★★★
★★★★
★★★
★★
★
ease
1 of 5
2 of 5
3 of 5
4 of 5
5 of 5
1 / 5
features
1 of 5
2 of 5
3 of 5
4 of 5
5 of 5
1 / 5
design
1 of 5
2 of 5
3 of 5
4 of 5
5 of 5
1 / 5
support
1 of 5
2 of 5
3 of 5
4 of 5
5 of 5
1 / 5
User Reviews
- All
- ★★★★★
- ★★★★
- ★★★
- ★★
- ★
-
We use Windows because it’s not Linux (where you have to compile and build programs to make them work).
This product is NOT ready to run on Windows. I’m getting a message:
g++: fatal error: cannot execute ‘cc1plus’: CreateProcess: No such file or directory compilation terminated. -
I have just installed GCC 10.2 compiler in my windows 10.
I can Compile but, I can’t able to Run C++ code.
when I try to open application file( .exe) file of c++ code i get error(0xc000007b).
Please Help
Read more reviews >
In this tutorial, we will learn how to install GCC in Windows 10, Mac, and Linux.
We will use an open-source Integrated Development environment named Code::Blocks which bundles a compiler (named gcc offered by Free Software Foundation GNU), editor and debugger in a neat package.
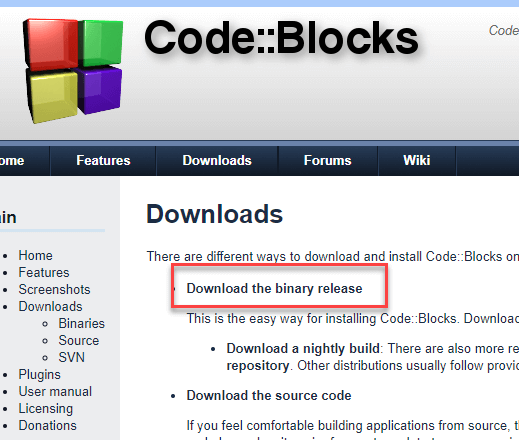
Step 1) Download Binary release
Go to http://www.codeblocks.org/downloads and click Binary Release.
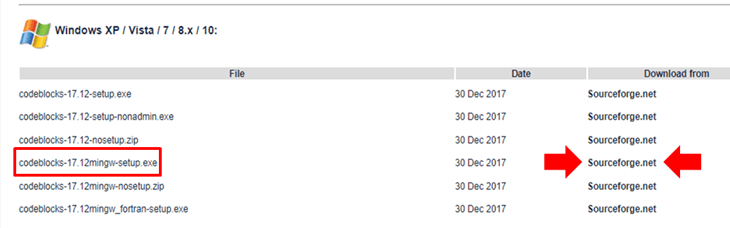
Step 2) Select the installer with GCC for Windows compiler
Choose the installer with GCC Compiler, e.g., codeblocks-17.12mingw-setup.exe which includes MinGW’s GNU GCC compiler download and GNU GDB debugger with Code::Blocks source files.
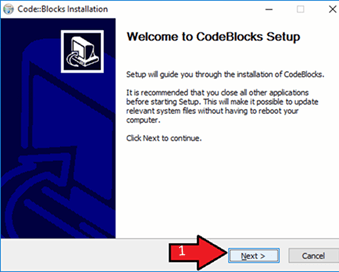
Step 3) Start installation
Run the downloaded installer and accept the default options to install GCC Windows file.
Step 4) Accept the terms and conditions
Accept the Agreement

Step 5) Keep default component selection
Keep the component selection default and click Next.

Step 6) Locate the installation path
You may change the installation folder and click Next.

Step 7) Find and double-click on the CodeBlocks icon
To launch Code::Blocks double click on the icon.
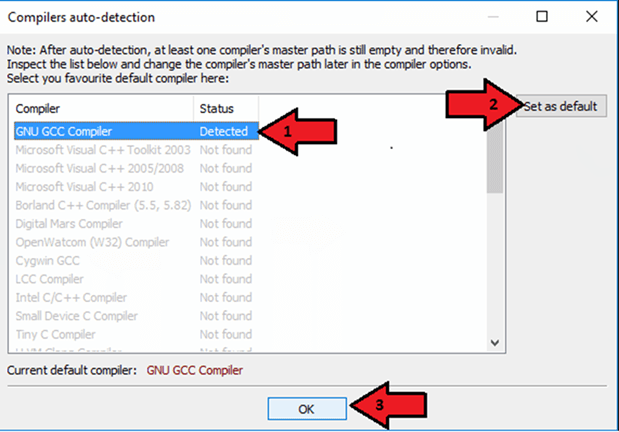
Step  Let it detect the compiler itself
It will detect the GCC compiler for Windows automatically, set it as default.
Associate C/C++ files with code::blocks
Step 9) Open the IDE and start using
You will see the IDE Home screen.

Install GCC Linux
Linux operating systems mostly comes with GCC preinstalled. To verify if the compiler is installed on the machine, run the following command in the terminal:
gcc --version
After executing this command if the gcc is installed on the machine then it will return the information about the compiler otherwise it will ask you to install the compiler.
To set up the ‘C’ environment on Linux distributions follow the given steps:
1. Open terminal.
2. For red-hat, Fedora users, type and execute this command
# yum groupinstall 'Development Tools'
3. For Debian and Ubuntu users, type and execute following command
$ sudo apt-get update
$ sudo apt-get install build-essential manpages-dev
4. To verify that the GCC has been successfully installed on the machine as we discussed earlier, execute the following command
gcc --version
Install GCC on Mac
To set up a ‘C’ programming environment on MAC operating system, follow the given steps:
1. Visit the given link https://developer.apple.com/downloads/index.action and download. You will need an Apple developer ID
“Command Line Tools for X-Code,” pick any version (latest version is always recommended) and download the .dmg file.
2. After the file is being downloaded on the machine, double click and follow the wizard and install the file. Always keep the default settings as suggested by the installation wizard.
3. After the installation process, open a terminal and run gcc -v command to check if everything is successfully installed.
Conclusion
‘C‘ program can be written and executed on any machine that has a suitable environment to run the program. Its recommended using an IDE or C compiler for Windows to run C programs. An IDE includes a compiler, editor and debugger. Clanfg, MinGW compiler (Minimalist GNU compiler collection for Windows), Portable ‘C’ compiler, Turbo C are popular compilers available.