Windows 10 сочетает в себе лучшее от предыдущих операционных систем компании Microsoft и объединяет их в единую окончательную версию. Если вы бесплатно обновились и изменили свое мнение после этого в течение нескольких дней, вы будете рады узнать, что обновления можно легко отменить. Я в свою очередь, покажу вам как откатить Windows 10 до Windows 7 или 8.1.
Не волнуйтесь, если вы не учли этого перед обновлением. Microsoft предоставил возможность без труда вернуться к предыдущей версии операционной системы в течение ограниченного периода. Тем не менее, существуют и другие методы отката к прежней ОС, так что если вам действительно не понравится Windows 10, вы всегда можете удалить его и восстановить Windows 8.1 или 7.
Встроенная опция отката
После обновления системы до Windows 10, старые системные файлы будут храниться в папке под названием Windows.old, которую можно удалить, чтобы освободить место. Но ее наличие обеспечит возможность легко вернуться к прежней версии.
Windows 10 имеет встроенную функцию, которая позволяет вернуться к старой операционной системе. Нюанс заключается в том, что этот параметр доступен только в течение одного месяца после того, как вы обновились. Если это время прошло, попробуйте другие методы, описанные ниже.

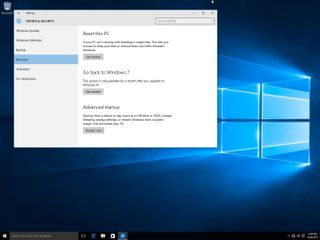
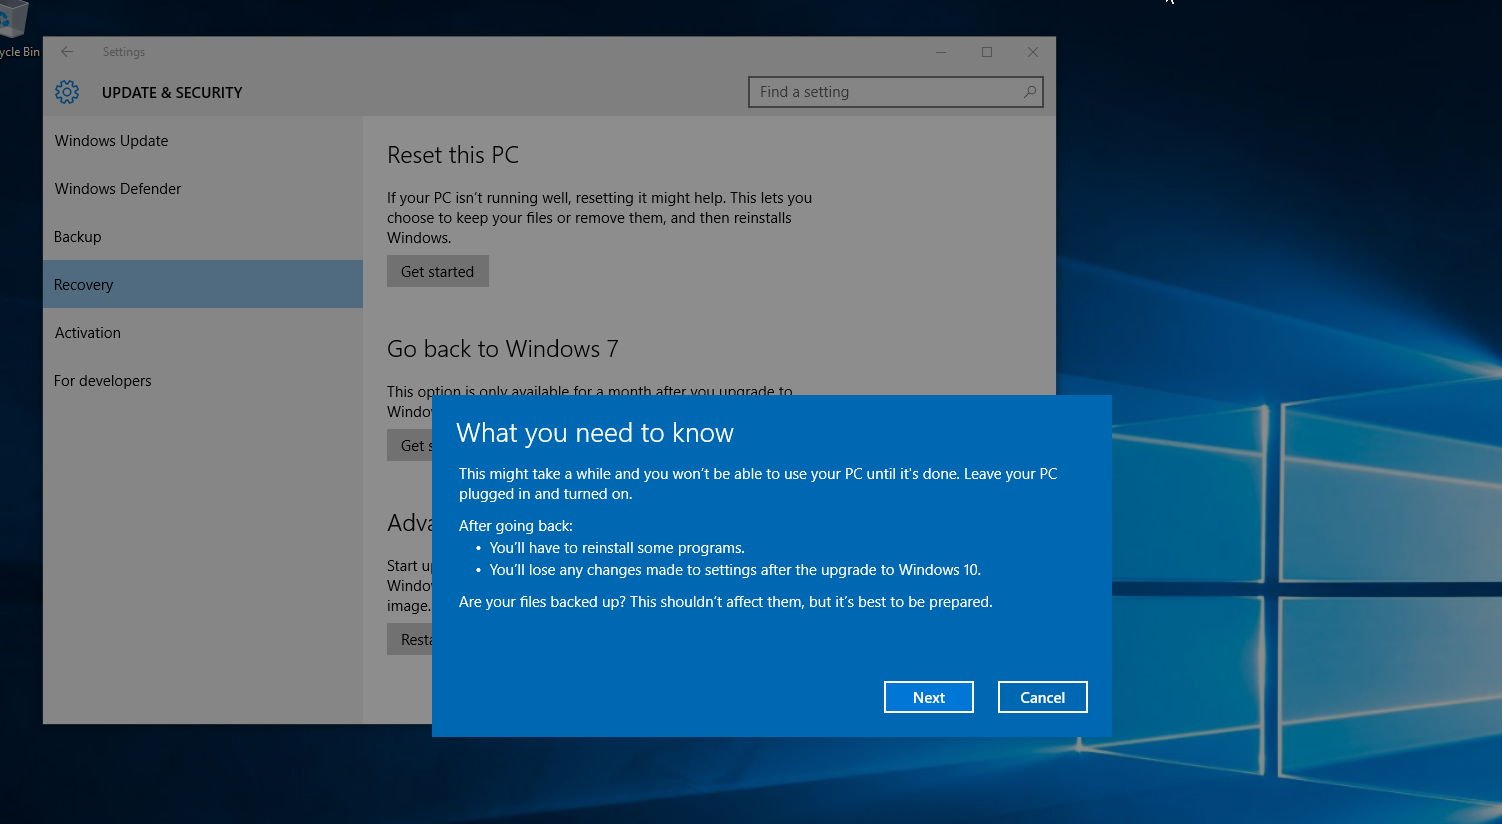
Чтобы начать процесс, нажмите сочетание клавиш Windows + I, чтобы вызвать экран настроек. Нажмите кнопку «Обновление и безопасность», а затем выберите «Восстановление» из выпадающей слева навигации. Здесь вы увидите заголовок Вернуться к Windows X (зависит от того, какая версия у вас была до этого). Нажмите кнопку НАЧАТЬ.
Откроется окошко подтверждения вашего желания вернуться к старой версии. Подтвердите, и далее следуйте инструкциям на экране, обращая внимание на предупреждения и другую информацию (например, не отключать систему во время процесса).

Возможно, вам придется переустановить некоторые программы или изменить пару настроек после отката, но в целом вы убедитесь, что процесс возврата достаточно быстрый и простой.
Можно выбрать другой метод — чистая установка вашей предыдущей версии Windows. Данная процедура сотрет всю информацию на диске, а значит — резервное копирование персональных данных – это обязательный шаг перед началом данного процесса.
Если у вас есть предыдущие версии Windows на физическом установочном носителе, например, загрузочный DVD-диск или USB-накопитель, вставьте его в свой компьютер. Если у вас нет физической версии, то ее можно создать непосредственно в Microsoft, благодаря Windows 7 Software Recovery и Windows 8.1 Installation Media.

После этого перезагрузите систему и дождитесь экрана с сообщением вроде «нажмите клавишу F12», чтобы выбрать загрузочное устройство. Текст сообщения может варьироваться – F10 и клавиша ESC представляют собой общую комбинацию. Вы можете нажать на клавишу несколько раз и проверить сработает или нет.
Затем вы увидите меню, которое будет содержать список всех загрузочных устройств, из которых нужно выбрать. Используйте клавиши со стрелками, чтобы выбрать устройство, которое вы только что вставили, и затем нажмите Enter. Следуйте инструкциям мастера установки, подтверждая выбор установки операционной системы заново. Вас попросят ввести лицензионный ключ продукта, который можно найти на установочном носителе (если Windows был куплен отдельно), или на наклейке на устройстве или сопроводительной документации (если Windows приобретен вместе с компьютером).
Образ диска
Этот метод возможен только в том случае, если вы подготовили его раньше, чем обновили систему до Windows 10. То есть, если у вас есть образ вашего диска, вы можете просто восстановить его. Образ — это полная копия того, что на диске, включая в себя персональные данные, а также иные файлы.

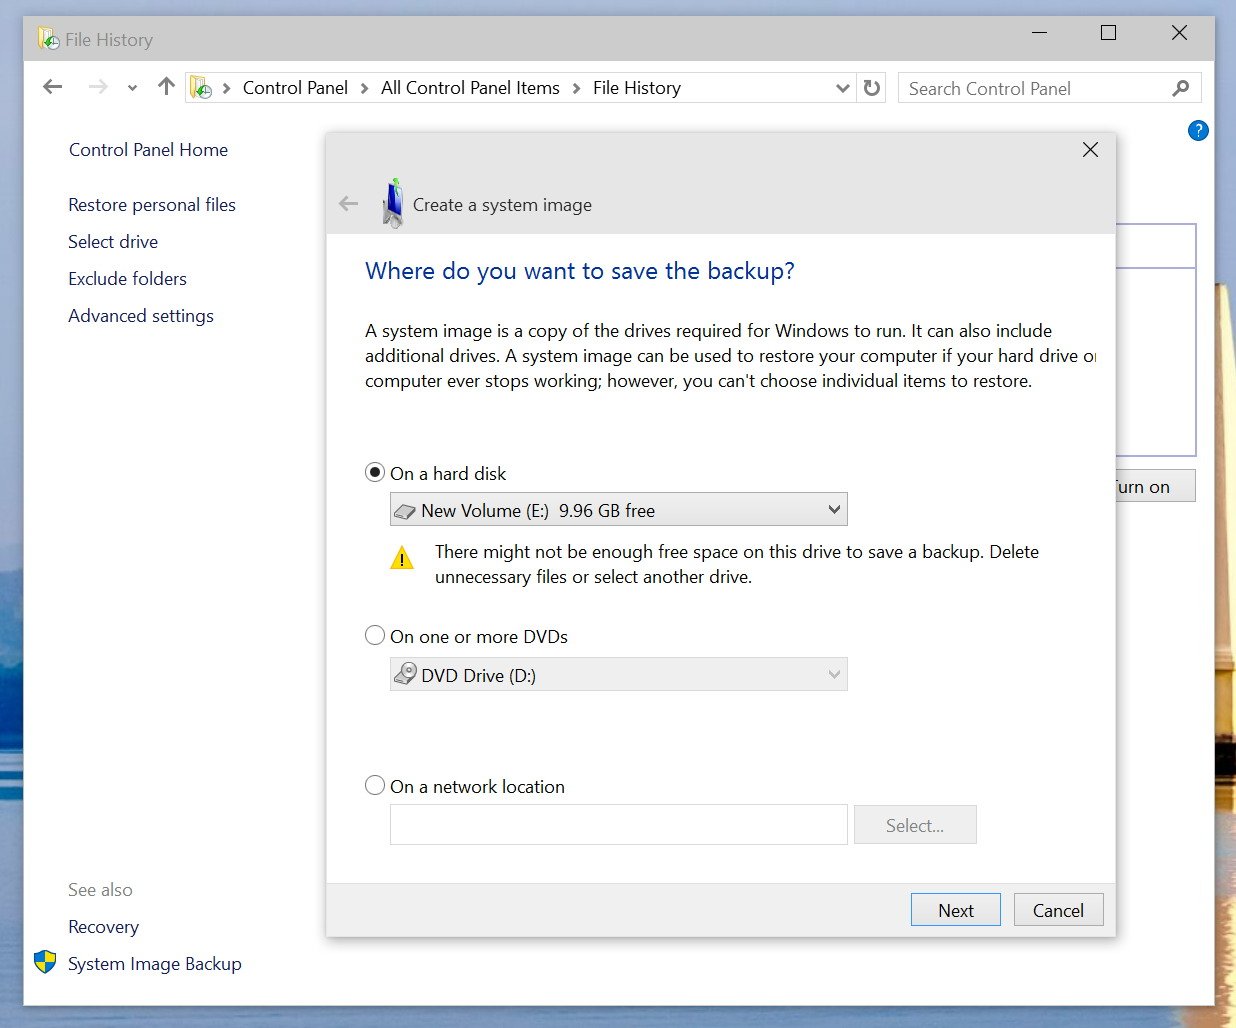
Образ диска может быть создан в Windows 7 и 8.1 с помощью утилиты System Image, который затем может храниться на внешних носителях. Для его восстановления в Windows 10, нажмите клавишу Windows + I, потом нажмите кнопку Обновление и безопасность, затем выберите Восстановление. После этого нажмите кнопку Перезагрузить сейчас и следуйте инструкциям, чтобы восстановить систему с образа диска.
Опять же, это сработает, только если вы сделали образ диска перед обновлением системы до версии Windows 10.
Вывод
Microsoft надеется, что всем понравится Windows 10, тем более что это последняя версия Windows, хотя кто знает. К счастью, очень легко вернуться к предыдущей полюбившейся вам версии, несмотря на то, что вы уже обновили систему.
Помните, предоставленная Microsoft опция в Windows 10 по откату системы к предыдущей версии будет доступна только в течение 30 дней после обновления, так что сделайте это как можно раньше, потому что данный способ является самым простым и безопасным для возврата к прежней версии.
Хотите ли вы вернуться к предыдущей версии (вместо того, чтобы остаться с Windows 10) или вы уже сделали откат? Если так, то что вам не понравилось в новой операционной системе Microsoft?
Windows 10 is having a great jump start, in only three weeks, after the operating system released to the public millions of users have already upgraded. Perhaps some of the reasons why people are quickly upgrading is because Microsoft is offering Windows 10 as a free upgrade for computers running Windows 7 and Windows 8. Additionally, there a lot of new features, such as Cortana, the Unified Settings app which runs across devices, the return of the Start menu, which combines the Windows 7 Start menu with the Start screen in Windows 8.1, and many more features that you can read in my previous write up here.
Seeing that Windows 10 introduces many new features, that it’s headed in the right direction, and that you’re getting it for free, there is no doubt that Microsoft wants you to upgrade and quickly. In fact, you only have one year from the day it was launch to take on the free offer after that you’ll have to pay to upgrade.
However, since Windows 10 became available to the public, not everyone has had a good experience. Some people have issues upgrading, others have been reporting compatibility issues, the Windows Store not updating apps (which has already been fixed), and a number of other problems. As you can imagine, once people begin having issues almost by reflect the first thing that comes to mind is how can go back from Windows 10 to my previous version, in this case, Windows 7.
Today, we are going to go through three options, and steps to downgrade from Windows 10 to Windows 7, in case things aren’t working out for you.
It’s worth to point out that the options are pretty much the same as downgrading from Windows 10 to Windows 8.1, which I have previously added here.
Method one: Recovery by uninstalling Windows 10
Microsoft did something new in Windows 10 that wasn’t available in Windows 8, which is adding a feature to the Settings app to allow you seamlessly go back to your previous version of the operating system.
As such, if you are having issues with Windows 10 or you simply don’t like it you have options. For example, the software giant is including the «Go back to Windows 7» feature to make the process a lot simpler. However, there is a caveat; you only have a month after you have upgraded to Windows 10 to go back.
Now, if you’re still on the one-month «trial», you can follow the instructions below to roll back:
1- Use the Windows + I shortcut to open the Settings app.
2- Navigate to Update & security and go to Recovery.
3- If everything is set correctly on your PC, you’ll see the option Go back to Windows 7. Here simply click the Get started button.
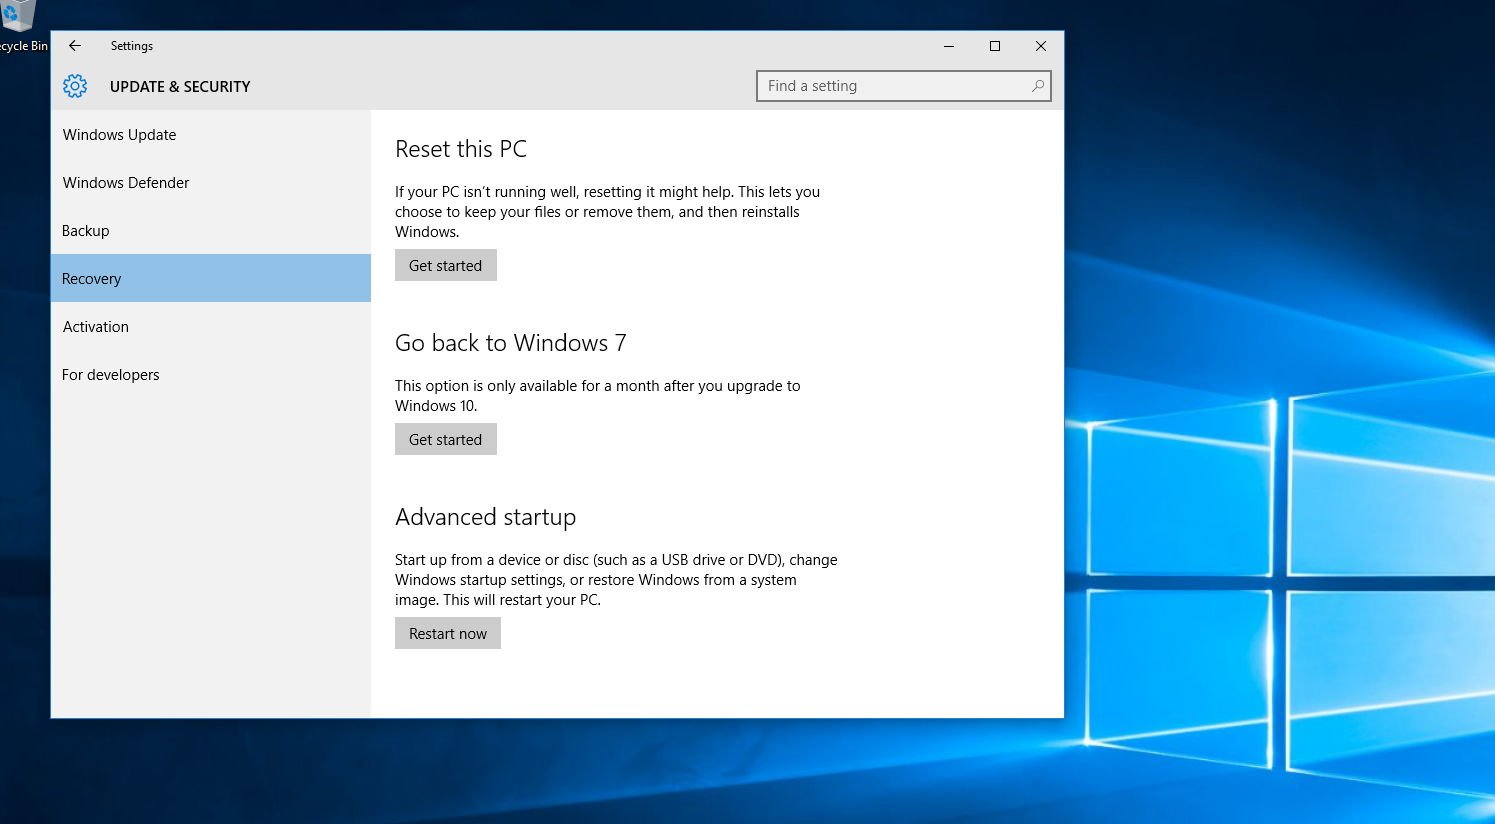
4- At this point, you will need to pick the reason you’re going back, click Next.
5- You will get a warning that you’ll need to reinstall some apps and programs, and you’ll lose any changes made after upgrading to Windows 10. Keep in mind that while a file backup is not necessary, but it’s highly recommended, and then click Next.
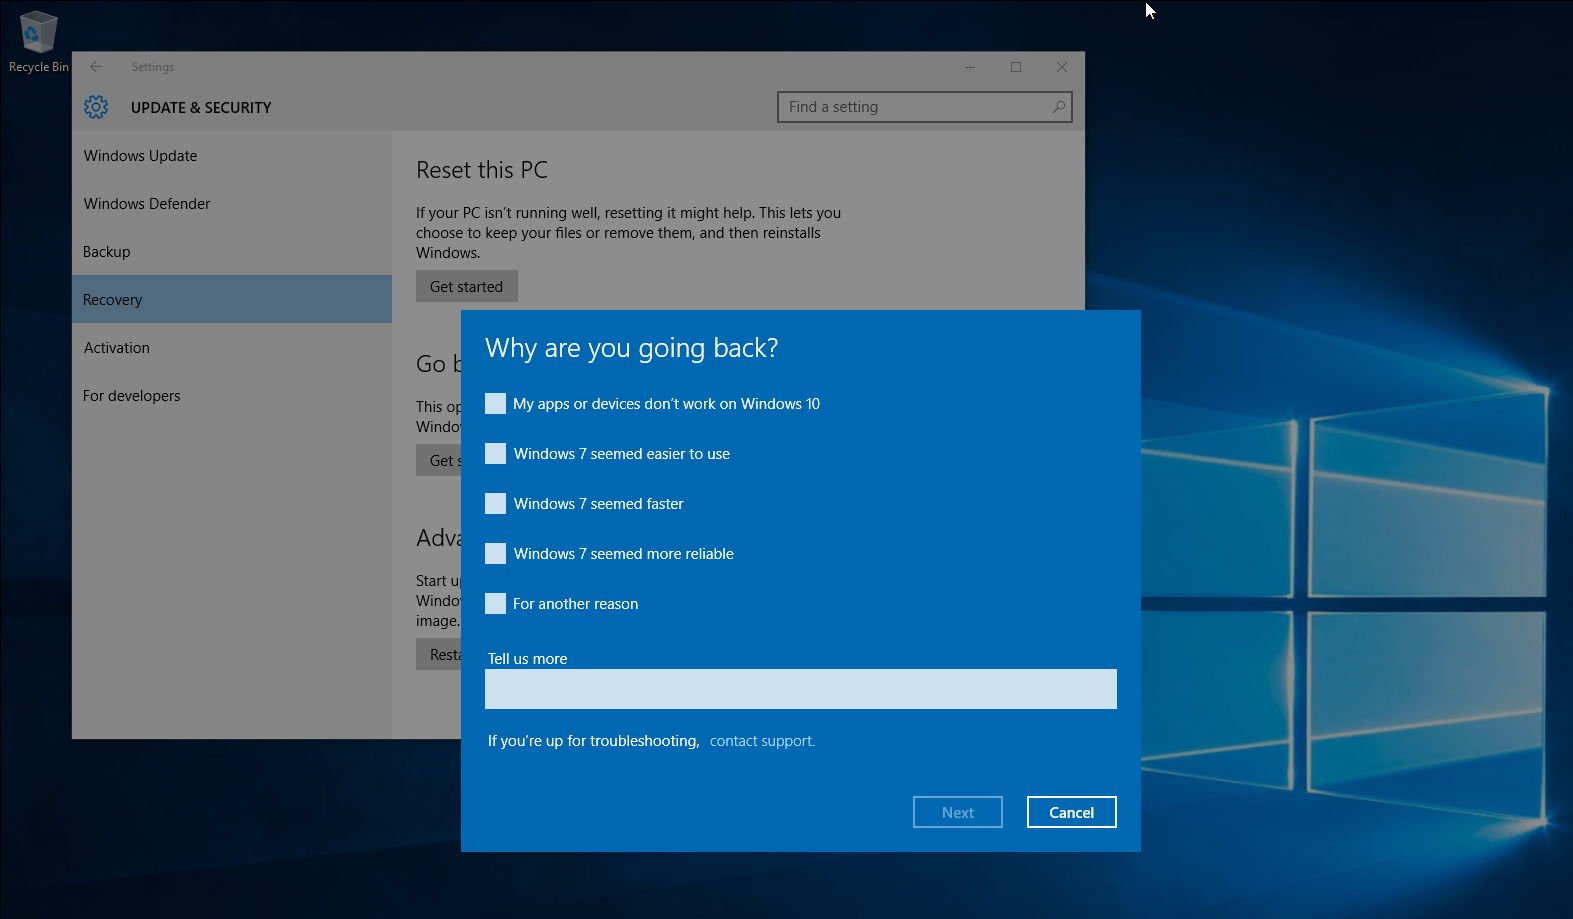
6- Make sure you know your Windows 7 password as you’ll be locked out of the system without it, and then click Next.
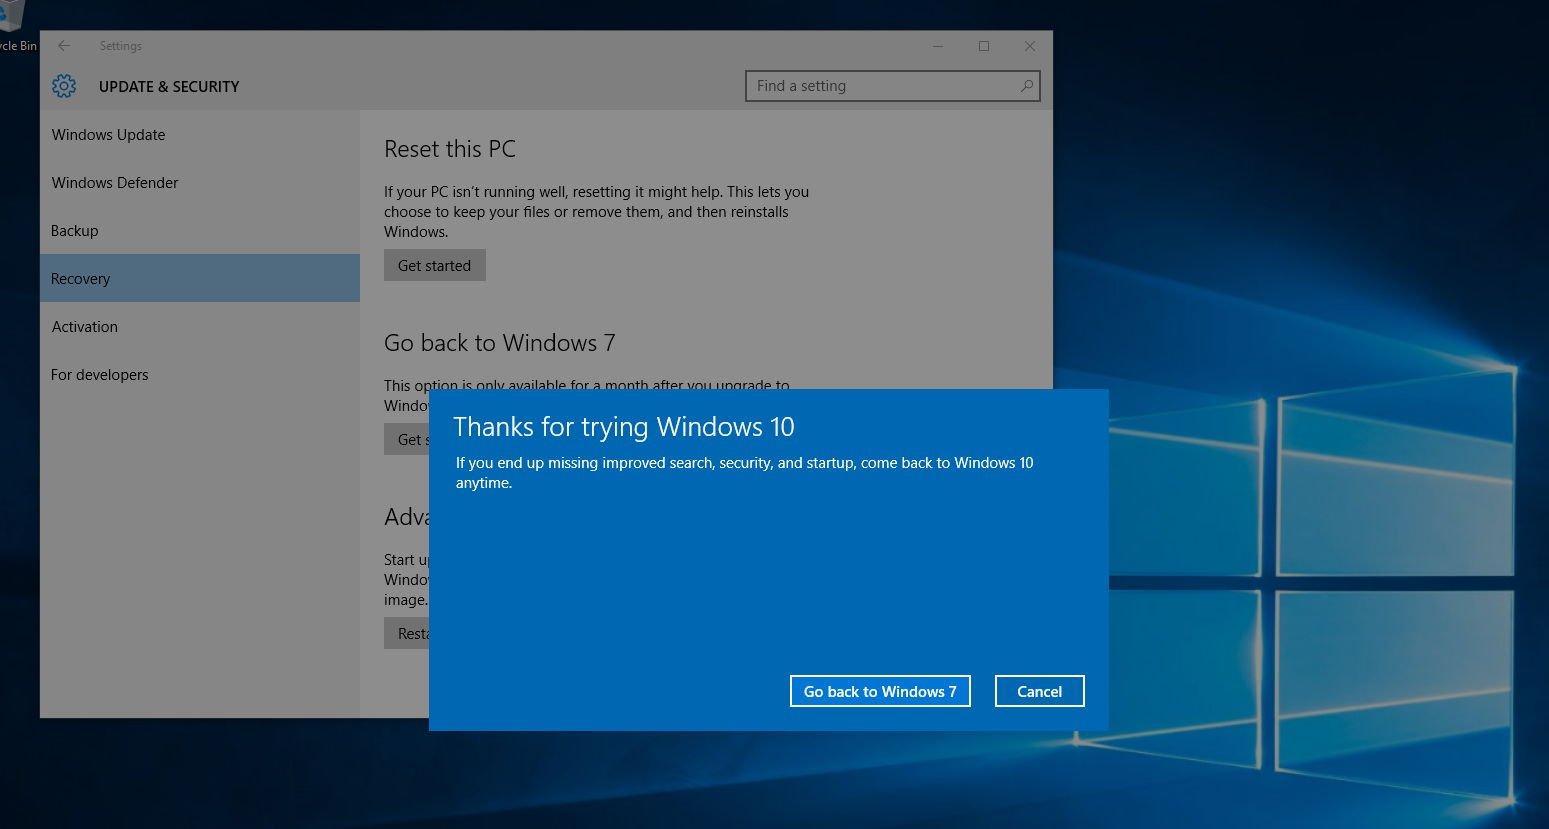
7- Finally, click the Go back to Windows 7 and to begin the downgrade process.
The time to complete the process should only be several minutes, but the time will vary from computer-to-computer. After you’re back in Windows 7, don’t forget to check that all your programs work correctly. As always make sure Windows is up to date, as it has probably been several weeks since and Microsoft may have already released some patches.
Method two: Downgrade by using you previous backup
You should always keep a backup of your computer before modifying any operating system. If you haven’t upgraded to Windows 10, check out my previous post on how to prepare your computer for Windows 10. That will guide you through what you need to do before upgrading, including creating a full backup of your computer.
If you have the backup, you are haft way done. You only need to make a backup of your new files since the last full backup or simply copy all your files to an external drive. Besides, you may want to note any new software you have installed on your computer since the last backup, as you will need to reinstall them later on.
You can do this by:
- Searching for Control Panel with Cortana.
- Navigating to Programs and Features.
- Arranging the list of apps in your system by Installed On.
After you have the backup of your files, and you know the apps you need to reinstall, reboot your computer using the «repair disc», which you’re prompted to create after creating the initial full backup.
Quick Tip: If you don’t have repair disc, you can also boot with the Windows 7 installation media to perform the recovery.
Connect the external hard drive with the backup, reboot your PC, follow these steps:
- While in the Setup wizard, click Next, and then Repair your computer.
- Select «Restore your computer using a system image that you create earlier», and click Next.
- Select the backup to restore and click Next.
- Select the image you want to use and click Next.
- Click Next one more time and then Finish to begin with the recovery process.
Once the process completes, you’ll be back to the previous version of your operating system, in this case, Windows 7.
Method three: Downgrade by clean installation
Alternatively, in the same way like you could do in going back to Windows 8.1, you can downgrade from Windows 10 to Windows 7 by doing a clean installation of the operating system. This method is more suited for people that have the time and don’t trust the concept of rolling back.
This process involves having to reinstall the operating system using the Windows 7 installation media, and formatting, which will erase everything on the hard drive. You’ll also need to reinstall all your applications once again, and use a backup to restore all of your files. This process takes more time than other methods, but it will ensure that everything works correctly.
Follow this steps:
- Reboot your computer with Windows 7 installation files (make sure your PC is set to boot from the drive with installation files).
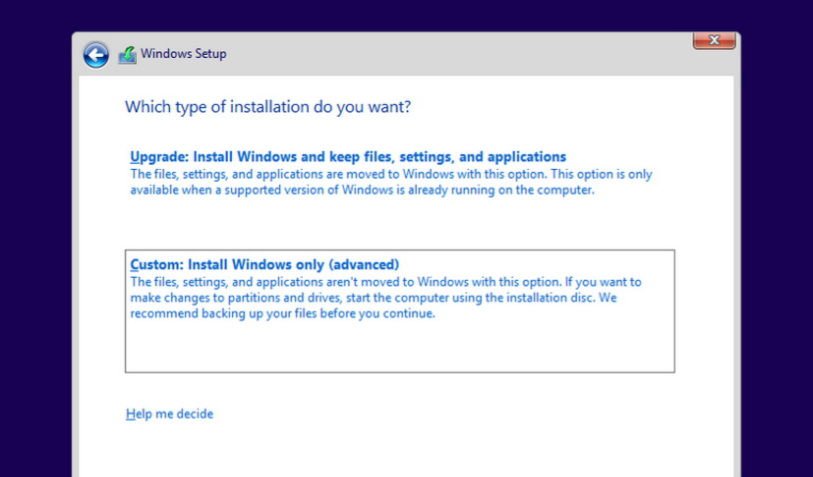
- During the Windows Setup, click Next, accept the licensing, and click Next.
- Click the option Custom: Install Windows only (Advanced) option to do a clean installation.
- Delete any partition created by you current installation of Windows.
- Select the empty drive and click Next to start the installation process.
Important: If you have a partition where you store files or a secondary hard drive, you don’t have to delete these partitions.
Once the Windows Setup process completes, you will once again back to Windows 7. However, remember that you need to restore your files and reinstall and configure all the programs you have previously installed on your system.
Wrapping this up
As you can see, downgrading from Windows 10 to either Windows 7 or Windows 8.1 are virtually identical. Just remember that in both versions of the operating system you only have a month to use the Settings app to go back to you previous version. If past the 30 days, then you likely have to go through one of the other two methods.
Always remember to make a full backup first, you’ll never know when you are going to need it to recover!
Are you giving up on Windows 10 and going back to Windows 7? Let us know your experience in the comments below.
More Resources
Remember that we have many other articles on Windows 10, if you need help you always check these other resources:
- Our definitive review of Windows 10
- Windows 10 on Windows Central – All you need to know
- Windows 10 help, tips, and tricks
- Windows 10: Help and discussion forum at Windows Central
All the latest news, reviews, and guides for Windows and Xbox diehards.
Mauro Huculak is technical writer for WindowsCentral.com. His primary focus is to write comprehensive how-tos to help users get the most out of Windows 10 and its many related technologies. He has an IT background with professional certifications from Microsoft, Cisco, and CompTIA, and he’s a recognized member of the Microsoft MVP community.
Are you regretful for upgrading to Windows 10? Don’t know how to rollback Windows 10 to Windows 7 or Windows 8.1? Here are several solutions for you to downgrade Windows 10 to Windows 7/ 8.1 without data loss.
You May Feel Regretful after Upgrading to Windows 10, Right?
In order to let more people use the newest Windows operating system – Windows 10. Nevertheless, after using this system for a period of time, parts of users planned to rollback Windows 10 to Windows 7 or Windows 8.1 since they think Windows 10 is not as good as Microsoft says, and I searched on the internet, with listing the following 4 reasons for rollback:
- Some programs cannot be used in Windows 10.
- Privacy is threatened since Microsoft might collect or leak our private information like address, mail, and phone number by default.
- Windows 10 loses many cool features which work well in Windows 7 or 8.1.
- Windows 10 is a new-born operating system so it is vulnerable and unstable.
Related article: Configure Windows 10 from These 3 Aspects to Protect Your Privacy
Of course, there might be other reasons driving you to downgrade Windows 10, but this is not the key point. What users care about most is how to rollback Windows 10 to Windows 7. However, we will show you the solutions for Windows 10 rollback.
How to Rollback Windows 10 to Windows 7 or Windows 8.1?
Backup Important Files in Case of Downgrade Failure
No matter which method we take to rollback Windows 10, it’s best to back up all important files. After all, any accident or error could occur during the rollback process, and this may result in data loss and even system crash.
Thus, you can use the professional file backup software – MiniTool ShadowMaker. It can help you to back up files with ease. So just download it to keep your data safe.
MiniTool ShadowMaker TrialClick to Download100%Clean & Safe
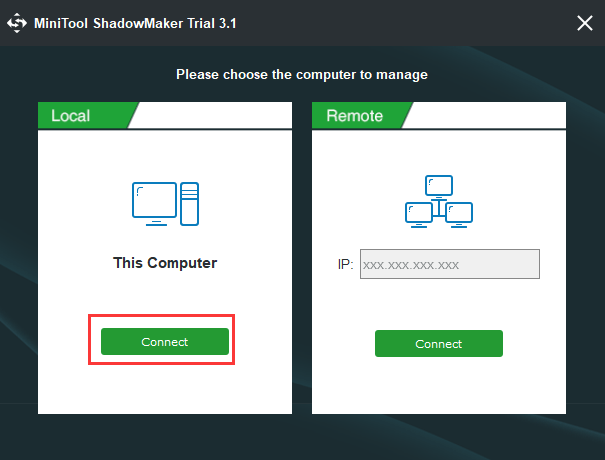
Step1: Install this software and launch it. Then click Connect in This Computer to enter its main interface.
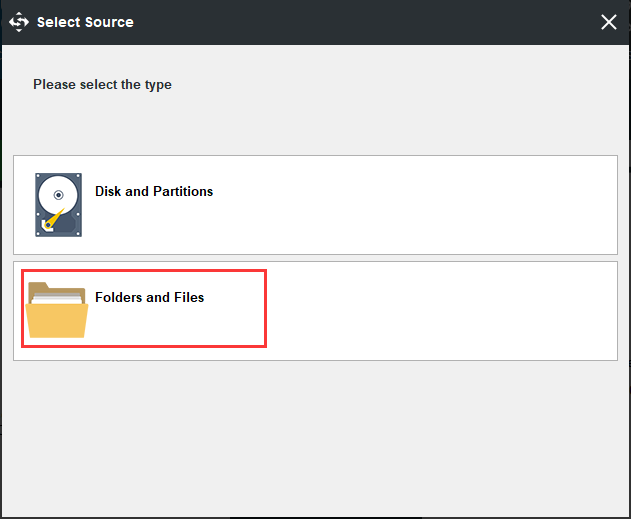
Step 2: Then go to the Backup page and click Source module to choose to Folders and Files to choose which files you want to back up.
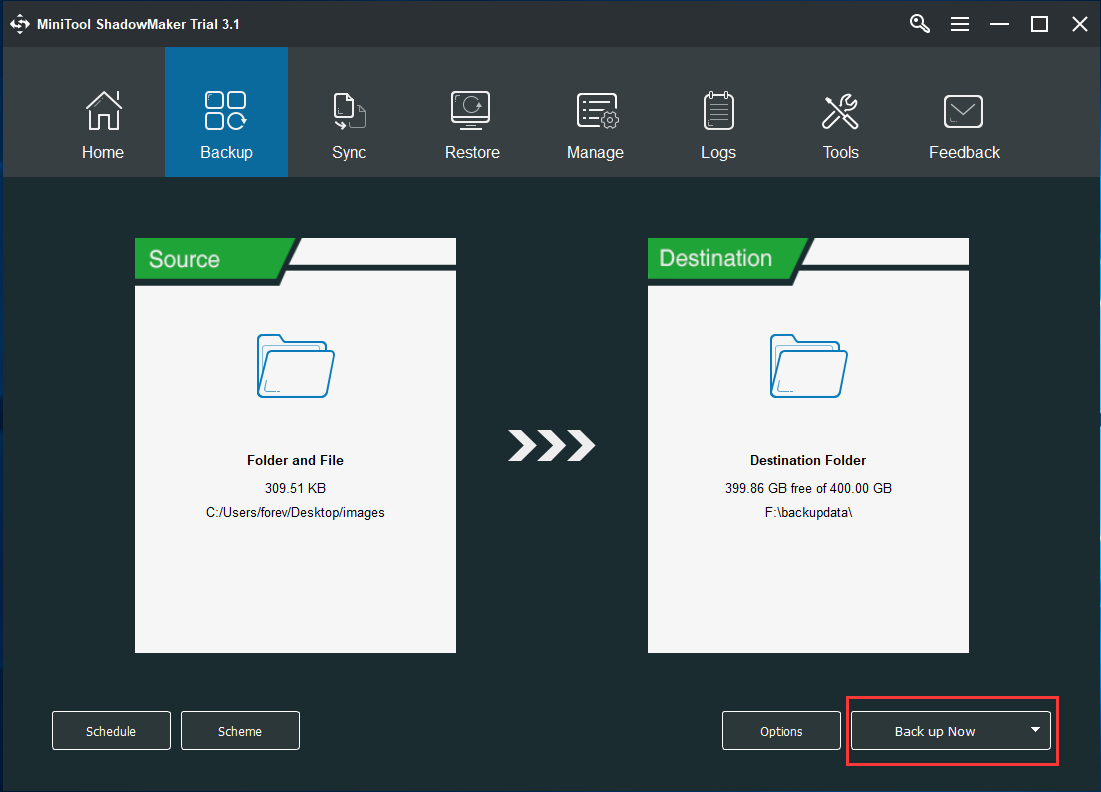
Step 3: Then click Destination module to choose where you want to save the backup image.
Step 4: After you have chosen the backup source and destination, you can click Back up Now to perform the task immediately.
When you have finished all the steps, you have successfully backed up all important files. And you can refer to the post How to Back up Files on Windows 10? Try These Top 4 Ways to know more information about files backup.
In addition, you can also use the Copy Disk feature of MiniTool Partition Wizard to help you back up important files.
MiniTool Partition Wizard FreeClick to Download100%Clean & Safe
Now, we will show you how to rollback Windows 10 to Windows 7.
Downgrade Windows 10 to Windows 7/8.1 within 10 Days
Microsoft has said that you can make the rollback within 10 days as long as you upgrade to Windows 10 from Windows 7/8.1 recently. Microsoft offers an option to do the downgrade, which could be Go back to Windows 7, Go back to Windows 8.1, or Go back to previous version of Windows 10, depending on your system and settings. Here, we take rollback Windows 10 to Windows 8.1 for example:
Tip: Please note that if your computer came with Windows 10 installed, no earlier version of Windows was ever on it. In that situation, you can’t go back to Windows 7 or Windows 8.1.
Click Start > Settings > Update & security > Recovery to get the window below:
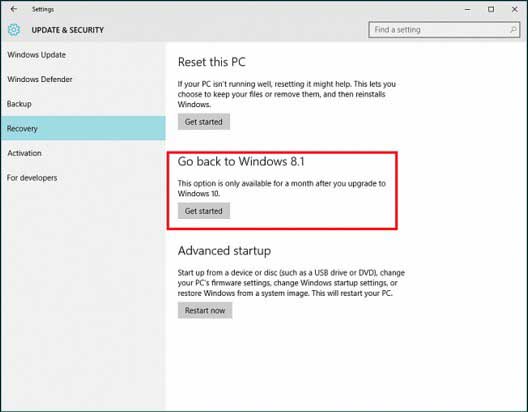
Here you can see the Go back to option. Please tap on Get started button, and then Microsoft will ask for your feedback as well as reasons for changing back to previous Windows. Type your feedback and click Next. Then, the following screen will appear:
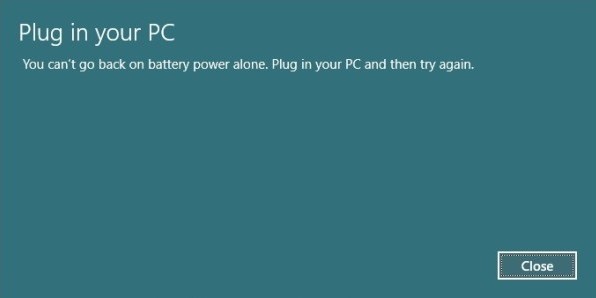
Please make sure that your computer is plugged in because the rollback might be interrupted due to power off, and then click Close to continue. Afterward, click Go back to Windows 8.1 button to do the rollback, which may take some time for the system needs to read settings of the previous Windows. Once the rollback process is completed, your computer will automatically boot from the previous version of Windows.
Tip: Rollback requires the password of your old version of Windows. Without it, you will be locked out of the system. In addition, after you go back to old Windows, some apps coming with Windows 10, like Mail and People, might not work anymore. To fix them, reinstall them from the Store.
Nevertheless, during the rollback progress, you may receive the error message: We are sorry, but you can’t go back. The files we need to take you back to a previous version of Windows were removed from this PC.

Now, most users would want to know what files were deleted or removed. In fact, the rollback should be on the availability of Windows.old and $Windows.~BT or $Windows.~WS, which are created by Windows during the upgrade and hidden in drive C by default. If one of them is deleted, renamed, or damaged, then you may receive the error message above. To check whether these files are still there, please do these operations:
Go to Drive C, click on View tab, check File name extensions and Hidden items:

Then open Options, under View tab put the checkmark on Show hidden file, folders, and drives, and remove checkmarks from Hide extensions for known file types and Hide protected operating system files.
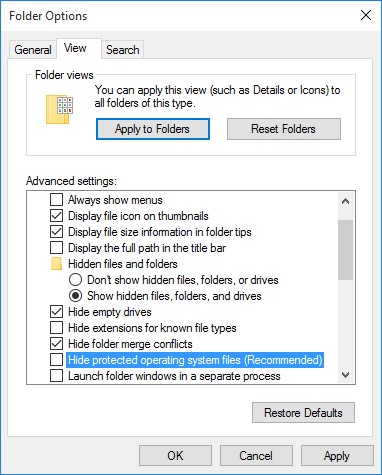
After these settings, these files would be visible in root directory of C drive. However, if you can’t find them, most probably they have been lost. Under this situation, users have no choice but to try recovering them or take another rollback solution that will be introduced in the next section.
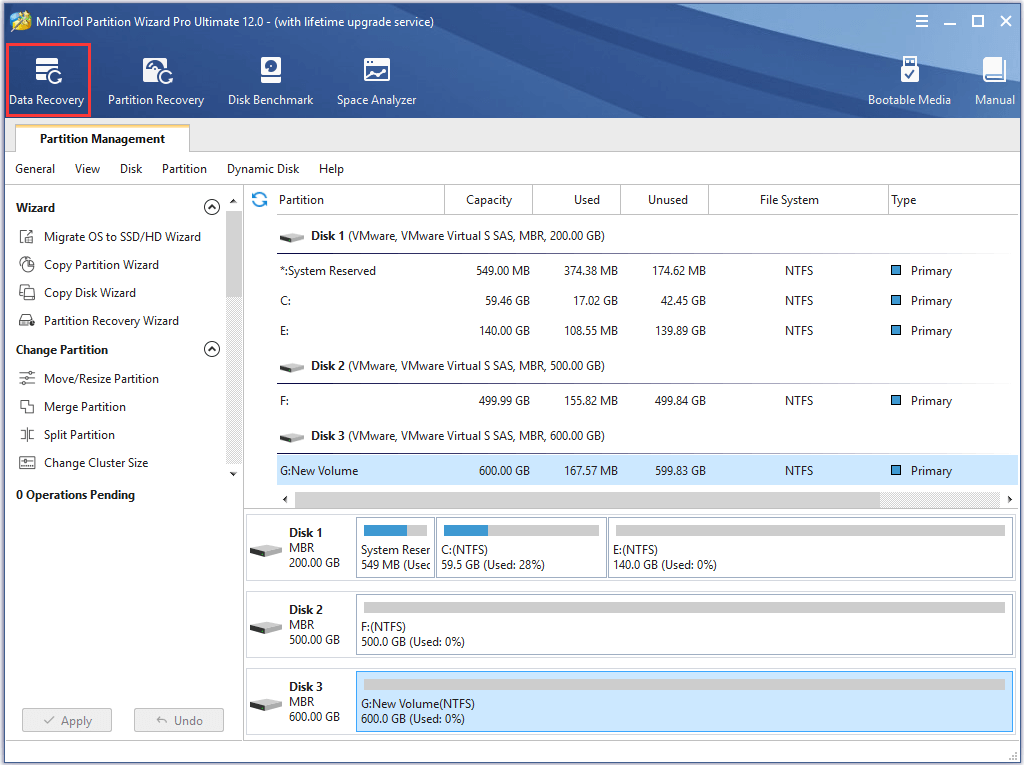
And if you want to recover the lost or mistakenly deleted data, the Data Recovery feature of MiniTool Partition Wizard plays an important role.
Step 1: Launch MiniTool Partition Wizard to enter its main interface and then choose Data Recovery to continue.
Step 2: Choose the drive that has lost the files and click Scan to continue.
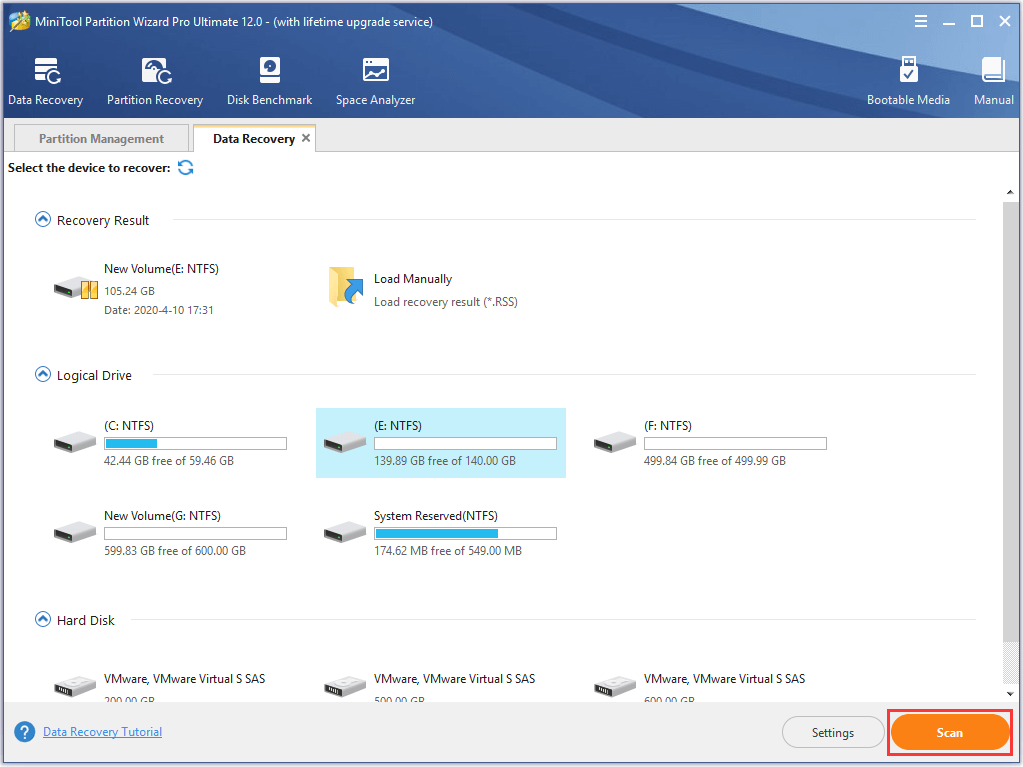
Step 3: When the scanning is finished, you can recover your lost data.
Related article: Are You Ready to Recover Deleted Files in Windows 10 Right Now
In addition, it’s very necessary to mention another situation: you are unable to find the Go back to previous version of Windows option even if the upgrade is completed within 10 days. Here is the possible reason: you logged in as a regular user rather than with admin account. To deal with this situation, just change the current account to the admin account, and then the very option would emerge.
Click to Tweet
Well then, what if the upgrade has been done for more than 10 days? Users have to take the following methods.
Rollback Windows 10 to Windows 7 or 8.1 after 10 Days Limit
Before showing the exact methods, let’s see a way to extend the 10 days limit to go back to previous version of Windows, which is recommended by lots of websites.
The Way to Extend the One Month Limit to Go back to Previous Windows
Based on the fact that files (Windows.old and $Windows.~BT or $Windows.~WS) used to revert back to Windows 7 will be deleted automatically after 10 days, which is the key to resulting in downgrade to Windows 7/8.1 failure, many people suggest making a copy for those files or renaming them before the 10 days limit ends, which is in theory available. But in my opinion, it’s useless. Here is my explanation.
From Microsoft I got the message that the Go back to previous version of Windows option will be unavailable in Settings if the upgrade has been done for more than 10 days. Without such an option, how can we do the rollback even if files for reverting are still there? Of course, if you are lucky enough to find the option somewhere or make it appear again, this is undoubtedly an excellent solution.
Therefore, users have to look for other ways after the upgrade has been done over 10 days.
Change Windows 10 Back to Windows 7/8.1 from a Windows 7 or 8.1 Backup
Before upgrading to Windows 10, most people will be suggested to make a backup for their system or other important files in case of upgrade failure. If you have prepared such a backup, it could be so easy to do the restoration. You can refer to the following methods.
1. Restore from Backup and Restore (recommended to revert to Windows 7)
Go to Control Panel > System and Security > Backup and Restore (Windows 7) > Select another backup to restore files from. Then, do the recovery by following instructions.
Note: Backup and Restore is a component of Microsoft Windows introduced in Windows Vista, which allows users to create backups and restore from backups. It was deprecated in Windows 8 and removed in Windows 8.1, and then back in Windows 10. This tool allows you to restore any old Windows 7 backups on your Windows 10 computer.
In addition, if you have created a system image for Windows 7 or Windows 8.1 before the upgrade, you can use another recovery option in Windows 10 to do the rollback – Advanced Startup.
2. Restore from System Image
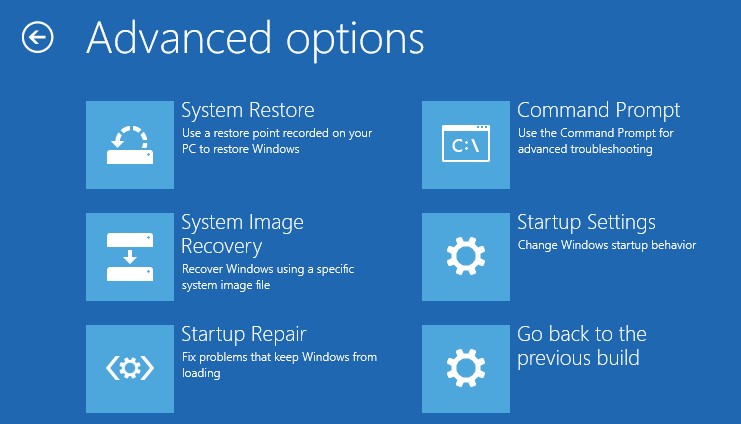
Go to Start > Settings > Update & security > Recovery > Advanced startup > Restart now > Troubleshoot to get the following window:
Then choose Advanced option to enter the following page and choose System Image Recovery to continue.
Note: Everything will be replaced with the information in the system image if you recover from a system image, so please backup all your important files saved after the image is created.
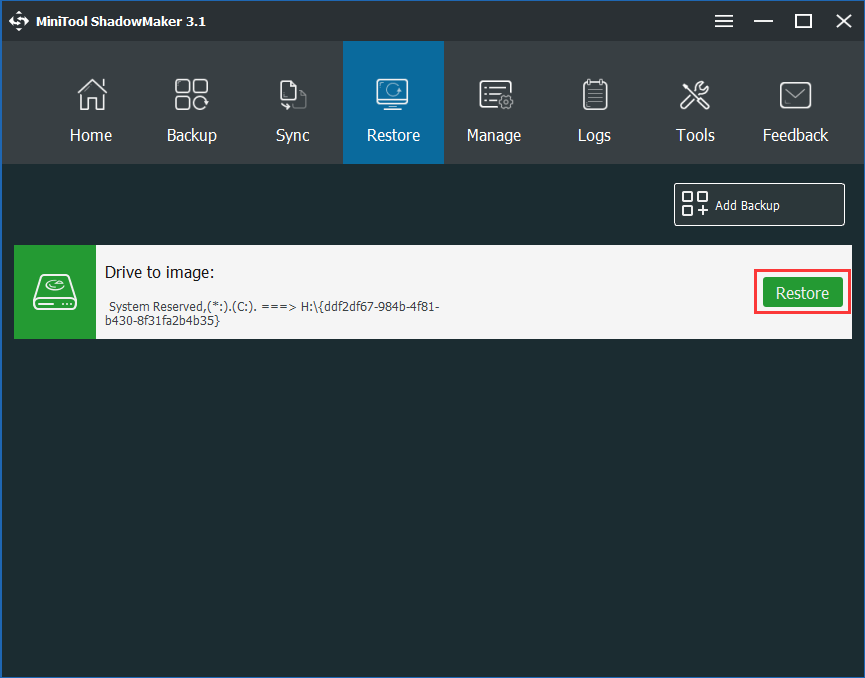
3. Use MiniTool ShadowMaker
If you have created a system image with MiniTool ShadowMaker before updating to Windows 10, you can use this software to downgrade Windows 10 to Windows 7.
MiniTool ShadowMaker TrialClick to Download100%Clean & Safe
MiniTool ShadowMaker can help you to rollback Windows 10 to Windows 7 with the system image. And you can read the post 2 Ways to Restore Computer to Earlier Date in Windows 10 to know more detailed information.
In addition, someone suggests rolling back Windows 10 from a command prompt, which is indeed introduced by Microsoft especially for Windows 7 users. If you are interested in this method, just try it. Well, what if we want to do the rollback when Windows 10 is unbootable? Here are 2 options: rollback Windows 10 from Safe Mode or revert it by using Windows installation disc or system repair disc (CD or DVD disc rather than USB flash drive). We haven’t tested these 2 methods, but you can have a try.
All in all, rollback Windows 10 to old version of Windows from a backup is highly recommended if we have a backup for Windows 7 or Windows 8.1, because this requires simple operations and just removes new things. However, if there is no such backup, we have to take the following recovery options.
Rollback Windows 10 to Windows 7 or 8.1 via Restoring Factory Settings
In Windows 10 you are able to restore your computer to factory settings, which reinstalls the version of Windows coming with your computer. For example, if your computer was preinstalled with Windows 8, then upgraded to 8.1, and then upgraded to Windows 10, restoring factory settings will change Windows 10 back to Windows 8 rather than 8.1.
Detailed steps to do factory reset are as follows: go to Start, and then select Settings > Update & security > Recovery > Reset this PC > Get started > Restore factory settings.
Tip: This method will remove all your personal files and programs. So before going ahead, please back them up.
Click to Tweet
However, this recovery option isn’t available on all computers. If it doesn’t work for you or you have a product key for the previous version of Windows, we highly suggest making a clean Windows installation.
Change Windows 10 back to Windows 7/8.1 via Clean Installation
You can download the Media Creation Tool to create installation disc for Windows 8.1 or download Windows 7 ISO file and burn it to USB flash drive or DVD. Then, install your old version of Windows from this disc, and the product key for the previous Windows is required.
Bottom Line
After reading this post, do you know how to rollback Windows 10 to Windows 7/8.1? And if you need to downgrade Windows 10 to Window 7, please try these methods.
And if you have any better solution to revert back to Windows 7/8.1, you can share it on the comment zone.
And if you have any problem with MiniTool programs, please feel free to contact us via the email [email protected].
Rollback Windows 7 FAQ
How do I restore my Windows 7 computer to an earlier date?
- Type Create a restore point in the search box of Windows and choose the best matched one.
- Then go to the System Protection tab.
- Click System Restore… to continue.
- Click Next.
- Select the Restore point.
- Confirm the restore point and choose Finish.
Does Windows 7 have system restore?
System Restore is available in Windows 7. The System Restore feature enables you to create the restore points which can safeguard your computer. It can help you to restore your computer to an earlier date and do not affect your personal files.
How long does a System Restore take Windows 7?
The system restore may take about 15 minutes. Once started, the computer will restart and begin the restore process. It can help you to restore the OS or settings to the previous state and does not affect your personal files. But you need to notice that do not interrupt the restore process if it is started.
Is Windows 7 better than Windows 10?
Windows 7 and Windows 10 are two different operating system versions of Microsoft. If you want to know more difference between Windows 7 and Windows 10, you can read the post: Windows 7 vs. Windows 10: It’s Time to Upgrade to Windows 10? But please note that the Windows 7 will end support on January 14, 2020.

If you get a new computer that comes with Windows 10 preinstalled, you might want to downgrade it to Windows 7 or 8.1. Here’s what you need to know to do it.
Update: It’s worth noting that Microsoft has killed support for Windows 7. Also, Windows 8.1 no longer has mainstream support. This is what the company says about Windows 8.1: “Windows 8.1 reached the end of Mainstream Support on January 9, 2018, and will reach end of Extended Support on January 10, 2023. With the general availability of Windows 8.1, customers on Windows 8 had until January 12, 2016, to move to Windows 8.1 to remain supported.” In fact, downgrading to a previous unsupported version of Windows probably won’t work anymore.
Microsoft hopes to have Windows 10 running on 1 billion systems within three years. An admirable goal, but one that does not take into account the requirements of the user. Windows 10 shares a lot in common with Windows 8.1; it is a smooth experience upgrading from that release. For Windows 7 users, the story might be a little different. Some older applications just work better with the older versions. If you purchase a new PC today, it likely will have Windows 10 preinstalled. Users still have an option, though, which is the ability to downgrade the installation to an older version of Windows, such as Windows 7 or even Windows 8.1.
Prerequisite Tasks you should Complete
Downgrading is an involved process; I strongly recommend you have everything in place before you start this project, such as:
- The copy of Windows 7 or Windows 8.1 you want to downgrade. If you don’t have a license, you will have to purchase a Windows 7 or Windows 8.1 license. If your system came preinstalled with Windows 10 Pro, you’d need to download or borrow a Windows 7 Professional or Windows 8.1 Pro disc.
- A product key from a computer that is running Windows 7 Professional or Windows 8.1 Pro. If you are exercising downgrade rights from Windows 10 Pro OEM, this key can be either a retail upgrade, full version, OEM preinstalled, or System Builder product key.
- Necessary hardware drivers for either Windows 7 or Windows 8.1.
- External hard disk to back up your Windows 10 installation.
- Have a copy of your Windows 10 Pro OEM product key available, just in case Microsoft support needs to verify it during activation. Here is how you can find it. Please note, this is for OEM preinstalled Windows 10 Pro licenses only.
Press Windows key + X then click Command Prompt (Admin), at the command prompt, type the following command, then hit Enter on your keyboard.
wmic path SoftwareLicensingService get OA3xOriginalProductKey
Other Options you should Consider Before Downgrading
For computers upgraded to Windows 10 from Windows 8.1 or Windows 7, a limited option is available within 30 days to roll back to your previous version. If your upgrade to Windows 10 is more than a month old, then a manual downgrade will have to be done. If your computer came with recovery media, consult the documentation for instructions on how to reinstall Windows 7 or Windows 8 on your computer.
If you recently purchased a new computer, preinstalled with Windows 10, only to find out it does not work with your hardware or software, or you just don’t like it, then you might want to consider returning the computer. The hassle associated with actually downgrading is not as convenient and smooth sailing as you might believe.
Also, there remains a demand for systems with older versions of Windows, which is what you might prefer. Most OEM vendors such as Dell, HP, and Lenovo offer new model systems with a choice of Windows 7 or Windows 8.1. If your computer is still within its warranty period, then I suggest you take advantage of it and purchase an appropriate system preinstalled with Windows 7 or Windows 8.1.
Microsoft made available, a list of vendors who are providing a selection of Windows 7/8.1 systems with support for Intel’s latest CPU architecture, Skylake. Microsoft recently announced plans to limit Windows 7 and Windows 8.1 support for future revisions of Skylake. This would make now an opportune time to upgrade to a new PC while they are available. Within a year’s time, Microsoft will only focus on supporting Windows 10 on future processor technology.
Downgrade to Windows 8.1 or Windows 7
If you recently bought a system with Windows 10, but your purchase is outside the warranty window, then your next best option is to manually downgrade, if your system supports it. Here is what you need to do, to determine if you can successfully downgrade:
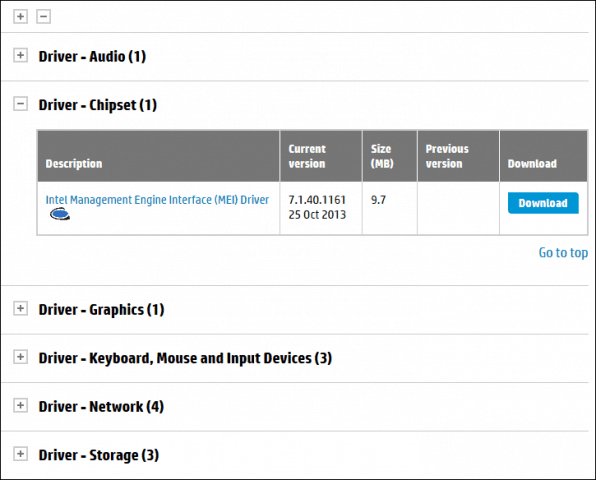
- Check if the manufacturer has native Windows 7 and Windows 8.1 hardware drivers available; depending on the model system, it is not a guarantee they do. You will need important drivers such as Chipset, Video, Network, Audio, and Storage to have a working system.
- A Windows 7 or Windows 8.1 license. If you don’t have a license for Windows 8.1 or Windows 7, you will need to purchase one. If your system came preinstalled with Windows 10 Pro, then you are automatically entitled to downgrade rights to Windows 8.1 Pro or Windows 7 Professional.
Go to the manufacturer’s website, and then look in the downloads and drivers section of the website. Enter the model number then click OK or Go.
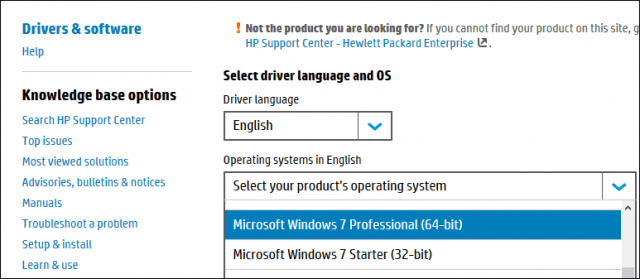
Once your drivers have been found, the website will usually have an option to filter the operating system. Click in the list box, select Windows 7 or Windows 8.1 depending on which version you decide to downgrade. Proceed to download all the critical drivers such as Chipset, Video, Network, Audio, and Storage. After downloading, save them to a thumb drive until you are ready to install them.
Backup your Windows 10 System
You might not like Windows 10 today, or your trip back to Windows 7 might be temporary. In the future, if and when you decide to return to Windows 10, you can make it a convenient process for restoring a system image. This will, of course, be like performing a clean install, with minimal inconvenience. Check out our article for instructions on how to create a system image in Windows 10.
Choose the right edition and architecture of Windows 7 or Windows 8.1
You need to determine, the version and architecture of Windows 7 or 8.1, you will be installing. If your computer has more than 4 GB of RAM installed, use a 64-bit version. If your objective is compatibility with legacy hardware or software, then 32 bit will be your best choice, this will limit the amount of memory your system will be able to address.
If you are exercising downgrade rights from Windows 10 Pro OEM, you can download a copy of Windows 7 or Windows 8.1 from the software recovery page. For Windows 7 media, you will need to have a valid product key. If you don’t, then the software recovery page will not work. Your next best option is to borrow a corresponding Windows 7 Professional disc from a trusted friend or family member.
Disable Secure Boot and EFI Boot then Prepare to install Windows 7 or 8.1
Installing Windows 7 or Windows 8.1 is a relatively easy process. Check out our articles for instructions on how to do so. The procedure involves performing a clean install. You can’t perform an in-place upgrade to an older version of Windows, from within Windows 10. Before starting the installation, you will need to disable Secure Boot and native EFI boot. This process is required if you are installing Windows 7. Also, disabling Secure Boot is necessary before enabling legacy boot.

Secure Boot was first introduced as part of the Windows 8 wave of systems featuring a new security mechanism for protecting systems from malware. Disabling Secure Boot might vary across system brands and models; the process will require booting into the system’s firmware interface. Check out the following TechNet article for instructions on how to disable Secure Boot.

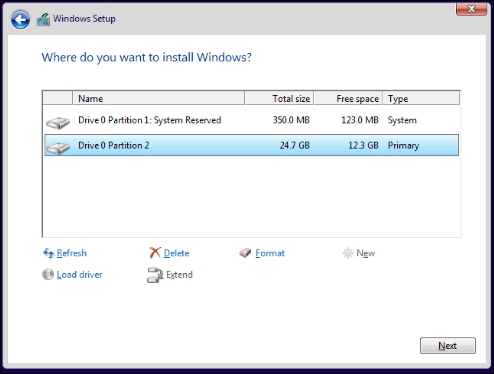
After booting from your Windows 7 or Windows 8.1 install media. Click the option Custom (Advanced), then select each partition, then click delete until there is only a single, unallocated disk. Click New; this will create a system recovery partition. Choose the larger system partition then click Next to install your version of Windows.
Install Hardware Drivers and Update Windows
After installing Windows 7 or Windows 8.1, proceed to install the appropriate drivers you had downloaded in advance. Start off with the most critical which include; Chipset, Video, and Network. Your Windows 8.1 and Windows 7 installations will likely be out of date, so immediately check Windows Update for the latest updates then install them. Also, ensure your Antivirus utility is updated. Windows 8.1 includes a built-in antivirus called Windows Defender. Windows 7 users can download Windows Defender or another free third-party Antivirus utility.

Activating your Windows 7 or Windows 8.1 License
Once you have Windows 7 or Windows 8.1 up and running, you will need to activate your license. Depending on the options chosen or available, this process should be smooth. If you had to purchase a retail or OEM system builder license, then standard Internet activation will be all you need to do.
For systems utilizing downgrade rights through Windows 10 Pro, your options are tricky. According to Microsoft, you should contact the OEM about obtaining a license.
Some OEMs pre-inject the product key for Windows 7 Professional or Windows Vista Business into the BIOS for just such an occasion. If your OEM did this on your PC, you have to take only one of the following actions:
- Install Windows 7 Professional or Windows Vista Business by using the recovery media for that version of Windows that was provided by the same OEM. Your system will activate automatically by using the product key that was injected into the BIOS. source
If your OEM has not injected your product key into the BIOS on your PC, follow these steps:
- Obtain genuine Windows 7 Professional or Windows Vista Business installation media and the corresponding product key. You may have to buy a full-package product copy of the Windows downgrade from a retailer. source
These statements defeat the purpose of downgrade rights. The workaround in this situation is to use an existing Windows 7 or Windows 8.1 Product Key to initiate the activation. The tricky part of this is, it can be a product key that is already in use but corresponds with the edition. The burden is on you the user to find such a product key.
Options include borrowing a Windows 7 Professional/Windows 8/8.1 Pro key from a trusted friend or family member. The intention is not to use the key to activate the license but to exercise downgrade rights itself. You can also use a product key from a computer preinstalled with an OEM Windows 7 Professional or Windows 8/8.1 Pro license. See instructions at the beginning of this article on how to extract a Windows 8.1 Pro product key through the command line.
Press Windows key + R then type, slui.exe 4 then hit Enter on your keyboard. Select your country from the list box, choose the Phone Activation option. Stay on the phone, then wait for a Microsoft Answer Tech to help you with activation. The most important thing you need to remember to say is “I am exercising downgrade rights.”
Disable Get Windows 10
Since you are now back on a qualifying version of Windows, you will get the notification to upgrade to Windows 10. Check out our articles here and here, for how you can disable the Get Windows 10 app from automatically upgrading your computer to Windows 10.
When you do decide to upgrade to Windows 10 again in the future, you can choose the in-place upgrade route, or restore the system image you had created in advance. If you have accumulated data on the system, back that up first, then restore the system image.
Phew, now that was a lot to articulate. Microsoft wants every PC to upgrade to Windows 10; the reality is that can only happen in a perfect world. We all have our various reasons why we still prefer Windows 7 or Windows 8.1; it is our right. Windows 10 is indeed the future, but I am sure many of us would prefer to embrace the future on our terms.
![]()
С момента выпуска Windows 10 прошло почти 2 года, но многие пользователи категорически не принимают новую систему, оставаясь верными старушке Windows 7. Если на вашем компьютере установлена «десятка», а вы по какой-то причине хотите вернуться на «семерку», эта статья — для вас.
 Откатить операционную систему к предыдущей копии можно только тогда, когда последняя сохранилась на жестком диске. Если на машине изначально стояла «десятка» или старая система была удалена, переход на Windows 7 возможен лишь путем чистой установки. Сегодня поговорим о том, как установить Windows 7 вместо Windows 10 в двух часто встречающихся случаях:
- Вы обновили Виндовс 7 до Виндовс 10, и с момента этого события прошло меньше 10 дней. Обязательное условие: в системном разделе сохранилась папка Windows.old, где находятся все файлы предыдущей установки системы.
- Прежняя копия Виндовс 7 не сохранилась, но вы готовы поставить ее заново.
Содержание
- Возврат на Windows 7 после обновления до Windows 10
- Откат из-под текущей версии Windows 10
- Если после обновления система не загружается
- Чистая установка Windows 7 вместо Windows 10
- Подготовка
- Ход установки
- У меня на ноутбуке есть раздел Recovery с Windows 7. Возможен ли сброс системы к заводскому состоянию (factory reset)?
Возврат на Windows 7 после обновления до Windows 10
Возможность возврата к предыдущей копии системы с сохранением пользовательских файлов, программ и настроек, существует, повторим, только 10 дней с момента обновления (раньше на раздумья отводилось 30 дней, но сейчас этот срок почему-то сократили в 3 раза). Если вы пропустили дедлайн, переходите к разделу инструкции о чистой установке.
В ходе отмены обновления программы и настройки, установленные и сделанные в Виндовс 10, будут удалены. Вы получите компьютер ровно в том состоянии, в каком он был до инсталляции «десятки».
Перед тем как перейти к процедуре отката, Microsoft также рекомендует сделать резервную копию важных файлов на случай возможного сбоя.
Откат из-под текущей версии Windows 10
- Загрузите операционную систему в обычном режиме. Откройте меню «Пуск» и запустите приложение «Параметры».
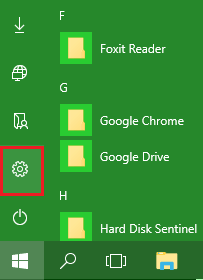
- Перейдите в раздел «Обновление и безопасность».
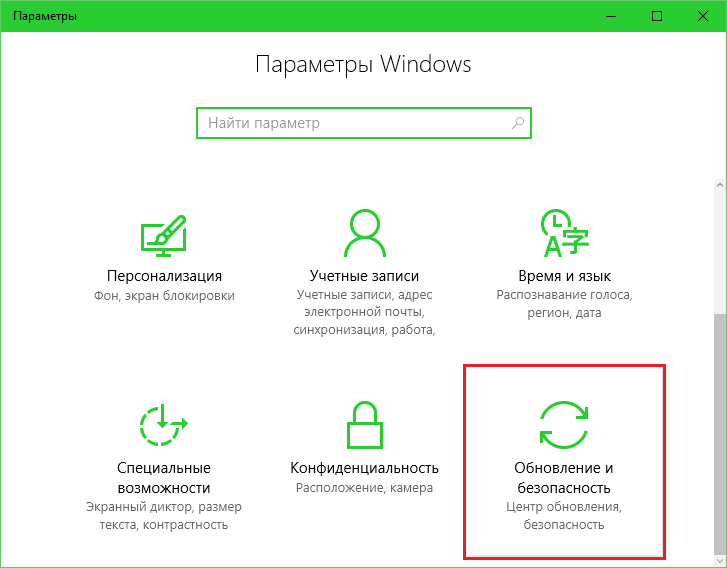
- Откройте подраздел «Восстановление» и возле пункта «Вернуться к Windows 7» нажмите «Начать».

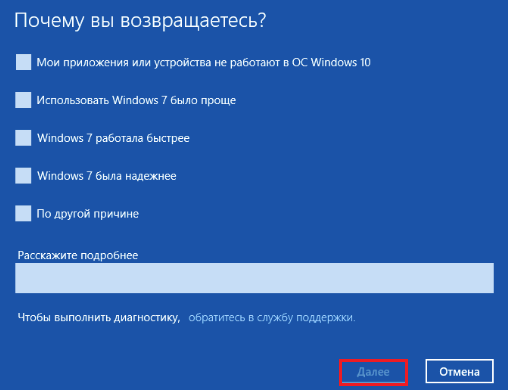
- Отметьте любую из причин, почему вы решили отказаться от обновления, и нажмите «Далее».
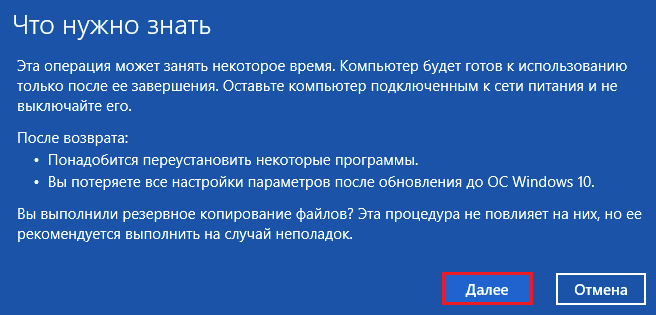
- В окне предупреждений снова нажмите «Далее».
Если откат пройдет успешно, через 30-40 минут вы опять увидите рабочий стол Windows 7 со всеми ярлыками, папками, файлами и остальным, что на нем было.
Если после обновления система не загружается
Даже если при обновлении произошел сбой и «десятка» перестала грузиться, вы все равно можете откатить компьютер до Windows 7. Для этого вам понадобится диск или флешка с дистрибутивом Windows 10, чтобы войти в среду восстановления.
Как в нее попасть и что делать дальше:
- Подключите установочную флешку или поместите в привод DVD-диск. Перезагрузите компьютер, зайдите в настройки BIOS и назначьте накопитель с дистрибутивом первым загрузочным устройством. Как это сделать, читайте в статье о чистой установке Windows 10.
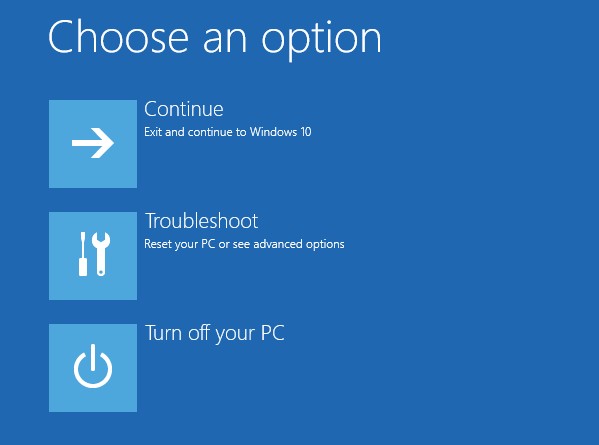
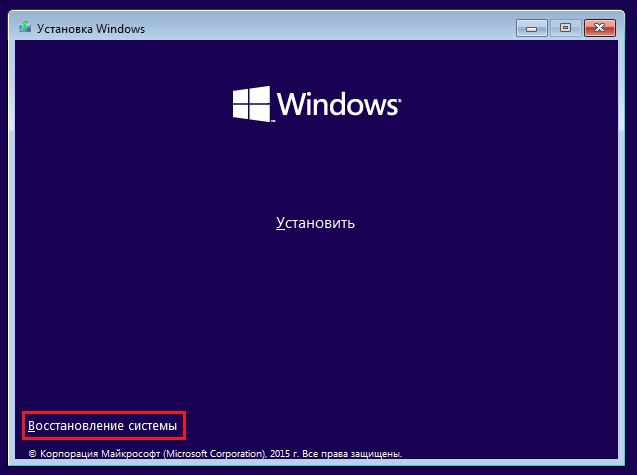
- После появления окна «Установить» нажмите «Восстановление системы». Так вы перейдете в среду восстановления.
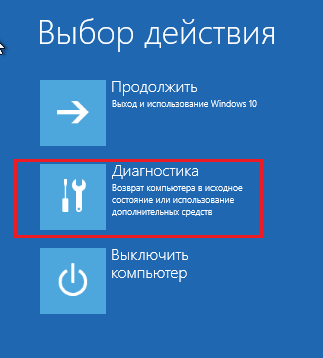
- На экране «Выбор действия» в среде восстановления щелкните мышкой по пункту «Диагностика».
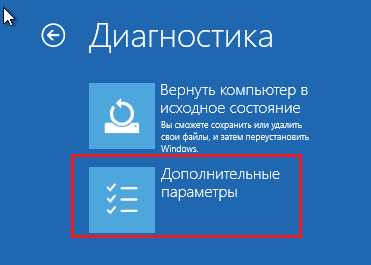
- Выберите «Дополнительные параметры»
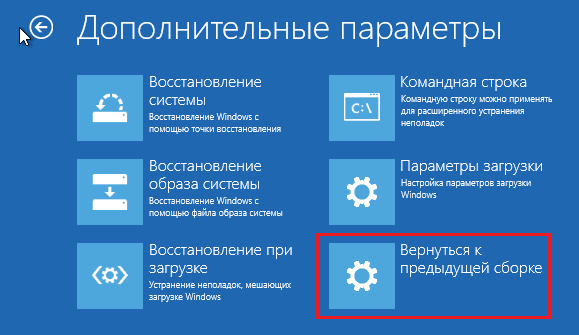
- Из перечня дополнительных параметров выберите «Вернуться к предыдущей сборке».
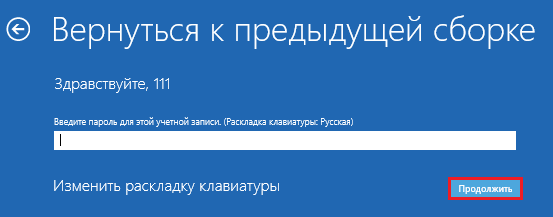
- Для продолжения кликните вашу учетную запись в текущей версии Виндовс.

- Введите пароль входа в аккаунт и нажмите «Продолжить».
После этого система проверит наличие ранее установленной копии (папки Windows.old в корневом разделе диска С) и, если она есть, приступит к процедуре отката.
Чистая установка Windows 7 вместо Windows 10
Под чистой установкой Windows 7 мы понимаем удаление предыдущей копии Windows 10 с форматированием или без форматирования системного раздела. По сути оно ничем не отличается от инсталляции «винды» на новый компьютер: вам потребуется загрузочный носитель с дистрибутивом и ключ для активации ОС, поскольку лицензия «десятки» обратной силы не имеет. И всё же небольшой шанс обойтись без покупки новой лицензии у вас есть, если соблюдены 2 условия:
- на этом компьютере ранее стояла лицензионная Windows 7, которую вы впоследствии обновили до Windows 10;
- раздел, в котором стояла лицензионная система, не подвергался форматированию.
Эти же условия важно соблюсти и при установке новой «семерки»: она непременно должна быть той же версии и разрядности, что и старая (если старая была 32 bit, а вы поставите 64 bit, лицензия будет недействительна). Кроме того, во время инсталляции необходимо сохранить все данные на системном разделе жесткого диска.
Если сохранение лицензии для вас некритично, редакция вновь устанавливаемой системы может быть любой.
Подготовка
О том, как создавать носитель с дистрибутивом «винды» и как загружать с него компьютер, мы рассказывали в статье о методах чистой установки Windows 10. Для записи загрузочной флешки «семерки» можете использовать те же самые утилиты, кроме Media Creation Tools, так как она предназначена только для работы с «десяткой».
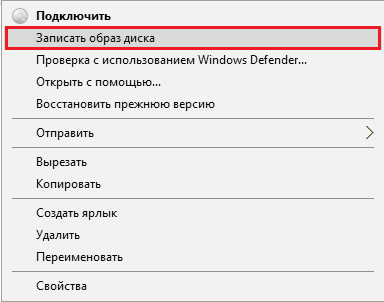
Чтобы создать установочный диск DVD, просто запишите на него загруженный из Интернета ISO-образ Windows 7, используя любую подходящую программу (Nero, UltraISO, Alcohol 120%) или собственные средства Windows. При выборе второго варианта поместите чистый диск в привод, откройте контекстное меню файла ISO и кликните по пункту «Записать образ».
Ход установки
Запуск процесса инсталляции «семерки», как и прочих версий Windows, возможен двумя способами:
- Если на компьютере стоит Windows 10, которая нормально загружается и работает, достаточно открыть дистрибутив и дважды кликнуть по файлу Setup.exe.
- Если «десятка» не загружается либо программа установки в ней по каким-то причинам не запускается, следует выключить компьютер и загрузить его с носителя с дистрибутивом.
Дальнейшие действия при том и другом варианте одинаковы. Рассмотрим их поближе.
- В первом окошке, которое откроет программа установки, вам предстоит выбрать основной язык системы, форматы даты и времени, денежные единицы и раскладку клавиатуры.

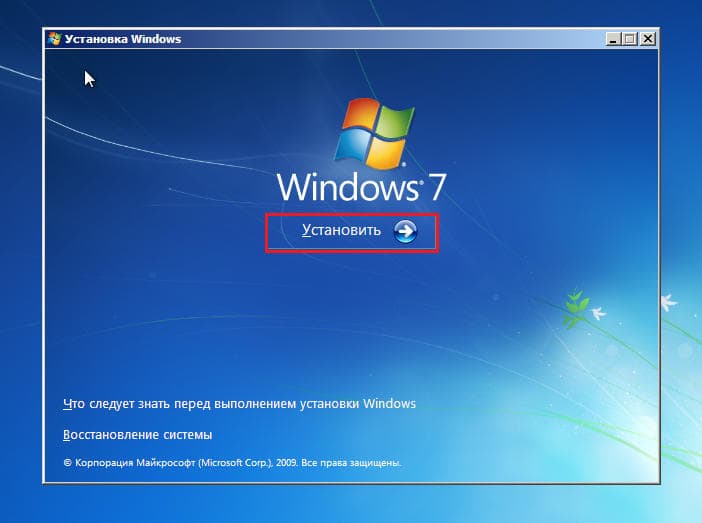
- За этим следует запуск самого процесса инсталляции. Нажмите кнопку «Установить».
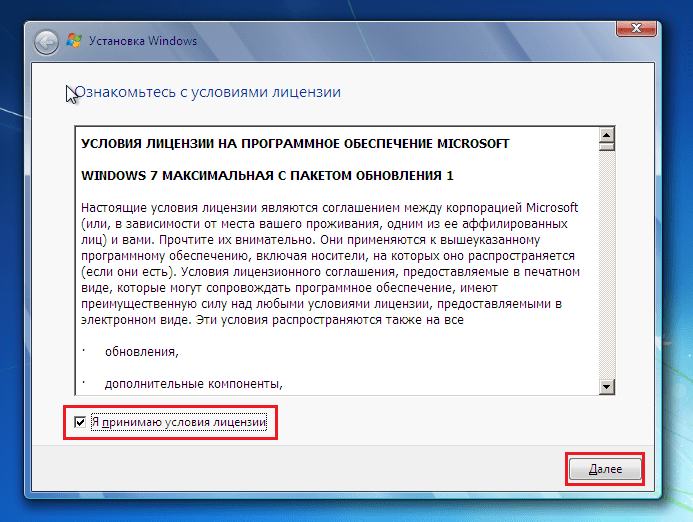
- Согласитесь с условиями лицензии.
- Выберите тип установки. Вариант «Обновление» (с сохранением пользовательских файлов, программ и настроек), к сожалению, не подойдет. Он возможен только тогда, когда на компьютере уже стоит рабочая копия Windows 7, поэтому выбирайте полную установку.

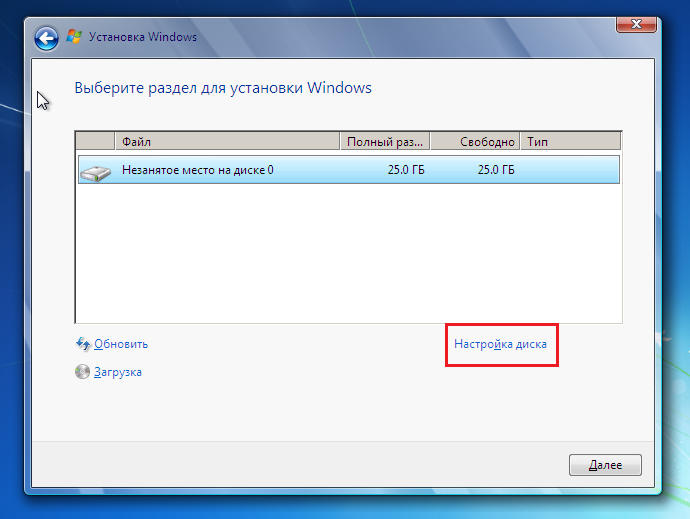
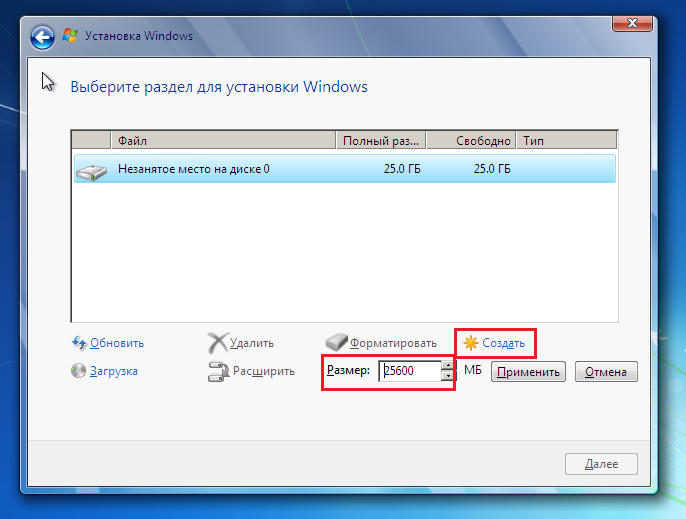
- Далее — самое ответственное: выбор раздела жесткого диска, где будет располагаться новая система. Если вы надеетесь сохранить лицензию, ставьте систему в тот же раздел, где находится Windows 10, и не форматируйте его. Если нет, вы можете не только отформатировать, но и изменить размер раздела. Нажмите «Настройка диска».
- Для изменения емкости раздела кликните кнопку «Создать» и укажите в соответствующем поле его новый размер. Примените настройку и кликните «Далее».
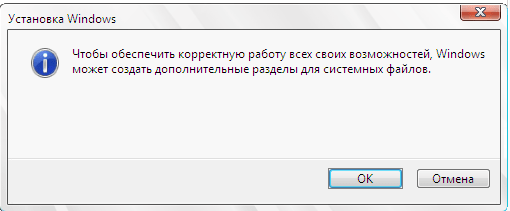
- Когда установщик предложит создать дополнительный раздел для системных файлов, нажмите ОК. Если такой раздел существует (а при повторной установке он должен быть), это окошко появляться не будет.
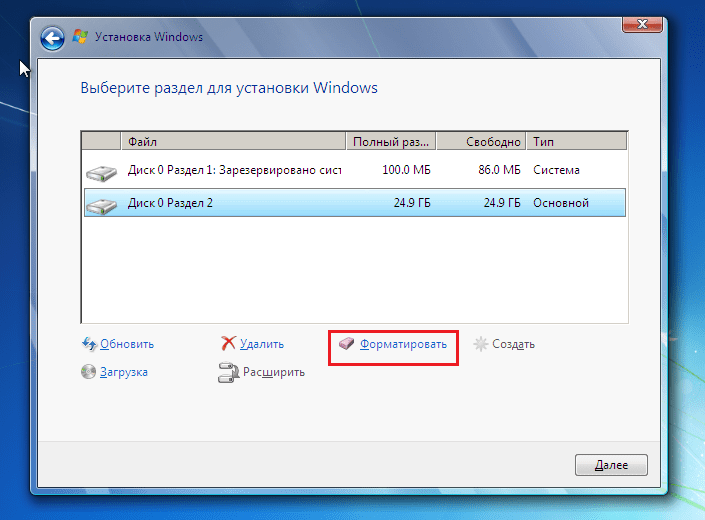
- Теперь вы можете отформатировать разделы диска. Если пропустите форматирование системного раздела, файлы старой копии Windows и все прочие данные останутся на месте, но будут перемещены в папку C:\Windows.old. Кстати, бывают случаи, когда без форматирования Windows не устанавливается. Причина — недостаток свободного места в системном разделе.
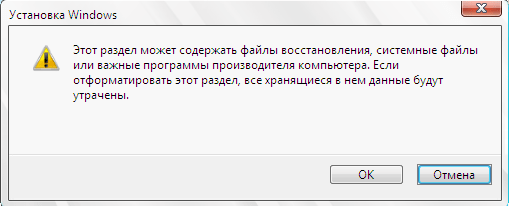
- При нажатии кнопки «Форматировать» программа установки предупредит вас, что все данные на диске будут уничтожены. Если вы согласны, кликните ОК.
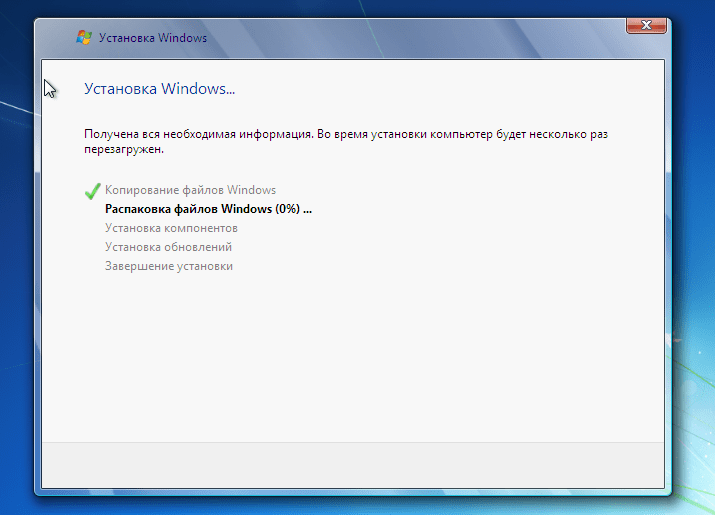
- Дальше можете немного передохнуть: копирование и распаковка файлов новой ОС, установка компонентов и обновлений не требует участия пользователя. Этот этап длится в среднем 20-40 минут.
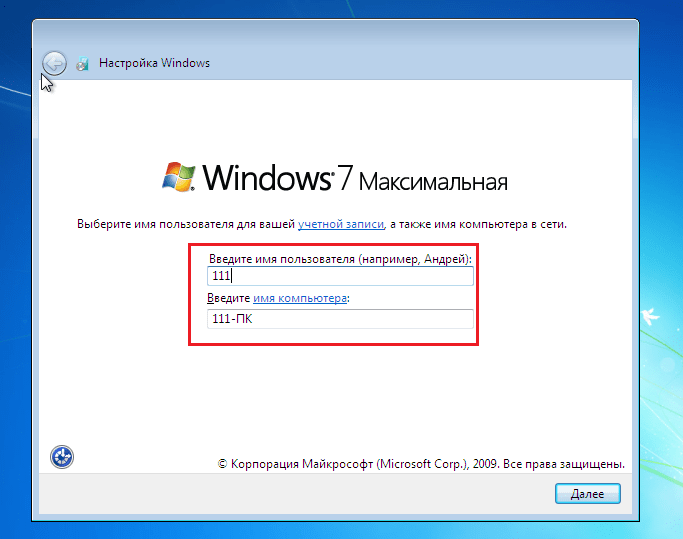
- После нескольких перезагрузок вы увидите окно с предложением ввести имена первого пользователя и компьютера. Учетная запись, которая создается при установке, наделяется правами администратора системы.
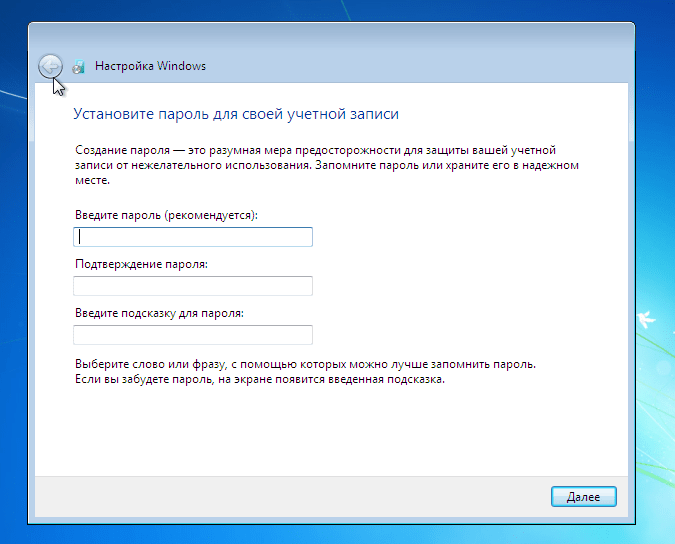
- Дальше будет предложено защитить свою учетную запись паролем. Если вы не планируете использовать пароль для входа в Виндовс, оставьте эти поля пустыми.
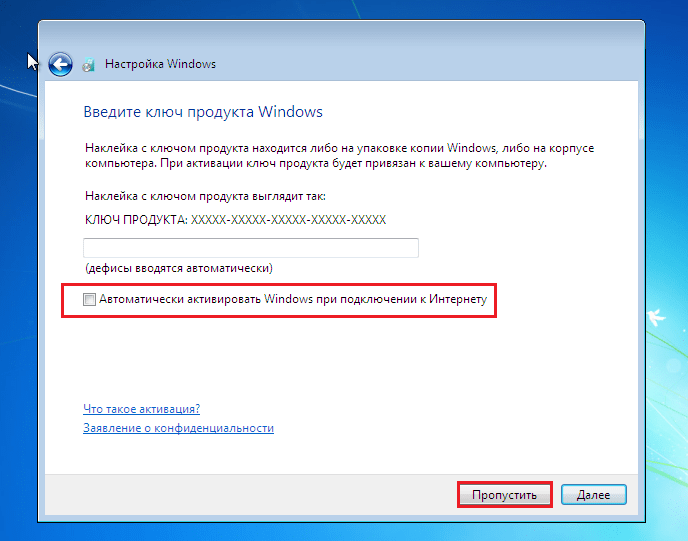
- Следующее окно предназначено для ввода ключа продукта. Если он у вас есть (обычно находится на фирменном лейбле, приклеенном к днищу ноутбука), заполните это поле. Если нет или вы планируете ввести его позднее, нажмите «Пропустить». Также не забудьте снять флажок возле предложения автоматической активации системы при подключении к Интернету.
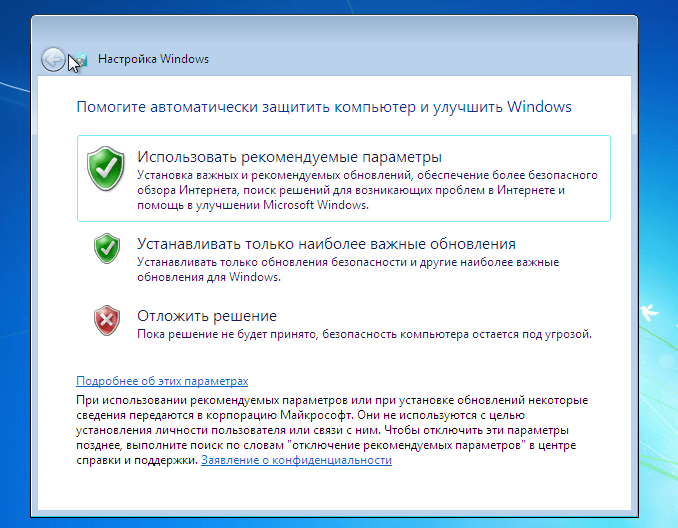
- После ввода ключа программа настройки предложит скачать и установить обновления Windows 7. Выбор пункта «Использовать рекомендуемые параметры» может затянуть процесс установки на несколько часов — все зависит от скорости Интернета и объема загружаемых файлов. Если хотите закончить инсталляцию побыстрее, нажмите «Отложить решение».
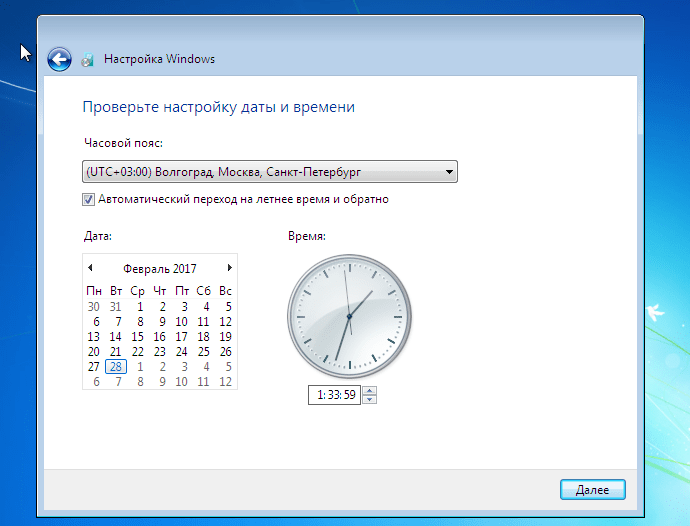
- Настройте системное время и часовой пояс.
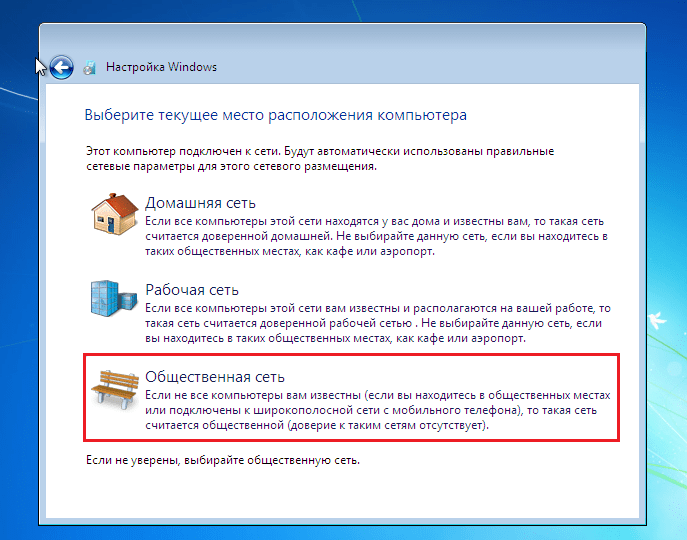
- Укажите текущее сетевое расположение компьютера. Можете выбрать любое, но в целях безопасности лучше остановиться на «Общественном». Позже, когда установите антивирус и файервол, вы сможете изменить эту настройку.
- На этом почти всё. Осталось подождать, пока «семерка» закончит применение параметров.
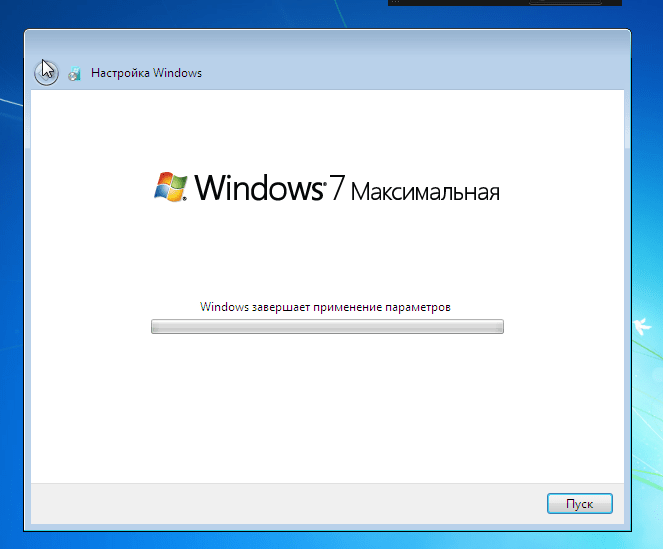
- Подготовка рабочего стола занимает всего пару минут.
И вот, наконец, то, к чему вы стремились: рабочий стол Windows 7. Пока он совершенно пуст. От того, что было в Windows 10, не осталось и следа, ведь вы переустановили систему начисто. Осталось поставить в нее программы — и можно начинать пользоваться.
У меня на ноутбуке есть раздел Recovery с Windows 7. Возможен ли сброс системы к заводскому состоянию (factory reset)?
Вы, наверное, знаете, что функция возврата в к заводскому состоянию присутствует на всех ноутбуках и фирменных ПК, где операционная система предустановлена производителем. Достаточно нажать клавишу — и машина девственно-чиста, как только что из магазина.
Factory reset — действительно полезная функция, но… ровно до того момента, пока вы не установите на компьютер другую версию Виндовс, отличную от седьмой. Расположение и структура подсистемы восстановления к заводскому состоянию каждой новой ОС радикально отличается от предыдущей, поэтому откат Windows 10 к предустановленной Windows 7 становится невозможным.