В этой статье мы рассмотрим, как в Linux смонтировать общую сетевую папку, расположенную на хосте Windows. В Windows для доступа к общим сетевым папкам используется протокол SMB (Server Message Block), который ранее назывался CIFS (Сommon Internet File System). В Linux для доступа к сетевым папкам Windows по протоколу SMB можно использовать клиент cifs-utils или Samba.
- Смонтировать сетевую папку в Linux с помощью cifs-util
- Автоматическое монтирование сетевой папки в Linux
- Linux: подключиться к сетевой папке с помощью клиента samba
Содержание:
Совет. Для доступа к сетевым папкам по SMB/CIFS используется порт TCP/445. Для разрешения имени используются порты UDP 137, 138 и TCP 139. Если эти порты закрыты, вы сможете подключиться к сетевой папке Windows только по IP адресу.
Смонтировать сетевую папку в Linux с помощью cifs-util
Вы можете смонтировать сетевую папку, находящуюся на Windows хосте, с помощью утилит из пакета cifs-util. Для установки пакета выполните команду:
- В Ubuntu/Debian:
$ sudo apt-get install cifs-utils - В CentOS/Oracle/RHEL:
$ sudo dnf install cifs-utils
Создайте точку монтирования:
$ sudo mkdir /mnt/share
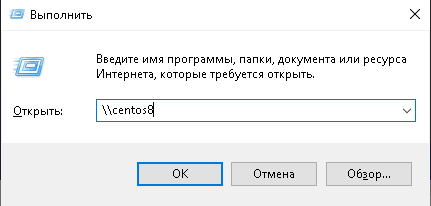
Теперь вы можете смонтировать сетевую папку с компьютера Windows под пользователем User03с помощью команды:
$ sudo mount.cifs //192.168.31.33/backup /mnt/share -o user=User03
Укажите пароль пользователя Windows для подключения к сетевой папке.
![]()
При подключении сетевой SMB папки можно задать дополнительные параметры:
$ sudo mount -t cifs -o username=User03,password=PasswOrd1,uid=1000,iocharset=utf8 //192.168.31.33/backup /mnt/share
- //192.168.31.33/backup – сетевая папка Windows
- /mnt/share – точка монтирования
- -t cifs – указать файловую систему для монтирования
- -o опции монтирования (эту опцию можно использовать только с правами root, поэтому в команде используется sudo)
- username=User03,password=PasswOrd1 – имя и пароль пользователя Windows, у которого есть права доступа к сетевой папке. Можно указать имя пользователя guest, если разрешен анонимный доступ к сетевой папке
- iocharset=utf8 – включить поддержку кодировки UTF8 для отображения имен файлов
- uid=1000 – использовать этого пользователя Linux в качестве владельца файлов в папке

По умолчанию шары Windows монтируются в Linux с полными правами (0755). Если вы хотите изменить права по-умолчанию при монтировании, добавьте в команду опции:
dir_mode=0755,file_mode=0755
Если вы хотите использовать имя компьютера при подключении сетевого каталога Windows, добавьте в файл /etc/hosts строку:
IP_АДРЕС ИМЯ_КОМПЬЮТЕРА
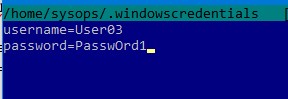
Чтобы не указывать учетные данные пользователя Windows в команде монтирования сетевой папки, их можно сохранить в файле.
Например:
$ mcedit ~/.windowscredentials
Добавьте в файл:
username=User03
password=PasswOrd1
Для подключения к папке под анонимным пользователем:
username=guest
password=
Если нужно указать учетную запись пользователя из определенного домена Active Directory, добавьте в файл третью строку:
domain = vmblog.ru
Измените права на файл:
$ chmod 600 ~/.windowscredentials
Теперь при подключении сетевой папки вместо явного указания имени пользователя и пароля можно указать путь к файлу:
$ sudo mount -t cifs -o credentials=/home/sysops/.windowscredentials,uid=1000,iocharset=utf8 //192.168.31.33/backup /mnt/share
Отмонтировать сетевую SMB папку:
$ sudo umount /mnt/share
Автоматическое монтирование сетевой папки в Linux
Можно настроить автоматическое монтирование сетевой папки Windows через /etc/fstab.
$ sudo mcedit /etc/fstab
Добавьте в файл следующую строку подключения SMB каталога:
//192.168.31.33/backup /mnt/share cifs user,rw,credentials=/home/sysops/.windowscredentials,iocharset=utf8,nofail,_netdev 0 0
- rw – смонтировать SBM папку на чтение и запись
- nofail – продолжить загрузку ОС если не удается смонтировать файловую систему
- _netdev – указывает что подключается файловая система по сети. Linux не будет монтировать такие файловые системы пока на хосте не будет инициализирована сеть.
Вы можете указать версию протокола SMB, которую нужно использовать для подключения (версия SMB 1.0 считается небезопасной и отключена по-умолчанию в современных версиях Windows). Добавьте в конец строки с настройками подключения параметр vers=3.0.
//192.168.31.33/backup /mnt/share cifs user,rw,credentials=/home/sysops/.windowscredentials,iocharset=utf8,nofail,_netdev,vers=3.0 0 0
Если на стороне хоста Windows используется несовместимая (старая версия) SMB, при подключении появится ошибка:
mount error(112): Host is downилиmount error(95): Operation not supported
Чтобы сразу смонтировать сетевую папку, выполните:
$ mount -a
Linux: подключиться к сетевой папке с помощью клиента samba
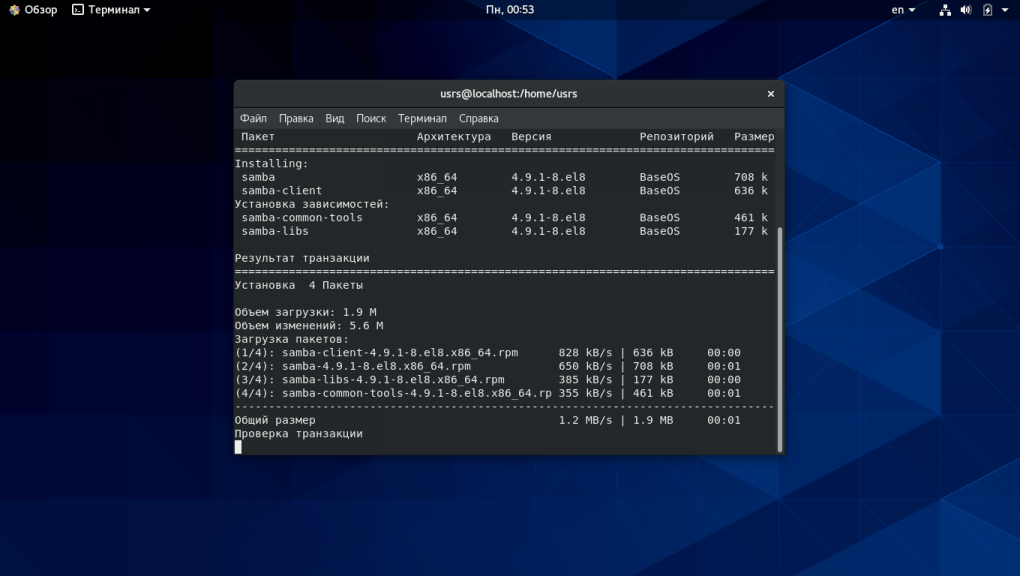
Установите в Linux клиент samba:
- В Ubuntu/Debian:
$ sudo apt-get install smbclient - В CentOS/Oracle/RHEL:
# dnf install smbclient
Для вывода всех SMB ресурсов в локальной сети:
$ smbtree -N
Вывести список доступных SMB папок на удаленном хосте Windows:
smbclient -L //192.168.31.33 -N
Если в Windows запрещен анонимный доступ, появится ошибка:
session setup failed: NT_STATUS_ACCESS_DENIED
В этом случае нужно указать учетную запись пользователя Windows, которую нужно использовать для подключения:
smbclient -L //192.168.31.33 -U User03
Если нужно использовать учетную запись пользователя домена, добавьте опцию –W:
smbclient -L //192.168.31.33 -U User03 –W Domain

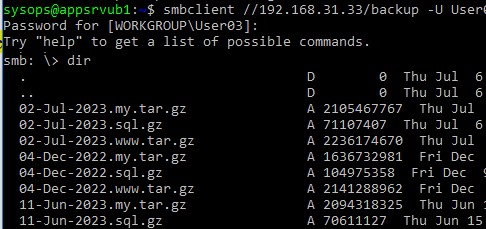
Для интерактивного подключения к сетевой папке Windows используется команда:
smbclient //192.168.31.33/backup -U User03 -W Domain
или
smbclient //192.168.31.33/backup -U User03
Для анонимного доступа:
smbclient //192.168.31.33/backup -U Everyone
После успешного входа появится приглашение:
smb: \>
Вывести список файлов в сетевой папке:
dir
Скачать файл из сетевой папки Windows:
get remotefile.txt /home/sysops/localfile.txt
Сохранить локальный файл из Linux в SMB каталог:
put /home/sysops/localfile.txt remotefile.txt
Можно последовательно выполнить несколько команд smbclient:
$ smbclient //192.168.31.33/backup -U User03 -c "cd MyFolder; get arcive.zip /mnt/backup/archive.zip"
Полный список команд в smbclient можно вывести с помощью команды help. Команды smbclient схожи с командами ftp клиента.
При использовании команды smbclient может появиться ошибка:
Unable to initialize messaging contextsmbclient: Can't load /etc/samba/smb.conf - run testparm to debug it.
Чтобы исправить ошибку, создайте файл /etc/samba/smb.conf.
Если на хосте Windows отключен протокол SMB 1.0, то при подключении с помощью smbclient появится ошибка:
Reconnecting with SMB1 for workgroup listing.
protocol negotiation failed: NT_STATUS_CONNECTION_RESET
Unable to connect with SMB1 -- no workgroup available.
Устанавливаем утилиту cifs-utils
[root@localhost ~]# yum install cifs-utilsДобавляем пользователей
[root@localhost ~]# useradd -u 5000 UserPackages
[root@localhost ~]# useradd -u 5001 UserTraffic
[root@localhost ~]# groupadd -g 6000 share_library
[root@localhost ~]# usermod -G share_library -a UserPackages
[root@localhost ~]# usermod -G share_library -a UserTraffic
Создаем каталоги, в которые будем монтировать расшаренные windows-ресурсы
[root@localhost ~]# mkdir /mnt/Packages
[root@localhost ~]# mkdir /mnt/Traffic
Создаем файл с настройками доступа к расшаренным windows-ресурсам и задаем права на этот файл
Selectel — ведущий провайдер облачной инфраструктуры и услуг дата-центров
Компания занимает лидирующие позиции на рынке на рынке выделенных серверов и приватных облаков, и входит в топ-3 крупнейших операторов дата-центров в России.
[root@localhost ~]# nano /root/smb_user
username=user
domain=DOMAIN
password=password
[root@localhost ~]# chmod 0600 /root/smb_user
Монтируем
[root@localhost ~]# mount.cifs \\\\192.168.0.15\\Packages /mnt/Packages -o credentials=/root/smb_user,uid=5000,gid=6000
[root@localhost ~]# mount.cifs \\\\192.168.0.15\\Traffic /mnt/Traffic -o credentials=/root/smb_user,uid=5001,gid=6000
Команды для размонтирования:
[root@localhost ~]# umount /mnt/Packages
[root@localhost ~]# umount /mnt/Traffic
Автоматическое монтирование каталогов при последующей загрузке операционной системы
Открываем файл /etc/fstab в текстовом редакторе и добавляем в конце файла строки:
[root@localhost ~]# nano /etc/fstab
\\\\192.168.0.15\\Packages /mnt/Packages    cifs    credentials=/root/smb_user,uid=5000,gid=6000 0 0
\\\\192.168.0.15\\Traffic /mnt/Traffic   cifs    credentials=/root/smb_user,uid=5001,gid=6000 0 0
У блога появился новый хостинг от компании Selectel.
Нашли интересную или полезную информацию в блоге? Хотели бы видеть на нем еще больше полезных статей? Поддержи автора рублем.
Если вы размещаете материалы этого сайта в своем блоге, соц. сетях, и т.д., убедительная просьба публиковать обратную ссылку на оригинал.
Одним из наиболее распространенных способов взаимодействия между компьютерами на базе linux и windows является Samba. Samba — это пакет программ, которые позволяют создавать и обращаться к сетевым дискам и общим папкам на одинаковых или разных операционных системах. Наиболее частым из способов применения Samba является ее настройка в качестве файлового сервера.
В сегодняшней нашей инструкции вы узнаете как выполняется установка и настройка Samba CentOS 8 для обмена файлами между Linux и Windows системами. Доступ к общим папкам сервера будет настроен для в первой части для любого пользователя без запроса пароля, а во второй — с запросом пароля доступа к защищенной общей папке.
Сперва авторизуйтесь на вашем сервере от имени пользователя root. Затем используйте команду приведенную ниже для установки необходимых пакетов:
dnf install samba samba-common samba-client -y

По умолчанию во всех windows компьютерах используется рабочая группа WORKGROUP. Вы можете проверить принадлежность вашего Windows компьютера к этой рабочей группе выполнив следующую команду:
net config workstation

Настройка samba в CentOS 8
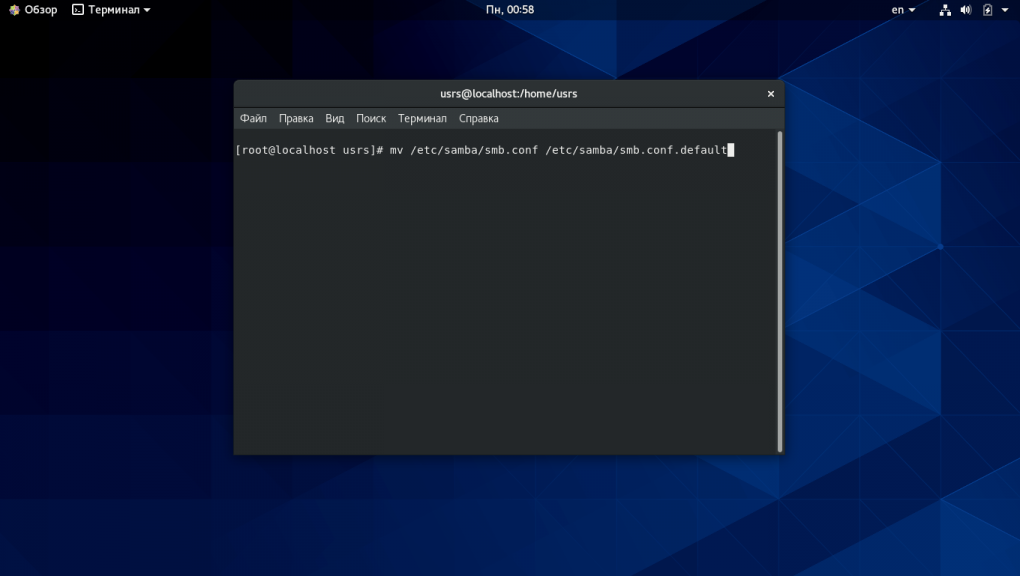
Сперва перед началом настройки переименуйте конфигурационный файл Samba для сохранения его резервной копии. Выполняется это действие следующей командой:
mv /etc/samba/smb.conf /etc/samba/smb.conf.default
1. Общий ресурс с анонимным доступом
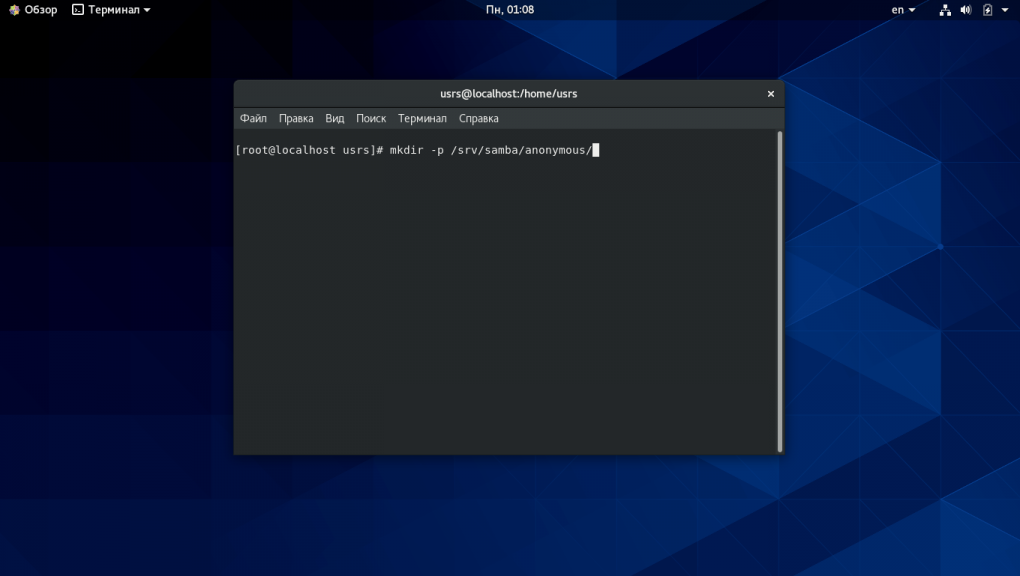
Теперь создайте на сервере общий ресурс в котором будут хранится файлы и папки с предоставленным к ним анонимным доступом. Для этого вам необходимо создать папку к которой будет предоставлен анонимный доступ:
mkdir -p /srv/samba/anonymous
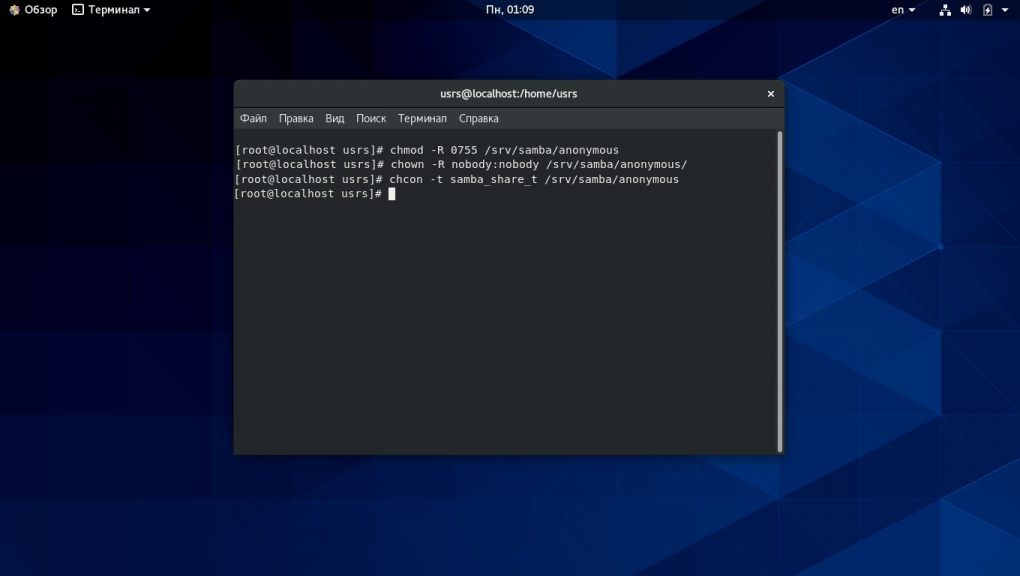
Затем настройте права и разрешения selinux на доступ к этой папке при помощи следующих команд:
chmod -R 0755 /srv/samba/anonymous
chown -R nobody:nobody /srv/samba/anonymous
chcon -t samba_share_t /srv/samba/anonymous
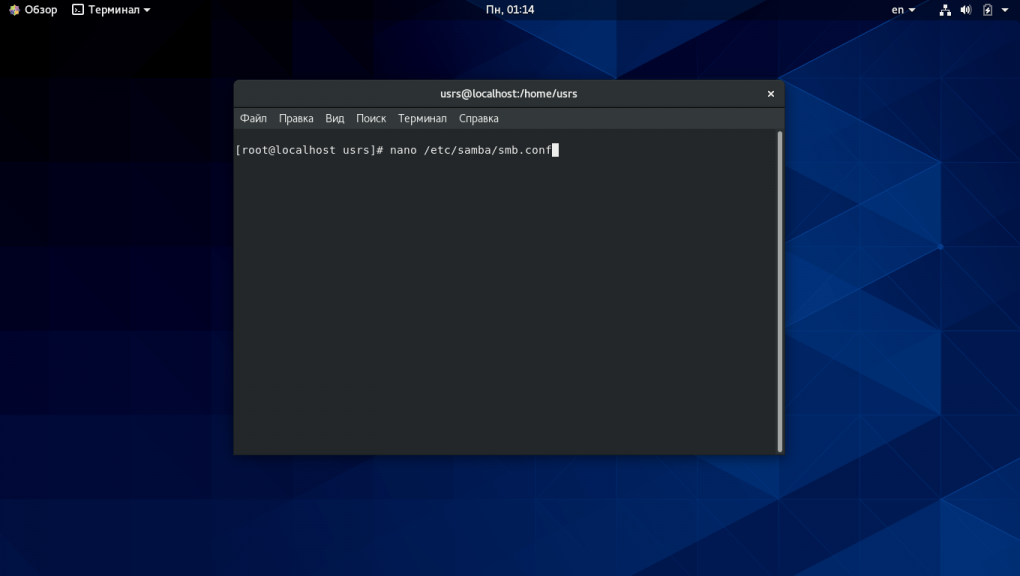
Теперь создадим новый файл конфигурации Samba следующей командой:
nano /etc/samba/smb.conf
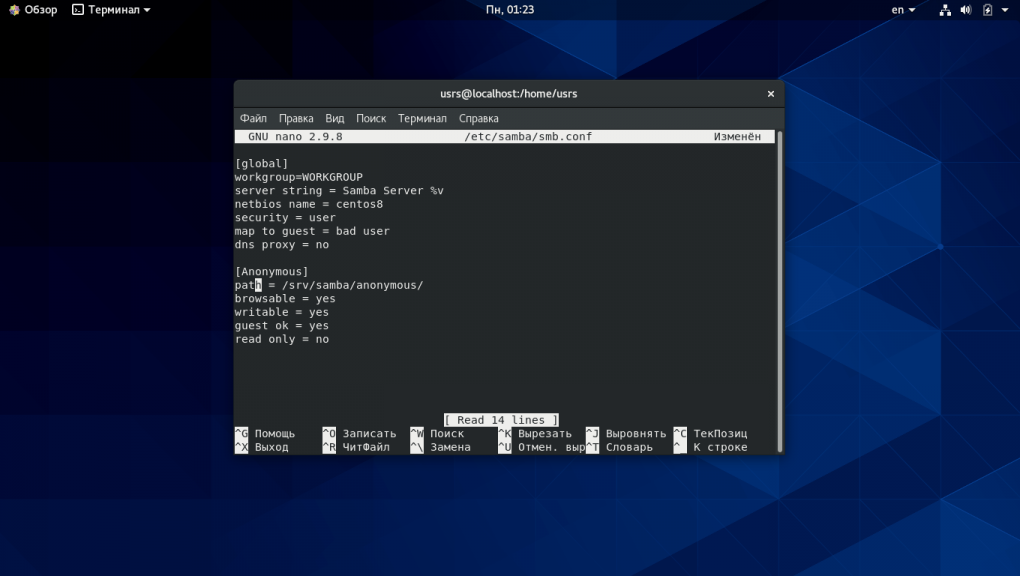
Добавьте в созданный файл следующие строки:
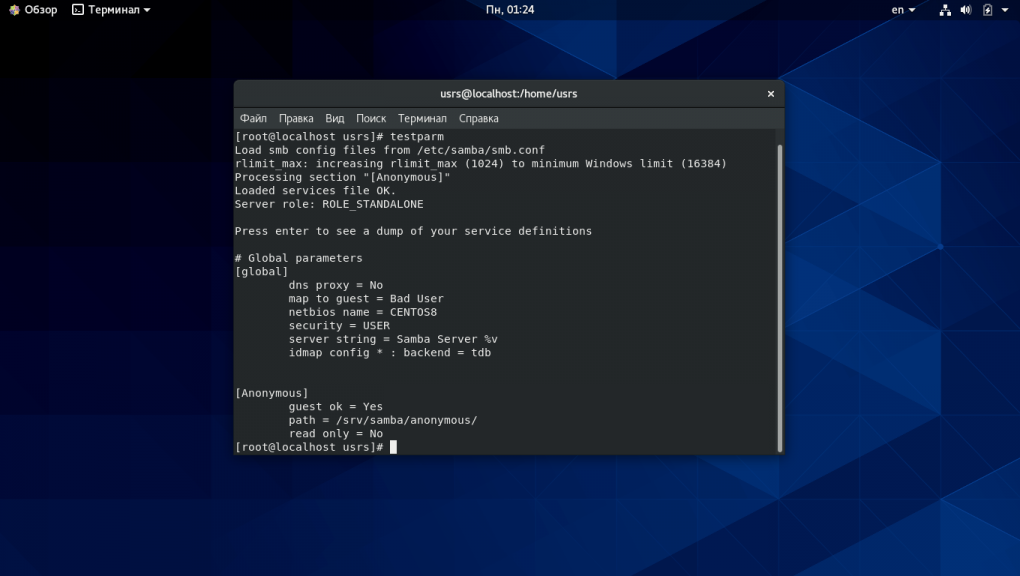
[global]

workgroup = WORKGROUP

server string = Samba Server %v

netbios name = rhel8

security = user

map to guest = bad user

dns proxy = no
[Anonymous]

path = /srv/samba/anonymous

browsable =yes

writable = yes

guest ok = yes

read only = no
Проверьте настройки Samba запустив следующую команду:
testparm
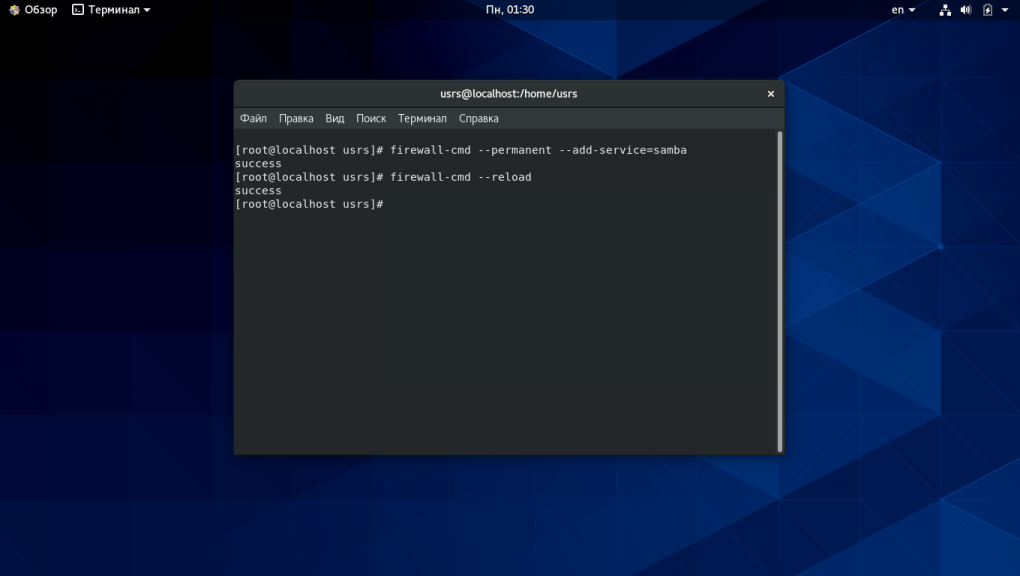
Теперь вам необходимо добавить службу Samba в брандмауэр и запустить её. Для этого выполните следующие команды:
firewall-cmd --permanent --add-service=samba
firewall-cmd --reload
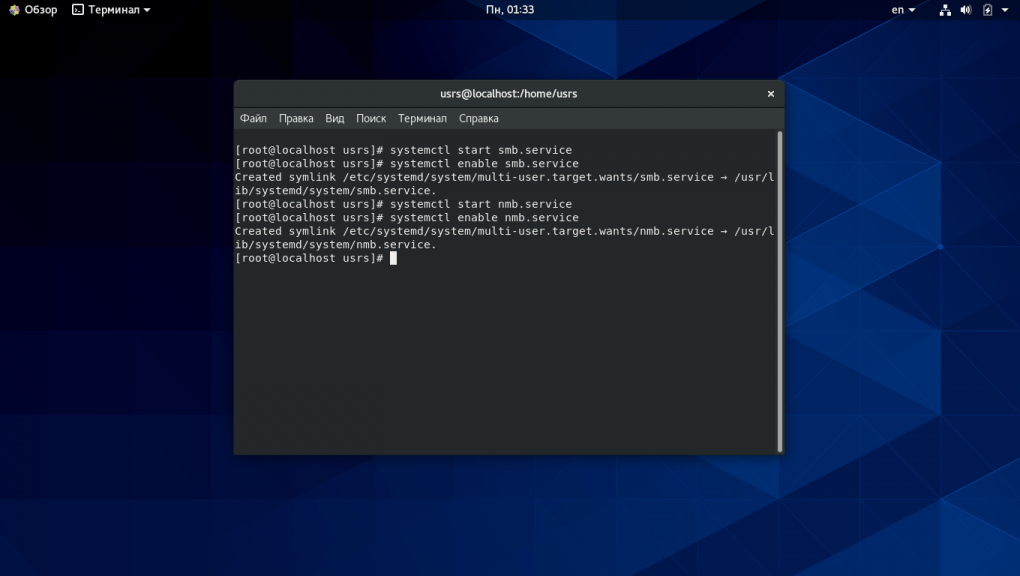
Запустите и добавьте в автозагрузку сервис Samba:
systemctl start smb.service

systemctl enable smb.service

systemctl start nmb.service

systemctl enable nmb.service
Теперь на вашей windows машине откройте строку Выполнить находящуюся в меню Пуск или при помощи сочетания клавиш Win+R. В открывшейся строке наберите следующую команду и нажмите ОК либо Enter:
\\centos8

У вас откроется сетевая папка расположенная на вашем CentOS 8 сервере настроенная для анонимного доступа.
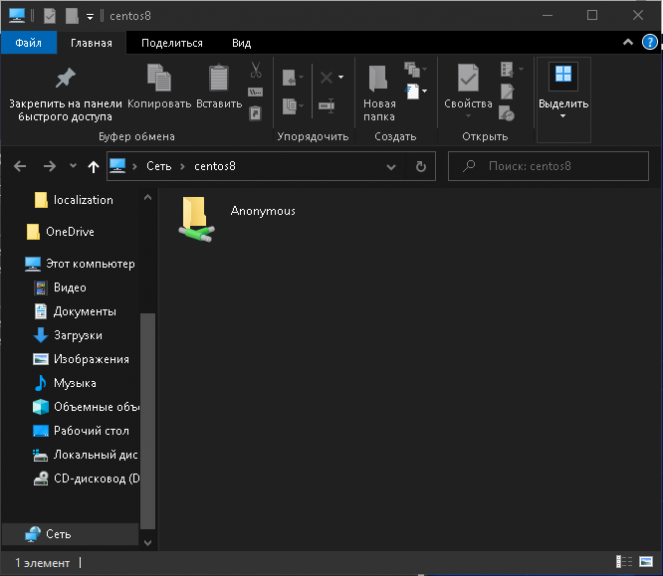
Теперь вы можете добавлять требуемые файлы и папки в эту папку предоставляя другим пользователям доступ к ним.
Настройка Samba CentOS 8 для анонимного доступа к данным завершена.
2. Общий ресурс с приватным доступом
Для предоставления доступа к файлам и папкам определенным пользователям создайте защищенную папку Samba. Сперва создайте защищенную группу с пользователями. Для этого выполните следующую команду:
groupadd securedgroup

Теперь добавьте пользователя в группу securedgroup от имени которого будет осуществляться вход в защищенную папку:
useradd demo -G securedgroup

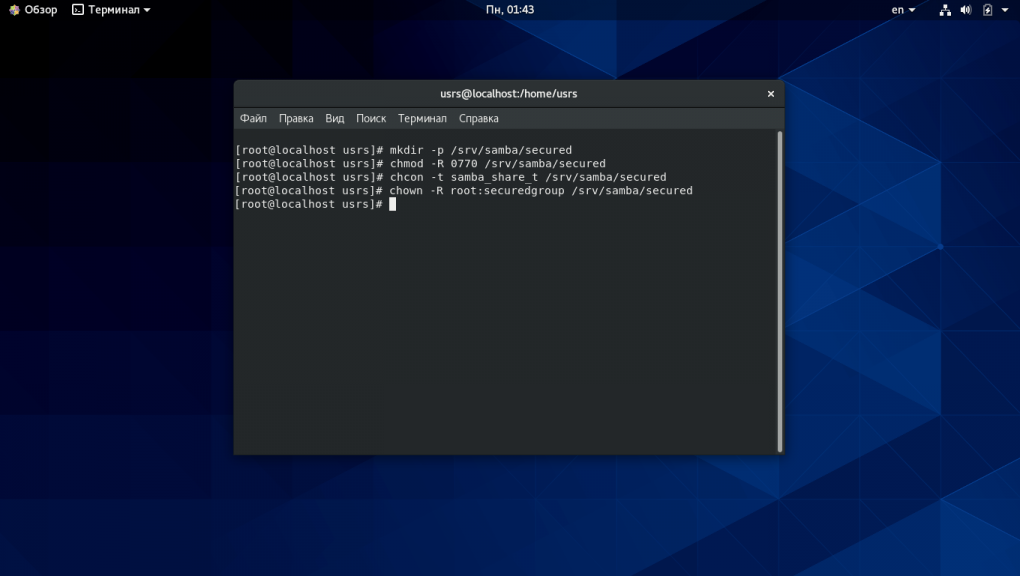
Теперь создайте защищенную общую папку Samba и добавьте к ней необходимые разрешения выполнив следующие команды:
mkdir -p /srv/samba/secured
chmod -R 0770 /srv/samba/secured
chcon -t samba_share_t /srv/samba/secured
chown -R root:securedgroup /srv/samba/secured/
Теперь добавьте пользователя в базу данных и установите для него пароль:
smbpasswd -a demo

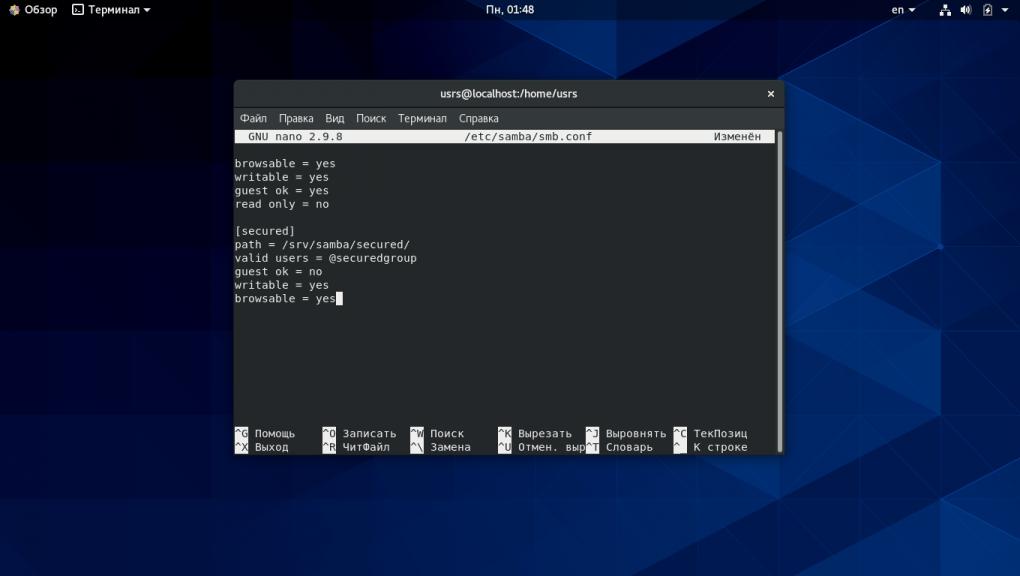
Добавьте в файл конфигурации Samba следующие строки:
nano /etc/samba/smb.conf
[secured]

path = /srv/samba/secured

valid users = @securedgroup

guest ok = no

writable = yes

browsable = yes
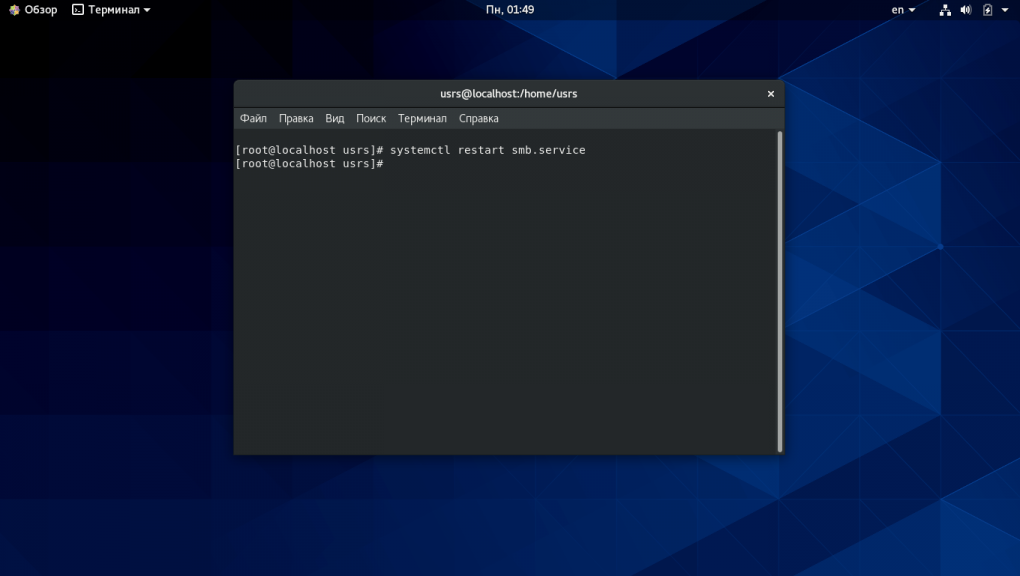
Затем перезапустите Samba следующей командой:
systemctl restart smb.service
Теперь для того, чтобы получить доступ к защищенной папке вашего CentOS 8 сервера из вашей windows машины откройте строку Выполнить из пункта меню Пуск или при помощи комбинации клавиш Win+R и наберите:
\\centos8
Затем нажмите ОК или клавишу Enter.
При попытке входа в защищенную папку у вас появится окно с требованием ввести имя пользователя и пароль для получения доступа к файлам находящимся в защищенной папке.
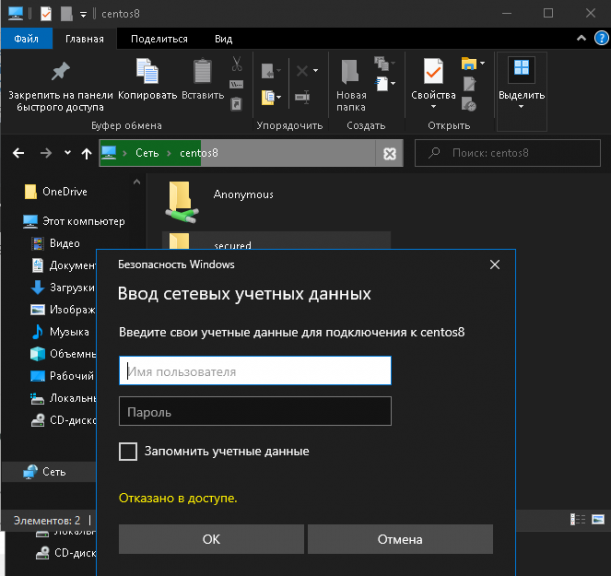
После ввода имени пользователя и пароля вы сможете получить доступ к защищенной папке. Теперь вы можете добавлять в нее файлы и папки для того, чтобы поделиться ими только с определенными пользователями.
Выводы
В сегодняшней инструкции мы рассказали вам как выполняется установка samba centos 8, а также как установить и настроить общие папки расположенные на вашем CentOS 8 сервере для того, чтобы вы могли делиться файлами и папками с другими пользователями.
Обнаружили ошибку в тексте? Сообщите мне об этом. Выделите текст с ошибкой и нажмите Ctrl+Enter.

Статья распространяется под лицензией Creative Commons ShareAlike 4.0 при копировании материала ссылка на источник обязательна .
This article is intended as a general guide. Installing and configuring a SAMBA client on CENTOS 7 for file sharing on Windows.
Step 1 — Check windows machine Workgroups
Before you proceed to configure samba, make sure the Windows machine is in the same workgroup to be configured on the CentOS server. To check the value in windows machine run the command at cmd prompt:
net config workstation
Enter fullscreen mode
Exit fullscreen mode

Step 2 — Install SAMBA
First install Samba4 and required packages from the default CentOS repositories using the:
dnf install samba* -y
Enter fullscreen mode
Exit fullscreen mode
Step 3 — Configure
The main samba configuration file is:
nano /etc/samba/smb.conf
Enter fullscreen mode
Exit fullscreen mode
But, before configuring samba, I suggest you to take a backup of the default file like this.
cp /etc/samba/smb.conf /etc/samba/smb.conf.orig
Enter fullscreen mode
Exit fullscreen mode
Edit the file according to your needs. In my case I will share the /var/www/html folder and allow the smbgrp group to access it.


Secure Samba file sharing
As root, create the user you want to access the shared folder. In my case I will be creating a group “smbgrp” allowed to access the shared folder. This allows you to add more users in the future.
groupadd smbgrp
# Assign your user to this group.
usermod user -aG smbgrp
# Set a password for this user.
sudo smbpasswd -a user
# Also set the appropriate permissions on the directory.
chmod -R 0775 /var/www/html
# Assign the full control of the shared folder to the user.
chown -R user:smbgrp /var/www/html
Enter fullscreen mode
Exit fullscreen mode
In my case, I will be sharing the html folder in /var/www/html. This is useful for web developers, because lets you edit in realtime a file in the centos server from windows. In a classic Apache HTTP server.
Allow Samba server default ports through firewall
firewall-cmd --permanent --add-port=137/tcp
firewall-cmd --permanent --add-port=138/tcp
firewall-cmd --permanent --add-port=139/tcp
firewall-cmd --permanent --add-port=445/tcp
firewall-cmd --permanent --add-port=901/tcp
firewall-cmd --reload
Enter fullscreen mode
Exit fullscreen mode
Restart SAMBA services:
systemctl start smb
systemctl start nmb
systemctl status smb
systemctl status nmb
Enter fullscreen mode
Exit fullscreen mode
Step 4 — Verify the shared folder
In order to verify the correct installation, create an example file in the shared folder with touch:
touch /var/www/html/hola.txt
Enter fullscreen mode
Exit fullscreen mode
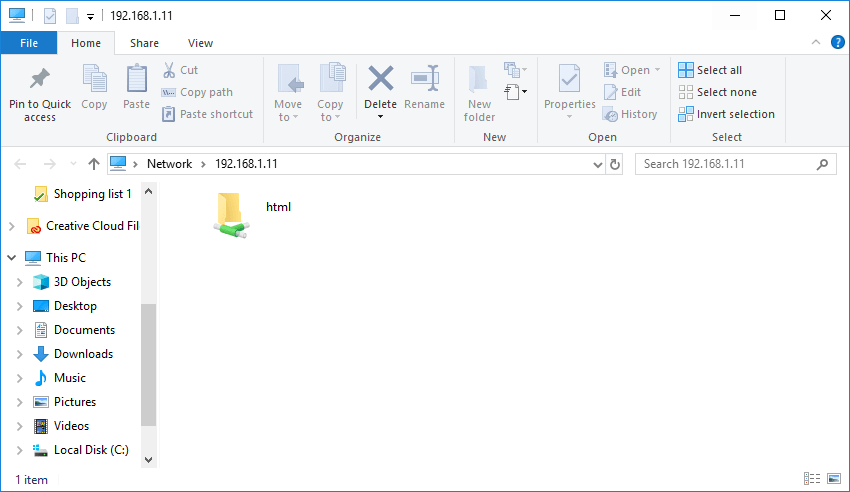
In windows, press “Windows Key+R” and submit your ip address, preceded by two inverted slashes: \
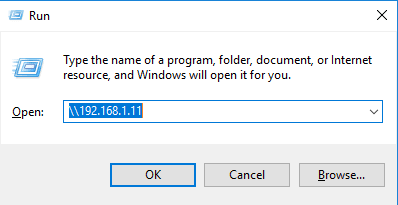
You will see your shared folder like this:
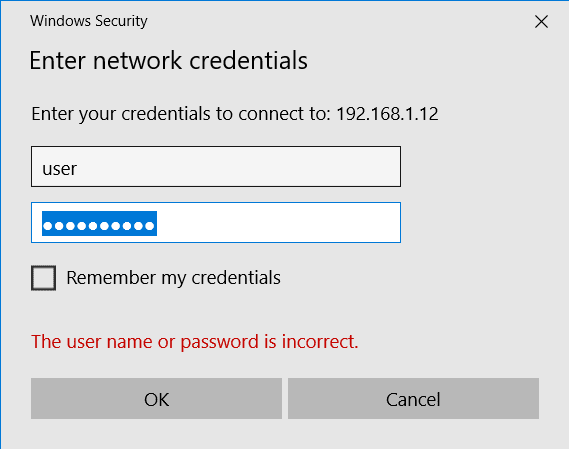
If you set the user and folder permissions as described before, you should see a login window. In which you must enter your centOS user and the password selected.
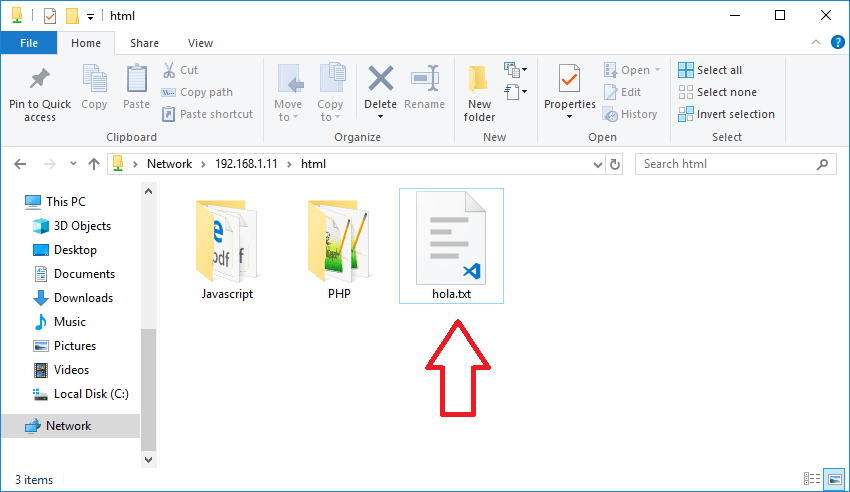
There is the hola.txt file created from centOS 7.
Finally, start and enable samba services to start automatically at next boot:
systemctl enable smb.service
systemctl enable nmb.service
systemctl start smb.service
systemctl start nmb.service
Enter fullscreen mode
Exit fullscreen mode
# Conclusion
Setting up Samba is easy, and something to consider if you want easy file sharing between Linux and Windows machines, or even Linux and Linux machines. I gave some context of how to set it up, but there are tons of use cases for Samba. You can also tie it in to different authentication/authorization schemes if you’d like an use it with Active Directory as well. Check out Samba.org for more information.
Read next

File transfer through SSH is easy!
Mateus Abelli —

Bash, the magic that empowers the Cloud
Sm0ke —

What is DevOps, Really?
Tai Kedzierski —

A Step-by-Step Guide on Creating a Resource Group, Virtual Network and Subnet in Azure with Terraform.
Bernard Chika Uwaezuoke —
Once unpublished, all posts by alemartinezz will become hidden and only accessible to themselves.
If alemartinezz is not suspended, they can still re-publish their posts from their dashboard.
Note:
Once unpublished, this post will become invisible to the public and only accessible to Alejandro Martínez.
They can still re-publish the post if they are not suspended.
Thanks for keeping DEV Community safe. Here is what you can do to flag alemartinezz:
Make all posts by alemartinezz less visible
alemartinezz consistently posts content that violates DEV Community’s
code of conduct because it is harassing, offensive or spammy.
Overview
In this tutorial, you will learn how to mount SMB shares on CentOS 7. You will be guided through the process for both desktop and server installations of the operating system.
CentOS provides support for mounting Microsoft CIFS or SMB shares. Not just limited to shares hosted from Microsoft Windows, we can also mount shares from any network device that uses the SMB protocol. This includes just about any NAS device on the market.
If you understand how to mount SMB shares on earlier versions of Red Hat Enterprise Linux or CentOS, the instructions are identical.
Share Configuration
For this tutorial, I prepared a share named Core Library on a Windows Server 2012 R2 server that is a member of an Active Directory domain.
| Hostname | Operating System | Share Path | SMB Version |
|---|---|---|---|
| WS12FS01 | Windows Server 2012 R2 | \\WS12FS01\libraries\core | 2.0 |
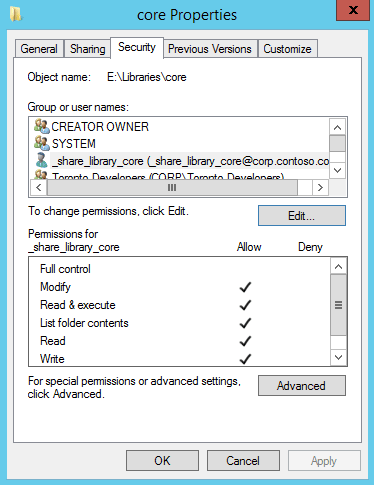
For the share permission on WS12FS01, we grant Full Control to Everyone. Don’t be fooled into thinking this is insecure. Although everyone has access to the share, the NTFS permissions on the volume hosting the share overrule the share permissions. By leaving Everyone and granting full control, we save our selves work by only having to manage permissions on the file system itself.

For the NTFS permissions, we created an Active Directory account named _share_library_core and granted it Modify, Read & Execute, List folder contents, Read, and Write. The account will be used when we mount the share onto CentOS 7.
We use an Active Directory account in this tutorial as an example of how someone would accomplish this in an enterprise environment.
However, an Active Directory account is not required. As long as the CentOS server has an account that can authenticate successfully on the host publishing the share, it doesn’t matter where the account actually exists – in Active Directory or locally on the file server itself.
Preparing CentOS 7 for Mounting SMB Shares
A default CentOS 7 build will not be able to mount SMB\CIFS shares, unless you customized the install. We’ll need to install a package onto the server that allows it to understand the SMB protocol.
- Install the cifs-utils package from the default CentOS yum repository.
yum install cifs-utils
- Next, we need an account on the CentOS server that will map to the Windows account granted permission to the SMB share, _share_library_core. We’ll create a service account named svc_library_core with a user id (UID) of 5000.
useradd -u 5000 svc_library_core
- We also want a group on the CentOS server that will map to the share. This group will contain all of the Linux accounts that will need access to the share. Our account will be called share_library_core and it will have a group id (gid) of 6000.
groupadd -g 6000 share_library_core
- Finally, add any Linux accounts that require access to the SMB share to the newly created Linux group. I have an existing account named user1 that I will add to the share_library_core group.
usermod -G share_library_core -a user1
Mounting an SMB Share
We are now ready to mount our SMB share. In the example below, we temporarily mount the SMB share onto our CentOS server. The share will remain mounted until the server is rebooted.
- Create a directory to mount the SMB share into. We’ll mount the share in a directory called lib_core.
mkdir /lib_core
- Using the mount.cifs command, mount the SMB share into lib_core using the Active Directory user account _share_library_core. We need to map the UID of our svc_library_core account (5000) and the gid of our share_library_core group (6000) to the SMB share.
mount.cifs \\\\WS12FS01\\libraries\\core /lib_core -o user=_share_library_core,pass="secret",uid=5000,gid=6000
The extra backslashes (\) are not typos. Backslashes are used to escape certain characters. Because of this, we have to double up on them when accessing Microsoft shares.
- If no errors appeared, the share should successfully be mounted. The verify this, use the df command or the mount.
Hiding SMB USer Credentials
In the example above, we’re forced to enter the username and password into the command-line. This is a major security issue, as someone could browse your bash history to obtain the credentials, or they can see them while you type them in. Thankfully, there’s a way to address this problem by using a credentials file.
- If not Root, SU into the Root account.
su - root
- Create a credentials file in Root’s home directory. I typically create this file in a sub-directory in Root’s home, for organizational reasons. But for this example, I will place it in /root.
touch /root/creds_smb_library_core
- Modify the file’s permissions so that only the Root account is granted read permissions. No groups or other users should have access to the file.
chmod 0600 /root/creds_smb_library_core
- Open the file in a text editor. I like using VI, but you can use whichever you prefer.
vi /etc/root/creds_smb_library_core
- Add the following lines to the file. Remember to replace the username and password values so that they match your environment.
username=_share_library_core
password=secret
TABLE2 – Credential file options
username The Windows or Active Directory username granted permissions to the share on the Windows file server. password The password given to the username - Save your changes to the credential file and exit the text editor.
- Mount the SMB share. However, instead of using the user and pass options, we instead use the credentials option and point to our credentials file.
mount.cifs \\\\WS12FS01\\libraries\\core /lib_core -o credentials=/root/creds_smb_library_core,uid=5000,gid=6000
Persistent SMB Mounts using FSTAB
The downfall of the examples above is that the mounts are only temporary – the will not remount at system boot. The make the mount permanent we need to add it the fstab.
- Open /etc/fstab into a text editor.
vi /etc/fstab
- Add the following line to your fstab. Remember to replace the values with those that match your environment.
\\\\WS12FS01\libraries\\core /lib_core cifs credentials=/root/creds_smb_library_core,uid=5000,gid=6000 0 0
- Save your changes and exit the text editor.
- The SMB share will mount the next time the CentOS server is rebooted. To mount the share immediately, use the mount command.
mount -a