 Очередное обновление Windows 11 около полугода назад принесло возможность устанавливать обои «Windows: Интересное» или Windows Spotlight в качестве обоев рабочего стола. О том, как это сделать, можно прочитать здесь.
При использовании таких обоев есть один нюанс, который некоторые пользователи могут счесть недостатком: отображение значка «Дополнительные сведения об этом изображении» на рабочем столе. При желании его можно убрать, в этой инструкции — о том, как это сделать.
Отключение значка «Дополнительные сведения об этом изображении» на рабочем столе в редакторе реестра
Первый способ не предполагает использование каких-либо сторонних средств настройки оформления Windows 11, достаточно добавить значение в реестре. Внимание: при использовании способа будут сброшены расположения значков на рабочем столе, потребуется расставить их заново.
Шаги будут следующими:
- Запустите редактор реестра. Для этого можно нажать правой кнопкой мыши по кнопке «Пуск», выбрать пункт «Выполнить», ввести regedit и нажать Enter.
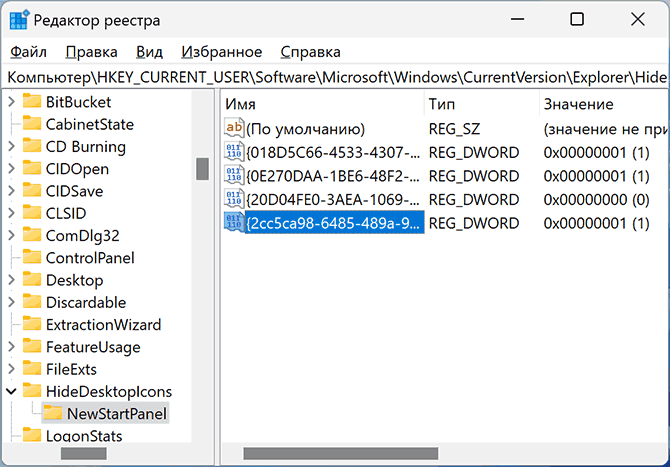
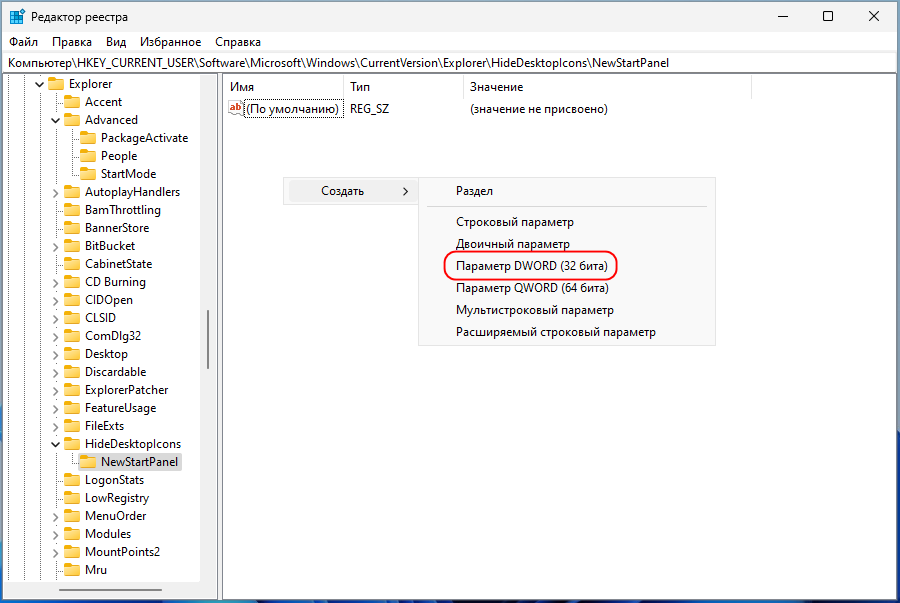
- В редакторе реестра перейдите к разделу
HKEY_CURRENT_USER\Software\Microsoft\Windows\CurrentVersion\Explorer\HideDesktopIcons\NewStartPanel
- Нажмите правой кнопкой мыши в пустом месте правой панели редактора реестра и выберите пункт «Создать» — «Параметр DWORD (32-бита)».
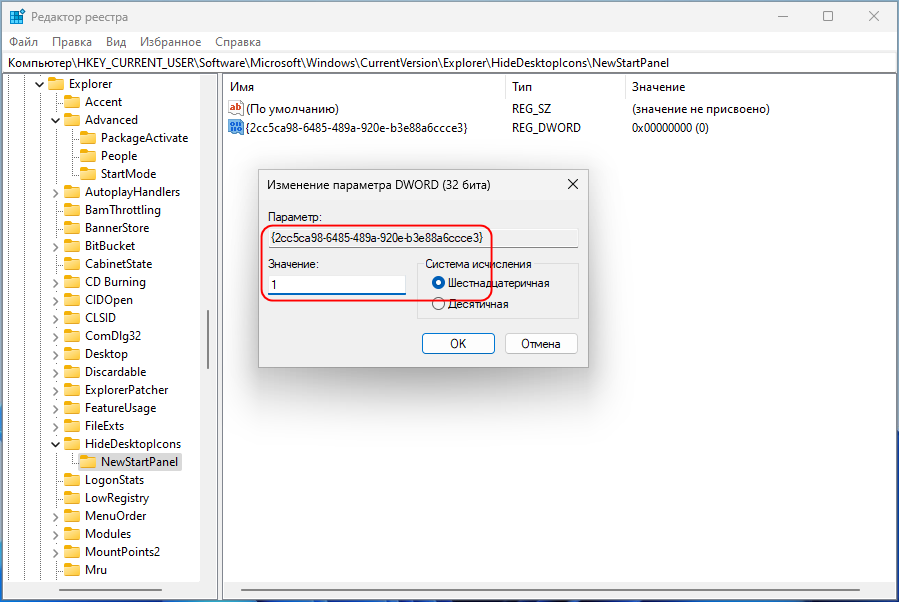
- Укажите имя
{2cc5ca98-6485-489a-920e-b3e88a6ccce3}для нового параметра.
- Дважды нажмите по параметру и задайте значение 1 для него, примените настройки, закройте редактор реестра.

Как правило, останется нажать клавишу F5 на клавиатуре при активном рабочем столе для обновления его содержимого, кнопка «Дополнительные сведения об этом изображении исчезнет». Если этого не произошло — выйдите из системы и снова зайдите в неё.
Убираем значок в ExplorerPatcher
Бесплатная программа ExplorerPatcher позволяет настроить очень многое в части оформления Windows 11, в том числе и убрать значок, появляющийся при выборе обоев рабочего стола «Windows: Интересное».
- Скачайте последнюю версию ExplorerPatcher с официального сайта разработчика https://github.com/valinet/ExplorerPatcher/releases и запустите скачанный файл. На короткое время вы увидите рабочий стол, затем включится классическая панель задач Windows 10 в Windows 11 (это можно будет отменить).
- Нажмите правой кнопкой мыши по пустому месту панели задач и выберите пункт «Свойства», это откроет интерфейс ExplorerPatcher.
- В главном окне в пункте Taskbar вы можете вернуть стиль Windows 11 — укажите соответствующее значение в пункте Taskbar Style.

- Перейдите в раздел «Spotlight» (отображается только если вы включили обои Windows: Интересное), установите отметку «Hide the Learn about this picture icon».
- Нажмите «Restart File Explorer» внизу слева окна программы для перезапуска проводника и применения настроек.

Кстати, в программе можно выполнить и много других действий: убрать раздел «Рекомендуем» из меню Пуск, отключить группировку значков на панели задач, сделать так, чтобы меню Пуск всегда открывалось в разделе «Все приложения» и многое другое.
Недавно Microsoft реализовала очередную функцию персонализации Windows 11, добавив возможность установки на рабочий стол сменяемых изображений Windows Spotlight непосредственно из приложения «Параметры». В настоящее время новая опция доступна еще не во всех сборках Windows 11, если у вас она отсутствует, можете ускорить ее появление, скачав с сайта www.catalog.update.microsoft.com/Home.aspx пакет обновления KB5014019 и установив его в ручном режиме.
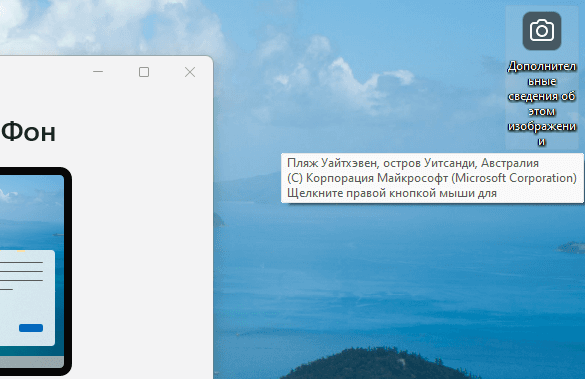
Картинки Spotlight на рабочем столе — это те же динамически сменяющие друг друга обои, но с одним маленьким отличием. Все изображения «Windows: Интересное» имеют специальный ярлык «Дополнительные сведения об этом изображении», служащий для пользовательской оценки фонов и подгрузки новых изображений из поисковой системы Bing и располагающийся в правом верхнем углу изображения. В отличие от обычных ярлыков, значок оценки обоев Windows Spotlight нельзя ни перемещать, ни удалять. По крайней мере, опции его скрытия в интерфейсе Windows 11 не предусмотрено.
Для его скрытия мы предлагали использовать стороннюю утилиту ExplorerPatcher, но есть и другое решение.
Избавиться от раздражающего ярлыка «Дополнительные сведения об этом изображении» можно путем применения несложного твика реестра.
Откройте редактор реестра командой regedit и разверните ветку:
HKCU\Software\Microsoft\Windows\CurrentVersion\Explorer\HideDesktopIcons\NewStartPanel
Если последний подраздел отсутствует, создайте его вручную.
Далее в этом разделе создайте параметр типа DWORD,
назовите его {2cc5ca98-6485-489a-920e-b3e88a6ccce3} и установите в качестве его значения 1.
Настройки должны вступить в силу сразу же после обновления рабочего стола нажатием клавиши F5.
Если значок не исчезнет сразу, выйдите и заново войдите в свою учетную запись.
Обращаем также внимание, что твик действует только в рамках той учетной записи, в которой он был применен.
Чтобы восстановить значок, либо удалите созданный параметр, либо измените его значение на 0.
![]() Загрузка…
Загрузка…
Оглавление
- Отключение значка «Дополнительные сведения об этом изображении» на рабочем столе в редакторе реестра #
- Убираем значок в ExplorerPatcher #
 Очередное обновление Windows 11 около полугода назад принесло возможность устанавливать обои «Windows: Интересное» или Windows Spotlight в качестве обоев рабочего стола. О том, как это сделать, можно прочитать здесь.
При использовании таких обоев есть один нюанс, который некоторые пользователи могут счесть недостатком: отображение значка «Дополнительные сведения об этом изображении» на рабочем столе. При желании его можно убрать, в этой инструкции — о том, как это сделать.
Отключение значка «Дополнительные сведения об этом изображении» на рабочем столе в редакторе реестра # #
Первый способ не предполагает использование каких-либо сторонних средств настройки оформления Windows 11, достаточно добавить значение в реестре. Внимание: при использовании способа будут сброшены расположения значков на рабочем столе, потребуется расставить их заново.
Шаги будут следующими:
- Запустите редактор реестра. Для этого можно нажать правой кнопкой мыши по кнопке «Пуск», выбрать пункт «Выполнить», ввести regedit и нажать Enter.
- В редакторе реестра перейдите к разделу
HKEY_CURRENT_USER\Software\Microsoft\Windows\CurrentVersion\Explorer\HideDesktopIcons\NewStartPanel
- Нажмите правой кнопкой мыши в пустом месте правой панели редактора реестра и выберите пункт «Создать» — «Параметр DWORD (32-бита)».
- Укажите имя
{2cc5ca98-6485-489a-920e-b3e88a6ccce3}для нового параметра.
- Дважды нажмите по параметру и задайте значение 1 для него, примените настройки, закройте редактор реестра.

Как правило, останется нажать клавишу F5 на клавиатуре при активном рабочем столе для обновления его содержимого, кнопка «Дополнительные сведения об этом изображении исчезнет». Если этого не произошло — выйдите из системы и снова зайдите в неё.
Убираем значок в ExplorerPatcher # #
Бесплатная программа ExplorerPatcher позволяет настроить очень многое в части оформления Windows 11, в том числе и убрать значок, появляющийся при выборе обоев рабочего стола «Windows: Интересное».
- Скачайте последнюю версию ExplorerPatcher с официального сайта разработчика и запустите скачанный файл. На короткое время вы увидите рабочий стол, затем включится классическая панель задач Windows 10 в Windows 11 (это можно будет отменить).
- Нажмите правой кнопкой мыши по пустому месту панели задач и выберите пункт «Свойства», это откроет интерфейс ExplorerPatcher.
- В главном окне в пункте Taskbar вы можете вернуть стиль Windows 11 — укажите соответствующее значение в пункте Taskbar Style.
- Перейдите в раздел «Spotlight» (отображается только если вы включили обои Windows: Интересное), установите отметку «Hide the Learn about this picture icon».
- Нажмите «Restart File Explorer» внизу слева окна программы для перезапуска проводника и применения настроек.


Кстати, в программе можно выполнить и много других действий: убрать раздел «Рекомендуем» из меню Пуск, отключить группировку значков на панели задач, сделать так, чтобы меню Пуск всегда открывалось в разделе «Все приложения» и многое другое.
Живые плитки на рабочем столе Windows 11 и 10 в Live Tiles Anywhere
In this tutorial, we will help you how to remove Windows Spotlight ‘Learn about this picture’ desktop icon in Windows 11. Earlier, it was limited or restricted to turn on or enable Windows Spotlight feature to lock screen only, but now, Microsoft has come with a new feature for Windows 11 using which you can display Windows Spotlight backgrounds on the desktop. Though the feature is handy to display different backgrounds or images from time to time, it also displays a Learn about this picture icon on the desktop, as visible in the image below.
![]()
There is no direct option to remove this icon and you may find it annoying. So, if you want to remove or hide this Windows Spotlight desktop icon, then you can use a Registry trick covered in this post.
What is “Learn about this picture” icon on the Desktop in Windows 11?
When you choose Windows Spotlight to show the desktop backgrounds on your Windows 11 computer, a Learn about this picture icon is also placed on the desktop in the top right corner. You can move that icon anywhere on the desktop and use that icon to get more information about the displayed picture, switch to the next picture, like that picture, etc.
Everything is fine and it works and looks like any other desktop icon. But, unlike other desktop icons, you can’t use delete, Shift+Del hotkey, cut, copy, paste options or move Windows Spotlight desktop icon to a folder. So, those who want to get rid of this Windows Spotlight desktop icon can try the Registry trick added in this article.
Before using this Registry trick, you should create a backup of the Registry so that you can restore the Registry if needed. When you have done that, follow these steps:
- Open Windows Registry Editor
- Select the NewStartPanel key
- Create a
{2cc5ca98-6485-489a-920e-b3e88a6ccce3}DWORD value - Add 1 in its Value data
- Refresh your desktop.
Let’s have a look at all these steps in detail.
First of all, use the Search box of Windows 11/10 to open Windows Registry Editor. All you need to do is type regedit and hit the Enter key.
In Registry Editor, select the NewStartPanel key available under the HKEY_CURRENT_USER root key. The path is as follows:
HKEY_CURRENT_USER\Software\Microsoft\Windows\CurrentVersion\Explorer\HideDesktopIcons\NewStartPanel

Now open the right-click context menu of NewStartPanel, expand the New menu, and use the DWORD (32-bit) Value option. After that, rename that DWORD value to {2cc5ca98-6485-489a-920e-b3e88a6ccce3}.

Double-click on that value to open its edit box. When the box is opened, add 1 in the Value data field. Press the OK button.

Finally, access your Windows 11 desktop and press the F5 hotkey or use the context menu option to refresh it. As soon as you refresh the desktop, the Windows Spotlight icon will vanish.
To show Learn about this picture icon again on the desktop, you can simply repeat the steps mentioned above, and delete this {2cc5ca98-6485-489a-920e-b3e88a6ccce3} value.
Related: How to find Windows Spotlight Lock Screen images in Windows.
As of now, this is the only built-in option for removing this Windows Spotlight icon from Windows 11 desktop. With upcoming updates, it could be possible that we will be able to do that using the Settings app or some other option also. Until then, you can use this Registry trick.
TIP: You can also use the Picture, Slideshow, or Solid color option for Background available under the Personalization category of the Settings app to remove or hide the Windows Spotlight desktop icon. But that option will also stop showing Windows Spotlight images for the desktop background. Therefore, this Registry Editor is better to use.
Read: How to Enable or Disable Desktop Search Bar in Windows 11
How do I get a Spotlight background in Windows 11?
Windows 11 now provides a built-in feature to set Windows Spotlight backgrounds as desktop wallpapers. To do this:
- Open the Settings app by pressing Win+I hotkey
- Click on the Personalization category available in the left section
- Access the Background page
- Click on the drop-down menu available for Personalize your background section
- Select the Windows spotlight option.
How to hide desktop icons in Windows 10?
Whether you want to hide desktop icons on Windows 10 or a Windows 11 computer, there are a few native options to do that. These are:
- Using the desktop context menu
- Group Policy Editor
- Desktop Icon Settings.
While the first two options let you hide all the desktop icons (including desktop shortcuts), the Desktop Icon Settings option lets you hide/unhide Recycle Bin, This PC, user folder, Network icons, etc.
Hope this helps.
Read next: How to reset the Windows Spotlight feature in Windows 11/10.
You can remove the «Learn more about this picture» Windows Spotlight Icon from the desktop in Windows 11 if you find its presence annoying. So you can keep Spotlight for serving your wallpapers, but without its icon.
Spotlight is a feature that is familiar to most Windows users. It is available starting in Windows 10. There, Microsoft added it as a Lock Screen background option. So every time you lock the screen, you see a fresh gorgeous background image downloaded from the Internet.
![]()
With Windows 11, Microsoft goes even further by expanding Spotlight to the Desktop. It allows you to set it as a desktop background, so you can enjoy impressive nature shots, landscapes and scenery without locking your PC. It will change your wallpaper automatically.
When Spotlight is set as your desktop background, it adds an extra icon, Learn more about this picture. The purpose of the Windows Spotlight desktop icon is to show your extra information about the current image. This works even for stock wallpapers. Also, the icon has a context menu, from where you can switch to the next background image, or upvote/downvote the current one.
![]()
As of now, Windows 11 doesn’t offer any option anywhere in settings to hide the icon from desktop. So once you choose Spotlight to maintain wallpapers, it will remain always visible. To remove the «Learn more about this picture» desktop icon, you need to apply a Registry tweak.
So, if you want to remove the Spotlight icon from the Desktop in Windows 11, do the following.
- Press the Win + R keys to open the Run dialog, and type
regeditin the Run box. - In the Registry Editor that opens, navigate to the HKEY_CURRENT_USER\Software\Microsoft\Windows\CurrentVersion\Explorer\HideDesktopIcons\NewStartPanel key.
- Right-click the NewStartPanel key on the left, and select New > DWORD (32-bit) value from the menu.

- Set the value name to {2cc5ca98-6485-489a-920e-b3e88a6ccce3} and double-click to change its data.
- Change the {2cc5ca98-6485-489a-920e-b3e88a6ccce3} value data from 0 to 1.

- Now, right-click anywhere on your desktop and select Refresh from the menu. The Windows Spotlight icon will disappear from the Desktop.

As you can see in the screenshot below, the «Learn more about this picture» icon is no longer present on the Desktop.
![]()
You are done. You can restore the icon at any moment later by removing the {2cc5ca98-6485-489a-920e-b3e88a6ccce3} value you have created from the Registry.![]()
Ready-to-use Registry files
Instead of going through Registry jungles, you can use the REG files I’ve created to save your time.
Download this ZIP archive and extract its contents to any folder location convenient to you.
![]()
Now, open the file remove windows spotlight icon from desktop.reg. You may be prompted by the User Account Control; if so, click on the Yes button.
Once opened the file, refresh your desktop. This is how you remove the Windows Spotlight icon from the desktop in Windows 11.![]()
Finally, the other file add windows spotlight icon to desktop.reg is the undo tweak. Open it to restore the icon.
It is worth noting some alternative methods you can use instead of the Registry modifications.
Using Winaero Tweaker
You can use Winaero Tweaker to get rid of the Spotlight desktop icon. Starting with version 1.40 it includes a new option for that.
Download the app from here, install and run. Now, navigate to Windows 11 > Windows Spotlight Desktop Icon in the left pane.
![]()
On the right, place a checkmark next to the «Disable Windows Spotlight Desktop Icon» option, and you are good to go. You may need to refresh the desktop manually, or sign out from your user account to apply the change.
If you occasionally change your time, you can revert the change with a couple of click. Just open Windows 11 > Windows Spotlight Desktop Icon on the left, and uncheck the setting in the right panel.
Winaero Tweaker has a number of other options you may find useful as a Windows 11 user. It allows enabling full extended context menus instead of the compact ones, and show tray icons in two or even three rows, and much more. There are hundreds of options that add extra value to the OS.
The app supports exporting and importing of the changes you made, you can easily transfer them across your devices, or restore after a clean install.
Remove the Spotlight icon from desktop in Windows 11
Alternatively, you can a freeware opensource app called ExplorerPatcher. It allows customizing several areas of Windows 11 without learning about tweaks or doing much manually. The ability to hide the Spotlight desktop icon is one of its features.
Here’s how use ExplorerPatcher to hide the Spotlight desktop icon in Windows 11.
- Download the app installer from its home page.
- Run the downloaded file and follow the setup wizard.
- When done, you will have a Windows 10-like taskbar. Right-click it and select Properties from the menu.

- Go to the Spotlight section on the left, and select the Hide the «Learn about this picture» icon option.

- Finally, if you don’t like the Windows 10 taskbar, you can switch to the newer one under the Taskbar section.

You are done. Regardless of the method you used, you will no longer have the Windows Spotlight icon on the desktop.
You can uninstall ExplorerPatcher like any other app in Windows 11. For that, open Settings (Win + I), and head over the Apps > Installed apps section. There, find ExplorerPatcher in the list and click on the three dots button next to it. Finally, select Uninstall to remove the app from your operating system.
That’s it!
Support us
Winaero greatly relies on your support. You can help the site keep bringing you interesting and useful content and software by using these options:
If you like this article, please share it using the buttons below. It won’t take a lot from you, but it will help us grow. Thanks for your support!