Just because running servers and Windows 10 don’t exactly mix doesn’t mean you can’t get something set up. If you’re planning to set up an FTP server to transfer files over the network but don’t want to switch to a server edition or a Linux distro, this guide is for you. There are many reasons why you may want to start an FTP server. One of the most common reasons for a private FTP server is transferring large files without paying a lot for cloud storage fees.
With small files, using cloud storage services like Google Drive makes sense, but as the size of the files you want to transfer increases, the prices rise quickly. That’s when you should think about taking the time to turn your Windows 10 into an FTP. Here, I’ll show you how to do that before revealing a much easier way to get it done.

Windows 10 VPS Hosting
Get yourself an efficient Windows 10 VPS for remote desktop, at the cheapest price out there. FREE Windows 10 running on NVMe SSD storage and high-speed internet.
Check Out Windows 10 VPS Plans
Steps to Create an FTP Server in Your Windows 10
- Activate IIS on Windows 10
- Configure an FTP Server on Windows 10
- Configure Windows Firewall for an FTP Server
- Enable Port Forwarding on your Route
Windows 10 can turn into an FTP server without additional software. But this tool is disabled by default and you need to enable it first.
To create an FTP server in Windows 10 you need to enable a Windows utility called Internet Information Services. Microsoft created the IIS to support HTTP, HTTPS, FTP, FTPS, and SMTP, among other protocols.
How to Activate IIS on Windows 10?
To activate IIS on Windows 10, follow these steps:
Step 1: Open the launch section
Press ‘WinKey + R’.

Step 2: Type appwiz.cpl
Type in “appwiz.cpl” and press Enter.
appwiz.cpl
Step 3: Turn Windows features
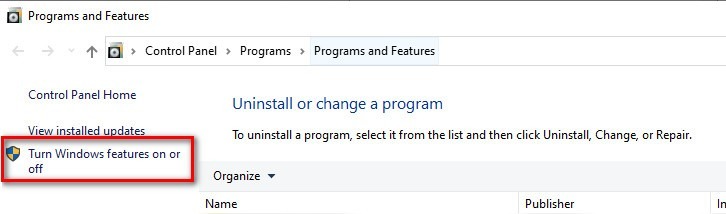
From the left-hand panel, click on “Turn Windows features on or off.”
Step 4: Internet Information Services
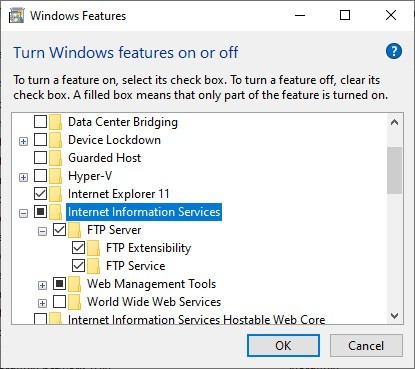
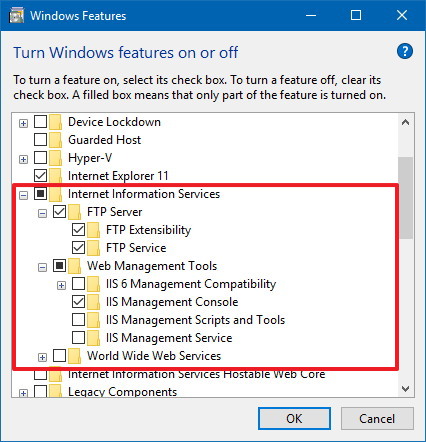
Then find ‘Internet Information Services’ and expand it.
Step 5: FTP Server
Check the ‘FTP Server’ and expand it.
Step 6: FTP Extensibility
Check the ‘FTP Extensibility’.
Step 7: Web Management Tools
Check the ‘Web Management Tools’.
Step 8: Confirm changes
Click OK.
Windows will proceed to install the tools. Then you can configure your server.
How to Configure an FTP Server on Windows 10?
Now that the IIS is enabled, we need to configure the server. To configure an FTP server on Windows 10, follow these steps:
Step 1: Open the search box
Press ‘WinKey + S’.
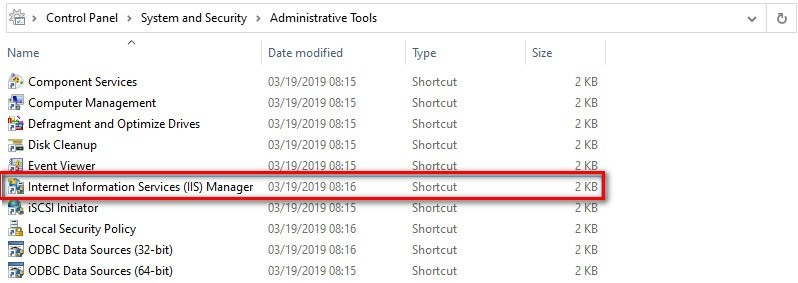
Step 2: Search Administrative Tools
Search for and open ‘Windows Administrative Tools’.
Step 3: Open IIS
Double-click on ‘Internet Information Services (IIS) Manager’.
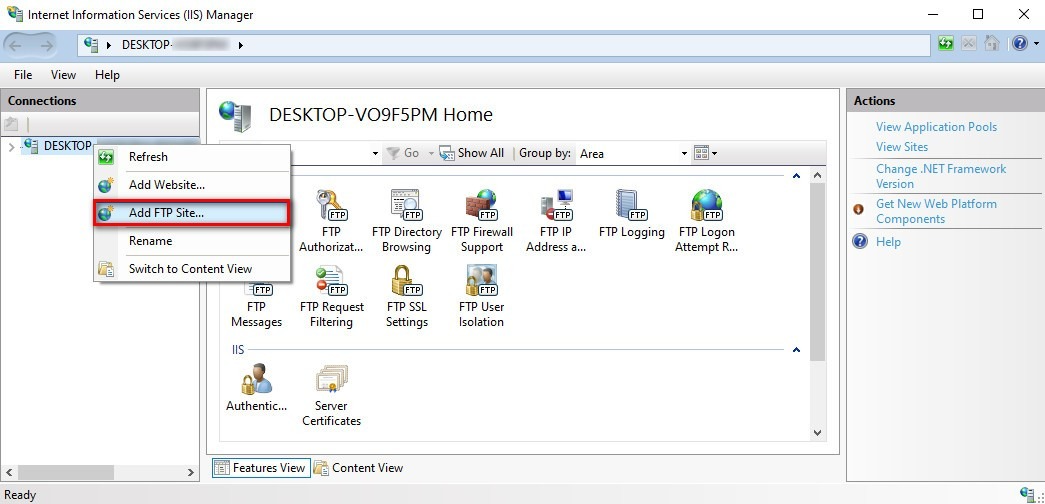
Step 4: Select computers name
From the left-hand panel, right-click on your computer’s name.
Step 5: Add FTP site
Click on the ‘Add FTP site’.
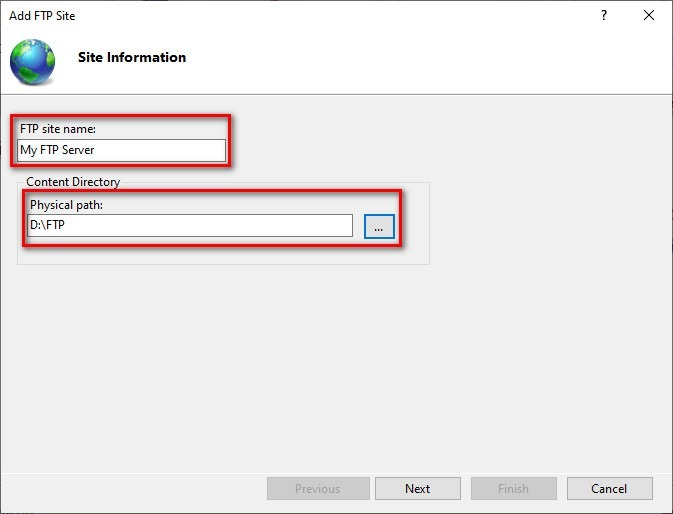
Step 6: Fill FTP site name
Type in a name for your FTP server in the ‘FTP site name’ field.
Step 7: Choose a folder
Choose a folder as the physical path of your FTP directory.
Step 8: Assign an IP address to your FTP.
You can assign an IP address and port to your FTP in the next step. You can leave them the way they are.
Step 9: SSL Status
If you use the FTP server as a test and security isn’t an issue, you can choose No SSL and proceed. Otherwise, you need to choose Require SSL. You can use Comodo’s SSL management tool to create an SSL certificate.
Step 10: Configure FTP
configure an FTP server on Windows 10
Step 11: chooses Basic
On the authentication section, choose ‘Basic’.
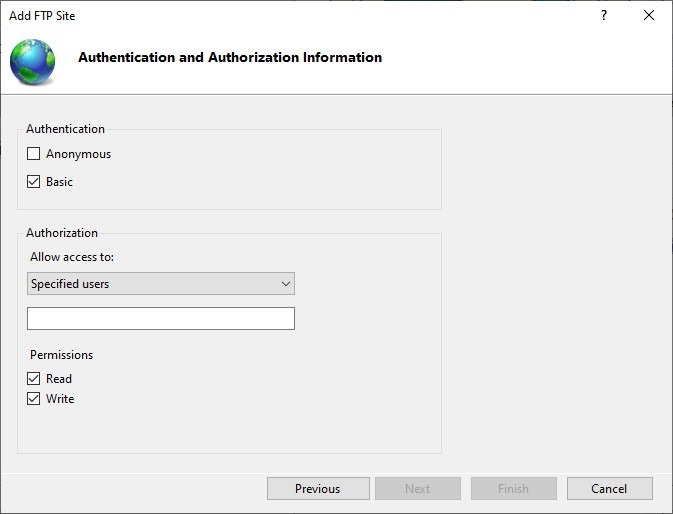
Step 12: Allow Access
Set ‘Allow Access to’ on ‘Specified users’.
Step 13: Enter your information
Type your name or your Microsoft account’s email address in the field below.
Step 14: Set permissions
Give yourself permission to Read and Write.
Step 15: Finish
Click on Finish.
Now you have an FTP server on your Windows.
Windows 10 VPS Hosting
Get yourself an efficient Windows 10 VPS for remote desktop, at the cheapest price out there. FREE Windows 10 running on NVMe SSD storage and high-speed internet.
Check Out Windows 10 VPS Plans
How to Configure Windows Firewall for an FTP Server?
By default Windows Firewall blocks all FTP access. To fix this you need to take the steps below:
Step 1: open the search box
Press ‘WinKey + S’ and type-in Windows Firewall.
Step 2: Allow an app or feature through Windows Firewall
Click on ‘Allow an app or feature through Windows Firewall’ from the left-hand menu.
Step 3: Change settings
Click on ‘Change settings’.
Step 4: Find FTP Server
Find ‘FTP Server’ in the list and check-mark public and private.
Step 5: Confirm changes
Click OK.
This lets you establish a local connection. Of course, if you want to access the server over the internet, you need to open the ports on your router.
How to Enable Port Forwarding on your Route?
Your FTP server needs port 21 open to connect to other computers on the internet. There are different ways to open a port on a router. Here is how it works on an Asus router:
Step 1: Search for cmd box
Press ‘Winkey + S’ and type in ‘cmd’.
Step 2: Open cmd
Open ‘Command Prompt’.
Step 3: Select ipconfig
Type in ‘ipconfig’ and press Enter.
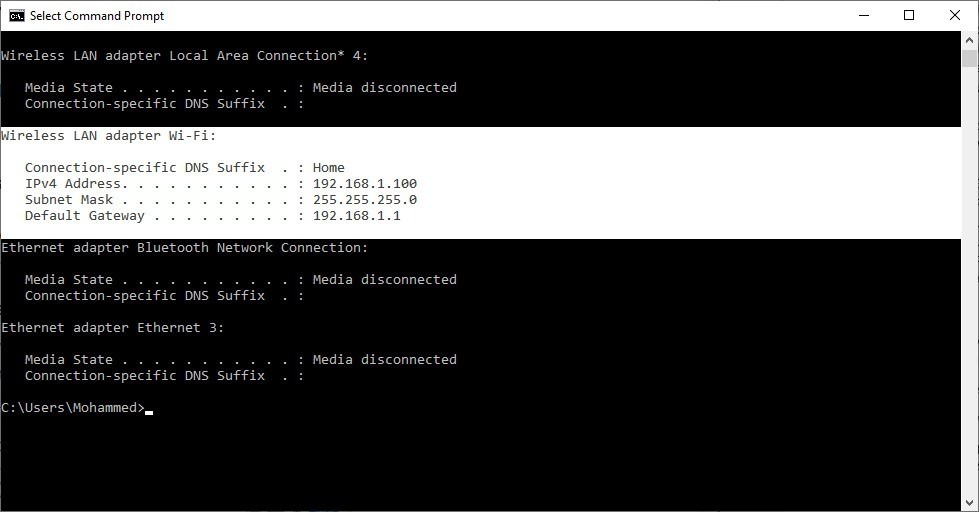
Step 4: Write the Default Gateway
Write the Default Gateway number down. (Normally, it’s 192.168.1.1)
Step 5: Browser
Open your web browser.
Step 6: Type the Gateway
Type the Default Gateway number on the address bar and press Enter.
Step 7: Sign in to the control panel
Sign in to your router’s control panel.
Step 8: Choose WAN
Choose ‘WAN’ from the left-hand menu.
Step 9: Create a new port
Create a new port forwarding with the following setup:
- Give your item a name under ‘Service Name’
- Port Range: 21
- Local IP: Use the IPv4 address on the ‘ipconfig’ command explained above.
- Local Port: 21
- Protocol: TCP
Step 10: Apply changes
Click on Apply.
Create an FTP Server in Windows 10 with Username and Password
The method above gives access to you or other users on the computer. But how can you make users log in with their username and password to access your FTP? The answer is to add a generic user with user-password authentication.
To add a user with a username-password authentication, follow these steps:
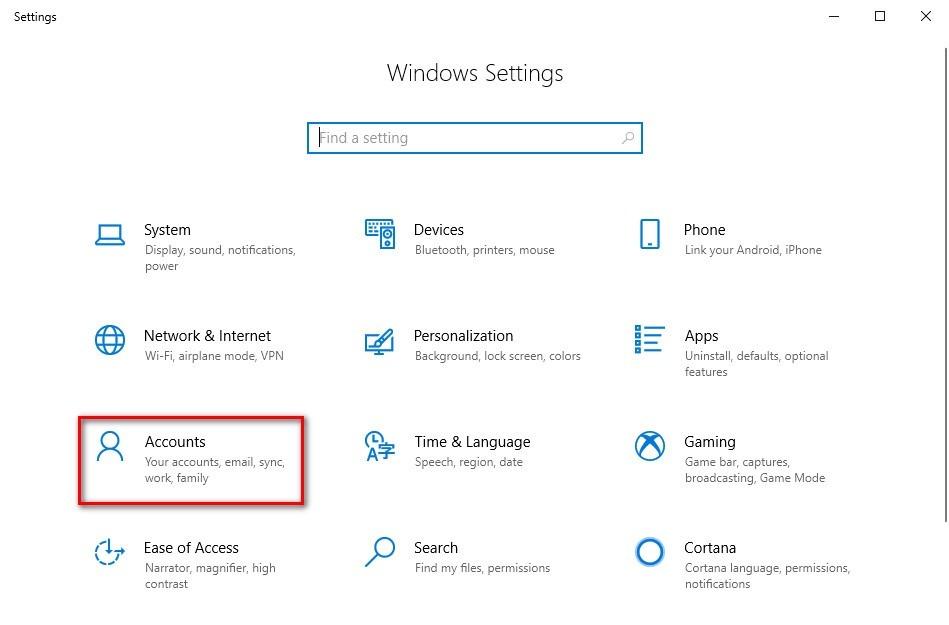
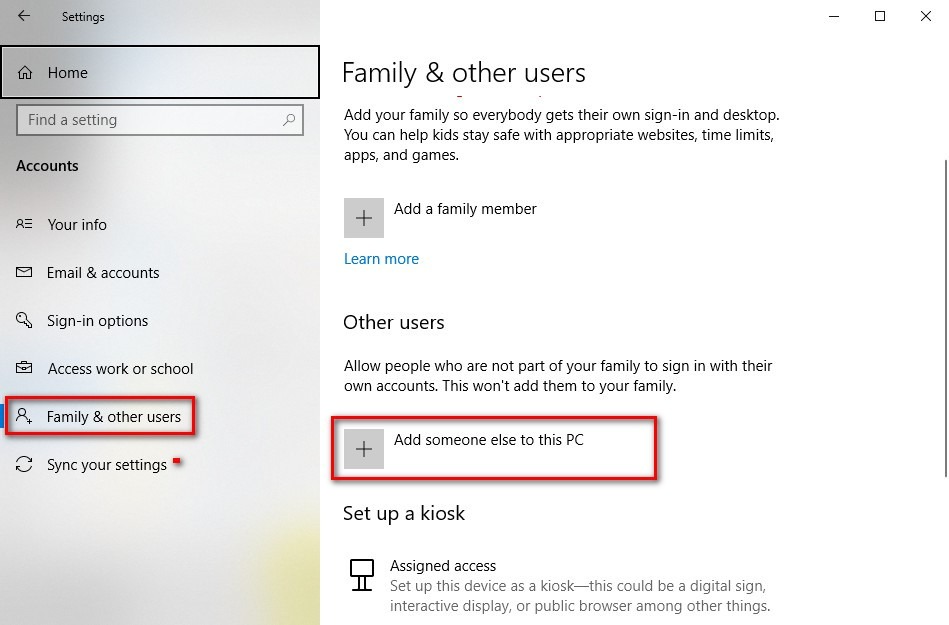
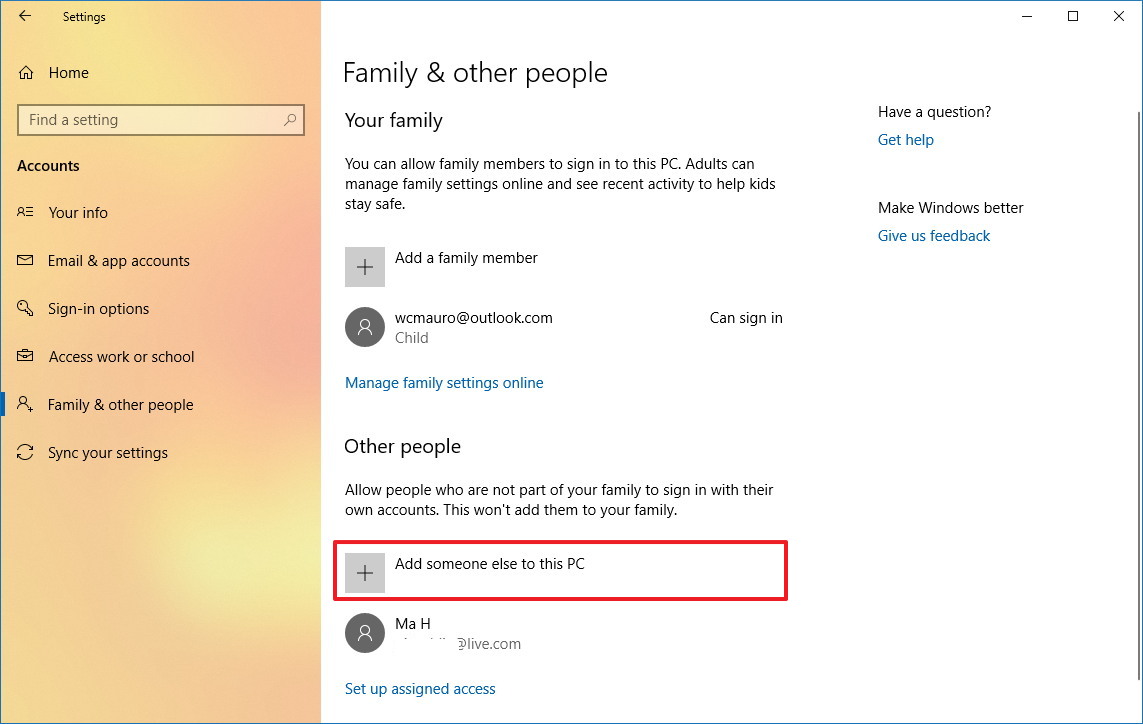
1- Go to Settings.
2- Choose Accounts.
3- Go to “Family & other users”.
4- Click ‘Add someone else to this PC’.
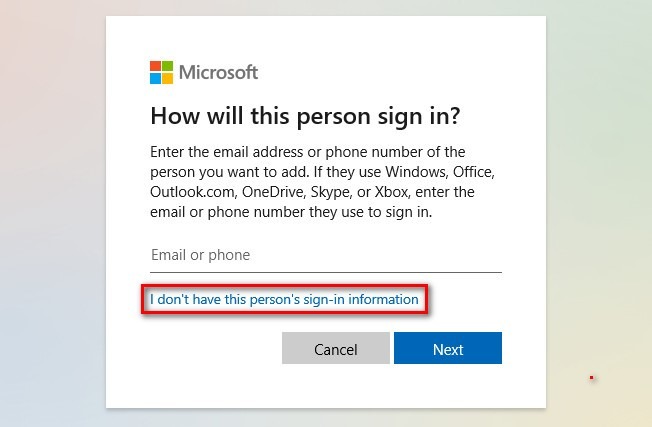
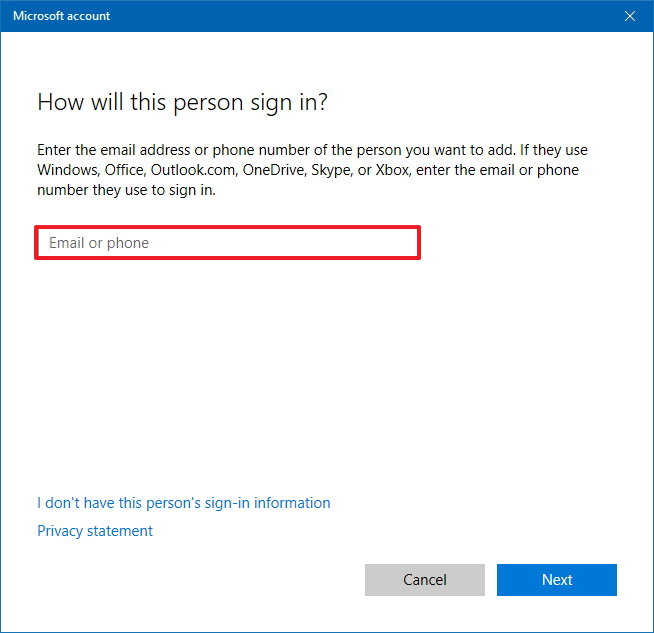
5- On the new window, choose ‘I don’t have this person’s sign-in information’.
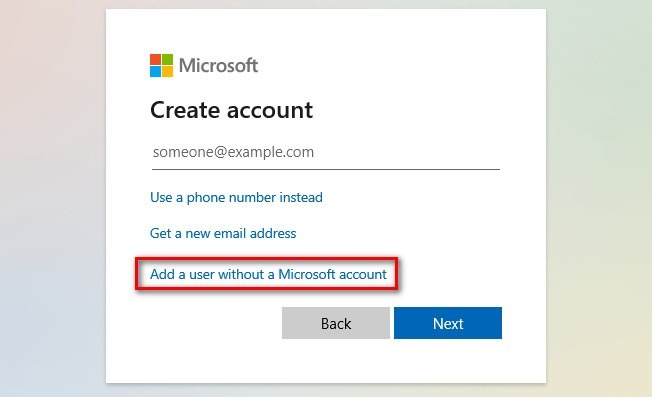
6- Click on ‘Add a user without Microsoft account’.
7- Choose a username and password and fill in the security questions.
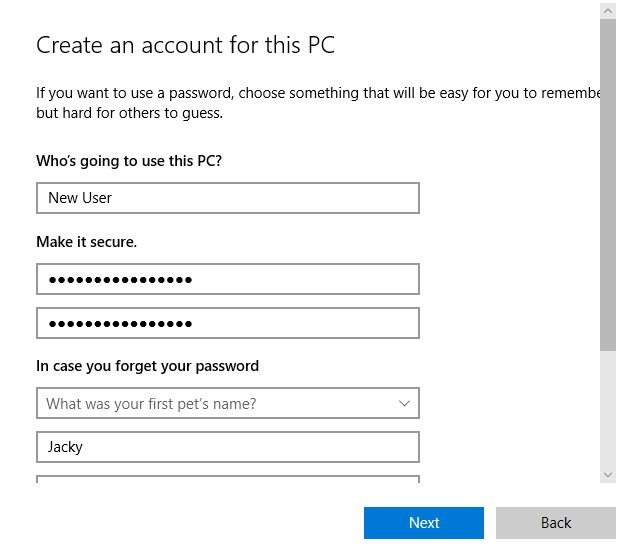
8- Click Next.
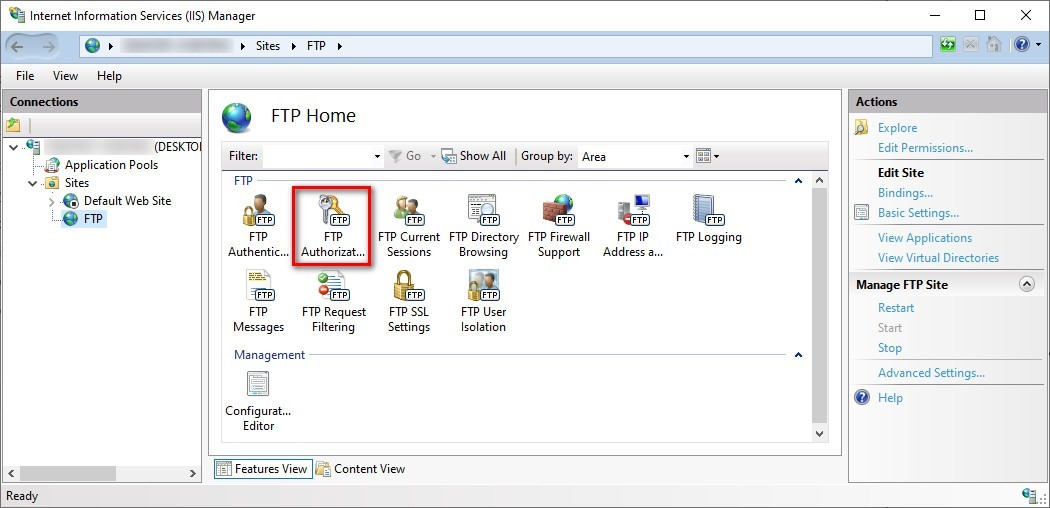
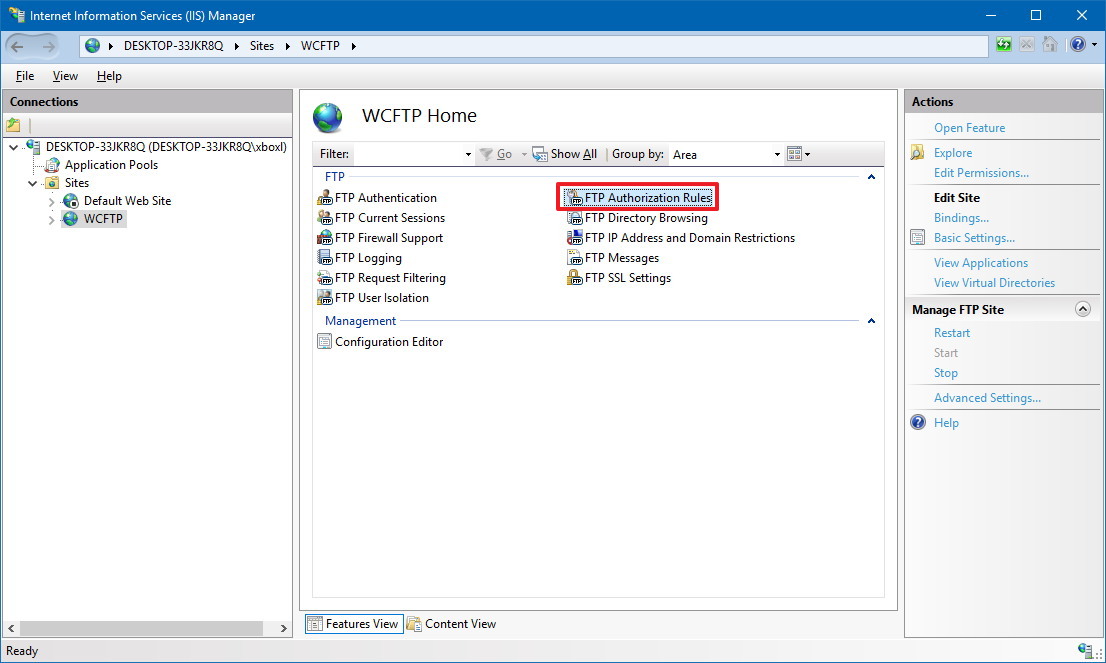
9- Now go again to ‘Windows Administrative Tools > Internet Information Services (IIS) Manager’.
10- Select your site from the left-hand panel.
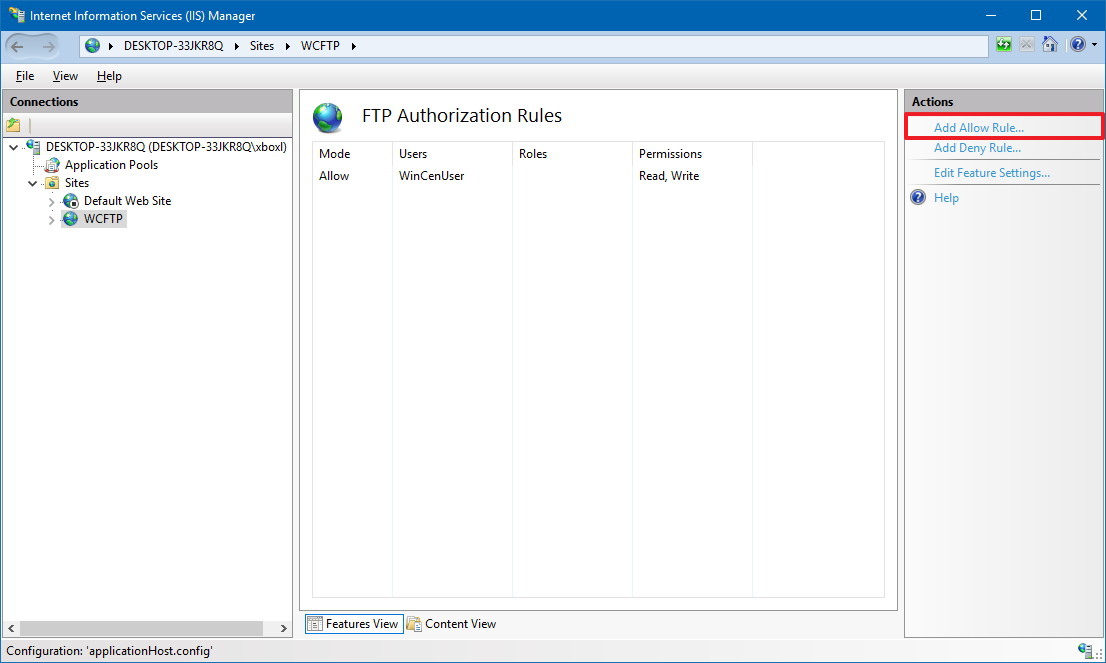
11- Click on ‘FTP authorization rules’.

12- From the right-hand panel, choose ‘Add Allow Rule’.
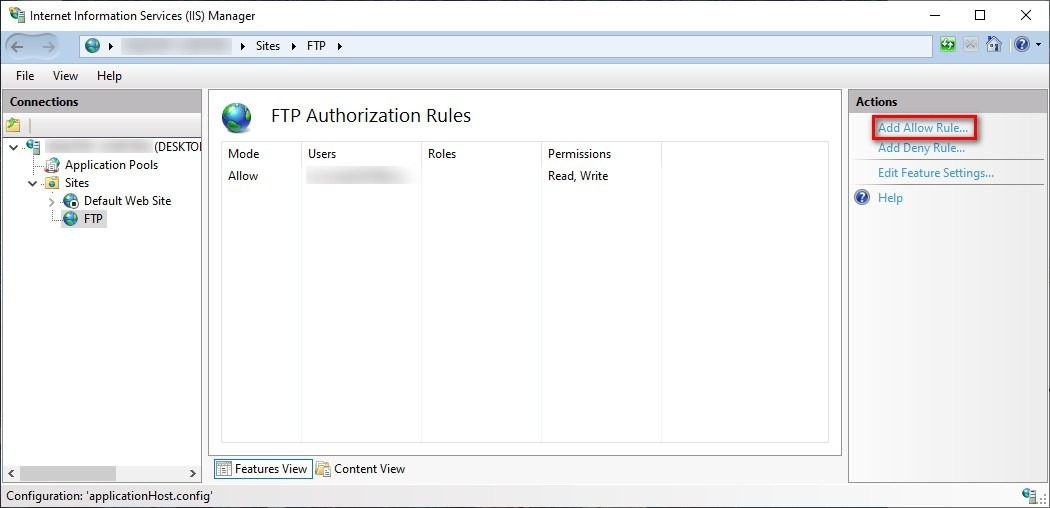
13- Choose Specified users and add the username you chose above.
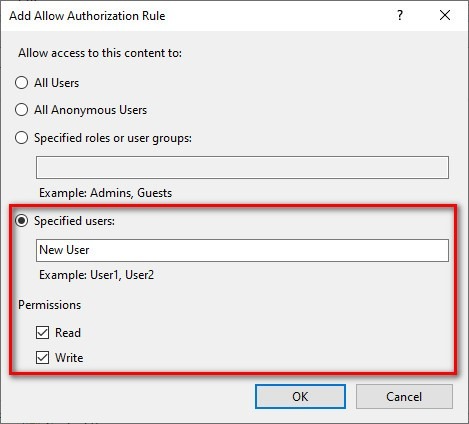
14- Give them the permissions you want.
15- Click OK.
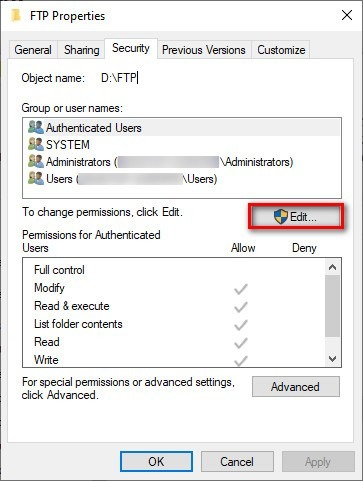
Now you need to add permission to the FTP folder as well. To do so:
- Go to the FTP folder.
- Right-click and choose ‘Properties’.
- Go to the ‘Security’ tab.

- Choose Edit, then Add.
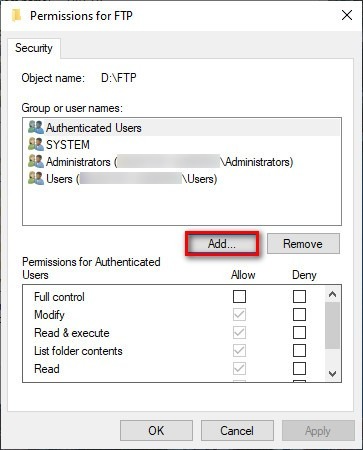
- Type-in the username in the ‘Enter the object…’ section and click Check Names.

- Click OK.
- Select the user and give them the permissions they need.
- Click OK.
Now you can use the username and password to access your FTP.
How to Create Multiple FTP Accounts on Windows 10?
To create another account, you need to take the same steps as above and then specify the Email Address of the new user.
To create multiple FTP accounts on Windows 10:
Step 1: Setting
Go to ‘Settings’.
Step 2: Choose accounts
Click on Accounts.

Step 3: Select Family
Go to Family & other users.
Step 4: Add someone else
Click ‘Add someone else to this PC’.

Step 5: Create an account
Add their Microsoft account or click on “I don’t have this person’s…” to create an account for them.
Step 6: Select (IIS) Manager
Go to ‘Windows Administrative Tools > Internet Information Services (IIS) Manager.
Also Read: How to install IIS on Windows 10?
Step 7: Select your website
Select your site from the left-hand panel.
Step 8: FTP authorization
Click on ‘FTP authorization rules.
Step 9: Add Allow Rule
From the right-hand panel choose ‘Add Allow Rule’.

Step 10: Add username
Choose Specified users and add the username you chose above.

Step 11: Access permissions
Give them the permissions you need.
Step 12: Apply changes
Click OK.
Now you need to add permission to the FTP folder as well. To do so:
- Go to the FTP folder.
- Right-click and choose ‘Properties’.
- Go to the ‘Security’ tab.
- Choose Edit, then Add.
- Type in the username in the ‘Enter the object…’ section and click Check Names.
- Click OK.
- Select the user and give them the permissions they need.
- Click OK.
How to Connect to an FTP Server on Windows 10?
Now that you have created your FTP server and configured it correctly, it’s time to connect and test your server out. If you have a client such as FileZilla, you can connect to the server. But also you can take the steps below using your web browser:
Step 1: Browser
Open your browser.
Step 2: Type IP address
Type in your IPv4 address with ftp:// at the beginning.
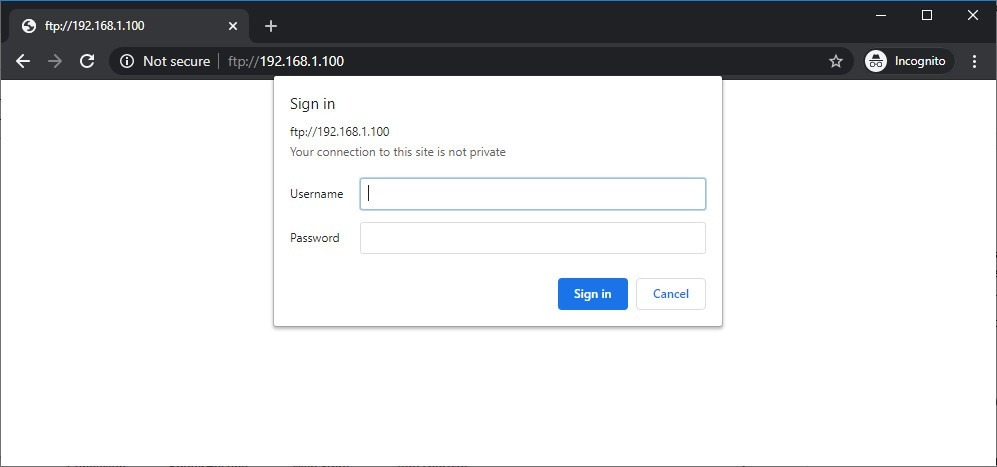
Step 3: Enter credentials
Enter your credentials to log in.

Step 4: Download files
Here you can see your files. To download or change the files remotely you can use FileZilla.
What are my Windows 10 FTP Server Credentials?
By default, you add your Windows account as the main FTP account. This means your Microsoft email and password are your credentials. Read the instructions on setting up user authentication above to use a more independent method. Or use a different account by adding another account to your FTP as I explained before.
Windows 10 VPS Hosting
Get yourself an efficient Windows 10 VPS for remote desktop, at the cheapest price out there. FREE Windows 10 running on NVMe SSD storage and high-speed internet.
Check Out Windows 10 VPS Plans
Conclusion
As you probably guessed from how long the article was, launching a successful FTP server on Windows 10 is not a short and sweet process. It is, of course, easy, but it takes many steps, and in the end, Windows 10 will not give you the best FTP performance possible. The most obvious way to set up a decent FTP server is to use a Linux server distro. For a lot of us, dual-booting our computer and entering a completely new environment will be out of the question. But I did promise that I’d reveal a much easier way, and that’s getting a VPS. A VPS is ideal for launching an FTP server with just the right resources. Plus, you can install a Linux distro or even a Windows Server edition with just a few clicks, allowing you to make the most of your FTP server without forcing you to switch your PC over to Linux. Cloudzy offers Linux VPS plans on top-tier hardware with super-fast bandwidth and connection speed. So, stop by and find out how our VPS can help with your FTP.
Setting up a File Transfer Protocol (FTP) server on Windows 10 is perhaps one of the most convenient solutions to upload and download files from virtually anywhere to your computer without the limitations typically found with cloud storage services.
Using an FTP server, you’re basically creating a private cloud that you have absolute control. You don’t have monthly transfers caps and speeds can be fast (depending on your internet subscription).
Also, there not file type or size restrictions, which means that you can transfer a 1KB text file as well as 1TB backup file, and you can create as many accounts as you want to let family and friends store and share files with each other.
There are plenty third-party solutions to set up a file server of this kind, but even though it may sound complicated, the FTP feature bundled on Windows 10 isn’t difficult to set up.
In this Windows 10 guide, we’ll walk you through the steps to set up and manage an FTP server on your computer to transfer files within your home network or remotely over the internet.
- How to install the FTP server components on Windows 10
- How to configure an FTP server site on Windows 10
- How to set up multiple FTP accounts on Windows 10
- How to connect to an FTP server remotely on Windows 10
How to install the FTP server components on Windows 10
Although Windows 10 includes support to set up an FTP server, you need to add the required components manually.
To install the FTP server components, do the following:
- Open Control Panel.
- Click on Programs.
- Under «Programs and Features,» click the Turn Windows features on or off link.
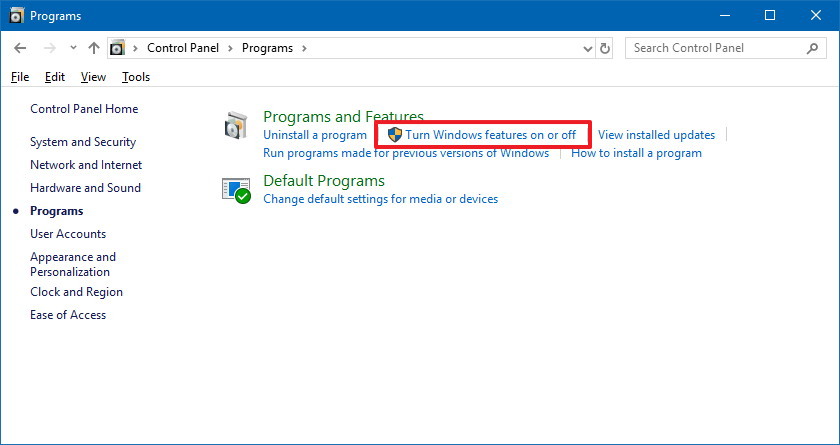
- Expand the «Internet Information Services» feature, and expand the FTP server option.
- Check the FTP Extensibility and FTP Service options.
- Check the Web Management Tools option with the default selections, but making sure that the IIS Management Console option is checked.
- Click the OK button.
- Click the Close button.
Once you’ve completed the steps, the components to set up an FTP server will be installed on your device.
How to configure an FTP server site on Windows 10
After installing the required components, you can proceed to configure an FTP server on the computer, which involves creating a new FTP site, setting up firewall rules, and allowing external connections.
Setting up an FTP site
To set up an FTP site, do the following:
- Open Control Panel.
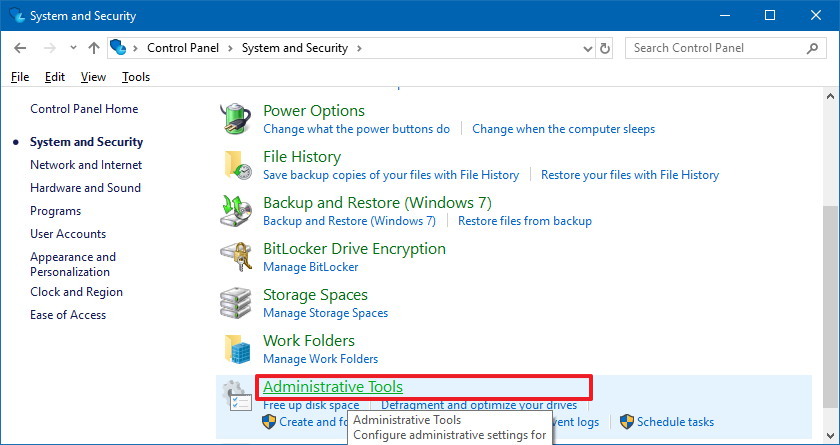
- Click on System and Security.
- Click on Administrative Tools.
- Double-click the Internet Information Services (IIS) Manager shortcut.
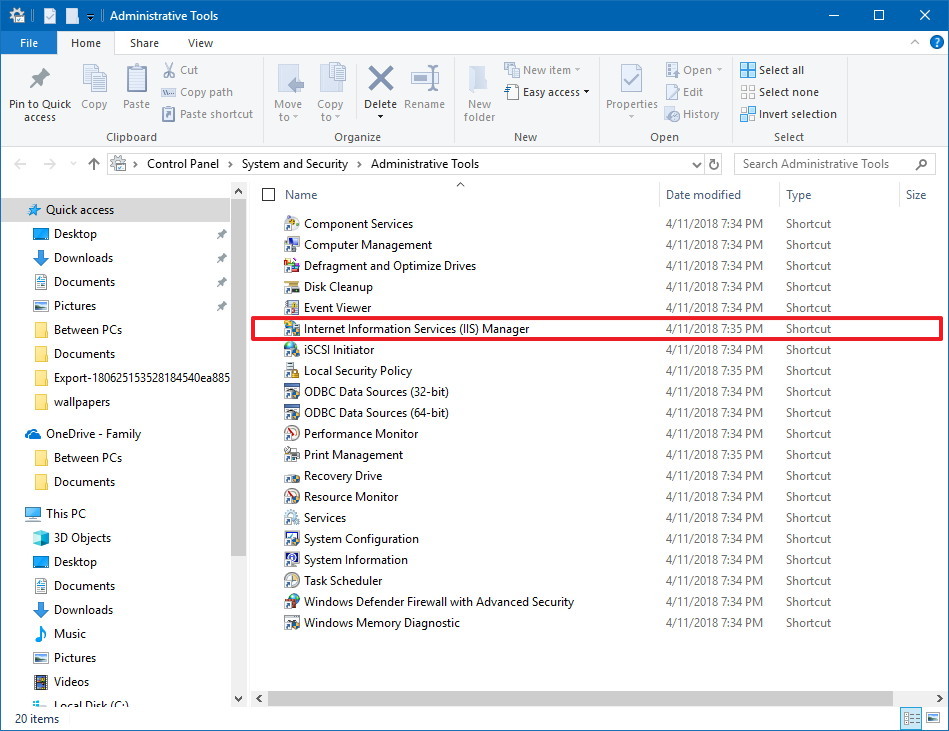
- On the «Connections» pane, right-click Sites, and select the Add FTP Site option.
- In the FTP site name, type a short descriptive name for the server.
- In the «Content Directory» section, under «Physical path,» click the button on the right to locate the folder you want to use to store your FTP files.Quick Tip: It’s recommended to create a folder in the root of the main system drive, or on an entirely different hard drive. Otherwise, if you set the home folder in one of your default folders when adding multiple accounts, users won’t have permission to access the folder. (You can adjust folder permissions, but it’s not recommended.)
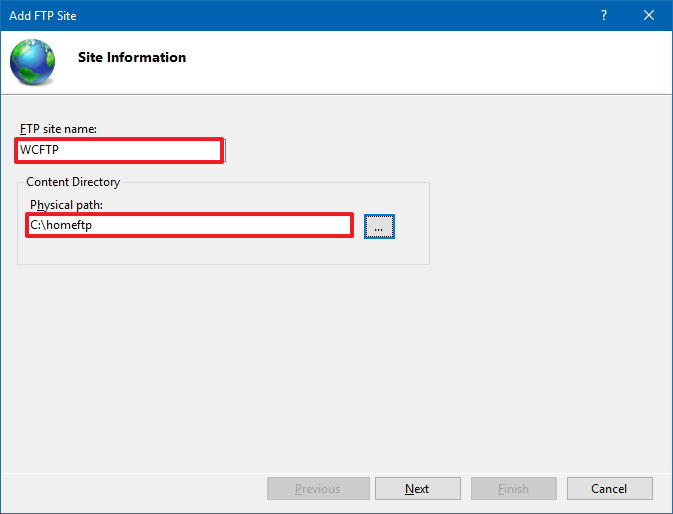
- Click the Next button.
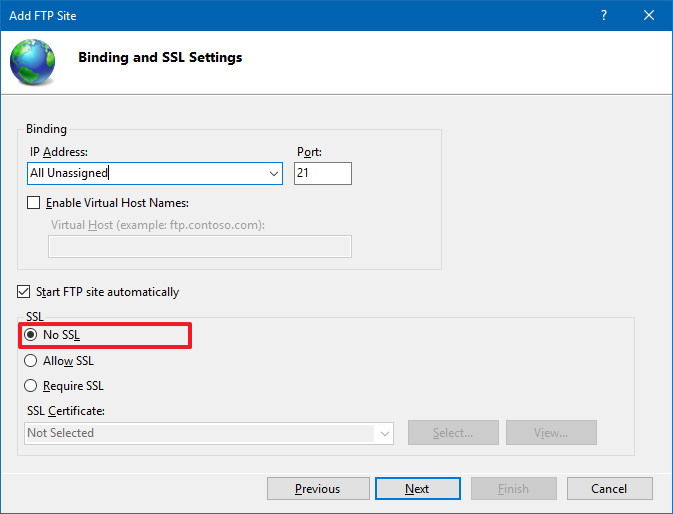
- Use the default Binding settings selections.
- Check the Start FTP site automatically option.
- In the «SSL» section, check the No SSL option.Important: In a business environment or on an FTP server that will host sensitive data, it’s best practice to configure the site to require SSL to prevent transmitting data in clear text.
- Click the Next button.
- In the «Authentication» section, check the Basic option.
- In the «Authorization» section, use the drop-down menu, and select Specified users option.
- Type the email address of your Windows 10 account or local account name to allow yourself access to the FTP server.
- Check the Read and Write options.
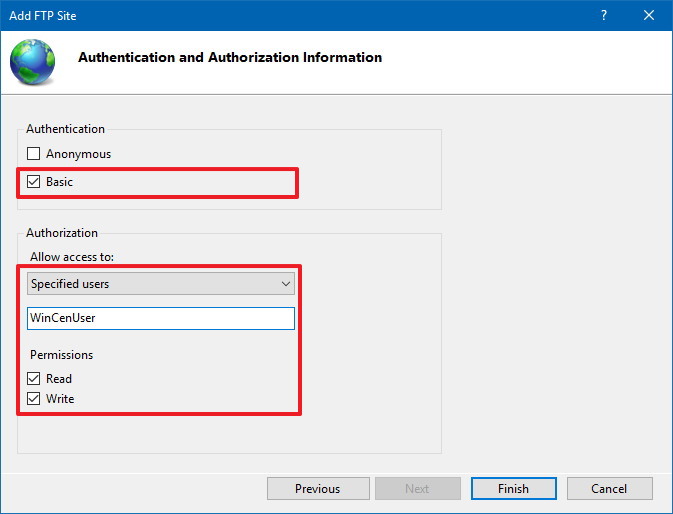
- Click the Finish button.
After completing the steps, the FTP site should now be operational on your computer.
Configuring firewall rules
If you’re running the built-in firewall on Windows 10, connections to the FTP server will be blocked by default until you manually allow the service through, using these steps:
- Open Windows Defender Security Center.
- Click on Firewall & network protection.
- Click the Allow an app through firewall option.
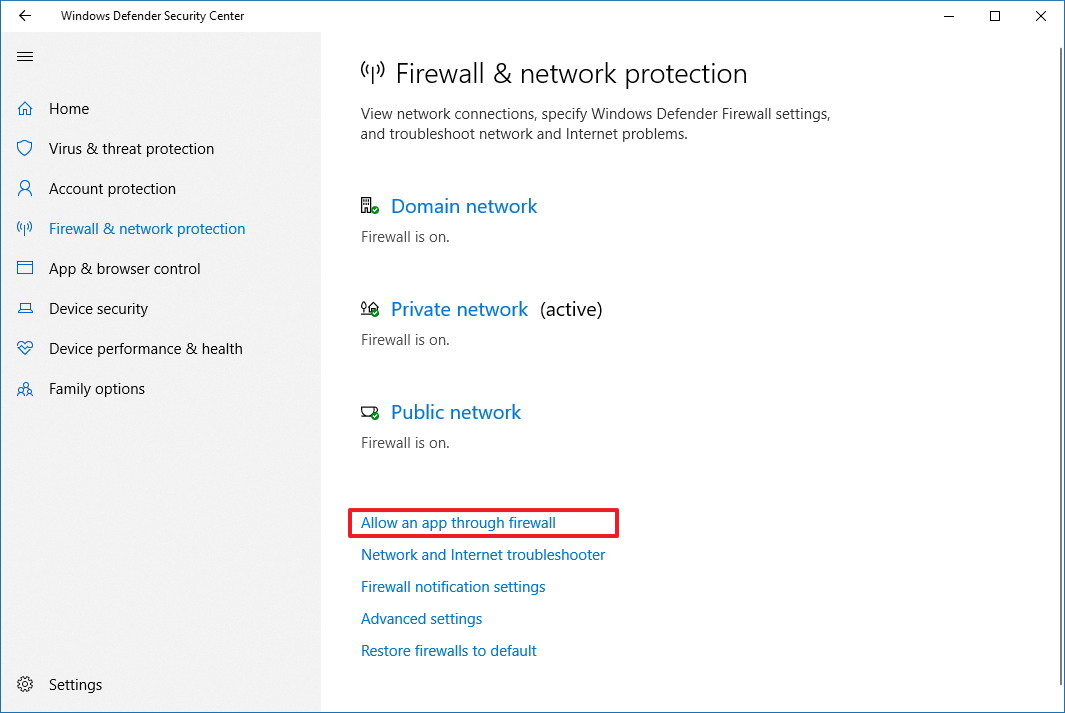
- Click the Change settings button.
- Check the FTP Server option, as well as the options to allow Private and Public access.
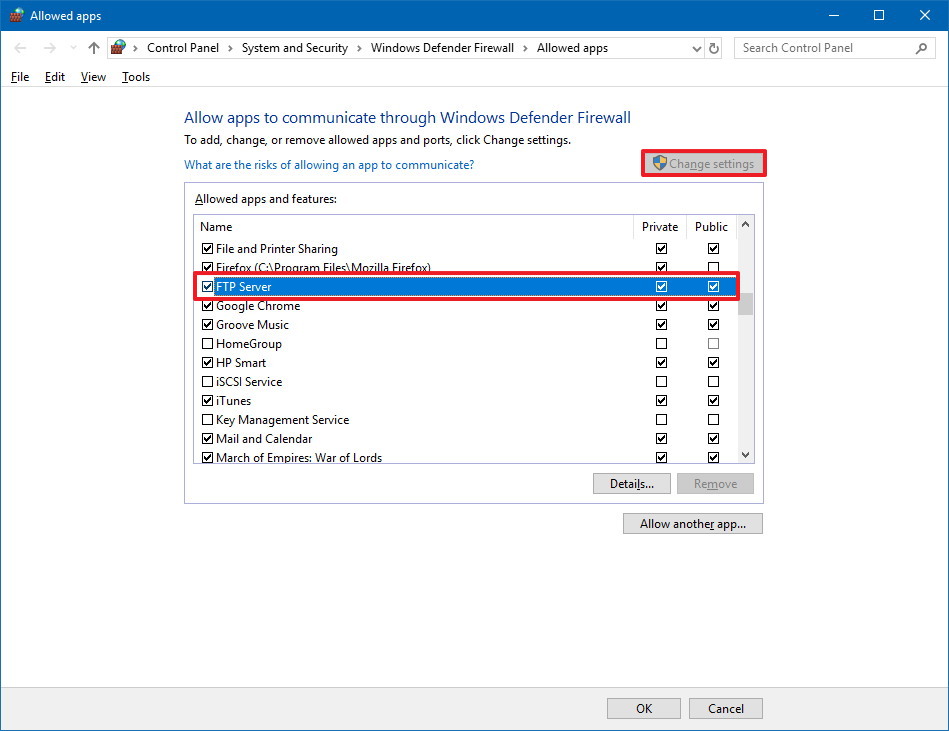
Once you’ve completed the steps, the FTP server should now be accessible from the local network.
In the case that you’re running third-party security software, make sure to check your vendor support website for more specific details on adding firewall rules.
Allowing external connections
To make your FTP server reachable from the internet, you also need to open the Transmission Control Protocol/Internet Protocol (TCP/IP) port number 21 on your router.
The instructions to forward a port will be different depending on the router, and even depending on the firmware version. In the steps below, we’ll outline the general steps, but you may need to consult your manufacturer support website for specific details.
To forward port 21 to allow FTP connections outside of the local network, do the following:
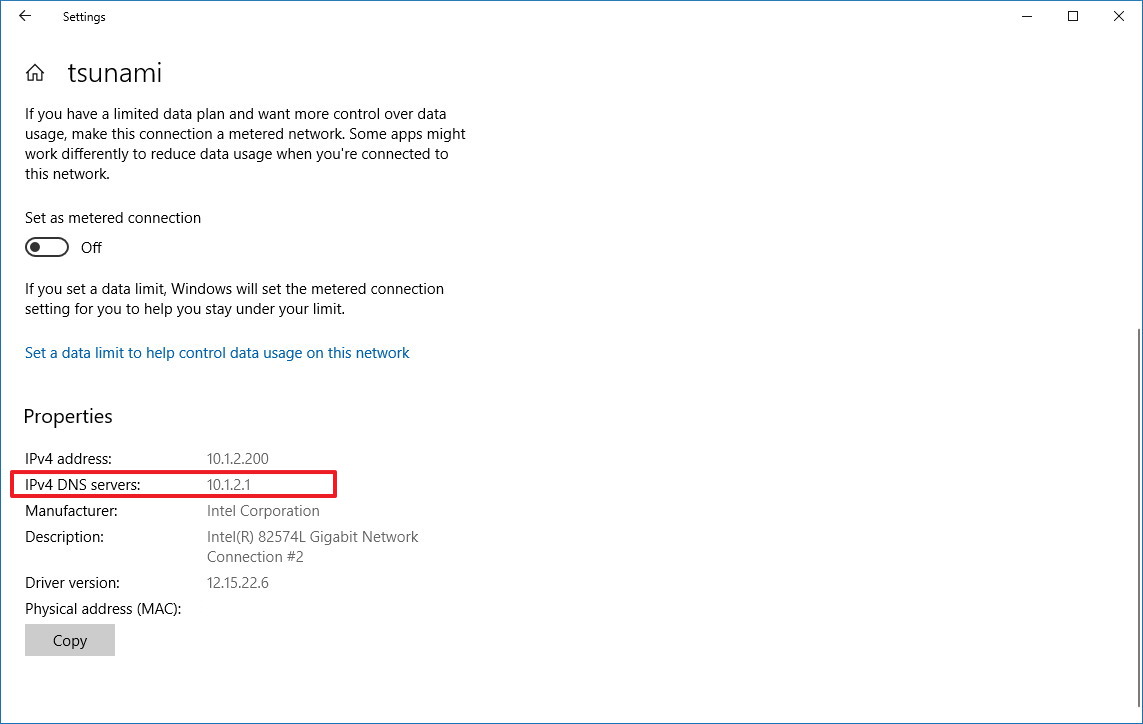
- Open Settings.
- Click on Network & Internet.
- Click on Status.
- Click the Change connections properties option.
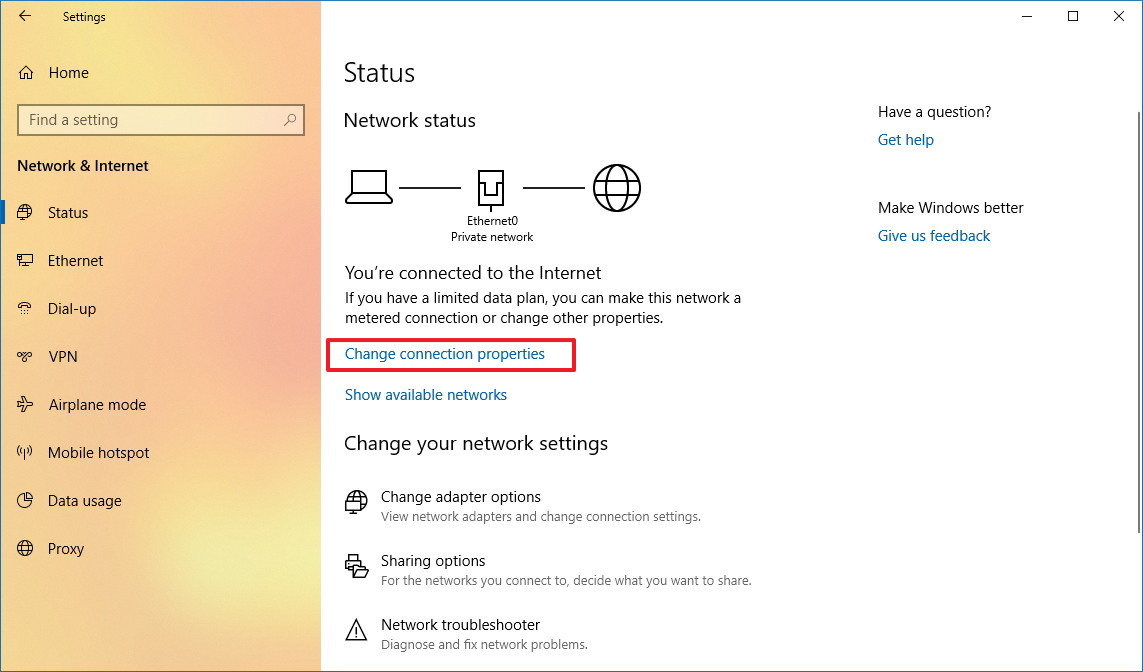
- Make a note of the IPv4 DNS server address, which is the address of your router. Usually, it’s private address in the 192.168.x.x range. For instance, 192.168.1.1 or 192.168.2.1.
- Open your default web browser.
- On the address bar enter the router’s IP address (for example, 192.168.1.1) and press Enter.
- Sign-in with your router credentials.
- Open the Port Forwarding page. (Usually, these settings can be found under the WAN, NAT, or Advanced settings pages.)
- Add a new rule to forward incoming connections to the FTP server from the internet by including this information:
- Service name: Type a descriptive name for the port forwarding rule.
- Port range: 21.
- Local IP: This is the FTP server IP address that the router will forward incoming connections. (This is your IPv4 address. See step No. 5.)
- Local port: 21.
- Protocol: TCP.
- Click the add button.
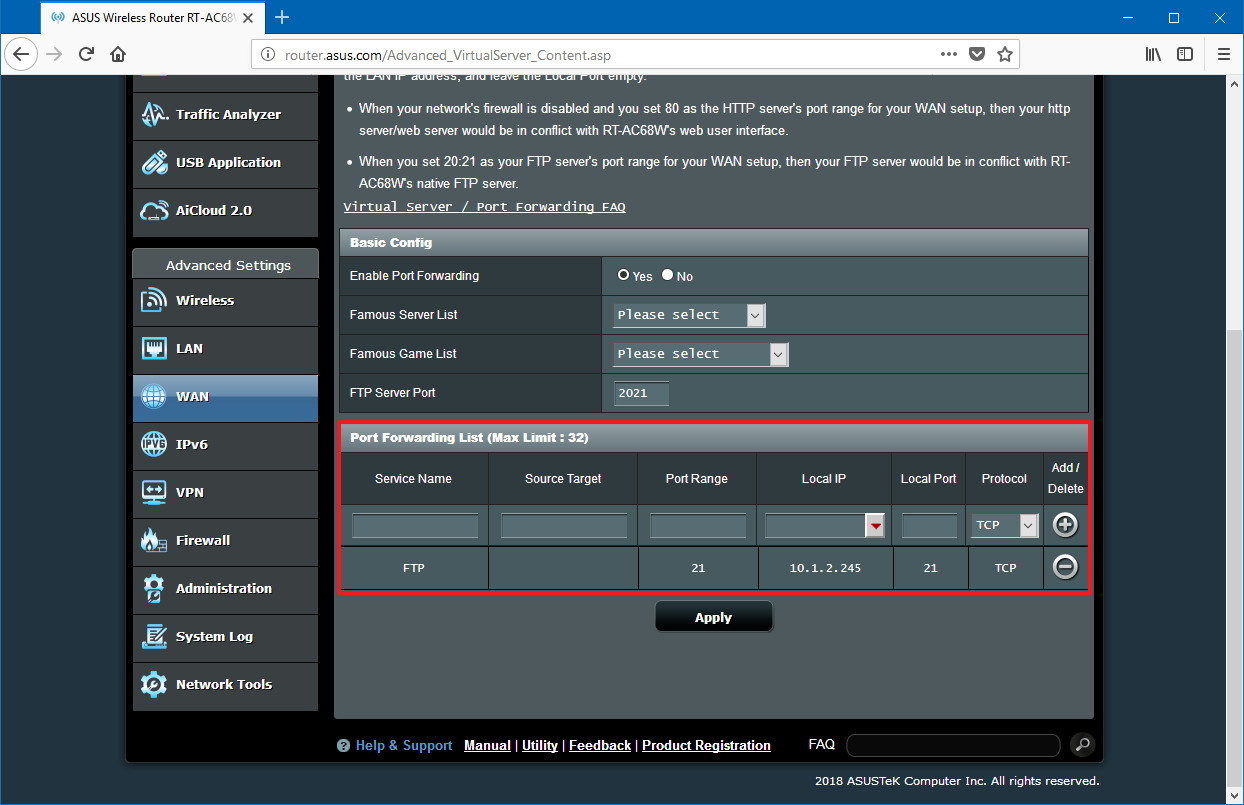
- Click the Apply button to save the changes.
After completing the steps, any incoming connection on port 21 will be forwarded to the FTP server to establish a networking session.
Setting up a static IP address
If you’re planning to transfer files over the internet in the regular basis, then it’s recommended to configure a static IP address to prevent having to reconfigure your router in the future if your device’s IP changes.
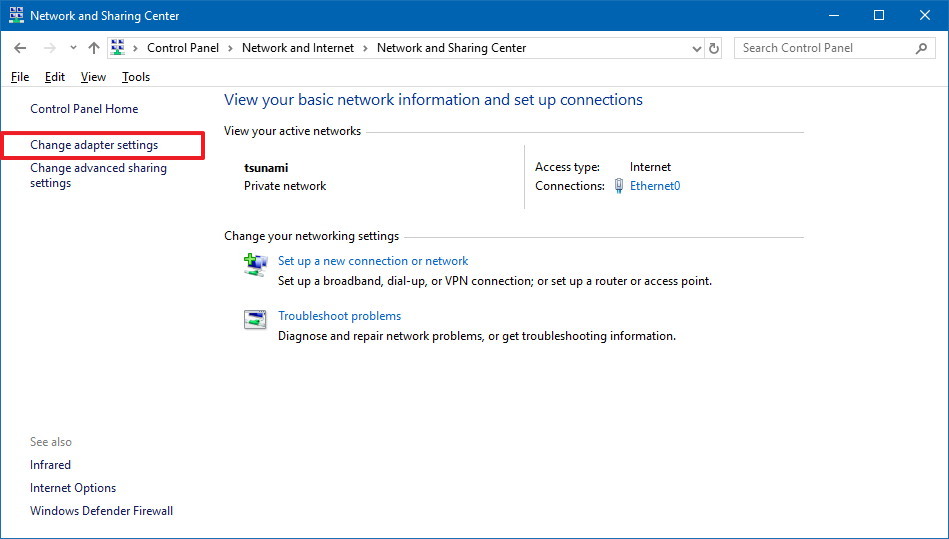
- Open Control Panel.
- Click on Network and Internet.
- Click on Network and Sharing Center.
- In the left pane, click the Change adapter settings option.
- Right-click the network adapter, and select the Properties option.
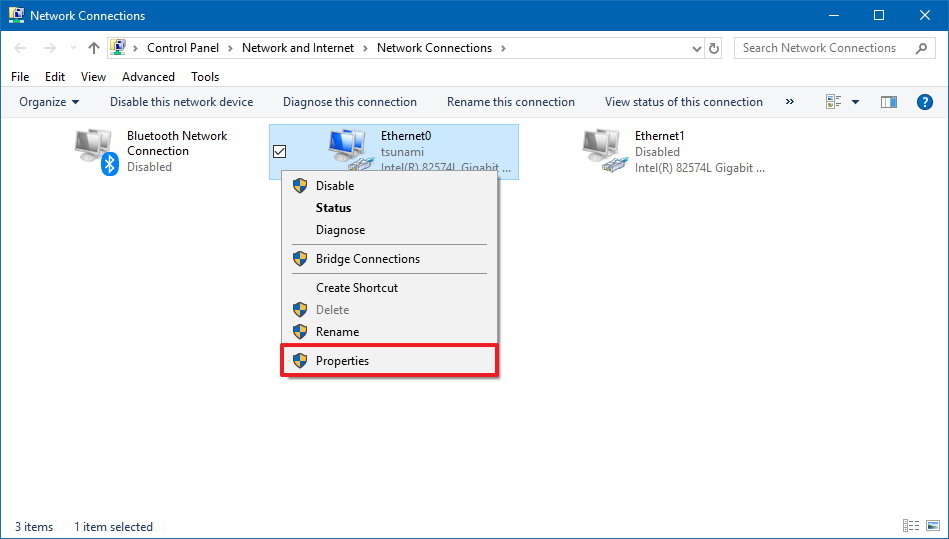
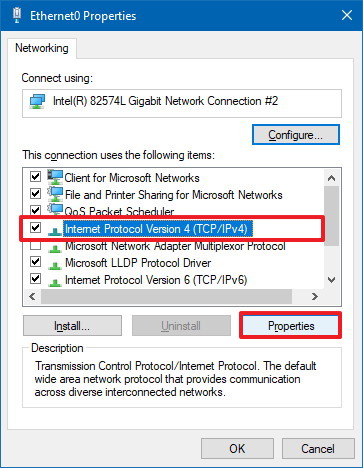
- Select the Internet Protocol Version 4 (TCP/IPv4) option.
- Click the Properties button.
- Select the Use the following IP address option.
- Specify the IP settings:
- IP address: Specify a static network address for the computer. You should use an address outside of the DHCP server scope configured in your router to prevent conflicts. For instance, 192.168.1.200.
- Subnet mask: In a home network, the address usually is 255.255.255.0.
- Default gateway: This is usually the IP address of the router. For example, 192.168.1.1.
- Preferred DNS server: Typically, this is also the IP address of your router.
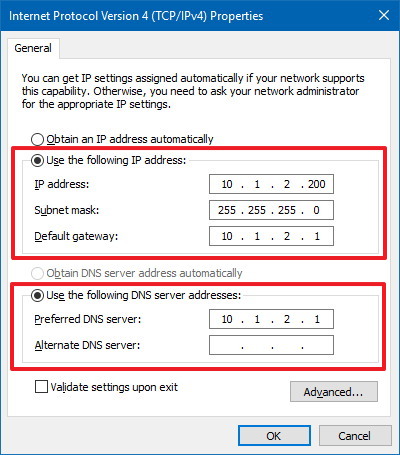
- Click the OK button.
- Click the Close button.
Once you’ve completed the steps, the IP configuration will no longer change, and it’ll prevent potential connection problems in the future.
How to set up multiple FTP accounts on Windows 10
If you want to allow multiple people to download and upload files to the FTP server simultaneously, you need to set up multiple accounts with specific permissions.
This process is done by creating new standard Windows 10 accounts and configuring the correct settings.
Creating new user accounts
To add multiple accounts to an FTP server, do the following:
- Open Settings.
- Click on Accounts.
- Click on Family & other people.
- Click the Add someone else to this PC button.
- Type the Microsoft account address for the user you want to allow access to the FTP server.Quick Tip: If you want users to access the server using local accounts, then click the I don’t have this person sign-in information option, click the Add a user without a Microsoft account option, and follow the on-screen direction to create the account.
- Click the Next button.
Once you’ve completed the steps, you may need to repeat the steps to create additional accounts.
Configuring user accounts to FTP server
If you want multiple users to access the FTP server at the same time, you need to modify the server settings using these steps:
- Open Control Panel.
- Click on System and Security.
- Click on Administrative Tools.
- Double-click the Internet Information Services (IIS) Manager shortcut.
- On the left pane, expand «Sites,» and select the site you created earlier.
- Double-click the FTP Authorization Rules option.
- On the right pane, click the Add Allow Rule option.
- Select one of these two options:
- All Users: Allows every user configured on your Windows 10 device to access the FTP server.
- Specified users: You can use this option to specify all the users you want to access the FTP server. (You must separate each user using a comma.)
- Check the Read and Write options.
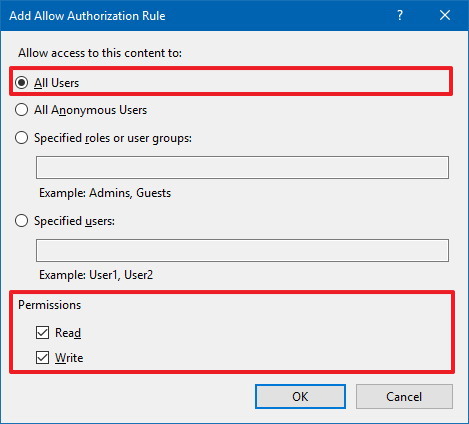
- Click the OK button.
After completing the steps, all the users you specified should now be able to access the FTP server to download and upload files remotely.
How to connect to an FTP server remotely on Windows 10
Once you’ve created and configured your FTP server, there are many ways to view, download, and upload files.
Viewing and downloading files
If you want to browse and download files, you can do this using Internet Explorer, Firefox, or Chrome:
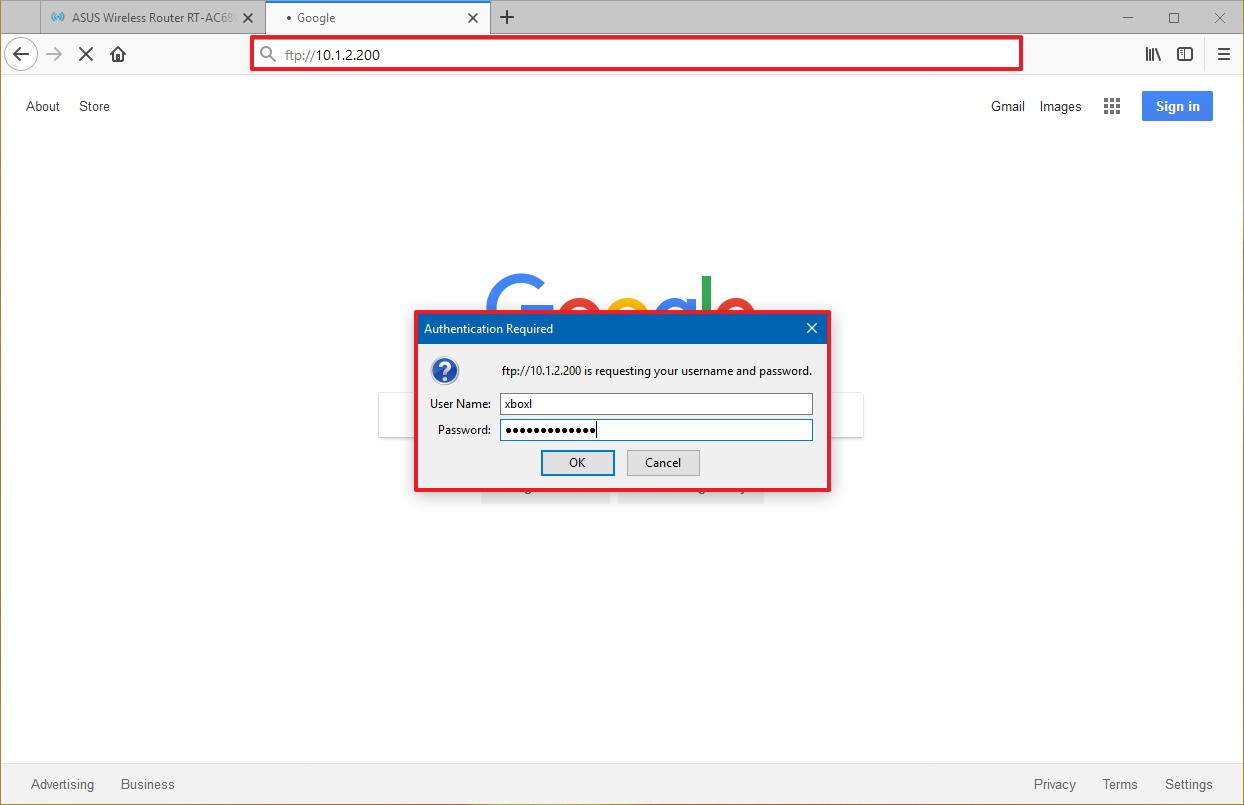
- Open a web browser.
- In the address bar, type the server IP address using ftp://, and press Enter. For example, ftp://192.168.1.100.
- Type your account credentials.
- Click the Log on button.
After completing the steps, you should be able to navigate and download files and folders from the server.
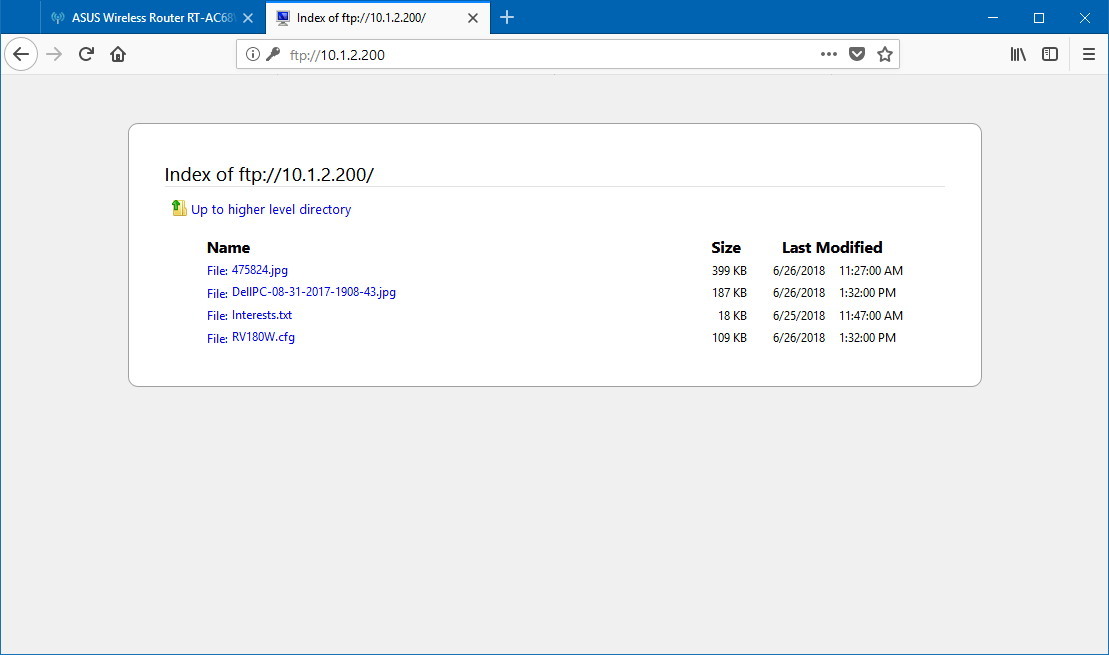
In the case that you’re trying to connect from the internet, you have to specify the public (internet) IP address of the network hosting the FTP server.
The easiest way to find out is to search for «What’s my IP» in Google or Bing within the network before trying to connect from a remote connection. Also, unless you have an static IP address from your internet provider, or you’re not using DDNS service, you may need to check your public IP regularly in order to connect, in case it changes.
Viewing, downloading, and uploading files
The easiest way to browse, download and upload files is to use File Explorer with these steps.
- Open File Explorer.
- In the address bar, type the server address using ftp://, and press Enter. For example, ftp://192.168.1.100.
- Type your account credentials.
- Check the Save password option.
- Click the Log on button.
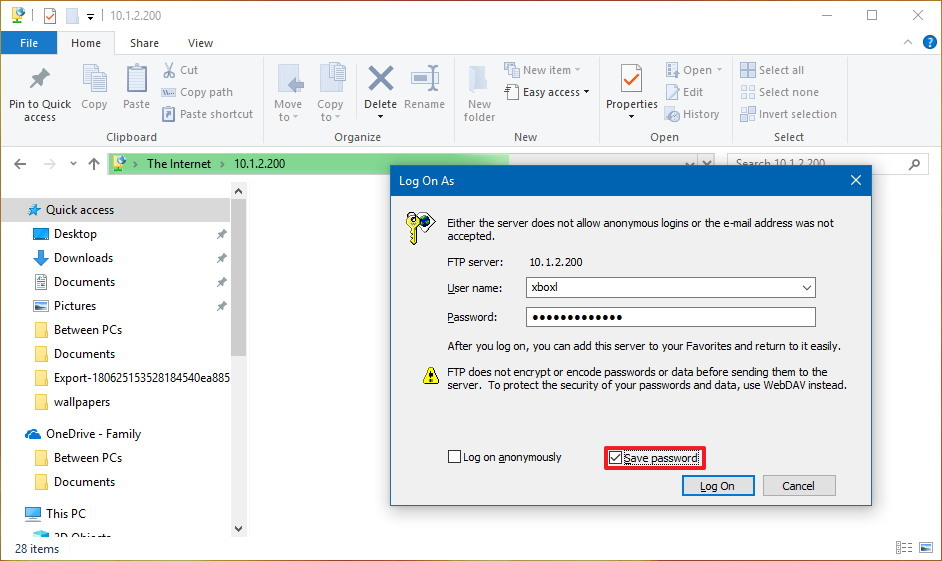
After completing the steps, you’ll be able to browse folders and files, as well as download and upload files as if they’re locally stored on your device.
You can avoid going through the steps to reconnect to the FTP server by right-clicking Quick Access in the left pane, and selecting the Pin current folder to Quick Access option.
Of course, you’re not limited to use File Explorer as there are plenty of FTP clients, such as FileZilla that you can use to transfer files.
Wrapping things up
In this guide, we outlined the steps to get started with the FTP server feature available on Windows 10, and the steps to view, download, and upload files. However, bear in mind that you can only establish a connection as long as the device hosting the service is turned on. You won’t be able to access your files when the computer is asleep or hibernating.
The FTP Server component is available on Windows 10 Pro as well as on Windows 10 Home, and older versions of the OS, including Windows 8.1 and Windows 7.
More Windows 10 resources
For more helpful articles, coverage, and answers to common questions about Windows 10, visit the following resources:
- Windows 10 on Windows Central – All you need to know
- Windows 10 help, tips, and tricks
- Windows 10 forums on Windows Central
All the latest news, reviews, and guides for Windows and Xbox diehards.
Mauro Huculak is technical writer for WindowsCentral.com. His primary focus is to write comprehensive how-tos to help users get the most out of Windows 10 and its many related technologies. He has an IT background with professional certifications from Microsoft, Cisco, and CompTIA, and he’s a recognized member of the Microsoft MVP community.
В некоторых предыдущих публикациях мы уже упоминали в разных контекстах подключение к серверам по FTP, но как это делается подробно не разбирали. Исправим же сегодня это упущение, рассказав о том, как вообще происходит обмен данными по FTP, как настроить FTP-сервер на примере машины, управляющейся Windows 10, а также о способах подключения, наибольшее внимание уделив продукту FileZilla.
Для начала дадим определение FTP. Эта аббревиатура разворачивается как «file transfer protocol» – т.е. речь идет об особом протоколе по которому можно удаленно передавать данные в интернете. В основе протокола лежит клиент-серверная архитектура, позволяющая задействовать разные каналы обмена данными и командами. При этом передача осуществляется с помощью конкретного соединения, устанавливающегося через 21 TCP-порт, который является одним из основных протоколов в сетях TCP/IP.
Когда клиент подключается к серверу по FTP, создается сессия, сохраняющая статус активной весь процесс обмена данными. Работа FTP-протокола может протекать в двух режимах: активном и пассивном.
- Активный режим. Здесь клиент передает серверу свой IP и номер порта, через который будут передаваться данные, после чего устанавливается соединение. Происходит подключение сервера к заданному узлу и запускается процесс обмена файлами.
- Пассивный режим. Часто клиент защищен межсетевым экраном (брандмауэром), фильтрующим входящий трафик, и в силу этого не может принять входящее подключение. Тогда он посылает запрос к серверу, ответом на который становится IP-адрес сервера и номер TCP-порт, после чего клиент производит по ним подключение и запускается сессия по обмену данных.
Для обмена данных FTP-протокол также предусматривает несколько режимов: поточный, блочный и сжатый
- Поточный режим. Является дефолтным. Данные передаются непрерывным потоком, никак не обрабатываясь протоколом. Данные разбиваются уже TCP на сегменты конкретного размера.
- Блочный режим. Протокол делит данные на кластеры, каждому из которых присваивается свой заголовок, номер, размер и другие характеристики.
- Сжатый. Если передаваемый файл слишком велик, то протокол сжимает его RLE-методом кодирования длин серий (run-length encoding).
Аутентификация клиента осуществляется стандартным образом: он передает серверу логин и пароль и, если юзер с такими кредсами зарегистрирован, производится коннект. Также при желании к FTP-серверу можно настроить и анонимный доступ.
Создание и настройка FTP-сервера на Windows 10
Теперь, когда мы рассказали об основных принципах передачи данных по FTP, поговорим о том, как создать собственный FTP-сервер. В качестве примера мы рассмотрим персональный компьютер, находящийся под управлением ОС Windows 10. Сразу отметим, что сделать это можно как с помощью встроенных инструментов операционной системы, так и с помощью внешних утилит, одной из наиболее распространенных считается FileZilla Server. При выбранной схеме в качестве сервера будет выступать жесткий диск вашей пекарни. Т.е. именно на нем будет находиться файловое хранилище, удаленный доступ к которому по FTP-протоколу можно будет настроить.
В общем случае создание FTP-сервера — достаточно трудоемкая задача, справиться с которой могут только опытные пользователи. Тем не менее, на Windows 10 этот процесс существенно упрощают встроенные инструменты, благодаря которым разобраться в создании сервера при некоторой дотошности смогут даже рядовые юзеры.
Рассмотрим же подробно инструкцию, неукоснительно следуя которой можно создать и настроить FTP-сервер на своем персональном компьютере.
- Шаг 1. По дефолту в Windows 10 FTP-сервер выключен. Для его активации необходимо зайти в раздел «Программы», а затем кликнуть на «Включение» или отключение компонентов Windows. В диалоговом окне «Компоненты Windows» потребуется развернуть узел Службы IIS. Разверните узел «FTP-сервер», установив флажки «FTP-сервер» и флажок «Служба FTP», а затем нажмите кнопку «ОК».
- Шаг 2. Переходим в корень «Панели управления» и находим там раздел «Администрирование». Перед вашими глазами окажется россыпь файлов, среди которых нужно будет найти «Диспетчер служб IIS». Два раза кликаем левой кнопкой мыши, в открывшемся окне слева находим вкладку, озаглавленную как «Сайты». Нажимаем правую кнопку мыши и ищем строку «Добавить FTP-сайт». Нажав на нее, вбиваем путь к создаваемому серверу (это может быть диск «C» или иной раздел винчестера).
- Шаг 3. Настраиваем параметры привязки. В качестве айпишника выставляем значение «Все свободные», выбираем порт «21», ставим галки в полях «Запускать сайт FTP автоматически» и «Без SSL».
- Шаг 4. Теперь нужно настроить доступы. Как уже говорилось выше, он может быть анонимным и тогда получить доступ к вашему диску сможет любой пользователь, а может — защищен логином и паролем (в настройках этот вариант обозначен как «Обычный»). Обратите внимание, что создавая собственный FTP-сервер, на ПК нужно активировать протокол передачи данных в межсетевом экране. Для этого нужно перейти в раздел «Дополнительные параметры» брандмауэра и выдать там необходимые разрешения.
- Шаг 5. Все, сервер создан. Осталось решить, кто из пользователей компьютера будет иметь к нему прямой доступ. Переходим по пути «Панель управления» => «Администрирование => «Управление компьютером» и правой кнопкой мыши вызываем меню, в котором находим строчку «Создать группу». Здесь можно добавить учетки желаемых пользователей, после чего потребуется зайти в свойства группы и во вкладке «Безопасность» добавить созданную группу в список, после чего нажать кнопку «Изменить». Финиш, настройки доступа к FTP-серверу на вашей пекарне завершены: можно приступать к обмену файлами.
Как установить FTP-сервер на Linux
Также надо сказать несколько слов о том, как FTP-сервер устанавливается на Linux. Операционки этого семейства позволяют подключать несколько распространенных FTP-серверов, например proftpd, wu-ftpd, pureftpd и vsftpd. Итак, как настроить vsftpd-сервер — «very secure», один из самых шустрых и безопасных с поддержкой IPv6 и SSL?
Рассмотрим мы это на примере сборки 20.04 Ubuntu, однако по той же схеме это можно сделать для дистрибутивов версий 18.04 и 16.04: отлаживаем, подключаем защищенное соединение SSL/TLS, выдаем пользователям доступ по FTP и настраиваем межсетевой экран. Теперь рассмотрим эти шаги подробнее.
- 1 этап: устанавливаем vsftpd. В терминале выполняем команду «sudo apt-get install vsftpd», которая запускает установку нужного ПО на VPS-сервер. Когда все файлы скачаны, в распоряжении юзера оказывается уже с конфигурированная программа. Часть настроек безопасности предустановлена, однако их нужно допиливать вручную: так по умолчанию подключаться к вашему vsftpd можно анонимно, чего вам наверняка хотелось бы избежать.
- 2 этап: отладка vsftpd на Ubuntu. Ищем н сервере конфиг sudo nano /etc/vsftpd.conf, открываем, в нем находим строку «Anonymous_enable», в которой меняем значение с «да» на «нет», чтобы перекрыть кислород анонимусам: «anonymous_enable=NO».
Затем производим раскомментирование еще нескольких строк: убираем знак «#» из начала строк нескольких опций («local_enable», «write_enable», «chroot_local_user») и меняем их значение, дописав в конец «=YES».
После этого нужно сохранить изменения в конфиге и выйти из файла. Чтобы при работе без root-доступа не возникало ошибки запуска последних версий нужно выполнить еще три вещи: зарегистрировать нового пользователя, выдать ему админский доступ и создать новую директорию внутри пользовательской домашней директории. После этого вы производите замену владельца этой директории на нового root-пользователя.
Если вам понадобится что-либо поменять во вложенной директории «files», не забудьте сохранить его и перезагрузить vsftpd, выполнив «sudo service vsftpd restart».
Осталось настроить фаерволл. В Ubuntu 16.04 и других упомянутых сборках это делается так: межсетевой экран перезапускается последовательным вводом «sudo ufw disable» => «sudo ufw enable», затем на порты для входящих подключений вешаются правила: «sudo ufw allow 20/tcp» => «sudo ufw allow 21/tcp». - 3 этап: получаем доступ к FTP-серверу. Когда FTP-сервер Linux установлен, подключаемся к нему через консоль или адресную строку в браузере. В первом случае в терминале выполняется команда ftp в сочетании с доменным именем или IP-адресом сайта: ftp example.com. Во-втором случае в браузер вбивается название ftp-протокола и домен или айпишник сервера: ftp://example.com. Осталось вспомнить пользовательские кредсы (логин-пароль) и можно заходить в свою директорию. В конце работы в консоли нужно набрать «exit» для выхода.
Описанный в предыдущем разделе алгоритм показывает, что создание FTP-сервера с помощью инструментов, встроенных в Windows — не слишком сложный, но достаточно рутинный процесс, требующий большой внимательности. Поэтому большинство пользователей выбирают в качестве решения специальные программы, которые позволяют в несколько кликов создавать на своей базе FTP-сервера, которым остается лишь выдать доступы к файлам на своей машине.
Существует огромное число таких утилит: FAR, Total Commander, Xlight FTP Server и т.д. Однако ниже мы сосредоточимся на работе с самым популярным из этих приложений, известным как FileZilla Server.
FileZilla Server: настройка FTP и порядок работы
Утилита FileZilla считается одной из самых популярных, когда требуется организовать доступ к удаленному серверу по FTP. Достаточно лишь вбить параметры доступа к конкретным каталогам, ввести корректное имя сервера с паролем и можно эффективно обмениваться файлами. Однако не все знают, что кроме FTP-клиента коробочный вариант FileZilla, который можно скачать с официального сайта, предоставляет также функции элементарно настраиваемого FTP-сервера. Рассмотрим чуть подробнее порядок работы с этим сервисом.
FileZilla очень удобен в работе т.к. предлагает гибкую систему настройки параметров, отвечающих задачам практически любого пользователя. Интерфейс также весьма интуитивен: рабочая область состоит из нескольких окон, слева находится дерево каталогов с файлами на компьютере клиента, справа — разделы с файлами на сервере, к которому клиент подключается.
В верхней части интерфейса находится панель быстрого подключения, которая позволяет подключаться к серверам на одну сессию после заполнения строк «хост» (айпишник или имя домена), «имя пользователя» (логин по которому вы входите в панель управления) и «пароль». В качестве порта указывается стандартный «21», затем нужно кликнуть на кнопку «Быстрое соединение» и вуаля — настройка FTP-соединения произведена, можно приступать к загрузке файлов на хостинг или скачивания оттуда чего-то необходимого вам на локальной машине.
При этом утилита не запоминает данные, вводимые таким образом. Чтобы не вбивать все это каждый раз заново, достаточно зарегистрировать аккаунт, в котором все параметры подключения будут сохранены. Делается настройка пользователя FTP по следующему алгоритму.
- Шаг 1. Нажимаете Ctrl+S или заходите в меню «Файл», откуда вызываете «Менеджер сайтов» и в появившемся окне кликаете на «Новый сайт».
- Шаг 2. Заполняете все появившиеся поля (все те же «хост», «имя пользователя» и «пароль»).
- Шаг 3. В качестве типа входа выбираете «Нормальный» и вбиваете логин.
- Шаг 4. Во вкладке «Настройки передачи» выбираете «Пассивный» режим.
- Шаг 5. После ввода данных нажимаете «Соединиться» и ждете несколько секунд, пока не произойдет подключение к сайту через FileZilla.
Важно отметить, что для повышения секьюрности не стоит сохранять в приложениях пароли: если в ваш компьютер проникнут злоумышленники, то через FileZilla они смогут получить доступ и к данным сервера, с которым вы соединяетесь по FTP. Лучше не лениться вводить пароль каждый раз вручную, для чего тип входа следует изменить с «Нормального» на «Запрос пароля».
Теперь, когда профиль доступа создан, можно приступать к работе с файлами на удаленном сервере. После подключения с ними можно выполнять все те же операции (создание, редактирование, копирование, удаление и т.д.), что и своем на локальном компьютере. Чтобы загрузить что-либо на сервер достаточно или кликнуть правой кнопкой мыши на нужные файлы в левой части экрана FileZilla и вызвать опцию «Закачать на сервер» или еще проще — перетащить эти файлы в нужный каталог в правой части экрана по методу drag-and-drop. Прогресс копирования будет отображаться в баре в нижней части экрана.
Для редактуры файлов достаточно открыть их с помощью стандартных программ, установленных на компьютере напрямую из файлового каталога сервера (правый раздел экрана FileZilla). После сохранения изменений в этих программах файлы будут автоматически обновляться на сервере.
Заключение
Подытоживая, можно сделать следующие выводы. FTP-протокол является одним из наиболее удобных форматов обмена данными между клиентами и серверами. Создать собственный FTP-сервер можно практически в любой операционной системе; примерный механизм мы рассмотрели на примере Windows 10, в которую встроены все необходимые инструменты. Тем не менее, несмотря на простоту, это довольно кропотливый процесс и гораздо удобнее настраивать FTP-сервера и подключаться к ним с помощью специализированных программ. Самой популярной из них является FileZilla Server, однако на рынке существует немало альтернативных решений: Total Commander, FAR-manager и т.д. Клиенты Максиплейс, арендующие место на наших серверах получают квалифицированную поддержку: в частности наши инженеры помогут вам настроить FTP-доступ к файлам, которые вы доверяете нам и гарантируют его бесперебойность.

FTP functions on a client-server model. The server hosts the files to be shared and the client provides the interface to access, download, or upload files to the file server. The device transferring the files can be within the same network where the FTP server is configured. It could also reside outside the network. As described in his guide “How to install and configure a FileZilla Server on Windows“, FTP uses two ports, one for connection and one for sending data. Setting up a File Transfer Protocol (FTP) server on Windows 10 is a relatively convenient way to upload and download files from virtually anywhere to your device. See this guide on how to access FTP Server from your browser: How to create a shortcut and access Filezilla from Windows Explorer.
Since Windows's built-in FTP does not support secure FTP, you could use the Filezilla Server as an option to support secure FTP. It also offers a simpler user management that is presented upfront on the server application's interface. While it is not a better solution to the IIS FTP role, it is a quick solution if you do not use IIS and use a Windows-based control panel that doesn't offer FTP. You may also want to see this guide: Warning: FTP over TLS is not enabled, users cannot securely log in: You appear to be behind a NAT Router, please configure the passive mode settings and forward a range of ports in your router.Step 1 – Configure FTP Components:
In this guide, I will take you through to install the FTP server components on your server.
– Search and open Control Panel.

This will open up the Control Panel window. Click on Programs as shown below.

Under “Programs and Features,” click the “Turn Windows features on or off” link. This can take a while to fully display the features, please wait.

You will need to expand the “Internet Information Services” feature, and expand the FTP server option.
– Ensure you check the FTP Extensibility and FTP Service options.
– Also select the Web Management Tools option with the default selections,
– Please also select the IIS Management Console.


Click on OK. This will search for the required files as shown below. This can also take a while, sit back and relax 🙂 When it has successfully applied all changes, a restart will be required. Click on Restart now.


Furthermore, the components to set up an FTP server have been successfully installed on the Windows 10 device.
Step 2 – Set up an FTP site:
However, After installing the required components, you can proceed to configure an FTP server on the device. Moreover, which involves creating a new FTP site, setting up firewall rules, and allowing external connections. To do this, perform the following steps.
– In addition, Launch the Administrative Tools from the Start Menu and click on Internet Information Services as shown below.
– Alternatively, you could click on the control panel, System and Security, and Administrative Tools. Click on the Internet Information Services.

This will open the Internet Information Services as shown below.

From the “Connections” pane, right-click Sites as shown below and click on the Add FTP Site option.
FTP depends on IIS (Internet Information Services). Both IIS and FTP services should be installed for the configuration of the FTP server. A root folder is required for FTP publishing. The folder can be created under:
%SystemDrive%\TechDAFTP
Note: It is recommended to create a folder in the root of the main system drive, or on a different drive. Else, if you set the home folder in one of your default folders when adding multiple accounts, users won’t have permission to access the folder.
– Type a descriptive name in the FTP site name.
– In the “Content Directory” click on the button and browse to the location of the folder you want to use to store your FTP files.


Nonetheless, Click the Next button to open up the Binding and SSL Settings as shown below.
– Consequently, Use the default Binding settings selections and ensure the Start FTP site automatically option is selected.
– Similarly, In the “SSL” section, select the “No SSL” option. This is currently set up in a lab environment and will be destroyed in the next hour. Therefore, in your production environment, please select require SSL, and this will prevent your data from being transmitted in a clear text.

If you want multiple users to access the FTP server at the same time, you need to modify the server settings using these steps:
When you chose "All Users", the option to type in users will be grayed out. Also, click on the Read and Write options.
- When you are done, click on Finish.
As you can see, the FTP server has been configured successfully and it is operational (started).

Note: Ensure your FTP server is assigned a static IP address. You may also configure a DNS record (A record) for it.Step 3 – Configure Windows Firewall rules: Since you are running the built-in firewall on Windows 10, connections to the FTP server are blocked by default. To remediate this, we will need to allow the FTP service through the Firewall. To do this, please follow the steps below.
– Open Windows Defender Security Center.

This will open the Windows Security as shown below. Click on the Firewall & network protection.
– Click the Allow an app through the firewall option.

This will open the “Allow apps to communicate through Windows Defender Firewall”. In order to do this, click on the “Change Settings” as shown below.

Click on the FTP Server option, and ensure you check to allow Domain, Private and Public access as shown below.

Once you’ve completed the steps, the FTP server should now be accessible from the local network. If you are using other 3rd party software, you will also need to create an exception.
Step 4 – Creating new user accounts:
Additionally, If you wish to allow multiple people to download and upload files to the FTP server simultaneously, you need to set up multiple accounts with specific permissions.
– Furthermore, This process is done by creating new standard Windows 10 accounts and configuring the correct settings
- Open Settings.
- Click on Accounts.
- Click on Family & other people.
- Click the Add someone else to this PC button.
Follow through the prompts to have a local account created.


This will ensure the user account is created.

Step 5 – Connect to your FTP Server: However, You may want to see this guide for more information “Access FTP Server from your browser: How to create a shortcut and access Filezilla from Windows Explorer“.


Moreover,You will be prompted to select an app, as shown below. I will be selecting Internet Explorer, as shown below.

Enter the username and password created above. In addition, This account allows this user to access the FTP server internally or externally.

Nonetheless, the user we created could access the FTP server via the web browser. You may wish to access the FTP server via the FileZilla client etc. Consequently, To do this, please follow the steps in this guide: Access FTP Server from your browser: How to create a shortcut and access Filezilla from Windows Explorer.

Nevertheless, In the future, if you wish to change or restrict the users accessing the FTP server, you need to modify the server settings using the steps below.
– Therefore, Launch the IIS Manager, and on the left pane, expand “Sites,” and select the site (TDAFTP) you have created.
– Double-click the FTP Authorization Rules option.
– On the right pane, click the Add Allow Rule option.
– Follow through the rest of the steps as they are very basic.


I hope you found this blog post helpful. If you have any questions, please let me know in the comment session.
Looking for configuring Windows 10 FTP server to share and access files over the network? Here in this post, we discuss How to create FTP server in windows 10 and 8.1. Also, show you How to share files to Access Via FTP server and how you can access it via LAN and WAN from anywhere anyplace. And You can give access to your FTP site by restricting users with username/password or anonymous access. It depends on the purpose of the FTP server on your internal or external network.
FTP stands for file transfer protocol, a useful feature to transfer files between the client machine and the FTP Server. It’s like you share some File folders on the configured FTP server on a port number, And a user can read and write files through the FTP protocol from anywhere. And most browsers support FTP protocol so we can access the FTP servers through the browser.
For example, ftp : // YOURHOSTNAME or IP address.
Contents
- 1 How to create FTP server in windows 10
- 1.1 Enable FTP in windows 10
- 1.2 Configure FTP Server Windows 10
- 1.3 Allow an FTP server through Windows Firewall
- 1.4 Configure the Router to Allow external connections
- 1.5 How to Access an FTP server from any PC
- 1.6 Download and Upload files, Folders On FTP server
Having an FTP server on the internal or external network is always easy and faster to share and access files over the network. Windows 10 and 8.1 come with a built-in FTP server feature under Internet Information Service features that need to be installed before use. In this section, we walk through how to set up FTP Server on Windows 10. And Using WinSCP as a windows client to connect to FTP Server. Also, there are some free FTP clients available by which you can transfer files between your PC and remote servers.
Enable FTP in windows 10
To configure the FTP server on a Windows computer first, we need to Turn on FTP And IIS Features.
- Press Windows + R, keyboard shortcut type appwiz.cpl and click ok.
- This will open Programs and Features,
- here click on ‘Turn Windows features on or off’ as shown image below.
Note: If IIS was not installed earlier on a particular Windows 10 or 8.1 computer, you need to install other features of IIS too (as shown by arrow marks). See the below screenshot for the actual requirements to run the FTP server on Windows 10 (All ticked features need to be installed).
- Press OK to install the selected features.
- This will take some time to install the features, wait until complete.

Configure FTP Server Windows 10
Now After installation is completed, you need to configure the FTP server following the steps below.
- Open Control Panel\All Control Panel Items\Administrative Tools
- Then double click on Internet Information Services (IIS) Manager
- The IIS manager opens, here Expand the sites, right-click on it and click Add FTP Site.

Note: I have created a folder called ‘windows101tricks FTP Share’ (Which we are going to share through the FTP server ) on C drive before reaching this step.

- Give a name for the FTP site and browse the local folder you want to share with others through the FTP server.

- You need to select the local computer’s IP address from the drop-down box on the next screen. I hope you have already set up static IP for the computer.
- And left port number 21 as the default port number of the FTP server.
- Under the SSL option, select No SSL to make the connection without an SSL certificate.
- In a production environment for a professional FTP server setup, you may need to enable SSL, which requires a certificate.

- In the next screen, you can set permission for users to access the FTP site.
- Here you need to decide how others will be accessing the FTP share and who will be having Read-only or Read & Write access.
Let’s assume this scenario
If you want specific users to have read and write access, so obviously they must type a username and password for it. Other users can access the FTP site without any username or password to view the content only, it’s called anonymous user access. Now click Finish.

Allow an FTP server through Windows Firewall
If you have Windows Firewall running on your computer, then the security feature will block any connections trying to access the FTP server. Use the steps below to allow the FTP server through the firewall.
- Open Control Panel\All Control Panel Items\Windows Firewall.
- Click the Allow an app or feature through the Windows Firewall link.
Note: Nowadays, firewalls manage by an Antivirus application, So either you need to configure/Allow FTP from there or Disable Firewall protection on your Antivirus

- Now Click the Changes settings button.
- Select FTP Server and make sure to allow it on a Private and Public network.
- Click OK.
At this point, you should be able to use your favorite FTP client to connect your newly created FTP server from your local network.

Configure the Router to Allow external connections
Now We need to Configure on Router and open TCP/IP port number 21 to allow connections to your PC. So That your FTP server can be reachable from the internet and you can access it from anywhere. Here find the steps to configure most routers. (For more specific instructions to forward TCP/IP ports, you should check your router’s manufacturer support website.)
- First Open the command prompt, type the command ipconfig and hit the enter key.
- Find out and note down the Default Gateway address (Router IP address)
Typically, it’s a private address in the 192.168.x.x range. For example, 192.168.1.1 or 192.168.2.1.

- Now Open your default web browser.
- On the address bar, enter the router’s IP address and press Enter.
- Sign in with your router credentials.

Find the Port Forwarding section – usually, you’ll find this feature under the WAN or NAT settings.
Create a new port forwarding that includes the following information:
- Service name: You can use any name. For example, FTP-Server.
- Port rage: You must use port 21.
- PC’s TCP/IP address: Open Command Prompt, type ipconfig, and the IPv4 address is your PC’s TCP/IP address.
Now Apply the new changes, and save the new router configurations.
How to Access an FTP server from any PC
Here’s the quickest way to test your FTP server after configuring the firewall and forwarding port 21 on your router.
- Open your default web browser.
- In the address bar, type your Windows 10 PC IP address, on an FTP link format, and press Enter.
- The address should look like this: FTP://192.168.1.199. or your public address.
- This will ask for Authentication Type your system Username and password to access the files you shared on the FTP share folder.

To access the FTP server from Different locations/Networks, you need to type the Static IP (provided by your internet provider). For example, if your Static IP is 11.03.68.445, you need to use ftp://11.03.68.445 or your ftp://your local hostname.
Download and Upload files, Folders On FTP server
You can also use third-party applications like (FileZilla) to Download Upload, and manage files, and Folders between the client machine and FTP Server. There are multiple free FTP Clients available you can use any of them to manage your FTP server:
FireFTP: Firefox browser FTP Client extension
FileZilla: an FTP Client available for Windows
Cyberduck: FTP Client available for Windows
WinSCP: A free and open-source SFTP, FTP, WebDAV, Amazon S3 and SCP client for Microsoft Windows
For example, I am using WinSCP.
- First, download and install the application.
- Open WinSCP, then Input the FTP Server details.
- Username is the FTP Server Windows username. The password is FTP Server Windows password & Click Save The WinSCP establishes a connection and list out all files and folders available for download.

The left side windows in your machine and the right side is the FTP Server.
- Drag files from left to right will copy the file and move to FTP SERVER.
- Drag files from the Right to left will copy the file and move to the Client machine.
That’s all you have successfully configured the FTP server on windows 10 computers. Also, these steps (setup FTP server) are applicable to Windows 8.1, 8 and Windows 7 computers.
Also read:
- How to install Kali Linux on Windows 10 subsystem (Step by step guide)
- Does Windows 10 Printer keep going offline? Let’s make it online.
- Solved: Can’t print documents, Printer Driver is unavailable in Windows 10
- How to fix DNS Server not Responding On Windows 10/8.1/7
- Windows 10 won’t shut down after update? Here’s How To Fix It!