The #1 containerization software for developers and teams
Your command center for innovative container development

What’s Docker Desktop?
The fastest way to containerize applications
Docker Desktop is secure, out-of-the-box containerization software offering developers and teams a robust, hybrid toolkit to build, share, and run applications anywhere.
Why developers love Docker
![]()
Quick to set up
Start developing on your local machine and immediately connect with remote resources. Docker Desktop’s single installer sets up everything you need to start building, sharing, and running containers in seconds.
![]()
Simple to maintain
Our monthly releases include new features to help developers, team leads, and businesses rapidly deliver secure and innovative applications. Docker Desktop is also regularly maintained with bug fixes and security updates.
![]()
Secure from the start
We’re setting the standard for enterprise-ready container development solutions. Docker Desktop is secure from the first download, consistently monitoring and managing patches and security fixes as needed.
![]()
Easy to scale
Whether you’re a small startup or an organization with 1,000+ developers, Docker Desktop is designed to grow with you. Scale confidently with features such as Hardened Docker Desktop.
Enterprise ready
Develop with Docker containers at scale
Whether you’re orchestrating mid-sized to large development teams or require advanced security and management tools, Docker is your unwavering partner in providing a complete suite of developer tools and services. Trusted by an astounding 70% of Fortune 100 companies, we’re helping our customers streamline how they build, share, and run applications.
Get started with Docker Business
Your perfect pricing
A subscription level for everyone
Choose the subscription level that supports your development velocity and start building with Docker Desktop today.
![]()
Pro
Includes pro tools for individual developers who want to accelerate their productivity.
Buy now
![]()
Team
For smaller teams requiring collaboration and productivity tools.
Buy now
![]()
Business
Ideal for businesses looking for centralized management and advanced security capabilities.
Buy now
Docker Desktop Extensions
Extend the power of Docker Desktop
Extensions expand Docker Desktop’s capabilities and establish new functionalities, integrating your most critical tools seamlessly. At Docker we’re invested in ensuring individual developers and teams can build their ideal development environment.
Docker Extensions

Our community
Find your pod with Docker
Our worldwide community means you can find a peer community near you.
Join our pod
![]()
Connect with developers
Collaborate with our over 200+ user groups either virtually or in person.
![]()
Join Docker events
Learn about new products, features, and other topics at Docker-sponsored events.
![]()
Meet Docker Captains
In every friend group, there are always go-to experts you look to for advice — those are our Docker Captains.
Developer resources
Find support
Get the help you need to build, share, and run your Docker applications with confidence.
Get support

Get started
Learn more about Docker and customize your experience with additional tools.

Download and install
Visit our Docs for instructions on quickly installing Docker Desktop for Windows, Linux, or Mac.

Get the latest news
Read the blog to stay current on new releases, products, features, and much more.
Search code, repositories, users, issues, pull requests…
Provide feedback
Saved searches
Use saved searches to filter your results more quickly
Sign up
Рассмотрим установку Docker Desktop for Windows — это Community-версия Docker для систем Microsoft Windows.
Системные требования
- Windows 10 64-bit: Pro, Enterprise, Education (Build 16299 или выше).
Для успешного запуска Client Hyper-V в Windows 10 требуются следующие предварительные требования к оборудованию:
- 64 bit процессор c поддержкой Second Level Address Translation (SLAT).
- 4GB системной памяти.
- Поддержка аппаратной виртуализации на уровне BIOS должна быть включена в настройках BIOS.
Подготовка
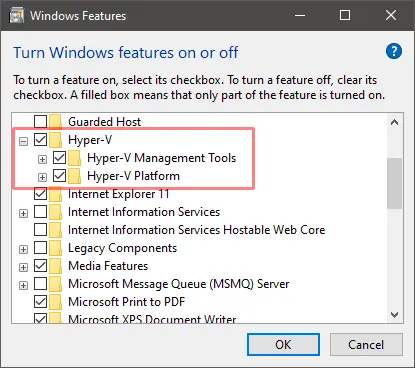
Включаем функции Hyper-V Containers Window. Для этого переходим в панель управления — установка и удаление программ — включение или отключение компонентов Windows. Активируем пункт Hyper-V, который включает Hyper-V Managment Tools, Hyper-V Platform.
Также это можно выполнить через powershell или dism (все команды необходимо выполнять с правами администратора).
Powershell:
Enable-WindowsOptionalFeature -Online -FeatureName Microsoft-Hyper-V -All
DISM:
DISM /Online /Enable-Feature /All /FeatureName:Microsoft-Hyper-V
Установка
Скачиваем установщик Docker (Docker Desktop Installer) с Docker Hub.
Установка Docker Desktop включает Docker Engine, Docker CLI client, Docker Compose, Notary, Kubernetes и Credential Helper. Контейнеры и образы, созданные с помощью Docker Desktop, используются всеми учетными записями пользователей на компьютерах, на которых он установлен. Это связано с тем, что все учетные записи Windows используют одну и ту же виртуальную машину для создания и запуска контейнеров. При использовании Docker Desktop WSL 2 невозможно обмениваться контейнерами и образами между учетными записями пользователей.
Запускаем установщик Docker Desktop Installer.exe и ожидаем пока он скачает все необходимые компоненты.
После установки система потребует перезагрузки. Перезагружаемся и входим в систему.
После входа может возникнут запрос на установку дополнительного компонента WSL2. Переходим по ссылке и скачиваем необходимый пакет с официального сайта Microsoft.
После скачивания выполняем установку WSL2, после которой снова потребуется перезагрузка.
Настройка и запуск приложения
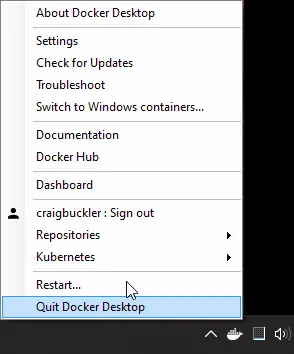
Входим в систему и ждем запуска всех служб Docker. Когда все службы будут запущены, мы увидим в трее классический значок Docker — это значит что служба установлена и запущена. Далее можно запустить приложение Docker desktop. Далее можно изменить настройки Docker при необходимости:

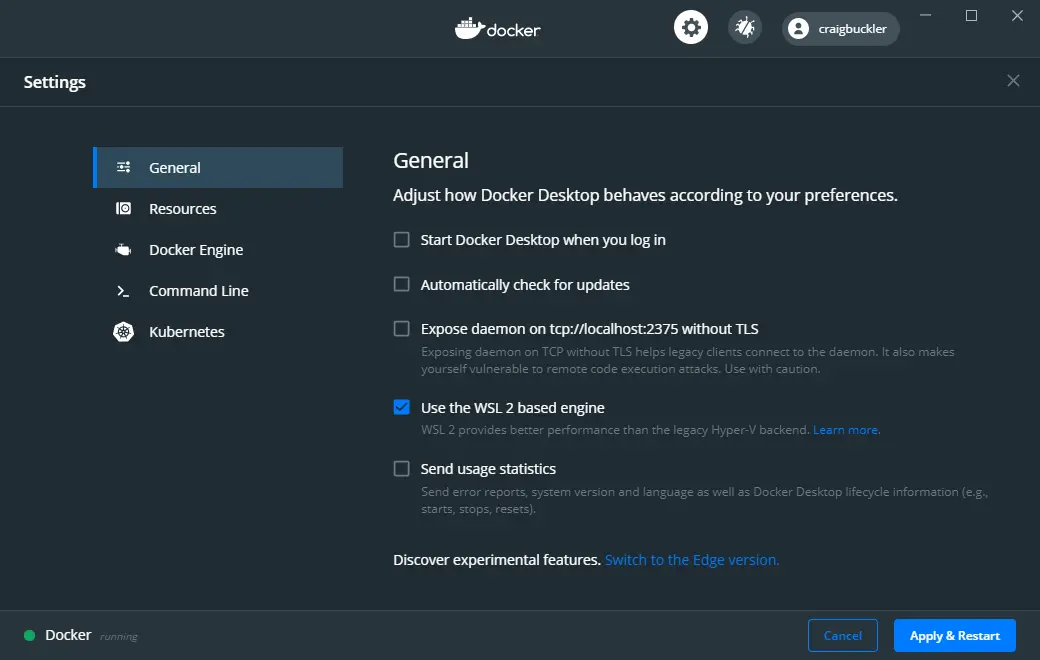
Рисунок 1 — Изменение параметров Docker desktop
Далее управление Docker выполняется через Powershell. Проверяем версию и выполняем тестовый запуск контейнера:

Рисунок 2 — Проверка версии Docker
После выполнения всех этих действий, Docker готов к использованию.
Нужна помощь? Настройки docker/docker swarm/docker compose мы осуществляем в рамках услуги DevOps-аутсорсинг.
1,600 words, 8-minute read
Docker can be installed on Linux, mac OS, or Windows.
Requirements and installation instructions can be found on the Docker Docs help pages.
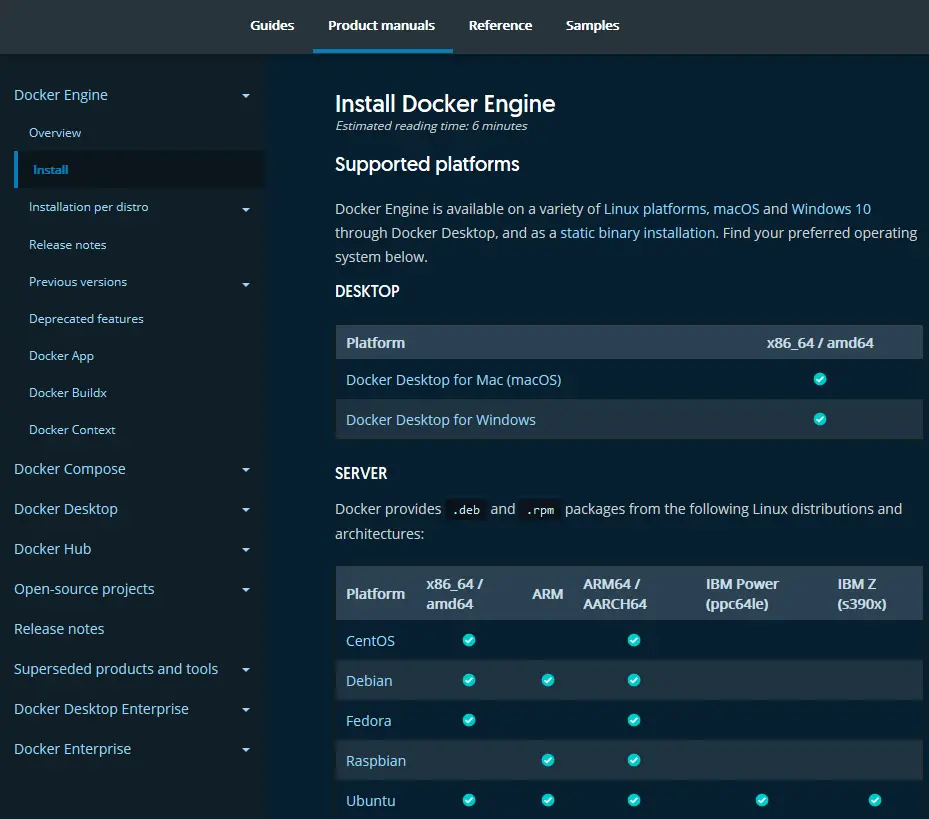
Install Docker on Linux #
Docker Desktop for Linux can be downloaded from Docker Hub. The installer includes the Docker server, CLI, Docker Compose, Docker Swarm, and Kubernetes.
Alternatively, the Docker command-line tool is available in official Linux repositories although these are often older editions. The latest edition is supported on recent 64-bit editions of popular Linux distros:
- Ubuntu (and derivatives such as Mint)
- CentOS
- Debian
- Fedora
Static binaries are available for other distros, although Googling “install Docker on [your OS]” may provide easier instructions, e.g. “install Docker on a Raspberry Pi”.
Follow the Docker documentation for your distro. For example, Docker for Ubuntu is installed with the following commands:
sudo apt-get remove docker docker-engine docker.io containerd runc
sudo apt-get update
sudo apt-get install ca-certificates curl gnupg lsb-release

sudo mkdir -p /etc/apt/keyrings
curl -fsSL https://download.docker.com/linux/ubuntu/gpg | sudo gpg --dearmor -o /etc/apt/keyrings/docker.gpg

echo "deb [arch=$(dpkg --print-architecture) signed-by=/etc/apt/keyrings/docker.gpg] https://download.docker.com/linux/ubuntu $(lsb_release -cs) stable" | sudo tee /etc/apt/sources.list.d/docker.list > /dev/null

sudo apt-get update
sudo apt-get install docker-ce docker-ce-cli containerd.io docker-compose-plugin
To run Docker commands as a non-root user (without sudo), create and add yourself to a docker group:
sudo groupadd docker
sudo usermod -aG docker $USER
Then reboot to apply all changes.
Install Docker on macOS #
Docker Desktop for macOS Sierra 10.13 and above can be downloaded from Docker Hub. The package includes the Docker server, CLI, Docker Compose, Docker Swarm, and Kubernetes.
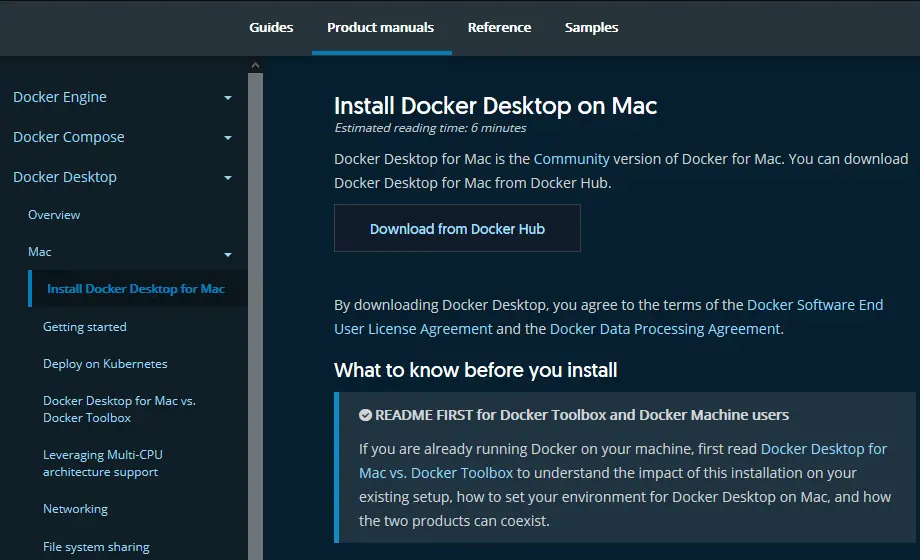
Two editions are available: stable and edge with experimental features. The stable version is best for most developers.
Double-click Docker.dmg to open the installer, then drag the Docker icon to the Applications folder. Double-click Docker.app in that folder to launch Docker.
After completion, the whale icon in the status bar indicates Docker is running and commands can be entered in the terminal.
![]()
Install Docker on Windows #
Docker Desktop for Windows requires either WSL2 or Hyper-V.
Windows Subsystem for Linux (WSL) 2 #
WSL allows you to run full Linux environments directly on Windows 10 or Windows 11.
IMPORTANT!
You can not install the Linux edition of Docker within a WSL-powered Linux distro. You must install Docker Desktop for Windows which allows Docker commands to be run in all Windows and Linux terminals.
WSL2 is the recommended default option for Docker on Windows. It is faster than Hyper-V and available in all editions of Windows 11 and Windows 10 from the May 2020 update (version 2004, OS build 19041).
To install WSL2:
-
Enable hardware virtualization support in your BIOS.
This will be active on most devices, but check by rebooting and accessing your PC’s BIOS panels – typically by hitting DEL, F2, or F10 as your system starts. Look for Virtualization Technology, VTx or similar options. Ensure they are enabled, save, and reboot.
WARNING! Be careful when changing BIOS settings – one wrong move could trash your PC.
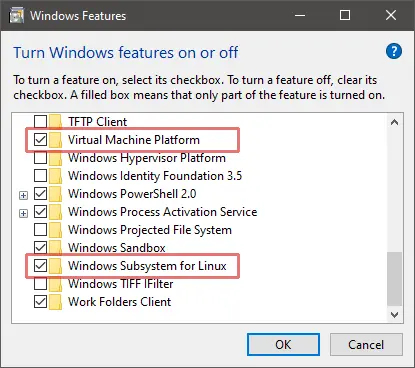
-
Enable the Virtual Machine Platform and Windows Subsystem for Linux options in the Turn Windows features on or off panel:

This can be accessed by hitting the Start button and typing the panel name or from Programs and Features in the classic Control Panel.
-
Reboot, then enter the following command in a Windows Powershell or
cmdprompt to set WSL2 as the default:wsl --set-default-version 2 -
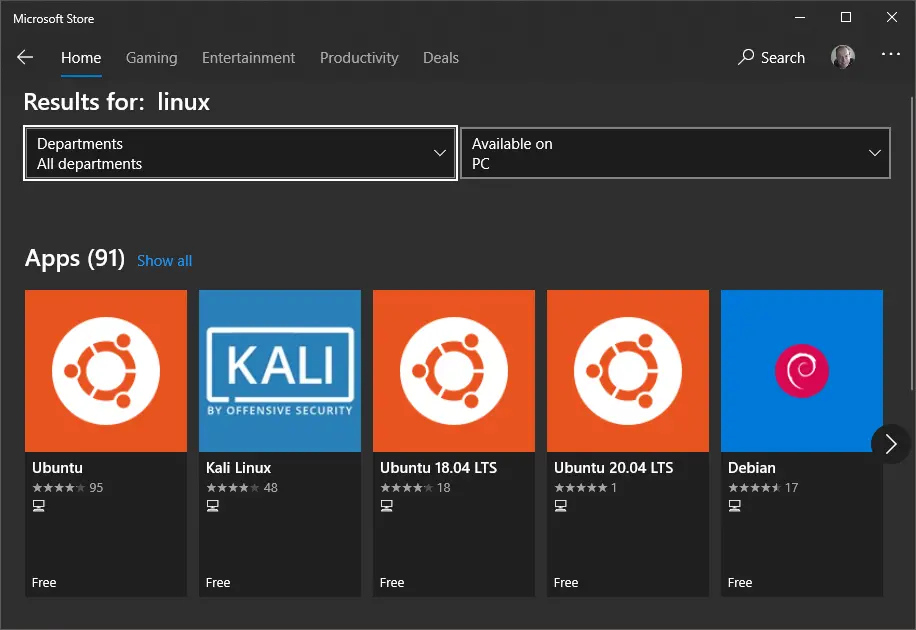
Download and install your preferred distro by searching for “Linux” in the Microsoft Store app. Ubuntu is a good choice.

-
To complete the installation, launch your distro by clicking its Store’s Launch button or choosing its icon from the Start menu.
You may be prompted to install a kernel update – follow the instructions and launch the distro again.
-
Enter a Linux username and password. These are separate from your Windows credentials although choosing the same ones can be practical.
-
Ensure your distro is up-to-date. For example, on an Ubuntu bash prompt enter:
sudo apt update && sudo apt upgrade
You can now install Docker Desktop (see below). For the best performance and stability, store development files in your Linux file system and run Docker from your Linux terminal.
More information about installing and using WSL2:
- Windows Subsystem for Linux 2: The Complete Guide, and
- optionally, Windows Terminal: The Complete Guide.
Hyper-V #
The Microsoft Hyper-V hypervisor is provided free with Windows 10 and 11 Professional and Enterprise. (Windows Home users must use WSL2.)
To install Hyper-V:
-
Enable hardware virtualization support in your BIOS.
This will be active on most devices, but check by rebooting and accessing your PC’s BIOS panels – typically by hitting DEL, F2, or F10 as your system starts. Look for Virtualization Technology, VTx or similar options. Ensure they are enabled, save, and reboot.
WARNING! Be careful when changing BIOS settings – one wrong move could trash your PC.
-
Enable the Hyper-V option in the Turn Windows features on or off panel then reboot.
This can be accessed by hitting the Start button and typing the panel name or from Programs and Features in the classic Control Panel.
You can now install Docker Desktop.
Install Docker Desktop for Windows #
Docker Desktop for Windows 10 and 11 can be downloaded from Docker Hub. The installer includes the Docker server, CLI, Docker Compose, Docker Swarm, and Kubernetes.
Two editions are available: stable and edge with experimental features. The stable version is best for most developers.
Double-click Docker Desktop Installer.exe to start the installation process. After completion and launch, the whale icon in the notification area of the task bar indicates Docker is running and ready to accept commands in the Windows Powershell/cmd terminal (and Linux if using WSL2).
Docker Engine Settings #
Docker uses WSL2 as the default engine when available. You will be prompted to confirm this choice during installation and after WSL2 is installed.
Alternatively, WSL2 can be enabled by checking Use the WSL 2 based engine in the General tab of Settings accessed from the Docker task bar icon. Unchecking the option reverts to Hyper-V.
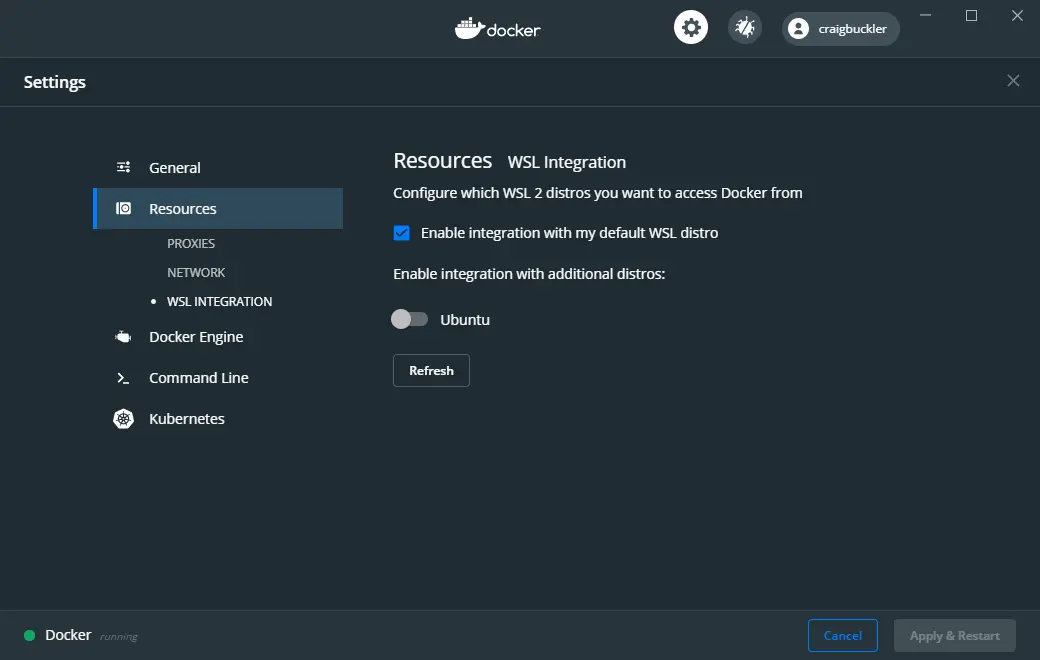
When using WSL2, at least one Linux distro must be enabled – the default is chosen. You can also permit Docker commands in other distros by accessing the WSL integration panel in the Resources section of the Docker Settings:
When using Hyper-V, Docker must be granted access to the Windows file system. Select the drives it is permitted to use by accessing the File Sharing panel in the Resources section of the Docker Settings:
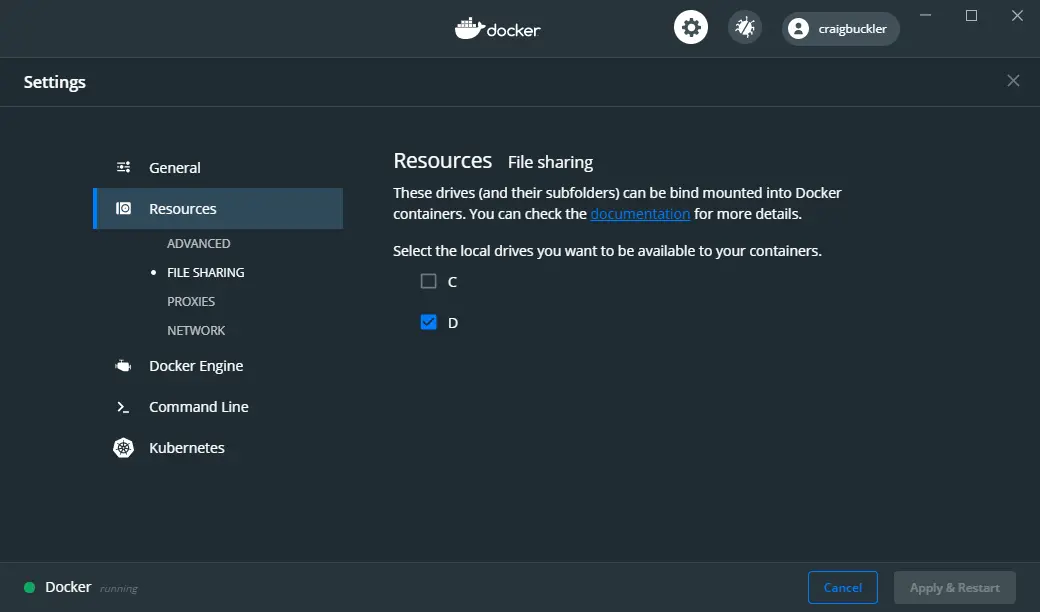
(This option was named Shared Drives in previous editions of Docker Desktop.)
Test your Docker installation #
Check Docker has successfully installed by entering the following command in your terminal:
docker versionA response similar to the following is displayed:
Client: Docker Engine - Community
 Version:           19.03.12
 API version:       1.40
 Go version:        go1.13.10
 Git commit:        abcdef0
 Built:             Mon Jun 22 15:45:36 2020
 OS/Arch:           linux/amd64
 Experimental:      false

Server: Docker Engine - Community
 Engine:
  Version:          19.03.12
  API version:      1.40 (minimum version 1.12)
  ...etc...
Ensure Docker Compose is working by entering:
docker-compose versionTo receive something like:
docker-compose version 1.27.2, build 8d51620a
docker-py version: 4.3.1
CPython version: 3.7.7
OpenSSL version: OpenSSL 1.1.1c  10 Sep 2019
Optionally, try entering:
docker run hello-worldto verify Docker can pull an image from Docker Hub and start containers as expected…
Unable to find image 'hello-world:latest' locally
latest: Pulling from library/hello-world
1b930d010525: Pull complete
Digest: sha256:f9dfddf63636d84ef479d645ab5885156ae030f611a56f3a7ac
Status: Downloaded newer image for hello-world:latest

Hello from Docker!
This message shows your installation appears to be working correctly.
Key points #
What you’ve learned in this chapter:
- How to install and configure Docker on your Linux, macOS, or Windows system.
- How to install Docker Compose.
- How to test the Docker installation.
The following chapters demonstrate how to use Docker during development…
…but to continue reading, you need to buy the book.
Do you want an easy-to-follow course which demonstrates how to use Docker and create practical web development environments on your Windows, macOS, or Linux PC?
Buy the «Docker for Web Developers» book & video course…
-
full course
$99 $50 £43 / €49
buy all
-
ebooks only
$30 $15 £13 / €15
buy books
-
videos only
$80 $40 £34 / €40
buy videos
plus your country’s sales tax where applicable
Pre-requisites: Windows OS, Docker
Before understanding the concept of Docker, let’s first discuss the concept of Hypervisors. So in an IT Company, or any cooperate, there is a development team, a testing team, and an operation team for developing the application, testing it, and deploying it. Now suppose the developers are working on a different OS, for example, let’s say macOS, and they used some dependencies or libraries as per the language they are using, so they just won’t hand the software to the testing team, but also the libraries, but now, the application didn’t run o the tester’s machine, but it worked on the developer’s machine, maybe because the tester’s machine has different OS features than the developer’s one, so now, devs have to send the OS, but that is not practically possible, as one can’t just copy the C drive and hand it over, that’s where the concept of Hypervisors comes into the picture, think of this as a virtual machine or Wim-ware, so you have the physical hardware, you host an OS on it, and the OS can now host another OS also called Guest OS, and this guest OS can be packed and send to the testing team.
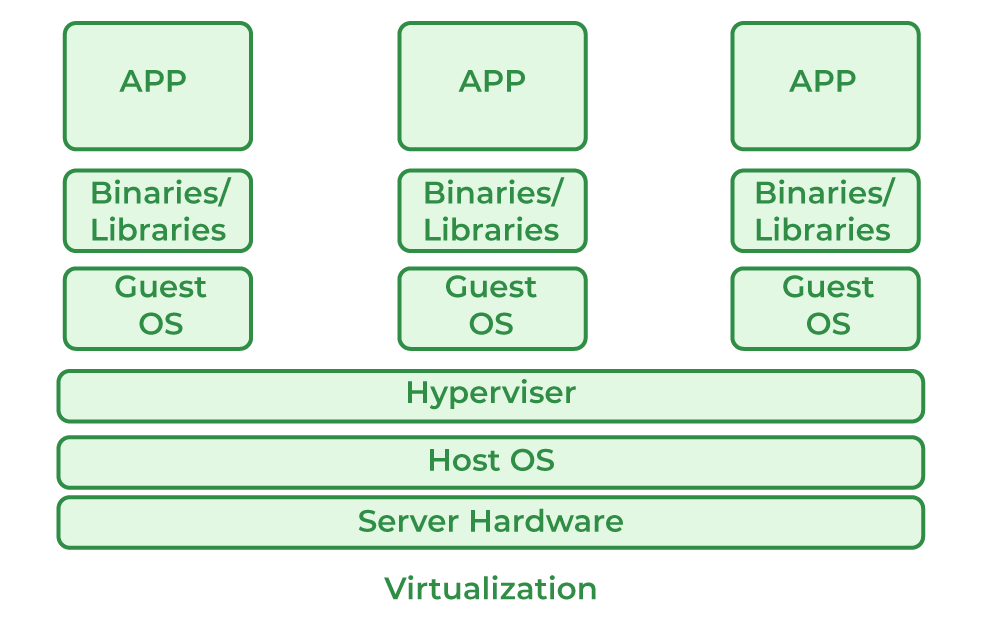
But the problem here is, for every application, one needs a different OS, this will result in a waste of resources as multiple OSs will be running. So for this problem, we have the concept of Containers, the difference between Hypervisors and containers is that we don’t need multiple OS for every application, multiple applications can share the same OS kernel, great isn’t it? So instead of installing HYPERVISOR, we will be installing Docker.

What is Docker?
Docker is an open-source platform where we run our applications in the form of containers. Docker containers are very light in weight and contain all the dependencies and configurations so we can run them across different computing environments. Developers can package all the dependencies of the application in the form of images it can be portable easily or shared easily with other developers without worrying about the underlying OS.
Requirements
- Windows 11 64-bit: Home or Pro version 21H2 or higher, or Enterprise or Education version 21H2.
- Windows 10 64-bit: Home or Pro version 21H2 or higher, or Enterprise or Education version 21H2.
- 4GB RAM or Higher.
- Hyper V feature must be enabled in Windows.
Specifications
- RAM: The minimal amount of Memory needed to run containers smoothly is 4GB, however, if a program has more complicated functions, it will need more than 6 GB RAM.
- Storage: For running the containers and installation of docker the minimum space required is 25GB. If you want to store the container images and data then we need at least more than 35 GB to 40 GB.
- Network: To download, push and pull the images we need active internet then only we can maintain the container images with the help of docker.
- CPU: At least a 64-bit processor is required for docker.
Docker can be run on a laptop with 4 GB of Memory, a 64-bit processor, and 25 GB of storage. It might change based on our use cases.
Step-By-Step Docker Installation On Windows
Follow the below steps to install and configure Docker on Windows:
Step 1: For installation of Docker, go to your favorite browser(chrome will be used here, but it can be done by using any browser). In the search bar, type Docker download. And click on the first link that appears.

Step 2: After clicking the link, choose your OS, be it Windows, MAC, or Linux for installation.
Step 3: The download will start, and based on your internet speed, it will take some time to do so. To know more about docker desktop installation visit Docker Desktop.
Start Docker Desktop Tool
Step 1: After installation, it will look something like this in Windows:
- Open the Docker Desktop.
- Accept the Docker Subscription Service Agreement window. and click On continue. Docker Desktop will start after we accept the terms and conditions.
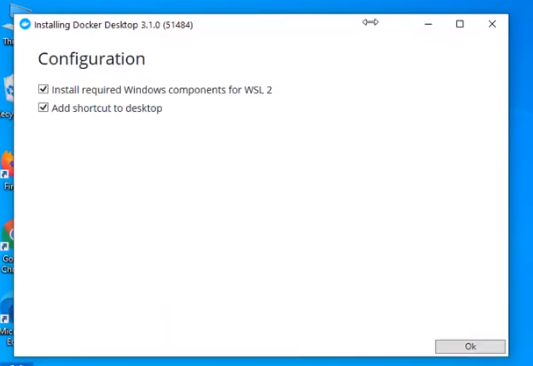
Step 2: After clicking Ok the installation will start.
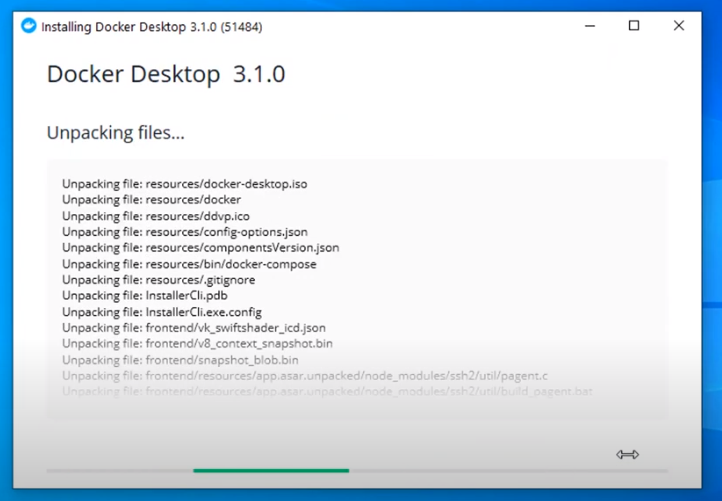
Step 3: After installation, it will show something like the below:
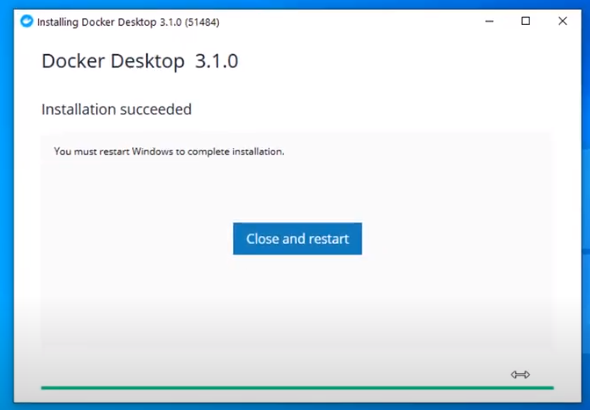
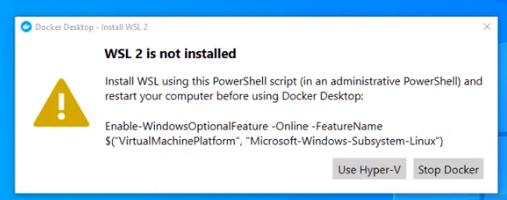
Step 3: After installation, we need to restart our PC and install WSL 2, which stands for Windows Setup for LINUX. It is a compatibility layer for running Linux binary executables natively on Windows 10. Please follow the next few instructions carefully. After restarting, the following dialog box will appear, then click on the Stop Docker button there.
Step 4: After clicking, we need to enable the Hyper-V, for that we will restart the PC and go to BIOS setup, Settings>Update and Security>Recovery>Advanced Setup>Device Configuration. After that, if the option Enable Turbo Boost on DC. is unmarked, mark it, after it, save, and exit.

Step 5: Afterward, in the last step, go to Control Panel> Turn Windows Features on and off. Then for activating Hyper-V, mark the Hyper-V and Windows Hypervisor Platform.
At this point, you have successfully installed and configured Docker on your Windows machine.
How To Install From The Command Line?
To install the Docker desktop, follow the procedures listed below.
Step 1: Run the following command in the Command prompt.
start /w "" "Docker Desktop Installer.exe" install
Step 2: Add user account into docker user groups.
net localgroup docker-users <users>/add
Verification
Verify the docker installation and versions,
1. Run the following command in the command prompt to check the docker version.
docker --version
2. After that we will receive a Beta invitation email When you start docker for the first time.
How To Install Docker On Windows 10?
You must perform the following steps in order to install Docker on Windows 10:
Step 1: In this step, we must assure that our Windows can support Docker the minimum requirement is Docker requires 64-bit Windows 10 Pro.
Step 2: You can download the docker by using this link “https://www.docker.com/products/docker-desktop”.
Step 3: Once the installation is finished go to the start menu and open Docker Desktop. Enable Hyper-V and Windows Subsystem for Linux features after enabling Docker Desktop will automatically restart. After restarting you can open the Docker Desktop and start using it.
Step 4: To test whether the Docker Desktop is installed or not open the command prompt or PowerShell window and run try to pull the sample image for example Nginx if the image is pulled then the Docker installation in Windows was completed successfully completed.
How To Install Docker On Windows 11?
First, make sure that your Windows matches Docker’s requirement Docker requires 64-bit Windows 11 Pro, and the rest all the steps are the same as Windows 10.
How To Update The Docker In Windows?
By following the steps mentioned below we can update our Docker:
Step 1: Open the Docker Desktop from the start menu.
Step 2: Click on the settings and click on the “resource” tab there we can find an option called “Check for Updates.”Docker Desktop will check for any available updates.
Step 3: If any update is available Docker will show us like “Download and Install” Directly click on it Docker Desktop will automatically download it after completion of installation you can the Docker version by using the following command in the command prompt or PowerShell window.
docker version
Advantages of Docker In Windows
- Docker for Windows allows developers to their applications easily on any Windows.
- Docker can be installed very easily on Windows.
- Docker containers can be moved in between Windows and Linux without changing the Source code.
- The application is isolated from the underlying OS which makes it more secure.
Uninstall Docker Desktop Tool
To uninstall the Docker Desktop follow the steps mentioned below.
- Find “Add or Remove Programs” in the start menu and choose it.
- Click Docker Desktop when you see Docker in the list of installed programs.
- When you click on uninstall in Docker Desktop, be sure to follow the steps that appear.
- After the uninstallation is complete, restart the computer.
How To Install And Enable WSL 2 On Windows
Before installing docker by using WSL 2 make sure your Windows is supported for that and then install and enable WSL2 on your laptop.
Step 1:Enter the following command as an administrator to enable the Windows Subsystem for Linux feature.
dism.exe /online /enable-feature /featurename
:Microsoft-Windows-Subsystem-Linux /all /norestart
Step 2: In this step, you need to enable the virtual machine platform feature to enable it to run the following command in Powershell as an administrator
dism.exe /online /enable-feature /featurename
:VirtualMachinePlatform /all /norestart
Step 3: After running the above command you need to restart your computer by this the virtual machine platform feature will be enabled.
Step 4: Know download and install WSL 2 Linux kernel updated package from the official website of Microsoft
Step 5: Make WSL 2 the standard version. Run the following command when logged in as an administrator in Windows PowerShell.Install a Linux distribution by using the Microsoft Store. You can pick from a variety of Linux distributions, including Kali Linux, Debian, and Ubuntu.
wsl --set-default-version 2
After completing the above steps we can use execute Linux commands on your windows using WSL 2.
How To Install Docker With WSL 2 Backend On Windows?
Utilizing dynamic memory allocation will help the WSL 2 backend consume resources more efficiently. which enables us to launch Docker very quickly and improve Docker’s speed. To make this happen please follow the steps mentioned below.
Step 1: Install and enable WSL 2 on Windows by following the steps outlined in the previous answers. And install Docker Desktop as mentioned above for Windows.
Step 2: Once the Docker Desktop installation is completed open the setting in Docker Desktop click on the resources tab and click on WSL 2 integration. Click “Apply & Restart” to apply the changes.
Step 3: Open a terminal in your WSL 2 distribution and use the following command to confirm that Docker is operational after Docker Desktop has restarted.
docker pull ubuntu
If the image is successfully retrieved, WSL 2 has likely been deployed as a backend for Docker. The WSL 2 backend now allows you to use Docker to construct and manage containers on your Windows computer.
Note: The Docker CLI interacts with the Docker daemon running in the Windows Docker Desktop application when you issue Docker commands in your WSL 2 terminal.
Conclusion
In this article, we covered a step-by-step procedure to install docker in Windows 11 and Windows 10. We also covered how to install docker in Windows 10 and 11 with the help of the Command line. Refer to Install in Mac and Ubuntu to know more about installation in different OSs.