Docker is a tool which allows developers to quickly create, deploy and run applications by using containers. The concept of containerization is an approach in which the application, its dependencies and configuration are all packed in a single file known as a container.
Containers are kind of similar to a Virtual Machine, but instead of running whole OS and all its services, they only run bare minimum required by the software packed as a container and depend on host OS for the most part. These containers have better performance than running a complete Virtual Machine and are isolated from the host OS environment.
In this article, let’s look at how to install Docker and enable Hyper-V and WSL to run containers on Windows 10.
Prerequisites
You need Windows 10 64-bit Pro, Enterprise or Education edition with 1703 update or later (build 15063 or later) for using Hyper-V backend or Windows 10 64-bit with 2004 update or later (build 19041 or later) for WSL backend. Aside from this, a modern 64-bit processor with virtualization support and a minimum 4 GB of ram is required.
In addition to the above requirements, you need virtualization support enabled in the BIOS. To check if you already have virtualization enabled, open the Task Manager and go to the Performance tab.

If the virtualization is shown as ‘Disabled’, you will need to enable it in BIOS settings. Depending upon the Motherboard and CPU you have, the steps to enable virtualization differ.
For Intel processors, enable the setting called as Intel Virtualization Technology (VT-x) in the BIOS. Similarly, for AMD processors enable the setting called SVM mode in the BIOS. Refer to your motherboard manual to find the respective settings for your CPU.
Install Docker via Winget
Docker is available in the Winget repository, so it can be installed by using a simple command. If you don’t have the winget tool installed and wish to learn more about it, then check out our guide on how to install Winget package manager.
We will install the stable release of Docker available on Winget repositories. Open the PowerShell or CMD and run the following command to install it.
winget install -e --id Docker.DockerDesktop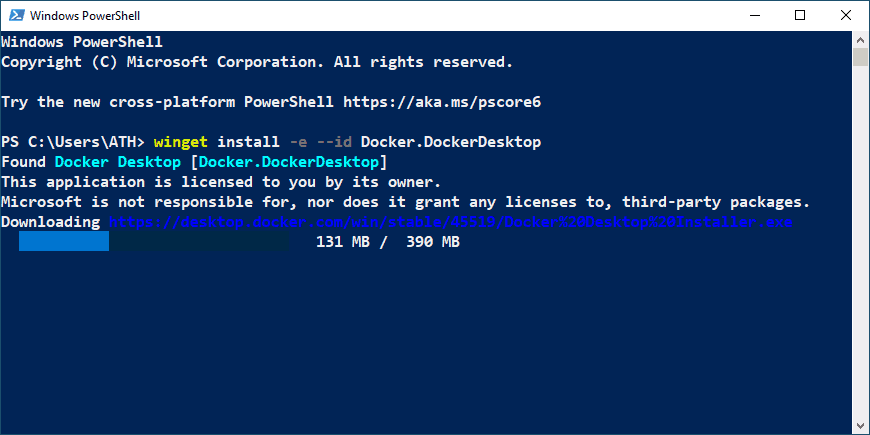
A UAC prompt will ask for permission to make changes, click on ‘yes’ to continue the Docker Desktop installation. Soon Docker will be installed on your system.
But we can’t run Docker yet, before doing so we need to enable Hyper-V or WSL for Windows 10 or else Docker will throw an error and won’t start. We’ll discuss that later in the guide.
Download and Install Docker Manually
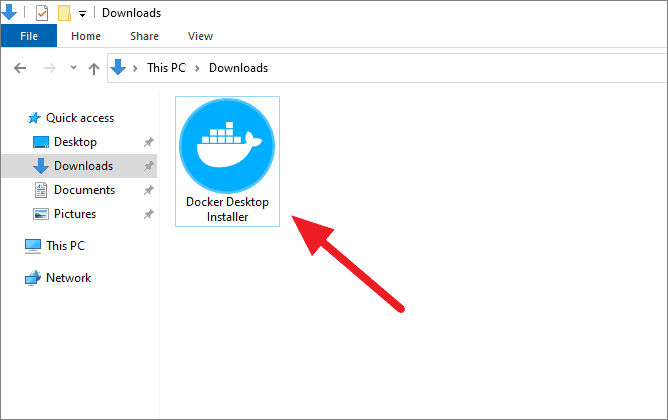
If you want to install Docker the manual way, head on over to the Docker Desktop downloads page and then click on ‘Download for Windows (Stable)’ button to download the installer file.

Then, go to your downloads folder and double click on ‘Docker Desktop Installer’ setup file to initiate the installation process.
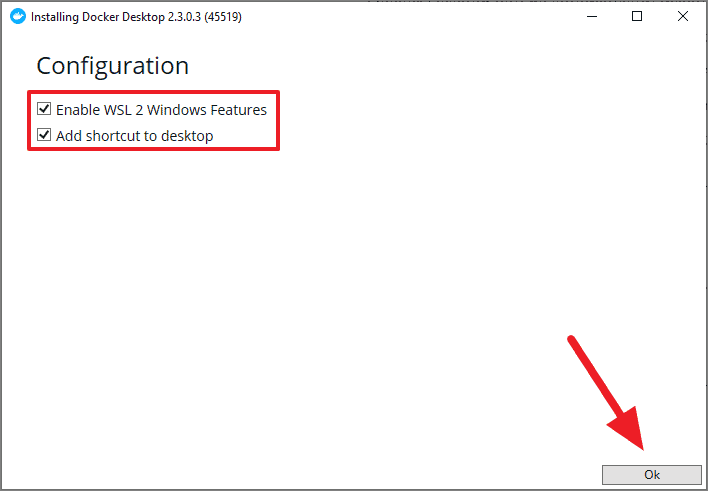
You will be presented with a configuration window in the setup process. Tick ‘Enable WSL 2 Windows Features’ if you are on Windows 10 Home edition or want to use Docker’s WSL 2 backend and Tick ‘Add shortcut to desktop’ if you want Docker Desktop shortcut, then press ‘Ok’ to begin the installation.
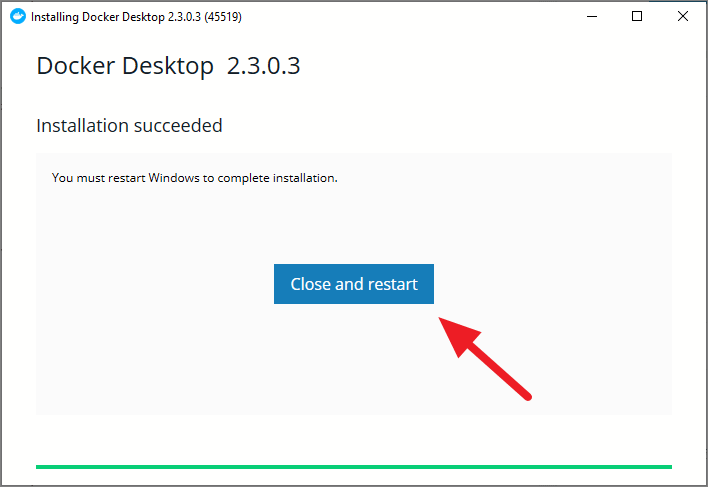
Once the Docker Desktop setup finished unpacking and installing the files, click on the ‘Close and restart’ button to complete the docker installation process.
Enable Hyper-V or WSL?
Now all that is left is to enable the Hyper-V or WSL depending upon the Windows 10 edition and version you have.
- Windows 10 Pro, Enterprise & Education edition with 1703 update or later: If you are not on 2004 update or later, then only Hyper-V backend can be used.
- Windows 10 Home edition with 2004 update or later: Only WSL can be enabled as Hyper-V feature is not available on Home edition.
- Windows 10 Pro, Enterprise & Education edition with 2004 update or later: Both the Hyper-V & WSL can be enabled and used with docker.
Enable Hyper-V
Hyper-V is a native hypervisor for Windows 10 which can be used to create and run virtual machines. Hyper-V is on the route to becoming the legacy option to run containers on Windows 10, as docker is planning to use WSL as its main backend to run containers.
But you still need Hyper-V if you want to run Docker native Windows containers. Thus to enable Hyper-V, open the PowerShell as administrator and run the following command:
Enable-WindowsOptionalFeature -Online -FeatureName $("Microsoft-Hyper-V", "Containers") -All
PowerShell will prompt you to restart the computer to complete Hyper-V installation, type Y and hit enter to do the same. After rebooting the computer, you can run Docker Desktop and use containers.
Enable WSL
Windows Subsystem for Linux (WSL) is a compatibility layer which allows users to run Linux application natively on Windows 10. The Docker WSL backend allows users to run native Linux Docker containers on Windows without Hyper-V emulation.
If you have the latest Windows 10 2004 update, then it is recommended to use the WSL as Docker backend as it performs better than Hyper-V backend. The Windows 10 Home edition users have no other option than using the WSL backend for Docker as Home edition don’t have Hyper-V feature.
Note: If you have ticked ‘Enable WSL 2 Windows Feature’ in the setup, this command can be skipped as Docker Setup enables WSL automatically. Go to the ‘Update WSL’ section below to continue with the process.
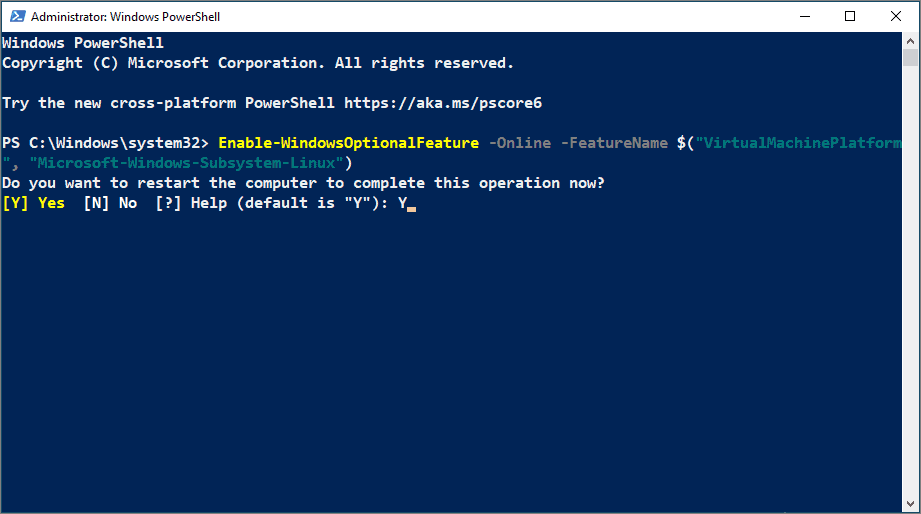
Open PowerShell as administrator then run the following commands to enable WSL and ‘Virtual Machine Platform’ WSL component for Windows 10.
Enable-WindowsOptionalFeature -Online -FeatureName $("VirtualMachinePlatform", "Microsoft-Windows-Subsystem-Linux")Press ‘Y’ and hit enter to restart the computer and complete the process.
Update WSL
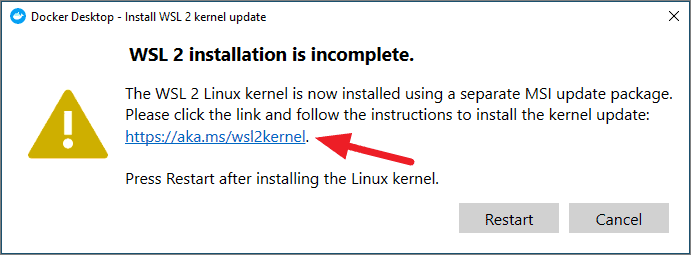
After you have Completed the Docker Installation and restarted the system, when you run the Docker Desktop you will see an error as shown below.
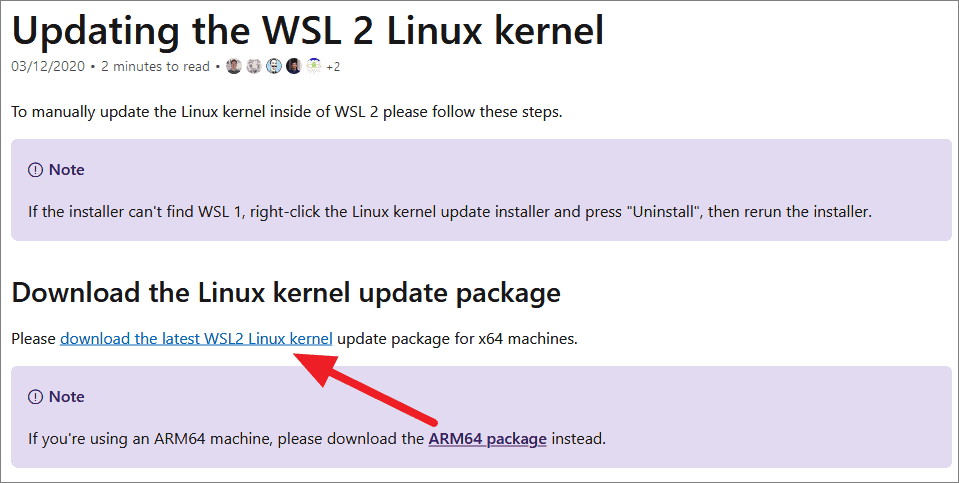
Click on this link or link in the error to go to Microsoft Docs page with the latest WSL2 kernel update. Then click on ‘download the latest WSL2 Linux kernel’ link on the page as shown below to download ‘wsl_update_x64’ setup file.
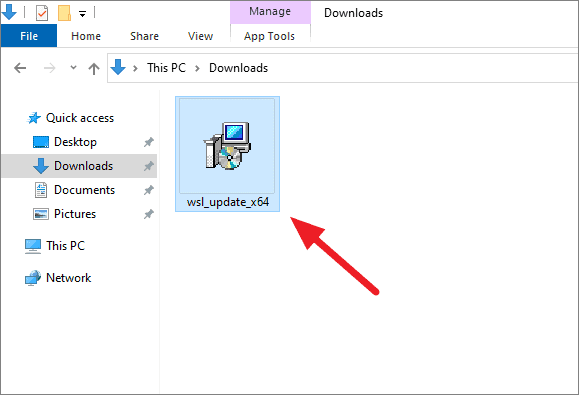
Double click on the setup file you downloaded in the step above and press ‘yes’ when prompted for permission.
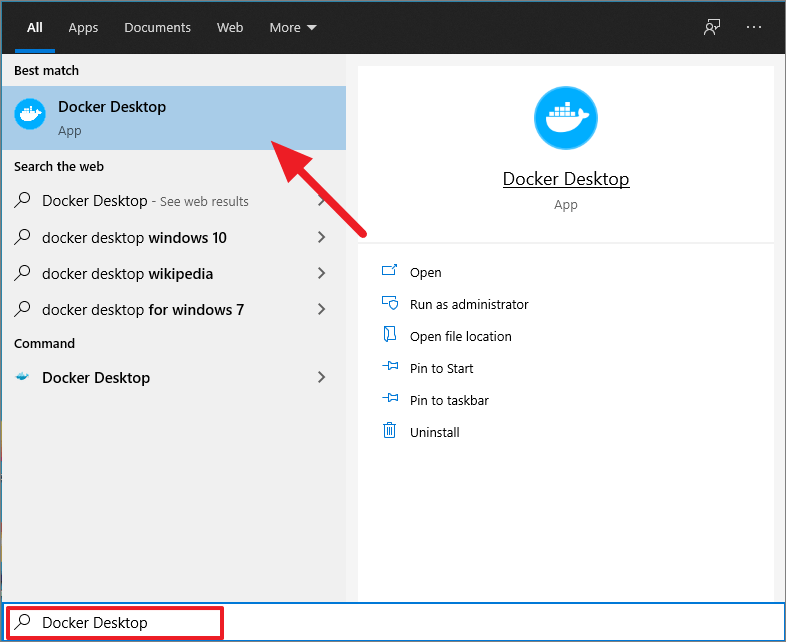
Once you’ve enabled and updated the WSL for Windows 10, you can run Docker searching for it in the Start menu.
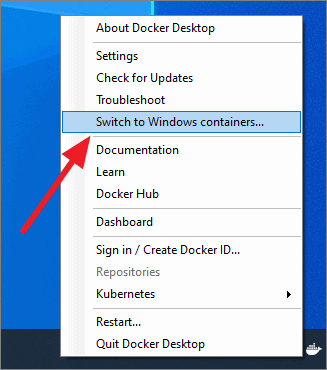
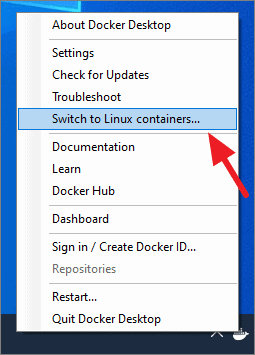
Switch between Hyper-V & WSL Backend
If you have enabled both Hyper-V & WSL you can use both the backends and switch between them to either use the native Windows Containers or Linux Containers.
Switch to Hyper-V backend by going to the Docker system tray icon, right-clicking on it and selecting ‘Switch to Windows containers’ option. Similarly, you can switch to WSL backend by selecting ‘Switch to Linux containers’ option.

Switch to Hyper-V Backend 
Switch to WSL Backend
Verify Docker Installation
The white whale in the system tray indicates that Docker is running. But you can also test your docker installation by opening the PowerShell or CMD and typing docker --version
PS C:\Users\ATH> docker --version
Docker version 19.03.8, build afacb8b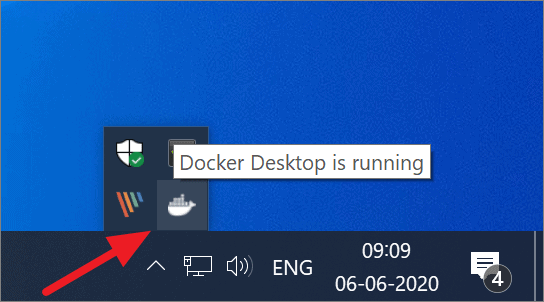
Next, try to pull the hello-world image and run a container by running docker run hello-world command in PowerShell or CMD:
PS C:\Users\ATH> docker run hello-world
Unable to find image 'hello-world:latest' locally
latest: Pulling from library/hello-world
0e03bdcc26d7: Pull complete
Digest: sha256:6a65f928fb91fcfbc963f7aa6d57c8eeb426ad9a20c7ee045538ef34847f44f1
Status: Downloaded newer image for hello-world:latest

Hello from Docker!
This message shows that your installation appears to be working correctly.
This message shows that our Docker installation was successful and we are ready to pull images and create containers.
Docker is a platform for creating and deploying applications in self-sufficient containers. The installation of Docker is pretty easy in Linux, but this is usually not the case with Windows. In this post, I will show you how to install Docker in Windows 10 or Windows 11 in multiple ways. You’ll learn there is indeed a way that makes the Docker Desktop installation in Windows as simple as in Linux.
Contents
- Prerequisites
- Docker with WSL2 backend
- Docker with Hyper-V backend
- Install Docker using the GUI
- Install Docker using winget
- Install Docker using PowerShell
- Author
- Recent Posts

Surender Kumar has more than twelve years of experience in server and network administration. His fields of interest are Windows servers, Active directory, PowerShell, web servers, networking, Linux, virtualization, and Kubernetes. He loves writing for his blog.
Prerequisites
You might already be aware that Docker relies on virtualization technology. On Windows, Docker can use either the Windows Subsystem for Linux (WSL) 2 or Hyper-V as a backend.
Docker with WSL2 backend
The current version of Docker Desktop only works on the 64-bit edition of Windows, whether you’re running Windows 10 or Windows 11. To run Docker with the WSL2 backend, your system must meet the following prerequisites:
- Windows 10: Home/Pro 21H1 (build 19043) or higher, or Enterprise/Education 20H2 (build 19042) or higher
- Windows 11: Home/Pro version 21H2 or higher, or Enterprise/Education version 21H2 or higher
- WSL2 feature enabled
- Linux kernel update package for WSL2
- For WSL2, the following are the hardware requirements:
- 64-bit CPU with second-level address translation (SLAT)
- Hardware virtualization support, which must be enabled in BIOS/UEFI
- 4 GB RAM
Docker with Hyper-V backend
To be able to run Docker with a Hyper-V backend and Windows containers, your system must meet the following prerequisites:
- Windows 10: Pro 21H1 (build 19043) or higher, or Enterprise/Education 20H2 (build 19042) or higher
- Windows 11: Pro/Enterprise/Education version 21H2 or higher
- Optional Windows features for Hyper-V and Containers must be enabled

Enable Hyper V and Containers windows features for Docker

For Hyper-V, following are the hardware requirements:
- 64-bit CPU with second-level address translation (SLAT)
- Hardware virtualization support, which must be enabled in BIOS/UEFI
- 4 GB RAM
In addition to the aforementioned requirements, if you want to run Docker in a Hyper-V guest VM, you need to enable nested virtualization by running this PowerShell command on the Hyper-V host:
Set-VMProcessor -VMName <VMName> -ExposeVirtualizationExtensions $True

Enable nested virtualization for a VM on Hyper V host using PowerShell
Make sure your VM is powered off before running this command. Without nested virtualization support, Docker will not work in a VM, and you will receive the error message shown below.

Docker desktop cannot start An unexpected error occurred
Install Docker using the GUI
To install Docker Desktop in Windows using the GUI, follow these steps:
Download Docker Desktop. You will see a configuration screen, as shown in the screenshot:

Docker desktop configuration Use WSL 2 instead of Hyper V recommended
To use Docker with the WSL 2 backend, check the box that says Use WSL 2 instead of Hyper-V (recommended). If you want to use Hyper-V instead, uncheck this option and click OK.
When the installation is complete, click the Close and Restart button to restart your computer.

Close Docker installer and restart the computer to complete installation
After restarting, you will be able to run Docker Desktop using either a shortcut or a command prompt. If you did not install WSL 2 before installing Docker, you will receive the WSL 2 installation is incomplete error when you try to start Docker.

Docker desktop error WSL 2 installation is incomplete
To fix this error, run the wsl —update command in an elevated PowerShell console, and restart your computer.

Installing WSL2 kernel updates to fix the WSL 2 installation is incomplete error
Install Docker using winget
Winget is a command-line package manager for modern versions of Windows, which works just like apt or DNF in Linux. If you have a little experience with package installation in Linux, you probably know that you usually just have to type a command and the package is ready for use. Well, winget does the exact same thing in Windows. All you need is Windows 10 1809 (build 17763) or Windows 11. To install Docker in Windows using winget, follow these steps:
Launch an elevated command prompt or PowerShell console, and type the following command:
winget install --exact --id Docker.DockerDesktop --accept-source-agreements --accept-package-agreements

Installing docker desktop in windows using winget
The —exact (or -e in short) parameter tells winget to find the package using an exact match. The installation can take a while, but it is pretty much automatic, so there is nothing you need to do but wait.
When the command is finished, open a new command prompt (or PowerShell console) and run the docker —version command.
If you try to run docker —version in the same command prompt, you will likely see The term ‘docker’ is not recognized as the name of a cmdlet, function, script file, or operable program error, as shown in the screenshot.

The term docker is not recognized as the name of a cmdlet function script file or operable program
This error occurs because your current command session (cmd or PowerShell) is still using the old environment variables. To be able to recognize the newly added Docker variable, you must reload the environment variables. Launching a new command session is the easiest way to load new variables.
Install Docker using PowerShell
To install Docker Desktop using PowerShell, follow these steps:
Download Docker Desktop.
Once the installer package is downloaded, open an elevated PowerShell console or Windows Terminal, and type the following command to start Docker installation:
Start-Process "D:\Docker Desktop Installer.exe" -Wait -NoNewWindow "install --quiet --accept-license"

Installing Docker silently using PowerShell
Make sure you adjust the installer path. The -Wait parameter causes the Start-Process cmdlet to wait for the new process to finish, and the -NoNewWindow parameter prevents the new process from opening in a new window. The —quiet switch is offered by Docker’s install command and suppresses the installation information. To see the information, skip this switch. Since we are using PowerShell, notice how —quiet and other flags are enclosed in quotes along with the install command—this is very important to avoid errors. By default, Docker will use the WSL 2 backend, but you could include the —backend=hyper-v flag to use the Hyper-V backend instead.
Once the above command is finished, you will see a shortcut for Docker Desktop on your desktop. Double-click the shortcut to launch Docker.
All of these installation methods are self-sufficient, so there is nothing additional you need to do. But you may still get an error message that says Docker Desktop – Access denied. You are not allowed to use Docker. You must be in the «docker-users» group.
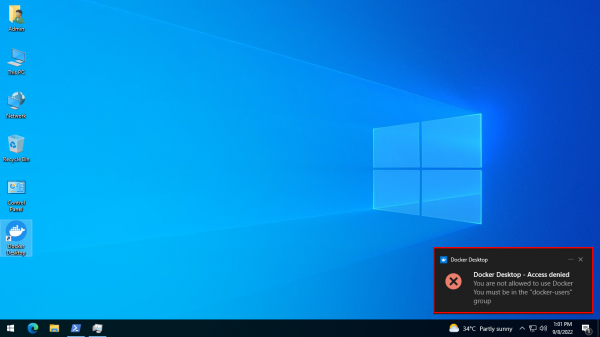
Docker Desktop – Access denied. You are not allowed to use Docker. You must be in the docker users group
If you get this error, run the following command in an elevated PowerShell console:
Add-LocalGroupMember -Group "docker-users" -Member $env:UserName -Verbose

Adding the current user to the docker users group using PowerShell
Don’t forget to log off and log on again after running this command. If you want to delegate another user to run Docker Desktop, you can specify that username with the -Member parameter instead of $env:UserName.
Subscribe to 4sysops newsletter!
That was all for this guide. You just learned how to install Docker in Windows using the GUI, winget, and PowerShell. I am curious to know which method you prefer, and why.
Рассмотрим установку Docker Desktop for Windows — это Community-версия Docker для систем Microsoft Windows.
Системные требования
- Windows 10 64-bit: Pro, Enterprise, Education (Build 16299 или выше).
Для успешного запуска Client Hyper-V в Windows 10 требуются следующие предварительные требования к оборудованию:
- 64 bit процессор c поддержкой Second Level Address Translation (SLAT).
- 4GB системной памяти.
- Поддержка аппаратной виртуализации на уровне BIOS должна быть включена в настройках BIOS.
Подготовка
Включаем функции Hyper-V Containers Window. Для этого переходим в панель управления — установка и удаление программ — включение или отключение компонентов Windows. Активируем пункт Hyper-V, который включает Hyper-V Managment Tools, Hyper-V Platform.
Также это можно выполнить через powershell или dism (все команды необходимо выполнять с правами администратора).
Powershell:
Enable-WindowsOptionalFeature -Online -FeatureName Microsoft-Hyper-V -All
DISM:
DISM /Online /Enable-Feature /All /FeatureName:Microsoft-Hyper-V
Установка
Скачиваем установщик Docker (Docker Desktop Installer) с Docker Hub.
Установка Docker Desktop включает Docker Engine, Docker CLI client, Docker Compose, Notary, Kubernetes и Credential Helper. Контейнеры и образы, созданные с помощью Docker Desktop, используются всеми учетными записями пользователей на компьютерах, на которых он установлен. Это связано с тем, что все учетные записи Windows используют одну и ту же виртуальную машину для создания и запуска контейнеров. При использовании Docker Desktop WSL 2 невозможно обмениваться контейнерами и образами между учетными записями пользователей.
Запускаем установщик Docker Desktop Installer.exe и ожидаем пока он скачает все необходимые компоненты.
После установки система потребует перезагрузки. Перезагружаемся и входим в систему.
После входа может возникнут запрос на установку дополнительного компонента WSL2. Переходим по ссылке и скачиваем необходимый пакет с официального сайта Microsoft.
После скачивания выполняем установку WSL2, после которой снова потребуется перезагрузка.
Настройка и запуск приложения
Входим в систему и ждем запуска всех служб Docker. Когда все службы будут запущены, мы увидим в трее классический значок Docker — это значит что служба установлена и запущена. Далее можно запустить приложение Docker desktop. Далее можно изменить настройки Docker при необходимости:

Рисунок 1 — Изменение параметров Docker desktop
Далее управление Docker выполняется через Powershell. Проверяем версию и выполняем тестовый запуск контейнера:

Рисунок 2 — Проверка версии Docker
После выполнения всех этих действий, Docker готов к использованию.
Нужна помощь? Настройки docker/docker swarm/docker compose мы осуществляем в рамках услуги DevOps-аутсорсинг.
Updated in December 2020

TL;DR : In this article you learn how to install the necessary tools to run Docker & Kubernetes on Windows 10: Docker for Windows, Minikube, Kind, and K3s. You’ll also learn which setup is the best with regards to your machine.

Docker and Kubernetes are two popular tools to run containers at scale.
So what’s the problem with getting both of these tools on Windows?
Containers come in two flavours: Windows and Linux containers.
However, the majority of the time, when people say containers, they refer to Linux containers.
Unfortunately, you can’t run Linux containers on a Windows host or vice versa.
That’s because containers expect to use the kernel of the operating system they’re designed for.
A Linux executable expects a Linux host, and there’s no way to run it on Windows!
But there’s a workaround.
You could create a Virtual Machine that runs Linux on your Windows host.
This will let every Linux application or executable run inside a container in the virtual machine.
So how do we choose the right Virtual Machine?
It depends on your hardware and operating system.
There are several options available.
Today, you’re going to determine which combination is best for you and get up to speed on how to install it.
Specifically, we’re going to look whether you should install Docker through Docker for Windows or Minikube AND whether you should use Minikube, Kind, or K3s for Kubernetes.
Table of contents:
- The challenge with running Linux containers on Windows 10
- What options you have to run containers on Windows 10?
- Installing Docker for Windows With WSL 2 or Hyper-V
- What options do you have for installing Kubernetes on Windows 10?
- Installing Kubernetes on Windows 10 with Minikube
- Installing Kubernetes on Windows 10 with Kind
- Installing Kubernetes on Windows 10 with K3s
- Appendix 1: Installing WSL 2
- Appendix 2: Installing Chocolatey
The challenge with running Linux containers on Windows 10
Containers are processes that are isolated from the rest of the operating system but still use their resources.
Imagine clicking on an icon on your desktop and launching an application — the application runs unrestricted and can use as many CPU and memory as needed.
If you execute the same application but within a container, not only you can define how much memory and CPU it will use at most, but you can also restrict access to the filesystem, network, etc.
Containers use the underlying operating system to offer a restricted view of the resources available.
If your operating system is Windows, you can isolate Windows applications in containers.
The same is the case for Linux.
However, if you want to run Linux containers on Windows, you can’t unless you run a Linux host.
You have a few options when it comes to running Linux on your computer, but it all boils down to running a virtual machine.
Here’s a quick summary:

Let’s have a look in detail.
What options you have to run containers on Windows 10?
Docker is a tool designed to run containers.
It can run both Windows and Linux containers, but in this guide, you will focus primarily on Linux containers.
When Docker for Windows was released, it supported Hyper-V as its virtualization technology.
In other words, every Linux container that you created ran inside a virtual machine in Hyper-V.
Hyper-V is a Type-1 hypervisor and thus provides excellent performance for running virtual machines on Windows.
Then in May 2019, Windows Subsystem for Linux 2 (WSL 2) was announced.
WSL 2 runs a Hyper-V virtual machine with Linux inside — just like Docker does.
Why is WSL 2 a big deal?
WSL 2 runs on top of the Windows Hypervisor (Hyper-V), which is a bare-metal hypervisor.
You can expect the best type of performance from this hypervisor.
WSL 2 also supports memory reclaim, and this means that the system uses only the right amount of RAM required for running the Linux kernel.
And best of all, WSL 2 offers deep integration with the rest of the Windows host.
You can navigate and copy files across the virtual machine as if it were natively on Windows.
For more information on WSL 2, you should check out this deep dive by Microsoft themselves.
Wouldn’t it be great if you could use WSL2 to run your Docker containers?
If you’re running WSL 2, Docker for Windows integrates with it automatically, and it leverages the existing WSL 2 virtual machine to run your containerised applications.
If your Windows 10 build is higher than 19018, you should be easily able to install it.
You can check your build version with the following command:
—
□
𝖷
PowerShell
Get-ComputerInfo OsName,OsVersion,OsBuildNumber
OsName                      OsVersion  OsBuildNumber
------                      ---------  -------------
Microsoft Windows 10 Pro    10.0.19041 19041
You can follow the instructions on how to install WSL 2 here.
In case you don’t have access to WSL 2, that’s where things get a bit tricky.
Without WSL 2, your second best option for running Linux containers on Windows is using Docker for Desktop with Hyper-V.
In other words, rather then reutilising the Hyper-V virtual machine created by WSL 2, Docker for Windows creates a brand new virtual machine.
Unfortunately, not all Windows versions ship with Hyper-V.
Hyper-V is unavailable on Windows 10 Home, but ships with the Windows 10 Pro and Enterprise editions.
You can check if your computer supports Hyper-V with the following command:
—
□
𝖷
PowerShell
Get-WindowsOptionalFeature -Online -FeatureName Microsoft-Hyper-V
FeatureName      : Microsoft-Hyper-V
DisplayName      : Hyper-V Platform
RestartRequired  : Possible
State            : Enabled
If you have Hyper-V, but it is disabled, you can enable it with:
Enable-WindowsOptionalFeature -Online -FeatureName Microsoft-Hyper-V -All.
If your computer supports Hyper-V but not WSL 2, you can jump to the next chapter to install Docker for Windows on Hyper-V.
If your Windows installation doesn’t have WSL 2 or Hyper-V, you can’t install Docker for Windows unless you upgrade.
Installing Docker for Windows with WSL 2 or Hyper-V
Instead of downloading the binary and manually insert environment variables, this guide uses Chocolatey the Windows package manager to install Docker for Windows.
You can follow the instructions on how to install Chocolatey here.
With Chocolatey, you can install Docker for Windows with:
—
□
𝖷
PowerShell
choco install docker-desktop -y
Installing the following packages:
docker-desktop
By installing you accept licenses for the packages.
# truncated output
Installing docker-desktop...
docker-desktop has been installed.
Once the installation is over, you can search in the Windows menu for Docker by typing its name.
If it’s there, restart your PC for the changes to take effect because, without it, it won’t run.
After the restart, you might see the following error:

This error arises when virtualization is disabled in the BIOS.
The easiest way to find this setting in your BIOS is to Google the query «enable virtualization in bios + laptop name/motherboard name».
There’s a high chance you can find a tutorial specific to your machine that shows you all the steps to accomplish the task.
Once you make the changes, restart your machine and Docker should now work.
To confirm if it works, open PowerShell as an administrator and type:
—
□
𝖷
PowerShell
docker ps
CONTAINER ID   IMAGE   COMMAND   CREATED   STATUS   PORTS   NAMES
You can verify that Docker is installed correctly with the following command:
—
□
𝖷
PowerShell
docker run hello-world
Hello from Docker!
This message shows that your installation appears to be working correctly.
Excellent, now that you’ve installed Docker for Windows, you’re ready to install Kubernetes.
What options do you have for installing Kubernetes on Windows 10?
Similar to Docker, Kubernetes has constraints that you need to watch out for.
Kubernetes can run Windows and Linux containers.
However, you can only run Windows containers on Windows nodes and Linux containers on Linux nodes.
And there’s a further constraint: the Kubernetes control plane can only run on a Linux node.
In other words, Kubernetes will have to run inside a Linux virtual machine to operate correctly on Windows.
Here you have the same choice of virtual machines as you had with Docker:
- You can run Kubernetes in WSL 2.
- If your Windows version supports it, you can use Hyper-V to create a virtual machine or
- You can create a virtual machine using VirtualBox.
But choosing a virtual machine is only part of the challenge.
There are several tools designed to run a Kubernetes cluster locally.
In this guide, you will cover Minikube, Kind and K3s.
But how do you decide which method to install with?
Well, it depends on your use case.
- Are you getting started with Kubernetes and you need a fully working environment in no time? If so, Minikube will work just right.
- If you’re extending Kubernetes or you need to test Kubernetes using clusters larger than a single node, Kind is the way to go.
- If you have a low spec machine or want something that uses fewer resources, K3s is what you need.
After that, you need to look at your hardware capabilities.
The methods we’re going to look at demand anywhere from 2GB to up to 8GB of RAM.
To be specific, Minikube needs 2GB, Kind needs 8GB and K3s requires 2GB.
In most cases, your hardware will easily be able to support all three methods.
Once you know which methods your system is capable of running, you can look at your use case and choose your preferred method.

| WSL 2 | Hyper-V | VirtualBox | |
|---|---|---|---|
| Minikube | ✅ | ✅ | ✅ |
| KinD | ✅ | ✅ | |
| K3s | ✅ | ✅ | ✅ |
- Click here to learn how to install Minikube
- Click here to learn how to install Kind
- Click here to learn how to install K3s
Installing Kubernetes on Windows 10 with Minikube
Minikube is one of the most developer-friendly local Kubernetes cluster that you can install.
If you haven’t done so, install Chocolatey — the Windows package manager.
You can find the instructions here.
Open PowerShell as an administrator and execute:
—
□
𝖷
PowerShell
choco install minikube -y
Installing the following packages:
minikube
By installing you accept licenses for the packages.
# truncated output
minikube package files install completed. Performing other installation steps.
The install of minikube was successful.
Once the installation is complete, you can launch a local cluster with:
—
□
𝖷
PowerShell
minikube start
👍  Starting control plane node minikube in cluster minikube
🐳  Preparing Kubernetes v1.25.2 ...
🔎  Verifying Kubernetes components...
🌟  Enabled addons: default-storageclass, storage-provisioner
🏄  Done! kubectl is now configured to use "minikube" by default
Minikube follows the same logic as Docker for Windows.
If WSL 2 has been installed, it will be used by default.
If WSL 2 isn’t available, Minikube will try to use the same Hyper-V virtual machine created by Docker for Windows.
You can also create a separate Hyper-V virtual machine with :
—
□
𝖷
PowerShell
minikube start --driver=hypervAfter a while, you’ll either have a successful installation or be presented with some error.
In most cases, if following the instruction doesn’t help, you should try to delete the cluster with:
—
□
𝖷
PowerShell
minikube delete
🔥  Deleting "minikube" ...
💀  Removed all traces of the "minikube" cluster.
And create a new one with:
—
□
𝖷
PowerShell
minikube start --v=7The --v=7 flag increases the logging level, and you should be able to spot the error in the terminal output.
Once the command completes successfully, you can test the setup with:
—
□
𝖷
PowerShell
kubectl get nodes
NAME       STATUS   ROLES    AGE   VERSION
minikube   Ready    master   13d   v1.19.4
Congrats you have a fully working Kubernetes cluster!
Installing Kubernetes on Windows 10 — Kind
Kind is short for Kubernetes in Docker.
As the name suggests, you need to have a working installation of Docker before you can use KinD.
You can refer to instructions at the top of this article on the best option to install Docker on your machine.
Once Docker is installed, you should install kubectl next.
Kubectl is a command-line interface that assists in handling Kubernetes clusters.
In most cases, it should easily be installed through Chocolatey with:
The steps to install Chocolatey are described here.
—
□
𝖷
PowerShell
choco install kubernetes-cli -y
Installing the following packages:
kubernetes-cli
By installing you accept licenses for the packages.
# truncated output
The install of kubernetes-cli was successful.
If that doesn’t work, you can do it manually as well.
You can follow the instructions on the official homepage.
Now you will use choco to install Kind.
—
□
𝖷
PowerShell
choco install kind -y
Installing the following packages:
kind
By installing you accept licenses for the packages.
# truncated output
The install of kind was successful.
If you hadn’t installed Docker till now, the above command should install it automatically.
Note: If you have WSL 2 installed, it will automatically be used.
Let’s test it:
—
□
𝖷
PowerShell
kind create cluster
Creating cluster "kind" ...
 ✓ Ensuring node image (kindest/node:v1.19.1) 🖼
 ✓ Preparing nodes 📦
 ✓ Writing configuration 📜
 ✓ Starting control-plane 🕹️
 ✓ Installing CNI 🔌
 ✓ Installing StorageClass 💾
Set kubectl context to "kind-kind"
You can now use your cluster with:

kubectl cluster-info --context kind-kind

Have a nice day! 👋
The command could take a while (5 minutes+ and if your RAM is 8GB, you’ll see some slowdown as well).
To check if we were successful, type:
—
□
𝖷
PowerShell
kubectl cluster-info --context kind-kind
Kubernetes master is running at https://127.0.0.1:58120
CoreDNS is running at https://127.0.0.1:58120/api/…

To further debug and diagnose cluster problems, use 'kubectl cluster-info dump'.
Excellent, your cluster is ready!
Installing Kubernetes on Windows 10 — K3s
K3s is a minimal distribution of Kubernetes.
You can install K3s on:
- WSL 2
- Hyper-V or VirtualBox virtual machines.
You should pick the WSL 2 installation method if your computer supports it.
Using K3s with WSL 2
Now install K3s from this Github repository.
Open the WSL 2 shell and execute the following commands:
—
□
𝖷
PowerShell
chmod +x k3s
sudo ./k3s server
If you encounter problems, you might find it worth your time to check out this discussion).
If your computer doesn’t support WSL 2, you can try MultiPass.
Using K3s with MultiPass
MultiPass is a tool that creates and manages virtual machines that are based on Ubuntu.
You can download MultiPass with Chocolatey with:
—
□
𝖷
PowerShell
choco install multipass -y
Installing the following packages:
multipass
By installing you accept licenses for the packages.
# truncated output
The install of multipass was successful.
Once downloaded, run the executable file and choose installation options.
During the installation, you’ll be asked if you want to use Hyper-V or VirtualBox.
If you have Hyper-V, go for it.
Otherwise, stick to VirtualBox.
To launch a node with Multipass, open PowerShell and execute:
—
□
𝖷
PowerShell
multipass launch -n node1
Launched: node1
Here you created a node with default configurations of 1GB RAM and one CPU named node1.
To verify if the node exists, you can execute:
—
□
𝖷
PowerShell
multipass list
Name                    State             IPv4             Image
node1                   Running           172.25.60.186    Ubuntu 20.04 LTS
Sometimes you might not see an IP address assigned to your virtual machine.
There are a couple of reasons why you might encounter errors with the above command:
- Encountering a mistake because of VirtualBox or Hyper-V.
- Having a public network enabled.
- Having corrupted IP addresses.
Encountering an error because of VirtualBox or Hyper-V
Although Hyper-V is recommended, there’s a chance it just might not work on your system.
In that case, you should try changing your hypervisor.
To change to Hyper-V, type:
—
□
𝖷
PowerShell
multipass set local.driver=hypervTo change to VirtualBox, type:
—
□
𝖷
PowerShell
multipass set local.driver=virtualboxWhen you perform either change, be sure to reboot your system.
Having a public network enabled
MultiPass can give errors on a public network.
Type the following command to get information on your network:
—
□
𝖷
PowerShell
Get-NetConnectionProfile
Name             : Network
InterfaceAlias   : Ethernet
InterfaceIndex   : 6
NetworkCategory  : Public
IPv4Connectivity : Internet
IPv6Connectivity : NoTraffic
The NetworkCategory variable will tell you if your network is set to public or private.
The output will also give you an InterfaceIndex variable.
You’ll have that to change the network category to Private.
To change your network profile, execute:
—
□
𝖷
PowerShell
Set-NetConnectionProfile -InterfaceIndex 'your number' -NetworkCategory PrivateHaving corrupted IP addresses
When you execute multipass list and see a dash in the IP address column like below:
—
□
𝖷
PowerShell
multipass list
Name                    State             IPv4             Image
node1                   Running           N/A              Ubuntu 20.04 LTS
It means that your node isn’t assigned any IP address.
To fix that you need open a file called hosts.ics which can be located in either path:
C:\Windows\System32\drivers\etc\hosts.icsC:\Windows\System32\drivers\hosts.ics
Retrieve the content of the file and check if your machine has an IP address assigned to it.
—
□
𝖷
cat C:\Windows\System32\drivers\etc\hosts.ics
172.25.48.1 learnk8s.mshome.net
172.25.60.186 node1.mshome.net
If you see anything other than an IP address like random numbers, you need to do the following:
- Uninstall Multipass.
- Delete
hosts.ics. - Reboot.
- Reinstall Multipass.
- Rerun the launch command.
When your launch fails for whatever reason, you’ll be unable to create another node of the same name without clearing the list.
Before debugging, do this:
—
□
𝖷
PowerShell
multipass delete --purge --allJust keep in mind that this command deletes all instances.
Installing K3s on the node
Now you will install K3s on this node with the following command:
—
□
𝖷
PowerShell
multipass exec node1 -- bash -c "curl -sfL https://get.k3s.io | sh -"After a little wait you should be able to see your cluster in action with:
—
□
𝖷
PowerShell
multipass exec node1 -- sudo kubectl get nodes
NAME       STATUS   ROLES    AGE   VERSION
node1      Ready    master   13d   v1.19.4+k3s1
Congratulations, you installed K3s!
Appendix 1: Installing WSL 2
There are two ways you can install WSL 2: simplified and manual install.
To use the simplified install method, you need to be a member of the Windows Insider Program and have the preview build of Windows 10 (build 20262 or higher).
Then open PowerShell as an admin and type:
—
□
𝖷
PowerShell
wsl --installAfter the installation, you’ll need to restart your machine.
For a manual installation, perform the following steps:
Enable WSL through the PowerShell as an administrator with:
—
□
𝖷
PowerShell
dism.exe /online /enable-feature /featurename:Microsoft-Windows-Subsystem-Linux /all /norestart
Deployment Image Servicing and Management tool
Version: 10.0.19041.572

Image Version: 10.0.19041.685

Enabling feature(s)
[==========================100.0%==========================]
The operation completed successfully.
Now, enable the ‘Virtual Machine Platform’ setting through:
—
□
𝖷
PowerShell
Enable-WindowsOptionalFeature -Online -FeatureName VirtualMachinePlatform -NoRestart
Path          :
Online        : True
RestartNeeded : False
Reboot your system for the changes to take effect.
Set WSL 2 as the default version with:
—
□
𝖷
PowerShel
wsl --set-default-version 2Next thing you need is a Linux distro.
You can get them from the Microsoft Store.
If you are not sure, select Ubuntu as the Linux distro.
It might take a while to complete the installation, but once it is successful, you can test with:
—
□
𝖷
PowerShell
wsl --list --verbose
  NAME                   STATE           VERSION
* ubuntu-20.10           Running         2
As a safety measure, we’ll need to explicitly limit how much resource allowance we give to WSL 2.
Simply go to C:\users\your profile and create a .wslconfig file.
Here’s what its contents should be:
.wslconfig
[wsl2]
memory=4GB
processors=3
Open PowerShell as an administrator and execute:
—
□
𝖷
PowerShell
Restart-Service LxssManagerTo restart WSL 2 for the configurations to take place.
Appendix 2: Installing Chocolatey
Installing binaries on Windows could take some time.
You have to visit a website, hope that the download URL is still valid, search for the download page, select the right version, download it, install it, and finally add it to your path.
It’s doable, but I’m sure you would rather spend time doing more coding than chasing and installing executables from the internet.
Enter Chocolatey.
Chocolatey is a package manager for Windows.
You tell it what executables you wish to install, and Chocolatey installs them on your behalf.
You’re outsourcing all the hard work of provisioning software to Chocolatey.
Installing Chocolatey is easy.
You can find the full instructions on the official website.
To verify the installation, type:
—
□
𝖷
PowerShell
choco -v
0.10.15
Now you can use choco install <name> to install any executable you wish.
Don’t miss the next article!
Be the first to be notified when a new article or Kubernetes experiment is published.
*We’ll never share your email address, and you can opt-out at any time.
Introduction
In the earlier articles Docker Introduction and Docker Architecture, we came to know the fundamentals, usage, and introduction of Docker. So let’s learn how to install and configure Docker in Windows 10. Community provided community edition (CE) as this is a free version. As it’s free licensing, you can download and install it on your personal computer. Docker fundamentals and details must be required in case you wanted to build Cloud Native Microservices related applications.
There are many more platforms and tools are available in the market which provides building container-based applications. However, in the last few years, Docker became a major industry-standard for building container-based applications using https://kubernetes.io/ organization.
Getting Started:
Docker requires Hyper-V enabled options for Windows 10. Without an enabled option, Docker can not run after installation. Therefore, the Hyper-V option must be enabled.
Enable Hyper-V option in Windows 10
Step 1
Ensure that the hardware virtualization support option is turned on in the BIOS settings.
Step 2
Enable the Hyper-V role through Windows Settings.
- Right-click on the Windows button and please select ‘Apps and Features’.
- Select Programs and Features on the right under related windows settings.
- Select Turn Windows Features on or off.
- Select Hyper-V and click OK.
Please note that Docker needs enabled Hyper-V option in Windows 10 only. It will not be required with VMware Workstation or Virtual Box. For more detail, please refer to the Docker documentation. Since Docker will consume a lot of RAM, even I can feel it affected on speed performance on an 8GB RAM laptop of mine. However, it will not majorly be affected. You can still work on it smoothly. A 16GB RAM laptop may be the best option related to performance after installing Docker.
Download Docker Desktop for Windows
Docker Hub provides the official Docker Desktop installer. The Community edition can be downloaded from Docker Hub. Either you can create an account on Docker Hub or you can have a direct download option for Docker Desktop for Windows.
Click on Products Option -> Docker Desktop on the menu bar. This will take you to the docker desktop product page. Which will be redirected to Docker Desktop Page. Docker community provides all supported installers for Windows, Mac, Linux. You can download it as per your preference.
Click on the download icon or button. It will allow you to download an installer for Docker Desktop.
Installation Docker Using Docker Desktop Installer
After successfully downloading the installer file of Docker Desktop, please double click on the installer file. The Windows UAC screen will appear for permission to run the program. Click on Yes to continue to the installation process.
You can see from the image, Docker will automatically download or
install additional required files. In the case that an internet connection is not
enabled, it will automatically move to the next step which is the configuration
screen where it asks to create an icon on the desktop and enable features in IIS.

Let’s Run Docker
After restarting Windows, you can able to run Docker using the icon created on the desktop or choose the ‘Docker Desktop’ option from the start menu. Once you click on the icon, Docker starts its service automatically. It will take around 30 sec to start Docker services. Once Docker gets started, you can see an icon for Docker on the bottom right of the taskbar, as shown below.
Check the version of Docker that’s installed
You can review the version of Docker by going to docker —version command in git bash, it will display the current version which is installed on your machine.
Summary
In this article, we learned to install and configure Docker Desktop in Windows 10. Apart from software UI, Docker has a large number of commands that can be executed through a terminal or command prompt. In my next upcoming article, we will learn the configuration of Docker with a web application. Installation of Docker is very easy, similar to other software installations on Windows 10.