Today, Microsoft announced the general availability of Windows Server 2016, and with it, Docker engine running containers natively on Windows. This blog post describes how to get setup to run Docker Windows Containers on Windows 10 or using a Windows Server 2016 VM. Check out the companion blog posts on the technical improvements that have made Docker containers on Windows possible and the post announcing the Docker Inc. and Microsoft partnership.
Before getting started, It’s important to understand that Windows Containers run Windows executables compiled for the Windows Server kernel and userland (either windowsservercore or nanoserver). To build and run Windows containers, a Windows system with container support is required.
Windows 10 with Anniversary Update
For developers, Windows 10 is a great place to run Docker Windows containers and containerization support was added to the the Windows 10 kernel with the Anniversary Update (note that container images can only be based on Windows Server Core and Nanoserver, not Windows 10). All that’s missing is the Windows-native Docker Engine and some image base layers.
The simplest way to get a Windows Docker Engine is by installing the Docker for Windows public beta (direct download link). Docker for Windows used to only setup a Linux-based Docker development environment (slightly confusing, we know), but the public beta version now sets up both Linux and Windows Docker development environments, and we’re working on improving Windows container support and Linux/Windows container interoperability.
With the public beta installed, the Docker for Windows tray icon has an option to switch between Linux and Windows container development. For details on this new feature, check out Stefan Scherers blog post.
Switch to Windows containers and skip the next section.

Windows Server 2016
Windows Server 2016 is the where Docker Windows containers should be deployed for production. For developers planning to do lots of Docker Windows container development, it may also be worth setting up a Windows Server 2016 dev system (in a VM, for example), at least until Windows 10 and Docker for Windows support for Windows containers matures.
For Microsoft Ignite 2016 conference attendees, USB flash drives with Windows Server 2016 preloaded are available at the expo. Not at ignite? Download a free evaluation version and install it on bare metal or in a VM running on Hyper-V, VirtualBox or similar. Running a VM with Windows Server 2016 is also a great way to do Docker Windows container development on macOS and older Windows versions.
Once Windows Server 2016 is running, log in, run Windows Update to ensure you have all the latest updates and install the Windows-native Docker Engine directly (that is, not using “Docker for Windows”). Run the following in an Administrative PowerShell prompt:
Install-PackageProvider -Name NuGet -MinimumVersion 2.8.5.201 -Force
Install-Module -Name DockerMsftProvider -Force
Install-Package -Name docker -ProviderName DockerMsftProvider -Force
Restart-Computer -Force
Docker Engine is now running as a Windows service, listening on the default Docker named pipe. For development VMs running (for example) in a Hyper-V VM on Windows 10, it might be advantageous to make the Docker Engine running in the Windows Server 2016 VM available to the Windows 10 host:
# Open firewall port 2375
netsh advfirewall firewall add rule name="docker engine" dir=in action=allow protocol=TCP localport=2375

# Configure Docker daemon to listen on both pipe and TCP (replaces docker --register-service invocation above)
Stop-Service docker
dockerd --unregister-service
dockerd -H npipe:// -H 0.0.0.0:2375 --register-service
Start-Service docker
The Windows Server 2016 Docker engine can now be used from the VM host by setting DOCKER_HOST:
$env:DOCKER_HOST = "<ip-address-of-vm>:2375"
See the Microsoft documentation for more comprehensive instructions.
Running Windows containers
First, make sure the Docker installation is working:
> docker version
Client:
Version:      1.12.1
API version:  1.24
Go version:   go1.6.3
Git commit:   23cf638
Built:        Thu Aug 18 17:32:24 2016
OS/Arch:      windows/amd64
Experimental: true

Server:
Version:      1.12.2-cs2-ws-beta
API version:  1.25
Go version:   go1.7.1
Git commit:   62d9ff9
Built:        Fri Sep 23 20:50:29 2016
OS/Arch:      windows/amd64
Next, pull a base image that’s compatible with the evaluation build, re-tag it and to a test-run:
docker pull microsoft/windowsservercore
docker run microsoft/windowsservercore hostname
69c7de26ea48
Building and pushing Windows container images
Pushing images to Docker Cloud requires a free Docker ID. Storing images on Docker Cloud is a great way to save build artifacts for later user, to share base images with co-workers or to create build-pipelines that move apps from development to production with Docker.
Docker images are typically built with docker build from a Dockerfile recipe, but for this example, we’re going to just create an image on the fly in PowerShell.
"FROM microsoft/windowsservercore `n CMD echo Hello World!" | docker build -t <docker-id>/windows-test-image -
Test the image:
docker run <docker-id>/windows-test-image
Hello World!
Login with docker login and then push the image:
docker push <docker-id>/windows-test-image
Images stored on Docker Cloud available in the web interface and public images can be pulled by other Docker users.
Using docker-compose on Windows
Docker Compose is a great way develop complex multi-container consisting of databases, queues and web frontends. Compose support for Windows is still a little patchy and only works on Windows Server 2016 at the time of writing (i.e. not on Windows 10).
To develop with Docker Compose on a Windows Server 2016 system, install compose too (this is not required on Windows 10 with Docker for Windows installed):
Invoke-WebRequest https://dl.bintray.com/docker-compose/master/docker-compose-Windows-x86_64.exe -UseBasicParsing -OutFile $env:ProgramFiles\docker\docker-compose.exe
To try out Compose on Windows, clone a variant of the ASP.NET Core MVC MusicStore app, backed by a SQL Server Express 2016 database. A correctly tagged microsoft/windowsservercore image is required before starting.
git clone https://github.com/friism/Musicstore
...
cd Musicstore
docker-compose -f .\docker-compose.windows.yml build
...
docker-compose -f .\docker-compose.windows.yml up
...
To access the running app from the host running the containers (for example when running on Windows 10 or if opening browser on Windows Server 2016 system running Docker engine) use the container IP and port 5000. localhost will not work:
docker inspect -f "{{ .NetworkSettings.Networks.nat.IPAddress }}" musicstore_web_1
172.21.124.54
If using Windows Server 2016 and accessing from outside the VM or host, simply use the VM or host IP and port 5000.
Summary
This post described how to get setup to build and run native Docker Windows containers on both Windows 10 and using the recently published Windows Server 2016 evaluation release. To see more example Windows Dockerfiles, check out the Golang, MongoDB and Python Docker Library images.
Please share any Windows Dockerfiles or Docker Compose examples your build with @docker on Twitter using the tag #windows. And don’t hesitate to reach on the Docker Forums if you have questions.
More Resources:
- Sign up to be notified of GA and the Docker Datacenter for Windows Beta
- Docker for Windows Server
- Learn more about the Docker and Microsoft partnership
Enterprise servers are not always exposed to the internet and are often sitting behind firewalls with restrictions to prohibit any malicious activity on an internet-facing server. But to install a Docker image from the Docker Hub, you need internet access. To overcome this, you can configure a Docker client to use a proxy server if one is available, but there is another way around this, which we will discuss in the following high-level steps.
Contents
- Install Docker with internet access
- Pull the image from the Docker Hub and export it
- Download Docker Enterprise
- Install Docker Enterprise on Windows Server 2016
- Load and run the image
- Conclusion
- Author
- Recent Posts

Prateek Singh is an infrastructure developer, an avid PowerShell blogger, and a community contributor. In 2017, FeedSpot recognized his blog RidiCurious.com as among the «Top 50 PowerShell blogs in the world.» All of his PowerShell projects and modules are open-sourced at GitHub, and you can reach out to him on Twitter at @SinghPrateik.
Install Docker with internet access
Log in to a Windows 10 machine that has internet access, probably your laptop or workstation, and use the following URL for instructions to install Docker on Windows 10.
Once the installation is complete, run a PowerShell console and verify the Docker installation on Windows 10:
docker --version
Get-Service *docker*

Verify the Docker installation
Pull the image from the Docker Hub and export it
Now use Docker to download or pull a Docker test image from the Docker Hub. We’ll later use this image to test a Docker installation on Windows Server 2016.
docker pull hello-world:nanoserver-sac2016
After downloading the image, use the docker save command to export and save the image to a file («nano.tar» for example).
docker save -o nano.tar hello-world:nanoserver-sac2016
This will save the image as «nano.tar» in your current working directory.
Download Docker Enterprise
Now that we have a Docker image, let’s use PowerShell to download «Docker Enterprise Edition» to our local workstation as a zip file. We will need this because we don’t have internet access on Windows Server 2016.
$URL = ‘https://download.docker.com/components/engine/windows-server/17.06/docker-17.06.2-ee-16.zip’
invoke-webrequest -UseBasicparsing -Outfile docker-17.06.2-ee-16.zip -Uri $URL
We can now copy the two files: Docker Enterprise Edition for Windows Server 2016 as a zipped file and a test Docker image we have saved as «nano.tar» in the previous step to the target Windows 2012 Server.
Install Docker Enterprise on Windows Server 2016
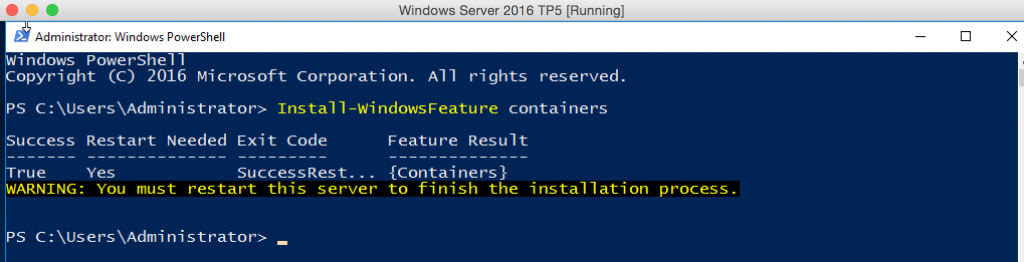
Let’s switch to the Windows 2012 Server and assume you have placed the Docker Enterprise installation files and the image on D:\. So the first step required is installing the container feature on the Windows 2012 Server and then rebooting the machine when prompted.
# Install Docker
Install-WindowsFeature containers | Out-Null
Once the machine is up and running again, launch a PowerShell console. Then unzip the compressed file and move the Docker executables to the system’s program files.
# cd <path to the zip file and docker image>
cd d:\

# Extract the archive.
Expand-Archive docker-17.06.2-ee-16.zip -DestinationPath $Env:ProgramFiles  Force
Next, use the following PowerShell commands to add the Docker folder location to the system’s PATH variable and run the Docker executable as a service.
# Add Docker to the path for the current session and to PATH to persist across sessions.
$env:path += ";$env:ProgramFiles\docker"

$newPath = "$env:ProgramFiles\docker;" +
[Environment]::GetEnvironmentVariable("PATH",
[EnvironmentVariableTarget]::Machine)

[Environment]::SetEnvironmentVariable("PATH", $newPath,
[EnvironmentVariableTarget]::Machine)

# Register the Docker daemon as a service.
dockerd --register-service

# Start the Docker service.
Start-Service docker

Set up the PATH variable and Docker service
This will complete the Docker Enterprise setup on Windows Server 2016.
Load and run the image
From the PowerShell console, use the docker load command to load the «nano.tar» file (the Docker image) into our current session. Verify the image is loaded and available and the Docker service is running.
# docker load image offline
docker load -i nano.tar

# list all available images
docker images

# make sure docker service is running
Get-Service *docker
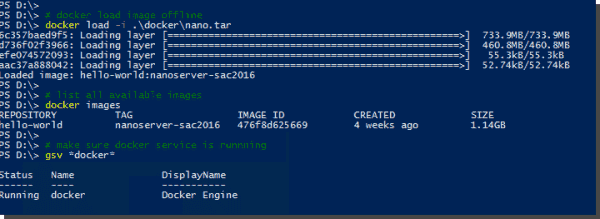
Load the Docker image
Now run the test container image using the docker run command. If you get results like in the following screenshot, this means installation was successful and the container is running properly.
Subscribe to 4sysops newsletter!
# run the test container
docker run hello-world:nanoserver-sac2016
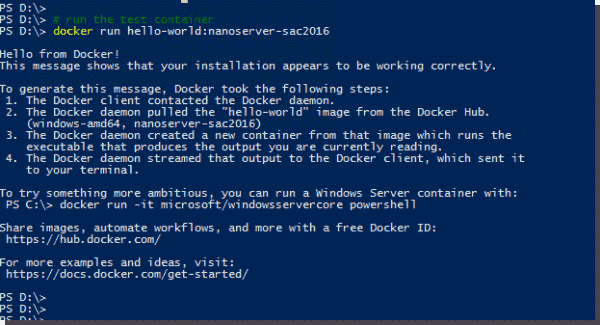
Run test containers
Conclusion
Downloading Docker container images from the Docker Hub or Registry is often restricted on enterprise servers. One workaround is to set up a proxy server to allow such access. But in case this is not available or allowed, you can pull and save a Docker image to a machine (Windows 10) that has internet access. Later, you can export the image as a compressed file and move it to the enterprise server (Windows Server 2016) that cannot access the internet. Once you have the image as a compressed file, you can directly load it using the docker load -i <image file name> command on Windows Server 2016 and run containers with the image.
![]()
![]()
This multi-part blog series will show how to configure, build, and run Docker containers on Windows. The first part showed how to setup Windows Server 2016 on Virtual Box for Docker Containers. This part will install the operating system images and configure Docker. Instructions are available at msdn.microsoft.com/virtualization/windowscontainers/deployment/deployment.
How to Install Docker in Windows Server 2016 Container Feature
Start PowerShell:
Install the container feature:
Restart the Virtual Machine:
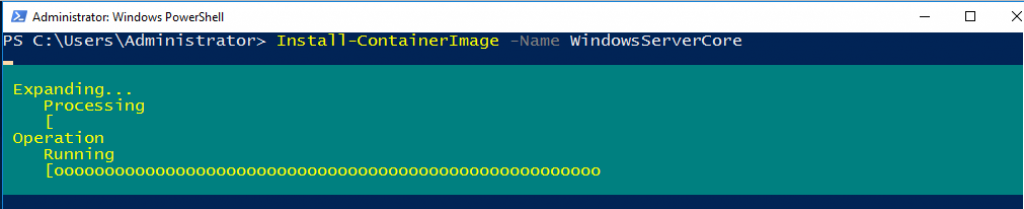
Install Windows Server 2016 Base Docker Image
Base operating system can be installed using ContainerImage PowerShell module. Install the module as:

See the list of operating system images that are available:

Install the Windows Server Core base OS image:

Install Docker on Windows Server 2016
Download the script to install Docker:
![]()
Run the script:
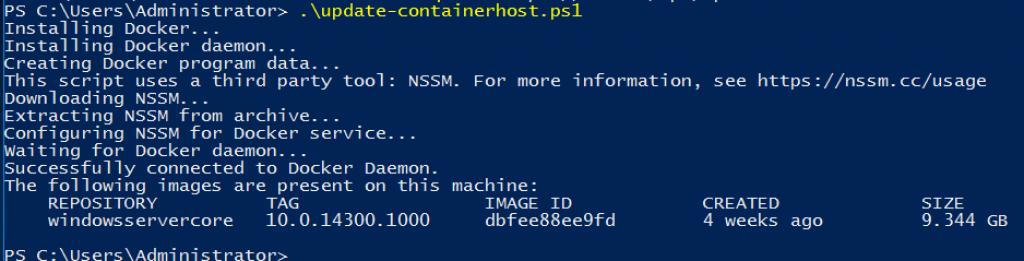
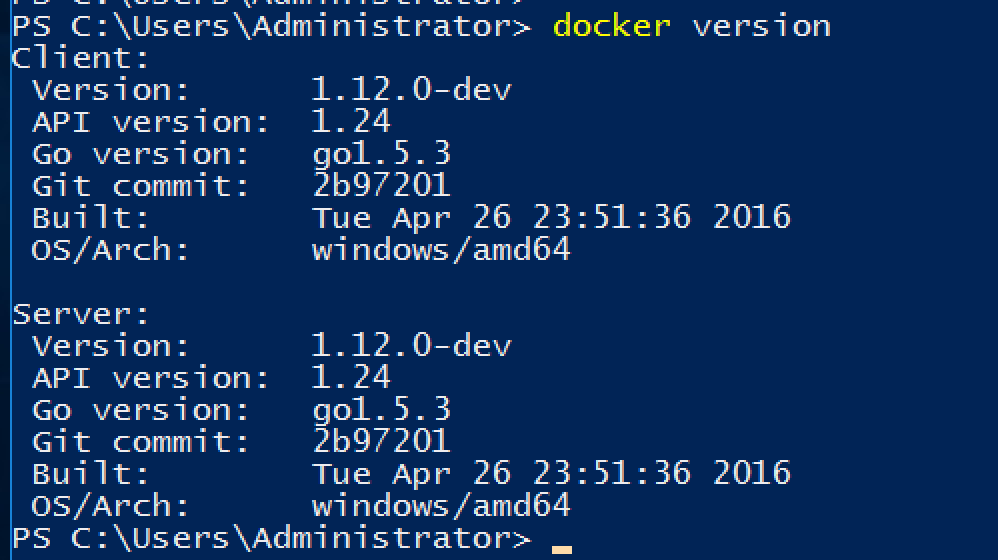
Check Docker version:
Check the list of images and tag the base OS image to latest:

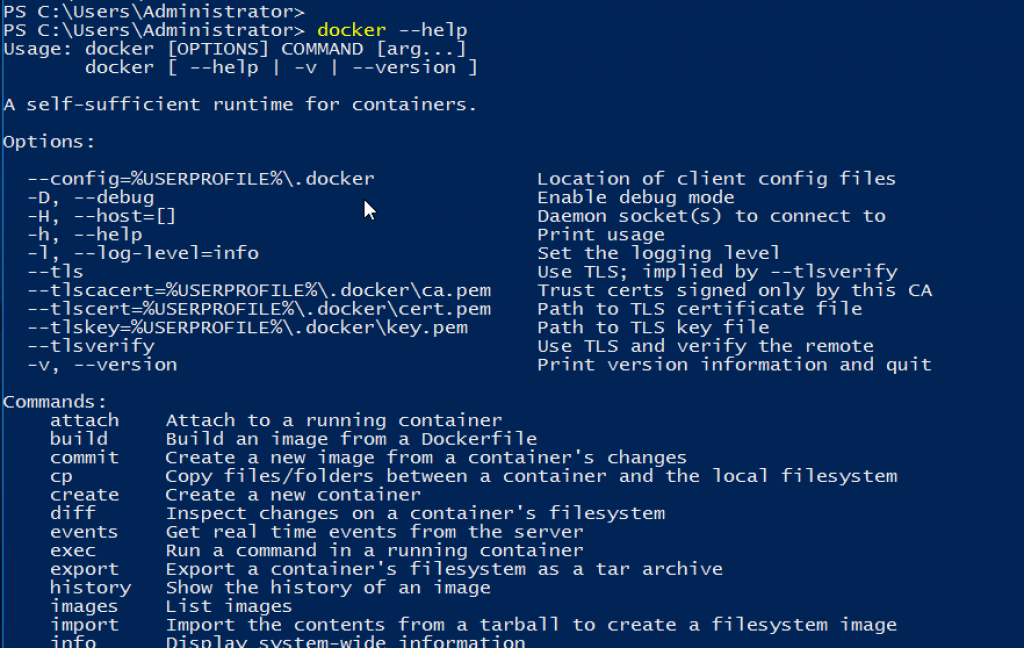
Check docker --help command:
Subsequent blogs will show how other fun things with Docker on Windows Server 2016!
Some further topics to read …
- Windows Server Containers – Quick Start
- Windows Server 2016 Technology Preview 5
- Docker Documentation
- Getting Started with Docker for Java developers

Posted by Arun Gupta, VP, Developer Advocacy, Couchbase
Arun Gupta is the vice president of developer advocacy at Couchbase. He has built and led developer communities for 10+ years at Sun, Oracle, and Red Hat. He has deep expertise in leading cross-functional teams to develop and execute strategy, planning and execution of content, marketing campaigns, and programs. Prior to that he led engineering teams at Sun and is a founding member of the Java EE team.
Gupta has authored more than 2,000 blog posts on technology. He has extensive speaking experience in more than 40 countries on myriad topics and is a JavaOne Rock Star for three years in a row. Gupta also founded the Devoxx4Kids chapter in the US and continues to promote technology education among children. An author of several books on technology, an avid runner, a globe trotter, a Java Champion, a JUG leader, NetBeans Dream Team member, and a Docker Captain, he is easily accessible at @arungupta.
Windows Server 2016 предоставляет возможность использования Docker-контейнеров для упрощения разработки, тестирования и развёртывания приложений. Docker является одним из самых популярных инструментов для контейнеризации приложений, позволяющим запускать и управлять приложениями и их зависимостями в изолированной среде, гарантируя их надежность и переносимость.
Чтобы начать использовать Docker в Windows Server 2016, необходимо установить Docker Engine, который является основой для работы с Docker-контейнерами. Docker Engine можно скачать с официального сайта проекта Docker. Установщик Docker Engine для Windows Server 2016 предоставляет простой интерфейс для установки и настройки Docker и его зависимостей.
После установки Docker Engine в Windows Server 2016, можно начать создавать и запускать Docker-контейнеры. Для этого необходимо использовать Docker CLI (Command Line Interface), который позволяет управлять Docker-контейнерами с помощью команд в командной строке. Docker CLI предоставляет широкий набор команд для управления Docker-контейнерами, таких как создание, запуск, остановка и удаление контейнеров, а также управление Docker-образами и сетями.
Важно отметить, что Docker в Windows Server 2016 поддерживает две разные технологии контейнеризации: контейнеры Windows и контейнеры Linux. Контейнеры Windows позволяют запускать приложения, разработанные для Windows, в контейнерах, работающих на Windows Server 2016. Контейнеры Linux позволяют запускать приложения, разработанные для Linux, в контейнерах, работающих на Windows Server 2016.
Содержание
- Установка Docker на Windows Server 2016
- Выбор версии Docker для Windows Server 2016
- Docker Community Edition
- Docker Enterprise Edition
- Требования к системе для Docker на Windows Server 2016
- Установка Docker на Windows Server 2016 через PowerShell
Установка Docker на Windows Server 2016
Для установки Docker на Windows Server 2016, следуйте этим шагам:
- Откройте браузер и перейдите на официальный сайт Docker: https://www.docker.com/products/docker-desktop.
- На странице загрузки, найдите раздел «Download Docker Desktop for Windows» и нажмите на кнопку «Download Docker Desktop».
- Ожидайте завершения загрузки файла установки Docker и запустите его.
- В появившемся окне установки Docker, выберите параметры установки, оставив значения по умолчанию, и нажмите кнопку «Install».
- После установки Docker, запустите Docker Desktop из списка установленных программ.
- Дождитесь, пока Docker Desktop завершит инициализацию и запустит Docker на вашей системе Windows Server 2016.
- Веб-интерфейс Docker будет доступен по адресу
http://localhost.
Теперь вы успешно установили Docker на Windows Server 2016 и можете начать использовать его для создания и управления контейнерами.
Выбор версии Docker для Windows Server 2016
Windows Server 2016 предоставляет разные варианты версий Docker для удовлетворения различных потребностей и требований.
Версия Docker Engine может быть установлена на Windows Server 2016 с помощью двух основных подходов: Docker Community Edition (CE) и Docker Enterprise Edition (EE).
Docker Community Edition (CE) является бесплатной версией Docker, разработанной для разработчиков и компаний малого и среднего бизнеса.
Существует две основные ветки Docker Community Edition для Windows Server 2016: stable (стабильная) и edge (экспериментальная).
Ветка stable содержит новейшие стабильные выпуски Docker, поддерживаемые Docker Inc., с гарантированной стабильностью и обновлениями безопасности. Эта версия рекомендуется для продакшн окружений.
Edge-версия является более рискованной, но более инновационной веткой, предназначенной для тестирования последних функций Docker до их выпуска в стабильную версию. Эта версия может содержать нестабильные или экспериментальные функции и потенциально нестабильна. Она подходит для случаев, когда требуется более новый функционал Docker.
Docker Enterprise Edition
Docker Enterprise Edition (EE) — это коммерческая подписка, которая предоставляет обширный набор инструментов и функций для развертывания и управления большими производственными бизнес-средами.
Docker EE включает несколько предложений, которые могут быть подходящими для развертывания в Windows Server 2016:
- Docker EE Advanced – рекомендовано для команд, которым требуются расширенные функции и сквозная поддержка Windows Server 2016.
- Docker EE Standard – рекомендуется для команд, которым требуются основные функции и поддержка Windows Server 2016.
Выбор версии Docker для Windows Server 2016 зависит от ваших конкретных потребностей и бизнес-требований. При выборе версии Docker важно учитывать стабильность, поддержку и доступность необходимых функций.
| Версия | Преимущества | Недостатки |
|---|---|---|
| Stable (стабильная) |
|
|
| Edge (экспериментальная) |
|
|
| Docker EE Advanced |
|
|
| Docker EE Standard |
|
|
В результате, при выборе версии Docker для Windows Server 2016, рекомендуется тщательно оценить свои требования и выбрать версию, которая соответствует вашим потребностям и бизнес-целям, учитывая потенциальные преимущества и недостатки каждой версии.
Требования к системе для Docker на Windows Server 2016
Установка и использование Docker на Windows Server 2016 требует соответствия определенным системным требованиям.
1. Операционная система:
Для установки Docker на Windows Server 2016 необходимо использовать 64-разрядную версию операционной системы. Также необходима наличие последних обновлений системы.
2. Процессор и память:
Для использования Docker рекомендуется иметь 4-ядерный процессор и не менее 4 ГБ оперативной памяти.
3. Виртуализация:
На компьютере должна быть включена поддержка виртуализации в BIOS, например, Intel VT-x или AMD-V. Docker будет использовать Hyper-V для виртуализации контейнеров, поэтому также необходимо убедиться, что Hyper-V включен в Windows Server 2016.
4. Дисковое пространство:
Для установки Docker на Windows Server 2016 необходимо иметь как минимум 20 ГБ свободного дискового пространства.
5. Сеть:
Для использования Docker на Windows Server 2016 необходимо иметь подключение к сети с доступом в Интернет.
Соблюдение этих требований позволит успешно установить и использовать Docker на Windows Server 2016, открывая широкие возможности виртуализации и контейнеризации для вашей системы.
Установка Docker на Windows Server 2016 через PowerShell
Шаг 1: Первым шагом необходимо установить PowerShell, если его еще нет на вашем сервере. Убедитесь, что вы используете PowerShell версии 5.1 и выше.
Шаг 2: Запустите PowerShell с правами администратора.
Шаг 3: Введите следующую команду, чтобы скачать и установить Docker посредством PowerShell:
Install-Module -Name DockerMsftProvider -Repository PSGallery -Force
Шаг 4: Затем выполните следующую команду, чтобы установить Docker:
Install-Package -Name docker -ProviderName DockerMsftProvider -Force
Шаг 5: После успешной установки Docker введите команду:
Restart-Computer -Force
Шаг 6: После перезагрузки проверьте, что Docker успешно установлен, введя команду:
docker version
Если вы видите информацию о версии Docker и его компонентах, значит, установка прошла успешно.
How to Install and Run Docker on Windows Server 2016, 2019, 2022. In this tutorial we will introduce Docker and how it works with it’s main advantages then move onto installation phase with how to install Docker using PowerShell.
Docker is one of the most widely used containerization platform used by developers. It allows developers to create, deploy, and run applications with the help of containers.
Next in this article How to Install and Run Docker on Windows Server 2016, 2019, 2022 is to introduce Docker.
What Is Docker?

The Docker is an open source platform that allows you to build, deploy, run, update, and manage containers. They are standardized, executable components that integrate application source code with operating system libraries and dependencies they need to run that code in any environment.
With the help of containers, the process of simplifying the development and delivery of distributed applications becomes effortless. The platform is highly popular among organizations transforming themselves to cloud native developments and hybrid multi cloud environments. Therefore, by using Docker, you will tend to acquire the following additional advantages:
Docker Benefits
- Light Weight – The Docker containers do not have to carry the payload of an entire OS instance and hypervisor. They only require the OS processes and dependencies for executing the code. Also, since their sizes are measured in megabytes, you can make better use of hardware capacity and have faster start-up times.
- Greater Resource Efficiency – With the help of Docker containers, you can run several copies of the same application on the hardware as many times as you want, thereby reducing cloud spending.
- Improved Developer Productivity – Write and run only once a time a containerized application anywhere. In comparison to VMs, they will run faster and deploy, provision and restart effortlessly. This way, you can make them ideal for usage in continuous integration and continuous delivery (CI/CD) pipelines. It will also be a better fit for development teams adopting Agile and DevOps practices.
- Improved And Seamless Container Portability – Docker containers tend to run without modification across any desktop, data center, and cloud environment.
- Automated Container Creation – Docker tends to build a container automatically according to the application source code.
- Shared Container Libraries – Docker enables you to access open source libraries, which include numerous user contributed containers.
- Containers Reuse – In Docker, you can use existing containers as base images, especially templates for building new containers.
- Container Versioning – Docker trackers the versions of a computer image, get back to previous versions and then identify who built it and when. They also upload only deltas between an existing version and a new one.
Moreover, if you use containers, you tend to acquire benefits, like improved app quality, faster response to market changes, etc.
How Does Docker Work?

Docker work by packaging, provisioning, and running containers. Its technology is available to the operating system. A container packages the application service or function will every library, configuration files, dependencies, and other necessary parts and parameters to operate. Every container contributes to the service of one underlying operating system.
Moreover, Docker images constitute the dependencies required for executing code inside a container. This way, containers that move between Docker environments with similar OS work with no changes.
Docker also uses resource isolation in the OS Kernel to run several containers on the same OS. It is not as same as Virtual Machines (VMs) that encapsulate an entire OS with executable codes on an abstracted layer of physical hardware resources.
On the other hand, Docker was developed to work on the Linux platform. However, it has extended its offer to provide support to non Linux Operating systems too. It includes Microsoft Windows and Apple OS X. Docker also has the version for Amazon Web Services (AWS) and Microsoft Azure.
Next in this post we will show you how to install and run Docker on Windows server 2016 / 2019 and 2022.
Enable the Containers Feature
By default, the container features are not enabled on Windows server machine. So you will need to enable it first.
Install-Module -Name DockerMsftProvider -Repository PSGallery -Force
The above command will install the Docker-Microsoft PackageManagement Provider from the PowerShell Gallery.
Run Docker Engine on Windows in Azure
Run Docker Engine on Windows in AWS
Run Docker Engine on Windows in GCP
Install Docker Engine
After the Containers feature is enabled on Windows Server, open your powershell windows and install the latest Docker Engine and Client by running the command below:
Install-Package -Name docker -ProviderName DockerMsftProvider
Once the Docker is installed, you will get the following output:
					WARNING: A restart is required to enable the containers feature. Please restart your machine.

Name                           Version          Source           Summary
----                           -------          ------           -------
Docker                         20.10.9          DockerDefault    Contains Docker EE for use with Windows Server.
Next, you will need to restart your system to enable the docker features. You can run the following command to restart the system:
Verify the Docker Installation
You can verify the installed version of Docker using the following command in the powershell window:
Get-Package -Name Docker -ProviderName DockerMsftProvider
You will get the following output:
					Name                           Version          Source                           ProviderName
----                           -------          ------                           ------------
docker                         20.10.9          DockerDefault                    DockerMsftProvider
You can also run the following command to see the Docker version information:
You should see the Docker version information in the following output:
					Client: Mirantis Container Runtime
 Version:           20.10.9
 API version:       1.41
 Go version:        go1.16.12m2
 Git commit:        591094d
 Built:             12/21/2021 21:34:30
 OS/Arch:           windows/amd64
 Context:           default
 Experimental:      true

Server: Mirantis Container Runtime
 Engine:
  Version:          20.10.9
  API version:      1.41 (minimum version 1.24)
  Go version:       go1.16.12m2
  Git commit:       9b96ce992b
  Built:            12/21/2021 21:33:06
  OS/Arch:          windows/amd64
  Experimental:     false
If you want to get detailed information of Docker package, run the following command:
You should see the following output:
					Client:
 Debug Mode: false
 Plugins:
  cluster: Manage Docker clusters (Docker Inc., v1.1.0-8c33de7)

Server:
 Containers: 0
  Running: 0
  Paused: 0
  Stopped: 0
 Images: 0
 Server Version: 19.03.2
 Storage Driver: windowsfilter
  Windows:
 Logging Driver: json-file
 Plugins:
  Volume: local
  Network: ics l2bridge l2tunnel nat null overlay transparent
  Log: awslogs etwlogs fluentd gcplogs gelf json-file local logentries splunk syslog
 Swarm: inactive
 Default Isolation: process
 Kernel Version: 10.0 14393 (14393.3808.amd64fre.rs1_release.200707-2105)
 Operating System: Windows Server 2016 Standard Version 1607 (OS Build 14393.3808)
 OSType: windows
 Architecture: x86_64
 CPUs: 2
 Total Memory: 3.999GiB
 Name: CLOUD-0Q59R832Q
 ID: BTXL:3ZPL:A7MZ:FNCV:UZRU:VG7I:YU7X:DERR:2Q2Y:2YNL:SYGN:AGYT
 Docker Root Dir: C:\ProgramData\docker
 Debug Mode: false
 Registry: https://index.docker.io/v1/
 Labels:
 Experimental: false
 Insecure Registries:
  127.0.0.0/8
 Live Restore Enabled: false
Run the Docker Container
Next, download the Docker dotnet nano server container image using the following command:
docker pull mcr.microsoft.com/dotnet/samples:dotnetapp-nanoserver-2009
Once the image is downloaded, you can run the container from the downloaded image using the following command:
docker run mcr.microsoft.com/dotnet/samples:dotnetapp-nanoserver-2009
Run Linux Container on Windows
By default, Docker on Windows machine can only run Windows container. In order to use Linux containers on Windows Server, you need to use the Docker Enterprise Edition Preview which includes a full LinuxKit system for running Docker Linux containers.
The first thins is to remove your Windows Docker engine using the following command:
Uninstall-Package -Name docker -ProviderName DockerMSFTProvider
Secondly, install Docker for Linux by running the following command:
					Install-Module DockerProvider
Install-Package Docker -ProviderName DockerProvider -RequiredVersion preview
Thirdly, enable LinuxKit system for running Linux containers using the following command:
[Environment]::SetEnvironmentVariable("LCOW_SUPPORTED", "1", "Machine")
The next step is to start the Docker service with the following command:
Then download and run your first Linux container using the following command:
docker run -it --rm ubuntu /bin/bash
This command will download the latest Ubuntu container image, create the container and connect to the container shell as shown below:
You can now run the following command inside the container to verify the Ubuntu version:
					root@21340a2fsf7e2:/# cat /etc/os-release
 NAME="Ubuntu"
 VERSION="22.04.1 LTS (Jammy Jellyfish )"
 ID=ubuntu
 ID_LIKE=debian
 PRETTY_NAME="Ubuntu 22.04.1 LTS"
 VERSION_ID="22.04"
 HOME_URL="https://www.ubuntu.com/"
 SUPPORT_URL="https://help.ubuntu.com/"
 BUG_REPORT_URL="https://bugs.launchpad.net/ubuntu/"
 PRIVACY_POLICY_URL="https://www.ubuntu.com/legal/terms-and-policies/privacy-policy"
 VERSION_CODENAME=Jammy Jellyfish
 UBUNTU_CODENAME=Jammy Jellyfish
To disconnect from the container, run the following command:
root@21340a2fsf7e2:/# exit
How to Use Docker
Docker provides many useful commands that help developers or system administrators to easily manage Docker containers from the command line.
You can use the –name option with Docker to assign a container name when running a new container. For example, to launch a new container from the debian:latest images and assigned a name debian-container, run the following command:
docker.exe container run --name debian-container debian:latest
After starting the container, you can see the status of all container using the following command:
There are two ways of running a container, in attached mode and in detached mode. By default, Docker runs the container in attached mode. In the attached mode, you will be connected to the terminal session, where it displays output and messages.
If you want to run a container in detached mode, use the -d flag:
docker.exe container run -d debian:latest
You can run a container in interactive mode with Docker. In this mode, you can run commands inside the container. You can use the following command to run a container in an interactive mode:
docker container run -it debian:latest /bin/bash
If you want to start, stop or remove the Docker container, run the following commands:
					docker container start container-name
docker container stop container-name
docker container rm container-name
Great! You have read How to Install and Run Docker on Windows Server 2016, 2019, 2022 until the very end. let’s conclude.
How to Install and Run Docker on Windows Server 2016, 2019, 2022 Conclusion
In this post we illustrated how to install Docker CE on Windows server 2016, 2019, and 2022. We also explained how to run dotnet container in Windows server. I hope this guide will help a lot to run and manage the Docker container. Docker’s containers technology makes development highly scalable as it separates your applications from your infrastructure to be able to deliver software quickly. Shipping, testing and deploying the code is made quickly with less delays in applications delivery.
Windows Server provides many great features to run your Docker containers, including Hyper V isolation for additional security and kernel protection. Also, Microsoft Windows Server can run both Windows and Linux containers meaning you can have a mixed environment supporting applications needing both Windows and Linux components.