Table of contents
-
-
-
- 0. Environmental preparation
- 1. Download the docker_toolbox tool
- 1. 2 Install docker_toolbox
- 1. 3 Use virtual machines
- 1, 4 port mapping
- 1. Directory mounting:
-
-
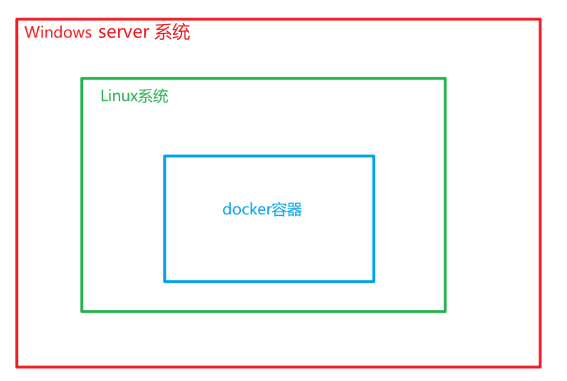
Drama diagram:
Latterdocker_toolboxTools are actually similar to VMware of Windows,docker_toolboxA Linux system is provided, which can be used in the DOCKER (using docker in the Linux environment in peace)
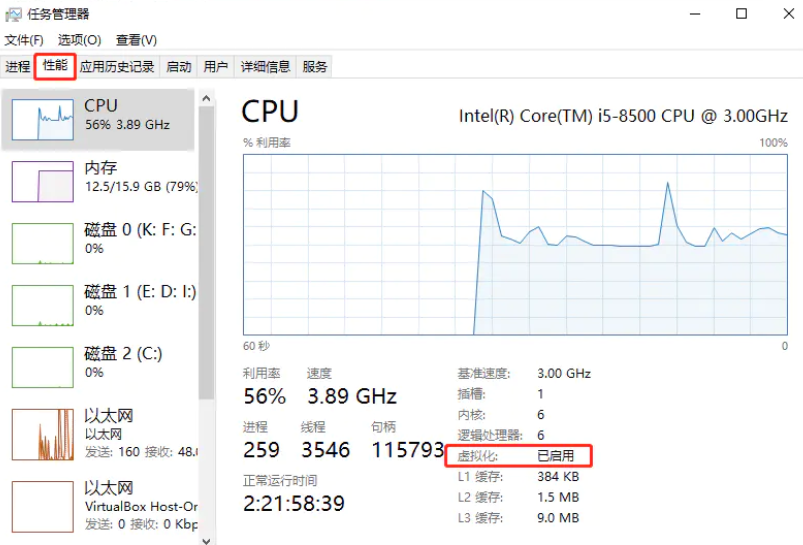
0. Environmental preparation
Docker needs your CPU to support virtualization on Window. Open the task manager, select performance to view:
1. Download the docker_toolbox tool
Note:(Windows Server 2012 version requires the tool support to run docker)
Attach an installation package: extraction code: VMXV[Click me to download]You can also download it by yourself.
1. 2 Install docker_toolbox
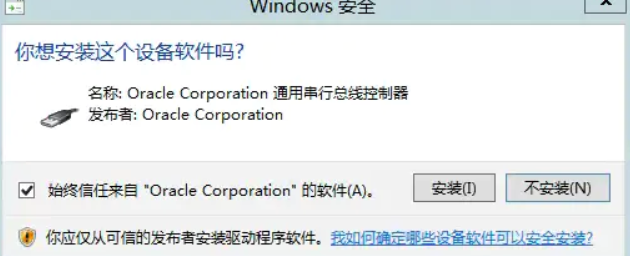
Double -click to run the downloaded docker_toolbox program for installation;
Select the installation path by yourself;
In the following interface, it is recommended to check, and the rest of the default will be the next step.
1. 3 Use virtual machines
Double -click the virtual machine management tool installed below, and after entering the default, there is a name calleddefaultVirtual machine, right -click to run;
The default information of the virtual machine is generally:
host:192.168.99.100
user:docker
password:tcuser
(1) You can use your own terminal window for operation (not supporting Chinese display, not recommended);
(2) You can also use your own XSHELL tools to connect (recommend)
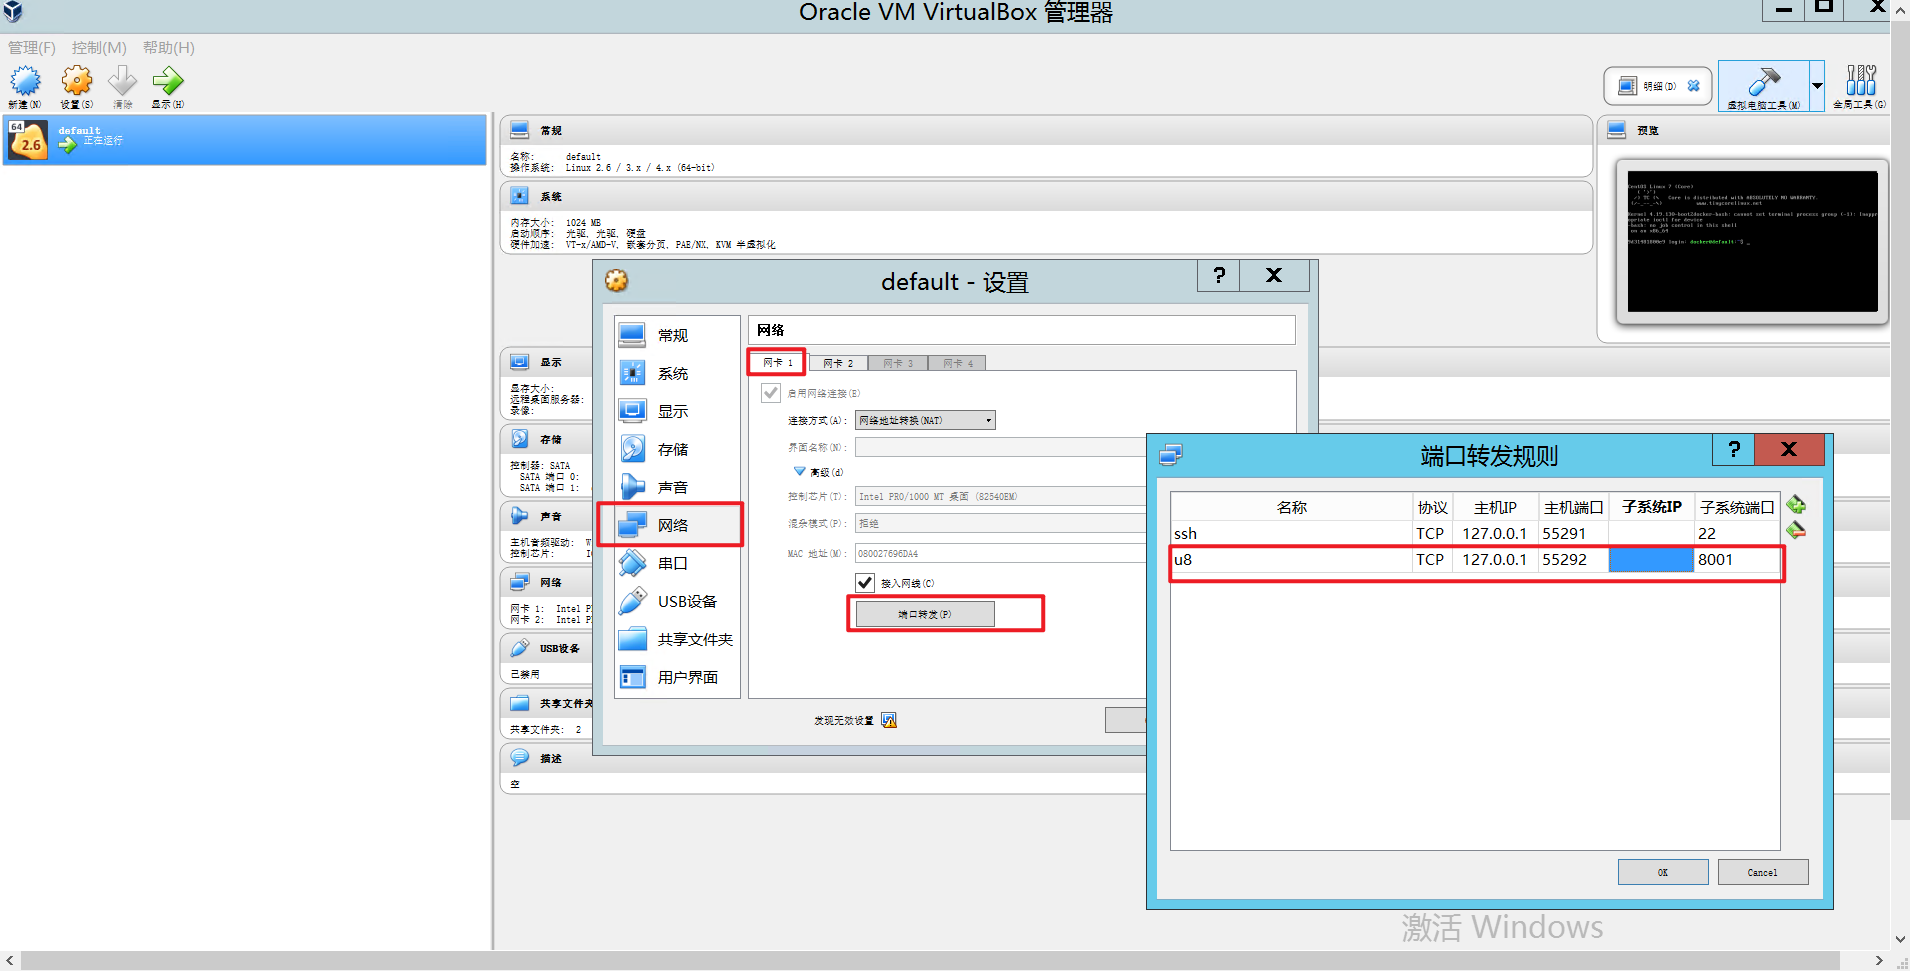
1, 4 port mapping
E.g:
If you need to map the port 8001 of the internal service of the Docker container, you need to set it in the Docker_toolbox tool to access it at your Windows Server Solit Owner Browser:
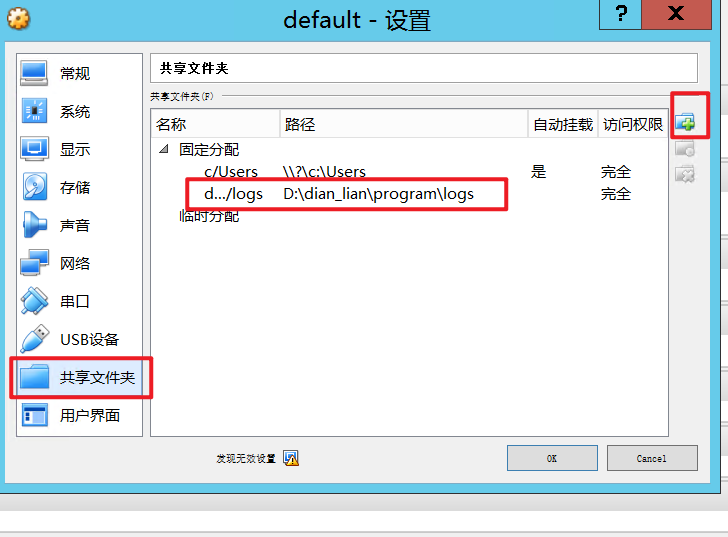
1. Directory mounting:
If you need to map the internal directory of Docker to the local area of Windows Server. need:
1. First map the local directory of Windows to the Linux virtual machine
Log in to the virtual machine Linux, execute the following command to mount
# Switching root
sudo -i

#
sudo mount -t vboxsf d/dian_lian/program/logs /mnt/docker/logs
2. Then map the Docker’s internal directory to the directory of the virtual machine Linux.
# Put the mirror into a container (map the container directory to the virtual machine directory)
docker run --name=u8 --privileged=true -p 8001:8001 -v /mnt/docker/logs:/web/u8_data/logs -itd u8 /usr/sbin/init
Установка Docker на операционную систему Windows Server 2012 может показаться сложной задачей, но на самом деле существует простая и понятная инструкция. Docker — это открытая платформа, которая позволяет упаковывать, переносить и запускать приложения в контейнерах. Она обеспечивает высокую скорость и гибкость в разработке и доставке приложений.
Для установки Docker на Windows Server 2012 существует несколько шагов. Прежде всего, убедитесь, что ваша операционная система поддерживает Docker. Windows Server 2012 не является нативной платформой для Docker, поэтому сначала вам необходимо установить некоторые предварительные требования.
Для начала, убедитесь, что на вашем компьютере установлена последняя версия .NET Framework. Для установки Docker на Windows Server 2012 требуется версия .NET Framework 4.6.2 или выше. Если у вас установлена более старая версия, обновите ее до последней.
Затем, перейдите на официальный сайт Docker и скачайте установщик Docker for Windows. Он представляет собой исполняемый файл с расширением .msi. Запустите установщик и следуйте инструкциям по установке Docker. В процессе установки может понадобиться перезагрузка системы.
Таким образом, установка Docker на Windows Server 2012 достаточно проста, но требует выполнения нескольких шагов. Не забудьте проверить совместимость своей операционной системы с Docker, обновить .NET Framework до подходящей версии и скачать установщик Docker for Windows. После успешной установки Docker вы сможете начать использовать его мощные возможности для разработки и доставки приложений в контейнерах.
Содержание
- Выбор версии Docker
- Системные требования
- Подготовка сервера
- Загрузка и установка Docker
- Проверка установки Docker
- Настройка Docker
Выбор версии Docker
Перед установкой Docker на Windows Server 2012 необходимо выбрать подходящую версию программного обеспечения. Docker поддерживает две основные версии для Windows: Docker Desktop и Docker Engine.
Docker Desktop является удобным решением для начинающих пользователей и разработчиков. Оно включает в себя все необходимые компоненты Docker, такие как Docker Engine, Docker CLI и Docker Compose. Docker Desktop также предоставляет графический интерфейс пользователя для управления контейнерами.
Для более опытных пользователей и продвинутых сценариев использования рекомендуется установка Docker Engine. Docker Engine представляет собой более минимальную версию Docker, которая включает в себя только самый основной функционал. Установка Docker Engine позволяет гибко настраивать и управлять Docker-контейнерами через командную строку.
Решение о выборе версии Docker зависит от уровня комфорта пользователя и специфических требований проекта. Обе версии Docker поддерживают Windows Server 2012, и правильный выбор версии позволит наиболее эффективно использовать Docker в вашей среде.
Системные требования
Для установки Docker на Windows Server 2012 необходимо удостовериться, что ваша система соответствует следующим требованиям:
- Операционная система: Windows Server 2012 или выше
- Процессор: 64-битный процессор с поддержкой виртуализации и поддержка Second Level Address Translation (SLAT)
- Оперативная память: минимум 2 ГБ (рекомендуется 4 ГБ или больше)
- Свободное место на диске: минимум 20 ГБ
- Подключение к интернету: рекомендуется для загрузки и установки Docker
Убедитесь, что ваша система соответствует указанным требованиям перед тем, как приступить к установке Docker на Windows Server 2012.
Подготовка сервера
Перед установкой Docker на Windows Server 2012 необходимо выполнить несколько предварительных шагов:
| Шаг 1: Проверка версии операционной системы |
Убедитесь, что на вашем сервере установлена Windows Server 2012 (версия 6.2 или выше). Для этого откройте командную строку и выполните команду winver. Если ваша версия операционной системы отличается от необходимой, обновите ее до Windows Server 2012. |
| Шаг 2: Установка обновлений |
| Перед установкой Docker убедитесь, что на вашем сервере установлены все последние обновления операционной системы. Откройте раздел «Обновления» в «Панели управления» и установите все доступные обновления. |
| Шаг 3: Включение Hyper-V |
| Для работы Docker требуется включенная роль Hyper-V на сервере. Откройте «Управление сервером» и выберите «Добавить роли и компоненты». В появившемся окне выберите Hyper-V и выполните установку. |
| Шаг 4: Включение контейнеров Windows |
Для использования Docker-контейнеров на Windows Server 2012 необходимо включить опцию контейнеров Windows. Откройте PowerShell от имени администратора и выполните команду Enable-WindowsOptionalFeature -Online -FeatureName Containers -All. |
| После выполнения всех этих шагов сервер будет готов к установке Docker и запуску контейнеров. |
Загрузка и установка Docker
Для установки Docker на сервере Windows Server 2012 необходимо выполнить несколько шагов:
- Перейдите на официальный веб-сайт Docker по адресу https://www.docker.com/get-started
- Нажмите на кнопку «Get Docker» для загрузки установочного файла.
- Сохраните установочный файл на вашем компьютере.
- Запустите установочный файл Docker for Windows Installer.exe.
- В появившемся окне установщика Docker, нажмите кнопку «Next» для продолжения установки.
- Ознакомьтесь с условиями лицензионного соглашения и согласитесь с ним, выбрав опцию «I accept the terms in the License Agreement».
- Выберите директорию для установки Docker и нажмите кнопку «Next».
- Выберите компоненты для установки Docker. Оставьте все компоненты выбранными и нажмите кнопку «Next».
- Выберите начальное значение для подключения к Docker Hub. Рекомендуется оставить значение по умолчанию «Stable» и нажать кнопку «Next».
- Настройте параметры сети и прокси, если это необходимо для вашей конфигурации, и нажмите кнопку «Next».
- Выберите тип установки. Для большинства пользователей рекомендуется выбрать опцию «Enable Hyper-V Windows Hypervisor platform».
- После завершения настройки параметров, нажмите кнопку «Install» для начала установки Docker.
- Подождите, пока установка Docker завершится. Это может занять некоторое время.
- После завершения установки, нажмите кнопку «Finish».
Теперь Docker успешно установлен на вашем сервере Windows Server 2012 и готов к использованию.
Проверка установки Docker
После того как Docker успешно установлен на вашем сервере Windows Server 2012, вы можете приступить к проверке версии и работоспособности установки. Для этого выполните следующую команду:
docker versionЕсли установка прошла успешно, вы увидите информацию о версиях клиента и сервера Docker, а также другую дополнительную информацию. Возможно, вам придется перезапустить сервер, чтобы изменения вступили в силу.
Для проверки того, что Docker корректно работает на вашем сервере, вы можете выполнить следующую команду:
docker run hello-worldЕсли Docker работает должным образом, вы увидите сообщение «Hello from Docker!» с информацией о версии Docker и другими деталями. Это означает, что Docker успешно запущен на вашем сервере Windows Server 2012.
Настройка Docker
После успешной установки Docker на Windows Server 2012 необходимо выполнить некоторые дополнительные настройки.
1. Откройте командную строку от имени администратора.
2. Установите переменные среды для Docker. Для этого выполните следующую команду:
setx DOCKER_HOST "tcp://0.0.0.0:2375"setx DOCKER_CERT_PATH "%USERPROFILE%\.docker\machine\machines\default"setx DOCKER_TLS_VERIFY "0"
3. Перезапустите компьютер, чтобы изменения вступили в силу.
4. После перезагрузки откройте командную строку от имени администратора снова.
5. Установите переменную среды для конфигурации Docker Swarm:
setx SWARM_CLUSTER "swarm"
6. Выполните следующую команду для запуска Docker:
dockerd
После выполнения всех этих действий, Docker должен быть настроен и работать верно на Windows Server 2012.
Running Docker locally on a Windows machine is generally not an issue; unless you’ve committed to using Hyper-V. Since the Docker install for Windows relies on Sun’s Oracle’s Virtual Box, you can’t have both running (Hyper-V and Virtual Box).
There are ways to disable Hyper-V for a boot session (via bcdedit for example – here). However, I’d just like to run in Hyper-V.
Thankfully, Chris Swan has a nice post on getting started, using the Boot2Docker ISO, and setting up the data disk (via a differencing disks) so you can just re-use this config in future Docker instances. You can also see some of the details on the boot2docker requirements for naming of the data disk, username and password for SSH, etc. here:
- https://github.com/boot2docker/boot2docker
- http://docs.docker.com/installation/windows/
Basic Steps
Download ISO – from github https://github.com/steeve/boot2docker/releases
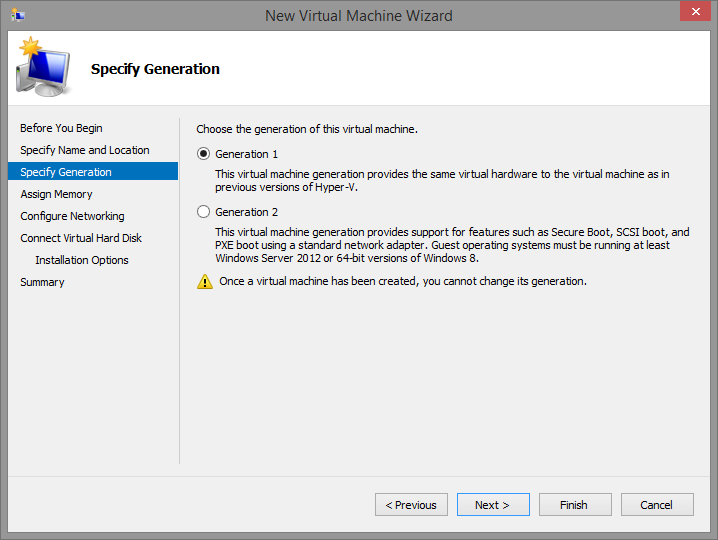
Create the VM and just use the ISO for bootup – we’ll add the disk in a moment
We’ll create the VM as a Generation 1 – we need the legacy adapters etc. as the version of CoreOS used won’t recognize the other adapter types.
Simple Settings:
Memory Size: 1,204 MB
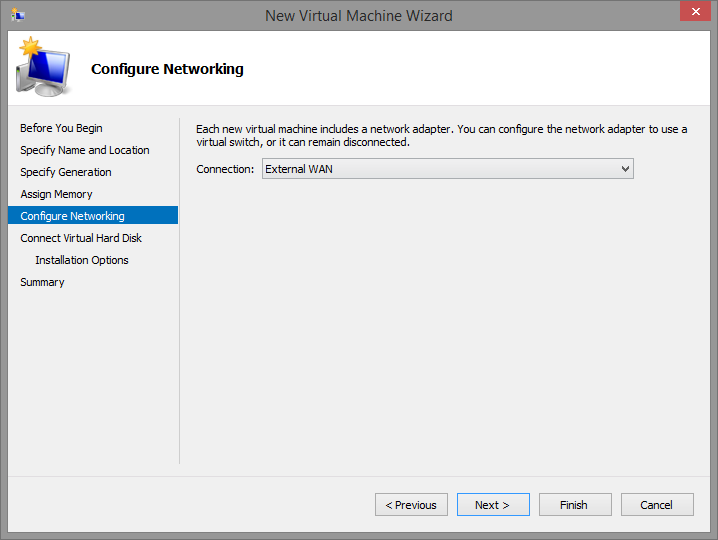
Network Connection: Choose an interface that has Internet access and DHCP assignable addresses for ease:
Next, postpone the setup of the Hard Disk as we’re going to setup a differencing disk and we’d like some control over the IDE adapter / Port to use.
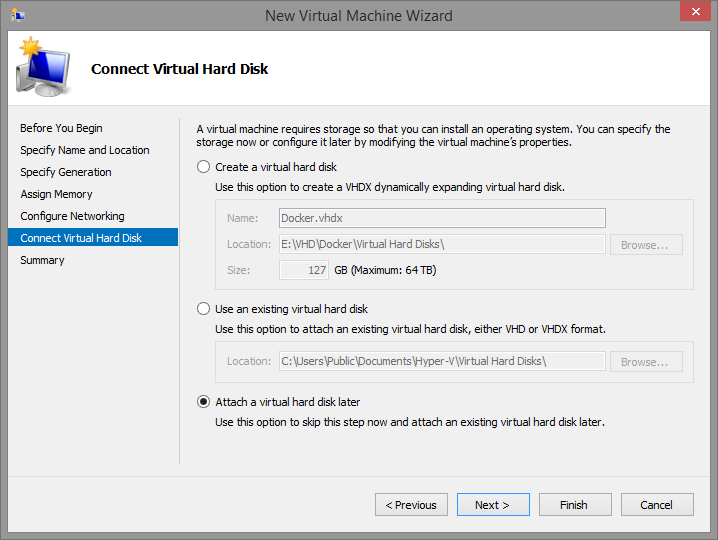
Once you’re done with the ‘New Virtual Machine’ Wizard, hop into settings for the VM
Modify the DVD settings to point to the ISO image that you downloaded above:

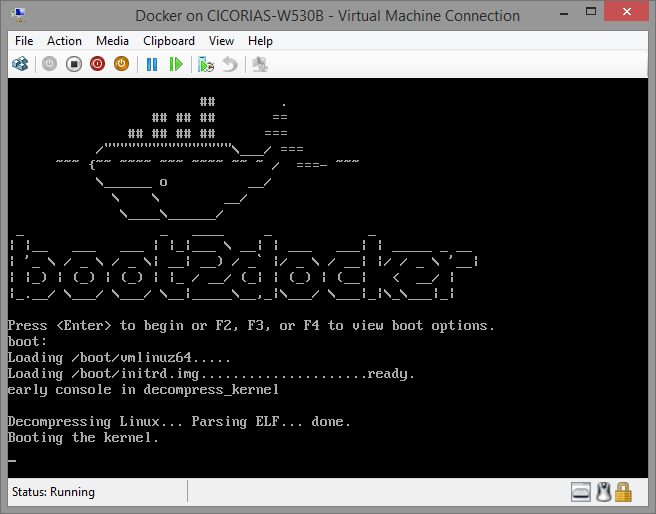
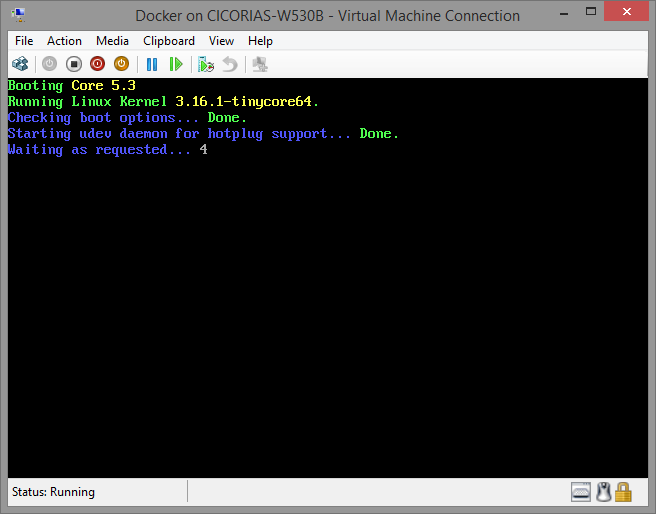
Boot the VM for the First Time
All goes right, you should see in the VM console the ‘bootdocker’ loader information, and eventually the linux prompt
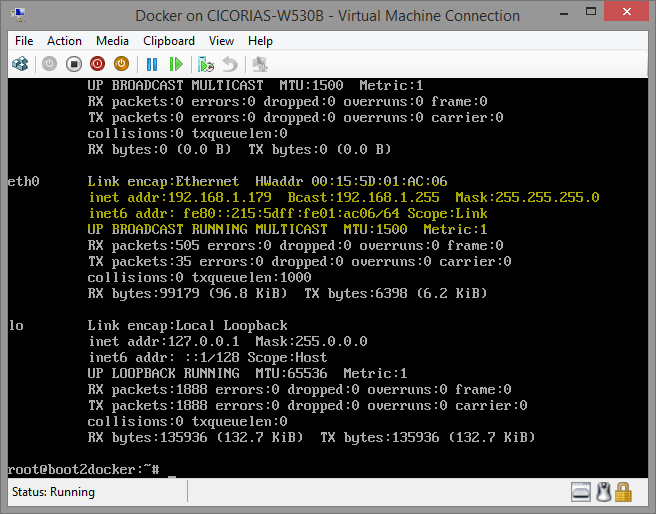
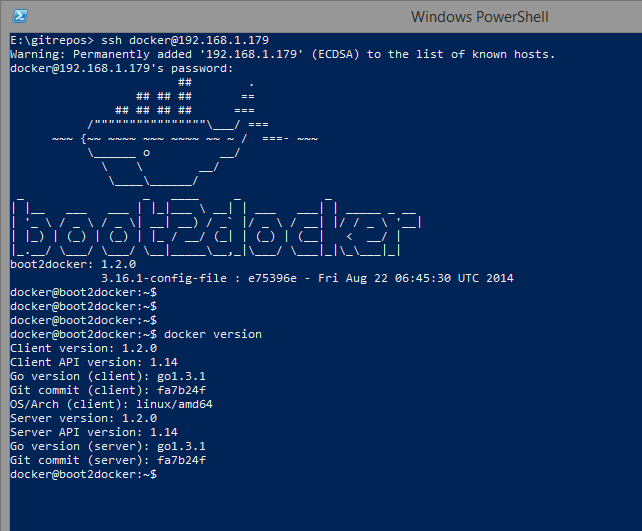
Start a SSH session with your VM (if desired)
To get the IP address of the VM, run ifconfig eth0 to see the default adapter. You should get an address that is hopefully on the Network interface/LAN that you chose. This has to be accessible from your host OS if you want to use SSH – in fact, it also needs access to the internet in order to get to the Docker HUB for downloading images.
I use «github» Windows tools (which in turn sets up the ‘poshgit’ tools, etc.) so I can just run a SSH session from PowerShell. https://windows.github.com/
Initiate the connection normally with SSH
ssh docker@<IP.address>
Note that the default username / password is : docker / tcuser — see the section on SSH at https://github.com/boot2docker/boot2docker for more information.
Setup the Virtual Disk
Shutdown the VM.
The next step is following what Chris Swan did in his post – which is to setup the VHD – run through the initialization, then make a differencing disk based off of that VHD, then swap out the configuration settings on the VM to use the Differencing disk instead of the base.
Boot the VM again
Once it’s started, choose SSH or the console to perform the disk preparation
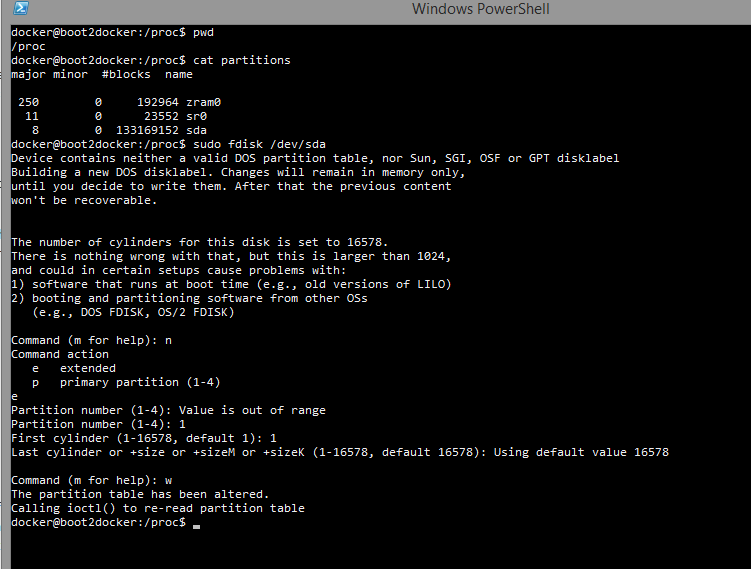
Partition the drive
The steps below are slightly different than Chris’ post – but are:
-
Dump out the partition table just to be sure
- cat /proc/partions (if you chose IDE 0 / PORT 0 then it should be /dev/sda)
-
run fdisk
- sudo fdisk /dev/sda
- Choose ‘extended’
- Select partition ‘1’
- Choose the defaults for the first and last cylinder
- Once that is done, commit with the ‘w’ command
Setup the file system
The naming convention of the disk is also specified on the boot2docker github page – but it has to be ‘boot2docker-data’
Next, format the drive with:
sudo mkfs.ext4 -L boot2docker-data /dev/sda
Note that you will be warned about formatting the entire device, and not a partition. For now, I just went with the above.
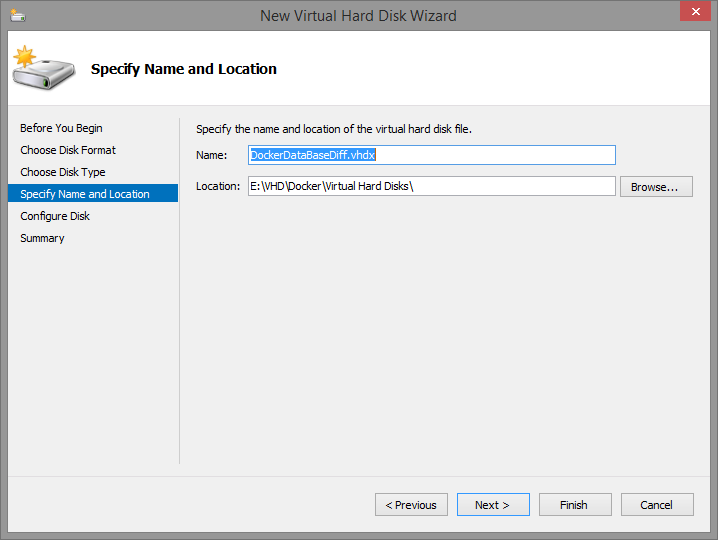
Create the Differencing Disk
Shut down the VM again
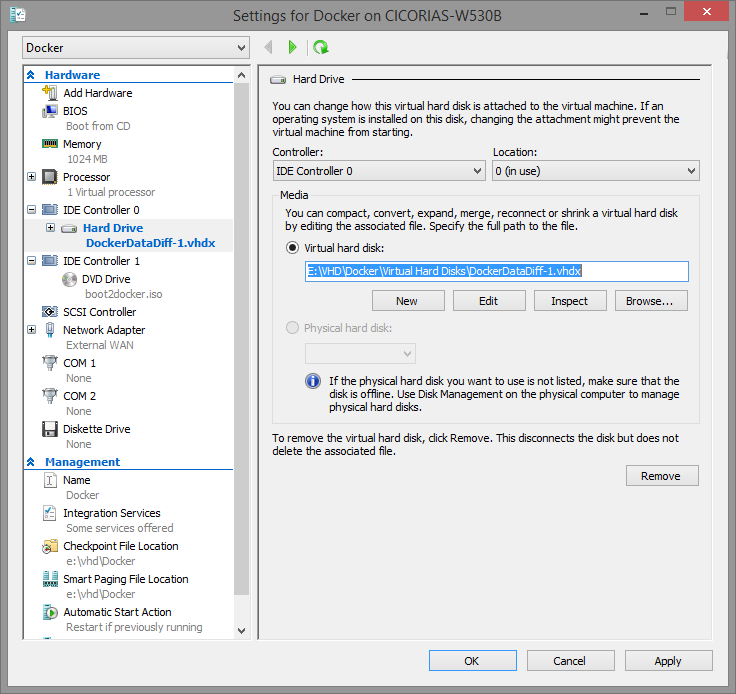
Go back into the Virtual Machine Wizard. Select the settings for the VM, then go to the Disk settings and create a «New Virtual Disk».
Make sure when prompted, you choose the «base» image you created before, but when you’re done, your «Differencing» disk should be what’s listed in the Hard Disk path for the Controller/Location as below.
Boot the VM – 3rd time
I think it’s the 3rd time – don’t remember at this point…
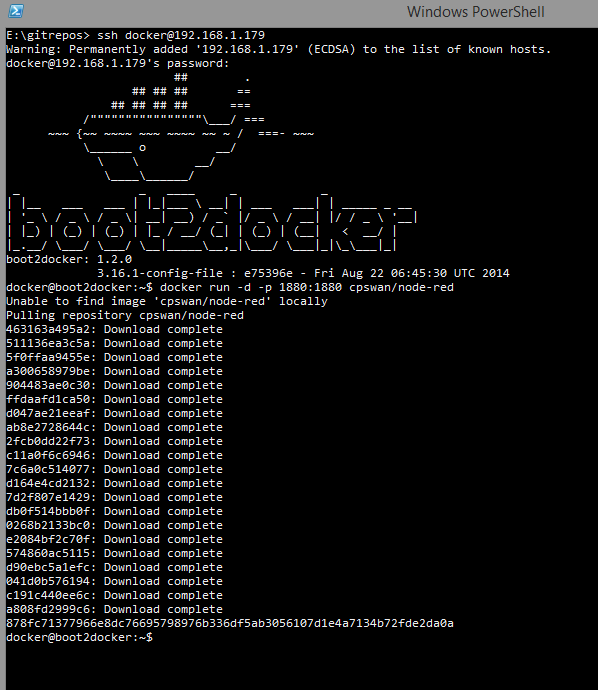
Now we’re ready to «run» something. We’ll use the same image that Chris posted about, just because it’s a cool tool (Node-RED — http://nodered.org/)
Access the image either through the console or via SSH
Do a ‘docker run’ specifying to download the image if needed (-d) as it’s won’t be in the image local library.
docker run –d –p 1880:1880 cpswan/node-red
If all is working, then you should see the image and all it’s dependencies downloading – with the container – and at the end, docker launches the process.
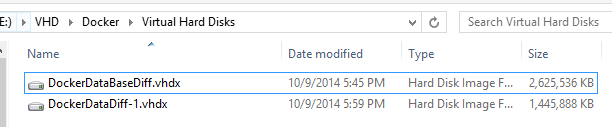
Checkout if the Differencing disk is working
The «before» size

The «after» size – note the increase of the Differencing disl.
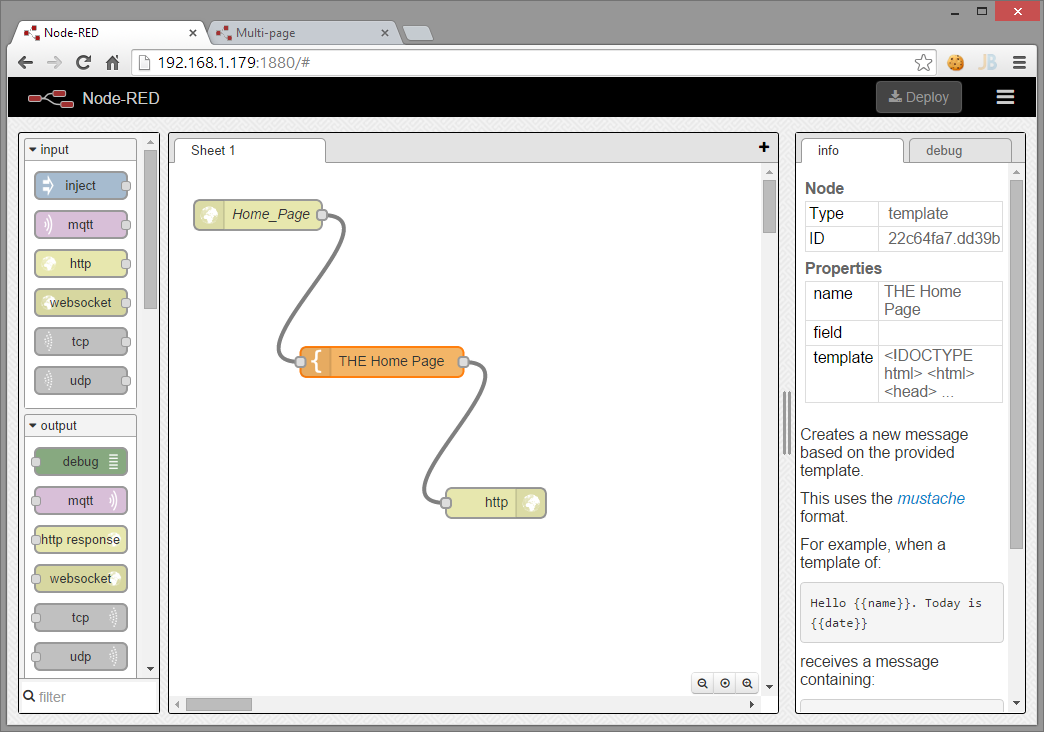
Launch the Application
Note that the port mapping is using the same port 1880 (Nat’d).
You should get the ‘Node-Red’ home page, which is the designer surface.
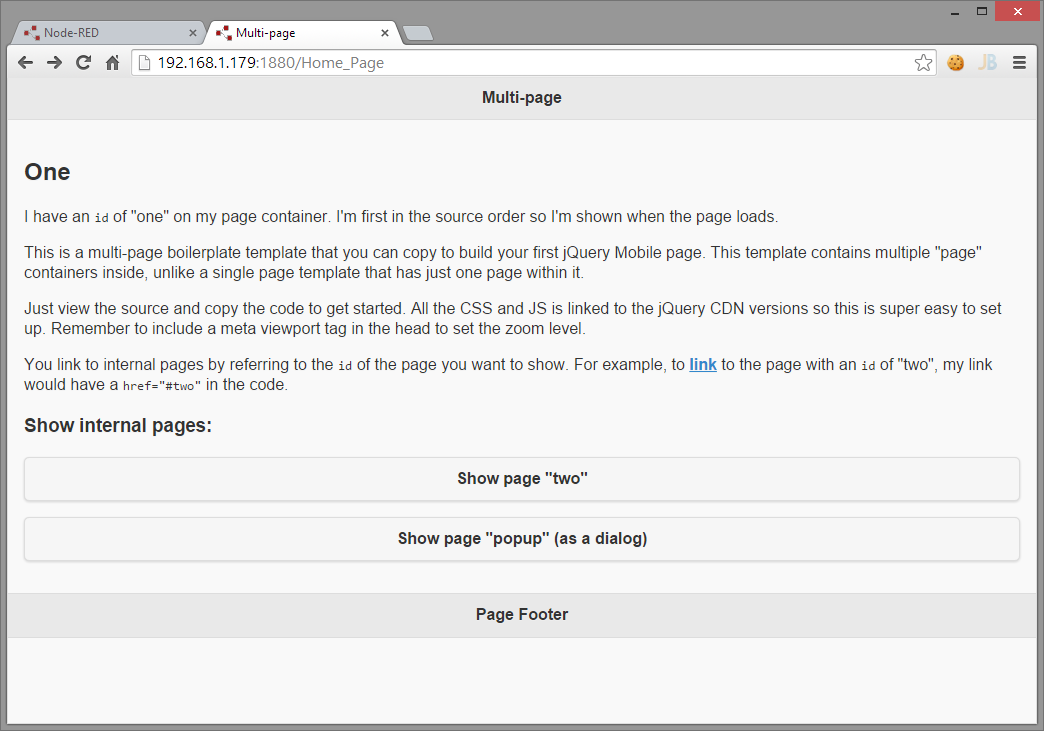
I quickly imported a simple «hello world» from the flows http://flows.nodered.org/flow/8069baf59dcb258bb2bd
Unfortunately, Docker is not officially supported on Windows Server 2012 R2. Docker requires a minimum of Windows Server 2016 to be able to run.
However, if you still want to use Docker on your Windows Server 2012 R2, there is an alternative solution called “Docker Toolbox” that you can try. Docker Toolbox provides a way to run Docker on older Windows versions that do not support Docker natively.
Here are the steps to install Docker Toolbox on your Windows Server 2012 R2:
- First, you need to uninstall any existing Docker installation from your server.
-
Download Docker Toolbox from the Docker website. Make sure to choose the appropriate version for Windows.
-
Run the Docker Toolbox installer and follow the installation wizard.
-
Once the installation is complete, launch “Docker QuickStart Terminal” from the Start menu. This will set up the Docker environment on your Windows Server 2012 R2.
-
After the Docker environment is set up, you can start using Docker commands through the Docker QuickStart Terminal.
Please note that using Docker Toolbox has some limitations compared to running Docker natively on Windows Server 2016 or later. It uses a VirtualBox virtual machine to run the Docker containers, which can have performance implications.
If possible, it is recommended to upgrade your Windows Server to a version that officially supports Docker, such as Windows Server 2016 or newer.
I would like to deploy our microservices on a Windows Server 2012 installed machine. How can I enable containerization on that machine? On the Internet, the technical guides generally folds in two favors. One is for container technology on Linux platforms and the other one is for the Azure. I could not find any specific guide for what I am trying for.
Thanks
- windows-server-2012-r2
- docker
- kubernetes
- containers
asked Jul 24, 2017 at 10:15
![]()
1 Answer
answered Apr 1, 2018 at 20:27
![]()
sceeesceee
1213 bronze badges