The #1 containerization software for developers and teams
Your command center for innovative container development

What’s Docker Desktop?
The fastest way to containerize applications
Docker Desktop is secure, out-of-the-box containerization software offering developers and teams a robust, hybrid toolkit to build, share, and run applications anywhere.
Why developers love Docker
![]()
Quick to set up
Start developing on your local machine and immediately connect with remote resources. Docker Desktop’s single installer sets up everything you need to start building, sharing, and running containers in seconds.
![]()
Simple to maintain
Our monthly releases include new features to help developers, team leads, and businesses rapidly deliver secure and innovative applications. Docker Desktop is also regularly maintained with bug fixes and security updates.
![]()
Secure from the start
We’re setting the standard for enterprise-ready container development solutions. Docker Desktop is secure from the first download, consistently monitoring and managing patches and security fixes as needed.
![]()
Easy to scale
Whether you’re a small startup or an organization with 1,000+ developers, Docker Desktop is designed to grow with you. Scale confidently with features such as Hardened Docker Desktop.
Enterprise ready
Develop with Docker containers at scale
Whether you’re orchestrating mid-sized to large development teams or require advanced security and management tools, Docker is your unwavering partner in providing a complete suite of developer tools and services. Trusted by an astounding 70% of Fortune 100 companies, we’re helping our customers streamline how they build, share, and run applications.
Get started with Docker Business
Your perfect pricing
A subscription level for everyone
Choose the subscription level that supports your development velocity and start building with Docker Desktop today.
![]()
Pro
Includes pro tools for individual developers who want to accelerate their productivity.
Buy now
![]()
Team
For smaller teams requiring collaboration and productivity tools.
Buy now
![]()
Business
Ideal for businesses looking for centralized management and advanced security capabilities.
Buy now
Docker Desktop Extensions
Extend the power of Docker Desktop
Extensions expand Docker Desktop’s capabilities and establish new functionalities, integrating your most critical tools seamlessly. At Docker we’re invested in ensuring individual developers and teams can build their ideal development environment.
Docker Extensions

Our community
Find your pod with Docker
Our worldwide community means you can find a peer community near you.
Join our pod
![]()
Connect with developers
Collaborate with our over 200+ user groups either virtually or in person.
![]()
Join Docker events
Learn about new products, features, and other topics at Docker-sponsored events.
![]()
Meet Docker Captains
In every friend group, there are always go-to experts you look to for advice — those are our Docker Captains.
Developer resources
Find support
Get the help you need to build, share, and run your Docker applications with confidence.
Get support

Get started
Learn more about Docker and customize your experience with additional tools.

Download and install
Visit our Docs for instructions on quickly installing Docker Desktop for Windows, Linux, or Mac.

Get the latest news
Read the blog to stay current on new releases, products, features, and much more.
Эта статья даст вам полное представление о Docker Desktop для пользователей Windows и MAC. Мы изучим установку Docker Desktop на компьютерах с Windows и Mac. После установки мы также попытаемся выполнить некоторые операции Docker.
Docker Desktop — это собственное настольное приложение, разработанное Docker для пользователей Windows и MAC. Это самый простой способ запуска, сборки, отладки и тестирования приложений Dockerized.
Docker Desktop предлагает важные и наиболее полезные функции, такие как быстрые циклы редактирования, уведомления об изменениях файлов, встроенная поддержка корпоративной сети и гибкость для работы с собственным выбором прокси и VPN.
Docker Desktop состоит из инструментов для разработчика, приложения Docker, Kubernetes и синхронизации версий. Он позволяет вам создавать сертифицированные образы и шаблоны языков и инструментов.
Скорость, безопасность и выбор — все, что вам нужно для разработки и доставки контейнерных приложений, доступных на вашем рабочем столе, будет представлено вам.
Прежде чем перейти к процессу установки, давайте разберемся с его версиями.
Версии Docker
Docker в основном поставляется в двух версиях, в Community и ENterprise.
Community версия поставляется с бесплатным набором продуктов Docker. ENterprise корпоративная версия представляет собой сертифицированную контейнерную платформу, которая предоставляет коммерческим пользователям дополнительные функции, такие как безопасность образов, управление образами, оркестровка и управление средой выполнения контейнеров, но по разумной цене.
Мы начнем наше обучение с Community Edition. Контейнеры Docker, работающие в конкретной операционной системе, совместно используют ядро ОС. Это означает, что мы не можем использовать ядро Windows (хост) для запуска контейнеров Linux или наоборот. Чтобы проделать это, у нас есть Docker Desktop для Windows и MAC.
Выпуски Docker Desktop
Docker Desktop выпускается в двух вариантах.
- Stable: как видно из названия, стабильный выпуск тщательно протестирован и может быть использован при разработке более надежных приложений. Его версии полностью синхронизированы с версиями Docker Engine.
- Edge: эти версии состоят из всех новых и экспериментальных функций Docker Engine. Есть больше шансов ошибок, сбоев и проблем, которые могут возникнуть. Тем не менее, пользователи получат возможность ознакомиться с предстоящими функциями.
Docker на Windows
Есть два варианта Docker на Windows.
1. Использование Docker Toolbox
Docker Toolbox предоставляет набор легких инструментов.
- Oracle virtual box
- Docker Engine
- Docker Machine
- Docker compose
- Kitematic GUI
Вышеуказанные инструменты устраняют необходимость развертывания отдельной виртуальной машины для запуска Docker. Просто установите исполняемый файл панели инструментов Docker непосредственно в Windows и начните разработку приложений. Требуется 64-битная ОС и Windows 7 или выше с включенным режимом виртуализации.
Но опять же, панель инструментов Docker — это оригинальная поддержка, предоставляемая в Windows для запуска Docker и его устаревшего решения для всех ОС Windows, которые не соответствуют требуемой конфигурации.
2. Использование Docker Desktop
Docker Desktop — это новейшая технология, используемая для Docker в Windows. Он заменяет виртуальную машину Oracle собственной технологией виртуализации, доступной в Windows, то есть Microsoft Hyper-V.
Он по-прежнему будет запускать Docker на Linux-машине, созданной под ним. Но на этот раз вместо виртуальной машины Oracle мы использовали нативный Microsoft Hyper-V.
Установка Docker на Windows
Вы можете скачать репозиторий Docker Desktop из Docker Hub.
истемные требования:
- Windows 10 или Windows Server 2016 Professional или Enterprise Edition
- Поддержка Hyper-V.
Чтобы запустить Hyper-V, оборудование должно соответствовать следующим требованиям:
- 64-битный процессор
- > = 4 ГБ ОЗУ
- Поддержка виртуализации оборудования на уровне BIOS
Следовательно, программная и аппаратная зависимость заключается в запуске Docker Desktop на Windows.
Установка Docker на macOS
Вы можете скачать репозиторий Docker Desktop из Docker Hub.
Системные требования:
- MAC Hardware 2010 или новее с аппаратной поддержкой управления памятью и неограниченным режимом. Выполните команду kern.hv_support, чтобы проверить, поддерживает ли оборудование MAC инфраструктуру гипервизора.
- MAC OS версии 10.13 или новее.
- > = 4 ГБ ОЗУ
- Virtual-Box до версии 4.3.30
Работа с образами
После установки проверьте версию установленного Docker Engine.
docker --versionDocker работает с доставкой и запуском контейнерных приложений. Вам либо нужно создать свое собственное контейнерное приложение, либо Docker поддерживает контейнерные образы в Docker Hub, и его можно легко загрузить с помощью простой команды docker run.
Здесь мы будем тянуть образ Redis.
docker pull redis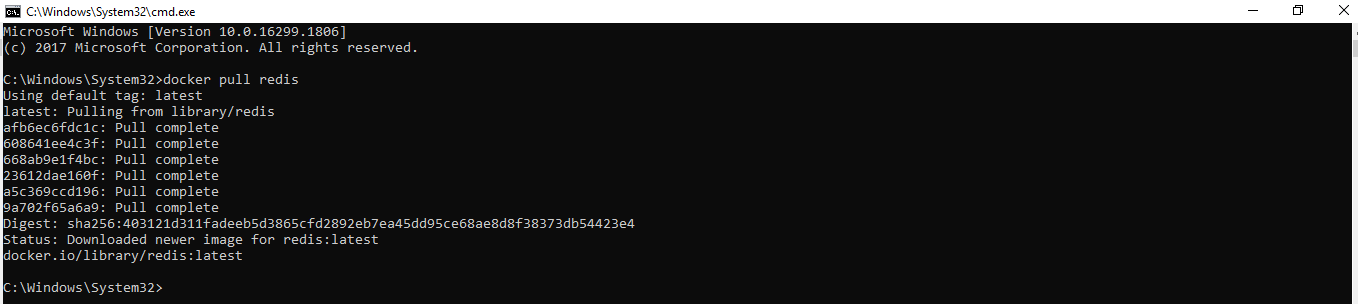
С помощью простой команды run образы можно скачивать и загружать на GitHub или Docker Hub, и любой пользователь во всем мире может получить к нему доступ и начать работать с ним.
Docker Container запускает образ Docker. Следующим шагом является запуск контейнера.
docker run -p 6379 Redis
Будет создан зашифрованный идентификатор контейнера. Вы можете быстро проверить состояние работающего экземпляра в Docker, нажав на Dashboard option.

Обязательно остановите контейнер, прежде чем удалять его из Docker Engine.

Возможности Docker Desktop
Существует множество преимуществ:
- Поддерживает широкий спектр инструментов разработки.
- Обеспечьте быстрый и оптимизированный способ создания и публикации контейнерного образа на любой облачной платформе.
- Простота установки и настройки полной среды Docker
- Повышение производительности благодаря встроенной виртуализации Hyper-V для Windows и HyperKit для MAC.
- Возможность работать в Linux через WSL 2 на компьютерах с Windows.
- Легкий доступ к работающим контейнерам в локальной сети.
- Возможность поделиться любым приложением на облачной платформе, на разных языках и в разных средах.
- Для обеспечения безопасности и актуальности выполняются автоматические обновления.
- Включены последние версии Kubernetes.
- Возможность переключения между Linux и Windows сервером на Windows.
Docker Desktop — это нативное приложение, разработанное на Windows и MAC OS для запуска, сборки и доставки контейнерных приложений или сервисов.
Однако
Docker Desktop предназначен не для производственной среды, а для рабочего стола и среды разработки.
Также рекомендуем прочитать:
- Docker для начинающих — технология контейнеров
- В чем разница между Docker и Kubernetes?
- Введение в Docker Hub и все, что вы должны знать о нем
- Как установить Docker на Ubuntu, Windows, Debian и CentOS?
- Kubernetes — Введение для начинающих
- Docker посмотреть запущенные контейнеры, запустить или остановить контейнеры
If you’re looking for simple and painless software deployment, Docker is the right tool for you. It is the best containerization platform and in this blog on Docker for Windows we’ll specifically focus on how Docker works on Windows.
To get in-depth knowledge on Docker, you can enroll for live DevOps Certification Training by Edureka with 24/7 support and lifetime access.
I’ll be covering the following topics in this blog:
- Why use Docker For Windows?
- Docker for Windows prerequisites
- Components installed with Docker
- What is Docker?
- Docker Terminologies
- Hands-On
Why use Docker for Windows?
Why use Docker for Windows – Docker for Windows
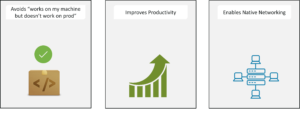
- Avoids the work on my machine but doesn’t work on production problem: This problem occurs due to the inconsistent environment throughout the software development workflow. With Docker you can run an application within a container which contains all the dependencies of the application and the container can be run throughout the software development cycle. This practice provides a consistent environment throughout the software development life cycle
- Improves productivity: By installing Docker on windows we’re running Docker natively. If you’ve been following Docker for a while, you know that Docker containers originally supported only Linux operating systems. But thanks to the recent release, Docker can now natively run on windows, which means that Linux support is not needed, instead the Docker container will run on the windows kernel itself
- Supports native networking: Not only the Docker container, the entire Docker tool set is now compatible with windows. This includes the Docker CLI (client), Docker compose, data volumes and all the other building blocks for Dockerizied infrastructure are now compatible with windows. But how is this advantageous? Since all the Docker components are locally compatible with windows, they can now run with minimal computational overhead.
You can get a better understanding with this Online Docker Training Course.
Docker For Windows Prerequisites

Docker for Windows – Prerequisites
The following requirements need to be met before installing Docker on windows:
- Check if you’re using Windows 10, either pro edition or enterprise edition, 64-bit system. Docker will not run on any other windows version. So if you’re running on an older windows version, you can install the Docker toolbox instead.
- Docker for windows requires a Type-1 hypervisor and in the case of windows, it’s called the Hyper-V. Hyper-V is basically a lightweight virtualization solution build on top of the hypervisor framework. So you don’t need a virtual box, you just have to enable the hypervisor.
- And also you need to enable the virtualization in BIOS. Now when you install Docker for windows, by default of this is enabled. But in case you’re facing any issue during installation, please check if your Hyper-V and virtualization is enabled.
Components Installed With Docker
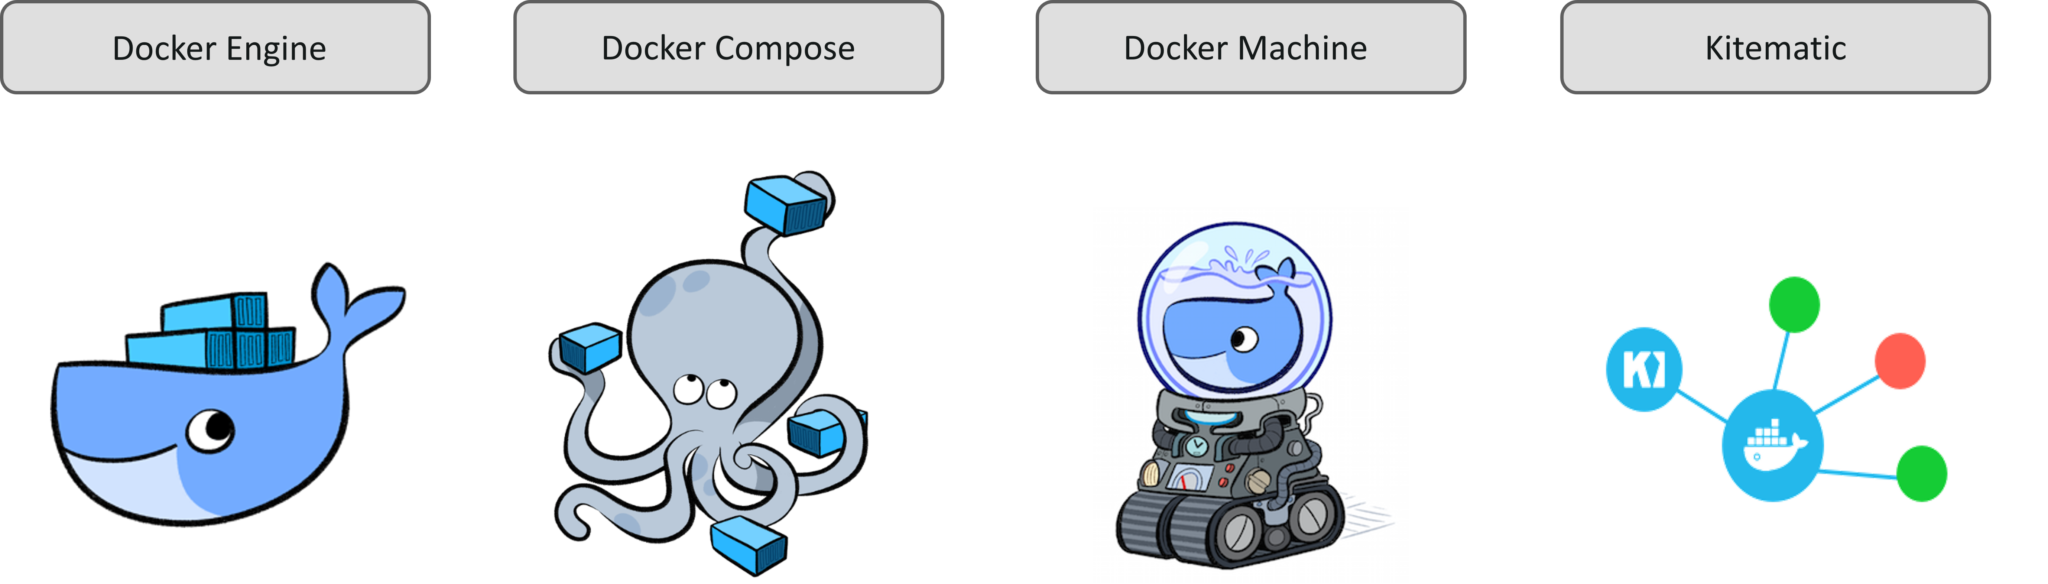
Components installed with Docker – Docker for Windows
- Docker Engine: When we say Docker, we actually mean Docker engine. The Docker engine contains the Docker daemon, REST API for interacting with the Docker daemon and a command line interface client that communicates with the daemon. Docker daemon accepts Docker commands such as Docker run, Docker build, etc, from the Docker client.
- Docker Compose: Docker compose is used to run multiple Docker containers at once by using a single command, which is docker-compose up.
- Docker Machine: Docker machine is used to install Docker engine. It is basically what you install on your local system. The Docker machine has it’s own CLI client known as the Docker machine and a Docker engine client called Docker.
- Kitematic: Kitematic is an open source project built to simplify the use of Docker on Windows. It helps to automate the installation of Docker and it provides a very interactive user interface for running Docker containers.
If you want to learn more about Docker for Windows, check out this video by our DevOps experts.
Docker For Windows | Setting Up Docker On Windows | Docker Tutorial For Beginners | Edureka
This Edureka video on Docker For Windows we’ll discuss Docker which is one of the best containerization platforms out there.
What Is Docker?
Docker is a containerization platform that runs applications within containers called Docker containers. Docker containers are light weighted when compared to virtual machines. When you install a Virtual machine on your system, it uses the guest operating system on top of your host operating system. This obviously takes up a lot of resources like disk space, RAM, etc. On the other hand, Docker containers make use of the host operating system itself.

What is Docker – Docker for Windows
In the above image, you can see that, there’s a host operating system on top of which the Docker engine is mounted. The Docker engine runs container #1 and container #2. Both of these containers have different applications and each application has its own libraries and packages installed within the container.
I hope you have a good idea about what Docker is if you still have doubts check out this blog to learn more!
Let’s discuss some Docker terminologies now:
- Docker Images
Docker images are read-only templates to build Docker images. Docker images are created from a file called Dockerfile. Within the Dockerfile, you define all the dependencies and packages that are needed by your application.
- Docker Containers
Every time you run a Docker image, it runs as a Docker container. Therefore, a Docker container is the run time instance of a Docker image.
- Docker’s Registry
Docker’s registry, known as DockerHub is used to store Docker images. These images can be pulled from the remote server and can be run locally. DockerHub allows you to have Public/Private repositories.
- Docker Swarm
Docker swarm is a technique to create and maintain a cluster of Docker engines. A cluster of Docker engines comprises of multiple Docker engines connected to each other, forming a network. This network of Docker engines is called a Docker swarm. A Docker manager initiates the whole swarm and the other Docker nodes have services running on them. The main goal of the Docker manager is to make sure that the applications or services are running effectively on these Docker nodes.
- Docker Compose
Docker compose is used to run multiple containers at once. Let’s say that you have 3 applications in 3 different containers and you want to execute them at once. This is where Docker compose comes in, you can run multiple applications in different containers at once, with a single command, which is docker-compose up.
Hands-On
We’ll begin our demo by installing Docker for windows. But before we do that, check if you’ve met the prerequisites.
One more thing to note is since Docker for Windows requires Microsoft’s Hyper-V and once it’s enabled, VirtualBox will no longer be able to run virtual machines. So you can’t run Docker for Windows and a VirtualBox on the same system, side by side.
Install Docker On Windows:
- Download Docker for Windows installer from the official website
- Double-click on the installer to run it
- Go through the Install Wizard, accept the license and proceed with the install
- After installation, open the Docker for Windows app and wait till the whale icon on the status bar becomes stable
- Open up any terminal like Windows PowerShell and start running Docker
 Installation – Docker for Windows
Enough of theory, let’s get our hands dirty and create a simple Python web application by using Docker Compose. This application uses the Flask framework and maintains a hit counter on Redis.
Flask is a web development framework, written in Python and Redis is an in-memory storage component, used as a database. You don’t have to install Python or Redis, we’re simply going to use Docker images for Python and Redis.
In this demo we’re going to use Docker compose to run two services, namely:
- Web service
- Redis service.
What does the application do? It maintains a hit counter every time you access a web page. So each time you access the website the hit counter gets incremented. It’s simple logic, just increment the value of the hit counter when the web page is accessed.
For this demo, you’ll need to create four files:
- Python file
- Requirements.txt
- Dockerfile
- Docker compose file
Below is the Python file (webapp.py) that creates an application by using the Flask framework and it maintains a hit counter on Redis.
import time
import redis
from flask import Flask
app = Flask(__name__)
cache = redis.Redis(host='redis', port=6379)
def get_hit_count():
retries = 5
while True:
try:
return cache.incr('hits')
except redis.exceptions.ConnectionError as exc:
if retries == 0:
raise exc
retries -= 1
time.sleep(0.5)
@app.route('/')
def hello():
count = get_hit_count()
return 'Hello World! I have been seen {} times.
'.format(count)
if __name__ == "__main__":
app.run(host="0.0.0.0", debug=True)
The requirements.txt file has the name of the two dependencies, i.e. Flask and Redis that we’ll be installing in the Dockerfile.
flask
redis
The Dockerfile is used to create Docker images. Here, I’m installing python and the requirements mentioned in the requirements.txt file.
FROM python:3.4-alpine
ADD . /code
WORKDIR /code
RUN pip install -r requirements.txt
CMD ["python", "webapp.py"]
The Docker compose file or the YAML file contains two services:
- Web service: Builds the Dockerfile in the current directory
- Redis service: Pulls a Redis image from DockerHub
version: '3'
services:
web:
build: .
ports:
- "5000:5000"
redis:
image: "redis:alpine"
You can now run these two services or containers by using the following command:
docker-compose up
To view the output you can use Kitematic. To open Kitematic, right click on the whale icon on the status bar.

Kitematic – Docker for Windows
On the top left-hand corner, you can see the two services running.

Kitematic – Docker for Windows
This is what the output looks like. When you refresh the page, the hit count gets incremented.
 Output – Docker for Windows
With this, we come to the end of this blog. I hope you have a better understanding of how Docker works on Windows. Stay tuned for more blogs on the most trending technologies.
If you found this Docker for Windows blog relevant, check out the DevOps training by Edureka, a trusted online learning company with a network of more than 450,000 satisfied learners spread across the globe. The Edureka DevOps Certification Training course helps learners gain expertise in various DevOps processes and tools such as Puppet, Jenkins, Docker, Nagios, Ansible, and GIT for automating multiple steps in SDLC.
What is Docker Desktop & How Does it Work?
It is often imperative to first understand the history behind any tools and tech to understand from where it came and why it was created even in the first place. So to get into history, Docker first saw its light in 2011 in France when Solomon Hykes envisioned building platform-independent mechanisms to deploy all your development binaries in such a way that all the libraries, os level dependencies, and codes can be deployed on any cloud or system giving the developer confidence that their software will function as expected without any rework and hiccups.
The core reason for docker container conceptualization was to make a developer’s life easy. Setting up a working environment configuration to support different software versions on any given machine was a big issue. But with docker, you just need to create an isolated package comprising of all the configurations (called docker container) supporting different versions, and each container here holds a separate isolated environment configuration that doesn’t impact the OS level configs or any other running container active on your machine.
Now that we have some basic idea of why docker was started and created, it’s a high time we define a few components to establish docker as a concept. So the first thing is to define Docker. Know more about devops skills that a devops engineer should master.
What is Docker?
Docker is like that huge Cargo Ship loaded with big boxes (unique containers to be pulled by the tagged owners) that offers developers a Software platform that allows them to build, test, and deploy applications quickly. Docker packages software into standardized units called containers that have everything the software needs to run including libraries, system tools, code, and runtime.
Docker provides the ability to package and run an application in a loosely isolated environment called a container. The isolation and security allow you to run many containers simultaneously on a given host.
To further understand the magic of docker we need to decode the Docker architecture as it lays down clearly how each component of the Docker system interacts with the others.
Docker Architecture
.png&w=3840&q=75)
Fig 1- Docker Architecture
Docker has three major components:
- Client
- Docker Host
- Registry
Let’s dig deeper into each one of these, one by one. First and foremost we need to understand the docker daemon.
If you want to know more about docker and get a practical sense of it, you can explore our dedicated docker online course.
What Is Docker Deamon?
It is a kind of persistent thread that runs in the background in order to manage the Docker containers on a single host.
Docker daemon also known as dockerd, runs on the host operating system acting like a runtime that takes care of docker objects like
- Docker images
- Docker containers
- Networks and
- Storage
Now that you know the basics of docker daemons let’s understand the first key component of Docker architecture
Docker Client
As it is seen, in Fig 1, the docker client is like your local machine where all the necessary client operations are performed by the users. This client gives developers a primary interface (CLI) to interact with the Docker server (daemons) using the pre-defined set of commands
Its main objective is to provide a medium to direct the pull of images from a registry and to have it run on a Docker host. Common commands issued by a docker client are:
$ docker build
$ docker pull
$ docker run
Docker client uses these commands and REST APIs to interact with Docker daemon which also is a Server. Do you know that the Docker client can communicate with more than one daemon?
Docker Host
It is a complete hosting environment that holds docker daemon, containers, images, networks, and storage that is required by developers to execute and run any given applications
Docker Registry
The primary role of the docker registry is to store docker images. These image repositories can be either public or private. The popular public registry is the Docker hub.
So whenever you as a developer are looking to pull one of the docker images using the docker pull command, the required images are pulled from your publicly configured registry (like docker hub). Similarly, when you use the docker push command, your image is pushed to your configured registry.
Before we wrap up the docker fundamentals we also need to touch upon the docker objects.
Docker Objects
You can’t fully understand Docker without understanding the underlying docker objects. Some of the key objects are
- Docker Images
- Docker Containers
Docker Images
Being a developer you would have for sure came across a situation where the development you have done locally on your PC/Laptop requires you to configure your editor, OS dependencies, libraries, environment variables, etc to package and run your code binary. But if your system breaks down due to some reason and you are asked to move to a new PC/Laptop, that old code binary struggles to run as expected on it.
But in the current time, this is not the case thanks to Docker and a docker objects called Image.
Docker image
It is nothing but a read-only template that has all the instructions required to create a docker container(another object which we will cover next). These images use as a private container registry to share container images either publicly or privately. Every packed image in the container is meta-tagged to explain the container’s ability.
These images are at the core of the Docker ecosystem, as they foster team collaboration and speedy development and deployment. The kind of experience it brings is simply commendable and that’s why Docker images and their underlying utility are so popular in the developer and tech fraternity.
Dockerfile
Being a developer, you may simply use docker images created by someone and shared publicly or maybe want to create a custom image to be used within the organization. While creating a custom image you rely on the concept of Dockerfile which defines a simple syntax comprising the steps needed to create the image and deploy it on Docker hub/ AWS ECR repo.
Dockerfile has all the instructions which are created as a separate layer in the docker image, so whenever you update the docker images only those layers which have changed are rebuilt. This is the reason which makes docker images so lightweight, tiny, and quick as compared to the older concept of virtualization
Docker Containers
Now that we know the basics of docker images it’s time to decode another key docker object called Containers.
Containers are nothing but the runnable instance of a docker image.
Runnable is an interface that is to be implemented by a class whose instances are intended to be executed by a thread.
These containers can be
- Created
- Started
- Stopped
- Moved
- Deleted
All by the use of Docker CLI/API.
Containers are isolated pieces that can be plugged into one or more networks and also allow storage to be associated with it. Each container that are hosted in Docker Host is unique and is defined by the images it holds as well as by the configs.
Do you know?
When a container is deleted, all the changes to its state that are not stored in persistent storage vanishes.
With this, we have covered all the fundamentals one should before knowing Docker Desktop. So let’s start defining. But before that, get to know more about how to become a devops engineer.
What Is Docker Desktop?
As we have understood so far that docker objects like images and containers are key building blocks, it is also imperative to know that these objects are generally dockerized, and here the role of Docker Desktop comes into the picture.
Docker desktop is the fastest way to containerize/dockerize applications. It is a native application designed by Docker for both Windows and MAC users.
Why Docker Desktop?
Docker desktop that is built on top of the Docker engine is a perfect tool for developers that are looking to leverage the Docker ecosystem and get started quickly to dockerize and deploy their apps. It is a powerful tool that packages Docker’s CLI, Docker Compose, Kubernetes, and other tools to Fastrack application development.
It is easy to install and OS independent and comes up with these key features that make it stand out amongst others
Top Features that Makes Docker Desktop Special
- Simple and easy-to-install providing an environment to build, ship, and run your containers
- Storage volumes are easily mapped and managed
- Supports both Local and remote management of Docker images
- Facilitates collaborations amongst developers where they can share repeatable and reproducible development from their local machine to the docker container
- Easy to get started with Kubernetes on your local machine with Docker Desktop.
- Provides a simple dashboard to help developers get an overview of running containers, images, and volumes
- Tailor-made to support multi-architecture images
Now that we have got enough reason to use the Docker desktop it’s time to get decode how one can install it and get started.
Getting Started With Docker Desktop for Windows & Mac
Before we kickstart this phase its important to understand a few things
What are a few things to know?
- Docker desktop supports both Windows and MAC systems.
- One should use a community open source edition to get started with Docker desktop
- Also, there is a commercial edition that is suitable for enterprises and a large team
- Commercial use of Docker Desktop in larger enterprises (more than 250 employees OR more than $10 million USD in annual revenue) now requires a paid subscription.
Installing Docker Desktop On Mac
Docker desktop comes with two versions for mac
- One for MAC with Intel Chip
- One For MAC with its own indigenous Apple chip
Pre-requisites Of MAC — Intel Chips :
- macOS must be version 10.15 or newer. That is, Catalina, Big Sur, or Monterey.
- Run the command kern.hv_support to verify if MAC hardware supports the Hypervisor framework
- If you experience any issues after upgrading your macOS to version 10.15, you must install the latest version of Docker Desktop to be compatible with this version of macOS.
- At least 4 GB of RAM.
- VirtualBox prior to version 4.3.30 must not be installed as it is not compatible with Docker Desktop
Installing Docker Desktop On MAC — Intel Chip:
The best way is to visit
Install Docker Desktop on Mac
Estimated reading time: 7 minutes Update to the Docker Desktop terms Commercial use of Docker Desktop in larger…docs.docker.com
And download the latest Docker installation file from there, you will get the options as depicted below.
.png&w=3840&q=75)
Click for the intel version and wait till the docker .dmg file is downloaded. Once done just click the file and the rest will be an easy cakewalk as the wizard will be there to guide you. You must read and agree on the SLA which will be popping on your MAC to proceed.
Similarly, you can install docker desktop on your MAC with an Apple silicon chip
Pre-requisites Of MAC — Intel Chips :
- It is recommended that you download the latest Docker Desktop version. With version 4.3.0, the hard requirement to install Rosetta 2 is no more required but still, to get the best-uninterrupted experience, it is wise that you install Rosetta 2.
- One can install Rosetta 2 manually from the CLI, using the following command:
$softwareupdate --install-rosetta
Installing Docker Desktop On MAC — Apple Silicon Chip:
The process through guided wizard remains the same. Download the .dmg file for the Apple silicon version and the rest you can easily set up using Wizard after you have given your consent against the SLA.
Installing on MAC using CLI: (for both chip types it works )
Once you have downloaded the preferred .dmg file considering your MAC machine chip type (Intel/Apple silicon) you can easily install the docker desktop via CLI commands as shown below.
You need to type these commands on your mac terminal
$ sudo hdiutil attach Docker.dmg
$ sudo /Volumes/Docker/Docker.app/Contents/MacOS/install
$ sudo hdiutil detach /Volumes/Docker
What is hdiutil?
hdiutil is a command-line utility in macOS to Manipulate disk images (attach, verify, burn, etc).
$ sudo /Volumes/Docker/Docker.app/Contents/MacOS/install
Here install command accepts the following arguments —
- —accept-license: accepts the Docker Subscription Service Agreement(SLA) now, rather than requiring it to be accepted when the application is first run
- —allowed-org=<org name>: requires the user to sign in and be part of the specified Docker Hub organization when running the application
If you are done installing, you may be able to open it by visiting your launchpad and clicking on the docker icon
.png&w=3840&q=75)
Once you click, you can see the docker fav menu icon on the extreme top right of your MAC as seen in the image below, in my case you can see a first small icon that starts to animate and you will see the docker desktop dashboard as shown below.
.png&w=3840&q=75)
It will show you the current docker images, volumes attached, and the environment info. This means you are now successfully running Docker Desktop. You can click the docker fav menu icon to see Preferences and other options.
Installing Docker Desktop On Windows
Visit this official docker link —
Install Docker Desktop on Windows
Update to the Docker Desktop terms Commercial use of Docker Desktop in larger enterprises (more than 250 employees OR…docs.docker.com
And select the option as shown below-
.png&w=3840&q=75)
Pre-requisite:
You should take care of the following before installing docker desktop on your windows machine:
- Windows 11 64-bit: Home or Pro version 21H2 or higher, or Enterprise or Education version 21H2 or higher.
- Windows 10 64-bit: Home or Pro 21H1 (build 19043) or higher, or Enterprise or Education 20H2 (build 19042) or higher.
- Enable the WSL 2 feature on Windows. For detailed instructions, refer to the Microsoft documentation.
Windows Subsystem for Linux is a compatibility layer for running Linux binary executables natively on Windows 10, Windows 11, and Windows Server 2019. In May 2019, WSL 2 was announced, introducing important changes such as a real Linux kernel, through a subset of Hyper-V features
- The following hardware prerequisites are required to successfully run WSL 2 on Windows 10 or Windows 11:
- 64-bit processor with Second Level Address Translation (SLAT)
- 4GB system RAM
- Hyper-V and Containers Windows features must be enabled.(only if you want Hyper-V option instead of WSL 2)
- BIOS-level hardware virtualization support must be enabled in the BIOS settings. For more information, see Virtualization.
- Download and install the Linux kernel update package.
Installing Docker Desktop On Windows Using Wizard:
- Double-click Docker Desktop Installer.exe that you downloaded as per the instructions we have covered above in order to run the installer.
- When asked, ensure WSL 2 instead of Hyper-V option on the Configuration page is selected. It depends on your choice of backend.
- Note in case your PC only supports one of the two options, you will not be able to select which backend to use
- Follow the given instructions on the installation wizard to authorize the installer and complete the installation
- When the installation is done, click Close to complete the installation process.
Note!
If your admin account is different from your user account, you must add the user to the docker-users group.
- Run Computer Management as an administrator and navigate to Local Users and Groups > Groups > docker-users. Right-click to add the user to the group. Log out and log back in for the changes to take effect.
Installing from the CLI:
Please ensure Docker Desktop Installer.exe is available locally on your machine. If yes, then type the following command in a terminal. Make sure you are in the root folder where the installer file exists.
«Docker Desktop Installer.exe» install
In case you use PowerShell you should type
Start-Process ‘.\win\build\Docker Desktop Installer.exe’ -Wait install
The install command accepts the following arguments :
- —quiet: suppresses information output when running the installer
- —accept-license: accepts the Docker Subscription Service Agreement now, rather than requiring it to be accepted when the application is first run
- —allowed-org=<org name>: requires the user to sign in and be part of the specified Docker Hub organization when running the application
- —backend=<backend name>: selects the backend to use for Docker Desktop, hyper-v or wsl-2 (default)
Note!
In case your admin account is different from your user account, you must add the user to the docker-users group:
net localgroup docker-users <user> /add
Now that the installation process has been completed, its time to validate the same
Start the Docker On Your Machine :
Start Docker Desktop
To start Docker Desktop
- Search for Docker, and select the Docker Desktop menu option in the search results.
- Accepts the SLA terms & conditions
Note!
If you do not agree to the updated terms, the Docker Desktop application will close and you can no longer run Docker Desktop on your machine. You can choose to accept the terms at a later date by opening Docker Desktop.
3. When the initialization is complete, you can see Quick Start Guide UI as seen in the image below
.png&w=3840&q=75)
You can skip it for the time being and move forward. You will be able to view the docker dahsboard. This shows you have successfully installed the docker desktop!.
If you want to install docker desktop on the Linux system, you can easily do so by following the instructions given in the below-given link.
Here is the installation link —
Install Docker Desktop on Linux
Welcome to Docker Desktop for Linux. This page contains information about system requirements, download URLs, and…docs.docker.com
Docker Desktop release notes:
When you are installing Docker desktop fresh or want to update, do keep a close eye on these release notes that are frequently updated and shared on Docker’s official web portal. Here is the link-
Docker Desktop release notes
Estimated reading time: 31 minutes This page contains information about the new features, improvements, known issues…docs.docker.com
This comprises the new features, improvements, known issues, and bug fixes in Docker Desktop releases.
Quick Workshop To Get You Started
Now that we are done with the installation it’s time to play with the docker desktop. We will learn in this demo a few of the docker commands like
- docker run
- docker push
- docker pull
- docker build
We will see the pushed docker image in our docker hub public repo. So before we start please sign in to your docker desktop, you need to have an account with docker hub, if not please visit here-
Docker Hub Container Image Library | App Containerization
Edit descriptionhub.docker.com
Firstly, signup. Once you have created the account go to the docker desktop icon and sign-up with the same. Once you signup you will see the below-given screen
.png&w=3840&q=75)
1. Docker Run:
Open your terminal and type this command-
$ docker run hello-world
When you type there may be a high probability that the image with this name would not be present locally, but don’t worry docker understands this as a default thing so it will look for the docker image with this name in their docker hub public repo and will take a pull to download the same as shown in the image below.
Output:
.png&w=3840&q=75)
You can clearly see that the docker run command looked for the image and as it didn’t find the same, took the pull from the hub.
So now when you again run the docker run command you will see that it responded with the message —
“Hello from the Docker!”
.png&w=3840&q=75)
2. Listing all docker images :
.png&w=3840&q=75)
When you key in this command you can see the list of the Docker images that exist in your local system, which can also be seen in your docker desktop dashboard, here is how it looks in my docker dashboard.
.png&w=3840&q=75)
3. Docker ps command:
The ‘docker ps’ is a Docker command to list the running containers by default
$ docker ps
When typed this command this, you can see in the output none of container images are in a running state
.png&w=3840&q=75)
But if you want to list all the containers, including stopped once? We can do that by adding —all option.
$ docker ps - all
.png&w=3840&q=75)
I have created on the image, docker/getting-started, let’s see if it is running state or not
.png&w=3840&q=75)
If we type docker ps again let’s see what happens
$ docker ps
.png&w=3840&q=75)
Now you can see that our latest pulled image docker/getting-started is in a running state.
4. Docker stop command:
To stop a container, use the docker stop command with either the container id or container name. We may stop a container if we want to change our docker run command.
Here we will stop our docker/getting-started container whose id is “6fa658d60902”
$docker stop 6fa658d60902
.png&w=3840&q=75)
Now when we run the ps command after running docker stop, we can see that now our docker/getting-started has stopped.
5. Docker restart Command:
.png&w=3840&q=75)
As can be seen from the above image, after we ran the docker restart command using the command-
$docker stop 6fa658d60902
and again typed docker ps command we get our docker/getting-started container up and running again stopped.
6. Docker Push Command:
If you want to push your Docker image to any public repository like the docker hub, you can use the docker push command.
Let’s create a public repo in the docker hub. So go to docker and sign-in

Once you give a repo name and click a create button, you will see the following output UI

Our repo with name pramdemo/demorepo is created, also, the command which will be required to push to this new repo is given on the right side-
“docker push pramdemo/demorepo:tagname”
Let’s see how we can push our locally existing docker images to this docker hub repo now.
When you type
$docker push pramdemo/demorepo
it will flag an error because no such image exists with the tag pramdemo/demorepo

Let’s tag our local image docker/getting-started and try to push the same to the docker hub repo
$ docker tag docker/getting-started pramdemo/demorepo

Now that we have the tagged image ready let’s try to push the same
$ docker push pramdemo/demorepo

woohoo! the image got pushed, let. check the same in our docker hub repo

You can see in the docker hub tag section the image got pushed.
This way you can code all your app create a docker image using dockerfile, and push the same to the docker hub publicly or privately. Once this is done your image will be ready to be pulled by any CI/CD pipeline or by any of your team members.
6. Docker Pull Command:
Now that your image is pushed in your docker hub repo you can anytime take a pull of the same in your local machine and get started. let’s see how it works.
If you carefully see the pushed image you will also get a pull command that one can use to take a pull. In this case the command is
$ docker pull pramdemo/demorepo:latest
the output:

We can see from the CLI output our latest image got pulled successfully.
7. Docker remove Command:
If you wanna get rid of unwanted images from your repo you can do so by command
docker rmi it removes images by their ID.
To remove the image, you first need to list all the images to get the Image IDs, Image names, and other details.
Let’s get the image id of docker/getting-started

We can see that docker/getting-started has the image id 157095baba98
So if we type
$ docker rmi 157095baba98
Output:

We got an error as one of the containers is running which is using this image, so we need to first stop the container or we can also enforce the deletion by using -f flag, let’s do the same and see the outcome
$docker rmi 157095baba98 -f
output:

We can see that our image docker/getting-started that had the image id 157095baba98 got deleted. When we typed the command
we can see that the all the images with the ID 157095baba98 got removed

Takeaways
We have comprehensively covered the docker and docker desktop journey and can see how magical this tool is. We learned the fundamentals of
- Docker
- Docker objects
- Docker architecture
- What & Why of Docker Desktop tool
- Installation of Docker on Windows and MAC systems
Then we ran through a quick demo workshop to see a few of the popular docker commands in action.
So what we learned from this, well here are a few key learnings as a takeaway
- Docker is a go-to tool for any big enterprises or small startups to ensure they are building, running, testing, and shipping their binaries fast
- If you are looking for a smart collaboration tool for development docker has to be a part of your arsenal to scale those efforts, especially when you are looking to implement micro-services as a part of your DevOps culture
To learn more about DevOps you can check one of the best courses for DevOps
- Docker supports docker-compose & Kubernetes which helps you to orchestrate your containerized apps and deploy them to the K8S cluster at scale.
Want to learn more about Docker and Kubernetes, you can subscribe to this exclusive course called docker and kubernetes online training.
Getting Started with Docker for Windows
Welcome to Docker for Windows!
Please read through these topics on how to get started. To give us your feedback on your experience with the app and report bugs or problems, log in to our Docker for Windows forum.
Already have Docker for Windows? If you already have Docker for Windows installed, and are ready to get started, skip over to the Getting Started with Docker tutorial.
Download Docker for Windows
If you have not already done so, please install Docker for Windows. You can download installers from the stable or beta channel. For more about stable and beta channels, see the FAQs.
| Stable channel | Beta channel |
|---|---|
| This installer is fully baked and tested, and comes with the latest GA version of Docker Engine.
This is the best channel to use if you want a reliable platform to work with. These releases follow a version schedule with a longer lead time than the betas, synched with Docker Engine releases and hotfixes. |
This installer offers cutting edge features and comes with the experimental version of Docker Engine, which is described in the Docker Experimental Features README on GitHub.
This is the best channel to use if you want to experiment with features we are working on as they become available, and can weather some instability and bugs. This channel is a continuation of the beta program, where you can provide feedback as the apps evolve. Releases are typically more frequent than for stable, often one or more per month. |
| Get Docker for Windows (stable)Download checksum: InstallDocker.msi SHA256 | Get Docker for Windows (beta)Download checksum: InstallDocker.msi SHA256 |
Important Notes:
Docker for Windows requires 64bit Windows 10 Pro, Enterprise and Education
(1511 November update, Build 10586 or later) and Microsoft Hyper-V. Please
see What to know before you install
for a full list of prerequisites.You can switch between beta and stable versions, but you must have only one
app installed at a time. Also, you will need to save images and export
containers you want to keep before uninstalling the current version before
installing another. For more about this, see the
FAQs about beta and stable channels.
What to know before you install
- README FIRST for Docker Toolbox and Docker Machine users: Docker for Windows requires Microsoft Hyper-V to run. After Hyper-V is enabled,
VirtualBox will no longer work, but any VirtualBox VM images will remain.
VirtualBox VMs created withdocker-machine(including thedefaultone
typically created during Toolbox install) will no longer start. These VMs cannot
be used side-by-side with Docker for Windows. However, you can still use
docker-machineto manage remote VMs.
- The current version of Docker for Windows runs on 64bit Windows 10 Pro, Enterprise and Education (1511 November update, Build 10586 or later). In the future we will support more versions of Windows 10.
- Containers and images created with Docker for Windows are shared between all user accounts on machines where it is installed. This is because all
Windows accounts will use the same VM to build and run containers. In the
future, Docker for Windows will better isolate user content.
- The Hyper-V package must be enabled for Docker for Windows to work. The Docker for Windows installer will enable it for you, if needed. (This requires a
reboot). If your system does not satisfy these requirements, you can install
Docker Toolbox, which uses Oracle Virtual Box instead of
Hyper-V.
- Virtualization must be enabled. Typically, virtualization is enabled by default. (Note that this is different from having Hyper-V enabled.) For more
detail see Virtualization must be
enabled in Troubleshooting.
- What the Docker for Windows install includes: The installation provides Docker Engine, Docker CLI client, Docker Compose, and Docker Machine.
About Windows containers and Windows Server 2016
Looking for information on using Windows containers?
- Getting Started with Windows Containers (Lab)
provides a tutorial on how to set up and run Windows containers on Windows 10 or
with Windows Server 2016. It shows you how to use a MusicStore application with
Windows containers.
- Setup — Windows Server 2016 (Lab) specifically describes environment setup.
- Switch
between Windows and Linux containers (Beta
feature) describes the Linux / Windows containers toggle in Docker for Windows and points you to the tutorial mentioned above.
- Docker Container Platform for Windows Server 2016 articles and blog posts on the Docker website
Step 1. Install Docker for Windows
-
Double-click
InstallDocker.msito run the installer.If you haven’t already downloaded the installer (
InstallDocker.msi), you can get it here. It typically downloads to yourDownloads folder, or you can run it from the recent downloads bar at the bottom of your web browser. -
Follow the install wizard to accept the license, authorize the installer, and proceed with the install.
You will be asked to authorize
Docker.appwith your system password during the install process. Privileged access is needed to install networking components, links to the Docker apps, and manage the Hyper-V VMs. -
Click Finish on the setup complete dialog to launch Docker.


Step 2. Start Docker for Windows
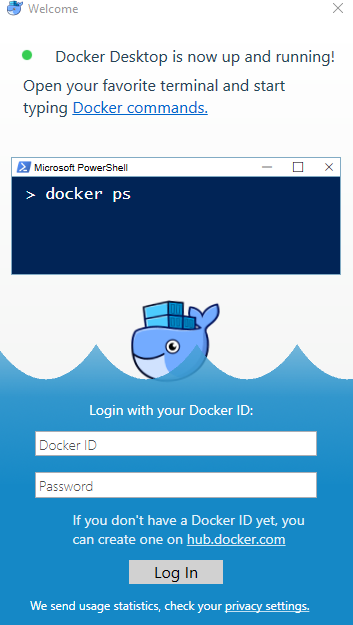
When the installation finishes, Docker starts automatically.
The whale in the status bar indicates that Docker is running, and accessible from a terminal.
If you just installed the app, you also get a popup success message with suggested next steps, and a link to this documentation.

When initialization is complete, select About Docker from the notification area icon to verify that you have the latest version.
Congratulations! You are up and running with Docker for Windows.
Step 3. Check versions of Docker Engine, Compose, and Machine
Start your favorite shell (cmd.exe, PowerShell, or other) to check your versions of docker and docker-compose, and verify the installation.
  PS C:\Users\samstevens> docker --version
  Docker version 1.12.0, build 8eab29e, experimental

  PS C:\Users\samstevens> docker-compose --version
  docker-compose version 1.8.0, build d988a55

  PS C:\Users\samstevens> docker-machine --version
  docker-machine version 0.8.0, build b85aac1
Step 4. Explore the application and run examples
The next few steps take you through some examples. These are just suggestions for ways to experiment with Docker on your system, check version information, and make sure docker commands are working properly.
-
Open a shell (
cmd.exe, PowerShell, or other). -
Run some Docker commands, such as
docker ps,docker version, anddocker info.Here is the output of
docker psrun in a powershell. (In this example, no containers are running yet.)PS C:\Users\samstevens> docker ps CONTAINER ID IMAGE COMMAND CREATED STATUS PORTS NAMESHere is an example of command output for
docker version.PS C:\Users\Vicky> docker version Client: Version: 1.12.0 API version: 1.24 Go version: go1.6.3 Git commit: 8eab29e Built: Thu Jul 28 21:04:48 2016 OS/Arch: windows/amd64 Experimental: true Server: Version: 1.12.0 API version: 1.24 Go version: go1.6.3 Git commit: 8eab29e Built: Thu Jul 28 21:04:48 2016 OS/Arch: linux/amd64 Experimental: trueHere is an example of command output for
docker info.PS C:\Users\Vicky> docker info Containers: 0 Running: 0 Paused: 0 Stopped: 0 Images: 0 Server Version: 1.12.0 Storage Driver: aufs Root Dir: /var/lib/docker/aufs Backing Filesystem: extfs Dirs: 0 Dirperm1 Supported: true Logging Driver: json-file Cgroup Driver: cgroupfs Plugins: Volume: local Network: host bridge null overlay Swarm: inactive Runtimes: runc Default Runtime: runc Security Options: seccomp Kernel Version: 4.4.16-moby Operating System: Alpine Linux v3.4 OSType: linux Architecture: x86_64 CPUs: 2 Total Memory: 1.95 GiB Name: moby ID: BG6O:2VMH:OLNV:DDLF:SCSV:URRH:BW6M:INBW:OLAC:J7PX:XZVL:ADNB Docker Root Dir: /var/lib/docker Debug Mode (client): false Debug Mode (server): false Registry: https://index.docker.io/v1/ Experimental: true Insecure Registries: 127.0.0.0/8Note: The outputs above are examples. Your output for commands like
docker versionanddocker infowill vary depending on your product versions (e.g., as you install newer versions). -
Run
docker run hello-worldto test pulling an image from Docker Hub and starting a container.PS C:\Users\samstevens> docker run hello-world Hello from Docker. This message shows that your installation appears to be working correctly. To generate this message, Docker took the following steps: 1. The Docker client contacted the Docker daemon. 2. The Docker daemon pulled the "hello-world" image from the Docker Hub. 3. The Docker daemon created a new container from that image which runs the executable that produces the output you are currently reading. 4. The Docker daemon streamed that output to the Docker client, which sent it to your terminal. -
Try something more ambitious, and run an Ubuntu container in a Bash shell.
   $ docker run -it ubuntu bash

   PS C:\Users\samstevens> docker run -it ubuntu bash
   Unable to find image 'ubuntu:latest' locally
   latest: Pulling from library/ubuntu
   5a132a7e7af1: Pull complete
   fd2731e4c50c: Pull complete
   28a2f68d1120: Pull complete
   a3ed95caeb02: Pull complete
   Digest: sha256:4e85ebe01d056b43955250bbac22bdb8734271122e3c78d21e55ee235fc6802d
   Status: Downloaded newer image for ubuntu:latest
Type
exitto stop the container and close the Bash shell. -
For the pièce de résistance, start a Dockerized webserver with this command:
docker run -d -p 80:80 --name webserver nginxThis will download the
nginxcontainer image and start it. Here is the output of running this command in a powershell.PS C:\Users\samstevens> docker run -d -p 80:80 --name webserver nginx Unable to find image 'nginx:latest' locally latest: Pulling from library/nginx fdd5d7827f33: Pull complete a3ed95caeb02: Pull complete 716f7a5f3082: Pull complete 7b10f03a0309: Pull complete Digest: sha256:f6a001272d5d324c4c9f3f183e1b69e9e0ff12debeb7a092730d638c33e0de3e Status: Downloaded newer image for nginx:latest dfe13c68b3b86f01951af617df02be4897184cbf7a8b4d5caf1c3c5bd3fc267f -
Point your web browser at
http://localhostto display the start page.(Since you specified the default HTTP port, it isn’t necessary to append
:80at the end of the URL.) -
Run
docker pswhile your webserver is running to see details on the container.PS C:\Users\samstevens> docker ps CONTAINER ID IMAGE COMMAND CREATED STATUS PORTS NAMES dfe13c68b3b8 nginx "nginx -g 'daemon off" 3 days ago Up 45 seconds 0.0.0.0:80->80/tcp, 443/tc p webserver -
Stop or remove containers and images.
The
nginxwebserver will continue to run in the container on that port until you stop and/or remove the container. If you want to stop the webserver, type:docker stop webserverand start it again withdocker start webserver.To stop and remove the running container with a single command, type:
docker rm -f webserver. This will remove the container, but not thenginximage. You can list local images withdocker images. You might want to keep some images around so that you don’t have to pull them again from Docker Hub. To remove an image you no longer need, usedocker rmi <imageID>|<imageName>. For example,docker rmi nginx.

Want more example applications? — For more example walkthroughs that include setting up services and databases with Docker Compose, see Example Applications.
Docker Settings
When Docker is running, the Docker whale is displayed in the system tray. If it is hidden, click the up arrow in the tray to show it.

To get a popup menu with application options, right-click the whale:

The Settings dialogs provide options to allow Docker auto-start, automatically check for updates, share local drives with Docker containers, enable VPN compatibility, manage CPUs and memory Docker uses, restart Docker, or perform a factory reset.
Beta 26 and newer include an option to switch between Windows and Linux conatiners. See Switch between Windows and Linux containers (Beta feature). This is not yet available on stable builds.

General

-
Start Docker when you log in — Automatically start the Docker for Windows application upon Windows system login.
-
Check for updates when the application starts — Docker for Windows is set to automatically check for updates and notify you when an update is available. If an update is found, click OK to accept and install it (or cancel to keep the current version). Uncheck this option if you do not want notifications of version upgrades. You can still find out about updates manually by choosing Check for Updates from the menu.
-
Send usage statistics — You can set Docker for Windows to auto-send diagnostics, crash reports, and usage data. This information can help Docker improve the application and get more context for troubleshooting problems.
Uncheck any of the options to opt out and prevent auto-send of data. Docker may prompt for more information in some cases, even with auto-send enabled. Also, you can enable or disable these auto-reporting settings with one click on the information popup when you first start Docker.
Shared Drives
Share your local drives (volumes) with Docker for Windows, so that they are available to your containers.

You will be asked to provide your Windows system username and password (domain user) to apply shared drives. You can select an option to have Docker store the credentials so that you don’t have to re-enter them every time.
Permissions to access shared drives are tied to the credentials you provide here. If you run docker commands and tasks under a different username than the one used here to set up sharing, your containers will not have permissions to access the mounted volumes.
Tip: Shared drives are only required for volume mounting Linux containers, not Windows containers.
See also Verify domain user has permissions for shared drives in Troubleshooting.
Firewall rules for shared drives
Shared drives require port 445 to be open between the host machine and the virtual
machine that runs Linux containers.
Note: In Docker for Windows Beta 29 and higher,
Docker detects if port 445 is closed and shows the following message when you
try to add a shared drive:

To share the drive, allow connections between the Windows host machine and the
virtual machine in Windows Firewall or your third party firewall software. You
do not need to open port 445 on any other network. By default, allow connections
to 10.0.75.1 port 445 (the Windows host) from 10.0.75.2 (the virtual machine).
Advanced

-
CPUs — Change the number of processors assigned to the Linux VM.
-
Memory — Change the amount of memory the Docker for Windows Linux VM uses.
Please note, updating these settings requires a reconfiguration and reboot of the Linux VM. This will take a few seconds.
Network
You can configure Docker for Windows networking to work on a virtual private network (VPN).
-
Internal Virtual Switch — You can specify a network address translation (NAT) prefix and subnet mask to enable internet connectivity.
-
DNS Server — You can configure the DNS server to use dynamic or static IP addressing.

Note: Some users reported problems connecting to Docker Hub on Docker for Windows stable version. This would manifest as an error when trying to run
dockercommands that pull images from Docker Hub that are not already downloaded, such as a first time run ofdocker run hello-world. If you encounter this, reset the DNS server to use the Google DNS fixed address:8.8.8.8. For more information, see Networking issues in Troubleshooting.
Note that updating these settings requires a reconfiguration and reboot of the Linux VM.
Proxies
Docker for Windows lets you configure HTTP/HTTPS Proxy Settings and automatically propagate these to Docker and to your containers.
For example, if you set your proxy settings to http://proxy.example.com, Docker will use this proxy when pulling containers.

When you start a container, you will see that your proxy settings propagate into the containers. For example:
$ docker run -it alpine env
PATH=/usr/local/sbin:/usr/local/bin:/usr/sbin:/usr/bin:/sbin:/bin
HOSTNAME=b7edf988b2b5
TERM=xterm
HOME=/root
HTTP_PROXY=http://proxy.example.com:3128
http_proxy=http://proxy.example.com:3128
no_proxy=*.local, 169.254/16
You can see from the above output that the HTTP_PROXY, http_proxy and no_proxy environment variables are set.
When your proxy configuration changes, Docker restarts automatically to pick up the new settings.
If you have containers that you wish to keep running across restarts, you should consider using restart policies
Docker daemon
You can configure options on the Docker daemon in the given JSON configuration file, and determine how your containers will run.
For a full list of options on the Docker daemon, see daemon in the Docker Engine command line reference.

Note that updating these settings requires a reconfiguration and reboot of the Linux VM.
Switch between Windows and Linux containers (Beta feature)
Starting with Beta 26, you can select which daemon (Linux or Windows) the Docker CLI talks to. Select Switch to Windows containers to toggle to Windows containers. Select Switch to Linux containers.
Microsoft Developer Network has preliminary/draft information on Windows containers here.
This feature is not yet available on stable builds.
See also Shared Drives
Getting started with Windows containers (Beta feature)
If you are interested in working with Windows containers, here are some guides to help you get started.
-
Build and Run Your First Windows Server Container (Blog Post) gives a quick tour of how to build and run native Docker Windows containers on Windows 10 and Windows Server 2016 evaluation releases.
-
Getting Started with Windows Containers (Lab) shows you how to use the MusicStore application with Windows containers. The MusicStore is a standard .NET application and, forked here to use containers, is a good example of a multi-container application.
Disclaimer: This lab is still in work, and is based off of the blog, but you can test and leverage the example walkthroughs now, if you want to start experimenting. Please checking back as the lab evolves.
Diagnose and Feedback
If you encounter problems for which you do not find solutions in this documentation, searching Docker for Windows issues on GitHub already filed by other users, or on the Docker for Windows forum, we can help you troubleshoot the log data.
Select Upload a diagnostic.
This uploads (sends) the logs to Docker.

To create a new issue directly on GitHub, open Docker for Windows issues on GitHub in your web browser and follow the instructions in the README. Click New Issue on that page to get a “create new issue” template prepopulated with sections for the ID and summary of your diagnostics, system and version details, description of expected and actual behavior, and steps to reproduce the issue.

Reset

-
Restart Docker — Shuts down and restarts the Docker application.
-
Reset to Toolbox default machine content — Imports containers and images from the existing Docker Toolbox machine named
default. (This option is enabled only if you have Toolbox installed.) The VirtualBox VM will not be removed. -
Reset to factory defaults — Resets Docker to factory defaults. This is useful in cases where Docker stops working or becomes unresponsive.
Where to go next
-
Try out the Getting Started with Docker tutorial.
-
Dig in deeper with learn by example tutorials on building images, running containers, networking, managing data, and storing images on Docker Hub.
-
See Example Applications for example applications that include setting up services and databases in Docker Compose.
-
Interested in trying out the new swarm mode on Docker Engine v1.12?
See Get started with swarm mode, a tutorial which includes specifics on how to leverage your Docker for Windows installation to run single and multi-node swarms.
Also, try out the Swarm examples in docker labs. Run the
bash scriptand follow the accompanying Docker Swarm Tutorial. The script uses Docker Machine to create a multi-node swarm, then walks you through various Swarm tasks and commands. -
For a summary of Docker command line interface (CLI) commands, see Docker CLI Reference Guide.
-
Check out the blog posts on Docker for Mac and Docker for Windows public betas, and earlier posts on the initial private beta.
-
Please give feedback on your experience with the app and report bugs and problems by logging into our Docker for Windows forum.