Have you wondered initially what is docker? Docker is a computer program that functions Operating-system-level Virtualization, also called “containerization”. Whenever the containers made with docker permit you to create an isolated development environment on your system. You can find various benefits of docker from the official docker website or else from our docker tutorials.
For performing any of the tasks related to docker, firstly, you need to install docker on your windows version. If your windows version is 7/8/9 then you should download and install the Docker toolbox.
Do you want to know what the docker toolbox means, how to install the docker desktop on windows, what do you need for installation, installation instructions, and many more? checking out this entire How To Install Docker on Windows 7/8/10 Home and Pro Tutorial is the perfect solution.
- What is meant by Docker?
- What is Docker Toolbox?
- Prerequisites
- Steps to Install Docker on Windows 7/8/10 Home
- a – Download the Docker Toolbox executable
- b – Run the Docker Toolbox installer for Windows.
- c – Run the Docker Quickstart for Windows
- Steps to Install Docker on Windows 10 Pro and Enterprise
- a – Check your virtualization settings
- b – Create an account on Docker Hub
- c – Install Docker Desktop for Windows’
- d – Configuring Docker Desktop
- Conclusion
What is meant by Docker?
Docker is the most popular virtualization platform available by far and it was founded in 2010 by Solomon Hykes. Software engineers make use of this docker platform widely for DevOps operations like continuous development and deployment purposes. Also, Docker attains as a reference for managing, deploying, and running applications all over the world.
What is Docker Toolbox?
Docker Toolbox is for older Mac and Windows systems that do not meet the requirements of Docker for Mac and Docker for Windows. Docker Toolbox automatically performs a Linux VM on VirtualBox that hosts Docker on your Windows system.
Prerequisites
First of all, you want to determine the current version of Windows running on your computer.
Get your current Windows version
- How To Install Docker on Ubuntu 18.04 & Debian 10
- How To Install Prometheus with Docker on Ubuntu 18.04
- How To List Docker Images | What is Docker Image | docker image ls command
Installations are different between the Windows Pro Edition and the Windows Home Edition as Windows Home does not ship the Hyper-V feature (necessary to run “Docker for Windows”)
To determine your current Windows version, open your control panel.
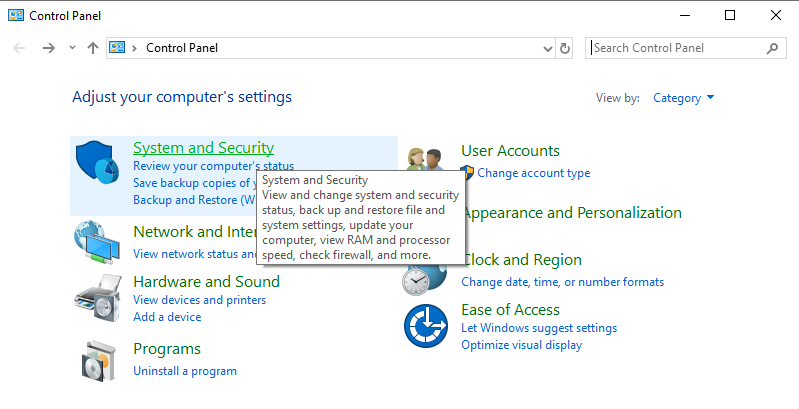
Click on System and Security, and you should see this panel.
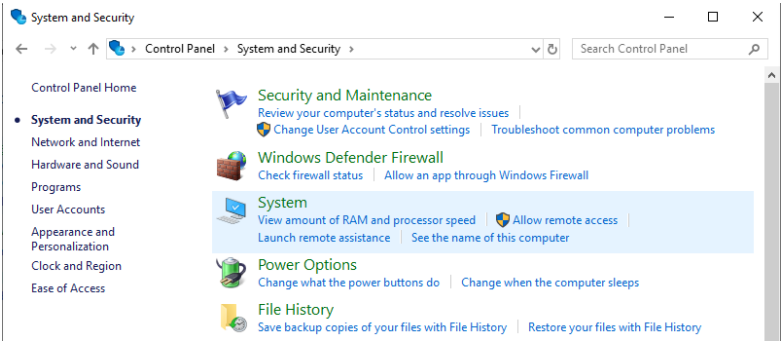
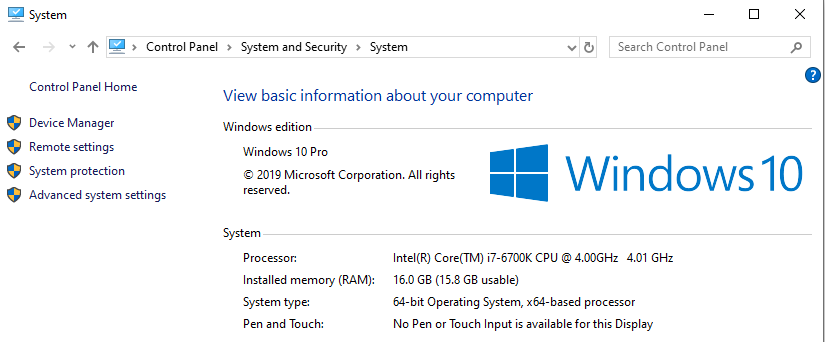
Click on the System option, and you should be able to see your system version.
As you can see, I am running Windows 10 Pro (or Enterprise), so I will be able to install Docker Desktop for Windows.
If you are running Windows 7/8 or 10 Home, you should install the Docker Toolbox.
Verify virtualization is enabled on Windows
In order to verify that virtualization is enabled on Windows, press Ctrl + Alt + Del and head over to the “Performance” panel.
On this panel, you should see the Virtualization option.
Make sure virtualization is enabled.
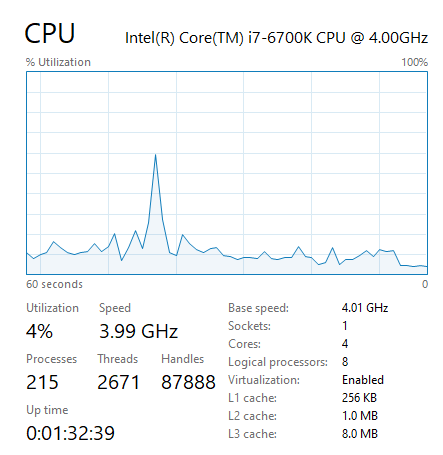
Docker heavily relies on virtualization, making it impossible to run Docker if this option is not enabled on your computer.
If you need to enable Windows virtualization, you can follow this tutorial.
Steps to Install Docker on Windows 7/8/10 Home
First, we are going to see how you can install Docker for computers that do not have the Hyper-V feature available.
For those computers, you are going to need Docker Toolbox.
a – Download the Docker Toolbox executable
First of all, head over to the official Docker Toolbox repository on Github and download the latest executable available.
At the time of this tutorial, version v19.03.1 is available.
Click on the executable available.
As you can see, the Docker Toolbox comes with multiple executables:
- Docker: the docker binaries available to create and run containers on your computer. When installing Docker, you get a Docker CLI for you to communicate with a Docker server. This way, you can launch instructions and they will be executed on your containers;
- Docker-machine: a tool that handles provisioning on your containers (installing packages, deleting packages, running them, etc.);
- Docker-compose: a tool for environments containing multiple containers with different environments. This way, you can start multiple containers together, or stop them together;
- Kitematic: a sweet graphical interface for you to control your containers on Windows and Mac;
- Boot2Docker ISO: a tiny Linux distribution for you to run Docker on Windows;
- VirtualBox: open-source hypervisor for Windows and used to emulate operating systems on your Windows system.
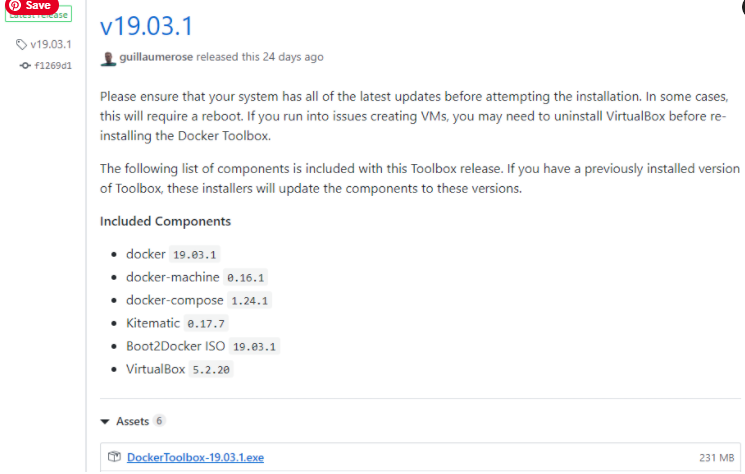
Save your executable somewhere appropriate, and run it to install Docker on Windows.
b – Run the Docker Toolbox installer for Windows.
First, this is what you should see when running the executable on Windows.
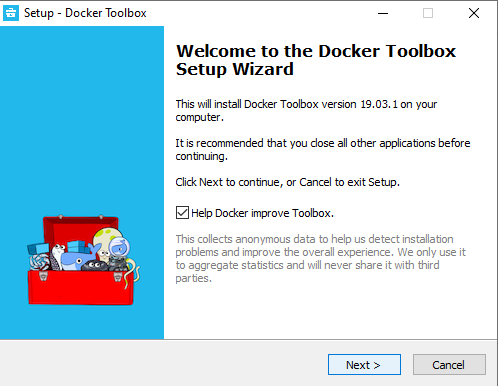
Click on Next.
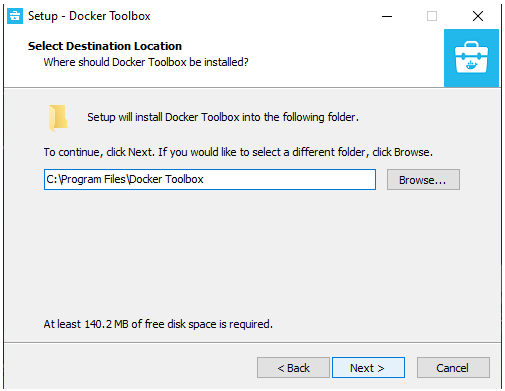
For the second screen, choose a location where to store your Docker files, and click on Next.
Select the full installation on Windows, and check the Git for Windows option if not already installed on your computer.
If VirtualBox is already installed on your computer, you can uncheck this option (it won’t get reinstalled if you let the checkbox be checked)
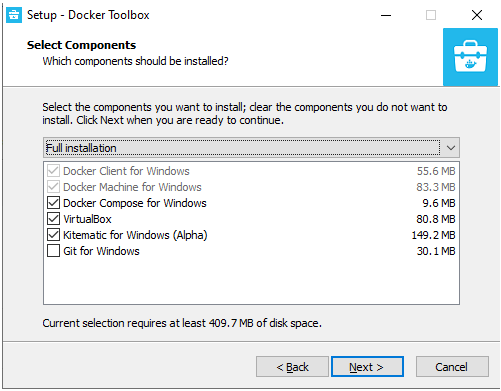
Click on Next.
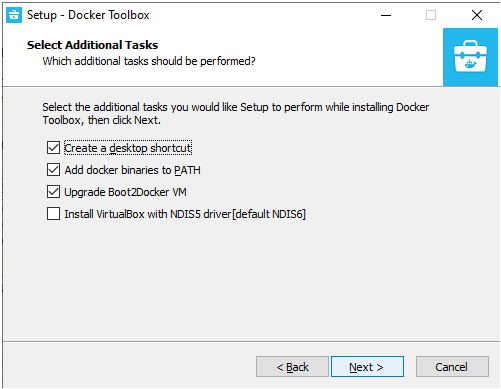
For the additional tasks, you can let the default options and click on Next.
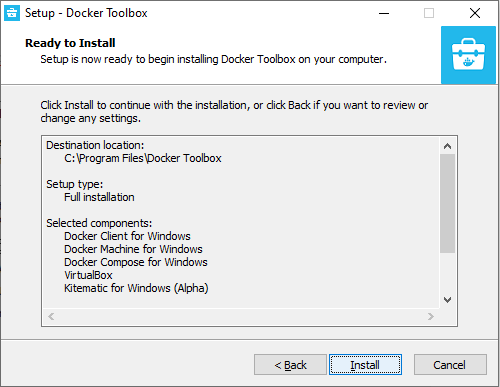
Finally, click on Install to start the Docker Toolbox installation.
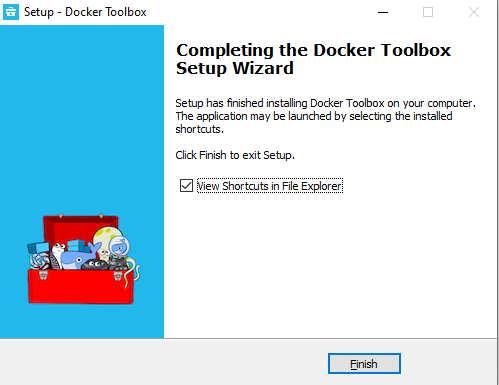
After a short while, your installation should be complete. Leave the checkbox checked in order to see the shortcuts created by Docker.
c – Run the Docker Quickstart for Windows
Now that Docker is installed, you are going to run the Docker quickstart process.
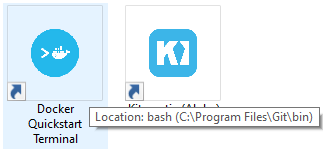
Double-click on the icon to start Docker Quickstart.
A terminal shell opens and starts running some commands on your computer to setup Docker properly. This setup step will create a VirtualBox VM using the Boot2Docker ISO downloaded.
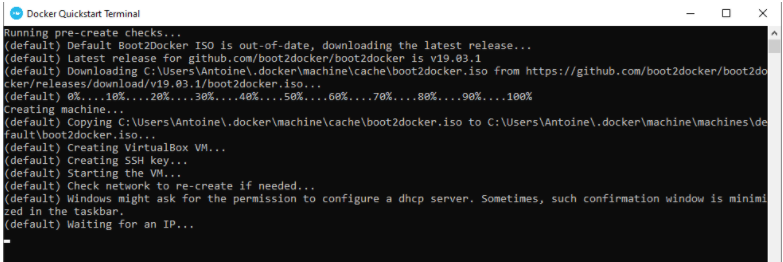
Wait a few moments for the setup to complete.
After some moments, you should see Moby (the whale of Docker!), meaning that your installation was successful.

To verify your current Docker version, run the following command
$ docker version
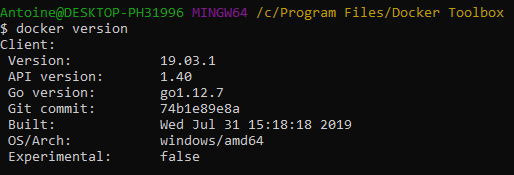
Awesome!
You have successfully installed Docker on Windows 7/8 and 10 Home.
Steps to Install Docker on Windows 10 Pro and Enterprise
Windows 10 has the Hyper-V feature available, so we are going to install the Docker Desktop version that includes the Docker Community Edition for Windows.
a – Check your virtualization settings
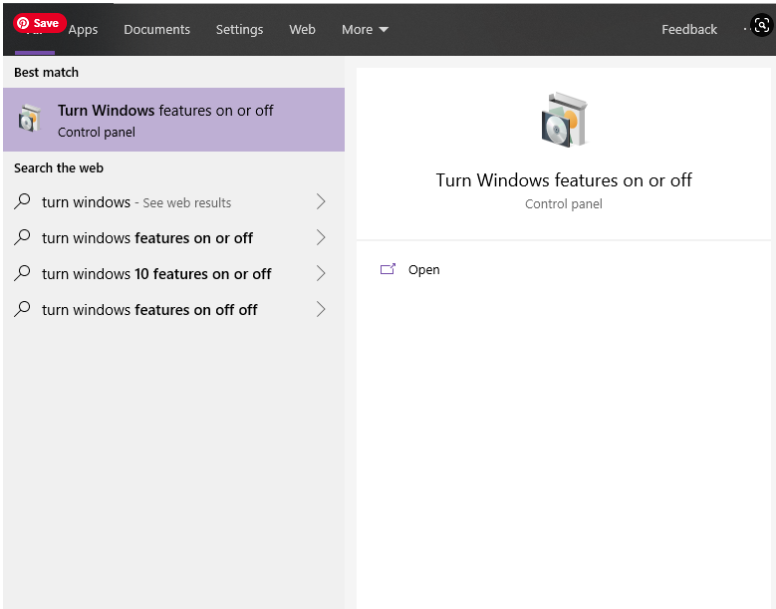
First, we are going to check if Hyper-V is enabled on your machine. If not, you will have to enable it.
In the Windows search menu, type “Type Windows Features On and Off“, and select it.
A window similar to this one should appear. Make sure that the Hyper V checkbox is enabled.
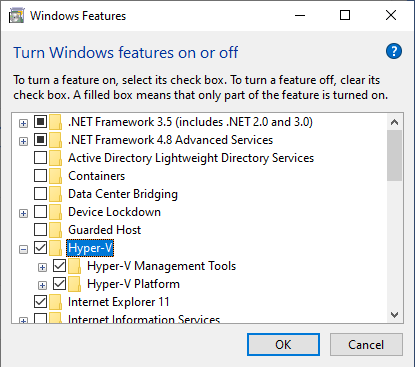
Restart your computer for the changes to be applied.
Nice!
Now let’s download Docker Desktop for Windows.
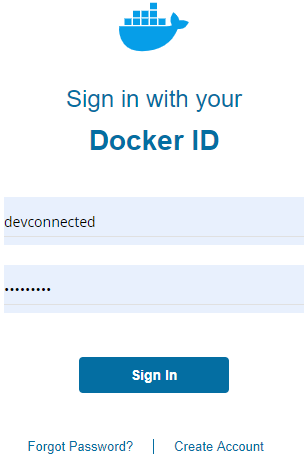
b – Create an account on Docker Hub
In order to download Docker Desktop, you are going to need a Docker Hub account.
Head over to the Docker Hub sign-up page, and create a new account.
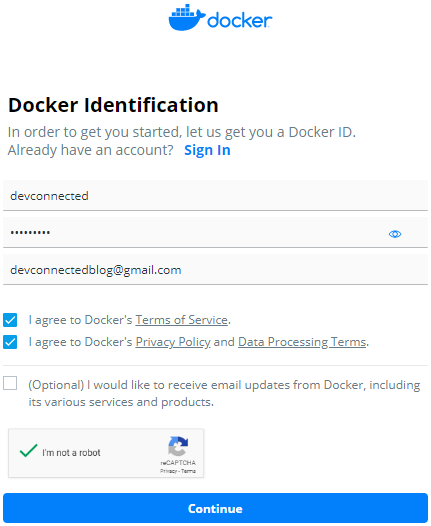
Click on “Continue“.
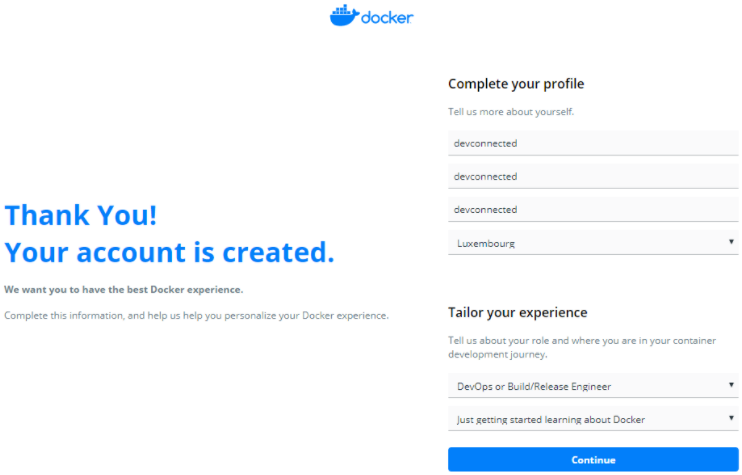
On the next screen, fill up the information needed, and click on “Continue”.
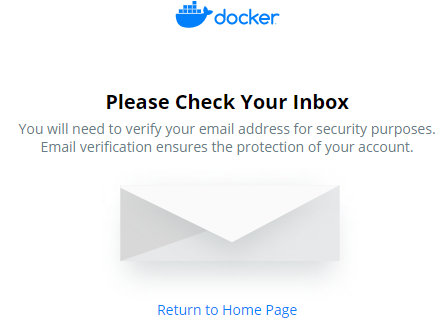
On the next screen, you are asked to verify your email. Make sure to check your inbox and to click on the verify link from Docker Hub.
As an example, this is the email that I received from Docker.
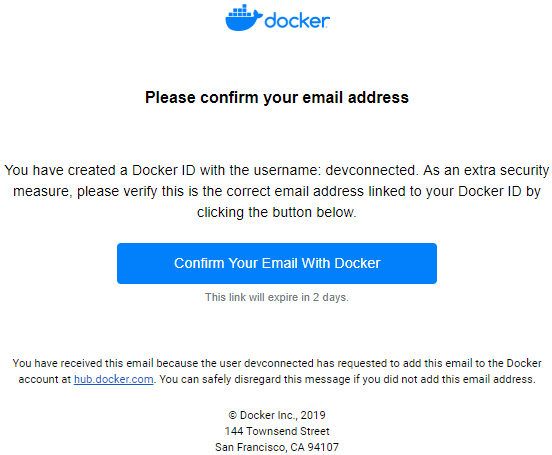
Click on “Confirm your email with Docker”, and this is what you should see.

Click on “Go to Sign In” and sign in using the credentials you specified before.
Great! Now let’s download Docker Desktop for Windows.
c – Install Docker Desktop for Windows
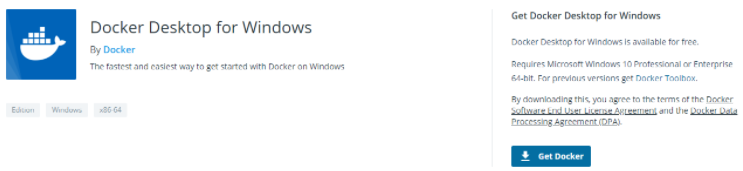
In order to download Docker Desktop, head over to this page, and click on “Get Docker“.
Your browser should start download the executable file. When the download is done, click on it to start the Docker Desktop installation for Windows.
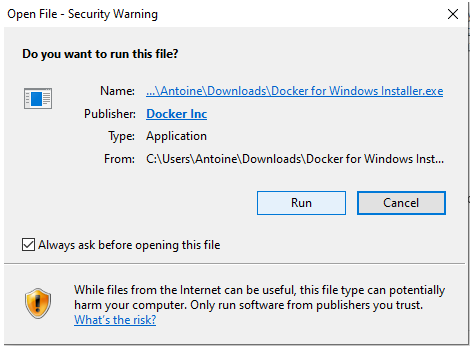
Make sure that the executable is coming from “Docker Inc” and click on “Run”.
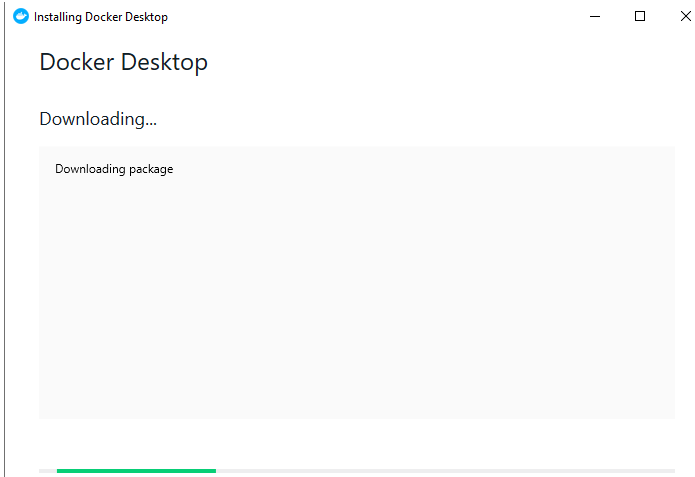
Initially, the Docker Desktop installer should start download some packages. This is completely normal, just wait a couple of seconds until it is done.
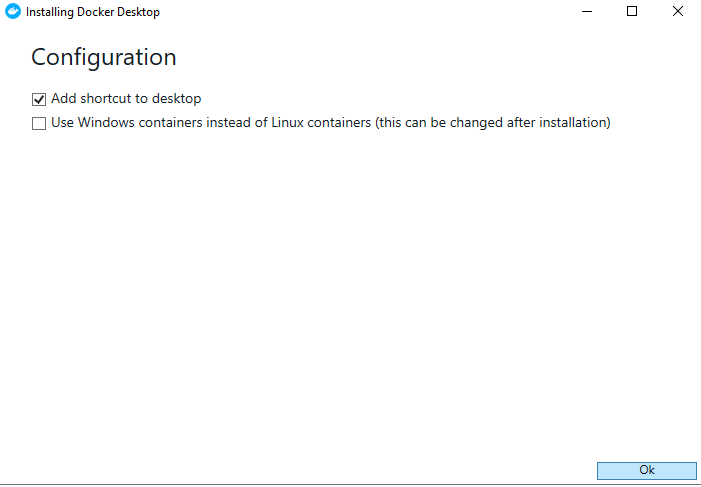
When it is done, just leave the default options on the next screen, unless you want to use Windows containers in the future.
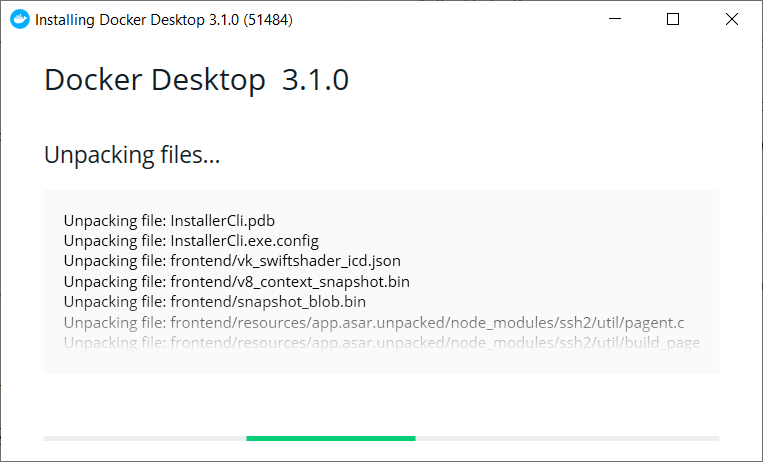
Right after, Docker will start unpacking some files. Just wait a couple of seconds until it is done.
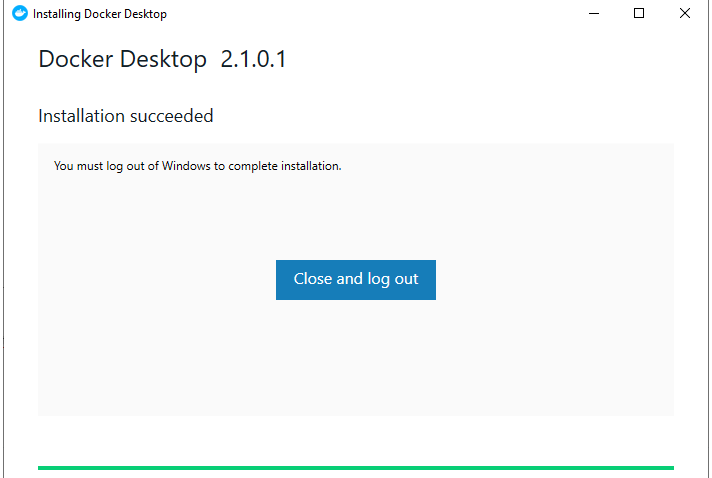
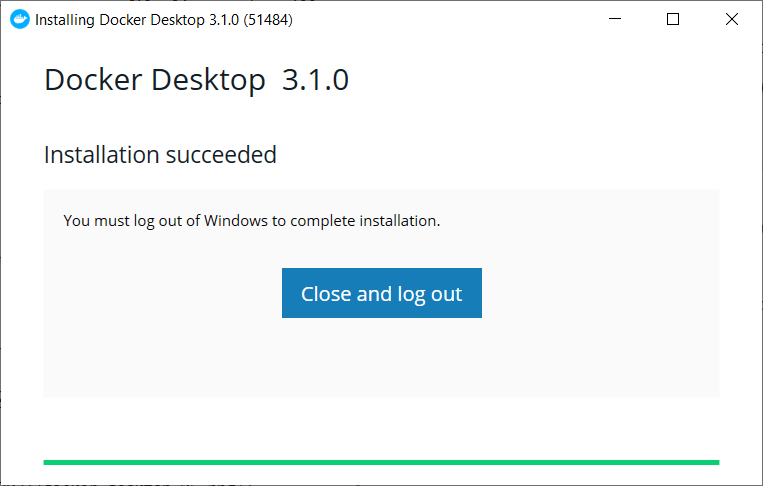
Finally, click on “Close and Log Out”. Make sure that you don’t have any unsaved work or important programs running in the background.
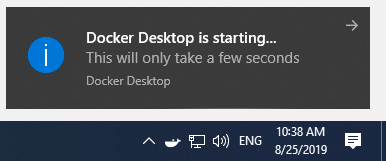
When signing back in, this is what you should see at the bottom right corner of your desktop.
Now that Docker Desktop is running, open a Powershell console and check your Docker version.
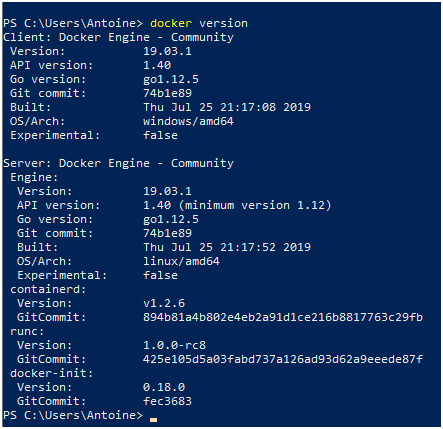
Great, as you can see I am now running the latest stable version of Docker on my Windows 10 Pro.
d – Configuring Docker Desktop
Before using Docker Desktop for Windows 10 Pro, you may need to do some quick configuration steps for it to run as smoothly as possible.
Sharing Drives
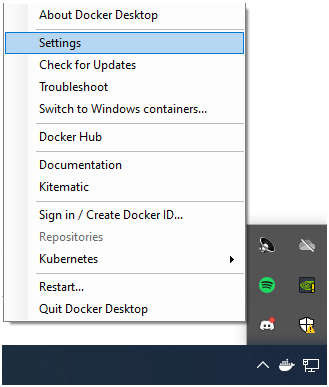
At the bottom right corner of your screen, click on the Docker icon and select “Settings”.
On the “Shared drives” section, make sure to enable some of your hard drives if you plan on writing code on them and running it inside Docker.
This can be useful in case you plan on mapping volumes for example to Docker containers. Without checking those hard drives, you might not be able to do it.
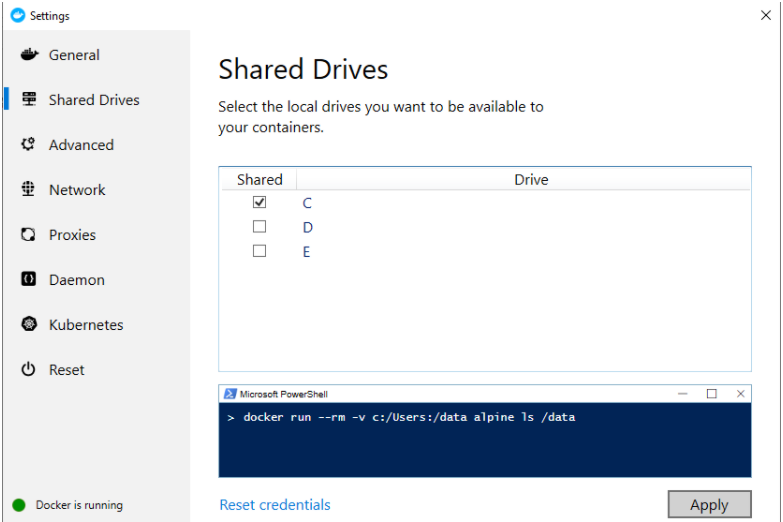
In my case, I will share the C: drive on my computer and click on “Apply”.
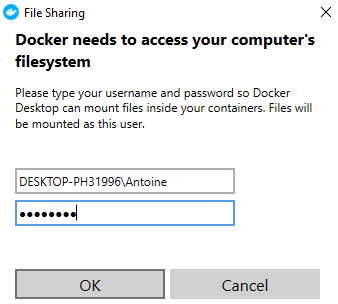
Docker will need to access your computer’s filesystem in order to share drives. Simply enter your account password and click on “Ok”.
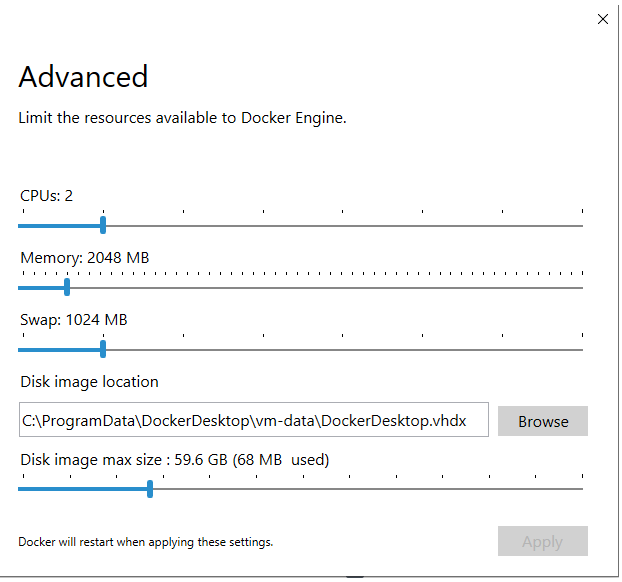
Customize Docker resources
In the “Advanced” tab, make sure that you are allocating the right amount of resources to Docker for it to run smoothly.
Those are the parameters set by default but you may need to have higher specifications if Docker is running badly.
Great! You learned how to install Docker Desktop on Windows 10 Pro.
Conclusion
In this tutorial, you learned how to install Docker Toolbox and Docker Desktop for the latest versions of Windows.
Now that you have a complete Docker setup, it is time for you to run your first container.
Have a look at this video in order to create your first Docker container.
~6 min read
In this post, I describe how to install WSL 2 to serve as the backend for Docker Desktop for Windows. Previously I’ve always worked with Linux in a Virtual Machine using something like VMWare or Virtual Box, but I decided to give Docker Desktop a try, and was pleasantly surprised by the experience!
I’ll start by describing how to install WSL 2 based on the install documents, then show how to install Docker Desktop. Finally, I show the the experience of running a container and how it looks in Docker Desktop.
Installing WSL2
The Windows Subsystem for Linux (WSL) is a way to run a full Linux environment on your Windows machine, without having to install a «heavier» virtual machine, such as Virtual Box, VM Ware, or Hyper-V. WSL 2 also provides a mechanism for running Docker (with Linux containers) on your Windows machine. We’ll install it as a prerequisite for Docker Desktop for Windows.
If you’re running Windows Home, WSL 2 is the only way to run Docker Desktop. On Windows Pro, you can also use Hyper-V, but that is deprecated now, so WSL 2 is the way to go in all cases.
1. Install WSL 1
We’ll start by installing WSL 1 by enabling the WSL feature.
Open PowerShell as Administrator (I hit the Start key, type powershell and hit ctrl+shift+enter to open an elevated command prompt). Run the following, to enable WSL 1
dism.exe /online /enable-feature /featurename:Microsoft-Windows-Subsystem-Linux /all /norestart
You should see the following:
> dism.exe /online /enable-feature /featurename:Microsoft-Windows-Subsystem-Linux /all /norestart

Deployment Image Servicing and Management tool
Version: 10.0.19041.746

Image Version: 10.0.19042.804

Enabling feature(s)
[==========================100.0%==========================]
The operation completed successfully.
That enables WSL, but we’re going to enable the newer WSL 2 version, which Docker Desktop can use to run the VM it needs to run containers.
2. Enable the Virtual Machine feature
WSL 2 uses a lightweight VM, so you need to enable the Virtual Machine feature available in Windows 10 version 1903 and higher. In the same, elevated command prompt, run:
dism.exe /online /enable-feature /featurename:VirtualMachinePlatform /all /norestart
You should see something like the following:
> dism.exe /online /enable-feature /featurename:VirtualMachinePlatform /all /norestart
Deployment Image Servicing and Management tool
Version: 10.0.19041.746

Image Version: 10.0.19042.804

Enabling feature(s)
[==========================100.0%==========================]
The operation completed successfully.
3. Restart
Time to restart your machine to ensure everything is registered correctly.
4. Install the WSL 2 update
Download the WSL2 Linux kernel update package for x64 machines and install it.
Note, if you see the following error when running the update, make sure you’ve restarted your machine afer installing the WSL 1 and VM features:
The installer runs very quickly, and hopefully you’ll see a confirmation screen, something like the following:
5. Set WSL 2 as your default version
This is an easy step, just run wsl --set-default-version 2 in any PowerShell window:
>wsl --set-default-version 2
For information on key differences with WSL 2 please visit https://aka.ms/wsl2
6. (Optional) Install a Linux distribution
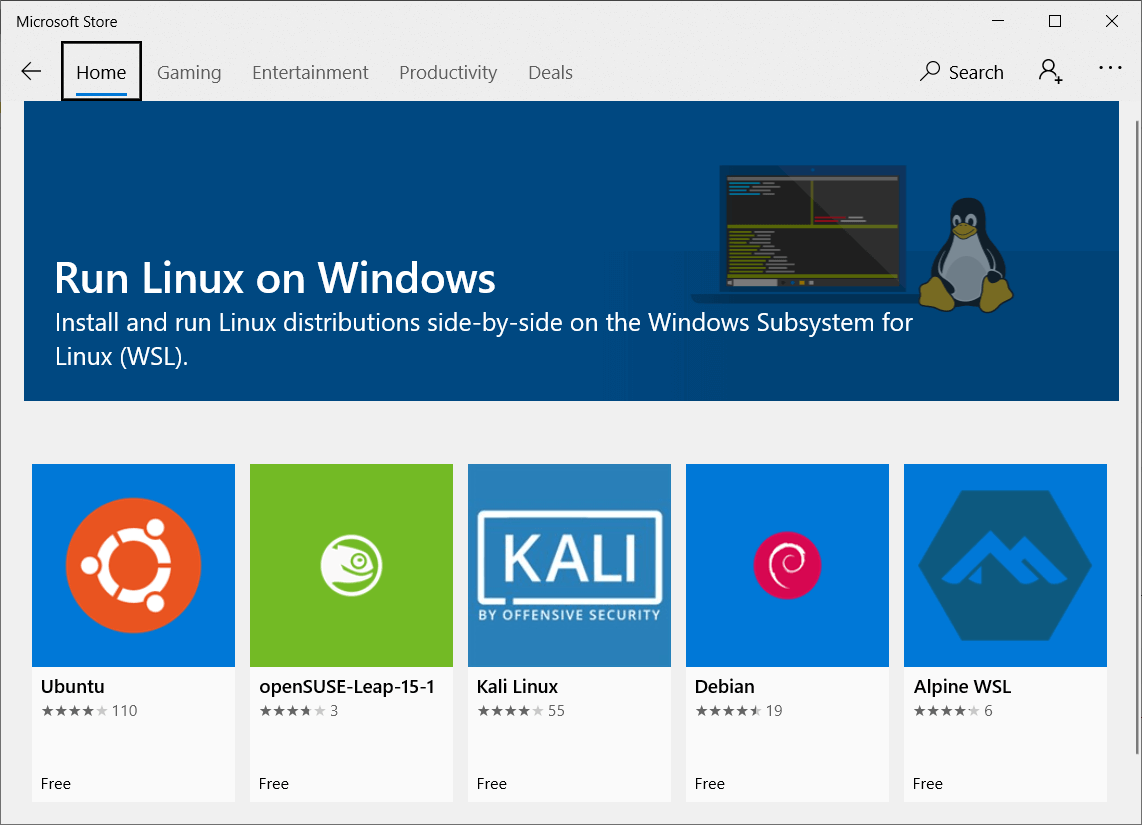
We actually don’t need to install a Linux distribution to use Docker Desktop, but if you want to shell into Linux directly, you’ll need to install one. You can install a distribution directly from the Microsoft Store.
The first time you launch the distribution, the distribution will extract and install, and you’ll need to set a username and password.
7. (Optional) Add to Windows Terminal
If you’re using Windows Terminal (you should be!) you can configure it to open your WSL distribution. The easiest way to do this is to open up the settings.json file and reset it. You can do this by deleting the contents of the file—Terminal will automatically repopulate it with the defaults, which will include a tab for WSL.
Obviously you won’t want to lose your setting customisations, so make sure to backup the contents of the file first!
You’re looking for WSL in the profiles list—add that to you profile list, and you’ll be able to quickly open up your WSL instance from Windows Terminal!
That’s the prerequisite starter for Docker Desktop covered, so now lets get to the main course!
Installing Docker Desktop for Windows
1. Download and Install
Head to the Docker Desktop website and download the Installer for Windows.. This is a hefty ~500MB, but once it’s finished, run the installer.
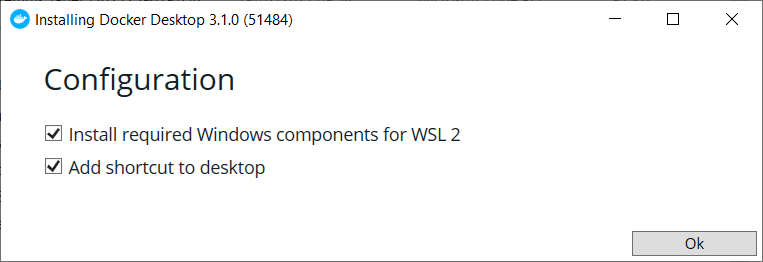
On the first screen, ensure you keep «Install required components for WSL 2» checked:
After clicking OK, the installer will unpack a whole load of files:
Before finally prompting you to log out of your Windows account to complete the installation:
2. Logout and back in
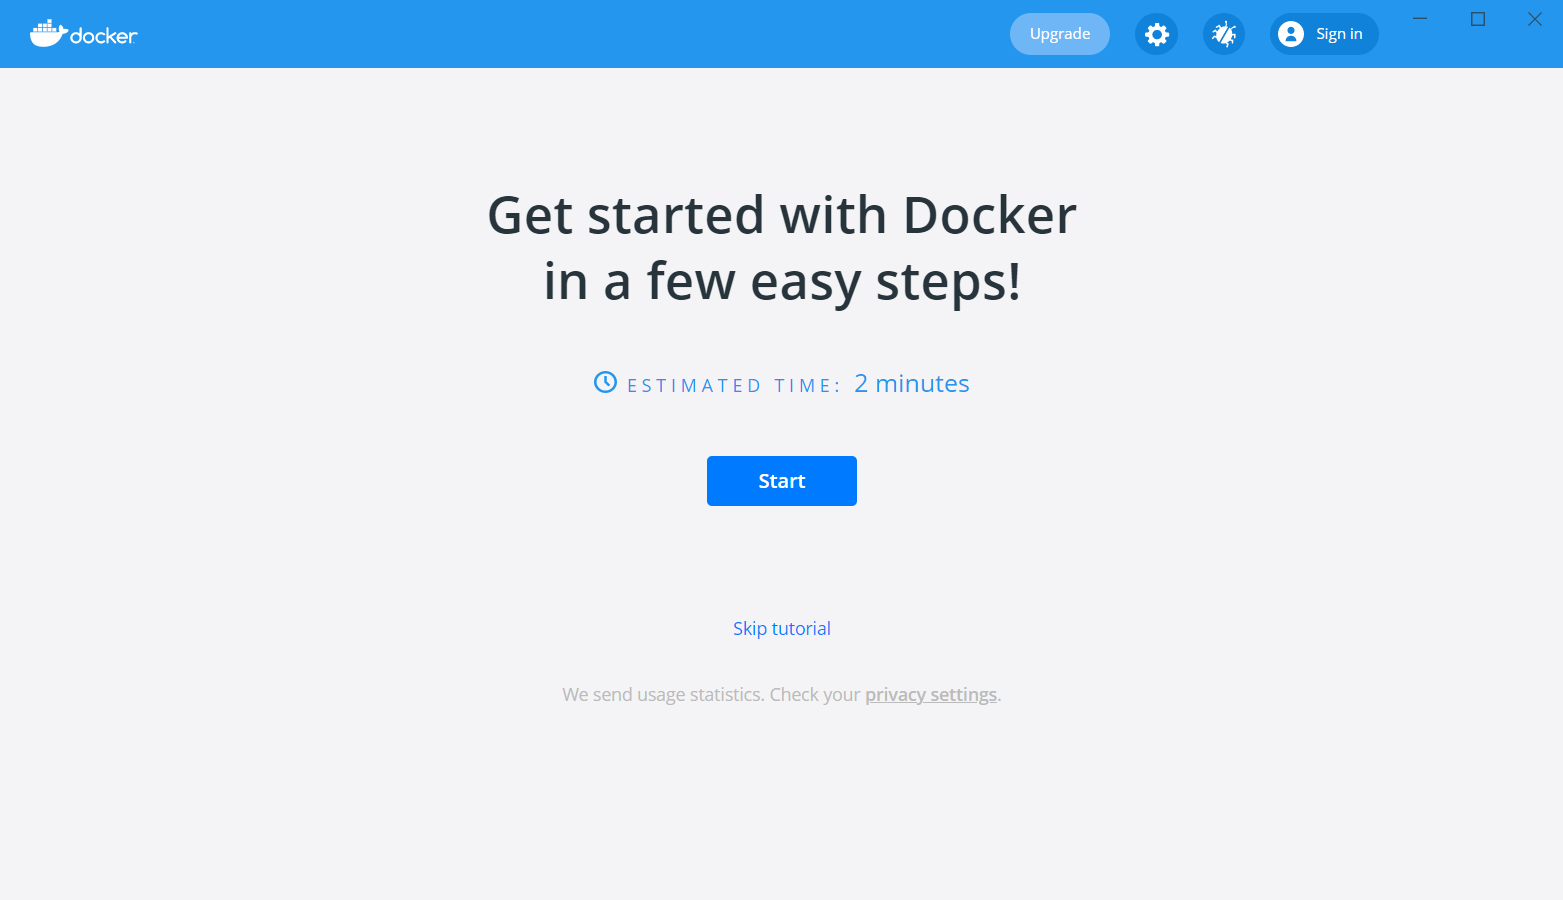
The Docker Desktop installer will automatically log you out of your Windows account on completion. When you sign back in, you’ll get a notification that Docker is starting the Linux Containers WSL 2 backend. Eventually, the main Docker Desktop window will pop up, and offer you a tutorial
3. Give it a try!
With Docker Desktop installed, you now have the docker command available in your command prompt:
> docker

Usage:  docker [OPTIONS] COMMAND

A self-sufficient runtime for containers

Options:
...
Now it’s installed, let’s take it for a spin!
Trying out Docker Desktop for Windows
For simplicity, we’ll run one of the .NET 5.0 sample apps available on DockerHub:
docker run -it --rm `
    -p 8000:80 `
    --name my-sample `
    mcr.microsoft.com/dotnet/samples:aspnetapp
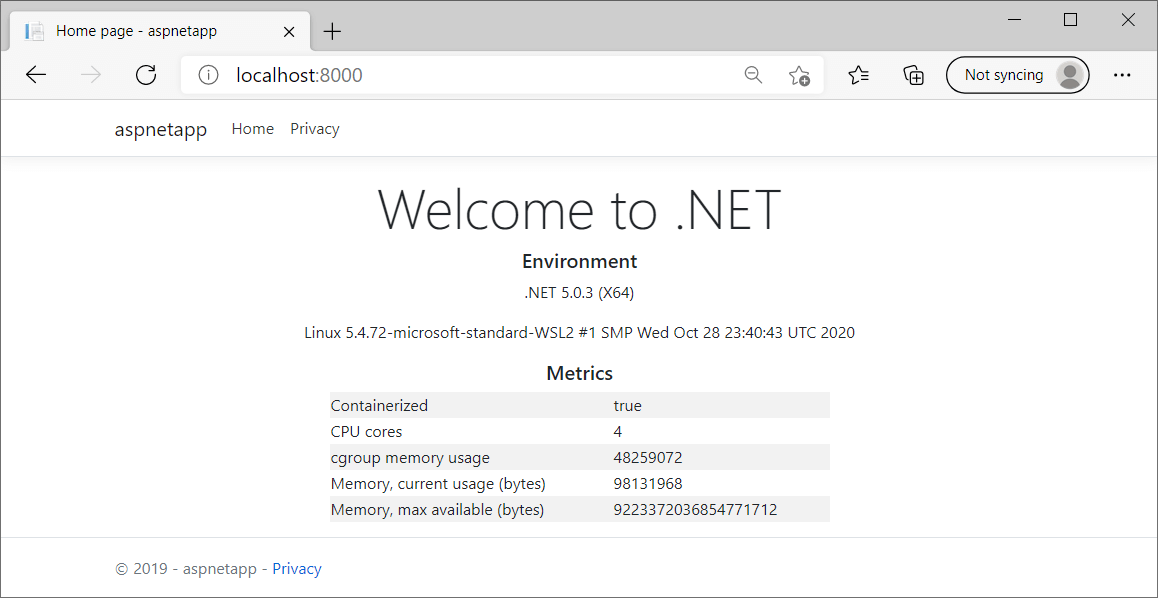
This is a simple Razor Pages app, packaged in a Docker image, and ready to run. You can see the Dockerfile for the app here. When you run the above command Docker will pull the image, run it and start listening:
Unable to find image 'mcr.microsoft.com/dotnet/samples:aspnetapp' locally
aspnetapp: Pulling from dotnet/samples
45b42c59be33: Extracting [=========================>                         ]  13.57MB/27.1MB
752dcc4c3a04: Download complete
5ccb476d6b8b: Download complete
513626bd05cb: Downloading [======================>                            ]  472.8kB/1.
...
Status: Downloaded newer image for mcr.microsoft.com/dotnet/samples:aspnetapp
info: Microsoft.Hosting.Lifetime[0]
      Now listening on: http://[::]:80
If you navigate to http://localhost:8000/, you’ll see the app running there—a Linux container, running on Windows 🤯
The interesting thing, which I didn’t realise until I installed it, is that Docker Desktop for Windows installs a very nice UI for managing your containers!
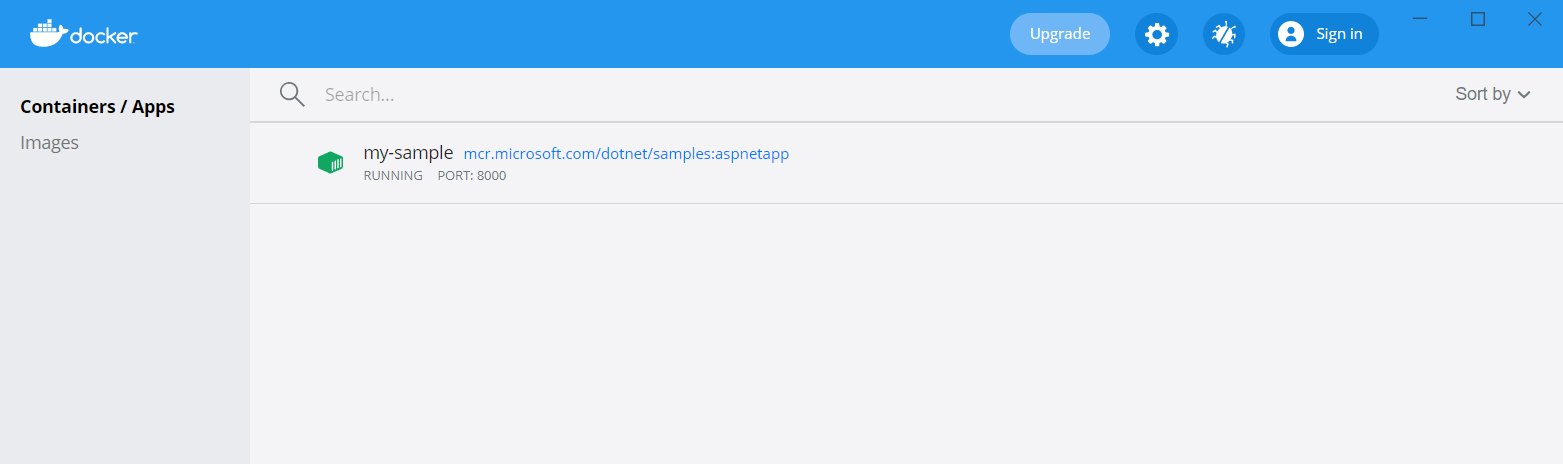
If you click on the my-sample container row, you’ll see the logs for the container:

You can also inspect the environment variables, view stats about the container, or click CLI to open a shell inside (exec into) the container! You can do all these things from the command line obviously, and if you’re automating things, that’s definitely the right option. For casual or local development, personally I find you can’t beat a nice GUI!
Summary
In this post I described how to Install WSL, upgrade it to WSL 2, and how to install Docker Desktop. This requires a restart of Windows and a logout which is a bit annoying, but otherwise it went very smoothly. The Docker Desktop UI also looks very handy, in particular the ability to exec into a container—I’m always getting the CLI command wrong, so that will be very unseful!
Andrew Lock | .Net Escapades
![]() Want an email when
Want an email when
there’s new posts?
This is a very straightforward guide to install Docker Desktop on Windows 10. In this case, maybe too straightforward. Remember last time I tried installing Docker Desktop? In case you forgot, here is the error the installer threw at me back then:

Since I obtained the 20H1 Windows update today, I ran the same the Docker Desktop installer once more. Eventually, the checks passed.

It took a few minutes to start writing this post, finally, the installation completes:

Consequently, after the restart, I got a message about enabling virtualization in the BIOS. Now, I cannot complain since it didn’t take long how to figure that out. As little as one google search did the trick.

Although I got an error for the 8239123289th time after restarting, there was some hope. Indeed, this time, I don’t have to wait a few months and even get a link to fix it in the alert.

As soon as I realized, I clicked the link to install the thing:

Once that ultimate installation completed, after a restart, Docker runs, finally.

Let’s run the hello-world container to validate that Docker is working properly:

Wrapping up
There you go, if you follow these steps you too will be able to run Docker on Windows the same way you can on Mac or Linux. Tell your friends that can’t or won’t get Windows Professional that they can install docker desktop on Windows 10 Home for free.
Don’t hesitate to comment on posts to let me know what topics you would like me to dig into.
Thanks for reading, feel free to subscribe to this blog for more tech content (input just below), to follow me on Twitter here and to check out my latest podcast episode right there.
See you next time!
If you’ve ever tried to install Docker for Windows, you’ve probably came to realize that the installer won’t run on Windows 10 Home. Only Windows Pro, Enterprise or Education support Docker. Upgrading your Windows license is pricey, and also pointless, since you can still run Linux Containers on Windows without relying on Hyper-V technology, a requirement for Docker for Windows.
If you plan on running Windows Containers, you’ll need a specific version and build of Windows Server. Check out the Windows container version compatibility matrix for details.
99.999% of the time, you only need a Linux Container, since it supports software built using open-source and .NET technologies. In addition, Linux Containers can run on any distro and on popular CPU architectures, including x86_64, ARM and IBM.
In this tutorial, I’ll show you how to quickly setup a Linux VM on Windows Home running Docker Engine with the help of Docker Machine. Here’s a list of software you’ll need to build and run Docker containers:
- Docker Machine: a CLI tool for installing Docker Engine on virtual hosts
- Docker Engine: runs on top of the Linux Kernel; used for building and running containers
- Docker Client: a CLI tool for issuing commands to Docker Engine via REST API
- Docker Compose: a tool for defining and running multi-container applications
I’ll show how to perform the installation in the following environments:
- On Windows using Git Bash
- On Windows Subsystem for Linux 2 (running Ubuntu 18.04)
First, allow me to explain how the Docker installation will work on Windows.
Want to build more of a foundation in Docker knowledge? Read Learning Docker – Second Edition on SitePoint Premium.
How it Works
As you probably know, Docker requires a Linux kernel to run Linux Containers. For this to work on Windows, you’ll need to set up a Linux virtual machine to run as guest in Windows 10 Home.
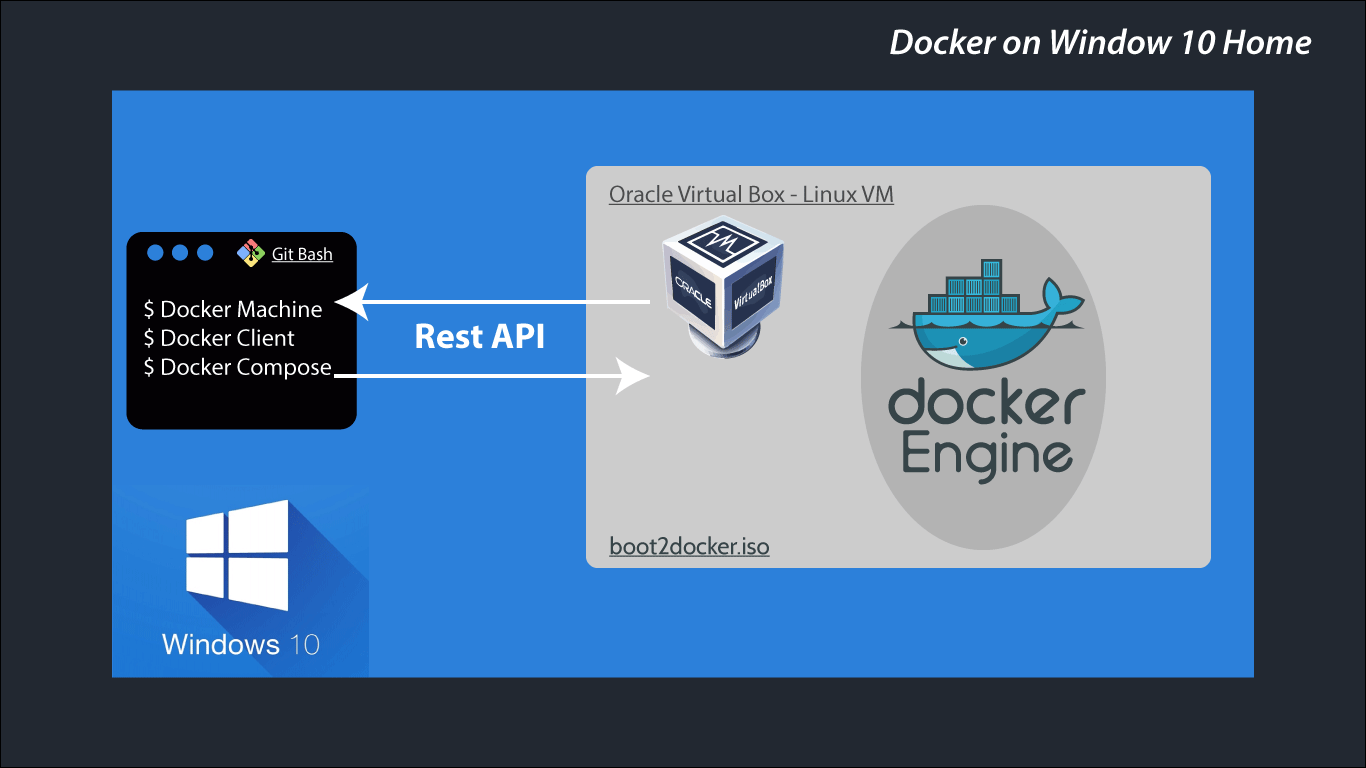
Setting up the Linux VM can be done manually. The easiest way is to use Docker Machine to do this work for you by running a single command. This Docker Linux VM can either run on your local system or on a remote server. Docker client will use SSH to communicate with Docker Engine. Whenever you create and run images, the actual process will happen within the VM, not on your host (Windows).
Let’s dive into the next section to set up the environment needed to install Docker.
Initial Setup
You may or may not have the following applications installed on your system. I’ll assume you don’t. If you do, make sure to upgrade to the latest versions. I’m also assuming you’re running the latest stable version of Windows. At the time of writing, I’m using Windows 10 Home version 1903. Let’s start installing the following:
-
Install Git Bash for Windows. This will be our primary terminal for running Docker commands.
-
Install Chocolatey, a package manager for Windows. It will make the work of installing the rest of the programs easier.
-
Install VirtualBox and its extension. Alternatively, If you have finished installing Chocolatey, you can simply execute this command inside an elevated PowerShell terminal:
C:\ choco install virtualbox -
If you’d like to try running Docker inside the WSL2 environment, you’ll need to set up WSL2 first. You can follow this tutorial for step-by-step instructions.
Docker Engine Setup
Installing Docker Engine is quite simple. First we need to install Docker Machine.
-
Install Docker Machine by following instructions on this page. Alternatively, you can execute this command inside an elevated PowerShell terminal:
C:\ choco install docker-machine -
Using Git Bash terminal, use Docker Machine to install Docker Engine. This will download a Linux image containing the Docker Engine and have it run as a VM using VirtualBox. Simply execute the following command:
$ docker-machine create --driver virtualbox default -
Next, we need to configure which ports are exposed when running Docker containers. Doing this will allow us to access our applications via
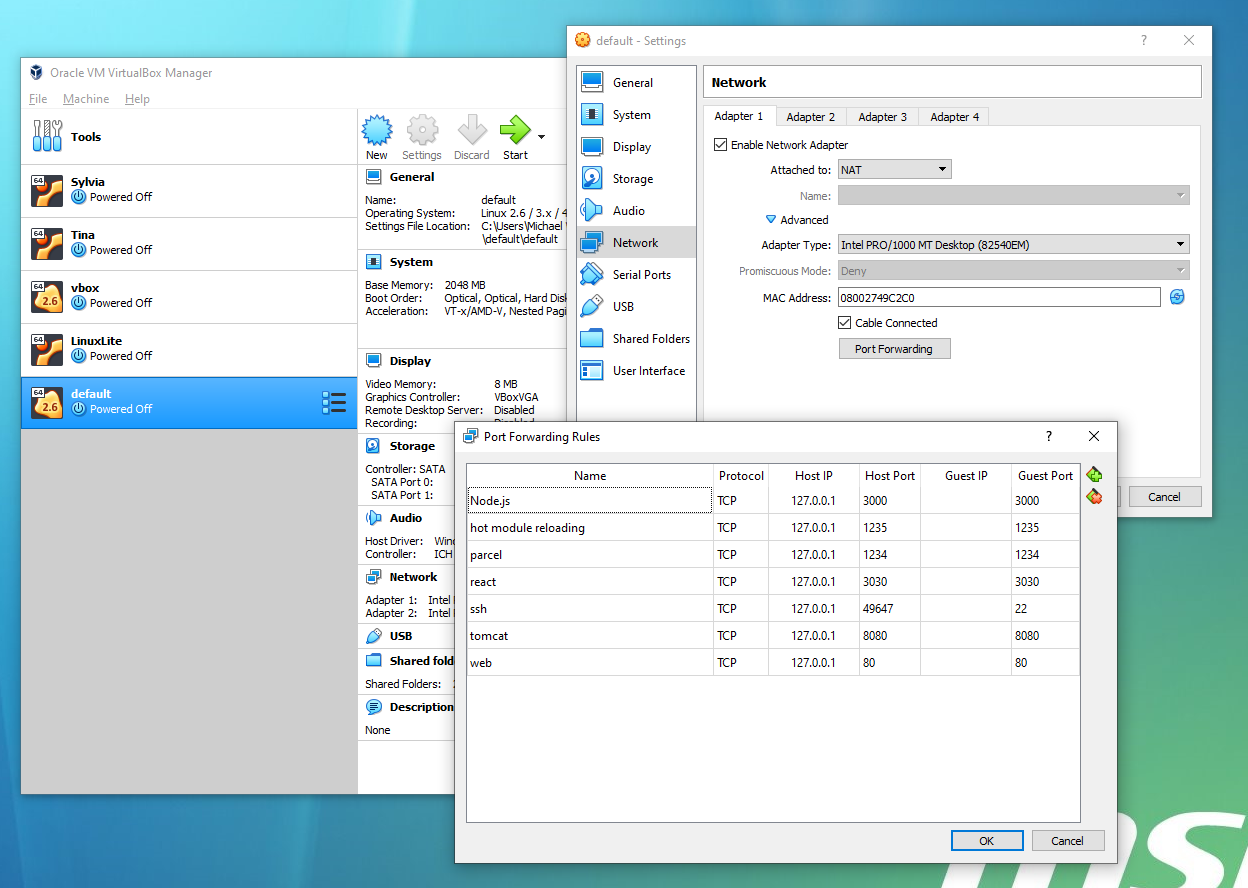
localhost<:port>. Feel free to add as many as you want. To do this, you’ll need to launch Oracle VM VirtualBox from your start menu. Select default VM on the side menu. Next click on Settings > Network > Adapter 1 > Port Forwarding. You should find thesshforwarding port already set up for you. You can add more like so:
-
Next, we need to allow Docker to mount volumes located on your hard drive. By default, you can only mount from the
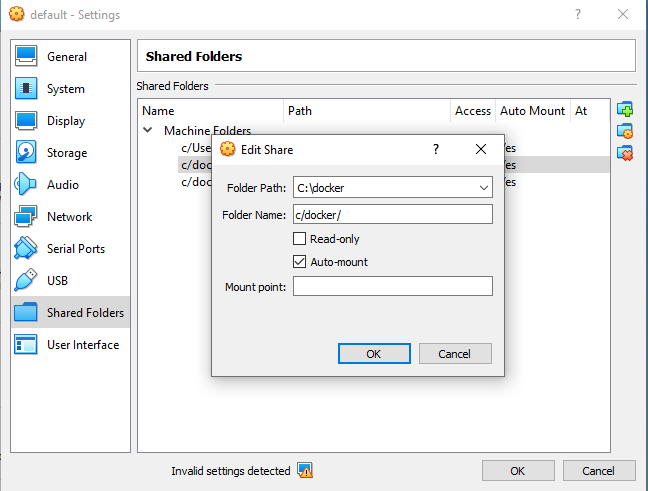
C://Users/directory. To add a different path, simply go to Oracle VM VirtualBox GUI. Select default VM and go to Settings > Shared Folders. Add a new one by clicking the plus symbol. Enter the fields like so. If there’s an option called Permanent, enable it. -
To get rid of the invalid settings error as seen in the above screenshot, simply increase Video Memory under the Display tab in the settings option. Video memory is not important in this case, as we’ll run the VM in headless mode.
-
To start the Linux VM, simply execute this command in Git Bash. The Linux VM will launch. Give it some time for the boot process to complete. It shouldn’t take more than a minute. You’ll need to do this every time you boot your host OS:
$ docker-machine start vbox -
Next, we need to set up our Docker environment variables. This is to allow the Docker client and Docker Compose to communicate with the Docker Engine running in the Linux VM,
default. You can do this by executing the commands in Git Bash:# Print out docker machine instance settings $ docker-machine env default # Set environment variables using Linux 'export' command $ eval $(docker-machine env default --shell linux)You’ll need to set the environment variables every time you start a new Git Bash terminal. If you’d like to avoid this, you can copy
evaloutput and save it in your.bashrcfile. It should look something like this:export DOCKER_TLS_VERIFY="1" export DOCKER_HOST="tcp://192.168.99.101:2376" export DOCKER_CERT_PATH="C:\Users\Michael Wanyoike\.docker\machine\machines\default" export DOCKER_MACHINE_NAME="default" export COMPOSE_CONVERT_WINDOWS_PATHS="true"IMPORTANT: for the
DOCKER_CERT_PATH, you’ll need to change the Linux file path to a Windows path format. Also take note that there’s a chance the IP address assigned might be different from the one you saved every time you start thedefaultVM.
In the next section, we’ll install Docker Client and Docker Compose.
For this section, you’ll need to install the following tools using PowerShell in admin mode. These tools are packaged inside the Docker for Windows installer. Since the installer refuses to run on Windows 10 Home, we’ll install these programs individually using Chocolatey:
C:\ choco install docker-cli
C:\ choco install docker-compose
Once the installation process is complete, you can switch back to Git Bash terminal. You can continue using PowerShell, but I prefer Linux syntax to execute commands. Let’s execute the following commands to ensure Docker is running:
# Start Docker VM
$ docker-machine start default

# Confirm Docker VM is running
$ docker-machine ls

# Configure Docker Envrionment to use Docker Vm
$ eval $(docker-machine env default --shell linux)

# Confirm Docker is connected. Should output Docker VM specs
$ docker info

# Run hello-world docker image. Should output "Hello from Docker"
$ docker run hello-world
If all the above commands run successfully, it means you’ve successfully installed Docker. If you want to try out a more ambitious example, I have a small Node.js application that that I’ve configured to run on Docker containers. First, you’ll need to install GNU Make using PowerShell with Admin privileges:
C:\ choco install make
Next, execute the following commands. Running this Node.js example will ensure you have no problem with exposed ports and mounting volumes on the Windows filesystem. First, navigate to a folder that that you’ve already mounted in VirtualBox settings. Next, execute the following commands:
$ git clone git@github.com:brandiqa/docker-node.git

$ cd docker-node/website

$ make
When you hit the last command, you should expect a similar output:
docker volume create nodemodules
nodemodules
docker-compose -f docker-compose.builder.yml run --rm install
npm WARN optional SKIPPING OPTIONAL DEPENDENCY: fsevents@1.2.9 (node_modules/fsevents):
npm WARN notsup SKIPPING OPTIONAL DEPENDENCY: Unsupported platform for fsevents@1.2.9: wanted {"os":"darwin","arch":"any"} (current: {"os":"linux","arch":"x64"})

audited 9731 packages in 21.405s

docker-compose up
Starting website_dev_1 ... done
Attaching to website_dev_1
dev_1  |
dev_1  | > docker-node@1.0.0 start /usr/src/app
dev_1  | > parcel src/index.html --hmr-port 1235
dev_1  |
dev_1  | Server running at http://localhost:1234
Getting the above output means that volume mounting occurred successfully. Open localhost:1234 to confirm that the website can be accessed. This will confirm that you have properly configured the ports. You can edit the source code, for example change the h1 title in App.jsx. As soon as you save the file, the browser page should refresh automatically. This means hot module reloading works from a Docker container.
I would like to bring your attention to the docker-compose.yml file in use. For hot module reloading to work from a Docker Container in Windows requires the following:
-
When using parcel, specify HMR port in your
package.jsonstart script:parcel src/index.html –hmr-port 1235
-
In the VM’s Port Forwarding rules, make sure these ports are exposed to the host system:
- 1234
- 1235
-
inotifydoesn’t work onvboxsffilesystems, so file changes can’t be detected. The workaround is to set polling forChokidarvia environment variables indocker-compose.yml. Here’s the full file so that you can see how it’s set:version: '3' services: dev: image: node:10-jessie-slim volumes: - nodemodules:/usr/src/app/node_modules - ./:/usr/src/app working_dir: /usr/src/app command: npm start ports: - 1234:1234 - 1235:1235 environment: - CHOKIDAR_USEPOLLING=1 volumes: nodemodules: external: true
Now that we have a fully working implementation of Docker on Windows 10 home, let’s set it up on WSL2 for those who are interested.
Windows Subsystem for Linux 2
Installing Docker on WSL2 is not as straightforward as it seems. Unfortunately, the latest version of Docker Engine can’t run on WSL2. However, there’s an older version, docker-ce=17.09.0~ce-0~ubuntu, that’s capable of running well in WSL2. I won’t be covering that here. Instead, I’ll show you how to access Docker Engine running in the VM we set up earlier from a WSL terminal.
All we have to do is install Docker client and Docker compose. Assuming you’re running WSL2 Ubuntu Terminal, execute the following:
-
Install Docker using the official instructions:
# Update the apt package list. sudo apt-get update -y # Install Docker's package dependencies. sudo apt-get install -y \ apt-transport-https \ ca-certificates \ curl \ software-properties-common # Download and add Docker's official public PGP key. curl -fsSL https://download.docker.com/linux/ubuntu/gpg | sudo apt-key add - # Verify the fingerprint. sudo apt-key fingerprint 0EBFCD88 # Add the `stable` channel's Docker upstream repository. # # If you want to live on the edge, you can change "stable" below to "test" or # "nightly". I highly recommend sticking with stable! sudo add-apt-repository \ "deb [arch=amd64] https://download.docker.com/linux/ubuntu \ $(lsb_release -cs) \ stable" # Update the apt package list (for the new apt repo). sudo apt-get update -y # Install the latest version of Docker CE. sudo apt-get install -y docker-ce # Allow your user to access the Docker CLI without needing root access. sudo usermod -aG docker $USER -
Install Docker Compose using this official guide. An alternative is to use PIP, which will simply install the latest stable version:
# Install Python and PIP. sudo apt-get install -y python python-pip # Install Docker Compose into your user's home directory. pip install --user docker-compose -
Fix the Docker mounting issue in WSL terminal by inserting this content in
/etc/wsl.conf. Create the file if it doesn’t exist:[automount] root = / options = "metdata"You’ll need to restart your machine for this setting to take effect.
-
Assuming that Linux Docker VM is running, you’ll need to connect the Docker tools in the WSL environment to it. If you can access
docker-machinefrom the Ubuntu terminal, run theevalcommand. Otherwise, you can insert the following Docker variable in your.bashrcfile. Here is an example of mine:export DOCKER_HOST="tcp://192.168.99.101:2376" export DOCKER_CERT_PATH="/c/Users/Michael Wanyoike/.docker/machine/machines/vbox" export DOCKER_MACHINE_NAME="vbox" export COMPOSE_CONVERT_WINDOWS_PATHS="true"You’ll need to restart your terminal or execute
source ~/.bashrcfor the settings to take effect. Running Docker commands should work properly in WSL without a hitch.
Switching to Linux
We’re now coming to the end of this article. The steps for setting up Docker in Windows 10 is a bit of a lengthy process. If you plan to reformat your machine, you’ll have to go through the same process again. It’s worse if your job is to install Docker on multiple machines running Windows 10 Home.
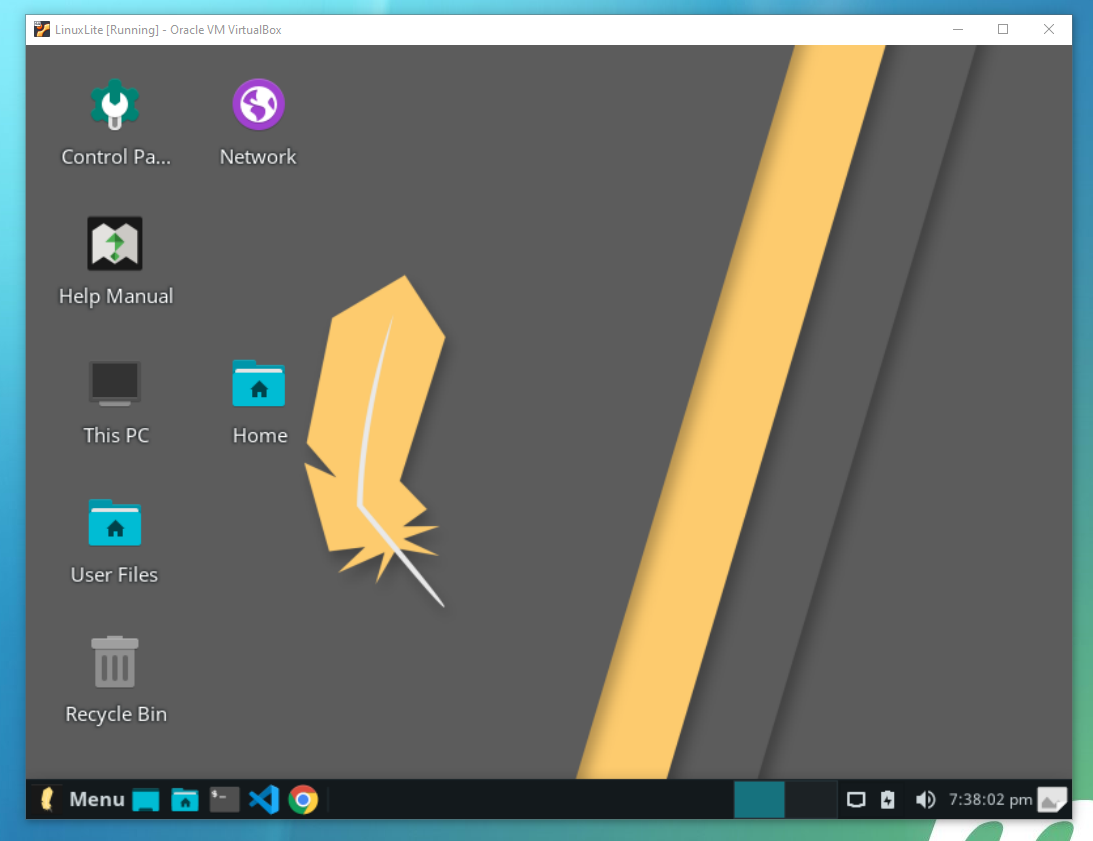
A simpler solution is to switch to Linux for development. You can create a partition and set up dual booting. You can also use VirtualBox to install and run a full Linux Distro inside Windows. Check out which popular distro you’d like to try out. I use Linux Lite because it’s lightweight and is based on Ubuntu. With VirtualBox, you can try out as many distros as you wish.
If you’re using a distro based on Ubuntu, you can install Docker easily with these commands:
# Install https://snapcraft.io/ package manager
sudo apt install snapd

# Install Docker Engine, Docker Client and Docker Compose
sudo snap install docker

# Run Docker commands without sudo
sudo usermod -aG docker $USER
You’ll need to log out and then log in for the last command to take effect. After that, you can run any Docker command without issue. You don’t need to worry about issues with mounting or ports. Docker Engine runs as a service in Linux, which by default starts automatically. No need for provisioning a Docker VM. Everything works out of the box without relying on a hack.
Summary
I hope you’ve had smooth sailing installing and running Docker on Windows 10 Home. I believe this technique should work on older versions such as Windows 7. In case you run into a problem, just go through the instructions to see if you missed something. Do note, however, that I haven’t covered every Docker feature. You may encounter a bug or an unsupported feature that requires a workaround, or may have no solution at all. If that’s the case, I’d recommend you just switch to Linux if you want a smoother development experience using Docker.
Docker is a tool used by developers to compile software using operating system-level virtualization. Docker has container infrastructure, meaning each container is secluded from the other, but all containers are delivered as a single product.
Docker was originally introduced for the Linux platform. But now, by ensuring several prerequisites, it can now be executed on Windows 10 Professional, Enterprise and Education editions. By default, the Windows 10 Home edition was not supported by the Docker. Let’s continue to see how we can enable Docker for the Home edition.
Ensuring the Prerequisites
We must firstly make sure that all prerequisites are met so that the installation of Docker runs smoothly and without interruptions.
- System Requirements:
64-Bit Windows 10 Home edition version 2004 or higher
At least 4 GB RAM - Install Hyper-V on Windows 10 Home edition.
- Enable Hyper-V and Container Windows Feature by pressing Windows Key and R, then enter OptionalFeatures. Make sure the features are checked, press OK to make the changes.
- Enable Virtualization from BIOS settings.
Install Linux Kernel
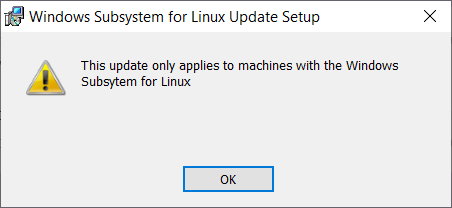
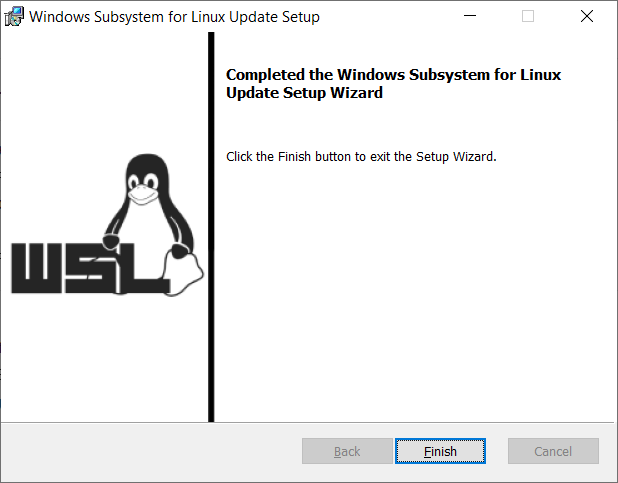
To begin with, we will need to update the WSL2 Linux Kernel. It is essential to do so as the communication between Docker and the hardware of the computer depends upon it. You may download the updated package for WSL2 Linux Kernel here.
When the download is completed, run it by double-clicking it and then press Next to begin the installation. This installation would usually take less than a minute. When completed, press Finish to exit the installation wizard.
Manipulating Windows Registry
- Open up the Registry Editor by pressing Windows Key and R simultaneously to open Run. Type Regedit and press Enter.
- Navigate to the following location within the Registry Editor:
HKEY_Local_Machine -> Software -> Microsoft -> Windows NT -> CurrentVersion - After clicking CurrentVersion, right-click Edition ID in the right window and click Modify.
- Under Value Data, replace CoreN with ProfessionalN.
Install Docker on Windows 10 Home
Next, we move onto the Docker itself. Download the installation package for Windows 10 Home here.
Once the download is complete, run it by double-clicking it. A screen should appear as shown below:

Ensure that Enable WSL 2 Windows Features is checked. Click OK to begin the installation. This step usually takes about 5 minutes as it displays a screen as show below:

Once the installation is completed, press Close and Restart to exit the installation wizard and restart the computer. Once the computer has rebooted, the Docker shall start itself and windows such as the following should popup:

Once the installation is completed, we can now move back to revert to the registry manipulation performed earlier during the process and convert ProfessionalN back to CoreN.
If you are a developer and want to test your applications, Docker is the way to go. Go ahead and install Docker on your Windows 10 Home machine and enjoy testing. Don’t forget to comment below!