Are you new to Docker Windows Images? Are you currently working in a Windows shop and curious to learn about Docker builds for container images? You have come to the right place. The best way to learn about new something is by doing with the docker build and docker build "tag" commands!
Not a reader? Watch this related video tutorial!
Not seeing the video? Make sure your ad blocker is disabled.
In this article, you are going to learn how to create your first Windows Docker image from a Dockerfile using the docker build command.
Let’s get started!
Understanding Docker Container Images
For years, the only way to test or perform development on multiple operating systems (OS) was to have several dedicated physical or virtual machines imaged with the OS version of your choice. This methodology required more hardware and overhead to provision new machines for each software and OS specification.
However, these days the usage of Docker container images has grown partly due to the popularity of micro-service architecture. In response to the rise in Docker’s popularity, Microsoft has started to publicly support Docker images for several flagship products on their Docker Hub page. They have even added native support for images for Windows as a product feature in Windows 10 and Windows Server 2016!
A Docker image is run on a container by using the Docker Engine. Docker images have many benefits such as portability (applicable to multiple environments and platforms), customizable, and highly scalable. As you can see below, unlike traditional virtual machines, the Docker engine runs on a layer between the host OS kernel and the isolated application services that are being containerized.
Understanding Docker Build and Images
The docker build command can be leveraged to automate container image creation, adopt a container-as-code DevOps practice, and integrate containerization into the development cycle of your projects. Dockerfiles are simply text files that contain build instructions used by Docker to create a new container image that is based on an existing image.
The user can specify the base image and list of commands to be run when a container image is deployed or startup for the first time. In this article, you will learn how to create a Windows-based docker image from Dockerfile using a Windows container.
This process has several benefits over using a pre-built container image:
- You are able to rebuild a container image for several versions of Windows – which is great for testing code changes on several platforms.
- You will have more control over what is installed in the container. This will allow you to keep your container size to a minimum.
- For security reasons, you might want to check the container for vulnerabilities and apply security hardening to the base image
Prerequisites/Requirements
This article is a walkthrough on learning about learning how to build a Docker image using a Dockerfile. If you’d like to follow along, ensure that you have the following prerequisites in place.
- Docker for Windows installed. I’ll be using the Docker Community Edition (CE) version 2.1.0.4 in my environment.
- Internet access is needed for downloading the Docker images
- Windows 10+ Operating System (version 1709 is being used for this tutorial)
- Nested virtualization enabled
- 5 GB of free diskspace on your local machine
- PowerShell 5.0+
- This tutorial uses the Visual Studio Code IDE. However feel free to use what ever IDE you’d prefer.
Note: Be sure to enable Windows Containers Configuration when installing Docker.
Getting Prepared
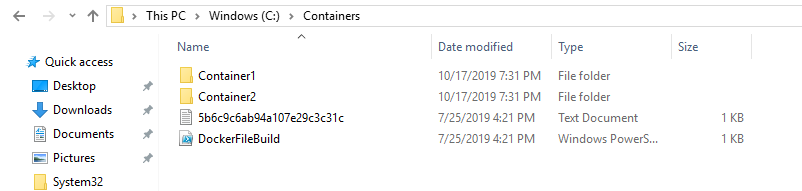
You’ll first need a folder to store all of the Docker images and containers you’ll be building from those images. To do so, open a Powershell or cmd terminal (you’ll be using PowerShell throughout this article) and create a new directory called C:\Containers.
Once the folder is created, change to that directory. This puts the console’s current working directory to C:\Containers to default all downloads to this directory.
PS51> mkdir C:\Containers
PS51> cd C:\Containers
In this article, you’ll get a headstart. Most of the files to work through this project are already available. Once the folder is created, perform a Git pull to copy over the files needed for this article from the TechSnips Github repository to the C:\Containers folder. Once complete, check to make sure that the C:\Containers folder looks like below.
Downloading the IIS Windows Docker Image
The first task to perform is to download a “template” or base image. You’ll be building your own Docker image later but first, you need an image to get started with. You’ll be downloading the latest IIS and Windows Server Core Images that are required for this tutorial. The updated list of images can be found on the official Microsoft Docker hub image page.
Reviewing the Current Docker Base Images
Before downloading the image from the image repository, let’s first review the current Docker base images that you currently have on your local system. To do so, run a PowerShell console as Administrator and then type docker images. This command returns all images on your local system.
As you can see below, the images available are initially empty.

Downloading the Base Image
Now it’s time to download the base IIS image from Docker Hub. To do so, run docker pull as shown below. This process can take some time to complete depending on your internet speeds.
PS51> docker pull mcr.microsoft.com/windows/servercore/iis
Now run docker images and you should have the latest Microsoft Windows Core IIS image available for this tutorial.

Inspecting the Dockerfile
In an earlier step, you had downloaded an existing Dockerfile for this tutorial. Let’s now take a look at exactly what that entails.
Open the C:\Containers\Container1\Dockerfile file in your favorite editor. The contents of this Dockerfile are used to define how the container image will be configured at build time.
You can see an explanation of what each piece of this file does in the in-line comments.
# Specifies that the latest microsoft/iis image will be used as the base image
# Used to specify which base container image will be used by the build process.

# Notice that the naming convention is "**owner/application name : tag name**"
# (shown as microsoft/iis:latest); so in our case the owner of the image is
# Microsoft and the application is IIS with the "latest" tag name being used
# to specify that you will pull the most recent image version available.
FROM microsoft/iis:latest

# Copies contents of the wwwroot folder to the inetpub/wwwroot folder in the new container image
# Used to specify that you want to copy the WWWroot folder to the IIS inetpub WWWroot
# folder in the container. You don't have to specify the full path to your local
# files because docker already has the logic built-in to reference files and folders
# relative to the docker file location on your system. Also, make note that that
# docker will only recognize forward slashes for file paths - since this is a
# Windows based container instead of Linux.
COPY wwwroot c:/inetpub/wwwroot

# Run some PowerShell commands within the new container to set up the image

# Run the PowerShell commands to remove the default IIS files and create a new
# application pool called TestPool
RUN powershell Remove-Item c:/inetpub/wwwroot/iisstart.htm -force
RUN powershell Remove-Item c:/inetpub/wwwroot/iisstart.png -force
RUN powershell Import-Module WebAdministration
RUN powershell New-WebAppPool -Name 'TestPool'

# Exposes port 80 on the new container image
# Used to open TCP port 80 for allowing an http connection to the website.
# However, this line is commented out, because the IIS container has this port
# already open by default.
#EXPOSE 80

# Sets the main command of the container image
# This tells the image to run a service monitor for the w3svc service.
# When this is specified the container will automatically stop running
# if the w3svc service stopped. This line is commented out because of the
# IIS container already has this entrypoint in place by default.
#ENTRYPOINT ["C:\\ServiceMonitor.exe", "w3svc"]
Building a New Docker Image
You’ve got the Dockerfile ready to go and a base IIS image downloaded. Now it’s time to build your new Docker image using the Dockerfile.
To build a new image, use the docker build "tag" command. This command creates the image. For this article, you can see below you’re also using the -t ** option which replaces the “tag” portion. This option allows you to give your new image a friendly tag name and also reference the Dockerfile by specifying the folder path where it resides.
Below you can see an example of ensuring the console is in the C:\Containers directory and then building a new image from the Dockerfile in the C:\Containers\Container1 directory.
PS51> cd C:\Containers
PS51> docker build -t container1 .\Container1
Once started, you can see the progress of the command as it traverses each instruction in the docker file line by line:
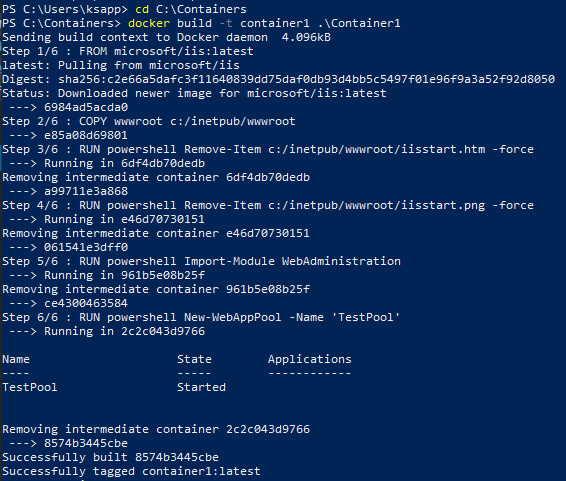
Once done, you should now have a new Docker image!
Now run the docker images command to view the images that are available. You can see below an example of the container1 image created.

Note: The
docker build —helpcommand is a useful parameter to display detailed information on the docker command being run.
Running the Docker Container
At this point, you should have a new image created. It’s time to spin up a container using that image. To bring up a new container, use the docker run command.
The docker run command will bring up a new Docker container based on the container1 image that you created earlier. You can see an example of this below.
Notice that the -d parameter is used. This tells the docker runtime to start the image in the detached mode and then exit when the root process used to run the container exits.
When docker run completes, it returns the ID of the container created. The example below is capturing this ID into a $containerID variable so we can easily reference it later.
PS51> $containerID = docker run -d container1
PS51> $containerID
Once the container is brought up, now run the docker ps command. This command allows you to see which containers are currently running using each image. Notice below that the running image is automatically generated a nickname (busy_habit in this case). This nickname is sometimes used instead of the container ID to manage the container.

Running Code Inside a Docker Container
A new container is built from a new image you just created. Let’s now start actually using that container to run code. Running code inside of a Docker container is done using the docker exec command.
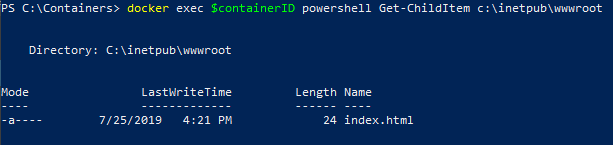
In this example, run docker exec to view PowerShell output for the Get-ChildItem command in the container using the command syntax below. This will ensure the instructions in the Dockerfile to remove the default IIS files succeeded.
PS51> docker exec $containerID powershell Get-ChildItem c:\inetpub\wwwrootYou can see below that the only file that exists is index.html which means the default files were removed.
Now run the ipconfig command in the container to get the local IP address of the container image so that you can try to connect to the IIS website.
PS51> docker exec $containerID ipconfigYou can see below that ipconfig was run in the container just as if running on your local computer and has return all of the IP information.
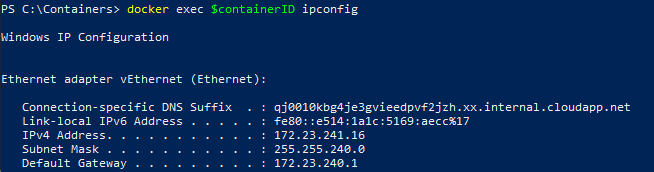
ipconfig in a Docker containerInspecting the IIS Website
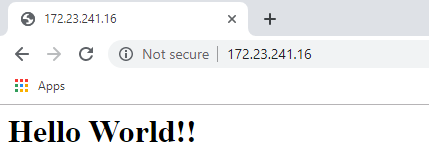
Now it’s time to reveal the fruits of your labor! It’s time to see if the IIS server running in the Docker container is properly serving up the index.html page.
Open a browser and paste the IP4 Address found via ipconfig into the address bar. If all is well, you should see a Hello World!! message like below.
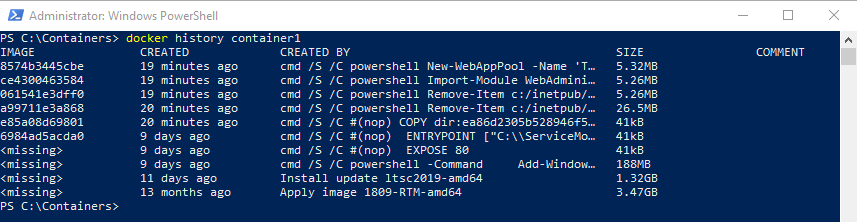
Reviewing Docker History
One useful command to use when working with Docker containers i the docker history command. Although not necessarily related to creating an image or container itself, the docker history command is a useful command that allows you to review changes made to the container image.
PS51> docker history container1You can see below, that docker history returns all of the Dockerfile and PowerShell activity performed on the container1 container you’ve been working with.
docker historyCleaning up the Running Docker Images
The steps below are used to cleanup all stopped containers running on your machine. This will free up diskspace and system resources.
Run the docker ps command to view a list of the containers running on your system:

Now stop the running containers using the docker stop command:
PS51> docker stop <image nick name: busy_haibt in my case>
PS51> docker stop <image nick name: unruffled_driscoll in my case>
Finally you can permanently remove the stopped containers using the docker system prune command.
PS51> docker system prune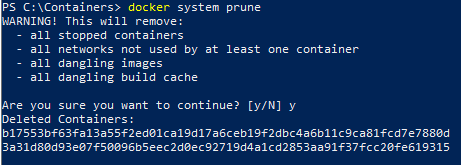
Further Reading
- Creating Your First Docker Windows Server Container
- How to Manage Docker Volumes on Windows
- Author
- Recent Posts

Josh’s primary focus is in Windows security and PowerShell automation. He is a GIAC Certified Windows Security Administrator (GCWN) and GIAC Certified Forensic Analyst (GCFA). You can reach Josh at MSAdministrator.com or on Twitter at @MS_dministrator.
A Dockerfile (no file extension) is a definition file that will build and run a container. That container can be a simple Microsoft IIS web application or Python/Flask application or a simple build/reporting service. A definition file helps us with our operational tasks, especially when we are building services or scripts for the repeatable tasks we face on a daily basis.
Here is an example of a Dockerfile that will set up an IIS web server with ASP.NET 4.5 on a Windows system:
FROM microsoft/iis

RUN mkdir c:\myapp
RUN powershell -NoProfile -Command \
    Install-WindowsFeature NET-Framework-45-ASPNET; \
    Install-WindowsFeature Web-Asp-Net45; \
    Import-Module IISAdministration; \
    New-IISSite -Name "MyApp" -PhysicalPath C:\myapp -BindingInformation "*:8000:"

EXPOSE 8000

ADD bin/ /myapp
Wow, I bet you didn’t think these few lines would set up an entire IIS web application with ASP.NET 4.5, did you? Well, they do! Let’s break this down a bit further.
As explained in my previous post, Docker images are prebuilt «prerequisites» we can install and use when creating and running our container. Within a Dockerfile we specify the base image we want to use by declaring FROM {image name}. In this case, we are using the Docker Hub image for an IIS server Microsoft has provided.
FROM microsoft/iis
The second statement you see uses the RUN command to tell the container, once it is running, to call mkdir c:\myapp. At this point, it creates a new directory inside our container itself called c:\myapp.
At this point Docker has downloaded and built a containerized application based of the Microsoft/iis image with all the base prerequisites needed for setting up an IIS server. In addition we are telling the container also to create a new «virtual» folder inside the container itself. You don’t really have access to this location, meaning you won’t see it on your local file system. At this point, you just need to trust Docker is doing what you specified (and it is).
Moving on, the next statement you see is another RUN command:
RUN powershell -NoProfile -Command \
    Install-WindowsFeature NET-Framework-45-ASPNET; \
    Install-WindowsFeature Web-Asp-Net45; \
    Import-Module IISAdministration; \
    New-IISSite -Name "MyApp" -PhysicalPath C:\myapp -BindingInformation "*:8000:"
This RUN command is a bit different but does essentially the same thing. This time we are now specifying that we should create a new PowerShell «shell» by calling:
powershell -NoProfile -Command
Next, we specify our standard PowerShell commands as normal. You may notice that each line has a «\» at the end of it. The backslash is to ensure line continuation within the Docker container.
Install-WindowsFeature NET-Framework-45-ASPNET; \
Install-WindowsFeature Web-Asp-NET45; \
Import-Module IISAdministration; \
New-IISSite -Name "MyApp" -PhysicalPath C:\myapp -BindingInformation "*:8000:"
We then install the NET-Framework-45-ASPNET and Web-Asp-Net45 Windows features, just like we would do on a normal IIS web server. We then import the IISAdministration PowerShell module and create a new IIS website called MyApp. The New-IISSite cmdlet also allows us to specify a PhysicalPath and a specific port to bind to. In our case, we are binding all requests to port 8000.
Next, we then run the EXPOSE networking option in our Dockerfile. This option is a bit confusing to some, but it allows the individual who is generating the Docker container to specify a network port the individual can use to interact with the container. EXPOSE does not actually expose the network port. To expose a port to the world (or our network), you would need to specify another option when you run your container. For example, you would do the following:
docker run {image} -p 80
This would actually expose the container to a network outside your local system.
Within our folder that contains our Dockerfile, we should also have a folder named bin. Within this folder, we should have a basic HTML file called index.html with the following content:
<!DOCTYPE html PUBLIC "-//IETF//DTD HTML 2.0//EN">
<HTML>
   <HEAD>
      <TITLE>
         Hello from my Docker for Windows Container!
      </TITLE>
   </HEAD>
<BODY>
   <H1>Hi</H1>
   <P>This is very minimal "hello world" HTML document, but it's running within Docker for Windows</P>
</BODY>
</HTML>
The last statement in our Dockerfile is the ADD command. This command will add files or scripts or whatever you have specified to the container.
ADD bin/ /myapp
How the ADD command works is that it takes the current directory holding your Dockerfile, and if you have specified a specific folder, like bin/, it would add this directory and all of its contents to /myapp within the Docker container. Here’s a visual representation of this:

Add files from local file system to your Docker container
Now that we have our Dockerfile and our bin/index.html in the same folder, we will now build and run our new container!
To run our new container, open up your PowerShell console. Next, change directories to the folder container for your Dockerfile and bin/index.html folder. For me, I have these located at C:\Docker For Windows Example:
[Open PowerShell Console]
cd 'C:\Docker For Windows Example'
docker build .
Please note that the full command is docker build . The period at the end is needed, and it references the location of our Dockerfile.
After we have pulled down our image from Docker Hub, we should now have a new IIS website set up and running our index.html page. You can view it by going to your browser and going to:
http://127.0.0.1/index.html
Besides the options I mentioned in our example, you have additional commands available that I believe you will find extremely useful. These additional commands are:
ENTRYPOINT/CMD: You may see this command as either ENTRYPOINT or CMD, but there are only minor differences between the two. An example of how to use CMD is as follows:
General Example: CMD ["executable","param1","param2"]
Python Example: CMD ["python", "/usr/src/app/setup.py"]
PowerShell Example: CMD [powershell.exe, -executionpolicy, bypass, c:\startup.ps1]
ENV: The ENV statement allows you to specify environmental variables within the container you are running. These can be great for a handful of variables, but this command does slow down your build process.
WORKDIR: WORKDIR allows you to set the working directory within a container. This is great if you want to use relative paths within your container. We’d typically use this before we call our RUN, CMD, ENTRYPOINT, etc. commands in our Dockerfile
You can find more information about all the commands available by visiting Docker’s official documentation. Please view this documentation here.
Now that we understand the basics on building containers, we should be familiar enough to start playing around with all the available images on Docker Hub and even starting to create our own.
In the next segment of this series, we will go a bit further and talk about using docker-compose. This amazing feature will allow you to create multiple containers simultaneously. Why is this useful? Imagine creating an application that has both a front-end UI and a back-end database. In the meantime, please check out more information about Docker Compose here.
![]()
In this tutorial, I will demonstrate how to host an ASP.NET Core 2.2 application on Windows Containers by using a Docker image. A Docker image will be packaged with an ASP.NET Core application that will be run when a container is spun up.
Before we get started with creating a Docker image. Let’s make sure we have prerequisites done.
Prerequisites
- Installing docker-cli and other components to get started
- Visual Studio code.
- Docker extension for visual studio code.
Once you have the prerequisites, we will use a publicly available ASP.NET Core base image from Microsoft. Microsoft maintains their Docker images on Docker hub. Docker hub is a container registry to manage your Docker images either by exposing the image publicly or maintaining it privately. Private image responsibilities cost money. Visit Docker Hub website to learn more about image repository management.
Step 1: Open the PowerShell console as an administrator
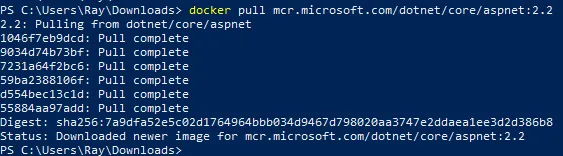
Step 2: Let’s get started by pulling ASP.NET Core 2.2 Docker image from Docker hub by executing the below command.
docker pull mcr.microsoft.com/dotnet/core/aspnet:2.2Your output should look similar to what is shown below:
Step 3: Create a folder with your preference name whatever you prefer. I will use c:\docker\ for demonstration purposes.
Step 4: Download ASP.NET Core application package from this URL.
Invoke-WebRequest -UseBasicParsing -OutFile c:\docker\WebAppCore2.2.zip https://github.com/rahilmaknojia/WebAppCore2.2/archive/master.zipWhat we are doing in the above command is downloading packaged code that is already built to save time on building a package.
Step 5: Extract WebAppCore2.2.zip by using the PowerShell 5.0 native command. If you do not have PowerShell 5.0 and above, you will have to manually extract the package.
Expand-Archive c:\docker\WebAppCore2.2.zip -DestinationPath c:\docker\ -Force Step 6: Now let’s create a Docker file in c:\docker folder.
New-Item -Path C:\docker\Dockerfile -ItemType FileStep 7: Go ahead and open C:\docker folder path in Visual Studio Code.
Step 8: Now we will open Dockerfile by double-clicking on the file in Visual Studio Code to start writing the required steps to build an image.
Copy and paste the code below into Dockerfile.
# Pull base image from Docker hub
FROM mcr.microsoft.com/dotnet/core/aspnet:2.2

# Create working directory
RUN mkdir C:\\app

# Set a working directory
WORKDIR c:\\app

# Copy package from your machine to the image. Also known as staging a package
COPY WebAppCore2.2-master/Package/* c:/app/

# Run the application
ENTRYPOINT ["dotnet", "WebAppCore2.2.dll"]
What we told the
Dockerfileis to pull an asp.net core base image from Docker hub. Then we ran a command to create a directory calledappinc:\apppath. We also told the container to setc:\appas a working directory. That way we can access binary directly when the container is spun up. We also added a step to copy all the binaries fromc:\docker\WebAppCore2.2-master\Package\to destination path in containerc:\app. Once we had the package staged in the container, we told it to run the application by executingdotnet WebAppCore2.2.dllso that the app would be accessible from outside the container. To learn more aboutDockerfilefor Windows, check out this Microsoft documentation.Now that you have the required steps to build an image, let’s go ahead with the below steps.
Step 9: Navigate to Dockerfile working directory from PowerShell console. If you are already in that path, you can ignore it.
Step 10: Execute the below command to build a container image.
docker build -t demo/webappcore:2.2.0The above command will create a Docker image under demo path. With the image name called as webappcore and version 2.2.0.
Your output should look like below once it is successful:
PS C:\docker> docker build -t demo/webappcore:2.2.0 .
Sending build context to Docker daemon  9.853MB
Step 1/5 : FROM mcr.microsoft.com/dotnet/core/aspnet:2.2
 ---> 36e5a01ef28f
Step 2/5 : RUN mkdir C:\\app
 ---> Using cache
 ---> 8f88e30dcdd0
Step 3/5 : WORKDIR c:\\app
 ---> Using cache
 ---> 829e48e68bda
Step 4/5 : COPY WebAppCore2.2-master/Package/* c:/app/
 ---> Using cache
 ---> 6bfd9ae4b731
Step 5/5 : ENTRYPOINT ["dotnet", "WebAppCore2.2.dll"]
 ---> Running in 4b5488d5ea5f
Removing intermediate container 4b5488d5ea5f
 ---> 9729270fe1ac
Successfully built 9729270fe1ac
Successfully tagged demo/webappcore:2.2.0
Step 11: Once the image has been built, you are now ready to run the container. Execute the below command.
docker run --name webappcore --rm -it -p 8000:80 demo/webappcore:2.2.0The above command will create a new container called webappcore with parameters.
--rmis used to automatically remove the container after it is shutdown.-itwill open a session into your container and output all the logs.-pis used for creating an external port and assigning it to the internal port of a container. Port 8000 is exposed to outside containers, and port 80 is used to access the app within the container.demo/webappcore:2.2.0is the path to the Docker image to run as a container.
Output of a running container

Step 12: Browsing your application from your local machine localhost:8000.
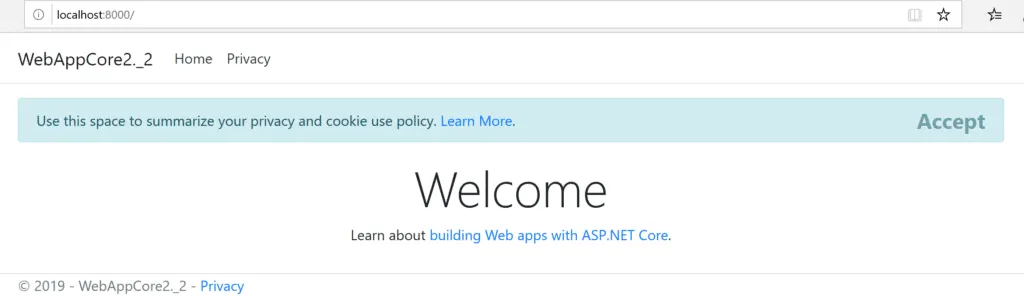
This is it! You ran your first Docker container in your local environment. Thank you for following the tutorial. Please comment below for any issue or feedback you would like to share.
Docker can build images automatically by reading the instructions from a
Dockerfile. A Dockerfile is a text document that contains all the commands a
user could call on the command line to assemble an image. Using docker build
users can create an automated build that executes several command-line
instructions in succession.
This page describes the commands you can use in a Dockerfile. When you are
done reading this page, refer to the Dockerfile Best
Practices for a tip-oriented guide.
Usage
The docker build command builds an image from
a Dockerfile and a context. The build’s context is the files at a specified
location PATH or URL. The PATH is a directory on your local filesystem.
The URL is a the location of a Git repository.
A context is processed recursively. So, a PATH includes any subdirectories and
the URL includes the repository and its submodules. A simple build command
that uses the current directory as context:
$ docker build .
Sending build context to Docker daemon  6.51 MB
...
The build is run by the Docker daemon, not by the CLI. The first thing a build
process does is send the entire context (recursively) to the daemon. In most
cases, it’s best to start with an empty directory as context and keep your
Dockerfile in that directory. Add only the files needed for building the
Dockerfile.
Warning: Do not use your root directory,
/, as thePATHas it causes
the build to transfer the entire contents of your hard drive to the Docker
daemon.
To use a file in the build context, the Dockerfile refers to the file specified
in an instruction, for example, a COPY instruction. To increase the build’s
performance, exclude files and directories by adding a .dockerignore file to
the context directory. For information about how to create a .dockerignore
file see the documentation on this page.
Traditionally, the Dockerfile is called Dockerfile and located in the root
of the context. You use the -f flag with docker build to point to a Dockerfile
anywhere in your file system.
$ docker build -f /path/to/a/Dockerfile .
You can specify a repository and tag at which to save the new image if
the build succeeds:
$ docker build -t shykes/myapp .
To tag the image into multiple repositories after the build,
add multiple -t parameters when you run the build command:
$ docker build -t shykes/myapp:1.0.2 -t shykes/myapp:latest .
The Docker daemon runs the instructions in the Dockerfile one-by-one,
committing the result of each instruction
to a new image if necessary, before finally outputting the ID of your
new image. The Docker daemon will automatically clean up the context you
sent.
Note that each instruction is run independently, and causes a new image
to be created — so RUN cd /tmp will not have any effect on the next
instructions.
Whenever possible, Docker will re-use the intermediate images (cache),
to accelerate the docker build process significantly. This is indicated by
the Using cache message in the console output.
(For more information, see the Build cache section) in the
Dockerfile best practices guide:
$ docker build -t svendowideit/ambassador .
Sending build context to Docker daemon 15.36 kB
Step 1 : FROM alpine:3.2
 ---> 31f630c65071
Step 2 : MAINTAINER SvenDowideit@home.org.au
 ---> Using cache
 ---> 2a1c91448f5f
Step 3 : RUN apk update &&      apk add socat &&        rm -r /var/cache/
 ---> Using cache
 ---> 21ed6e7fbb73
Step 4 : CMD env | grep _TCP= | (sed 's/.*_PORT_\([0-9]*\)_TCP=tcp:\/\/\(.*\):\(.*\)/socat -t 100000000 TCP4-LISTEN:\1,fork,reuseaddr TCP4:\2:\3 \&/' && echo wait) | sh
 ---> Using cache
 ---> 7ea8aef582cc
Successfully built 7ea8aef582cc
When you’re done with your build, you’re ready to look into Pushing a
repository to its registry.
Format
Here is the format of the Dockerfile:
# Comment
INSTRUCTION arguments
The instruction is not case-sensitive. However, convention is for them to
be UPPERCASE to distinguish them from arguments more easily.
Docker runs instructions in a Dockerfile in order. The first
instruction must be `FROM` in order to specify the Base
Image from which you are building.
Docker treats lines that begin with # as a comment, unless the line is
a valid parser directive. A # marker anywhere
else in a line is treated as an argument. This allows statements like:
# Comment
RUN echo 'we are running some # of cool things'
Line continuation characters are not supported in comments.
Parser directives
Parser directives are optional, and affect the way in which subsequent lines
in a Dockerfile are handled. Parser directives do not add layers to the build,
and will not be shown as a build step. Parser directives are written as a
special type of comment in the form # directive=value. A single directive
may only be used once.
Once a comment, empty line or builder instruction has been processed, Docker
no longer looks for parser directives. Instead it treats anything formatted
as a parser directive as a comment and does not attempt to validate if it might
be a parser directive. Therefore, all parser directives must be at the very
top of a Dockerfile.
Parser directives are not case-sensitive. However, convention is for them to
be lowercase. Convention is also to include a blank line following any
parser directives. Line continuation characters are not supported in parser
directives.
Due to these rules, the following examples are all invalid:
Invalid due to line continuation:
# direc \
tive=value
Invalid due to appearing twice:
# directive=value1
# directive=value2

FROM ImageName
Treated as a comment due to appearing after a builder instruction:
FROM ImageName
# directive=value
Treated as a comment due to appearing after a comment which is not a parser
directive:
# About my dockerfile
FROM ImageName
# directive=value
The unknown directive is treated as a comment due to not being recognized. In
addition, the known directive is treated as a comment due to appearing after
a comment which is not a parser directive.
# unknowndirective=value
# knowndirective=value
Non line-breaking whitespace is permitted in a parser directive. Hence, the
following lines are all treated identically:
#directive=value
# directive =value
#	directive= value
# directive = value
#	  dIrEcTiVe=value
The following parser directive is supported:
escape
escape
Or
The escape directive sets the character used to escape characters in a
Dockerfile. If not specified, the default escape character is \.
The escape character is used both to escape characters in a line, and to
escape a newline. This allows a Dockerfile instruction to
span multiple lines. Note that regardless of whether the escape parser
directive is included in a Dockerfile, escaping is not performed in
a RUN command, except at the end of a line.
Setting the escape character to ` is especially useful on
Windows, where \ is the directory path separator. ` is consistent
with Windows PowerShell.
Consider the following example which would fail in a non-obvious way on
Windows. The second \ at the end of the second line would be interpreted as an
escape for the newline, instead of a target of the escape from the first \.
Similarly, the \ at the end of the third line would, assuming it was actually
handled as an instruction, cause it be treated as a line continuation. The result
of this dockerfile is that second and third lines are considered a single
instruction:
FROM windowsservercore
COPY testfile.txt c:\\
RUN dir c:\
Results in:
PS C:\John> docker build -t cmd .
Sending build context to Docker daemon 3.072 kB
Step 1 : FROM windowsservercore
 ---> dbfee88ee9fd
Step 2 : COPY testfile.txt c:RUN dir c:
GetFileAttributesEx c:RUN: The system cannot find the file specified.
PS C:\John>
One solution to the above would be to use / as the target of both the COPY
instruction, and dir. However, this syntax is, at best, confusing as it is not
natural for paths on Windows, and at worst, error prone as not all commands on
Windows support / as the path separator.
By adding the escape parser directive, the following Dockerfile succeeds as
expected with the use of natural platform semantics for file paths on Windows:
# escape=`

FROM windowsservercore
COPY testfile.txt c:\
RUN dir c:\
Results in:
PS C:\John> docker build -t succeeds --no-cache=true .
Sending build context to Docker daemon 3.072 kB
Step 1 : FROM windowsservercore
 ---> dbfee88ee9fd
Step 2 : COPY testfile.txt c:\
 ---> 99ceb62e90df
Removing intermediate container 62afbe726221
Step 3 : RUN dir c:\
 ---> Running in a5ff53ad6323
 Volume in drive C has no label.
 Volume Serial Number is 1440-27FA

 Directory of c:\

03/25/2016  05:28 AM    <DIR>          inetpub
03/25/2016  04:22 AM    <DIR>          PerfLogs
04/22/2016  10:59 PM    <DIR>          Program Files
03/25/2016  04:22 AM    <DIR>          Program Files (x86)
04/18/2016  09:26 AM                 4 testfile.txt
04/22/2016  10:59 PM    <DIR>          Users
04/22/2016  10:59 PM    <DIR>          Windows
               1 File(s)              4 bytes
               6 Dir(s)  21,252,689,920 bytes free
 ---> 2569aa19abef
Removing intermediate container a5ff53ad6323
Successfully built 2569aa19abef
PS C:\John>
Environment replacement
Environment variables (declared with the ENV statement) can also be
used in certain instructions as variables to be interpreted by the
Dockerfile. Escapes are also handled for including variable-like syntax
into a statement literally.
Environment variables are notated in the Dockerfile either with
$variable_name or ${variable_name}. They are treated equivalently and the
brace syntax is typically used to address issues with variable names with no
whitespace, like ${foo}_bar.
The ${variable_name} syntax also supports a few of the standard bash
modifiers as specified below:
${variable:-word}indicates that ifvariableis set then the result
will be that value. Ifvariableis not set thenwordwill be the result.${variable:+word}indicates that ifvariableis set thenwordwill be
the result, otherwise the result is the empty string.
In all cases, word can be any string, including additional environment
variables.
Escaping is possible by adding a \ before the variable: \$foo or \${foo},
for example, will translate to $foo and ${foo} literals respectively.
Example (parsed representation is displayed after the #):
FROM busybox
ENV foo /bar
WORKDIR ${foo}   # WORKDIR /bar
ADD . $foo       # ADD . /bar
COPY \$foo /quux # COPY $foo /quux
Environment variables are supported by the following list of instructions in
the Dockerfile:
ADDCOPYENVEXPOSELABELUSERWORKDIRVOLUMESTOPSIGNAL
as well as:
ONBUILD(when combined with one of the supported instructions above)
Note:
prior to 1.4,ONBUILDinstructions did NOT support environment
variable, even when combined with any of the instructions listed above.
Environment variable substitution will use the same value for each variable
throughout the entire command. In other words, in this example:
ENV abc=hello
ENV abc=bye def=$abc
ENV ghi=$abc
will result in def having a value of hello, not bye. However,
ghi will have a value of bye because it is not part of the same command
that set abc to bye.
.dockerignore file
Before the docker CLI sends the context to the docker daemon, it looks
for a file named .dockerignore in the root directory of the context.
If this file exists, the CLI modifies the context to exclude files and
directories that match patterns in it. This helps to avoid
unnecessarily sending large or sensitive files and directories to the
daemon and potentially adding them to images using ADD or COPY.
The CLI interprets the .dockerignore file as a newline-separated
list of patterns similar to the file globs of Unix shells. For the
purposes of matching, the root of the context is considered to be both
the working and the root directory. For example, the patterns
/foo/bar and foo/bar both exclude a file or directory named bar
in the foo subdirectory of PATH or in the root of the git
repository located at URL. Neither excludes anything else.
If a line in .dockerignore file starts with # in column 1, then this line is
considered as a comment and is ignored before interpreted by the CLI.
Here is an example .dockerignore file:
# comment
    */temp*
    */*/temp*
    temp?
This file causes the following build behavior:
| Rule | Behavior |
|---|---|
# comment |
Ignored. |
*/temp* |
Exclude files and directories whose names start with temp in any immediate subdirectory of the root. For example, the plain file /somedir/temporary.txt is excluded, as is the directory /somedir/temp. |
*/*/temp* |
Exclude files and directories starting with temp from any subdirectory that is two levels below the root. For example, /somedir/subdir/temporary.txt is excluded. |
temp? |
Exclude files and directories in the root directory whose names are a one-character extension of temp. For example, /tempa and /tempb are excluded. |
Matching is done using Go’s
filepath.Match rules. A
preprocessing step removes leading and trailing whitespace and
eliminates . and .. elements using Go’s
filepath.Clean. Lines
that are blank after preprocessing are ignored.
Beyond Go’s filepath.Match rules, Docker also supports a special
wildcard string ** that matches any number of directories (including
zero). For example, **/*.go will exclude all files that end with .go
that are found in all directories, including the root of the build context.
Lines starting with ! (exclamation mark) can be used to make exceptions
to exclusions. The following is an example .dockerignore file that
uses this mechanism:
All markdown files except README.md are excluded from the context.
The placement of ! exception rules influences the behavior: the last
line of the .dockerignore that matches a particular file determines
whether it is included or excluded. Consider the following example:
    *.md
    !README*.md
    README-secret.md
No markdown files are included in the context except README files other than
README-secret.md.
Now consider this example:
    *.md
    README-secret.md
    !README*.md
All of the README files are included. The middle line has no effect because
!README*.md matches README-secret.md and comes last.
You can even use the .dockerignore file to exclude the Dockerfile
and .dockerignore files. These files are still sent to the daemon
because it needs them to do its job. But the ADD and COPY commands
do not copy them to the image.
Finally, you may want to specify which files to include in the
context, rather than which to exclude. To achieve this, specify * as
the first pattern, followed by one or more ! exception patterns.
Note: For historical reasons, the pattern . is ignored.
FROM
Or
Or
The FROM instruction sets the Base Image
for subsequent instructions. As such, a valid Dockerfile must have FROM as
its first instruction. The image can be any valid image – it is especially easy
to start by pulling an image from the Public Repositories.
-
FROMmust be the first non-comment instruction in theDockerfile. -
FROMcan appear multiple times within a singleDockerfilein order to create
multiple images. Simply make a note of the last image ID output by the commit
before each newFROMcommand. -
The
tagordigestvalues are optional. If you omit either of them, the builder
assumes alatestby default. The builder returns an error if it cannot match
thetagvalue.
MAINTAINER
The MAINTAINER instruction allows you to set the Author field of the
generated images.
RUN
RUN has 2 forms:
RUN <command>(shell form, the command is run in a shell, which by
default is/bin/sh -con Linux orcmd /S /Con Windows)RUN ["executable", "param1", "param2"](exec form)
The RUN instruction will execute any commands in a new layer on top of the
current image and commit the results. The resulting committed image will be
used for the next step in the Dockerfile.
Layering RUN instructions and generating commits conforms to the core
concepts of Docker where commits are cheap and containers can be created from
any point in an image’s history, much like source control.
The exec form makes it possible to avoid shell string munging, and to RUN
commands using a base image that does not contain the specified shell executable.
The default shell for the shell form can be changed using the SHELL
command.
In the shell form you can use a \ (backslash) to continue a single
RUN instruction onto the next line. For example, consider these two lines:
RUN /bin/bash -c 'source $HOME/.bashrc ;\

echo $HOME'
Together they are equivalent to this single line:
RUN /bin/bash -c 'source $HOME/.bashrc ; echo $HOME'
Note:
To use a different shell, other than ‘/bin/sh’, use the exec form
passing in the desired shell. For example,
RUN ["/bin/bash", "-c", "echo hello"]
Note:
The exec form is parsed as a JSON array, which means that
you must use double-quotes (“) around words not single-quotes (‘).
Note:
Unlike the shell form, the exec form does not invoke a command shell.
This means that normal shell processing does not happen. For example,
RUN [ "echo", "$HOME" ]will not do variable substitution on$HOME.
If you want shell processing then either use the shell form or execute
a shell directly, for example:RUN [ "sh", "-c", "echo $HOME" ].
When using the exec form and executing a shell directly, as in the case for
the shell form, it is the shell that is doing the environment variable
expansion, not docker.Note:
In the JSON form, it is necessary to escape backslashes. This is
particularly relevant on Windows where the backslash is the path separator.
The following line would otherwise be treated as shell form due to not
being valid JSON, and fail in an unexpected way:
RUN ["c:\windows\system32\tasklist.exe"]
The correct syntax for this example is:
RUN ["c:\\windows\\system32\\tasklist.exe"]
The cache for RUN instructions isn’t invalidated automatically during
the next build. The cache for an instruction like
RUN apt-get dist-upgrade -y will be reused during the next build. The
cache for RUN instructions can be invalidated by using the --no-cache
flag, for example docker build --no-cache.
See the Dockerfile Best Practices
guide for more information.
The cache for RUN instructions can be invalidated by ADD instructions. See
below for details.
Known issues (RUN)
-
Issue 783 is about file
permissions problems that can occur when using the AUFS file system. You
might notice it during an attempt torma file, for example.For systems that have recent aufs version (i.e.,
dirperm1mount option can
be set), docker will attempt to fix the issue automatically by mounting
the layers withdirperm1option. More details ondirperm1option can be
found ataufsman pageIf your system doesn’t have support for
dirperm1, the issue describes a workaround.
CMD
The CMD instruction has three forms:
CMD ["executable","param1","param2"](exec form, this is the preferred form)CMD ["param1","param2"](as default parameters to ENTRYPOINT)CMD command param1 param2(shell form)
There can only be one CMD instruction in a Dockerfile. If you list more than one CMD
then only the last CMD will take effect.
The main purpose of a CMD is to provide defaults for an executing
container. These defaults can include an executable, or they can omit
the executable, in which case you must specify an ENTRYPOINT
instruction as well.
Note:
IfCMDis used to provide default arguments for theENTRYPOINT
instruction, both theCMDandENTRYPOINTinstructions should be specified
with the JSON array format.
Note:
The exec form is parsed as a JSON array, which means that
you must use double-quotes (“) around words not single-quotes (‘).
Note:
Unlike the shell form, the exec form does not invoke a command shell.
This means that normal shell processing does not happen. For example,
CMD [ "echo", "$HOME" ]will not do variable substitution on$HOME.
If you want shell processing then either use the shell form or execute
a shell directly, for example:CMD [ "sh", "-c", "echo $HOME" ].
When using the exec form and executing a shell directly, as in the case for
the shell form, it is the shell that is doing the environment variable
expansion, not docker.
When used in the shell or exec formats, the CMD instruction sets the command
to be executed when running the image.
If you use the shell form of the CMD, then the <command> will execute in
/bin/sh -c:
FROM ubuntu
CMD echo "This is a test." | wc -
If you want to run your <command> without a shell then you must
express the command as a JSON array and give the full path to the executable.
This array form is the preferred format of CMD. Any additional parameters
must be individually expressed as strings in the array:
FROM ubuntu
CMD ["/usr/bin/wc","--help"]
If you would like your container to run the same executable every time, then
you should consider using ENTRYPOINT in combination with CMD. See
ENTRYPOINT.
If the user specifies arguments to docker run then they will override the
default specified in CMD.
Note:
don’t confuseRUNwithCMD.RUNactually runs a command and commits
the result;CMDdoes not execute anything at build time, but specifies
the intended command for the image.
LABEL
LABEL <key>=<value> <key>=<value> <key>=<value> ...
The LABEL instruction adds metadata to an image. A LABEL is a
key-value pair. To include spaces within a LABEL value, use quotes and
backslashes as you would in command-line parsing. A few usage examples:
LABEL "com.example.vendor"="ACME Incorporated"
LABEL com.example.label-with-value="foo"
LABEL version="1.0"
LABEL description="This text illustrates \
that label-values can span multiple lines."
An image can have more than one label. To specify multiple labels,
Docker recommends combining labels into a single LABEL instruction where
possible. Each LABEL instruction produces a new layer which can result in an
inefficient image if you use many labels. This example results in a single image
layer.
LABEL multi.label1="value1" multi.label2="value2" other="value3"
The above can also be written as:
LABEL multi.label1="value1" \
      multi.label2="value2" \
      other="value3"
Labels are additive including LABELs in FROM images. If Docker
encounters a label/key that already exists, the new value overrides any previous
labels with identical keys.
To view an image’s labels, use the docker inspect command.
"Labels": {
    "com.example.vendor": "ACME Incorporated"
    "com.example.label-with-value": "foo",
    "version": "1.0",
    "description": "This text illustrates that label-values can span multiple lines.",
    "multi.label1": "value1",
    "multi.label2": "value2",
    "other": "value3"
},
EXPOSE
EXPOSE <port> [<port>...]
The EXPOSE instruction informs Docker that the container listens on the
specified network ports at runtime. EXPOSE does not make the ports of the
container accessible to the host. To do that, you must use either the -p flag
to publish a range of ports or the -P flag to publish all of the exposed
ports. You can expose one port number and publish it externally under another
number.
To set up port redirection on the host system, see using the -P
flag. The Docker network feature supports
creating networks without the need to expose ports within the network, for
detailed information see the overview of this
feature).
ENV
ENV <key> <value>
ENV <key>=<value> ...
The ENV instruction sets the environment variable <key> to the value
<value>. This value will be in the environment of all “descendant”
Dockerfile commands and can be replaced inline in
many as well.
The ENV instruction has two forms. The first form, ENV <key> <value>,
will set a single variable to a value. The entire string after the first
space will be treated as the <value> — including characters such as
spaces and quotes.
The second form, ENV <key>=<value> ..., allows for multiple variables to
be set at one time. Notice that the second form uses the equals sign (=)
in the syntax, while the first form does not. Like command line parsing,
quotes and backslashes can be used to include spaces within values.
For example:
ENV myName="John Doe" myDog=Rex\ The\ Dog \
    myCat=fluffy
and
ENV myName John Doe
ENV myDog Rex The Dog
ENV myCat fluffy
will yield the same net results in the final container, but the first form
is preferred because it produces a single cache layer.
The environment variables set using ENV will persist when a container is run
from the resulting image. You can view the values using docker inspect, and
change them using docker run --env <key>=<value>.
Note:
Environment persistence can cause unexpected side effects. For example,
settingENV DEBIAN_FRONTEND noninteractivemay confuse apt-get
users on a Debian-based image. To set a value for a single command, use
RUN <key>=<value> <command>.
ADD
ADD has two forms:
ADD <src>... <dest>ADD ["<src>",... "<dest>"](this form is required for paths containing
whitespace)
The ADD instruction copies new files, directories or remote file URLs from <src>
and adds them to the filesystem of the container at the path <dest>.
Multiple <src> resource may be specified but if they are files or
directories then they must be relative to the source directory that is
being built (the context of the build).
Each <src> may contain wildcards and matching will be done using Go’s
filepath.Match rules. For example:
ADD hom* /mydir/        # adds all files starting with "hom"
ADD hom?.txt /mydir/    # ? is replaced with any single character, e.g., "home.txt"
The <dest> is an absolute path, or a path relative to WORKDIR, into which
the source will be copied inside the destination container.
ADD test relativeDir/          # adds "test" to `WORKDIR`/relativeDir/
ADD test /absoluteDir/         # adds "test" to /absoluteDir/
All new files and directories are created with a UID and GID of 0.
In the case where <src> is a remote file URL, the destination will
have permissions of 600. If the remote file being retrieved has an HTTP
Last-Modified header, the timestamp from that header will be used
to set the mtime on the destination file. However, like any other file
processed during an ADD, mtime will not be included in the determination
of whether or not the file has changed and the cache should be updated.
Note:
If you build by passing aDockerfilethrough STDIN (docker), there is no build context, so the
build - < somefileDockerfile
can only contain a URL basedADDinstruction. You can also pass a
compressed archive through STDIN: (docker build - < archive.tar.gz),
theDockerfileat the root of the archive and the rest of the
archive will get used at the context of the build.
Note:
If your URL files are protected using authentication, you
will need to useRUN wget,RUN curlor use another tool from
within the container as theADDinstruction does not support
authentication.
Note:
The first encounteredADDinstruction will invalidate the cache for all
following instructions from the Dockerfile if the contents of<src>have
changed. This includes invalidating the cache forRUNinstructions.
See theDockerfileBest Practices
guide for more information.
ADD obeys the following rules:
-
The
<src>path must be inside the context of the build;
you cannotADD ../something /something, because the first step of a
docker buildis to send the context directory (and subdirectories) to the
docker daemon. -
If
<src>is a URL and<dest>does not end with a trailing slash, then a
file is downloaded from the URL and copied to<dest>. -
If
<src>is a URL and<dest>does end with a trailing slash, then the
filename is inferred from the URL and the file is downloaded to
<dest>/<filename>. For instance,ADD http://example.com/foobar /would
create the file/foobar. The URL must have a nontrivial path so that an
appropriate filename can be discovered in this case (http://example.com
will not work). -
If
<src>is a directory, the entire contents of the directory are copied,
including filesystem metadata.
Note:
The directory itself is not copied, just its contents.
-
If
<src>is a local tar archive in a recognized compression format
(identity, gzip, bzip2 or xz) then it is unpacked as a directory. Resources
from remote URLs are not decompressed. When a directory is copied or
unpacked, it has the same behavior astar -x: the result is the union of:- Whatever existed at the destination path and
- The contents of the source tree, with conflicts resolved in favor
of “2.” on a file-by-file basis.
Note:
Whether a file is identified as a recognized compression format or not
is done solely based on the contents of the file, not the name of the file.
For example, if an empty file happens to end with.tar.gzthis will not
be recognized as a compressed file and will not generate any kind of
decompression error message, rather the file will simply be copied to the
destination. -
If
<src>is any other kind of file, it is copied individually along with
its metadata. In this case, if<dest>ends with a trailing slash/, it
will be considered a directory and the contents of<src>will be written
at<dest>/base(<src>). -
If multiple
<src>resources are specified, either directly or due to the
use of a wildcard, then<dest>must be a directory, and it must end with
a slash/. -
If
<dest>does not end with a trailing slash, it will be considered a
regular file and the contents of<src>will be written at<dest>. -
If
<dest>doesn’t exist, it is created along with all missing directories
in its path.
COPY
COPY has two forms:
COPY <src>... <dest>COPY ["<src>",... "<dest>"](this form is required for paths containing
whitespace)
The COPY instruction copies new files or directories from <src>
and adds them to the filesystem of the container at the path <dest>.
Multiple <src> resource may be specified but they must be relative
to the source directory that is being built (the context of the build).
Each <src> may contain wildcards and matching will be done using Go’s
filepath.Match rules. For example:
COPY hom* /mydir/        # adds all files starting with "hom"
COPY hom?.txt /mydir/    # ? is replaced with any single character, e.g., "home.txt"
The <dest> is an absolute path, or a path relative to WORKDIR, into which
the source will be copied inside the destination container.
COPY test relativeDir/   # adds "test" to `WORKDIR`/relativeDir/
COPY test /absoluteDir/  # adds "test" to /absoluteDir/
All new files and directories are created with a UID and GID of 0.
Note:
If you build using STDIN (docker build - < somefile), there is no
build context, soCOPYcan’t be used.
COPY obeys the following rules:
-
The
<src>path must be inside the context of the build;
you cannotCOPY ../something /something, because the first step of a
docker buildis to send the context directory (and subdirectories) to the
docker daemon. -
If
<src>is a directory, the entire contents of the directory are copied,
including filesystem metadata.
Note:
The directory itself is not copied, just its contents.
-
If
<src>is any other kind of file, it is copied individually along with
its metadata. In this case, if<dest>ends with a trailing slash/, it
will be considered a directory and the contents of<src>will be written
at<dest>/base(<src>). -
If multiple
<src>resources are specified, either directly or due to the
use of a wildcard, then<dest>must be a directory, and it must end with
a slash/. -
If
<dest>does not end with a trailing slash, it will be considered a
regular file and the contents of<src>will be written at<dest>. -
If
<dest>doesn’t exist, it is created along with all missing directories
in its path.
ENTRYPOINT
ENTRYPOINT has two forms:
ENTRYPOINT ["executable", "param1", "param2"]
(exec form, preferred)ENTRYPOINT command param1 param2
(shell form)
An ENTRYPOINT allows you to configure a container that will run as an executable.
For example, the following will start nginx with its default content, listening
on port 80:
docker run -i -t --rm -p 80:80 nginx
Command line arguments to docker run <image> will be appended after all
elements in an exec form ENTRYPOINT, and will override all elements specified
using CMD.
This allows arguments to be passed to the entry point, i.e., docker run <image> -d
will pass the -d argument to the entry point.
You can override the ENTRYPOINT instruction using the docker run --entrypoint
flag.
The shell form prevents any CMD or run command line arguments from being
used, but has the disadvantage that your ENTRYPOINT will be started as a
subcommand of /bin/sh -c, which does not pass signals.
This means that the executable will not be the container’s PID 1 — and
will not receive Unix signals — so your executable will not receive a
SIGTERM from docker stop <container>.
Only the last ENTRYPOINT instruction in the Dockerfile will have an effect.
Exec form ENTRYPOINT example
You can use the exec form of ENTRYPOINT to set fairly stable default commands
and arguments and then use either form of CMD to set additional defaults that
are more likely to be changed.
FROM ubuntu
ENTRYPOINT ["top", "-b"]
CMD ["-c"]
When you run the container, you can see that top is the only process:
$ docker run -it --rm --name test  top -H
top - 08:25:00 up  7:27,  0 users,  load average: 0.00, 0.01, 0.05
Threads:   1 total,   1 running,   0 sleeping,   0 stopped,   0 zombie
%Cpu(s):  0.1 us,  0.1 sy,  0.0 ni, 99.7 id,  0.0 wa,  0.0 hi,  0.0 si,  0.0 st
KiB Mem:   2056668 total,  1616832 used,   439836 free,    99352 buffers
KiB Swap:  1441840 total,        0 used,  1441840 free.  1324440 cached Mem

  PID USER      PR  NI    VIRT    RES    SHR S %CPU %MEM     TIME+ COMMAND
    1 root      20   0   19744   2336   2080 R  0.0  0.1   0:00.04 top
To examine the result further, you can use docker exec:
$ docker exec -it test ps aux
USER       PID %CPU %MEM    VSZ   RSS TTY      STAT START   TIME COMMAND
root         1  2.6  0.1  19752  2352 ?        Ss+  08:24   0:00 top -b -H
root         7  0.0  0.1  15572  2164 ?        R+   08:25   0:00 ps aux
And you can gracefully request top to shut down using docker stop test.
The following Dockerfile shows using the ENTRYPOINT to run Apache in the
foreground (i.e., as PID 1):
FROM debian:stable
RUN apt-get update && apt-get install -y --force-yes apache2
EXPOSE 80 443
VOLUME ["/var/www", "/var/log/apache2", "/etc/apache2"]
ENTRYPOINT ["/usr/sbin/apache2ctl", "-D", "FOREGROUND"]
If you need to write a starter script for a single executable, you can ensure that
the final executable receives the Unix signals by using exec and gosu
commands:
#!/bin/bash
set -e

if [ "$1" = 'postgres' ]; then
    chown -R postgres "$PGDATA"

    if [ -z "$(ls -A "$PGDATA")" ]; then
        gosu postgres initdb
    fi

    exec gosu postgres "$@"
fi

exec "$@"
Lastly, if you need to do some extra cleanup (or communicate with other containers)
on shutdown, or are co-ordinating more than one executable, you may need to ensure
that the ENTRYPOINT script receives the Unix signals, passes them on, and then
does some more work:
#!/bin/sh
# Note: I've written this using sh so it works in the busybox container too

# USE the trap if you need to also do manual cleanup after the service is stopped,
#     or need to start multiple services in the one container
trap "echo TRAPed signal" HUP INT QUIT TERM

# start service in background here
/usr/sbin/apachectl start

echo "[hit enter key to exit] or run 'docker stop <container>'"
read

# stop service and clean up here
echo "stopping apache"
/usr/sbin/apachectl stop

echo "exited $0"
If you run this image with docker run -it --rm -p 80:80 --name test apache,
you can then examine the container’s processes with docker exec, or docker top,
and then ask the script to stop Apache:
$ docker exec -it test ps aux
USER       PID %CPU %MEM    VSZ   RSS TTY      STAT START   TIME COMMAND
root         1  0.1  0.0   4448   692 ?        Ss+  00:42   0:00 /bin/sh /run.sh 123 cmd cmd2
root        19  0.0  0.2  71304  4440 ?        Ss   00:42   0:00 /usr/sbin/apache2 -k start
www-data    20  0.2  0.2 360468  6004 ?        Sl   00:42   0:00 /usr/sbin/apache2 -k start
www-data    21  0.2  0.2 360468  6000 ?        Sl   00:42   0:00 /usr/sbin/apache2 -k start
root        81  0.0  0.1  15572  2140 ?        R+   00:44   0:00 ps aux
$ docker top test
PID                 USER                COMMAND
10035               root                {run.sh} /bin/sh /run.sh 123 cmd cmd2
10054               root                /usr/sbin/apache2 -k start
10055               33                  /usr/sbin/apache2 -k start
10056               33                  /usr/sbin/apache2 -k start
$ /usr/bin/time docker stop test
test
real	0m 0.27s
user	0m 0.03s
sys	0m 0.03s
Note: you can override the
ENTRYPOINTsetting using--entrypoint,
but this can only set the binary to exec (nosh -cwill be used).
Note:
The exec form is parsed as a JSON array, which means that
you must use double-quotes (“) around words not single-quotes (‘).
Note:
Unlike the shell form, the exec form does not invoke a command shell.
This means that normal shell processing does not happen. For example,
ENTRYPOINT [ "echo", "$HOME" ]will not do variable substitution on$HOME.
If you want shell processing then either use the shell form or execute
a shell directly, for example:ENTRYPOINT [ "sh", "-c", "echo $HOME" ].
When using the exec form and executing a shell directly, as in the case for
the shell form, it is the shell that is doing the environment variable
expansion, not docker.
Shell form ENTRYPOINT example
You can specify a plain string for the ENTRYPOINT and it will execute in /bin/sh -c.
This form will use shell processing to substitute shell environment variables,
and will ignore any CMD or docker run command line arguments.
To ensure that docker stop will signal any long running ENTRYPOINT executable
correctly, you need to remember to start it with exec:
FROM ubuntu
ENTRYPOINT exec top -b
When you run this image, you’ll see the single PID 1 process:
$ docker run -it --rm --name test top
Mem: 1704520K used, 352148K free, 0K shrd, 0K buff, 140368121167873K cached
CPU:   5% usr   0% sys   0% nic  94% idle   0% io   0% irq   0% sirq
Load average: 0.08 0.03 0.05 2/98 6
  PID  PPID USER     STAT   VSZ %VSZ %CPU COMMAND
    1     0 root     R     3164   0%   0% top -b
Which will exit cleanly on docker stop:
$ /usr/bin/time docker stop test
test
real	0m 0.20s
user	0m 0.02s
sys	0m 0.04s
If you forget to add exec to the beginning of your ENTRYPOINT:
FROM ubuntu
ENTRYPOINT top -b
CMD --ignored-param1
You can then run it (giving it a name for the next step):
$ docker run -it --name test top --ignored-param2
Mem: 1704184K used, 352484K free, 0K shrd, 0K buff, 140621524238337K cached
CPU:   9% usr   2% sys   0% nic  88% idle   0% io   0% irq   0% sirq
Load average: 0.01 0.02 0.05 2/101 7
  PID  PPID USER     STAT   VSZ %VSZ %CPU COMMAND
    1     0 root     S     3168   0%   0% /bin/sh -c top -b cmd cmd2
    7     1 root     R     3164   0%   0% top -b
You can see from the output of top that the specified ENTRYPOINT is not PID 1.
If you then run docker stop test, the container will not exit cleanly — the
stop command will be forced to send a SIGKILL after the timeout:
$ docker exec -it test ps aux
PID   USER     COMMAND
    1 root     /bin/sh -c top -b cmd cmd2
    7 root     top -b
    8 root     ps aux
$ /usr/bin/time docker stop test
test
real	0m 10.19s
user	0m 0.04s
sys	0m 0.03s
Understand how CMD and ENTRYPOINT interact
Both CMD and ENTRYPOINT instructions define what command gets executed when running a container.
There are few rules that describe their co-operation.
-
Dockerfile should specify at least one of
CMDorENTRYPOINTcommands. -
ENTRYPOINTshould be defined when using the container as an executable. -
CMDshould be used as a way of defining default arguments for anENTRYPOINTcommand
or for executing an ad-hoc command in a container. -
CMDwill be overridden when running the container with alternative arguments.
The table below shows what command is executed for different ENTRYPOINT / CMD combinations:
| No ENTRYPOINT | ENTRYPOINT exec_entry p1_entry | ENTRYPOINT [“exec_entry”, “p1_entry”] | |
|---|---|---|---|
| No CMD | error, not allowed | /bin/sh -c exec_entry p1_entry | exec_entry p1_entry |
| CMD [“exec_cmd”, “p1_cmd”] | exec_cmd p1_cmd | /bin/sh -c exec_entry p1_entry exec_cmd p1_cmd | exec_entry p1_entry exec_cmd p1_cmd |
| CMD [“p1_cmd”, “p2_cmd”] | p1_cmd p2_cmd | /bin/sh -c exec_entry p1_entry p1_cmd p2_cmd | exec_entry p1_entry p1_cmd p2_cmd |
| CMD exec_cmd p1_cmd | /bin/sh -c exec_cmd p1_cmd | /bin/sh -c exec_entry p1_entry /bin/sh -c exec_cmd p1_cmd | exec_entry p1_entry /bin/sh -c exec_cmd p1_cmd |
VOLUME
The VOLUME instruction creates a mount point with the specified name
and marks it as holding externally mounted volumes from native host or other
containers. The value can be a JSON array, VOLUME ["/var/log/"], or a plain
string with multiple arguments, such as VOLUME /var/log or VOLUME /var/log. For more information/examples and mounting instructions via the
/var/db
Docker client, refer to
Share Directories via Volumes
documentation.
The docker run command initializes the newly created volume with any data
that exists at the specified location within the base image. For example,
consider the following Dockerfile snippet:
FROM ubuntu
RUN mkdir /myvol
RUN echo "hello world" > /myvol/greeting
VOLUME /myvol
This Dockerfile results in an image that causes docker run, to
create a new mount point at /myvol and copy the greeting file
into the newly created volume.
Note:
If any build steps change the data within the volume after it has been
declared, those changes will be discarded.
Note:
The list is parsed as a JSON array, which means that
you must use double-quotes (“) around words not single-quotes (‘).
USER
The USER instruction sets the user name or UID to use when running the image
and for any RUN, CMD and ENTRYPOINT instructions that follow it in the
Dockerfile.
WORKDIR
The WORKDIR instruction sets the working directory for any RUN, CMD,
ENTRYPOINT, COPY and ADD instructions that follow it in the Dockerfile.
If the WORKDIR doesn’t exist, it will be created even if it’s not used in any
subsequent Dockerfile instruction.
It can be used multiple times in the one Dockerfile. If a relative path
is provided, it will be relative to the path of the previous WORKDIR
instruction. For example:
WORKDIR /a
WORKDIR b
WORKDIR c
RUN pwd
The output of the final pwd command in this Dockerfile would be
/a/b/c.
The WORKDIR instruction can resolve environment variables previously set using
ENV. You can only use environment variables explicitly set in the Dockerfile.
For example:
ENV DIRPATH /path
WORKDIR $DIRPATH/$DIRNAME
RUN pwd
The output of the final pwd command in this Dockerfile would be
/path/$DIRNAME
ARG
ARG <name>[=<default value>]
The ARG instruction defines a variable that users can pass at build-time to
the builder with the docker build command using the
--build-arg <varname>=<value> flag. If a user specifies a build argument
that was not defined in the Dockerfile, the build outputs an error.
One or more build-args were not consumed, failing build.
The Dockerfile author can define a single variable by specifying ARG once or many
variables by specifying ARG more than once. For example, a valid Dockerfile:
FROM busybox
ARG user1
ARG buildno
...
A Dockerfile author may optionally specify a default value for an ARG instruction:
FROM busybox
ARG user1=someuser
ARG buildno=1
...
If an ARG value has a default and if there is no value passed at build-time, the
builder uses the default.
An ARG variable definition comes into effect from the line on which it is
defined in the Dockerfile not from the argument’s use on the command-line or
elsewhere. For example, consider this Dockerfile:
1 FROM busybox
2 USER ${user:-some_user}
3 ARG user
4 USER $user
...
A user builds this file by calling:
$ docker build --build-arg user=what_user Dockerfile
The USER at line 2 evaluates to some_user as the user variable is defined on the
subsequent line 3. The USER at line 4 evaluates to what_user as user is
defined and the what_user value was passed on the command line. Prior to its definition by an
ARG instruction, any use of a variable results in an empty string.
Warning: It is not recommended to use build-time variables for
passing secrets like github keys, user credentials etc. Build-time variable
values are visible to any user of the image with thedocker historycommand.
You can use an ARG or an ENV instruction to specify variables that are
available to the RUN instruction. Environment variables defined using the
ENV instruction always override an ARG instruction of the same name. Consider
this Dockerfile with an ENV and ARG instruction.
1 FROM ubuntu
2 ARG CONT_IMG_VER
3 ENV CONT_IMG_VER v1.0.0
4 RUN echo $CONT_IMG_VER
Then, assume this image is built with this command:
$ docker build --build-arg CONT_IMG_VER=v2.0.1 Dockerfile
In this case, the RUN instruction uses v1.0.0 instead of the ARG setting
passed by the user:v2.0.1 This behavior is similar to a shell
script where a locally scoped variable overrides the variables passed as
arguments or inherited from environment, from its point of definition.
Using the example above but a different ENV specification you can create more
useful interactions between ARG and ENV instructions:
1 FROM ubuntu
2 ARG CONT_IMG_VER
3 ENV CONT_IMG_VER ${CONT_IMG_VER:-v1.0.0}
4 RUN echo $CONT_IMG_VER
Unlike an ARG instruction, ENV values are always persisted in the built
image. Consider a docker build without the –build-arg flag:
$ docker build Dockerfile
Using this Dockerfile example, CONT_IMG_VER is still persisted in the image but
its value would be v1.0.0 as it is the default set in line 3 by the ENV instruction.
The variable expansion technique in this example allows you to pass arguments
from the command line and persist them in the final image by leveraging the
ENV instruction. Variable expansion is only supported for a limited set of
Dockerfile instructions.
Docker has a set of predefined ARG variables that you can use without a
corresponding ARG instruction in the Dockerfile.
HTTP_PROXYhttp_proxyHTTPS_PROXYhttps_proxyFTP_PROXYftp_proxyNO_PROXYno_proxy
To use these, simply pass them on the command line using the flag:
--build-arg <varname>=<value>
Impact on build caching
ARG variables are not persisted into the built image as ENV variables are.
However, ARG variables do impact the build cache in similar ways. If a
Dockerfile defines an ARG variable whose value is different from a previous
build, then a “cache miss” occurs upon its first usage, not its definition. In
particular, all RUN instructions following an ARG instruction use the ARG
variable implicitly (as an environment variable), thus can cause a cache miss.
For example, consider these two Dockerfile:
1 FROM ubuntu
2 ARG CONT_IMG_VER
3 RUN echo $CONT_IMG_VER
1 FROM ubuntu
2 ARG CONT_IMG_VER
3 RUN echo hello
If you specify --build-arg CONT_IMG_VER=<value> on the command line, in both
cases, the specification on line 2 does not cause a cache miss; line 3 does
cause a cache miss.ARG CONT_IMG_VER causes the RUN line to be identified
as the same as running CONT_IMG_VER=<value> echo hello, so if the <value>
changes, we get a cache miss.
Consider another example under the same command line:
1 FROM ubuntu
2 ARG CONT_IMG_VER
3 ENV CONT_IMG_VER $CONT_IMG_VER
4 RUN echo $CONT_IMG_VER
In this example, the cache miss occurs on line 3. The miss happens because
the variable’s value in the ENV references the ARG variable and that
variable is changed through the command line. In this example, the ENV
command causes the image to include the value.
If an ENV instruction overrides an ARG instruction of the same name, like
this Dockerfile:
1 FROM ubuntu
2 ARG CONT_IMG_VER
3 ENV CONT_IMG_VER hello
4 RUN echo $CONT_IMG_VER
Line 3 does not cause a cache miss because the value of CONT_IMG_VER is a
constant (hello). As a result, the environment variables and values used on
the RUN (line 4) doesn’t change between builds.
ONBUILD
The ONBUILD instruction adds to the image a trigger instruction to
be executed at a later time, when the image is used as the base for
another build. The trigger will be executed in the context of the
downstream build, as if it had been inserted immediately after the
FROM instruction in the downstream Dockerfile.
Any build instruction can be registered as a trigger.
This is useful if you are building an image which will be used as a base
to build other images, for example an application build environment or a
daemon which may be customized with user-specific configuration.
For example, if your image is a reusable Python application builder, it
will require application source code to be added in a particular
directory, and it might require a build script to be called after
that. You can’t just call ADD and RUN now, because you don’t yet
have access to the application source code, and it will be different for
each application build. You could simply provide application developers
with a boilerplate Dockerfile to copy-paste into their application, but
that is inefficient, error-prone and difficult to update because it
mixes with application-specific code.
The solution is to use ONBUILD to register advance instructions to
run later, during the next build stage.
Here’s how it works:
- When it encounters an
ONBUILDinstruction, the builder adds a
trigger to the metadata of the image being built. The instruction
does not otherwise affect the current build. - At the end of the build, a list of all triggers is stored in the
image manifest, under the keyOnBuild. They can be inspected with
thedocker inspectcommand. - Later the image may be used as a base for a new build, using the
FROMinstruction. As part of processing theFROMinstruction,
the downstream builder looks forONBUILDtriggers, and executes
them in the same order they were registered. If any of the triggers
fail, theFROMinstruction is aborted which in turn causes the
build to fail. If all triggers succeed, theFROMinstruction
completes and the build continues as usual. - Triggers are cleared from the final image after being executed. In
other words they are not inherited by “grand-children” builds.
For example you might add something like this:
[...]
ONBUILD ADD . /app/src
ONBUILD RUN /usr/local/bin/python-build --dir /app/src
[...]
Warning: Chaining
ONBUILDinstructions usingONBUILD ONBUILDisn’t allowed.
Warning: The
ONBUILDinstruction may not triggerFROMorMAINTAINERinstructions.
STOPSIGNAL
The STOPSIGNAL instruction sets the system call signal that will be sent to the container to exit.
This signal can be a valid unsigned number that matches a position in the kernel’s syscall table, for instance 9,
or a signal name in the format SIGNAME, for instance SIGKILL.
HEALTHCHECK
The HEALTHCHECK instruction has two forms:
HEALTHCHECK [OPTIONS] CMD command(check container health by running a command inside the container)HEALTHCHECK NONE(disable any healthcheck inherited from the base image)
The HEALTHCHECK instruction tells Docker how to test a container to check that
it is still working. This can detect cases such as a web server that is stuck in
an infinite loop and unable to handle new connections, even though the server
process is still running.
When a container has a healthcheck specified, it has a health status in
addition to its normal status. This status is initially starting. Whenever a
health check passes, it becomes healthy (whatever state it was previously in).
After a certain number of consecutive failures, it becomes unhealthy.
The options that can appear before CMD are:
--interval=DURATION(default:30s)--timeout=DURATION(default:30s)--retries=N(default:3)
The health check will first run interval seconds after the container is
started, and then again interval seconds after each previous check completes.
If a single run of the check takes longer than timeout seconds then the check
is considered to have failed.
It takes retries consecutive failures of the health check for the container
to be considered unhealthy.
There can only be one HEALTHCHECK instruction in a Dockerfile. If you list
more than one then only the last HEALTHCHECK will take effect.
The command after the CMD keyword can be either a shell command (e.g. HEALTHCHECK) or an exec array (as with other Dockerfile commands;
CMD /bin/check-running
see e.g. ENTRYPOINT for details).
The command’s exit status indicates the health status of the container.
The possible values are:
- 0: success — the container is healthy and ready for use
- 1: unhealthy — the container is not working correctly
- 2: reserved — do not use this exit code
For example, to check every five minutes or so that a web-server is able to
serve the site’s main page within three seconds:
HEALTHCHECK --interval=5m --timeout=3s \
  CMD curl -f http://localhost/ || exit 1
To help debug failing probes, any output text (UTF-8 encoded) that the command writes
on stdout or stderr will be stored in the health status and can be queried with
docker inspect. Such output should be kept short (only the first 4096 bytes
are stored currently).
When the health status of a container changes, a health_status event is
generated with the new status.
The HEALTHCHECK feature was added in Docker 1.12.
SHELL
SHELL ["executable", "parameters"]
The SHELL instruction allows the default shell used for the shell form of
commands to be overridden. The default shell on Linux is ["/bin/sh", "-c"], and on
Windows is ["cmd", "/S", "/C"]. The SHELL instruction must be written in JSON
form in a Dockerfile.
The SHELL instruction is particularly useful on Windows where there are
two commonly used and quite different native shells: cmd and powershell, as
well as alternate shells available including sh.
The SHELL instruction can appear multiple times. Each SHELL instruction overrides
all previous SHELL instructions, and affects all subsequent instructions. For example:
FROM windowsservercore

# Executed as cmd /S /C echo default
RUN echo default

# Executed as cmd /S /C powershell -command Write-Host default
RUN powershell -command Write-Host default

# Executed as powershell -command Write-Host hello
SHELL ["powershell", "-command"]
RUN Write-Host hello

# Executed as cmd /S /C echo hello
SHELL ["cmd", "/S"", "/C"]
RUN echo hello
The following instructions can be affected by the SHELL instruction when the
shell form of them is used in a Dockerfile: RUN, CMD and ENTRYPOINT.
The following example is a common pattern found on Windows which can be
streamlined by using the SHELL instruction:
...
RUN powershell -command Execute-MyCmdlet -param1 "c:\foo.txt"
...
The command invoked by docker will be:
cmd /S /C powershell -command Execute-MyCmdlet -param1 "c:\foo.txt"
This is inefficient for two reasons. First, there is an un-necessary cmd.exe command
processor (aka shell) being invoked. Second, each RUN instruction in the shell
form requires an extra powershell -command prefixing the command.
To make this more efficient, one of two mechanisms can be employed. One is to
use the JSON form of the RUN command such as:
...
RUN ["powershell", "-command", "Execute-MyCmdlet", "-param1 \"c:\\foo.txt\""]
...
While the JSON form is unambiguous and does not use the un-necessary cmd.exe,
it does require more verbosity through double-quoting and escaping. The alternate
mechanism is to use the SHELL instruction and the shell form,
making a more natural syntax for Windows users, especially when combined with
the escape parser directive:
# escape=`

FROM windowsservercore
SHELL ["powershell","-command"]
RUN New-Item -ItemType Directory C:\Example
ADD Execute-MyCmdlet.ps1 c:\example\
RUN c:\example\Execute-MyCmdlet -sample 'hello world'
Resulting in:
PS E:\docker\build\shell> docker build -t shell .
Sending build context to Docker daemon 3.584 kB
Step 1 : FROM windowsservercore
 ---> 5bc36a335344
Step 2 : SHELL powershell -command
 ---> Running in 87d7a64c9751
 ---> 4327358436c1
Removing intermediate container 87d7a64c9751
Step 3 : RUN New-Item -ItemType Directory C:\Example
 ---> Running in 3e6ba16b8df9


    Directory: C:\


Mode                LastWriteTime         Length Name
----                -------------         ------ ----
d-----         6/2/2016   2:59 PM                Example


 ---> 1f1dfdcec085
Removing intermediate container 3e6ba16b8df9
Step 4 : ADD Execute-MyCmdlet.ps1 c:\example\
 ---> 6770b4c17f29
Removing intermediate container b139e34291dc
Step 5 : RUN c:\example\Execute-MyCmdlet -sample 'hello world'
 ---> Running in abdcf50dfd1f
Hello from Execute-MyCmdlet.ps1 - passed hello world
 ---> ba0e25255fda
Removing intermediate container abdcf50dfd1f
Successfully built ba0e25255fda
PS E:\docker\build\shell>
The SHELL instruction could also be used to modify the way in which
a shell operates. For example, using SHELL cmd /S /C /V:ON|OFF on Windows, delayed
environment variable expansion semantics could be modified.
The SHELL instruction can also be used on Linux should an alternate shell be
required such zsh, csh, tcsh and others.
The SHELL feature was added in Docker 1.12.
Dockerfile examples
Below you can see some examples of Dockerfile syntax. If you’re interested in
something more realistic, take a look at the list of Dockerization examples.
# Nginx
#
# VERSION               0.0.1

FROM      ubuntu
MAINTAINER Victor Vieux <victor@docker.com>

LABEL Description="This image is used to start the foobar executable" Vendor="ACME Products" Version="1.0"
RUN apt-get update && apt-get install -y inotify-tools nginx apache2 openssh-server
# Firefox over VNC
#
# VERSION               0.3

FROM ubuntu

# Install vnc, xvfb in order to create a 'fake' display and firefox
RUN apt-get update && apt-get install -y x11vnc xvfb firefox
RUN mkdir ~/.vnc
# Setup a password
RUN x11vnc -storepasswd 1234 ~/.vnc/passwd
# Autostart firefox (might not be the best way, but it does the trick)
RUN bash -c 'echo "firefox" >> /.bashrc'

EXPOSE 5900
CMD    ["x11vnc", "-forever", "-usepw", "-create"]
# Multiple images example
#
# VERSION               0.1

FROM ubuntu
RUN echo foo > bar
# Will output something like ===> 907ad6c2736f

FROM ubuntu
RUN echo moo > oink
# Will output something like ===> 695d7793cbe4

# You᾿ll now have two images, 907ad6c2736f with /bar, and 695d7793cbe4 with
# /oink.
Docker containers become unavoidable for infrastructure development as it provides, Isolation, Simplicity, Rapid Continuous Deployment, and Faster Configuration with Security. Earlier, Docker has only used for Linux based applications as it is using the Linux kernel baseline for creating Containers. But Windows applications are widely used in Software development and Hence, windows developers need Docker Containers for Windows. In this article, we will discuss How to Create Docker Windows Containers from Docker Desktop.
Table of Contents
Docker Desktop Installation
Requirement
- Minimum Windows 10 (Home and All other Editions)
- Hyper-V (In-Built and can be Enabled)
- Only 64bit Processor Architecture
- Virtualization Enablement from Bios Level
Installation
- Step-1: Download the “Docker Desktop for Windows” exe file from here (https://hub.docker.com/editions/community/docker-ce-desktop-windows/) and run it to install.
- Step-2: Enable Docker Running Environment 1. For Windows Home – Enable Windows Subsystem for Linux (Instructions Here: https://docs.microsoft.com/en-us/windows/wsl/install-win10). 2. For Windows Other Editions – Enable Hyper-V (Instructions Here: https://docs.microsoft.com/en-us/virtualization/hyper-v-on-windows/quick-start/enable-hyper-v)
- Step-3: Follow the instructions on the Installation process
- Step-4: If you are the Only user with Admin access, you can proceed. Else add the current user into a docker-users group (Instructions Here: https://www.tenforums.com/tutorials/88049-add-remove-users-groups-windows-10-a.html)
NOTE:
Docker Desktop Installed in the Windows Machine can run Linux Based Docker Containers and Windows-based Docker Container. But You cannot run Windows Based Docker Containers on Docker Engine installed in Linux. Refer the below image.

About Docker on Windows Machine
As we all know, the Docker Engine will run as a daemon that uses the Linux specific kernel features. So, running the Docker Engine on Windows directly is not possible. Hence, we must create a Linux based environment in Windows to run docker. In order to enable Linux environment on the windows, we have two options,
- Windows Subsystem for Linux (WSL) – is the compatibility layer to run Linux applications
- Hyper-V – Microsoft solution for virtualization.

Both these features are available from Windows 10. Running docker on windows will be ultimately using the Linux environment. But it is using some of the Host’s features. So, Docker Engine will sit on top of the Linux Kernel created by the Hyper-V/WSL. On top of the Docker Engine, Docker Containers can be created. All this is managed by the Docker Desktop. So, Application Program which will be written by the developers will sit on top of the Containers.
Simple Windows Container with Example
Let’s learn how to create the Docker Windows container using Docker Desktop. For that, first, we are going to create Dockerfile which is the simple text file with the instructions of the application and configurations.
Creating Dockerfile
Let’s run a simple application which will return the “hello world” print output from the Windows Docker Container. For the same, create a file called “Dockerfile” and put the bellow content.
# Base Image
FROM microsoft/nanoserver

# Copy powershell init-script from the host machine (windows) to the docker container.
COPY init-setup.ps1 c:\\workspace\application\init-setup.ps1

# Run the Powershell script in the Docker Container
CMD ["powershell.exe", "c:\\workspace\application\init-setup.ps1"]
- In this, Line number #2 is setting the container from the base image. Here it is “
microsoft/nanoserver”. - Inline Number #5 is giving
init-script.ps1from the host to the docker container. - Line Number #8 is to run the script in PowerShell executable.
And Create a script file called “init-setup.ps1” and put the below content inside the file
Building Docker Image
Once you have this file in your folder you can start building the Dockerfile as Docker image using the command.
$ docker build -t digitalvarys/print-hello-world .
where digitalvarys/print-hello-world is the tag name of the docker image.
Once the Docker image is been built, you can check the Image by passing the following commad
This will display the created image.
Running the Docker Container
Now, it is time to run the Docker image which we have created. Hence, run the following command
$ docker run digitalvarys/print-hello-world
This will print the string “hello world” as we provided.
If you run it with -it parameter, you can explore the Created Docker Container with Windows CMD.
ASP.net example of the Windows Docker Container.
The above sample application will tell you about the basic container feature. This one will tell you the real-time advantage of the Windows Docker Container.
Sample application
For this tutorial, we are going to use, cloud foundry’s sample Dotnet core hello world application (https://github.com/cloudfoundry-samples/dotnet-core-hello-world). Just clone it and keep it in your working directory
Dockerfile creation.
Now, we are going to create Dockerfile to create the image of the above application.
# Base Image
FROM microsoft/dotnet:nanoserver-core

# Copy entire application code folder dotnet-application to the working directory in Container.
COPY c:\\workspace\dotnet-application .

# Relax the firewall rule to expose port 5000
EXPOSE 5000

# Run the dotnet application
CMD ["dotnet", "run", "--server.urls", "http://0.0.0.0:5000"]
Just like the PowerShell example, we are going to take the base image and copy the application from the host to the container. Then, we are going to expose the port 5000 to run the dotnet application in this port. Then, we are going to run the application using the dotnet executable.
Building the Docker Image.
Once the Dockerfile is ready, we have to build the Docker container.
$ docker build -t digitalvarys/simple-dotnet-application .
Here, I am giving the image name as “digitalvarys/simple-dotnet-application”.
Running the Docker Container
Now, we have to run the application in background (detached mode),
$ docker run -d -p 5000:5000 digitalvarys/simple-dotnet-application
This will run the container and expose the container port to the host port 5000.
Getting the IP address of the Created Docker Container.
Now, Just inspect the Docker container and see the assigned IP address of the running container,
$ docker inspect [container-id]
This will show you the JSON response. In that, check for “networks” -> “nat” -> “IPAddress”. This will be your container IP address.
Now, Just enter the URL in the browser as https://[container-ip-address]:5000, then you will see the Hello world message in the browser. This means your application is running in a container.
Conclusion
As we already discussed, Docker is unavoidable for the application development or at least in the process of application development. But the Containerization of the Windows application like dotnet application needs extra lookup. Hope this article covers enough concepts and procedures for the Windows Docker Containers running on windows application. In our upcoming article, we will discuss more running a cluster of Microsoft Windows-based applications in Docker Swarm and Kubernetes. Stay tuned and subscribe DigitalVarys for more articles and study materials on DevOps, Agile, DevSecOps and App Development.

Experienced DevSecOps Practitioner, Tech Blogger, Expertise in Designing Solutions in Public and Private Cloud. Opensource Community Contributor.