Для управления локальными пользователями и группами в Windows можно использовать встроенный PowerShell модуль Microsoft.PowerShell.LocalAccounts. С помощью этого модуля вы можете создать или удалить локального пользователя, создать новую группу безопасности и добавить в нее пользователей. Этот модуль доступен во всех версиях Windows, начиная с Windows Server 2016 и Windows 10. В предыдущих версиях Windows этот модуль устанавливается вместе с Windows Management Framework 5.1 при обновлении версии PowerShell.
Содержание:
- Создать нового локального пользователя с помощью PowerShell
- Управление локальными пользователями Windows из PowerShell
- Используем PowerShell для управления локальными группам
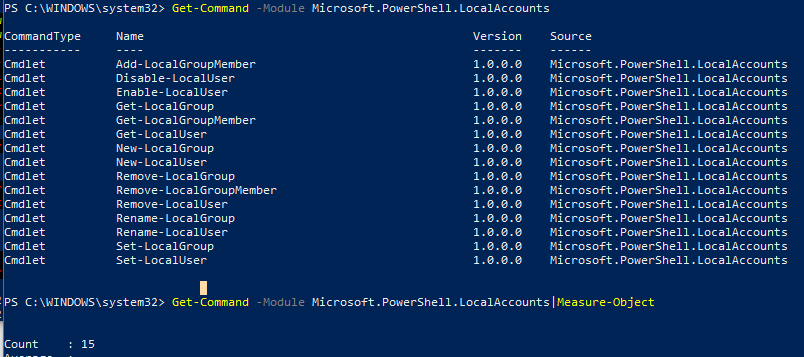
Полный список командлетов PowerShell в модуле LocalAccounts можно вывести так:
Get-Command -Module Microsoft.PowerShell.LocalAccounts
- Add-LocalGroupMember – добавить пользователя в локальную группу
- Disable-LocalUser – отключить локальную учетную запись
- Enable-LocalUser – включить учетную запись
- Get-LocalGroup – получить информацию о локальной группе
- Get-LocalGroupMember – вывести список пользователей в локальной группе
- Get-LocalUser – получить информацию о локальном пользователе
- New-LocalGroup – создать новую локальную группы
- New-LocalUser – создать нового пользователя
- Remove-LocalGroup – удалить группу
- Remove-LocalGroupMember – удалить члена из группы
- Remove-LocalUser – удалить пользователя
- Rename-LocalGroup – переименовать группу
- Rename-LocalUser – переименовать пользователя
- Set-LocalGroup – изменить группу
- Set-LocalUser – изменить пользователя
Рассмотрим несколько типовых задач по управлению локальными пользователями и группами на компьютере Windows при помощи PowerShell командлетов из модуля LocalAccounts.
Ранее для управления локальными пользователями и группами в Windows использовалась графическая оснастка Local Users and Groups Management (
lusrmgr.msc
) и команды
net user
,
net localgroup
.
Создать нового локального пользователя с помощью PowerShell
Чтобы быстро создать нового пользователя, выполните команду:
New-LocalUser -Name "TestUser1" -FullName "Test User" -Description "User for tests"
Укажите пароль для нового пользователя:

Если вы хотите использовать командлет New-LocalUser для автоматического создания новых локальных пользователей из скриптов PowerShell, пароль можно задать заранее в коде скрипта. Строку с паролем нужно преобразовать в формат Secure String:
$pass = ConvertTo-SecureString "WinitP@ss321!" -AsPlainText -Force
New-LocalUser -Name TestUser2 -Password $password
Чтобы сразу добавить пользователя в группу локальных администраторов, выполните команду:
Add-LocalGroupMember -Group Administrators -Member TestUser2
При создании пользователя можно дополнительно использовать следующие параметры:
-
-AccountExpires
– дату действия учетной записи, при наступлении которого учетная запись будет автоматически отключена (по умолчанию командлет New-LocalUser создает бессрочную учетную запись) -
-AccountNeverExpires -
-Disabled
– отключить учетную запись после создания -
-PasswordNeverExpires
– неограниченный срок действия пароля -
-UserMayNotChangePassword
– запретить пользователю менять свой пароль
Для создания нового пользователя в домене AD нужно использовать командлет New-ADUser.
Управление локальными пользователями Windows из PowerShell
Чтобы вывести список всех локальных пользователей Windows на текущем компьютере, выполните:
Get-LocalUser
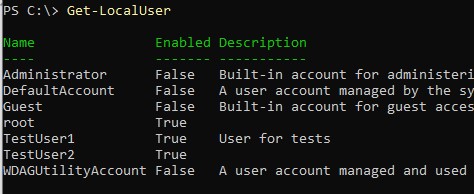
Как вы видите, на компьютере имеется 7 локальных учетных записей, 4 из которых отключены (Enabled=False) (в том числе встроенный администратор Windows).
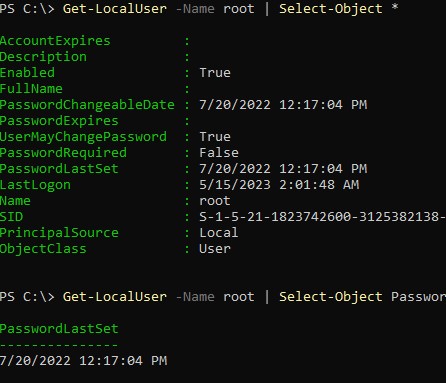
Чтобы вывести все свойства конкретной локальной учетной записи (аналог комадлета для получения информации о пользователях из AD — Get-ADUser), выполните:
Get-LocalUser -Name ‘root’ | Select-Object *
AccountExpires         :
Description            :
Enabled                : True
 FullName               :
PasswordChangeableDate : 7/20/2022 12:17:04 PM
PasswordExpires        :
UserMayChangePassword  : True
PasswordRequired       : False
PasswordLastSet        : 7/20/2022 12:17:04 PM
LastLogon              : 5/15/2023 2:01:48 AM
Name                   : root
SID: S-1-5-21-1823742600-3125382138-2640950260-1001
PrincipalSource        : Local
ObjectClass            : User
Обратите внимание на атрибут PrincipalSource. В нем указан тип аккаунта. Это может быть:
- Локальный пользователь Windows (PrincipalSource: Local)
- Учетные записи Microsoft (PrincipalSource: Microsoft Account)
- Учетные записи Azure AD (PrincipalSource: AzureAD)
Чтобы получить значение конкретного атрибута пользователя, например, время последней смены пароля, выполните:
Get-LocalUser -Name ‘root’ | Select-Object PasswordLastSet
Чтобы изменить пароль существующего пользователя, выполните команду:
Set-LocalUser -Name TestUser2 -Password $UserPassword –Verbose
Чтобы установить флаг «Срок действия пароля пользователя не истекает» («Password never expired»), выполните:
Set-LocalUser -Name TestUser2 –PasswordNeverExpires $True
Отключить учетную запись:
Disable-LocalUser -Name TestUser2
Включить пользователя:
Enable-LocalUser -Name TestUser2
Чтобы удалить локального пользователя, выполните:
Remove-LocalUser -Name TestUser2 -Verbose
Используем PowerShell для управления локальными группам
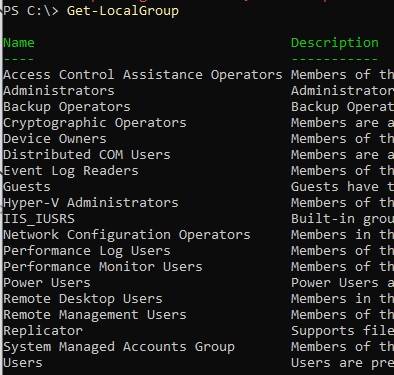
Теперь выведем список локальных групп на компьютере:
Get-LocalGroup
Создадим новую группу:
New-LocalGroup -Name 'RemoteSupport' -Description 'Remote Support Group'
Теперь добавим в новую группу несколько локальных пользователей и группу локальных администраторов:
Add-LocalGroupMember -Group 'RemoteSupport' -Member ('SIvanov','root', 'Administrators') –Verbose
Также вы можете добавить пользователя в группы с помощью следующего конвейера (в этом примере мы добавим пользователя в локальную группу, разрешающую ему удаленный доступ к рабочему столу через RDP):
Get-Localuser -Name TestUser2 | Add-LocalGroupMember -Group 'Remote Desktop Users'
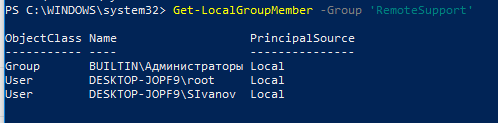
Выведем список пользователей в локальной группе:
Get-LocalGroupMember -Group 'RemoteSupport'
В локальную группу могут быть добавлены не только локальные учетные записи (PrincipalSource – Local), но и доменные аккаунты (domain), учетные записи Microsoft (MicrosoftAccount) и аккаунты из Azure (AzureAD).
Чтобы добавить в локальную группу пользователя из Microsoft или AzureAD, используется такой синтаксис:
Add-LocalGroupMember -Group 'RemoteSupport' -Member ('MicrosoftAccount\[email protected]','AzureAD\[email protected]') –Verbose
Чтобы вывести список локальных групп, в которых состоит конкретный пользователь, выполните следующий скрипт:
foreach ($LocalGroup in Get-LocalGroup)
{
if (Get-LocalGroupMember $LocalGroup -Member 'sivanov' –ErrorAction SilentlyContinue)
{
$LocalGroup.Name
}
}
Чтобы удалить пользователя из группы, выполните:
Remove-LocalGroupMember -Group 'RemoteSupport' –Member 'testuser2'
Для управления локальными пользователями на удаленном компьютере нужно сначала подключится к нему через WinRM командлетами Invoke-Command или Enter-PSSession.
Например, нам нужно собрать список учетных записей в локальной группе на удаленных компьютерах:
$s = new-pssession -computer pc01,pc02,pc03
invoke-command -scriptblock {Get-LocalGroupMember -Group 'RemoteSupport'} -session $s -hidecomputername | select * -exclude RunspaceID | out-gridview -title "LocalAdmins"
When you need to create a local user in Windows 10 or 11 you can use the User Accounts control panel. But we can also use PowerShell to create a new local user. This way we can easily automate creating a local account on Windows devices.
To create a local user with PowerShell you will need to have administrator access to the computer and run PowerShell as admin (elevated). Otherwise, you won’t be able to create accounts.
In this article, I will explain how you can create a new localuser. At the end of the article, I have two PowerShell scripts that you can use to create a local user.
In this article
To create a new local user we are going to use the New-LocalUser cmdlet in PowerShell. We have the option to set a password for the account or create an account without a password.
There are also a couple of other useful parameters that we can use:
| Parameter | Description |
|---|---|
| -Name | Login name of the account – max 20 characters |
| -Password | Password – supplied with a secure string |
| -Description | Description of the account |
| -AccountExpires | DateTime object when the account expires |
| -AccountNeverExpires | Account does not expire |
| -Disabled | Creates the account as disabled |
| -FullName | The display name of the account |
| -PasswordNeverExpires | Password does not expire |
| -UserMayNotChangePassword | User can’t change the password |
So to quickly create a local user account with PowerShell we can do the following:
$password = Read-Host -AsSecureString
New-LocalUser -Name "LazyUser" -Password $password -FullName "Lazy User" -Description "Test user"
This small PowerShell script will require you to first enter the password, after which the user is created with the given password.
Providing the Password
As you can see this won’t allow you to run the script autonomous, because you will need to enter a password. This is also the challenge with creating local users, most of the time you want to supply the password in a secure way.
If you run the script remotely or under your own supervision then you could write the password inside a PowerShell script and convert it to a secure string. But keep in mind, anyone who opens the script is able to read the password!
# Username and Password
$username = "LazyUser"
$password = ConvertTo-SecureString "LazyAdminPwd123!" -AsPlainText -Force  # Super strong plane text password here (yes this isn't secure at all)

# Creating the user
New-LocalUser -Name "$username" -Password $password -FullName "$username" -Description "Lazy Test user"
You could save this into a ps1 file and simply run it in an elevated PowerShell session.
Setting the Expired Date
By default, the new user account won’t expire, but with the New-LocalUser cmdlet, we can set an expiration date for the account. For the date we will need to use a PowerShell DateTime object:
$date = Get-Date -Year 2022 -Month 06 -Day 10

# Creating the user
New-LocalUser -Name "$username" -Password $password -AccountExpires $date -FullName "$username" -Description "Lazy Test user"
Making user member of a group with Add-LocalGroupMember
After you have created the user you will need to make it a member of a local group. Without it, the user won’t be able to log on. To make the user member of a group we are going to use the Add-LocalGroupMember cmdlet.
The Add-LocalGroupMember only requires the group name and the member that you want to add:
Add-LocalGroupMember -Group Users -Member LazyUser
The cmdlet doesn’t give any output on success, only an error when the group name or member isn’t found.
You can also add multiple users to a local group with PowerShell. Simply comma separate the members in the cmdlet:
Add-LocalGroupMember -Group Users -Member "LazyUser", "LazyUser2"
Complete Script for new localuser in PowerShell
I have created two scripts that will help you with creating a local user account with PowerShell. In both scripts, I have added the option to write a log file. This log file is stored on a network share, allowing you to easily check if the creation is successful on the computer.
The first script has a password set in the script, so you can simply run the script on a computer. Keep in mind that you will need to have administrator access to create a local user account!
<#
.SYNOPSIS
  Create local admin acc

.DESCRIPTION
  Creates a local administrator account on de computer. Requires RunAs permissions to run

.OUTPUTS
  none

.NOTES
  Version:        1.0
  Author:         R. Mens - LazyAdmin.nl
  Creation Date:  25 march 2022
  Purpose/Change: Initial script development
#>

# Configuration
$username = "adminTest"   # Administrator is built-in name
$password = ConvertTo-SecureString "LazyAdminPwd123!" -AsPlainText -Force  # Super strong plane text password here (yes this isn't secure at all)
$logFile = "\\server\folder\log.txt"

Function Write-Log {
  param(
      [Parameter(Mandatory = $true)][string] $message,
      [Parameter(Mandatory = $false)]
      [ValidateSet("INFO","WARN","ERROR")]
      [string] $level = "INFO"
  )
  # Create timestamp
  $timestamp = (Get-Date).toString("yyyy/MM/dd HH:mm:ss")

  # Append content to log file
  Add-Content -Path $logFile -Value "$timestamp [$level] - $message"
}

Function Create-LocalAdmin {
    process {
      try {
        New-LocalUser "$username" -Password $password -FullName "$username" -Description "local admin" -ErrorAction stop
        Write-Log -message "$username local user crated"

        # Add new user to administrator group
        Add-LocalGroupMember -Group "Administrators" -Member "$username" -ErrorAction stop
        Write-Log -message "$username added to the local administrator group"
      }catch{
        Write-log -message "Creating local account failed" -level "ERROR"
      }
    }
}

Write-Log -message "#########"
Write-Log -message "$env:COMPUTERNAME - Create local admin account"

Create-LocalAdmin

Write-Log -message "#########"
The script will make the user member of the Administrators group in this case. You can of course change this to any other group. Make sure that you set the username, password, and logfile path in this first part of the script.
You can also download the complete script here from my Github repository.
Local User account script
The second script creates a local user account that is a member of the user’s groups. The difference with the first script is that this script will ask for the password.
<#
.SYNOPSIS
  Create local user acc

.DESCRIPTION
  Creates a local user account on de computer. Requires RunAs permissions to run

.OUTPUTS
  none

.NOTES
  Version:        1.0
  Author:         R. Mens - LazyAdmin.nl
  Creation Date:  25 march 2022
  Purpose/Change: Initial script development
#>

# Configuration
$username = "LazyTestUser"   # UserName
$fullName = "Lazy Test User" # Full name
$logFile = "\\server\folder\log.txt"

Function Write-Log {
  param(
      [Parameter(Mandatory = $true)][string] $message,
      [Parameter(Mandatory = $false)]
      [ValidateSet("INFO","WARN","ERROR")]
      [string] $level = "INFO"
  )
  # Create timestamp
  $timestamp = (Get-Date).toString("yyyy/MM/dd HH:mm:ss")

  # Append content to log file
  Add-Content -Path $logFile -Value "$timestamp [$level] - $message"
}

Function Create-LocalUser {
    process {
      try {
        New-LocalUser "$username" -Password $password -FullName "$fullname" -Description "local user" -ErrorAction stop
        Write-Log -message "$username local user created"

        # Add new user to administrator group
        Add-LocalGroupMember -Group "Users" -Member "$username" -ErrorAction stop
        Write-Log -message "$username added to the local users group"
      }catch{
        Write-log -message "Creating local account failed" -level "ERROR"
      }
    }
}

# Enter the password
Write-Host "Enter the password for the local user account" -ForegroundColor Cyan
$password = Read-Host -AsSecureString

Write-Log -message "#########"
Write-Log -message "$env:COMPUTERNAME - Create local user account"

Create-LocalUser

Write-Log -message "#########"
Again, you can download the complete script here from my Github repository.
Wrapping Up
The New-LocalUser should also be capable of creating a local account that is connected to a Microsoft account. But the username is still limited to 20 characters and doesn’t accept the @ symbol. So for now we are limited to local accounts only.
I hope this article helped you with creating a local user account with PowerShell. If you have any questions, just drop a comment below.
To help admins manage local users and groups with PowerShell more easily, Microsoft provides a cmdlet collection called Microsoft.PowerShell.LocalAccounts. Previously, you had to download and import it into PowerShell explicitly, and also install Windows Management Framework 5.1; in the Windows Server 2016 and Windows 10 operating systems, the cmdlet collection is included as a standard module.
There are 15 cmdlets in the LocalAccounts module. You can view the full list by running the following command:
Get-Command -Module Microsoft.PowerShell.LocalAccounts
- Add-LocalGroupMember — Add a user to the local group
- Disable-LocalUser —Disable a local user account
- Enable-LocalUser — Enable a local user account
- Get-LocalGroup — View local group preferences
- Get-LocalGroupMember — View the list of all local group members
- Get-LocalUser — View a local user account’s preferences
- New-LocalGroup — Create a new local group
- New-LocalUser — Create a new local user account
- Remove-LocalGroup — Remove a local group
- Remove-LocalGroupMember — Remove a member from a local group
- Remove-LocalUser — Remove a local user account
- Rename-LocalGroup — Rename a local group
- Rename-LocalUser — Rename a local user account
- Set-LocalGroup — Change the settings of a local group
- Set-LocalUser — Change the account settings of a local user
Managing Local User Accounts with PowerShell
Let’s see how you can use these commands to perform common tasks related to managing local users on a Windows 10 computer.
Listing users and their properties with PowerShell
First, let’s get a list of all local user accounts on the machine. We’ll use the Get-LocalUser cmdlet:
Get-LocalUser
As you can see, we have two local user accounts, and one of them is disabled (the one that has “False” in the “Enabled” column).
If you want to output all the properties and their values for a local user account, you need to use the Get-LocalUser cmdlet with the following parameters:
Get-LocalUser -Name ‘guest’ | Select-Object *
To get the value of a particular local user account attribute, type its name after the Select-Object parameter. In this example, we want to know the value of the PasswordLastSet attribute for the account with the username “administrator”:
Get-LocalUser -Name ‘administrator’ | Select-Object PasswordLastSet
Creating a local user with PowerShell
Let’s create a new user with the help of the New-LocalUser cmdlet. This cmdlet can create the following types of user accounts:
- Windows local user accounts
- Microsoft accounts
- Azure Active Directory accounts
When creating a local user account, never type in the password as plain text; always convert it to a secure string using the ?AsSecureString or ?ConvertTo-SecureString parameter. Here’s the command for creating a new local user account:
$UserPassword = Read-Host –AsSecureString
New-LocalUser "Netwrix" -Password $UserPassword -FullName "Netwrix" -Description "CompleteVisibility"
In a Windows 10 environment, users can authorize under their Microsoft accounts, so we can create a new local user account that binds to a Microsoft account’s credentials. Use the following script to do this (note that you don’t need to type in the password because it is stored in the Microsoft cloud):
New-LocalUser -Name "MicrosoftAccountSomeAccount@outlook.com" -Description "Microsoft Account"
In order to create a local account that binds to your Azure AD, use the following command:
New-LocalUser -Name "AzureADNetwrix@enterprise.com" -Description "Azure AD Account"
Changing a local user’s password or password properties with PowerShell
To change the password of a local user account, we need to use the Set-LocalUser cmdlet. Let’s change the local admin password:
$UserPassword = Read-Host –AsSecureString
Set-LocalUser -Name Administrator -Password $UserPassword –Verbose
To set the Password never expires to a local user with PowerShell, we need to run the following script:
Set-LocalUser -Name Netwrix –PasswordNeverExpires $False
Deleting a local user account with PowerShell
To remove a local user account, you need to use the Remove-LocalUser cmdlet:
Remove-LocalUser -Name Netwrix -Verbose
Managing Local Groups with PowerShell
Now let’s turn our attention from local users to local groups.
Reviewing local groups with PowerShell
First, let’s get a list of all groups on our Windows Server:
Get-LocalGroup
Adding a local group with PowerShell
Now let’s create a new group:
New-LocalGroup -Name 'Netwrix Users' -Description 'Netwrix Users Group'
Adding users to a local group with PowerShell
To add a user (or a group) to a local group, we need to use the Add-LocalGroupMember cmdlet. For example, suppose we want to add users to the local Administrators group, but we don’t want to add them one by one. Let’s add a group to local Administrators, namely the “Netwrix Users” group:
Add-LocalGroupMember -Group 'Administrators' -Member ('Netwrix',’Netwrix Users') –Verbose
If your computer or server is a part of the domain, you can also add domain account and groups to local groups in order to give those users special local rights on the server. Add them using the format “DomainNameUser” (for a user) or “DomainNameDomain Group” (for a group).
Viewing the membership of a particular group with PowerShell
Now let’s list all the members of a particular local group:
Get-LocalGroupMember -Group 'Netwrix Users'
As you can see, the command shows all the local account and groups that are members of the group “Netwrix Users”. Although only local accounts and groups are listed here, this command will also show any domain users and group, as well as all Microsoft and Azure AD accounts.
Viewing all groups that a user is a member of using PowerShell
To list all the groups that a particular user is a member of, we’d run the following script:
foreach ($LocalGroup in Get-LocalGroup)
{
if (Get-LocalGroupMember $LocalGroup -Member 'Guest' –ErrorAction SilentlyContinue)
{
$LocalGroup.Name
}
}
Removing a local group with PowerShell
To remove a local user account from a group, you need to use the Remove-LocalGroupMember cmdlet:
Remove-LocalGroupMember -Group 'Netwrix Users' –Member 'guest'
Managing local users and groups remotely with PowerShell
If you want to manage local user account and groups remotely, you need to connect to the remote workstations via WinRM using the Invoke-Command and Enter-PSSession cmdlets. For example if we want to output the membership of the local Admin group remotely on multiple computers we need to run the following script:
$search = new-pssession -computer pcname1,pcname2,pcname3
invoke-command -scriptblock {Get-LocalGroupMember -Group 'Administrators'} -session $search -hidecomputername | select * -exclude RunspaceID | out-gridview -title "LocalAdmins"
As you can see, it is rather easy to manage local groups and users via PowerShell, but to ensure security, compliance and business continuity, it’s essential to audit all these changes. To learn about configuring native auditing, please refer to the Windows Server Auditing Quick Reference Guide.

Jeff is a former Director of Global Solutions Engineering at Netwrix. He is a long-time Netwrix blogger, speaker, and presenter. In the Netwrix blog, Jeff shares lifehacks, tips and tricks that can dramatically improve your system administration experience.

В Windows 10 вы можете создать локальную учетную запись пользователя или создать учетную запись, подключенную к учетной записи Microsoft, чтобы воспользоваться дополнительными преимуществами, такими как синхронизация настроек между устройствами и плавная интеграция с различными облачными службами Microsoft.
Если вы используете Windows 10, вероятно, вы уже используете учетную запись, подключенную к учетной записи Microsoft. Однако в случае, если вам нужно настроить другую учетную запись (помимо использования приложения «Настройки» и «Командная строка»), вы можете создать новую локальную учетную запись пользователя с помощью PowerShell.
В этом руководстве вы узнаете, как создать или удалить новую локальную учетную запись с помощью PowerShell в Windows 10.
Содержание
- Как создать учетную запись пользователя в PowerShell
- Подключение новой учетной записи к учетной записи Microsoft
- Как удалить учетную запись пользователя с помощью PowerShell
Чтобы создать административную или стандартную локальную учетную запись в Windows 10 с помощью PowerShell, выполните следующие действия:
- С помощью поиск Windows nайдите Windows PowerShell, щелкните правой кнопкой мыши верхний результат и выберите «Запуск от имени администратора».
- Введите следующую команду для временного хранения пароля в защищенной строке в переменной $ Password и нажмите Enter:
$ Password = Read—Host —AsSecureString
- Введите пароль, который вы хотите использовать для новой учетной записи, и нажмите Enter.
- Введите следующую команду для создания новой учетной записи и нажмите «Ввод»:
New—LocalUser «ИМЯ_НОВОГО_ПОЛЬЗОВАТЕЛЯ» —Password $Password —FullName «ПОЛНОЕ_ИМЯ_ПОЛЬЗОВАТЕЛЯ» —Description «Описание аккаунта»

Создание учетной записи в PowerShell В команде обязательно измените имя учетной записи и пользователя. Кроме того, измените описание по своему усмотрению.
- Введите следующую команду, чтобы добавить учетную запись в нужную группу пользователей и нажмите Enter:
Add—LocalGroupMember —Group «Administrators» —Member «ИМЯ_НОВОГО_ПОЛЬЗОВАТЕЛЯ»

Добавление новой учетной записи в группу «Администратор» В этой команде мы добавляем новую учетную запись в группу «Администраторы», которая дает пользователю полный доступ к устройству. Однако, если вы хотите, чтобы пользователь имел ограниченный доступ, вы можете добавить учетную запись в группу «Пользователи», что делает учетную запись «стандартным пользователем».


После того, как вы выполните шаги, новая учетная запись будет добавлена на ваше устройство с полным доступом. Конечно, это невозможно, если вы не добавили учетную запись в группу «Пользователи».
Подключение новой учетной записи к учетной записи Microsoft
Использование PowerShell должно быть способно создать учетную запись пользователя, подключенную к учетной записи Microsoft, но, похоже, есть ошибка с командой, которая не позволяет создать этот тип учетной записи.
Однако обходной путь этой проблемы заключается в создании локальной учетной записи, а затем подключении ее к учетной записи Microsoft с помощью настроек Windows.
- Войдите в систему, используя только что созданную учетную запись пользователя.
- Откройте настройки.
- Нажмите «Аккаунты».
- Выберите ваш аккаунта.
- Нажмите «Войти» с помощьюе учетной записью Microsoft.
- Следуйте инструкциям на экране, чтобы подключить свою учетную запись к учетной записи Microsoft.
После выполнения шагов новая учетная запись будет подключена к указанной вами учетной записи Microsoft.
Как удалить учетную запись пользователя с помощью PowerShell
Если вам больше не нужна учетная запись, вы можете удалить ее, используя эти шаги в PowerShell:
- Найдите Windows PowerShell, щелкните правой кнопкой мыши верхний результат и выберите «Запуск от имени администратора».
- Введите следующую команду, чтобы удалить учетную запись пользователя и нажмите Enter:
Remove—LocalUser —Name «ИМЯ_ПОЛЬЗОВАТЕЛЯ»

Удаление учетной записи локального пользователя в PowerShell

После выполнения шагов учетная запись будет удалена с вашего устройства. Однако данные учетной записи пользователя будут оставаться на жестком диске. Если вы хотите удалить как учетную запись, так и данные, самый простой способ — удалить учетную запись, используя страницу «Учетные записи» в приложении «Настройки».
Search code, repositories, users, issues, pull requests…
Provide feedback
Saved searches
Use saved searches to filter your results more quickly
Sign up