Lots of people don’t like the idea of ‘stopping/delaying’ Windows updates. I won’t get in to that. Here is a way to prevent Windows Update installing any drivers. This does not effect the security, quality, patch, or any other type update…they are presented as normal.
In short…you don’t have to worry about WU installing (changing) AMD graphics drivers.
This is done through group policy:
Type gpedit in the search bar…follow > Computer Configuration > Administrative Templates > Windows Components > Windows Update

On the right side scroll to Do not include drivers with Windows Update policy and double click it. Select the ENABLED option.

Click ‘Apply’ then OK.
Reboot your computer.
Windows 10 includes a new option to prevent installing driver updates on your computer. On this version of the operating system, updates are mandatory for everyone, and you don’t only get patches for Windows 10, but driver updates too.
Although this can be considered a good approach to keep devices secure and always up to date, sometimes updates roll out with bugs or compatibility issues that can cause more harm than good.
For this reason, Windows 10 includes an option to allow users to stop the OS from including driver updates when you update your system using the Local Group Policy editor and Registry.
In this guide, you’ll learn the steps to stop getting driver updates when installing new updates on your computer.
- How to prevent Windows Update from installing driver updates using Group Policy
- How to prevent Windows Update from installing driver updates using Registry
How to prevent Windows Update from installing driver updates using Group Policy
If you’re using Windows 10 Pro, Enterprise or Education, you can use the Local Group Policy editor to stop Windows Update from installing driver updates during the rollout of new quality updates.
To exclude driver updates on Windows 10, do the following:
-
Open Start.
-
Search for gpedit.msc and press Enter to open the Local Group Policy Editor.
-
Browse the following path
Computer Configuration > Administrative Templates > Windows Components > Windows Update
-
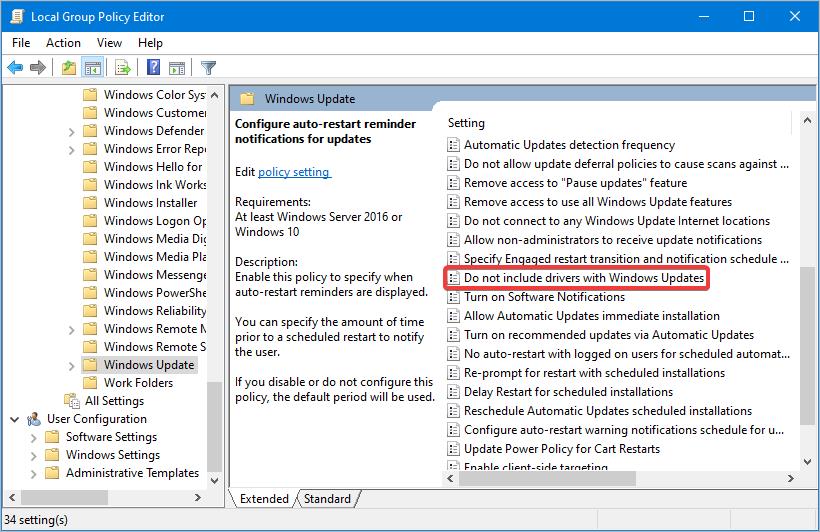
Double-click the Do not include drivers with Windows Updates policy.

Group Policy for Windows Update -
Select the Enabled option on the top-left.

Exclude driver updates from Windows Update -
Click Apply.
-
Click OK.


How to prevent Windows Update from installing driver updates using Registry
On Windows 10 Home, you won’t have access to the Local Group Policy editor, but you can stop driver updates using the Registry.
Warning: It’s very important to note that modifying the Windows Registry can cause serious problems if not used properly. It’s assumed you know what you’re doing and you have created a full backup of your system before proceeding.
To exclude driver updates on Windows 10, do the following:
-
Open Start.
-
Search for regedit, and click the result to open the Registry.
-
On the Windows 10 Anniversary Update browse the following path, go through the additional steps, and then continue with step No. 4:
HKEY_LOCAL_MACHINE\SOFTWARE\Policies\Microsoft\Windows
-
Right-click the Windows (folder) key, select New, and click on Key.
-
Name the key WindowsUpdate and press Enter.
-
Right-click the WindowsUpdate key, select New, and click on DWORD (32-bit) Value.
-
Name the key ExcludeWUDriversInQualityUpdate and press Enter.
If you’re on the Windows 10 Creators Update, the path is different. You’ll have to use the following path and continue with step No. 4:
HKEY_LOCAL_MACHINE\SOFTWARE\Microsoft\WindowsUpdate\UX\Settings
-
-
Double-click the DWORD ExcludeWUDriversInQualityUpdate.
-
Change the DWORD value from 0 to 1.

Exclude driver update Registry setttings -
Click OK.

Once you disable the option your computer will no longer get driver updates through the Windows Update service.
Keep in mind that preventing Windows 10 from installing driver updates can also have a negative effect, as outdated drivers can also cause issues in the long run. However, it’s a good option if you prefer to manually install device drivers you download from your PC manufacturer’s support website.
Another scenario where this option can come in handy is when the latest driver update is causing problems, in which case, you can roll back the old driver, and clear this new option in Settings to prevent Windows 10 from re-downloading the update.
Remember that you can also use the Show or hide updates troubleshooter tool to block problematic updates.
Update, March 24, 2017: Originally published in January 2017, updated on March 2017. This guide has been updated with alternative method to block driver updates using Windows Update, because Windows 10 removes the option from the Settings app.
We may earn commission for purchases using our links to help keep offering the free content. Privacy policy info.
All content on this site is provided with no warranties, express or implied. Use any information at your own risk. Always backup of your device and files before making any changes. Privacy policy info.
(Image credit: Future)
On Windows 11, the system uses an automatic mechanism to download and install security and maintenance updates, Microsoft products, and drivers for hardware components and peripherals.
Although it’s a convenient way to detect and install virtually any kind of hardware, the updates available through Windows Update are not always the latest, and sometimes they may also include buggy drivers.
If your device is experiencing issues with a driver update or you prefer to install drivers manually, Windows 11 includes at least a couple of ways to disable automatic driver updates through the Settings app and Group Policy.
This how-to guide will teach you the different ways to stop the system from using Windows Update to install device drivers automatically on Windows 11.
How to stop drivers installation from Group Policy
To disable updates for drivers automatically on Windows 11 through the Group Policy Editor, use these steps:
- Open Start.
- Search for gpedit and click the top result to open the app.
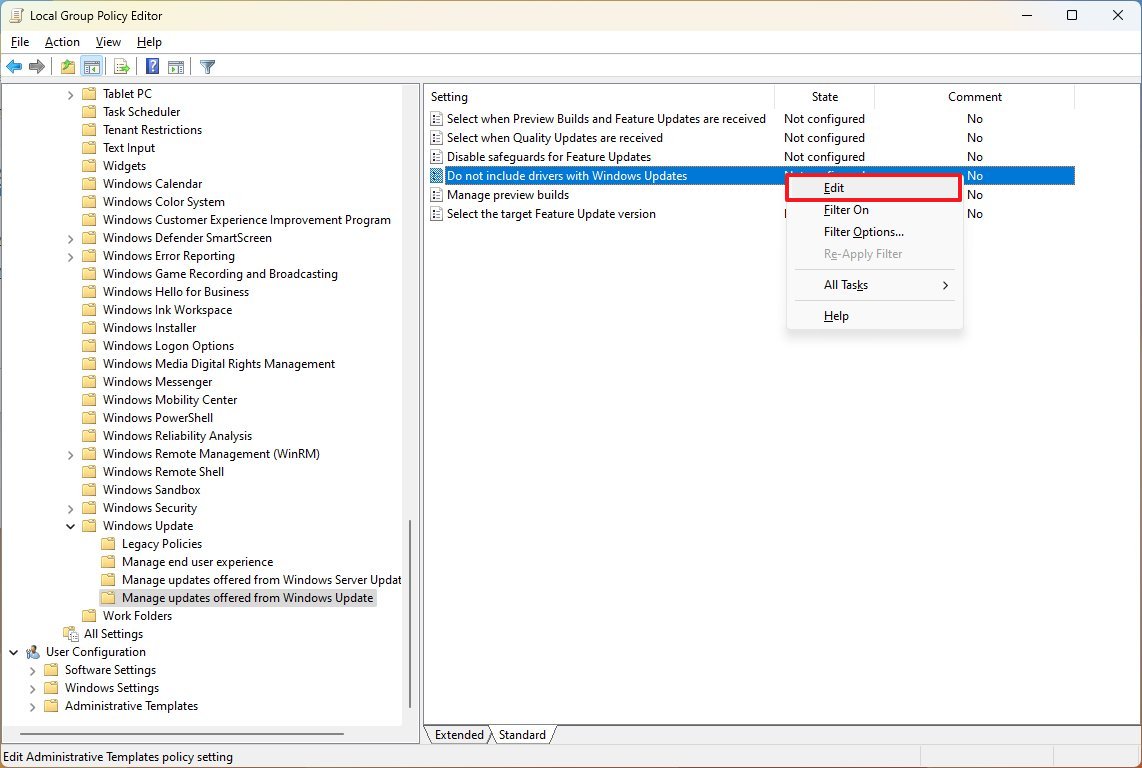
- Open to this path: Computer Configuration > Administrative Templates > Windows Components > Windows Update > Manage updates offered from Windows Update
- Right-click the «Do not include driver with Windows Update» policy from the right side and choose the Edit option.
- Select the Enabled option to disable the feature.
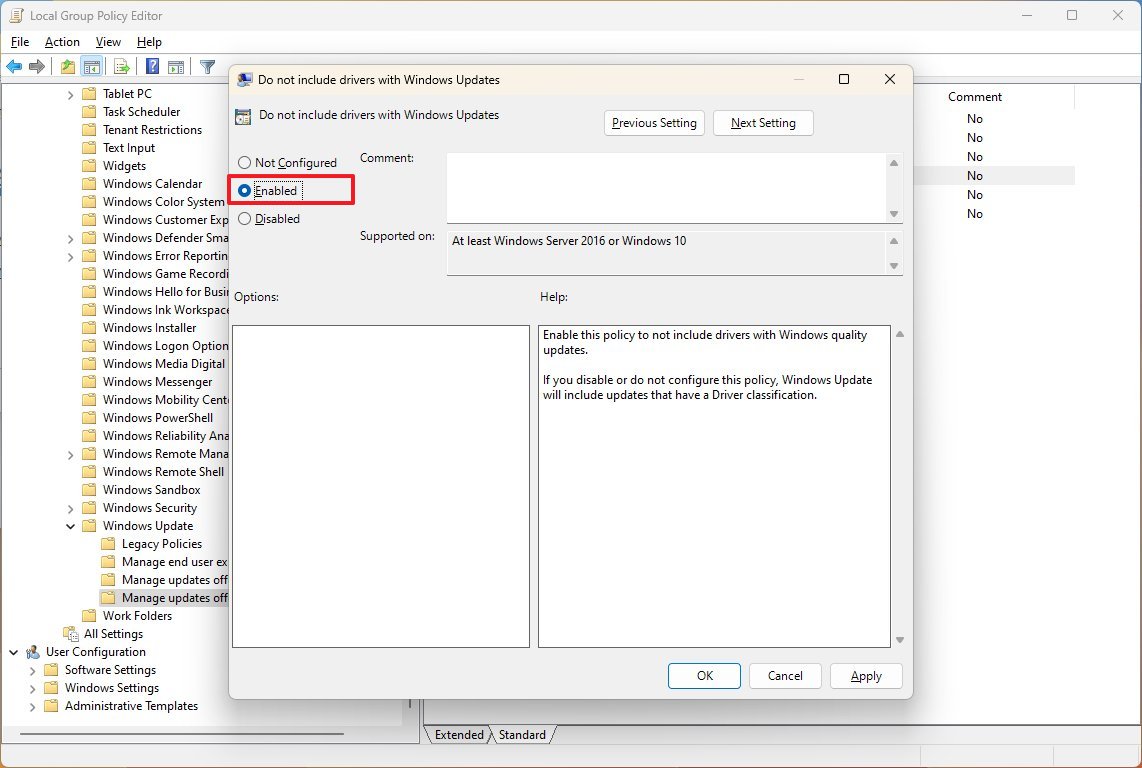
- Click the Apply button.
- Click the OK button.
Once you complete the steps, Windows Update will no longer try to download updates for device drivers.
If you change your mind, you can always undo the changes using the same instructions, but on step 5, make sure to choose the «Not configured» option.
How to stop drivers installation from Settings
To prevent Windows 11 from downloading updates for drivers automatically, use these steps:
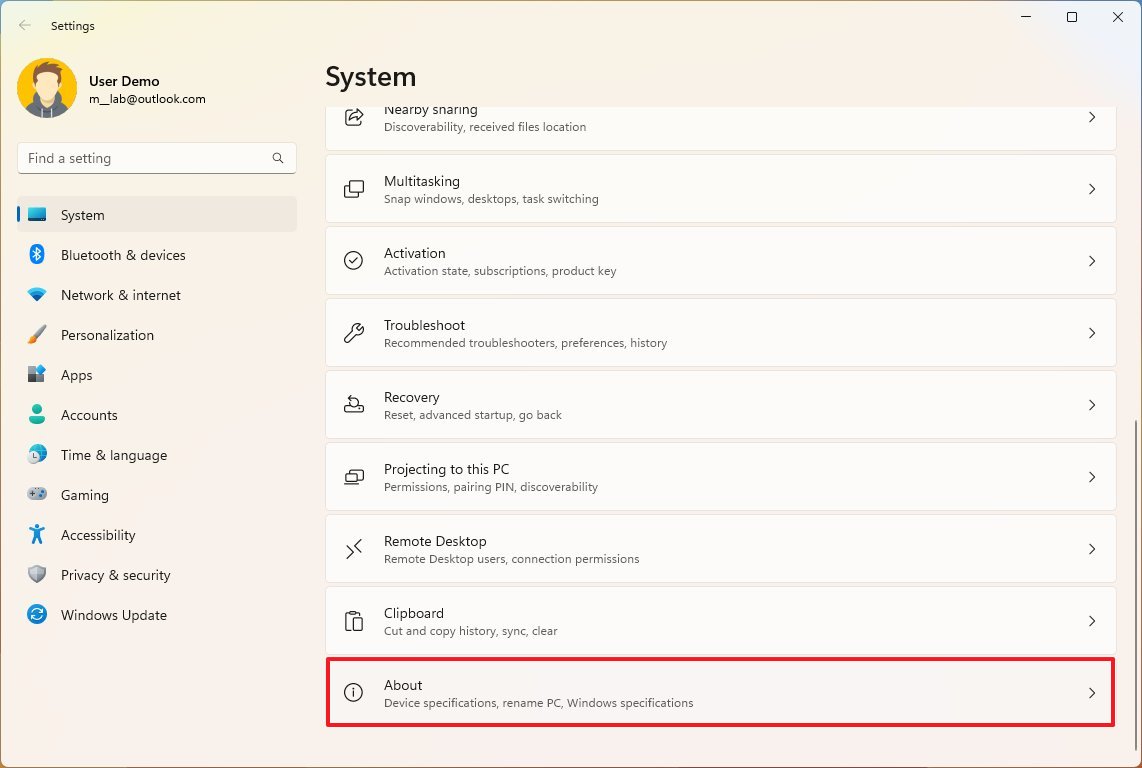
- Open Settings.
- Click on System.
- Click the About page on the right side.
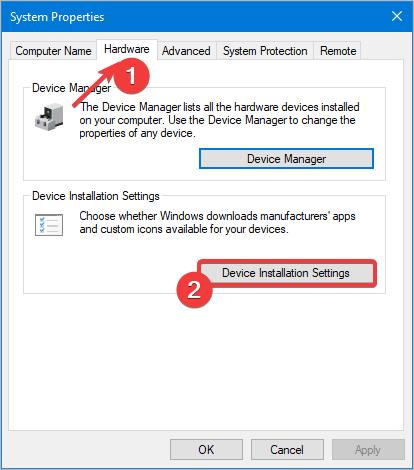
- Click the «Advanced system settings» option.
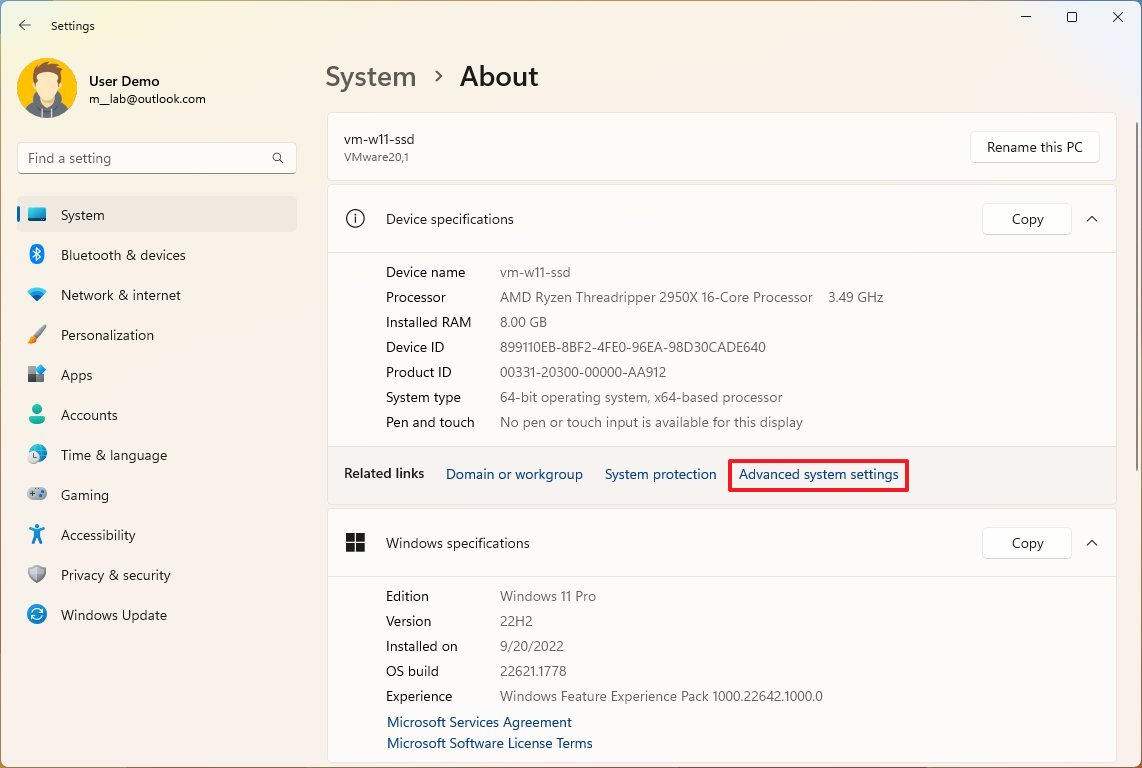
- Click the Hardware tab.
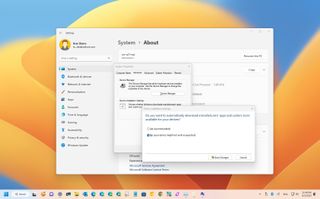
- Click the «Device Installation Settings» button.
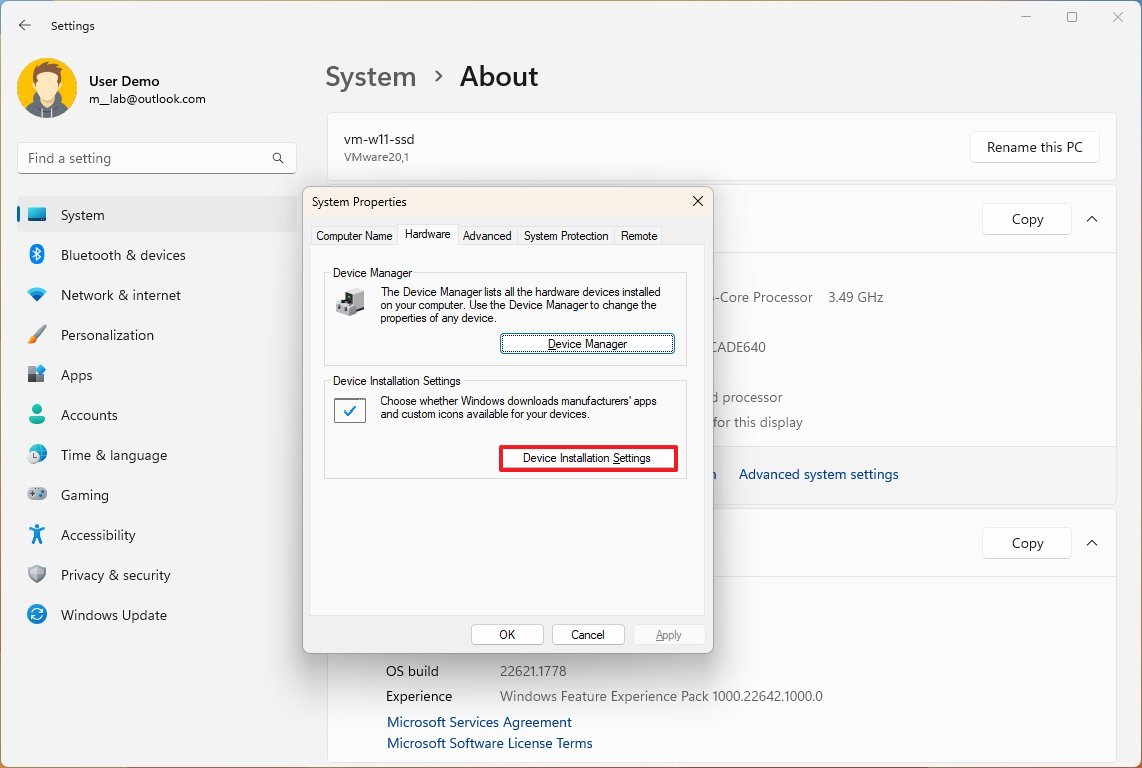
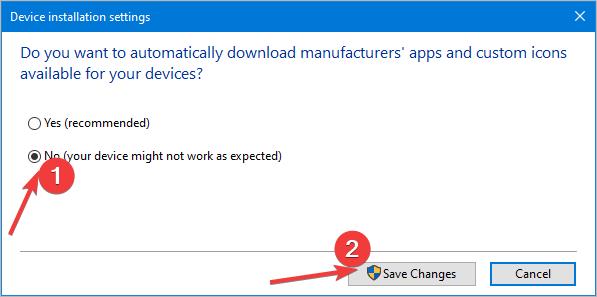
- Choose the «No (your device might not work as expected)» option.

- Click the Save Changes button.
- Click the OK button.
After you complete the steps, the system will stop installing driver updates on your computer.
If an update is required for a component or peripheral, you will have to install it manually. Or you can undo the changes using the same instructions mentioned above, but on step 7, choose the «Yes» option.
When using this approach, you will only disable the hardware installation with drivers from Windows Update. The system will continue to be able to detect specific generic drivers from the local driver library.
More resources
For more helpful articles, coverage, and answers to common questions about Windows 10 and Windows 11, visit the following resources:
- Windows 11 on Windows Central — All you need to know
- Windows 10 on Windows Central — All you need to know
All the latest news, reviews, and guides for Windows and Xbox diehards.
Mauro Huculak is technical writer for WindowsCentral.com. His primary focus is to write comprehensive how-tos to help users get the most out of Windows 10 and its many related technologies. He has an IT background with professional certifications from Microsoft, Cisco, and CompTIA, and he’s a recognized member of the Microsoft MVP community.
Windows 10 can automatically download and install drivers for some devices via Windows Update, say graphics cards. It’s good that Windows helps you update drivers automatically. But sometimes it can cause issues. If you don’t want Windows 10 to install drivers automatically, you can use one of the three methods to disable automatic driver updates.
Method 1: Configure Device Installation settings
You can configure Device Installation Settings to allow or prevent automatic driver updates. Here’s how to do it:
1. Open Control Panel.
2. View by Large icons and select System.
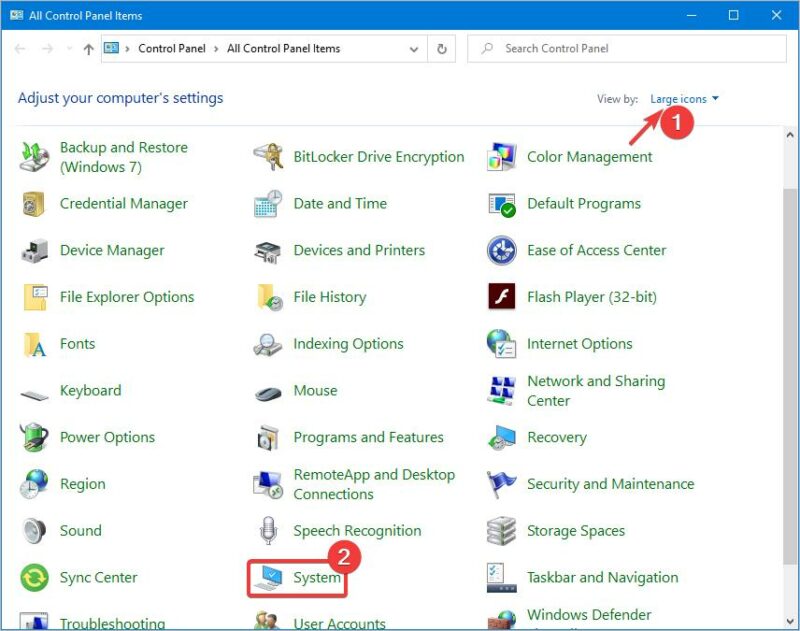
3. Select Advanced system settings.
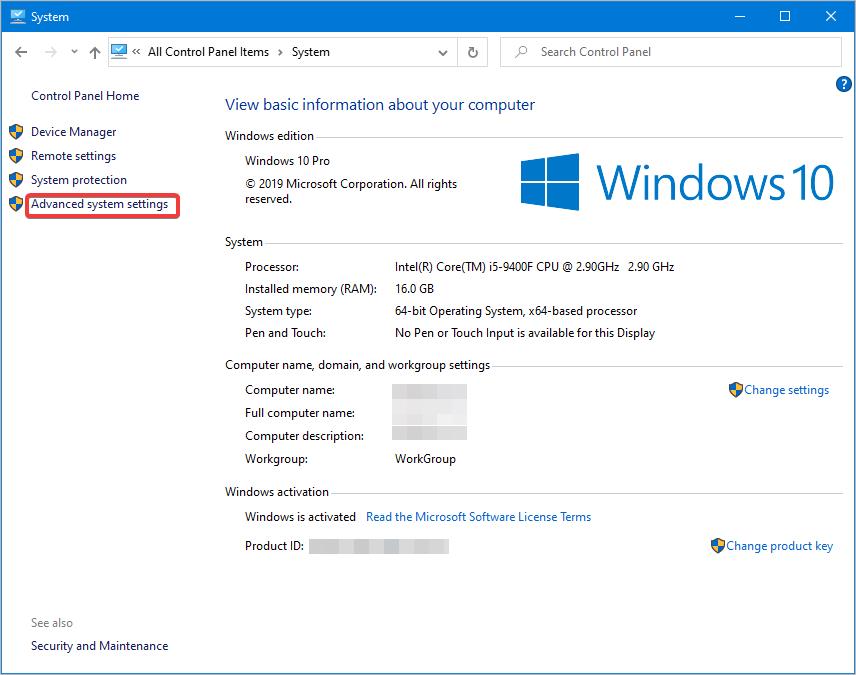
4. Select the Hardware tab and click Device Installation Settings.
5. Select No and click Save Changes.
Method 2: Disable automatic driver updates via Group Policy
You can stop Windows 10 automatically installing drivers using Group Policy. Just enable ‘Do Not Include Drivers with Windows Updates’ in Group Policy.
Follow these steps to disable automatic driver updates via Group Policy:
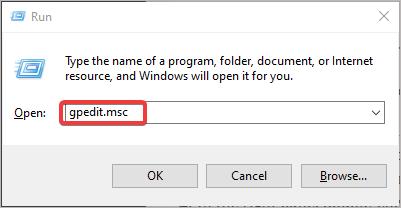
1. On your keyboard, press Win+R (the Windows logo key and the R key) at the same time to invoke the Run box.
2. Type gpedit.msc in the Run box and click OK to open the Local Group Policy Editor.
3. Expand Computer Configuration > Administrative Templates > Windows Components, then click Windows Update.
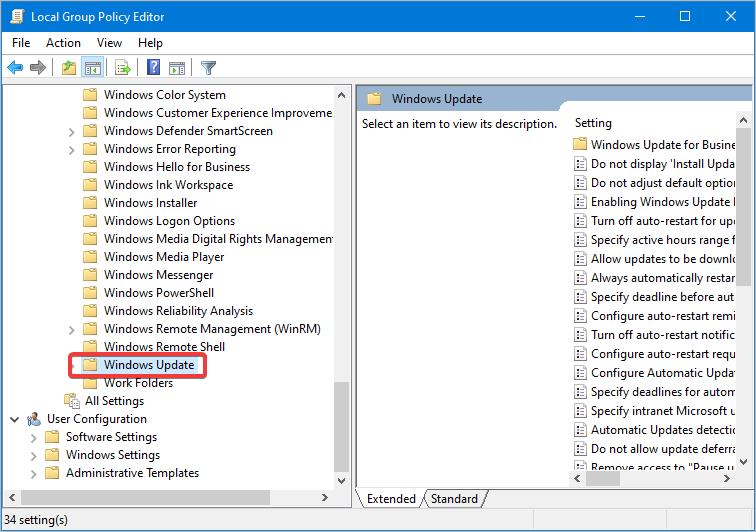
4. On the right panel, double-click Do not include drivers with Windows Updates.
5. Select Enabled and click OK to save the changes.

After you configure the settings following the steps above, you won’t get driver updates via Windows Update. But this method only applies to Windows 10 Professional, Windows 10 Ultimate, and Windows 10 Enterprise, as Group Policy isn’t available in Windows 10 home. For Windows 10 home users, Method 1 should work for you.
Method 3: Block driver updates for specific devices
If you just want Windows 10 not to update drivers for some specific devices, you can use this method, which allows you to block driver updates for specific devices. To block driver updates for specific devices, only two steps are needed:
Step 1: Find the hardware IDs for the device
A hardware ID is a vendor-defined identification string that Windows uses to match a device. Almost all devices have a list of hardware IDs. To block driver updates for a specific device, you need to find the hardware IDs for the device.
Here’s how to find the hardware IDs for a device:
1. On your keyboard, press Win+R (the Windows logo key and the R key) at the same time to invoke the Run box.
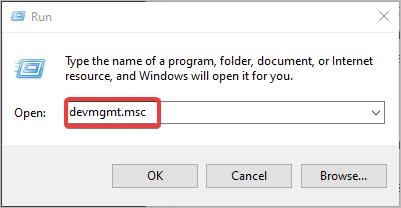
2. Type devmgmt.msc in the Run box and click OK to open Device Manager.
3. In Device Manager, find the device that you want to block the driver updates for.
4. Double-click on the device to open the device Properties.
5. Select the Details tab.
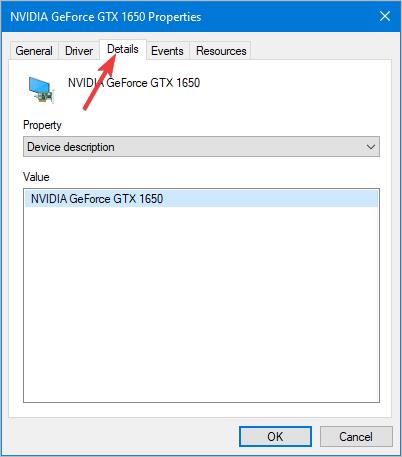
6. Select Hardware Ids from the drop-down menu of Property.

7. Copy all hardware IDs from the Value section.
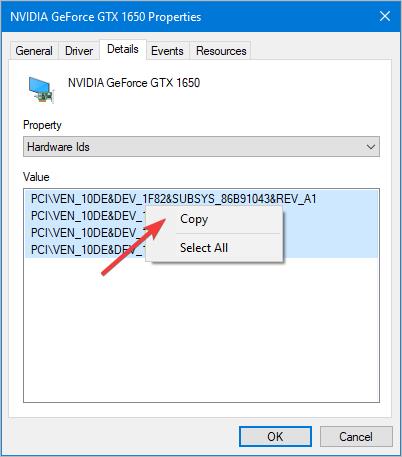
8. Create a text file and paste the hardware IDs to the text file.
If you need to block driver updates for multiple devices, repeat the above steps for each device. Then copy and paste the hardware IDs of the devices to the text file.
9. Save the text file.
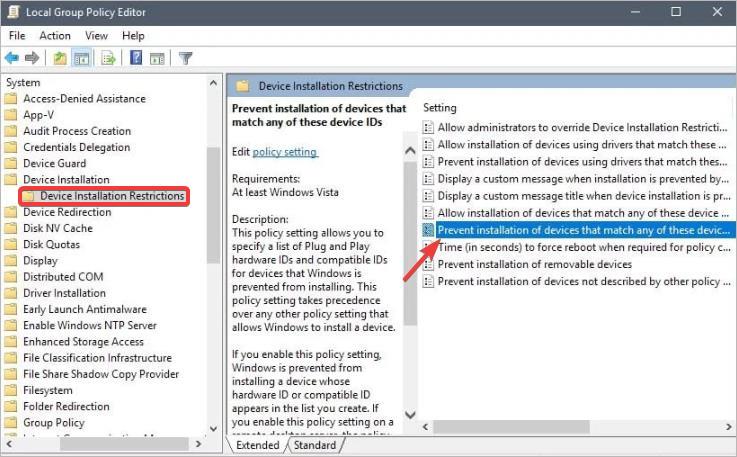
Step 2: Prevent installation of devices that match any of these device IDs
After you find the hardware IDs for the devices, open the Group Policy editor and configure the related settings to prevent installation of the device drivers. Follow the below steps:
1. On your keyboard, press Win+R (the Windows logo key and the R key) at the same time to invoke the Run box.
2. Type gpedit.msc in the Run box and click OK to open the Local Group Policy Editor.
3. Expand Computer Configuration > Administrative Templates > System > Device Installation, and click Device Installation Restrictions. On the right panel, double-click on Prevent installation of devices that match any of these devices IDs.
5. Select Enabled and click the Show button to open the Show Contents window.
6. In the Show Contents window, copy and paste all hardware IDs you’ve saved earlier to the Value section. Then click OK to save the changes.
7. Back on the policy page, click OK to save the changes.
If you want to prevent driver updates for other specific devices in the future, you can keep adding the hardware IDs of those devices to the Value section mentioned in Step 6. But you need to keep the Enabled option (mentioned in Step 5) selected.
Hopefully you find this article helpful. If you have any questions, feel free to drop a comment below. I’ll get back to you ASAP.
While Windows driver updates are meant to be helpful, sometimes they just cause chaos with your hardware instead. You can turn off automatic driver updates in Windows using several different methods.
Note: some methods use the Group Policy Editor. This is not available in the Windows Home edition, only Professional and higher. However, there is a way to enable the local Group Policy Editor if you’re an administrator.
Content
- How to Hide Windows Driver Updates
- How to Completely Disable Driver Updates in Windows
- How to Block Driver Updates for a Specific Device
- Additional Things to Consider
If you plan to eventually install Windows driver updates, hide them temporarily. You can choose to unhide the updates when you’re ready to install later on, or never. There are several ways to do this. If you want to permanently disable driver updates in Windows for all devices or just a specific device, skip to those sections.
Settings
Windows lets you pause all available updates for up to five weeks. During this time, you can choose individual updates to install, if you want. This will pause all updates, including driver updates.
1. Go to «Start -> Settings -> Windows Update.»

2. Choose how long you want to pause updates from the «Pause updates» drop-down box.

This method is temporary. After the five weeks are up, Windows will install all available updates, including driver updates.
Tip: check out these essential PowerShell commands you need to know.
PowerShell
If you know the name of the update you want to hide, you can use PowerShell to hide it. Luckily, you can also get a list of available updates within PowerShell.
Follow our guide to enable PowerShell to hide updates and learn how to hide specific updates.
Microsoft’s Hide Update Tool
As a word of caution, sometimes Microsoft removes this tool randomly. In addition, Microsoft will be retiring this tool and other troubleshooters in future Windows 11 releases. Also, some users have reported it doesn’t work, while others have no issues with it. We’ve personally used it to hide specific updates, including graphics drivers and a few buggy feature updates (until they were fixed).
1. Download wushowhide.diagcab from Microsoft, and run the utility.
2. Click «Next» to start the tool. Wait for Windows to detect updates that can be hidden.

3. Select «Hide updates.» The first time you run this, you may just get a list of updates. If so, skip the next step.

4. Check the update(s) you want to hide. Optional updates aren’t listed here. Click «Next.»

You can rerun the tool at any time, and select «Show hidden updates» to select the ones you’d like to install.
Tip: learn how to roll back a driver if it starts acting up after an update.
How to Completely Disable Driver Updates in Windows
If you want to do more than hide driver updates, there are once again several options to do so. These range from editing the registry to using the Group Policy editor. All allow you to reverse the process to re-enable automatic driver updates.
Control Panel
1. Open the Start menu, and search for «control panel.» Click the result on the right.

2. Select «System and Security.» If you don’t see this, change the view at the top right to «Category.»

3. Select «System.» Depending on your version of Windows, either this will take you to Windows Settings, or you’ll stay inside the Control Panel. In Windows 11, this jumps you into Windows Settings.

4. Click «Advanced system settings.» This option will appear in the Control Panel in some versions of Windows.

5. In the «Hardware» tab, select «Device Installation Settings.»

6. Click «No (your device might not work as expected)» then «Save changes,» to save your preferences. On some versions of Windows, you’ll see «No, let me choose what to do.» If so, select «Never install driver software from Windows Update.»

7. If you’d prefer to bypass the Control Panel and jump straight to the System Properties window, do the following:
Press Win + R, type sysdm.cpl, and click «OK.»

8. Once you’re in the System Properties window, follow the instructions above to disable driver updates.
FYI: learn how to reset Group Policy settings in Windows.
Group Policy Editor
1. Press Win +R to open the Run dialog box. Type gpedit.msc, and press «OK.»

2. In the left pane, expand «Computer Configuration -> Administrative Templates -> Windows Components -> Windows Update -> Manage updates offered from Windows Update.»

3. Right-click «Do not include drivers with Windows Updates,» and select «Edit.»

4. Click the «Enable» option, and select «Apply.»

Registry Editor
Even if you’re comfortable editing the Windows registry, it’s still a good idea to back it up before you make any changes. Follow our guide to backing up and restoring the Windows Registry before proceeding. When everything’s backed up, it’s time to stop automatic driver updates in Windows using the Registry Editor.
Press Win + R, and type regedit. Click «OK» to open the Registry Editor.

In the left pane, expand the following:
Computer\HKEY_LOCAL_MACHINE\SOFTWARE\Microsoft\Windows\CurrentVersion\DriverSearching

Right-click «SearchOrderConfig» in the «DriverSearching» folder. Select «Modify.»

Change the value to «0.» If you need to re-enable updates at some point, change the value back to «1.» Press «OK» to save your changes, and exit the Registry Editor.

Tip: seeing an NVIDIA GeForce Experience driver download error in Windows? Learn what to do.
How to Block Driver Updates for a Specific Device
Sometimes, letting Windows update drivers automatically will be okay, except for a specific device. If Windows keeps replacing your manufacturer driver with a generic Windows one, though, you can block automatic driver updates for specific devices.
At the time of writing, you can still use Microsoft’s Hide Update Tool mentioned above. Since it may not always be available, there are a few other ways to block individual driver updates.
Remember, you can also use PowerShell to block some updates, but not necessarily by device. See the «How to Hide Windows Driver Updates» section for more details.
Find the Device ID
First, you need to know the device ID of the device that will have its drivers blocked. You’ll need it in the next sections.
1. Press Win + X, and select «Device Manager.»

2. Right-click your device. I’m using my mouse as an example. Select «Properties.»

3. Open the «Details» tab. Select «Hardware Ids» from the drop-down list.

4. Copy the IDs in the list to Notepad or another text editor. Click inside the «Value» box, and press Ctrl + A to select all, then press Ctrl + C to copy them. Finally, press Ctrl + V to paste them into your text editor.
5. Exit all the Device Manager windows before continuing.
Tip: check out how to stop all Windows updates.
Open Local Group Policy Editor
Please note that if you block updates this way, you can’t manually update the driver either. You’ll need to remove the IDs from the list, perform the update manually, then re-block them.
1. Open the Local Group Policy Editor as shown above.
2. Expand «Computer Configuration -> Administrative Templates -> System -> Device Installation -> Device Installation Restrictions.»

3. Right-click «Prevent installation of devices that match any of these device IDs,» and select «Edit.» Or, double-click it.

4. Click «Enable» and the «Show» button under «Options.»

5. Copy each of the hardware IDs that you saved earlier into the box. You’ll need to do them one at a time. Press «OK» when you’re done.

6. Press «Apply» on the next screen to save your changes. Exit the remaining windows.
Tip: PC getting cluttered? Learn how to free up space on your «C:» drive.
Additional Things to Consider
If you’re having trouble with drivers updating and devices not working properly, it’s a good idea to block driver updates. However, you still need to update your device drivers regularly. If you don’t, devices may not work as well or at all, as Windows releases new features and OS updates.
Depending on the device itself, updating drivers can improve your PC performance. For instance, updating your graphics card driver helps improve your gaming experience. If you’re noticing performance problems after turning off automatic driver updates in Windows, start updating your drivers manually, or turn on automatic driver updates, and just block the problematic ones.
In the case of Windows using a generic or even a completely wrong driver, it’s better to do it manually than have the wrong driver.
Optimizing Your PC Experience
After taking charge of how Windows updates your drivers, you may also want to take a moment to get rid of old, outdated, and useless drivers that aren’t being used anymore. If you’re trying to manually update drivers, you may encounter issues with AMD drivers. Learn how to fix those issues with these tips.
All images and screencaps by Crystal Crowder.

Crystal Crowder has spent over 15 years working in the tech industry, first as an IT technician and then as a writer. She works to help teach others how to get the most from their devices, systems, and apps. She stays on top of the latest trends and is always finding solutions to common tech problems.
Subscribe to our newsletter!
Our latest tutorials delivered straight to your inbox