Huawei uses machine translation combined with human proofreading to translate this document to different languages in order to help you better understand the content of this document.
Note: Even the most advanced machine translation cannot match the quality of professional translators.
Huawei shall not bear any responsibility for translation accuracy and it is recommended that you refer to the English document (a link for which has been provided).
DNS Configuration
This chapter describes how to configure the domain name system (DNS) for network devices to communicate using domain names.
- Overview of DNS
- Configuration Precautions for DNS
- Configuring DNS Client
- Maintaining DNS
- Clearing Dynamic DNS Entries
- Monitoring the DNS Running Status
- Configuration Examples for DNS
- Example for Configuring Static DNS
- Example for Configuring Dynamic DNS Client
Overview of DNS
Domain Name System (DNS) is a distributed database for
TCP/IP applications that provides conversion between domain names
and IP addresses.
DNS uses a hierarchical naming method to specify a meaningful
name for each device on the network and uses a resolver to establish
mappings between IP addresses and domain names. DNS allows users to
use meaningful and easy-to-memorize domain names instead of IP addresses
to identify devices.
Configuration Precautions for DNS
Feature Requirements
None
Configuring DNS Client
This section describes how to configure DNS and establish mappings between domain names and IP addresses, so that a device can communicate with other devices using domain names.
Usage Scenario
If you want to use meaningful and easy-to-memorize domain names to access other devices, configure DNS. DNS entries record the mappings between domain names and IP addresses. In Figure 1-545, the DNS client and client program are on the same device.
- If you seldom use domain names to visit other devices or no DNS server is available, configure static DNS on the DNS client. To configure static DNS, you must know the mappings between domain names and IP addresses. If a mapping changes, you must manually modify the DNS entry on the DNS client.
- If you want to use domain names to visit many devices and DNS servers are available, configure dynamic DNS on the DNS client. Dynamic DNS requires DNS servers.
Figure 1-545 Networking diagram for typical domain name resolution
Pre-configuration Tasks
Before configuring DNS, complete the following tasks:
-
Configuring a route between the DNS client and server, so that the DNS client and server can communicate
-
Configuring DNS servers
Procedure
- Configure static DNS.
-
Run system-view
The system view is displayed.
-
Run ip host host-name ip-address [ vpn-instance vpn-name ]
The mapping between the domain name and IPv4 address of the host is configured.
-
Run commit
The configuration is committed.
-
- Configure dynamic DNS.
-
Run system-view
The system view is displayed.
-
Run dns resolve
Dynamic DNS is enabled.
-
Run dns server ip-address [ vpn-instance vpn-name ] [ tcp ssl-policy ssl-policy-name ]
A DNS server is configured.
-
(Optional) Run dns server source-ip [ vpn-instance vpn-name ] ipv4Addr
The IP address of the local NE is specified.
An IP address is specified for the DNS client to communicate with the DNS server. Using a specified source address ensures the security of communication between the DNS client and DNS server.
-
Run dns domain domain-name [ vpn-instance vpn-name ]
A domain name suffix is added.
-
(Optional) Run dns timeout interval-time
A DNS query response timeout period is configured.
-
(Optional) Run dns try times
The number of retransmission times for DNS query packets is configured.
-
Run commit
The configuration is committed.
To configure multiple DNS servers, repeatedly perform Step 3. To configure multiple domain name suffixes, repeatedly perform Step 5.
-
Verifying the Configuration of a DNS Client
After configuring a DNS client, verify the configuration.
-
Run the display ip host command to view static DNS entries, including mappings between domain names and IP addresses.
-
Run the display dns server command to view the IP addresses of all configured DNS servers.
-
Run the display dns domain command to view the domain name suffix list.
-
Run the display dns dynamic-host command to view dynamic DNS entries stored in the cache.
Maintaining DNS
This chapter describes how to maintain DNS, which includes clearing dynamic DNS entries and monitoring the DNS running status.
Clearing Dynamic DNS Entries
This section describes how to clear dynamic DNS entries using a reset command.
Context
The dynamic DNS entries cannot be restored after they are cleared. Exercise caution when running the reset command.
Procedure
- After confirming the dynamic DNS entries to be deleted from the cache, run the reset dns dynamic-host [ vpn-instance vpn-name ] [ hostname ] command in the user view.
Monitoring the DNS Running Status
This section describes how to monitor the DNS running status.
Context
In routine maintenance, you can run the following commands in all views to check the running status of DNS.
Procedure
- Run the display ip host [ vpn-instance vpn-name ] command to check information about the static domain name resolution table.
- Run the display dns server(IPv4) [ vpn-instance vpn-name ] command to check DNS server configurations.
- Run the display dns domain(IPv4) [ vpn-instance vpn-name ] command to check domain name suffixes.
- Run the display dns dynamic-host [ vpn-instance vpn-name ] command to check information about dynamic DNS entries in the cache.
Configuration Examples for DNS
Each configuration example consists of the networking requirements, configuration roadmap, configuration procedures, and configuration files.
Example for Configuring Static DNS
This section describes how to configure static DNS.
Networking Requirements
As shown in Figure 1-546, Device A frequently uses the domain name «host.com» to visit the host. To improve the efficiency of domain name resolution, you can establish a static mapping between the domain name «host.com» and IP address 10.100.1.2 in the static domain name resolution table of Device A.
Figure 1-546 Configuring static DNS
Configuration Roadmap
The configuration roadmap is as follows:
- Establish a static mapping between the domain name «host.com» and IP address 10.100.1.2 on Device A.
Data Preparation
To complete the configuration, you need the following data:
-
IP addresses of Device A and the host
-
Domain name of the host
Procedure
- Configure a static mapping between the domain name «host.com» and IP address 10.100.1.2.
<HUAWEI> system-view[~HUAWEI]sysname DeviceA
[*HUAWEI]commit
[~DeviceA] ip host host.com 10.100.1.2
[*DeviceA] commit
- Verify the configuration.
# Run the ping host.com command on Device A. The host can be pinged. The destination IP address for the ping operation is 10.100.1.2.
<DeviceA> ping host.comping host.com (10.100.1.2):56 data bytes, press CTRL_C to break Reply from 10.100.1.2: bytes=56 Sequence=1 ttl=128 time=1 ms Reply from 10.100.1.2: bytes=56 Sequence=2 ttl=128 time=4 ms Reply from 10.100.1.2: bytes=56 Sequence=3 ttl=128 time=3 ms Reply from 10.100.1.2: bytes=56 Sequence=4 ttl=128 time=2 ms Reply from 10.100.1.2: bytes=56 Sequence=5 ttl=128 time=3 ms --- host.com ping statistics --- 5 packet(s) transmitted 5 packet(s) received 0.00% packet loss round-trip min/avg/max = 1/2/4 ms# Run the display ip host command on Device A to check static DNS entry information, including mappings between domain names and IP addresses.
<DeviceA> display ip hostHost Age Flags Address host.com 0 static 10.100.1.2
Configuration Files
-
Device A configuration file
#
 sysname DeviceA
#
 ip host host.com 10.100.1.2
#
return
Example for Configuring Dynamic DNS Client
This section describes how to configure dynamic DNS.
Networking Requirements
As shown in Figure 1-547, Device A serves as the DNS client. With the help of the DNS server, Device A can use the domain name «huawei.com» to access the host with IP address 10.2.1.3/16.
Figure 1-547 Networking diagram for dynamic DNS
Interfaces 1 through 2in this example are GE 0/1/0, GE 0/1/1 respectively.
Configuration Roadmap
The configuration roadmap is as follows:
-
Enable dynamic DNS.
-
Configure the IP address of the DNS server.
-
Configure a domain name suffix.
Data Preparation
To complete the configuration, you need the following data:
-
Domain names of Device B and Device C
-
IP address of the DNS server
-
Domain name suffixes
Procedure
- Configure Device A.
# Configure dynamic DNS entries.
<HUAWEI> system-view[~HUAWEI]sysname DeviceA
[*HUAWEI]commit
# Enable dynamic DNS.
[~DeviceA] dns resolve
# Configure the IP address of the DNS server.
[*DeviceA] dns server 10.3.1.2
# Configure a domain name suffix «net».
[*DeviceA] dns domain net
# Configure a domain name suffix «com».
[*DeviceA] dns domain com
[*DeviceA] commit
[~DeviceA] quit
To implement domain name resolution, you must configure a route between Device A and the DNS server for them to communicate. For details about how to configure a route, see NEMid-End Router Configuration Guide — IP Routing.
- Verify the configuration.
# Run the ping huawei command on Device A. The host with domain name «huawei.com» can be pinged. The destination IP address for the ping operation is 10.2.1.3.
<DeviceA> ping huawei.comPING huawei.com (10.2.1.3): 56 data bytes, press CTRL_C to break
Reply from 10.2.1.3: bytes=56 Sequence=1 ttl=126 time=6 ms
Reply from 10.2.1.3: bytes=56 Sequence=2 ttl=126 time=4 ms
Reply from 10.2.1.3: bytes=56 Sequence=3 ttl=126 time=4 ms
Reply from 10.2.1.3: bytes=56 Sequence=4 ttl=126 time=4 ms
Reply from 10.2.1.3: bytes=56 Sequence=5 ttl=126 time=4 ms
--- huawei.com ping statistics ---
5 packet(s) transmitted
5 packet(s) received
0.00% packet loss
round-trip min/avg/max = 4/4/6 ms
# Run the display dns dynamic-host command on Device A. Dynamic DNS entry information stored in the cache is displayed.
<DeviceA> display dns dynamic-hostNo Domain Name IpAddress TTL Alias
1 huawei.com 10.2.1.3 3579
TTL indicates how long a DNS entry can exist, in seconds.
Configuration Files
-
Configuration file of Device A
#
sysname DeviceA#
dns resolve
dns server 10.3.1.2
dns domain net
dns domain com
#
interface GigabitEthernet0/1/0undo shutdown
ip address 1.1.1.2 255.255.0.0
#
rip 1
network 1.0.0.0
#
return
-
Configuration file of Device B
#
sysname DeviceB#
interface GigabitEthernet0/1/0undo shutdown
ip address 2.1.1.1 255.255.0.0
#
interface GigabitEthernet0/1/1undo shutdown
ip address 1.1.1.1 255.255.0.0
#
interface LoopBack0
ip address 4.1.1.1 255.255.255.255
#
rip 1
network 2.0.0.0
network 1.0.0.0
network 4.0.0.0
#
return
-
Configuration file of Device C
#
sysname DeviceC#
interface GigabitEthernet0/1/0undo shutdown
ip address 2.1.1.2 255.255.0.0
#
interface GigabitEthernet0/1/1undo shutdown
ip address 3.1.1.1 255.255.0.0
#
interface LoopBack0
ip address 4.1.1.2 255.255.255.255
#
rip 1
network 2.0.0.0
network 3.0.0.0
network 4.0.0.0
#
return
- Overview of DNS
- Configuration Precautions for DNS
- Configuring DNS Client
- Maintaining DNS
- Clearing Dynamic DNS Entries
- Monitoring the DNS Running Status
- Configuration Examples for DNS
- Example for Configuring Static DNS
- Example for Configuring Dynamic DNS Client
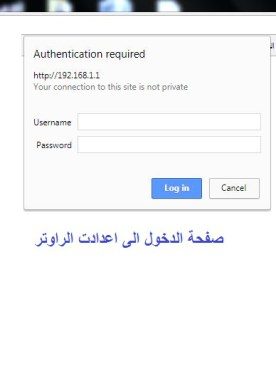
Для начала нужно зайти в настройки роутера
1. Перейдите в браузер Google Chrome или любой другой браузер, установленный на вашем рабочем столе, и откройте его.
2: Напишите в адресной строке эти числа 192.186.1.1, и эти числа являются IP-адресом вашего маршрутизатора, и он считается основным по умолчанию для всех существующих маршрутизаторов.
3: После ввода этих чисел нажмите кнопку Enter. Откроется страница входа в маршрутизатор с двумя полями, в первом из которых написано имя пользователя.
Второй — это пароль …… имя пользователя — admin, а пароль — admin. Если он не открывается с вами, перейдите к маршрутизатору и посмотрите за ним. Вы найдете имя пользователя и пароль сзади. Введите их в двух коробках перед вами.
Посмотри на следующую картинку
Одна из причин, которые, по мнению пользователей, вызывают медленный Интернет, — это присутствие злоумышленников, подключенных к вашему маршрутизатору без вашего ведома, и это делается с помощью некоторых вредоносных программ, которые могут проникнуть в ваш маршрутизатор и вызвать замедление вашего Интернета или даже отключить ваше соединение.
Причиной медленного интернета также может быть качество вашей наземной линии связи, поэтому вам необходимо связаться с поставщиком услуг и узнать эффективность вашей наземной линии связи и уровень помех.
Что такое DNS и для чего он нужен?
Возможно, термин DNS известен не всем, поэтому мы должны объяснить, что такое DNS, который является просто аббревиатурой для сервера доменных имен, и это общий и важный термин в интернет-системах, и без DNS вы не можете выходить в Интернет, так как его задача — перевести частный домен любого сайта на IP-адрес, браузер может использовать его для более быстрого доступа к сайтам, а Интернет запрашивает у вас DNS-адрес, чтобы преобразовать домен сайта и преобразовать его в IP-адрес .
Как можно увеличить скорость интернета, изменив DNS в роутере Huawei?
Вы можете легко решить проблему медленного Интернета, если у вас есть маршрутизатор Huawei, изменив DNS или, другими словами, найдя быстрый DNS-сервер.К счастью, есть много быстрых DNS-серверов, которые могут обеспечить более высокую скорость Интернета.
Шаги по смене DNS на роутере Huawei:
- Войдите в Интернет-браузер со своего компьютера.
- Введите IP-адрес маршрутизатора в поле URL-адреса, который будет 192.168.1.1.
- Появится страница входа в настройки маршрутизатора, введите имя пользователя и пароль, который по умолчанию будет admin, и вы можете связаться с поставщиком услуг, чтобы проверить это.
- После входа на страницу маршрутизатора перейдите на вкладку Основные, затем LAN, а затем DHCP.
- Через опцию DHCP вы найдете поле под названием Primary DNS Server Address и другое поле под названием Secondary DNS Server Address, вы пишете DNS внутри каждого из них, а затем нажимаете на опцию сохранения настроек или Submit. .
- Узнайте о многих DNS: отсюда
Статьи по теме
**Как установить IP на компьютер**
Узнать характеристики компьютера несложно
Простая команда, чтобы узнать, какие документы и файлы были открыты на вашем устройстве
Всего 4 шага для увеличения скорости загрузки при загрузке из Интернета
Лучший способ проверить оперативную память профессионально и без программ
Скрытие и отображение файлов и папок во всех системах Windows
Статьи по теме


Even with the recent rollout of Fibre across Ireland, there are still many of us just off the grid when it comes to fixed line broadband, the easy alternative is to use a Mobile Broadband service such as 3 – one downside to this is generally the modems/routers supplied by 3 can be locked down in some areas that us nerds like to customise, custom DNS servers being an example. In this guide I will show you how to set a custom primary and secondary DNS server on your Huawei router, in this example I am using the B525-23a as that’s the modem I have on hand, but this should work on most other Huawei modems supplied by 3, Vodafone etc.
Let’s get in to it! To begin, we need to log in to the web browser of your 4G modem:
- Open your favourite web browser (e.g. Brave, Chrome, Firefox)
- Type 192.168.8.1 (the default IP to access the admin web UI) in the address bar
- The default username will be admin
- The default password is the default WiFi password, which can be found on the sticker on the bottom of the modem.
After you log in, you now need to navigate to the DHCP page, this can be found by first opening the Advanced menu item in the top menu, and then following the Router > DHCP menu items on the left, alternatively you use this link to bring you directly to the DHCP page (once are you already logged in).
Now we need to get a console window open, to do this in Chrome, press Command+Option+J (Mac) or Control+Shift+J (Windows, Linux, Chrome OS).
In the console type the below:
allow pastingNow, we can paste in the code to reveal the DNS fields, depending on which version firmware you are running on your modem, the steps will differ slightly.
If you are on an older firmware version – your admin panel looks like this:

If this is the case , paste the following in your console:
$('#dhcp_dns_statistic').show();
$('#dhcp_primary_dns').show();
$('#dhcp_secondary_dns').show();
If you are on the newer Firmware – your admin panel looks like this:
Then you just need to paste this:
$('#dhcp_dns').show();Tick the box beside “Set DNS server manually”
Now, whichever option you need to choose, you will now be able to set a customer primary and secondary DNS server. Also, once you save the settings and refresh the page, the fields will be hidden again, but yourDNS settings will be saved – I promise.
In my next post, I’ll recommended DNS servers to use, be sure to check back – or even better, sign up to the newsletter below!
These instructions will provide guidance on how to configure CleanBrowsing on your Huawei HG8240/HG8245/HG8247. You can find guides for this router here:
- EchoLife HG8240/HG8245/HG8247 GPON Terminal V100R002C00&C01
Step 1: Access the router
Log in to the Huawei Router Configuration page by entering the following IP into your URL bar: 192.168.100.1
You will need to log in using your administrator credentials.
Step 2: Navigate to DNS Section in the Router Dashboard
Navigate to LAN > DHCP Server Configuration
Step 3: Update DNS Settings
Check Enable primary DHCP server.
Check Enable DHCP L2Relay (May be labeled as just DHCP Relay)
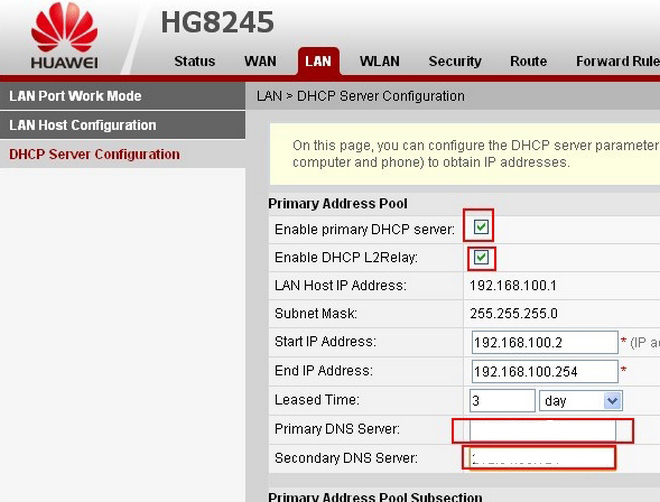
Enter the IP addresses in the DNS server fields.
The CleanBrowsing Family IP’s are:
- 185.228.169.168
- 185.228.168.168
Note: If you have a paid plan use the DNS IPs provided in your account.
Select SaveNote: If you have a paid plan use the DNS IPs provided in your account.
Currently, we use a Huawei LTE router at home. I recently noticed that DNS resolution got very slow. By default, an operating system like macOS uses the router as DNS server. The router itself proxies these DNS request to the DNS server of your ISP. So, it seemed like our ISP’s DNS server had some performance issues. The performance did not get better in the following days.
Therefore, I changed the DNS server — popular public alternatives are Cloudflare DNS & Google DNS. You can either change the DNS settings of your computer, but this means that DNS resolution for this specific device gets fixed. Better is to change the DNS settings on router level.
For our Huawei router, the DNS setting is hidden inside the “Advanced => DHCP” menu. On the “DHCP” page, open the web console (e.g. on macOS: Command + Option + I, then go to tab “Console”). Then, execute the command $('#dhcp_dns').show();. Now, a checkbox “Set DNS server manually” should appear. When you enable it, you can set primary and secondary DNS servers. For example, for Cloudflare DNS, set these to 1.1.1.1 and 1.0.0.1.
(via bornoe.org)