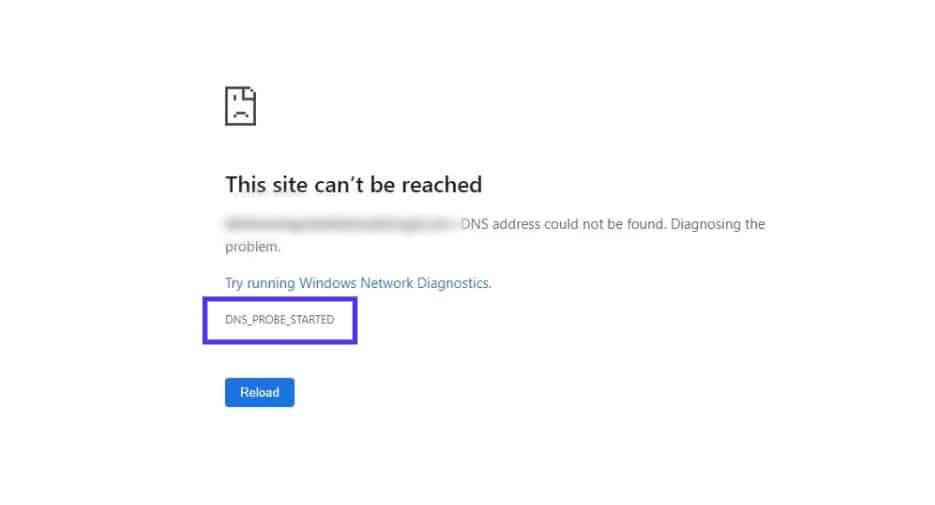
You may run into a wide variety of issues when browsing the internet or trying to access a website. One of the most common is the DNS_PROBE_STARTED error message.
While inconvenient, this Domain Name Server (DNS) problem isn’t anything to panic about. You can use a handful of relatively easy, quick, and straightforward solutions to resolve the issue and get back to a smooth browsing experience.
In this post, we’ll explain what the DNS_PROBE_STARTED error means and its common causes. Then we’ll walk you through six methods you can use to resolve it. Let’s dive in!
Check Out Our Video Guide to Fixing the DNS_PROBE_STARTED Error
What the DNS_PROBE_STARTED Error Means
The DNS_PROBE_STARTED error message typically indicates an issue with your DNS or network. Most often, it means that your computer was unable to connect to a DNS server:
DNS, sometimes referred to as the phonebook of the Internet, is the system that lets people connect to websites using easy-to-remember domain names instead of hard-to-remember IP addresses. For example, it will convert an IP address such as 104.18.42.131 into a site name such as www.kinsta.com.
While inconvenient, this DNS problem isn’t anything to panic about. 😅 And with help from this guide you’ll be equipped to handle it 🛠 You can use a handful of relativelyClick to Tweet
A DNS probe is a network diagnostic tool used to test the reachability of a given hostname or IP address. A DNS probe can also test the performance of a DNS server by measuring the time it takes for the server to resolve a given hostname.
There are various types of DNS-related errors that can occur. Other examples include:
- DNS_PROBE_BAD_CONFIG (which can be caused by VPN apps)
- DNS_PROBE_FINISHED_NXDOMAIN (Common with Android & iOS)
- DNS SERVER NOT RESPONDING
DNS_PROBE_STARTED is an error message that indicates that the DNS probe failed to start. This can happen due to several factors. While DNS_PROBE_STARTED in Chrome is the most common occurrence, it can also happen in other browsers, including Microsoft Edge and Android browsers.
Common Causes of the DNS_PROBE_STARTED Message
There are a few common causes of the DNS_PROBE_STARTED message. Firstly, your DNS server may be down. This issue commonly occurs because of a misconfiguration of your DNS or network settings.
It could also be attributed to a problem with your network adapter or router. If you have antivirus or firewall software installed, it may be blocking DNS requests, leading to this error message.
How To Fix the DNS_PROBE_STARTED Error (6 Methods)
Now that we understand more about this error, let’s get into how you can resolve it. Below are six methods to use to fix the DNS_PROBE_STARTED error.
Note that for the following tutorial, we’ll be using Windows/Chrome since this is where you will most likely encounter this error. However, if you’re using a Mac device or another browser, you can follow the same steps by substituting the commands with the OS/browser equivalents.
1. Change Your IPv4/IPv6 DNS Address
The first solution you can try is changing your IPv4/IPv6 DNS address. Without getting into the nitty-gritty, these internet protocols have slight technical differences. While IPv6 is the newest version, IPv4 is still the most popular.
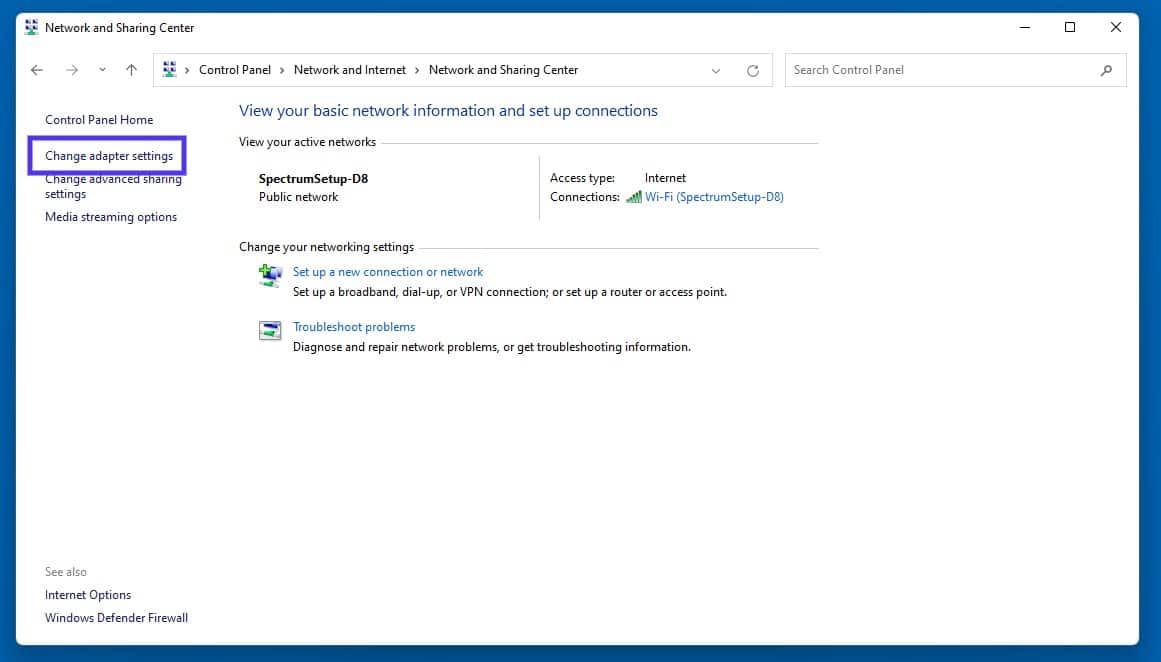
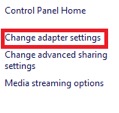
To get started, navigate to your control panel and click on Network & Internet > Network and Sharing Center. From the menu on the left, select Change adapter settings:
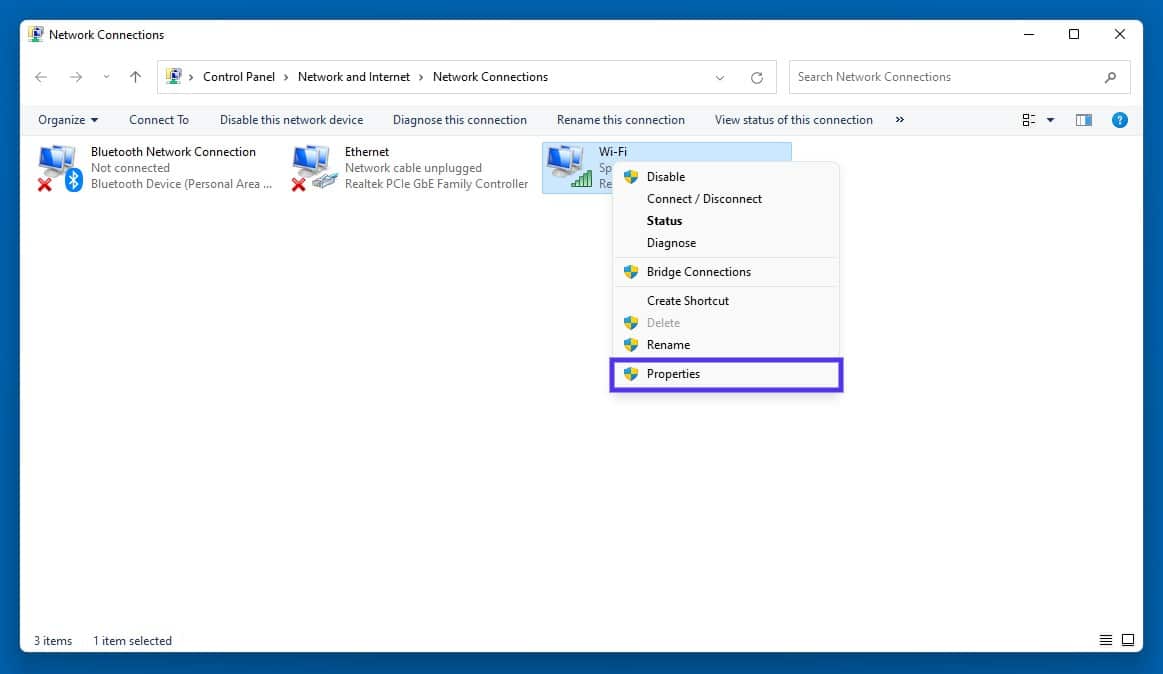
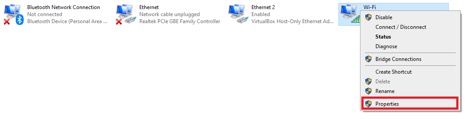
This will open the Network Connections window. Right-click on your network and then select Properties:
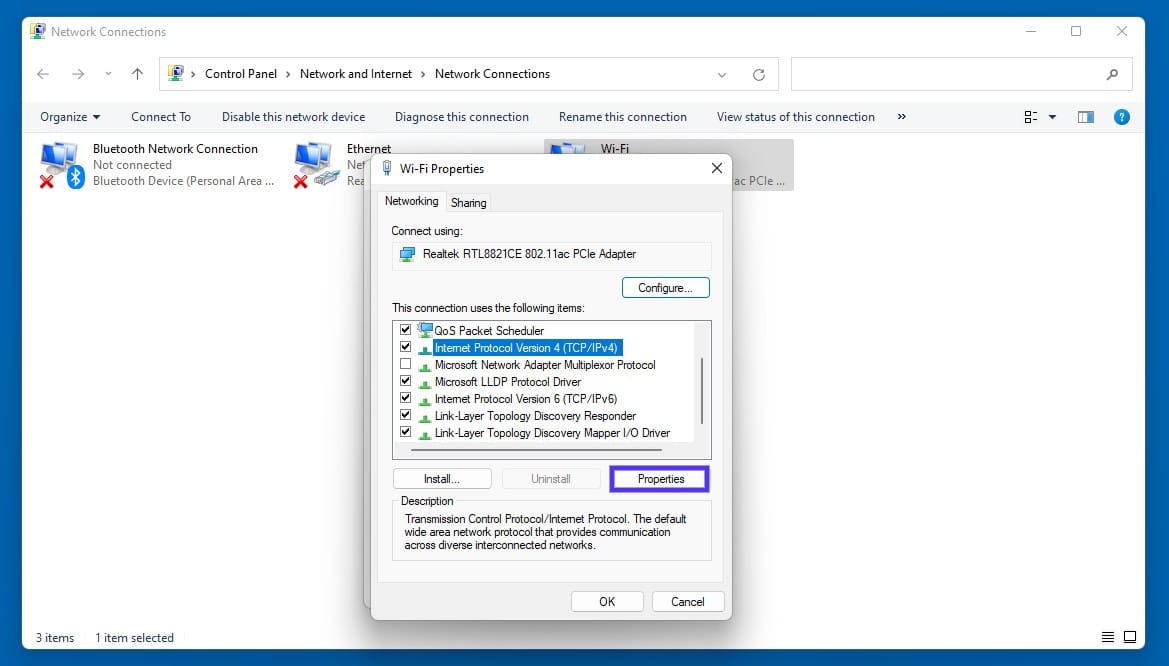
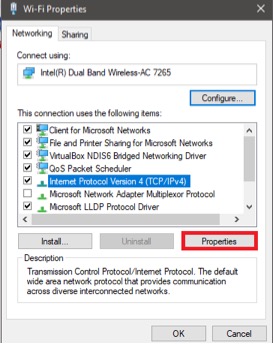
In the window that opens, click on Internet Protocol Version 4 (TCP/IPv4) from the list, then select Properties again:
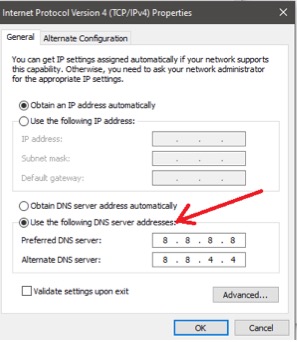
Click on Use the following DNS server addresses. You can enter “8.8.8.8” for the Preferred DNS server and “8.8.4.4” for the Alternate DNS server:
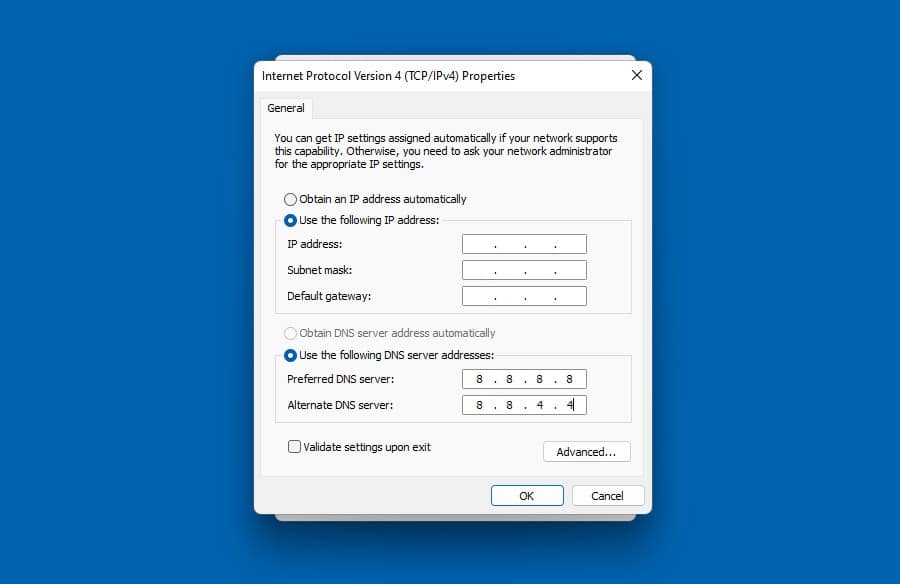
When you’re done, click on the OK button to save your changes. Close all the windows, then try reaccessing the website to see if the error is still present. If the problem isn’t fixed, you can move on to the next potential solution.
2. Refresh Your DNS
DNS caching involves your OS/browser saving your recently visited IP addresses in a database. However, an outdated database can lead to network connectivity issues, such as the DNS_PROBE_STARTED error.
Therefore, the next method you should try to resolve this issue is to flush your DNS cache to refresh it. Open the Command Prompt. To do this, press the Windows key + R, type “cmd” into the Run box, and press Enter:
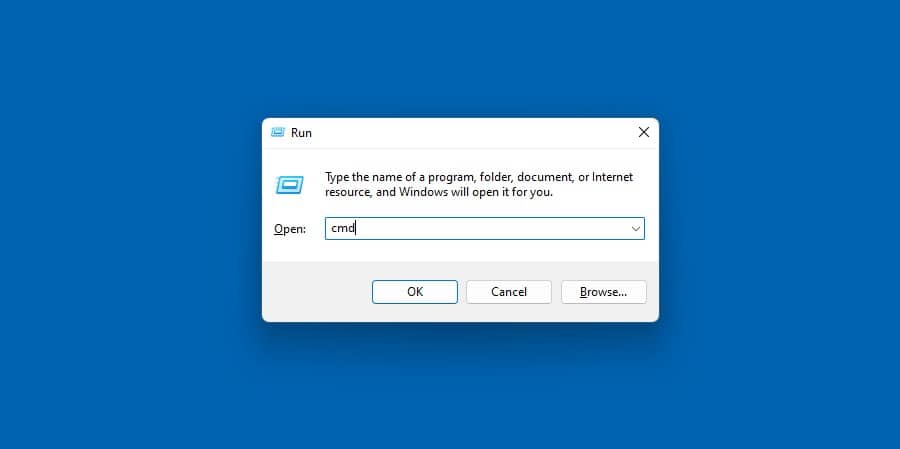
If you’re using macOS, you can navigate to Utilities > Terminal. In the command prompt window, type the following:
ipconfig /flushdnsPress your Enter key. This will clear any incorrect DNS entries from your computer’s cache. Next, enter the following command:
ipconfig /renewThis will renew your computer’s IP address. Finally, you can input:
ipconfig /registerdnsPress Enter to run the command. This will register your computer’s DNS settings with your Internet Service Provider (ISP). You can type in “exit,” and press Enter to close the command prompt.
3. Clear Your Browser Cache and Cookies
If you’re still seeing the DNS_PROBE_STARTED error message, clearing your cache and cookies is the next method you can try. The exact steps for this process will vary depending on your browser.
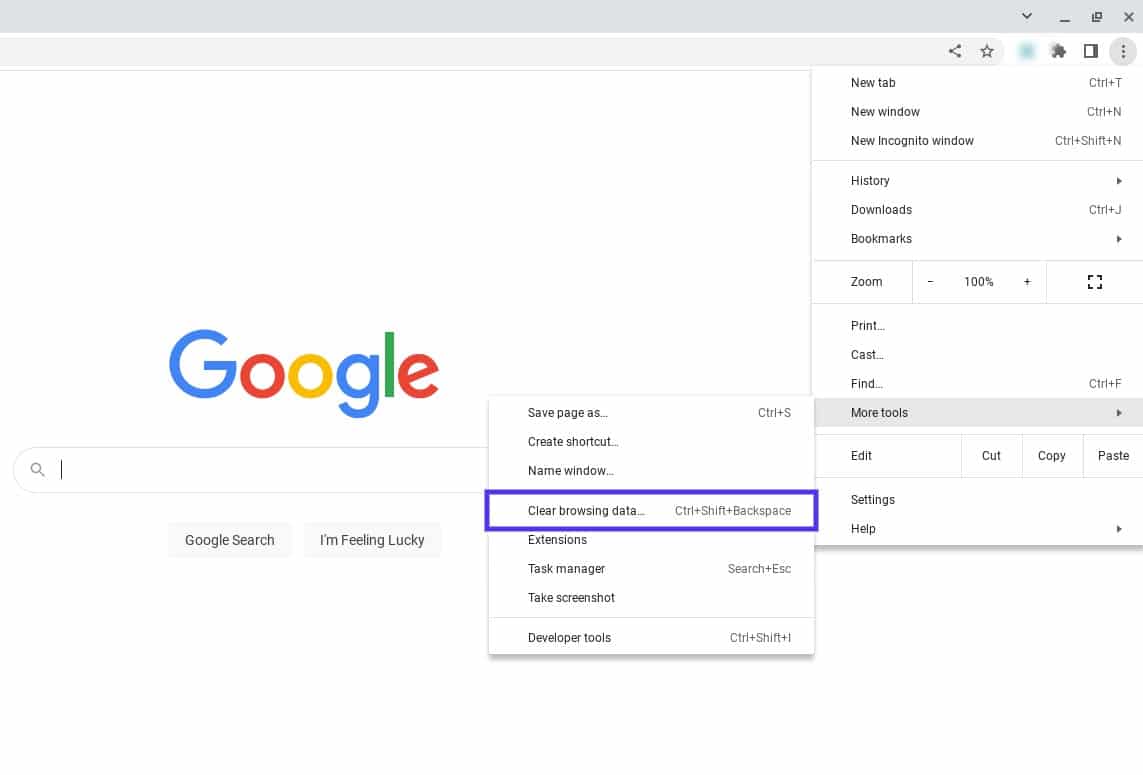
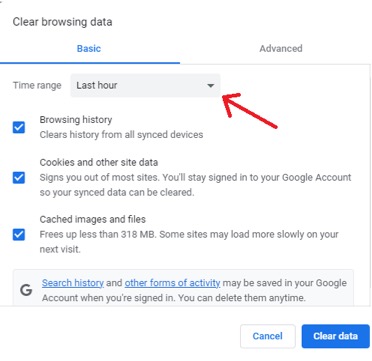
For example, in Google Chrome, you can select the three vertical dots in the upper right corner, then navigate to More tools > Clear browsing data:
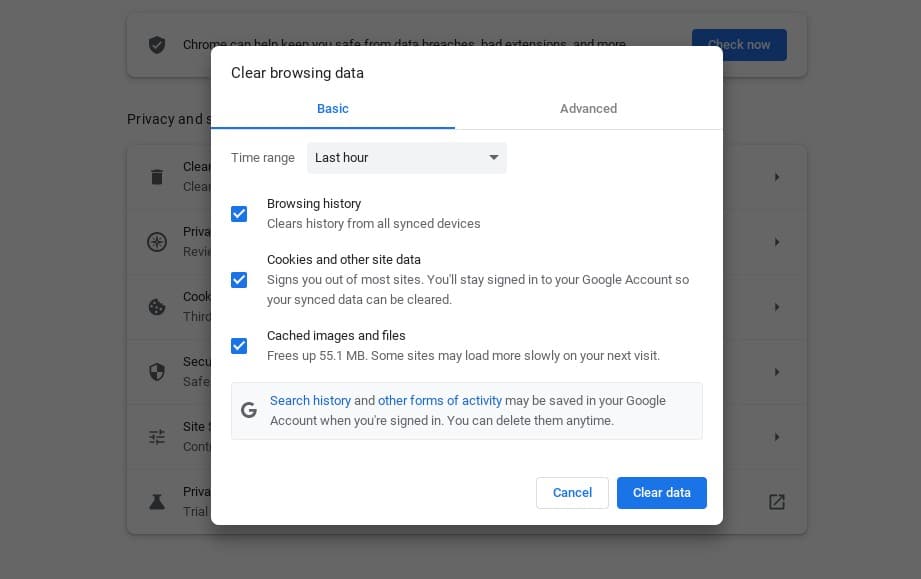
In the window that opens, you can select all three options under Basic. Then click on Clear data:
You can follow similar steps if you’re using a Mac device or another web browser. For detailed guidance, you can refer to our guide on How to Clear Cache for All Major Browsers.
4. Uninstall and Reinstall Your Network Driver(s)
Many issues can arise from outdated network drivers. One of them is the DNS_PROBE_STARTED error message.
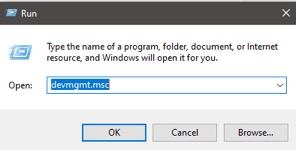
Therefore, if you’re still seeing the error, you can try uninstalling and then reinstalling your network drivers through your Device Manager. In Windows, press the Windows key + R, then type “devmgmt.msc” into the Run box and hit Enter.
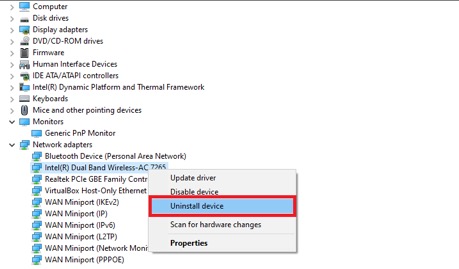
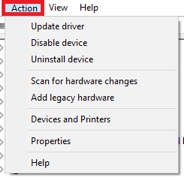
In the Device Manager window, click to expand Network adapters. Then right-click on your network adapter, and select Uninstall device:
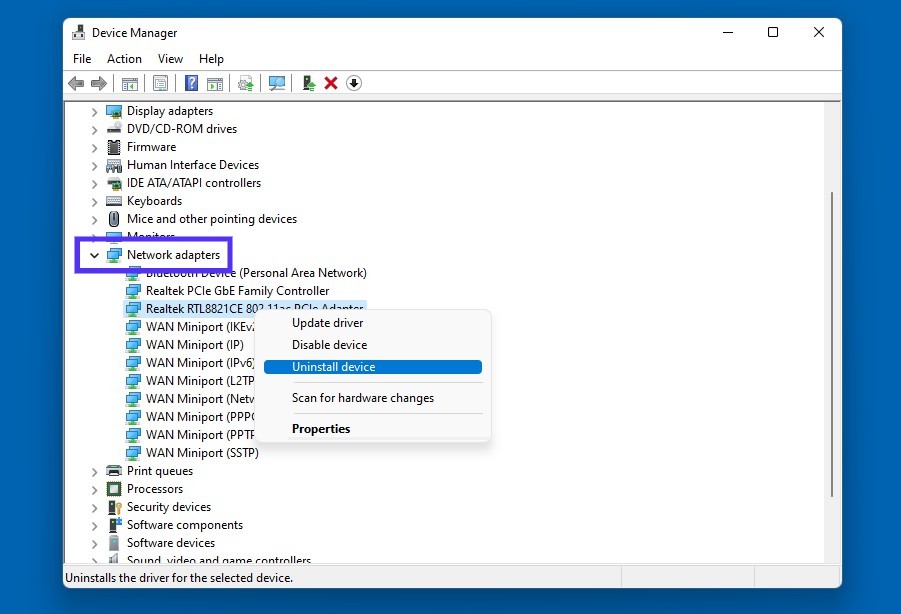
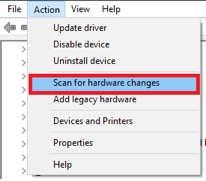
Close the Device Manager window and restart your computer. Once your computer has restarted, open the Device Manager again and select your network adapter. Click on Action > Scan for hardware changes from the menu bar:

This will reinstall your network driver(s). Now try loading the website again.
5. Disable Antivirus and Firewall Software
Antivirus and firewall tools are important because they can safeguard you against various issues, including multiple types of malware.
However, if you’re still having trouble with the DNS_PROBE_STARTED error, your antivirus software may be blocking DNS requests. Therefore, you can try disabling it temporarily to see if that fixes the problem.
You can also temporarily disable your firewall. Alternatively, you may want to try adjusting its settings.
To check your firewall settings, open your control panel and type “control” into the search field, followed by your Enter key. Select System and Security, then under Windows Defender Firewall, pick Allow an app or feature through Windows Firewall:
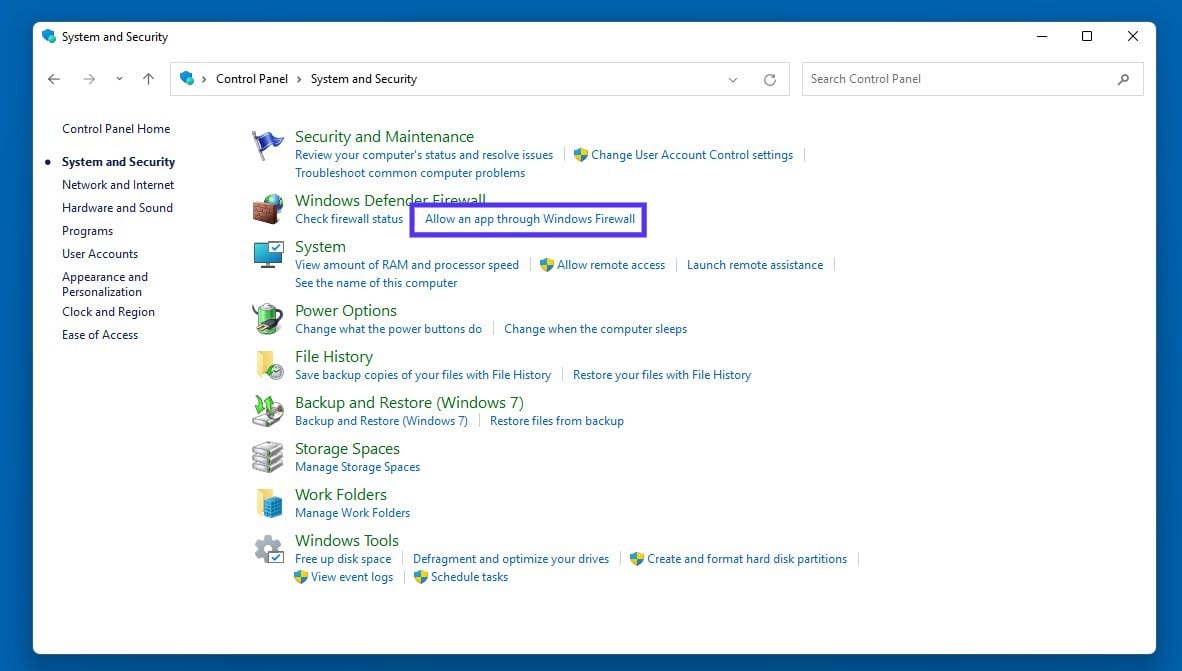
In the next window, click on Change settings:
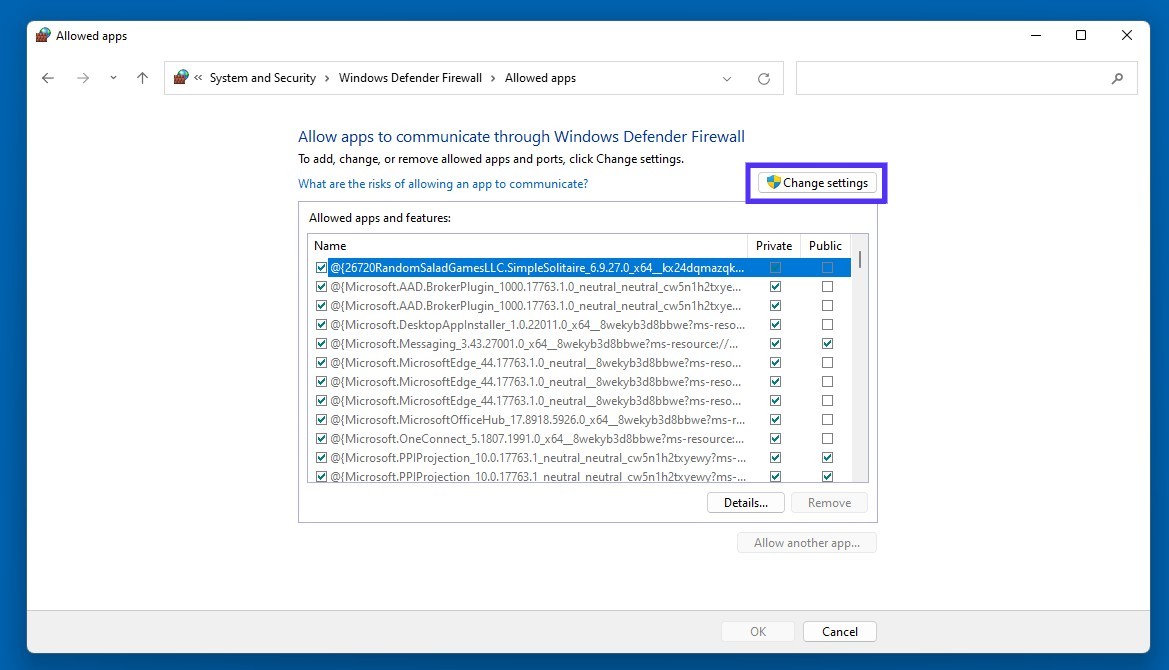
If your DNS client is not listed, you can add it by clicking on the plus (+) icon. When you’re done, select the OK button to save your changes.
6. Restart Your Router/Modem
Finally, the last method you can try is to restart your router or modem. This will reset the connection between your computer and DNS servers.
You can skip this step if you only see the DNS_PROBE_STARTED message in one browser, such as Chrome, but not in others, like Edge. In this scenario, the issue is likely with your browser settings rather than your network or internet connection.
After you power off your computer, router/modem, unplug them from the outlet(s) and wait a few minutes. Then turn on your router/modem and, after another minute or two, your computer.
Thanks to the straightforward solutions in this guide, you can get back to a smooth browsing experience ASAP. 😌Click to Tweet
Summary
Dealing with DNS problems can be a real pain, especially if you don’t know what’s causing the issue. However, if you come across the DNS_PROBE_STARTED error, you can take a handful of troubleshooting steps to resolve it.
As we discussed in this post, there are six methods you can use to fix the DNS_PROBE_STARTED error. If one does not work, then try the next one. You should be able to successfully resolve the issue using one of the methods above.
Do you want to switch to hosting that can help you quickly identify, troubleshoot, and resolve problems with your website? Learn how our application, database, and managed WordPress hosting plans, user-friendly MyKinsta dashboard, and Application Performance Monitoring (APM) tool can help!
Появление ошибки с сообщением «DNS_PROBE_STARTED» означает, что произошел сбой связи с сервером сайта на уровне домена (DNS). Это может означать сбой работы браузера, и прочие причины, взаимосвязанные с работой DNS-протоколов. Не волнуйтесь, никаких поломок у вас нет, всего лишь сбои в работе оборудования или самого сайта. Эта инструкция поможет решить вашу проблему.
Сбой dns probe сообщает вам о том, что сайт недоступен по причинам, связанным с ДНС протоколами. Ищем проблему с соединением, Интернетом либо самим сайтом. Вам может быть полезна инструкция: «Ошибка dns probe finished nxdomain», которая встречается чаще, но имеет сходные причины.
Перезапустите браузер
Устранить сбой в браузере dns probe no internet можно перезапустив сам браузер. Следует сохранить важные документы, с которыми вы работали в браузере или добавить в закладки необходимые страницы. После чего закрыть браузер. Закрывается большинство из них кликом ЛКМ по крестику в углу справа вверху.

Запускается он снова после двойного клика по ярлычку на рабочем столе либо одинарного клика по иконке в панели управления снизу экрана.

Если это не помогло, возможно на вашем устройстве браузер открыт несколько раз или он повис, и до конца не закрывается, вместе с окном. Тогда запустите диспетчер задач, и закройте там все запущенные браузеры.

Стоит попробовать перезагрузить ОС, возможно это системный сбой и после перезагрузки все будет нормально. Чтобы исключить вину браузера, откройте эту же страницу другим браузером. Если она открывается, тогда вам следует сбросить настройки браузера либо полностью переустановить его.
Проблема с роутером
Исправить dns probe started помогает перезагрузка роутера WIFI. Не зависимо от того, подключены вы кабелем либо через wifi соединение, перезагрузите свой роутер. Чтобы исключить сбои в его работе. Внешне это может никак не проявляться кроме этой ошибки на экране.
Для перезагрузки следует отключить маршрутизатор от сети, вынув шнур питания из розетки на 2-3 минуты.

Либо нажав кнопку отключения и выждав 2-3 минуты, чтобы сбросились все настройки.

Более сложный вариант, попасть в меню маршрутизатора и там кликнуть ЛКМ по «RestartTheRoyter».

Запустите «УстранениеНеполадок» подключения
В системах виндовс 7,8,10 и 11 присутствует встроенное устранение неполадок с подключением. После запуска, все работает автоматически, поэтому способ доступен для любого пользователя. Поэтому при ошибке dns probe started no internet следует воспользоваться им:
Для винды 7 и 8 достаточно кликнуть ПКМ по значку доступа к Интернету в панели задач и перейти в «ДиагностикаНеполадок»;
- Для систем 10 и 11 следует нажать «Win+i»;
- Кликнуть ЛКМ по «ОбновлениеИбезопасность»;
- Перейти в «УстранениеНеполадок»;
- Оттуда в «ДополнительныеСредстваУстраненияНеполадок…»;
- Затем выбираете «ПодключенияК Интернету»;
- Кликаете по «ЗапуститьСредствоУстраненияНеполадок»;

Запустится проверка, которая либо устранит неполадки автоматически. Либо перечислит все не устранимые неполадки, с которыми вам придется работать самостоятельно. Или стоит обращаться к профессионалу в таком деле.
Обновление IP-адреса и чистка Кэша DNS
Чтобы быстро общаться с доменами сайтов на любом компьютерном устройстве присутствует кэш DNS, в котором хранятся данные. Переполнение этого КЭШа неизбежно вызывает проблемы с подключением к сайтам и интернету вообще. Устранить проблему «dns_probe_started» возможно очисткой этого КЭШа и обновлением IP-адреса вашего устройства. Запустите «КоманднуюСтроку», затем:
- Впишите в ней «ipconfig/flushdns» и нажмите «Энтер»;

- Для обновления IP наберите «ipconfig/release», и вашему устройству присвоится новый адрес;
- Вписав «ipconfig/renewLaunch Chrome» сможете проверить, появился ли доступ к нужному сайту;
Если этот метод не дал результата, вот еще методы очистки Кэша DNS.
Смените DNS-сервер устройства
Любой браузер пользуется DNS-сервером, чтобы связаться с адресами сайтов. Когда с вашим сервером возникла проблема, ни один браузер уже не сможет подключиться через него к доменам, отсюда и ошибки. Устранить сбой «dns_probe_started» может смена сервера ДНС. Действия такие:
- Открывайте подраздел «Настройки»;
- Переходите в пункт «Сеть и Интернет»;
- Кликните ПКМ по «СетевойАдаптер»;
- Переходите к «Свойства»;

- Выбирайте строчку «Интернет-протоколВерсия4» кликом ЛКМ;
- Кликните «Свойства»;
- Активируйте строчку «ИспользоватьСледующиеАдресаDNS-серверов»;

- Для применения настроек общего сервака Гугл вписывайте «8.8.8.8» в строке «ПредпочитаемыйDNS-сервер»;
- Затем вбейте «8.8.4.4» для строчки «АльтернативныйDNS-сервер»;
- Во второй вкладке альтернативных серваков наберите: «1.1.1.1» в строчке «ПредпочитаемыйDNS-сервер»;
- И впишите «1.0.0.1» в строчку «АльтернативныйDNS-сервер»;
- Теперь кликните по «ОК», чтобы изменения сохранились.
Отключайте брандмауэр и антивирусы
Появление ошибки «dns_probe_started» в браузере может быть связано с блокировкой сайта встроенным антивирусом либо брандмауэром системы. Следует выключить эти приложения и снова проверить доступ к сайту. Процесс отключения таков:
- Кликните иконку «Пуск»;
- Там отыщите «БезопасностьWindows» через поисковую строчку;
- В правой стороне найдите «ЗащитаОтВирусов…»;
- Переключите слайдер настроек «ЗащитаВРежимеРеальногоВремени» в положение «off»(отключено);

- Теперь перейдите к «Брандмауэр…» слева в панели;
- Выберите раздел справа «ДоменнаяСеть» и переключите слайдер строчки «MicrosoftDefender…» в положение «off»(отключено);

- Следует повторить такие же действия с разделами «ОбщедоступнаяСеть» и «ЧастнаяСеть»;
Проверьте, запускается ли проблемный сайт теперь. Вам могут пригодиться инструкции по отключению Брандмауэра и Встроенной защиты виндовс 10.
Выполните обновление драйверов для сетевых адаптеров
Обновить драйвера сетевых адаптеров (их в современном компьютере может быть несколько). Это устраняет большинство сетевых проблем и улучшает Интернет-соединение. Способ годится для решения вопроса при ошибках типа «dns_probe_started». Нужно запустить «ДиспетчерУстройств», затем:
- Переходите к подразделу «СетевыеАдаптеры»;
- В списке кликаете ПКМ по нужному устройству и переходите в строчку «ОбновитьДрайвер»;

- Рекомендую кликнуть «АвтоматическийПоиск», другой вариант для профессиональных пользователей;

Система должна сама выполнить поиск и обновление, но работает это не всегда (может написать – нет необходимости в обновлении или драйвера не найдены), тогда придется заняться этим вручную.
Ошибка DNS_PROBE_STARTED – как исправить Видео:
Просто повторяйте действия, и все получится даже без перевода, или сверяйтесь с инструкцией написанной выше!
When browsing the internet, you’ve likely come across various types of errors, some of which are more frequent and common than others. One of these is the DNS_PROBE_STARTED Error, which is very common.
But if you’re new to browsing the internet and haven’t heard of this error before, don’t worry, you’re not alone. This error can happen to anyone at any time.
Therefore In this blog, we’ll cover every aspect of the DNS_PROBE_STARTED error such as What it is, What are its causes, How to prevent it, and methods to fix it. Let’s Get started then!
What does DNS_probe_started mean?

DNS, or Domain Name System, is a critical part of the internet that helps translate human-readable domain names into machine-readable IP addresses. In other words, it acts like a translator, making it easier for you to access websites and other online resources.
Read: 🚩 What is a DNS?
Without DNS, we would have to remember long strings of numbers or the Website’s IP addresses instead of easy-to-remember domain names like google.com or amazon.com.
The DNS_PROBE_STARTED Error occurs when your computer or device is unable to establish a connection with the DNS server. This can happen due to various reasons, such as poor or unstable internet connection, misconfigured DNS settings, or a problem with the DNS server. Which we will discuss later in this blog.
When you encounter the DNS_PROBE_STARTED Error, you won’t be able to access any website, and your browser will display an error message saying “DNS_PROBE_STARTED.” This error can be frustrating, but fortunately, there are several ways to fix it.
Similarly, there are various other types of DNS issues that you might face so you must also check them out.
- DNS_probe_finished_nxdomain
- DNS Server not responding
Since DNS_PROBE_STARTED is the most common error and it generally occurs in the Chrome browser, it does not mean that it won’t happen in other browsers such as Microsoft Edge or Android.
What are the Causes of DNS_Probe_Started Error?
The DNS_PROBE_STARTED Error can be caused by several different factors, including DNS server issues, internet connection issues, firewall or antivirus software, incorrect DNS settings, and browser issues. Let’s explore each of these causes in more detail:
- DNS server issues: DNS servers are responsible for translating human-readable domain names into machine-readable IP addresses. If the DNS server you’re using is experiencing issues such as being down, overloaded, or not responding, it can cause the DNS_PROBE_STARTED Error. To fix this issue, you can try switching to a different DNS server or contacting your internet service provider to troubleshoot the problem.
- Internet connection issues: Your internet connection can also be a culprit for the DNS_PROBE_STARTED Error. Poor connectivity or an unstable internet connection can make it difficult for your computer to communicate with the DNS server, leading to the error. To fix this issue, you can try resetting your modem or router or contacting your internet service provider to check for connectivity issues.
- Firewall or antivirus software: Sometimes, your firewall or antivirus software can interfere with your computer’s ability to access the internet, leading to the DNS_PROBE_STARTED Error. To fix this issue, try temporarily disabling your firewall or antivirus software, or adding an exception for your browser or the DNS server you’re using.
- Incorrect DNS settings: Incorrect DNS settings can also cause the DNS_PROBE_STARTED Error. This can happen if you recently changed your DNS settings or if they were changed without your knowledge. To fix this issue, you can try resetting your DNS settings to their default values or using a different DNS server.
- Browser issues: Certain browser issues, such as cache and cookie problems, can also cause the DNS_PROBE_STARTED Error. Clearing your browser’s cache and cookies can help resolve this issue.
DNS_PROBE_STARTED Error can be caused by several different factors, and identifying the root cause is key to resolving the issue.
Now you understand what the DNS_Probe_Started error means and what are the possible reasons that cause it. Let us get started on How to fix the DNS_PROBE_STARTED error.
Below are some of the best methods you can use to fix the DNS_PROBE_STARTED error easily.
- Refresh/Relaunch or Update (if available) Google Chome
- Use internet connection TroubleShooter
- Delete Browser Cache and Cookies
- Change IPv4/IPv6 DNS Address
- Flush Your DNS and Reset it
- Reinstall or update your network Adaptors
- Disable or Stop running Antivirus and Firewall
- Restart your Internet Modem or Router
Note: In the below DNS_PROBE_STARTED Fixes, we’ll primarily focus on Windows and Chrome since they’re widely used and you’re most likely to encounter this error on these platforms. However, that doesn’t mean we’re not here to help Mac users too!
We’ve got you covered with a separate solution for MacOS, along with Windows/Chrome and Android.
1. Refresh/Relaunch or Update your Google Chrome Browser (Windows 10, Windows11, Android, or MacOS)
For Refreshing Google Chrome
To refresh the browser, simply click the “Refresh” button located near the top left-hand side of the browser window. Alternatively, you can press the “F5” key on your keyboard.
For Relaunching Google Chrome
To relaunch the browser, click on the three vertical dots in the top right corner of the browser window again and select the “Exit” option. Then, simply re-open Chrome to relaunch the browser.
To check Chrome Update
- First, open your Google Chrome browser.
- Look for the three vertical dots located in the top right corner of the browser window. Click on them.
- From the drop-down menu that appears, select the “Settings” option.
- Scroll down the page and click on the “About Chrome” option, which should be located towards the bottom of the left-hand side menu.
- Here, you’ll see the current version of your Chrome browser. If an update is available, you’ll see an option to update the browser. Click on it and wait for the update to be completed.
- If you don’t see an option to update, it means you’re already on the latest version of Chrome.
If this simple and most basic troubleshooting method doesn’t work try the next potential solutions.
2. Use Windows Internet connection Troubleshooter
The best part about Windows OS is that there are multiple Internet connection Troubleshooter options available that can help you identify and fix any Internet connection issues you may be experiencing.
So, if you’re encountering the “dns_probe_started” error on your Chrome browser, don’t worry! Just follow the simple steps outlined below:
For Windows 10 users:
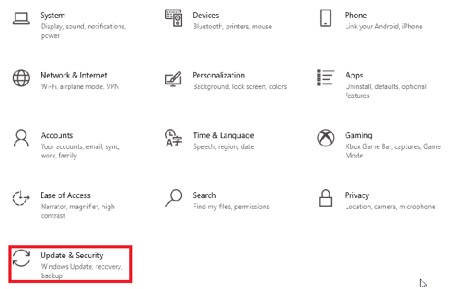
Step 1: Open the Settings menu by simply Pressing the Windows + I key simultaneously.
Step 2: On the same page, select “Update & Security“.
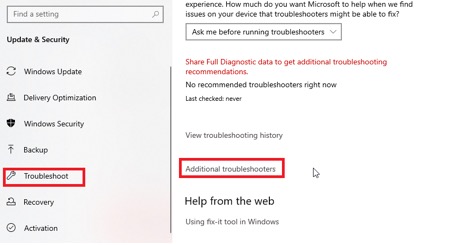
Step 3: Scroll down to the left-hand menu and select “Troubleshoot“.
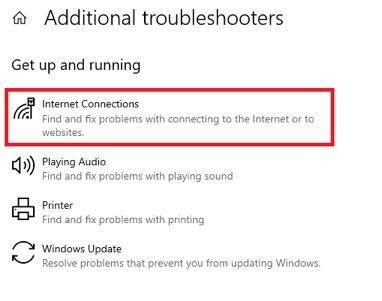
Step 4: Under the “Get up and running” section, click on “Additional troubleshooters“.

Step 5: From the list of troubleshooters that appears, select “Internet Connections“.
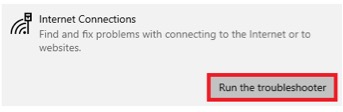
Step 6: Click on the “Run the troubleshooter” button.

Step 7: Then the troubleshooter tool will start finding issues with your internet connection.
Step 8: Once it has completed the scan, any issues that it finds will be listed, along with the steps on how to fix them.
For Windows 11 users (Some steps differ from windows 10)
Open the Start menu on your Windows device and Type “troubleshoot settings” in the search bar.
From the list of results that appear, click on “Other Troubleshooters“.
On the Internet connections option click on the “Run” button.

A prompt will appear that will automatically start detecting problems.
3. Delete Browser Cache and Cookies
If you’re still experiencing the “DNS_PROBE_STARTED” error message, you may want to try clearing your cache and cookies. Here are the steps you can follow:
Note: Since Chrome has a major Browser market share, we will be using Chrome for this tutorial.
Step 1: Depending on your browser, navigate to the settings menu. In Google Chrome, you can click on the three vertical dots in the upper right corner of the window.
Step 2: Select “More tools” and Click on “Clear browsing data“.

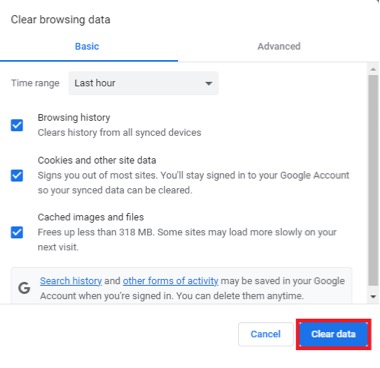
Step 3: A pop-up window will open on which, you can select all three options under the “Basic” section as shown in the picture below. These options are “Browsing history“, “Cookies and other site data“, and “Cached images and files“.
Step 4: Click on “Clear data” to initiate the process.

4. Change IPv4/IPv6 DNS Address
For Windows 10 and Windows 11 users:
Step 1: If you are a Windows 10 or 11 User, you have to open the control panel by simply typing “Control Panel” in the search bar.
Step 2: In the Control Panel select Network & Internet > Network and Sharing Center.
Step 3: From the menu on the left, select Change adapter settings.
Step 4: Right-click on your network and select Properties.
Step 5: In the window that opens, click on Internet Protocol Version 4 (TCP/IPv4) from the list, then select Properties again.

Step 6: Click on Use the following DNS server addresses.
Step 7: Enter “8.8.8.8” for the Preferred DNS server and “8.8.4.4” for the Alternate DNS server.

Step 8: Click on the OK button to save your changes.
Step 9: Close all the windows and try re-accessing the website to see if the error is still present.
If the problem persists, you may need to try other solutions. However, changing your DNS address can often resolve internet connection issues.
For MacOS users:
Step 1: First, navigate to the System Preferences on your Mac. You can find this by clicking on the Apple icon in the top-left corner of your screen, then selecting “System Preferences“.

Step 2: Once you’re in System Preferences, locate the “Network” icon and click on it. From there, select the network connection that you want to modify (e.g., Wi-Fi or Ethernet).
Step 3: In the Network settings, you should see a button labeled “Advanced“. Click on that, and then navigate to the “DNS” tab.
![DNS servers on Mac How to fix the DNS_PROBE_STARTED Error? [8 Ways]](https://www.wpoven.com/blog/wp-content/uploads/2023/02/DNS-servers-on-Mac.png "How to fix the DNS_PROBE_STARTED Error? [8 Ways] 12")
Step 4: Here’s where you’ll add the DNS server addresses. Click on the “+” button at the bottom-left of the DNS settings window, and then type in the IPv4 address for Cloudflare’s DNS servers: 1.1.1.1. Press enter, then repeat the process to add another address: 1.0.0.1.
Step 5: Finally, click “OK” to save the changes you’ve made. You should now be all set with your new DNS settings!
5. Flush DNS and Refresh it
Many people have found that resetting the DNS cache is a helpful solution when experiencing network issues. This involves clearing out your old DNS cache and replacing it with updated IP addresses.
This method can be particularly useful if you’re encountering problems caused by outdated or corrupted cache files. Fortunately, both Windows and Mac devices have specific rules for resetting the DNS cache.
By flushing out your old cache and resetting it with fresh data, you may be able to troubleshoot and resolve connectivity issues such as the DNS_PROBE_STARTED error. This is a simple yet effective step that could get you back online in no time.
For Windows 10 and Windows 11 users:
Step 1: Open the Run command by pressing the Windows key and R. Alternatively, you can search for it in the Start menu.
Step 2: Type “cmd” and hit Enter to open the Command Prompt.

Step 3: Once the Command Prompt window is open, type “ipconfig/release” to release your current IP address.

Step 4: Next, type “ipconfig/flushdns” to release the DNS cache.
Step 5: Type “ipconfig /renew” to obtain a new IP address.

Step 6: Type “netsh int ip set dns” and hit Enter to reset your IP settings.
Step 7: Finally, type “netsh winsock reset” to restore the Winsock Catalog.

Step 8: After completing these steps, restart your computer to ensure the changes take effect.
For MacOS users:
Step 1: To begin with, open the system preference options on your Mac. If you have a Gas Mask installed, it can make searching for system-related tasks easier.
Step 2: Next, navigate to the Ethernet tab and click on the advanced options.
Step 3: Under the TCP/IP tab, you will find the option to release a DHCP lease. Clicking on this option will allow you to clear out the local DNS on your Mac.

Step 4: To clear the local DNS cache, go to Utilities > Terminal and enter the command.
Step 5: The command for flushing the local DNS cache is “dscacheutil -flushcache”.
Step 6: Once you have entered the command, there will be no separate success or failure message that pops up. However, in most cases, the cache will be cleared without any major issues.
6. Reinstall or update your network Adaptors
Sometimes, an outdated network Adaptor can also be the culprit for triggering the DNS_PROBE_STARTED error. Hence, if you are still facing the error try uninstalling and reinstalling your network drivers through your Device Manager:
Step 1: Press the Windows key + R on your keyboard.
Step 2: Type “devmgmt.msc” into the Run box and hit Enter.
Step 3: In the Device Manager window, click to expand Network adapters.
Step 4: Right-click on your network adapter, and select Uninstall device.
Step 5: Confirm the action and wait for the process to complete.
Step 6: Close the Device Manager window and restart your computer.
Step 7: Once your computer has restarted, open the Device Manager again and select your network adapter.
![9 How to fix the DNS_PROBE_STARTED Error? [8 Ways]](https://www.wpoven.com/blog/wp-content/uploads/2023/03/9.png "How to fix the DNS_PROBE_STARTED Error? [8 Ways] 18")
Step 8: Click on Action > Scan for hardware changes from the menu bar. This will reinstall your network driver(s).

Step 9: Now try loading the website again. If the issue persists, you may need to update your drivers manually or seek further assistance.
7. Disable or Stop running Antivirus and Firewall
Antivirus and firewalls are undoubtedly essential tools for protecting your PC against malware and hacking threats. However, sometimes these security tools are configured too strictly and start blocking DNS requests, causing connectivity issues.
Therefore, you can try temporarily disabling them and check whether it fixes the issue or not.
For Windows users:
Step 1: First, you need to open your computer’s control panel. To do this, click on the “start” menu on your desktop and type in “control” in the search field.
Step 2: Next, select “System and Security” from the control panel options. This will take you to a new page.
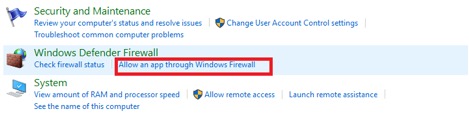
Step 3: On the new page, you’ll see an option for “Windows Defender Firewall.” Click on “Allow an app or feature through Windows Firewall.”
![11 How to fix the DNS_PROBE_STARTED Error? [8 Ways]](https://www.wpoven.com/blog/wp-content/uploads/2023/03/11.png "How to fix the DNS_PROBE_STARTED Error? [8 Ways] 20")
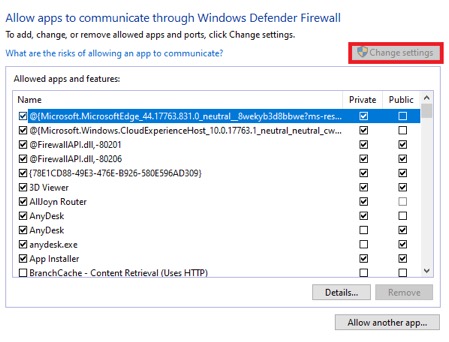
Step 4: In the next window, you’ll see a list of apps and features that are allowed to communicate through your firewall. To change these settings, click on “Change settings.”
![12 How to fix the DNS_PROBE_STARTED Error? [8 Ways]](https://www.wpoven.com/blog/wp-content/uploads/2023/03/12.png "How to fix the DNS_PROBE_STARTED Error? [8 Ways] 21")
Step 5: If you don’t see your DNS client on the list, you can add it by clicking on the plus (+) icon.
Step 6: To temporarily disable your firewall, uncheck the box next to “Windows Defender Firewall” and click on “OK” to save your changes.
Step 7: Alternatively, you can adjust your firewall settings by finding the DNS client or any other application you want to configure and checking or unchecking the boxes next to the desired settings.
Step 8: Once you’re done adjusting your settings, click on “OK” to save your changes.
Note: It’s important to disable your firewall temporarily if you need to troubleshoot a connectivity issue. Leaving your computer without a firewall can expose it to potential security threats.
8. Restart your Internet Modem or Router
If none of the methods mentioned above works, the last but most essential method that you must try is to Restart or re-establish your internet connection.
Make sure that your internet modem and router are properly plugged in and that your system has a strong and stable internet connection.
If you’re experiencing any issues, it’s always a good idea to try restarting your router or modem. This can help reset the connection between your computer and the DNS server, and might just do the job done.
How to Prevent DNS_PROBE_STARTED Error?
- Regularly check and update your DNS settings to maintain a healthy DNS system and prevent DNS_PROBE_STARTED Error.
- Use a DNS monitoring tool to check the health of your DNS system and receive alerts if any issues arise.
- Choose a reliable internet service provider that provides stable and fast internet connectivity to prevent DNS_PROBE_STARTED Error. A good ISP will have a robust DNS infrastructure that is less prone to errors.
Conclusion
DNS_PROBE_STARTED Error can be frustrating, but it’s not a permanent issue. By following the basic troubleshooting steps and using some advanced solutions, you can fix the error and get back to browsing the internet. It’s also essential to take preventative measures to ensure that your DNS system stays healthy and stable.
We hope this article has helped you understand what DNS_PROBE_STARTED Error is, why it occurs, and how to fix it.
Remember, if you’re not comfortable with troubleshooting DNS issues, it’s always best to seek professional help to avoid making the problem worse. Happy browsing!
Save your time, money, and resources, and give your website mammoth growth with WPOven’s the Best dedicated hosting for wordpress.
- 24X7 WordPress Expert support
- Cloudflare integration
- High-end Security
- Datacentres around the world, etc.
You can have all these features and much more in a single plan with unlimited Free migrations, unlimited staging, and a 14-day risk-free guarantee, Signup Now!
Frequently Asked Questions
Why do I keep getting DNS probe started?
There are the following reasons it could trigger a DNS probe started error:
1. Misconfigured DNS or Network Settings
2. Poor Internet Connection
3. Installed Antivirus or Firewall
4. Browser Issues
How to fix Dns_probe_started in Chrome?
The best thing you can do to fix the Dns_probe_started Error in Chrome is to try clearing your cache and cookies.
1. Click on the three vertical dots in the upper right corner of the window.
Select “More tools“.
2. Click on “Clear browsing data“.
3. In the window that opens, you can select all three options under “Basic“. These options are “Browsing history“, “Cookies and other site data”, and “Cached images and files”.
4. Click on “Clear data” to initiate the process.
How do I fix DNS probe started?
Below are some of the best methods you can use to fix the DNS_PROBE_STARTED error easily.
1. Refresh/Relaunch or Update (if available) Google Chome
2. Use an internet connection TroubleShooter
3. Delete Browser Cache and Cookies
4. Change IPv4/IPv6 DNS Address
5. Flush Your DNS and Reset it
6. Reinstall or update your network Adaptors
7. Disable or Stop running Antivirus and Firewall
8. Restart your Internet Modem or Router
While browsing the web, you may encounter
issues such as the DNS_Probe_Started Error, which is a result of a network
problem. Nonetheless, this error can be easily managed.
In this blog post, you will learn about the
problems you may face with the DNS_Probe_Started error, the reasons behind it,
and solutions to help you mitigate it.
We will focus primarily on Google Chrome as
our browser, but don’t let that confuse you. By adapting the steps mentioned
here, you can find a solution for other operating systems as well. So, let’s
dive right in!
What is the
DNS_Probe_Started Error?
DNS or the Domain Name System takes a hostname
or a website address that is translated into an IP address from the contact
book of the DNS. This way, it acts as a medium between you and the server,
translating where needed for the comprehension of both parties.
The DNS_Probe_Started error is a type of
DNS-related error that indicates a problem with the DNS probe on your computer.
A DNS probe is responsible for the quality assurance check on the hostname.
Moreover, it determines the ability and the speed to fetch the translation of a
hostname into a workable IP address.
If the probe is compromised for any reason,
you may see this error appear on your browser. This error mostly runs on Google
Chrome, but you may find it on Microsoft Edge and other browsers too.
Reasons For the
DNS_Probe_Started Error to Occur
There are a number of reasons why this error
may surface on your screen. Sometimes, the source of the error is as minimal as
an outdated cache in your browser or the problem may be with a poorly
configured DNS server.
8 Easy and Quick
Solutions
There might be different causes for this error
and even unknown, but its solutions are clear. Skim through the list to find
the solution for the DNS error on your end.
1. Change Your DNS
Directory
On your computer, there is a designated DNS
server that helps locate the relevant IP addresses. You can change this server
to any popular DNS server to make faster and safer connections. Google Public
DNS is one of the most popular Domain Name Systems that can help you achieve
this.
There are two versions of IP addresses: IPv4
and IPv6. The former is the older version, also known as IP version 4, while
the latter is the newer version, also known as IP version 6. Although there are
many differences between the two, IPv6 offers more variations in hostnames,
thereby creating a larger directory of IP addresses.
Google Public DNS supports both versions of IP
addresses. It even allows you to pick one of them as your preferred choice if
you are inclined towards one more than the other. Here’s how you can change
your DNS server.
- Search for Network & Internet or locate it from the Control Panel.
- Head to the Network and Sharing
Center.

- On your left, you will find the Change
adapter settings. Click on it.
- Skim through the
network options to find your network. Right-click on it to find and
press on Properties.
- From the list, select Internet Protocol
Version 4 (TCP/IPv4) and go to Properties.
- You will find a number of options. Choose “Use the following DNS server addresses.”
- Type “8.8.8.8”
in the Preferred DNS server block and “8.8.4.4” in the Alternate DNS
server block. You can also leave the Alternate DNS server area blank.
- Hit OK to save the changes.

2. Flush the DNS Cache
Just like a browser cache, there is a DNS
cache that may interrupt a proper network run. You can eliminate this happening
by removing the DNS cache from your system and fixing the probe error.
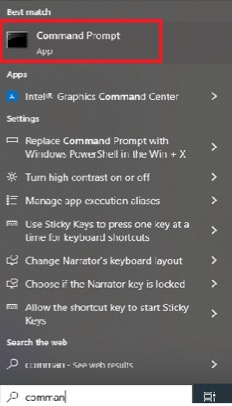
- Search for
Command Prompt in the Start menu.
- Write the
following code,
![]()
- After removing the DNS cache, type this
to renew your IP address.
![]()
- Lastly, you must register the new DNS
settings with your ISP. To do this, write
![]()
- Close and refresh by writing Exit.
![]()
3. Get Rid of the Browser
Cache
Cookies and cache can lead to a number of
errors if they are not removed. Similarly, you may also encounter the
DNS_Probe_Started error if the cache in your system has become outdated. One
way to avoid this and many such errors is by removing them.
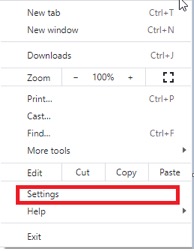
- On Google Chrome, click on the three
dots on the right side of the screen.

- Go to Settings.
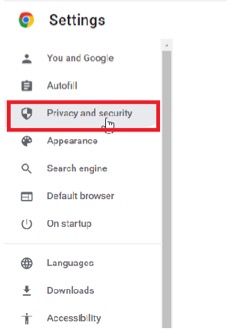
- Head to Privacy and security.
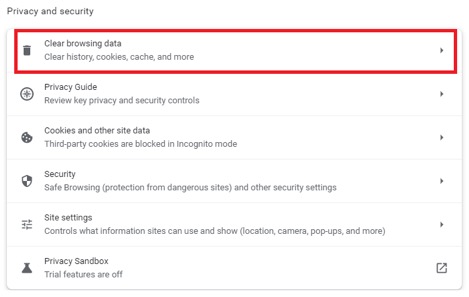
- Tap on Clear browsing data.
- In the pop-up window, check all the
boxes.
- Confirm by clicking on Clear data.
4. Update the Network
Drivers
An important part of keeping your system
running smoothly is handling all updates. If there is anything outdated or old,
the system may experience a lag or an error like the DNS_Probe_Started error.
Similarly, if you do not keep your network
drivers updated, the system won’t be able to encounter any bugs. In general,
you will be missing out on a bunch of bug fixes and improvements for various
features. Your best bet is to uninstall and reinstall the drivers from the
Device Manager.
- Search for the Run app from
the Start menu. - Type “devmgmt.msc” and hit OK.
- Press the Network adapters to open
the tab. Find and right-click on your adapter. - Select Uninstall device.
- Close the window and restart your
computer. - Follow the first
two steps again. - Now, click on Network Adapter and press the Action option from the top bar.
- Go to Scan for hardware changes.
- Reload the
website to see if the error is gone.
5. Take Help from the
Troubleshooter
The Internet Connections Troubleshooter is a
great tool to help you locate and resolve issues that you may not be aware of.
Additionally, it can help detect issues that you might not be able to identify
on your own. This tool is especially helpful if you are not very tech-savvy
because it is easy to use and doesn’t require a lot of technical knowledge to
operate.
- Go to Settings on your
computer and head to Update & Security.
- Now, go to Troubleshoot. Scroll down to find Additional troubleshooters.
- Find and select Internet Connections.
- Press the Run the troubleshooter button.
- Choose the issue
you want to fix and the Troubleshooter will guide you with each problem.
6. Disable the Antivirus
Program & the Firewall
Antivirus and Firewalls solve many issues in
the background but could lead to other errors at the front. The DNS_Probe_Started
error is one such error that the Antivirus may be creating indirectly.
You may encounter it because the program must
have found the website shady and may have blocked it. This is all manageable
though. You can temporarily disable the Antivirus program & the Firewall to
see if this is the reason behind the error.
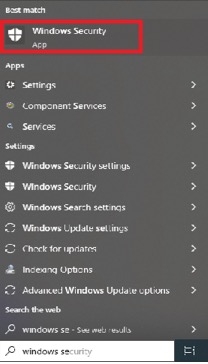
- Search for Windows Security from the Start menu and click on it.
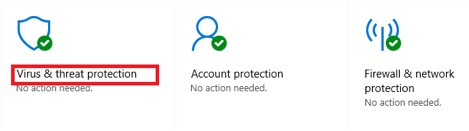
- Choose Virus & threat protection.
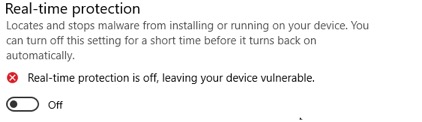
- Press the Real-time protection button under the Manage Settings tab to turn it off.
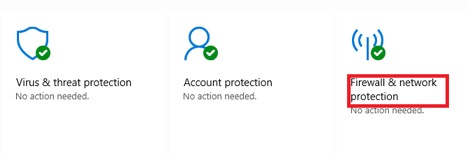
- Now, look for the Firewall &
network protection by going back.
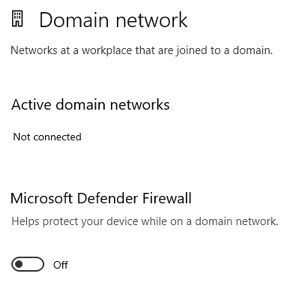
- Go to Domain network and
toggle the Microsoft Defender Firewall button.
- Reload the
website to see if the error is still there.
If the website loads without any error, then
the Firewall must have been the primary issue. You do not have to keep the
firewall disabled or turn it off whenever you need to access that particular
site. Instead, you can adjust the settings to your liking such that the
firewall is only disabled when you use that site.
- Go to the Control Panel and search for System and Security.
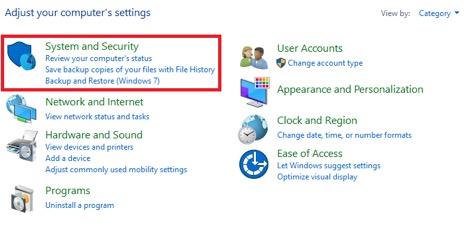
- Locate the Windows Defender
Firewall tab. - Now, select the Allow an app
through Windows Firewall option.
- Tap on the Change Settings button.
- Alter the
settings as per your liking. However, if the respective DNS client is not
there, you can always add it to adjust the settings. This can be done by
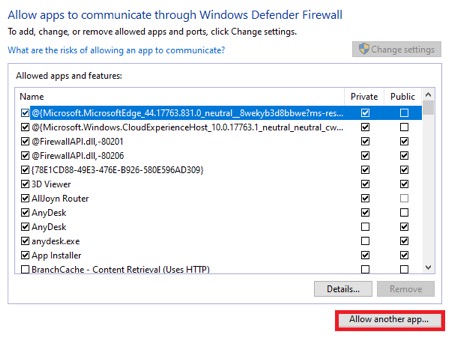
clicking on Allow another app…
7. Try a Different
Browser
The DNS_Probe error could also be a result of
an outdated browser. To check if your browser is the issue, try loading the
same site on a different browser. If you regularly use Chrome as your default
browser, use Microsoft Edge or Mozilla Firefox to see if the error is still
there.
If the probe error is not visible on other
browsers, try updating your existing browser. It may help in the mitigation of
the error.
8. Reset Your Connection
Another way to remove the DNS_Probe_Started
error is to reset the connection between the DNS server and your computer. The
simplest way to do that is by restarting your router.
You can do this by turning off your router and
removing all the plugs. Reinsert the plugs and start the router to see if the
error is still there.
Conclusion
To sum up, the DNS_Probe_Started error is a
common type of DNS error. You may encounter it due to a bunch of reasons but
the most common is the wrong DNS settings on your computer. To remove this
error, you can try out a few quick solutions even if you are not tech-savvy.
These solutions will save you time and get you the easiest fix within minutes.
FAQs
What is a DNS Probe?
A DNS Probe is basically a tool that helps
determine the strength between the hostname and its relevant IP address. It is
responsible for determining how fast the server can fetch an IP address.
What Exactly Does the DNS
Probe Error Mean?
It means that the probe is unable to start and
cannot determine the performance of the DNS server. It can happen due to a
number of reasons but the most common is the misconfigured DNS server or old
DNS & browser cache.
Узнаем, как решить ошибку DNS PROBE…
Ошибка DNS_PROBE_STARTED
[adace-ad id=»5173″]
Откуда же берется сбой DNS и каковы причины этой ошибки? Давайте разбираться!
Нет соединения с интернетом
Если при попытке открытия страницы появляется надпись «DNS PROROBE STARTED», значит интернет-соединение отсутствует.
DNS-порты бывают временно недоступны. Попробуйте обновить страницу через пару минут
В тексте ошибки, кроме её кода, появляются и другие указания — их нужно выполнить, чтобы ошибка не возникала в будущем. Иногда перезагрузить страницу недостаточно и приходится перезагружать компьютер.
Низкая скорость интернета
Ошибка DNS_PROBE_STARTED часто возникает при медленном интернете.
[adace-ad id=»5168″]
Если в домашней сети два-три устройства, то канала может не хватать. В этом случае ошибка DNS PROBE STARTED также может появляться в браузер
Компьютеру ошибка DNS_PROBE_STARTED навредить не может — она просто информирует о невозможности получения DNS адреса
Если перезагрузка компьютера не помогла, стоит перезапустить роутер.
Резюме
Если ошибка DNS PROBE STARTED появляется слишком часто, попробуйте изменить адреса DNS-серверов.
Изменять DNS-адреса можно только в том случае, если вы на 100% уверены, что делаете. В противном случае — лучше обратиться к техническому сотруднику используемого вами провайдера
Таким образом, сообщение DNS_PROBE_STARTED не представляет никакой опасности. Для начала — убедитесь, что интернет на используемом устройстве есть и просто перезагрузите страницу.