A router is a network device that forwards information packets among PC networks. Routers perform traffic routing functions on the Internet. Data sent over the Internet, such as a website or email, is in the form of data packets. Packets are typically forwarded from one router to another through the networks that make up the internetwork until they reach their destination node. the router is connected to two or more data lines from different IP networks. When a packet of data arrives at either line, the router reads the network address information in the packet header to determine its final destination. It then uses information in its routing table or routing policy to forward the packet to the next network. The most common types of IP routers are home routers and small office routers, which simply forward IP packets between your home computer and the Internet. More advanced routers such as Enterprise routers connect large corporate or ISP networks to powerful core routers to transfer data at high speeds over fiber optic lines of the internet backbone.
Router Components:
The major components of the router are:
- Processor or CPU
- Memory
- Ports

Processor or CPU:
Routers are powered by a high-performance multicore processor that supports high-speed multiple LAN and WAN connections and can run multiple concurrent services. The CPU in the router executes commands and processes the command in the operating system. The flow of data in the interface is controlled by the CPU. The CPU used in routers are generally, RISC-based CPUs.
Memory:
The router involves different types of memory that are mentioned below:
- Read Only Memory (ROM): ROM stores the bootstrap startup program of the router along with the operating system software and other test programs like POST programs (Power On Self-Test).
- Flash Memory: Flash memory mostly known as flash holds the IOS images. The flash content is used by the router at the time of reload. Flash is erasable and reprogrammable ROM.
- Random Access Memory (RAM): RAM stores information such as routing tables and running configuration files. RAM is volatile; hence, its content is lost during router power down and reload.
- Non-volatile RAM (NVRAM): NVRAM stores the startup configuration files. It is non-volatile RAM; hence contents are not lost during router power down and reload.
Ports and Interfaces:
Interfaces connect routers to other devices. Data travels through these interfaces in the network. Ports and interfaces are identified by their name and number. Different types of Ports and Interfaces are mentioned below:
- Standard Ethernet: It is the basic type of Ethernet defined in the IEEE 802.3 standard. Ethernet supports 10Mbps data speed. The transmission media supported for the Ethernet is 10Base-T.
- Fast Ethernet: Fast Ethernet port also called the Fe port, provides a higher data transmission rate of up to 100 Mbps. Fast Ethernet is defined in IEEE 802.3u standard. The transmission media supported for fast Ethernet is 100Base-T, 100Base-TX, 100Base-FX, etc.
- Gigabit Ethernet: Gigabit Ethernet is the next-level Ethernet technology that provides a ten times higher data rate than fast Ethernet. It can have a data transmission rate up to 1000 Mbps and is defined in IEEE 802.3z. The transmission media supported for the Gigabit Ethernet are 1000Base-T, 1000Base-LX, 1000Base-SX, etc.
- Serial Interface: The serial interface is used for WAN connectivity. Separate modules and cards are added to the router for serial connection. It is used for point-to-point links. Serial connection between routers has two ends DCE (Data Communication Equipment) and DTE (Data Terminating Equipment).
- ISDN (Integrated Services Digital Interface): ISDN is a circuit-switched network that provides simultaneous digital services for voice as well as data over an ordinary analog telephone line.
- Console Port: The console port is used for the management and configuration of the router. The console port of the router is connected to the COM port of the PC or laptop using a Console cable. The hyper-terminal session is established between the router and the PC to access the router.
- Auxiliary Port: Auxiliary Port (AUX) connects the router remotely in the non-network environment. The dialup modem is used for the end-to-end connectivity between the auxiliary port of the router and the remote PC. This allows a network to access the router from a remote location.
- Loopback Interface: The lookback interface is not the physically available port in the router. The loopback interface is the “Always On” port which is used as router ID when we configure OSPF protocols in the router and for diagnostics and troubleshooting purposes.
Router Boot Process:
The router goes through the following steps during the boot process:
- The router is powered on.
- POST is performed which checks the hardware components including memory and interfaces.
- The bootstrap program is loaded and executed.
- Bootstrap reads the configuration register value which defines how the router will boot up.
- Depending on the value of the configuration register, the bootstrap program finds and locates the IOS image.
- If the bootstrap fails to load the IOS it will drop the boot sequence to ROMMON (ROM Monitor) mode for troubleshooting.
- If the IOS is loaded it finds and loads the configuration.
- If the configuration is not present, the system configuration dialog would be launched.
- If the configuration is loaded, you would be presented in the CLI interface.

Last Updated :
02 Oct, 2022
Like Article
Save Article
Потому что cisco поддерживают всякое древнее легаси, которое может до сих пор эксплуатироваться на различных предприятиях.
Потому что замена документации и переобучение сотрудников на использование USB-Serial для администрирования может стоить еще дороже, чем просто поддержание легаси.
Вы про Console или про AUX?
Если первое то в дохрена каком оборудовании, в том числе и mtk, иcпользуется консольный именно com порт.
Если второе, то во первых легаси, во вторых — через него можно подключить консоль другой железки и поуправлять ей удаленно
ppp hdlc — легаси, раньше через aux можно было подключить dual-up модем и заюзать как резервный канал связи
Как узнать порт на роутере
Роутер — это устройство, которое служит для соединения вашей локальной сети с интернетом. Он имеет несколько портов, одни из которых используются для подключения устройств, а другие — для доступа к настройкам роутера и контроля за трафиком. Если вы хотите узнать, какой порт используется для взаимодействия вашего устройства и роутера, есть несколько способов проверки.
- Как узнать свой порт на ПК с Windows
- Как посмотреть какой COM порт
- Как узнать какой у меня порт открыт
- Как узнать порт запроса
- Что такое порт на роутере
- Полезные советы и выводы
Как узнать свой порт на ПК с Windows
Следуйте этим шагам для нахождения своих портов на ПК с Windows:
- Откройте командную строку.
- Для этого нажмите на клавиатуре клавишу Win+R.
- Введите «cmd» и нажмите Enter.
- Введите команду «ipconfig».
- Найдите раздел «IPv4-адрес».
- Вы найдете здесь несколько частных IP-адресов, например, 192.168.0.1 и т.д.
- Далее введите команду «netstat -a», после чего откроется список ваших номеров портов.
Как посмотреть какой COM порт
COM-порты — это последовательные порты, которые используются для подключения внешних устройств к компьютеру. Если вы хотите узнать, какой COM-порт используется на вашем компьютере, следуйте этим шагам:
- Откройте меню «Пуск» на вашем компьютере.
- В поисковой строке наберите «Диспетчер устройств» и откройте его.
- Раскройте вкладку «Порты (COM и LPT)».
- Найдите устройство Bluetooth — в скобках будет указан нужный вам порт.
Как узнать какой у меня порт открыт
Открытые порты — это порты, которые могут быть использованы для обмена данными между вашим устройством и интернетом. Если вы хотите узнать, какие порты открыты на вашем компьютере, следуйте этим шагам:
- Введите комбинацию клавиш Win+R на клавиатуре.
- В открывшемся окне наберите «CMD» и нажмите Enter (откроется командная строка).
- Наберите команду «netstat –a» и нажмите Enter.
Как узнать порт запроса
Запросы — это процесс, при котором ваше устройство ищет какие-либо ресурсы в интернете. Если вы хотите узнать, какой порт используется для этого запроса, следуйте этим шагам:
- Нажмите комбинацию клавиш Win+R.
- Введите «cmd» и нажмите Enter.
- Введите команду «netstat –a» и повторно нажмите Enter.
Что такое порт на роутере
Порт на роутере — это сетевой интерфейс, который позволяет устройствам находиться в сети и обмениваться данными. Роутер — это устройство, которое имеет несколько портов, доступных для использования. Каждый порт имеет свой уникальный номер и используется для определенного вида трафика.
Полезные советы и выводы
- Если вы не можете определить, какой порт используется для подключения устройства к интернету, попробуйте подключить свое устройство к другому порту на роутере.
- Если вы не можете открыть порт на своем роутере, убедитесь, что вы настроили правила брандмауэра на вашем устройстве.
- При работе с роутером будьте осторожны, так как неправильные настройки могут привести к серьезным проблемам с сетью. Всегда следуйте инструкциям производителя.
- Используйте антивирусы и брандмауэры для защиты вашей сети и устройств в ней.
- Помните, что порты могут быть заблокированы вашим интернет-провайдером. Если у вас есть какие-либо вопросы по поводу вашей сети, свяжитесь со своим поставщиком услуг.
Как узнать серийный номер IP-камеры
Чтобы узнать серийный номер IP-камеры, необходимо подключиться к устройству через браузер Internet Explorer. После успешного подключения следует открыть вкладку «Устройство» и затем перейти в раздел «Информация». В этом разделе нужно найти пункт «Версия» и нажать на него. После этого отобразится серийный номер камеры — Serial ID. Этот номер является уникальным и позволяет идентифицировать конкретную камеру или видеорегистратор. Зная серийный номер, можно провести различные операции с камерой, такие как настройка, обновление прошивки и т. д. Важно помнить, что для получения доступа к этой информации нужно иметь соответствующие права и логин/пароль для входа в систему устройства. Узнавать серийный номер камеры полезно, например, при установке и настройке системы видеонаблюдения.
Как определить айпи телефона
Для того чтобы определить IP-адрес своего телефона, нужно открыть меню «Настройки» и перейти в раздел «О телефоне». Затем необходимо нажать на «Все параметры» и перейти в раздел «Общая информация». На открывшейся странице следует найти IP-адрес. Этот адрес является уникальным и определяет устройство в сети. IP-адрес позволяет телефону подключаться к интернету и передавать данные. Определение IP-адреса может быть полезно, если необходимо настроить сетевые настройки или выполнить диагностику сети. Также, зная IP-адрес, можно узнать местоположение устройства или проверить его безопасность. Поэтому известие о том, как определить IP-адрес телефона, может быть полезным для всех, кто интересуется работой и настройкой своего устройства.
Как узнать порт Windows
Для того чтобы узнать, какие порты открыты на вашем компьютере под управлением Windows, можно воспользоваться утилитой netstat. Для этого необходимо выполнить следующие шаги:
- Нажмите комбинацию клавиш Win+R, чтобы открыть окно «Выполнить».
- В появившемся окне введите команду «cmd» и нажмите клавишу Enter. Откроется командная строка.
- В командной строке введите команду «netstat -a» и нажмите клавишу Enter.
После выполнения этих действий в командной строке будет выведен список открытых портов на вашем компьютере. Это может быть полезно, например, при настройке сетевых программ или в случае необходимости отследить активность сетевых соединений. В результате вы сможете получить информацию о том, какие порты используются на вашем компьютере.
Сколько гарантия в DNS
Согласно информации на сайте DNS, гарантийный срок на товары не превышает 45 дней. В течение всего этого периода покупатель имеет право на бесплатное гарантийное обслуживание. Если в процессе использования товара возникают какие-либо проблемы, их можно будет устранить без дополнительной оплаты. Важно отметить, что если товар потребует ремонта, срок гарантии на него продлевается на время нахождения товара в ремонте. Кроме того, гарантийное обслуживание осуществляется непосредственно в магазинах DNS. Если возникли вопросы, можно обратиться к консультантам сети или заполнить заявку через онлайн-форму. В целом, гарантии в DNS обеспечивают защиту прав потребителей и гарантируют качественный сервис на протяжении всего гарантийного срока.
Не буду рассказывать историю как у меня почти год лежал поломанный маршрутизатор Dlink, и 5 раз прошивая его различными прошивками — работать он отказывался, но после прошивки не стабильной версией DD-WRT он начал работать как вечные часы.
Откроем свет собственно на такую вещь, как подключение дополнительных устройств с роутеру через его системный COM порт, а конкретнее — как организовать связь между устройствами.
Еще проще говоря получать данные (температура, давление, влажность) с датчиков через интернет.
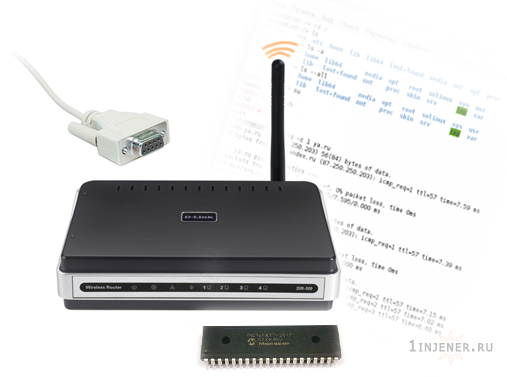
Пересмотрев массу информации на данную тему стало обидно за мой старенький Dir300, так как везде используется Dlink Dir320.
Изначально нам понадобиться маршрутизатор с установленным Linux BusyBox
О прошивке можно прочитать на официальном сайте: Прошивка Dlink Dir300 DD-WRT
(Инструкция опробована и верна)
Цель
1. Организовать связь роутера и любого устройства по RS232.
2. Отправлять по Wi-Fi данные в маршрутизатор Dir300A1 и получать ответ.
Было решено соединить маршрутизатор с компьютером (для полной наглядности), передавать данные с нетбука.
Приступим
Уровни сигналов маршрутизатора и компьютера отличаются, поэтому необходимо поработать паяльником — сделать конвертер уровней RS232-TTL.
Конвертер уровней RS232-TTL
Детали для конвертера:
Конденсатор (электролит) 1Мкф 16В — 4 Шт
Конденсатор (электролит) 10Мкф 16В — 1 Шт
Резистор (SMD или Обычный) 400-470 Ком — 1 Шт
Резистор (SMD или Обычный) 4-5 Ком — 1 Шт
Конвертер MAX232 (для SP232 необходимы 10Мкф вместо 1Мкф)
Разъем Com 9pin (мама) — 1 шт
Файл с печатной платой Lay и описанием можно скачать по ссылке: Uart
Что получилось в итоге видно на плохом фото ниже. Исполнено на макетке.
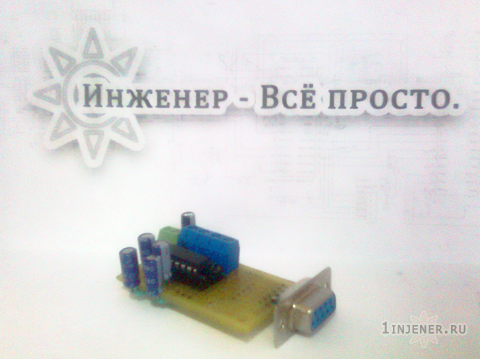
Самая частая ошибка начинающих: — «Непропай», отсоединенная «земля», перепутанные входы и выходы.
Правильное подключение входов и выходов указанно на рисунке ниже.
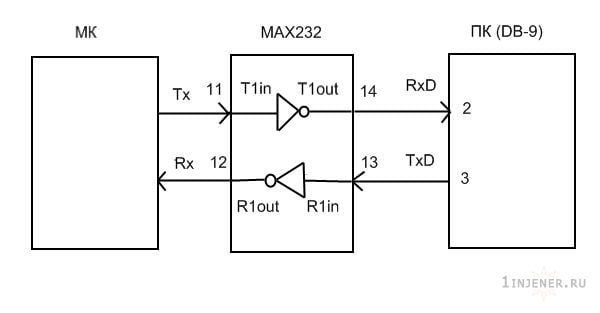
Далее необходимо впаять выводы конвертера в маршрутизатор, предварительно обнаружив на плате не распаянный сервисный com порт.
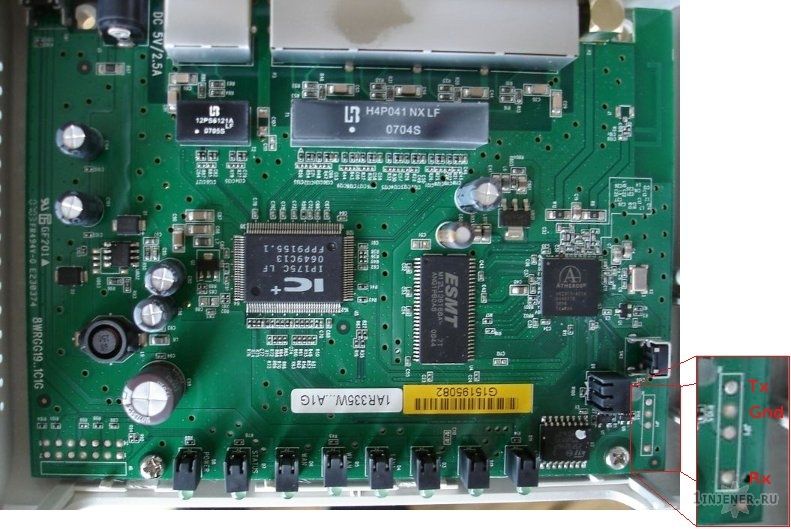
Не буду останавливаться на железе, статья посвящена более настройкам роутера.
Подключаемся (connect) по Wi-Fi к маршрутизатору.
При установке DD-WRT на Ваш маршрутизатор было предложено ввести Логин и Пароль администратора. Пришло время его вспомнить.
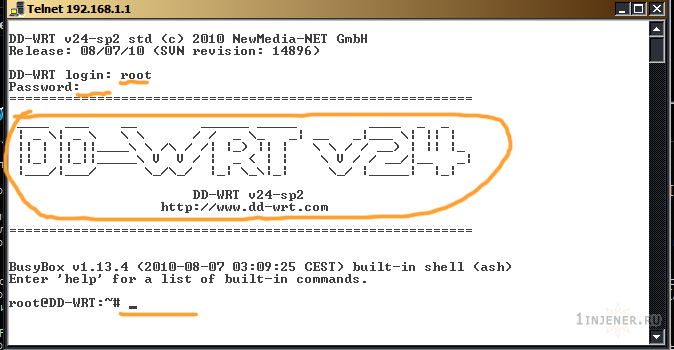
Подключаемся к маршрутизатору через telnet с нетбука.
Пуск > Выполнить > telnet 192.168.1.1
Вводим Логин и Пароль — подключаемся.
Командой root@DD-WRT:~# stty — смотрим настройки нашего com порта.

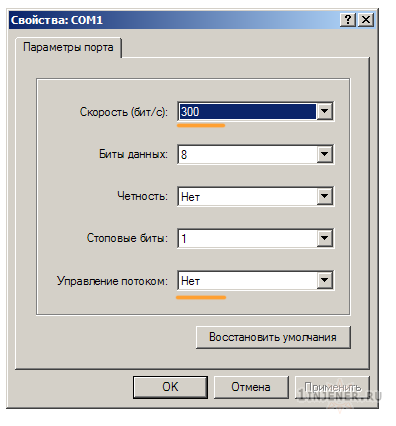
Необходимо сменить скорость до 300 бод — как бы дико это не звучало. Но толкать некоторые числа вполне достаточно.
root@DD-WRT:~# stty 300> /dev/tts/0

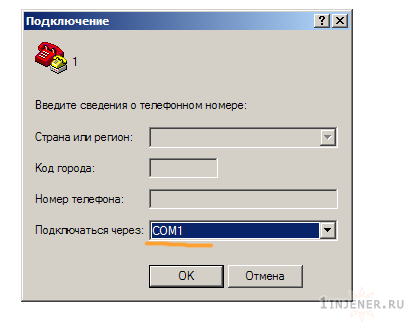
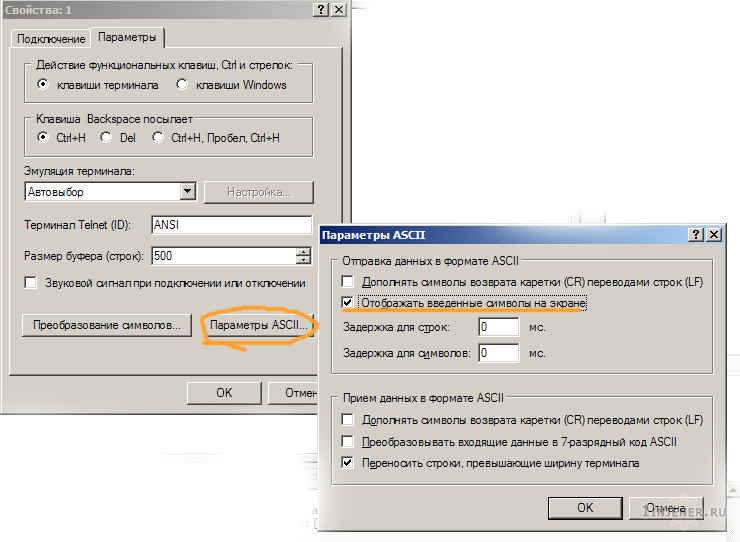
Далее открываем стандартный терминал , подключаясь к Com порту компьютера и выставляя настройки как на рисунках.
Далее Файл > Cвойства > Параметры > Параметры ASCll > Отображать введенные символы на экране
Приступаем к общению.
Поток данных отправляемых в com порт маршрутизатора, как можно было заметить выше находится по адресу /dev/tts/0
Записываем данные в поток , отправляем их в компьютер.
root@DD-WRT:~# echo «URA»> /dev/tts/0
root@DD-WRT:~# echo «1injener.ru»> /dev/tts/0

Смотрим что пришло в терминал компьютера:
URA
1injener.ru
Jan 1 01:25:25 login[25468]: root login on ‘pts/1’
3-я строчка не спроста, так как это системный com порт, в него маршрутизатор все же пишет данные, в данном случае информация о логине root-а.
Но применив какую нибудь свою версию протокола в виде: *port_2 *port_3 — ориентируясь на * возможно распарсивать данные.
Что бы читать данные отправляемые «устройством» в маршрутизатор выполните открытие файла в потоке:
root@DD-WRT:~# cat /dev/tts/0
В итоге , прошивка DD-WRT дает огромные возможности. Но так как в Dir300 довольно мало памяти сильно не разогнаться. Но не стоит забывать что используя переходники USB-ETHERNET или COM-ETHERNET вполне расширит количество подключаемых устройств.
Вариантов много -Выбор за Вами. Таким образом возможно создавать домашних управляемых роботов или системы контроля за теплицами, квартирами, дачами.
Проверка
Как бы странно не звучало telnet клиенты присутствуют даже для платформы j2me. Скачав на телефон MidpSSH и уехав в другой конец города или вовсе в другой город, подключившись к роутеру по интернету появляется возможность общения с любым устройством. Пусть это будет обычная программируемая микросхема Pic с RS232 портом или несколько микро-компьютеров Малина.
Данный вид связи-общения наиболее дешевый, особенно если по рукой находится маршрутизатор.
Собственно питание всех данных устройств не превышает 5 вольт что и делает их использование безопасными без присмотра, также рентабельными — конечно же в зависимости от поставленной Вами цели.
Интересное по теме:
Чем смазать куллер что бы не гудел. Удачный эксперимент!
Другие статьи по разделу:
 ПОХОДЫ. ВЗГЛЯД ИНЖЕНЕРА
Фитнес трекер #Garmin Forerunner стал часами
IPHONE COVER/ЧЕХЛЫ ДЛЯ АЙФОН
ЗИМА 2013. ОБОГРЕВАТЕЛЬ ДЛЯ РУК.
Usage possibilities for serial ports in RouterOS
The most obvious (and default) usage is the serial console for RouterOS. On every RouterBoard or other system you will have a RouterOS login prompt on serial0 (the first serial interface).
This is one of the ways to do the basic configuration on your RouterOS device after installation (i.e. at least give it an ip address or so).
There are other and more advanced uses for serial ports. I try to sum up those possibilities here.
You can use RouterOS to access another device (like a switch, for example) that is connected through a serial cable
- directly from a RouterOS console or telnet/ssh login (i.e. «from within RouterOS»)
- by opening a telnet/ssh session that will get you directly on this device (without having to login to RouterOS first)
- as if it were connected to a physical COM port of your PC
There’s also a nasty workaround for sending text out over a serial port. Unfortunately RouterOS doesn’t provide commands to write/read the serial port directly.
Preparations
Please note that there are some #Caveats you should be aware of! Take your time understanding those limits to avoid strange things to happen when connecting a device to a serial port on a RouterBoard.
First you have to have a free serial port to use for this. If you are on a device with only one serial port (like all RouterBoards, WRAP/ALIX boards etc.) you will have to disable the system console on this serial port:
/system console disable 0
Be sure to just disable the console rather than removing it, as RouterOS will recreate the console after the next reboot when you really remove it.
Next you will have to configure your serial port according to the serial port settings of the connected device.
Using the following command you will set your serial port to 19200 Baud 8N1. What settings you need to use depends on the device you connect:
/port set serial0 baud-rate=19200 data-bits=8 parity=none stop-bits=1
You can also try to let RouterOS guess the needed baud rate by setting
/port set serial0 baud-rate=auto
Now’s the time to connect your device if not already done. Usually you will have to use a null modem cable (the same thing as a cross-over-cable for Ethernet). Now we’re ready to go!
Accessing a serial device from within RouterOS
The easiest way is the serial-terminal command:
/system serial-terminal serial0
This will give you access to the device you connected to port serial0.
Ctrl-A is the prefix key, which means that you will enter a small «menu» by pressing Ctrl-A. The Ctrl-A character will not be sent to your device!
If you want to exit the connection to the serial device type Ctrl-A, then Q. This will return you to your RouterOS console.
If you really want to send a Ctrl-A character to your serial device you have to type Ctrl-A two times.
Accessing a serial device directly by SSH / telnet / mac-telnet
If you want to access the device directly without logging into RouterOS first, use the special-login command.
First create a new user for access to the serial device:
/user add name=serial password=secret group=read
Then connect this username to the desired serial port:
/special-login add user=serial port=serial0
Now when you connect to your RouterOS machine using SSH (or telnet/mac-telnet) and use the username/password of the user you just created, you will be connected to your serial device directly.
One nice side effect of this is that you could give this login to someone else who can access the serial device, but not RouterOS itself. (Or, if connecting by WinBox, couldn’t change anything.)
Accessing a serial device as if it were physically connected to your PCs’ COM port
Perhaps you are using a software to access your serial device that can only talk to COM ports like COM1? Want to use this to access your device when it’s located somewhere else?
The usual way would be to purchase something like a LanTronix or Moxa serial server, but you can do this for free with RouterOS, too!
RFC 2217 defines a protocol to transfer data from/to a serial device over TCP. Combine this with a software driver on your PC that presents this network connection as a «virtual COM port» and your done!
There are lots of software solutions for the PC side to do this, most of them commercial. Some example tools you can use:
- «Serial/IP COM Port Redirector» from Tactical Software.
- Serial to Ethernet Connector
- VSPE (virtual serial port emulator)from Eterlogic.
- Eltima RS232 Data Logger by Eltima
Configuring the RouterOS part
/port remote-access add port=serial0 protocol=rfc2217 tcp-port=10000
This will connect an incoming connection on TCP port 10000 to the port serial0.
You can restrict from what ip addresses you accept connections using the parameter address-range (as in «/ip service»). Using the «local-address» parameter you can specify on which local ip address you want to listen for incoming connections (if you have more than one ip address configured).
That’s about everything we need to configure in RouterOS!
Configuring your PC
Now on to the PC part. Install the VPSE software from Eterlogic and start it.
You will see a screen like this:
File:Vpse-step1.jpg
Clicking on the «Create new device» button will get you here:
File:Vpse-step2.jpg
Make sure you selected device type «Connector» in the drop-down and press «Next»:
File:Vpse-step3.jpg
Now select a (unused) COM port number which should be your new virtual COM port and press «Finish».
Make sure that the application you want to use to access this virtual port can open the COM port number you are about to create here. Older applications often only can be configured to use COM1-COM4, so creating COM9 could mean getting yourself into trouble.
Verify that the virtual COM port you created (COM3 in the screenshot) is shown as «Ready»:
File:Vpse-step4.jpg
Next, press the «Create new device» button again and select «TcpClient» as device type:
File:Vpse-step5.jpg
Press «Next». In the next screen you will have to enter the ip address of your RouterOS machine (192.168.1.254 in the screenshot) and the port number you configured above (10000 in our example). Also make sure that you select the virtual COM port we created just before in the «Source serial port» drop-down:
File:Vpse-step6.jpg
Clicking on «Finish» will end our work and present you with a screen like this:
File:Vpse-step7.jpg
If the status of your TCPClient device doesn’t show «OK», you either have an error in your RouterOS config, or you cannot reach the configured port on the RouterOS machine from your PC (network cabling? routing? firewall? …).
If everything went well, you can now start any software and use our freshly created COM3 (in the example) to access your serial device connected to the RouterOS machine. Even if this would be located on another continent!
Caveats
There are some caveats with using the serial port on RouterBoards for the applications described above. Please read them carefully to understand how you might lock yourself out of your router!
Losing serial console access
By reconfiguring port serial0 on a RouterBoard as seen above, you will loose your serial console access to RouterOS. This means, that if you cannot access your RouterBoard over the network anymore, you might even have to reset the whole configuration of it to gain access again.
RouterBOOT entering the game
When rebooting a RouterBoard the bootloader (RouterBOOT) will always use the serial console (serial0 on RouterBoards) to send out some startup messages and offer access to the RouterBOOT menu.
Having text coming out of the serial port to the connected device might confuse your attached device. Furthermore in standard config you can enter RouterBOOT menu by pressing ANY key. So if your serial device sends any character to the serial port of your RouterBoard during boot time, the RouterBoard will enter the RouterBOOT menu and will NOT boot RouterOS unless you manually intervene!
You can reconfigure RouterBOOT to enter the RouterBOOT menu only when a DEL character is received — use this to reduce the chance to get a router that’s stuck when rebooting!
Or if newer versions are used «Silent boot» feature can be used to suppress any output on the serial interface, including removal of booting sounds.