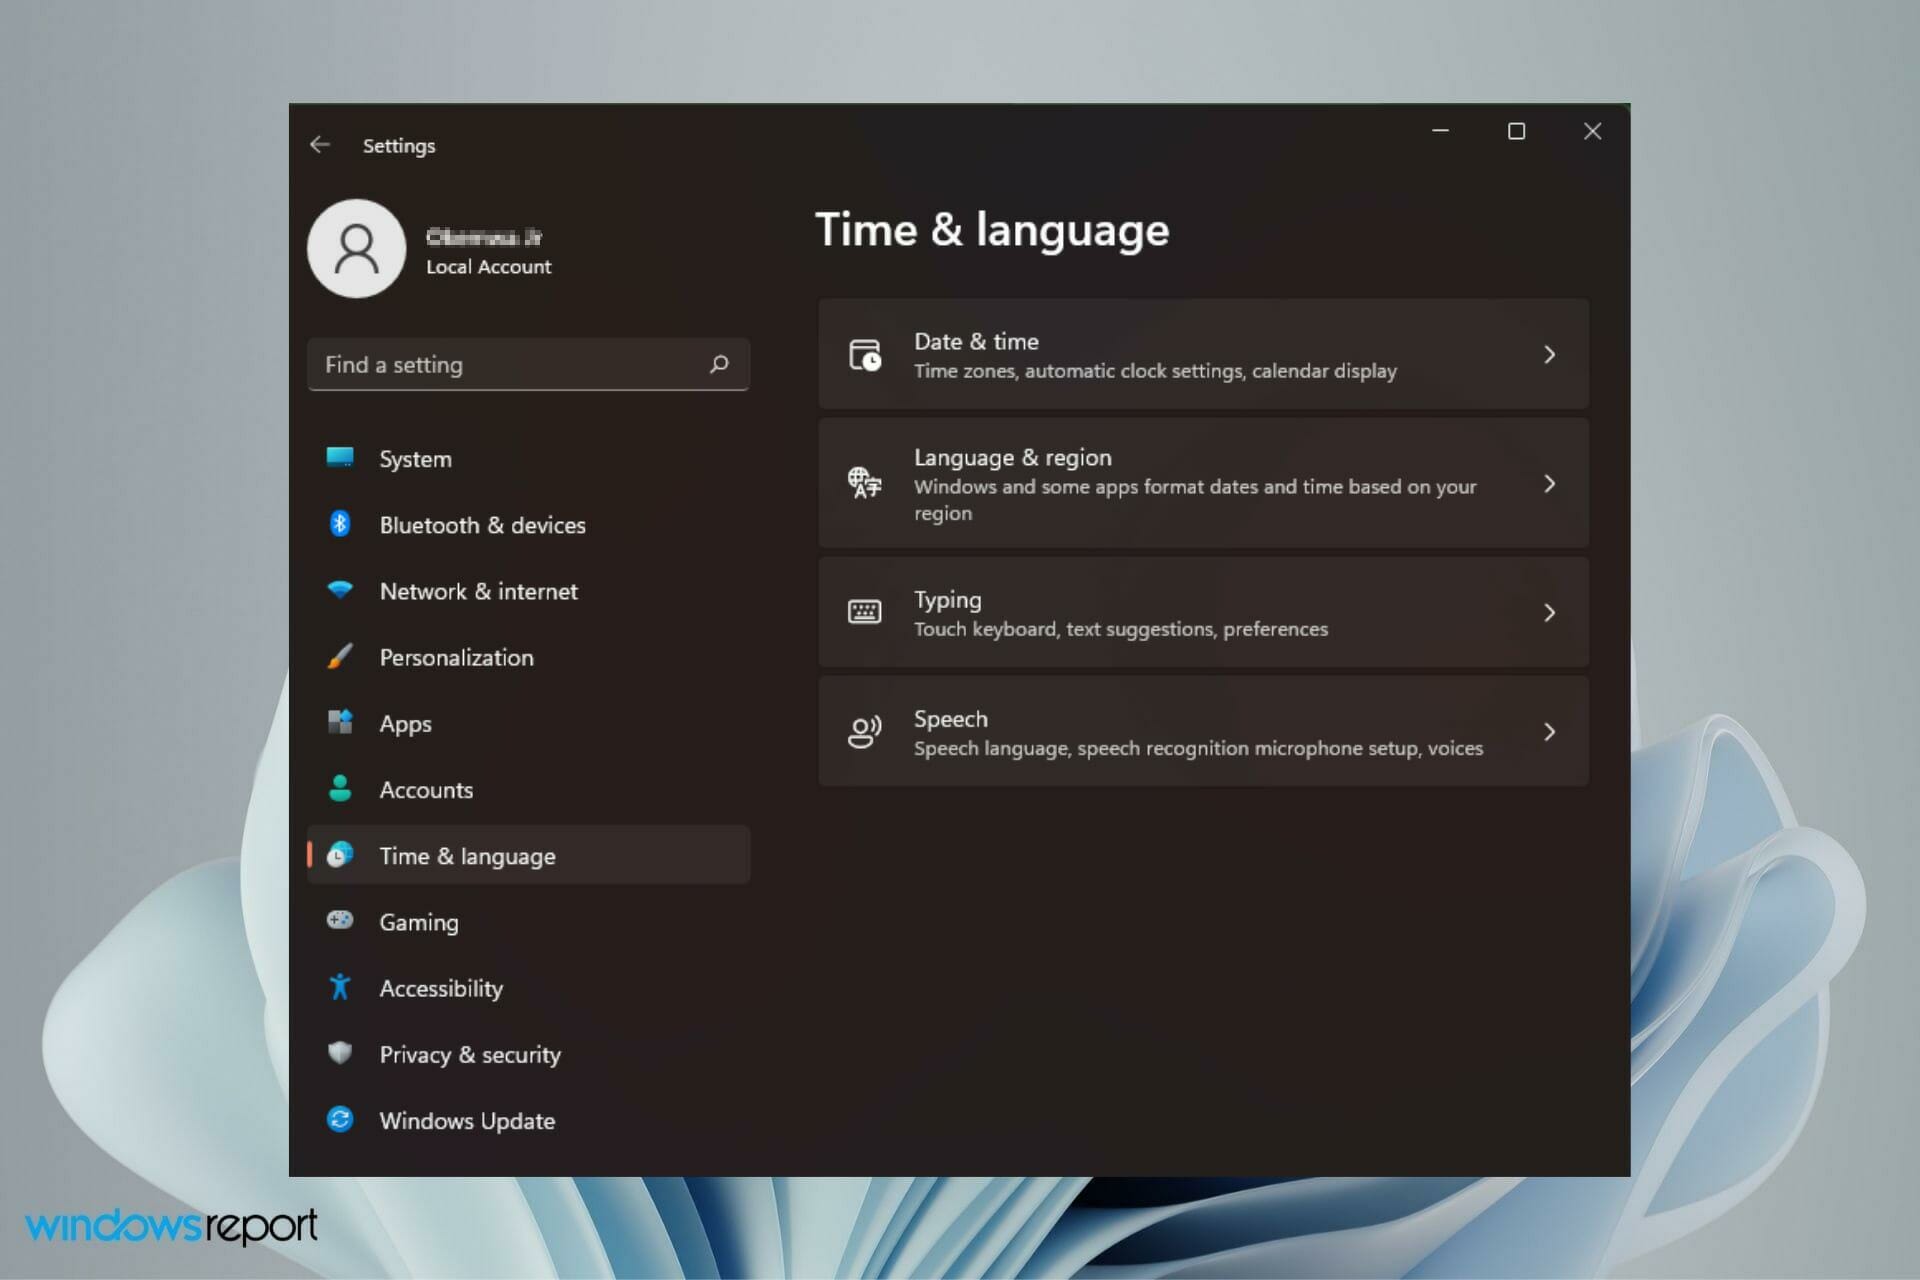
To manage all aspects of the input and display language settings on your Windows 11 PC, use the following methods.
To switch the keyboard layout you’re using, press and hold the Windows key and then repeatedly press the Spacebar to cycle through all your installed keyboards. (If this doesn’t do anything, it means you have only one installed.)
You can also select the language abbreviation in your taskbar then choose the language or input method you want to use.
Note: In the input field, press the Windows logo key + period (.) to access the Emoji & more keyboard, if your language supports it.
If you can’t find the keyboard layout you want, you may have to add a new keyboard.
Adding an input language lets you set a language-preference order for websites and apps, as well as change your keyboard language.
-
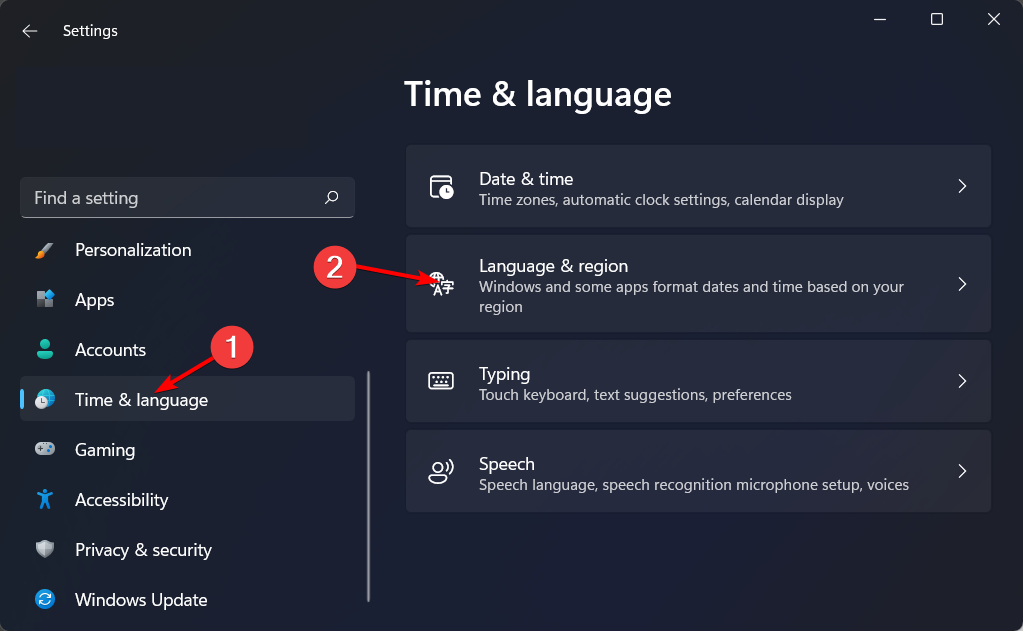
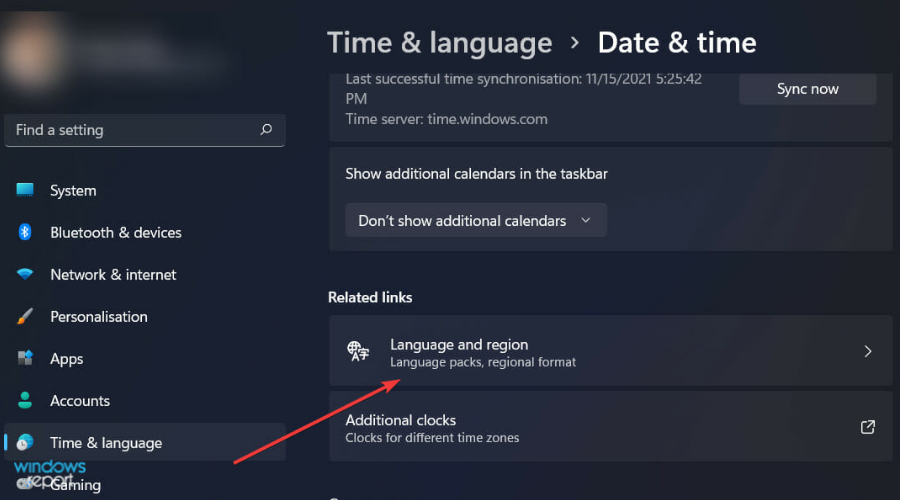
Select the Start > Settings > Time & language > Language & region.
-
Select the language that has the keyboard you want, then select Options.
-
Select Add a keyboard and choose the keyboard you want to add. If you don’t see the keyboard you want, you may have to add a new language to get additional options. If this is the case, go on to step 4.
-
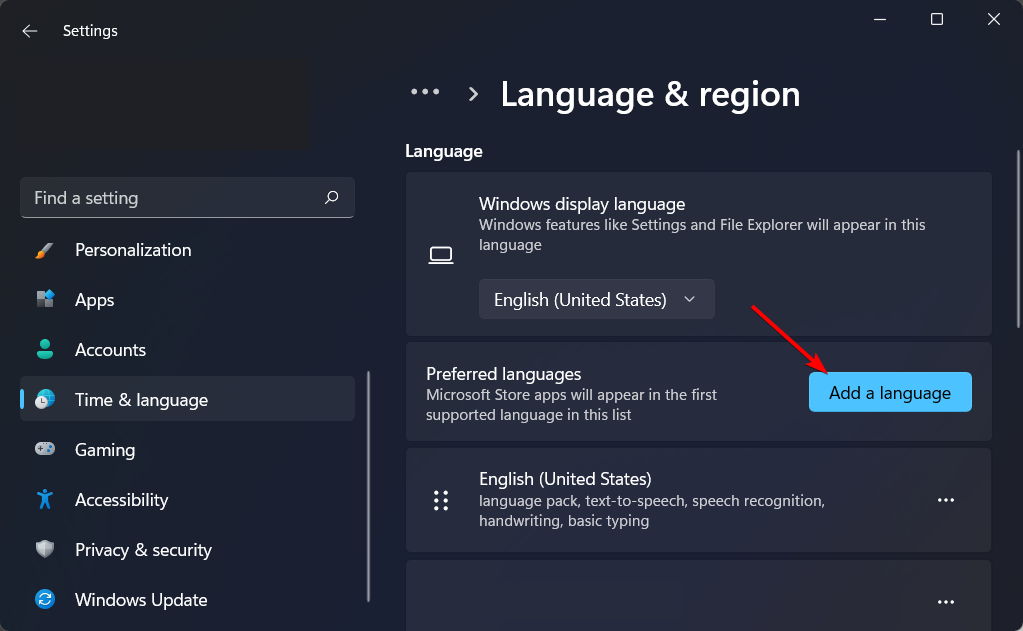
Return to the Language settings page, go to Preferred languages, then select Add a language.
-
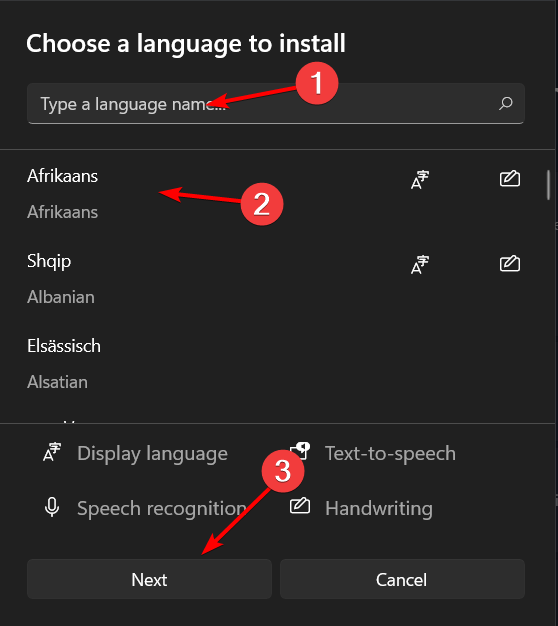
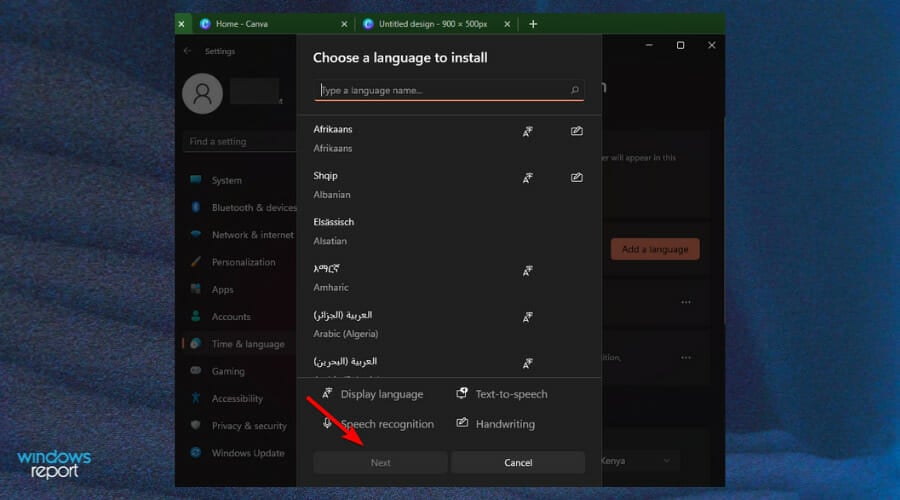
Choose the language you want to use from the list, then select Next.
-
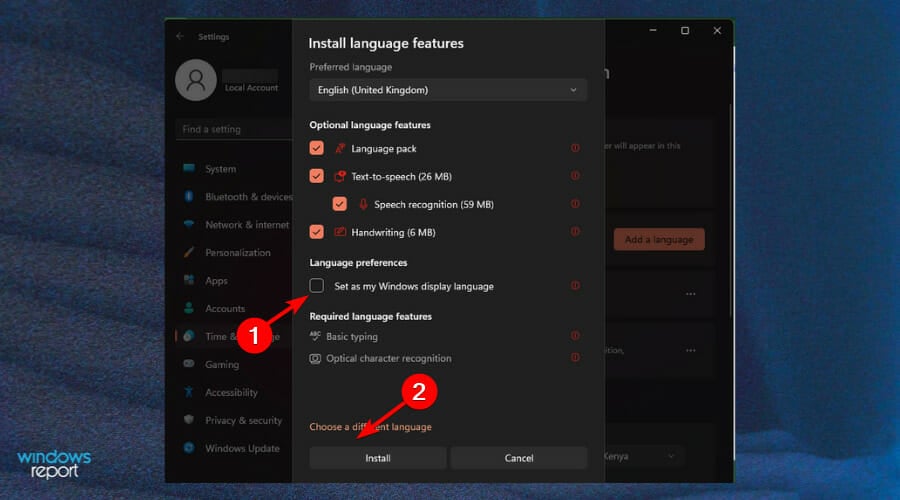
Review any language features you want to set up or install, and select Install.
«Add a keyboard» shortcut
The display language you select changes the default language used by Windows features like Settings and File Explorer.
-
Select Start > Settings > Time & language > Language & region.
-
Choose a language from the Windows display language menu.
«Change your display language» shortcut
If a language is listed under Preferred languages but doesn’t appear on the Windows display language list, you’ll first need to install its language pack (if it’s available).
-
Select Start > Settings > Time & language > Language & region.
-
In Preferred languages, select Add a language, enter the language you want, then select Next.
-
Select Download from the Download language pack option.
-
After the language pack is installed, select Back.
-
Choose a language from the Windows display language menu.
«Install a language pack» shortcut
If you receive an «Only one language pack allowed» or «Your Windows license supports only one display language» message, you have a single language edition of Windows 10. Here’s how to check your Windows 10 language edition:
-
Select Start > Settings > About, and then go to the Windows specification section.
-
If you see Windows 11 Home Single Language next to Edition, you have a single language edition of Window 11, and you can’t add a new language unless you purchase an upgrade to either Windows 11 Home or Windows 11 Pro.
Upgrade to Windows 11 Home or Windows 11 Pro
-
Select Start > Settings > Time & language > Language & region.
-
Under Preferred languages, select the language you want to remove, and then select Remove.
-
To remove an individual keyboard, select the language (see step 2), select Options, scroll down to the Keyboards section, select the keyboard you want to remove, and select Remove.
To manage all aspects of the input and display language settings on your Windows 10 device, use the following methods.
To switch the keyboard layout you’re using in Windows 10, press and hold the Windows key and then repeatedly press the Spacebar to cycle through all your installed keyboards. (If this doesn’t do anything, it means you have only one installed.)
You can also select the language abbreviation on the far right of the taskbar and then choose the language or input method you want to use.
Note: In the input field, press Windows +period (.) to access the emoji keyboard, if your language supports this.
If you can’t find the keyboard layout you want, you may have to add a new keyboard.
Adding an input language lets you set a language-preference order for websites and apps, as well as change your keyboard language.
-
Select the Start button, then select Settings > Time & Language > Language.
-
Under Preferred languages, select the language that contains the keyboard you want, and then select Options.
-
Select Add a keyboard and choose the keyboard you want to add. If you don’t see the keyboard you want, you may have to add a new language to get additional options. If this is the case, go on to step 4.
-
Return to the Language settings page, and select Add a language.
-
Choose the language you want to use from the list, and then select Next.
-
Review any language features you want to set up or install, and select Install.
«Add a keyboard» shortcut
Some languages require additional language features
For some languages to work properly, you need an admin on your PC to install the language features. Here’s a list of the languages that are affected:
-
Microsoft IME – Primary keyboard of Japanese
-
Microsoft Pinyin – Primary keyboard of Chinese (Simplified, China), Primary keyboard of Chinese (Simplified, Singapore)
-
Microsoft Wubi – Secondary keyboard of Chinese (Simplified, China), Secondary keyboard of Chinese (Simplified, Singapore)
-
Microsoft Bopomofo – Primary keyboard of Chinese (Traditional, Taiwan), Secondary keyboard of Chinese (Traditional, Hong Kong SAR), Secondary keyboard of Chinese (Traditional, Macao SAR)
-
Microsoft ChangJie – Secondary keyboard of Chinese (Traditional, Taiwan), Secondary keyboard of Chinese (Traditional, Hong Kong SAR), Secondary keyboard of Chinese (Traditional, Macao SAR)
-
Microsoft Quick – Secondary keyboard of Chinese (Traditional, Taiwan), Primary keyboard of Chinese (Traditional, Hong Kong SAR), Primary keyboard of Chinese (Traditional, Macao SAR)
-
Bangla Phonetic – Secondary keyboard of Bengali (India)
-
Gujarati Phonetic – Secondary keyboard of Gujarati
-
Hindi Phonetic – Secondary keyboard of Hindi
-
Kannada Phonetic – Secondary keyboard of Kannada
-
Malayalam Phonetic – Secondary keyboard of Malayalam
-
Marathi Phonetic – Secondary keyboard of Marathi
-
Odia Phonetic – Secondary keyboard of Odia
-
Punjabi Phonetic – Secondary keyboard of Punjabi (Gurmukhi)
-
Tamil Phonetic – Secondary keyboard of Tamil (India)
-
Telugu Phonetic – Secondary keyboard of Telugu
The display language you select changes the default language used by Windows features like Settings and File Explorer.
-
Select the Start button, then select Settings > Time & Language > Language.
-
Choose a language from the Windows display language menu.
«Change your display language» shortcut
If a language is listed under Preferred languages but doesn’t appear on the Windows display language list, you’ll first need to install its language pack (if it’s available).
-
Select the Start button, then select Settings > Time & Language > Language.
-
Choose a language from the Add a language list under Preferred languages, and then select Options.
-
Select Download from the Download language pack option.
-
After the language pack is installed, select Back .
-
Choose a language from the Windows display language menu.
«Install a language pack» shortcut
If you receive an «Only one language pack allowed» or «Your Windows license supports only one display language» message, you have a single language edition of Windows 10. Here’s how to check your Windows 10 language edition:
-
Select the Start button, select Settings > About, and then scroll down to the Windows specification section.
-
If you see Windows 10 Home Single Language next to Edition, you have a single language edition of Window 10, and you can’t add a new language unless you purchase an upgrade to either Windows 10 Home or Windows 10 Pro.
Upgrade to Windows 10 Home or Windows 10 Pro
-
Select the Start button, then select Settings > Time & Language > Language.
-
Under Preferred languages, select the language you want to remove, and then click Remove.
-
To remove an individual keyboard, select the language in question (see step 2), select Options, scroll down to the Keyboards section, select the keyboard you want to remove, and click Remove.
Need more help?
Want more options?
Explore subscription benefits, browse training courses, learn how to secure your device, and more.
Communities help you ask and answer questions, give feedback, and hear from experts with rich knowledge.
Find solutions to common problems or get help from a support agent.
Display Language Switcher is a mostly automated script to install and change the Display Language for Windows Editions that are not allowed to have multiple languages by default.
Some of these editions include Windows 10 Home Single Language, Windows 8.1 Single Language, Windows 8 Single Language, Windows 7 SP1 Starter, Windows 7 SP1 Starter N, Windows 7 SP1 Home Basic, Windows 7 SP1 Home Basic N, Windows 7 SP1 Home Premium, Windows 7 SP1 Home Premium N, Windows 7 SP1 Professional, and Windows 7 SP1 Professional N.
The following languages are supported: Arabic, Bulgarian, Chinese (Simplified), Chinese (Hong Kong S.A.R.), Chinese (Taiwan), Croatian, Czech, Danish, Dutch, English, English (United Kingdom), Estonian, Finnish, French, French (Canada), German, Greek, Hungarian, Italian, Japanese, Korean, Latvian, Lithuanian, Norwegian, Polish, Portuguese (Brazil), Portuguese (Portugal), Romanian, Russian, Serbian (Latin), Slovak, Slovenian, Spanish, Spanish (Mexico), Swedish, Thai, Turkish, and Ukrainian.
How to use:
1: Get desired Language Pack matching your operating system version and architecture (32bit or 64 bit) and put the file in «LangPack» folder. For Windows 7, you can use the original EXE file, or manually converted CAB file
Optional: Get Language Features On Demand Packs for Windows 10 if available and put the files in «FOD» folder
you can let Windows Update to install them later after changing the language
2: Right-click on DisplayLanguageSwitcher.cmd and select Run as administrator
3: After loading and showing Operating System and detected Language Pack information, you will be prompted to continue to install a new LangPack or exit.
4: Restart the system to complete the language change
A few notes:
If you later want to go back to the original language or already installed multiple languages run the script, and you will be prompted to select one of the detected languages to set as primary
The script will not set or change the local language preferences: Formats, Location, Keyboards, language for non-Unicode programs (system locale). You can set them manually, before or after changing the display language:
Windows 7: «Region and Language» Control Panel Windows.
8/8.1: «Region», «Language» Control Panel.
Windows 10: «Region,» «Language,» Control Panels, or Settings app.
Apply our detailed procedure right away
by Claire Moraa
Claire likes to think she’s got a knack for solving problems and improving the quality of life for those around her. Driven by the forces of rationality, curiosity,… read more
Updated on
- Windows allows users to change the text display language which is used in menus and other graphic elements of the system.
- However, it may sometimes happen that you can’t change the display language because of a few limitations.
- This should not worry you because you can easily tweak the settings and select your preferred system language in a few easy steps.
The ability to change the display language of your operating system is helpful for multilingual people. Still, it’s also suitable for users who want to try out other languages or switch from one to another.
To accommodate users worldwide, Windows 11 allows you to change such settings.
Suppose a computer comes to you with different language settings, and you travel frequently. In that case, it can be useful to set the operating system’s language accordingly whenever you are in a new location.
You can tweak the settings to display a different one, and you may also add more options so that you can switch with ease and get a multilingual experience.
There are several reasons for wanting to change the Windows system language. Maybe you bought a Windows PC on the last trip abroad or over the Internet, and it comes in one you don’t understand.
Perhaps you have the computer you bought, but now upgrading to a new operating system changes your default system language, and you want to remove the unwanted display language in Windows 11.
Whatever your reasons, changing the Windows 11 display language should be easy. However, when you upgrade to the OS, you can encounter an issue where it is not correctly set.
How we test, review and rate?
We have worked for the past 6 months on building a new review system on how we produce content. Using it, we have subsequently redone most of our articles to provide actual hands-on expertise on the guides we made.
For more details you can read how we test, review, and rate at WindowsReport.
You might see the language change, but it still displays the same that you originally had on your system even after a reboot.
How do I change the display language in Windows 11?
- Press Windows + I in order to open Settings and navigate to Time & language followed by Language & region.

- Next, click on the Add a language button.
- Now, search for the desired language, click on it and select Next.

- Check the Set as my Windows display language and select Install.

For related ways in which you can tweak your system, check out our post on how to change display language in Windows 10.
Why can’t I change my Windows display Language?
The inability to change your display language can be a frustrating experience since you need to understand what you are doing on your device. If you can’t maneuver, you can be stuck for a while.
It might seem like a small issue at first glance, but it’s pretty important if you want to use your computer in multiple languages.
Some of the reasons you may be unable to change the display language are:
- You don’t have administrator privileges – If your user account doesn’t have administrator privileges, or you are logging in as a guest, you may not be able to make any changes. You need to sign in to your Microsoft account to make any changes.
- Note that you need to enable additional languages for your country/region – You can only change the display language in Windows if you have set multiple languages for your country or region.
- You need to download and install the language pack – The pack contains several languages you can choose from. Without it, you can only access the default language on your device. You can install the language pack and choose one from the list so that you can be able to toggle between languages.
What can I do if I can’t change the display language?
1. Install the language pack
- Press the Windows + I keys to open Settings.

- Select Time & language on the left pane.

- Choose the Language and region option.
- Click the Add a language button.
- Select your preferred language and press Next.
- Check the box for Set as my Windows display language then press Install.
- Restart your PC to effect the changes.

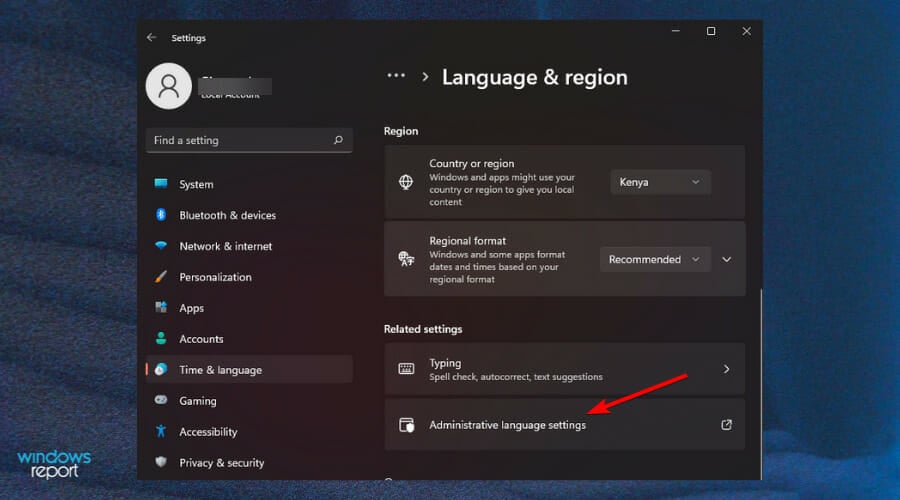
2. Adjust the region settings
- Press the Windows + I keys to open Settings.
- Click on Time & language.
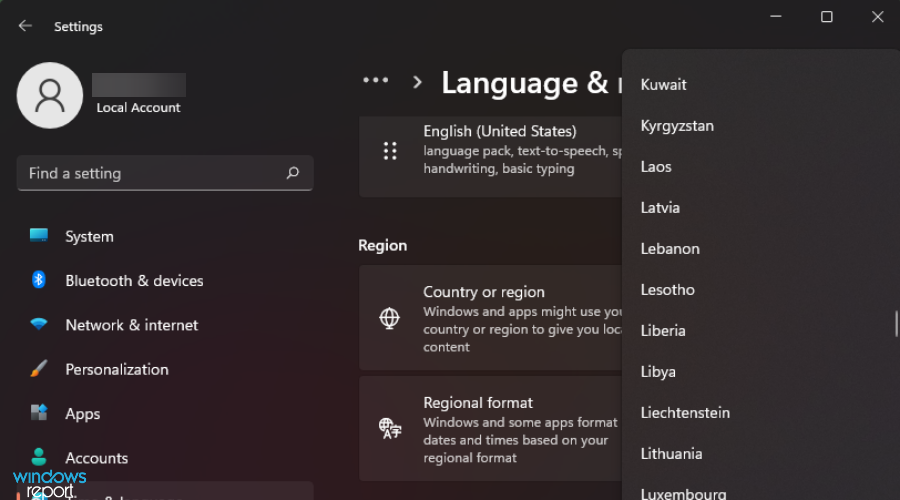
- Click the Language and region page on the right side.
- Under Country or region, update your location if applicable.
- Next, go back to the Administrative language settings.
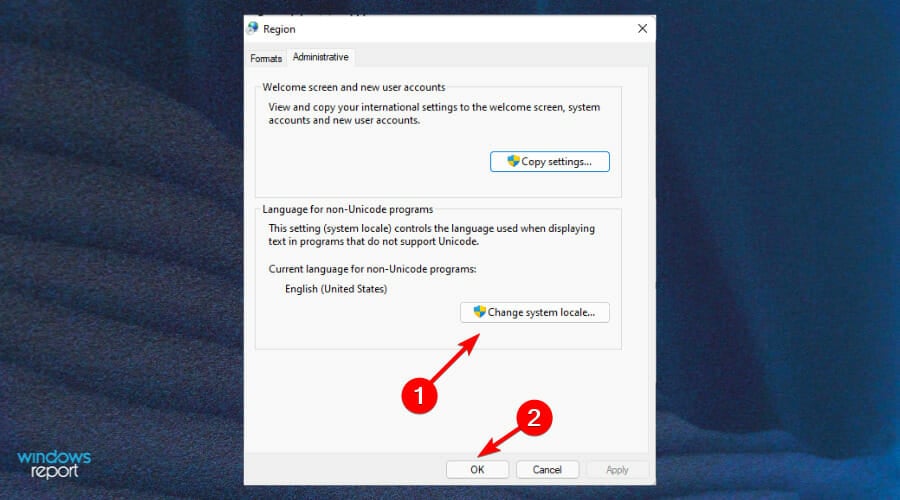
- Select Change system locale button then press OK.
- Specify the new language, check the Beta: Use Unicode UTF-8 for worldwide language support box and then click the OK button.
- Restart your PC and try changing your display language again.

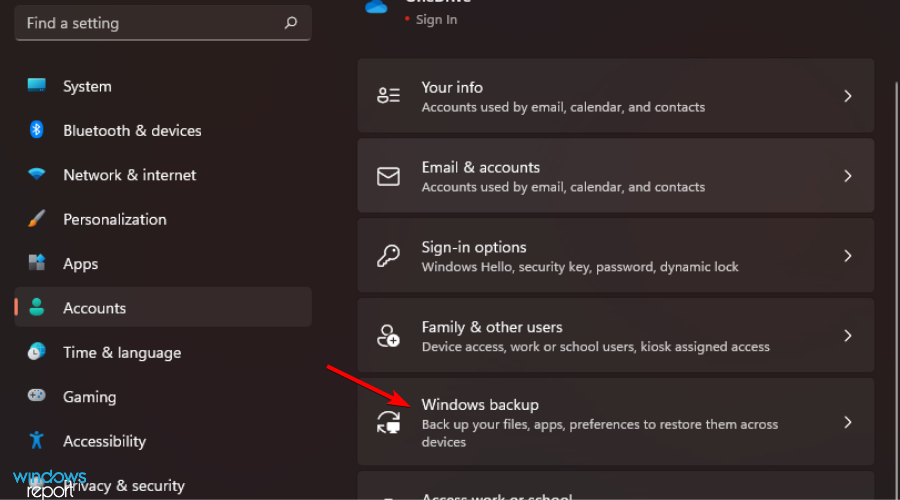
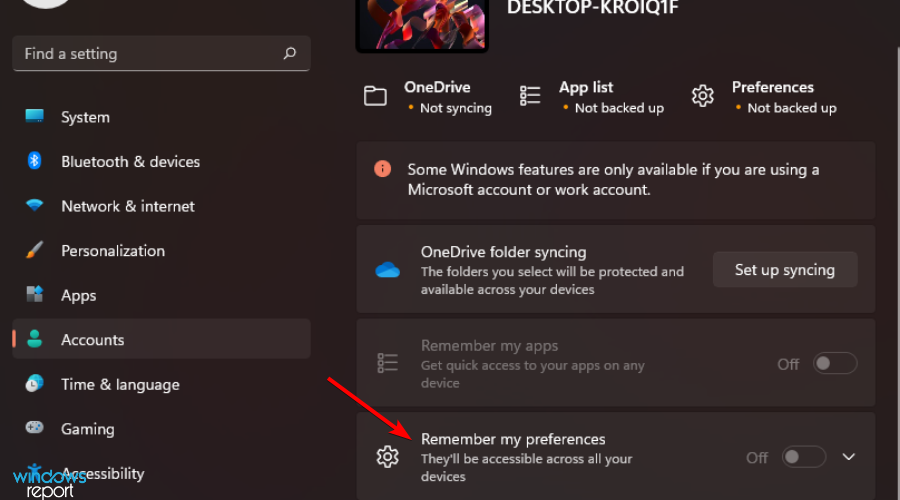
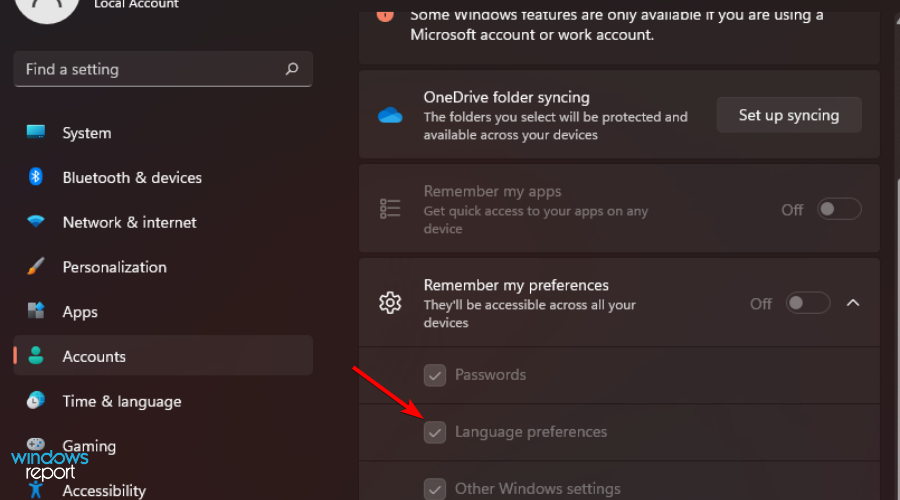
3. Disable sync for language settings
- Press the Windows + I keys to open Settings.
- Click on Accounts.
- Click the Windows backup page on the right side.
- Click Remember my preferences and toggle it on.
- Clear the Language preferences option.
- You should now be able to change your display language.

How do I add a display language in Windows 11?
- Hit the Windows key to open Settings.
- Click on Time & language.
- Select Language and region on the right pane.
- Under the Language section, press the Add a language button.
- Select your preferred language from the drop-down list and click Next to install.
How do I add the language bar to my taskbar in Windows 11?
Having the language bar floating on your taskbar is the most efficient way of switching between languages while you’re working on your computer. Once you add it, you’ll be able to change your keyboard layout with a single click instead of navigating through the Control Panel.
To add it to the taskbar, follow the steps below:
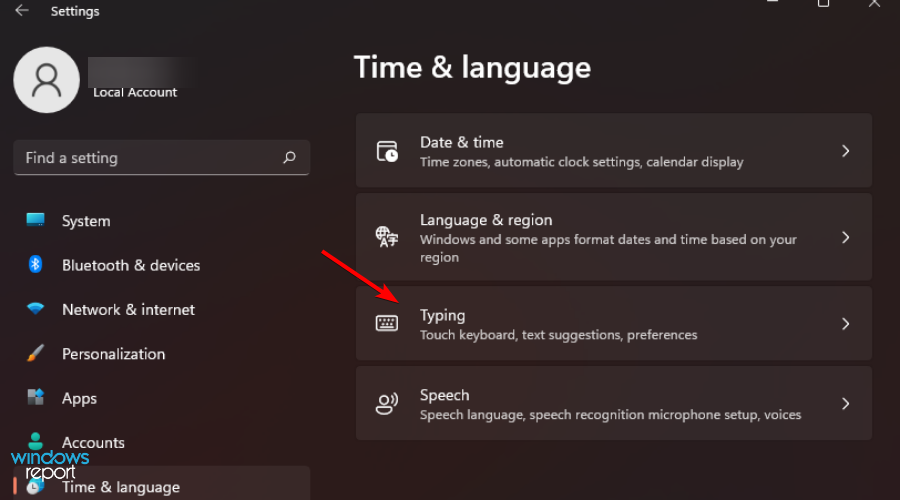
- Press the Windows + I keys simultaneously to open Settings.
- Select Time & language.
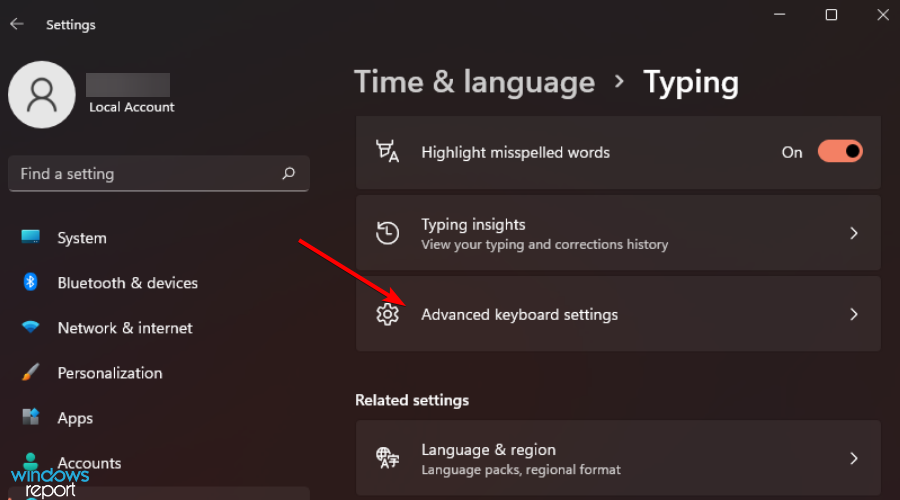
- Select Typing option on the right pane.
- Click on Advanced keyboard settings option.
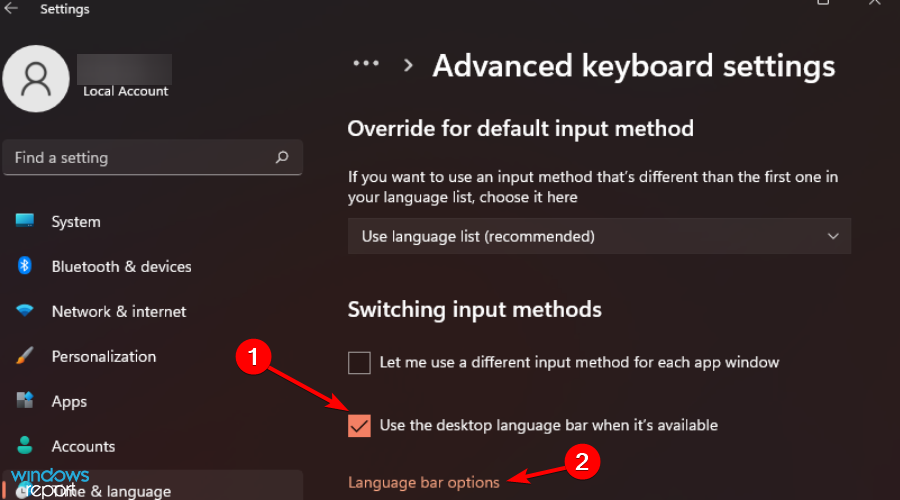
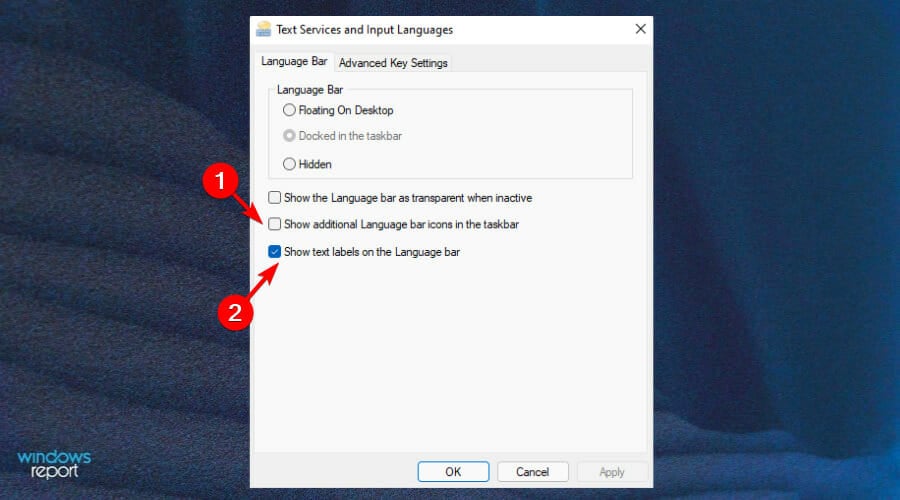
- Check the Use the Desktop language bar when it’s available box and select Language bar options.
- On the Language Bar tab, select Floating On Desktop.
- Also, check the Show additional Language bar icons in the taskbar and Show text labels on the Language bar boxes.
- The language bar should now appear on the taskbar.

How do I change the Welcome screen language in Windows 11?
To change your Welcome screen language, follow the steps below:
- Press the Windows key to open Settings.
- Select Time & language.
- Select Language and region on the right pane.
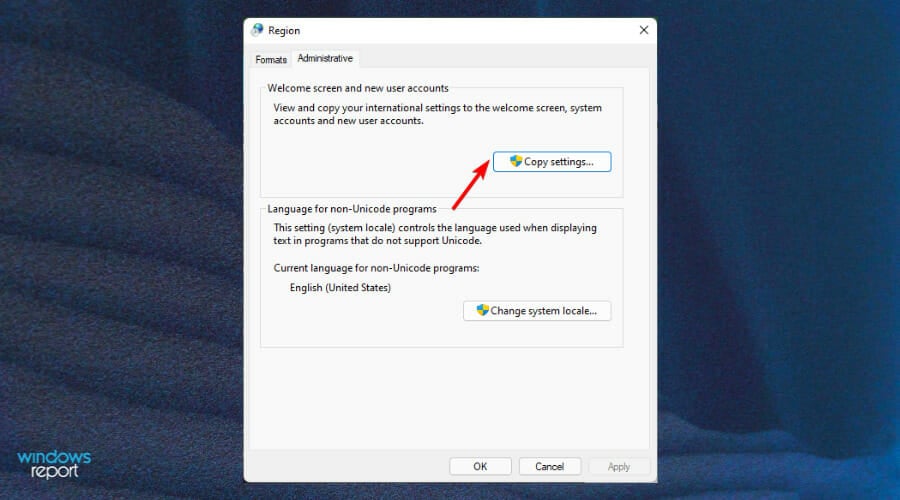
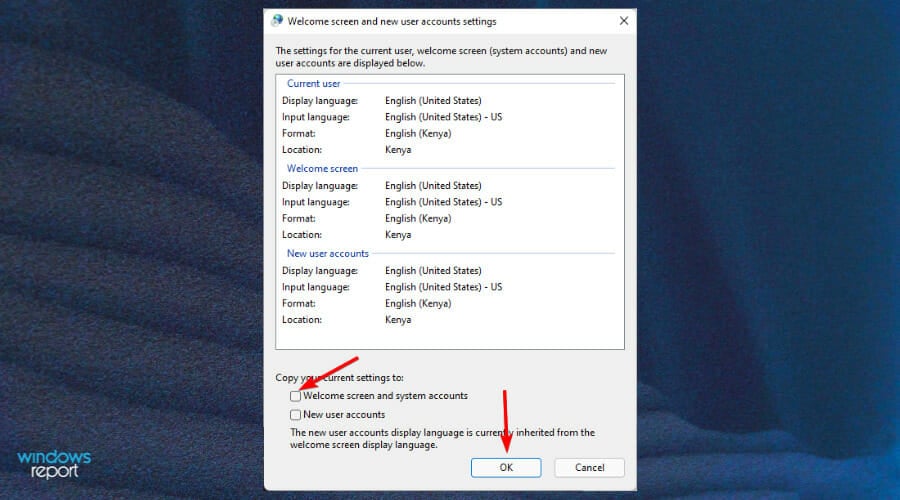
- Scroll down and go to Administrative language settings.
- Under the Administrative tab, select Copy settings.
- Check the Welcome screen and system accounts box, and proceed to saving the changes by clicking OK and restart your computer.
- Your Welcome screen is now changed.

What can I do if my Windows license supports only one display language?
If your edition of Windows is not licensed to support multiple display languages, but you have already added another during installation, you can still keep using that new language pack.
This will give you enough time while you’re evaluating whether you want to purchase a product key that will enable all of its features going forward.
Alternatively, you can refer to our guide on how to fix the language not supported error to easily bypass this issue and prevent it from appearing again.
Once you are ready and have selected your preferred system language, you can proceed to uninstall and install language packs for a fresh start and avoid errors.
If you experience difficulties and your language pack does not work, we have an excellent guide to help you solve the problem.
Additionally, your system language is not the only setting you can tweak to select your preferred choice. You can also change your keyboard language.
Although you may rarely need to change your display language, knowing how to will come in handy when you travel to a new region and desperately need to use your PC.
That’s it for this article, and we hope you were able to change your system language successfully.
Remember that language packs take up a lot of drive space, so you might want to exercise some limitations in installing multiple languages you don’t need.
If you have any further comments, suggestions, or queries on this subject, share in the comment section below.
![]()
Windows 11 предоставляет пользователю уникальный интерфейс, который можно настроить на свой вкус. Однако, у пользователей могут возникать проблемы с языком интерфейса, если Windows 11 не поддерживает нужный язык или ограничивает выбор только одним языком.
Изменение языка интерфейса в Windows 11
Изменение языка интерфейса в Windows 11 довольно простое и доступное для любого пользователя. Следуйте данным шагам, чтобы изменить язык интерфейса:
- Нажмите правой кнопкой мыши на панели задачи и выберите «Настройки панели задачи».
- Откроется окно настроек Windows 11. Нажмите на «Язык и регион».
- Откроется меню с настройками языка и региона. Нажмите на «Язык».
- Выберите язык, который вы хотите использовать в интерфейсе Windows 11. Нажмите на кнопку «Установить язык».
- После того, как язык установлен, выберите его как основной.
Обход ограничений на один язык интерфейса
Некоторые пользователи могут столкнуться с ограничением, что Windows 11 поддерживает только один язык интерфейса. Если вы хотите использовать несколько языков интерфейса в Windows 11, есть несколько способов, как это можно сделать.
Установка языков через PowerToys
PowerToys — это набор утилит для настройки и улучшения Windows 11. Скачайте и установите PowerToys на свой компьютер, и следуйте данным шагам:
- Откройте PowerToys и перейдите в раздел «FancyZones».
- В правой части интерфейса выберите «Languages».
- Нажмите на кнопку «Add languages». Выберите языки, которые вы хотите использовать в интерфейсе Windows 11.
- После установки языков перезагрузите компьютер.
Использование приложения Punto Switcher
Punto Switcher — это утилита, которая автоматически меняет язык интерфейса в соответствии с выбранным приложением. После установки Punto Switcher на свой компьютер, следуйте данным шагам:
- Откройте Punto Switcher и выберите языки, которые вы хотите использовать в интерфейсе Windows 11.
- Настройте приложение на автоматическую смену языка интерфейса в соответствии с выбранным приложением.
Изменение языка интерфейса через реестр
Данный метод требует наличия определенных навыков и знаний в работе с реестром Windows 11. Следуйте данным шагам, чтобы изменить язык интерфейса через реестр:
- Нажмите на кнопку «Пуск» и в строке поиска введите «regedit». Нажмите Enter.
- Пройдите к следующему пути: HKEY_LOCAL_MACHINE\SYSTEM\CurrentControlSet\Control\Nls\Language.
- Найдите ключ LanguageMenu и щелкните правой кнопкой мыши на нем. Выберите «Изменить».
- В строке «Значение» введите язык, который вы хотите использовать в интерфейсе Windows 11.
- Нажмите ОК и перезагрузите компьютер.
Заключение
В Windows 11 есть много способов, как изменить язык интерфейса и обойти ограничения на один язык. Выберите подходящий вариант для вас и настройте интерфейс по своему вкусу.
The recently released Windows 11 is packed with over 110 languages. A fresh installation of Windows 11 offers you the option to set the default language. However, if you want to use another display language, or you purchased a PC that is configured with a different language than yours, you can easily change the display language in Windows 11, by using the instructions on this article.
Some Windows 11 PC – especially laptops, are pre-installed with languages such as Chinese, Japanese depending on the region where they are purchased. In other instances, multiple users who share one computer can decide to apply different languages to their user profile. *
* e.g.: if you are sharing a Windows 11 computer with «English» as display language, you can read this guide and select «French» as the display language in your user profile.
At any case, you can effortlessly change the Windows 11 display language to meet your needs.
How to Change the Display Language on Windows 11.
Before you change the Windows 11 display language, consider the following: If you have set up your computer with a Microsoft account, then any changes you make to the display language settings on that computer will be synchronized across all your devices that use the same Microsoft account. If you don’t want that, proceed and prevent the language preferences synchronization, by following the below steps:
How to Stop Syncing Display language across devices. *
* Note: Keep in mind, that the display language will not be synchronized on other computers if you set up the computer with a local account. At such there is not need to display language settings synchronization.
1. Right-click at Start ![]() menu and select Settings
menu and select Settings

2. Select Accounts on the left and then click Windows Backup on the right side.

3. Under Remember my preferences settings, uncheck the Language preferences option.

4. Once you complete the above steps, you can go ahead and change the language settings, without affecting the display language on other devices that use the same MS account.
How to Change Language on Windows 11.
1. Right-click at Start ![]() menu and select Settings.
menu and select Settings.
2. Select Time and Language on left & click Language & region on the right.

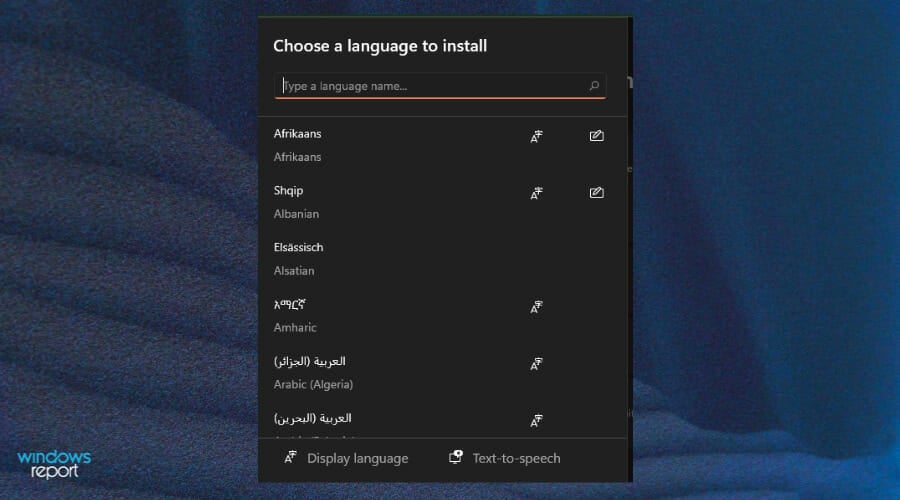
3. Under the Language section, select Add a language button from the «Preferred languages» setting.

4. Scroll down until you locate the language you want to install, select it and click Next. *
* Note: For quick access to the language, you can use the search bar. (e.g. type French in the search box to find quickly the «French» language)

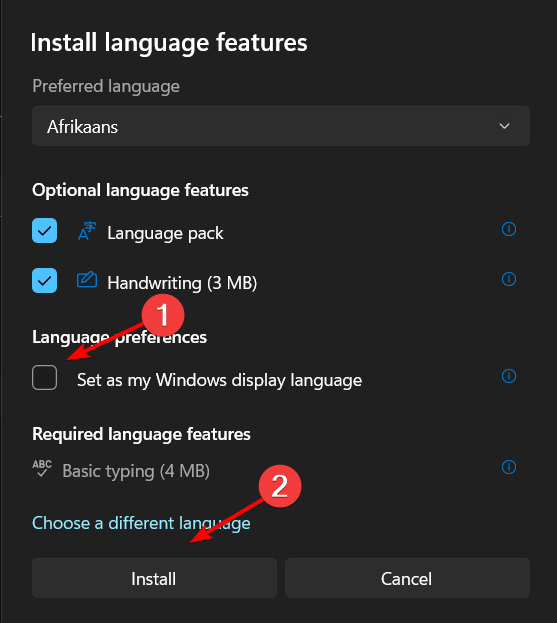
5. At Install Language features options:
a. Review all the Optional language features and choose if you can install them.*
* Note: Not all Windows 11 languages supports input and display features such as: Display language, Text-to-speech, Speech recognition, and Handwriting.
b. Check Set as my Windows display language option.
c. Click the Install button.

6. When the language pack download is complete, the new language is added under “Preferred languages» and you will get a notification that “Windows needs to sign out in order to apply your new display language. Click Sign out to apply the change.

7. At next login, Windows 11 will be displayed in the language you just installed and the changes will apply also to all Windows 11 Settings and Apps.
In a situation where you are changing Windows 11 language because you are in a different country, you may also consider changing the Region. To do that:
- Navigate again to Time and Language -> Language & region
- Under the «Region» section, at Country or region use the drop-down menu to select your current location, and you’re done.

Conclusion: Changing the Windows 11 language is relatively easy when you install your preferred language pack. The only inconvenience you might experience is to sign out and re-open your apps.
That’s it! Let me know if this guide has helped you by leaving your comment about your experience. Please like and share this guide to help others.