Время на прочтение
8 мин
Количество просмотров 100K
 Windows Server 2012 R2 вышел 18 октября 2013 года. С тех пор на эту серверную операционную систему Microsoft выпущено несколько сотен обновлений исправляющих уязвимости и дефекты продукта, а так же улучшающие функционал.
Огромное количество обновлений — источник головной боли. Наиболее актуальный дистрибутив сервера, так называемый «Update2», в который интегрированы обновления по ноябрь 2014 года, безнадежно устарел. Установив с него операционную систему, вы получите вдогонку еще 200+ обновлений, которые будут устанавливаться 2-4 часа.
В этой короткой инструкции мы освежим ноябрьский дистрибутив, интегрировав в него все кумулятивные пакеты обновлений и обновления безопасности.
Помимо дистрибутива мы освежим и память администратора, вспомнив как обновляется носитель для установки, зачем выполняется каждый шаг, и какие нас может ожидать подвохи на разных этапах.
Делать будем по максимуму просто, используя штатные инструменты.
Все работы лучше проводить на сервере с уже развернутом Windows Server 2012 R2, чтобы не было накладок с версией утилиты DISM. Так же на нем удобно подключать ISO файлы, не распаковывая их.
Готовим рабочие директории
Для работы потребуются следующие каталоги:
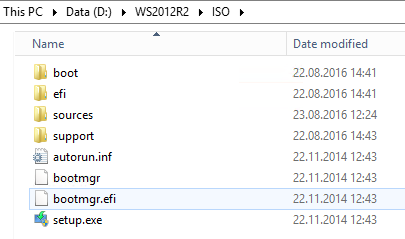
ISO — в этот каталог копируются файлы дистрибутива. В скопируйте в него содержимое дистрибутива SW_DVD9_Windows_Svr_Std_and_DataCtr_2012_R2_64Bit_English_-4_MLF_X19-82891.ISO, предварительно смонтировав образ, а затем размонтировав.
MOUNT — пустой каталог, в него будут монтироваться образы из wim-файла.
CU — в этот каталог поместим кумулятивные обновления
SU — в этом каталоге будут находиться обновления безопасности и другие обновления
mkdir D:\WS2012R2\ISO
mkdir D:\WS2012R2\MOUNT
mkdir D:\WS2012R2\CU
mkdir D:\WS2012R2\SU
Скачиваем кумулятивные обновления
Tip & Trick #1. Microsoft выпускает для Windows Server 2012 R2 кумулятивные пакеты обновлений, но в них входят только обновления, исправляющие ошибки и улучшающие функционал. Обновления безопасности не включены. При этом обновления и не особо кумулятивны. Некоторые не включают в себя предыдущие обновления, и надо ставить «кумулятивное» за каждый месяц. Бардак. В октябре эта ситуация изменится к лучшему.
Со списком кумулятивных обновлений вы можете ознакомиться на этой wiki странице.
С ноября 2014 года нам потребуется интегрировать следующие обновления:
1. December 2014 Windows RT 8.1, Windows 8.1, and Windows Server 2012 R2. KB3013769, cкачать.
2. July 2016 Windows RT 8.1, Windows 8.1, and Windows Server 2012 R2. KB3172614, скачать.
Пакеты за май и июнь поглощены этим июльским пакетом. Но перед установкой обязательно обновление April 2015 servicing stack update for Windows 8.1 and Windows Server 2012 R2. KB3021910, скачать.
3. August 2016 Windows RT 8.1, Windows 8.1, and Windows Server 2012 R2. KB3179574, скачать.
Обновленный клиент центра обновления можно не интегрировать
Свежий Windows Update Client for Windows 8.1 and Windows Server 2012 R2: June 2016 вошел в KB3161606
KB3161606 поглощен KB3172614.
UPD: Я несколько преувеличил то, насколько Microsoft качественно подготовила дистрибутив. Обновления April 2014 и November 2014 действительно интегрированы. А все промежуточные — нет. Поэтому добавляем
May 2014 update rollup for Windows RT 8.1, Windows 8.1, and Windows Server 2012 R2. KB2955164, скачать
June 2014 update rollup for Windows RT 8.1, Windows 8.1, and Windows Server 2012 R2. KB2962409, скачать.
July 2014 update rollup for Windows RT 8.1, Windows 8.1, and Windows Server 2012 R2. KB2967917, скачать.
August 2014 update rollup for Windows RT 8.1, Windows 8.1, and Windows Server 2012 R2. KB2975719, скачать.
September 2014 update rollup for Windows RT 8.1, Windows 8.1, and Windows Server 2012 R2. KB2984006, скачать.
October 2014 update rollup for Windows RT 8.1, Windows 8.1, and Windows Server 2012 R2. KB2995388, скачать.
Tip & Trick #2. В разных статьях для интеграции обновлений предлагается извлечь из msu cab-файл. Делать это для offline-образа необязательно — интегрируйте msu без распаковки.
В папку CU разместите упомянутые выше msu файлы — Windows8.1-KB3013769-x64.msu, Windows8.1-KB3021910-x64.msu, Windows8.1-KB3138615-x64.msu, Windows8.1-KB3172614-x64.msu, Windows8.1-KB3179574-x64.msu.
Скачиваем обновления безопасности
Помимо кумулятивных обновлений интегрируем обновления, которые способна скачать утилита WSUS Offline Update.
Для этого:
- Скачиваем программу download.wsusoffline.net
- Выбираем обновления для Windows Server 2012 R2

- После скачивания открываем каталог wsusoffline\client\w63-x64\glb и *.cab файлы копируем в каталог C:\WS2012R2\SU

ОСТОРОЖНО: Если в список попали KB2966828 или KB2966827, удалите их, иначе после установки не получится добавить компонент Net Framework 3.5 (подробности).
Обновления готовы, приступим к интеграции.
Интеграция обновлений
Для интеграции обновлений нам потребуется:
- Смонтировать содержимое одного из образов в install.wim
dism /mount-wim /wimfile:{путь к wim файлу} /Index:{N} /mountdir:{путь к директории монтирования} - Интегрировать в offline установку каждое обновление
dism /image:{путь к директории монтирования} /add-package /packagepath:{путь к *.msu или *.cab файлу} - Сохранить изменения
dism /Unmount-WIM /MountDir:{путь к директории монтирования} /Commit
Этот процесс легко следующим автоматизировать командным файлом:
for /l %%N in (1,1,4) do (
dism /mount-wim /wimfile:"D:\WS2012R2\ISO\sources\install.wim" /Index:%%N /mountdir:D:\WS2012R2\MOUNT
for %%f in (D:\WS2012R2\CU\*.*) DO (dism /image:D:\WS2012R2\MOUNT /add-package /packagepath:%%f)
for %%f in (D:\WS2012R2\SU\*.*) DO (dism /image:D:\WS2012R2\MOUNT /add-package /packagepath:%%f)
dism /unmount-WIM /MountDir:D:\WS2012R2\MOUNT /Commit
)
Tip: Запуская командный файл, перенаправьте вывод в журнал
UpdateWIM.cmd >>log.txt 2>>&1
В результате мы получим файл D:\WS2012R2\ISO\sources\install.wim размером в 6.15Gb. Можем ли мы его уменьшить? Да, с помощью экспорта можно получить оптимизированный файл размером в 5.85Gb.
Экономия небольшая, кроме того после этого не очень красиво выглядит диалог выбора операционной системы при установке, поэтому следующий шаг опционален.
Что надо сделать?
Для получения сжатого образа необходимо:
- Экспортировать первый образ из оригинального wim-файла в новый файл
dism /export-image /sourceimagefile:{путь к исходному файлу wim} /sourceindex:1 /destinationimagefile:{путь к новому файлу wim} /compress:max - Подключить следующий образ из оригинального wim-файла в точку монтирования
dism /mount-wim /wimfile:"D:\WS2012R2\ISO\sources\install.wim" /Index:2 /mountdir:{директория для монтированния образа} - Добавить в новый файл следующий образ методом «захвата»
dism /append-image /imagefile:{путь к новому файлу wim} /captureDir:{директория с смонтированным образом} /name:{оригинальное имя} /description:{оригинальное описание} - Размонтировать образ, повторить итерацию добавления для каждого дополнительного образа
dism /unmount-WIM /MountDir:{директория с смонтированным образом} /Discard
Автоматизируем скриптом:
dism /export-image /sourceimagefile:D:\WS2012R2\ISO\sources\install.wim /sourceindex:1 /destinationimagefile:D:\WS2012R2\ISO\sources\install1.wim  /compress:max

dism /mount-wim /wimfile:"D:\WS2012R2\ISO\sources\install.wim" /Index:2 /mountdir:D:\WS2012R2\MOUNT

dism /append-image /imagefile:D:\WS2012R2\ISO\sources\install1.wim /captureDir:mount /name:"Windows Server 2012 R2 SERVERSTANDARD" /description:"Windows Server 2012 R2 SERVERSTANDARD"

dism /unmount-WIM /MountDir:D:\WS2012R2\MOUNT /discard

dism /mount-wim /wimfile:"D:\WS2012R2\ISO\sources\install.wim" /Index:3 /mountdir:D:\WS2012R2\MOUNT

dism /append-image /imagefile:D:\WS2012R2\ISO\sources\install1.wim /captureDir:mount /name:"Windows Server 2012 R2 SERVERDATACENTERCORE" /description:"Windows Server 2012 R2 SERVERDATACENTERCORE"

dism /unmount-WIM /MountDir:D:\WS2012R2\MOUNT /discard

dism /mount-wim /wimfile:"D:\WS2012R2\ISO\sources\install.wim" /Index:4 /mountdir:D:\WS2012R2\MOUNT

dism /append-image /imagefile:D:\WS2012R2\ISO\sources\install1.wim /captureDir:mount /name:"Windows Server 2012 R2 SERVERDATACENTER" /description:"Windows Server 2012 R2 SERVERDATACENTER"

dism /unmount-WIM /MountDir:D:\WS2012R2\MOUNT /discard
Удалите оригинальный install.wim, а сформированный install1.wim переименуйте в install.wim
Создание компактного образа install.esd
По совету D1abloRUS, если вы хотите получить инсталляционный диск минимального размера умещающийся на DVD5, можно экспортировать один (и только один) из образов в esd файл. Например, для экспорта Windows Server 2012 R2 Standard, используйте команду
dism /export-image /sourceimagefile:D:\WS2012R2\ISO\sources\install.wim /sourceindex:2 /destinationimagefile:D:\WS2012R2\ISO\sources\install.esd /compress:recovery
Оригинальный install.wim можно удалить.
Сборка ISO-файла
Для сборки нам потребуется утилита oscdimg.exe из комплекта Windows ADK. Если у вас ее не оказалось, можно просто скачать утилиту по ссылке (не используйте из этого комплекта ничего, кроме самой утилиты).
Tip & Trick #3. Для того, чтобы не было проблем с загрузкой из образа, следует расположить загрузочные файлы в пределах первых 4 гигабайт образа. Для этого используем файл bootorder.txt
boot\bcd
boot\boot.sdi
boot\bootfix.bin
boot\bootsect.exe
boot\etfsboot.com
boot\memtest.exe
boot\en-us\bootsect.exe.mui
boot\fonts\chs_boot.ttf
boot\fonts\cht_boot.ttf
boot\fonts\jpn_boot.ttf
boot\fonts\kor_boot.ttf
boot\fonts\wgl4_boot.ttf
sources\boot.wim
Пути в этом файле указываются относительно корневой директории с образом, поэтому подстраивать пути на ваши фактические не требуется.
Tip & Trick #4. Если install.wim имеет размер больше 4700Mb, то инсталлятор вылетит с ошибкой «Windows cannot open the required file D:\sources\install.wim. Error code: 0x8007000D».
Нас учили что жизнь — это бой, поэтому разделим исходный install.wim на два командой
dism /split-Image /imagefile:D:\WS2012R2\ISO\sources\install.wim /swmfile:D:\WS2012R2\ISO\sources\install.swm /filesize:4096
Оригинальный файл install.wim можно удалить.
Tip & Trick #5. Вообще Microsoft говорит, что
пить
так делать нельзя.
In Windows 8.1 and Windows 8, Windows Setup does not support installing a split .wim file.
Мы говорим, что будем! Инсталлятор прекрасно подхватывает swm-файл. Проблем с установкой не будет.
Собираем образ командой:
oscdimg -m -n -yoD:\WS2012R2\bootorder.txt -bD:\WS2012R2\ISO\BOOT\etfsboot.com -lIR5_SSS_X64FREV_EN-US_DV9 D:\WS2012R2\ISO en_windows_server_2012R2_August_2016.iso
Уважаемый ildarz подсказывает, что для создания образа, одинаково хорошо работающего с BIOS и EFI, следует руководствоваться KB947024 и создавать образ так:
oscdimg -m -u2 -udfver102 -yoD:\WS2012R2\bootorder.txt -bootdata:2#p0,e,bD:\WS2012R2\ISO\BOOT\Etfsboot.com#pEF,e,bD:\WS2012R2\ISO\EFI\microsoft\BOOT\efisys.bin -lIR5_SSS_X64FREV_EN-US_DV9 D:\WS2012R2\ISO en_windows_server_2012R2_August_2016.iso
Работоспособность проверена в ESXi с любым типом загрузки (BIOS/EFI).
Все получилось? Поздравляю!

Но решена ли проблема полностью? Для идеала необходимо интегрировать еще сотню «опциональных» и «рекомендованных» обновлений, но с этим не будем торопиться. Дадим Microsoft шанс самим разобраться в том бардаке, который они устроили с обновлениями.
PS. Зачем мы все это делали? Для того, чтобы освежить память, сделать работу чуть удобнее и получить несколько простых командных файлов, при помощи которых в дальнейшем можно практически автоматизированно интегрировать обновления в серверный дистрибутив, экономя время ввода сервера в эксплуатацию. Тем более есть надежда, что начиная с октября интегрировать обновления станет гораздо проще.
Точно так же вы сможете интегрировать Windows 7 convenience rollup и не наступить на грабли распаковки обновлений, невозможности загрузки из образа, превышения размера install.wim.
Спасибо за внимание и до новых встреч, друзья.
Если есть возможность поделиться опытом — жду вас в комментариях.
Over time, as your Windows Server runs longer, more and more disk space is eaten. Simply gone! Investigating the disk usage leaves you clueless; there are no large log files, crash dumps, or there is no software to be removed. Where did that space go?
The answer: Windows Updates, Service Pack, and hotfix installations.
The Windows disk cleanup utility cleanmgr is not available in Windows Server 2012 if the Desktop Experience-feature is not installed. This makes cleaning up used disk space a bit harder. You can utilize your cmd.exe or PowerShell command-line, and use Deployment Image Servicing and Management (DISM) to clean up the Windows Component Store (WinSxS) in Windows Server 2012 and up.
This post also shows you how to move the Windows Server SoftwareDistribution folder and user’s Documents folder to a different partition.
WinSxS cleanup in Windows Server – using DISM and PowerShell
The WinSxS folder is located in the Windows folder, for example C:\Windows\WinSxS. It’s the location for Windows Component Store files.
The Windows Component Store contains all the files that are required for a Windows installation. And, any updates to those files are also held within the component store as the updates are installed (source: KB 2795190 – and do read Manage the Component Store). The WinSxS folder will become large…
Let’s clean up WinSxS!
Regain used disk space with
Deployment Image Servicing and Management (DISM)

Dism disk cleanup: Deployment Image Servicing and Management (DISM) is a command-line tool that allows you to install, uninstall, configure, and update Windows features, packages, drivers, and international settings. The /Cleanup-Image parameter of dism.exe provides advanced users more options to further reduce the size of the WinSxS folder.
The Dism.exe /Online /Cleanup-Image has a few extra parameters (or switches):
/AnalyzeComponentStore/StartComponentCleanup/ResetBasewith/StartComponentCleanup/SPSuperseded
Throughout this article, I assume you’ll read help options, just add /?, like: dism.exe /Online /Cleanup-Image /?.
If you enjoyed this, you might also enjoy the following post summing up 5 extra ways to clean up disk space in Windows Server!
Analyze WinSxS folder (Component Store) with /AnalyzeComponentStore
First you can use the /AnalyzeComponentStore parameter. This analyzes the size of the Component Store in Windows. The AnalyzeComponentStore option is available in Windows 8.1 Windows Server 2012 R2, and it’ll notify you whether a Component Store Cleanup is recommended or not.
dism.exe /Online /Cleanup-Image /AnalyzeComponentStore 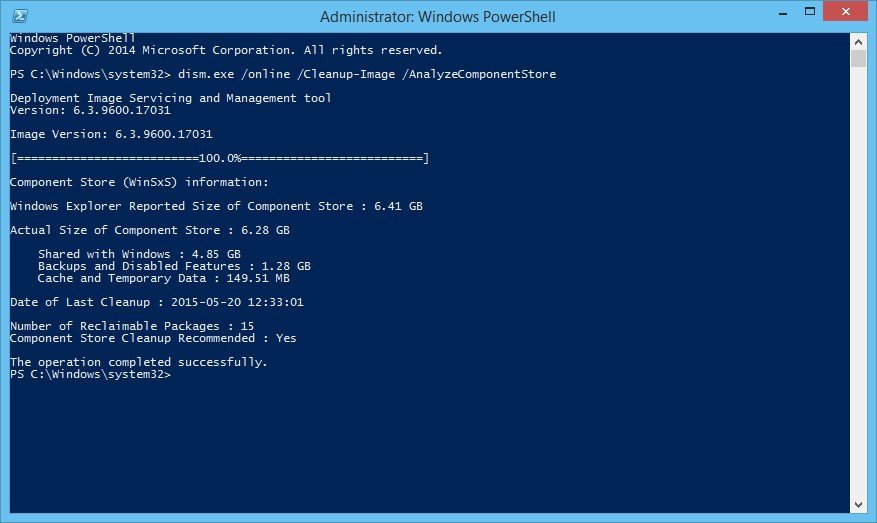
In the above image, AnalyzeComponentStore recommends a Component Store Cleanup. Let’s do so.
/StartComponentCleanup parameter
Dism.exe removes superseded and unused system files from a system with the /StartComponentCleanup parameter.
dism.exe /Online /Cleanup-Image /StartComponentCleanup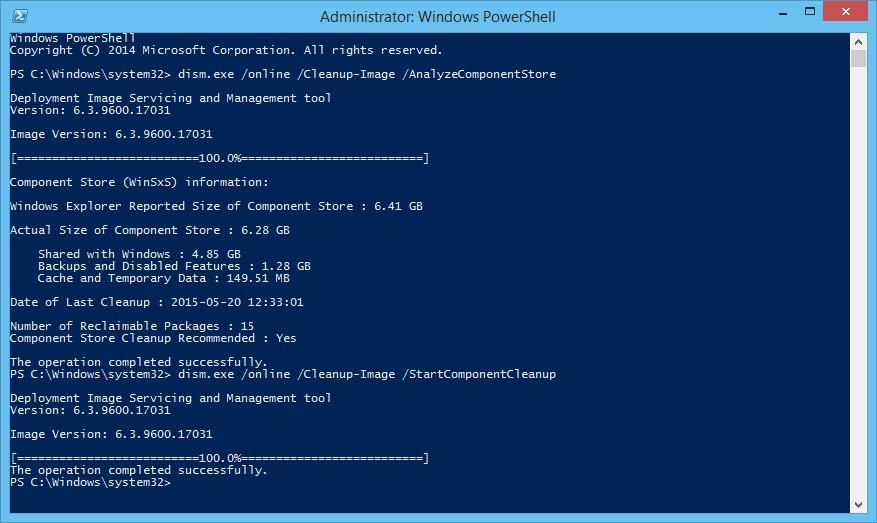
There is also a registered scheduled task called StartComponentCleanup. You can start this task from the command line:
schtasks.exe /Run /TN "\Microsoft\Windows\Servicing\StartComponentCleanup"The /StartComponentCleanup parameter is supported on Windows 8, Windows Server 2012 and up.
Using the /StartComponentCleanup parameter of Dism.exe on Windows 10 gives you similar results to running the StartComponentCleanup task in Task Scheduler, except previous versions of updated components will be immediately deleted (without a 30 day grace period) and you will not have a 1-hour timeout limitation.
From an elevated command prompt, type the following:
Dism.exe /online /Cleanup-Image /StartComponentCleanup/ResetBase switch with /StartComponentCleanup parameter
Using the /ResetBase switch with the /StartComponentCleanup parameter of dism.exe, all superseded versions of every component in the component store is removed.
Dism.exe /Online /Cleanup-Image /StartComponentCleanup /ResetBase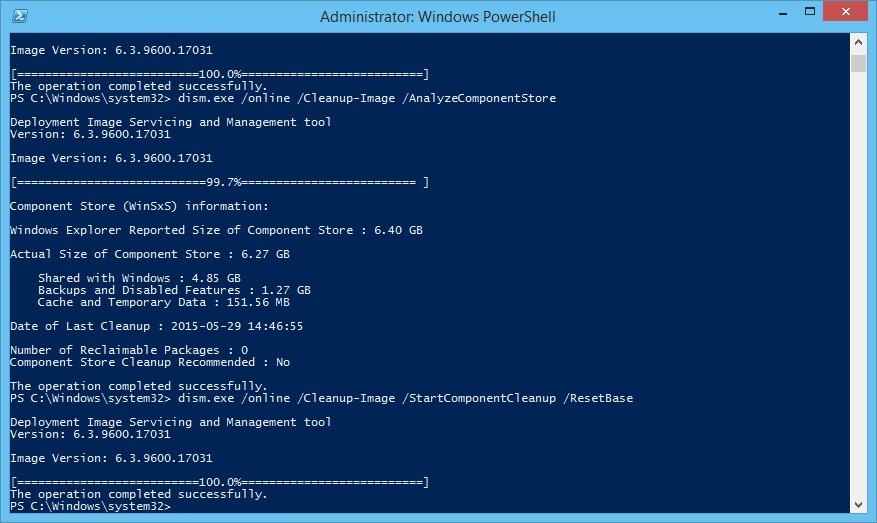
All existing service packs and updates cannot be uninstalled after this command is completed. This will not block the uninstallation of future service packs or updates.
The /ResetBase parameter is supported on Windows 8.1 and Windows Server 2012 R2.
/SPSuperseded parameter
The /SPSuperseded parameter removes any backup components needed for de-installation of a service pack. The service pack cannot be uninstalled after this command is completed.
Dism.exe /Online /Cleanup-Image /SPSupersededThe Service Pack cannot be uninstalled after this command is completed.
The /SPSuperseded parameter is supported on Windows 7 or Windows Server 2008 R2 Service Pack 1, 2012, 2012 R2.
The
/AnalyzeComponentStoreoption is available in Windows 8.1 and Windows Server 2012 R2. Use this to analyze the size of the Component Store (WinSxS folder) in Windows.
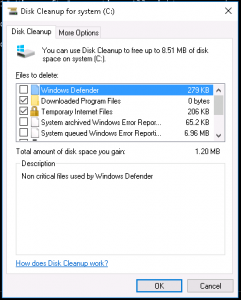
Disk Cleanup Tool is available on Windows Server 2012 but not Windows Server 2012 R2
As said at the beginning of this article, the Disk Cleanup Tool is available in Windows Server 2012, if you install the Desktop Experience-feature.
In some versions of Windows Server, you can simply copy cleanmgr.exe and cleanmgr.exe.mui to C:\Windows\system32 and C:\Windows\system32\en-Us from an old Windows 2008 R2 server, if you don’t want to install the Desktop Experience feature.
The following steps to install (copy) cleanmgr may not work on all versions of Windows Server. Try for yourself.
Disk Cleanup Wizard addon on Windows Server 2008 R2
Microsoft KB2852386 adds a Disk Cleanup option on Windows Server 2008 R2, similar to the Windows 7 update. I’ve tested this on Windows Server 2012. It may not clean up everything, but at least a lot.
Here’s how to make cleanmgr.exe available on Windows Server 2012 Standard (Windows version 6.2.9200), without installing the Desktop Experience feature:
Microsoft Windows [Version 6.2.9200]
(c) 2012 Microsoft Corporation. All rights reserved.

PS C:\Users\jan> $osversion = [System.Environment]::OSVersion.Version
PS C:\Users\jan> write-host $osversion
6.2.9200.0

C:\Windows\System32>cd ..

C:\Windows>copy WinSxS\amd64_microsoft-windows-cleanmgr.resources_31bf3856ad364e35_6.2.9200.16384_en-us_b6a01752226afbb3\cleanmgr.exe.mui \Windows\system32\en-US
        1 file(s) copied.

C:\Windows>copy WinSxS\amd64_microsoft-windows-cleanmgr_31bf3856ad364e35_6.2.9200.16384_none_c60dddc5e750072a\cleanmgr.exe \Windows\system32
        1 file(s) copied.

C:\Windows>system32\cleanmgr.exe

C:\Windows>
Unfortunately, this no longer works on Windows Server 2012 R2 (6.3.9600), probably due to KB2821895. As Aaron pointed out in the comments, the above solution to copy over the cleanmgr.exe and cleanmgr.exe.mui files doesn’t always work well. Therefore I removed this information for Windows Server 2012 R2.
Fortunately, the Disk Cleanup functionality is back in Windows Server 2016 (at least TP5).
After cleaning up the disk, a server reboot is required. Don’t forget to reboot your computer – or server – afterwards! The actual cleanup of the WinSxs directory occurs during the next reboot.
Error 0x800f0906 with DISM /Online /Cleanup-Image, PowerShell Install-WindowsFeature and SFC /scannow
Some reports are available explaining Microsoft Security Bulletin MS14-046 broke DISM /Online /Cleanup-Image /RestoreHealth, PowerShell Install-WindowsFeature with -Source parameter, and SFC /scannow. Yes, it broke a lot…
An update is made available by Microsoft: KB3005628
Update for the .NET Framework 3.5 on Windows 8, Windows 8.1, Windows Server 2012, and Windows Server 2012 R2. This update resolves an issue that prevents the optional Microsoft .NET Framework 3.5 feature from being enabled after you install security update 2966827 or 2966828 (described in Microsoft Security Bulletin MS14-046) for the Microsoft .NET Framework 3.5.
Move Windows Server SoftwareDistribution folder
Over time, your Windows Updates SoftwareDistribution folder in c:\Windows\SoftwareDistribution can become quite large, for example when multiple updates were not installed successfully.
Windows Update files are downloaded to this folder and removed after successful installation. When you find yourself in a situation where your C: partition is rather small, and SoftwareDistribution folder eats up too much disk space, follow these steps to move the SoftwareDistribution folder to a different location.
All in a cmd.exe shell (Start > Run > cmd and press enter). In this example the new location is D:\Windows-SoftwareDistribution.
- Stop the Windows Update service:
net stop wuauserv - Rename the folder
c:\Windows\SoftwareDistributiontoc:\Windows\SoftwareDistribution.old:rename c:\windows\SoftwareDistribution SoftwareDistribution.old - Create a link using Windows Sysinternals Junction, or Windows mklink
- Create the new directory:
mkdir D:\Windows-SoftwareDistribution - Create the Junction:
c:\>junction C:\Windows\SoftwareDistribution "D:\Windows-SoftwareDistribution", or:c:\>mklink /J C:\Windows\SoftwareDistribution "D:\Windows-SoftwareDistribution"
- Create the new directory:
- Restart the Windows Update Service:
net start wuauserv
When, after a while, everything seems to run and update fine, you can delete your SoftwareDistribution.old folder safely.
Move User Documents folder
Another way for you to gain some extra free space is to move the User Documents folder (and others, like Downloads), for instance from C:\Users\$USER$\Documents to D:\User\$USER$\Documents (substitute $USER$ with the username whose Documents folder you want to move). Here are the steps for you to follow (screenshots taken from Windows Server 2016 TP5):
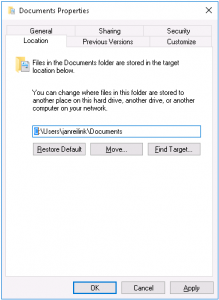
- Open Explorer and right click on the Documents folder and then Properties
- Choose Location
- Change the location where files are stored
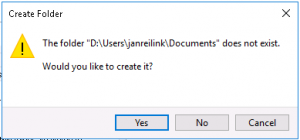
- When the destination does not exist, Windows asks to create the folder for you
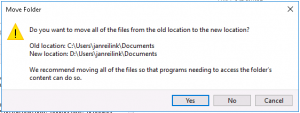
- After completion, files are moved to their new location.
Conclusion
Yes, the Windows component store (WinSxS folder) can become large, very large. But fortunately, Microsoft provides us the tools to monitor, manage and clean up the WinSxS folder to regain that used disk space.
If you are comfortable with installing the Desktop Experience Windows feature on your system, you can have the Disk Cleanup utility on your system. Otherwise, you can use the DISM (Deployment Image Servicing and Management) command for various clean up tasks.
To gain some extra free space, you can also move the Windows SoftwareDistribution folder to a different partition.
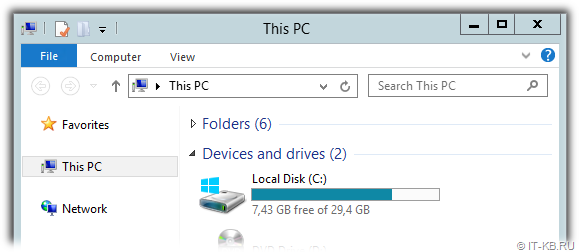
![]() Только что установленная Windows Server 2012 R2 Standard EN после установки всех обновлений, доступных в службе Windows Update занимает почти 22GB. В случае, если система готовится в качестве шаблона, с которого в дальнейшем планируется выполнять клонирование серверов, или же мы стали испытывать нехватку свободного места на системном диске уже функционирующего сервера, нам потребуется найти пути оптимизации используемого дискового пространства. Одним из возможных вариантов штатной оптимизации, заложенной в Windows Server, является операция обслуживания так называемого хранилища компонент в каталоге %windir%\WinSxS.
Только что установленная Windows Server 2012 R2 Standard EN после установки всех обновлений, доступных в службе Windows Update занимает почти 22GB. В случае, если система готовится в качестве шаблона, с которого в дальнейшем планируется выполнять клонирование серверов, или же мы стали испытывать нехватку свободного места на системном диске уже функционирующего сервера, нам потребуется найти пути оптимизации используемого дискового пространства. Одним из возможных вариантов штатной оптимизации, заложенной в Windows Server, является операция обслуживания так называемого хранилища компонент в каталоге %windir%\WinSxS.
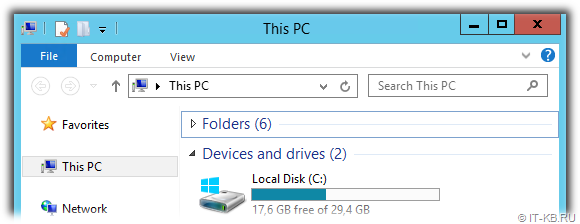
Перед нами показатель заполненности системного диска на только что установленном и обновлённом виртуальном сервере с ОС Windows Server 2012 R2 Standard.
Анализ текущего состояния хранилища компонент Windows и его последующую очистку мы можем провести с помощью утилиты, входящей в состав ОС – Dism.exe (сокращение от Deployment Image Servicing and Management).
Запускается анализ следующей командой (требуются права Администратора):
Dism.exe /Online /Cleanup-Image /AnalyzeComponentStore
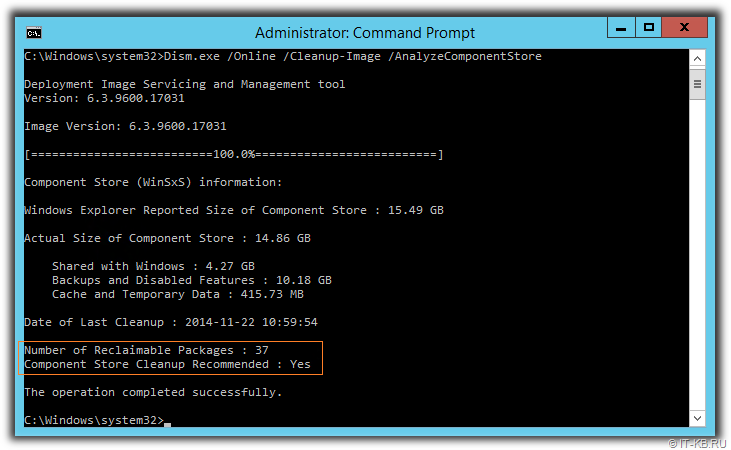
По окончании выполнения команды, изучим её вывод и обратим внимание на показатель «Number of Reclaimable Packages«, который определяет число пакетов, заменённых в процессе обновления системы через Windows Update. То есть, это те пакеты, которые могут быть безболезненно вычищены из хранилища.
Значение «Yes» в строке «Component Store Cleanup Recommended» говорит о том, что, по данным проведённого анализа, очистка возможна и рекомендуема.
Прежде, чем запускать нижеуказанную команду, нужно иметь ввиду, что в ходе её выполнения длительное время может быть ощутимо нагружен процессор. Поэтому планировать такую процедуру для уже работающих систем Windows лучше на время, когда не требуется продуктивная работа с системой.
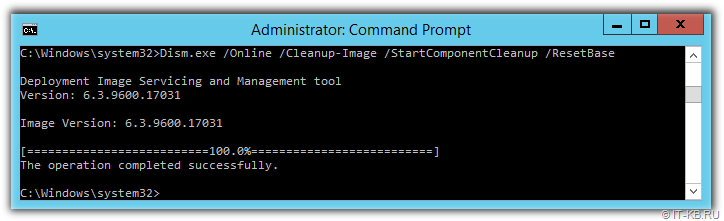
Запуск процедуры очистки хранилища компонент Windows выполняется командой:
Dism.exe /Online /Cleanup-Image /StartComponentCleanup
В нашем примере на только что установленной Windows Server 2012 R2 (с выполненной последующей доустановкой ~200 обновлений) время выполнения процедуры очистки заняло более двух часов.

Дождавшись успешного завершения, посмотрим, как изменилась ситуация на диске.
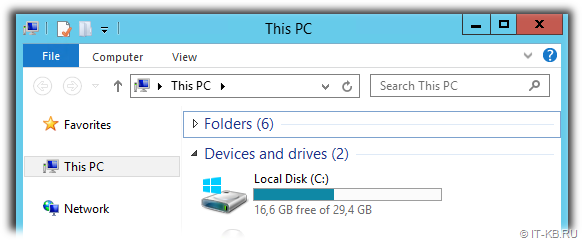
Как видим, вместо ранее имеющейся величины свободного места в 7,43 GB, теперь мы имеем 16,6 GB, то есть операция очистки высвободила в нашем случае 9,17 GB. Результат очень даже ощутимый.
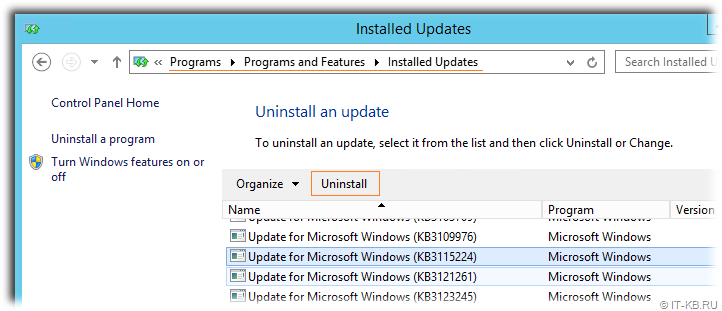
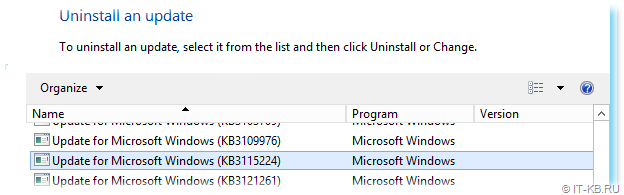
Однако в системе по-прежнему остаются файлы, которые могут использоваться для отката установленных обновлений, поддерживающих процедуру деинсталляции. Это хорошо видно, если в оснастке управления установки/удаления программ appwiz.cpl перейти в режим отображения информации об обновлениях. Здесь на большинстве обновлений мы увидим возможность удаления, то есть фактического отката заменяемых обновлениями файлов на их ранние версии.
Если мы считаем, что система работает стабильно и имеем уверенность в том, что нам не потребуется выполнять удаление каких-либо обновлений, то мы можем выполнить дополнительную процедуру удаления предыдущих версий для всех компонент, которые были изменены установленными обновлениями. Нужно понимать, что тем самым мы лишим себя возможности отката установленных обновлений. В таком случае, ранее используемую команду выполняем с дополнительной опцией /ResetBase:
Dism.exe /Online /Cleanup-Image /StartComponentCleanup /ResetBase
Снова посмотрим, как изменилась ситуация на диске.
Как видим, на этот раз мы смогли высвободить ещё 1 GB ёмкости дискового тома.
И теперь, если мы снова заглянем в оснастку управления установки/удаления программ appwiz.cpl в режиме отображения информации об обновлениях, то увидим, что при выборе любого из обновлений кнопка Uninstall более нам недоступна.
Таким образом, если мы решили прибегнуть к описанной выше процедуре очистки хранилища компонент Windows в каталоге WinSxS, то сначала лучше использовать более щадящую команду очистки, то есть без ключа /ResetBase, так как результат такой очистки в большинстве случаев даёт нам вполне удовлетворительный размер освобождаемого места, оставляя при этом больше «шансов для манёвра» в случае проблем с уже установленными обновлениями. То есть команду очистки с ключом /ResetBase предлагается использовать только в крайних исключительных случаях.
Дополнительные источники информации:
- Вадим Стеркин — Как работает и сколько места экономит оптимизация папки WinSxS в Windows 10, 8.1 и 8
- Вадим Стеркин — Как грамотно уменьшить размер папки WinSxS в Windows 10, 8.1 и 8
After writing yesterday’s post I wondered what switches DISM would have to install a new feature from a specified source. I played around a bit with DISM and realized that the version (6.2.9200.16384) in Server 2012 has more features compared to the version (6.1.7600.16385) in Server 2008. I haven’t obviously explored them all out, but as and when I do I’ll make subsequent posts to document them.
An interesting new feature that stands out for me is the fact that the /enable-feature switch now supports an /all switch that automatically installs all the needed dependency features.
|
1 2 3 4 5 6 7 8 9 10 11 12 13 14 15 16 17 |
C:\Users\Administrator.CONTOSO>dism /online /enable—feature /featurename:NetFx3 Deployment Image Servicing and Management tool Version: 6.2.9200.16384 Image Version: 6.2.9200.16384 Enabling feature(s) [==========================100.0%==========================] Error: 50 The operation is complete but NetFx3 feature was not enabled. A required parent feature may not be enabled. You can use the /enable—feature /all option to automatically enable each parent feature from the following list. If the parent feature(s) are already enabled, refer to the log file for further diagnostics. NetFx3ServerFeatures The DISM log file can be found at C:\Windows\Logs\DISM\dism.log |
Unfortunately the /disable-feature doesn’t have a corresponding switch to remove all the automatically installed dependencies so be sure to keep track of these.
The /disable-feature does have a /remove switch though which can be used to disable a package and remove all its binaries. This is one step ahead of what the /disable-feature in the previous DISM version offers. There you could only disable the feature but the binaries (the installed files) would still be on the system; now you have an option to remove them too.
Features whose binaries are thus removed (or were never installed in the first place) are marked differently when you use /get-features:
|
1 2 3 4 5 6 7 8 9 10 11 12 13 14 15 16 17 18 19 20 |
C:\Users\Administrator.CONTOSO>dism /online /get—features |more Deployment Image Servicing and Management tool Version: 6.2.9200.16384 Image Version: 6.2.9200.16384 Features listing for package : Microsoft—Windows—ServerCore—Package~31bf3856ad364e35~amd64~~6.2.9200.16384 Feature Name : NetFx3ServerFeatures State : Disabled Feature Name : NetFx3 State : Disabled with Payload Removed ... Feature Name : AdminUI State : Disabled with Payload Removed ... |
Note the “Disabled with Payload Removed” status.
If you are trying to install a feature whose binaries (the payload) are not present /enable-features complains about that. You can use the /Source switch to specify a source for these binaries.
|
C:\Users\Administrator.CONTOSO>dism /online /enable—feature /featurename:AdminUI Deployment Image Servicing and Management tool Version: 6.2.9200.16384 Image Version: 6.2.9200.16384 Enabling feature(s) [===========================61.5%=== ] Error: 0x800f0906 The source files could not be downloaded. Use the «source» option to specify the location of the files that are required to restore the feature. For more information on specifying a source location, see http://go.microsoft.com/fwlink/?LinkId=243077. The DISM log file can be found at C:\Windows\Logs\DISM\dism.log |
The /Source switch must point to a path similar to the one required by the -Source switch of the Add-WindowsFeature (see my previous blog post or this TechNet article). It must be the C:\Windows folder in a WIM file image or on a running Windows installation anywhere else on the network.
|
1 2 3 4 5 6 7 8 9 10 11 12 13 14 15 16 17 18 19 20 21 22 23 24 25 26 27 28 29 30 31 32 33 34 35 36 37 38 39 40 41 42 43 44 45 46 47 48 49 50 |
C:\Users\Administrator.CONTOSO>dism /get—wiminfo /wimfile:z:\sources\install.wim Deployment Image Servicing and Management tool Version: 6.2.9200.16384 Details for image : z:\sources\install.wim Index : 1 Name : Windows Server 2012 SERVERSTANDARDCORE Description : Windows Server 2012 SERVERSTANDARDCORE Size : 7,195,580,708 bytes Index : 2 Name : Windows Server 2012 SERVERSTANDARD Description : Windows Server 2012 SERVERSTANDARD Size : 11,999,848,937 bytes Index : 3 Name : Windows Server 2012 SERVERDATACENTERCORE Description : Windows Server 2012 SERVERDATACENTERCORE Size : 7,176,243,455 bytes Index : 4 Name : Windows Server 2012 SERVERDATACENTER Description : Windows Server 2012 SERVERDATACENTER Size : 11,995,224,677 bytes The operation completed successfully. C:\Users\Administrator.CONTOSO>dism /mount—wim /wimfile:z:\sources\install.wim /index:2 /mountdir:c:\offline /readonly Deployment Image Servicing and Management tool Version: 6.2.9200.16384 Mounting image [==========================100.0%==========================] The operation completed successfully. C:\Users\Administrator.CONTOSO>dism /online /enable—feature /featurename:AdminUI /source:c:\offline\windows Deployment Image Servicing and Management tool Version: 6.2.9200.16384 Image Version: 6.2.9200.16384 Enabling feature(s) [==========================100.0%==========================] The operation completed successfully. Restart Windows to complete this operation. Do you want to restart the computer now? (Y/N) |
And that’s it, the feature is installed!
I think I’ll stick to DISM instead of PowerShell for a while while managing features. PowerShell has a DISM module now and hence a subset of the DISM commands, but it’s easier working with DISM exclusively for these sort of tasks as DISM has more features and eventually you will need to depend on DISM for some of these features (managing WIM images, for instance) and so I feel sticking with it exclusively will help breed more familiarity with DISM.
DISM mounted images are persistent across reboots so be sure to /unmount-wim them. You can get a list of mounted WIM images via the /get-mountedwiminfo switch.
|
1 2 3 4 5 6 7 8 9 10 11 12 13 14 15 16 17 18 19 20 21 22 23 24 25 |
C:\Users\Administrator.CONTOSO>dism /get—mountedwiminfo Deployment Image Servicing and Management tool Version: 6.2.9200.16384 Mounted images: Mount Dir : c:\Offline Image File : z:\sources\install.wim Image Index : 2 Mounted Read/Write : No Status : Needs Remount The operation completed successfully. C:\Users\Administrator.CONTOSO>dism /unmount—wim /mountdir:c:\offline /discard Deployment Image Servicing and Management tool Version: 6.2.9200.16384 Image File : z:\sources\install.wim Image Index : 2 Unmounting image [==========================100.0%==========================] The operation completed successfully. |
The /discard switch is required while un-mounting to tell DISM it doesn’t need to save any changes (not that we made any changes in this case, but one could potentially make changes and save them using DISM). If you wanted to save changes instead use the /commit switch.
That’s all for now!
Over time, as your Windows Server runs longer and longer, more and more disk space (on system partiotion) is eaten. Simply gone. Investigating the disk usage leaves you clueless: there are no large log files, crash dumps, or there is no software to be removed. Where did that space go?
The answer as always is simple: Windows Updates, Service Pack, and hotfix installations.
On Windows Server, the Windows component store (C:\Windows\WinSxS) contains all the files that are required for a Windows installation. And, any updates to those files are also held within the component store as the updates are installed (source: KB2795190 and do read Manage the Component Store). The WinSxS folder will become larger and larger…
Deployment Image Servicing and Management (DISM) is a command-line tool that allows you to install, uninstall, configure, and update Windows features, packages, drivers, and international settings. The /Cleanup-Image parameter of dism.exe provides advanced users more options to further reduce the size of the WinSxS folder.
Here are the parameters most useful for clean up WinSxS folder:
1. Use the /AnalyzeComponentStore to analyze the size of the Component Store (WinSxS folder) in Windows. The AnalyzeComponentStore option is available in Windows 8.1 and Windows Server 2012R2.
dism.exe /Online /Cleanup-Image /AnalyzeComponentStore
2. Dism.exe removes superseded and unused system files from a system with the /StartComponentCleanup parameter (parameter is supported on Windows 8 and Windows Server 2012).
dism.exe /Online /Cleanup-Image /StartComponentCleanup
3. Using the /ResetBase switch with the /StartComponentCleanup parameter of dism.exe, all superseded versions of every component in the component store is removed (parameter is supported on Windows 8.1 and Windows Server 2012R2).
dism.exe /Online /Cleanup-Image /StartComponentCleanup /ResetBase
All existing service packs and updates cannot be uninstalled after this command is completed. This will not block the uninstallation of future service packs or updates.
4.The /SPSuperseded parameter removes any backup components needed for de-installation of a service pack (parameter is supported on Windows 7, Windows Server 2008R2 SP 1, Windows Server 2012, Windows Server 2012R2). The service pack cannot be uninstalled after this command is completed.
dism.exe /Online /Cleanup-Image /SPSuperseded
After cleaning up the disk, a server reboot is required – the actual cleanup of the WinSxS directory occurs during the next reboot.