Здравствуйте админ, буду краток — не загружается ноутбук с Windows 10, ошибки при загрузке выходят разные, а то и просто чёрный экран. Создал загрузочную флешку Windows 10 и загрузил с неё ноутбук, зашёл в «Дополнительные параметры» и выбрал восстановление системы, но оно оказалось отключено. В безопасный режим войти не могу.
Пробовал искать ответы в интернете, все советуют произвести восстановление системных файлов Windows 10 с помощью sfc /scannow, а как это можно сделать, если сама винда не грузится?
Как произвести восстановление целостности системных файлов, если Windows 10 не загружается
Привет друзья! В сегодняшней статье мы рассмотрим довольно сложный случай восстановления Windows 10, во-первых система не загружается, а во-вторых, когда мы загрузились в среду восстановления и попытались запустить средство проверки системных файлов sfc /scannow, у нас вышла ошибка.
Если ваша Windows 10 отказывается загружаться, то вполне возможно, это происходит из-за нарушения целостности системных файлов операционной системы и нужно просто произвести их восстановление, при этом повреждённые файлы будут заменены работоспособными версиями из хранилища компонентов Windows (папка C:Windows\WinSxS) и система должна загрузиться. Сделать это можно даже том в случае, если Windows не загружается, нужно всего лишь создать загрузочную флешку с Win 10 и загрузить с неё Ваш ноутбук.
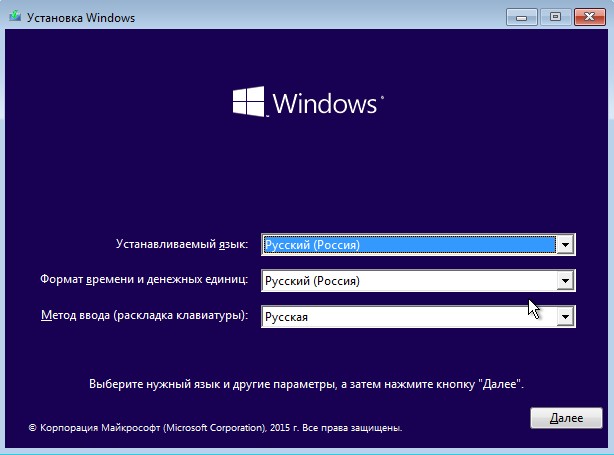
В начальном окне установки Windows 10 жмём клавиатурное сочетание «Shift + F10»— запускается командная строка.
Для начала определяем букву раздела с установленной Win 10, для этого водим команду notepad. Откроется блокнот, затем Файл->Открыть.
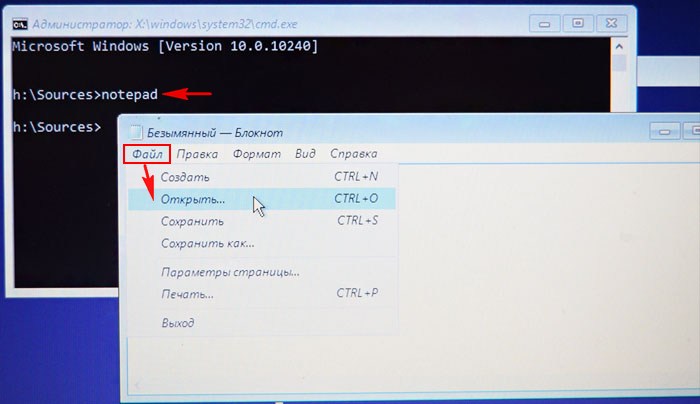
Заходим в Компьютер и определяем букву диска с установленной Windows 10, в моём случае раздел (E:)

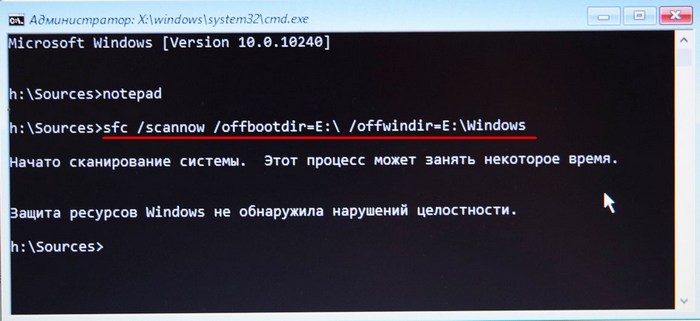
Закрываем блокнот и вводим в командной строке команду
sfc /scannow /offbootdir=E:\ /offwindir=E:\Windows
Где:
offbootdir=E:\ раздел, содержащий папку WinSxS с хранилищем оригинальных компонентов Windows, (папка C:Windows\WinSxS).
offwindir=E:\Windows — раздел с установленной операционной системой.
жмём Enter.
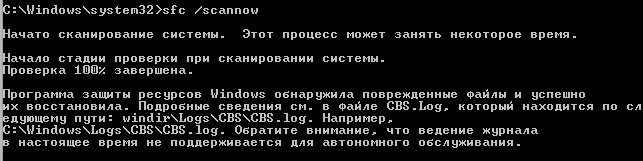
Начинается сканирование повреждённых файлов Windows.
На компьютере с исправной операционной системой программа защиты ресурсов Windows скорее всего не обнаружит повреждённые системные файлы и выдаст сообщение: «Защита ресурсов Windows не обнаружила нарушений целостности»
Если повреждения будут обнаружены, то результат будет таким: «Защита ресурсов Windows обнаружила поврежденные файлы и успешно их восстановила»
Вот и всё. Перезагружаемся и пробуем войти в операционную систему.

Но при тяжёлых системных сбоях, вызванных различными причинами, сообщение будет таким «Программа защиты ресурсов Windows обнаружила повреждённые файлы, но не может восстановить некоторые из них»
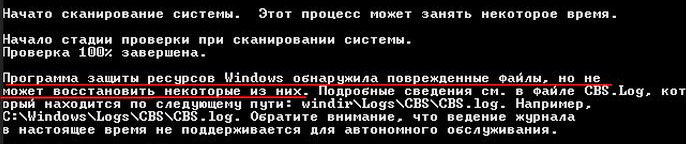
Что делать, если восстановление повреждённых системных файлов Windows 10 заканчивается неудачей, например ошибкой — «Программа защиты ресурсов Windows обнаружила повреждённые файлы, но не может восстановить некоторые из них»
Друзья, данная ошибка обозначает, что само хранилище оригинальных компонентов системы повреждено и сначала нужно восстановить его, а затем запускать sfc /scannow. Вот здесь начинается самое интересное, чтобы восстановить хранилище компонентов нужно выполнить команду Dism /Online /Cleanup-Image /RestoreHealth (подробно команда описывается в здесь), но в среде восстановления эта команда не работает, так как использует для восстановления Центр обновления Windows и у вас в итоге выйдет ошибка. Короче проблема получается такая, что sfc /scannow просто негде взять оригинальные компоненты для замещения неисправных системных файлов.
В этом случае поступают так — запускают команду sfc /scannow с определённым ключом указывающим на то, что в случае обнаружения нарушений в системных файлах для восстановления нужно использовать другой источник, например файлы из дистрибутива Windows 10. Как это сделать.
Найдите исправный компьютер с установленной Windows 7, 8.1, 10.
Скачайте на сайте Майкрософт ISO образ Windows 10,
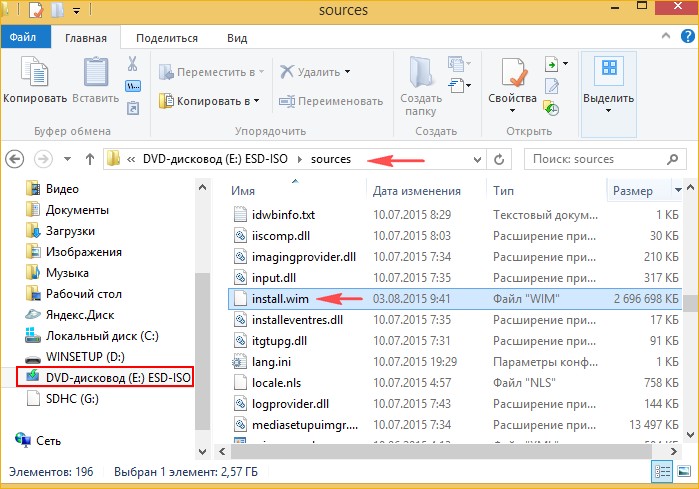
присоедините его к виртуальному дисководу, потом войдите в папку Sources и найдите там файл образ install.wim, его нужно разархивировать в папку с произвольным названием (например repair) на переносной жёсткий диск USB или обычную флешку объёмом не менее 16 Гб.
Затем, подсоедините переносной жёсткий диск USB к ноутбуку, на котором не загружается Windows 10, загрузите ноутбук с загрузочной флешки Windows 10, войдите в среду восстановления, откройте командную строку и выполните команду sfc /scannow с определённым ключом указывающим на то, что в случае обнаружения нарушений в системных файлах для восстановления нужно использовать папку repair с файлами Windows 10 на переносном жёстком диске.
Теперь обо всём подробно!
В первую очередь нам понадобится компьютер с установленной Windows 7, 8.1, 10.
Подсоединяем образ системы к виртуальному дисководу (в моём случае E:). Файлы в дистрибутиве Windows 10 сжаты и находятся в файл-образе install.wim, а тот, в свою очередь, находится в папке sources.
Примечание: Если вам понадобится восстановить таким же образом Windows 8.1, то вы соответственно скачаете ISO-образ Windows 8.1, но в этом образе вместо файла install.wim будет файл install.esd, разницы абсолютно никакой и делать дальше нужно одно и тоже.
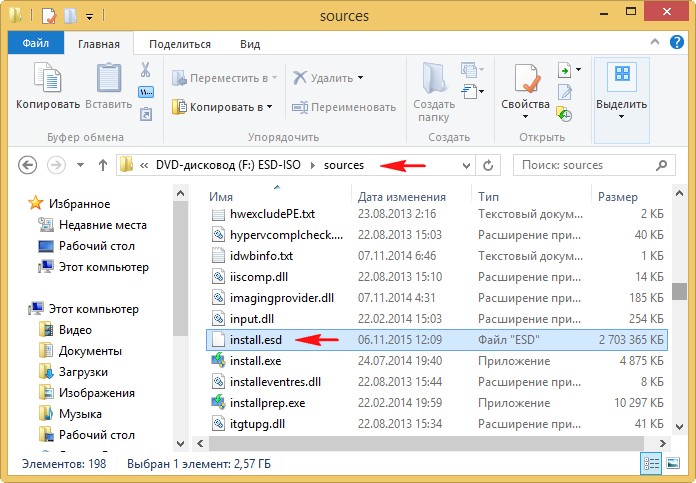
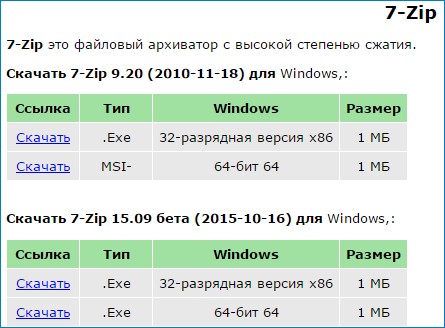
Откроем и скопируем из образа install.wim или install.esd все файлы на переносной винчестер, сделать это проще всего в программе 7-Zip.
Скачиваем бесплатную программу 7-Zip, устанавливаем и запускаем.
Официальный сайт программы
http://www.7-zip.org/
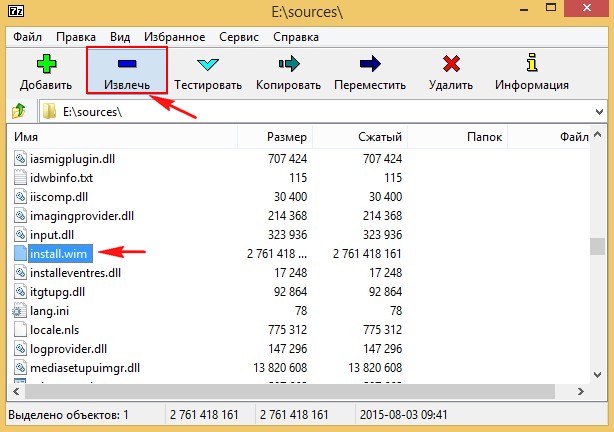
В главном окне программы (представляющей из себя обычный проводник) открываем виртуальный диск с файлами Windows 10 (в моём случае E:), идём в папку Sources, щёлкаем левой мышью на файле install.wim и выбираем «Извлечь»
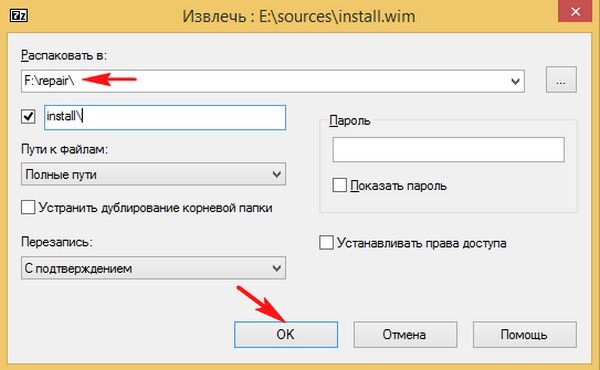
В открывшемся проводнике указываем путь к нашему переносному жёсткому диску USB (буква F:) и папке repair, жмём ОК.
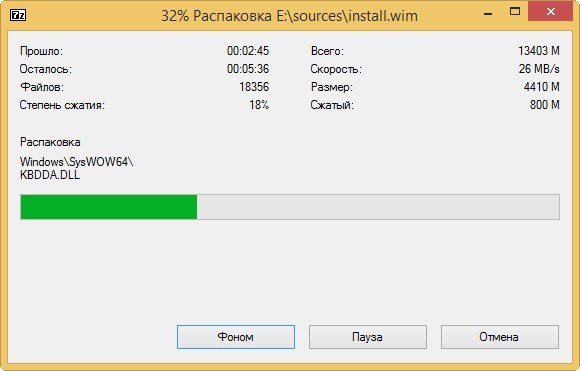
Начинается процесс извлечения файлов Windows 10 в папку repair переносного жёсткого диска USB (буква F:).
Закрыть
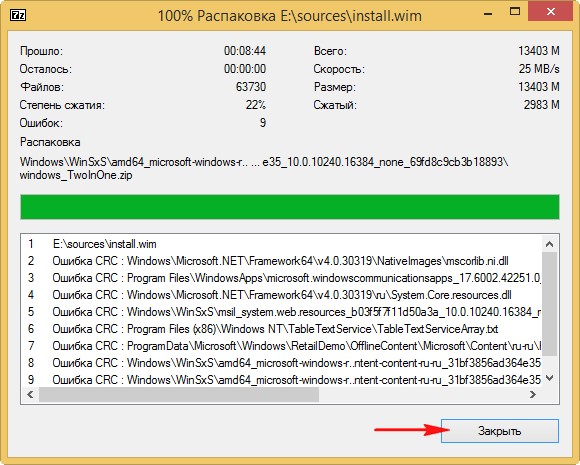
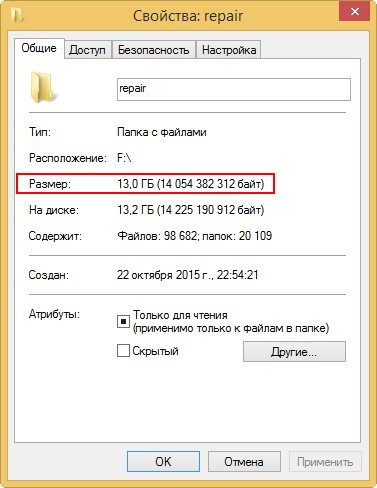
Папка с распакованными файлами Win 10 находится на переносном жёстком диске USB (F:)
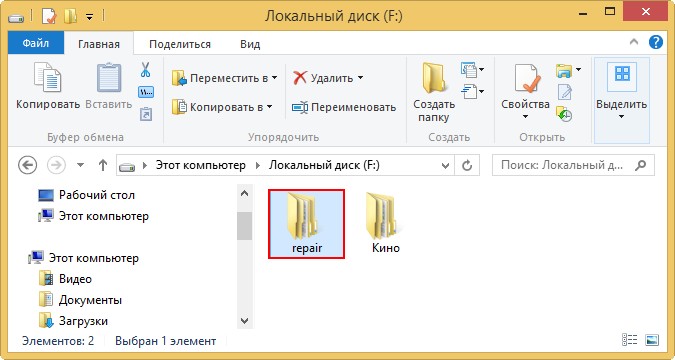
и занимает объём 13 Гб.
Идём к ноутбуку, на котором не загружается из-за ошибок Windows 10
Подсоединяем к нему переносной жёсткий диск USB с папкой repair.
Загружаем ноутбук с загрузочной флешки Windows 10.
В начальном окне установки системы жмём клавиатурное сочетание «Shift + F10» — запускается командная строка.
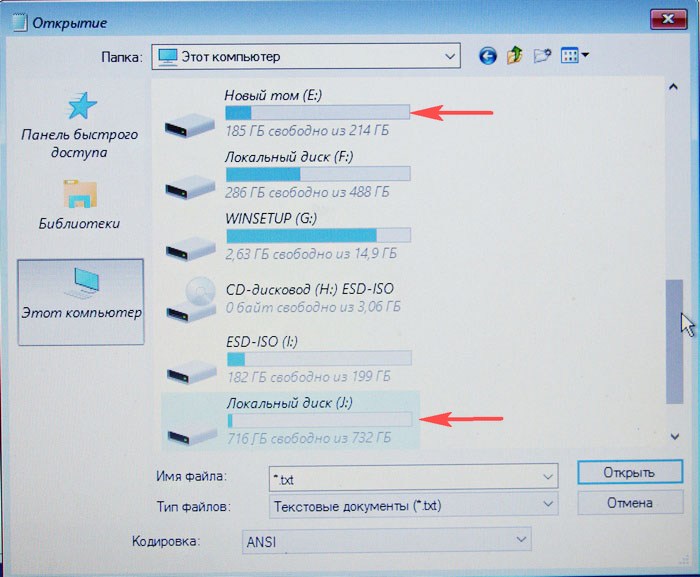
Определяем букву раздела с установленной Win 10 и букву переносного жёсткого диска USB с файлами Windows 10, для этого водим команду notepad. Откроется блокнот, затем Файл->Открыть.
Видим, что буква (E:) присвоена разделу с установленной Windows 10.
А буква (J:) присвоена — переносному жёсткому диску USB c папкой repair, где находятся системные файлы ISO-образа Windows 10.
Выполняем в командной строке команду:
sfc /scannow /offbootdir=J:\repair\ /offwindir=E:\Windows
Где:
offbootdir=J:\repair — переносной жёсткий диск USB c папкой repair, где находятся системные файлы ISO-образа Windows 10.
offwindir=E:\Windows — раздел с установленной Windows 10.
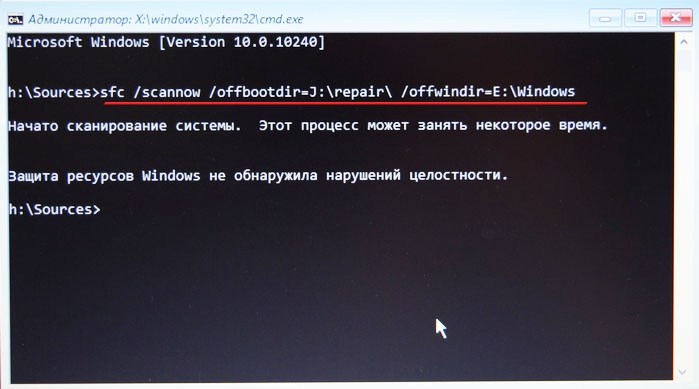
Друзья, я ввожу команду на ноутбуке с исправной Windows 10, поэтому нарушений целостности системных файлов в моём случае не обнаружено.
Если ваша операционная система неисправна, то вполне возможно средству sfc /scannow удастся восстановить повреждённые компоненты и ваша Windows 10 загрузится.
Статьи по теме:
- Восстановление повреждённого хранилища компонентов Windows 10 в Среде предустановки Windows (Windows PE) с помощью дистрибутива Win 10, а также виртуального диска VHD
- Что делать, если при запуске sfc/scannow выдается ошибка «Защита ресурсов Windows не может выполнить запрошенную операцию»
- Как конвертировать файл install.esd в install.wim.
Many error codes, such as 0x800f0954, 0x800f0950, 0x8024402c, etc., indicate the same problem – DISM failed on your computer. How desperate it is to see such an error message! But the good news is that there are several effective ways for you to troubleshoot the DISM errors.
If you search the internet, you’ll find numerous people care about this topic – DISM failed. This is a common error that can appear on any version of Windows system. So, what does this DISM error mean? How it will affect you? Can you fix it when DISM is not working? All these issues will be covered in this MiniTool post.
What Is DISM
DISM is the acronym for Deployment Image Servicing and Management; it is actually a command-line tool built into every Windows system. DISM is mainly used for mounting and servicing the Windows images (including the ones used for Windows Recovery Environment, Windows PE, and Windows Setup) before deployment. To put it simply, DISM is a basic Windows utility designed for network administrators to finish tasks like system image preparation, modification, and repair, when necessary.
What Does DISM Do
DISM can be used to fix some common problems. DISM command can be used to check and fix Windows system files and Windows images and corruption of the Windows image Component Store. Here gives some functions that DISM can make.
- Mount and get information about the Windows image (.wim) files or virtual hard disk (.vhd/.vhdx) files.
- Capture, split, or manage .wim files.
- Install, uninstall, configure, and update things like drivers, Windows features, packages, and international settings (in a .wim file or .vhd/.vhdx).
- Service a running operating system with the subsets of the DISM commands.
- Take the place of deployment tools, such as ImageX, PEimg, and Package Manager.
For more functions of DISM, please read this article: Repair Windows 10 Image with DISM and Other Useful Tips for DISM.
DISM Not Working & Failure
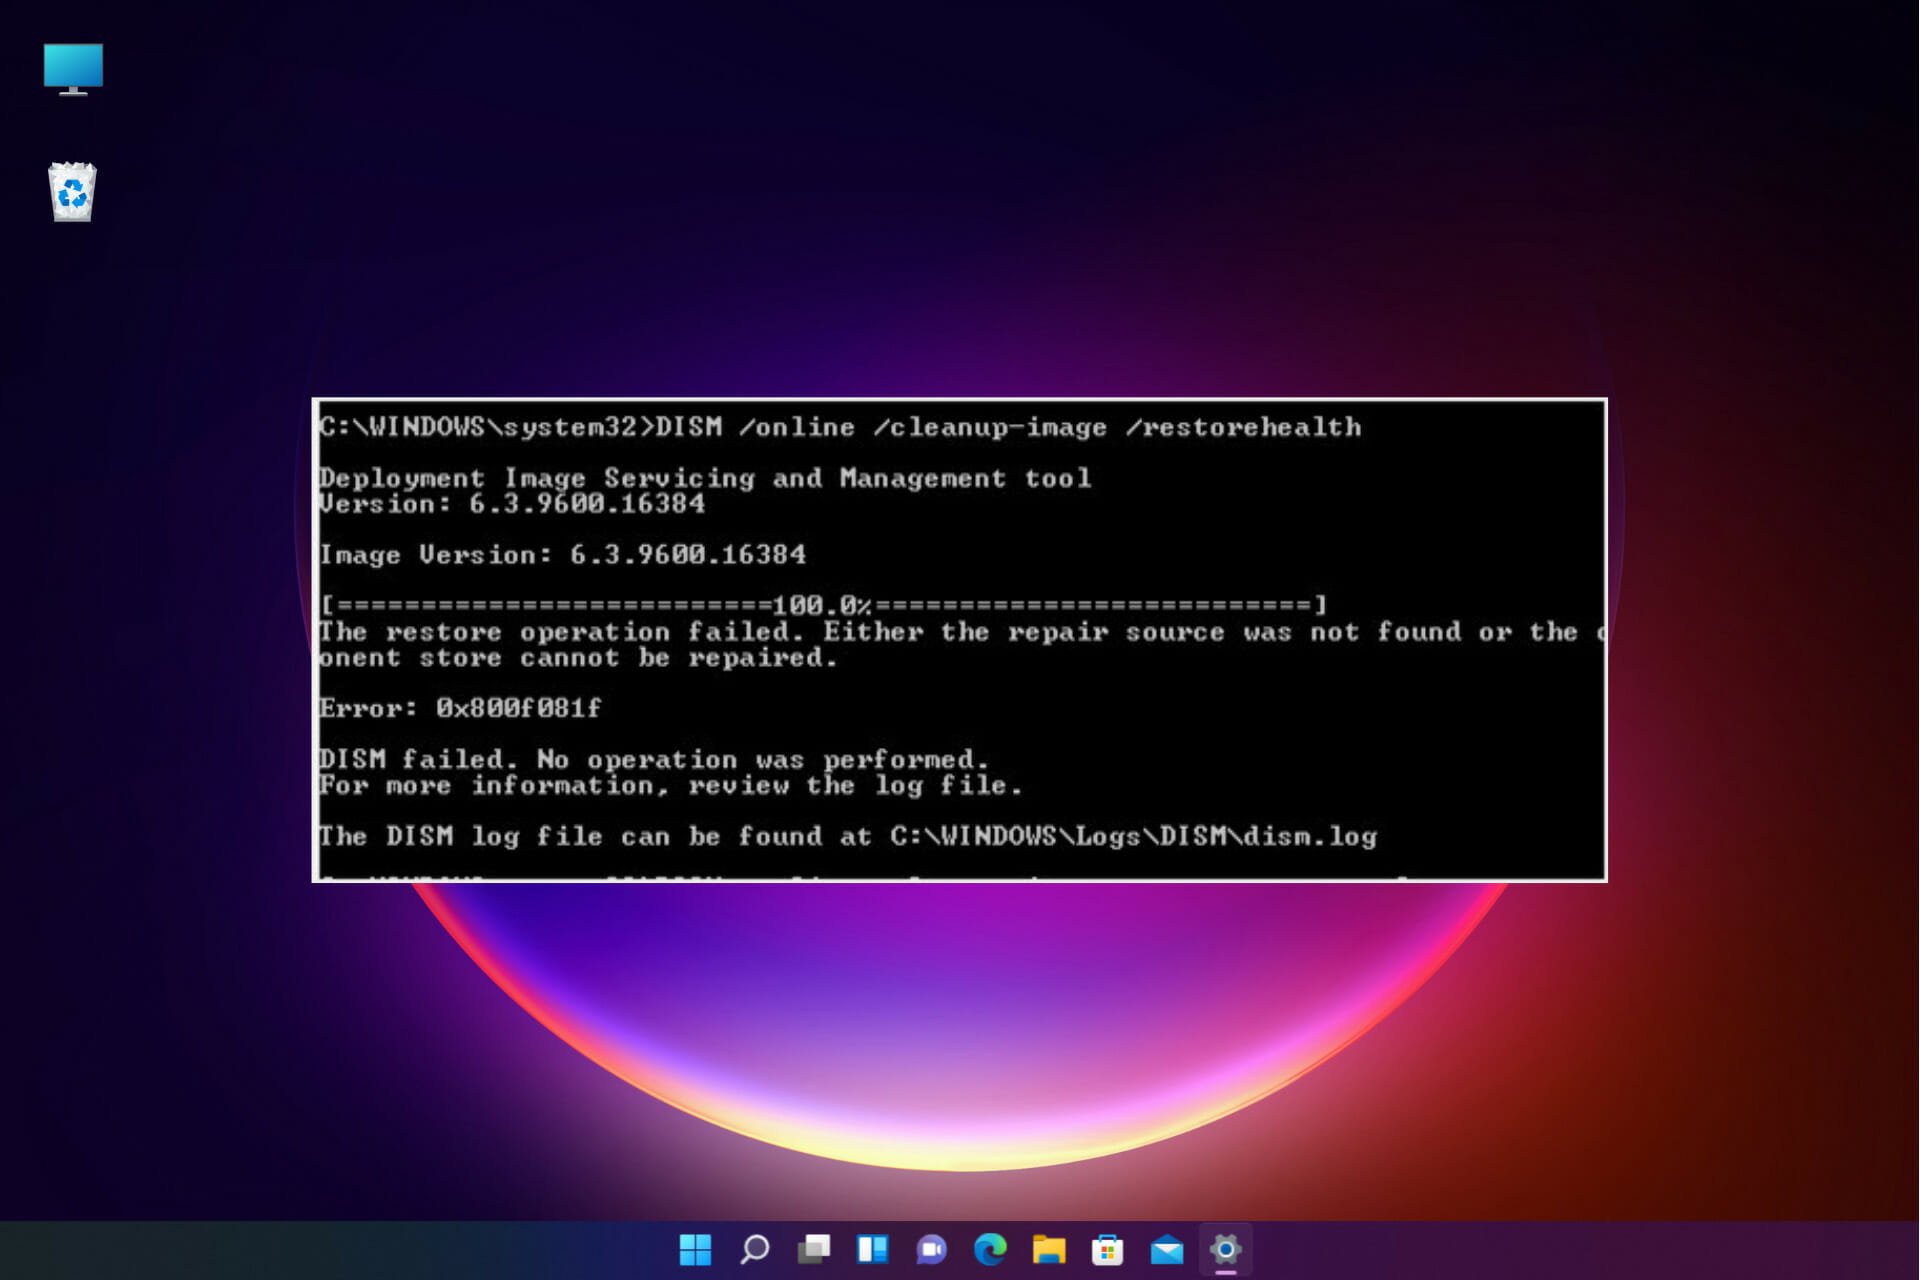
People are complaining on the internet that the DISM won’t run. When you try to repair the Windows image on Windows 10 by running “DISM /Online /Cleanup-Image /RestoreHealth” in the Command Prompt window, you may find the DISM not work. The DISM error 1910 “The object exporter specified was not found” could appear on your screen.
Some users said both the sfc /scannow and Dism /Online /Cleanup-image /RestoreHealth commands failed and they received 0x80240021 Failure DISM. See what you can do if DISM /Online /Cleanup-image /Restorehealth is stuck.
You can read the content below to find more methods to troubleshoot the issue.
How to Fix When DISM Failed
Some common error messages of DISM error:
- DISM failed no operation was performed: in the cases mentioned above, both users said their DISM failed and no operation was performed. You’re indeed able to fix this by using Windows 10 ISO file.
- DISM failed 0x8000ffff, 0x800f0954, 0x800f0950, 0x800f0907, 0x800f081f (The source files could not be found. Use the “Source” option to specify the location of the files that are required to restore the feature.): if you see error codes like this, you should use the install.wim file to start a DISM scan (after copying it from your Windows 10 ISO).
- DISM failure when attempting to copy boot files: some users said they have solved this error by cleaning up the system image components. You should try.
- DISM.exe failed validating command line, to load wim manager: if you are in the face of such problems, you should try to fix it by restarting the Windows update components, as many people said this method is helpful.
- Error Codes 2, 3, 11, 50, 87, 112, 1393, 1726, 1910, and so on.
- DISM failed while processing the command cleanup-image, add-package.
- DISM failed to load the provider, unload offline registry, flush file buffers, set the windows directory, mount the image.
- More waiting for you to discover…
# 1. Disable or Uninstall Antivirus or Security Programs
The antivirus software you have installed on your computer may cause a lot of problems such as compatibility issues, file loss, and the DISM error. The antivirus software of the security program is able to interfere with your system and intervene in any critical operation.
Therefore, if the DISM failed, I advise you to disable all the antivirus/security programs or uninstall them temporarily, and then repeat the DISM scan to see whether it works.
If this has helped to solve the DISM not working problem, you’d better consider changing the antivirus software or disabling the security features.
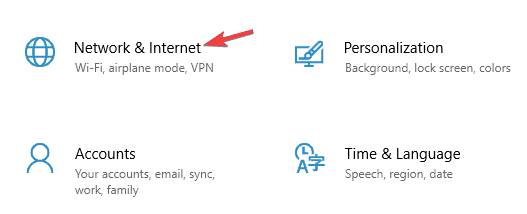
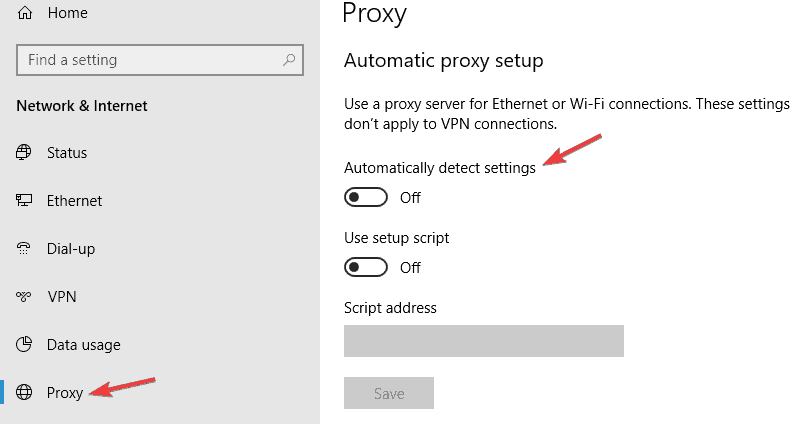
# 2. Disable Proxy on Your PC
Many users use proxy to protect their privacy from the public, but sometimes the proxy may interfere with system operation or lead to other problems. When you get the DISM error message, you can disable the proxy and then relaunch DISM to see if it works well.
Step 1: Press Win + I to open Settings.
Step 2: Choose Network & Internet.
Step 3: Shift to the Proxy option in the left pane.
Step 4: Turn off all the options in the right panel.
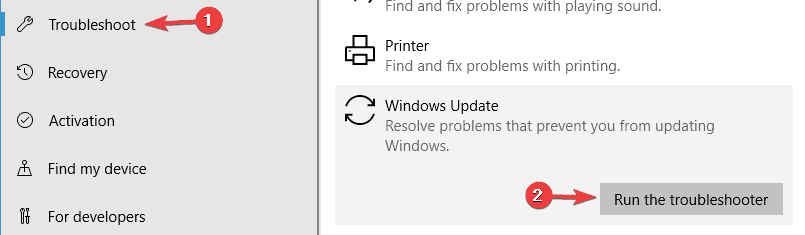
# 3. Run the Windows Update Troubleshooter
DISM errors can be caused by Windows Update in some cases. You can try this method when meet this problem.
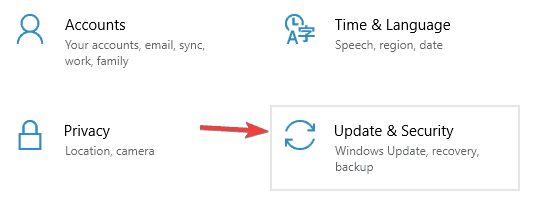
Step 1: Press Win + I on the keyboard to open Settings.
Step 2: Choose Update & Security.
Step 3: Shift to the Troubleshoot option in the left pane.
Step 4: Click Additional troubleshooters and then select Windows Update.
Step 5: Click on the Run the troubleshooter button.
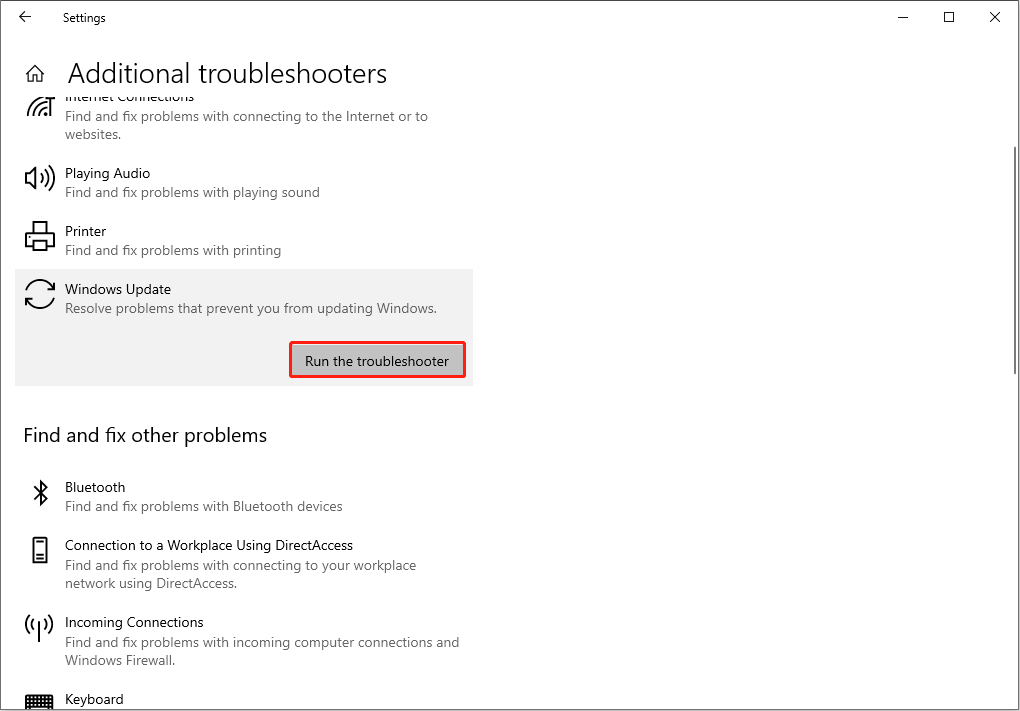
Step 6: Follow the on-screen instructions to complete the rest process.
# 4. Run DISM Command in Clean Boot
This method works for cases where the DISM failed due to service conflict.
Step 1: Press Win + I to open Settings.
Step 2: Scroll down to the bottom and select Update & Security.
Step 3: Shift to the Recovery option in the left pane.
Step 4: Look for the Advanced startup section in the right pane. Then, click Restart now under it.

Step 5: Select Troubleshoot in the Choose an option window.
Step 6: Choose Advanced options, and then click Command Prompt.
Step 7: Choose your account to continue.
Step 8: Run the DISM command (for instance, DISM /Online /Cleanup-Image /CheckHealth) and see if it works or not.

# 5. Specify/Tweak Install.wim File
If you get an error message like “Can’t find the source files”, the most possible cause is the install.wim file’s wrong location or setting. You can follow the next steps to fix this issue.
Warning:
The DISM command is case-sensitive; you must confirm that your spell every word correctly before executing the command.
Case 1: Correct location of install.wim file:
1: Get the bootable disk or at least a Windows 10 ISO file. If you’re using an ISO file, please use it to create a bootable drive and remember its drive letter.
2: Press Win+ R and type cmd.
3: Press Shift + Ctrl + Enter to run as administrator.
4: Type this command into the Command Prompt window:
DISM /Online /Cleanup-Image /RestoreHealth /source:WIM:X:\Sources\Install.wim:1 /LimitAccess (* Please replace X with the drive letter).
5: Hit Enter on the keyboard and wait for the command to complete.
Case 2: Copy install.wim (from the bootable disk to local disk C:):
1: Insert the bootable disk into your computer or mount the ISO file.
2: Locate the install.wim file and then copy it to a local disk.
3: Paste the file to the local disk C: (here take drive C: as an example).
4: Run Command Prompt as administrator and type DISM /Online /Cleanup-Image /RestoreHealth /source:WIM:C:\Install.wim:1 /LimitAccess (C refers to the location where you paste the file).
5: Then, press Enter and wait for the command to finish.
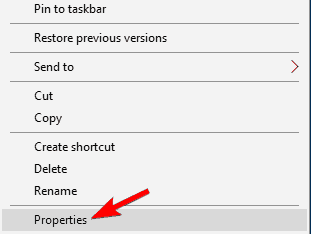
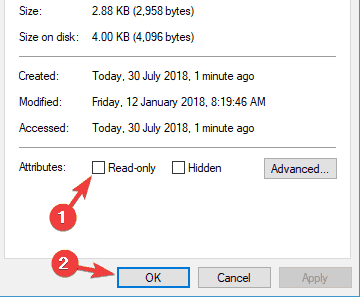
Case 3: Uncheck Install.wim Read-Only
Some cases prove that the DISM error is caused by the Read-Only setting. You can change it with the following steps.
1: Right-click on the install.wim file and choose Properties on the context menu.
2: Switch to the General tab and uncheck the Read-Only option.
3: Click on the Apply button and OK button to confirm.
4: Now, run the DISM command by specifying the source again.
# 6. Clean up System Image Components
Step 1: Press Win + R and type cmd in the search bar.
Step 2: Click Shift + Ctrl + Enter simultaneously to run Command Prompt as administrator.
Step 3: Copy the command: Dism.exe /online /Cleanup-Image /StartComponentCleanup in the Command Prompt.
Step 3: Press Enter on the keyboard and wait for the command to finish.
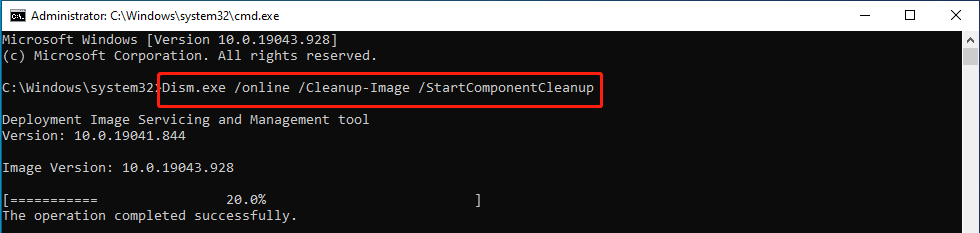
Step 4: Restart your computer and try to perform the DISM scan again.
If this command failed, you can take your chances with the following commands:
- DISM /Online /Cleanup-Image /StartComponentCleanup
- DISM /Online /Cleanup-Image /AnalyzeComponentStore
- DISM.exe /online /Cleanup-Image /StartComponentCleanup /ResetBase
# 7. Reset Windows Update Service
DISM error, like no operation was performed error, is related to Windows Update Service. When it begins to update but the service doesn’t support and disturbs the normal operation of the system, a DISM error occurs. Therefore, you can try to reset Windows Update Service to fix the issue.
Step 1: Type Command Prompt in the search bar from the Start menu.
Step 2: Select Run as administrator at the right panel.
Step 3: Type net stop wuauserv and hit Enter.
Step 4: Wait for the command to complete.
Step 5: Repeat steps 3 and step 4 to run these commands in order:
- cd %systemroot%SoftwareDistribution
- ren Download Download.old
- net start wuauserv
- net stop bits
- net start bits
- net stop cryptsvc
- cd %systemroot%system32
- ren catroot2 catroot2old
- net start cryptsvc.
Step 6: Restart your computer.
Recover Lost/Deleted Data on Windows
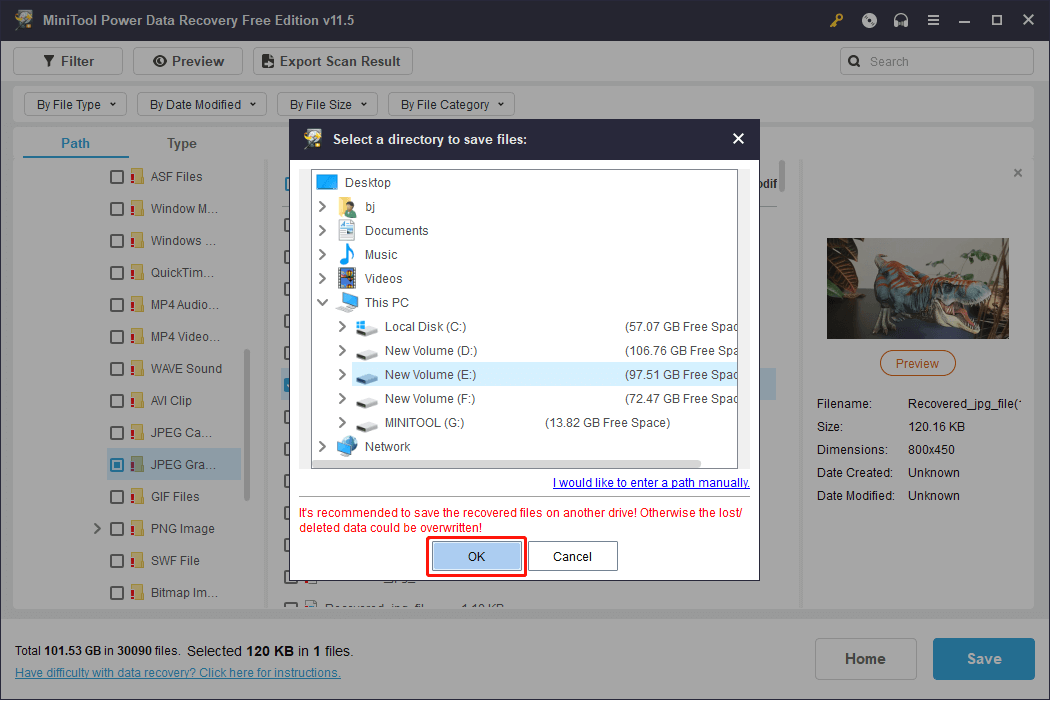
Although DISM errors are seldom caused by hardware issues, we can’t rule them out completely. Thus, it is necessary to check your data and recover them if necessary. MiniTool Power Data Recovery, the best free data recovery software for Windows, should be mentioned.
MiniTool Power Data Recovery is devoted to providing a safe and green data recovery environment. There is no damage to your data during the restoration process. Besides, it supports you retrieve data from different data storage devices such as external hard drives, USB flash drives, memory cards, and so on.
To improve data recovery efficiency, it provides more specific scan selections like desktop, recycle bin, and selected folder. Why not try the free edition to recover your data first?
Tips:
The free version of MiniTool Power Data Recovery allows you to recover up to 1 GB of data. If you need a larger data recovery capacity, please get an advanced edition through this page.
Step 1: Download MiniTool Power Data Recovery on your computer.
MiniTool Power Data Recovery FreeClick to Download100%Clean & Safe
Step 2: Run the software and select a partition to scan. If you check the drive at one time, you can switch to the Devices tab to scan the entire disk.
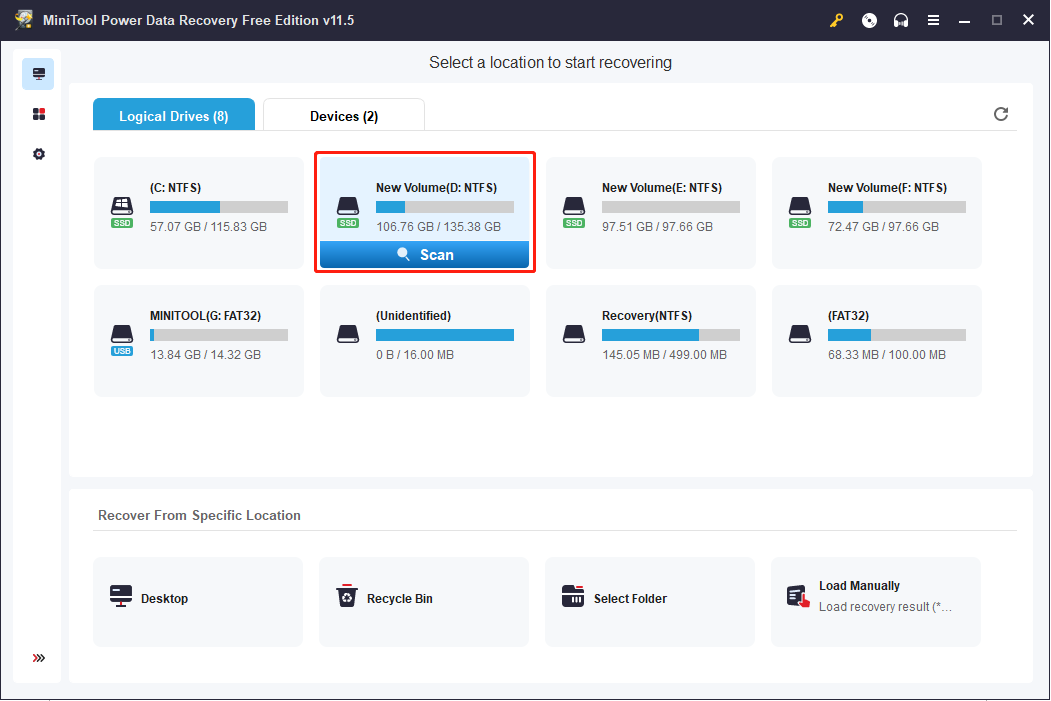
Step 3: After the scan process is completed, browse the result page to find your desired files.
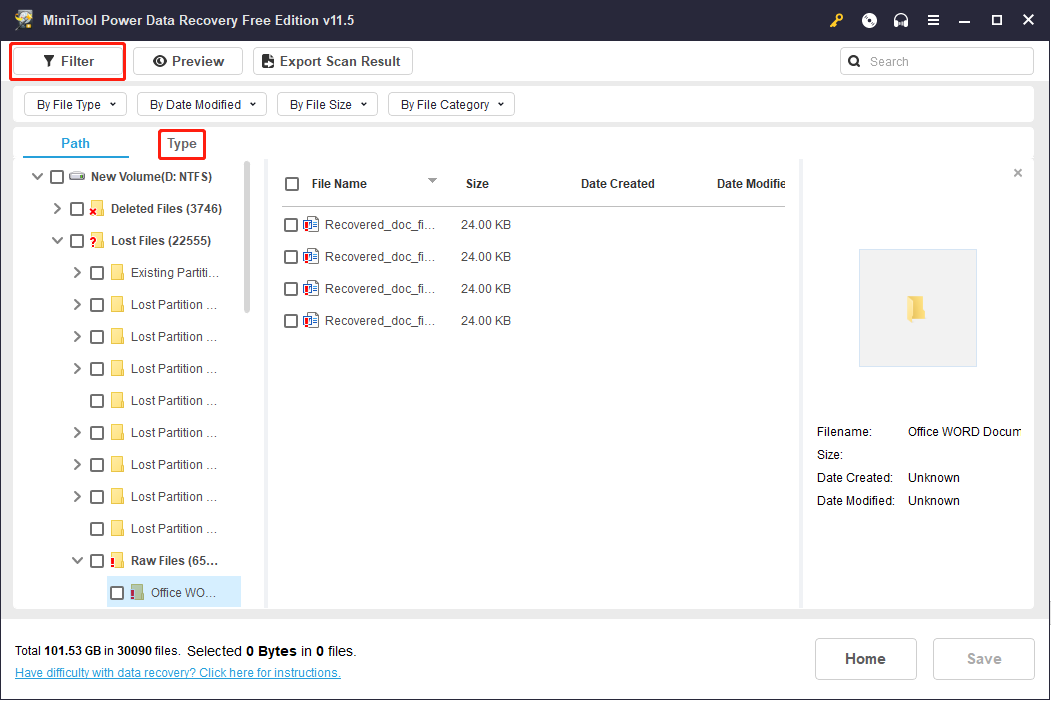
Tips:
If there are numerous data that you can’t locate wanted files quickly, you can choose Filter or Type function to reduce the distraction choices by setting different conditions, for instance, the type, size, created time, etc. The Search function works a lot when you remember the file’s names. Additionally, before saving the files, you can preview them to avoid restoring the wrong data.
Step 4: Click the Save button and choose a storage path for the data.
Step 5: Click OK to confirm.
Final Words
DISM is a useful tool for repairing Windows images. When you find the DISM failed on your computer, don’t worry. You can try the methods mentioned in this post one by one to work out your problem. If finding your data lost or mistakenly deleted, please don’t hesitate to try MiniTool’s professional data recovery software.
MiniTool Power Data Recovery FreeClick to Download100%Clean & Safe
Please leave us a message via [email protected] if you are still in trouble or want to solve other disk and system problems.
Get back to fixing corrupt files on your PC with the built-in tool
by Milan Stanojevic
Milan has been enthusiastic about technology ever since his childhood days, and this led him to take interest in all PC-related technologies. He’s a PC enthusiast and he… read more
Updated on
- DISM.exe (Deployment Image Servicing and Management) is a useful command-line tool for Windows images and Windows Recovery Environment.
- The DISM failed issue might be caused by interference from your antivirus software.
- A quick fix for DISM not working is to clean up system image components or disable your proxy.
XINSTALL BY CLICKING THE DOWNLOAD
FILE
The DISM command comes in very handy when it comes to repairing your Windows PC. For example, if your Windows 10 installation is corrupt, you can usually fix it using the built-in SFC /scannow command, followed by DISM.
However, the DISM can fail. In this case, you cannot use it to repair your PC, and the problems will not be fixed.
If DISM failed on your device, we will show you how to fix the tool in this guide and return to keeping your PC in top shape.
What causes the DISM failed issue?
There are various reasons for the DISM command not working on your Windows PC. Below are some of the variations of the DISM error and the causes:
- DISM failed no operation was performed – This is a relatively common problem with DISM. However, you might be able to fix the problem by performing the DISM can using the Windows ISO file. The full error message reads: DISM failed. no operation was performed. for more information, review the log file.
- DISM failed to load the provider, unload offline registry, flush file buffers, set the windows directory, and mount the image – These are some common problems you can encounter with DISM scan. However, you should be able to fix most of them using our solutions.
- DISM failed 0x8000ffff, 0x800f0954, 0x800f081f, 0x800f0827 – If you’re getting any of these errors, try copying the install.wim file from Windows 10 ISO and use it to perform a DISM scan.
- DISM failed while processing command cleanup-image, add-package – These are some common problems with DISM, but they can be solved using one of our solutions.
- DISM failure when attempting to copy boot files – This is another common problem with DISM, but you might be able to fix it by cleaning up system image components.
- Dism.exe failed validating command line to load wim manager – If you’re having any of these problems, restart Windows update components and check if that helps.
- DISM failed error 0x800f0905 – This is the case when users try running the DISM tool on encountering the 0x800f0905 update error.
- DISM failed no operation was performed Windows 11 – The DISM tool often fails with this error message in the latest iteration of Windows as well. The solution from above should do the trick.
- Dism /online /cleanup-image /restorehealth not working – While the other commands work, this one is not working for some users.
How can I fix the DISM not working issue?
- What causes the DISM failed issue?
- How can I fix the DISM not working issue?
- 1. Check your antivirus
- 2. Enter the correct location of Install.wim file
- 3. Copy the Install.wim file
- 4. Clean up system image components
- 5. Run the Windows Update troubleshooter
- 6. Reset Windows Update services
- 7. Disable proxy
- 8. Make sure that your .wim isn’t set to read-only
- 9. Perform an in-place upgrade
- How do you know if DISM is working?
- What can I do if DISM failed on Windows 11?
- Does DISM delete files?
1. Check your antivirus
In some rare instances, the DISM command not working issue can be caused by your antivirus. Your antivirus can interfere with your system and cause this problem.
If DISM failed on your system, you might be able to fix the problem simply by disabling certain antivirus features or the app. You also try to remove the antivirus software if disabling it does not solve the problem.
Should this fix the problem, you might need to consider one of the best modern antivirus software in ESET NOD 32.
This software uses cutting-edge technology to keep your PC secure without causing errors. What’s more, it provides both offline and online security and ensures your privacy. So, let it take care of your security while you worry about other things.
2. Enter the correct location of Install.wim file
If DISM is giving you the Can’t find source files message, you need to mount Windows 10 ISO file and specify the location of the Install.wim file.
To specify the location of the file, type the following command in Command Prompt and press Enter to run it: DISM /Online /Cleanup-Image /RestoreHealth /source:WIM:X:SourcesInstall.wim:1 /LimitAccess
Remember that you need to replace X with the letter that matches the drive where Windows 10 ISO file is mounted.
3. Copy the Install.wim file
Few users suggested that you can fix this problem by copying the Install.wim to the root directory of your hard drive.
To get Install.wim file, download Windows 10 ISO, mount it, and locate Install.wim file.
After copying the Install.wim file, be sure to enter the correct location of the Install.wim file before running the DISM scan.
How we test, review and rate?
We have worked for the past 6 months on building a new review system on how we produce content. Using it, we have subsequently redone most of our articles to provide actual hands-on expertise on the guides we made.
For more details you can read how we test, review, and rate at WindowsReport.
Also, remember that the DISM command is case sensitive, and users reported entering install.wim instead of Install.wim caused the DISM to fail. Therefore, enter the correct file name before starting the DISM scan.
Few users also reported that DISM doesn’t support spaces in the source location. So, be sure that the containing folder doesn’t have any spaces in its name.
4. Clean up system image components
1. Open Command Prompt as administrator.
2. Type the command below and press Enter. Dism.exe /online /Cleanup-Image /StartComponentCleanup
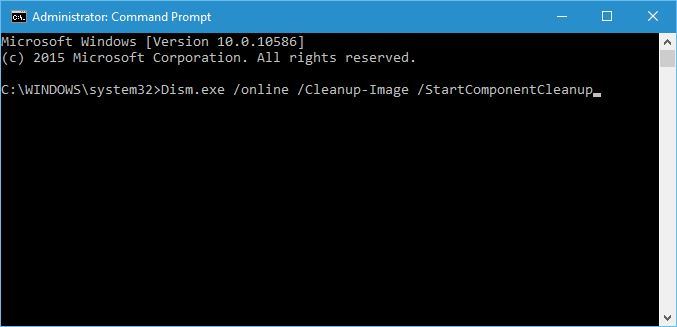
3. Wait for the process to finish.
4. Try to perform the DISM scan again after running these commands.
5. In addition, if DISM still isn’t working, you can also run the following commands:
DISM /Online /Cleanup-Image /StartComponentCleanup
DISM /Online /Cleanup-Image /AnalyzeComponentStore
Dism.exe /online /Cleanup-Image /StartComponentCleanup
Dism.exe /online /Cleanup-Image /StartComponentCleanup /ResetBase
If you’re facing DISM error 193, 740, 14098, 3017, and similar variations, you might be able to fix those problems by cleaning up the system image components.
This is simple, provided you follow the steps above. All you need is to run Command Prompt as an administrator and run a few commands with privileges.
There are many repair tools for Windows that can be used to fix broken or corrupted files. Check out our dedicated article to find out which are the best.
5. Run the Windows Update troubleshooter
- Press the Windows key + I to open the Settings app.
- Select the Update & Security option.

- Choose Troubleshoot from the menu on the left.
- Select Windows Update and click Run the troubleshooter.

- Follow the instructions on the screen to complete the troubleshooter.
According to users, sometimes DISM problems can occur due to Windows Update issues.
If DISM failed to complete or run on your system, you might be able to fix the problem by running the Windows Update troubleshooter.
Once the troubleshooter is finished, try to rerun the DISM scan, and it should be able to complete.
6. Reset Windows Update services
- Open Command Prompt as an administrator.
- When Command Prompt starts, run the following commands:
net stop wuauservcd %systemroot%SoftwareDistributionren Download Download.oldnet start wuauservnet stop bitsnet start bitsnet stop cryptsvccd %systemroot%system32ren catroot2 catroot2oldnet start cryptsvc
If DISM failed to complete, showing a DISM does not support servicing on Windows PC, the problem might be Windows Update services.
However, you can fix the problem simply by resetting Windows Update services. After these commands are executed, Windows Update components should restart, and the issue will be resolved.
7. Disable proxy
- Open the Settings app.
- Choose the Network & Internet option.

- Select Proxy from the menu on the left. In the right pane, disable all settings.

If DISM failed to complete or run on your PC, the problem might be your proxy. Many users use proxy to protect their privacy online, but sometimes your proxy can interfere with your system and lead to this and other issues.
After disabling your proxy, check if the problem is resolved. Although a proxy is a great way to protect your privacy online, many users prefer using a VPN over a proxy.
If you want to protect your privacy online and you’re looking for a good VPN, we strongly suggest you consider PIA.
- How to quickly fix DISM error 50 on Windows 10/11
- Sfc /scannow stops on Windows 10/11 [BEST SOLUTIONS]
- DISM source files could not be found? Try these 3 solutions
- Full Fix: Elevated permissions are required to run DISM
- Fix: Error 0X800f081f on Windows Update 10
8. Make sure that your .wim isn’t set to read-only
- Locate install.wim file on your hard drive, right-click it, and choose Properties.

- When the Properties window opens, make sure to uncheck the Read-only option. Now click Apply and OK to save changes.

Many users copy the install.wim file from Windows 10 installation ISO to run the DISM scan offline.
However, several users reported that DISM is not working because of the install.wim file was set as a read-only file.
If that happens, your PC won’t be able to write anything to the install.wim file and the DISM scan won’t complete. So, changing the properties of install.wim file should solve the issue in this case.
After making these changes, try to rerun the DISM scan.
9. Perform an in-place upgrade
- Download and run Media Creation Tool.
- Now select the Upgrade this PC now option.
- The setup will prepare the necessary files, so you’ll need to wait.
- Select Download and install updates (recommended) and click Next.
- Wait while the updates are downloaded.
- Follow the instructions on the screen. On the Ready to install screen, click the Change what to keep option.
- Select Keep personal files and apps and click Next.
- Follow the instructions on the screen to complete the in-place upgrade process.
If the DISM scan failed to complete on your PC, your final solution might be an in-place upgrade. This process will reinstall Windows 10 and force it to upgrade to the latest version.
Unlike reinstallation, this process will keep all your files and installed applications, so you can continue where you left off.
How do you know if DISM is working?
DISM does not take much time to scan your PC for errors. It is usually around 10 to 30 minutes but can sometimes take hours.
Users sometimes report that it hangs at around the 20% progress mark. But that does not mean it is not working, as this is normal. So far, it is showing progress, but the command is still working.
What can I do if DISM failed on Windows 11?
If you’ve upgraded to the new OS, you know by now that it’s not so different from Windows 10 apart from some new features and improved design.
And yes, DISM can fail on Windows 11 as often as on the older OSes, so you have to be prepared for this.
Luckily, all the solutions we listed above will work seamlessly on the new OS, and it will be even more accessible.
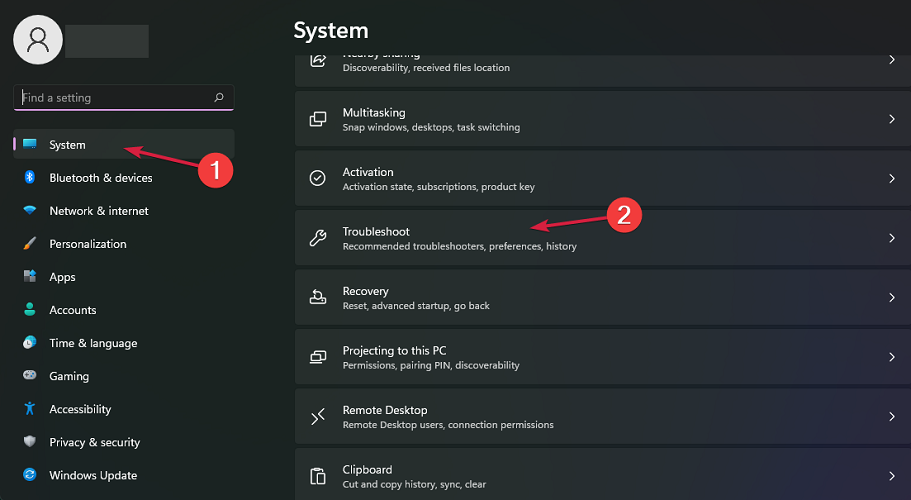
As you can see from our screenshot above, in Windows 11, the Troubleshoot option is right in the System settings, will be fewer clicks to access.
Does DISM delete files?
DISM works basically to repair broken and corrupt files on a PC. It keeps a log of the errors found on your PC, and the fixes applied.
It does not delete your files, app, or data. So you don’t have anything to worry about. DISM cannot harm your computer.
The DISM failed on Windows 10 or Windows 11 error can deprive you of an essential built-in tool to repair your PC for free. But with the fixes in this guide, you should be able to get it working again.
Are you facing other errors like the DISM error 2 on Windows 10? Then, check our guide to solve the problem quickly.
Feel free to let us know if you were able to get DISM working again on Windows in the comments below.
![]()
В статье объясняется как починить Windows 10 с помощью DISM: от небольших проблем до состояния, когда Windows 10 уже не загружается.
Итак в арсенале пользователей Windows имеется целый набор ремонтных инструментов, с помощью которых мы с вами можем вытаскивать с того света совсем уж, казалось бы, неподнимаемые системы. Фактически, единственным условием их оживления является лишь целостность жёсткого диска. И к возможностям вернуть Windows к жизни в последнем поколении ОС от Microsoft прибавилось ещё одно средство — DISM. Но сначала немного теории.
- DISM против SFC
- Windows 10 немного забарахлила…
- Windows работает, но выхода в интернет нет
- Windows 10 уже не загружается
DISM.exe против SFC.exe: кто «сильнее»?
Многие пользователи Windows 10, имея в арсенале оба средства восстановления, задаются вопросом: какой из указанных инструментов действеннее? Пробегите глазами по кратенькой справке для прояснения.
System File Checker — инструмент, неразрывно связанный с системой Windows Resource Protection. Последняя защищает ключи в реестре, директории, а также критические системные файлы. Если в процессе «эксплуатации» будут обнаружены хоть малейшие изменения в таких файлах, изменённый файл восстанавливается из закэшированной копии. Которая хранится в самой папке Windows. Всё бы ничего, и средство должно работать безотказно… если бы оно само и связанное с ним хранилище не попадали порой под удар. И вот тогда на помощь приходит…
DISM, которая обращается не к внутреннему хранилищу в кэш, а просит клиент обновлений Windows Update сверить файлы. Их в DISM повредить нельзя, так как они подкачиваются со стороны серверов Microsoft. Вобщем, ситуация представляется логичной: команды SFC /SCANNOW нам предостаточно, пока та может справиться. Однако, если кэш повреждён, можно попробовать починить Windows с помощью DISM.
DISM при попытке запуска выдаёт кучу ошибок?
Так что запускать первым?
Команда:
sfc /scannow
не требует соединения с сетью. Эффективность её работы часто определяется не только степенью повреждений, но и скоростью доступа к диску (чтения данных). Однако, если утилита не помогает, вероятнее всего, помощь нужна самому хранилищу компонентов Windows. В дело вступает:
Dism /Online /Cleanup-Image /RestoreHealth
Следующим шагом многие пренебрегают, однако ваш покорный слуга всегда повторяет команду проверки системных файлов
sfc /scannow

Но, как говорится, это уже потом. А сейчас подробнее о различных вариантах применения DISM. Или, точнее, вариантов «поломки» Windows: попробуем починить Windows с помощью DISM с флешки/диска или через сеть.
Windows 10 загружается и есть выход в сеть.
Итак, как известно, когда Windows 10 теряет часть своей функциональности, на помощь пользователю приходит инструмент Deployment Imaging and Servicing Management (он же DISM). Основное его назначение — корректировка ошибок обновлением системных файлов. В случае «непонятного» поведения Windows можно применить DISM с функцией Cleanup-Image:
Dism /Online /Cleanup-Image
со следующими переключателями:
- /ScanHealth — проверка хранилища компонентов на предмет повреждения с последующей записью в лог по адресу C:\Windows\Logs\CBS\CBS.log. Команда на проверку выглядит как:
Dism /Online /Cleanup-Image /ScanHealth
В такой форме файлы только проверяются без восстановления. Команда полезна для диагностики вероятных повреждений и чтения ошибок в логе.
- /CheckHealth — проверяет, присутствует ли уже в реестре маркер повреждения. Команда в таком виде сродни действию утилиты chkdsk.exe в режиме «только чтение»:
chkdsk буква_диска:
Время, отпускаемое на выполнение команды, непродолжительное: в среднем около минуты:
Dism /Online /Cleanup-Image /CheckHealth
- /RestoreHealth — наиболее востребованная команда. Она исполняет полный диапазон действий: проверка компонентов, запись в указанный выше лог и подмена повреждений обновлениями:
Dism /Online /Cleanup-Image /RestoreHealth
По длительности эта операция самая продолжительная — всё зависит от характера повреждений системы.

Таким образом, порядок проведения работ по исправлению ошибок Windows 10, которая В СОСТОЯНИИ ЗАГРУЗИТЬСЯ и ВЫЙТИ В СЕТЬ, но выказывает ошибки функционала, можно определить таким:
- открывается командная консоль от имени администратора
- запускается DISM с быстрой проверкой на предмет повреждений и возможностью их исправить
приступаем к работе с DISM со переключателем /RestoreHealth.
Windows 10 загружается, но сеть недоступна.
Как вы поняли, ключевым моментом в работе DISM является работоспособность клиента Windows Update и стабильное сетевое соединение. Вполне возможно, что и сам клиент также окажется в зоне повреждения. Тогда консоль потребует указать в качестве источника неповреждённых файлов папку в текущей инсталляции Windows. Или обратиться к сетевым ресурсам. Придётся набрать такую команду:
DISM.exe /Online /Cleanup-Image /RestoreHealth /Source:X:\папка_с\Windows /LimitAccess
где X:\папка_с\Windows — путь к папке с резервными файлами для ремонта, а Х — диск/флешка/карта. При этом файлы восстановления могут храниться как на жёстком диске, так и на флешке/DVD диске. Чтобы исправить свою Windows 10 с диска, придётся соблюсти ряд условий:
- Вам понадобится файл install.wim из состава того диска/флешки, с которых ваша копия Windows 10 и устанавливалась. Не конкретно их, конечно. Для этого достаточно скачать в сети образ Windows 10 вашей ВЕРСИИ. Так вот в этом файле и находится подходящий для вашей Windows DISM. Помните, что ЯЗЫК и ВЫПУСК также должны совпадать.
- Это прозвучит странно, но вам действительно стоит убедиться в том, что файл install.wim будет доступен в целевой папке. Большинство ошибок происходит именно по этой причине.
- Файл install.wim и директория, в которой он лежит, не должны быть с атрибутом «только для чтения».
- Все команды DISM чувствительны к регистру букв. Так что не ошибайтесь в вводимых путях.
Начинаем работу…
- Качаем бесплатно образ Windows 10 с помощью утилиты или программы Rufus. У меня для этой цели приготовлена загрузочная флешка с Windows 10, благодаря которой обеспечен быстрый доступ к нужным файлам;
- Запускаем cmd от имени администратора
- Вводим последовательно следующие команды
DISM /Online /Cleanup-Image /StartComponentCleanup
DISM /Online /Cleanup-Image /AnalyzeComponentStore
DISM /Online /Cleanup-Image /RestoreHealth /source:F:\sources\install.wim:1 /LimitAccess
в последней команде F:\sources\install.wim — путь к файлу install.wim, появившемуся после распаковки из скачанного образа.


Windows 10 уже не загружается…
Сразу оговорюсь — питать иллюзии не стоит, ибо дело практически гиблое. Если система не смогла успешно применить весь арсенал ремонтных средств, подобные команды справляются «50 на 50». Т.е. по принципу «повезёт-не повезёт». А у нас условия те же: где-то нужно достать загрузочные флешку или диск с той же версией, сборкой, языком что и у вас. Сразу ремарка: искать нужно внимательно, ибо понадобится версия максимально близкая к той, что установлена. Проблем поменьше, если загрузочная флешка с вашей Windows у вас осталась. А если скачивать, то лучше удостовериться в соответствии версий. Так что обратите внимание на статью Как узнать версию Windows, если та не загружается. В общем, вся эта работа тот ещё танец с бубном, где бронелобных путей нет, и приходится часто ориентироваться по обстановке. И статистика восстановления Windows такова, что чем больше Windows получила обновлений с момента её установки, тем меньше вероятность вернуть её к жизни. Даже несмотря на то, что с версиями на флешке и на диске вы угадали со 100% попаданием.
Продолжим. Нам нужен всё тот же файл install.wim. Как обычно:
- Вытаскиваем ненужные флешки, отсоединяем ненужные диски, чтобы не путались под ногами
- Запускаемся с загрузочной флешки/диска
- Выходим на командную строку


- Запускаем утилиту Diskpart, которая подскажет нам, как будущим командам DISM будут видеться буквы разделов. Напомню, что сейчас вам следует забыть про те, к которым вы привыкли во время работы. И вводим команды
list disk
select disk X
где X — цифра жёсткого диска, на котором лежит проблемная Windows 10. Если диск один, то команда выглядит как
select disk 0
Ищем разделы. Сейчас нам Windows покажет тома дисков, флешки, карты и DVD диски:
list volume

Смотрите: раздел с файлами Windows, где она «помэрла», имеет букву D. Диск с заряженным install.wim — букву E. Запоминайте свои буквы, а Diskpart нам больше не нужна:
exit
Создадим папку mount с файлами Windows на том же жёстком диске, где лежит побитая Windows 10 (у меня D):
mkdir D:\mount
Далее. На всякий пожарный создайте ещё одну пустую папку. Она пригодиться, если DISM сошлётся на потенциальную нехватку места. Создадим там же и назовём произвольно. Например, 1:
mkdir D:\1
Переносим сюда файлы с флешки::
dism /mount-Image /ImageFile:E:\sources\install.wim /index:1 /mountdir:D:\mount\ /readonly
После этой команды на диске с погибшей Windows появится папка mount, в которой буду лежать файлы будущей Windows. На них можно взглянуть прямо сейчас, вызвав окольными путями проводник. Как? Спуститесь в конец статьи до раздела Маленькая хитрость.

Восстанавливаем образ:
dism /Image:D:\ /Cleanup-image /Restorehealth /Source:D:\mount\Windows\ /LimitAccess
или
dism /Image:D:\ /Cleanup-image /Restorehealth /Source:D:\mount\Windows\ /ScratchDir:D:
Если всё прошло нормально, закрываем консоль и переходим с перезагрузкой в восстановленную Windows 10. Под стать этим двум командам есть и другая, позволяющая обратиться к флешке напрямую. Смотрите: восстанавливаем образ на диске D, используем в качестве источника флешку Е, используя в качестве хранилища папку 1 на диске D.
dism /image:D:\ /cleanup-image /RestoreHealth /Source:E:\sources\install.wim /ScratchDir:D:\1
Вполне вероятно, придётся указать на конкретный вариант файла install.wim. Команда может принять вид:
dism /image:D:\ /cleanup-image /RestoreHealth /Source:wim:E:\sources\install.wim:1 /ScratchDir:D:\1
где 1 — версия образа устанавливаемой Windows из контейнера. Мне иногда приходилось перебирать, не покидая DISM, все версии за раз: и 1-ю, и 2-ю, и 3-ю, и 4-ю. На случай, если что-то нафармачили, образ можно отсоединить без сохранения изменений:
dism /Unmount-Image /MountDir:D:\mount /discard
Папка mount исчезнет, место освободится. Часто это делается для того, чтобы переткнуть нужную флешку с другой версией и заново повторить монтирование и восстановление.
Маленькая хитрость.
Если вы немного потерялись, не имея большого опыта при работе исключительно с консолью и командами без GUI, на некоторое время можете прерваться и окунуться в знакомый вам проводник Windows. Наберите прямо в консоли команду открытия Блокнота
notepad.exe
и, не печатая ничего, откройте Файл — Сохранить как… Узнаёте File Explorer? Так что можете по-быстрому сориентироваться что к чему. Бонусом вам будут доступны многие команды из привычного интерфейса. Чтобы увидеть все файлы, а не только текстовые и папки, в окне проводника внизу в части Тип файла выберите Все файлы.


Успехов.
Для проверки целостности системных файлов и восстановления поврежденных файлов (библиотек) компонентов в Windows (Windows Server) можно использовать команды SFC и DISM. Эти две утилиты могут быть крайне полезными, если операционная система Windows работает нестабильно, появляются ошибки при запуске стандартных приложений или служб, после вирусного заражения и т.д.
В этой статье мы рассмотрим, как использовать команды
sfc /scannow
,
DISM /Online /Cleanup-Image /RestoreHealth
или
Repair-WindowsImage -Online -RestoreHealth
для восстановления образа и системных фалов в Windows 10/11 и Windows Server 2022/2019/2016.
Содержание:
- SFC /scannow: восстановление системных файлов Windows
- Проверка целостности хранилища компонентов Windows с помощью DISM
- Восстановление образа Windows с помощью DISM /RestoreHealth
- DISM /Source: восстановление образа Windows с установочного диска
- Восстановление образа Windows с помощью PowerShell
- DISM: восстановление поврежденного хранилища компонентов, если Windows не загружается
SFC /scannow: восстановление системных файлов Windows
Перед тем, как восстанавливать образ Windows с помощью DISM, рекомендуется сначала попробовать проверить целостность системных файлов с помощью утилиты SFC (System File Checker). Команда
sfc /scannow
позволяет проверить целостность системных файлов Windows. Если какие-то системные файлы отсутствуют или повреждены, утилита SFC попробует восстановить их оригинальные копии из хранилища системных компонентов Windows (каталог C:\Windows\WinSxS).
Утилита SFC записывает все свои действия в лог-файл
windir%\logs\cbs\cbs.log
. Для всех записей, оставленных SFC в файле CBS.log проставлен тег [SR]. Чтобы выбрать из лога только записи, относящиеся к SFC, выполните команду:
findstr /c:"[SR]" %windir%\Logs\CBS\CBS.log >"%userprofile%\Desktop\sfc.txt"
Если команда sfc /scannow возвращает ошибку “
Программа защиты ресурсов Windows обнаружила повреждённые файлы, но не может восстановить некоторые из них / Windows Resource Protection found corrupt files but was unable to fix some of them
”, скорее всего утилита не смогла получить необходимые файла из хранилища компонентов (образа) Windows.
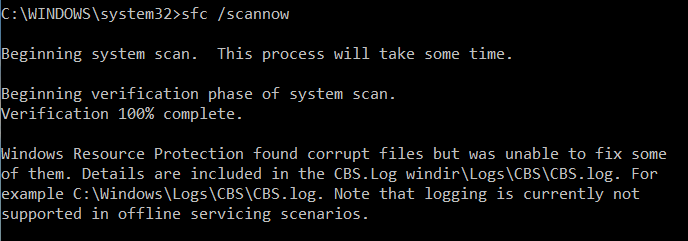
В этом случае вам нужно попробовать восстановить хранилище компонентов вашего образа Windows с помощью DISM.
После восстановления образа вы можете повторно использовать утилиту SFC для восстановления системных файлов.
Проверка целостности хранилища компонентов Windows с помощью DISM
Утилита DISM (Deployment Image Servicing and Management) доступна во всех версиях Windows, начиная с Vista.
Для сканирования образа Windows на наличие ошибок и их исправления используется параметр DISM /Cleanup-image. Команды DISM нужно запускать из командной строки, с правами администратора.
Чтобы проверить наличие признака повреждения хранилища компонентов в образе Windows (флаг CBS), выполните команду (не применимо к Windows 7/Server 2008R2):
DISM /Online /Cleanup-Image /CheckHealth
Эта команда не выполняет полное сканирование хранилища компонентов. Проверяются лишь записанные ранее маркеры повреждений и события в журнале Windows. Изменения в образ не вносятся. Команда проверит, не помечен ли ваш образ Windows как поврежденный и возможно ли исправить его.
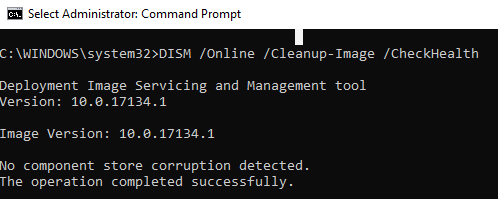
В этом примере команда вернула, что с образом все хорошо:
No component store corruption detected.
The operation completed successfully.
Чтобы выполнить полное сканирование хранилища компонентов на наличие повреждений в хранилище компонентов Windows, запустите команду:
DISM /Online /Cleanup-Image /ScanHealth
Команда проверки образа Windows может выполняться довольно долго (от 10 до 30 минут). И вернет один из трех результатов:
- No component store corruption detected – DISM не обнаружил повреждения в хранилище компонентов;
- The component store is repairable – DISM обнаружил ошибки в хранилище компонентов и может исправить их;
- The component store is not repairable – DISM не может исправить хранилище компонентов Windows (попробуйте использовать более новую версию DISM или вам придется восстанавливать образ Windows из резервной копии, сбрасывать или полностью переустанавливать вашу копию Windows.

В Windows 7 и Windows Server 2008 R2 для использования параметра DISM /ScanHealth нужно установить отдельное обновление KB2966583. Иначе при запуске DISM будет появляться “
Ошибка 87. Параметр ScanHealth не распознан в этом контексте
”.
Команда DISM /ScanHealth может вернуть ошибки:
- Ошибка: 1726. Сбой при удалённом вызове процедуры;
- Ошибка: 1910. Не найден указанный источник экспорта объекта.
Это однозначно говорит о том, что ваш образ Windows поврежден и его нужно восстановить.
Восстановление образа Windows с помощью DISM /RestoreHealth
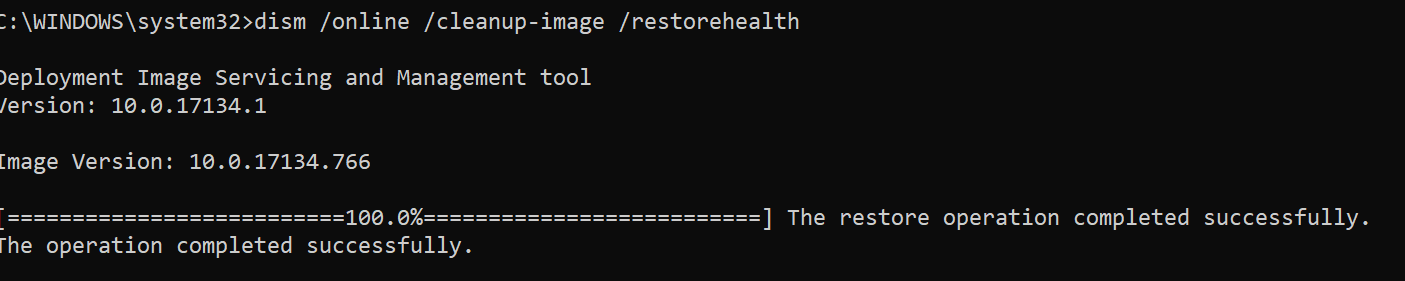
Чтобы исправить повреждения в хранилище компонентов образа Windows нужно использовать опцию RestoreHealth команды DISM. Эта опция позволит исправить найденные в образе ошибки, автоматически скачать и заменить файлы повреждённых или отсутствующих компонентов эталонными версиями файлов из центра обновлений Windows (на компьютере должен быть доступ в Интернет). Выполните команду:
DISM /Online /Cleanup-Image /RestoreHealth
В Windows 7/2008 R2 эта команда выглядит по другому:
DISM.exe /Online /Cleanup-Image /ScanHealth
Процесс сканирования и восстановления компонентов может быть довольно длительным (30 минут или более). DISM автоматически загрузит недостающие или поврежденные файлы образа с серверов Windows Update.
Восстановление выполнено успешно. Операция успешно завершена.
The restore operation completed successfully.
DISM /Source: восстановление образа Windows с установочного диска
Если на компьютере (сервере) отсутствует доступ в Интернет или отключена/повреждена служба Windows Update (как восстановить клиент Windows Update), то при восстановлении хранилища компонентов появятся ошибки:
- 0x800f0906 — Не удалось скачать исходные файлы. Укажите расположение файлов, необходимых для восстановления компонента, с помощью параметра Источник (0x800f0906 — The source files could not be downloaded. Use the source option to specify the location of the files that are required to restore the feature);
- Ошибка: 0x800f0950 — Сбой DISM. Операция не выполнена (0x800f0950 — DISM failed. No operation was performed);
- Ошибка:0x800F081F. Не удалось найти исходные файлы. Укажите расположение файлов, необходимых для восстановления компонента, с помощью параметра Источник (Error 0x800f081f, The source files could not be found. Use the «Source» option to specify the location of the files that are required to restore the feature).
 <
<
Во всех этих случаях вы можете использовать альтернативные средства получения оригинальных файлов хранилища компонентов. Это может быть:
- Установочный диск/флешка/iso образ Windows
- Смонтированный файл wim
- Папка \sources\SxS с установочного диска
- Файл install.wim с установочным образом Windows
Вы можете указать WIM или ESD файл с оригинальным установочным образом Windows, который нужно использовать в качестве источника для восстановления файлов системы. Предположим, вы смонтировали установочный ISO образ Windows 11 в виртуальный привод D:.
Примечание. Для восстановления поврежденных файлов в хранилище компонентов из локального источника версия и редакция Windows в образе должна полностью совпадать с вашей.
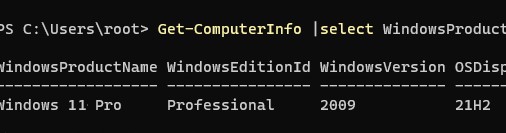
С помощью следующей PowerShell команды проверьте, какая версия Windows установлена на вашем компьютере:
Get-ComputerInfo |select WindowsProductName,WindowsEditionId,WindowsVersion, OSDisplayVersion
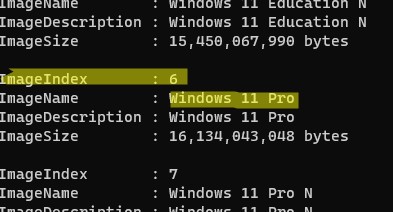
Выведите список доступных версий Windows в установочном образе:
Get-WindowsImage -ImagePath "D:\sources\install.wim"
В нашем случае образ Windows 11 Pro в образе install.wim имеет
ImageIndex = 6
.
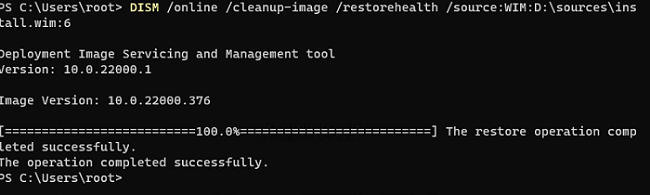
Для восстановления хранилища компонентов из локального WIM/ESD файла с блокированием доступа в интернет, выполните следующую команду (не забудьте указать ваш индекс версии Windows в файле):
DISM /online /cleanup-image /restorehealth /source:WIM:D:\sources\install.wim:6 /limitaccess
Или:
DISM /online /cleanup-image /restorehealth /source:ESD:D:\sources\install.esd:6 /limitaccess
Если при запуске появляется
- Ошибка Error: 50: DISM does not support servicing Windows PE with the /Online option, значит ваша DISM считает, что вы используете WinPE образWindows. Чтобы исправить это, удалите ветку реестра HKEY_LOCAL_MACHINE\SYSTEM\CurrentControlSet\Control\MiniNT.
Ошибка DISM Error 87: проверьте правильно написания команды, убедитесь что вы используете версию DISM для вашей версии Windows (обычно бывает при загрузке через WinPE/WinRE).
Утилита DISM пишет подробный журнал сканирования и восстановления системных файлов в файл
C:\Windows\Logs\DISM\dism.log
.
После восстановления хранилища компонентов вы можете запустить утилиту проверки системных файлов
sfc /scannow
. Скорее всего она успешно восстановит поврежденные файлы:
Программа защиты ресурсов Windows обнаружила поврежденные файлы и успешно их восстановила.
Windows Resource Protection found corrupt files and successfully repaired them.
Если все системные файлы целы, появится сообщение:
Windows Resource Protection did not find any integrity violations
Восстановление образа Windows с помощью PowerShell
В версии PowerShell в Windows 10/11 и Windows Server 2022/2019 есть аналоги рассмотренных выше команд DISM. Для сканирования хранилища компонентов и поиска повреждений в образе выполните:
Repair-WindowsImage -Online –ScanHealth
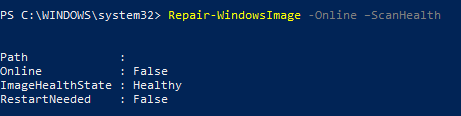
Если ошибок в хранилище компонентов не обнаружено, появится сообщение:
ImageHealth State: Healthy
Для запуска восстановления системных компонентов и файлов наберите:
Repair-WindowsImage -Online -RestoreHealth
При отсутствии доступа к интернету эта команда может зависнуть в процессе восстановления образа. Вы можете восстановить системные компоненты из локальной копии образа Windows в виде WIM/ESD файла, скопированного с установочного ISO образа Windows 10 (здесь также нужно указать индекс версии Windows в wim файле в качестве источника восстановления):
Repair-WindowsImage -Online -RestoreHealth -Source D:\sources\install.wim:5 –LimitAccess
DISM: восстановление поврежденного хранилища компонентов, если Windows не загружается
Если Windows не загружается корректно, вы можете выполнить проверку и исправление системных файлов в оффлайн режиме.
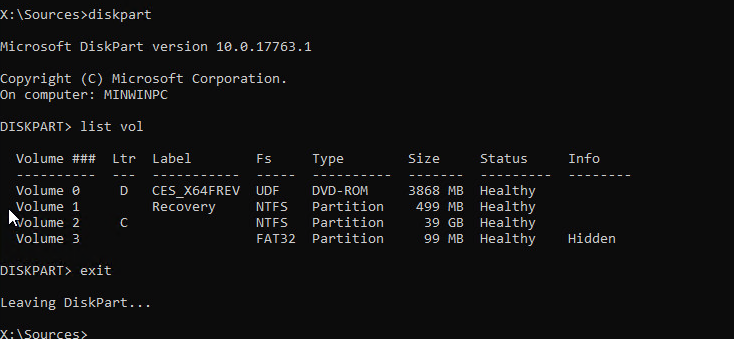
- Для этого загрузите компьютер с установочного образа Windows (проще всего создать загрузочную USB флешку с Windows 10/11 с помощью Media Creation Tool) и на экране начала установки нажмите
Shift + F10 - Чтобы разобраться с буквами дисков, назначенных в среде WinPE, выполните команду
diskpart
->
list vol
(в моем примере диску, на котором установлена Windows присвоена буква C:\, эту букву я буду использовать в следующих командах);
- Проверим системные файлы и исправим поврежденные файлы командой:
sfc /scannow /offbootdir=C:\ /offwindir=C:\Windows
- Для исправления хранилища компонентов используйте следующую команду (в качестве источника для восстановления компонентов мы используем WIM файл с установочным образом Windows 10, с которого мы загрузили компьютер):
Dism /image:C:\ /Cleanup-Image /RestoreHealth /Source:WIM:D:\sources\install.wim:6
- Если на целевом диске недостаточно места, то для извлечения временных файлов нам понадобится отдельный диск достаточного размера, например F:\, на котором нужно создать пустой каталог:
mkdir f:\scratch
и запустить восстановление хранилища компонентов командой:
Dism /image:C:\ /Cleanup-Image /RestoreHealth /Source:D:\sources\install.wim /ScratchDir:F:\scratch


Совет. Другие полезные команды DISM, которые должен знать администратор:
-
DISM /Add-Package
– установка MSU/CAB файлов обновлений, интеграция обновлений в образ Windows; -
DISM /Get-Drivers
– получение списка установленных драйверов; -
DISM /Add-Driver
– добавление драйверов в образ; -
DISM /Export-Driver
– экспорт установленных драйверов Windows; -
DISM /Add-Capability
– установка дополнительных компонентов Windows через Features on Demand (например, RSAT, сервер OpenSSH или ssh клиент Windows; -
DISM /Enable-Features
и
/Disable-Features
– включение и отключение компонентов Windows (например, протокола SMBv1), -
DISM /online /Cleanup-Image /StartComponentCleanup
– очистка хранилища компонентов и удаление старых версий компонентов (папки WinSxS); -
DISM /set-edition
– конвертирование ознакомительной редакции Windows на полную без переустановки.