Для проверки целостности системных файлов и восстановления поврежденных файлов (библиотек) компонентов в Windows (Windows Server) можно использовать команды SFC и DISM. Эти две утилиты могут быть крайне полезными, если операционная система Windows работает нестабильно, появляются ошибки при запуске стандартных приложений или служб, после вирусного заражения и т.д.
В этой статье мы рассмотрим, как использовать команды
sfc /scannow
,
DISM /Online /Cleanup-Image /RestoreHealth
или
Repair-WindowsImage -Online -RestoreHealth
для восстановления образа и системных фалов в Windows 10/11 и Windows Server 2022/2019/2016.
Содержание:
- SFC /scannow: восстановление системных файлов Windows
- Проверка целостности хранилища компонентов Windows с помощью DISM
- Восстановление образа Windows с помощью DISM /RestoreHealth
- DISM /Source: восстановление образа Windows с установочного диска
- Восстановление образа Windows с помощью PowerShell
- DISM: восстановление поврежденного хранилища компонентов, если Windows не загружается
SFC /scannow: восстановление системных файлов Windows
Перед тем, как восстанавливать образ Windows с помощью DISM, рекомендуется сначала попробовать проверить целостность системных файлов с помощью утилиты SFC (System File Checker). Команда
sfc /scannow
позволяет проверить целостность системных файлов Windows. Если какие-то системные файлы отсутствуют или повреждены, утилита SFC попробует восстановить их оригинальные копии из хранилища системных компонентов Windows (каталог C:\Windows\WinSxS).
Утилита SFC записывает все свои действия в лог-файл
windir%\logs\cbs\cbs.log
. Для всех записей, оставленных SFC в файле CBS.log проставлен тег [SR]. Чтобы выбрать из лога только записи, относящиеся к SFC, выполните команду:
findstr /c:"[SR]" %windir%\Logs\CBS\CBS.log >"%userprofile%\Desktop\sfc.txt"
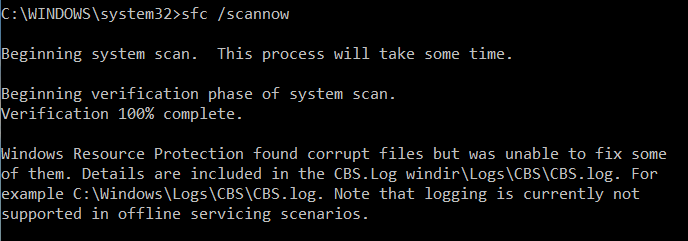
Если команда sfc /scannow возвращает ошибку “
Программа защиты ресурсов Windows обнаружила повреждённые файлы, но не может восстановить некоторые из них / Windows Resource Protection found corrupt files but was unable to fix some of them
”, скорее всего утилита не смогла получить необходимые файла из хранилища компонентов (образа) Windows.
В этом случае вам нужно попробовать восстановить хранилище компонентов вашего образа Windows с помощью DISM.
После восстановления образа вы можете повторно использовать утилиту SFC для восстановления системных файлов.
Проверка целостности хранилища компонентов Windows с помощью DISM
Утилита DISM (Deployment Image Servicing and Management) доступна во всех версиях Windows, начиная с Vista.
Для сканирования образа Windows на наличие ошибок и их исправления используется параметр DISM /Cleanup-image. Команды DISM нужно запускать из командной строки, с правами администратора.
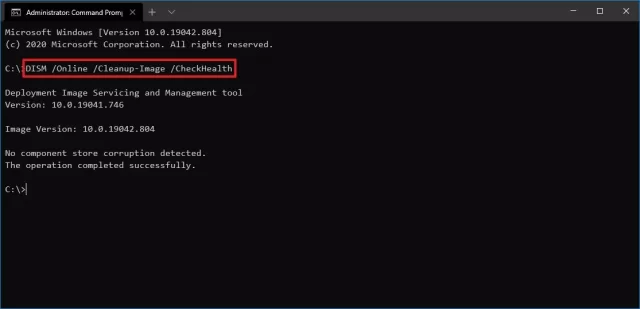
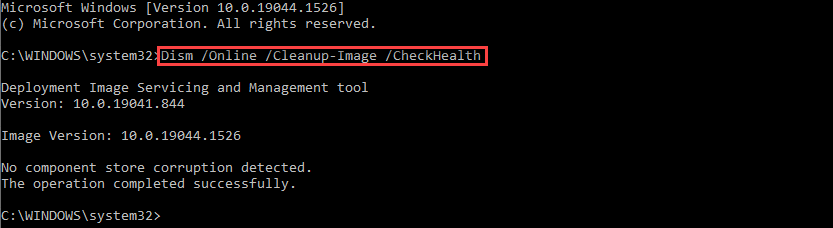
Чтобы проверить наличие признака повреждения хранилища компонентов в образе Windows (флаг CBS), выполните команду (не применимо к Windows 7/Server 2008R2):
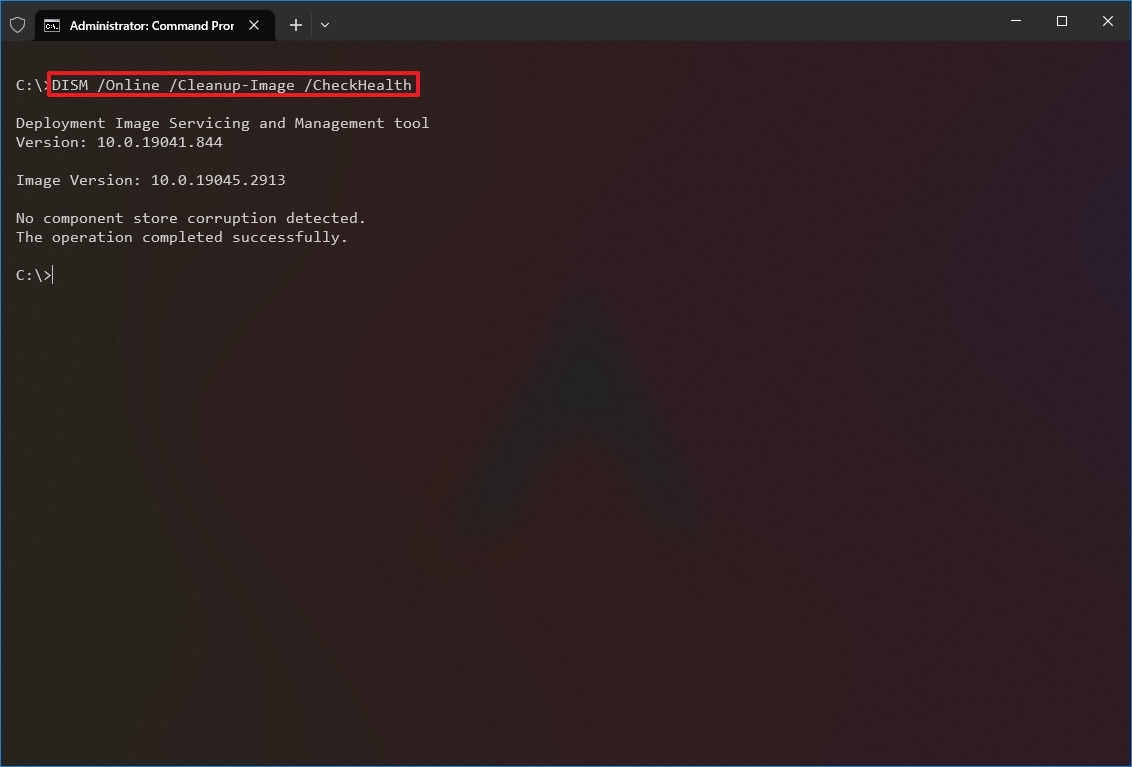
DISM /Online /Cleanup-Image /CheckHealth
Эта команда не выполняет полное сканирование хранилища компонентов. Проверяются лишь записанные ранее маркеры повреждений и события в журнале Windows. Изменения в образ не вносятся. Команда проверит, не помечен ли ваш образ Windows как поврежденный и возможно ли исправить его.
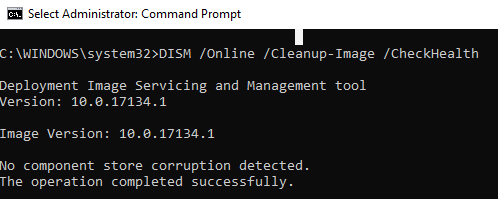
В этом примере команда вернула, что с образом все хорошо:
No component store corruption detected.
The operation completed successfully.
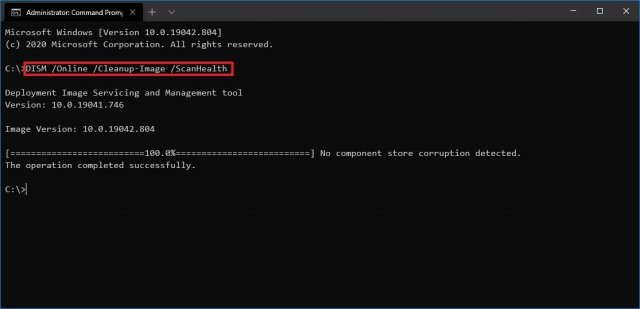
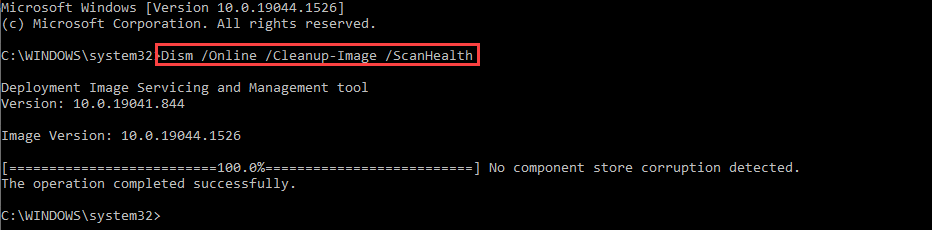
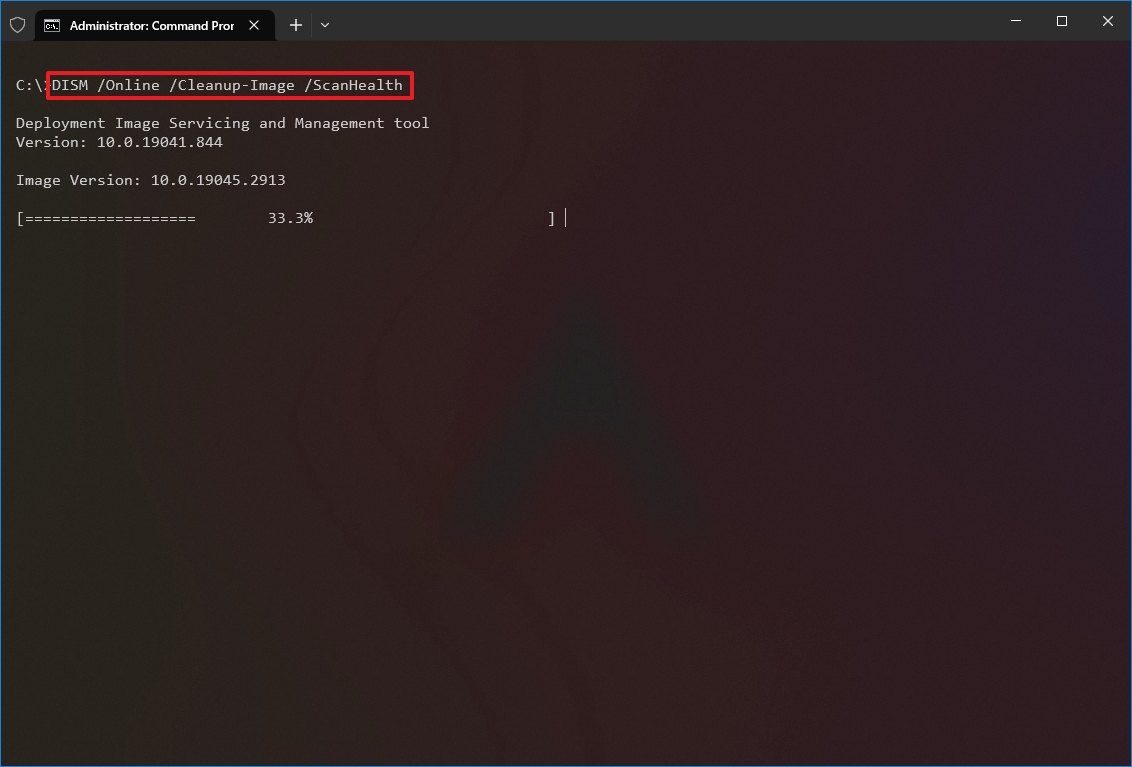
Чтобы выполнить полное сканирование хранилища компонентов на наличие повреждений в хранилище компонентов Windows, запустите команду:
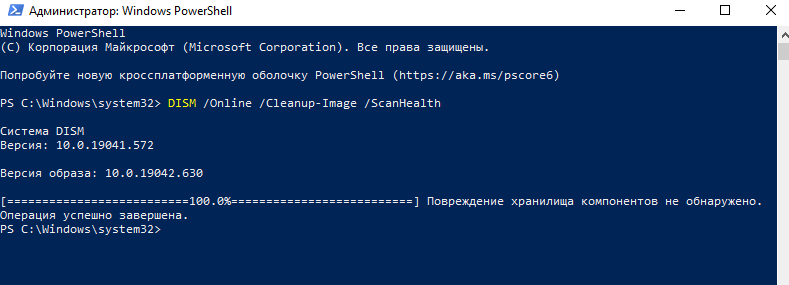
DISM /Online /Cleanup-Image /ScanHealth
Команда проверки образа Windows может выполняться довольно долго (от 10 до 30 минут). И вернет один из трех результатов:
- No component store corruption detected – DISM не обнаружил повреждения в хранилище компонентов;
- The component store is repairable – DISM обнаружил ошибки в хранилище компонентов и может исправить их;
- The component store is not repairable – DISM не может исправить хранилище компонентов Windows (попробуйте использовать более новую версию DISM или вам придется восстанавливать образ Windows из резервной копии, сбрасывать или полностью переустанавливать вашу копию Windows.

В Windows 7 и Windows Server 2008 R2 для использования параметра DISM /ScanHealth нужно установить отдельное обновление KB2966583. Иначе при запуске DISM будет появляться “
Ошибка 87. Параметр ScanHealth не распознан в этом контексте
”.
Команда DISM /ScanHealth может вернуть ошибки:
- Ошибка: 1726. Сбой при удалённом вызове процедуры;
- Ошибка: 1910. Не найден указанный источник экспорта объекта.
Это однозначно говорит о том, что ваш образ Windows поврежден и его нужно восстановить.
Восстановление образа Windows с помощью DISM /RestoreHealth
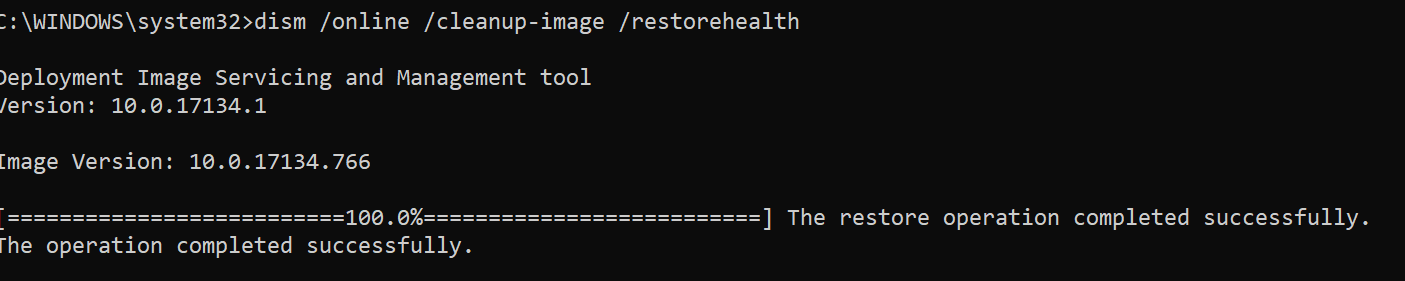
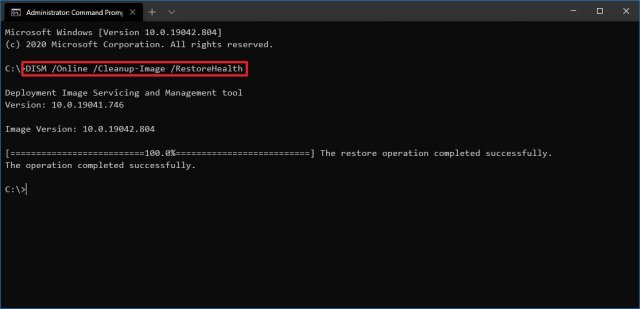
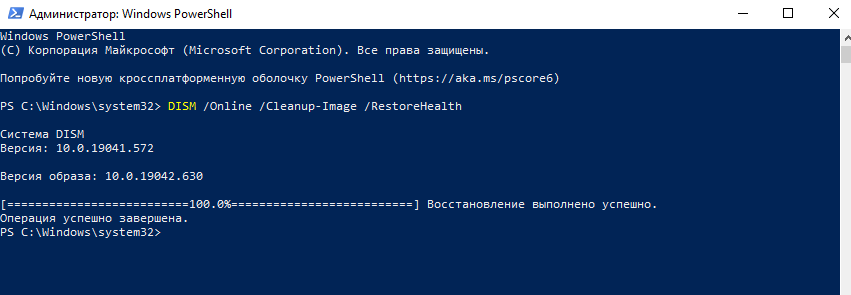
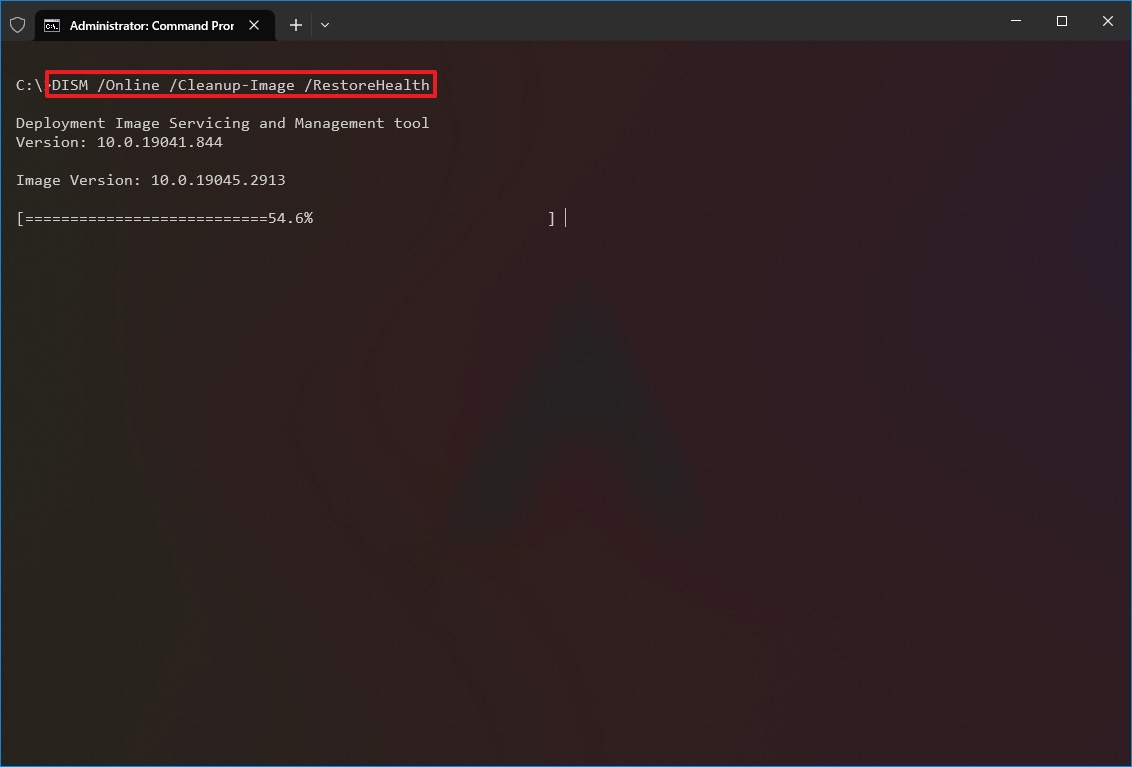
Чтобы исправить повреждения в хранилище компонентов образа Windows нужно использовать опцию RestoreHealth команды DISM. Эта опция позволит исправить найденные в образе ошибки, автоматически скачать и заменить файлы повреждённых или отсутствующих компонентов эталонными версиями файлов из центра обновлений Windows (на компьютере должен быть доступ в Интернет). Выполните команду:
DISM /Online /Cleanup-Image /RestoreHealth
В Windows 7/2008 R2 эта команда выглядит по другому:
DISM.exe /Online /Cleanup-Image /ScanHealth
Процесс сканирования и восстановления компонентов может быть довольно длительным (30 минут или более). DISM автоматически загрузит недостающие или поврежденные файлы образа с серверов Windows Update.
Восстановление выполнено успешно. Операция успешно завершена.
The restore operation completed successfully.
DISM /Source: восстановление образа Windows с установочного диска
Если на компьютере (сервере) отсутствует доступ в Интернет или отключена/повреждена служба Windows Update (как восстановить клиент Windows Update), то при восстановлении хранилища компонентов появятся ошибки:
- 0x800f0906 — Не удалось скачать исходные файлы. Укажите расположение файлов, необходимых для восстановления компонента, с помощью параметра Источник (0x800f0906 — The source files could not be downloaded. Use the source option to specify the location of the files that are required to restore the feature);
- Ошибка: 0x800f0950 — Сбой DISM. Операция не выполнена (0x800f0950 — DISM failed. No operation was performed);
- Ошибка:0x800F081F. Не удалось найти исходные файлы. Укажите расположение файлов, необходимых для восстановления компонента, с помощью параметра Источник (Error 0x800f081f, The source files could not be found. Use the «Source» option to specify the location of the files that are required to restore the feature).
 <
<
Во всех этих случаях вы можете использовать альтернативные средства получения оригинальных файлов хранилища компонентов. Это может быть:
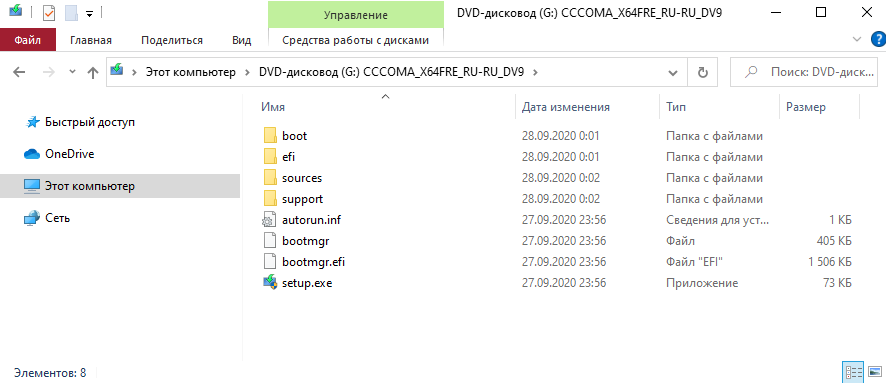
- Установочный диск/флешка/iso образ Windows
- Смонтированный файл wim
- Папка \sources\SxS с установочного диска
- Файл install.wim с установочным образом Windows
Вы можете указать WIM или ESD файл с оригинальным установочным образом Windows, который нужно использовать в качестве источника для восстановления файлов системы. Предположим, вы смонтировали установочный ISO образ Windows 11 в виртуальный привод D:.
Примечание. Для восстановления поврежденных файлов в хранилище компонентов из локального источника версия и редакция Windows в образе должна полностью совпадать с вашей.
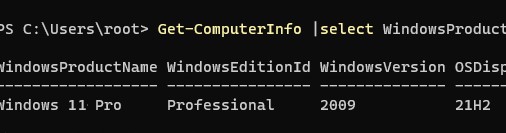
С помощью следующей PowerShell команды проверьте, какая версия Windows установлена на вашем компьютере:
Get-ComputerInfo |select WindowsProductName,WindowsEditionId,WindowsVersion, OSDisplayVersion
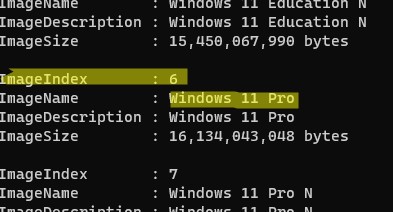
Выведите список доступных версий Windows в установочном образе:
Get-WindowsImage -ImagePath "D:\sources\install.wim"
В нашем случае образ Windows 11 Pro в образе install.wim имеет
ImageIndex = 6
.
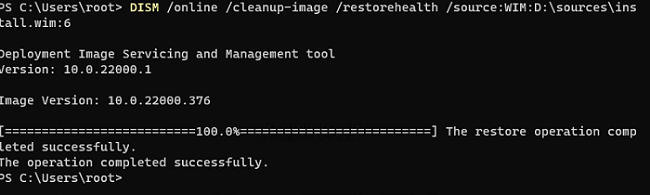
Для восстановления хранилища компонентов из локального WIM/ESD файла с блокированием доступа в интернет, выполните следующую команду (не забудьте указать ваш индекс версии Windows в файле):
DISM /online /cleanup-image /restorehealth /source:WIM:D:\sources\install.wim:6 /limitaccess
Или:
DISM /online /cleanup-image /restorehealth /source:ESD:D:\sources\install.esd:6 /limitaccess
Если при запуске появляется
- Ошибка Error: 50: DISM does not support servicing Windows PE with the /Online option, значит ваша DISM считает, что вы используете WinPE образWindows. Чтобы исправить это, удалите ветку реестра HKEY_LOCAL_MACHINE\SYSTEM\CurrentControlSet\Control\MiniNT.
Ошибка DISM Error 87: проверьте правильно написания команды, убедитесь что вы используете версию DISM для вашей версии Windows (обычно бывает при загрузке через WinPE/WinRE).
Утилита DISM пишет подробный журнал сканирования и восстановления системных файлов в файл
C:\Windows\Logs\DISM\dism.log
.
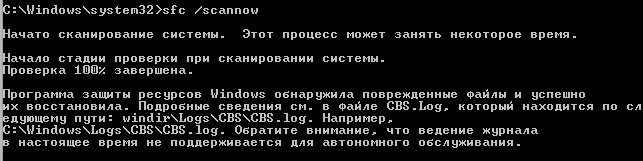
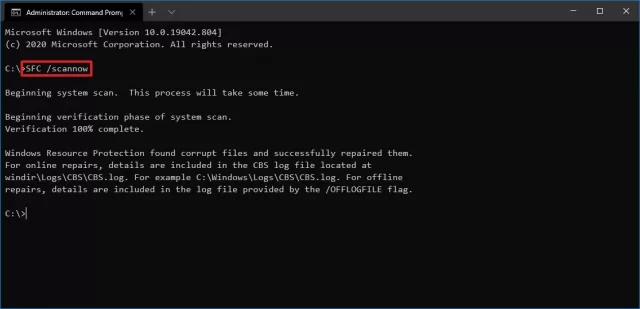
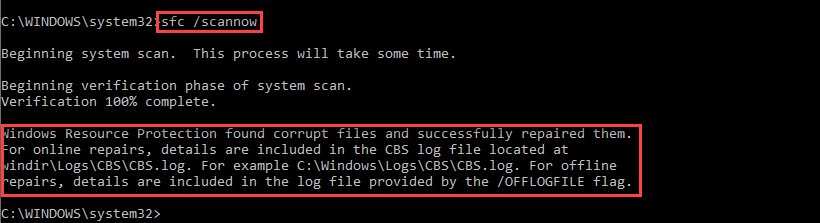
После восстановления хранилища компонентов вы можете запустить утилиту проверки системных файлов
sfc /scannow
. Скорее всего она успешно восстановит поврежденные файлы:
Программа защиты ресурсов Windows обнаружила поврежденные файлы и успешно их восстановила.
Windows Resource Protection found corrupt files and successfully repaired them.
Если все системные файлы целы, появится сообщение:
Windows Resource Protection did not find any integrity violations
Восстановление образа Windows с помощью PowerShell
В версии PowerShell в Windows 10/11 и Windows Server 2022/2019 есть аналоги рассмотренных выше команд DISM. Для сканирования хранилища компонентов и поиска повреждений в образе выполните:
Repair-WindowsImage -Online –ScanHealth
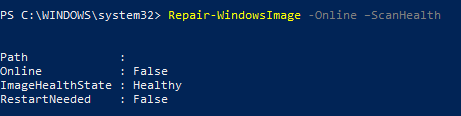
Если ошибок в хранилище компонентов не обнаружено, появится сообщение:
ImageHealth State: Healthy
Для запуска восстановления системных компонентов и файлов наберите:
Repair-WindowsImage -Online -RestoreHealth
При отсутствии доступа к интернету эта команда может зависнуть в процессе восстановления образа. Вы можете восстановить системные компоненты из локальной копии образа Windows в виде WIM/ESD файла, скопированного с установочного ISO образа Windows 10 (здесь также нужно указать индекс версии Windows в wim файле в качестве источника восстановления):
Repair-WindowsImage -Online -RestoreHealth -Source D:\sources\install.wim:5 –LimitAccess
DISM: восстановление поврежденного хранилища компонентов, если Windows не загружается
Если Windows не загружается корректно, вы можете выполнить проверку и исправление системных файлов в оффлайн режиме.
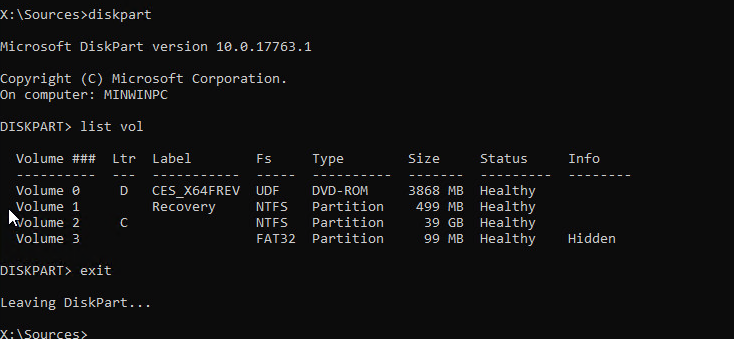
- Для этого загрузите компьютер с установочного образа Windows (проще всего создать загрузочную USB флешку с Windows 10/11 с помощью Media Creation Tool) и на экране начала установки нажмите
Shift + F10 - Чтобы разобраться с буквами дисков, назначенных в среде WinPE, выполните команду
diskpart
->
list vol
(в моем примере диску, на котором установлена Windows присвоена буква C:\, эту букву я буду использовать в следующих командах);
- Проверим системные файлы и исправим поврежденные файлы командой:
sfc /scannow /offbootdir=C:\ /offwindir=C:\Windows
- Для исправления хранилища компонентов используйте следующую команду (в качестве источника для восстановления компонентов мы используем WIM файл с установочным образом Windows 10, с которого мы загрузили компьютер):
Dism /image:C:\ /Cleanup-Image /RestoreHealth /Source:WIM:D:\sources\install.wim:6
- Если на целевом диске недостаточно места, то для извлечения временных файлов нам понадобится отдельный диск достаточного размера, например F:\, на котором нужно создать пустой каталог:
mkdir f:\scratch
и запустить восстановление хранилища компонентов командой:
Dism /image:C:\ /Cleanup-Image /RestoreHealth /Source:D:\sources\install.wim /ScratchDir:F:\scratch


Совет. Другие полезные команды DISM, которые должен знать администратор:
-
DISM /Add-Package
– установка MSU/CAB файлов обновлений, интеграция обновлений в образ Windows; -
DISM /Get-Drivers
– получение списка установленных драйверов; -
DISM /Add-Driver
– добавление драйверов в образ; -
DISM /Export-Driver
– экспорт установленных драйверов Windows; -
DISM /Add-Capability
– установка дополнительных компонентов Windows через Features on Demand (например, RSAT, сервер OpenSSH или ssh клиент Windows; -
DISM /Enable-Features
и
/Disable-Features
– включение и отключение компонентов Windows (например, протокола SMBv1), -
DISM /online /Cleanup-Image /StartComponentCleanup
– очистка хранилища компонентов и удаление старых версий компонентов (папки WinSxS); -
DISM /set-edition
– конвертирование ознакомительной редакции Windows на полную без переустановки.
Если в Windows 10 возникают проблемы, это может быть связано с отсутствием или повреждением файлов. Это руководство расскажет вам о восстановлении системы с помощью командных инструментов обслуживания образов развёртывания и управления ими (DISM) и средства проверки системных файлов (SFC).
В Windows 10 обслуживание образов развертывания и управление ими — это инструмент командной строки, предназначенный для администраторов для подготовки, изменения и восстановления образов системы, включая среду восстановления Windows, программу установки Windows и Windows PE (WinPE). Однако любой желающий может также использовать этот инструмент с локальным образом восстановления для решения типовых системных проблем.
Обычно, когда вам нужно устранить конкретную ошибку, определить, почему устройство перестаёт загружаться правильно, или решить проблемы с производительностью, вы можете использовать инструмент команды System File Checker для сканирования и замены отсутствующих или повреждённых системных файлов с помощью образа для восстановления. Проблема использования этого подхода заключается в том, что если один или несколько файлов Windows 10 в образе повреждены, команда SFC не сработает. Если вы столкнулись с такой проблемой, можно использовать образ «install.wim» с DISM для восстановления образа, а затем использовать инструмент SFC для исправления установки без необходимости повторно переустанавливать Windows с нуля.
В этом руководстве по Windows 10 рассказывается, как использовать инструменты DISM и SFC с командной строкой, чтобы вернуть компьютер в рабочее состояние без необходимости переустановки системы.
Предупреждение. Команды, описанные в этом руководстве, являются безопасными, но так как вы будете вносить изменения в систему, рекомендуется создать полную резервную копию, прежде чем продолжать.
Как использовать DISM для восстановления образа Windows 10
Инструмент DISM для Windows 10 предлагает три варианта восстановления образа, включая «CheckHealth», «ScanHealth» и «RestoreHealth», которые вы можете запускать по порядку. В зависимости от серьёзности проблемы можно использовать параметр «RestoreHealth» для исправления локально доступного образа с использованием различных исходных файлов.
Команда DISM с опцией CheckHealth
Параметр CheckHealth в DISM позволяет быстро определить, есть ли какие-либо повреждения внутри локального образа Windows 10. Никакого ремонта при этом не выполняется.
Чтобы проверить образ Windows 10 на наличие проблем с DISM, выполните следующие действия:
- Откройте меню «Пуск».
- Введите в поиск cmd, нажмите правой кнопкой мыши на верхний результат и выберите параметр «Запуск от имени администратора».
- Введите следующую команду, чтобы выполнить быструю проверку, и нажмите ввод:
DISM /Online /Cleanup-Image /CheckHealth
После выполнения этих действий DISM запустится и проверит любые повреждения данных, которые могут потребовать исправления.
Команда DISM с опцией ScanHealthОпция ScanHealth выполняет более расширенное сканирование, чтобы определить, есть ли в образе системы какие-либо проблемы.
- Откройте меню «Пуск».
- Введите в поиск cmd, нажмите правой кнопкой мыши на верхний результат и выберите параметр «Запуск от имени администратора».
- Введите следующую команду, чтобы выполнить расширенное сканирование DISM, и нажмите ввод:
DISM /Online /Cleanup-Image /ScanHealth
Расширенное сканирование может занять несколько минут, чтобы проверить и определить, нуждается ли образ Windows 10 в ремонте.
Команда DISM с опцией RestoreHealth
Если есть проблемы с образом системы, вы можете использовать DISM с опцией RestoreHealth для автоматического сканирования и устранения распространённых проблем.
Чтобы устранить проблемы с образами Windows 10 с помощью инструмента DISM, выполните следующие действия:
- Откройте меню «Пуск».
- Введите в поиск cmd, нажмите правой кнопкой мыши на верхний результат и выберите параметр «Запуск от имени администратора».
- Введите следующую команду, чтобы восстановить образ Windows 10, и нажмите ввод:
DISM /Online /Cleanup-Image /RestoreHealth
Примечание: если команда в какой-то момент зависла, это нормально. Через несколько минут процесс успешно завершится.
После выполнения этих шагов средство обслуживания образов развёртывания и управления ими подключится к центру обновления Windows для загрузки и замены повреждённых файлов (если они есть).
Устранение проблем с DISM с помощью образа install.wim
Команда DISM обычно выполняется без проблем, но если есть проблемы с заменой повреждённых файлов или вы не подключены к интернету, вам нужно будет предоставить другой образ с помощью параметра «Источник». Обычно вы можете использовать файл install.wim или install.esd с другого компьютера, загрузочный установочный носитель или ISO-файл Windows 10. Однако убедитесь, что файлы соответствуют версии, редакции и языку версии Windows 10, которую вы пытаетесь исправить.
Загрузите файл ISO для Windows 10
Если вам нужно использовать сторонний источник файлов, рекомендуется Media Creation Tool, чтобы загрузить новую копию Windows 10.
- Откройте веб-сайт поддержки Microsoft https://www.microsoft.com/ru-ru/software-download/windows10.
- Нажмите кнопку «Загрузить инструмент сейчас».
- Дважды кликните по файлу MediaCreationToolxxxx.exe для начала установки.
- Нажмите кнопку «Принять».
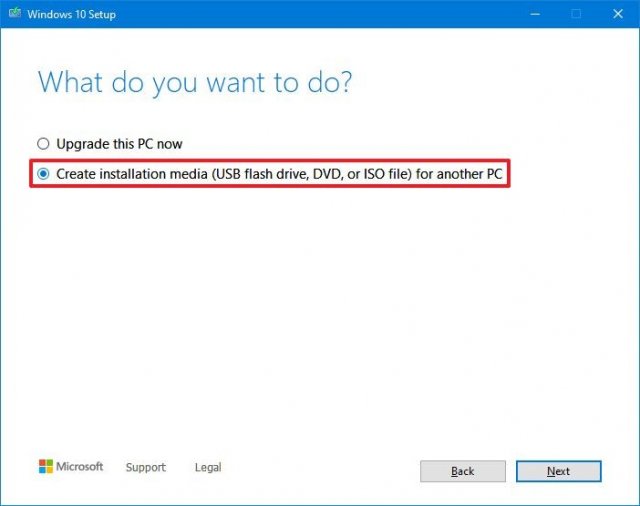
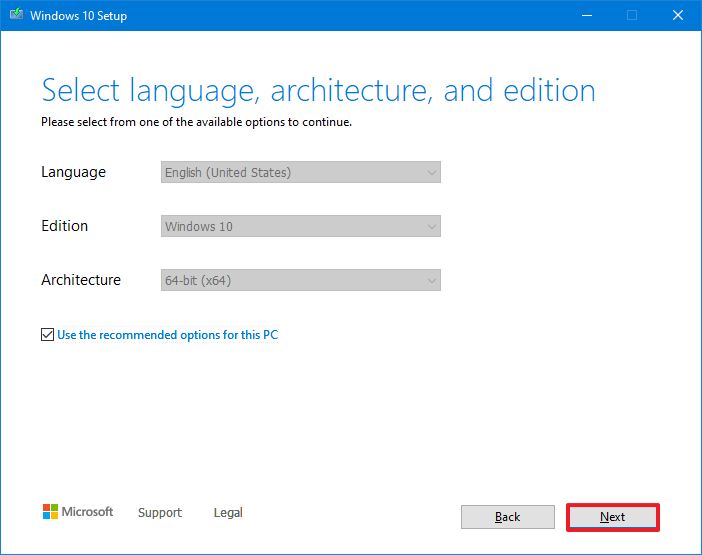
- Выберите «Создать установочный носитель (USB-накопитель, DVD-диск или файл ISO) для другого ПК».
- Нажмите кнопку «Далее».
- Нажмите кнопку «Далее» снова.
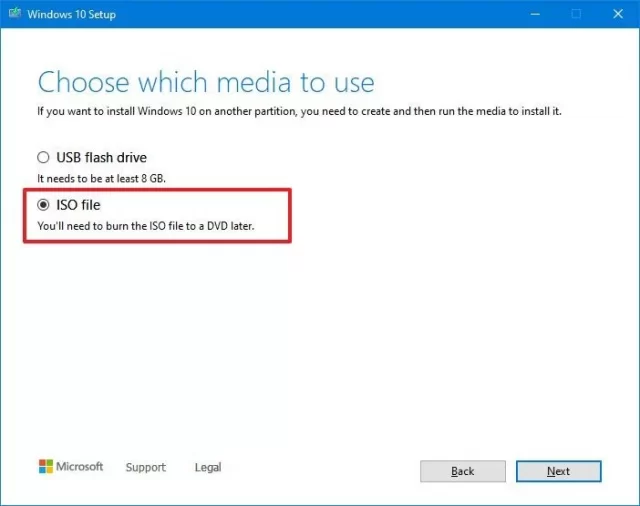
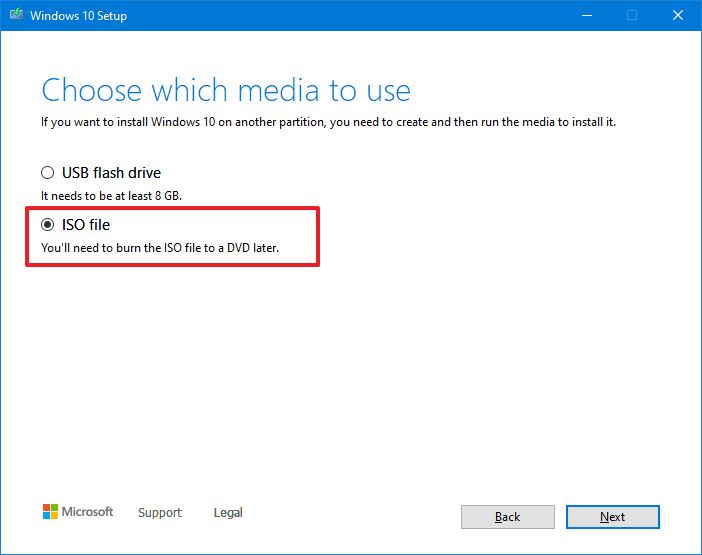
- Выберите вариант «Файл ISO».
- Нажмите кнопку «Далее».
- Выберите место назначения для сохранения ISO-файла Windows 10.
- Нажмите кнопку «Сохранить».
- Нажмите по ссылке, чтобы открыть расположение файла в проводнике.
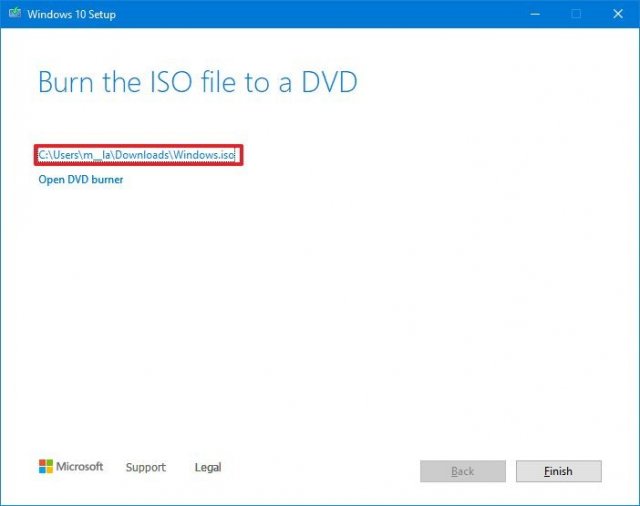
- Нажмите на кнопку «Завершить».
- Дважды нажмите по файлу Windows.iso, чтобы смонтировать образ.
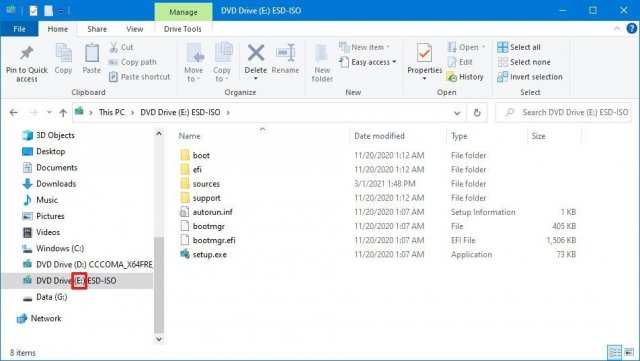
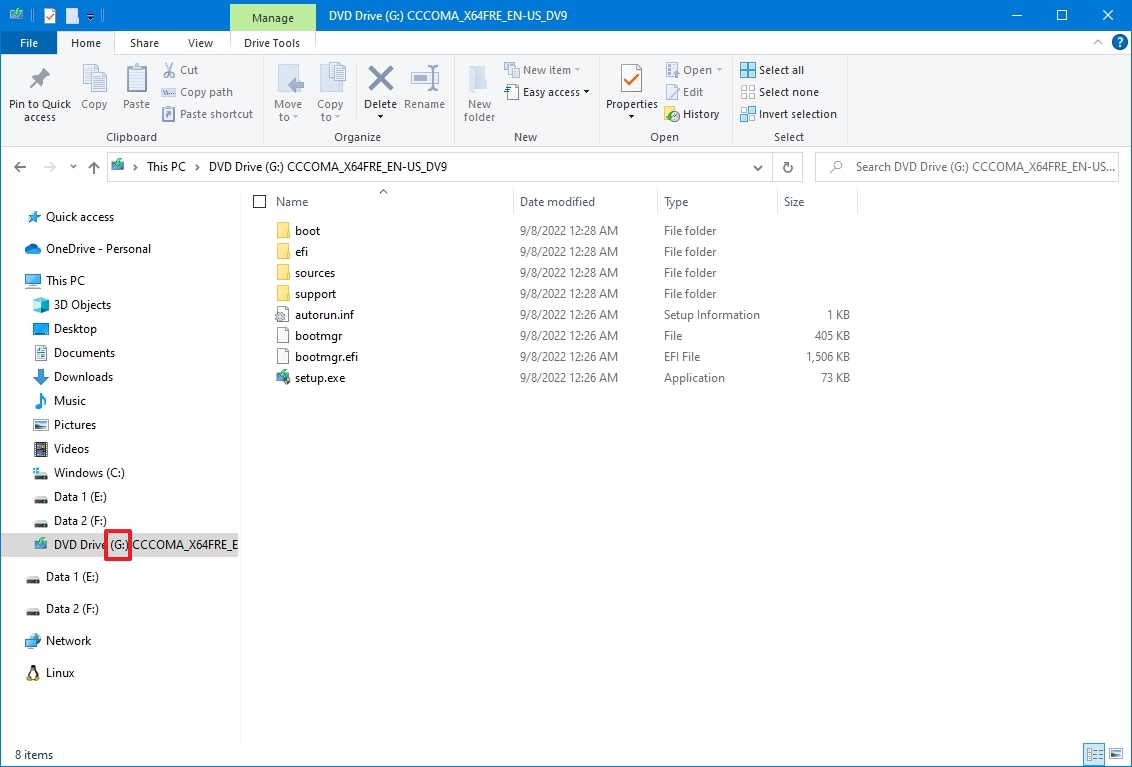
- В разделе «Этот компьютер» подтвердите букву диска для монтирования в панели слева.
После выполнения этих действий вы можете продолжить работу с DISM, используя параметр «Источник», чтобы восстановить локальный образ Windows 10.
Исправление образа восстановления Windows 10
Чтобы запустить средство обслуживания образов развёртывания и управления ими с помощью образа из альтернативного источника (install.wim), выполните следующие действия:
- Откройте меню «Пуск».
- Введите в поиск cmd, нажмите правой кнопкой мыши на верхний результат и выберите параметр «Запуск от имени администратора».
- Введите следующую команду, чтобы восстановить образ Windows 10, и нажмите ввод:
DISM /Online /Cleanup-Image /RestoreHealth /Source:E:\Sources\install.wim
В команде замените «F» буквой диска, соответствующей точке монтирования ISO в проводнике.
- Необязательно. Введите следующую команду, чтобы ограничить использование центра обновления Windows, и нажмите ввод:
DISM /Online /Cleanup-Image /RestoreHealth /Source:E\Sources\install.wim /LimitAccess
- Необязательно. Введите следующий вариант предыдущей команды для выполнения той же задачи и нажмите ввод:
DISM /Online /Cleanup-Image /RestoreHealth /Source:wim:E:\Sources\install.wim:1/LimitAccess
В команде измените F:\Sources на путь к файлу install.wim.
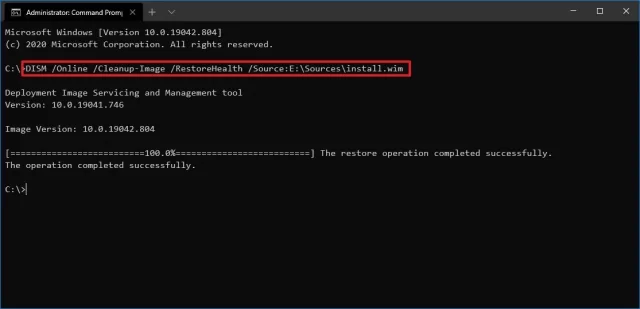
После выполнения этих действий команда просканирует и устранит наиболее распространённые проблемы, используя файл «install.wim», который вы указали в качестве альтернативного источника.
Устранение проблем с DISM с помощью образа ESD
Если у вас есть зашифрованный образ install.esd, вы можете использовать его для восстановления повреждённых файлов в Windows 10.
Чтобы использовать DISM с файлом образа «install.esd» в качестве источника для восстановления Windows 10, выполните следующие действия:
- Откройте меню «Пуск».
- Введите в поиск cmd, нажмите правой кнопкой мыши на верхний результат и выберите параметр «Запуск от имени администратора».
- Введите следующую команду, чтобы восстановить образ с помощью файла «install.esd», и нажмите ввод:
DISM /Online /Cleanup-Image /RestoreHealth /Source:C:\ESD\Windows\sources\install.esd
В команде замените C:\ESD\Windows\sources на путь, соответствующий расположению файла «.esd» (если есть).
- Необязательно. Введите следующую команду, чтобы ограничить использование центра обновления Windows, и нажмите ввод:
DISM /Online /Cleanup-Image /RestoreHealth /Source:C:\ESD\Windows\sources\install.esd /LimitAccess
- Необязательно. Введите следующий вариант предыдущей команды для выполнения той же задачи и нажмите ввод:
DISM /Online /Cleanup-Image /RestoreHealth /Source:esd:C:\ESD\Windows\sources\install.esd:1 /LimitAccess
- Необязательно. Введите следующую команду, чтобы использовать файл install.esd, расположенный на другом диске, и нажмите ввод:
DISM /Online /Cleanup-Image /RestoreHealth /Source:E:\Sources\install.esd
В команде замените F:\Sources на путь к расположению файла «install.esd».
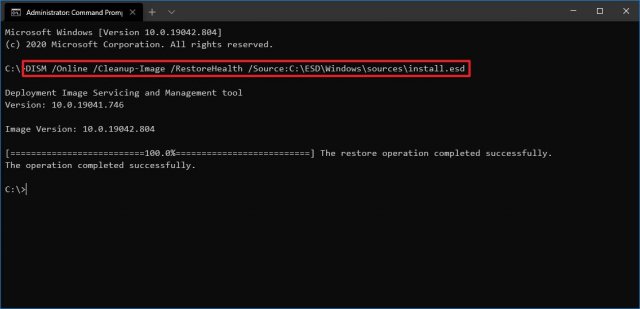
После выполнения этих действует DISM восстановит повреждённые файлы, используя файлы, включенные в образ «install.esd».
Как запустить SFC для устранения проблем в Windows 10
Приведенные выше инструкции предназначены для устранения проблем с образом системы, а не с текущей установкой Windows 10. После восстановления образа до работоспособного состояния вы должны использовать командный инструмент System File Checker (SFC), чтобы восстановить текущую систему.
Чтобы использовать инструмент SFC для восстановления установки Windows 10, выполните следующие действия:
- Откройте меню «Пуск».
- Введите в поиск cmd, нажмите правой кнопкой мыши на верхний результат и выберите параметр «Запуск от имени администратора».
- Введите следующую команду, чтобы восстановить установку, и нажмите ввод:
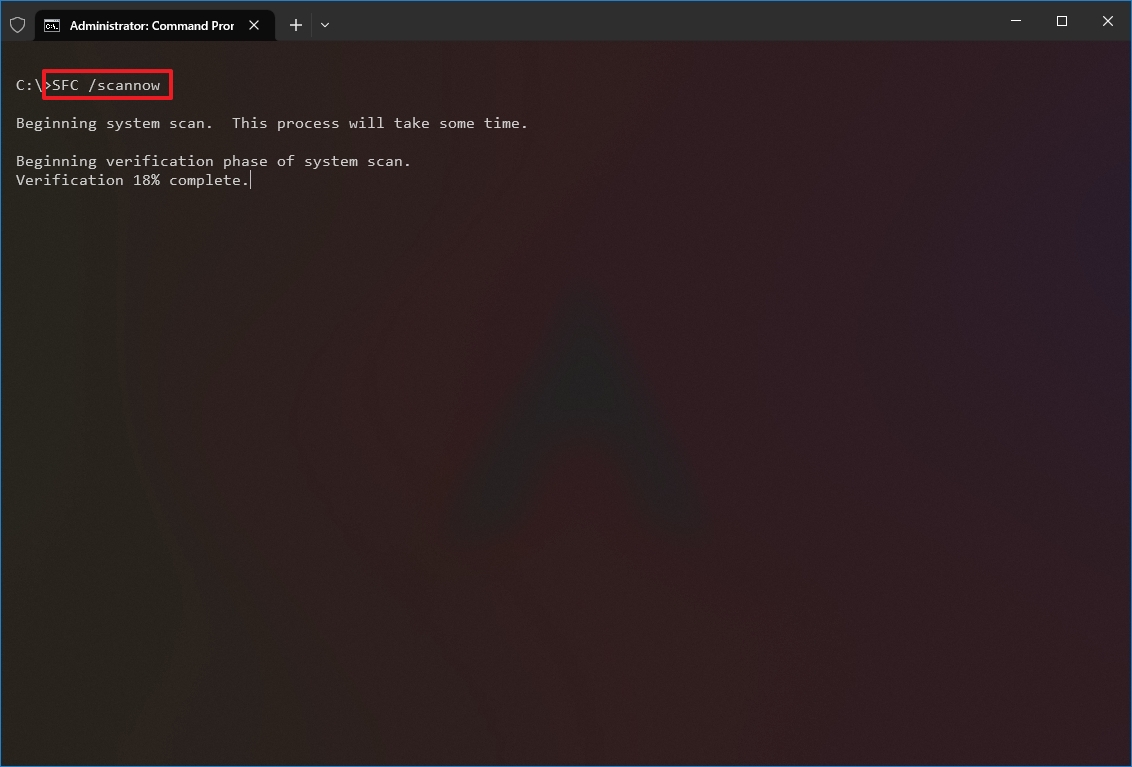
SFC /scannow
Совет: если обнаружены ошибки, вы можете запустить команду три раза, чтобы убедиться, что всё было исправлено.
После этого средство проверки восстановит системные файлы с помощью локальных файлов образов для устранения проблем с Windows 10, а файлы журнала будут сохранены в %windir%/Logs/CBS/CBS.log и %windir.%\Logs\DISM\DISM.log, который вы можете просмотреть, чтобы получить более подробную информацию о восстановленных файлах.
If your Windows 10 has been misbehaving and becoming bothersome for quite a while now, your Windows 10 possibly got corrupted. Can you still fix it? It depends, but the DISM cleanup-image can help!
At the end of this tutorial, you’ll learn how to make your computer work like a charm by using a series of DISM cleanup-image commands. All this for free and for your peace of mind.
Read on and get your Windows 10 fixed without resorting to a reset!
Prerequisites
This tutorial will be a hands-on demonstration. If you’d like to follow along, be sure you have the following:
- A Windows 10 PC – This tutorial uses Windows 10 Version: 21H2, but other versions will also work.
- A Windows user account with administrator privileges.
Scanning for Corrupted Items with dism cleanup-image
Before running DISM commands, don’t waste time repairing your Windows 10 image just to hit a roadblock. Essentially, check if your image is still repairable with the DISM cleanup-image option and two arguments (/ScanHealth and /CheckHealth).
In this tutorial, you’ll first use the /ScanHealth argument, which tells DISM to check individual items for corruption in the component store. The component store tracks and services all components that make up the Windows operating system.
Launch your command prompt as an administrator, and run the DISM command below to scan (/ScanHealth) your Windows image and log errors and/or corruptions when detected. The /Online switch in the command targets the running Windows 10 OS.
Remember to always run command prompt as administrator before running DISM commands since DISM requires elevated permissions.
Dism /Online /Cleanup-Image /ScanHealth
Depending on the volume of your Windows 10 image, scanning corrupted components will take time to complete. When the scan completes, you’ll see a similar image to the one below if no component store corruption has been detected.
With
/CheckHealth, DISM tells you whether the image is healthy, repairable, or non-repairable. According to Microsoft Support, if the image is non-repairable, “you should discard the image and start again“, implying reinstalling your Windows 10.
Checking the Component Store for Existing Detected Corruptions
Like the /ScanHealth argument, the /CheckHealth argument lets you check if any corruption has been detected, but /ScanHealth only takes a few seconds to complete. Yes! Scanning takes less time because the /CheckHealth argument reports existing error logs readily available.
1. Run the following command to check existing error logs for detected corruption in your system files.
Dism /Online /Cleanup-Image /CheckHealthBelow is an example output after appending the /CheckHealth argument. As you can see, the message says No component store corrupted detected. This output raises your chances of getting your Windows 10 image repaired.
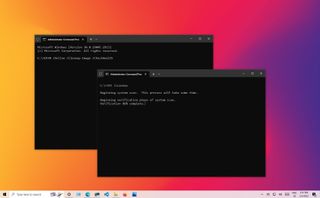
2. If your image is repairable, run the sfc /scannow command below to check for, and repair corrupted or modified system files.
After running the command, you’ll see verification progress, like the one below.
Do not close the command prompt until the scan reaches 100 percent and the repair completes.
If you get an error after running sfc /scannow command, check Microsoft’s documentation about using the System File Checker.
3. Finally, when you’ve successfully repaired your Windows 10 system files, restart your device to test if the repair fixed your Windows 10 issues.
Tidying Up the Component Store
Knowing that your Windows 10 image is repairable, take this opportunity to free up some disk space by reducing the size of the component store. Insufficient storage is known to cause issues, not just with Windows 10 but also other OS.
But before cleaning up the component store, you’ll first have to use the /AnalyzeComponentStore argument together with a DISM command.
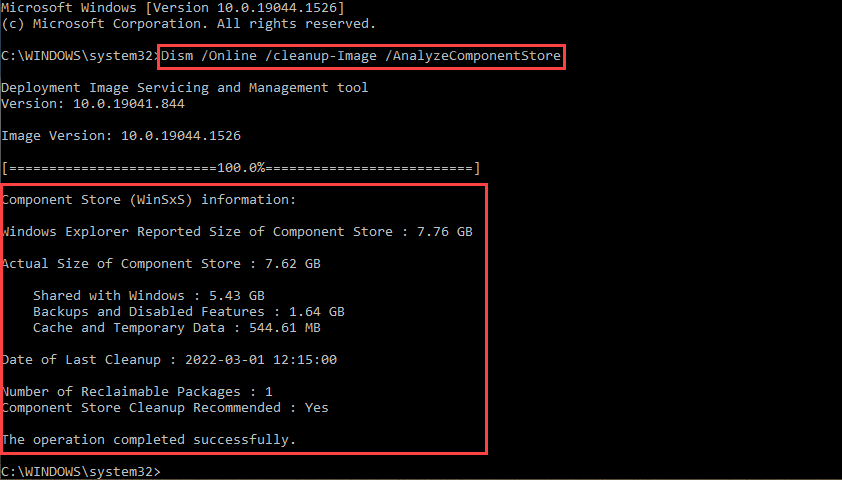
1. Run the following command to tell DISM to analyze the component store (/AnalyzeComponentStore). This command will show you the size of the component store, so you can see if there are reclaimable packages and if cleanup is recommended.
Dism /Online /Cleanup-Image /AnalyzeComponentStoreIn the analysis report as below, you can see the following information:
- Windows Explorer Reported Size of Component Store : 7.76 GB.
- Date of the Last Cleanup : 2022-03-01 12:15:00.
- Number of Reclaimable Packages : 1.
- Component Store Cleanup Recommended : Yes.
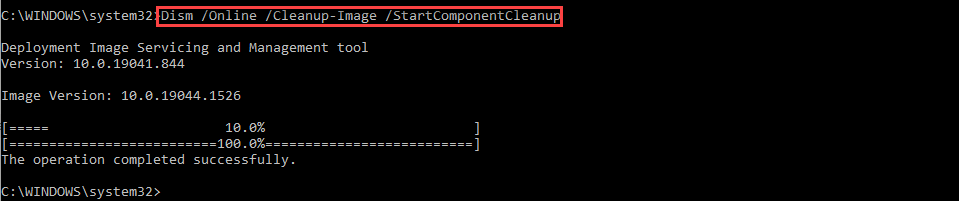
2. Next, run the below command to free up disk space (/StartComponentCleanup). The command eradicates outdated items in the component store or the earlier versions of updated components.
Dism /Online /Cleanup-Image /StartComponentCleanupYou can see below that the operation was completed successfully.
3. Now, execute the below command to make the component store size even smaller with the /ResetBase argument.
Note that you can’t uninstall Windows updates installed since the /ResetBase argument tells DISM to reset the base of the superseded components.
Dism /Online /Cleanup-Image /StartComponentCleanup /ResetBaseAdditionally, you can run the following command, appending /Defer, to delay long-running cleanup operations to the next automatic maintenance.
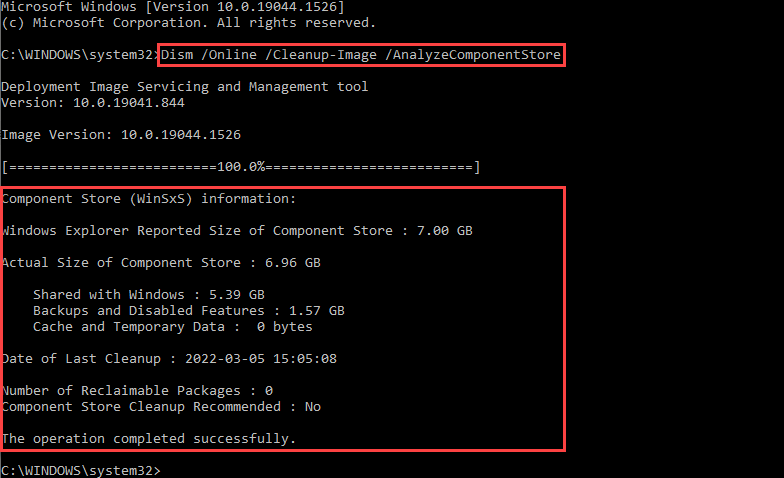
Dism /Online /Cleanup-Image /StartComponentCleanup /ResetBase /Defer4. Lastly, rerun the command below as you did in step one to see the changes after cleaning up the component store.
Dism /Online /Cleanup-Image /AnalyzeComponentStoreThe result below shows the new component store size is now 7.00 GB from 7.67 GB before cleaning up.
The /ResetBase argument was not used in this cleanup.
Repairing an Image Online
If you’re still unsatisfied with how your Windows 10 performs after cleaning up the component store, then it’s time to jump into repairing your Windows 10 image.
There are two ways to repair an image using the online method, using /Online switch and /Online switch with /Source argument. But you’ll start with the /Online switch for this tutorial as it does not require a lot of effort.
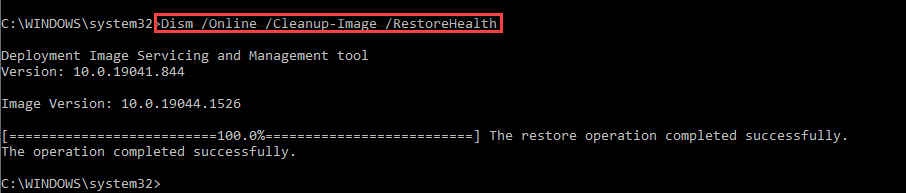
Run the command below to repair (/RestoreHealth) your Windows 10 image (/Cleanup-Image). The /Online switch below targets the current working Windows 10 OS to repair, while /RestoreHealth restores your image tip-top shape.
This command uses Windows Update to get the required files to fix corruptions on your Windows 10 image.
Dism /Online /Cleanup-Image /RestoreHealth
Now, restart your device after successfully repairing your Windows 10 image, and see if there are changes in how your Windows 10 performs.
Repairing an Image Offline with a Windows 10 Image Copy
If, for any reason that repairing your Windows 10 image online fails, you can repair your image offline with a fresh copy of a Windows 10 image. How? You’ll use the Windows Media Creation Tool to download an ISO file of a Windows 10 image.
1. Download and use the Windows Media Creation Tool to get a fresh copy of the Windows 10 image in an ISO file.
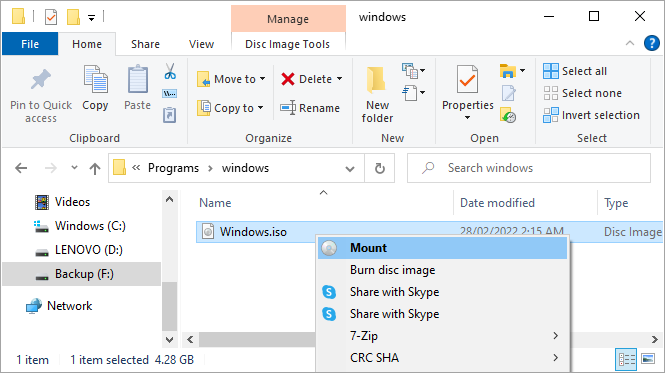
2. Next, open File Explorer, and locate your ISO file. Right click on the ISO file, and select Mount, as shown below, to mount your ISO file.
There’s no need to burn the ISO file into a blank DVD because Windows 10 can virtually mount ISO files.
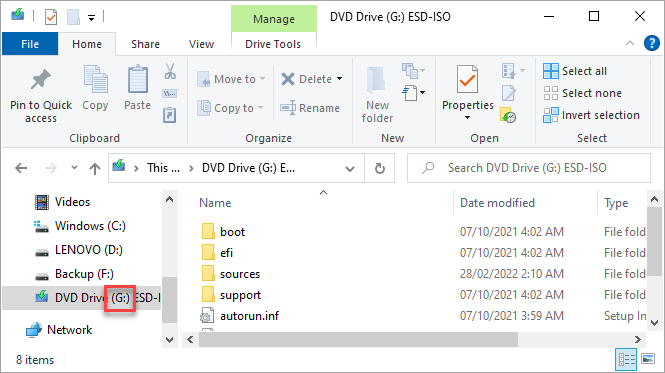
3. After you mount the image, take note of the mounted drive letter, and check the sources folder of your image to confirm if you have either install.wim or install.esd. You’ll need this information for the next step.
4. Run the following command to repair your image with a Windows 10 image source (/Source). The /LimitAccess parameter prevents DISM from using Windows Update as a repair source. Replace the following value in the command accordingly:
G:– with the actual drive letter you noted in step three.
win_image– with either install.wim or install.esd that you noted in step three.
Dism /Online /Cleanup-Image /RestoreHealth /Source:G:\sources\win_image /LimitAccess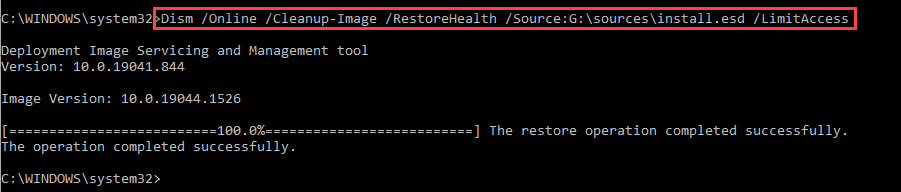
5. Finally, restart your device after the successful repair, and your Windows 10 should now be fully functional.
Repairing an Image Offline
Perhaps a client tasked you to repair an offline Windows 10 image. If so, appending the /Image switch can help, where you’ll specify the path to the root directory of the offline image copy.
1. Mount your ISO and confirm the drive letter as you did in the “Repairing an Image with a Windows 10 Image Copy” section (steps two-three).
You can skip this step if you have an image only instead of an ISO.
2. Next, check whether you have the install.esd or install.wim file. If you have the install.esd file, convert the file to install.wim, so you can mount the image on a folder (step four).
If you have the install.wim file already, you can jump to step five to repair your Windows 10 image.
For this tutorial, the converted install.wim file is saved on the C:\ drive directly, but you can save it on your preferred location.
Converting the image from .esd to .wim is required since /Mount-Wim option only mounts .wim files.
3. Create a folder with your preferred name where you’ll mount the offline image (install.wim). But for this tutorial, the folder is named C:\Offline.
4. Now, run the below command to mount the image (install.wim) to your dedicated folder (C:\Offline). Replace C:\install.wim with your image’s file path and C:\Offline with your dedicated offline image’s root folder.
DISM /Mount-Wim /WimFile:"C:\install.wim" /index:1 /MountDir:"C:\Offline"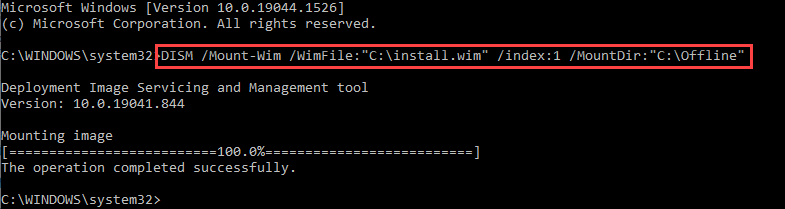
5. Finally, run the following command to repair your Windows 10 image offline (/Image) using your mounted Windows 10 image as the source (/Source).
Change the paths in the command below accordingly:
G:\sources\install.esd– your mounted Windows 10 image path.
C:\Offline– the root directory of your offline Windows 10 image.
Dism /Image:C:\Offline /Cleanup-Image /RestoreHealth /Source:G:\Sources\install.esd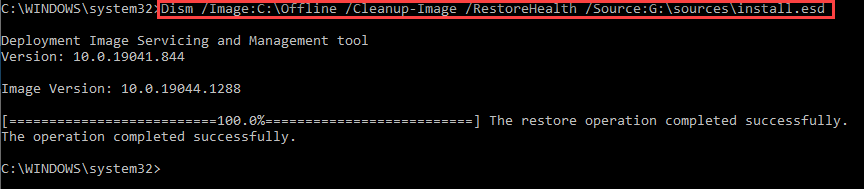
Repairing an Image Using /Cleanup-MountPoints
You’ve seen how DISM commands can fix your image online and offline. But on some occasions, an image can be corrupted while altering it with DISM. How do you fix it? You’ll clean up the mount points of your image with the /Cleanup-Mountpoints option.
Run the below command to clean up your image’s mount points. This command does not unmount any mounted image but removes resources associated with a corrupted image.
Dism /Cleanup-Mountpoints
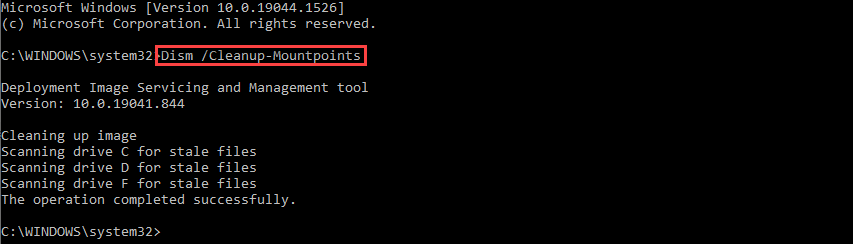
Now, restart your device after the cleanup and see if your Windows 10 image is working fine.
Conclusion
In this article, you have learned to scan, check, and restore your Windows 10 image using DISM cleanup-image. Cleanup-Image is an excellent tool for getting your computer back on track and is just one of the commands you can run with DISM.
Learning how to repair your computer is one thing and applying that knowledge is another. Now that you know how to do it yourself, it’s up to you to take action.
Со временем система или её файлы могут быть повреждены (особенно в любопытных пользователей). Тогда необходимо восстановить эти файлы до их исходного состояния. Можно использовать несколько встроенных инструментов для исправления файлов на Windows 10.
Эта статья расскажет, как пользоваться DISM для восстановления Windows 10. Средство исправляет синие экраны смерти (BSoD) и сбои приложений или некоторых функций. Инструмент был доступен в Windows 7 хоть и немного с ограниченной функциональностью.
DISM (Deployment Image & Servicing Management) — это инструмент, который используется для восстановления системы и работоспособности её компонентов. Если же средство SFC по какой-то причине не работает, тогда Вы можете использовать DISM для его восстановления.
Необязательно сразу пытаться восстановить систему. Можно проверить наличие повреждений хранилища компонентов. В целом SFC и DISM довольно полезные инструменты, и их не так уж сложно использовать. Изредка они могут спасти вас от чистой переустановки Windows 10.
Восстановление системных файлов Windows 10
Обычное восстановление (нужен Интернет)
Для сканирования образа Windows на наличие ошибок и их исправления используется параметр DISM /Cleanup-image. Все рассмотренные команды выполняются в классической командной строке или оболочке Windows PowerShell (запущенными от имени администратора).
- DISM /Online /Cleanup-Image /CheckHealth
С её помощью проверяем наличие повреждений хранилища компонентов. Команда смотрит только события, ранее записанные в журнале Windows 10. Никаких изменений не вносится. Будет проверено, помечено ли данные образа как повреждённые и можно ли их исправить.
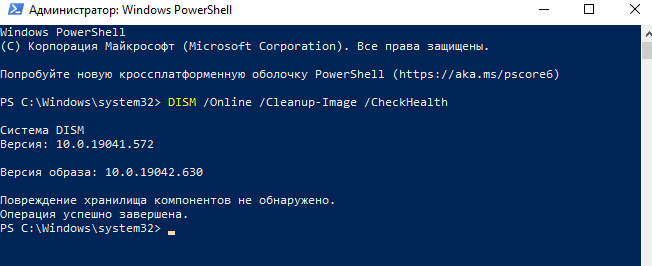
На моём компьютере повреждение хранилища компонентов не обнаружено. Ранее система Windows 10 была перенесена на другой SSD-диск. Судя по всему, очень даже успешно.
- DISM /Online /Cleanup-Image /ScanHealth
Выполняет полную проверку хранилища компонентов Windows на наличие повреждений. В зависимости от Ваших комплектующих занимает несколько минут. Мой компьютер справился буквально за две минуты и повреждение хранилища компонентов не было обнаружено.
- DISM /Online /Cleanup-Image /RestoreHealth
Эта команда исправляет повреждённые файлы или отсутствующих компоненты исходными версиями. В процессе восстановления берёт участие центр обновления Windows (автоматически загружаются нужные файлы). Ваш компьютер должен иметь доступ в Интернет.
Процесс сканирования и восстановления компонентов может занять продолжительное время (даже до 30 минут). Всё зависит от текущего состояния Вашей операционной системы. В итоге должно появиться сообщение о том, что операция восстановления была успешно завершена.
Восстановление с помощью ISO-файла образа
Если Ваш компьютер не имеет прямого доступа к Интернету или служба обновления Windows отключена, то при попытке восстановления хранилища компонентов появляются ошибки:
- 0x800f0906 — исходные файлы не могут быть загружены (используйте параметр источника, чтобы указать расположение файлов, необходимых для восстановления функции);
- 0x800f0950 — ошибка использования DISM (операция не проводилась);
- 0x800F081F — исходные файлы были не найдены (используйте опцию источника, чтобы указать расположение файлов, необходимых для восстановления функции).
Вы можете указать WIM или ESD-файл исходного установочного образа Windows, который будет использоваться для восстановления (в качестве источника файлов системных). Например, давайте смонтируем оригинальный ISO-образ диска Windows 10 на виртуальный диск (G:).
Восстановить хранилище компонентов из оригинального образа системы:
- DISM /Online /Cleanup-Image /RestoreHealth /Source:G:\Sources\Install.wim
Предотвратить использование служб обновления Windows (только локальный файл):
- DISM /Online /Cleanup-Image /RestoreHealth /Source:G:\Sources\Install.wim /LimitAccess
- Dism /Online /Cleanup-Image /RestoreHealth /LimitAccess
Важно! Сборка и выпуск Windows в образе WIM / ESD должны совпадать с таковыми в Вашей системе. Журнал восстановления системных файлов смотрите здесь: C:\Windows\Logs\CBS.log и C:\Windows\Logs\DISM \DISM.log. После восстановления можно запустить проверку sfc /scannow.
Как бонус — вот Вам ещё несколько команд:
| DISM /Get-WimInfo |
просмотреть информацию об образе в WIM-файле |
| DISM /Add-Package | установка файлов обновлений форматов MSU и CAB |
| DISM /Get-Drivers | получение полного списка установленных драйверов |
| DISM /Add-Driver | добавление драйверов в образ операционной системы |
| DISM /Add-Capability | используется для установки компонентов и RSAT |
| DISM /StartComponentCleanup | очистка старых версий компонентов (папка WinSxS) |
| DISM /Set-Edition | переход на полную версию Windows без переустановки |
В оболочке Windows PowerShell можно использовать команды: Repair-WindowsImage -Online —CheckHealth (-ScanHealth или -RestoreHealth) для быстрой проверки (полной или восстановления). Какой от этого профит непонятно, но такая возможность присутствует.
Заключение
Зачастую средство DISM используется для восстановления системных файлов Windows 10. Его команды отлично работают как в командной строке, так и в Windows PowerShell. Для офлайн-восстановления понадобится оригинальный дистрибутив Windows 10 с сайта Майкрософт.
(2 оценок, среднее: 5,00 из 5)
Администратор и основатель проекта Windd.pro. Интересуюсь всеми новыми технологиями. Знаю толк в правильной сборке ПК. Участник программы предварительной оценки Windows Insider Preview. Могу с лёгкостью подобрать комплектующие с учётом соотношения цены — качества. Мой Компьютер: AMD Ryzen 5 3600 | MSI B450 Gaming Plus MAX | ASUS STRIX RX580 8GB GAMING | V-COLOR 16GB Skywalker PRISM RGB (2х8GB).
(Image credit: Future)
The Deployment Image Servicing and Management (DISM) on Windows 10 is a tool that administrators use to prepare, modify, and repair system images, including Windows Recovery Environment, Windows Setup, and Windows PE (WinPE). However, you can also use it with the local recovery image to fix system issues.
Technically, when troubleshooting a specific error, figuring out why the device no longer boots correctly, or resolving performance problems, you can use the System File Checker (SFC) tool to replace missing or corrupted system files using the recovery image. The only caveat with this approach is that if one or more Windows 10 files in the local image are damaged, the SFC command won’t work. In this scenario, you can use the «install.wim» image file with DISM to repair the image and then use the SFC tool to fix the setup without having to reinstall Windows.
This how-to guide will walk you through the steps to use the DISM and SFC tools to bring a computer back from the dead to a healthy working state without reinstallation.
Warning: The commands outlined in this guide are non-destructive, but since you will be making system changes, it is still recommended to create a temporary full backup before proceeding.
How to use DISM to repair image of Windows 10
The DISM command tool includes multiple options to repair an image, including «CheckHealth,» «ScanHealth,» and «RestoreHealth,» which you’ll want to use in that order. Also, depending on the problem, you can use the «RestoreHealth» option to fix the locally available image using different source files.
DISM command with CheckHealth option
The «CheckHealth» option with the DISM tool lets you determine any corruptions inside the local Windows 10 image. However, the option does not perform any repairs.
To check the image of Windows 10 for issues with DISM, use these steps:
- Open Start.
- Search for Command Prompt, right-click the top result, and select the Run as administrator option.
- Type the following command to perform a quick check and press Enter: DISM /Online /Cleanup-Image /CheckHealth
Once you complete the steps, the Deployment Image Servicing and Management tool will run and verify any data corruption that may require fixing.
DISM command with ScanHealth option
The «ScanHealth» option performs a more advanced scan to determine whether the image has any problems.
To check image problems with the ScanHealth option on Windows 10, use these steps:
- Open Start.
- Search for Command Prompt, right-click the top result, and select the Run as administrator option.
- Type the following command to perform an advanced DISM scan and press Enter: DISM /Online /Cleanup-Image /ScanHealth
After you complete the steps, the scan may take some time to check whether the Windows 10 image needs any fixing.
DISM command with RestoreHealth option
If there are problems with the system image, use DISM with the «RestoreHealth» option to automatically scan and repair common issues.
To repair Windows 10 image problems with the DISM command tool, use these steps:
- Open Start.
- Search for Command Prompt, right-click the top result, and select the Run as administrator option.
- Type the following command to repair the Windows 10 image and press Enter: DISM /Online /Cleanup-Image /RestoreHealth
- Quick note: If the command appears stuck, this is normal behavior. After a few moments, the process will complete successfully.
Once you complete the steps, DISM will connect to Windows Update online to download and replace damaged files (as necessary).
Fix problems with DISM using install.wim image
The Deployment Image Servicing and Management commands typically don’t cause issues. However, if the tool finds problems replacing the damaged files or the computer isn’t connected to the internet, you’ll have to provide another image using the «Source» option. Usually, you can use an «install.wim» or «install.esd» file from another computer, install media, or ISO file. You only need to ensure that the files match the version, edition, and language of the version of Windows 10 you are trying to fix.
Download Windows 10 ISO file
If you need to use another file source, use the Media Creation Tool to download a fresh copy of Windows 10.
To download the ISO file of Windows 10, use these steps:
- Open this Microsoft support website.
- Click the Download Now button.
- Double-click the MediaCreationToolxxxx.exe file to launch the setup.
- Click the Accept button to agree to the terms.
- Select the «Create installation media (USB flash drive, DVD, or ISO file) for another PC» option.
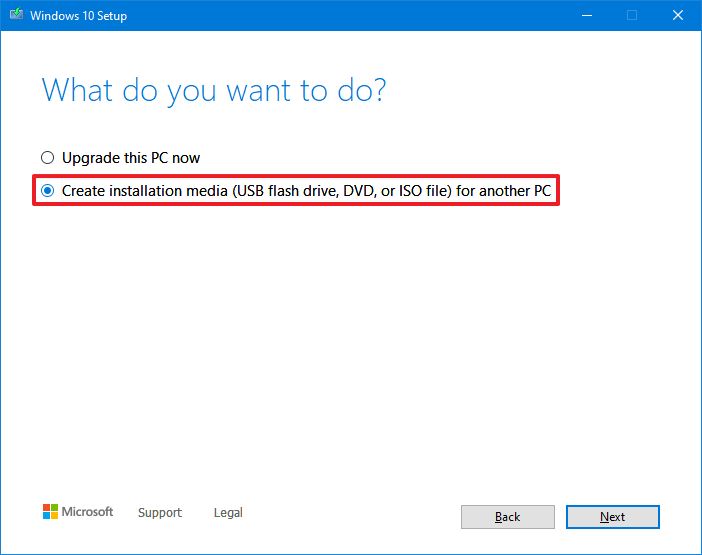
- Click the Next button.
- Click the Next button again.
- Select the ISO file option.
- Click the Next button.
- Select the destination to store the Windows 10 ISO file.
- Click the Save button.
- Click the link to open the file location with File Explorer.

- Click the Finish button.
- Double-click the Windows.iso file to mount the image.
- Under the «This PC» section, confirm the drive letter for the mount point of the ISO file.
After you complete the steps, you can continue with the DISM tool using the «Source» option to repair the local image.
Fix Windows 10 recovery image
To run Deployment Image Servicing and Management tool with an alternate source (install.wim) image, use these steps:
- Open Start.
- Search for Command Prompt, right-click the top result, and select the Run as administrator option.
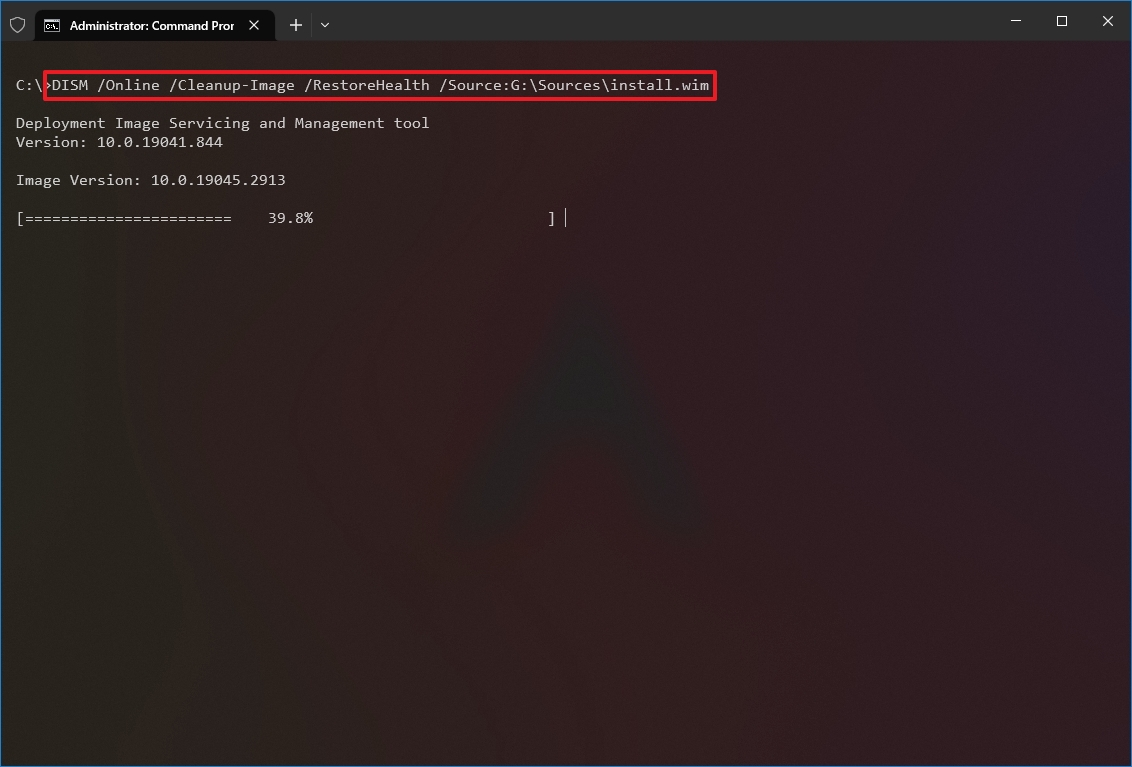
- Type the following command to repair the Windows 10 image and press Enter: DISM /Online /Cleanup-Image /RestoreHealth /Source:G:\Sources\install.wim
In the command, replace «G» with the ISO mount point drive letter in File Explorer.
- (Optional) Type the following command to limit the use of Windows Update and press Enter: DISM /Online /Cleanup-Image /RestoreHealth /Source:G\Sources\install.wim /LimitAccess
- (Optional) Type the following variant of the previous command to accomplish the same task and press Enter: DISM /Online /Cleanup-Image /RestoreHealth /Source:wim:G:\Sources\install.wim:1 /LimitAccess
In the command, change «G:\Sources,» for the path to the «install.wim» file.
Once you complete the steps, the command will scan and repair the problems using the «install.wim» file you specified as the alternative source.
Fix problems with DISM using ESD image
If you have an encrypted «install.esd» image, it’s possible to use it to repair the damaged files on Windows 10.
To use DISM with an «install.esd» image file as the source to repair Windows 10, use these steps:
- Open Start.
- Search for Command Prompt, right-click the top result, and select the Run as administrator option.
- Type the following command to repair the image with an «install.esd» file and press Enter: DISM /Online /Cleanup-Image /RestoreHealth /Source:C:\ESD\Windows\sources\install.esd
In the command, change «C:\ESD\Windows\sources» with the path to the location of the «.esd» file (if different).

- (Optional) Type the following command to limit the use of Windows Update and press Enter: DISM /Online /Cleanup-Image /RestoreHealth /Source:C:\ESD\Windows\sources\install.esd /LimitAccess
- (Optional) Type the following variant of the previous command to accomplish the same task and press Enter: DISM /Online /Cleanup-Image /RestoreHealth /Source:esd:C:\ESD\Windows\sources\install.esd:1 /LimitAccess
- (Optional) Type the following command to use an install.esd file located in another drive and press Enter: DISM /Online /Cleanup-Image /RestoreHealth /Source:E:\Sources\install.esd
In the command, replace «E:\Sources» with the path to the location of the «install.esd» file.
After you complete the steps, the tool will repair the damaged files using the files included in the «install.esd» image.
How to run SFC to repair problems on Windows 10
The above instructions will repair issues with the system image, not the problems with the system installation. After restoring the image to a healthy state, use the System File Checker command tool to repair the current setup.
To use the SFC command tool to repair Windows 10 problems, use these steps:
- Open Start.
- Search for Command Prompt, right-click the top result, and select the Run as administrator option.
- Type the following command to repair the installation and press Enter: SFC /scannow
- Quick tip: If errors are found, you may want to run the command around three times to ensure that everything was fixed correctly.
Once you complete the steps, the System File Checker tool will repair the system files using the local image files, and the log files will be saved on «%windir%/Logs/CBS/CBS.log» and «%windir%\Logs\DISM\dism.log,» which you can view to get more details about the process.
You can use this guide to learn more ways to use the SFC tool to fix problems on Windows 10.
More resources
For more helpful articles, coverage, and answers to common questions about Windows 10 and Windows 11, visit the following resources:
- Windows 11 on Windows Central — All you need to know
- Windows 10 on Windows Central — All you need to know
All the latest news, reviews, and guides for Windows and Xbox diehards.
Mauro Huculak is technical writer for WindowsCentral.com. His primary focus is to write comprehensive how-tos to help users get the most out of Windows 10 and its many related technologies. He has an IT background with professional certifications from Microsoft, Cisco, and CompTIA, and he’s a recognized member of the Microsoft MVP community.