Перенос физических серверов в виртуальную среду (Physical-to-Virtual, P2V) может преследовать различные цели. Например, выведя из эксплуатации устаревшие сервера и смигрировав их в виртуальную среду можно оптимизировать загрузку оборудования, не говоря о том что виртуальными машинами гораздо легче управлять. Способов P2V-миграции достаточно много, и сегодня я опишу один из них.
Переходим к конкретной задаче. Имеется одинокий 🙂 сервер с установленной на нем Windows Server 2003 R2. На сервере крутятся несколько важных сервисов, остановка которых более чем на несколько минут недопустима. Физический доступ к серверу ограничен, так как он стоит в датацентре. Задача — смигрировать его на Hyper-V, при этом минимизировав время недоступности сервисов.
Для решения этой задачи я решил воспользоваться программой Disk2VHD от Sysinternals. Disk2VHD умеет конвертировать физические жесткие диски в виртуальные диски формата VHD. Подключив созданные программой VHD-файлы к виртуальной машине, мы получаем полную копию физического сервера со всеми установленными ролями, приложениями и настройками.
При создании VHD программа использует службу теневого копирования (Volume Shadow Copy Service, VSS), что позволяет создавать образ диска прямо на работающей машине, без необходимости ее остановки. Более того, образ можно создать на том же диске, который вы конвертируете, правда скорость работы при этом будет несколько ниже, чем при использовании другого диска.
Disk2VHD бесплатна, не требует установки и поддерживает все более-менее актуальные операционные системы Microsoft начиная с Windows XP SP2 и Server 2003 SP1, как 32-х так и 64-битные версии. В общем, Disk2VHD оптимальна для решения нашей задачи, по крайней мере в теории. Посмотрим, что покажет практика ?
Создание образа
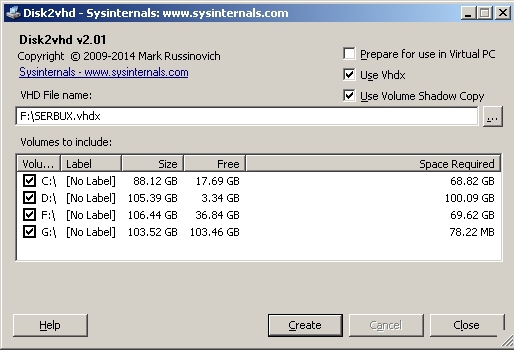
Одним из достоинств Disk2VHD является простота использования. Для того чтобы создать образ, просто загружаем программу на сервер и запускаем ее. В окне программы будут показаны все логические диски, имеющиеся в системе. Отмечаем те из них, которые нужно включить в образ, вводим имя VHD-файла и путь для сохранения, жмем «Create» и ждем, пока образ будет создан.
Если в системе несколько дисков, то для каждого физического диска, содержащего выбранные разделы, создается отдельный VHD-файл. Логическая структура диска при этом не изменится, если он был разбит на несколько логических разделов, то все они будут скопированы и помещены в один VHD-файл. Впрочем, при необходимости отдельные разделы можно исключить из образа. В этом случае разбиение на разделы сохранится, но скопируются только данные, относящиеся к выбранным разделам. Такой подход позволяет, например, включить в образ только системный раздел диска, исключив разделы с данными.

Важно. Если на системном диске есть скрытый раздел, не забудьте добавить его в образ, иначе система не загрузится. Опознать его просто, он не имеет буквы диска.
Disk2VHD может работать как в графическом режиме, так и из командной строки. Например, сконвертировать диск C: можно командой:
disk2vhd C: C:\Distr\Image.vhd
А так сконвертируются все диски, имеющиеся на сервере:
disk2vhd * C:\Distr\Image.vhd
Подключение образа
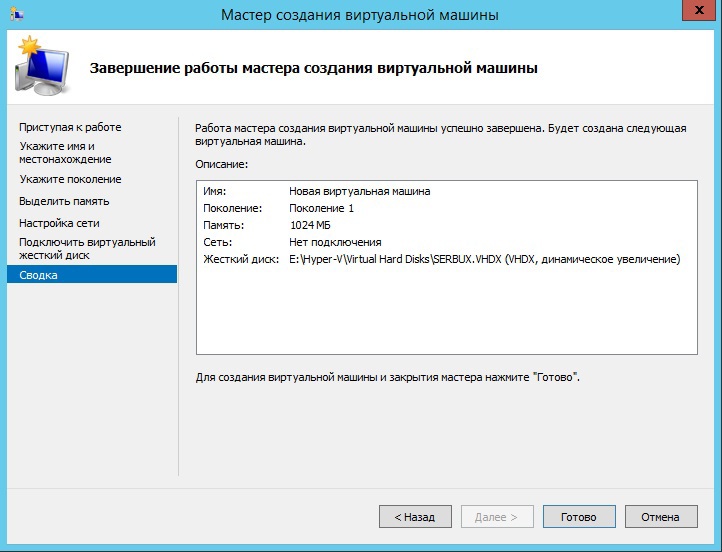
Получившийся образ переносим на сервер Hyper-V. Открываем Hyper-V Manager и запускаем процесс создания новой виртуальной машины. Параметры машины (процессор, память, сеть) устанавливаем в соответствии с характеристиками копируемого физического сервера, а в качестве виртуального диска указываем использовать полученный VHD-файл.

Запускаем виртуальную машину. При первой загрузке система попытается определить и установить драйвера на новое оборудование. Для новых ОС, таких как Windows Server 2012, этот процесс проходит автоматически, в нашем же случае надо перейти в меню Action — Insert Integration Services Setup Disk, после чего вручную запустить установку сервисов интеграции.

По окончании установки сервисов интеграции система потребует перезагрузки.

После перезагрузки мы получаем готовый к работе сервер. Единственное что еще может потребоваться — настроить параметры сетевого адаптера, в том случае если вы используете статическую адресацию.
Заключение
Программы от Sysinternals выручали меня в различных ситуациях, не подвели и на этот раз. С помощью Disk2VHD сервер успешно смигрировал в виртуальную среду с минимальными потерями. Допускаю, что мне просто повезло и я не столкнулся с проблемами в процессе перехода, однако у меня использование Disk2VHD вызвало только положительные эмоции 🙂
Disk2vhd v1.21By Mark Russinovich and Bryce CogswellPublished: October 27, 2009
IntroductionDisk2vhd is a utility that creates VHD (Virtual Hard Disk — Microsoft’s Virtual Machine disk format) versions of physical disks for use in Microsoft Virtual PC or Microsoft Hyper-V virtual machines (VMs). The difference between Disk2vhd and other physical-to-virtual tools is that you can run Disk2vhd on a system that’s online. Disk2vhd uses Windows’ Volume Snapshot capability, introduced in Windows XP, to create consistent point-in-time snapshots of the volumes you want to include in a conversion. You can even have Disk2vhd create the VHDs on local volumes, even ones being converted (though performance is better when the VHD is on a disk different than ones being converted). The Disk2vhd user interface lists the volumes present on the system:
It will create one VHD for each disk on which selected volumes reside. It preserves the partitioning information of the disk, but only copies the data contents for volumes on the disk that are selected. This enables you to capture just system volumes and exclude data volumes, for example.
To use VHDs produced by Disk2vhd, create a VM with the desired characteristics and add the VHDs to the VM’s configuration as IDE disks. On first boot, a VM booting a captured copy of Windows will detect the VM’s hardware and automatically install drivers, if present in the image. If the required drivers are not present, install them via the Virtual PC or Hyper-V integration components. You can also attach to VHDs using the Windows 7 or Windows Server 2008 R2 Disk Management or Diskpart utilities.
Disk2vhd runs Windows XP SP2, Windows Server 2003 SP1, and higher, including x64 systems. Here’s a screenshot of a copy of a Windows Server 2008 R2 Hyper-V system running in a virtual machine on top of the system it was made from:
Command Line UsageDisk2vhd includes command-line options that enable you to script the creation of VHDs. Specify the volumes you want included in a snapshot by drive letter (e.g. c:) or use «*» to include all volumes.
Download Disk2vhd Run Disk2vhd now from Live.Sysinternals.com |
Download Disk2vhd Run Disk2vhd now from Live.Sysinternals.com Runs on:
|
.gif) Download Disk2vhd (709 KB)
Download Disk2vhd (709 KB).png "Disk2vhd")
.png "Disk2vhd")
.jpg "Download")
Infopackets Reader Fabian A. writes:
» Dear Dennis,
I have a very old Dell Windows 2003 Server with a PERC RAID card set up for storage. We are trying to convert this old server into a virtual machine, then migrate to Windows Server 2016. I tried using the utility Disk2VHD to image the C drive into a .VHD file, then run the .VHD file using Oracle VirtualBox. Unfortunately, I keep getting ‘a disk read error occurred’ every time I try to boot the virtual machine. I have read your credentials and am very impressed with your knowledge, and was wondering if you could help us convert this server? Any help would be appreciated! «
My response:
I asked Fabian if he would like me to connect to his server using my
remote desktop support service, and he agreed.
Converting an old Windows Server 2003 to a virtual machine is not always an easy task for a few reasons. First, many Windows disk imaging / p2v
(physical to virtual) programs I came across simply would not work on Windows Server 2003 or required insane licensing fees. Secondly, Fabian was using a PERC RAID card, which complicated the issue greatly because most virtual machine software runs off either IDE or SATA, with limited support for SCSI (or RAID).
I spent a few days going over this problem and I’ll discuss some of the situations I came across.
How to Fix: Virtualize Dell Windows Server 2003 (PERC RAID)
As Fabian mentioned, the disk2vhd failed to convert his C drive to .VHD properly. When I tried mounting the .VHD inside of Oracle’s VirtualBox, I received an error that ‘a disk read error occurred’.
After researching
disk2vhd ‘a disk read error occurred’, it was suggested that the MBR (master boot record) was not copied during the disk2vhd conversion. I believe this was likely an issue with older releases of disk2vhd; I made sure
everything was selected the second time around, but the conversion still did not work. I also booted from Windows Server 2003 media to fix the MBR (master boot record) but that did not work, either.
At this point, I took the .VHD file and placed it onto a Windows 10 machine and attempted to mount the .VHD using Disk Management, which then reported that the drive was in RAW format (as opposed to NTFS). RAW format basically means the MFT (master file table) or the entire drive is corrupted. This should not happen, obviously.
I decided to abandon disk2vhd in search of another physical to virtual (p2v) conversion program.
Alternatives to Disk2VHD with Windows Server 2003
After some more research, I discovered other utilities that are still kept up to date and accessible and free to use. Here is a list:
- VMWware vCenter Standalone Converter — this
works on Windows Server 2003 R2 and above. Unfortunately Fabian is not using the R2 version. For almost all p2v (physical to virtual) jobs, this is my go to program. It creates files ready for VMWare Workstation, but those files can easily be converted to .VHD if you need to run Oracle VirtualBox, for example.
- Clonezilla — this program requires a reboot to run in a Linux environment. As such, virtualizing a machine by remote in this manner is out of the question unless the server supports
IPMI or if you’re in physical contact with the server. That said, it is 100% free, and from what I’ve heard, works wonders.
- Macrium Reflect — this runs from the Windows Server desktop environment. It has a 30 day trial for Windows Server editions, so if you plan to virtualize the main server, make sure you do it within the 30 day time limit, otherwise you will need to purchase the program if you intend to use it later. Not cheap!
I decided on Macrium Reflect because it was the only option that allowed me to convert Fabian’s server by remote without having to reboot the machine. To get the job done, I made a regular disk image backup (archive) of the server’s C drive into .mrimg files, then used ‘Other Tasks -> Convert image to VHD’ option inside of Macrium Reflect. IMPORTANT: when I selected the 000.mrimg file to convert to .VHD, the img2vhd reported it was «unable to convert.» I chose the 001.mrimg file and it worked. I am not sure why — but if this happens, try the next file in the series.
How to Fix: VirtualBox Error 0x0000007b
After the .VHD was created, I used Oracle VirtualBox to boot the virtual machine. Windows Server 2003 started to boot as normal, but after about 10 seconds I was greeted with a blue screen of death
(BSOD) boot error 0x0000007b.
After much research I discovered that this error was related to the Dell PERC RAID card. Basically, VirtualBox set the boot drive to use a SATA port, and Windows Server 2003 was expecting it on the PERC RAID configuration. When it was not found, Windows Server 2003 failed with boot error 0x0000007b.
Here is how I fixed it:
- First, I needed to specify that VirtualBox use IDE ICH6 interface. I shut the virtual machine down, then right clicked the
virtual machine and selected «Settings«.
- The «Settings» window appeared. Initially the .VHD file was located under «Controller: SATA». I clicked the green icon that says «Adds new storage controller» and added an «IDE» controller. Once the IDE controller was added, I changed the «type» to «PIIX4» (which is apparently ICH6 compatible), then clicked the blue disk icon with a green plus sign to add the .VHD to the IDE controller. Once that was done, I
removed the old SATA controller and .VHD file attached to it, then booted the virtual machine without any issues!
- After a bit more research, I read that an IDE controller, even when in a virtualized environment will run slower than SATA or SCSI. To fix this you need to add the SATA / SCSI controller, then boot Windows (under the IDE interface) so the new SATA / SCSI controllers are added into the Windows Registry. I did just that; however, in Fabian’s case, the SATA controller would not work — but worked fine with the SCSI controller, which was recognized as an LSI controller. I made these changes and the virtual machine is running fine.
Job complete! I hope this helps anyone else struggling with this issue.
Additional 1-on-1 Support: From Dennis
If you are trying to convert a Windows 2003 Server — or any machine for that matter — to a virtual machine, I can help using my
remote desktop support service. Simply contact me, briefly describing the issue and I will get back to you as soon as possible.
Got a Computer Question or Problem? Ask Dennis!
I need more computer questions. If you have a computer question — or even a
computer problem that needs fixing —
please email me with your question
so that I can write more articles like this one. I can’t promise I’ll respond to
all the messages I receive (depending on the volume), but I’ll do my best.
About the author: Dennis Faas is the owner and operator of Infopackets.com.
With over 30 years of computing experience, Dennis’ areas of expertise are a
broad range and include PC hardware, Microsoft Windows, Linux, network
administration, and virtualization. Dennis holds a Bachelors degree in Computer
Science (1999) and has authored 6 books on the topics of MS Windows and PC
Security. If you like the advice you received on this page, please up-vote /
Like this page and share it with friends. For technical support inquiries,
Dennis can be reached via Live chat online this site using the Zopim Chat
service (currently located at the bottom left of the screen); optionally, you
can contact Dennis through the website
contact form.
- Remove From My Forums
-
Question
-
I am trying to virtualize a Win2003R2 server onto Win2012Datacentre Hyper-V using Disk2Vhd however the new VM locks up after 3 days because the OS requires re-activation.
I don’t really want to re-activate it until I have finished evaluating the implications of this virtualization.
How can I proceed for a while without re-activating Win2003R2?
Answers
-
This is a limitation introduced through the act of P2V and does not limit installing a fresh 2003 OS in a VM and installing your application on top of that. This will always give you the least problems over the longest time and is always advised by
many in this forum over P2V.The issue is also related to the 3 day validation window combined with process.
IMHO, it is how the issue is perceived and addressed with that creates an issue. Is virtualizing an old OS a problem? No. Is P2V of an old OS and issue? It can be. And for reasons far beyond activation.
The tester in me would ask; what are you validating / how are you validating that it takes more than three days to determine functionality of a single server?
Brian Ehlert
http://ITProctology.blogspot.com
Learn. Apply. Repeat.
Disclaimer: Attempting change is of your own free will.-
Proposed as answer by
Monday, September 30, 2013 6:52 PM
-
Marked as answer by
Jeremy_Wu
Saturday, October 5, 2013 12:20 PM
-
Proposed as answer by
-
I am trying to virtualize a Win2003R2 server onto Win2012Datacentre Hyper-V using Disk2Vhd however the new VM locks up after 3 days because the OS requires re-activation.
I don’t really want to re-activate it until I have finished evaluating the implications of this virtualization.
How can I proceed for a while without re-activating Win2003R2?
If the server boots then ther P2V was a sucess. just activate and away you go

-
Proposed as answer by
Jeremy_Wu
Monday, September 30, 2013 6:52 PM -
Marked as answer by
Jeremy_Wu
Saturday, October 5, 2013 12:20 PM
-
Proposed as answer by

Как я делал из физического сервера виртуальный
Время на прочтение
2 мин
Количество просмотров 94K
Был у бухгалтеров bit2000 и всё их устраивало, ну, почти всё. Не устроило то, что нужно было бы привязать ещё склады в программу, но сделать такое не вышло. И переехали мы на 1с, и закуплен был сервер и было это хорошо, а старый сервер оказался не сильно нужен, но железо нужно.
И задумался я, а как бы мне физическую машину сделать виртуальной. Начал рыть интернет и даже на хабре в поиске — p2v, ничего стоящего нет, что могло бы помочь.
Как сделать слепок системы так, чтобы он запустился без проблем?
Интернет подсказывал несколько решений, вот только у меня исходная система windows server 2003, и даже с кряком не всё работает, нужен кряк под сервер. Скажу сразу, Акронис не подойдёт, Парагон диск менеджер серверный может сделать слепок системы, но выгружает его не на локальные диски, а только на физические диски. Имейте это ввиду, когда решите их использовать.
Интернет подсказал. В блоге Андрея Бешкова была ссылка на бесплатную утилиту disk2vhd. Маленькая, да удаленькая, позволяет сделать снимок работающей системы и выгрузить его на локальный диск.
Описание, как первоначальный раздел на 300 гигабайт был поделён на 3 раздела, можно пропустить.
Утилита очень простая, выбираете диски на которых стоит нужная вам система, и выбираете путь — его придётся прописать вручную. Я не пробовал, но, вероятно, программа может и на сетевые диски и папки перекидывать снапшот системы. Отметил также галочку «Prepare for use in Virtual PC», хоть и вместо Virtual PC, у меня Hyper-V. Help не работает.
После создания виртуального диска, создаём виртуальную машину.
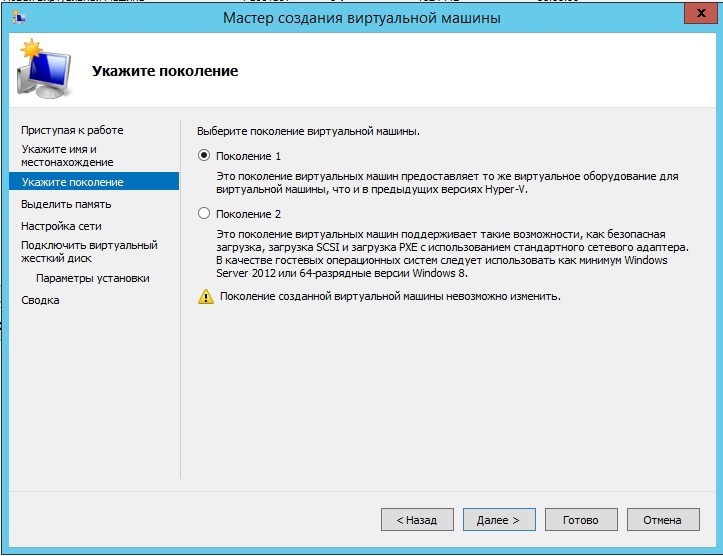
Выбираем 1 поколение.
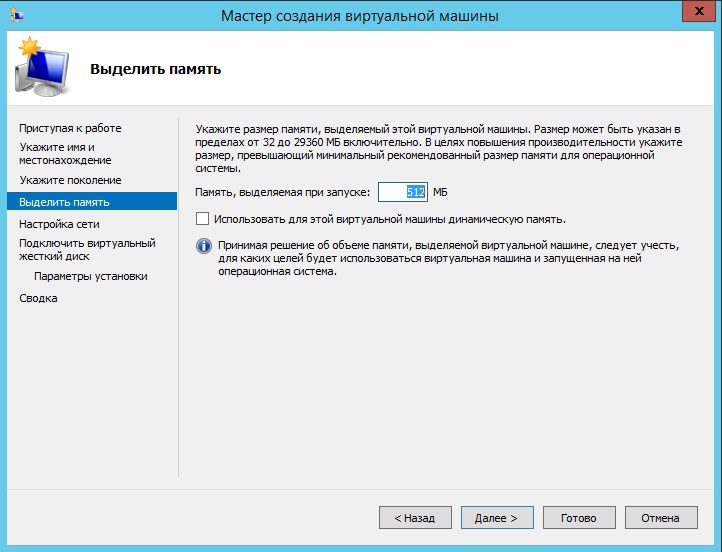
Устанавливаем нужный объём оперативной памяти — она будет выделятся из физической, в моём случае виртуальная машина крутится на 1 гигабайте оперативки, если выставить больше она просто не запускается — не хватает памяти, не только она одна работает на сервере.
Учитывайте этот момент.

Сетевой адаптер пока не выбираем.
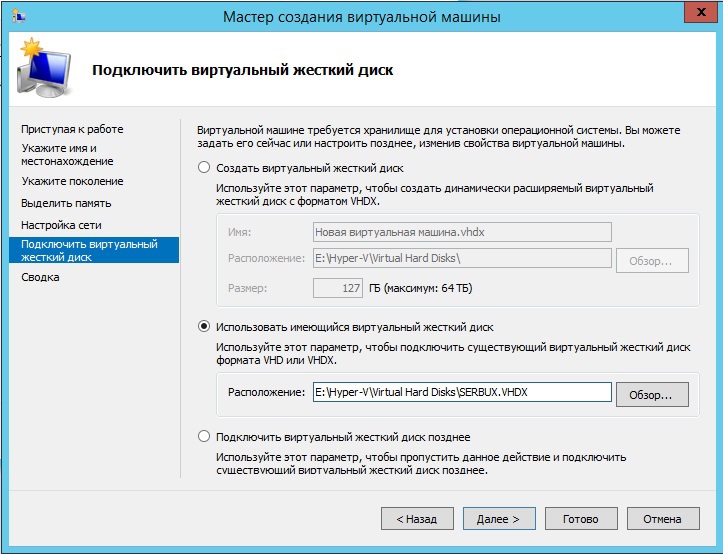
Указываем виртуальной машине использовать нами созданный виртуальный диск.
В такой конфигурации работает моя виртуальная машина.
Переходим к настройке виртуальной машины.
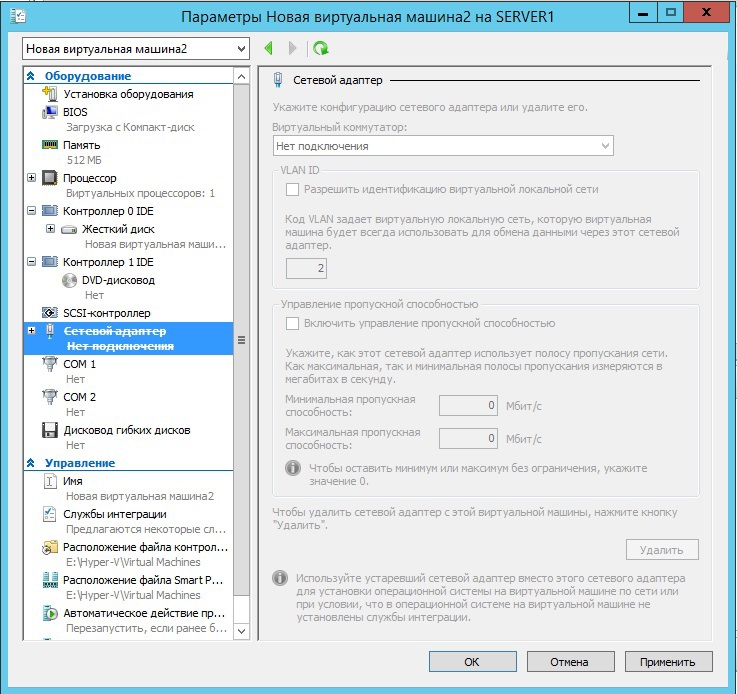
Удаляем имеющийся сетевой адаптер — он не будет работать на сервере, сервер который был завиртуален просто не увидит его.

Выставляем количество ядер процессора которые выделяем под данную виртуальную машину.
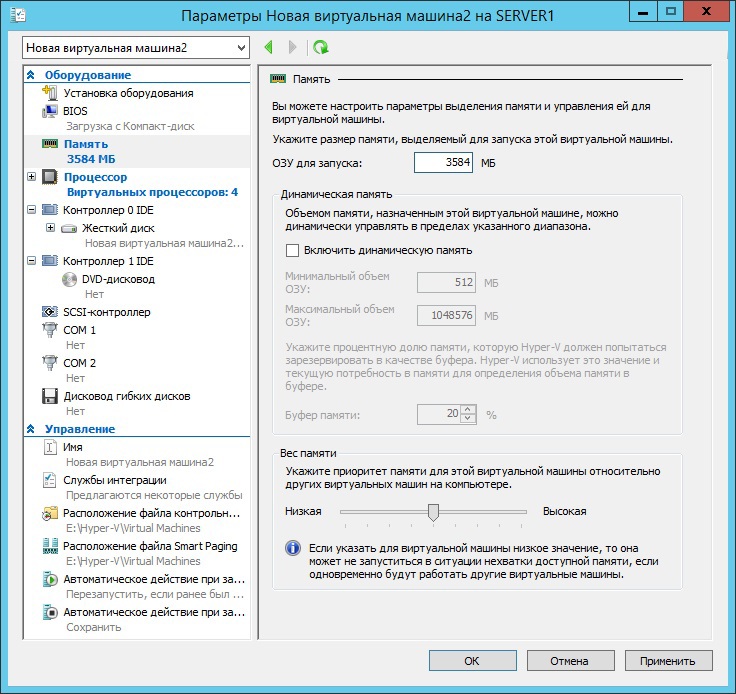
Можно установить желаемый объём оперативной памяти.
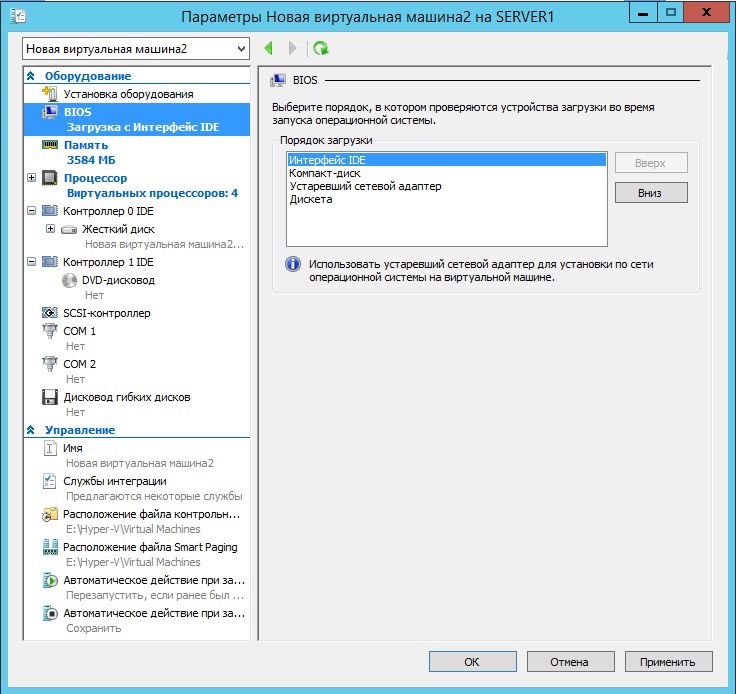
Загружаемся с диска, установка новой системы не требуется.
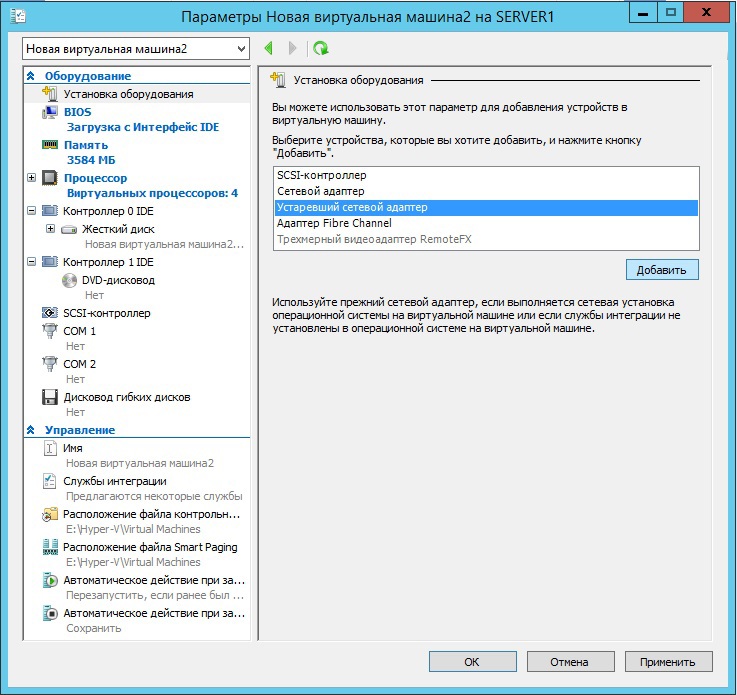
Устанавливаем новое оборудование — «Устаревший сетевой адаптер», его наш windows server 2003 увидит.
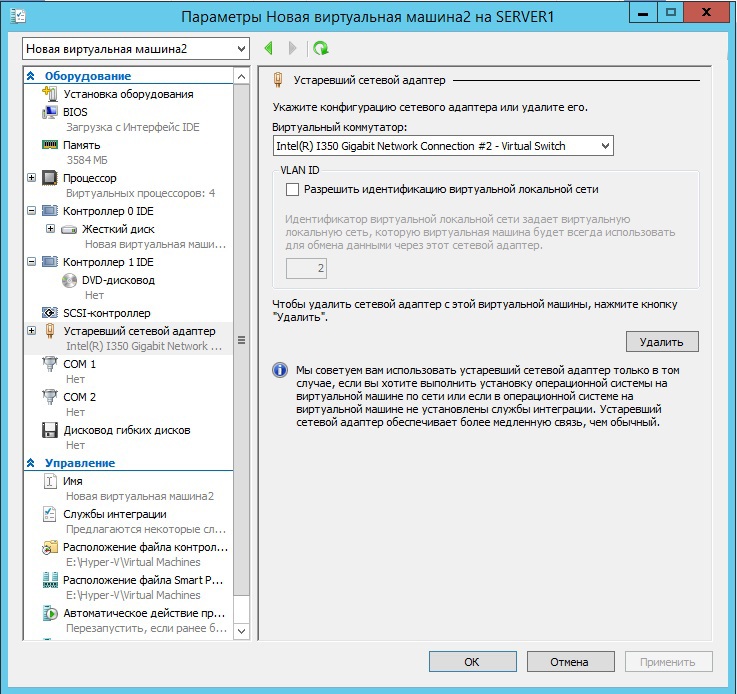
Выбираем нужный виртуальный адаптер. В моём случае, так как ещё одной виртуальной машиной выступает прокси сервер и под интернет выделена отдельная сетевая карта и своя сеть недоступная из обычной локальной сети, я выбрал виртуальный адаптер созданный для второй сетевой карты использующей нашу локальную сеть.
Всё готово, можно запускать.
После запуска скорее всего вас будет ждать несколько сюрпризов — мышка может не работать. Настраивать сетевую карту придётся с помощью клавиатуры. После настройки сетевой карты — удалось подключиться с помощью Radmin, напрямую к нашей новой виртуальной машине.
Кстати, при попытке увеличить разрешение экрана с 800х600 система выдала синий экран смерти, скорее всего, это связано с небольшим количеством оперативной памяти, которой я выделил под виртуальную машину.
Всё очень просто делается.
p.s. Чуть не забыл — надо будет снова активировать систему, система активировалась нормально.
p.p.s. Ссылки вставить правильно не удалось.