На одном из серверов с Windows Server 2016 после каждой перезагрузки сервера отключается дополнительный диск (не системный), подключенный в виде LUN с SAN хранилища по FC. Если открыть консоль управления дисками diskmgmt.msc, можно увидеть, что данный диск находится в автономном режиме Offline.
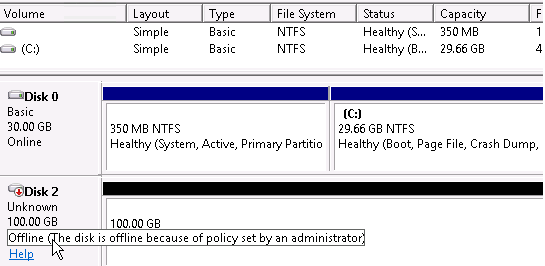
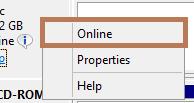
Чтобы сделать этот диск доступным в Windows нужно щелкнуть по нему ПКМ и перевести в режим Online. Это придется делать при каждой перезагрузке сервера. Сомнительная перспектива.
Сначала были подозрения, что при отключении питания в серверной СХД загружалась позже, чем сервер. Однако при штатной перезагрузке диск все равно отключался.
Обратите внимание на всплывающую надпись у отключённого диска в консоли управления дисками:
Offline (The disk is offline because of policy set by an administrator).
Как оказалось, такая проблема может наблюдаться в кластерах или на виртуальных машинах с Windows, на которых общие диски могут быть доступны нескольким операционным системам. Это связано с наличием специальной политики SAN Policy, которая впервые появилась в Windows Server 2008. Эта политика управляет автоматическим монтированием внешних дисков и используется для защиты общих дисков, которые доступны нескольким серверам одновременно. По умолчанию в Windows Server для всех SAN дисков, кроме загрузочного, используется политика Offline Shared (VDS_SP_OFFLINE_SHARED). Вы можете изменить SAN Policy на OnlineAll с помощью Diskpart.
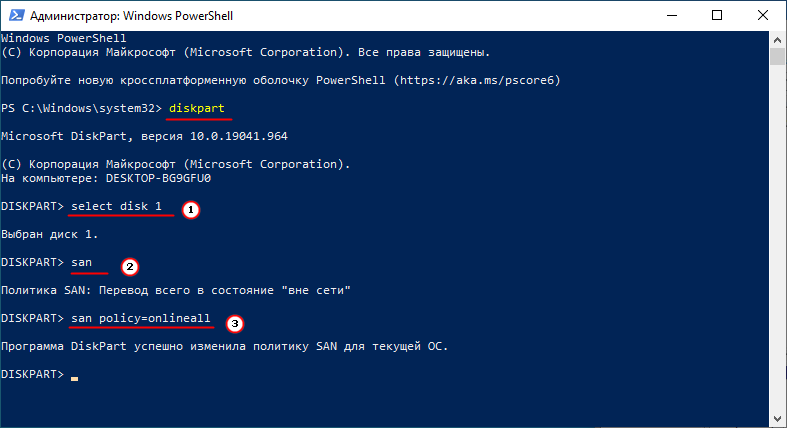
Отройте командную строку с правами администратора и выполните команду
diskpart
. В контексте diskpart выведите текущую политику SAN:
DISKPART>san
SAN Policy : Offline Shared
Измените политику SAN Policy:
DISKPART> san policy=OnlineAll
DiskPart successfully changed the SAN policy for the current operating system.

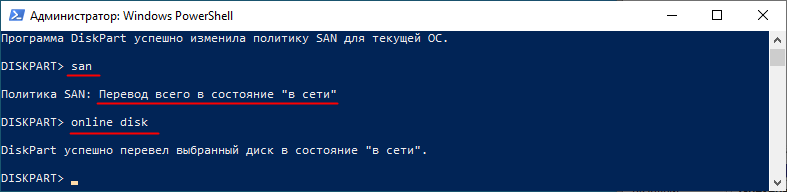
Еще раз проверим текущую политику:
DISKPART>
san
SAN Policy : Online All
Выберите ваш диск (в нашем примере индекс диска 2):
DISKPART>select disk 2
Можете проверить его атрибуты:
DISKPART>attributes disk
Проверьте, не включен ли атрибут Read-Only, если да, снимите его, иначе при записи на диск будет появляться надпись The disk is write protected:
DISKPART>attributes disk clear readonly
Переведите диск в online режим:
DISKPART>online disk
DiskPart successfully onlined the selected disk
Вы можете управлять дисками не только из Diskpart, но и с помощью встроенного PowerShell модуля Storage. Например, чтобы перевести диск в онлайн нужно выполнить команду:
Set-Disk 2 -IsOffline 0
Закройте diskpart, перезагрузите сервер и проверьте, что диск доступен после загрузки.
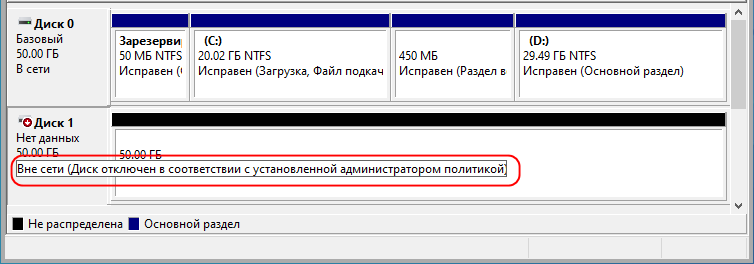
Как оказалась, проблема с недоступностью подключенных дисков характерна не только для Windows Server, но и для десктопных версий Windows. Например, в Windows 10 при подключении внешнего диска по USB или SSD диска в диспетчере устройства вы также можете видеть статус диска:
Вне сети (Диск отключен в соответствии с установленной администратором политикой).
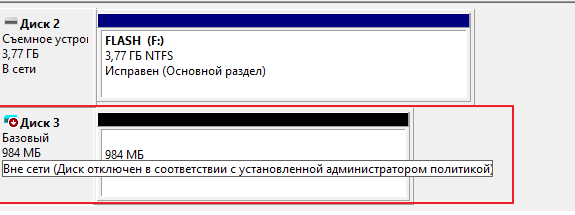
В Windows 10 проблема с отключающийся Offline дисками исправляется аналогично: изменением политики SAN policy. Если диск новый, возможно понадобится инициализировать его и создать на нем разделы с файловой системой.
Many users encounter “the disk is offline because of policy set by an administrator” issue when connecting an additional disk to the Windows system. Don’t worry. This post of MiniTool will analyze the possible causes of the issue and provide several effective fixes.
Possible Causes of the Disk Offline Error
According to user reports, the “The disk is offline because of policy set by an administrator” issue mainly occurs in two scenarios. The first case is when they restore a guest virtual machine from a snapshot, and the other one is when they are connecting an additional drive like external SSD/USB to their system (including Windows Server 2016/2018 and Windows 10).

What causes the hard drive offline error? After analyzing extensive user reports and references, we find the “disk is offline because of policy set by administrator” error is often related to the following common causes:
- Windows SAN or Storage Area Network policy: This policy is a network of data storage devices. It can control the automatic mounting of external drives and be used to protect shared disks available to multiple servers at once. If the SAN policy is disabled or set to Offline Shared for the disk, you will find the “this disk is offline because of a policy set by an administrator” error in Disk Management.
- A power outage: Some users reported that the additional disk showed as Offline after their server reboots due to a power outage. In this case, you can reconnect the disk and take it online.
- Disk identifier issues: As you know, each disk has a unique identifier (signature). If these disks that you connected to the server have the same identifiers, one or some of them will be deactivated and appear Offline with the error message. This situation is also called Disk Signature Collision.
Now, you should have known the causes of the “The disk is offline because of policy set by an administrator” error. To fix it, we summarize corresponding fixes. Let’s start exploring them.
How to Fix “The Disk Is Offline Because of Policy Set by an Administrator” Error
There are 4 applicable methods to fix the disk offline error. Here you can choose one based on your own situation.
Fix 1. Change the Disk Signature
If you encounter the “this disk is offline because of a policy set by an administrator” error after a power outage or when you connect multiple drives to the server, this error could be caused by disk signature collision. In this case, you can use either Disk Management or DiskPart to change the disk signature. Here’s how to do that:
Change the Disk Signature Using Disk Management:
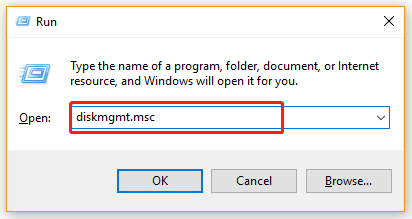
Step 1. Press Win + R keys to open the Run dialog box, and then type diskmgmt.msc in the box and hit Enter to open the Disk Management window.
Step 2. Right-click the Offline hard disk and select Online from the popped-up menu.
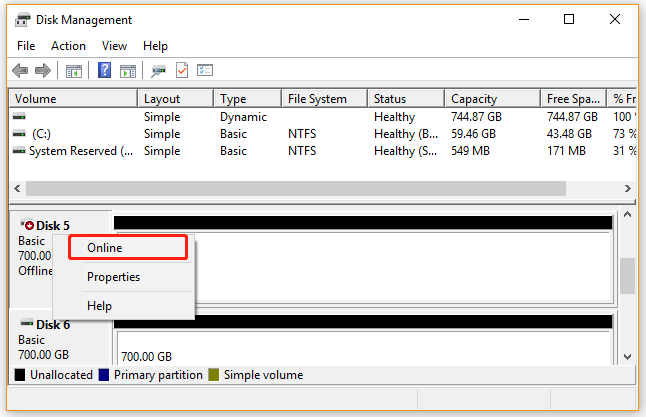
After that, Windows will assign a new disk signature for it automatically. If this method can’t help you fix the error, you can try using the Diskpart utility to change the disk signature.
Change the Disk Signature Using Diskpart:
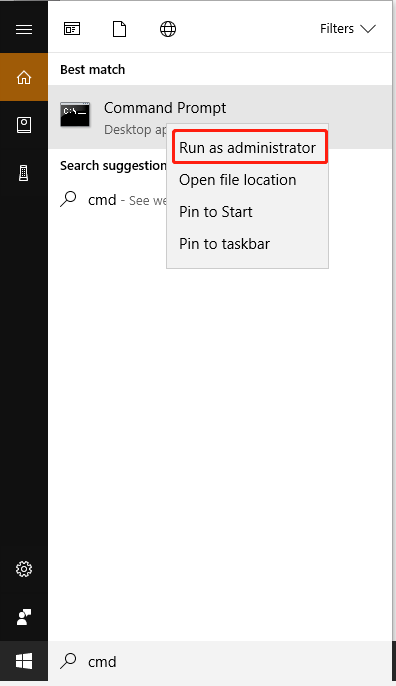
Step 1. Type cmd in the Search box, and then right-click the Command Prompt app from the top result and select Run as administrator. Then click on Yes in the UAC window to grant admin right to Command Prompt.
Step 2. In the elevated Command Prompt window, type the following commands in order and hit Enter after each one.
Note:
Make sure you give a correct format of ID, or you will receive the error message “The specified identifier is not in the correct format”.
- diskpart
- list disk (which show all available disks on your computer)
- select disk * (* represents the number of the Offline disk)
- unique disk id=New signature (If you are using an MBR disk, the new signature should be an ID in hexadecimal. If you are using a GPT disk, it should be in form of a GUID. For example, we can set the new id as uniqueid disk id=BEFBB4AA for the MBR disk)
- online disk (which change the status of the Offline disk to Online)
- list disk (see if the offline disk is online now)
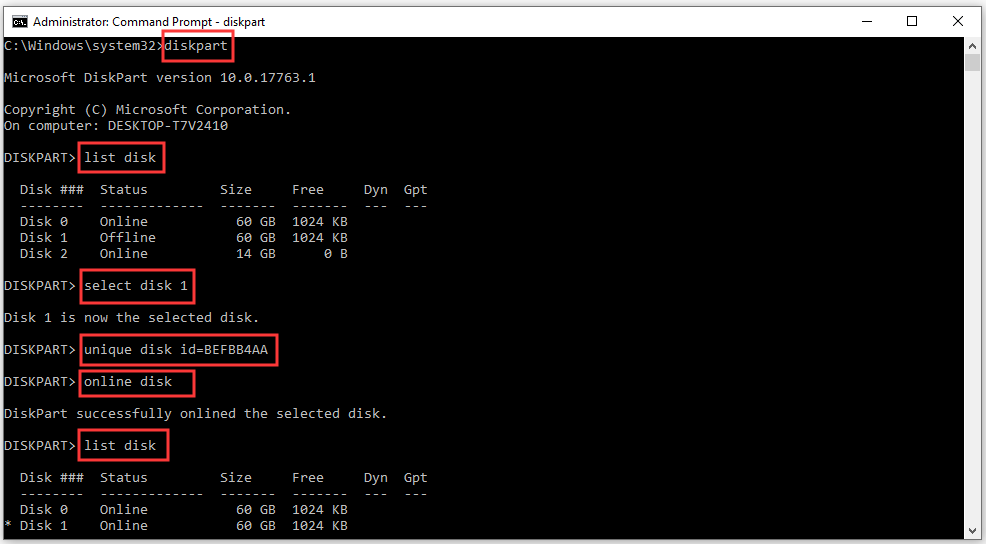
After you finish these steps, you can close Command Prompt and restart your computer to check if the “this disk is offline because of a policy set by the administrator” error gets solved.
Fix 2. Change the SAN Policy for the Disk to Online
As mentioned above, the main reason behind the Windows 10 disk offline issue is the Windows SAN policy. The Offline Shared policy is set for all SAN disks on Windows by default. Here you can change the SAN policy to OnlineAll using Diskpart.
Step 1. Open the elevated Command Prompt window again like Step 1 in Fix 1 and then run the diskpart command in it.
Step 2. In the Diskpart window, type the following commands in order and hit Enter after each one.
- san (which displays the current SAN policy on your computer. If there is an offline disk, it will display SAN Policy : Offline Shared)
- san policy=OnlineAll (which will change your SAN policy to Online All. If succeeded, you will see the message “DiskPart successfully changed the SAN policy for the current operating system”.)
- san (view the current SAN policy again)
- select disk * (* represents the number of the Offline disk)
- attributes disk
- attributes disk clear readonly (which will disable the Read-Only attribute in the selected disk)
- online disk (if succeeded, it will show the message “DiskPart successfully onlined the selected disk”.)

Now, you can close DiskPart and reboot your computer to see if the “disk is offline because of policy set by administrator” error is fixed.
Fix 3. Reconnect the External USB or SSD Drive
If you encounter the Windows 10 disk offline problem just when using an external drive like USB to reinstall Windows, you can try reconnecting the drive to your system or connecting the drive to another USB port on your computer. If it still doesn’t work, you may have to consider initializing the hard disk. To get more details, keep reading the following fix.
Fix 4. Initialize the Hard Disk
Some users report that they can’t access the offline disk and recover files in Disk Management when using a USB to install Windows. In this case, you can try initializing the disk and creating new partitions on it. For that:
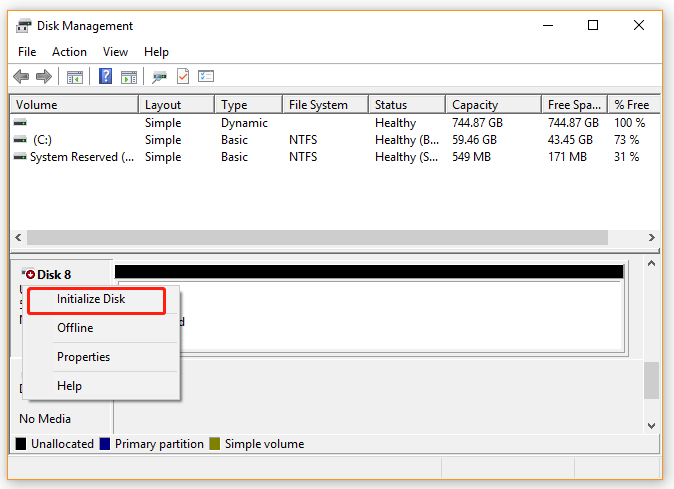
Step 1. Right-click the Start menu and select Disk Management from the context menu.
Step 2. In the Disk Management window, right-click the disk that you encountered the error on and select Initialize Disk.
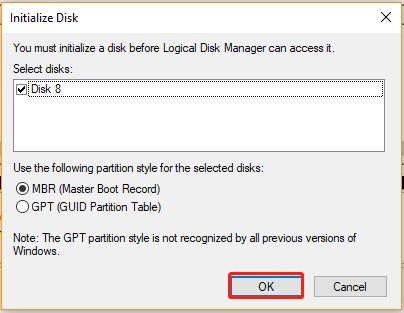
Step 3. Select a partition style (MBR or GPT) based on your situation and click on OK to save the change.
Now, you should create partitions and save files on them. However, if you are initializing a used hard disk, all the partitions and data on the disk will get lost. How to recover missing data due to the initialization process? The following part will explain it in detail.
Bonus Tip: Recover Lost Data Due to the Hard Drive Offline Error
To fix the “this disk is offline because of a policy set by the administrator”, some users initialized their disk but all the data get lost at the same time. If this scenario applies to you, you can a use professional data recovery tool to find them back.
MiniTool Partition Wizard is such a tool. Its Data Recovery and Partition Recovery features allow you to recover missing data from an initialized disk. Here we will show you how to recover lost data with the MiniTool software.
Tip: The Data Recovery function is only available in MiniTool Partition Wizard Pro Deluxe and higher editions. To know more information about the edition comparisons, you can click here.
MiniTool Partition Wizard DemoClick to Download100%Clean & Safe
Step 1. Launch the MiniTool software to enter its main interface and click on Data Recovery from the top toolbar.
Step 2. In the new window, go to the Devices tab, and then select the disk that you just initialized and click on Scan.

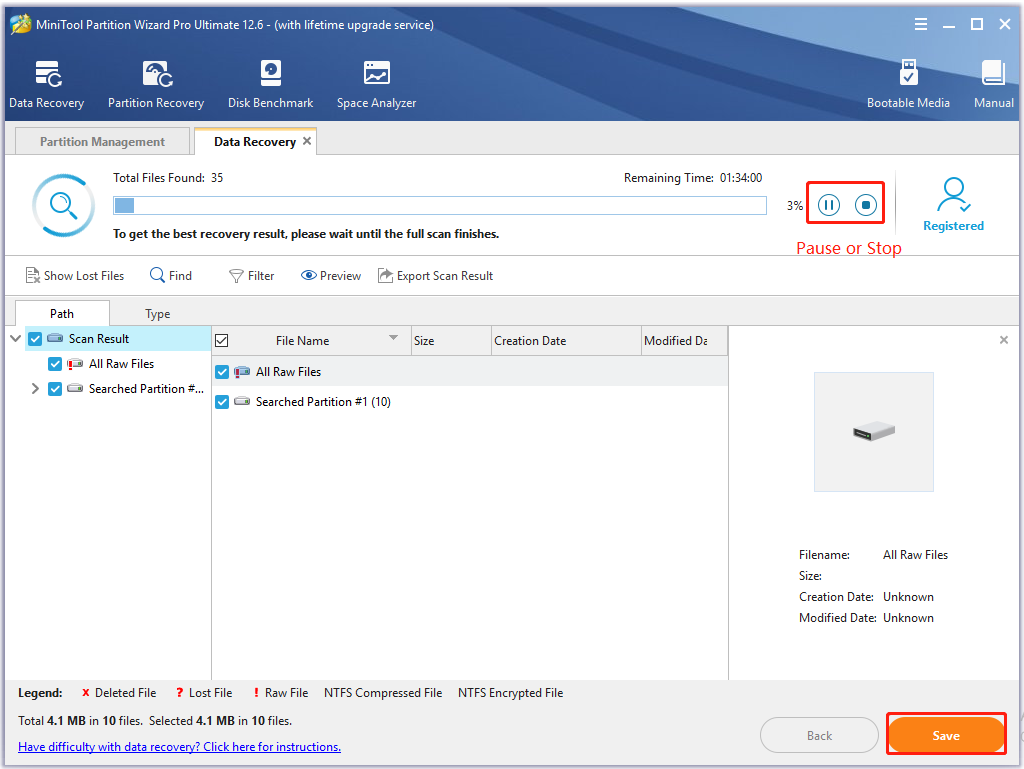
Step 3. Then MiniTool will start scanning the disk and you can view the scan process. Once you find any needed files, you can click on the Pause or Stop button to suspend the process. Choose the needed data and click Save. Also, you can wait for the process to complete and click on Save.
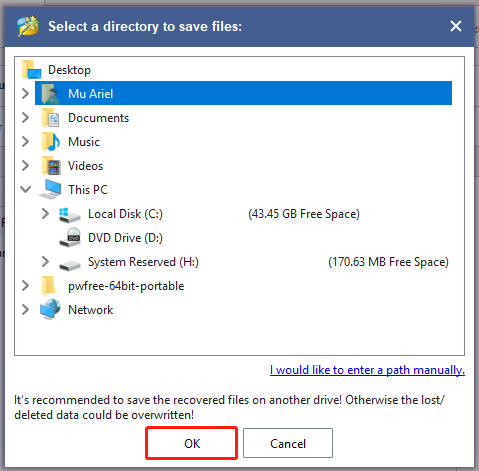
Step 4. Select a directory for the recovered data and click on OK to save it.
Note: It is highly recommended to save the recovered files on another drive. Otherwise, the lost/deleted data could be overwritten.
I noticed my hard disk is offline and shows “The disk is offline because of policy set by an administrator” error. Fortunately, I fixed the problem with the help of this post. Perhaps you’re looking for it.Click to Tweet
What’s Your Opinion
How to fix the “disk is offline because of policy set by administrator” error? This post has introduced several effective ways to you. If you have any other fixes to the problem, please write them down in the comment area. You can also send us an email to [email protected] when you have difficulty in using MiniTool Partition Wizard.
При подключении к компьютеру второго диска последний определяется системой автоматически, после чего диском можно пользоваться сразу. Исключение составляют новые и еще не проинициализированные накопители, а еще вы можете столкнуться со странной «неполадкой», когда физически подключенный диск оказывается отключенным программно со статусом «Вне сети». Причем отключается диск при каждой перезагрузке.
С этой проблемой приходится сталкиваться на виртуальных машинах, серверных и даже в некоторых случаях на десктопных версиях Windows.
Причина такого поведения Windows станет немного более понятной, если вы прочтете текст всплывающей подсказки, появляющейся при наведении на иконку диска в оснастке управления дисками. В ней будет указано, что «диск отключен в соответствии с установленной администратором политикой». Однако, если вы попробуете отыскать эту политику в GPO десктопной Windows, то, скорее всего, ее не найдете. Потому что эта политика специальная и искать ее нужно в другом месте.
Называется она SAN Policy.
Предназначением этой политики, появившейся в Windows Server 2008, является управление автомонтированием жестких дисков, подключенных к двум серверам одновременно. В серверной Windows по умолчанию автоматическое подключение накопителей этой политикой отключено. Вероятно, в вашем случае имеет место та же настройка. Чтобы изменить настройки политики, воспользуйтесь консольной утилитой Diskpart.
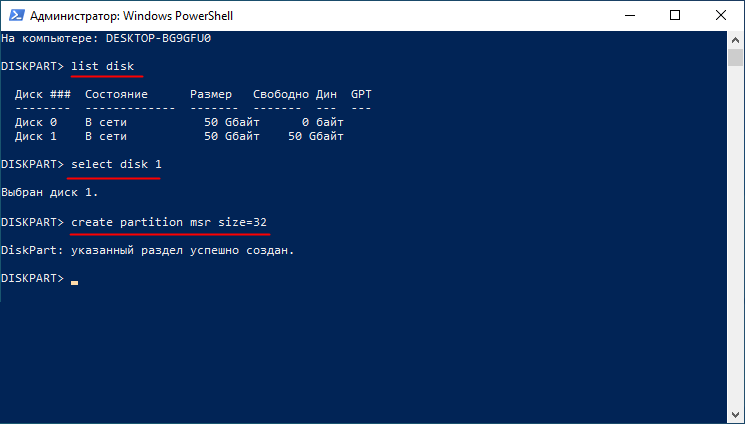
Откройте командную строку от имени администратора, запустите Diskpart одноименной командой и выполните следующие команды:
list disk
select disk 1
san
первая команда выводит список доступных физических дисков, второй командой выбирается второй диск, третья команда показывает текущий статус политики SAN. Если в статусе указано «Перевод всего в состояние вне сети», измените политику, для чего выполните команду san policy=OnlineAll.
В результате при повторном получении статуса значение должно измениться на «Перевод всего в состояние в сети».
Заодно можете сразу подключить диск, выполнив команду online disk.
Альтернативное решение
Если верить столкнувшимся с этой проблемой пользователям, на дисках GPT решить ее можно путем создания служебного раздела MSR.
Для этого выбираем в Diskpart диск и выполняем команду create partition msr size=32.
32 — это минимальный размер в мегабайтах для служебного тома на дисках со стилем разметки GPT.
![]() Загрузка…
Загрузка…

The disk is disabled according to the policy set by the administrator. Windows10
.jpg "Диск отключен в соответствии с установленной администратором политикой. Windows10")
Диск отключен в соответствии с установленной администратором политикой.
Открываем редактор реестра. Для этого, используя сочетание клавиш WIN + R, вызываем команду захвата и вводим «diskpart» (без кавычек)

DISKPART> san
Политика SAN: Автономные внутренние диски
.png "Диск отключен в соответствии с установленной администратором политикой. Windows10")
DISKPART> list disk
Диск ### Состояние Размер Свободно Дин GPT
——— ————- ——- ——- — —
Диск 0 Вне сети 238 Gбайт 1024 Kбайт *
Диск 1 В сети 119 Gбайт 0 байт
DISKPART> select disk 0
Выбран диск 0.
DISKPART> attributes disk
Текущее состояние только для чтения : Да
Только для чтения: Да
Загрузочный диск: Нет
Диск файла подкачки: Нет
Диск файла спящего режима: Нет
Диск аварийного дампа: Нет
Кластерный диск: Нет
DISKPART> attributes disk clear readonly
Атрибуты диска успешно очищены.
DISKPART> online disk
DiskPart успешно перевел выбранный диск в состояние «в сети».
Проблема возникла с флешками после какого-то из обновлений Windows 10. Некоторые USB флешки (не все) при втыкании в компьютер не появлялись в проводнике. При просмотре же дисков через консоль управления дисками, эти флешки имели статус «Вне сети».
Эти же флешки на других компьютерах под управлением Windows 7 или Windows 10 открывались нормально

Можно увидеть, что системой флешка распозналась, но она недоступна — «Вне сети» ( функция «в сети» для usb-флэшек недоступна ). При попытке включить диск из консоли управления компьютером получаем сообщение:
«Диск отключен в соответствии с установленной администратором политикой».
Политик никаких не применяется, система свежая, обновленная, лицензионная.
Погуглив немного, нашел несколько инструкций, как перевести диск в онлайн. Практически все они рекомендуют использовать запуск diskpart от лица администратора.
Однако, при попытке перевести диск в онлайн статус выдает ошибку:
DISKPART> online disk
Ошибка службы виртуальных дисков:
Объект не найден.

Путем проб и ошибок, достаточно долго разбирая различные решения на англоязычных сайтах (где было предложено и обновить драйвера, и поменять настройки электропитания для USB устройств, и чего-то еще), наконец нашел рабочий вариант решения проблемы, как заставить Windows 10 увидеть флешку.
Решение оказалось достаточно близким к использованию DISKPART, но немного другим. А именно, вместо запуска DISKPART от админской учетки, надо запустить Windows PowerShell (Пуск — Меню — W — Windows PowerShell) все так же от учетной записи администратора системы.
Далее набираем следующие команды :
PS C:\WINDOWS\system32> get-disk
Получаем список дисков с номером в первой колонке
Number Friendly Name Serial Number HealthStatus OperationalStatus
—— ————- ————- ———— ——————
0 INTEL SSDSC2KW120H6 BTLT705503ZC120GGN Healthy Online
1 WDC WD5000AAKX-00… WD-WMAYUN942037 Healthy Online
2 WDC WD5000AAKX-00… WD-WCAYUK805107 Healthy Online
3 Flash USB Disk 37270818F853706118283 Healthy Offline
Нам нужен диск номер 3. Переводим его в в online режим
PS C:\WINDOWS\system32> set-disk 3 -isoffline $false
И проверяем результат:
PS C:\WINDOWS\system32> get-disk
Number Friendly Name Serial Number HealthStatus OperationalStatus
—— ————- ————- ———— ——————
0 INTEL SSDSC2KW120H6 BTLT705503ZC120GGN Healthy Online
1 WDC WD5000AAKX-00… WD-WMAYUN942037 Healthy Online
2 WDC WD5000AAKX-00… WD-WCAYUK805107 Healthy Online
3 Flash USB Disk 37270818F853706118283 Healthy Online

Задача решена. Эти же действия можно проделать для каждого диска, который Windows 10 не видит.

Ну и напоследок. Частенько бывает, что после таких манипуляций флешка появляется в системе с атрибутом только для чтения. Снять защиту от записи на флешке быстрее всего оказалось с использованием командной строки. Запускам командную строку от лица администратора.
Стандартно выполняем «Пуск» — «Служебные Windows» — «Командная строка» (запустить с правами администратора). Далее вызываем утилиту управления дисками DISKPART. Можно также сразу запустить DISKPART из консоли PowerShell. Ниже у меня две флешки с атрибутами «только для чтения», чтобы убрать этот атрибут я вводил соответственно команды выбора нужного диска (select disk 3) и затем очистки соответствующего атрибута:
attributes disk clear readonly
C:\WINDOWS\system32>diskpart
Microsoft DiskPart, версия 10.0.17763.1
(C) Корпорация Майкрософт (Microsoft Corporation).
На компьютере: MYCOMP
DISKPART> list disk
Диск ### Состояние Размер Свободно Дин GPT
——— ————- ——- ——- — —
Диск 0 В сети 111 Gбайт 0 байт
Диск 1 В сети 465 Gбайт 0 байт
Диск 2 В сети 465 Gбайт 1024 Kбайт
Диск 3 В сети 14 Gбайт 2048 Kбайт
Диск 4 В сети 250 Gбайт 0 байт
DISKPART> select disk 3
Выбран диск 3.
DISKPART> attributes disk clear readonly
Атрибуты диска успешно очищены.
DISKPART> select disk 4
Выбран диск 4.
DISKPART> attributes disk clear readonly
Атрибуты диска успешно очищены.
DISKPART> exit
Завершение работы DiskPart…
C:\WINDOWS\system32>