
В данной статье рассмотрим, несколько способов отключения проверки жесткого диска (HDD), которая запускается каждый раз при включении или перезагрузке компьютера.
Причиной чаще всего является то, что система помечает жесткий диск как «грязный». Это происходит из-за неправильного выключения компьютера, нарушениях в файловой системе или повреждениях самого жесткого диска.
Для того чтобы устранить эту проблему, нужно проделать следующие действия:
1. Запустить полную проверку диска.
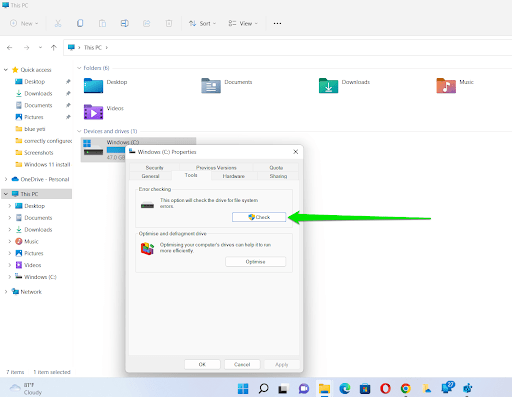
Откройте «Мой компьютер» => кликните правой кнопкой по диску, который постоянно проверяется => из контекстного меню выберите «свойства» => затем на вкладке «сервис» нажмите кнопку «Выполнить проверку»
в открывшемся окне поставте все галочки и нажмите «Запуск».

Если был выбран системный диск, то появится предложение выполнить проверку при следующей загрузке системы — соглашаемся и перезагружаем компьютер. Ждем окончания процесса проверки.
Если проблема осталась, переходим к следующему пункту;
2. Отключить проверку диска.
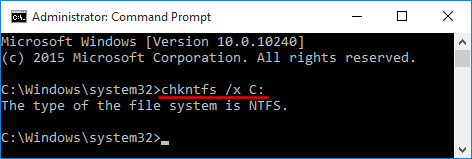
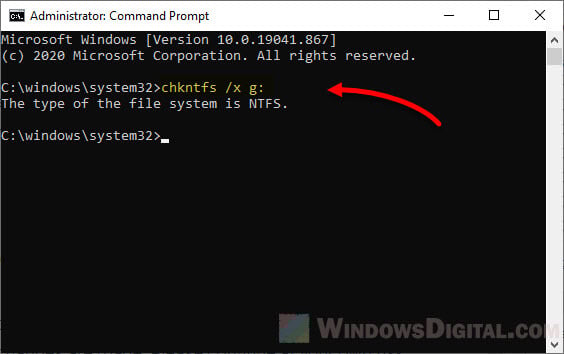
Нажимаем комбинацию клавиш Win-R или Пуск => Все программы => Стандартные => Выполнить => вводим команду cmd -> нажимаем OK. В открывшемся окне вводим команду chkntfs /X C: (где C: — имя диска, который постоянно проверяется).

Теперь проверка отключена. Если захотите ее снова включить, необходимо набрать команду chkntfs /D.
CHKNTFS — включение-отключение проверки жесткого диска при перезагрузке
Выводит или изменяет параметры проверки диска во время загрузки.
- CHKNTFS том: […]
- CHKNTFS /D
- CHKNTFS /T[:время]
- CHKNTFS /X том: […]
- CHKNTFS /C том: […]
том — определяет букву диска (с последующим двоеточием), точку подключения или имя тома.
/D — восстанавливает стандартные параметры компьютера; все диски проверяются при загрузке и CHKDSK запускается при обнаружении ошибок.
/T:time — изменяет обратный отсчет AUTOCHK на указанный отрезок времени в секундах. Если время не указано, показывает текущую настройку.
/X — исключает стандартную проверку диска при загрузке. Сведения об исключенных ранее дисках не сохраняются.
/C — запрашивает выполнение проверки диска при следующей загрузке; если на диске обнаружены ошибки, запускается CHKDSK.
Если никакие параметры не указаны, CHKNTFS отображает или состояние бита обнаружения ошибок для диска или его проверку при следующей перезагрузке.
Contents
- What is chkdsk.exe?
- Incorrect shutdowns
- A malware attack
- Hard drive issues
- How to cancel check disk in Windows 10
- Using the Command Prompt
- Do I need check disk in Windows 10?
- Should one disable check disk?
- Final Verdict

You have probably realized that every time you turn on your computer, it does a disk check, something that it never used to do before. Should this be a cause for alarm? While disk scanning does not always mean harm, it is mostly trying to communicate about an underlying problem.
This used to be an issue in Windows 10. However, many users are also experiencing it in Windows 11. As it turns out, your operating system may be detecting possible issues with your drive that it needs to check to confirm that everything is alright.
What is chkdsk.exe?
This is pronounced as “check disk”, and it is basically a command that checks drives. It works by displaying the status report of the disk and can even fix the issues found. However, to use this tool, your computer should have Autochk.exe in its system.
The computer hard disk stores all the files in folders. Also, it contains some security information on who can access those files. The hard disk carries so much information, and CHKDSK’s work is to ensure that all the information about the folders, data, and security status is correct. Unfortunately, an error might occur when the computer shuts down abruptly or when you eject or remove a USB device unsafely. It could also be as a result of hardware issues or malware. These problems are reflected in the hard disk’s administrative information, thus forcing the CHKDSK command to run in order to detect and fix those issues.
The CHKDSK command scans the hard disk and fixes any file issues on the drive. There is a range of possible reasons why the Check Disk command is triggered, some of which include:
Incorrect shutdowns
The primary trigger of the check disk process is if the system shuts down inappropriately. You are supposed to switch off the computer via the Start menu and give it time to shut down completely. If the computer goes off abruptly or if you shut it down by pressing the Start button, you are likely to experience data losses and file system issues that force it to go through a check disk routine when booting. Also, you should not make the mistake of shutting the computer down by unplugging it from the power supply. The check disk command is triggered to check if the hard disk is okay after undergoing the improper shutdown. This could also happen if you experience a power failure.
A malware attack
A check disk scan could also be an indication that your computer is under a malware attack, which might include viruses and other foreign programs that undermine the file system’s functionality. You probably opened an unsecured link that threatened the safety of the computer system, and this triggers the check disk utility to run to ensure that there are no threats. The best way to avoid this is by ensuring that you have a quality antivirus program installed at all times. In this case, you should invest in reliable anti-malware software to keep malware away.
Hard drive issues
Chances are that some problems with the drive have been detected. This is the leading cause of Windows 10 running CHCKDSK every time you turn your PC on. It does so to check for any file system issues like bad sectors that put the entire computer system at risk and could even result in hard drive failure. It is recommendable that you give the program time to run, hoping that it will fix the problem. It will indicate if it found any issues and show how they should be solved. The report is in Check Disk’s log file, which you can access by going to the Start menu and then typing ‘event viewer.’ Click on it and select the application. You will find comprehensive information on any found issues, and you can also do that by checking the system logs for any sources listed as the cause of the underlying problems. If you notice that the check disk utility keeps running after every startup, it means that the hard drive is failing, and that should cause alarm.
How to cancel check disk in Windows 10
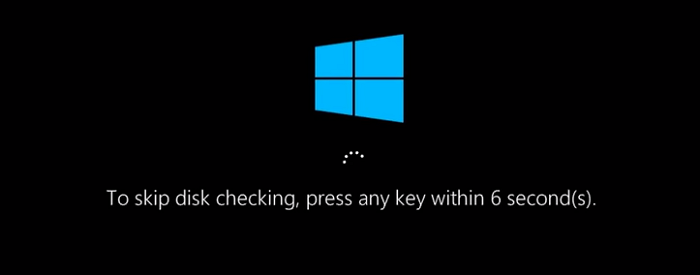
The check disk command is handy as it continually checks for bugs and failures in the computer system, but you do not need it to run every time after starting the computer. If you have enabled the command, it is easier to stop it since you only need to click on any key to skip this step. You will have about 8 seconds to quickly skip checking, after which the process will automatically run. The issues come in when you have a scheduled disk check and have no time to wait for the process to finish running. In such scenarios, you have no choice but to cancel the disk check.
Before doing so, you should determine if any of the drives have a scheduled check so you can cancel it by pressing skip on the next reboot.
That said, there are steps you can take to prevent the utility from running at startup. You don’t have to wait to hit a key to skip the automatic check desk routine whenever you turn on or restart your PC.
You can edit your system registry on Windows 10 or Windows 11 or use a command in the Command Prompt. We’ll walk you through both steps.
Using the System Registry
The system registry controls many different processes in Windows. Whether you’re running Windows 10 or 11, the process is pretty much the same, and you have to be careful about how you adjust settings in the registry. That’s because one wrong turn or adjustment could cause severe damage to your operating system.
So, it’s advisable that you create a backup of the entire registry before attempting to run this fix. This way, if you make a mistake, you can roll back the changes and undo the damage.
That said, you should look for an expert to handle this if you’re uncomfortable using the Registry Editor or don’t know how to navigate it.
Follow these steps to back up the System Registry in Windows 11 and Windows 10:
- On your keyboard, press the Win + R shortcut to summon the Run dialog window.
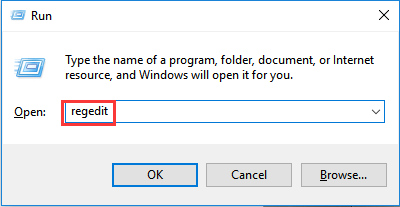
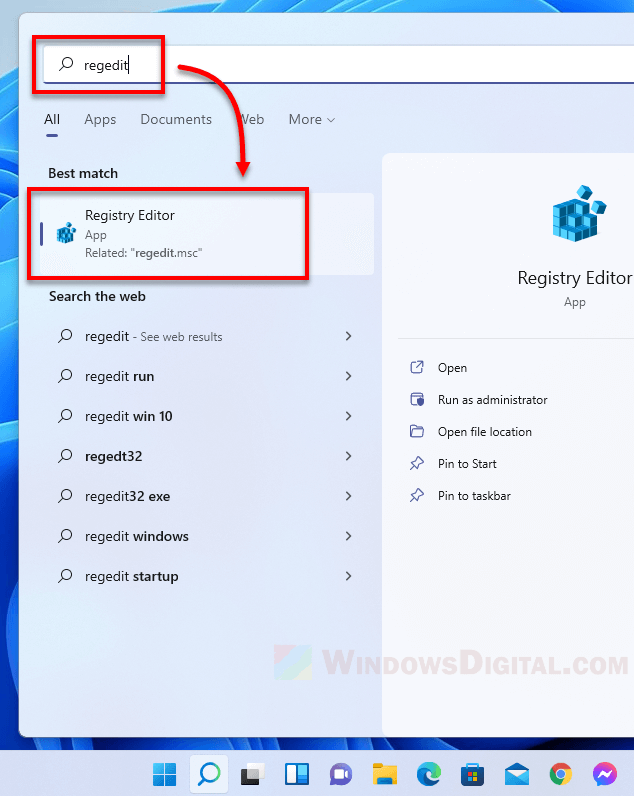
- Type “regedit” into the Run text box and hit the Enter key.
- Click on Yes when you see the UAC confirmation box.
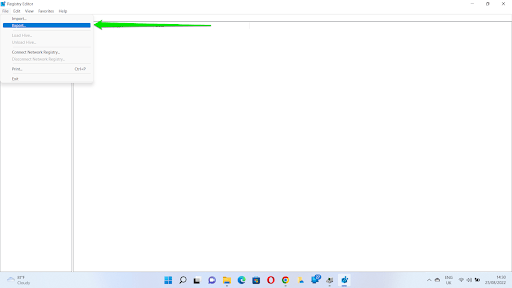
- After the Registry Editor appears, click on File and select Export from the context menu.
- Go to the File Name text box and enter a name for the backup file.
- Head to the Export Range section and select All. That means you’re backing up the entire system registry.
- Browse to the folder where you’d like to save the file, then click on the Save button.
- Whenever you want to recover the backup, click on File once you open the Registry Editor and select Import. Then, go to the folder where you saved the backup and double-click the file.
Now, follow these steps to prevent the system from running the CHKDSK utility at Startup:
- Launch the Registry Editor and expand HKEY_LOCAL_MACHINE in the left pane.
- Next, expand the SYSTEM folder.
- After that, click the arrow beside CurrentControlSet to expand it.
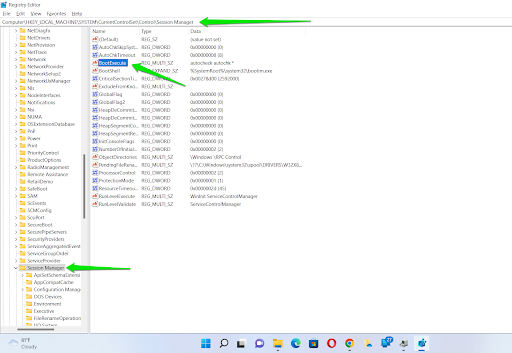
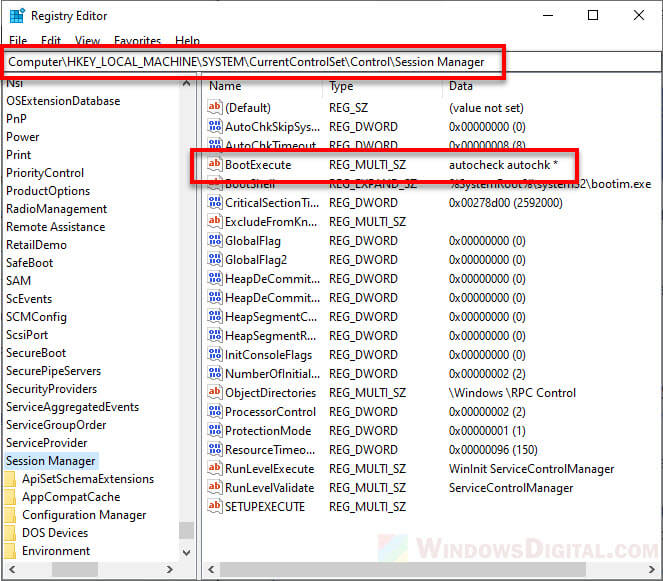
- Under CurrentControlSet, expand Control and scroll down to click on Session Manager.
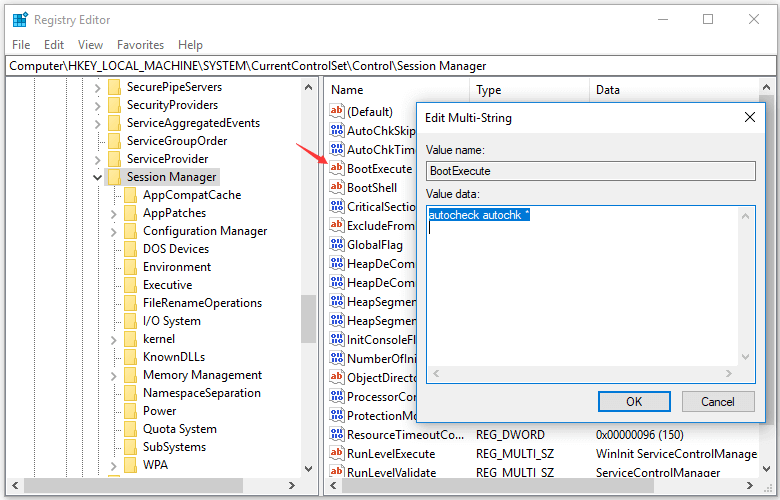
- Go to the right side of the screen after clicking on Session Manager to locate the BootExecute string and double-click it.
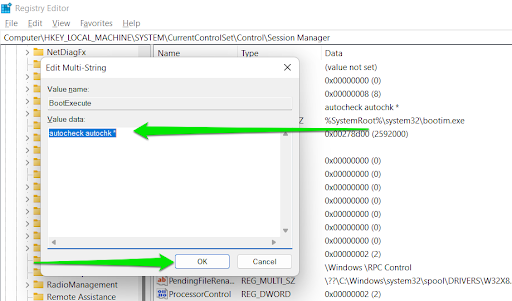
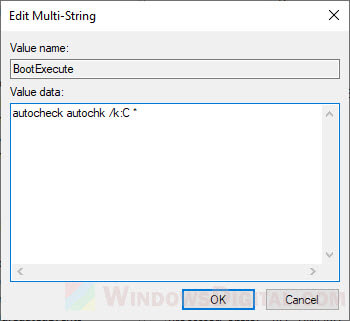
- After the Edit Multi-String dialog appears, go to the Value Data box and change the value to “autocheck autochk *” (Don’t add the quotes). Remember to add the space before the asterisk (*).
- Now, click on the OK button.
This should stop the CHKDSK utility from running on Windows startup whether you’re running Windows 10 or Windows 11.
Using the Command Prompt
You can also enter a series of command lines in the Command Prompt window to stop Windows from checking your disk whenever you turn on your computer or restart it.
Follow these steps:
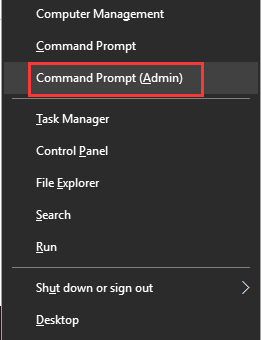
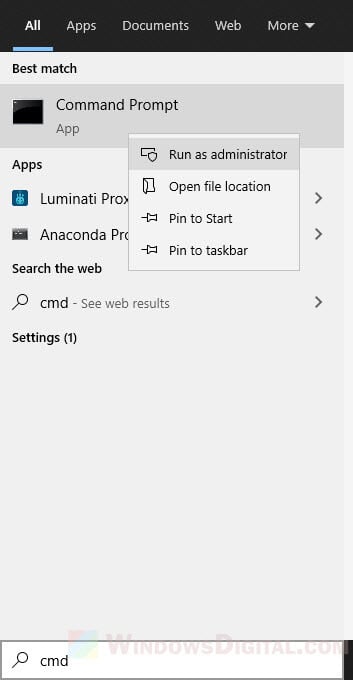
- Firstly, open the Command Prompt in admin mode. To do that, head to the Start menu, search for CMD, then click on Run as Administrator once you see the Command Prompt result. In some versions of Windows 10, you can right-click the Start button and select Command Prompt (Admin).
- Click on Yes in the UAC confirmation box.
- Once the Command Prompt opens, type “fsutil dirty query C:” (without the quotes) into the Command Prompt and hit the Enter key.
Note:
- The command helps you confirm if Windows has marked the hard drive with a dirty bit value. That’s because the CHKDSK utility automatically checks drives that are marked dirty.
- The “C:” part of the command should be replaced with your hard drive’s drive letter. So, if you want to query drive E’s dirty value, use “E:” instead.
- After that, type “chkntfs /x c:” (don’t add the quotes) and hit the Enter key. This command will prevent the Check Disk tool from checking the drive on startup.
- You can also prevent the utility from scanning more than one drive on startup. To do that, use the following command:
chkntfs /x c: d: e:
Note: Always add a space after entering a drive letter and the column.
- That’s it!
Do I need check disk in Windows 10?
The answer to this question is a simple yes. You may have noticed that disk checking in Windows 10 is a bit different from that on other Windows versions, but it offers great help in getting rid of bugs and other issues that could be slowing down the system. The check disk command helps in correcting any problems that could have been caused by corrupted software, sudden or improper shutdowns, or malware attacks. This, in return, helps in improving the computer’s performance.
Windows 10 has a disk checker, which is a tool meant for detecting and fixing disk issues automatically. This means that you do not have to run the traditional disk check to identify any underlying problems and fix them. The command periodically checks the hard drive for any bad sectors and system errors and automatically performs maintenance, so you do not have to run it.
To run chkdsk in Windows 10 and Windows 11, you should:
- Open File Explorer and go to This PC.
- Right-click on the drive that you wish to scan.
- Click on Properties.

- Click the Tools tab.
- Press the Check button.
You can also run the CHKDSK tool, using the Command Prompt. Here’s how:
- Firstly, open the Command Prompt in admin mode. To do that, head to the Start menu, search for CMD, then click on Run as Administrator once you see the Command Prompt result.
- Click Yes in the UAC confirmation box.
- After the Command Prompt opens, type the following and tap the Enter key:
chkdsk C: /f /r /x
Note:
- The /f parameter attempts to fix any error that the utility finds
- The /r option locates bad sectors with recoverable information and attempts to recover those files.
- The /x switch dismounts the drive or partition you want to scan before CHKDSK begins to check it. If the drive is in use, you’ll have to tap the Y keyboard button to start the check after your PC restarts.
- That’s how to run the utility using the Command Prompt on Windows 10 or Windows 11.
With this, the chkdsk utility will check for any errors on the file system.
If there are any errors detected, the system will ask you to check the disk, and if there are no errors, then a message will pop up, showing that you do not need the scan. However, when the chkdsk tool keeps running after every computer startup, this could be a sign of an underlying problem, and you should have the issue checked.
Should one disable check disk?
It depends on how the system behaves or operates. As mentioned earlier, the check disk process is crucial for detecting and fixing disk-related errors. However, if it becomes a nuisance, then you should disable it. The most annoying part of running a disk checker is when it keeps running when not needed. This mostly happens when you do not switch off the computer properly. The blue screen may appear, and this means danger. On booting the computer, it says that it’s checking the file system or that one of the disks needs to be checked. Although you may cancel the command and go ahead to boot the computer, it is recommendable that you let it finish the scan.
Pressing any key will stop the check disk process, but once you restart the computer, the command is likely to run again. If this happens, it means that your computer has an underlying issue that you should stop ignoring. It means that Windows still wants the drive to be scanned. If you ignore it, it will keep reminding you until you have it checked.
Letting the disk checker do its job is the best thing to do, but it can sometimes be time-consuming, and you do not have all that time to wait. Also, you may realize that even after letting it run the scan, it will still want to run after the next booting session. If you eject a USB flash before the system has finished running or if the system shuts down improperly, probably due to a power failure, Windows automatically detects the issue and will force another check disk scan. In such a case, you can disable it.
Final Verdict
From this information, it is evident that CHKDSK is a crucial aspect of your computer as it helps in keeping bugs at bay. However, it is most efficient when scheduled or when you run it manually. If you realize that it keeps running at startup, that means that your computer is experiencing some hard disk errors that need to be checked. You should let the disk checker finish the scan and identify the problems. If there are any issues detected, then let the tool fix them before continuing with the booting. If it shows that there are no errors, then you are good to go.
However, if you let it run the scan and it runs the same command during the next booting session, this could be a sign that your computer system has been attacked by malware and you should check to ensure that you have up-to-date antivirus software. If the issue continues, it is best if you let an expert look into the problem as it could be an indication of a bigger underlying issue.
Q: Why does my computer run to a disk check every time I start it up?
«Every time I turn on my laptop it does a disk check. It never used to do this before, but now it’s showing up all the time, taking me a long time to boot into Windows. How do I disable the disk check progress at the start in Windows 10? Can someone help me?»
The disk check utility (CHKDSK or chkdsk.exe) is helpful for scanning and repairing hard drive problems, but it can be annoying to see disk check running on every startup when you do not need it. This post is going to teach you how to stop disk check on startup in Windows 10 so you can skip this meaningless checking progress and directly enter the system.
| Workable Solutions | Step-by-step Troubleshooting |
|---|---|
| #1. Using Windows 10 Command Prompt | Press Windows + X keys to bring up the context menu, select Command Prompt (Admin) …Full steps |
| #2. Using Windows 10 Registry Editor | Press Windows + R keys to bring up the Run box, type regedit…Full steps |
***Common issues related to Check Disk you might encounter:
Should You Stop Auto Disk Check During Windows Startup?
When you turn on a computer and it starts going into a session of «scanning and repairing drive (C:) xx% complete», it can be an alarm of a boot drive issue. And if it’s checking the drive like D: or E:, the problem can be from the data drive. If you’re recently experiencing a slow computer performance, let Windows run through the checking disk from 0% to 100% complete.
If you’re reluctant to execute the disk check, you can avoid it by following the message «to skip disk checking, press any key within xx second(s).» However, when you restart your computer the next time, the same message will appear on the screen again because Windows still thinks the drive needs repairing and will keep reminding you until it is checked.
The fact is, to be frank, the disk check is not always triggered to find issues, as what we’re going to mainly discuss here. Some system events and insignificant problems can evoke the utility, which usually sets to take effect at the next system reboot and the next, and the next… For example:
- Improper system shutdown
- Suspicious malware or virus infection
- Unplug any external device from the computer without safely ejecting
At this moment, an unwanted disk check that constantly comes up can be irritated. All you need to do is cancel the automatic schedule.
You can follow the two ways below to check on the startup. And if you think this passage is useful, you can share with someone in need!
Except for the cases that Windows force you to run a disk check because it has detected issues waiting for repair, you can decide by yourself to stop it from working on each startup in Windows 10/8/7. There are two common ways for you to follow. We’ll display the guide based on Windows 10 operating system.
#1. Using Windows 10 Command Prompt
- Press Windows + X keys to bring up the context menu, select Command Prompt (Admin) and click in.
- On the Command Prompt window, type the command <chkntfs /x C:> if your target is to disable a disk check task on the C: drive.
#2. Using Windows 10 Registry Editor
- Press Windows + R keys to bring up the Run box, type regedit and click OK. This will help open Windows Registry Editor.
- You’ll navigate to the Session Manager folder by following the path: HKEY_LOCAL_MACHINE\SYSTEM\CurrentControlSet\Control\Session Manager. Double-click on the BootExecute on the right pane. In the new «Edit Multi-String» window, delete all linds under Value data except autocheck autochk *.
Simple & Free Windows 10 Disk Check Alternative
To run the disk check through Windows Command Prompt, you must be very familiar with the various CHKDSK parameters and know each parameter’s function as well. Are you interested in a simple yet free CHKDSK alternative that will never bother you on every startup?
EaseUS Partition Master is primarily an all-around disk and partition manager program for Windows, which allows users to take full charge of their computer hard disks and any external ones by adjusting the partition size, file system conversion, disk cloning, OS migration, etc. Its «Check partition» feature works exactly like the Windows inbuilt CHKDSK utility with regard to scanning and repairing disk errors and bad sectors it finds, and this feature is available to its free version.
Step 1. Right-click the target partition that has a problem.
Step 2. Choose «Advanced» > «Check File System».
Step 3. Confirm if you want to hide the partition or not.
Step 4. In the Check File System window, check the «Try to fix errors if found» option.
Step 5. Click «Start» to check errors on your partition.
In conclusion, the disk check running on startup usually does no harm to your computer, it can be a sign of a hard disk failure or file system corruption. It’s usually necessary to execute a disk check at least once if it’s first launched on a Windows startup screen. Otherwise, if every time check disk has found nothing to repair and it constantly starts scanning and repairing a drive before you can enter the Windows OS, use the two ways to stop it from the startup: [1] apply the chkntfs /x C: command; [2] retain only the autocheck autochk * value data in Windows Registry Editor.
For average computer users who have trouble in dealing with the CHKDSK command things, it’s worth downloading a free and user-friendly CHKDSK alternative software like EaseUS Partition Master for better management of disk and partitions in Windows 10/8/7.
Check Disk, or more often known by its abbreviation CHKDSK, is a built-in tool in Microsoft Windows to scan hard disk drives for errors and bad sectors and repair them. This short tutorial will show you how to skip or disable disk checking on Windows 10 or Windows 11 so that it won’t run on startup again.
Why is disk checking forced to run on startup
If a disk check is automatically scheduled to run every time you turn on your laptop or desktop computer without your consent, it can indicates two possibilities:
- Windows has detected unusual shut down or restart behavior.
- Windows has detected issues on one of your hard disk drives.
If you attempt to interrupt and cancel the disk check by “pressing any key”, you can temporary cancel the disk check for the current session. However, the disk check operation will repeat on every startup until the process can be completed at least once and that the disk has no issue.
What are the proper things to do
Let’s not ignore the obvious. Repeated forced startup disk check is an indication of possible disk errors or even hardware failure. The proper action to be taken is to let the disk check run to completion.
The disk check process will automatically scan for errors and repair them. Once the errors are fixed, Windows will stop scheduling disk checking on startup if there is no other issue detected in any of your disk drives.
If the disk check finds any error that can’t be fixed, it will let you know in the scan reports at the end of the scan. If this is the case, it usually indicates that your hard drive has started to fail or has already failed. You may want to quickly backup any existing data on the disk if you don’t want to lose them later.
How to skip disk check on Windows 10/11
There are two methods to force cancel a scheduled startup disk check on Windows 11/10. If one doesn’t work, try the other.
Stop disk checking via “Command Prompt”
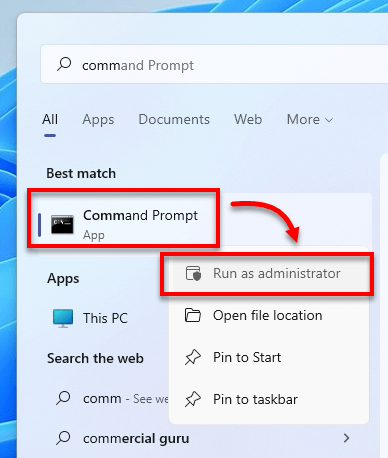
- On Windows 10/11 search bar, search for “cmd“. Right-click on Command Prompt from the search result and click “Run as administrator“.

Windows 10

Windows 11
- Enter the following command:
chkntfs /x c:

- Note: Replace C: with the letter of the drive you wish to stop disk checking on Windows startup.
- The /x parameter is to disable auto check for the selected drives on startup.
- To stop disk check for multiple drives, add the drive letters to the end of the command. For example:
chkntfs /x c: d: e:
Disable startup check disk scan via “Registry Editor”
Caution: Registry editing can cause serious problem and may potentially corrupt your operating system if incorrect changes are made. Please continue at your own risk.
- On the Windows 10/11 start menu, search for and open “regedit” (Registry Editor).


- In the Registry Editor window, navigate to the following path.
HKEY_LOCAL_MACHINE\SYSTEM\CurrentControlSet\Control\Session Manager
- Double-click on the “BootExecute” key in the right pane.

- In the “Value data” field, change the value to:
autocheck autochk /k:C *

- NOTE: Replace C with the letter of the drive you wish to disable disk checking on Windows startup.
- To disable disk checking for multiple drives, repeat the /k:x. For example:
autocheck autochk /k:C /k:D *
- The /k parameter is to tell autocheck to stop checking C: drive on Windows startup.
- Should you meet any unexpected result, you can change the key’s value back to its default:
autocheck autochk *
- Click OK to save changes.

Close Registry Editor and restart your PC. On the next Windows startup, the disk checking should not appear again.
If the disk checking persists on every startup
If the disk checking continues to run on every startup even after trying the methods above, you may want to seriously consider letting the disk check to complete the scan. If the scan finds any error that cannot be fixed, you may want to backup the existing data immediately before it’s too late, and replace the drive.
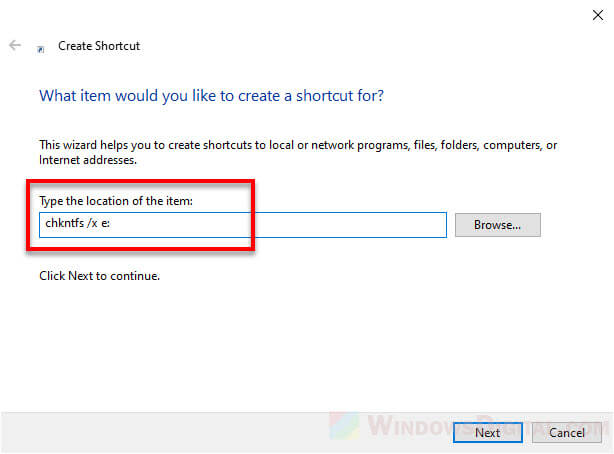
If you don’t care if the disk is faulty and that you might lose the data on the disk when it eventually fails, and just want to skip the disk checking on Windows startup, you can create a shortcut file to run the “chkntfs /x c:” (replace c: with the drive letter you wish to skip disk checking on startup) command and include the shortcut file as a startup program.
To create a shortcut file, right-click anywhere on your desktop, select New, then Shortcut. Enter the command as the shortcut path and follow the rest of the on-screen instruction to complete creating the shortcut.
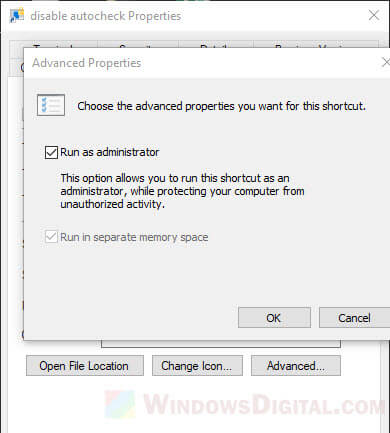
Note that the shortcut file has to be run as administrator for the command to be executed successfully. You can set it to always and automatically run as admin by right-clicking the shortcut file > Properties > Shortcut tab > Advanced > Run as administrator.
To set the shortcut file as a startup program, press Win + R keys to open Run window. In the Run window, type in “shell:startup” and press enter. This will open a folder where all startup programs’ shortcuts are placed. Move the shortcut you’ve created to the startup folder.
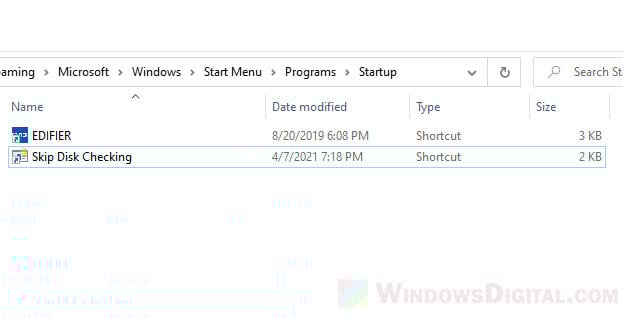
After doing so, the shortcut to execute the skip disk check command will automatically be run on every startup so that Windows will automatically skip the disk checking on the next startup.
Каждый раз, выпуская очередную операционную систему, представители Майкрософт заявляют о том, что с разнообразными ошибками и проблемами человек будет сталкиваться все реже и реже. И вот очередной юзер переходит на Windows 10, какое-то время пользуется, потом как-то включает свой комп и видит на экране надпись — Scanning and repairing drive.
Проблема в том, что такое состояние иногда наблюдается очень долго – проходят часы, а доступа в систему как не было, так и нет. Естественно, возникает вопрос – как исправить ситуацию? Именно об этом мы и поговорим в этой статье.
Что означает данная надпись на экране монитора?
Итак, чтобы разобраться в первопричинах возникновения такой ошибки, следует изначально понять, что же обозначает сообщение, возникшее на экране.
Scanning and repairing drive — перевод на русский: «сканирование и исправление жесткого диска».

Как отмечают специалисты, подобное может возникнуть в следующих ситуациях:
- Произошел как-то сбой, который приводит к тому, что зависает Windows 10 и система пытается самостоятельно решить проблему за счет встроенных инструментов;
- На винчестере начали действовать какие-то вредоносные программы, мешающие нормальной загрузке и функционированию операционки;
- Жесткий диск находится в крайне плохом состоянии – он сыпется и скоро вообще может прекратить функционировать.
Итак, что делать? Прежде всего, не начинать паниковать раньше времени – дайте системе шанс самостоятельно решить возникшую проблему. Да, иногда подобная проверка может длиться часами, но, если процент проверки периодически меняется на большее число, значит, Windows 10 занимается именно тем, чем нужно.
Если первопричина незначительная, то достаточно подождать завершения процедуры и перезапустить еще раз ПК, чтобы убедиться — Scanning and repairing drive больше не возникает.
К сожалению, но это не всегда так. Иногда при такой проверке ОС «виснет». Или перепроверка начинается с каждой новой перезагрузкой. Как быть?
В любом случае потребуется доступ к системе. Проверку можно пропустить, если операционка в этот момент виснет:
- На начальном этапе появления надписи успеть задействовать комбинацию кнопок «F8» и «Del»;
- На экране появится новое сообщение «To skip disk checking press any key within (цифра) seconds», предлагающее пропустить проверку в ближайшие несколько секунд;
- Достаточно нажать на любую кнопку, чтобы пропустить процедуру и зайти в ОС.
 seconds")
Что дальше? Рекомендуется сразу же активировать один из хороших, качественных антивирусников, чтобы удостовериться в отсутствии каких-либо заражений. Для этой цели можно применить следующие варианты: Dr. Web Cureit!, Kaspersky Removal Tool, Malware Anti-Malware или другое, схожее по функционалу программное обеспечение.
Естественно, потребуется перезагрузка по завершению сканирования, чтобы убедиться в наличии или отсутствии результата.
Если его нет, то предлагается следующее решение:
- Активировать работу командной строки. Для этого достаточно открыть меню Винды, начать на клавиатуре набирать название данного функционала, перейти по предложенной ссылке;
- Вбить «chkdsk X: /f /r». Без кавычек. «X» в данном случае тот диск, с которым возникла проблема (об этом указывается на экране ошибки при загрузке системы);
- Нажать на Enter. Подождать результатов. Перезапуститься.

Еще один метод предусматривает наличие возможности переставить винчестер на другое компьютерное оборудование – дома, у друзей, родственников, на работе:
- Подключить жесткий диск в качестве дополнительного;
- Выполнить вход в операционку с основного накопителя;
- Открываем проводник, используя ПКМ, кликаем на иконке проблемного тома;
- Активируется дополнительное меню, где необходимо будет перейти в «Свойства»;
- Открыть вкладку «Сервис». Обнаружить в ней предложение, позволяющее выполнить проверку;
- Перед непосредственным запуском необходимо обязательно поставить рядом две галочки;
- Кликнуть на кнопочку «Запустить» и ожидать результата.
Конечно же, по окончанию осуществить очередной перезапуск Виндовс, чтобы убедиться — Scanning and repairing drive complete.
Методы, подсказанные одним из пользователей
Один из интернет-пользователей предложил собственные решения подобной проблемы. Каждый из них, в определенных ситуациях дает необходимый результат.
Использование PowerShell
Программу следует запускать только с правами администратора, иначе ничего не получится. Что дальше:
- После открытия рабочего окна, найти строку, предназначенную для ввода команд;
- Вбить в нее «Repair-Volume –DriveLetter». Тоже без кавычек и через пробел – букву диска, который следует проверить;
- Кликнув на «Enter», подтвердить запуск процедуры;
- Потребуется немного подождать, пока программа будет пытаться решить проблему;
- В конце, для выхода, вбить в строку слово «Exit» и подтвердить «Enter-ом».

Использование загрузочной флешки
Как отмечает предложивший это решение пользователь, данный метод помогает в самых тяжелых случаях. Естественно, проверялся именно на десятой версии операционки от Microsoft:
- Изначально потребуется создать загрузочную флешку. Или аналогичный диск, если человек предпочитает использовать именно такой накопитель;
- Инициировать перезапуск компа и вход в BIOS (кнопкой DEL);
- Выставить приоритет загрузки с DVD-ROM или флеш-накопителя;
- Сохранить настройки и выйти из БИОСа;
- Начать загрузку с выбранного носителя. Это приведет к тому, что откроется окно установки Винды;
- В первом окошке следует нажать на «Далее»;
- Активируется еще один экран, где потребуется выбрать вариант, предлагающий пройти процедуру восстановления системы. Воспользоваться им;
- Дальше – «поиск и устранение неисправностей», где появится возможность воспользоваться строкой для ввода команд;
- В ней нужно вбить chkdsk Х: /F /R. Понятно, что «Х» — буква проблемного диска;
- Подтвердить команду «Ентером».
Процедура достаточно долгая. Поэтому придется набраться терпения. После ее завершения нужно будет еще раз перезапустить компьютер, не забыть зайти в БИОС и вернуть приоритетность загрузки в изначальное состояние. Чаще всего этот метод хорошо срабатывает.
Деактивация автоматической проверки в Windows 10
Сразу хочется отметить, что этот способ совершенно не решает проблему, а только скрывает ее. Зачем же он нужен, — могут спросить некоторые. Например, в ситуации, когда гарантированно известно, что причиной ошибки является плохое состояние жесткого диска. Да, через какое-то время он перестанет работать. Но, возможно, владельцу обязательно нужно еще получить доступ к ОС и файлам, которые хранятся на накопителе. И очень не хочется, чтобы проверка включалась при каждой новой загрузки операционной системы.
Деактивация производится таким образом:
- Изначально потребуется зайти в Windows. Выше уже описано, как обойти обязательную проверку;
- После входа, нажать на «Пуск» и вбить regedit. Перейти по предложенному пути;
- Откроется окошко реестра, где потребуется пройти следующий путь: HKEY_LOCAL_MACHINE\SYSTEM\CurrentControlSet\Control\Session Manager;
- В правой части экранчика найти параметр, имеющий название «BootExecute»;
- В поле «Значение» вводим «autocheck autochk /k:C /k:D *» (если на винчестере используются тома «С» и «D»);
- Кликнуть на «ОК».

Если все сделано правильно, то после следующей попытки входа в систему процедура обязательного сканирования и исправления активироваться не будет.
Еще один способ позволяет получить этот же результат, если в операционку зайти вообще невозможно. Но для этого изначально потребуется иметь загрузочную флешку или компакт-диск:
- Совершить вход с загрузочного накопителя (изменив приоритетность в БИОСе, как это описано выше);
- Дойти до экрана «восстановление системы». Из него перейти в «Диагностику», затем – в «доп.параметры»;
- Дальше появится возможность воспользоваться строкой для ввода команд;
- Набрать «regedit», в списке кликнуть на «HKEY_LOCAL_MACHINE»;
- Перейти наверх нового перечня, выбрать «Файл», затем – «Загрузить куст»;
- Через папку, в которую установлена Виндовс, перейти в System32\config;
- В разделе требуется обнаружить файл, помеченный как «System»;
- Выбрать именно его и воспользоваться предложением «Открыть»;
- Активируется табличка «Имя раздела». Вписать в него любое слово на английском языке, естественно;
- Совершить новое путешествие: ControlSet001 – Control — Session Manager. В конце пути будет нужный нам параметр «BootExecute»;
- Для него прописывается все тоже значение: autocheck autochk /k:C /k:D *;
- Совершить вход в только что созданный раздел. В нем выбрать «Файл», затем 2Выгрузить куст» и завершить все подтверждением этого приказа.
Можно выходить из утилиты, возвращать приоритет запуска с винчестера и оценивать полученный результат.
Отзывы
Некоторые юзеры уже сталкивались с подобной проблемой. Их отзывы позволяют понять, какой именно вариант позволил избавиться от этой неприятности:
- Борис. Я столкнулся с такой ситуацией только один раз. Неожиданно выключили свет в доме. А свой бесперебойник я отдал как раз в ремонт. В итоге, комп отключился. При включении началось это сканирование. Продолжалось минут сорок. Думал, если честно, что что-то серьезное. Оказалось, что Десятка все сама исправила и больше подобное сообщение не возникало.
- Владислав. Перепробовал все предложенные варианты. К сожалению, при каждом новом входе все повторяется. Друг посоветовал установить ПО для проверки состояния жесткого диска. Поставил. Оно обнаружило, что моему винту скоро придет полный конец. Пришлось покупать новый. Переустановил на него Винду. Проблема исчезла.
- Григорий. Меня подобная ситуация раздражает. Люблю включить комп и пойти делать себе кофе. А тут проверка. И если ее не успеть выключить, то продолжаться она будет крайне долго. А работать-то надо! В итоге, помог мне вариант с загрузочным диском. После запущенной таким образом процедуры исправления ошибка больше не появлялась.
- Дмитрий. На моем ноуте такое сканирование происходило катастрофически медленно. Специально поставил на ночь с вечера. Часам к четырем утра набрала сто процентов. К счастью, моего терпения хватило, чтобы дождаться, а не форматировать винт и устанавливать систему заново. Так как после завершения процедуры ситуация больше не повторялась.
- Егор. У меня ПК слабенький, поэтому антивирусники в режиме реального времени я не использую. Вот и занес какую-то заразу, которая и стала причиной возникновения этой неприятности. Не дождался завершения диагностики – очень долго. Просто перезапустил еще раз и успел выключить ее. Затем активировал антивирусную программу. Хорошенько все проверил. Нашел заражение и избавился от них. Проблема оказалась решенной.
Судя по отзывам пользователей, наибольшее неудобство доставляет время проведения этой автоматической процедуры. И не всегда ее достаточно, чтобы устранить первопричину. Тем не менее, если неприятность проявилась не из-за плохого состояния жесткого диска, большинство людей способны справиться с ней самостоятельно и без каких-либо дополнительных финансовых вложений.
Как вас статья?